

TransTel Communications DK1, DK2, DK3, DK6 User Manual
TDS 600
Digital Series
Station User Guide
Digital Telephone Sets
DK1 / DK2 / DK3 / DK6

NOTIFICATION
Notification is hereby given that TransTel Communications
Inc.reserves the right to modify, change update or revise this document from time to time as required without the prior obligation to
notify and person, company or organization. Further, TransTel
makes no warranty or representation, either expressed or implied,
with respect to merchantability, or fitness of it’s products for a particular purpose. TransTel disclaims any and all liabilities from errors, omissions or erroneous interpretations made from the contents of this document.
© 2001-2007 TransTel Communications Incorporated
This document or any parts thereof are not to be reproduced or
transmitted in any form or by any means, electronic or mechanical,
including photocopying, recording, or information storage and retrieval systems for any purpose whatsoever without the express
written consent and permission of TransTel Communications Inc.

IMPORTANT SAFETY INSTRUCTIONS
When using your telephone equipment, basic safety precautions
should always be followed to reduce the risk of fire, electric shock and
injury to persons, including the following:
1. Read and understand all instructions.
2. Follow all warnings and instructions marked on the product.
3. Unplug this product from the wall outlet before cleaning. Do not
use liquid cleaners or aerosol cleaners. Use a damp cloth for
cleaning.
4. Do not use this product near water, for example, near a bath tub,
wash bowl, kitchen sink or laundry tub, in a wet basement, or near
a swimming pool.
5. Do not place this product on an unstable cart, stand, or table. The
product may fall, causing serious damage to the product.
6. Slots and openings in the cabinet and the back or bottom are
provided for ventilation, to protect it from overheating, these
openings must not be blocked or covered. The openings should
never be blocked by placing the product on the bed, sofa, rug or
other similar surfaces. This product should never be placed near
or over a radiator or heat register. This product should not be
placed in a built-in installation unless proper ventilation is
provided.
7. This product should be operated only from the type of power
source indicated on the marking label. If you are not sure of the
type of power supply to your home or office, consult your dealer or
local power company.
8. The product is equipped with a three wire grounding type plug, a
plug will only fit into a grounding type power outlet. Contact your

electrician to replace your obsolete outlet. Do not defeat the
safety purpose of the grounding type plug.
9. Do not allow anything to rest on the power cord. Do not locate
this product where the cord will be abused by persons walking on
it.
10. Do not overload wall outlets and extension cores as this can result
in the risk of fire or electric shock.
11. Never push objects of any kind into this product as they may
touch dangerous voltage points or short out parts that could result
in a risk of fire or electric shock. Never spill liquid of any kind on
the product.
12. To reduce the risk of electric shock, do not disassemble this
product, but take it to a qualified service technician when service
or repair work is required. Opening or removing covers may
expose you to dangerous voltages or other risks. Incorrect
reassembly can cause electric shock when the appliance is
subsequently used.
13. Unplug this product from the wall outlet and refer servicing to
qualified service personnel under the following conditions:
A. When the power supply cord or plug is damaged or frayed.
B. If liquid has been spilled into the product.
C. If the product has been exposed to rain or water.
D. If the product does not operate normally by following the
operating instructions. Adjust only those controls that are covered
by the operating instructions because improper adjustment of
other controls may result in damage and will often require
extensive work by a qualified technician to restore the product to
normal operation.
E. If the product has been dropped or the cabinet has been
damaged.
F. If the product exhibits a distinct change in performance.
14. Avoid using a telephone (other than a cordless type) during an
electrical storm. There may be a remote risk of electric shock
from lightning.
15. Do not use the telephone to report a gas leak in the vicinity of the
leak.
SAVE THESE INSTRUCTIONS
TransTel TDS Series Digital Telephone Set
User Guide
Table Of Contents
Introduction...................................................................................7
DK-1 Telephone Layout ...............................................................8
DK-6 Telephone Layout ...............................................................8
DK-3 Telephone Layout ...............................................................9
DK-3 Telephone Layout ...............................................................9
Setting Up Your Telephone........................................................10
Account Codes - Client ..............................................................11
Advisory Messages....................................................................12
Answering Calls .........................................................................13
Automatic Callback ....................................................................15
Automatic Line Access...............................................................15
Automatic Last Number Redial ..................................................16
Automatic Redial........................................................................16
Background Music......................................................................17
Barge In (Override) ....................................................................17
Caller ID Features......................................................................18
Call Park.....................................................................................19
Call Pickup .................................................................................20
Call Split/Swap...........................................................................21
Call Transfer...............................................................................22
CO Line Callback .......................................................................23
Calling the Doorphone ...............................................................23
Call Forwarding..........................................................................24
Camp On....................................................................................25
5

Table Of Contents (Continued)
Check In - Check Out.................................................................26
Conference.................................................................................27
Conversation Monitor .................................................................29
Date and Time Setting................................................................29
Day - Night Service Switching....................................................30
Dial By Name..............................................................................32
Do Not Disturb............................................................................33
Extension Monitor.......................................................................33
Flash...........................................................................................34
Forced Account Code.................................................................35
Handsfree Operation..................................................................36
Headset Operation .....................................................................37
Hold............................................................................................38
Hotel Features............................................................................39
Intercom Dialing .........................................................................40
Individual Line Access................................................................41
ISDN & LCR Pre Dial ................................................................41
Last Number Redial....................................................................42
Message Waiting........................................................................43
Mute............................................................................................44
Off Hook Call Announce.............................................................44
Paging ........................................................................................45
Paging (Answer).........................................................................45
Saved Number Redial ................................................................46
Shift Key Operation ....................................................................47
Soft Keys F1, F2, F3 ..................................................................48
Station Lock - Unlock .................................................................49
Station Reminder........................................................................50
System Speed Dialing................................................................51
Personal Speed Dialing..............................................................53
Personal Speed Dialing / One Touch Keys................................54
Voice Mail Access ......................................................................55
Voice Mail Live Call Recording...................................................55
Voice Mail Message Retrieval....................................................56
Voice Mail Transfer Key .............................................................56
Volume Control...........................................................................57
Wake Up Call..............................................................................58
System Speed Dial Entries.........................................................59
Personal Speed Dial Entries ......................................................62
6
Issue 1.3 September 2007

Introduction
Congratulations on your purchase and welcome to the TransTel
Digital Series Key Telephone Set. The TransTel Digital Telephone
Sets were specifically designed with you in mind to help make you
more productive in communicating with customers, vendors, and
fellow business associates. We at TransTel believe that you should
not require extensive training to effectively use your telephone set,
and as such, have taken great care in developing one of the most
"user friendly" telephones available in the market today. Please take
a moment to review this guide. Just as each person's job function
differs, so do their telephone requirements. Pay particular attention to
those features which will be most helpful for you. Since each
telephone can be customized for your specific needs, your TransTel
Authorized Dealer will be happy to make sure your telephone set is
configured to your requirements.
Accessories
For your reference and convenience the following accessories and
replacement parts are available from your Authorized TransTel
Dealer.
Item Part
Description
Number
DK1-HND/I
DK1-HND/G
TD-HNDC/I
TD-HNDC/G
DK1-Label Kit/DS 30001090 Label Kit for Display and Speakerphone
DK1-Label Kit/B 30001091 Label Kit for Basic model. DK1-B
DK2-HND/I
DK2-HND/G
DK2 Label Kit 30001092 Label Kit for DK2
DK3 Label Kit 30001093 Label Kit for DK3
30001083
30001084
30001085
30001086
30001087
30001088
Standard Handset for all DK1 model
sets. Specify Ivory or Charcoal.
Handset Cord (10 Ft.) Ivory
Handset Cord (10 Ft.) Charcoal
models. DK1-D and DK1-S
Standard Handset for all DK2 model
sets. Specify Ivory or Charcoal.
7
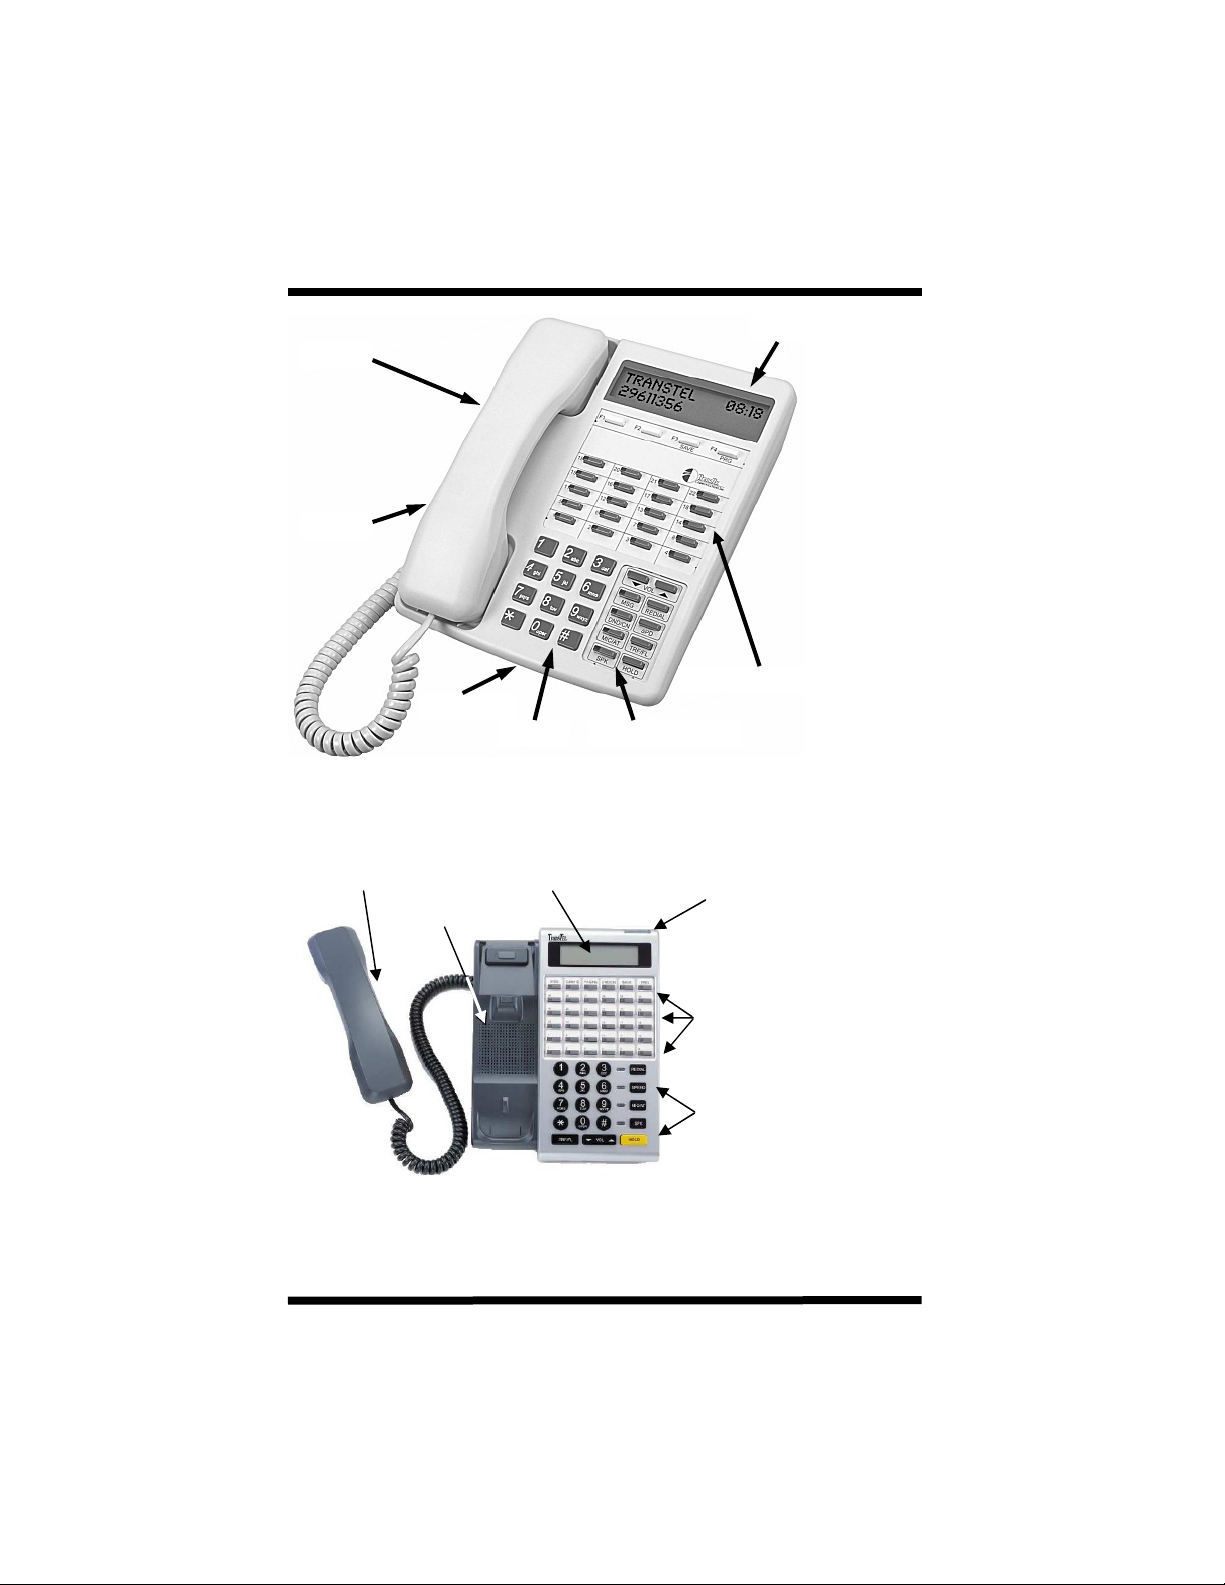
Telephone Layout DK1, DK2 & DK3 Models
Speaker
Handset
Programmable Feature Keys
Microphone
Fixed Feature Keys Dialpad
DK1 Layout
LCD Display
Handset LCD Display Ring & Message Indicator
Speaker
Programmable Feature Keys
Fixed Feature Keys
DK6 Layout
8
Issue 1.3 September 2007
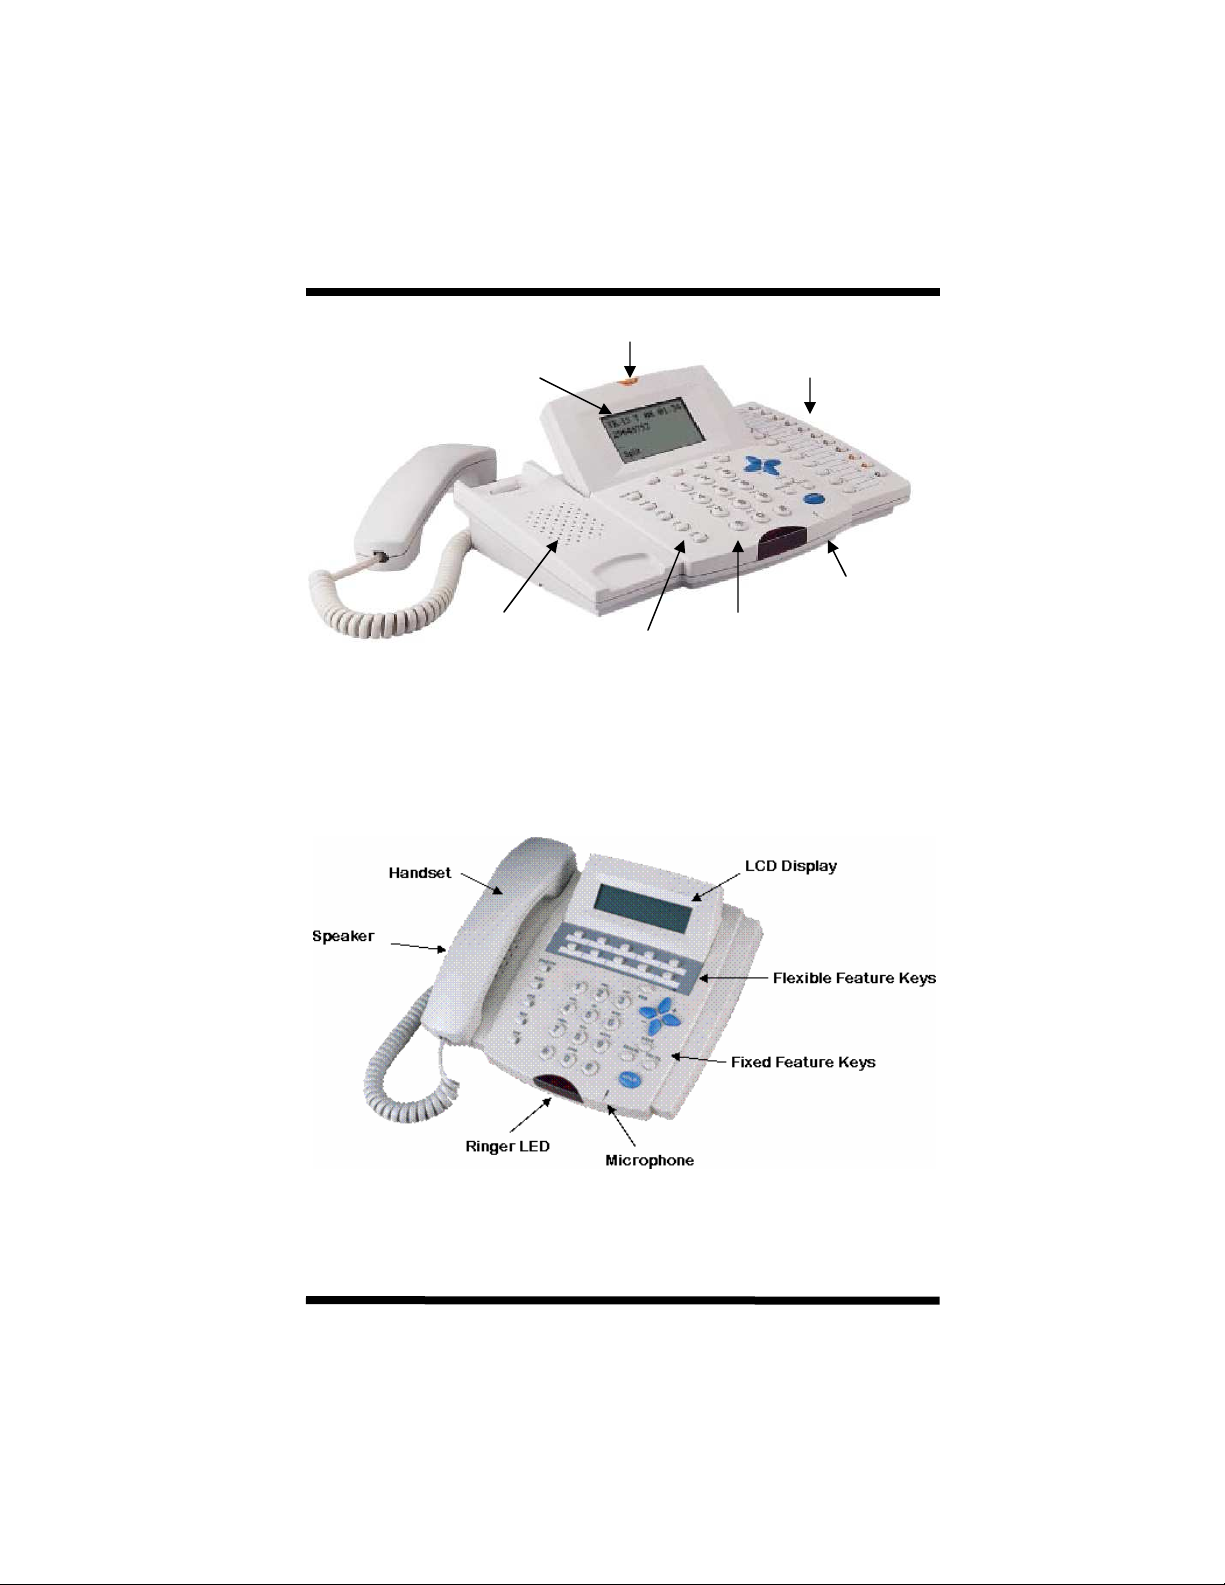
LCD Display
S
peaker
Ringing LED
Fixed Feature
Keys
DK2 Layout
Programmable
Feature Keys
Microphone
Dialpad
DK3 Layout
9

Setting Up Your Telephone Set
Description: Take a moment to familiarize yourself with the
telephone set features and various keys. Start by
programming the telephone to your desired settings.
The volume of the Ringer, Speaker, and Handset as
well as other features may be programmed for each
digital station. The volume settings may also be
changed for individual calls without affecting the
programmed levels.
Adjustments:
1. Ring Volume 5. Ring Frequency
2. Speaker Volume 6. Microphone Level
3. Handset Volume 7. Camp On Tone Volume
Level
4. Increase Ring Level Gradually
Permanent Programming:
1. While your station is idle, press [PRG], [6].
2. If your station is equipped with LCD,
the display will show: Set: 1:Ring 2:Spk
3:Handset More:#
3. Select the item that you want to program, (1, 2, or 3) or press
the # key for more options. (See adjustments above)
4. Press [VOL↑↑↑↑] to increase the volume or [VOL↓↓↓↓] to decrease.
5. Press [SAVE] to save the programming and exit to idle status.
Note: Each setting has eight discrete levels. LCD sets will show
the level number in the lower right corner of the LCD
display. You will also hear an audible indication to allow you
to select the most desireble level. It is suggested to leave
the microphone level at default.
Temporary Volume Adjustment:
1. While you are using your handset, your speaker, or your
telephone is ringing, you may:
2. Press [VOL↑↑↑↑] to increase the volume or press [VOL↓↓↓↓] on the
device (handset, speaker, ringer) that is operational.
3. If you are using your handset or speaker, the levels will revert to
permanent programming as soon as you hang up or turn off the
speaker. Ringing volume will revert to permanent programming
on the next call.
10
Issue 1.3 September 2007

Account Codes - Client
Description: During a conversation you may enter an account code
for billing purposes. The system will output a call record
to an external device for tracking purposes of billable
time spent with a specific client.
During a conversation
1. Press [SAVE] followed by [MSG]
2. Enter Account Code (up to 8 digits)
3. Press [SPK] to end.
11

Advisory Messages
Description: Digital Telephones equipped with LCD displays have
the capability to leave Advisory Messages that can be
read by other stations. These are most often placed
on stations during temporary absences from
telephone locations.
Some messages may be appended with a time or
date indicator to show your expected return time or
date.
Setting up a message:
1. Press [PRG],[MSG] . LCD will display:
Message Select
0 to 9 or Cancel
2. Enter the number of the message that you want to display (See
list below).
Note: You may scroll forward through the messages by pressing
[VOL↑↑↑↑] or scroll backwards through the messages by
pressing [VOL↓↓↓↓].
3. If appropriate, enter the time or date that you expect to return.
Press * to enter a colon (:) or # to enter a backslash.
4. Press [SAVE]. Your telephone will provide confirmation tone.
5. To return your telephone to the idle state, press [SPK].
6. Your LCD will display your selected message. Any station that
calls your station will have the message echoed to its display.
Turn off a message:
1. Press [PRG], [MSG]. LCD will display:
Message Select
0 to 9 or Cancel
2. Press [Save]. The message will clear from your display.
Messages:
0. On Vacation 5. Leave Voice Mail
1. Will Be Back 6. Call STN
2. At Lunch 7. Gone For The Day
3. In a Meeting 8. Out Of Town
4. Call 9. (Blank display)
12
Issue 1.3 September 2007

Answering Calls
Description: There are several ways that you may answer calls at
Your telephone. Depending on the particular type of
call and the system programming, calls may require
different actions in order to answer them.
Intercom Calls
Voice Announce Call:
If the system is programmed for Voice Announce calls, you will hear a
quick tone. The calling party will then be routed to your speaker. To
answer the call and have the ability to talk back to the caller, press
[MIC] (if your telephone is equipped with a speakerphone) or lift the
handset .
Note: If your telephone is programmed for Auto Answer, your
microphone will activate automatically upon a voice announce
call. It is not necessary to press any buttons to answer a call
if your station is in the Auto Answer mode.
Tone Signal Call:
If the system is programmed for Tone Signaling on Intercom calling,
or if you are called by a Voice Mail Port, you will hear a double ring
that repeats until you answer the call. You may answer the call by
pressing [SPK] if your telephone is speakerphone equipped or
answer by lifting the handset.
External Calls Ringing Your Telephone Set
For outside line calls that ring at your telephone, lift the handset or
press [SPK]. You will be connected to the call.
External Calls Not Ringing At Your Set
Calls With CO Line Appearance:
Incoming calls on a line that appears on your set may be picked up by
pressing the flashing CO line key. You will be connected to the call.
Note: This feature depends on system programming. On some
systems this option may be disabled. If that is the case, this
procedure will not work.
13

Answering Calls (Continued)
Calls That Do Not Appear on Your Telephone Set:
If an incoming call is not ringing on your telephone set and it does not
appear on a line button on your telephone set, you may answer the
call by one of several methods, depending on the way the call is
presented.
Please see Call Pickup for further explanation if necessary.
Line is ringing at a station within your pickup group:
Press the Group Pick Up key on your telephone set or
1. Press [*].
2. The LCD on your telephone (if equipped) will display:
Pick Up _
3. Press [0]. You will be connected to the call.
Line is ringing at a station in a pickup group other than your
own:
Press the Group Pick Up key on your telephone set or
1. Press [*].
2. The LCD on your telephone (if equipped) will display:
Pick Up _
3. Dial the 8 plus the group where the call is ringing (1-8). You will
be connected to the call.
OR
Press [*] followed by [9] to pick up any ringing telephone assigned to
any ringing group.
14
Issue 1.3 September 2007

Automatic Callback
Description: When dialing another station that is busy, you may
activate an automatic callback. When the busy station
becomes free, your telephone set will ring. When you
answer the callback, the other station’s telephone will
ring and you will be connected.
To initiate a Callback:
1. Dial desired party and hear busy tone
2. Press [MSG]. Your telephone set will return to an idle condition.
To respond to a Callback:
1. If you are on a conversation and a callback has been left on your
telephone and you have an LCD display it will indicate in the lower
portion of the LCD: MSG ST:XX Also, your Message key will
flash. This tells you who is leaving the callback message.
Automatic Line Access
Description: Automatic Line Access allows a station to gain access
to a telephone line without pressing a specific CO
line button. It is also known as Dial 9 access.
1. Dial [9].
2. Outside CO line dial tone will be returned from the first available
CO line in your Dial 9 group. If no outside lines in your group are
available, you will hear a Busy signal.
Note: In some systems, you must dial [0] instead of [9] depending
on the country where you are located. Please check with
your system administrator for the applicable access code.
15

Automatic Last Number Redial
Description: Automatic Last Number Redial allows you to
repeatedly dial the last external number dialed from
your telephone. This feature is most commonly used
when calling a telephone number that is continously
busy.
1. Place an outside CO line call.
2. Hang Up.
3. Press [SPD], [REDIAL].
4. The system will access a CO line and dial the number that was
previously dialed from your telephone.
5. The system will remain off hook for a pre-programmed period. If
you do not lift the handset, the telephone will automatically hang
up.
6. The system will periodically repeat steps 4 and 5 until either the
number of attempts has been satisfied (as per system
programming) or until you lift the handset while an attempt is in
progress.
Automatic Redial
Description: Automatic Redial allows you to save a telephone
number for use at a later time. This feature is in
addition to Last Number Redial.
1. You have dialed an outside call. The number does not answer or
is busy.
2. Press [SAVE].
3. The lower portion of the LCD
(on display telephones) will display: Auto Save
4. You may hang up.
5. You may make other calls if you wish.
6. While your telephone is idle, press [SAVE].
7. The telephone will access an available line, turn on your speaker
and redial the saved number.
8. If you take no action, the system will monitor the call for a
programmable period of time and then disconnect the call and
return your telephone to idle.
9. The telephone set will periodically access a CO line and continue
to redial the saved number. Steps 7 and 8 will continue for a
programmed number of times or until you lift the handset while an
attempt is in progress.
Note: If you place another call while Auto Redial is active, your
telephone will wait until you have finished the call and resume
the Auto Redial mode.
16
Issue 1.3 September 2007

Background Music
Description: If your system is equipped with background music or
music on hold capabilities, you may choose to have
the music play over your telephone's speaker when
your set is idle. Background music will automatically
be interrupted whenever you initiate a telephone call
or receive a call.
1. While your set is idle, press [#]. The [SPK] button will light.
Background music will be heard through your telephone speaker.
2. You may discontinue background music by pressing [#] or by
pressing the lit [SPK] key.
(Override) Barge In
Description: Depending on system programming, you may be able
to barge in on another station's conversation. When
you perform a Barge In, the station(s) being
interrupted receive an audible tone to inform them
that an intrusion is about to occur. Barge In may also
be performed on a CO line.
1. You call another station. It is busy.
2. Press [0]. If you are authorized, the station and whoever that
station is in conversation with will hear a tone.
3. When the tone stops, you will be admitted to the conversation.
You will be able to converse with both parties in the conversation.
4. If equipped with LCD, the telephone(s) involved in the original
conversation will show your identity and indicate that you are
overriding the call.
5. Your telephone, if equipped with LCD, will provide indication that
you have invoked the override, or barge function.
6. When you hang up, the two parties can resume their normal
conversation.
Note: Barge In capability is assigned by class of service level. A
station may Barge In on any conversation where all parties
are at an equal or lesser level than your telephone set. It is
for this reason that you may be able to barge in on some
stations, and not others. Not all stations will have the
capability to Barge In. Class of service Barge In levels are
assigned in system programming.
17

Caller ID Features
Description: The Caller ID feature on the TD-824i system allows you
to identify incoming callers before you answer the call.
This feature is available only to digital telephone sets
equipped with an LCD display.
While your telephone set is ringing with an incoming call:
1. Your LCD will display: TK: XX
TransTel
Note: Caller ID information will appear on your LCD with incoming
calls, held calls, transferred calls, and recalls back to your
station. You will also ger Caller ID information if you are
talking on an outside line and another calls rings in to your
telephone set. Your telephone may be programmed to display
number, name or name and number.
To review Caller ID records:
1. Press the lit Caller ID key on your telephone set.
Press [VOL ↑↑↑↑] or [VOL ↓↓↓↓] to scroll back and forth through the records.
To view Date and Time:
1. While reviewing a record you may also view the date and time by
pressing the [MIC] key.
Redial Caller ID Number:
1. Press the [REDIAL] key. The system will place the call for you
automatically. The current Caller ID record will be dialed back.
Delete Caller ID Record:
1. While reviewing a Caller ID record, you may delete it by pressing
the [TRF/FL] key.
To exit Caller ID Review Mode:
1. Press the [SPK] key.
NOTE: DK2 users have added capability. See “Softkeys” in this
document.
18
Issue 1.3 September 2007

Call Park
Description: Call Park allows you to place calls into a hel “orbit” for
retrieval by other station users. There are 10 park orbits in the system.
1. To place a call into an orbit slot, while on an outside call, press
the [Call Park] key or press [Hold] and dial [85].
2. If you have an LCD phone the call will auto park and the orbit slot
number will be displayed.
3. From speaker and basic telephones press the [Call Park] key or
dial the access code [85] after placing the call on hold. You will
hear a confirmation tone. Enter the orbit number you wish to park
the call in. A second tone indicates the call was parked successfully.
4. If you hear a busy tone, the orbit is not available. Simply enter
the next numeric orbit number until you hear a confirmation tone
indication the call was successfully parked.
5. You may announce through paging or the intercom the orbit number on which the call was parked.
6. To retrieve a call parked in an orbit, press the [Call Park] key dial
the orbit number or dial [85] plus the orbit number.
19

Call Pickup
Description: Call Pickup lets you answer a call that is ringing at
another telephone. Call Pickup can be accomplished
by dialing an access code or by pressing a
programmed pick up key on your telephone set.
Call Pickup Types: Station Group Pickup
Individual Station Pickup
Departmental Pickup
All Pickup
Station Group Pickup
To answer a call that is ringing within a specific station group:
1. Press [Group Call Pickup] key or press [* 8].
2. LCD Display (if equipped) will show:
Pick Up _
3. Enter the group number that you wish to pick up (1-8).
4. You will be connected to the call ringing at a station in the
selected group. If more than one telephone within the group is
ringing, you will be connected to the oldest call in the group. If
there is not a call ringing in the group, you will hear busy tone.
Individual Station Pickup
To answer a specific ringing station:
1. Press [*].
2. LCD Display (if equipped) will show: Pick Up _
3. Enter the station number that you wish to pick up. If the station is
ringing, you will be connected to the caller that is ringing the
station. If the station is idle, you will receive busy tone.
Departmental Pickup
Departmental Pickup allows you to answer a call ringing at another
station within your own station group.
1. Press [Your Group Pickup] key or press [*].
2. LCD Display (if equipped) will show: Pick Up _
3. Press [0]. You will answer the call that was ringing within
your pickup group. If no station was ringing in your group, you will
hear a busy tone.
All Pickup
20
Issue 1.3 September 2007
 Loading...