

Page 1

Quick Start Guide
Full Manual available online at
www.transtechsys.com/pdf/PQI380Manual.pdf
1
Page 2

Table of Contents
Contents 3
Charging Batteries 4
Starting the Software 5
GPS Setup 6
Control Menu 7
Unit Settings 8
Data Logging 9
Mix Details 10
Edit Mix 11
Stone Size 12
Depth 13
MTD (Max Theoretical Density) 14
Operator 16
Accepting Mix Change 17
Project Details 18
Edit Project 19
Reading Modes 21
Oset 22
Reading Mode (Detailed) 28
Single Mode 29
Average Mode 31
Continuous Mode 34
Segregation Mode 35
Data Management 37
Replacement Parts 38
2
1-800-724-6306 • www.transtechsys.com
Page 3
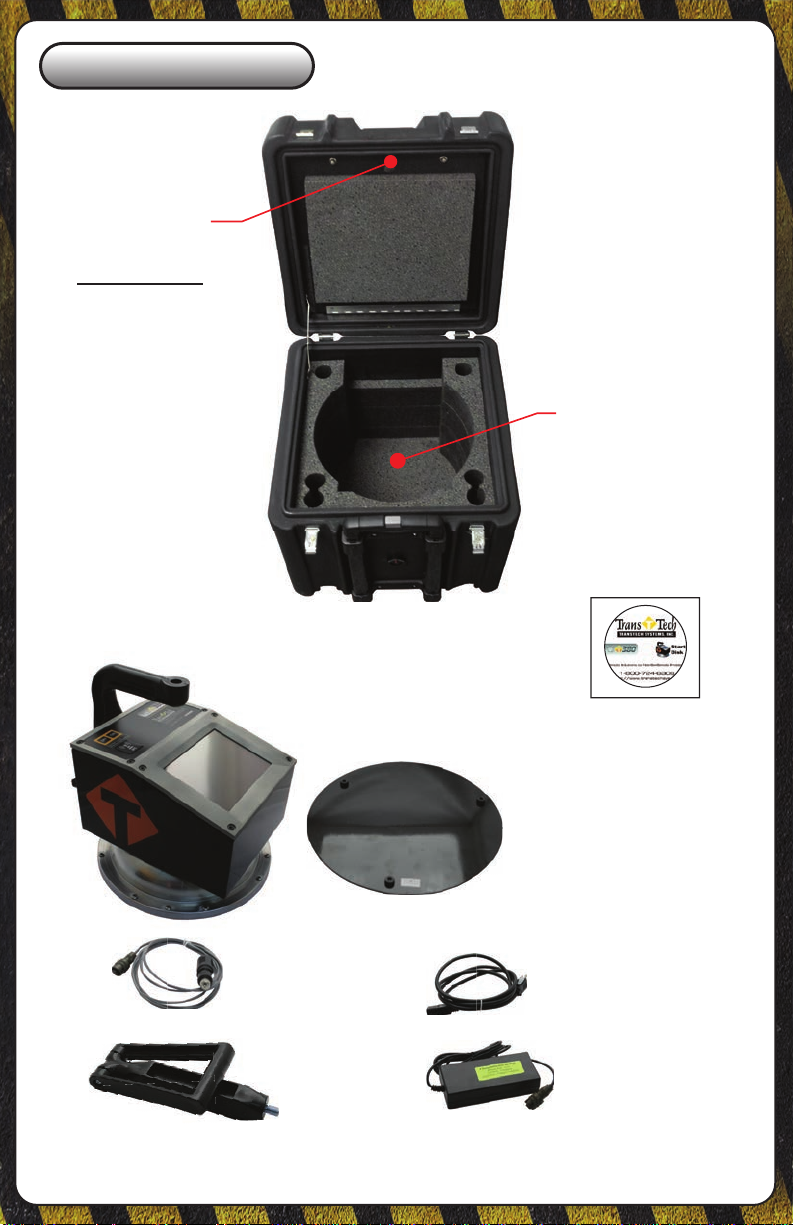
Contents
Fold open
compartment
contents
Charger
AC Cord
DC Cord
CD Manual
Handle
Slot for
PQI 380 and
Standardization
Plate
Case
PQI380
DC Cord
Handle
CD Manual
Standardization
Plate
AC Cord
Charger
3
Page 4

Charging Batteries
1. Turn the PQI 380 unit OFF.
2. Connect the charger to the charger connector located on the back of
the PQI 380.
3. Plug the charger into a standard AC outlet.
4. The red indicator lamp will turn green to indicate that the batteries are
charged. (approx. 4hrs)
5. Unplug the charger from the power source before disconnecting the
charger from the PQI 380.
Battery Care Tips
• Whenever uncertain about the battery charge level or condition,
recharge it
• The battery will self-discharge and should NOT be left uncharged for
more than 30 days
• An occasional complete discharge followed by a full recharge is
recommended
• NEVER drop the battery as this can damage the internals
• DO NOT store in freezer or expose to extreme heat
• Battery should be fully charged before use
4
1-800-724-6306 • www.transtechsys.com
Page 5
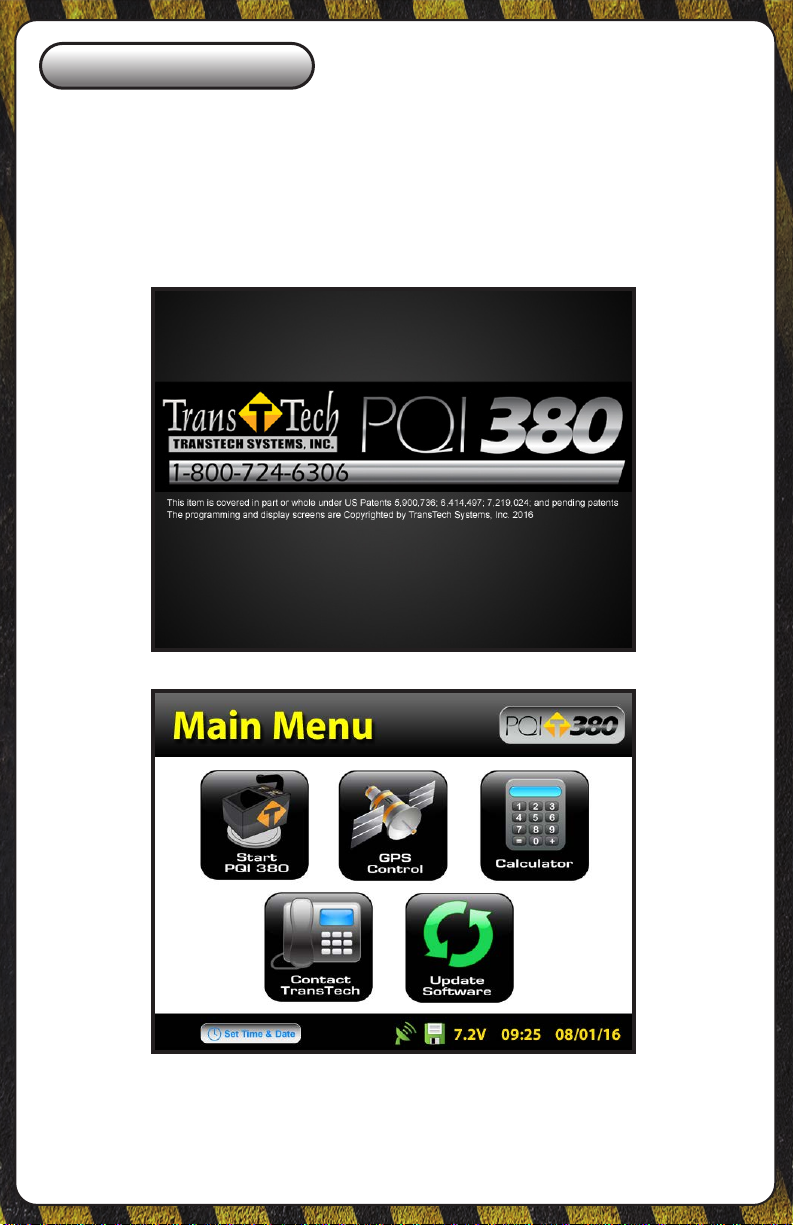
Starting the Software
Pressing the ON button will power on the PQI 380. After a few seconds
the TransTech splash screen will appear followed by the Main Menu
screen. The Main Menu screen will display ve options, Start PQI380,
GPS Control, Calculator, Contact TransTech and Update Software.
5
Page 6
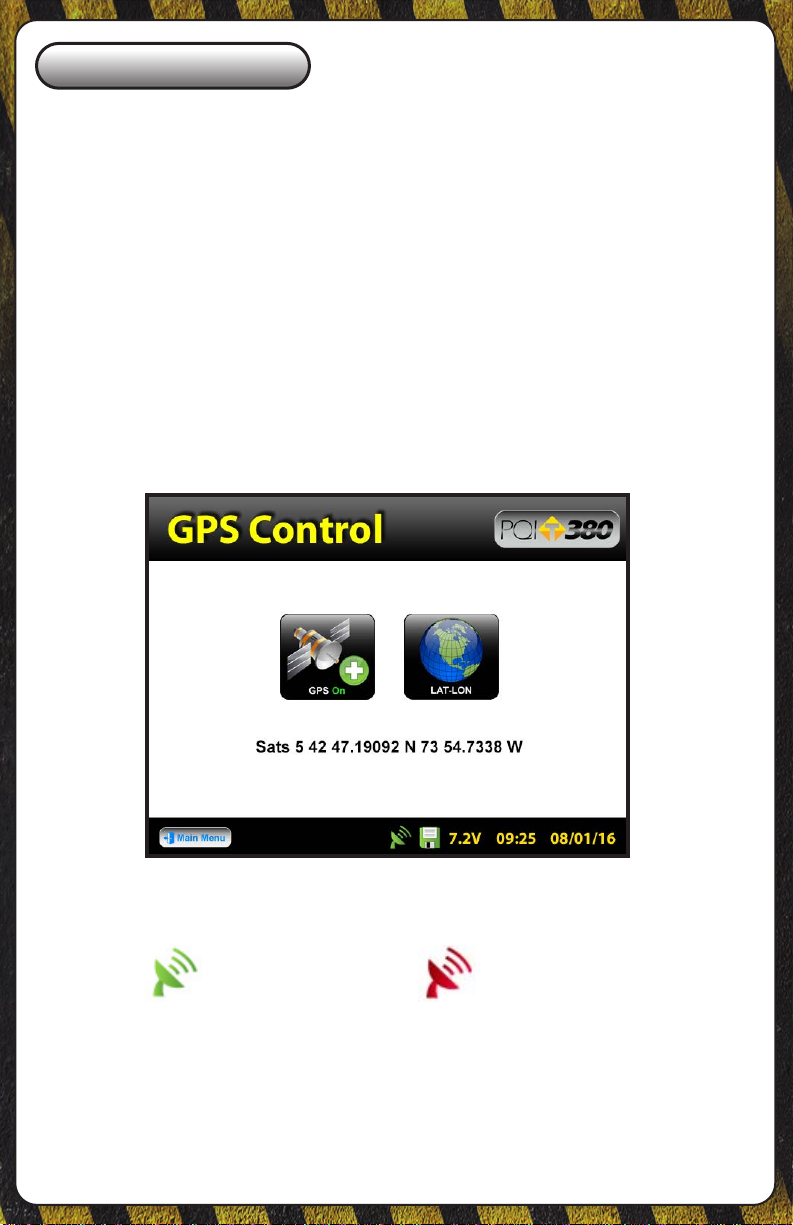
GPS Setup
From the Main Menu, press GPS CONTROL. GPS status can be toggled
ON or OFF. When enabled the satellite dish icon on the status bar at the
bottom of the display turns from red to green.
GPS formatting can also be toggled from the Universal Transverse
Mercator (UTM) grid to Latitude/Longitude (LAT-LON). Initially the
display will read Sats 0 for both formats until connections have been
made. The below example shows a connection to ve satellites (Sats 5).
GPS locations will appear on the bottom left corner of all reading mode
screens and will store with each reading when data logging is enabled.
Press Main Menu to return to the Main Menu.
GPS Enabled GPS Disabled
6
1-800-724-6306 • www.transtechsys.com
Page 7
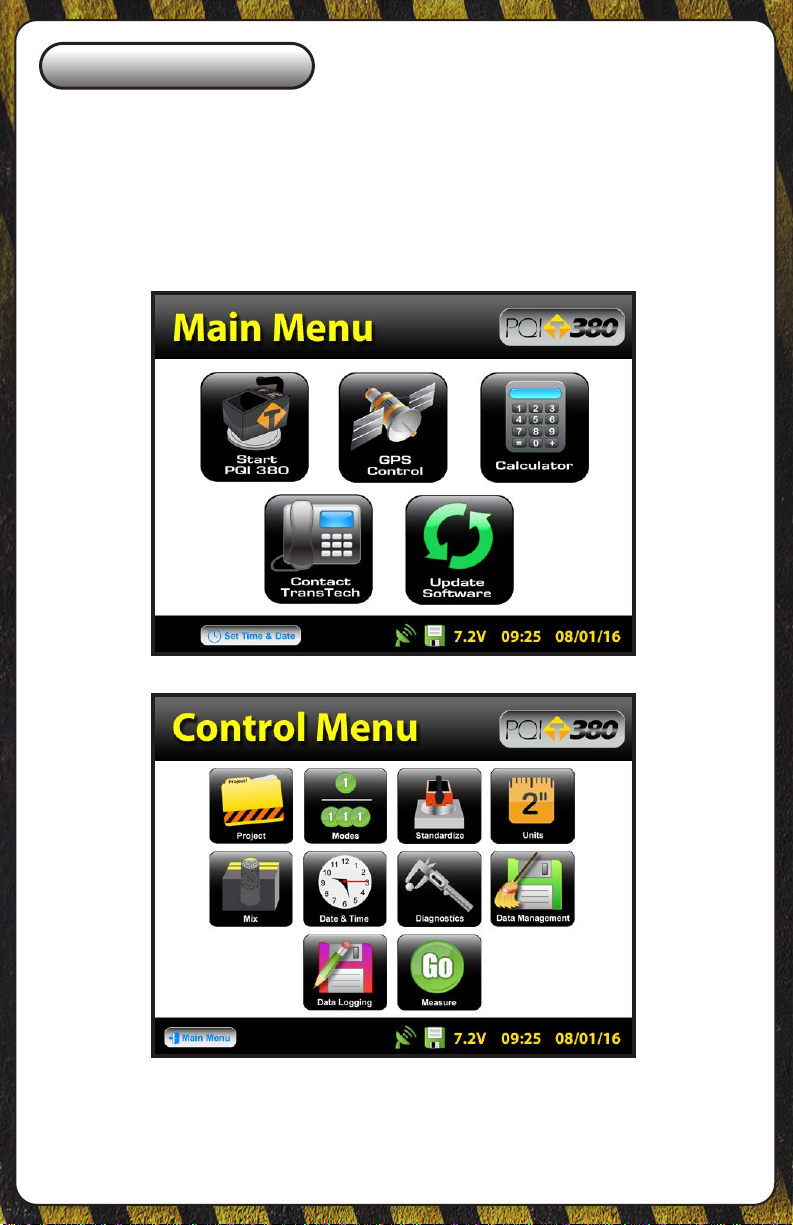
Control Menu
From the Main Menu, press Start PQI 380 to enter the Control Menu.
From this menu, you will select units, enable data logging, enter mix
information and select a measurement mode. As a quick start, the option
is yours whether to input project details if data logging is enabled or just
begin taking readings.
7
Page 8
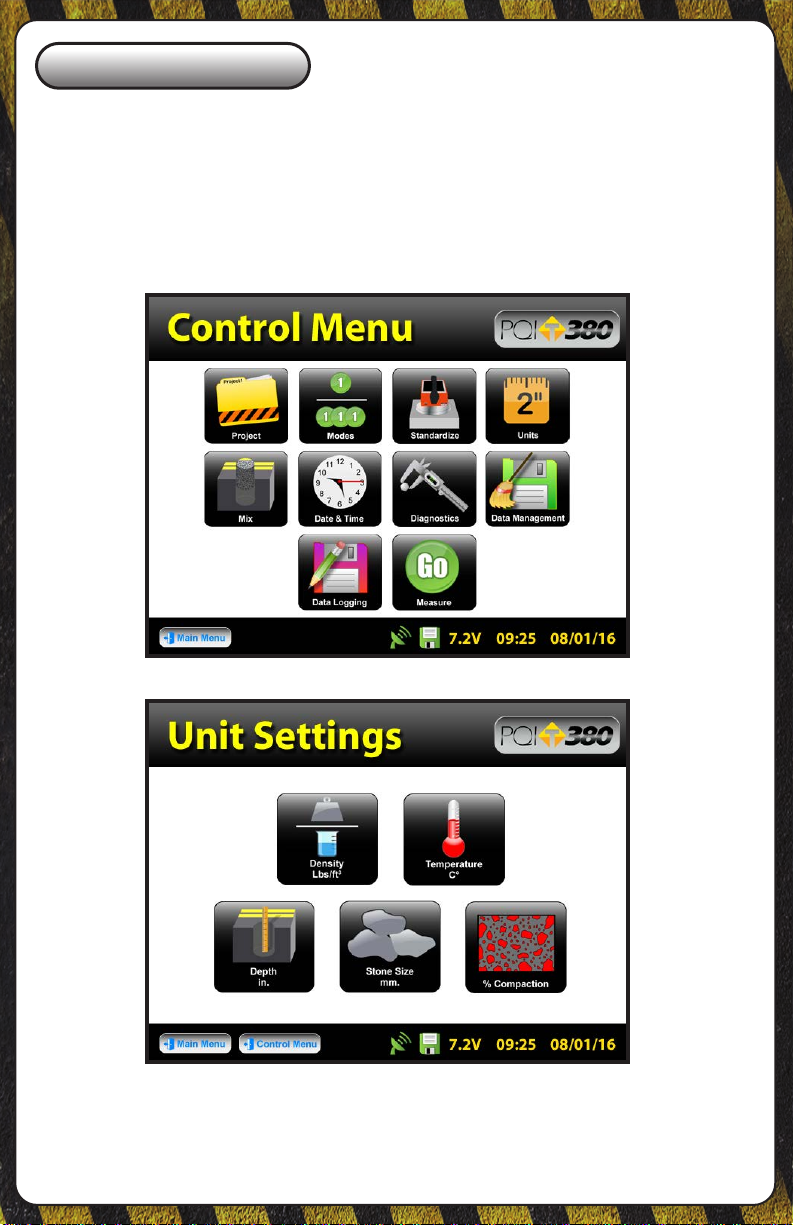
Unit Settings
From the Control Menu, press Units. Density, Temperature, Depth, Stone
Size and % Compaction can be toggled independently between system
international (SI “metric”) and U.S. customary units. For example, you can
set the density to lb/ft3 while temperature is set to celsius, depth is set to
inches while stone size is set for millimeters.
8
1-800-724-6306 • www.transtechsys.com
Page 9
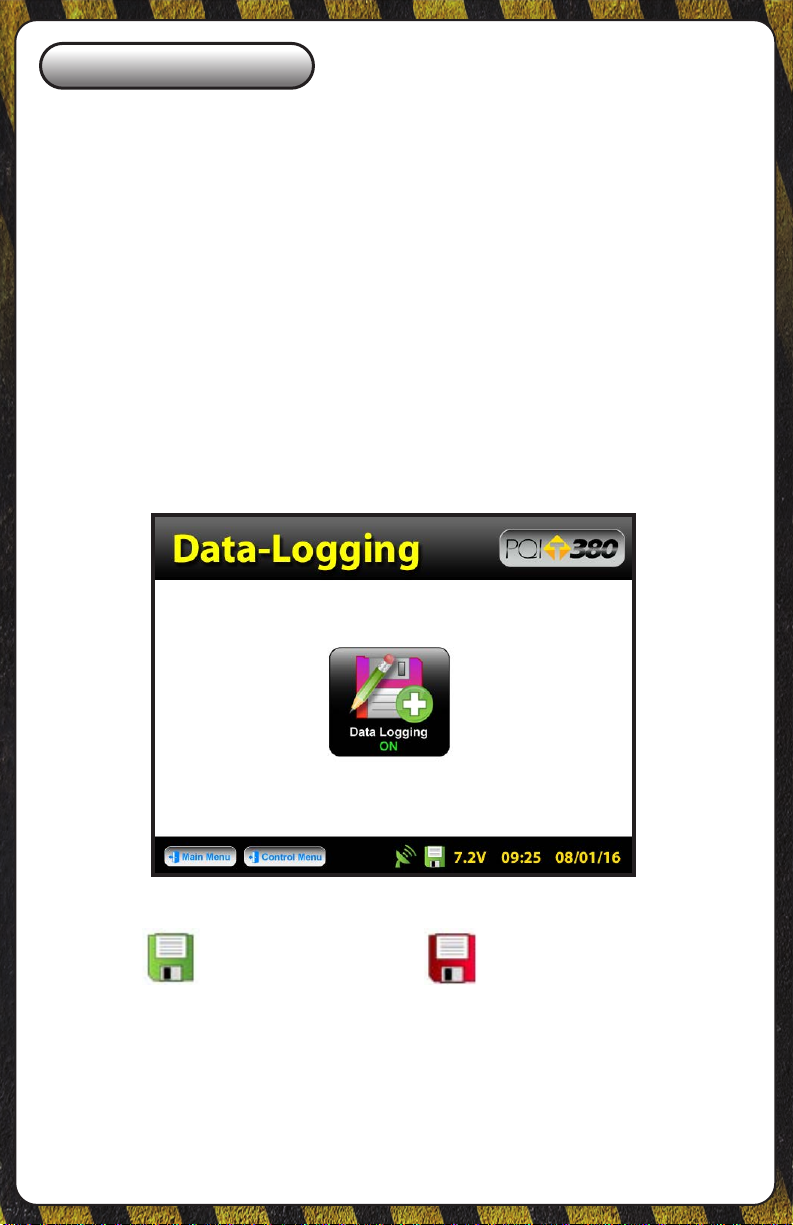
Data Logging
From the Control Menu, press Data Logging. If you wish to save your
data, you must enable the data logging feature by toggling the button to
ON. The oppy disk icon on the status bar will turn from red to green when
data logging is enabled. In the example below data logging is enabled.
Data will not save for continuous or segregation reading modes.
Data stored includes all project and mix details, as well as the compaction,
density, temperature and date and time of each reading. If the GPS is
enabled and it is connected to satellites, the location in the format chosen
as well as GPS date and GPS time for each reading will also be recorded.
Press Control Menu on the status bar to return to the Control Menu.
Data Logging
Enabled
Data Logging
Disabled
9
Page 10
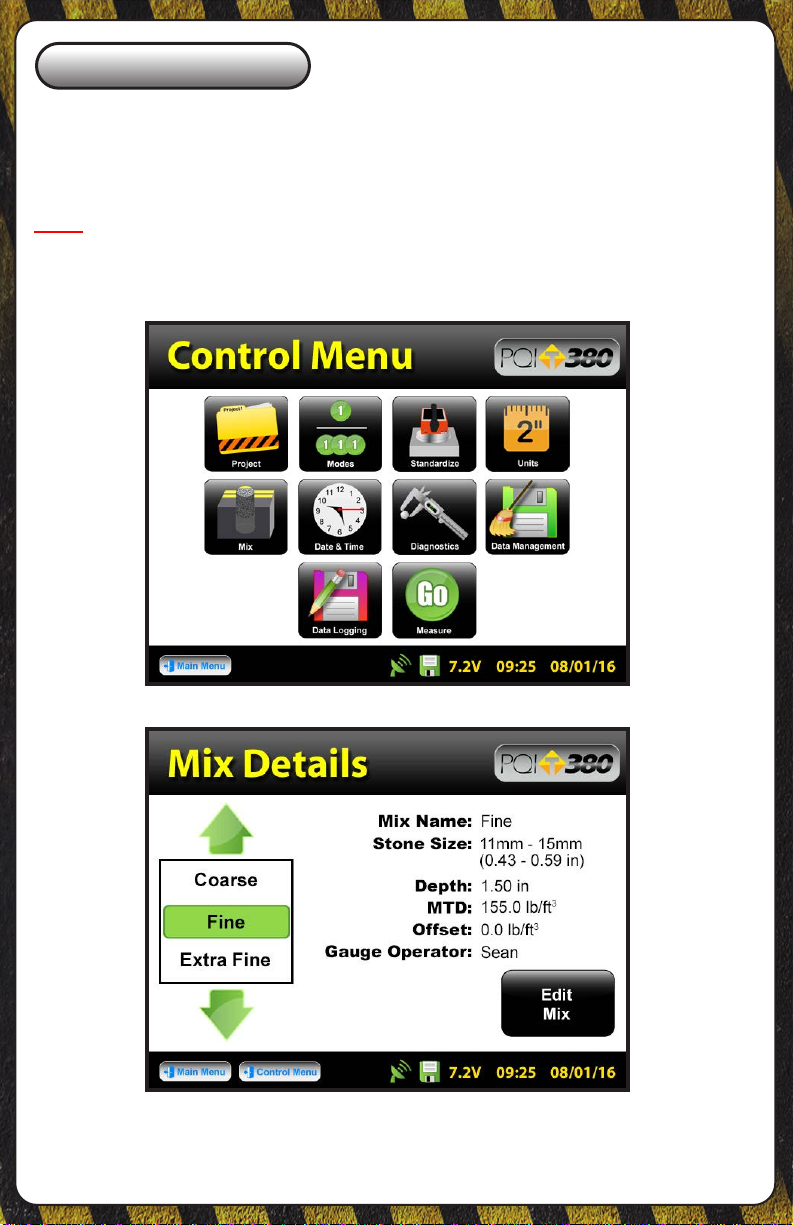
Mix Details
From the Control Menu, press Mix. The PQI 380 will store twenty detailed
mixes. The mix highlighted in green on the left is displayed in detail on the
right. To edit the details of this mix, press Edit Mix.
Note: Readings taken prior to accurately setting up the mix details
will result in incorrect density and compaction results.
10
1-800-724-6306 • www.transtechsys.com
Page 11
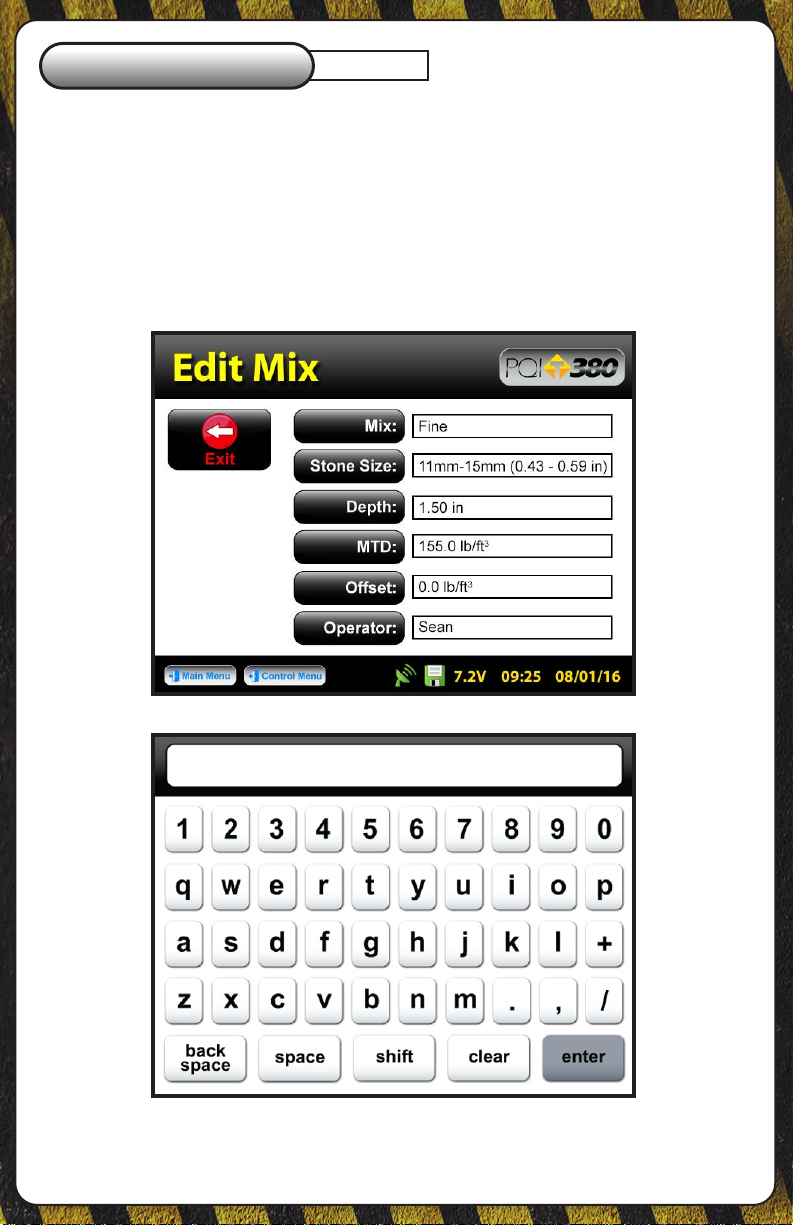
Edit Mix
There are six black buttons labeled Mix, Stone Size, Depth, MTD, Oset,
and Operator. By pressing one of these black labeled buttons, you will
enter the screen that allows you to store the information described by the
button. For example, press Mix, the keyboard will open allowing you to
change the default mix name. Press Clear if you would like to start over
with a new name. Press Shift to toggle from lowercase to uppercase
letters. Once editing has been completed press Enter.
Mix Name
Fine
11
Page 12
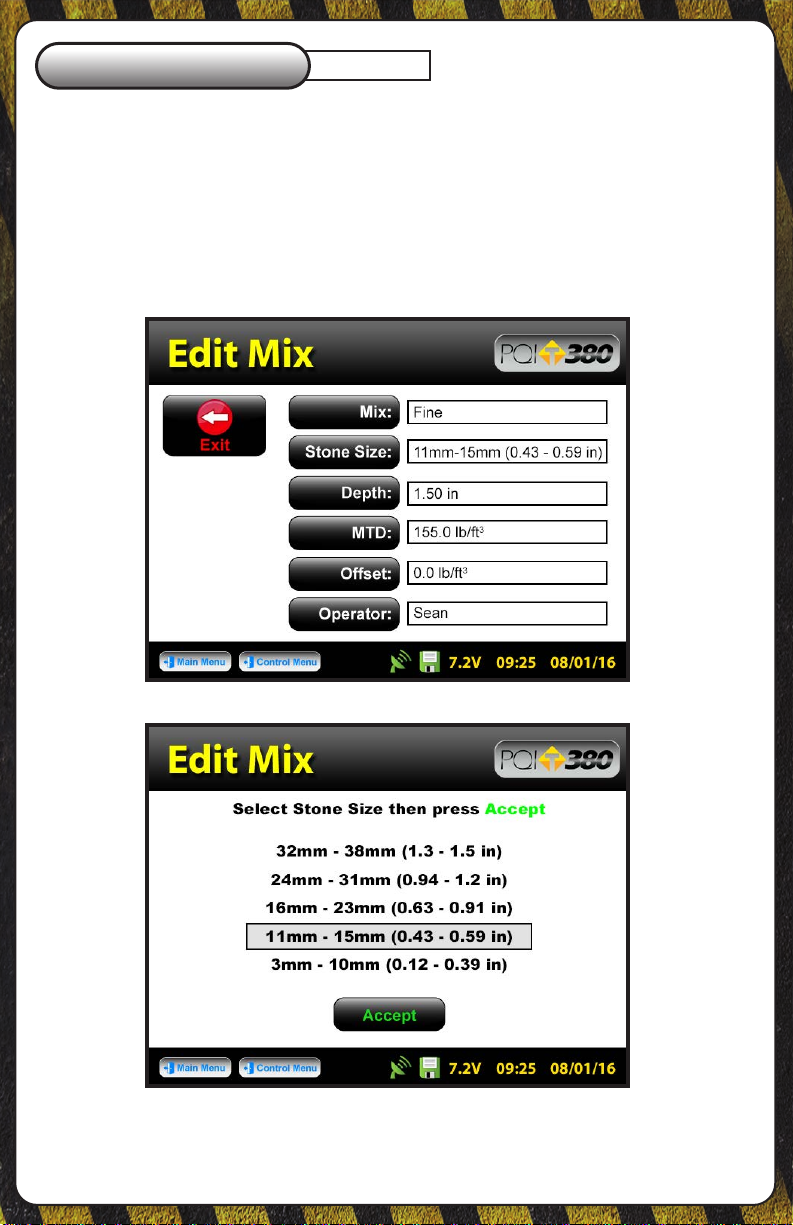
Edit Mix
Press Stone Size. There are ve options of aggregate sizes listed in
millimeters (inches). If, however, you do not see your specic stone size
listed choose the closest stone size available.
For example, if your mix has an aggregate size of 20mm (0.79in), select
16mm - 23mm (0.63 - 0.91). Press Accept after you made your selection.
Stone Size
12
1-800-724-6306 • www.transtechsys.com
Page 13

Edit Mix
Press Depth. Enter the depth of the asphalt mat on the numeric keypad in
the units you previously selected for the depth. Once the correct value has
been entered, press Accept.
An out of range Warning will display for depths entered outside of
the following range: 0.75in - 6.0in (19.05mm - 152.4mm)
Depth
13
Page 14

Edit Mix
MTD (Max Theoretical Density)
Press MTD. Enter the Maximum Theoretical Density (MTD) of the mix
on the numeric keypad in the units you previously selected. The MTD is
provided from the asphalt mix designer and is a key value in determining
the percent compaction. Once the correct value has been entered, press
Accept.
An out of range Warning will display for an MTD entered outside of
the following range: 100lb/ft
3
- 200lb/ft3 (1601.8kg/m3 - 3203.7kg/m
3
)
14
1-800-724-6306 • www.transtechsys.com
Page 15

Edit Mix
The oset for this material can be adjusted at a later time. Measurements
takenpriortoadjustingtheosetwillnotincludetheoset. You will
need to take a measurement to determine the oset. The oset feature will
be revisited later in the calibration section of this document.
Oset
15
Page 16

Edit Mix
Press Operator. Enter your name as the operator of the gauge, press
Enter. The gauge will return to the edit mix screen. Verify all mix
information on this screen. Once you have veried the results of the mix,
press Exit to save the mix.
Operator
16
Sean
1-800-724-6306 • www.transtechsys.com
Page 17

Edit Mix
After exiting the Edit Mix screen, the gauge will return to the Mix Details
screen. Here you may use the green up or down arrows to select a new
mix for editing or change an existing mix. The green highlighted mix is
the CURRENT MIX that the gauge will use when taking readings. Prior to
exiting this screen, be sure this is the mix you want and the information to
the right has been veried. Press Control Menu to return to the Control
Menu.
17
Page 18

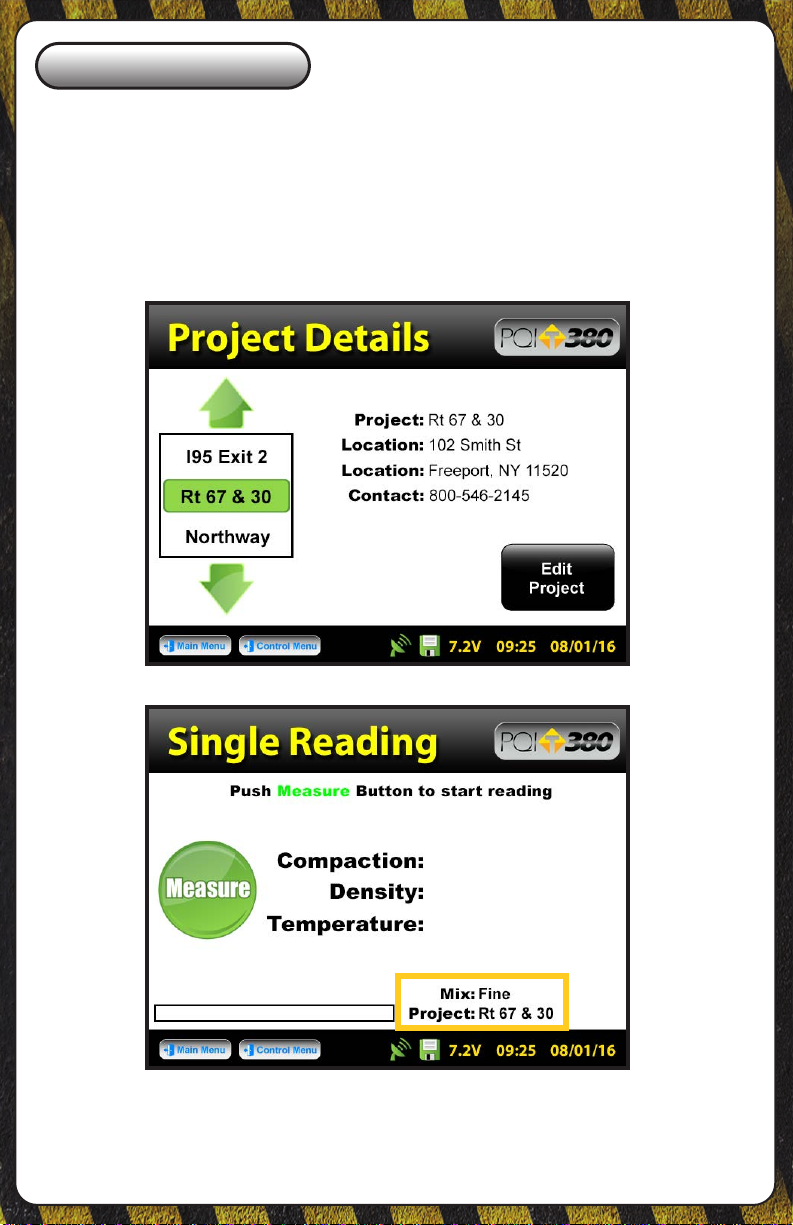
Project Details
If you wish to save data and you have data logging enabled, press
Project, otherwise skip to Reading Modes. The PQI 380 will store ten
detailed projects. The project details screen will resemble the mix details
screen such that you are able to select your project using the up and
down arrows. The green highlighted project is the CURRENT PROJECT.
Readings taken will store on a dat le using the CURRENT PROJECT
NAME. You may revisit each project at any given time to continue taking
readings. Data within each project will store in the order of which it was
taken. To edit a project, press Edit Project.
18
1-800-724-6306 • www.transtechsys.com
Page 19

Edit Project
There are four black buttons labeled Project, Location, Location and
Contact. By pressing one of these black labeled buttons, you will enter
the screen that allows you to store information for that project. For
example, press Project, the keyboard will open allowing you to change
the default name. Press Clear if you would like to start over with a new
name. Press Shift to toggle from lowercase to uppercase letters. Once
editing is complete, press Enter. Verify the information then press Exit to
save the project information and return to the project details screen. Press
Control Menu to return to the Control Menu.
Rt 67 & 30
19
Page 20
Edit Project
If you took readings with data logging enabled but did not set up a
project, data will store on the default project name (ex. Project1).
Always take note of the project and mix names displayed on your
reading mode screens.
20
1-800-724-6306 • www.transtechsys.com
Page 21

Reading Modes
From the Control Menu, press Modes. There are four reading modes
(Single, Average, Continuous and Segregation). Continuous and
segregation modes will not save data. Single and average modes will
save data when data logging is enabled. Press the button of the mode you
would like to use. The active mode button will appear larger than the rest.
For example, single reading mode has been selected below. Select either
continuous mode or single mode in order to take a quick reading to
determine the oset. Once your selection has been made, press Control
Menu to return to the Control Menu.
Detailed instructions on page 28
21
Page 22

Oset
Prior to cores being taken, you may want to adjust the PQI 380 to the
asphalt mat. After choosing the continuous or single reading mode as
described on the previous page, from the Control Menu, press Measure.
Take note and verify the mix and project names. Continuous mode
will continuously display and update the Compaction, Density and
Temperature until the STOP button is pressed. This data will not be saved.
Single mode will take one measurement, display the results and await
another reading if data logging is disabled.
22
1-800-724-6306 • www.transtechsys.com
Page 23

Oset
If data logging is enabled, the PQI 380 will display Accept and Reject
buttons for that reading. Once accepted, the Enter Location screen will
load which will allow specic information to be stored for that reading.
Press Accept to immediately bypass this screen or when you have
nished entering information for that reading. Once you are satised with
the density result, press Control Menu then press Mix to return to the
Mix Details screen.
23
Page 24

Oset
Be sure that the green highlighted mix is the mix you wish to apply the
oset. Press Edit Mix then press Oset. Using the value of the density
you previously measured, compare that to the value of density desired.
Once the numeric dierence is calculated, determine whether the PQI 380
is reading too high or too low. For example, if the PQI reads 155lb/ft3,
and you would like it to read 150lb/ft3, the PQI is reading too high and the
adjusted value for the oset is 5.
24
1-800-724-6306 • www.transtechsys.com
Page 25

Oset
Press PQI is reading too High or Low depending on your situation. For
our example, we are going to press PQI is reading too HIGH. The next
screen will contain a numeric keypad as well as the values for the mix
name and the current oset for that mix. Type in the adjusted value for the
oset which we previously determined would be 5. Press 5, then press
Enter.
25
Page 26

Oset
The adjusted value and new oset will be the same if the current oset
was originally zero. If the current oset had been -1 and the adjusted
value 5, then the new oset would be -6 for a PQI that was reading too
high. Press Accept. You will be brought to the Edit Mix screen where you
can verify the updated oset information for that mix. Once veried, press
Exit to save your results, then press Control Menu on the status bar to
return to the Control Menu.
26
1-800-724-6306 • www.transtechsys.com
Page 27

Oset
Theosetforeachmixcanbeadjustedatanytime.Readings
takenpriortoaspecicadjustmentwillnotreectthatadjustment.
Dataleswillrecordeachosetusedtocalculatedensityforeach
reading.
27
Page 28

Reading Modes
To change reading modes, from the Control Menu, press Modes. Select
the reading mode you would like to use, then press Control Menu. From
the Control Menu, press Measure to begin taking readings. The heading
of the screen will display the active mode (Single, Average, Continuous,
Segregation). For all reading modes, take note and verify the mix and
project names displayed in the bottom right corner. Do not touch or hover
over the gauge when it is taking a reading. Place the gauge on a at and
dry surface whenever possible.
Detailed
28
1-800-724-6306 • www.transtechsys.com
Page 29

Reading Modes
Single Reading Mode - Press Measure. If data logging is disabled, the
gauge will display the results of the rst reading and await another.
Single
29
Page 30
Reading Modes
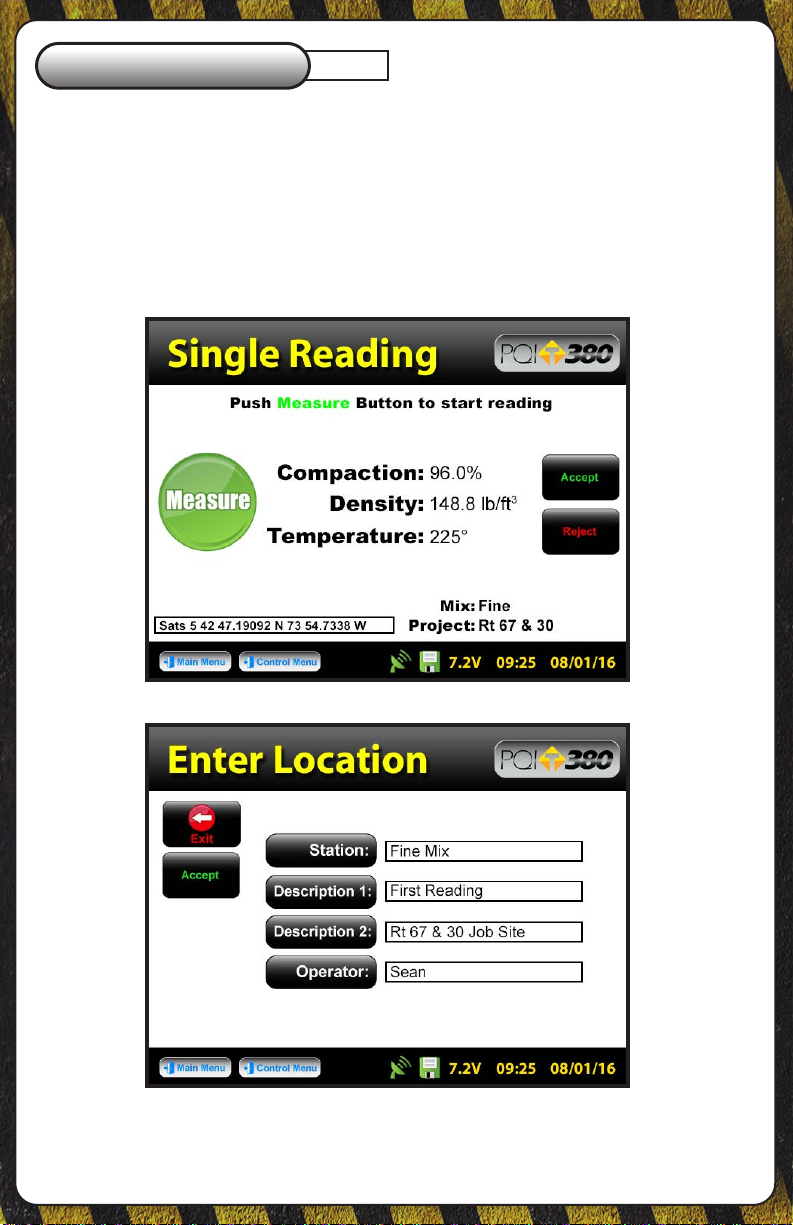
If data logging is enabled, the gauge will display Accept and Reject
buttons for that reading. Once accepted, the Enter Location screen will
load which will allow specic information to be stored for that reading.
Press Accept to immediately bypass this screen or when you have
nished entering information for that reading.
Single
30
1-800-724-6306 • www.transtechsys.com
Page 31
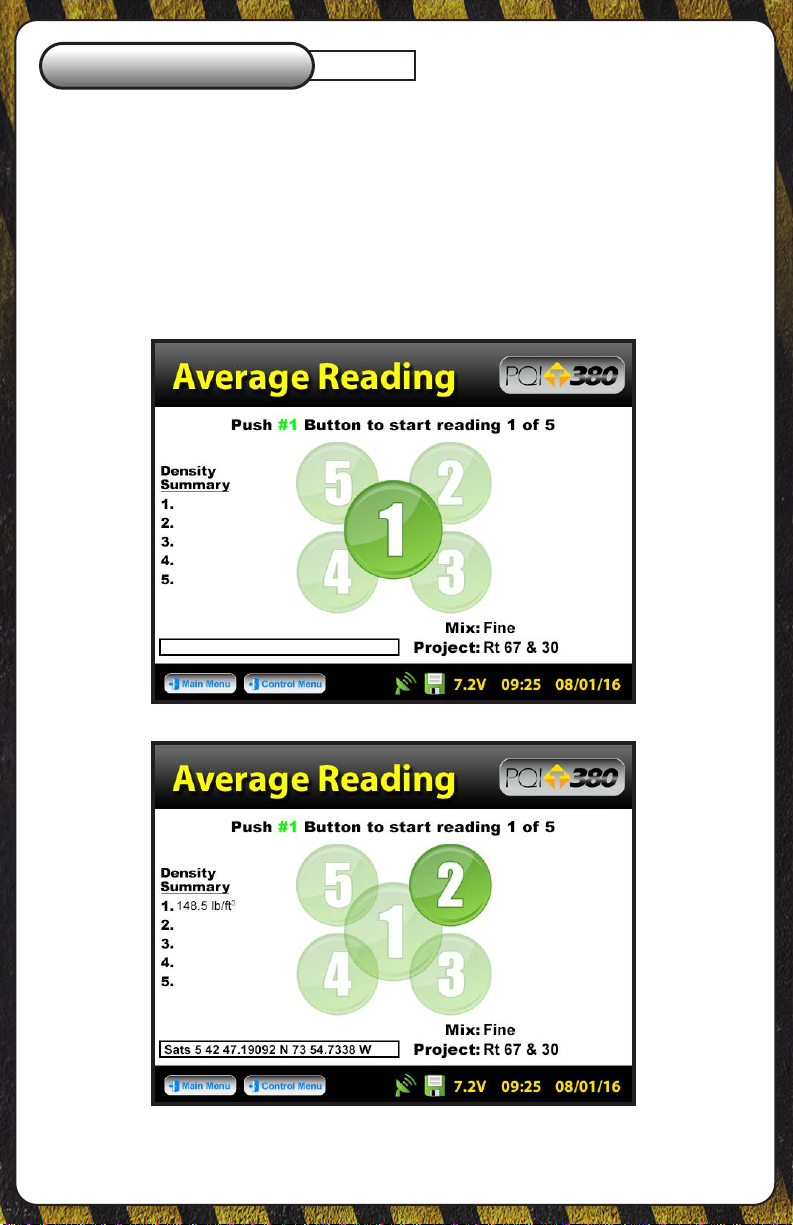
Reading Modes
Average Reading Mode - The ve average readings are taken in a clover
leaf format. The gauge will highlight the reading number as well as the
position of the gauge. Once the gauge is positioned on a at surface,
press 1. When reading one is complete, the density summary list will
begin to populate and the gauge will prompt you to move to location 2.
Move the gauge to position 2 and press 2 to continue. Repeat these steps
for the remaining three measurements.
Average
31
Page 32

Reading Modes
After the fth reading the PQI 380 will display the ve individual readings
under density summary along with the average of the compaction, density
and temperature. If data logging is enabled, the gauge will display Accept
and Reject buttons for that reading. Once accepted, the Enter Location
screen will load which will allow specic information to be stored for that
reading. Press Accept to immediately bypass this screen or when you
have nished entering information for that reading.
Average
32
1-800-724-6306 • www.transtechsys.com
Page 33

Reading Modes
The PQI 380 will not store individual readings in average mode, only
theaverageofallvereadingswillbestored.Ifindividualreadings
are needed, this will be the last time the screen will display them.
If data logging is disabled the gauge displays the average and awaits the
next reading set.
Average
33
Page 34

Reading Modes
Continuous Reading Mode - Press Measure. Data will NOT store for
this mode. Continuous mode will continuously display and update the
Compaction, Density and Temperature until the STOP button is pressed.
Continuous
34
1-800-724-6306 • www.transtechsys.com
Page 35

Reading Modes
Segregation Reading Mode - Press Measure. Data will NOT store for
this mode. This mode mimics the PQI 300, where two readings (A and B)
are taken for each location. For every reading taken the option to Accept
or Reject will be given.
Segregation
35
Page 36

Reading Modes
After the last pair of readings has been taken, press Calculate. The
gauge will display % Compaction, Density and Temperature for the lowest,
highest and mean readings.
Segregation
36
1-800-724-6306 • www.transtechsys.com
Page 37

Data Management
From the Control Menu, press Data Management. This is where project
les will be saved, viewed, printed and downloaded.
Download Data - Use the up and down arrows to scroll, highlight the
desired project and press Download. Insert the USB ash drive into the
USB port, press Download. The gauge will ask if you inserted the USB
drive, once ready, press Download. When downloading is complete the
gauge will display READY.
Viewing a Project File - Use the up and down arrows to scroll, highlight
the desired project and press View. All of your tests saved to this project
will be listed in the order they were taken. Only the most pertinent
information will be shown in this view including: Test Number, Station,
Description1, Density, Compaction and Surface Temperature. Press the
Back button to exit the Project View screen.
Deleting a Project File - Use the up and down arrows to scroll, highlight
the desired project and press Delete. You will be prompted with a warning
asking if you are sure you wish to delete the le. Once conrmed and
deleted, you will no longer be able to retrieve the measurement data.
Printing a Project File - Plug in your TransTech printer, use the up and
down arrows to scroll, highlight the desired project and press Print.
37
Page 38

Replacement Parts
To order parts call the TransTech service department at 1-800-724-6306
7500-0320
PQI 380 AC Charger
7500-0292
PQI 380 DC Vehicle
Charger
7500-0235
PQI 380 Extension
Handle Kit
38
1400-0028
PQI 380 StrongHold
Carry Case
8000-0063
PQI 380 Generation 1
Battery (3 Pack)
7500-0354
PQI 380 Generation 1
Battery Cap with Spring
1-800-724-6306 • www.transtechsys.com
Page 39

Replacement Parts
To order parts call the TransTech service department at 1-800-724-6306
7500-0356
PQI 380 Generation 2
Battery
7000-0336
PQI 380 Generation 2
Replacement Battery Door
2100-0159
PQI 380 Charging Port
Dust Cap
39
Page 40

900 Albany Shaker Road, Suite 2
Latham, NY 12110
Phone: 518-370-5558
Toll Free: 1-800-724-6306
Fax: 518-370-5538
Email: inquiries@transtechsys.com
Web: www.transtechsys.com
Toll Free: TransTech.Systems.Inc01
Follow us on
Ver. 1.4
03/2019
40
 Loading...