

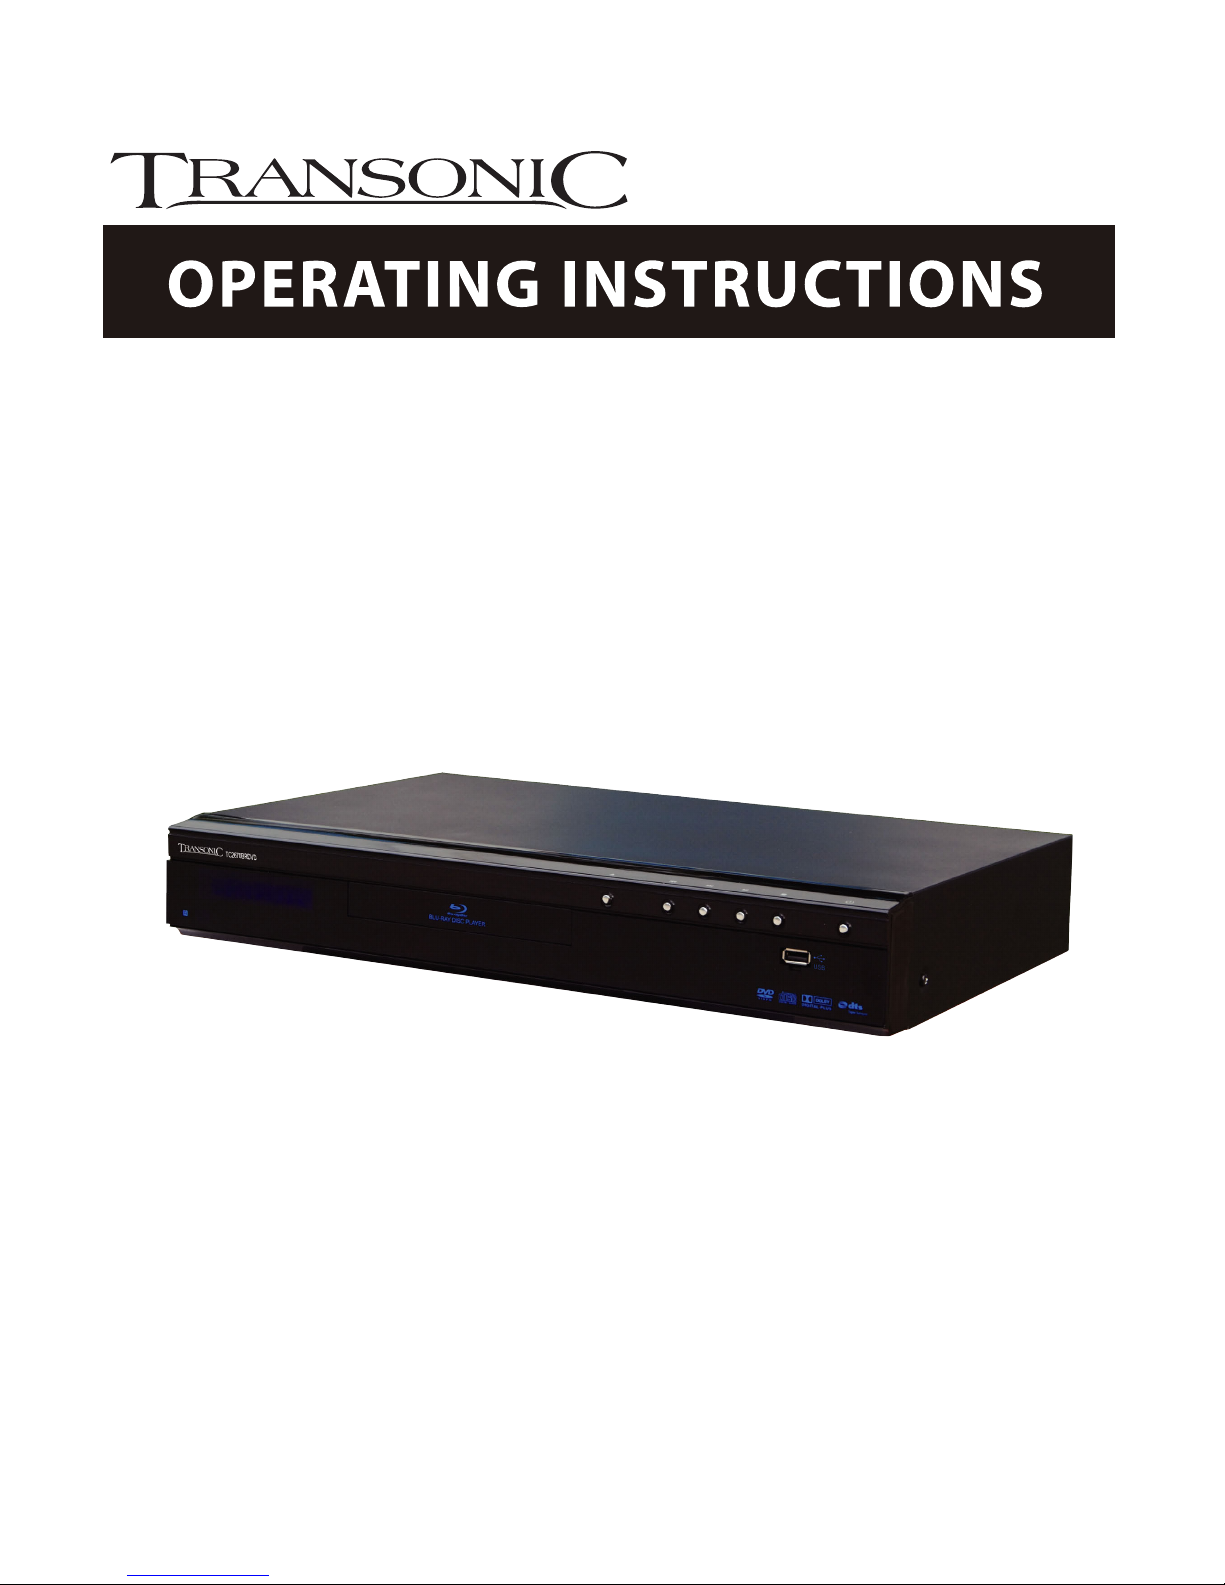
TC2670BRDVD
Blu-Ray Disc Player
Please read these instructions carefully and retain
for furture reference
Helpline
For assistance during normal working hours (9am-5pm, Mon-Fri, New Zealand local time) call
Oriental Pacific International Ltd.
NZ call: 0800 89 85 80
Email: service@orientalpacific.com
SYMBOLS
The graphic symbols used in this manual or on the back cover of the set
mean
the following:
Read this manual in full before use.
The
lightning flash symbol is intended to alert the user to the
enclosures
that contain hazardous voltages.
The exclamation symbol is intended to alert the user to the
presence
of important operating and maintenance (servicing)
instructions
in the literature accompanying the appliance.
IMPORTANT SAFEGUARDS
When using any electrical apparatus always observe safety regulations
and use basic safety precautions to reduce the risk of fire, electric
shock and personal injury, including the following
Read, Keep and Follow these instructions, heeding all Warnings.
CAUTION! This is a class 1 laser product.
beam
which could cause hazardous
radiati
on exposure if directed. Be sure to
operate
the equipment as directed. Do not
pl
ace eyes close to any openings when
connected
to the mains supply.
However
this player uses a visible laser

WARNING! Do not remove any cover.
WARNING! No objects filled with liquid, such as vases, shall be placed on this
equipment or in any position where liquid may fall into this equipment or any other
electrical apparatus.
WARNING! Do not insert any objects into any openings of this equipment or any
other electrical apparatus.
WARNING! Do not use this apparatus near water. To avoid the risk of fire or electric
shock, do not expose this apparatus to rain or moisture. The apparatus shall not be
exposed to dripping or splashes and is strictly for indoor use only.
WARNING! Do not immerse in any liquid whilst in use or cleaning. Clean only with a
damp cloth, dry with a dry towel. Do not use harsh abrasives as these may damage
the plastic parts.
WARN
ING! DO NOT block any ventilation openings. Keep away from curtains,
newspapers and restricted areas. Install in accordance with any specific
manufacturer’s instructions. Always allow a sufficient gap around the apparatus to
avoid overheating.
WARNING! Do not install near any heat sources such as radiators, gas heaters,
stoves or other apparatus (including amplifiers) that produce heat. Do not leave in
direct sunlight.
WARNING! Do not place any naked flame source, such as lighted candles on any
electrical apparatus.
WARNING! Connect to a suitable 230-240
V ~ 50 Hz power supply only. This
equipment must be connected to a mains socket with a protective earth connection
suitable for class 1 equipment.
WARNING! Keep out of reach of young children. This apparatus is not suitable for
use by young children or infirm persons without supervision. Young children must be
supervised to ensure that they do not play with the apparatus. Ensure young children
have enough knowledge to operate the equipment safely if they do have access to
this equipment.
WARNING! Do not abuse or damage a power cord. If any power cord is damaged, it
must be replaced by the manufacturer, its service agent or a similarly qualified
person in order to avoid a hazard. A replaceable cord must be replaced with an
authorised replacement from an authorised service agent only.

WARNING! Only use attachments/accessories specified by the manufacturer.
WARNING! Unplug completely from the power source this apparatus during
lightening storms or when unused for long periods of time.
WARNING! Attention is drawn to the environmental aspects of disposing of any
battery.
WARNING! Refer all servicing to qualified personnel. Servicing is required when the
apparatus has been damaged in any way, such as when the power supply cord or
plug is damaged, liquid has been spilled or objects have fallen into the apparatus, the
apparatus has been exposed to rain or moisture, does not operate normally, or has
been dropped.
WARNING! For household use only, this apparatus is not intended for commercial
use.
WARNING! If this apparatus is to be used by a third party, please supply these
instructions with it.
WARNING! No liability will be accepted for any personal injury or damage
caused by failure to follow these instructions.
This product incorporates copyright protection technology that is protected by
U S patent rights. Use of this copyright protection technology must be
authorised by the Macrovision, and is intended for home and other limited
viewing use only unless otherwise authorised by Macrovision. Reverse
engineering or disassembly is prohibited.
Manufactured under licence from Dolby Laboratories. Dolby and the double-D
symbol are trademarks of Dolby Laboratories.
Confidential Unpublished Works, 1992-1997 Dolby Laboratories. Inc. All rights
reserved.

...............................................................................................33
..................................................................................................................31
30
..
....30
................................................................30
................................................................30
..........................29
29
29
.....................................................................................28
..........................................................................27
..
................................................................26
...26
.......................
..............................................................................................................25
..............................................................................................................25
.........................................................................................................................24
4.7
4.6
4.
5
ETWORK
N
..
...............................................................................................................18
..............................................................................................................14
..........................................................................................................13
...............................................................................................................12
................12
....................................................................................11
TV .....................................................................................................................11
...............................................................................................................11
11
.............................................................................................
6.8 S
6.7 V
6.6 S
6.5 H
6.
4 MP3/W
6.3 MP3/W
6.2 F
6.1 I
6 MP3 /WINDOWS MEDIA AUDIO / JPEG IMAGE PLAYBACK .........................................................
4.4
YSTEM
..............3
5
....................................................................................................................
..............................................................................................................9
Remote control
T
ABLE OF CONTENTS
1 INTRODUCTION ...................................................................................................................
1.1 O
VERVIEW
......................................................................................................................................3
1.2 P
LAYABLE DISK TYPES
.....................................................................................................................
2 FUNCTIONAL
2.1 F
RONT PANEL
.................................................................................................................................5
2.2
.....................................................................................................................
2.3 R
EAR PANEL CONNECTORS
3 CONNECTING THE BD PLAYER.......................................................................................................
3.1 C
ONNECTING THE POWER
3.2 C
ONNECTING TO A
3.3 C
ONNECTING TO A HOME THEATRE SYSTEM
4 SETUP MENU .....................................................................................................................
4.1 S
ETUP MENU OPERATION
4.2 L
ANGUAGE MENU CATEGORY
4.3 D
ISPLAY MENU CATEGORY
P
ARENTAL CONTROL
S M
ENU CATEGORY
5 PLAYING A BD OR DVD DISK ........................................................................................................
5.1 S
TANDARD (ORNORMAL
) P
LAYBACK A BD OR
DVD
DISC
5.2 NON-S
TANDARD PLAYBACK OF A BD OR
DVD
DISC
5.3 O
THER BD AND
DVD P
LAYBACK FEATURES
NTRODUCTION
...............................................................................................................................
EATURES SUPPORTED FOR
MP3/W
INDOWS MEDIA AUDIO/JPEG IMAGE PLAYBACK
IND
OWS
M
EDIA AUDIOPLAYBACK REQUIREMENTS
IND
OWS
M
EDIA AUDIOPLAYBACK REQUIREMENTS
EL
P VIEW
...............................................................................................................................
IMPLE
MP3/WMA A
UDIO PLAYBACK
A
UDIOMENU CATEGORY
IEWING
JPEG I
MAGES
LIDE
S
HOW PLAYER INSTRUCTIONS
7 Appendix A Specifications...............................................................................................................38
A IMPORTANT SAFETY INSTRUCTIONS...............................................................................................
1
6
3
8 Warranty Card.....................................................................................................................................41

Read these operating instructions carefully before using the unit. Follow all the safety instructions listed
below.
Keep
these operating instructions handy for future reference.
1) Read these instructions.
2)
Keep these instructions.
3)
Heed all warnings.
4)
Follow all instructions.
5) Do not use this apparatus near water.
6) Clean only with dry cloth.
7)
Do not block any ventilation openings, Install in accordance with the manufacturer's instructions.
8) Do not install near any heat sources such as radiators, heat registers, or other apparatus (including
amplifiers) that produce heat.
9) Do not defeat the safety purpose of the polarized or grounding- type plug. A polarized plug has two
blades with one wider than the other. A grounding type plug has two blades and a third grounding
prong. The wide blade or the third prong are provided for your safety. If the provided plug does not
fi
t into your outlet, consult an electrician for replacement of the obsolete outlet.
10) Protect the power cord from being walked on or pinched particularly at plugs, convenience
receptacles, and the point where they exit from the apparatus.
11) Only use attachments/accessories specified by the manufacturer.
12) Use only with the cart, stand, tripod, bracket, or table specified by the manufacturer, or sold with the
apparatus. When a cart is used, use caution when moving the cart/apparatus combination to avoid
injur
y from tip-over.
13
) Unplug this apparatus during lightning storms or when unused for long periods of time.
14) Refer all servicing to qualified service personnel.
Servicing is required when the apparatus has been damaged in any way, such as power-supply cord or
plug
is damaged, liquid has been spilled or objects have fallen into the apparatus the apparatus has been
exposed to rain or moisture, does not operate normally, or has been dropped.
Pre
cautions Handling Cautions
Before connecting other components to this Blu-ray disc player, be sure to turn them all off.
Do not move the Blu-ray disc player while a disc is being played, or the disc may be scratched or
broken, the Blu-ray disc player internal parts may be damaged.
Do not put a flower vase filled with water or any small metal objects on the Blu-ray disc player.
Be careful not to put your hand into the disc tray.
Do not place anything other than the disc in the disc tray.
Exterior interference such as lightning and static electricity can affect normal operation of this Blu-
ray disc player. If this occurs, turn the Blu-ray disc player
off and on again with the POWER button, or disconnect and then reconnect the AC power cord to
the AC power outlet. The Blu-ray disc player will operate normally.
Be sure to remove the disc and turn off the Blu-ray disc player after use.
Disconnect the AC power cord from the AC outlet when you don’t intend to use the Blu-ray disc
pla
yer for long periods of time.
Clean the disc by wiping in a straight line from the inside to the outside of the disc.
Apparatus shall not be exposed to dripping or splashing and no objects filled with liquids, such as
vases, shall be placed on the apparatus.
The Main plug is used as a disconnect device and shall stay readily operable at any time.
1
This Blu-ray disc player is designed and manufactured to respond to the Region Management
Information.
If the Region number of a BD/DVD disc does not correspond to the Region number of this Blu-ray
disc player,
The Blu-ray disc player cannot play the disc.
A I
MPORTANT SAFETY INSTRUCTIONS

Restrictions on Playback
This player may not respond to all operating commands because some BD, DVD or CD discs allow
specific or limited operation and features during playback. Please note that this is not a defect in
the
player.
The manufacturer cannot assure that this player will play every disc bearing the BD, DVD and CD
lo
gos because disc formats may evolve, and problems and errors can occur during the creation of
BD, DVD and CD software and/or the manufacture of discs.
This player also operates differently than a standard DVD player or other AV equipment. Please contact
the customer support center if you have questions or encounter difficulty in playing BD, DVD or CD discs
in this player. Also, refer to the rest of this Manual for additional information on playback restriction
Disc Hand
ling Precautions
This Blu-ray disc player supports discs that are compatible with DVD-RAM Standard Version 2.0.
Avoid touching the surface of a disc
Be careful not to leave fingerprints or scratches on the surface of the Disc.
Clean with an optional DVD-RAM/PD disc cleaner (LF-K200DCA1 where available). Do not use
cleaners or cloths for CDs to clean BD or DVD-RAM/-RW/-R discs.
Wipe off dirt or contamination on the disc with a soft cloth.
If the player is not used for a long period of time, remove any discs from the player and store it in its
case.
Do not write on the printed side with a ball-point pen or pencil.
Do not use record cleaning sprays or antistatic. Also, do not use volatile chemicals, such as benzene
or
thinner.
Do not apply labels or stickers to discs. (Do not use discs fixed with exposed tape adhesive or
left
over peeled-off stickers.)
Do not use scratch-proof protectors or covers.
Do not use discs printed with label printers available on the market.
Do not load warped or cracked discs.
Disc Storage
Do not keep under direct sunlight.
Keep discs in a cool ventilated area.
Store vertically.
Keep in a clean protection jacket.
If you move your Blu-ray disc player suddenly from a cold place to a warm place, condensation may
generate on the operating parts and lens and cause abnormal disc playback. If this occurs, do not
connect the plug to the power outlet and wait for two hours. Then insert the disc and try to play back
again
2
high-definition and cinema-like pictures.
Soundtracks in more than one language are usua
Your BD player has the capability of providing
3
1 I
NTRODUCTION
1.1 O
VERVIEW
lly included on the disk, and subtitles in more
languages are often included as well.
1.2 P
LAYABLE DISK TYPES
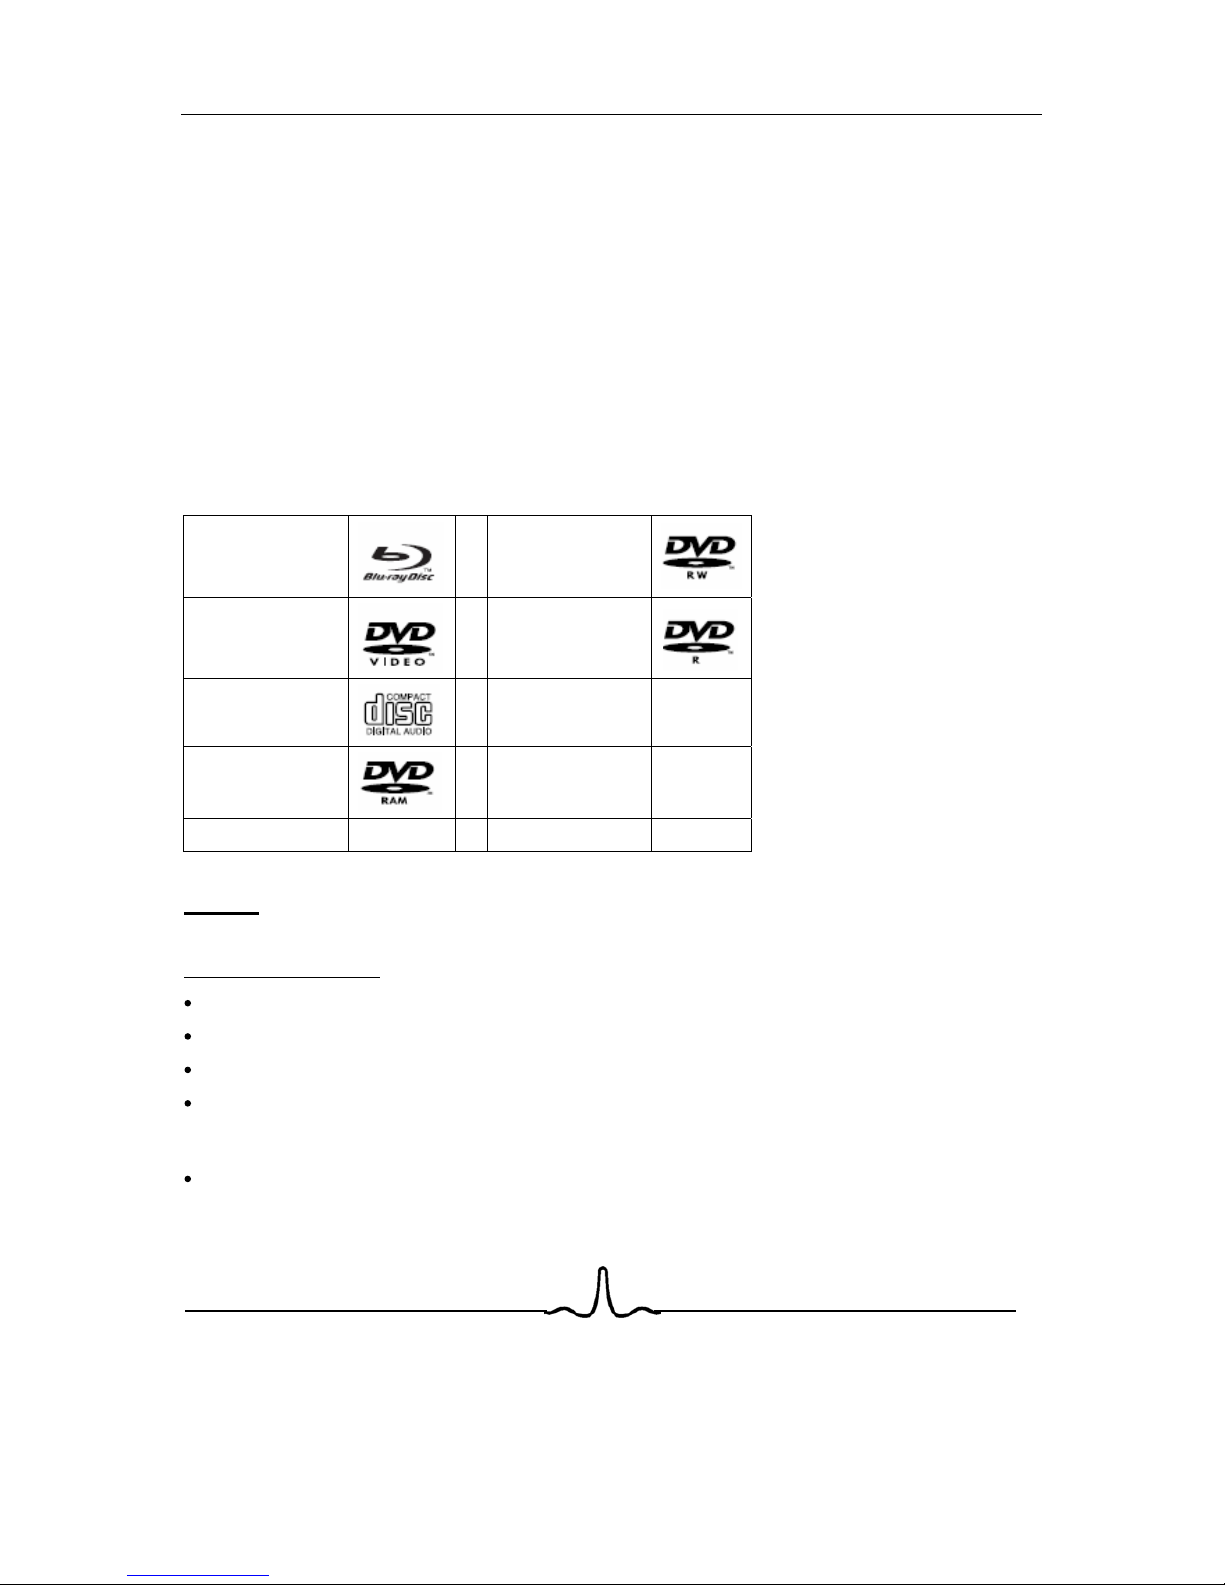
The following types of disks can play in the REF player:
Blu-Ray
TM
Disks
DVD-RW
DVD Video Disks
(DVD-ROM)
DVD-R
Audio CDs
(CDDA)
DTS-CD
DVD-RAM
Mp3/WMA/Jpeg
Data CD
VCD
SVCD
NOTES:
For writeable DVD disks
(DVD-RAM, DVD-RW, DVD-R)
DVD-RAM/-RW/-R recorded with UDF or ISO9660 format can be played back.
The disks must be finalized, VR-mode only
This Blu-ray disc player supports discs that are compatible with DVD-RAM Standard Version 2.0.
Playback may not work for some types of discs, or when specific operations, such as angle change
and aspect ratio adjustment, are being performed. Information about the discs is written in detail on
the box. Please refer to this if necessary.
Some DVD-VR disks will play. Not all features will be available
4
For writeable CD disks
CD-R/-RW media recorded with UDF or ISO9660 format can be played back.
MP3 files must be written to the disk with a .mp3 (or .MP3) file extension in order to be recognized
and played back properly
Windows Media Audio (WMA) files must be written to the disk with a .wma (or .WMA) file extension in
order to be recognized and played back properly
JPEG picture files must be written to the disk with an .jpeg or .jpg file extension in order to be
recognized and played back properly
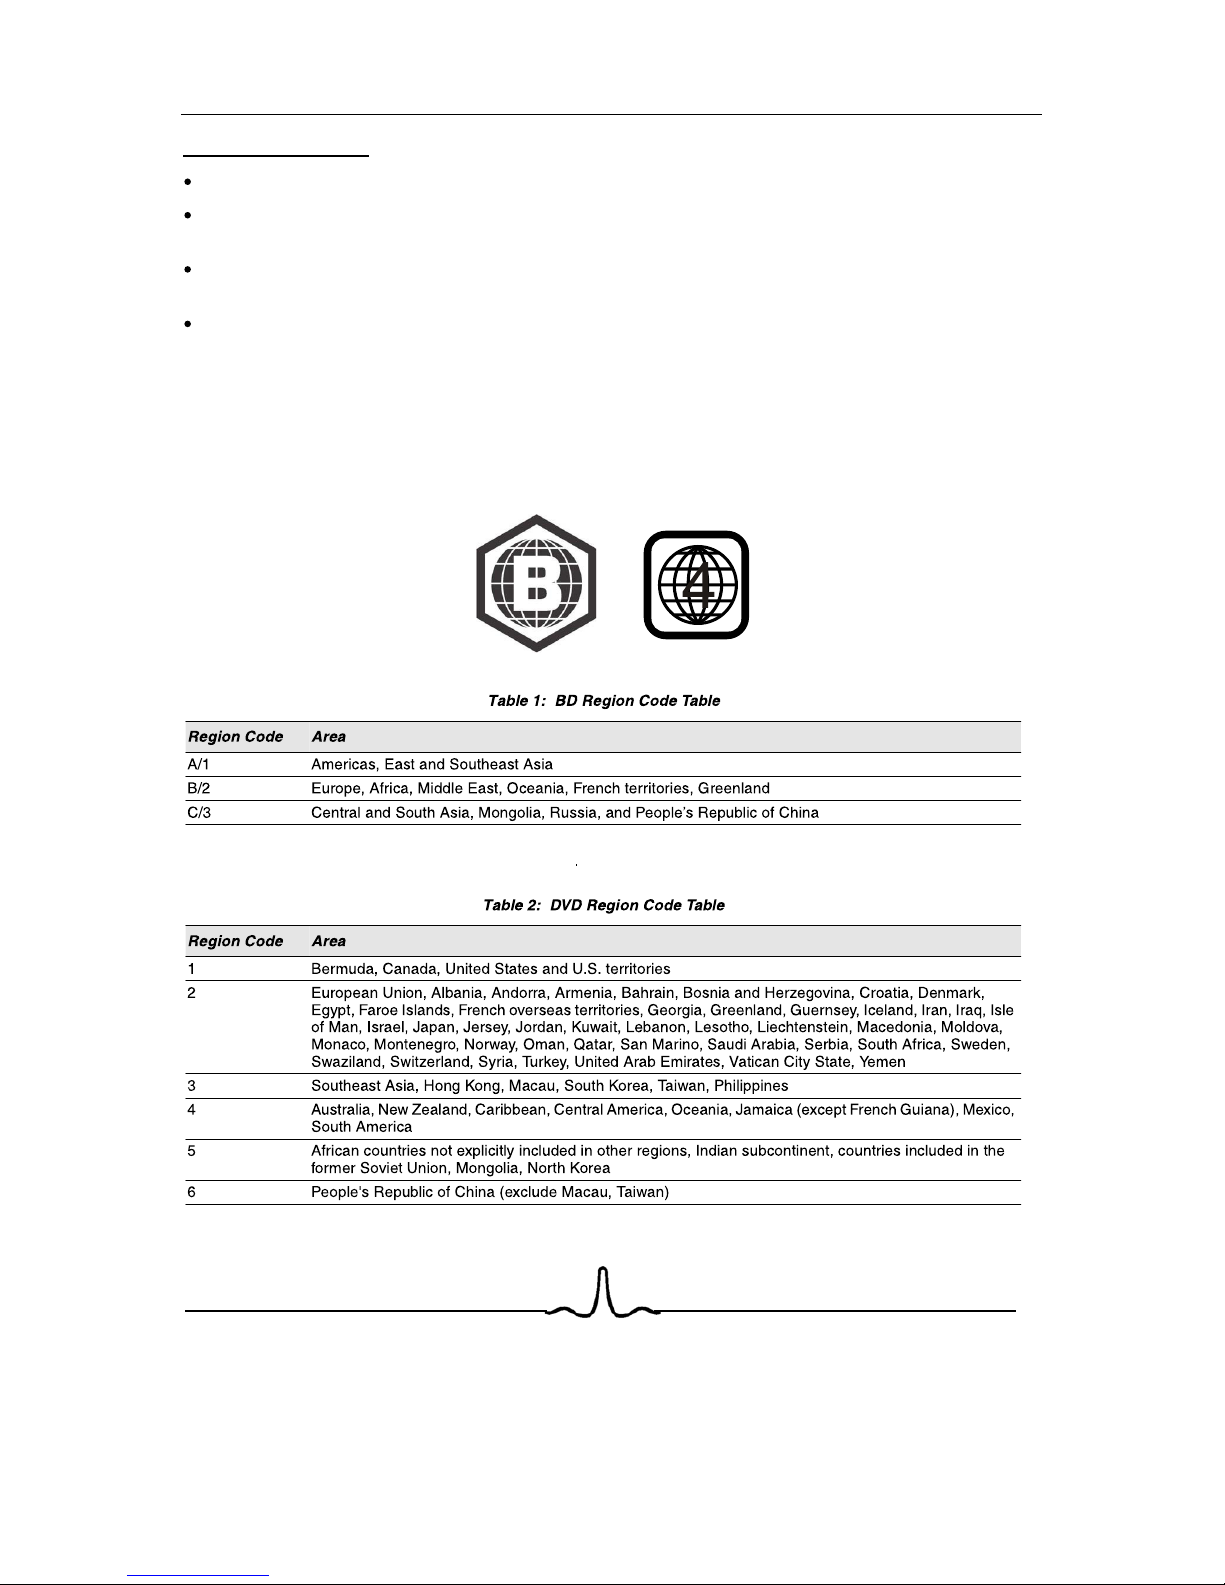
REGION CODE
If the Region number of a BD or DVD disc does not correspond to the region number of this Blu-ray disc
player, the Blu-ray disc player cannot play the disc. The region code is called out on the rear panel of the
BD player.
5
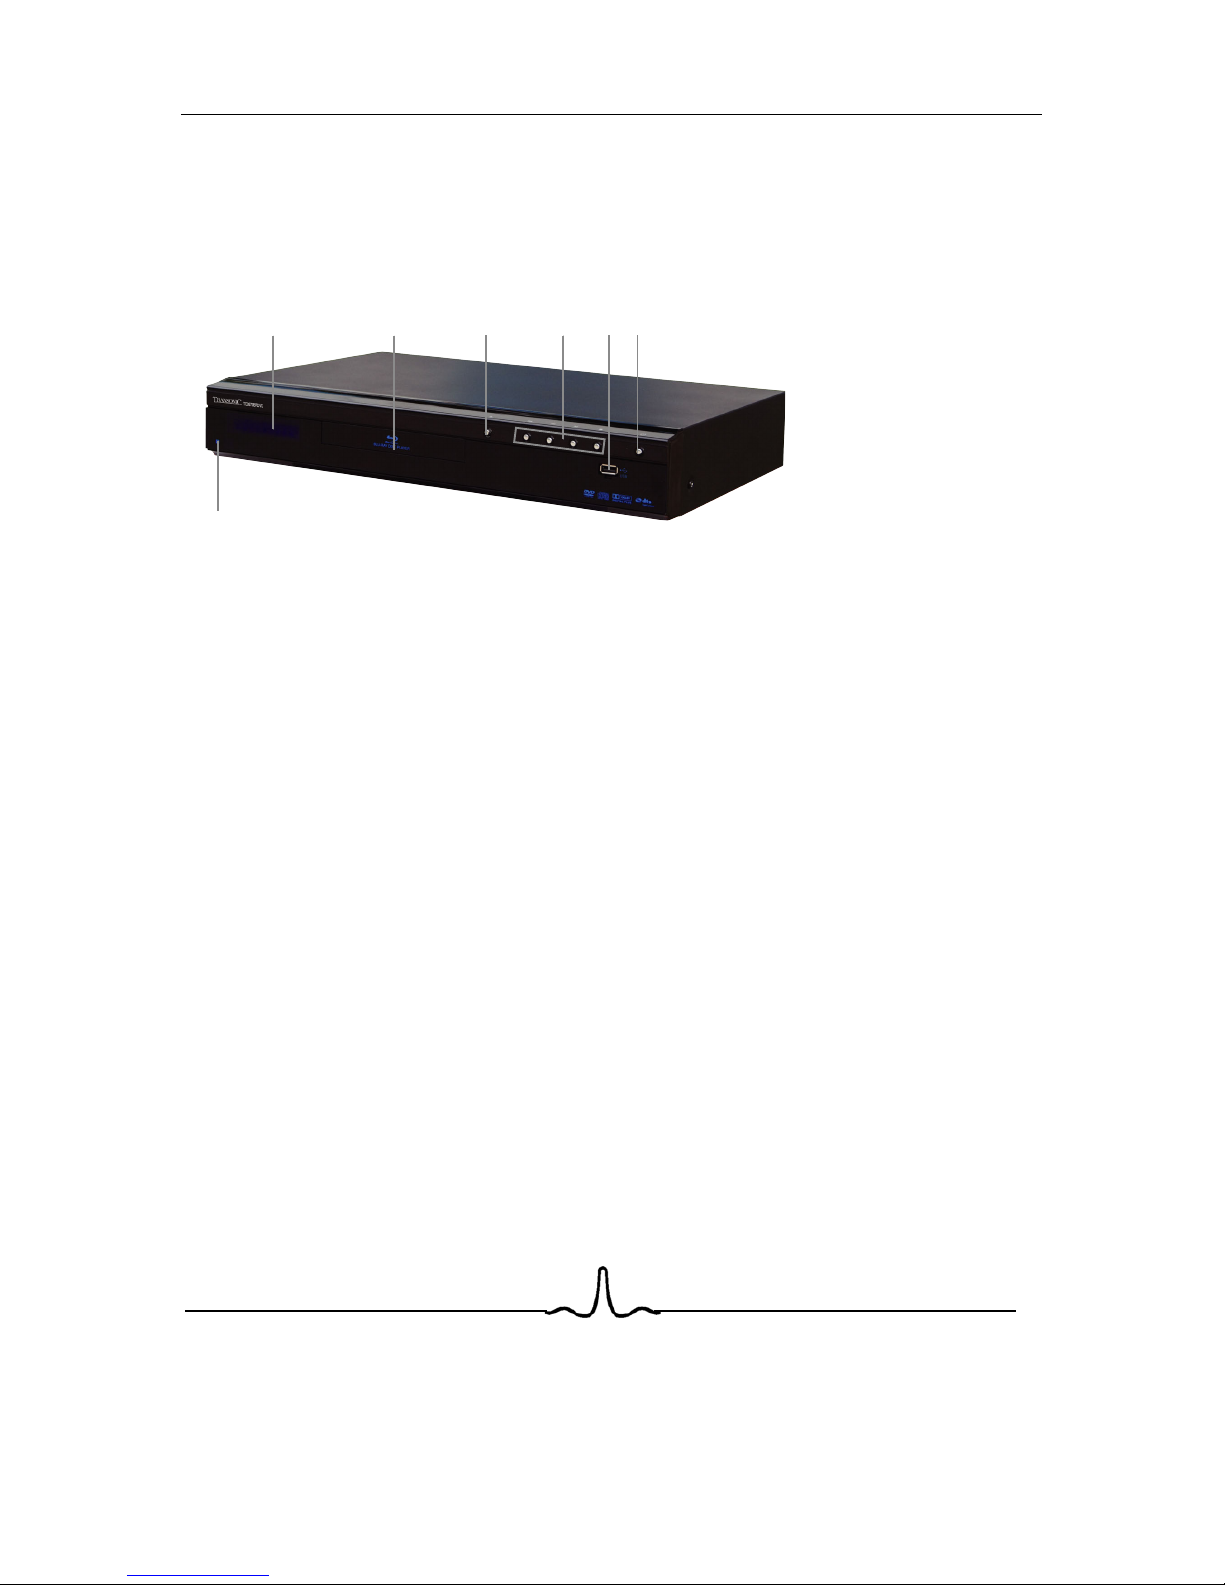
2 F
UNCTIONALOVERVIEW
2.1 F
RONTPANEL
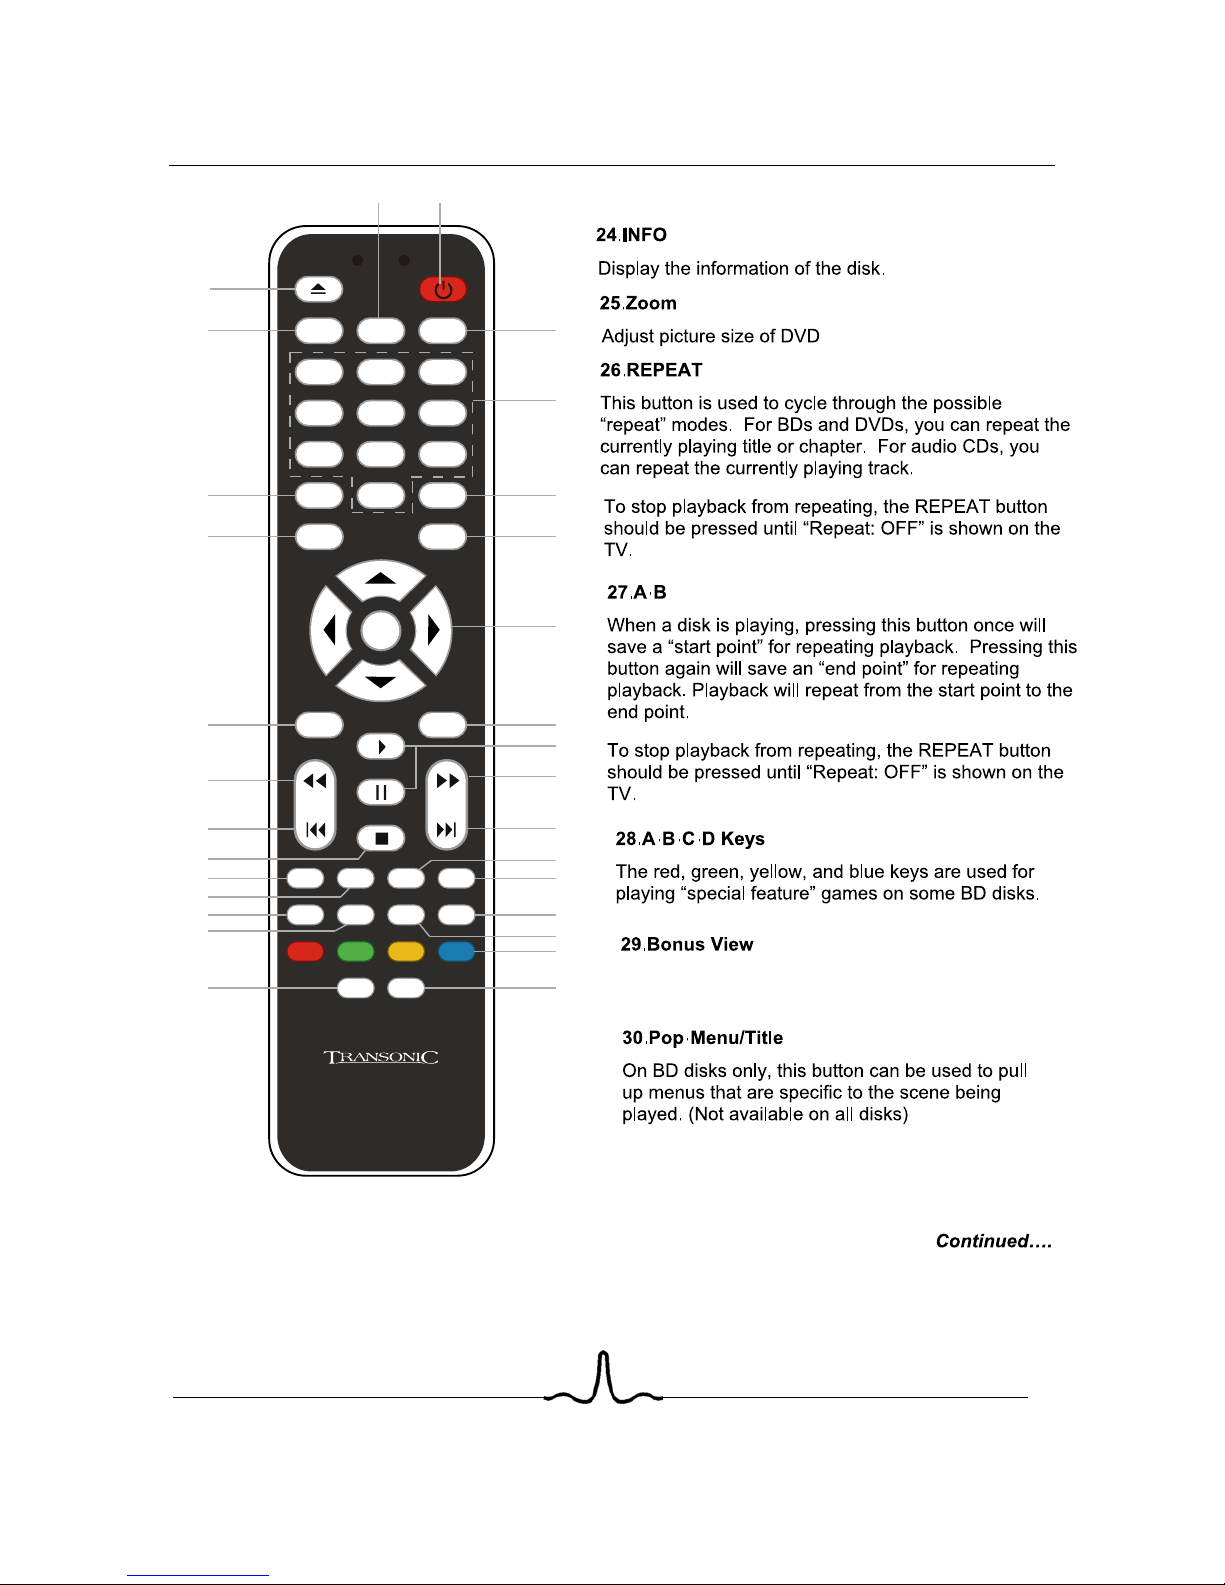
6. POWER BUTTON
5. USB PORT
3. OPEN/CLOSE BUTTON
2. DISC TRAY
1. FRONT PANEL DISPLAY
4. PREVIOUS/NEXT/PLAY/PAUSE/NEXT BUTTONS
Opens to accept a disc.
Opens and closes the disc tray.
Displays the playing status, time, etc. (See next section)
Allow for control of playback from the front Panel
6. POWER BUTTON
7. INDICATOR LIGHT
Press POWER BUTTON to turn on the player- “ON” mode.
And press POWER BUTTON again to turn the player to
the standby mode.
When the rear power switch is turned on, the player at the
Standby mode, the indicator light is Blue, if the player at
“ON” mode, the indicator light is off. and the display is on.
1
2 3 4
5
6
7
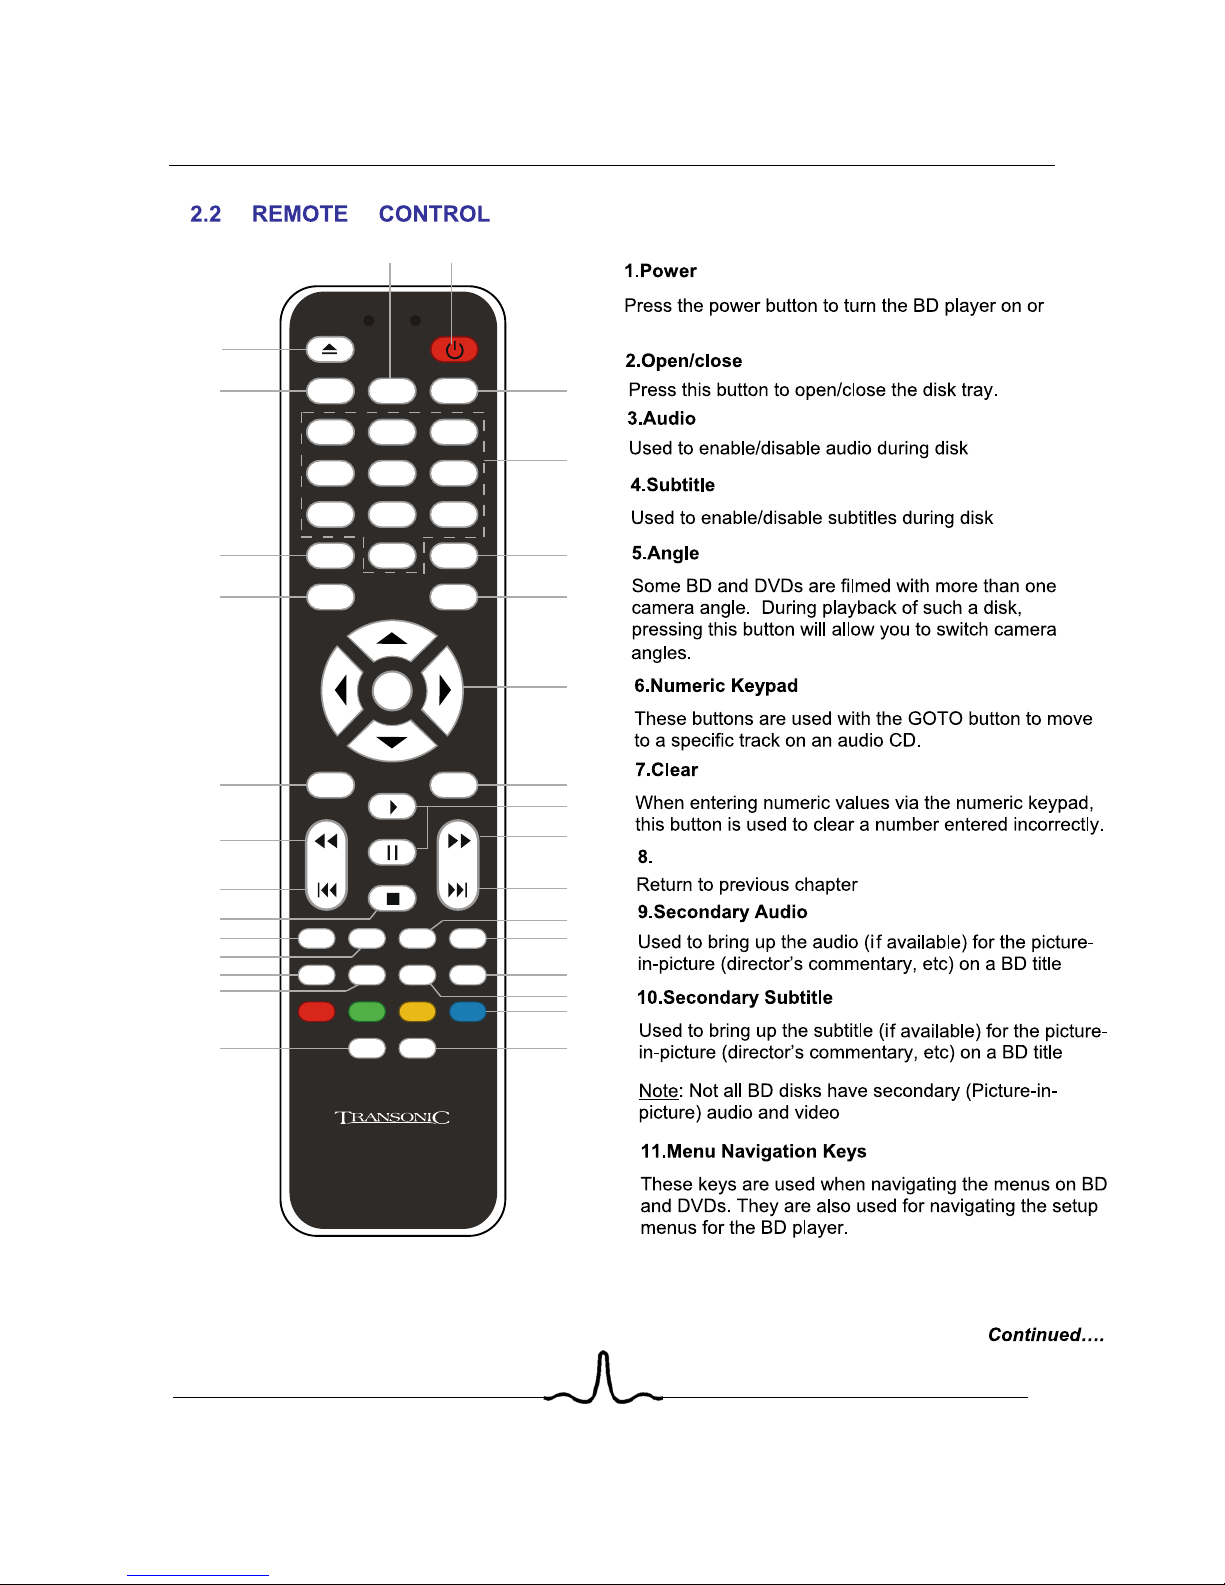
playback.
playback.
BACK
AUDIO
CLEAR
ENTER
GOTO
SLOW
RANDOM
FORMATMENU
INFOZOOM
A-BREPEAT
BONUS VIEW
SETUP
SECONDARY AUDIO SECONDARY SUBTITLE
1 2 3
4 5
6
7 8
9
0
ANGLE
SUBTITLE
BACK
POP-MENU
TITLE
TC2670BRDVD
14
2
3
7
9
12
15
16
19
20
21
26
27
29 30
28
25
24
23
22
18
17
14
13
11
10
8
6
5
6
standby.
play
1/2, 1/4, 1/8
AUDIO
CLEAR
ENTER
GOTO
SLOW
RANDOM
FORMATMENU
INFOZOOM
A-BREPEAT
BONUS VIEW
SETUP
SECONDARY AUDIO SECONDARY SUBTITLE
1 2 3
4 5
6
7 8
9
0
ANGLE
SUBTITLE
BACK
POP-MENU
TITLE
TC2670BRDVD
14
2
3
7
9
12
15
16
19
20
21
26
27
29 30
28
25
24
23
22
18
17
14
13
11
10
8
6
5
7
AUDIO
CLEAR
ENTER
GOTO
SLOW
RANDOM
FORMATMENU
INFOZOOM
A-BREPEAT
BONUS VIEW
SETUP
SECONDARY AUDIO SECONDARY SUBTITLE
1 2 3
4 5
6
7 8
9
0
ANGLE
SUBTITLE
BACK
POP-MENU
TITLE
TC2670BRDVD
14
2
3
7
9
12
15
16
19
20
21
26
27
29 30
28
25
24
23
22
18
17
14
13
11
10
8
6
5
8
Allows you to start PIP(Picture in Picture).
NOTE:Some discs don’t support PIP function.
2.3 R
EAR PANEL CONNECTORS
Since the rear panel contains multiple video and multiple audio outputs, a brief description of the
capabilities of each of the outputs is described below, in order to help you chose the appropriate outputs
to connect to your television and, if present, your surround-sound receiver.
2.3.1 Video Output Capabilities
Each of the video outputs are capable of different levels of functionality, as described in the table below.
Actual output will depend on setup menu settings and TV capabilities for HDMI televisions.
BD Player
Video Output
Resolutions Supported
(NTSC Models)
Resolutions Supported
(PAL Models)
HDMI
1080p 60/50/30/25/24
1080i 60
720p 60/30/24
420p 60/30/24
480i
1080p 60/50/30/25/24
1080i 50
720p 50/30/24
576p 60/30/24
576i 50
Component Video
1080i 60/48
720p 60/30/24
576p 60/30/24
480p 60/30/24
NTSC SD (480i)
1080i 60/48
720p 60/30/24
576p 60/30/24
480p 60/30/24
PAL SD (576i)
Composite Video NTSC SD (480i) PAL SD (576i)
2.3.2 Audio Output Capabilities
Each of the audio outputs are capable of different levels of functionality, as described in the table below.
Actual output will depend on
BD player setup menu settings,
what types of audio tracks are encoded on the disk, and,
surround sound receiver capabilities (for BD players connected to a surround-sound system
through HDMI or SPDIF)
BD Player
Audio Output
Audio tracks that can be sent
directly
to output
HDMI
Dolby TrueHD
DTS Master Audio
Dolby Digital Plus
DTS-HD High-Resolution Audio
Dolby Digital
DTS
PCM
(From mono up to 7.1 channels @96 Khz)
SPDIF or
Toslink
Dolby Digital
DTS
PCM
(stereo only, up to 96 Khz)
7.1 Analog
Outputs
Any selected digital track will be decoded, mixed with effects and
secondary channel, and converted to analog.
9

10
1. Component Video out
Rear Panel
2.3.3 Rear Panel Description
Connect these outputs to the component video inputs of the television, if the television does not have an
HD
MI input.
Some televisions can accept digital video and audio signals via an HDMI (see item 7 below) connection.
If your television has an HDMI digital input, you may use HDMI connection, and leave the component video
outputs of the player disconnected.
NOTE: The component video output has a maximum resolution of 1080i. It is further limited to SD
resolution if the HDMI output is also being used.
For BD-Live capabilities. (
You can insert DISC with BD-LIVE mark and above 1G memory USB. then let the
Connect to an 100-240V, 50/60Hz AC outlet with the Power Cable.
Turn on/off the power sup
p
ly.
8. Ethernet Connector (Note: This function is only for Blu ray Disc with BD-live mark.)
9. AC POWER IN
10. SWITCH
5. SPDIF Digital Audio Output
3. S-video Output
4. Stereo Audio Outputs
HD television.
np
uts, connect this output to the S-video input of the
2. Composite Video Output
If your TV does not have component or HDMI video inputs, connect this output to the composite video
input of the HD television.
If your TV does not have component or HDMI video i
These are analog, “old fashioned” stereo (left/right) outputs. If your TV does not have an HDMI input, you
can connect these outputs to the stereo audio inputs of a TV.
This is a digital audio output. If you have a surround-sound receiver with a Coaxial Digital Audio input,
c
onnect this
output to the Coaxial Digital Audio input of the surround sound receiver.
6. TOSLink (digital optical) audio output
This is another digital audio output. If you have a surround-sound receiver with a TOSLink input, connect
this output to the TOSlink input of the surround sound receiver
7. HDMI 1.3 Audio/Video Output
If you are using a surround-sound audio receiver with an HDMI input
, connect the HDMI output of
the BD player to the HDMI input of the audio receiver. (You will need to connect a second HDMI cable
from the HDMI output of the audio receiver to the HDMI input of the television)
1 2
3 6 7 8 9
4 5 10
BB
Or, you can using HDMI connect the BD player to the television directly.
unit play the disc in the tray. Using the Direct LAN cable (UTP cable), connect the LAN terminal on the rear
of the Blu-ray Disc Player to LAN terminal of your modem. connect to the internet to download BD film.
)

11
Connect the AC power to the BD player by the power cord.
3 C
ONNECTING THE
BD P
LAYER
3.1 C
ONNECTING THE POWER
deo->TV
S-vi
3.2 C
ONNECTING TO A
TV
HDMI->TV
NOTE
:
To play back a BD or DVD disk when connected to the TV via HDMi, the TV must support
the HDCP copyright protection system.
If your TV does not support HDCP, the TV picture will not be viewable over the HDMI
output.
Component->TV
Composite->TV
3.3 C
ONNECTING TO A HOME THEATRE SYSTEM
3.3.1 Highest-fidelity Audio and Video Setup:
Can only be achieved using HDMI. HDMI is the only REF output capable of 1080p video, and the only
output capable of the high definition audio codecs.
Connect the HDMI output of the player to the HDMI input of the audio receiver. (You will need to connect
a second HDMI cable from the HDMI output of the audio receiver to the HDMI input of the television)
BD Player
HDMI out
Surround Rcvr
HDMI in
HDMI out
HDTV
HDMI in
NOTE
:
To play back a BD or DVD disk when connected to a surround receiver and TV via HDMi,
both the surround receiver and the TV must support the HDCP copyright protection
system.
If your surround receiver and/or TV do not support HDCP, the TV picture will not be
viewable over the HDMI output.
SPDIF->Surround Rcvr
Stereo analog->Surround Rcvr
Stereo analog->TV

12
he SETUP menu by pressing the ENTER key on the
4 S
ETUP MENU
4.1 S
ETUP MENUOPERATION
4.1.1 Invoking the Setup Menu
After the BD player has been turned on, enter t
remote. The following screen will appear:
As shown in
the figure above, the Setup Menu screen is divided into
three
separate sections.
The
leftmost
section of the setup menu screen contains setup menu categories. One of the setup menu
categories is always highlighted (in yellow). In the screen above, the setup menu category that is
hi
ghlighted is
Language
.
The
middle
section of the setup menu screen contains menu options for each category. In the screen
above,
the setup menu options for the Language category are
Audio,Subtitle,Menu
, and
OSD
.
The
rightmost
section of the setup menu screen displays the currently saved choice for each menu
opti
on. In the screen above, the Language categories’ menu options are currently set to
Audio: Auto
,
Subtitle: None,Menu: Auto
, and
OSD: English
. (Each of these settings will be described later).
By p
ressing the up/down arrow keys ( ) on the remote, different setup menu categories can be
highl
ighted.
4.1.2 Changing Setup Menu Options
Once the desired Setup Menu category (Language, Display, Parental, etc) is highlighted, pressing the
righ
t arrow key (
) on the remote will cause one of the menu items in the center section of the screen to
be highlight
ed, and the rightmost portion of the screen will then show the options for each menu item, as
sh
own below:
Auto
Auto

13
By pressing the up/down arrow keys ( ) on the remote and moving the highlighting, the setting for each
option can be changed by pressing the Enter key (
) once the desired choice is highlighted. The
currently save d
setting will be indicated by an orange ball, as shown in the figure above.
In order to configure the BD player for proper audio and video output, press the up/down arrow keys ( )
on the remote until one the following setup menu categories is highlighted:
Language
Display
Audio
Parental
Language
Display
System Network
4.2 L
ANGUAGE MENU CATEGORY
From the main setup menu, press the up/down arrow keys ( ) on the remote until the
Language
menu
category is highlighted. Then, press the right arrow key (
) on the remote until the
center
portion of the
setup screen is highlighted.
4.2.1 Audio Language
To set the player’s audio language, press the up/down arrow keys ( ) on the remote until the
Audio
menu choice is highlighted in the center of the setup menu screen. Then, press the right arrow key ( )
on the remote until the rightmost portion of the setup screen is highlighted.
The up/down arrow keys ( ) on the remote can then be used to select English, French, Spanish, or
Chinese as the default language the characters in the movie will speak. Once the desired language has
been highlighted, press the Enter key (
) on the remote to select the language. The orange circle will
then move to that language.
Selecting ‘Auto’ will result in the default audio language being determined from information on the
BD/DVD disk.
NOTE
: Not all languages are available on all disks.
NOTE
: Some disks might not allow the user to select the audio language from the BD-player
setup menu. The audio language can only be selected from the BD or DVD disk ’s setup
menu. (The menu that appears after the disk has been inserted)
4.2.2 Subtitle Language
To set the player’s default subtitle language, press the up/down arrow keys ( ) on the remote until the
“Subtitle” menu choice is highlighted in the center of the setup menu screen. Then, press the right arrow
key (
) on the remote until the rightmost portion of the setup screen is highlighted.
Auto
Auto

14
NOTE
: Not all languages are available on all disks.
NOTE
: Some disks to not allow the user to select the audio language from the BD-player setup
menus. The audio language can only be selected from the BD or DVD disk ’s setup
menu. (The menu that appears after the disk has been inserted)
4.2.3 Menu Language
To set the language that will be displayed when the BD or DVD disk’s main menu appears , press the
up/dow
n arrow keys ( ) on the remote until the
Menu
choice in the center of the setup screen is
highlighted. Then, press the right arrow key (
) on the remote until the rightmost portion of the setup
screen is highlighted.
The up/down arrow keys ( ) on the remote can then be used to select English, French, Spanish, or
Chinese as the default language for menus that appear after a BD disk is inserted. Selecting ‘auto’ will
result in the default menu language being determined from information on the BD or DVD disk.
NOTE
: Not all languages are available on all disks. Most disks only have one menu language
available.
to English, French, Spanish.
4.2.4 Setup Menu (OSD) Language
To set the language that will be displayed for the BD player’s setup menus , press the up/down arrow keys
( ) on the remote until the
OSD
choice in the center of the setup screen is highlighted. Then, press the
righ
t arrow key (
) on the remote until the rightmost portion of the setup screen is highlighted.
The up/down arrow keys ( ) on the remote can then be used to
instantly
change the on-screen display
4.3 D
ISPLAY MENUCATEGORY
To set the video outputs correctly, press the up/down arrow keys ( ) on the remote until the
Display
menu category is highlighted on the
leftmost
portion of the setup menu screen.
A screen similar to the following will appear:
The up/down arrow keys ( ) on the remote can then be used to select English, French, Spanish, or
Chinese Japanese and Korean as the default language for disk subtitles. Selecting ‘None’ will result in
no s
ubtitle language being determined from information on the BD or DVD disk.
PAL
Wide

15
4.3.1 TV Type
You can tell the BD player whether to output US/Asia (NTSC) video or European (PAL) video using
this menu item.
To set the BD player’s output video format, press the up/down arrow keys ( ) on the remote until the
TV
Type
choice in the center of the setup screen is highlighted. Then, press the right arrow key ( ) on the
remote
until the rightmost portion of the setup screen is highlighted.
The u
p/down arrow keys ( ) on the remote can then be used to select NTSC or PAL as the video output
format.
NOTE
: Incorrectly setting this menu item may result in not being able to see video.
If you can already see the setup menu,
leave this menu item alone!
4.3.2 TV Aspect
You can use this menu item to tell the BD player whether you have a very rectangular shaped,
16
:9-aspect ratio television set, or a more traditional, almost square 4:3 aspect-ratio television set.
To inform the BD player of your TV’s aspect ratio, press the up/down arrow keys ( ) on the remote until
the
TV Aspect
choice in the center of the setup screen is highlighted. Then, press the right arrow key ( )
on
the remote until the rightmost portion of the setup screen is highlighted.
The
up/down arrow keys ( ) on the remote can then be used to select your TV’s aspect ratio.
If your TV has a very rectangular (16:9) aspect ratio
, you will need to choose one of the 16:9 aspect
ra
tios (wide or pillarboxed).
If your TV has an “old fashioned” (relatively square) (4:3) aspect ratio
, you will need to choose one
of the 4
:3 aspect ratios (letterboxed or pan/scan).
Your
preference should be based on whether the disk you will be watching contains a movie in
widesc
reen format, or has been cropped to fit a “standard” 4:3 screen, as well as your individual
pr
eference for viewing, as shown in the table below:
TV Aspect Menu Selection
If your TV is 16:9, choose: If your TV is 4:3, choose:
16:9 Wide 16:9 Pillarboxed 4:3 Letterboxed 4:3 Pan and Scan
Disk
Contents
Movie in
widescreen
format
Movie will fill
entire screen
No effect Movie will fill
entire screen
Movie will be shown in
re
ctangular “wide”
aspect ratio
(H
orizontal bars will
be shown
abov
e/below movie)
Center of movie
will be shown on
TV. Left and right
po
rtion of movie
contents will not be
shown
HD television
episodes in
widescreen
format
Episode will
fill entire
screen
No effect –
Epsiode will fill
entire screen
Episode will be shown
in rec
tangular “wide”
aspect ratio
(H
orizontal bars will
be shown
abov
e/below movie)
Center of episode
will be shown on
TV. Left and right
po
rtion of episode
contents will not be
shown

16
SD (4:3)
television
epi
sodes
be
stretched
horizontally
to
fit entire
screen
of screen;
vertical bars will
appear on sides
of screen
No
effect – Epsiode
will
fill entire screen
No effect –
Epsiode will fill
en
tire screen
Cropped
Movie (Movie
put on disk in
4:3 Aspect
Ra
tio)
Movie will be
stretched
horizontally
to
fit entire
screen
Movie will be
shown in center
of screen;
vertical bars will
appear on sides
of screen
No effect – Cropped
movie
will fill entire
screen
No effect –
cropped movie will
fill entire screen
The left/right menu keys can then be used to select the desired aspect ratio. Once the aspect ratio has
be
en selected, the player has been set. You can then move to another menu item.
NOTE
: Setting the player for one of the 16:9 settings when connected to a 4:3 TV could result in
the inability to see video on your TV.
Episode will
Episode will be
shown in center
4.3.3 Resolution
You can tell the BD player the maximum resolution of your TV using this menu item.
To set the player’s video output resolution, press the up/down arrow keys ( ) on the remote until the
Resolution
choice in the center of the setup screen is highlighted. Then, press the right arrow key ( ) on
the remote until the rightmost portion of the setup screen is highlighted.
The up/down arrow keys ( ) on the remote can then be used to select the video output resolution. The
table below describes the proper setting for your TV:
TV TYPE
Correct
Resolution
Setting
If your TV is HDMI equipped, and you are connected to your TV via HDMI, and you
wish the BD player to set the output resolution based on information exchanged
between the TV and the player over the HDMI cable.
HDMI auto
If your TV is a standard-definition NTSC TV (American, Asian SD TV)
480i/576i
If your TV is a standard-definition PAL TV (Euriopean SD TV)
If your TV is an enhanced-definition TV (EDTV)
480p
If your TV is a high-definition TV (HDTV) capable of 720p only
720p
If your TV is a high-definition TV (HDTV) capable of 1080i only
1080i
If your TV is HDMI equipped, and if your TV is a high-definition TV (HDTV) capable
of 1080p [any frame rate], and you are connected to your TV via HDMI
1080p
NOTE
:
Setting the player for an output resolution not supported by your TV will result in unpredictable results.
NOTE
:
Only the HDMI output is capable of producing 1080p (at any frame rate).
If you are connected to an HDMI TV and select a resolution the TV doesn’t support, you will not be
allowed to select the non-supported resolution.

17
NOTE
:
To play back a BD or DVD disk when connected to the TV via HDMI, the TV must support the HDCP
copyright protection system.
If your TV does not support HDCP, the TV picture will not be viewable over the HDMI output.
Component Output Limitations:
The component outputs are limited to 1080i max resolution
The component outputs are limited to less than 720p resolution when playing back most
commercial DVD disks. In other words, the component output’s scaler and deinterlacer are
restricted to less than optimal performance.
If the HDMI cable is connected to a 1080p TV, the component outputs are limited to 480i/576i on
many film-based BD disks
4.3.4 Color Space
To set the BD player’s HDMI colorspace, press the up/down arrow keys ( ) on the remote until the
Color Space
choice in the center of the setup screen is highlighted. Then, press the right arrow key ( )
on the remote until the rightmost portion of the setup screen is highlighted.
The up/down arrow keys ( ) on the remote can then be used to select the correct colorspace.
If your TV is not connected to the BD player or surround receiver via HDMI
,
this menu item does not
apply to the other video outputs (component, composite, etc). You can leave this menu item alone.
If your TV is connected to the BD player or surround receiver via HDMI,set this to xvYCC and
forget it.
4.3.5 Film Mode
This menu item only applies if you are connected to your TV via HDMI.
Movies are recorded on film at a rate of 24 pictures, or frames, per second. Many of the movies on BD
disks are placed on the disk at this frame rate. However, not all TVs can display 24 frames/second of
video.
If the BD player is connected to the TV via HDMI, and
the TV has the capability to display 24
frames/second of video, setting FILM MODE to ‘
ON’ indicates to the BD player that it may output disk
content recorded at 24 frames/second
directly
(without converting it to 30 or 60 frames/second)
If your TV is not connected to the BD player or surround receiver via HDMI
, this menu item does not
apply to the other video outputs (component, composite, etc).
Set film mode to OFF
.
If your TV is connected to the BD player or surround receiver via HDMI
, but it does
not
support 24
frames/second video (and/or 48 frames/second and/or 72 frames/second).
Set film mode to OFF
.
If your TV is connected to the BD player or surround receiver via HDMI, and the TV
does
support
24 frames/second video (and/or 48 frames/second and/or 72 frames/second)
.
Set film mode to ON.
To set film mode on or off, press the up/down arrow keys ( ) on the remote until the
Film Mode
choice
in the center of the setup screen is highlighted. Then, press the right arrow key (
) on the remote until
the rightmost portion of the setup screen is highlighted.
The up/down arrow keys ( ) on the remote can then be used to turn the BD player’s film mode ON or
OFF

18
NOTE
: Setting Film Mode to ‘ON’, if not supported by your TV, may result in some disks not
being playable on your TV.
NOTES
:
Setting Film Mode to ‘ON’ only affects the HDMI video output; it has no effect on the
component outputs.
Setting Film Mode to ‘ON’ has no effect if the output resolution has not been set to 1080p or
HDMI auto.
Setting Film Mode to ‘ON’ has no effect if the material on the BD disk is not 24 frames/second
Setting Film Mode to ‘ON’ has no effect if an “old fashioned”, or red-laser DVD is being played
back, regardless of the frame rate of the material on the DVD.
4.4 A
UDIO MENUCATEGORY
To set the digital and analog audio outputs correctly, press the up/down arrow keys ( ) on the remote
until the
Audio
menu category is highlighted on the
leftmost
portion of the setup menu screen.
A sc
reen similar to the following will appear:
Each of the menu choices above will be explained in the subsequent sections.
4.4.1 Digital Audio -- Overview
In order to properly set the BD player for the correct audio output settings, a high-level understanding of
the types of audio present on a Blu-Ray or DVD disk is helpful.
First, BD disks typically contain several audio tracks. These include
the
primary
audio tracks (the movie’s soundtrack),
an (optional) secondary audio tracks (director’s commentary, for example), and
a sound effects track (a unique sound may be associated with individual menu button pushes
when playing a “special features” game, for example).
In
addition, several different methods are used for representing the audio tracks on a disk. These
methods of storing audio data are called
codecs
, and include:
Bitstream HD

19
Dolby Digital
and
DTS
(Digital Theater Systems)
Digital Surround
These formats use “accurate but not identical” compression to encode
multichannel (5.1) audio onto a DVD or Blu-Ray disk.
Dolby Digital Plus
This format offers up to 7.1-channel surround sound, and is only available
on some DVD and Blu-Ray disks. It uses less compression than its Dolby
Digital or DTS counterparts, for a better reproduction of the original movie
soundtrack.
Dolby TrueHD
and
DTS-
HD
Both of these formats offer up to 7.1-channel surround sound, and are only
available on (some) Blu-Ray disks.
These formats use “accurate and identical” (sometimes referred to as
"lossless") compression to deliver soundtracks that are identical to the
movie studio's original audio master, for the closest possible reproduction
of the movie theater experience.
These lossless audio codecs can only
be sent out the HDMI output. A compatible HDMI surround receiver is
required in order to play these tracks.
PCM
This storage method is similar to what is found on a music CD. DVDs often
have a stereo PCM audio track. Some BD discs also feature multichannel
(5.1, 6.1, or 7.1) PCM soundtracks.
Multichannel PCM soundtracks are uncompressed audio that can
sometimes exactly match the quality of the studio master.
The
multichannel lossless PCM formats are only available on the HDMI
output. A compatible HDMI surround receiver is required in order to
play these tracks.
(Stereo PCM can be output over the SPDIF or TOSlink coax/optical audio
outputs)
A summary of these audio formats is shown in the table below:
Disk
Type
Possible Digital Audio Tracks on the disk
BD Player
Audio Output
Blu-Ray
Dolby TrueHD
DTS-HD
Dolby Digital Plus
HDMI
Blu-Ray and DVD
Dolby Digital
DTS
PCM
(BD - up to 7.1 channels @192 Khz)
PCM
(DVD - stereo only , up to 96 Khz)
SPDIF or
Toslink
All
Any selected digital track will be decoded, mixed with effects
and secondary channel, and converted to analog.
7.1 Analog
Outputs
(For a detailed description of the audio output capabilities of the BD player, see Appendix C)
Regardless of the type of codec used to store the movie’s audio track onto the disk, audio data is always
stored on a disk in a digital format. The BD player therefore has digital audio outputs, so that the digital
audio soundtracks on the disk can be sent straight to a surround-sound receiver, without any loss in
audio quality.
Not all surround-sound receivers are capable of playing back all of the digital audio codecs listed above.
In addition, some surround sound receivers can play pack PCM data, but the data must be sent to the
receiver at a slower rate that what is stored on the Blu-Ray disk.

20
Because of this, an understanding of your surround-sound receiver’s capabilities is required in
order to properly set up the digital audio outputs of the BD player.
Now that the various types of digital audio codecs have been explained, the next few menu items will be
de
scribed in further detail
dete
rmine the optimal digital output setting for your A/V setup:
4.4.2 Digital Output
You can tell the BD player what type of digital audio data to output over HDMI, SPDIF, or TOSlink
with this menu item.
To set the type of audio output data that appears on the digital audio outputs (HDMI, SPDIF, or TOSlink),
from th
e display menu, press the up/down arrow keys ( ) on the remote until the
Digital Output
choice
in the
center of the setup screen is highlighted. Then, press the right arrow key (
) on the remote until
the
rightmost portion of the setup screen is highlighted.
The u
p/down arrow keys ( ) on the remote can then be used to select one of the following digital audio
output for
mats.
-
Bitstream HD,
-
Bitstream Legacy,
-
Bitstream Mixed,
-
PCM 5.1,
-
PCM 7.1
-
PCM Stereo
Setting these outputs correctly depends on whether you have a surround-sound receiver connected to
the BD
player, and the capabilities of the surround sound receiver. Answer the questions below to
1.
Do you have a stereo audio receiver or surround-sound receiver connected to your BD
player?
If yes, go to question 2
.
If not,
you should set the output to
PCM stereo
. This is true regardless of whether the audio is
connected to the TV with HDMI or connected to the TV using the analog stereo outputs.
2.
Do you have a multichannel (5.1/7.1 channel) audio receiver connected to the BD player?
If
yes, go to question 3
.
If not,
this means that you have an “old-fashioned” stereo receiver connected to the BD player via the
analog audio outputs. The digital output setting has no effect on the audio going to the analog outputs
of the pl
ayer, so
set the digital audio outputs to PCM stereo
.
3.
Is your multichannel (5.1/7.1 channel) audio receiver connected to the BD player via one of the
digital audio outputs (HDMI, SPDIF, or TosLink)?
If yes, go to question 4
.
If not,
this means that your surround receiver is connected to the BD player via the analog audio
ou
tputs. The digital output setting has no effect on the audio going to the analog outputs of the player,
set the digital audio outputs to PCM stereo
.
4.
Is your multichannel (5.1/7.1 channel) audio receiver connected to more than two speakers?
If yes, go to question 5
.
If no,
set the digital output to PCM Stereo (or buy more speakers).
5.
Is your multichannel (5.1/7.1 channel) audio receiver connected to the BD player via HDMI?
If
yes, go to question 6
.
If no,
set the digital output based on the table below

21
Receiver Capabilities
Can decode DTS
Can decode Dolby
Digital
Can decode Dolby
Digital Plus
I want the highestfidelity movie
soundtrack audio
possible
Set to ‘Bistream
Legacy’ for disks with
DTS soundtracks.
Set to ‘Bistream
Legacy’for disks with
Dolby digital
soundtracks.
Set to PCM 5.1 or PCM
7.1 for disks without
Dolby sound tracks
(depending on the
number of speakers
connected to your
surround receiver)
Set to ‘Bistream Legacy’for
disks with DD+
soundtracks.
Set to PCM 5.1 or PCM
7.1 for disks without Do lby
Digital plus sound tracks
(depending on the number
of speakers connected to
your surround receiver)
I want to hear the
directors commentary
on the BD disk
--OR—
I want to set this menu
item once and then
forget it
Set the output to
‘Bistream Mixed’
Set to ‘Bistream mixed’ if your receiver also supports
DTS.
Otherwise, set the outp ut to PCM 5.1 or PCM 7.1
(depending on the number of speakers connected to
your surround receiver) i nstead.
NOTE
: To achieve the best audio quality, you must also use the set up menu on the disk to set
the highest quality audio track supported by the receiver.
NOTE
: Setting the digital output to ‘Bitstream HD’ means that only the primary digital audio
track (the movie soundtrack) will be sent to the sound receiver via the digital outputs.
Director’s commentary will not be heard when the digital output is set to ‘Bitstream HD’.
NOTE
: If you have a 5.1/7.1 audio system and the receiver does not support bass management
(setting the cutoff frequency of the subwoofer and the ‘size’ of the other speakers), you
may want to consider using multichannel analog outputs from the BD player in order to
benefit from the bass management capabilities of the BD player.
6.
If you have read this far, your multichannel (5.1/7.1 channel) audio receiver is connected to the
BD player via HDMI
Set the digital output based on the table below
Receiver Capabilities
Can decode DTS-
HD
Can decode
Dolby TrueHD
Can’t decode
DTS-HD or Dolby
TrueHD
I want the highestfidelity movie
soundtrack audio
possible
Set to Passthru for
disks with DTS-HD
soundtracks.
Set to DTS reencode otherwise
Set to Passthru for
disks with Dolby
TrueHD
soundtracks.
Set to DTS reencode otherwise
Go back to the
table in question 5
to decide.
I want to hear the
directors
commentary on
the BD disk
--OR—
I want to set this
menu item once
and then forget it
Set the output to DTS re-encode

22
NOTE
: To achieve the best audio quality, you must also use the set up menu on the disk to set
the highest quality audio track supported by the receiver.
NOTE
: Setting the digital output to ‘Bitstream HD’ means that only the primary digital audio
track (the movie soundtrack) will be sent to the sound receiver via the digital outputs.
Director’s commentary will not be heard when the digital output is set to ‘Bitstream HD’.
NOTE
: If you have a 5.1/7.1 audio system and the receiver does not support bass management
(setting the cutoff frequency of the subwoofer and the ‘size’ of the other speakers), you
may want to consider using multichannel analog outputs from the BD player in order to
benefit from the bass management capabilities of the BD player.
4.4.3 PCM Downsampling
You can use this menu item to tell the BD player whether your surround receiver can handle highbitrate PCM signals over the SPDIF/TOSlink interface.
To inform the BD player of your surround sound receiver’s PCM capabilities, press the up/down arrow
keys ( ) on the remote until the
PCM Downsampling
choice in the center of the setup screen is
highlighted. Then, press the right arrow key (
) on the remote until the rightmost portion of the setup
screen is highlighted.
The up/down arrow keys ( ) on the remote can then be used to select the maximum PCM sample rate
output by the BD player.
If you don’t have a surround sound receiver connected to the BD player
, you should
set the PCM
downsampling to 48 Khz
, and proceed to the next setup menu item. This is true regardless of whether
the audio is connected to the TV with HDMI, SPDIF, or the analog stereo outputs
If you have a surround sound receiver connected to the BD player, and you have connected to the
surround receiver via the BD player’s analog
multichannel audio outputs,
this setting has no effect
on the audio going to the analog outputs of the player.
Set the PCM downsampling to 48 Khz
, and
proceed to the next setup menu item.
If you have a surround sound receiver connected to the BD player, and you have connected to the
surround receiver via the BD player’s HDMI
output,
this setting has no effect on the audio going to the
HDMI output of the player.
Set the PCM downsampling to 48 Khz
, and proceed to the next setup menu
item.
If you have a surround sound receiver connected to the BD player via SPDIF (or TOSlink)
, set this
menu item to the maximum PCM sampling rate that your surround receiver can accept (48 Khz or 96
Khz).
If in doubt, consult your surround receiver’s manual or set to 48 KHz.
NOTE
: Incorrectly setting the digital audio output’s PCM sampling rate may result in
unpredictable audio playback.
4.4.4 Dynamic Range Control
Dynamic Range Control means that you can allow the BD player to make the loud parts of a
movie’s audio track quieter than they would be in the theatre, without making the dialog of the
actors any quieter.
This would be useful, for instance, when you want to watch a movie in the evening when others might be
sleeping.

23
NOTE
: This setup menu item
has no effect
unless:
Your audio device (TV or audio receiver) is connected to the BD player’s analog audio
outputs; OR
you have selected “Bitstream Mixed” or “PCM” in the BD player’s audio setup menu
To tell the BD player whether you want the loud noises in the movie to be quieter, press the up/down
arrow keys ( ) on the remote until the
Dynamic Range Control
menu choice in the center of the setup
screen is highlighted. Then, press the right arrow key (
) on the remote until the rightmost portion of the
se
tup screen is highlighted.
The up/down arrow keys ( ) on the remote can then be used to turn dynamic range compression (loud
noise q
uieting) on or off.
Selecting the “ON” option turns on the Dynamic range control for all BD
movie soundtracks
except
Dolby
TruH
D. If you have selected a TruHD track on the BD disk, the “ON” selection tells the BD player to only
turn on dynamic range control if information embedded in the TruHD sound track tells it to do so.

4.5.4 Parental Password
4.5.3 Parental Level
4.5.2 Parental Control
4.5.1 Parental Country
24
4.5 P
ARENTAL CONTROL
To set the player’s parental control settings, from the main setup menu, press the up/down arrow keys on
the remote until the “Parental Control” menu choice is highlighted.
Attempting to change any of these items initially will result in the following screen appearing:
The first time
this screen appears, you should enter the default parental password, which is
0000
. (This
ca
n be changed later). Be advised that as you type these numbers, a “*” will appear on the screen.
Onc
e you are done entering the parental control password, you will be automatically returned to the
parental
menu.
Yo
u can then configure the BD player for various levels of parental control, as described in the next
sections. (Note: In case forgot the password, please input Master Password #3308 to reset)
Use this menu item to tell the BD player what country you are in. Currently this menu item has no effect.
Use this menu item to turn parental control ON or OFF. When turned on, playback of certain disks
(controlle
d by the Parental Level menu item) will be restricted.
Use this menu item to restrict playback of disks encoded with a rating level equal to or higher than the
level you set. Parental Control must be turned on for this menu item to be effective.
To change the parental control password, press the up/down arrow keys ( ) on the remote until the
Parental Password
menu option in the center of the setup screen is highlighted. Then, press the right
arrow key (
) on the remote until the rightmost portion of the setup screen is highlighted.
Use the up/down arrow keys ( ) on the remote until the
User Defined
menu option on the right-hand
side of the screen is highlighted, and then press the Enter key ( ) on the remote. You will then be
prompted with a screen as shown below:
Canada
OFF
1.[Kid Safe]

4.7 N
4.6.2 Clear BD Storage
4.6.1 Reset Settings
4.6 S
4.5.5 Exiting the Pa
25
Others tell you the infromation of software version,loader type etc.
egory. Alternatively, you can press the SETUP key
Enter any 4-digit number for the parental password. Once this number has been entered, it must be reentered any time someone enters the parental setup category and then attempts to make changes.
rental Setup Menu
When you are done setting up the BD player’s parental controls, you may use the left arrow key ( ) on
the remote until only the left side of the setup menu is highlighted, and then you can use the up/down
arrow keys on the remote to choose another menu cat
on the remote to leave the setup menu.
YSTEM MENUCATEGORY
From the main setup menu, press the up/down arrow keys on the remote until the “System
”
menu choice is
highlighted, and the following screen will appear:
Highlighting this Reset menu selection, and then pressing ‘Enter’, will clear the portion of the BD player’s
internal memory that is used to store information from the Setup menu. The BD player will revert to the
“factory default” settings.
Highlighting this setup menu selection, and then pressing ‘Enter’, will clear the portion of the BD player’s
internal memory that is used to store “bookmarks” (which allow disks to resume play after the player has
been paused). It also clears any content (New movie trailers, etc) that has been downloaded from the
internet.
etwork
It display the information of network, if the network cable connected.
set
88
524
TLANLE
TI7620-01
1.11

26
5 P
LAYING A
BD
OR
DVD D
ISK
5.1 S
TANDARD (ORNORMAL
) P
LAYBACK A BD OR
DVD
DISC
1
Press the STANDBY/ON button on the front panel of the BD player
--------------- OR---------------
Press
the power button
on the remote
2
Turn on the TV, and using the TV remote control, select the input on the TV that is connected to
the
BD player (HDMI, component, etc)
3
Press OPEN/CLOSE on the front panel of the BD player to open the tray.
--
------------- OR---------------
Pres
s
the OPEN/CLOSE button
on the BD player remote to open the tray.
The
front panel will display
4
Insert the disk. Press OPEN/CLOSE on the front panel to close the tray
--------------- OR---------------
Insert
the disk. Press the OPEN/CLOSE button
on the BD player remote to close the tray.
The
front panel will display . The BD player will then determine the type of disk
inse
rted. If the BD player recognizes the type of disk, it will then display on the
front panel.
5
a
After a brief period of time, Chapter 1 of Title 1 on the disk will begin playback. You may begin
watch
ing the disk at this point.
The
Note: if no picture on your Television screen, please make sure your television support Resolution
1080P.
Otherwise: reset the lower resolution of the BD player, refer to section 4.3.3 Resolution.
front panel will display the elapsed time of playback, chapter number, etc
5
b
On many BD disks, chapter 1 of title 1 is an advertisement, or preview of upcoming releases. If
you
wi
sh, you may press the “Disk Menu” button on the remote to bring up the main disk menu.
Fro
m there, you can often use the arrow keys on the remote to select the “Play Movie” menu
item.
6
To pause playback, press the PAUSE button on the remote control
To r
esume playback after pausing,
press the PLAY
butto
n.

27
7
To stop playback, press the STOP button on the remote control
8
To remove the disk, press OPEN/CLOSE on the front panel of the BD player to open the tray.
--------------- OR---------------
To remove the disk, press the OPEN/CLOSE button
on the BD player remote to open the
tray.
The front panel will display
9
Remove the disk. Press OPEN/CLOSE on the front panel to close the tray
--------------- OR---------------
Remove the disk. Press the OPEN/CLOSE button
on the BD player remote to close the
tray.
The front panel will display . The BD player will then display .to indicate
that the tray is empty
10
Press the STANDBY/ON button on the front panel of the BD player to turn it off
--------------- OR---------------
Press the power button
on the BD player’s remote to turn it off.
5.2 NON-S
TANDARD PLAYBACK OF A BD OR
DVD
DISC
5.2.1 Fast Forward
When the disk is playing normally, press the forward scan button on the remote to begin fast
forward at 2x normal playback speed. Each time the forward scan button is pressed, the playback speed
will double. (The actual progression will be 2x fast forward, 4x fast forward, 8x fast forward, 16x fast
forward, then back to play).
To resume normal playback, press the play button
on the remote.
5.2.2 Fast Reverse
When the disk is playing normally, press the reverse scan button on the remote to begin fast
reverse at 2x normal playback speed. Each time the reverse scan button is pressed, the reverse
playback speed will double. (The actual progression will be 2x fast reverse, 4x fast reverse, 8x fast
reverse, 16x fast reverse, then back to play).
To resume normal playback, press the play button
on the remote.

To view the director’s commentary, after the movie has started playing, press the
28
5.2.3 “Slow Forward” Playback
5.2.4 Stepping Through a Scene
When the disk is playing normally, press the pause button on the remote to pause playback. When
the player is paused, pressing the pause button
again will cause the player to normal playback one
frame..
To resume normal playback, press the play button
on the remote.
5.3 O
THER BD AND
DVD P
LAYBACK FEATURES
5.3.1 Skipping to the Next Chapter
When the disk is playing normally, press the skip forward button once to jump to the next chapter on
the disk. The next chapter will start playing automatically.
5.3.2 Skipping to the Start of the Current Chapter
When the disk is playing normally, press the skip backwards button once to jump to the beginning of
the currentl
y playing chapter. The current chapter will start playing back (from the beginning)
automatically.
5.3.3 Skipping to a Previous Chapter
When the disk is playing normally, press the skip backwards button once to jump to the beginning of
the currently playing chapter,
and then press the skip backwards button again
to skip to the beginning
of the previous chapter. The previous chapter will start playing back (from the beginning) automatically.
5.3.4 Jumping Directly to a Spot on the Disk
When the disk is playing normally, press the GOTO button once to jump to a specific title or chapter on
the disk.
To
jump to a specific title, after the word TITLE: appears on the screen, enter the number of the title you
wish to jump to, and press
To jump to a specific chapter, after the word TITLE: appears on the screen, press the GOTO button
ag
ain, and the word CHAPTER appears. Enter the number of the chapter you wish to jump to, and press
.
5.3.5 Viewing Director’s Commentary During Playback of Blu-Ray Disks
Blu-Ray disks sometimes (but not always) contain director’s commentaries or other “secondary video”
content that can be turned on and off at will. The director’s commentary will typically appear in a
separate picture within the movie. (This is referred to as “picture-in-a-picture”, or “PIP”.
remote. If available on the disk, the director’s commentary will appear in small window on one part of the
screen.
BONUS VIEW
button on the
During playback, press the

29
5.3.6 Repeating a Title or Chapter
NOTE
: Only Blu-Ray disks have director’s commentaries that can be viewed via the ‘PIP’ feature. (DVDs
do not have this feature)
NOTE
: Not all Blu-Ray disks have director’s commentaries.
NOTE
: Blu-Ray disks that have director’s commentaries may not have this feature on all titles and all
chapters.
When the disk is playing normally, press the REPEAT button on the remote. The words REPEAT OFF
will appear on the TV screen. To repeat a chapter, continue pressing the REPEAT button on the remote
until the words REPEAT CHAPTER appear on the screen. The chapter will now continuously loop.
To repeat a Title, continue pressing the REPEAT button on the remote until the words REPEAT TITLE
appear on the screen. The title will now continuously loop.
To stop the title or chapter from looping, press the REPEAT button on the remote and the words REPEAT
OFF appear on the TV screen.
6.2 F
6.1 I
6 MP3 /W
INDOWS MEDIA AUDIO
/JPEGI
MAGE
P
LAYBACK
NTRODUCTION
This section explains how to use the
MWJ (M
p3/Windows Media/Jpeg) Audio and Image Player on the
BD Player
EATURES SUPPORTED FOR
MP3/W
INDOWS MEDIA AUDIO/JPEG IMAGE
P
LAYBACK
The following features are supported by the MWJ player:
Audio Player:
Music Play (MP3 and WMA files
only
)
Music Pause, Resume, Stop, Fast Forward, Rewind, Repeat
Skip Next Song, Skip Previous Song
Playlist:
o
Create Playlist
o
Add files to Playlist
o
Add folders to Playlist
o
Shuffle Playlist
JPEG Photo Viewer/Image Player:
Image Display
Thumbnail Display
Zoom-In, Zoom-Out, Pan Image, Rotate Image
Image Slideshow
Image Slideshow with background music

30
6.3 MP3/W
INDOWS MEDIA AUDIO PLAYBACK REQUIREMENTS
For the audio player, you will need to insert a “data CD” on a computer with pre-encoded MP3 or
Windows Media audio (WMA) files. MP3 files must
have a file extension of “
.mp3
”. Windows Media
au
dio files must
have a file extension of “
.wma
”.
6.6.1 Audio Play
6.6 S
6.5
H
6.4
MP3/W
INDOWS MEDIA AUDIO PLAYBACK REQUIREMENTS
For the JPEG image viewer, you will need to insert a “data CD” on a computer with pre-encoded JPEG
picture files. These files must
have a file extension of “
.jpg
”.
ELP VIEW
Press ‘INFO’ when a data CD is in the tray to get the instruction/help messages for handling the MWJ
application.
IMPLE
MP3/WMA A
UDIO PLAYBACK
Inserting a data CD with a data disk containing MP3, WMA, and/or JPEG files will automatically invoke
the MWJ subsystem.
Navigate through the disk using the ‘RIGHT’, ‘LEFT’, ‘UP’ and ‘DOWN’ navigation keys on the remote to
the desired audio file.
Option 1
Press ‘ENTER’ on a desired Audio File (MP3 or WMA). Playback of the audio file will begin, and the ID3
information will be displayed on the screen.
Option 2
Press the ‘MENU’ key to invoke the pop-up menu for the desired audio file. Select the ‘Play’ option in the
menu as shown in the figure below. Playback of the audio file will begin; and the ID3 information will be
displayed on the screen.
Note
: Press the ‘LEFT’ navigation key to exit the current level of the pop-up menu. Pressing ‘LEFT’ on
the f
irst level pop-up will exit from the pop-up view completely.
Play
Play List
Set As BGM

31
6.6.8 Skip Next Song
6.6.7 Audio Fast Rewind
6.6.6 Audio Fast Forward
6.6.5 Audio Resume from Stop
6.6.4 Audio Stop
6.6.3 Audio Play from Pause
6.6.2 Audio Pause
At the end of the current song, playback of the next song will begin until the end of the playlist is reached.
Pressing ‘LEFT’ only the first level pop-up will exit from the pop-up view completely.
Pressing ‘Pause’ on an audio file during the playback of the song will pause the audio playback.
Pressing ‘Play’ on an audio file during the playback of the song will cause the audio song to play if the
song was previously paused.
Pressing ‘Stop’ on an audio file during the playback of the song will stop the audio playback.
Pressing ‘Play’ on an audio file during playback of the song will cause the audio file to play from the
beginning of the song.
Pressing ‘Fast Forward’ on an audio file during the playback of the song will cause the audio to be muted,
and the audio counter will increment rapidly in the forward direction. If the end of file is encountered
during fast forward, playback of the next song will start.
Press ‘Fast Rewind’ on an audio file during the playback of the song will cause the audio to be muted,
and the audio counter will increment rapidly in the
reverse
direction. If the beginning of the file is
encountered during rewind mode, playback of the same song will begin.
Pressing ‘Skip Next’ on an audio file during the playback of the song will cause the playback of the
current song to stop, and next song in the disk folder will begin.
If the ‘Skip Next’ is pressed on the last file of the disk folder, playback from the first file in the folder will
start.
6.7.1 Image Play
6.7 V
6.6.9 Skip Previous Song
IEWING
Pressing ‘Skip Prev’ on an audio file during the playback of the song will cause playback of the current
song to stop, and the previous song in the disk folder will play instead.
If the ‘Skip Prev’ is pressed on the first file of the disk folder; playback from the last file in the folder will
start.
JPEG I
MAGES
Navigate through the disk contents using the ‘RIGHT’, ‘LEFT’, ‘UP’ and ‘DOWN’ navigation keys to the
desired image file.
Option1
Press ‘ENTER’ on the desired JPEG image file. The image file and the image number will be displayed.
Option 2
Press the ‘MENU’ key to invoke the pop-up menu for the image file. Select the ‘Play’ option in the menu
as shown in below figure. The image file and the image number will be displayed.

32
6.7.2 Viewing the Image Properties
Note
: Press the ‘LEFT’ navigation key to exit the current level of the pop-up menu. Pressing ‘LEFT’ on
the first level pop-up will exit from the pop-up view completely.
Navigate through the disk contents using the ‘RIGHT’, ‘LEFT’, ‘UP’ and ‘DOWN’ navigation keys to the
desired image file.
Option 1
Press the ‘MENU’ key to invoke the pop-up menu for the image file. Select the ‘Properties’ option in the
menu as shown in below figure. This will display the properties of the selected image file, such as camera
model, resolution, etc (if this information is present in the JPEG file).
Play
Start Slide Show
Properties
Note
: Press the ‘LEFT’ navigation key to exit the current level of the pop-up menu. Pressing ‘LEFT’ on
the first level pop-up will exit from the pop -up view completely.
Option2
The image properties can also be viewed while displaying the image.
Properties
Start Slide Show
Rotate
Press the ‘MENU’ key to invoke the pop-up menu for the image file in image display mode. Select the
‘Properties’ option in the menu as shown in below figure. This will display the properties of the selected
image file like camera model, resolution etc if information is present.
Note
: Press the ‘LEFT’ navigation key to exit the current level of the pop-up menu. Pressing ‘LEFT’ on
the first level pop-up will exit from the pop-up view completely.
Properties
Start Slide Show
Rotate
6.7.3 Rotating, Panning, and Scaling the Image
Rotating the Image
The image files can be rotated only while viewing the image.
Rotating the Image Clockwise
Press the ‘MENU’ key to invoke the pop-up menu. Select the ‘Rotate’ option in the menu as shown in the
figure below, and press the ‘RIGHT’ navigation key. This will invoke a sub pop-up. Select the ‘Right’
option from the sub pop-up and press ‘
ENTER’. This will rotate the image in the clockwise direction by 90
degrees.
Follow the steps above to rotate the image by 180, 270, or 360 degrees.

33
Note
: Press the ‘LEFT’ navigation key to exit the current level of the pop-up menu. Pressing ‘LEFT’ on
the first level pop-up will exit from the pop-up view completely.
Properties
Start Slide Show
Rotate
Right
Left
6.7.4 Skipping an Image
Rotating the Image Counterclockwise
Press the ‘MENU’ key to invoke the pop-up menu. Select the ‘Rotate’ option in the menu as shown in the
figure below, and press the ‘RIGHT’ navigation key. This will invoke a sub pop-up. Select the ‘Left’ option
from the sub pop-up and press ‘
ENRER’. This will rotate the image in the anti clock wise direction by 90
degrees.
Follow the step above to subsequently rotate the image by 180, 270 and 360 degrees.
Properties
Start Slide Show
Rotate
Right
Left
Note
: Press the ‘LEFT’ navigation key to exit the current level of the pop-up menu. Pressing ‘LEFT’ on
the first level pop-up will exit from the pop-up view completely.
Zooming the Image
The image files can be zoomed in/out only while viewing the image. The image can zoomed up to 5
levels.
Pressing the ‘ZOOM IN’ key while viewing the image to magnifies the image. The step can be repeated
until the image is zoomed up to 5 levels.
Presssing the ‘ZOOM OUT’ key only has an effect when the image has already been “zoomed in”. The
step can be repeated until the image is zoomed out to the original size
PAN Image
The image file can be panned in the left, right, top and bottom direction only when the image has been
“zoomed in”.
Panning can be done using the ‘RIGHT’, ‘LEFT’, ‘TOP’ and ‘BOTTOM’ navigation keys.
Pressing ‘Skip Next’ while viewing an image will cause the next image in the disk folder to be displayed.
Pressing ‘Skip Prev’ while viewing an image will cause the previous image in the disk folder to be
displayed.
6.8.1 Starting, Stopping, and Controlling the Slide Show
6.8 S
Starting the Slide Show – Option 1
Navigate through the disk contents using the ‘RIGHT’, ‘LEFT’, ‘UP’ and ‘DOWN’ navigation keys to the
desired image file.
LIDE SHOW PLAYER INSTRUCTIONS

34
Press the ‘MENU’ key to invoke the pop-up menu for the image file. Select the ‘Start Slide Show’ option in
the menu as shown in the figure below, and press the ‘RIGHT’ navigation key. This will invoke a sub popup. Select any one of the 6 effects options displayed (Blend, Film, Shutter, Fade, Curtain and None) from
the sub pop-up and press ‘ENTER’. This will start the slide show from the selected image file with the effect
selected above.
After displaying all the image files in the disk, the slide show will start again from the first image file.
Note
: Press the ‘LEFT’ navigation key to exit the current level of the pop-up menu. Pressing ‘LEFT’ on
the first level pop-up will exit from the pop-up view completely.
Play
Start Slide Show
Properties
Blend
Film
Shutter
Fade
Curtain
None

35
Starting the Slide Show - Option 3
The slide show can also be started while viewing an image.
Press the ‘MENU’ key to invoke the pop-up menu. Select the ‘Start Slide Show’ option in the menu as
shown in the figure below, and press the ‘RIGHT’ navigation key. This will invoke a sub pop-up. Select
the any one of the 6 effects options displayed (Blend, Film, Shutter, Fade, Curtain and None) from the
sub pop-up and press ‘
ENRER’. This will start the slide show from the next image file with the effect
selected above.
After displaying all the image files on the disk the slide show will start again from the first image file.
Note
: Press the ‘LEFT’ navigation key to exit the current level of the pop-up menu. Pressing ‘LEFT’ on
the first level pop-up will exit from the pop-up view completely.
Slide Show Pause
Press ‘Pause’ when slide show is in motion, this will cause the slide show to pause.
Properties
Start Slide Show
Rotate
Blend
Film
Shutter
Fade
Curtain
None
6.8.2 Changing the Slide Show Transition Effect
Slide Show Play from Pause
Pressing ‘Play’ when the slide show is paused will cause the slideshow to begin playing from the location
it was paused.
Skipping Images
Pressing ‘Skip Next’ during the slide show will cause the slide show to skip the image currently being
viewed.
Pressing ‘Skip Prev’ during slide show will cause the slide show to jump to the previous file.
Press the ‘MENU’ key to invoke the pop-up menu while viewing the slide show. Select the ‘Slide Show
Effect’ option in the menu as shown in the figure below, and press the ‘RIGHT’ navigation key. This will
invoke a sub pop-up. Select the any one of the 6 effects options displayed (Blend, Film, Shutter, Fade,
Curtain and None) from the sub pop-up and press ‘
ENTER’. This will change the slide show effect from
the current to the selected effect.
Slide Show Effect
Slide Show BGM
Slide Show Duration
Blend
Film
Shutter
Fade
Curtain
None

36
6.8.3 Setting the Duration between Images
Note
: Press the ‘LEFT’ navigation key to exit the current level of the pop-up menu. Pressing ‘LEFT’ on
the first le
vel pop-up will exit from the pop-up view completely.
The first time the image duration is set, the slide show must be running.
Press the ‘MENU’ key to invoke the pop-up menu. Select the ‘Slide Show Duration’ option in the menu as
shown in the figure below, and press the ‘RIGHT’ navigation key. This will invoke a sub pop-up. Select
any one of the displayed durations (3 seconds, 5 seconds, 10 seconds, and 30 seconds, 1 minute, 5
minutes, 30 minutes) and press ‘ENTER
’ to start the slide show with that particular duration.
Once the duration has been set, the slide show will always start with the selected duration until changed
using the steps above.
6.8.4 Setting a Background Song for the Slide Show
Note
: Press the ‘LEFT’ navigation key to exit the current level of the pop-up menu. .Pressing ‘LEFT’ on
the first level pop-up will exit from the pop-up view completely.
Navigate through the disk contents using the ‘RIGHT’, ‘LEFT’, ‘UP’ and ‘DOWN’ navigation keys to the
desired audio file.
Slide Show Effect
Slide Show BGM
Slide Show Duration 3s
5s
10s
30s
1min
30min
5min
Press the ‘MENU’ key to invoke the pop-up menu for the desired audio file. Select the ‘Set as BGM’
option in the menu as shown in the figure below, and then press the ‘RIGHT’ navigation key. This will
invoke a sub pop-up. Select any one of the 5 places and press ‘ENRER
’. This will set the selected audio
file to be played back during slide show.
If an audio file already occupies the location, the new selection will replace the old selection. Only 5
songs can be selected to be set as background songs.
Play
Play List
Set As BGM NONE
NONE
NONE
NONE
NONE

37
6.8.5 Starting the Slide Show with a Background Song
The first time the slide show is started with background music, the slide show must already be in motion.
Press the ‘MENU’ key to invoke the pop-up menu. Select the ‘Slide Show BGM’ option in the menu as
shown in the figure below, and press the ‘RIGHT’ navigation key. This will invoke a sub pop-up. Select
any one of the displayed songs and press ‘ENTER’ t
o start the slide show with that particular song. Up to
5 songs can be selected.
Once the background song has been selected and set, the slide show will always start with the selected
song.
Once the end of song is encountered, the same song will be played in repeat mode until the slide show is
stopped.
Note
: Press the ‘LEFT’ navigation key to exit the current level of the pop-up menu. Pressing ‘LEFT’ on
the first le
vel pop-up will exit from the pop-up view completely.
Slide Show Effect
Slide Show BGM
Slide Show Duration
Song1. Mp3/wma
Song1. Mp3/wma
NONE
Turning Off the Background Song During the Slide Show
The slide show background song can only be switched off while the slide show is already in motion.
Press the ‘MENU’ key to invoke the pop-up menu. Select the ‘Slide Show BGM’ option in the menu as
sh
own in the figure below, and press the ‘RIGHT’ navigation key. This will invoke a sub pop-up. Select
the ‘N
ONE’ option and press ‘ENTER’ to start the slide show with no background song.
Note
: Press the ‘LEFT’ navigation key to exit the current level of the pop-up menu. Pressing ‘LEFT’ on
the f
irst level pop-up will exit from the pop-up view completely.
Slide Show Effect
Slide Show BGM
Slide Show Duration
Song1. Mp3/wma
Song1. Mp3/wma
NONE
Note
: Press the ‘LEFT’ navigation key to exit the current level of the pop-up menu. Pressing ‘LEFT’ on
the first level pop-up will exit from the pop-up view completely.

Picture-in-picture(BD profile 2.0
BD-J/HDMV (BD profile 2.0)
7 Appendix A Player Specifications
Signal & GUI Format
Output Format NTSC/PAL up to 480i / 576i
up to 1080p
GUI/ Menu Language
Resolution
Panel & A'ssory
F/ Panel Tool No
Display
F/ Panel FL Dimmer
F/P Color
Memory slot
USB
R/Panel Video Out Composite
Component
HDMI
Audio Out Audio L/R
CoaNoial
Optical
HDMI
Ethernet
Power Wide SMPS
Convenience
Instant tray open
Quick booting
Quick loading
Firmware update via
CD
Application
Disc & AV Format
Playable BD-ROM
Disc Type DVD(NTSC)
DVD(PAL)
DVD-R
DVD-RW(Video/VR Mode)
DVD+R
DVD+RW(Video
mode)
38

DVD-RAM
Video CD/Super
VCD
Audio CD
CD-R/CD-RW
Video Format MPEG2
MPEG4 AVC
(H.264)
SMPTE VC1 (VC-9)
DivNo
Audio Format LPCM
(Bitstream) Dolby Digital
Dolby Digital Plus
Dolby TrueHD
DTS
DTS-HD MA (Passthru only)
MPEG 1/2 L2
MP3
WMA
Audio Format LPCM
(Decoding) Dolby Digital
Dolby Digital Plus
Dolby TrueHD
DTS
DTS-HD MA
MPEG 1/2 L2
MP3
WMA
Graphics/Subtitle Format
Video Video DAC
Features NTSC/PAL
VBI WSS/CGMS-A/Closed
Caption/Macrovsion
NTSC
PAL
Conversion
NovYCC
Last Scene memory
Audio Audio DAC
Feature S/N Ratio
DD 2ch Down MiNo
Digital Audio Output
Re-Encoder DTS Only
39

LPCM Conversion
(Dolby TrueHD)
Down Sampling 48kHz 16bit
Dynamic Range
Contr
ol
OFF/ON
BD Playback Specification
Interactive Content
MHP-Like
Interact
ivity
Simultaneous
Playback
of HD & SD Video
Dr
ip
MiNoed Presentation of Dual Audio
BD ROM profile
Still Picture
DVD / CD Playback
Specifications
Others 1080P Upscaling
Specifications
Screen Saver
Parental Lock
Initial logo
Trick Play Fast Forward BD, DVD(-VR), CD-DA, MP3/WMA
Fast Back BD, DVD(-VR), CD-DA, MP3/WMA
Forword Slow BD, DVD(-VR)
Pause BD, DVD(-VR), CD-DA, MP3/WMA
Forward Step BD, DVD(-VR)
Search Title/Track BD, DVD(-VR), CD-DA
Chapter BD, DVD(-VR)
Time DVD(-VR)
Repeat Play Title/Track BD, DVD(-VR), CD-DA, MP3/WMA
Chapter BD, DVD(-VR)
A-B DVD(-VR)
Resume Stop DVD(-VR)
Play Mode Program WMA/MP3 Only
Random CD-DA Only
40
Supply Power and Region Code
Supply Power: 100-240V AC 50/60 HZ
Power Comsumption: 33W
DVD Region Code:
Blu-Ray Region Code:
Note: Design and specifications are subject to change without prior notice for the purpose of
performance improvement.

41
Warranty Card
This product is guaranteed against faulty materials and workmanship for a period of one
year from the date of purchase with proof of purchase. The obligation to the purchaser
under this warranty is limited to servicing the unit and replacing defective parts or refund
when the product is returned freight prepaid to the retailer with proof of purchase. This
warranty becomes void if the product has been tampered with, damaged by accident,
damaged in any other way by improper use or has been purchased second hand. All
production orders have quality inspections. In the unlikely event of a deficiency, please
contact the retailer from which this product was purchased.
WARRANTY FOR APPLIANCES USED COMMERCIALLY LIMITED TO 90 DAYS
Type of Appliance: _______________________________________________________________
Model No.: __________________________________ Purchase Date: ____________________
Product Purchased From: ________________________________________________________
__________________________________________________________________________________
Your Name: ______________________________________________________________________
Address: _________________________________________________________________________
_______________________________________________ Phone Number: __________________
IMPORTANT!
Please retain this warranty card along with your purchase receipt. Please do not
post to the retailer. If service or a warranty claim is required, both of these
documents are to be returned with the appliance to your retailer, otherwise a fee
may be charged or warranty declined. For technical help contact the helpline.
 Loading...