


Introduction
This troubleshooting guide references devices manufactured during different time frames. It is important to
know the manufacture date and serial number of your device during the troubleshooting process or when
calling customer service. To determine the year of manufacture, refer to the first six (6) digits of your TMM
Series Stretcher-Chair’s serial number – these represent the date the chair was manufactured.
If you are utilizing an electronic copy of this document, words that are bold, blue and underlined represent
links to other pages in the document and/or links to web pages outside of this document. Simply click on the
words to follow the links.
Our Customer Service Department can be reached by any of the following methods:
Email: techservice@wincomfg.com
Phone: 352-854-2929 or 800-237-3377 (Toll Free U.S. Only)
Fax: 352-854-9544
Hours of Operation: Monday – Friday, 8:30 am – 5:00 pm ET

TMM Series Stretcher-Chairs
Trouble-Shooting Guide
GENERAL ISSUES
The following list can help troubleshoot general issues with your TransMotion Medical device. Click on
any of the following headings to see more information.
1. Battery Testing (Page 3)
a. Low or exhausted batteries is the most common cause for a TransMotion Stretcher-chair to
not perform. Once the battery has been eliminated as a cause to the issue, continue
troubleshooting.
2. Stretcher-Chair has no functions (Page 4)
a. Follow this link if you have completed the battery testing above and are confident the battery
is not the issue yet the device has no functions.
3. One or more functions have stopped functioning (Page 5)
a. Follow this link if one or more portions of the device is working but some are not moving.
b. If the Stretcher-chair is an X-Series chair, the manufacture date is prior to February of 2012, and
the leg, back or seat tilt functions are not working, see
“X-Series Chair built prior to February of
2012”.
4. Tall (T) chair is not going to full height (Page 6)
a. Follow this link if the chair is not raising as high as it should. NOTE: This is for Tall version
chairs only. Tall version chairs should raise to approximately 40” from the floor to the top of
the seat pad.
5. TMM3 (Video Fluoroscopy) Chair will not go down (Page 7)
a. Follow this link if the TMM3 version chair will go up but not down and all other functions are
working properly
6. X-Series Chair will not tilt or only tilt in one direction (Page 8)
a. Follow this link if you have an X-series Chair (seat tilt feature) will not tilt or only tilt in one
direction.
TMM-SCTG Page 2 of 12 Rev C - 072816

TMM Series Stretcher-Chairs
Trouble-Shooting Guide
BATTERY TESTING
For “B” battery powered chairs, determine if the battery on the device is charged and in good working
condition.
- Using a voltage meter, check the voltage of the battery. A fully charged battery should have a
reading of over 26 volts.
- The green light on the pendant will turn to amber if the battery is near or below 24.6 volts.
- If the battery is showing a charge of above 24.6 volts but the chair is not functioning, the battery
testing protocol can be used to determine if the battery is in need of replacement. The battery
testing protocol can be found by following this link: "B" Battery Testing Protocol
For “A” (AC Powered) chairs, ensure the device is plugged into a working 120V outlet.
- AC powered chairs require working batteries even when plugged into an AC outlet
- For testing AC Powered chairs built during or after February of 2012 email
techservice@wincomfg.com
and request the installation and maintenance manual (IM TMS-1066-
03). This manual describes how to change the battery pack but can also be used to remove the
pack to test the batteries.
- For testing AC powered chairs built prior to February of 2012 follow this link: "AC" Battery Testing
Protocol
Once you have determined that the battery is charged and in good working condition, use the
following instructions to continue troubleshooting the device or return to the “General Issues”
page.
TMM-SCTG Page 3 of 12 Rev C - 072816
TMM Series Stretcher-Chairs
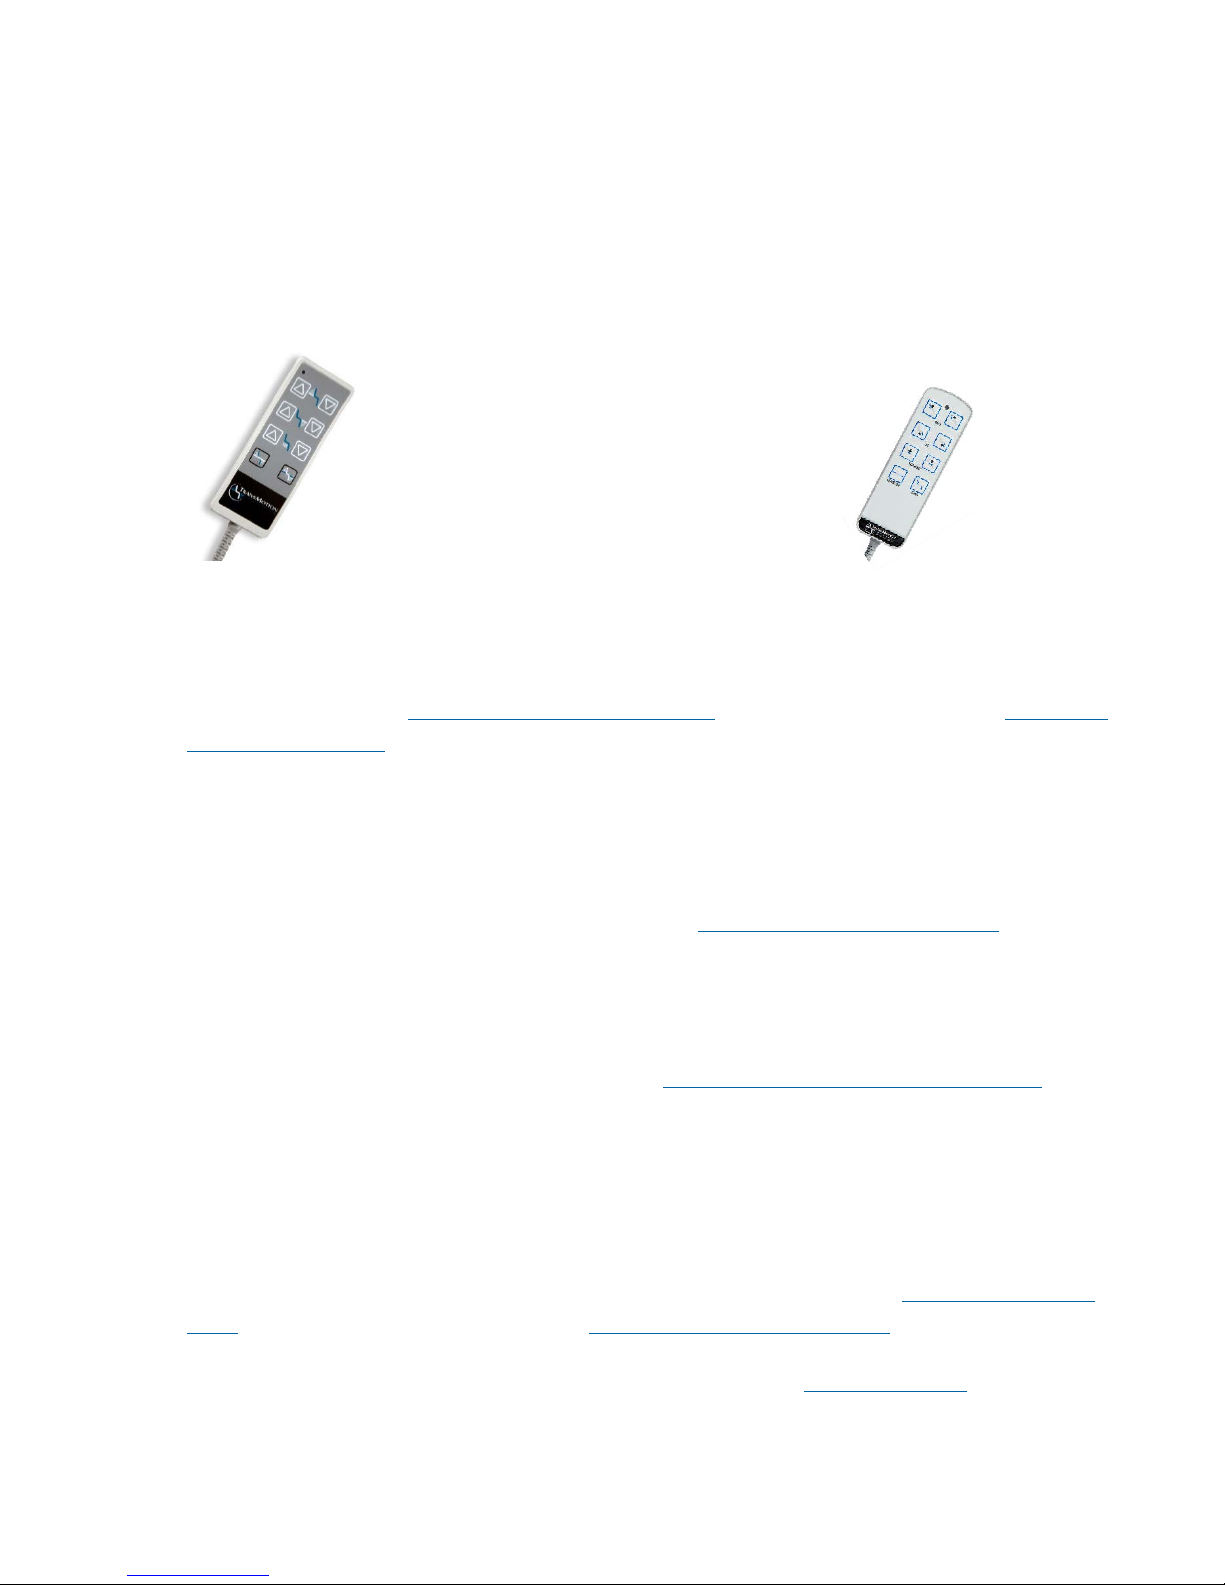
OLD STYLE
NEW STYLE
Trouble-Shooting Guide
STRETCHER-CHAIR HAS NO FUNCTIONS
1. Trace the cord from the pendant back to the control box and look for any signs of cuts or pinch
points in the cable. If the cord is damaged at any point, replace the pendant.
2. Does your TMM Series Stretcher-Chair have an old or new style pendant?
3. If your TMM Series Stretcher-Chair has an older style pendant, we recommend purchasing a
new pendant. Visit the Technical Service & Parts page of our website or contact 0ur
Customer
Service Department for the appropriate part number and / or pricing.
4. If another pendant is available, plug the working pendant into the control box and test the
functions of the device. NOTE: Pendants from other TMM Series Stretcher-Chairs may be able
to be used to troubleshoot the issue. Both devices must have the same or similar control boxes.
5. If switching pendants resolved the issue, contact our Customer Service Department
for a
replacement pendant.
6. If another pendant is not available, the issue may be either the pendant or the control box. A
replacement pendant and control box may be purchased together. Unused items may be
returned for a refund (please refer to section 6 of Winco Mfg., LLC’s Terms & Conditions
.)
7. Once the item(s) are received, plug the new pendant into the control box and test the functions
of the stretcher-chair.
8. If the replacement pendant did not resolve the issue, remove and replace the control box.
Control box installation and maintenance instructions should be included with the new control
box. If the instructions are not available, you may download a copy via the
Product Resources
Page of our Website or by contacting our Customer Service Department.
You may now continue troubleshooting your device or return to the “General Issues” page.
TMM-SCTG Page 4 of 12 Rev C - 072816

TMM Series Stretcher-Chairs
Trouble-Shooting Guide
ONE OR MORE FUNCTIONS HAVE STOPPED FUNCTIONING
1. At this point, one of three possible components may have failed: the control box, the actuator /
motor, or the pendant.
2. Access the control box in the base of the chair.
3. Refer to the control box wiring diagrams by following this link: “Control Box Wiring
”.
4. Determine the ports on the control box that operate the functioning and non-functioning sections of
the chair.
5. Switch the plugs in these two ports
• Example for KOM control box: if the back section of the chair is not working and the leg section
of the chair is working, switch the cords in ports #2 and #3.
6. The buttons on the pendant will now be switched. The buttons that controlled the non-functioning
portion of the chair will now be controlling the functioning portion of the chair.
• Following example from step 5: the buttons for the back section on the pendant will now be
controlling the leg section and the buttons for the leg section will now be controlling the back
section.
7. If the motor is now working, then you have eliminated the motor as the possible failed component.
8. If the motor is still not working, then the motor has likely failed and may need to be replaced. If this
is an X-Series chair built prior to February of 2012, additional troubleshooting can be done by
following this link: X-Series Chair built prior to February of 2012
. If this is not an X-Series chair built
prior to 2012, visit the Technical Assistance & Parts page of our website or contact 0ur Customer
Service Department for the appropriate part number and / or pricing.
9. If the motor is not the failed component, then the issue is either the control box or the pendant. If
another pendant is available, plug it into the control box of the non-working device to test the
functions. If the alternate pendant is still not working or if another pendant is not available, a
replacement pendant and control box may be purchased together. Unused items may be returned
for a refund (please refer to section 6 of Winco Mfg., LLC’s Terms & Conditions
10. Once the item(s) are received, plug the new pendant into the control box and test the functions of
the stretcher-chair. If the replacement pendant did not resolve the issue, remove and replace the
control box. Control box installation and maintenance instructions should be included with the new
control box. If the instructions are not available, you may download a copy via the
Resources Page of our Website or by contacting our Customer Service Department.
You may now continue troubleshooting your device or return to the “General Issues”
TMM-SCTG Page 5 of 12 Rev C - 072816
.)
Product
page.

TMM Series Stretcher-Chairs
Trouble-Shooting Guide
TALL (T) CHAIR IS NOT GOING TO FULL HEIGHT
1. Tall lift columns have two (2) actuators inside the tower that function simultaneously to raise and
lower the stretcher-chair, however each actuator is controlled by individual ports on the control
box.
2. First make note of which section of the column is not moving. This could be the lower section or the
upper section.
3. Refer to the control box wiring diagrams by following this link: “Control Box Wiring
”
4. For KOM control boxes, switch the cords in ports #1 and #4. For VCU control boxes switch the
cords in ports #1 and #2.
5. Use the pendant to raise and/or lower the chair.
6. If the section of the column that was not functioning is now functioning, the problem is either in the
button on the pendant or the port in the control box. Call or email technical service for part number
and price.
7. If the same section of the column is still not working and the chair has a KOM control box, then the
issue is likely in the column. Call or email technical service for part number and pricing. If the chair
has a VCU control box, then continue to step #8.
8. VCU control boxes require adapter cables for the columns. One of these adapter cables may be
faulty, pinched, or severed. Inspect the cables for damage. See picture of cable below. Call or email
technical service for part number and price if cable is damaged.
9. If the cables appear to be in good condition, switch the column cables in the adapter cables.
10. If the same section of the column is not working, the issue is in the column. Call or email technical
service for part number and price.
11. If the section of the column that was not functioning is now functioning, the problem is in the
adapter cable. Contact 0ur Customer Service Department
pricing.
You may now continue troubleshooting your device or return to the “General Issues” page.
TMM-SCTG Page 6 of 12 Rev C - 072816
for the appropriate part number and / or

TMM Series Stretcher-Chairs
Trouble-Shooting Guide
TMM3 (VIDEO FLUOROSCOPY) CHAIR WILL NOT GO DOWN
1. TMM3 chairs are designed so the chair seat cannot be lowered while the upper portion of the chair
is rotated. The upper portion of the chair must be in line with the base for the chair to be lowered.
2. If the seat cannot be lowered, rotate the upper portion of the chair then back to straight with the
base again and attempt to lower the chair.
3. If step #2 did not fix the issue, find the limit switch under the seat of the chair and ensure that it is
not activated (the button is not pushed in).
4. If the limit switch appears to be working properly, access the control box in the base of the chair
and unplug the cord in port #4. WARNING! This will disable the limit switch allowing the chair to
be lowered while the seat is rotated. Severe damage to the chair may occur while lowering the
seat while in the rotated state. This should only be disabled temporarily for troubleshooting
only!
5. With port #4 unplugged, attempt to lower the chair slightly.
6. If the chair goes down, the limit switch is faulty and requires replacement. Call or email technical
service for part number and price.
7. Plug the cord back into port #4.
8. If the column still does not go down, follow this link to “
One or more functions have stopped
functioning” to continue troubleshooting the chair.
You may now continue troubleshooting your device or return to the “General Issues” page.
TMM-SCTG Page 7 of 12 Rev C - 072816

TMM Series Stretcher-Chairs
Trouble-Shooting Guide
X-SERIES CHAIR WILL NOT TILT OR ONLY TILT IN ONE DIRECTION
1. The tilt feature on X-series chairs is limited to a certain amount of tilt forward and backward
depending on other included features.
2. The amount of tilt is controlled by limiting switches behind a small cover on the left side (patient’s
left) of the chair under the seat section. See Picture below
3. One of these limit switches may not be working properly. If one of the switches is fixed in the actuated
position, the tilt motor will not move in that direction.
4. Using a Phillips head screwdriver, remove the cover and attempt to manually actuate the switches.
5. An audible click should be able to be heard when the switch is activated and released.
6. If the one of the switches is not de-activating (button is not “popping” back up), then the switch is
faulty and needs to be replaced.
7. Call technical service for part number and price.
WARNING! – THE DEGREE OF TILT IS SET AT THE FACTORY AND SHOULD NOT MODIFIED.
MODIFYING THE AMOUNT OF TILT MAY CAUSE INTERFERENCE BETWEEN COMPONENTS ON THE
CHAIR CAUSING DAMAGE TO THE COMPONENTS OR THE DEVICE.
You may now continue troubleshooting your device or return to the “General Issues” page.
TMM-SCTG Page 8 of 12 Rev C - 072816

Tilt
Back
X-SERIES CHAIR BUILT PRIOR TO FEBRUARY OF 2012
TMM Series Stretcher-Chairs
Trouble-Shooting Guide
Note: This portion of the troubleshooting guide should only be followed after performing the “
ONE OR
MORE FUNCTIONS OF THE STRETCHER-CHAIR HAVE STOPPED FUNCTIONING” portion of this guide
and the motor has been determined as the issue.
1. X-series chairs built prior to February of 2012 include two (2) additional phono jack plugs under the
seat section at the back of the chair. Trace the pendant cord until it enters the cover at the back of
the chair. Remove this cover to reveal the plugs. There are 3 plugs in series behind the cover.
These plugs control the tilt, leg, and back motors.
2. These 3 plugs may be interchanged to determine the faulty part in the chair.
Leg
Motor
Motor
Motor
3. Note which motor is currently functioning and which is not currently functioning.
4. Unplug the motor that is not functioning and plug this motor into the port for the functioning motor.
• Example: if the leg motor is not functioning and the back motor is functioning, switch the
plugs in the middle and far right ports. The buttons for the leg section on the pendant
should now operate the back section.
5. If the motor that was not functioning before is still not functioning, then the issue is with the motor.
Call technical service for part number and price.
6. If the motor that was not functioning before is now functioning, then the motor is not the issue.
7. Check for damaged or disconnected wires leading to the faulty plug.
8. Call technical service for further instructions and part number and price.
You may now continue troubleshooting your device or return to the “General Issues”
page.
TMM-SCTG Page 9 of 12 Rev C - 072816

TMM Series Stretcher-Chairs
Port # 13 – Power supply (B- Chairs Only)
Power supply (A- Chairs Only)
Port # 10 – Pendant (pendant
extension on X-series chair)
Port # 7 – Limit Switch
(TMM3 Only)
Trouble-Shooting Guide
Control Box Port Diagrams (KOM control box diagram on next page):
VCU Control box (ALL X-series Chairs) or (Non-X chairs built during or after February of 2012)
Port #6 – Not used
Port #5 – Tilt Motor
(X-Series Only)
Port #4 – Leg Motor
Port #3 – Back
Motor
Port #2 – Column
(Only used with
Triple column)
Port # 1 – Column
Return to one of the following sections: “Tall (T) Chair is Not Going to Full Height”, “
Functions Have Stopped Functioning”, or the “General Issues” page.
One or More
TMM-SCTG Page 10 of 12 Rev C - 072816

Pendant
Port #1
Port #2
Port #3
Port #4
Port #5
KOM Control Box (Non-X Chairs built prior to February of 2012)
TMM Series Stretcher-Chairs
Trouble-Shooting Guide
Column
Back Motor
Leg Motor
Column
(If Triple column)
OR
Limit Switch
(TMM3 Only)
Return to one of the following sections: “Tall (T) Chair is Not Going to Full Height”, “
Functions Have Stopped Functioning”, or the “General Issues” page.
Power (B Only)
NEVER PLUG THE
POWER CORD
INTO ANOTHER
PORT!
One or More
TMM-SCTG Page 11 of 12 Rev C - 072816

RETURN POLICY
All returns or exchanges must be pre-approved by Winco Mfg., LLC
Please refer to section 6 of Winco Mfg., LLC’s Terms & Conditions
for additional information
concerning our return policy.
When returning parts, please contact our Customer Service Department
(customerservice@wincomfg.com
or 352-854-2929 for a return material authorization number (RMA).
Return to the “General Issues” page.
Page 12 of 12
TMM-SCTG
Rev C - 072816
 Loading...