

Transformative Engineering HXU-1 Owner's Manual

HDMI & USB, AUDIO, RS232, IR CAT5 Extender
ITEM NO: HXU-1 HDMI KVM Over IP with USB,RS232, IR, Analog Audio
The HXU-1: HDMI, USB, Analog audio, RS232, and IR extender is designed to extend and distribute all
signals over one CAT5e up to 150 meters, and provides a local HDMI monitor output. It provides superior
video quality up to 1920 x 1200 resolutions using cost effective UTP cable instead of: HDMI, RS232, and
other cables, for an easier, neater, more reliable installation. The transmitter and receiver units can be
connected together for a Point-to-Point connection via CAT5e/6 cable; or a Point-to-Many connection via a
gigabit fast network switch with IGMP snooping and 8K Jumbo Frame support. It is optimized for
applications such as: broadcasting systems, multimedia displays, multi-data sharing, digital signage, home
entertainment integration, industrial control, hospital, education, security, and HDMI over IP matrix
switching.
Features:
! Extend HDMI, RS232, IR and USB signals over one CAT5E/CAT6 cable.
! Supports resolutions up to 1080p Full HD and 1920 x 1200 (WUXGA) 32bpp@ 60 Hz
! Transmission range up to 150M over CAT5e, 180M over CAT6.
! Supports 2-way RS232 commands at baud rate 115200 (control software on a PC, or other automated
control system hardware) to control devices attached to the matrix using RS232. Full Duplex data
communication.
! HDMI 1.3b and HDCP compliant.
! HDMI audio support up to LPCM 7.1@192Khz
! Built in Bi-Directional analog audio.
! Built in Bi-Directional IR.
! HXU-1Tx transmitter unit includes built in HDMI loop output.
! HXU-1Rx receiver unit features 4USB ports (1 USB 1.1 & 3 USB 2.0), to extend USB peripheral
devices, such as flash disk, hard disk, keyboard, mouse, etc.
! Supports point to point and multiple source devices to multi-display connections/HDMI matrix switch
over IP via Gigabit network switch with IGMP Snooping and 8K Jumbo Frame support.
! Matrix extends USB, IR, and RS232 and is controllable via IP, IR, or RS232
2
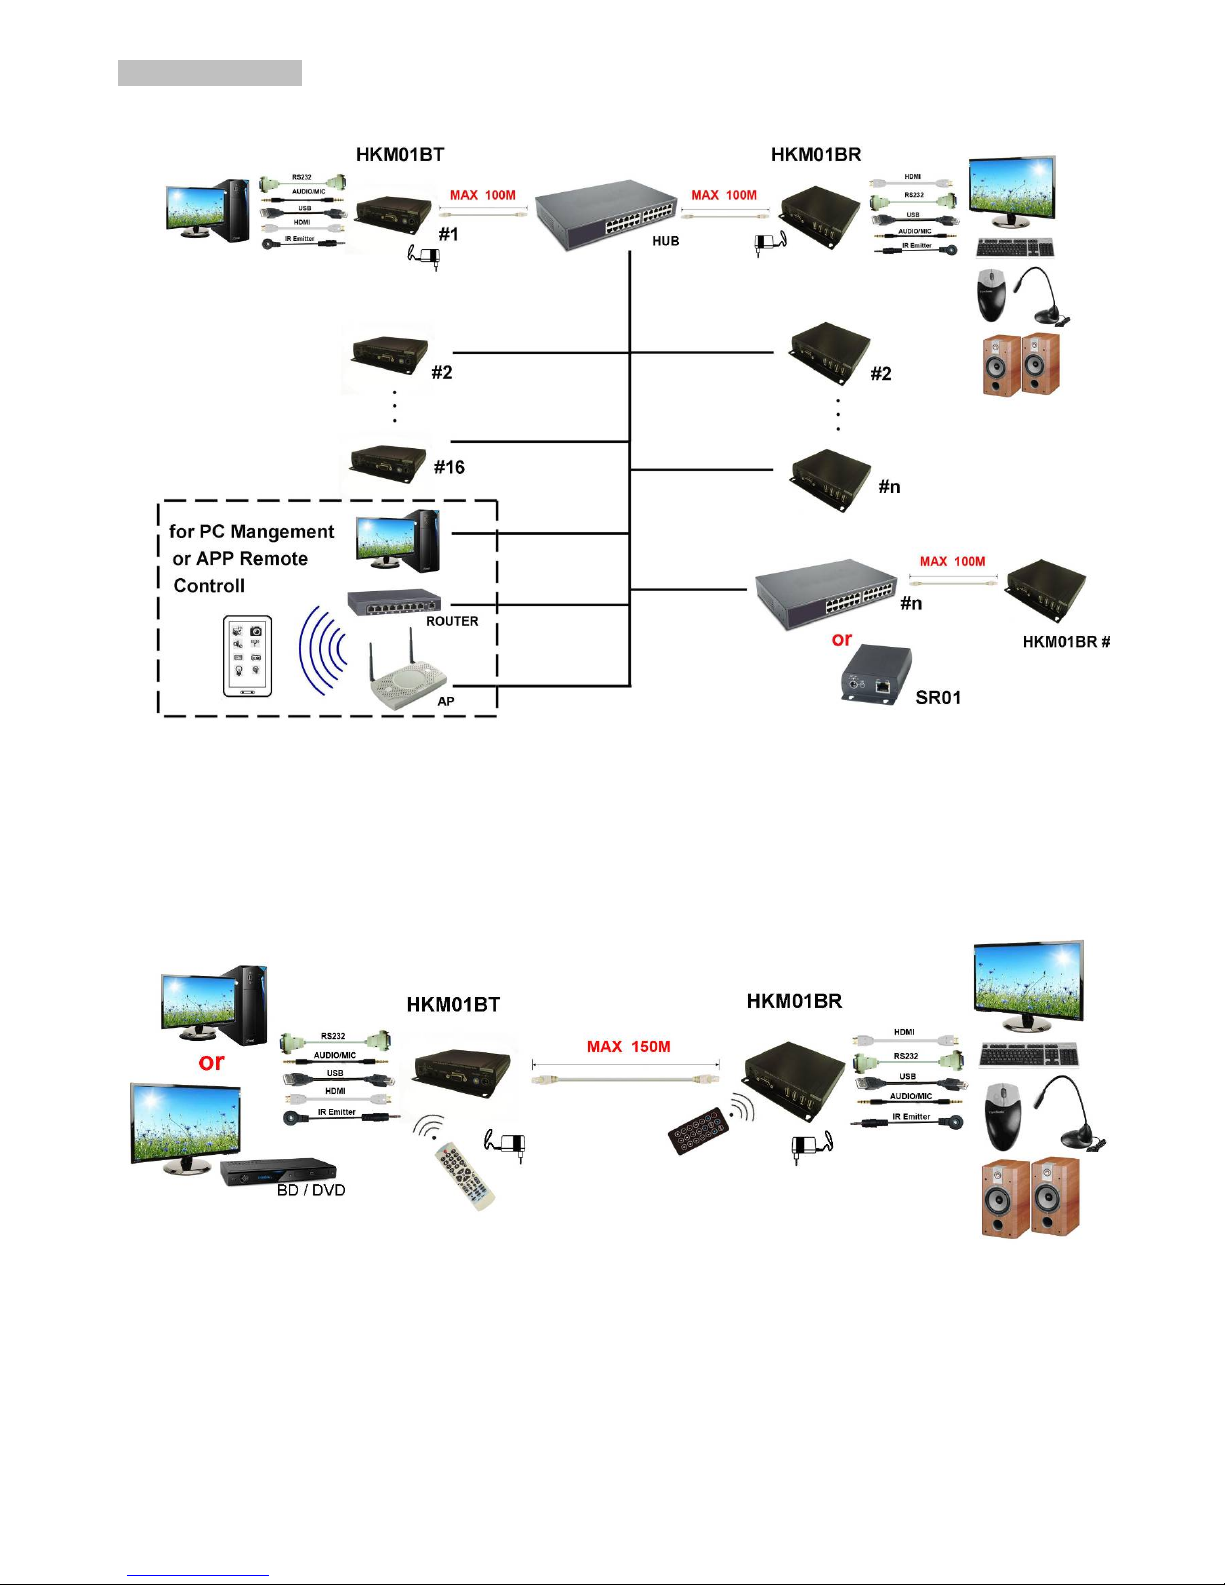
Installation View:
Multiple Transmitters to Multiple Receivers Connection: (Matrix Switcher)
Point to Point Direct Connection: (Extender)
3
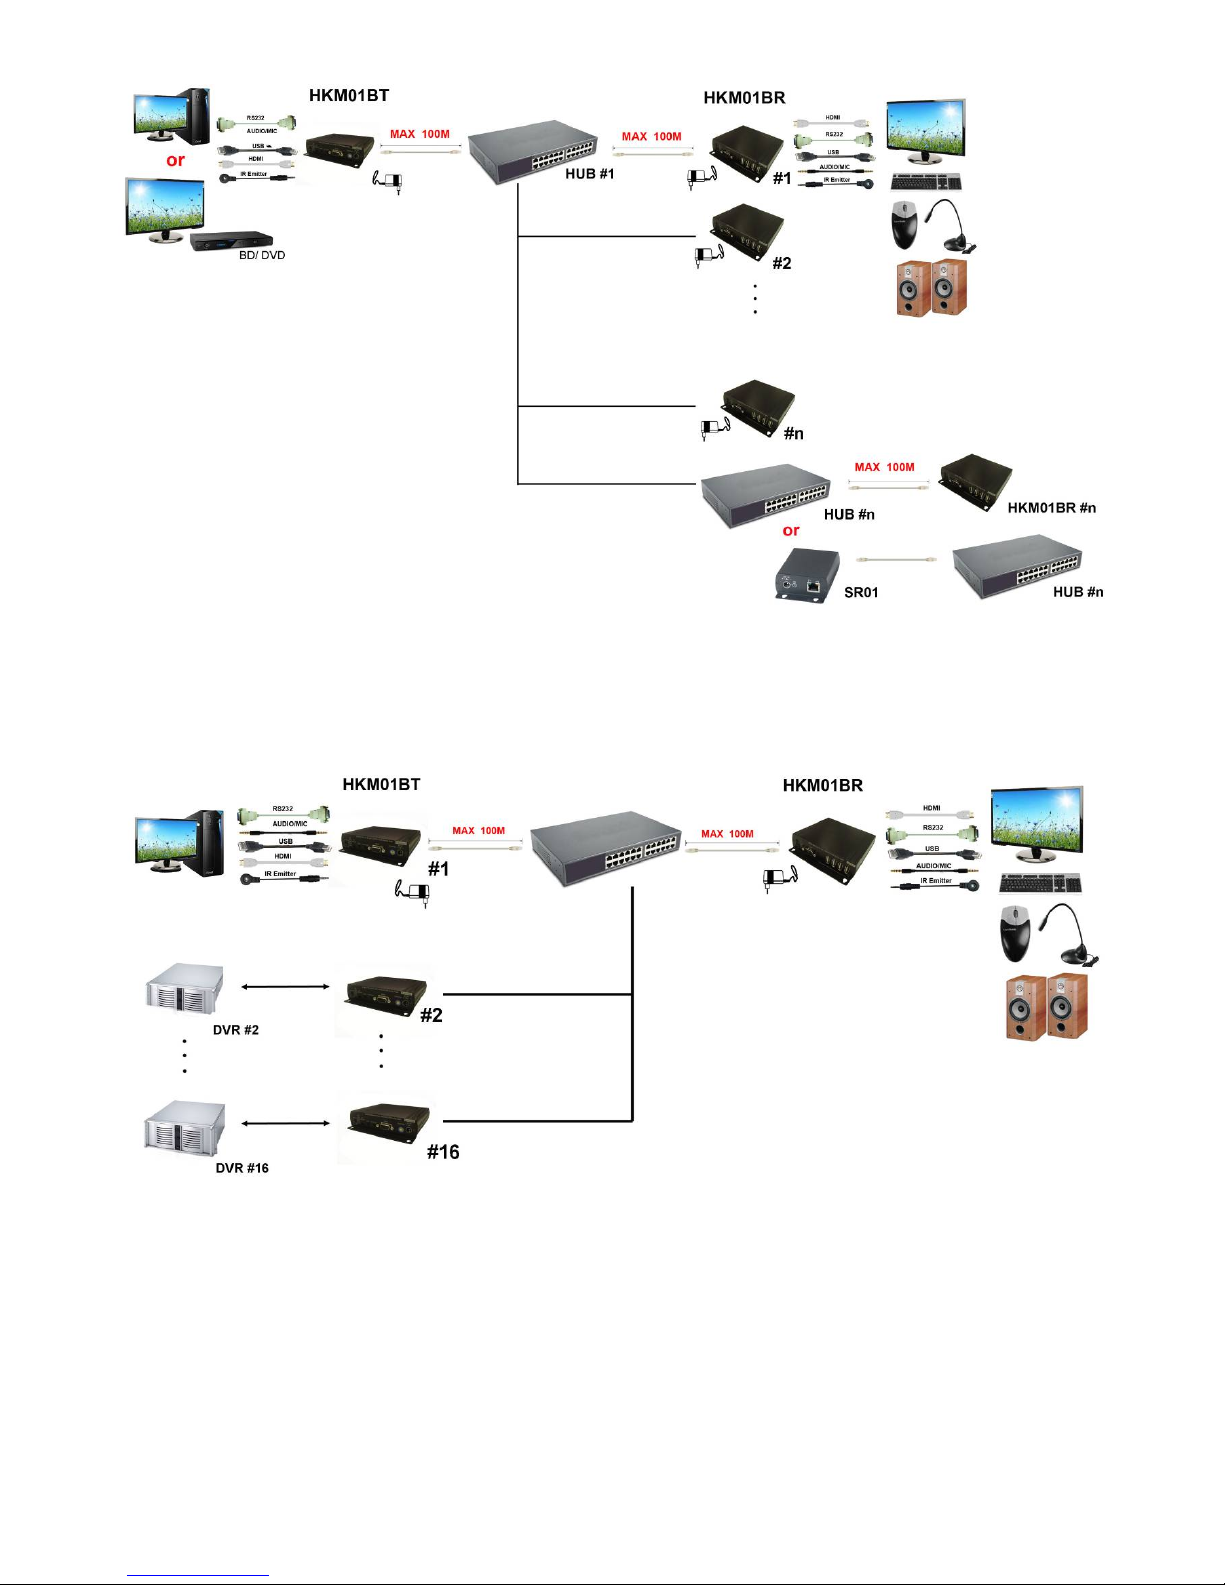
One Transmitter to Multiple Receivers Connection: (Splitter)
Multiple Transmitters to One Receiver Connection: (Switcher)
4
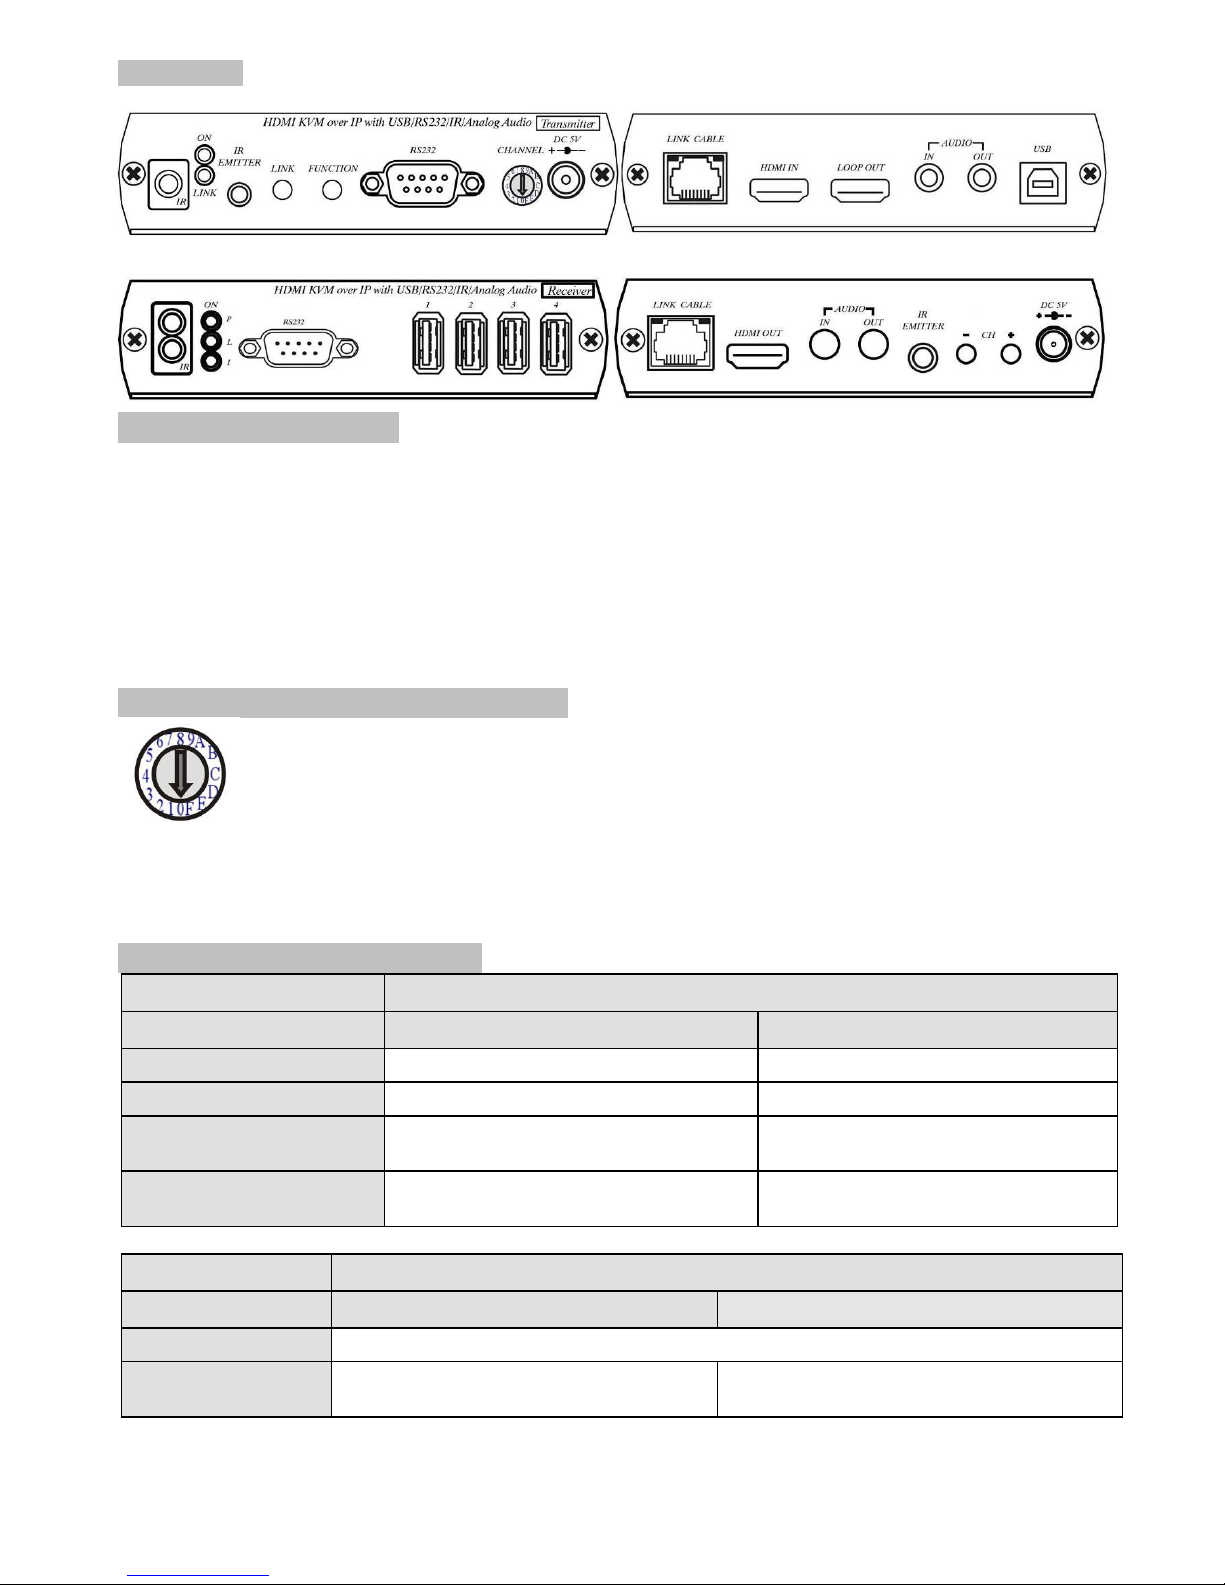
Panel View:
Transmitter
Receiver
LED Indication Status:
Power (Green LED): Flash Booting
ON Boot completed
Link (Blue LED): Flash Connecting or connected but no HDMI input
ON Transmitter connected with Receiver
RJ45 LED: Green Flash Data transmission
Orange On Ethernet connected
Back Panel Rotary Switch Function:
HXU-1Tx and HXU-1Rx must be set same channel in order to do mutual transmission.
HXU-1Tx is set via rotary switch to positions: “ 0 ~ F “ for a total of 16 channels, A = channel 10, B = channel
11, others channel same as 16 hex conversion.
HXU-1Rx channel is set via: console APIs (IP), RS-232, or IR.
Front Panel Button Function:
ITEM
HXU-1Tx
Button
LINK
FUNCTION
Short Press
Remote output (on / off)
Video Mode / Graphic Mode*
Long Press (3 seconds)
Loop output (on / off)*
Anti-Dither (1/2/off)*
Press to power on (Hold until
Green LED Flash)
N/A
Update EDID from loop output
Press to power on (Hold until
Green and Blue LED Flash)
RESET to Default*
N/A
ITEM
HXU-1Rx
Button
CH. -
CH. +
Press together
Confirm / Enter menu
Short Press
Reduce the numbers of
Channel/Menu/Value
Increase the numbers of Channel/Menu/Value
Above “bold font” part as the default
5
RJ45 pin define:
Link Cable (TIA/EIA-568-B)
1. Orange-white Data 1 +
2. Orange Data 1 -
3. Green-white Data 2 +
4. Blue Data 3 +
5. Blue-white Data 3 -
6. Green Data 2 -
7. Brown-white Data 4 +
8. Brown Data 4 -
Cable & Transmission Distance:
Link Cable use high quality Cat.5e UTP/STP/FTP or Cat.6 UTP cable
Transmission distance will be affected by equipment (Switch HUB, cable quality…etc). When using
CAT.5e the max transmission distance is 150M, using CAT.6 cable increases max to 180M.
You can use a Gigabit Switch hub which supports IGMP snooping and Jumbo Frame 8K for signal
distribution or extend distance.
System Default Settings:
The HXU-1 supports Unicast or Multicast mode, the default is Multicast.
Multicast mode can accommodate: one to one, one to multi, multi to one, or multi to multi
applications.
The analog audio output of transmitters and input of receivers will be off in this mode, analog audio
is only active in Point to Point mode.
Analog audio bi-direction transmission only in Unicast mode, please refer to the web setting
chapter: Casting Mode
System default IP setting is Auto IP, it will assign 169.254.X.X (submask 255.255.0.0) to
transmitters and receivers, you could also set to DHCP or Static IP, please refer to web setting
chapter: IP Setup.
Bandwidth Chart:
The bandwidth will be varied based on different resolution. Higher resolution may not request
bigger bandwidth. Below Chart is the resolution and bandwidth status for reference.
Resolution (@60Hz)
Average Bandwidth (Mbps)
1080p
77 (24 ~ 91)
720p
46 (29 ~ 150)
480p
63 (36 ~ 73)
1600x1200 (UXGA)
59 (24 ~ 73)
1280x1024 (SXGA)
58 (31 ~ 76)
1024x768 (XGA)
118 (56 ~ 138)
800x600 (SVGA)
83 (64 ~ 107)
Under Gigabit Ethernet network, the total flow must not exceed 1000Mbps to avoid any delay on
video streaming. If the video play with 1080p resolution, the HXU-1Tx Transmitter allow maximum
up to 10pcs for simultaneous video streaming.
USB Hot Key Function
In multicast mode the HXU-1 supports multiple USB keyboards and mice in each receiver, just plug
and play, but only one USB FLASH drive / hard disk may be used at a time.
You have to click “Pause/Break” key three times of the keyboard on the receiver to establish USB
FLASH drive /hard disk connection.
6
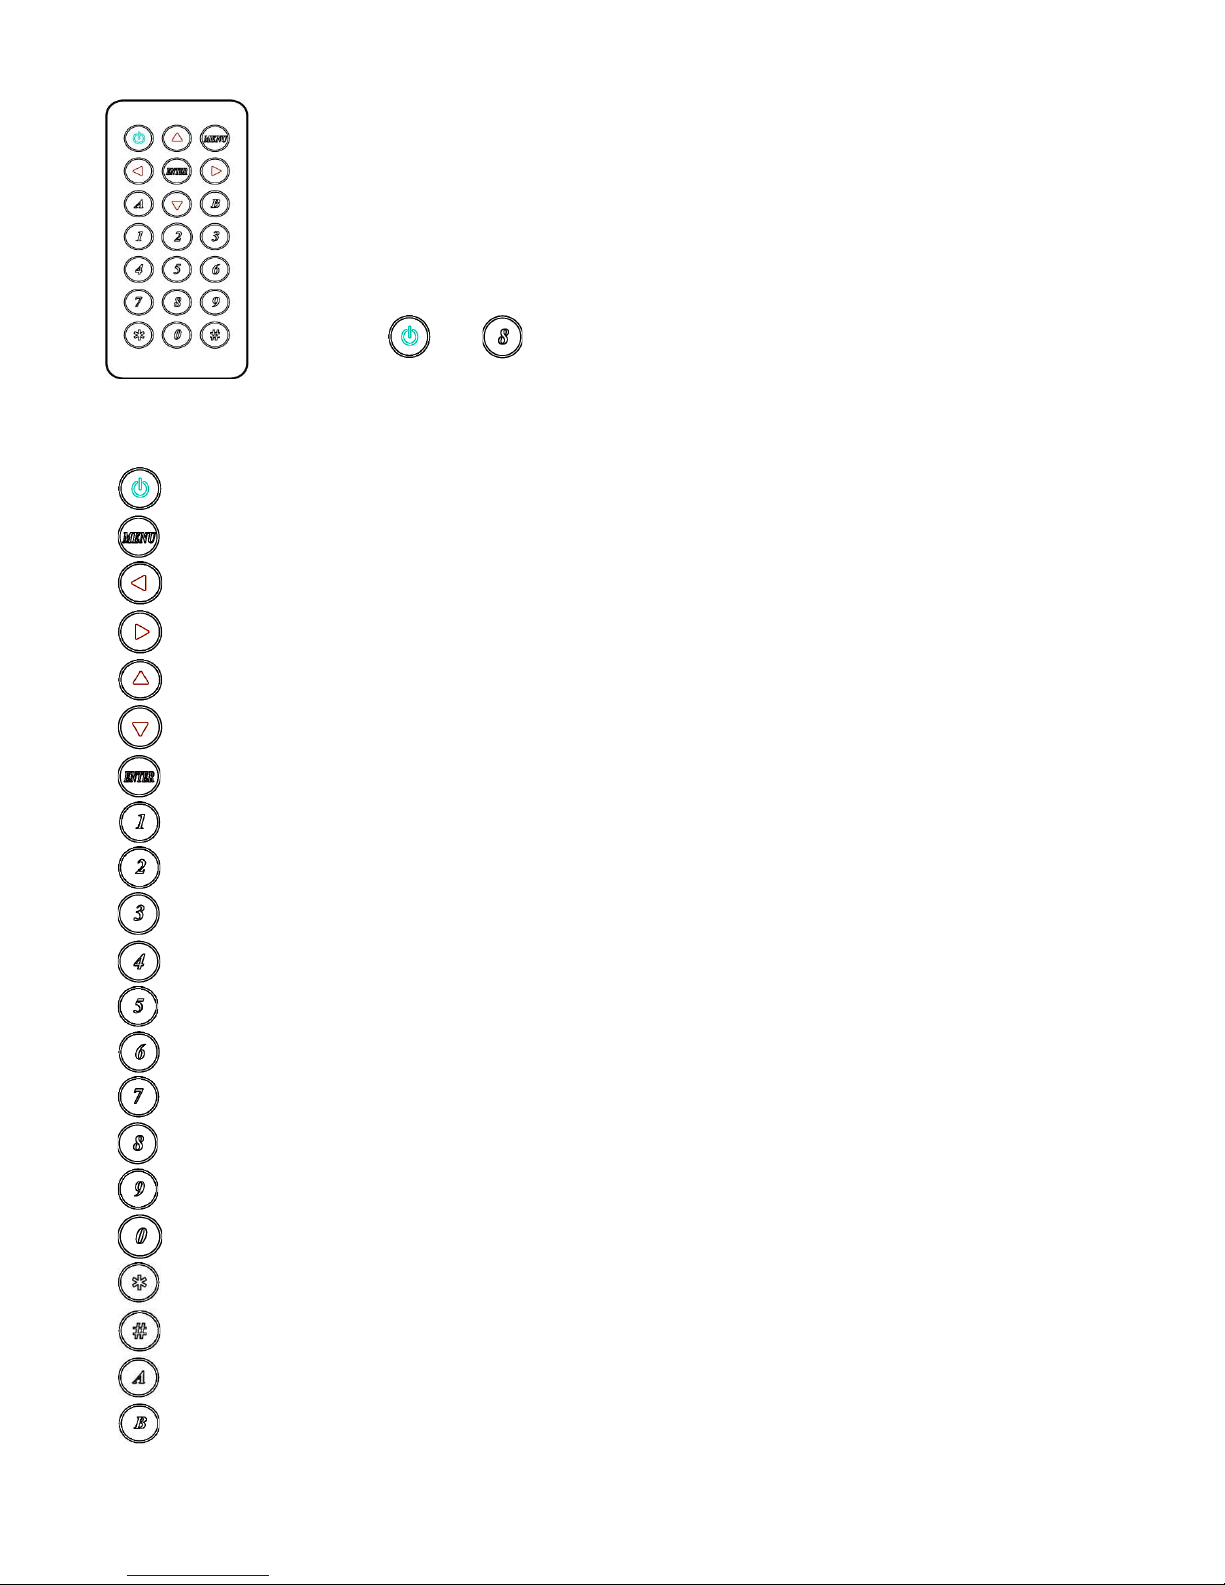
Remote Control Function:
If you do not use PC computer management to setup your HXU-1s, then you could
use the IR infrared remote control to preset channel selection.
The IR remote control and the equipment Remote ID must be using same ID. The
default Remote ID is 8. Upon first use of the remote or after changing the remote’s
battery Remote ID will need to be reset.
To set the Remote ID, Press and hold power button, then press button 8 to complete
the setting. + (For example)
Remote Control Button Function:
Symbol Function
Power Temporarily turn off the screen output /setup remote control Remote ID
MENU Quick menu selection, input numbers after press menu button
LEFT previous channel
RIGHT next channel
UP previous quick Menu selection
DOWN next quick Menu selection
ENTER Confirmation / display the current channel
1 number 1
2 number 2
3 number 3
4 numuber4
5 number 5
6 number 6
7 number 7
8 number 8
9 number 9
0 number 0
* cancel / exit
# clear input number
A no function
B no function
 Loading...