

Page 1
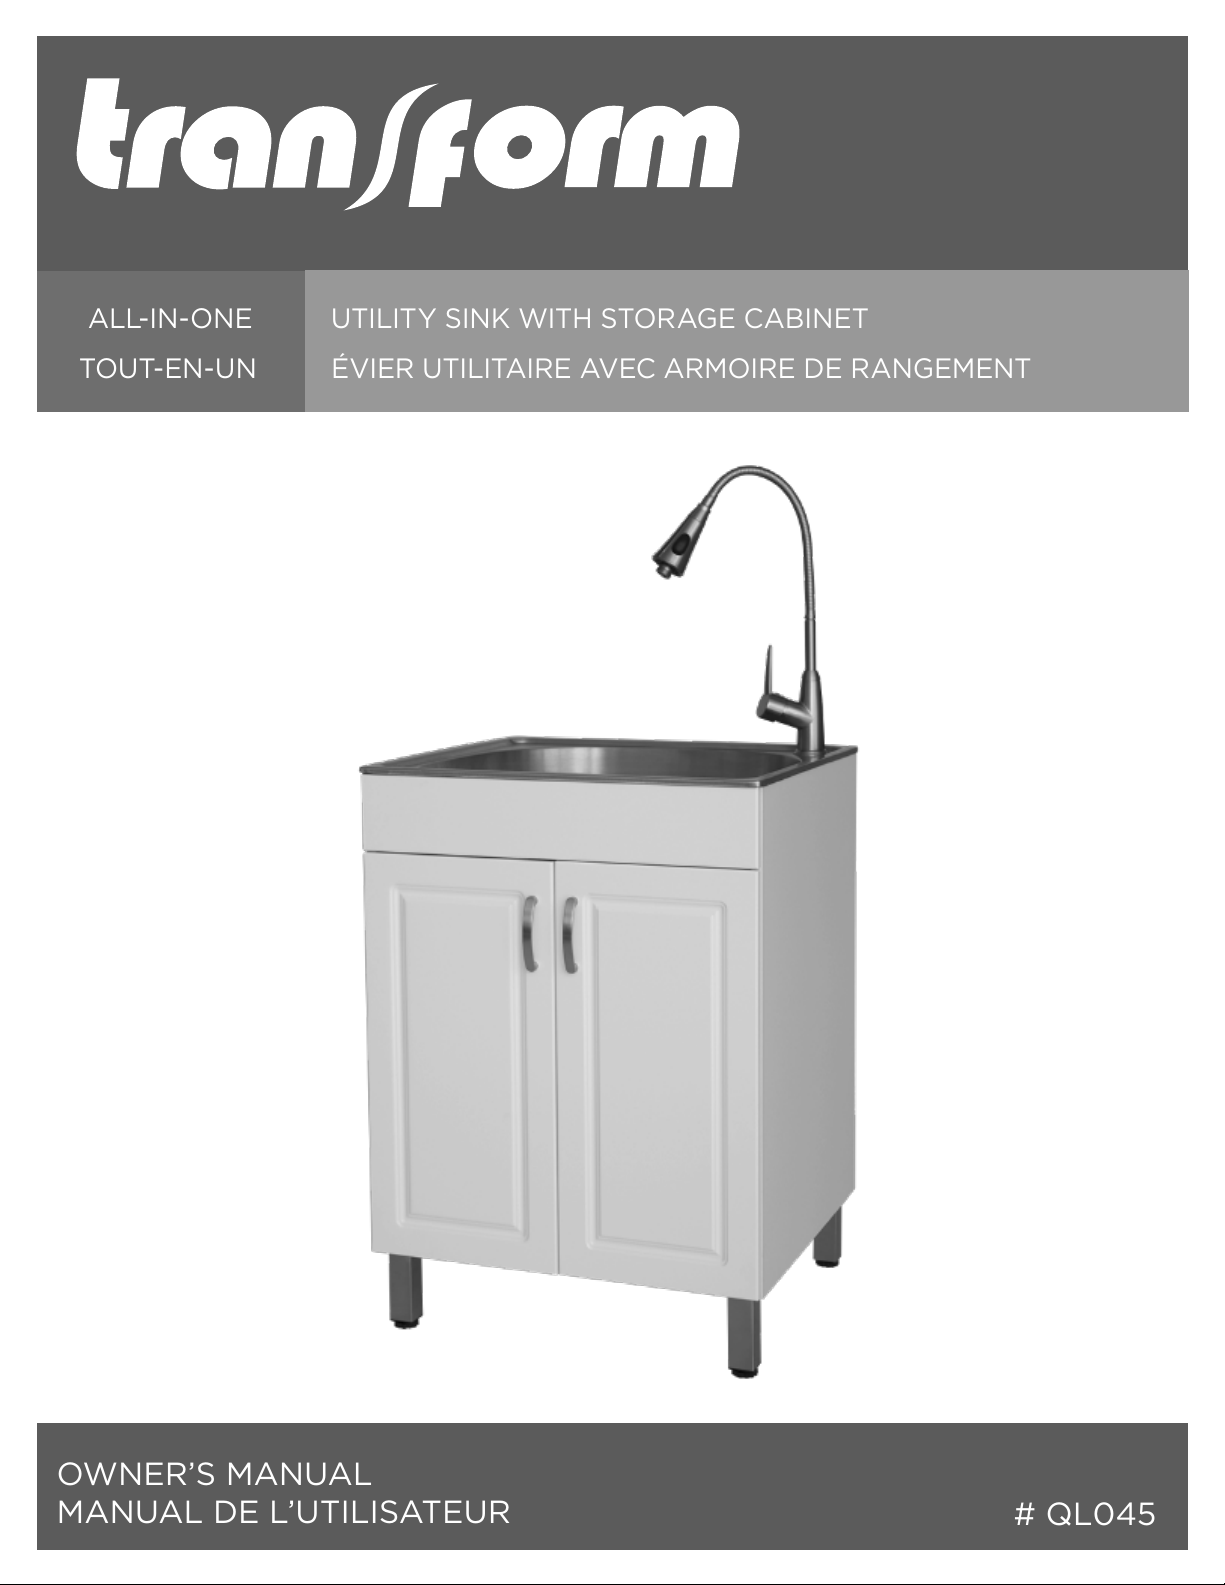
ALL-IN-ONE
UTILITY SINK WITH STORAGE CABINET
TOUT-EN-UN
ÉVIER UTILITAIRE AVEC ARMOIRE DE RANGEMENT
OWNER’S MANUAL
MANUAL DE L’UTILISATEUR
# QL045
Page 2
Table of Contents
Safety Information ..................................2
Warranty ...........................................
One Year Limited Warranty ...........................3
Warranty Claim Procedure ...........................3
Pre-Installation ......................................
ENGLISH
Tools/Materials Required ............................4
Package Contents .................................5
Installation .........................................
Faucet Assembly/Installation .........................6
Strainer Installation ................................7
Leveling Leg Installation ............................8
Safety Information
READ AND SAVE THESE INSTRUCTIONS
1. Unpack and inspect this product for chips, scratches, cracks,
dents, and scuff marks. Do not install this product if any
damages or defects are identied.
2. Use this product only in the manner intended by the
manufacturer. If you have any questions, contact the
manufacturer.
3. Installation work and plumbing must be done by qualied
person(s) in accordance with all applicable codes and standards.
4. Protect the entire surface during installation.
Door Handle Installation .............................8
Mounting the Utility Sink ............................9
Drainage .......................................10
Supply Line Assembly .............................10
Maintenance ........................................
Cartridge Replacement ............................10
Care and Cleaning ...................................
Utility Sink ......................................11
Cabinet .........................................11
Service Parts ......................................12
MANUEL DE L’UTILISATEUR ..........................13
DANGER: Always wear safety goggles and gloves in order
to avoid personal injury.
QL045
2
Page 3
Warranty
ONE YEAR LIMITED WARRANTY
A thorough inspection must be made before installation and any damage must be promptly reported. We will not be liable for failures or
damage that could have been discovered or avoided by proper inspection and testing prior to installation.
Conglom Inc. warrants this product to be free from defects in materials or workmanship for one (1) year from the date of purchase. Proof of
purchase (original sales receipt) from the original consumer purchaser must be made available to Conglom Inc. for all warranty claims.
This warranty is non-transferable and shall be voided if the unit is removed from its initial installation or if it is not installed following the
manufacturer’s instructions. It does not apply in the event of product damage due to the use of other than genuine Conglom Inc. replacement
parts, (Replacement parts may be obtained by e-mail at cs@conglomkb.com or by calling 1-877-333-0098 between 8:30 am - 5:00 pm EST)
installation error, abuse, misuse or improper care and maintenance (whether performed by a plumber, contractor, service provider or member
of the purchaser’s household). The warranty excludes damage due to aggressive air or water conditions, harsh or abrasive cleaners and/or
materials.
Under no circumstance shall we be held liable for personal injury or property damage resulting from improper installation or use of this
product. We will not be held liable for inconvenience caused by loss of use of this product, costs incurred for labour or materials, removal
and installation of replacement units, or any other incidental or consequential damages. Costs relating to obtaining access for repair or
replacement are the responsibility of the user.
Our obligation shall be limited to the repair or replacement of a unit (at our discretion) that may prove, by our sole examination, to be defective
under normal use and service during the warranty period.
Any failure of this product that is not traceable to a defect in material or workmanship is not covered by this warranty. These non-warrantable
items include, but are not limited to:
ENGLISH
- Improper installation not in accordance with manufacturer’s instructions.
- Dents and/or scratches incurred during shipping, handling, or installation.
- Change in colour or nish due to chemical usage.
- Damage caused by failure to follow care and cleaning guidelines, including damage caused by the use of abrasive cleaners.
- Alterations made to the unit by the purchaser or installer.
- Damage caused by accidental impact, re, ood, freezing, and normal wear.
- Bends and warping caused by forced connections, over-tightened ttings, and inadequate support during installation.
- Damage caused by use of chlorine-based cleaners.
This warranty does not extend to commercial and institutional installation or use.
WARRANTY CLAIM PROCEDURE
If a claimable defect occurs or replacement parts are needed,
(Service available in English and French, Monday - Friday from 8:30 am - 5:00 pm EST).
Before you make your call, please ensure that you have:
- Model number or description.
- Proof of sale.
- Details regarding the defect and/or part number.
- Name(s) and address(es) of the owner and/or installer.
please contact our customer service team at
cs@conglomkb.com
or 1-877-333-0098
3 CONGLOMKB.COM
Please contact cs@conglomkb.com or 1-877-333-0098 for further assistance.
Page 4
Pre-Installation
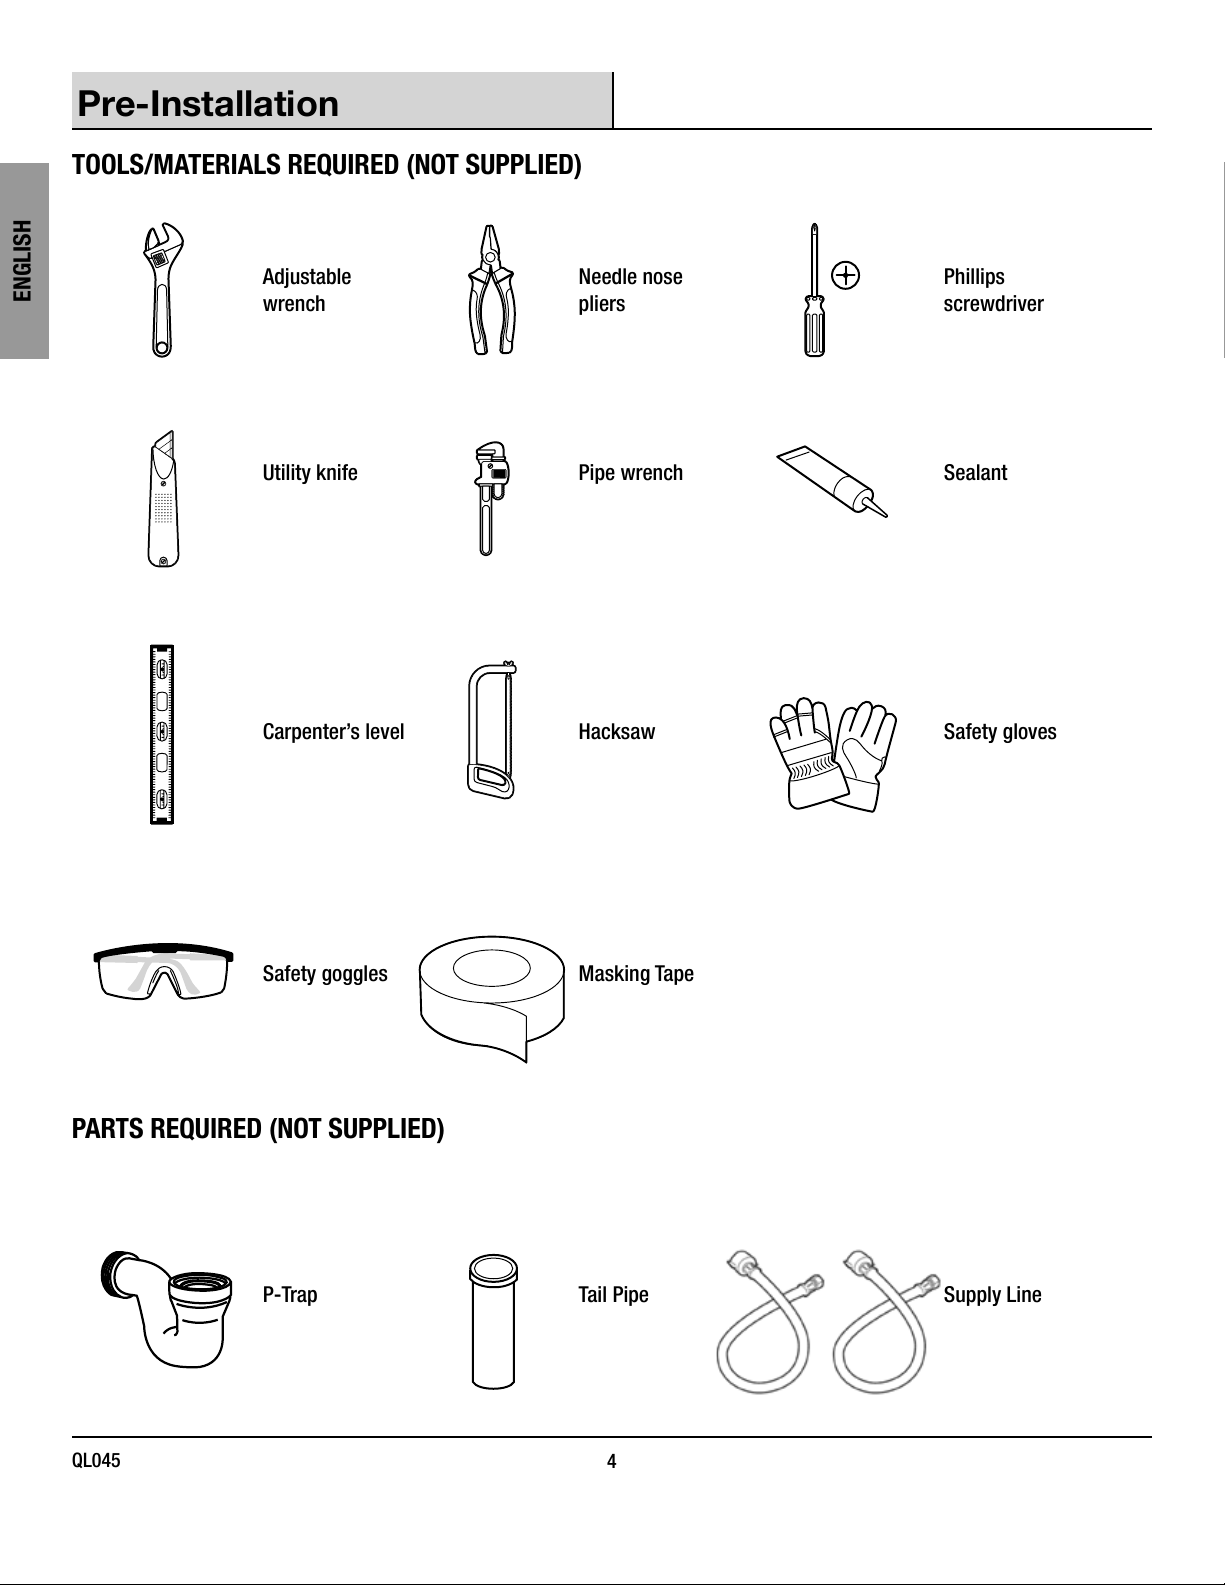
TOOLS/MATERIALS REQUIRED (NOT SUPPLIED)
ENGLISH
Adjustable
wrench
Utility knife Pipe wrench Sealant
Carpenter’s level Hacksaw Safety gloves
Needle nose
pliers
Phillips
screwdriver
Safety goggles Masking Tape
PARTS REQUIRED (NOT SUPPLIED)
P-Trap Tail Pipe Supply Line
QL045
4
Page 5
Pre-Installation (continued)
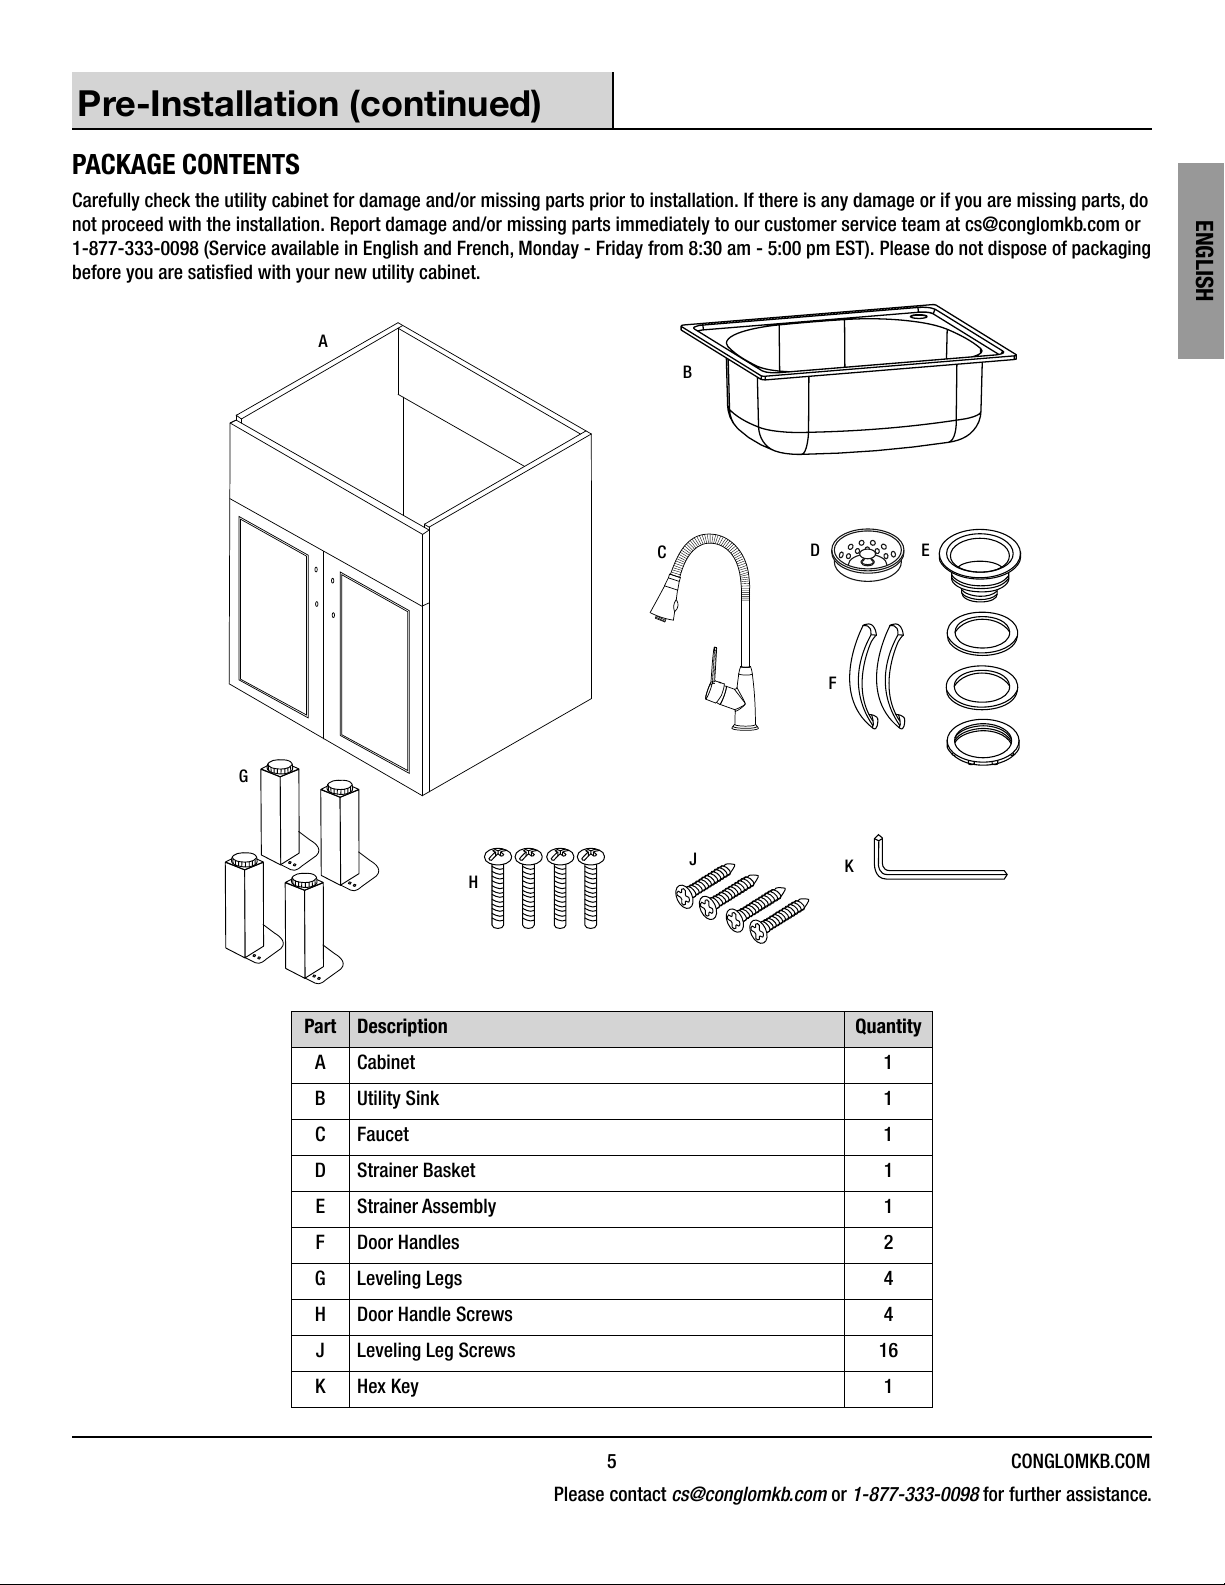
PACKAGE CONTENTS
Carefully check the utility cabinet for damage and/or missing parts prior to installation. If there is any damage or if you are missing parts, do
not proceed with the installation. Report damage and/or missing parts immediately to our customer service team at cs@conglomkb.com or
1-877-333-0098 (Service available in English and French, Monday - Friday from 8:30 am - 5:00 pm EST). Please do not dispose of packaging
before you are satised with your new utility cabinet.
A
B
ENGLISH
C
G
J
H
Part Description Quantity
A Cabinet 1
B Utility Sink 1
D E
F
K
C Faucet 1
D Strainer Basket 1
E Strainer Assembly 1
F Door Handles 2
G Leveling Legs 4
H Door Handle Screws 4
J Leveling Leg Screws 16
K Hex Key 1
5 CONGLOMKB.COM
Please contact cs@conglomkb.com or 1-877-333-0098 for further assistance.
Page 6
Installation
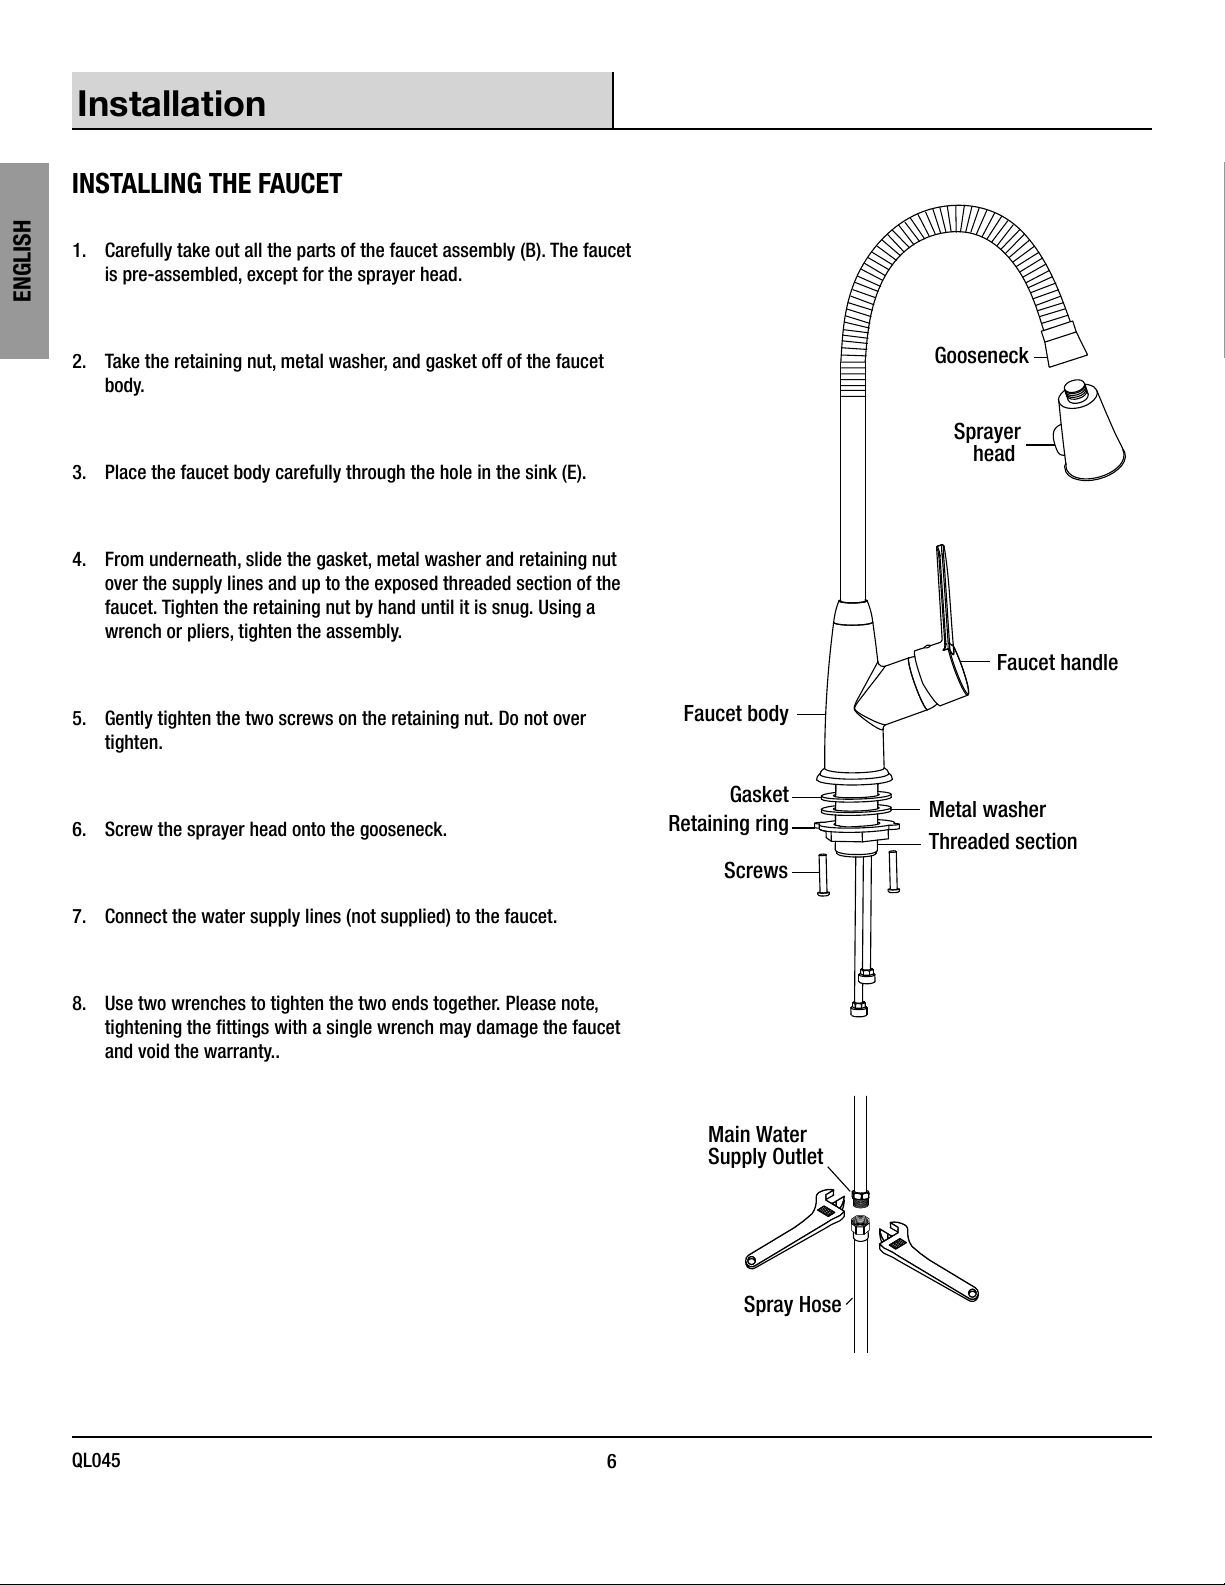
INSTALLING THE FAUCET
1. Carefully take out all the parts of the faucet assembly (B). The faucet
is pre-assembled, except for the sprayer head.
ENGLISH
2. Take the retaining nut, metal washer, and gasket off of the faucet
body.
3. Place the faucet body carefully through the hole in the sink (E).
4. From underneath, slide the gasket, metal washer and retaining nut
over the supply lines and up to the exposed threaded section of the
faucet. Tighten the retaining nut by hand until it is snug. Using a
wrench or pliers, tighten the assembly.
5. Gently tighten the two screws on the retaining nut. Do not over
tighten.
6. Screw the sprayer head onto the gooseneck.
7. Connect the water supply lines (not supplied) to the faucet.
Faucet body
Gasket
Retaining ring
Screws
Gooseneck
Sprayer
head
Faucet handle
Metal washer
Threaded section
8. Use two wrenches to tighten the two ends together. Please note,
tightening the ttings with a single wrench may damage the faucet
and void the warranty..
QL045
6
Main Water
Supply Outlet
Spray Hose
Page 7
Installation (continued)
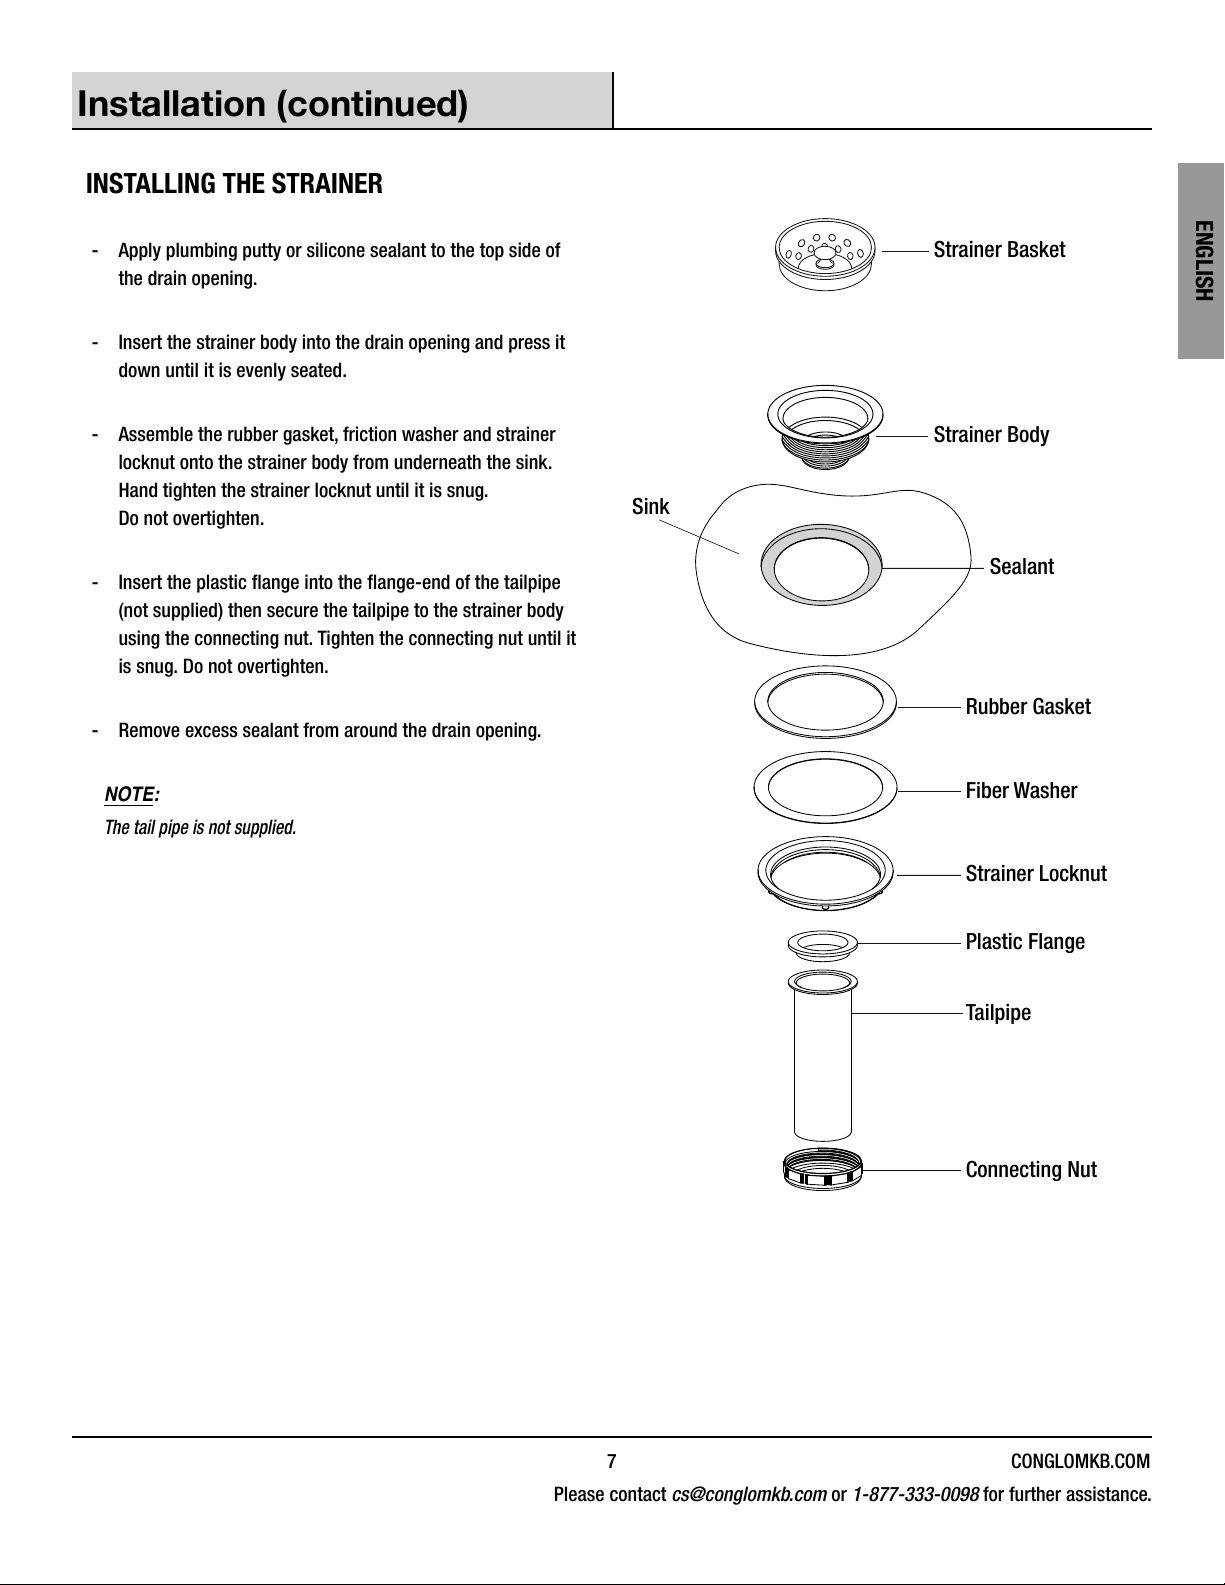
INSTALLING THE STRAINER
ENGLISH
- Apply plumbing putty or silicone sealant to the top side of
the drain opening.
- Insert the strainer body into the drain opening and press it
down until it is evenly seated.
- Assemble the rubber gasket, friction washer and strainer
locknut onto the strainer body from underneath the sink.
Hand tighten the strainer locknut until it is snug.
Do not overtighten.
- Insert the plastic ange into the ange-end of the tailpipe
(not supplied) then secure the tailpipe to the strainer body
using the connecting nut. Tighten the connecting nut until it
is snug. Do not overtighten.
- Remove excess sealant from around the drain opening.
NOTE:
The tail pipe is not supplied.
Strainer Basket
Strainer Body
Sink
Sealant
Rubber Gasket
Fiber Washer
Strainer Locknut
Plastic Flange
Tailpipe
Connecting Nut
7 CONGLOMKB.COM
Please contact cs@conglomkb.com or 1-877-333-0098 for further assistance.
Page 8
Installation (continued)
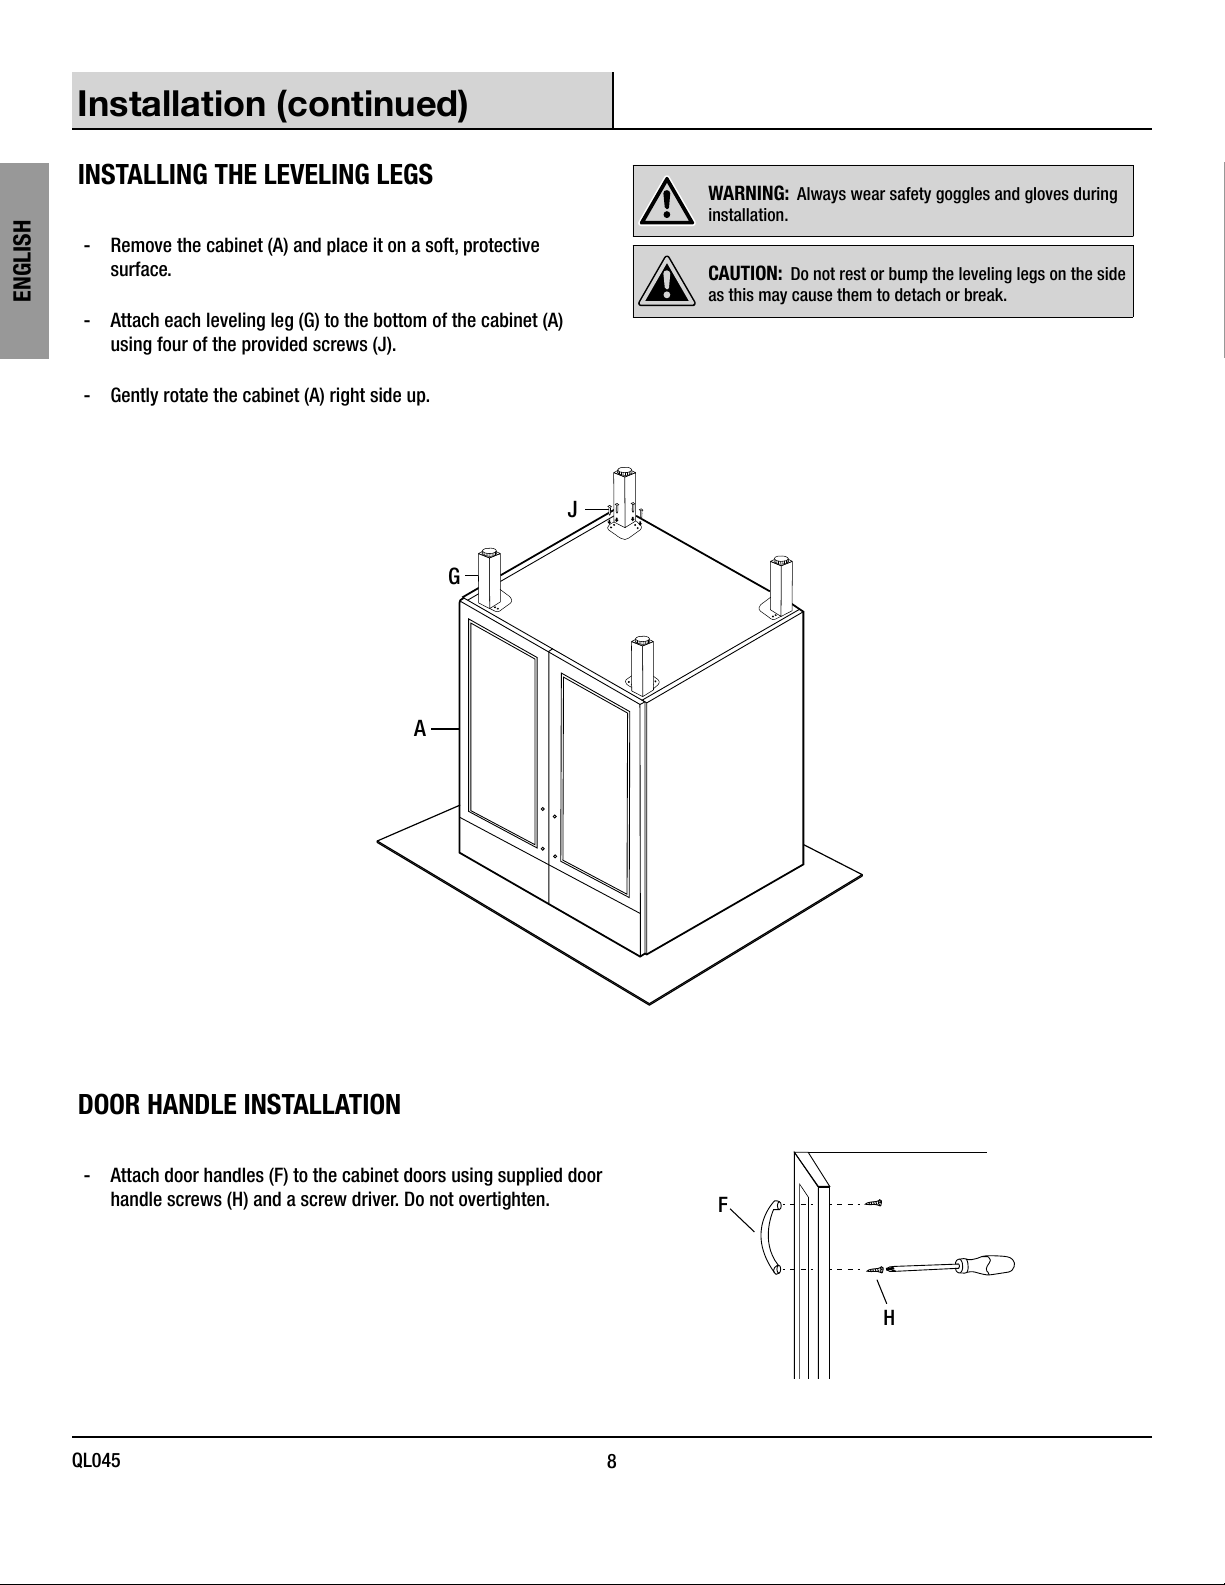
INSTALLING THE LEVELING LEGS
- Remove the cabinet (A) and place it on a soft, protective
surface.
ENGLISH
- Attach each leveling leg (G) to the bottom of the cabinet (A)
using four of the provided screws (J).
- Gently rotate the cabinet (A) right side up.
A
WARNING: Always wear safety goggles and gloves during
installation.
CAUTION: Do not rest or bump the leveling legs on the side
as this may cause them to detach or break.
J
G
DOOR HANDLE INSTALLATION
- Attach door handles (F) to the cabinet doors using supplied door
handle screws (H) and a screw driver. Do not overtighten.
QL045
8
F
H
Page 9
Installation (continued)
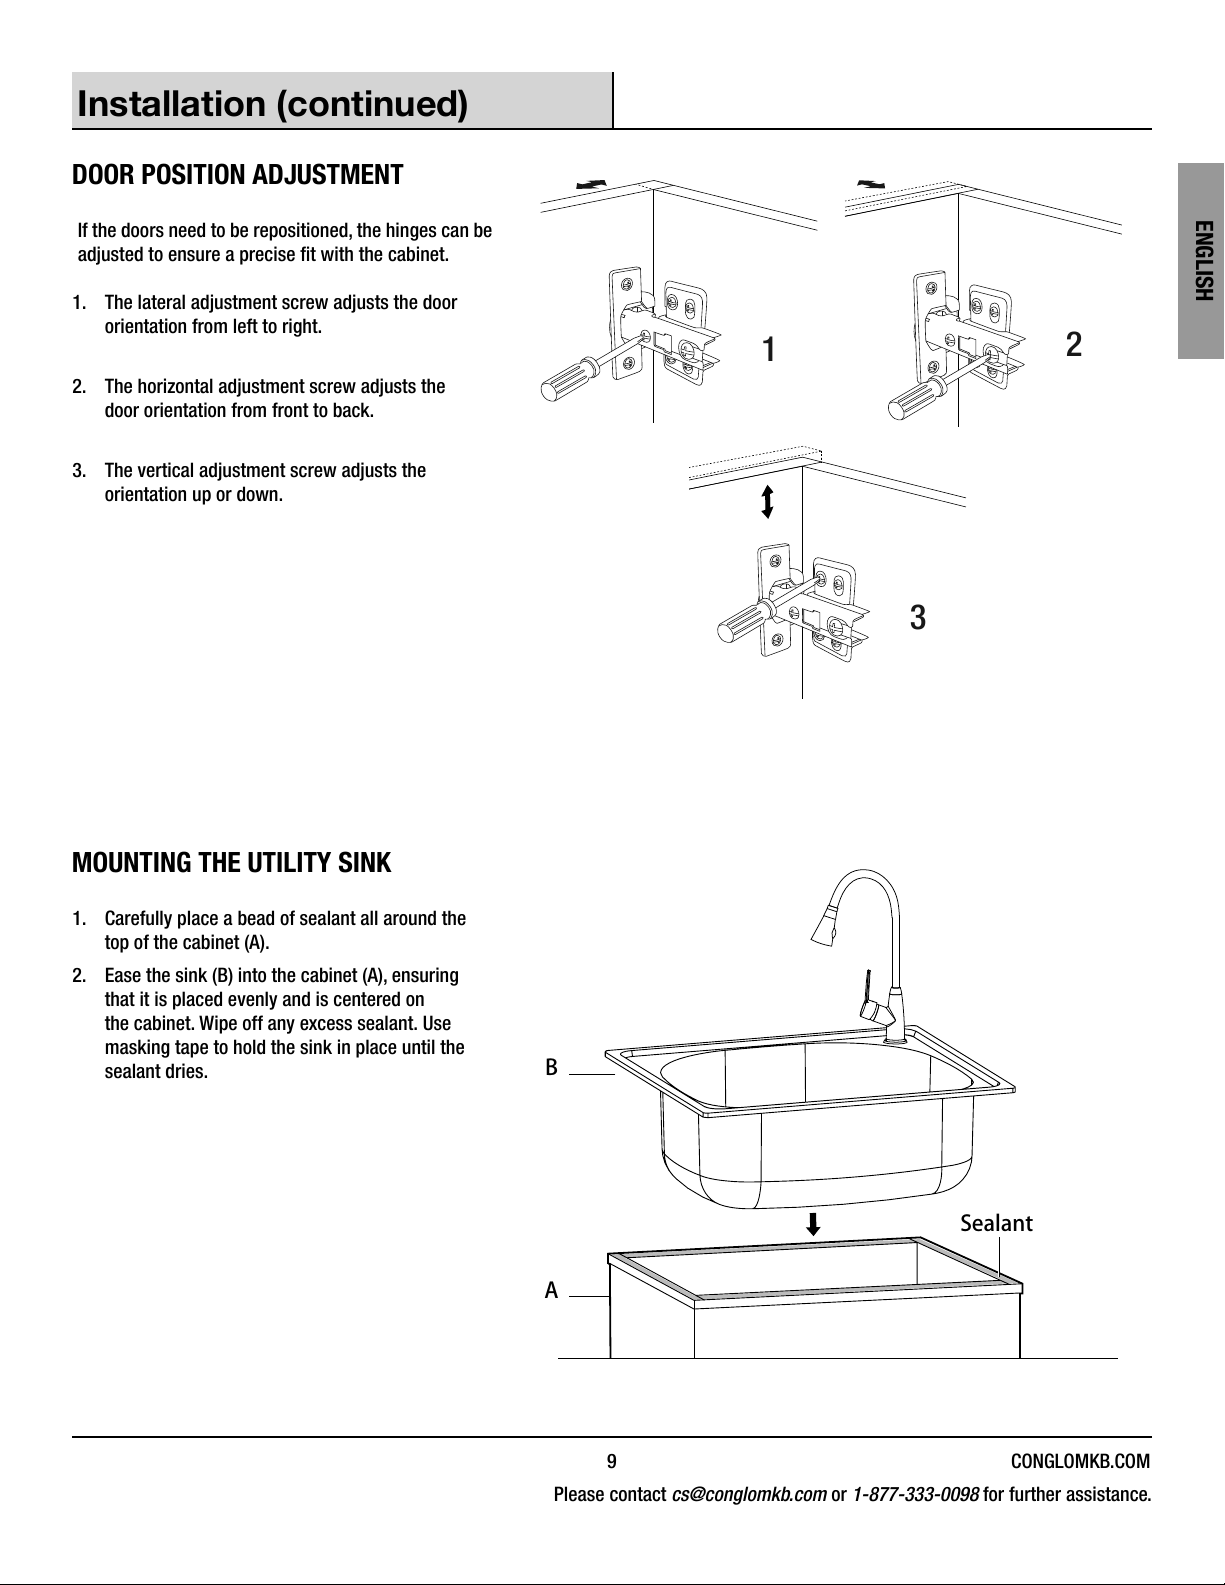
DOOR POSITION ADJUSTMENT
If the doors need to be repositioned, the hinges can be
adjusted to ensure a precise t with the cabinet.
1. The lateral adjustment screw adjusts the door
orientation from left to right.
2. The horizontal adjustment screw adjusts the
door orientation from front to back.
3. The vertical adjustment screw adjusts the
orientation up or down.
1
ENGLISH
2
3
MOUNTING THE UTILITY SINK
1. Carefully place a bead of sealant all around the
top of the cabinet (A).
2. Ease the sink (B) into the cabinet (A), ensuring
that it is placed evenly and is centered on
the cabinet. Wipe off any excess sealant. Use
masking tape to hold the sink in place until the
sealant dries.
B
Sealant
A
9 CONGLOMKB.COM
Please contact cs@conglomkb.com or 1-877-333-0098 for further assistance.
Page 10
Installation (continued)
Position the cabinet in the intended location. If required, level the cabinet by adjusting the four leveling legs and checking the alignment of
the top using a carpenter’s level.
DRAINAGE
ENGLISH
The tailpipe (not supplied) previously installed to the drain can now be connected to your household plumbing. In some cases, your
household plumbing will have to be modied to ensure proper drainage. If so, please consult a licensed plumber to complete needed
modications.
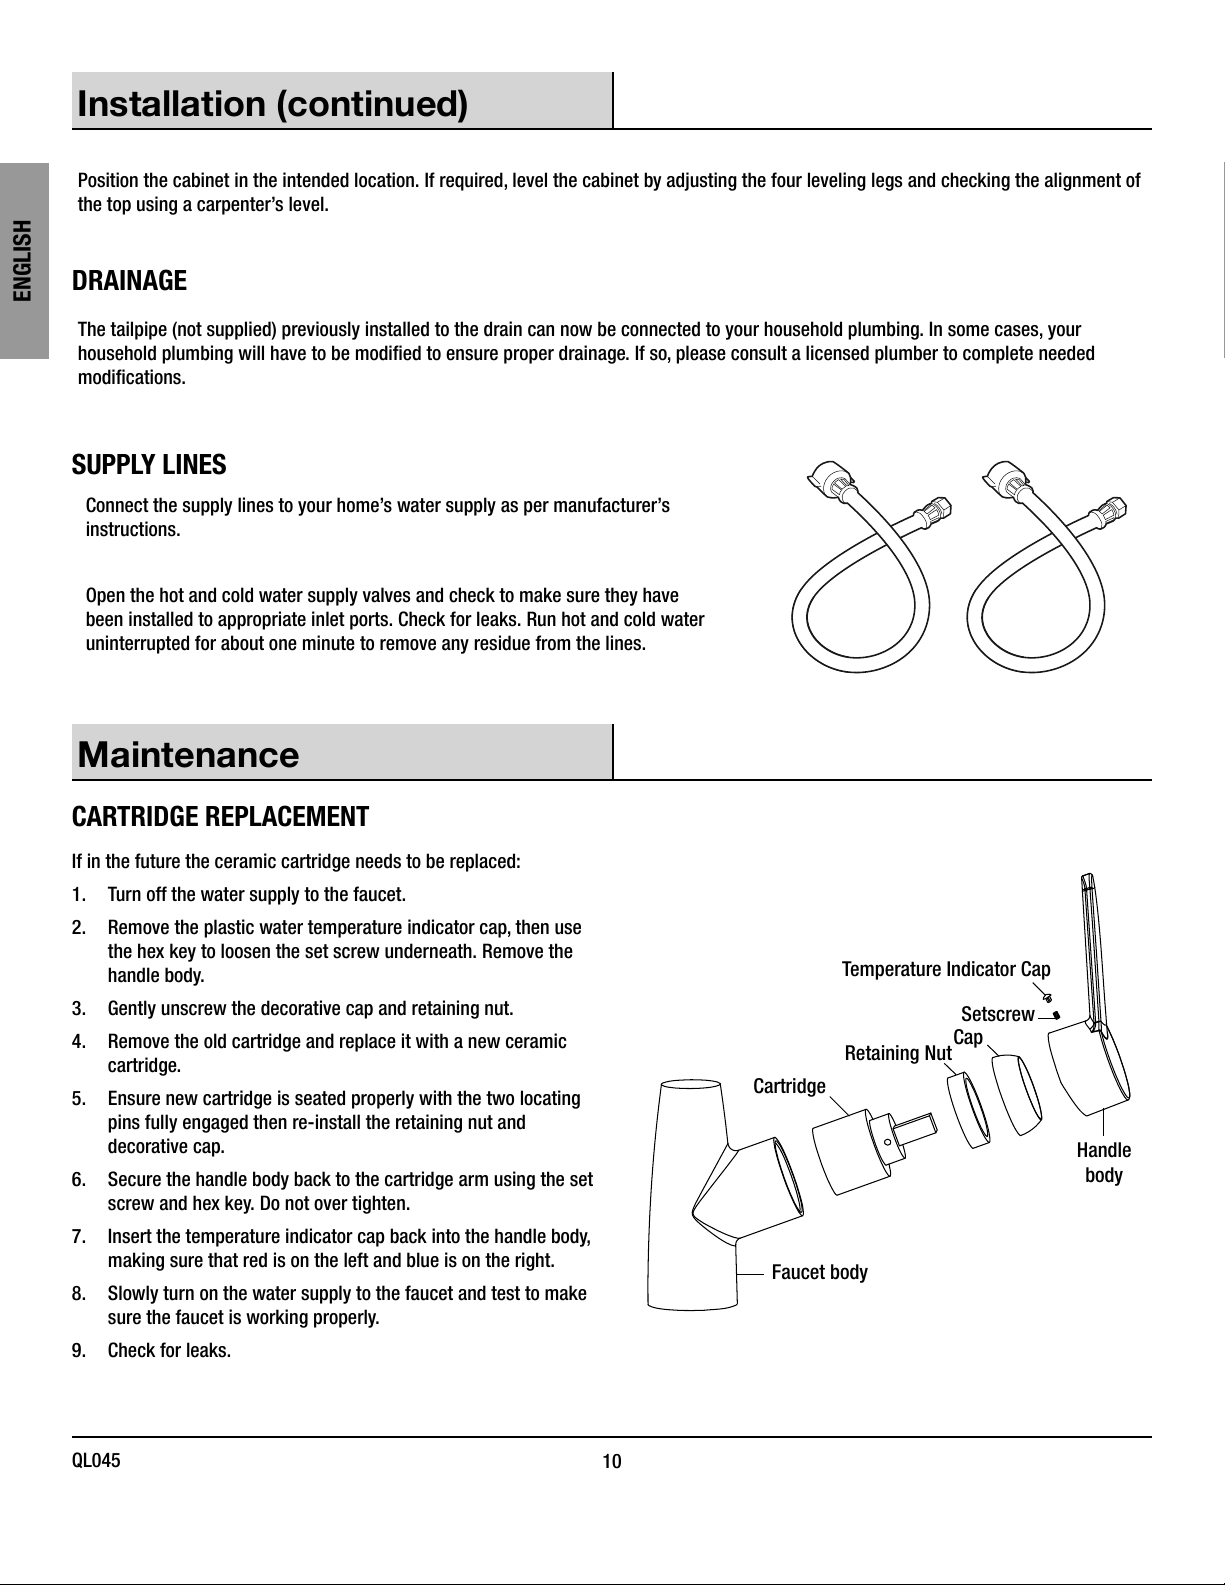
SUPPLY LINES
Connect the supply lines to your home’s water supply as per manufacturer’s
instructions.
Open the hot and cold water supply valves and check to make sure they have
been installed to appropriate inlet ports. Check for leaks. Run hot and cold water
uninterrupted for about one minute to remove any residue from the lines.
Maintenance
CARTRIDGE REPLACEMENT
If in the future the ceramic cartridge needs to be replaced:
1. Turn off the water supply to the faucet.
2. Remove the plastic water temperature indicator cap, then use
the hex key to loosen the set screw underneath. Remove the
handle body.
3. Gently unscrew the decorative cap and retaining nut.
4. Remove the old cartridge and replace it with a new ceramic
cartridge.
5. Ensure new cartridge is seated properly with the two locating
pins fully engaged then re-install the retaining nut and
decorative cap.
6. Secure the handle body back to the cartridge arm using the set
screw and hex key. Do not over tighten.
7. Insert the temperature indicator cap back into the handle body,
making sure that red is on the left and blue is on the right.
8. Slowly turn on the water supply to the faucet and test to make
sure the faucet is working properly.
9. Check for leaks.
Cartridge
Faucet body
Temperature Indicator Cap
Setscrew
Retaining Nut
Cap
Handle
body
QL045
10
Page 11
Care and Cleaning
UTILITY SINK CABINET
Do Do
ENGLISH
- After use, always rinse your sink with tap water to
dilute and remove deposits.
- Towel dry after use whenever possible to prevent
water spots. Should water spots occur, clean with
a mild solution of vinegar and water followed by a
thorough rinse.
- Use liquid soap, a general household cleaner, or a weak
solution of vinegar and water for regular cleaning.
- Only use plastic scouring pads recommended for use
in stainless steel sinks, and only use them in the bowl
of the sink. Scrub in the direction of the satin nish lines.
- Remove dust and dry dirt with a soft, damp cloth.
- Clean grease, oil, paint and ink stains with isopropyl
Do Do not
- Do not allow any food, detergent, soap or grease to dry
or sit for extended periods of time on the surface of the
sink.
- Never use abrasive cleaning products, as they will dull
and scratch the nish.
- Do not use scouting pads on the deck, as they will dull
the mirror nish.
- Never use steel wool pads, as they will leave iron
particles on the sink, which will cause corrosion.
- Never leave steel or cast iron pans in your sink for
extended periods of time, as this can cause corrosion.
- Do not allow your cabinet surface to come into contact
- Use caution when using sharp instruments that may
(rubbing alcohol). Immediately rinse with water after
stain removal.
with products such as acetone (nail polish remover),
nail polish, dry cleaning solution, lacquer thinners,
gasoline, pine oil, etc.
fall and scratch the surface.
Your sink is manufactured with the highest grade stainless steel and will provide you many years of enjoyment with the proper care.
SCRATCH, SPOT, AND BLEMISH REMOVAL AND SURFACE RESTORATION:
Little rust spots and blemishes that periodically appear in the sink are typically the result of the steel interacting with the chemicals
found in the vast spectrum of substances that sinks are commonly exposed to. They may also get transferred from other objects
placed or left in the sink. Scratches are the result of regular wear and tear.
To remove scratches, spots, and blemishes from the sink, rub them with a non-metallic scouring pad (e.g. Scotch-Brite®) combined
with a mild abrasive cleaner (e.g. Vim® or Barkeeper’s Friend®). Always rub the surfaces in the direction of the grain of the steel.
When nished, rinse the sink with water and dry it with a towel to allow the sink to form a protective outer layer. This procedure can
also be used to renew all of the surfaces of the sink.
11 CONGLOMKB.COM
Please contact cs@conglomkb.com or 1-877-333-0098 for further assistance.
Page 12
Service Parts
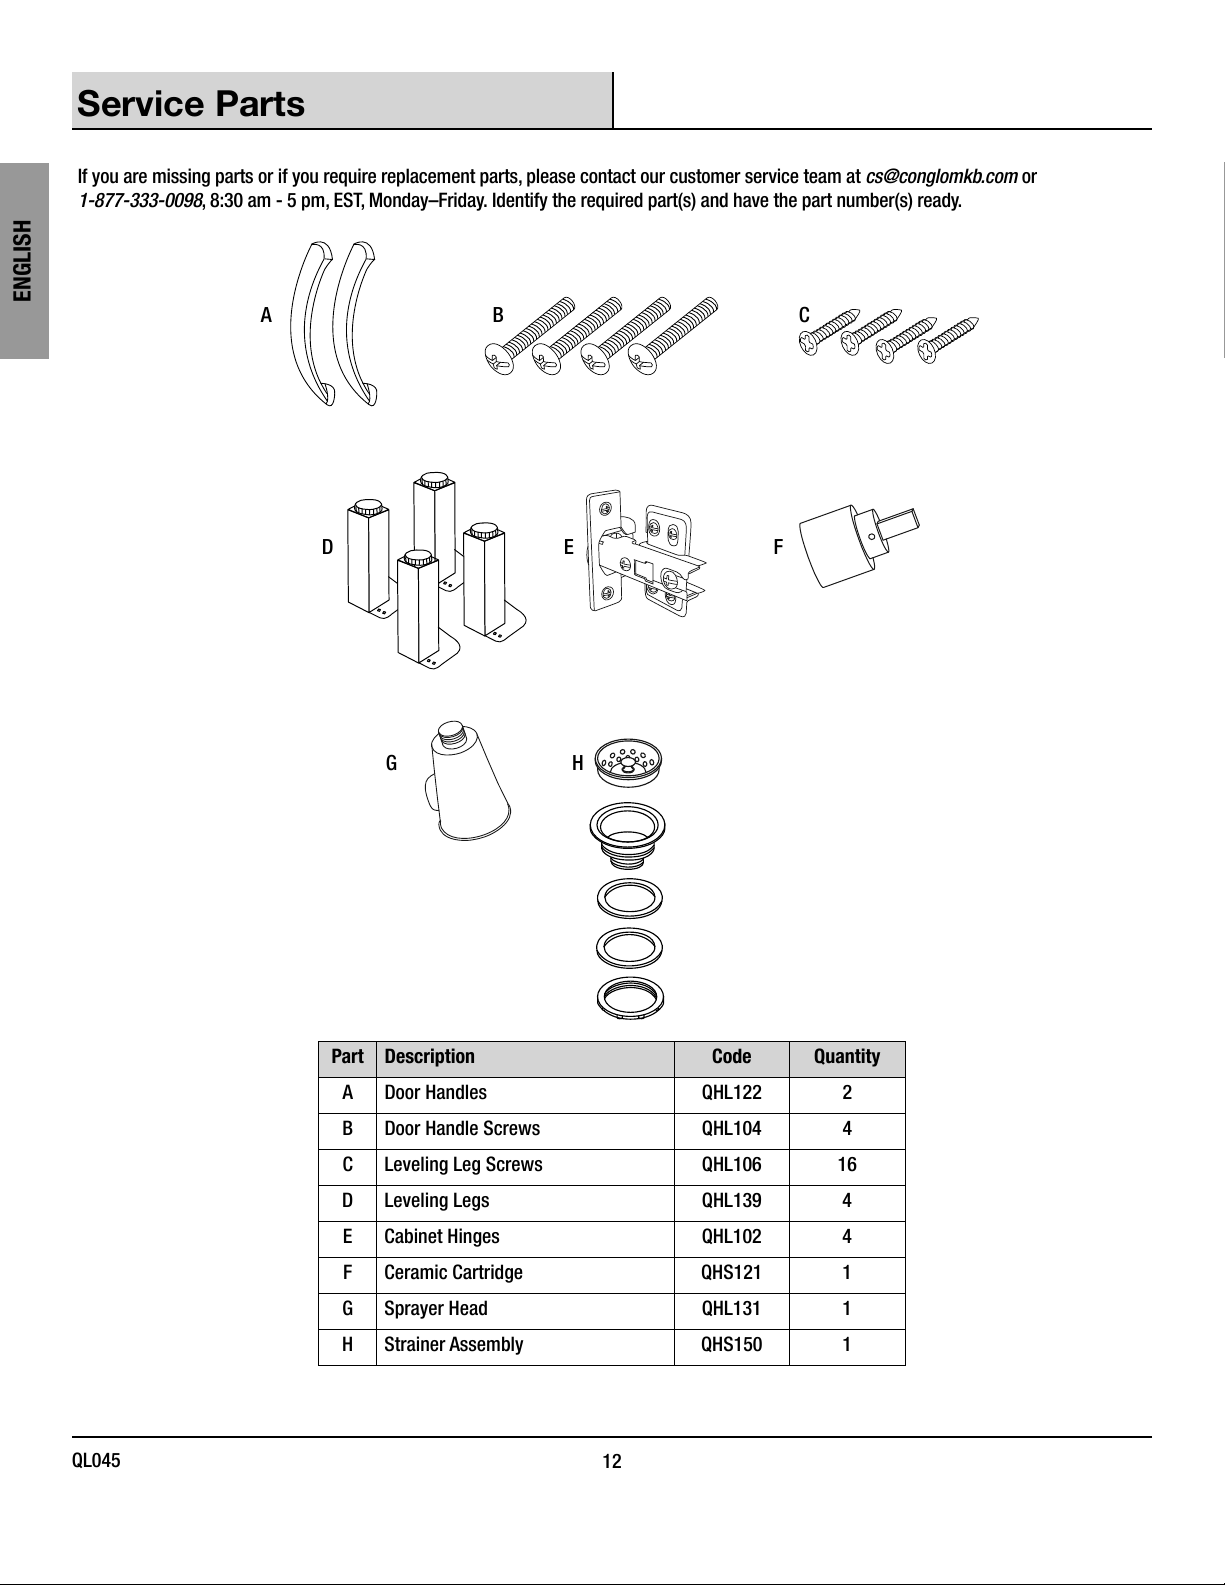
If you are missing parts or if you require replacement parts, please contact our customer service team at cs@conglomkb.com or
1-877-333-0098, 8:30 am - 5 pm, EST, Monday–Friday. Identify the required part(s) and have the part number(s) ready.
ENGLISH
A
B C
D
G
Part Description Code Quantity
A Door Handles QHL122 2
E F
H
B Door Handle Screws QHL104 4
C Leveling Leg Screws QHL106 16
D Leveling Legs QHL139 4
E Cabinet Hinges QHL102 4
F Ceramic Cartridge QHS121 1
G Sprayer Head QHL131 1
H Strainer Assembly QHS150 1
QL045
12
Page 13
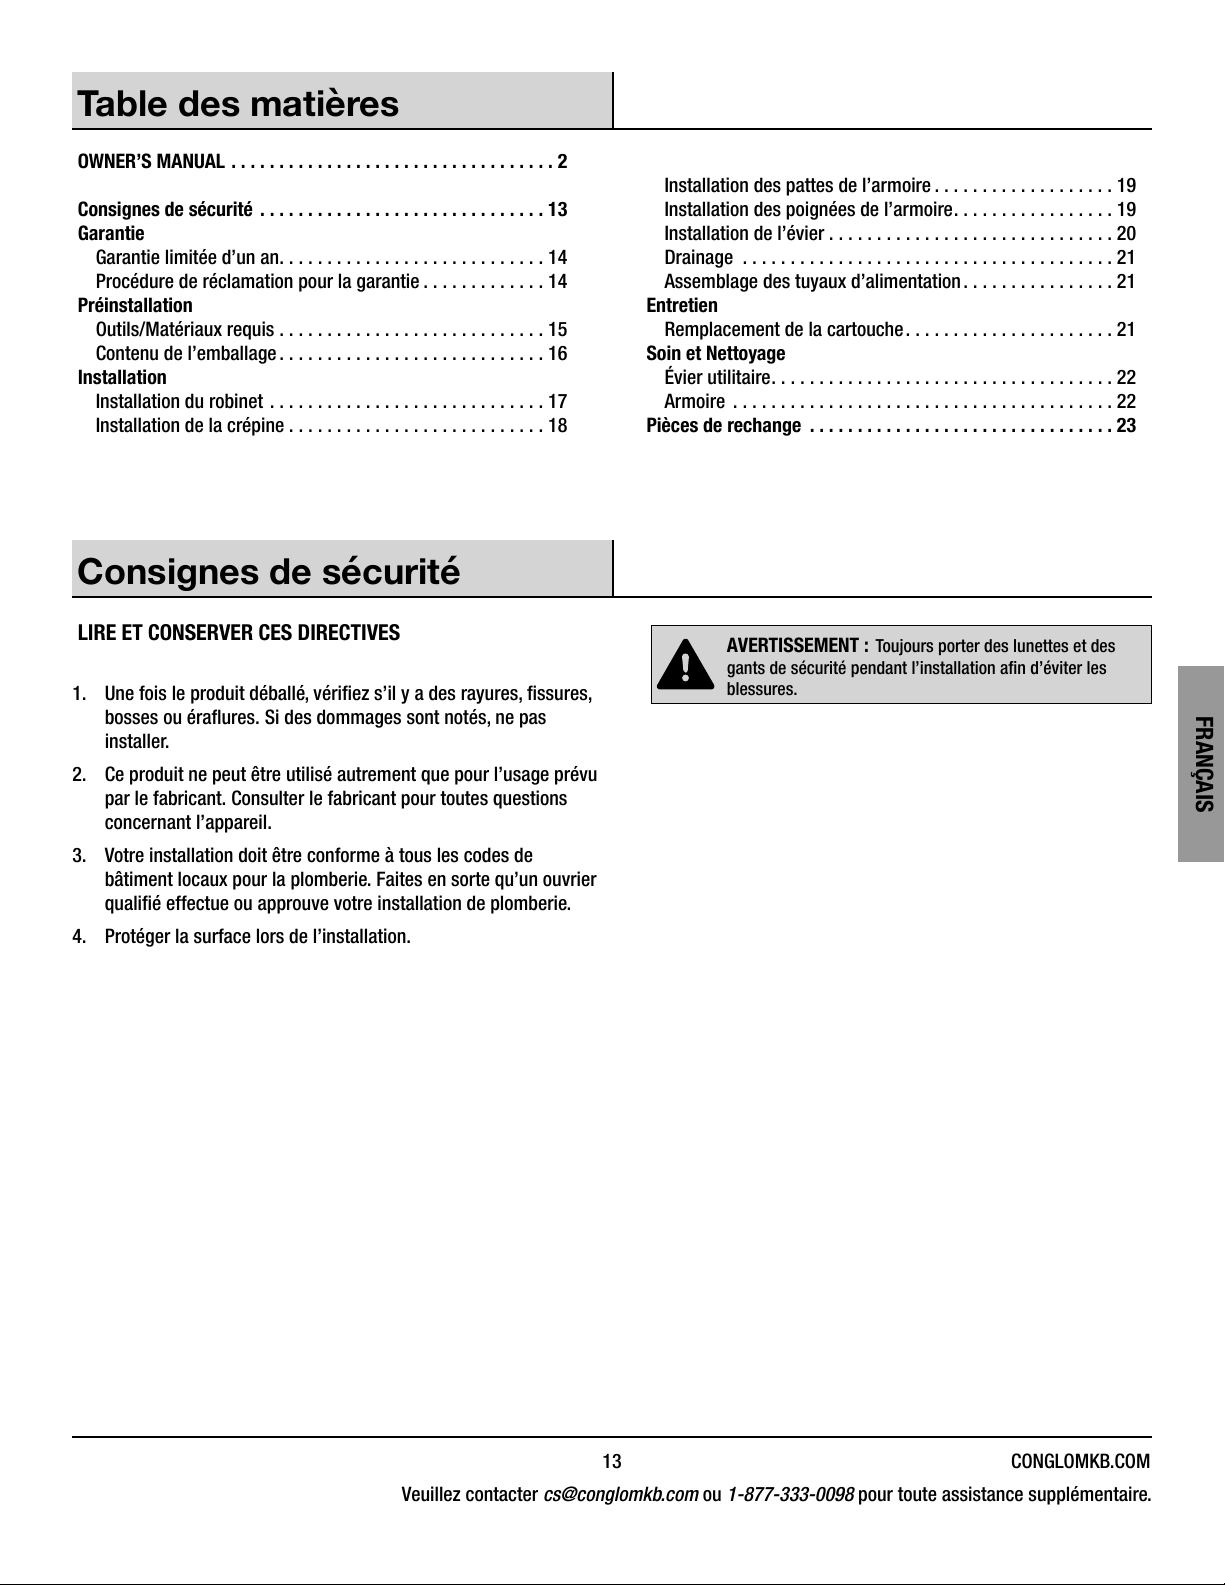
Table des matières
OWNER’S MANUAL ..................................2
Consignes de sécurité ..............................13
Garantie ............................................
Garantie limitée d’un an ............................14
Procédure de réclamation pour la garantie .............14
Préinstallation .......................................
Outils/Matériaux requis ............................15
Contenu de l’emballage ............................16
Installation .........................................
Installation du robinet .............................17
Installation de la crépine ...........................18
Installation des pattes de l’armoire ...................19
Installation des poignées de l’armoire .................19
Installation de l’évier ..............................20
Drainage .......................................21
Assemblage des tuyaux d’alimentation ................21
Entretien ...........................................
Remplacement de la cartouche ......................21
Soin et Nettoyage ....................................
Évier utilitaire ....................................22
Armoire ........................................22
Pièces de rechange ................................23
Consignes de sécurité
LIRE ET CONSERVER CES DIRECTIVES
1. Une fois le produit déballé, vériez s’il y a des rayures, ssures,
bosses ou éraures. Si des dommages sont notés, ne pas
installer.
2. Ce produit ne peut être utilisé autrement que pour l’usage prévu
par le fabricant. Consulter le fabricant pour toutes questions
concernant l’appareil.
3. Votre installation doit être conforme à tous les codes de
bâtiment locaux pour la plomberie. Faites en sorte qu’un ouvrier
qualié effectue ou approuve votre installation de plomberie.
4. Protéger la surface lors de l’installation.
AVERTISSEMENT : Toujours porter des lunettes et des
gants de sécurité pendant l’installation an d’éviter les
blessures.
FRANÇAIS
13 CONGLOMKB.COM
Veuillez contacter cs@conglomkb.com ou 1-877-333-0098 pour toute assistance supplémentaire.
Page 14
Garantie
GARANTIE LIMITÉE D’UN AN
Inspecter minutieusement le produit avant l’installation et signaler tout dommage sans délai. Nous ne serons pas responsables des défaillances
ou des dommages qui auraient dû être découverts ou évités par une inspection adéquate et des essais avant l’installation.
Conglom Inc. garantit ce produit contre tout défaut dans les matériaux ou la fabrication, pour une période d’un (1) an à compter de la date
de l’achat. Une preuve d’achat (facture d’achat originale) du consommateur/acheteur original devra accompagner toute réclamation faite à
Conglom Inc.
Cette garantie est non transférable et sera nulle si l’unité est enlevée de son installation initiale ou si elle n’est pas installée suivant
les spécications du fabricant. Elle ne s’applique pas dans l’éventualité de dommages causés au produit suite à l’utilisation de pièces
de rechange autre que les pièces originales Conglom Inc. (les pièces de rechange peuvent être obtenus en nous écrivant un courriel à
cs@conglomkb.com ou en appellant au 1-877-333-0098 entre 8h30 et 17h00, HNE), une erreur d’installation, l’abus, l’utilisation ou l’entretien
incorrecte et le service incorrects (qu’ils soient effectués par un plombier, un entrepreneur, une entreprise de service ou un membre de la
famille de l’acheteur). La garantie exclut les dommages causés par des conditions agressives d’air ou d’eau, des nettoyants ou des matériaux
rudes et/ou abrasifs.
Nous ne pouvons en aucun cas être tenus responsables pour toute blessure corporelle ou tout dommage matériel résultant d’une mauvaise
installation ou utilisation de ce produit. Nous ne serons pas tenues responsables de l’incapacité d’utiliser cette unité, des inconvénients,
des coûts encourus pour la main d’œuvre, des matériaux, de l’enlèvement et de l’installation des unités de remplacement ou d’aucun autre
dommage causé par un incident ou accessoire. Les coûts encourus pour obtenir l’accès pour la réparation ou le remplacement sont la
responsabilité de l’utilisateur.
Nos obligations se limitent à la réparation ou au remplacement de l’unité (selon notre choix) qui peut s’avérer, selon notre examen unique,
être défectueuse sous l’utilisation et le service normaux pendant la période de garantie. Nous pouvons émettre un crédit au montant de la
valeur de la facture du produit défectueux (ou d’un pourcentage de ce montant selon l’usure) tenant lieu de la réparation ou du remplacement.
Toute défectuosité de l’unité qui ne peut être liée à un défaut de matériel ou de fabrication n’est pas couvert par cette garantie. Ces conditions
non garanties incluent, mais ne se limitent pas aux suivantes :
- Une mauvaise installation non conforme aux instructions du fabricant.
FRANÇAIS
- Les bosselures, bosses et rayures causées pendant l’expédition, la manutention ou l’installation.
- Changement de la couleur ou du ni en raison de l’usage d’un produit chimique.
- Les dommages causés par le non-respect des directives de soin et de nettoyage, y compris les dommages causés par l’utilisation
de produits nettoyants abrasifs.
- Toute modication apportée à l’unité par l’acheteur ou l’installateur.
- Dommages en raison d’un impact accidentel, du feu, d’une inondation, du gel et de l’usure normale.
- Courbures et déformations provoquées par des raccordements forcés, des xations trop serrées et un support inadéquat
pendant l’installation.
- Tout défaut ou dommage aux ampoules électriques.
Cette garantie ne s’applique pas à l’utilisation ou l’installation à des ns commerciales ou institutionnelles.
PROCÉDURE DE RÉCLAMATION POUR LA GARANTIE
Si un défaut couvert par la garantie se produit ou si vous avez besoin de pièces de rechange, contacter notre service à la clientèle au
cs@conglomkb.com ou au 1-877-333-0098 (lundi au vendredi, 8h30 à 17h, HNE).
Avant d’appeler, veuillez-vous assurer d’avoir en main :
- Numéro de modèle ou une description.
- La preuve d’achat.
- Les détails concernant le défaut et/ou le numéro de la pièce de rechange.
- Le nom et l’adresse du propriétaire et/ou de l’installateur.
QL045
14
Page 15
Préinstallation
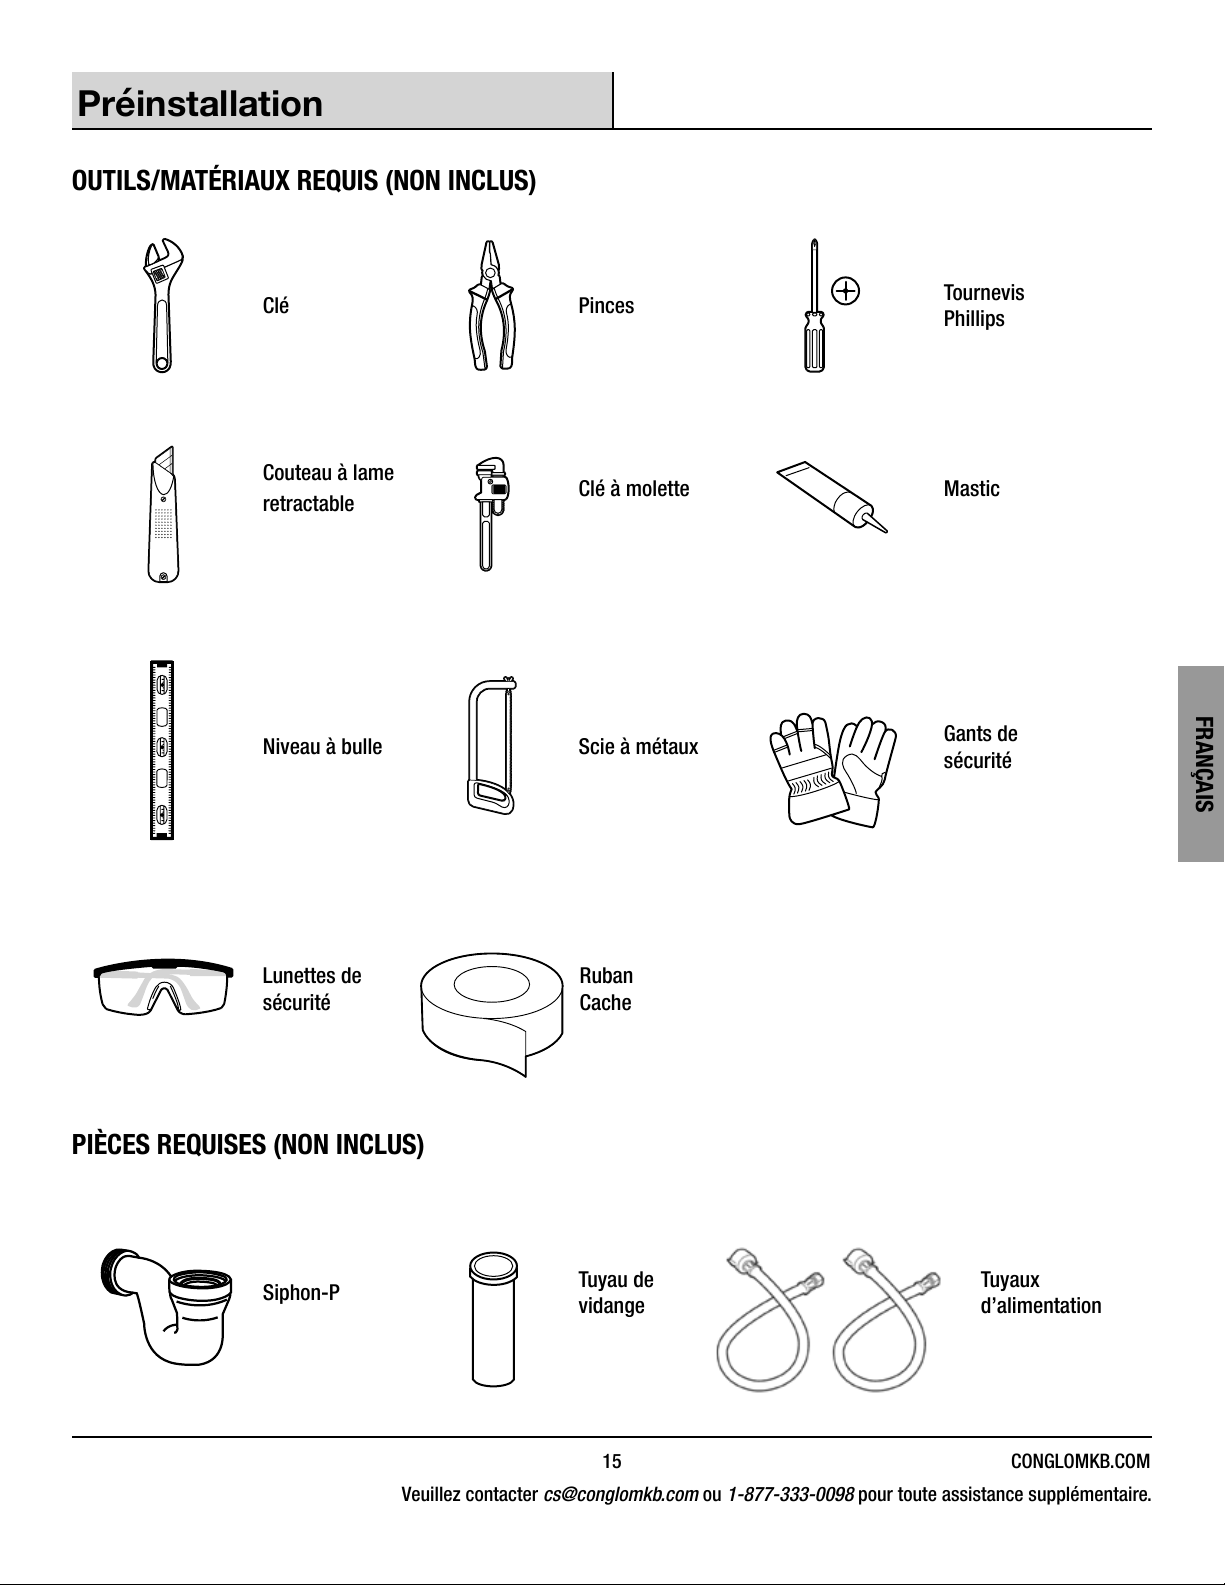
OUTILS/MATÉRIAUX REQUIS (NON INCLUS)
Clé Pinces
Couteau à lame
retractable
Niveau à bulle Scie à métaux
Clé à molette Mastic
Tournevis
Phillips
FRANÇAIS
Gants de
sécurité
Lunettes de
sécurité
Ruban
Cache
PIÈCES REQUISES (NON INCLUS)
Siphon-P
15 CONGLOMKB.COM
Veuillez contacter cs@conglomkb.com ou 1-877-333-0098 pour toute assistance supplémentaire.
Tuyau de
vidange
Tuyaux
d’alimentation
Page 16
Préinstallation (suite)
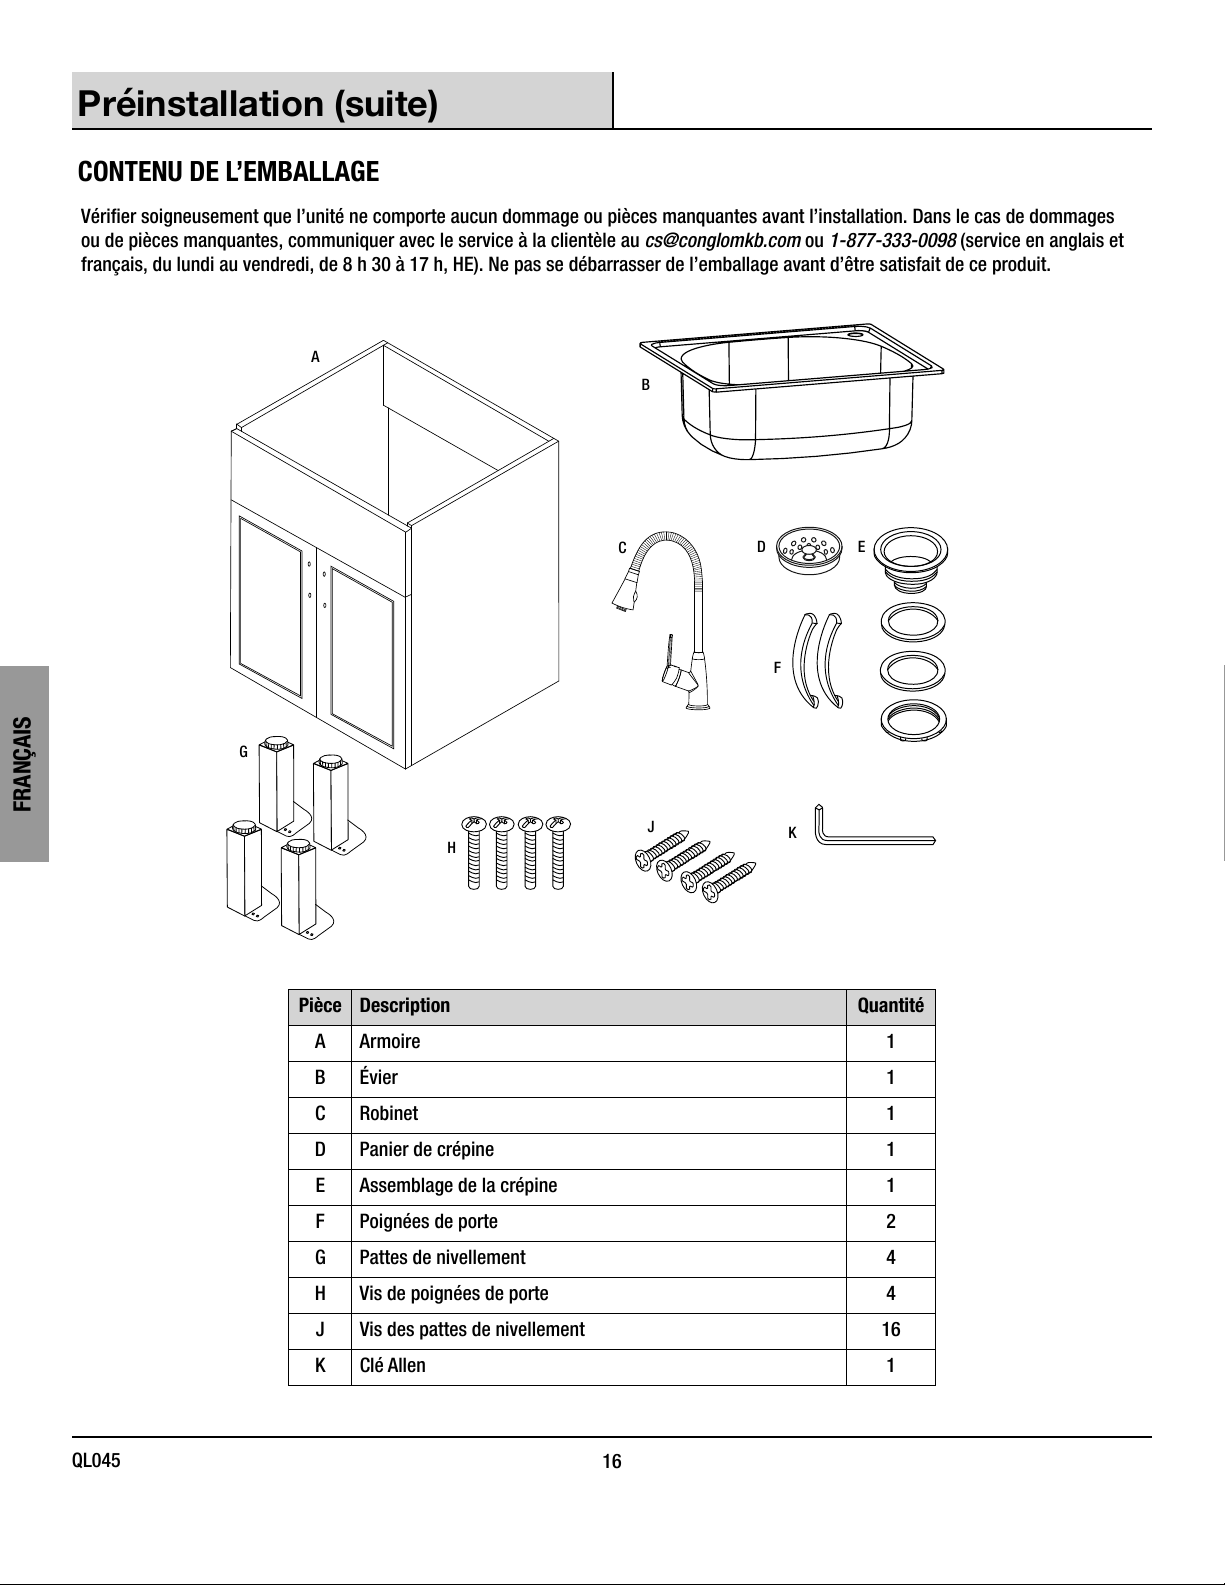
CONTENU DE L’EMBALLAGE
Vérier soigneusement que l’unité ne comporte aucun dommage ou pièces manquantes avant l’installation. Dans le cas de dommages
ou de pièces manquantes, communiquer avec le service à la clientèle au [email protected] ou 1-877-333-0098 (service en anglais et
français, du lundi au vendredi, de 8 h 30 à 17 h, HE). Ne pas se débarrasser de l’emballage avant d’être satisfait de ce produit.
A
B
FRANÇAIS
C
G
J
H
D E
F
K
Pièce Description Quantité
A Armoire 1
B Évier 1
C Robinet 1
D Panier de crépine 1
E Assemblage de la crépine 1
F Poignées de porte 2
G Pattes de nivellement 4
H Vis de poignées de porte 4
J Vis des pattes de nivellement 16
K Clé Allen 1
QL045
16
Page 17
Installation
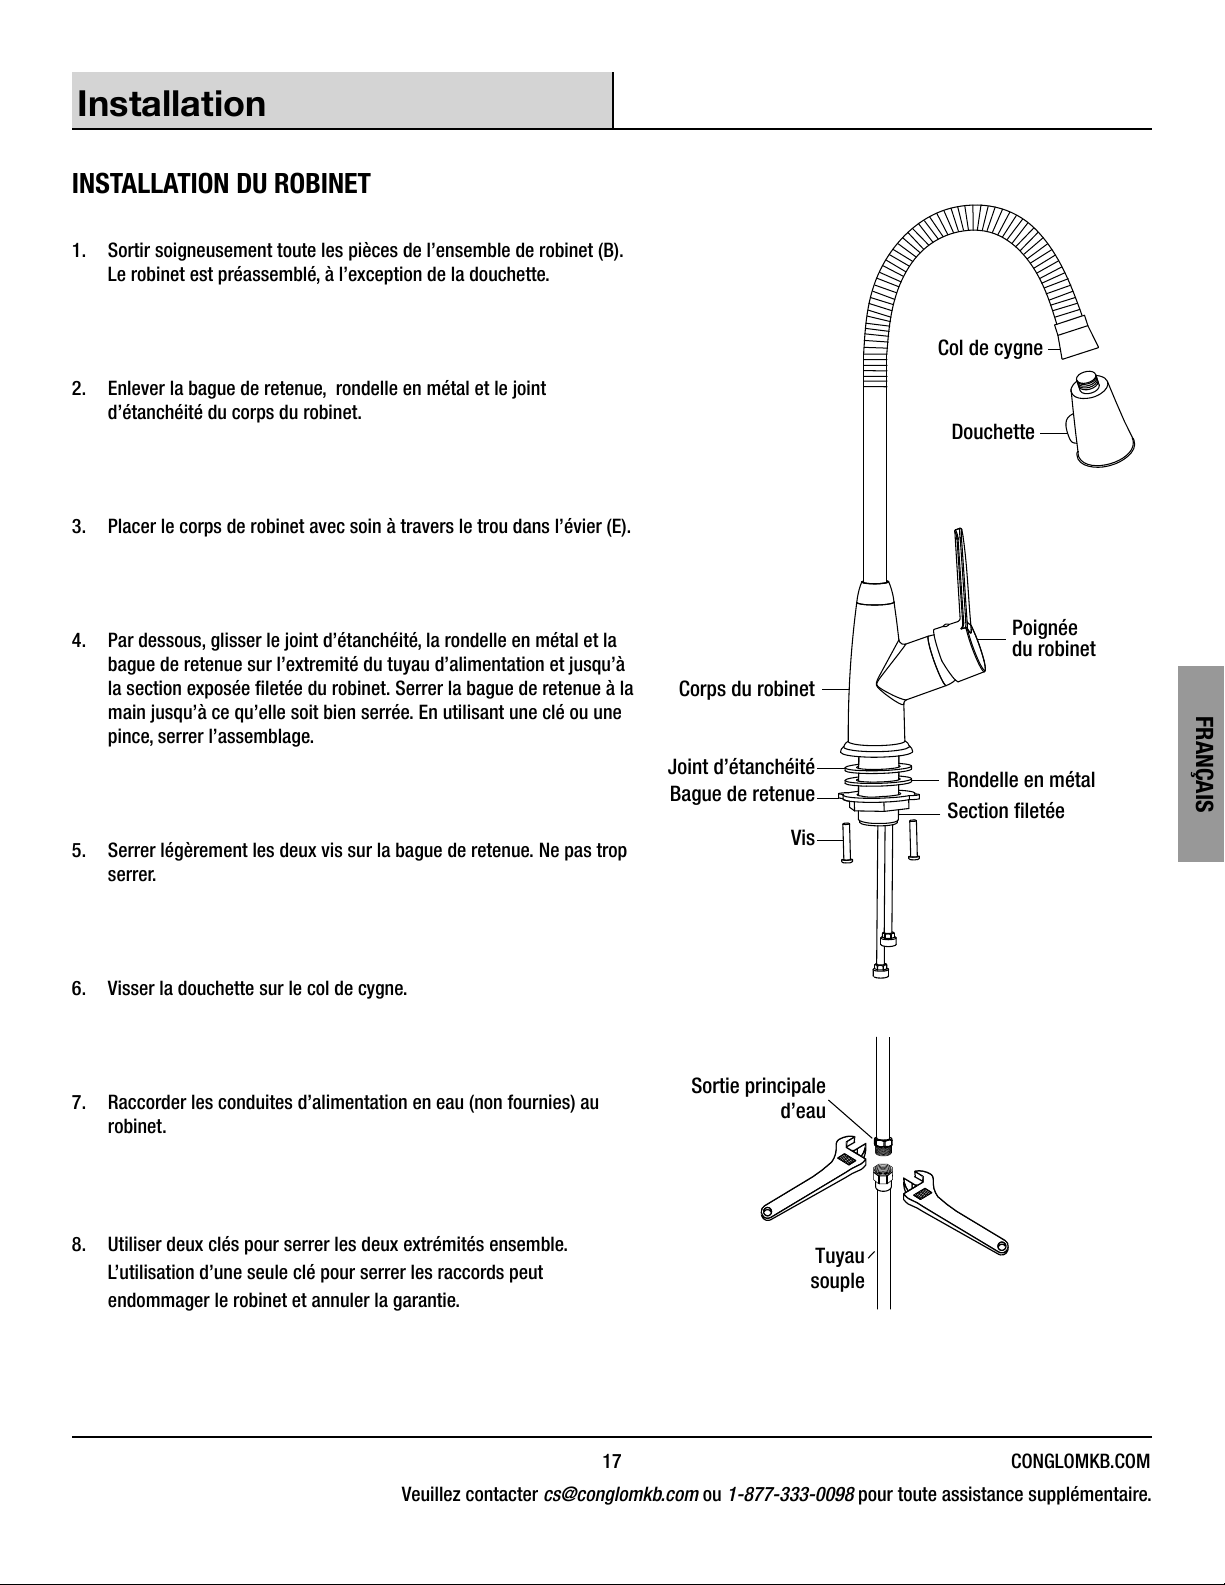
INSTALLATION DU ROBINET
1. Sortir soigneusement toute les pièces de l’ensemble de robinet (B).
Le robinet est préassemblé, à l’exception de la douchette.
2. Enlever la bague de retenue, rondelle en métal et le joint
d’étanchéité du corps du robinet.
3. Placer le corps de robinet avec soin à travers le trou dans l’évier (E).
Col de cygne
Douchette
4. Par dessous, glisser le joint d’étanchéité, la rondelle en métal et la
bague de retenue sur l’extremité du tuyau d’alimentation et jusqu’à
la section exposée letée du robinet. Serrer la bague de retenue à la
main jusqu’à ce qu’elle soit bien serrée. En utilisant une clé ou une
pince, serrer l’assemblage.
5. Serrer légèrement les deux vis sur la bague de retenue. Ne pas trop
serrer.
6. Visser la douchette sur le col de cygne.
7. Raccorder les conduites d’alimentation en eau (non fournies) au
robinet.
Corps du robinet
Joint d’étanchéité
Bague de retenue
Vis
Sortie principale
d’eau
Poignée
du robinet
FRANÇAIS
Rondelle en métal
Section letée
8. Utiliser deux clés pour serrer les deux extrémités ensemble.
L’utilisation d’une seule clé pour serrer les raccords peut
endommager le robinet et annuler la garantie.
17 CONGLOMKB.COM
Veuillez contacter cs@conglomkb.com ou 1-877-333-0098 pour toute assistance supplémentaire.
Tuyau
souple
Page 18
Installation (suite)
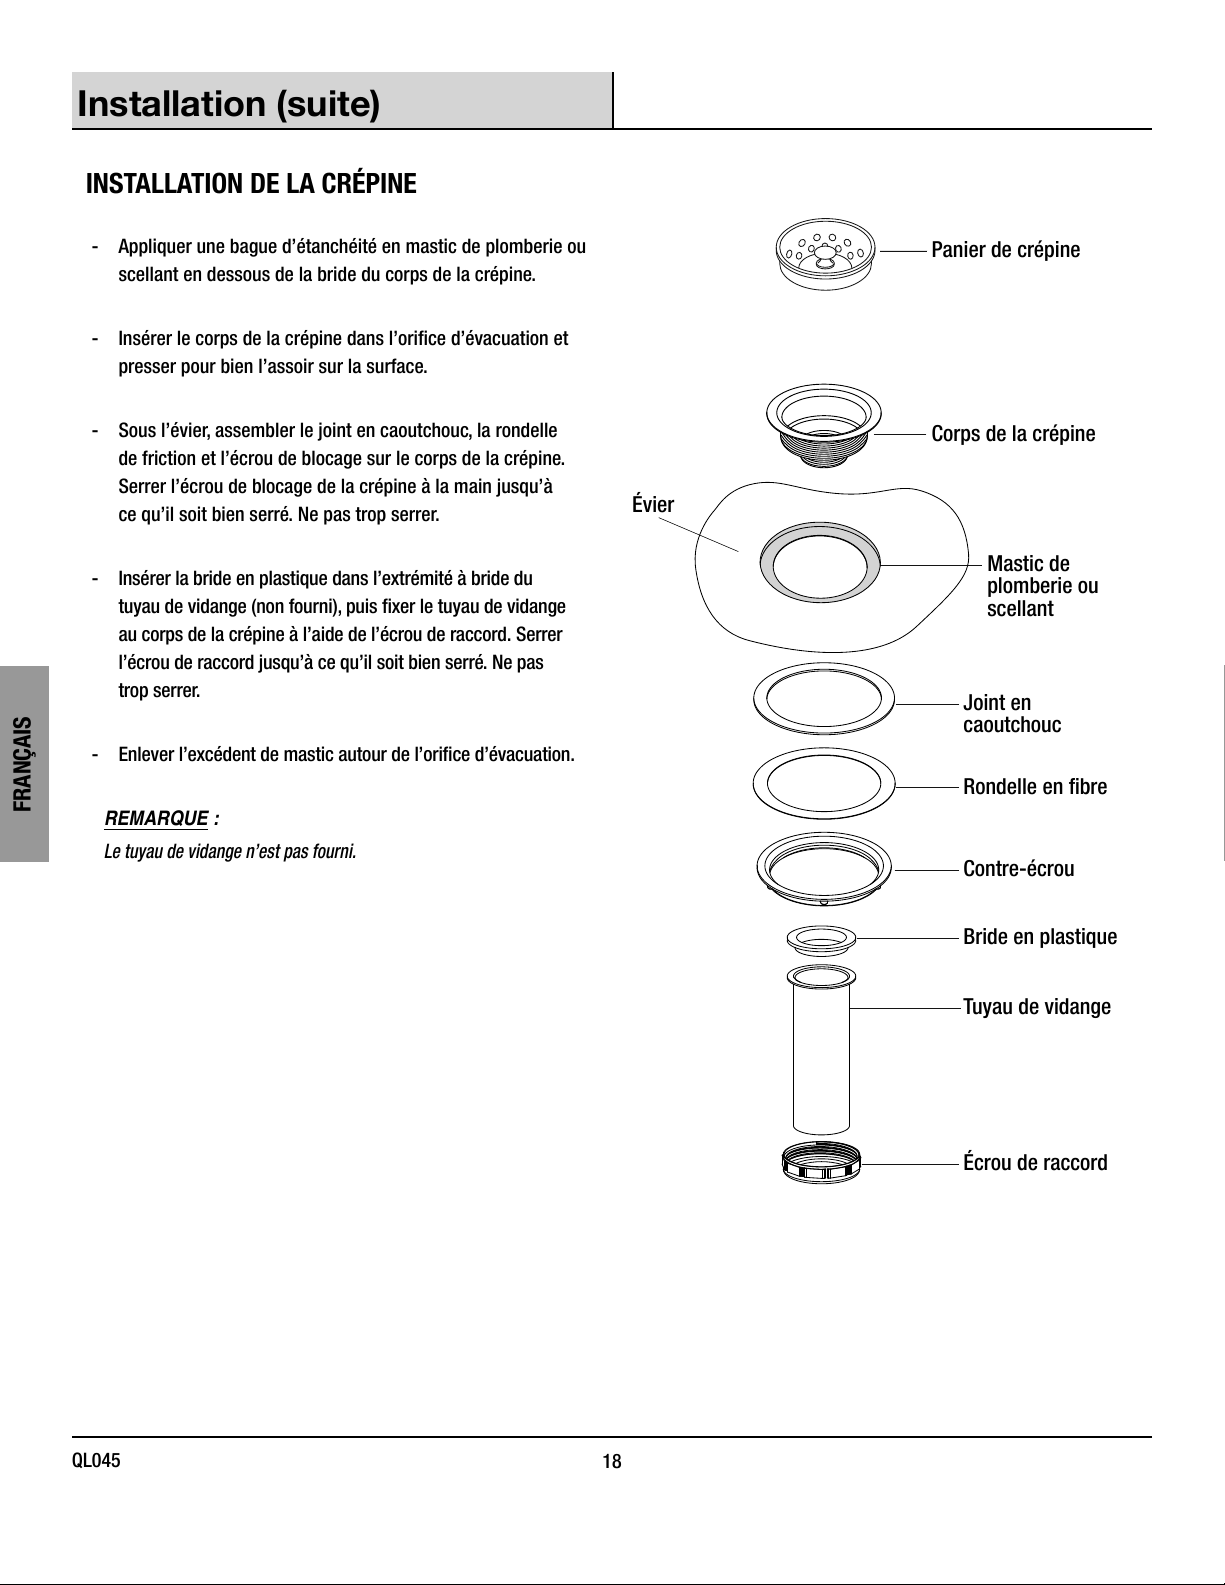
INSTALLATION DE LA CRÉPINE
FRANÇAIS
- Appliquer une bague d’étanchéité en mastic de plomberie ou
scellant en dessous de la bride du corps de la crépine.
- Insérer le corps de la crépine dans l’orice d’évacuation et
presser pour bien l’assoir sur la surface.
- Sous l’évier, assembler le joint en caoutchouc, la rondelle
de friction et l’écrou de blocage sur le corps de la crépine.
Serrer l’écrou de blocage de la crépine à la main jusqu’à
ce qu’il soit bien serré. Ne pas trop serrer.
- Insérer la bride en plastique dans l’extrémité à bride du
tuyau de vidange (non fourni), puis xer le tuyau de vidange
au corps de la crépine à l’aide de l’écrou de raccord. Serrer
l’écrou de raccord jusqu’à ce qu’il soit bien serré. Ne pas
trop serrer.
- Enlever l’excédent de mastic autour de l’orice d’évacuation.
REMARQUE :
Le tuyau de vidange n’est pas fourni.
Panier de crépine
Corps de la crépine
Évier
Mastic de
plomberie ou
scellant
Joint en
caoutchouc
Rondelle en bre
Contre-écrou
QL045
18
Bride en plastique
Tuyau de vidange
Écrou de raccord
Page 19
Installation (suite)
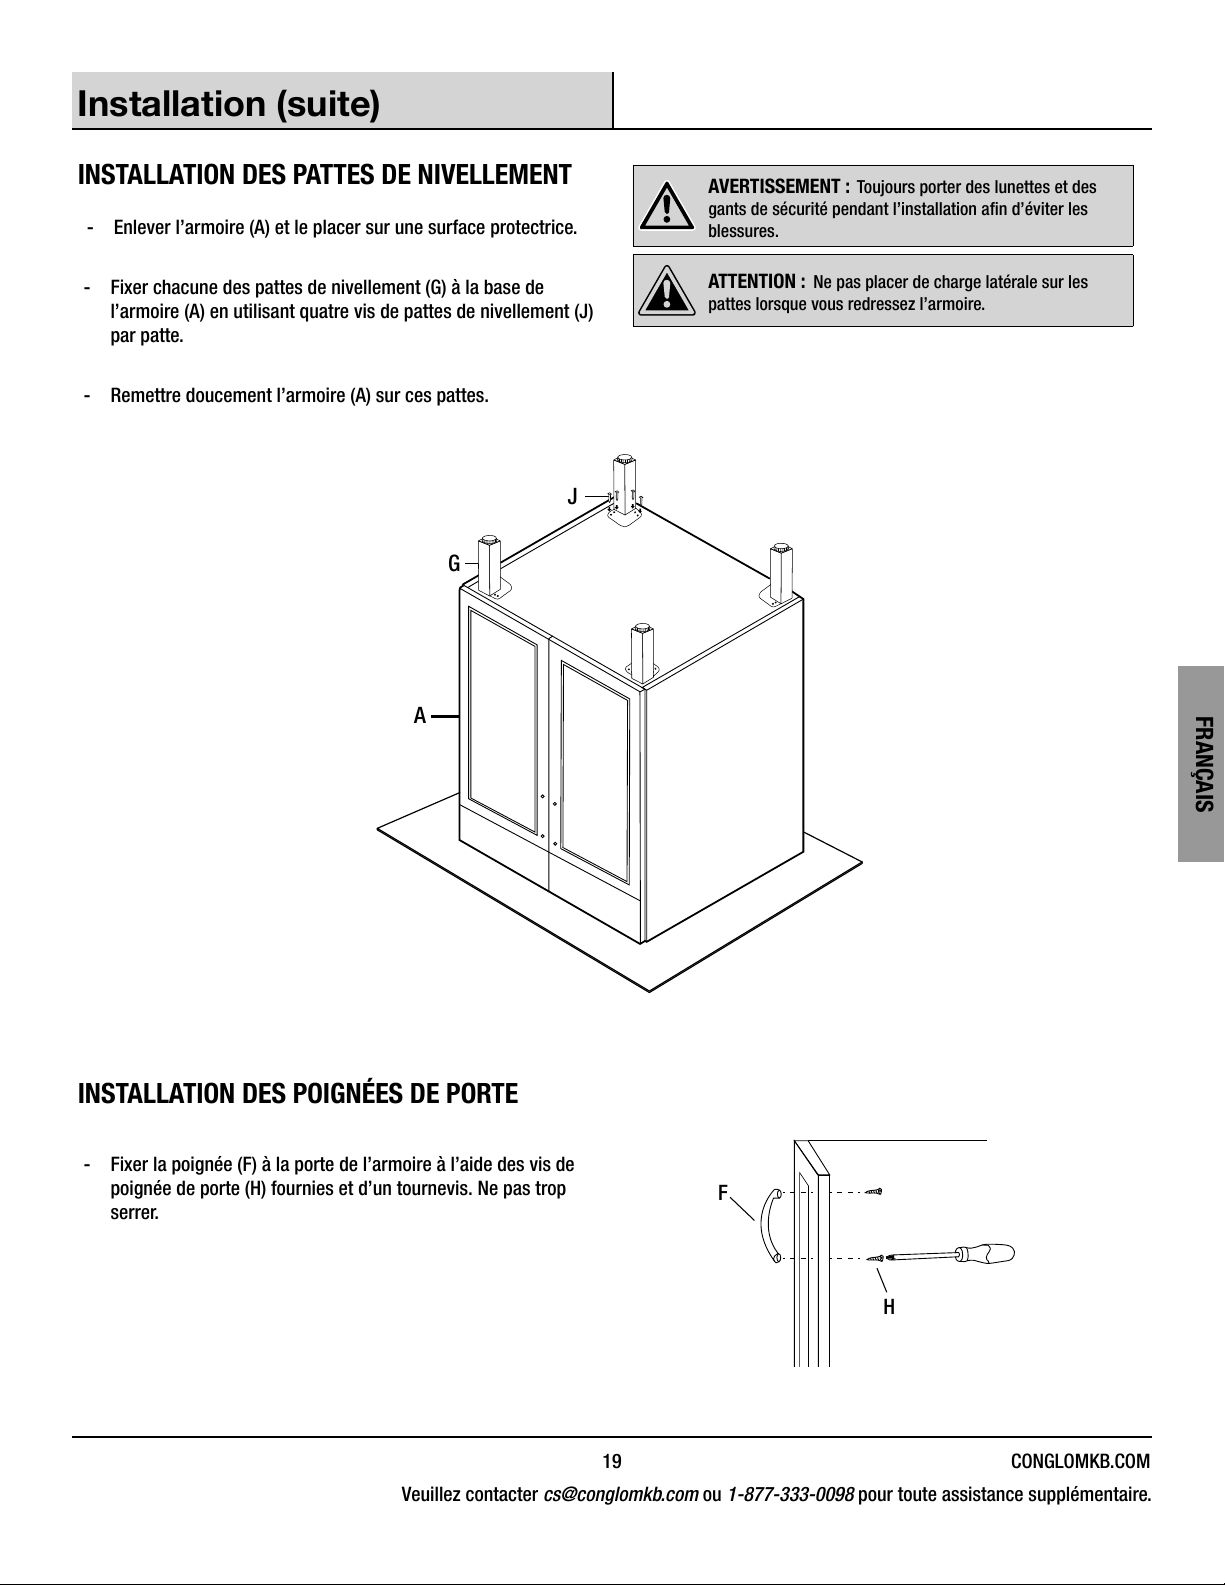
INSTALLATION DES PATTES DE NIVELLEMENT
- Enlever l’armoire (A) et le placer sur une surface protectrice.
- Fixer chacune des pattes de nivellement (G) à la base de
l’armoire (A) en utilisant quatre vis de pattes de nivellement (J)
par patte.
- Remettre doucement l’armoire (A) sur ces pattes.
G
A
AVERTISSEMENT : Toujours porter des lunettes et des
gants de sécurité pendant l’installation an d’éviter les
blessures.
ATTENTION : Ne pas placer de charge latérale sur les
pattes lorsque vous redressez l’armoire.
J
FRANÇAIS
INSTALLATION DES POIGNÉES DE PORTE
- Fixer la poignée (F) à la porte de l’armoire à l’aide des vis de
poignée de porte (H) fournies et d’un tournevis. Ne pas trop
serrer.
19 CONGLOMKB.COM
Veuillez contacter cs@conglomkb.com ou 1-877-333-0098 pour toute assistance supplémentaire.
F
H
Page 20
Installation (suite)
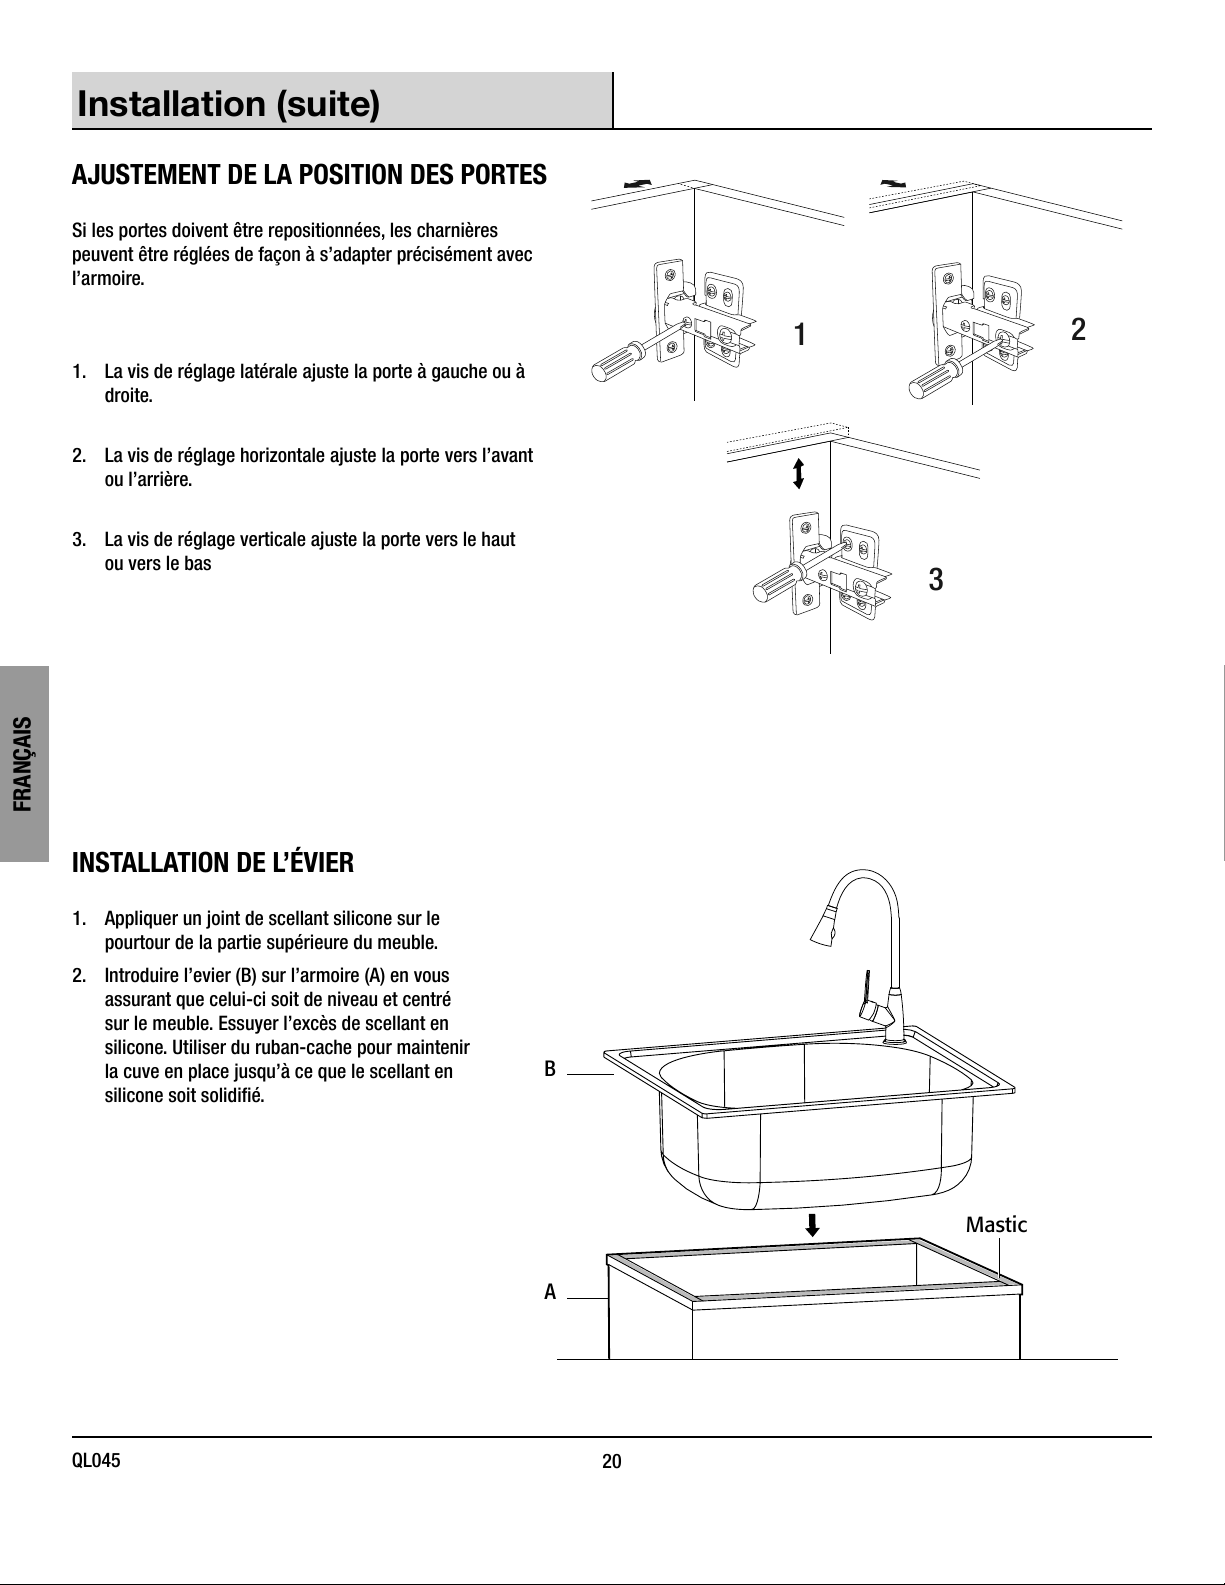
AJUSTEMENT DE LA POSITION DES PORTES
Si les portes doivent être repositionnées, les charnières
peuvent être réglées de façon à s’adapter précisément avec
l’armoire.
1. La vis de réglage latérale ajuste la porte à gauche ou à
droite.
2. La vis de réglage horizontale ajuste la porte vers l’avant
ou l’arrière.
3. La vis de réglage verticale ajuste la porte vers le haut
ou vers le bas
FRANÇAIS
INSTALLATION DE L’ÉVIER
1
2
3
1. Appliquer un joint de scellant silicone sur le
pourtour de la partie supérieure du meuble.
2. Introduire l’evier (B) sur l’armoire (A) en vous
assurant que celui-ci soit de niveau et centré
sur le meuble. Essuyer l’excès de scellant en
silicone. Utiliser du ruban-cache pour maintenir
la cuve en place jusqu’à ce que le scellant en
silicone soit solidié.
QL045
20
B
A
Mastic
Page 21
Installation (suite)
Positionner l’armoire à l’endroit désiré. Au besoin, mettre l’armoire à niveau en ajustant les quatre pattes de nivellement et en vériant
l’alignement de l’évier à l’aide d’un niveau de menuisier.
DRAINAGE
Le tuyau de vidange (non fourni) installé précédemment dans l’orice d’évacuation peut maintenant être raccordé à la plomberie
domestique. Dans certains cas, la plomberie devra être modiée pour assurer un drainage adéquat. Si c’est le cas, consulter un plombier
accrédité pour effectuer les modications nécessaires.
ASSEMBLAGE DES TUYAUX D’ALIMENTATION
Brancher les tuyaux d’alimentation à l’alimentation en eau du domicile
conformément aux instructions du fabricant.
Ouvrir les robinets d’alimentation en eau chaude et froide puis faire couler l’eau
pour vérier l’installation (tuyau d’eau chaude branché au bon endroit). Vérier
s’il y a des fuites. Faire couler de l’eau chaude et froide sans interruption pendant
environ une minute pour éliminer tout résidu des tuyaux.
Entretien
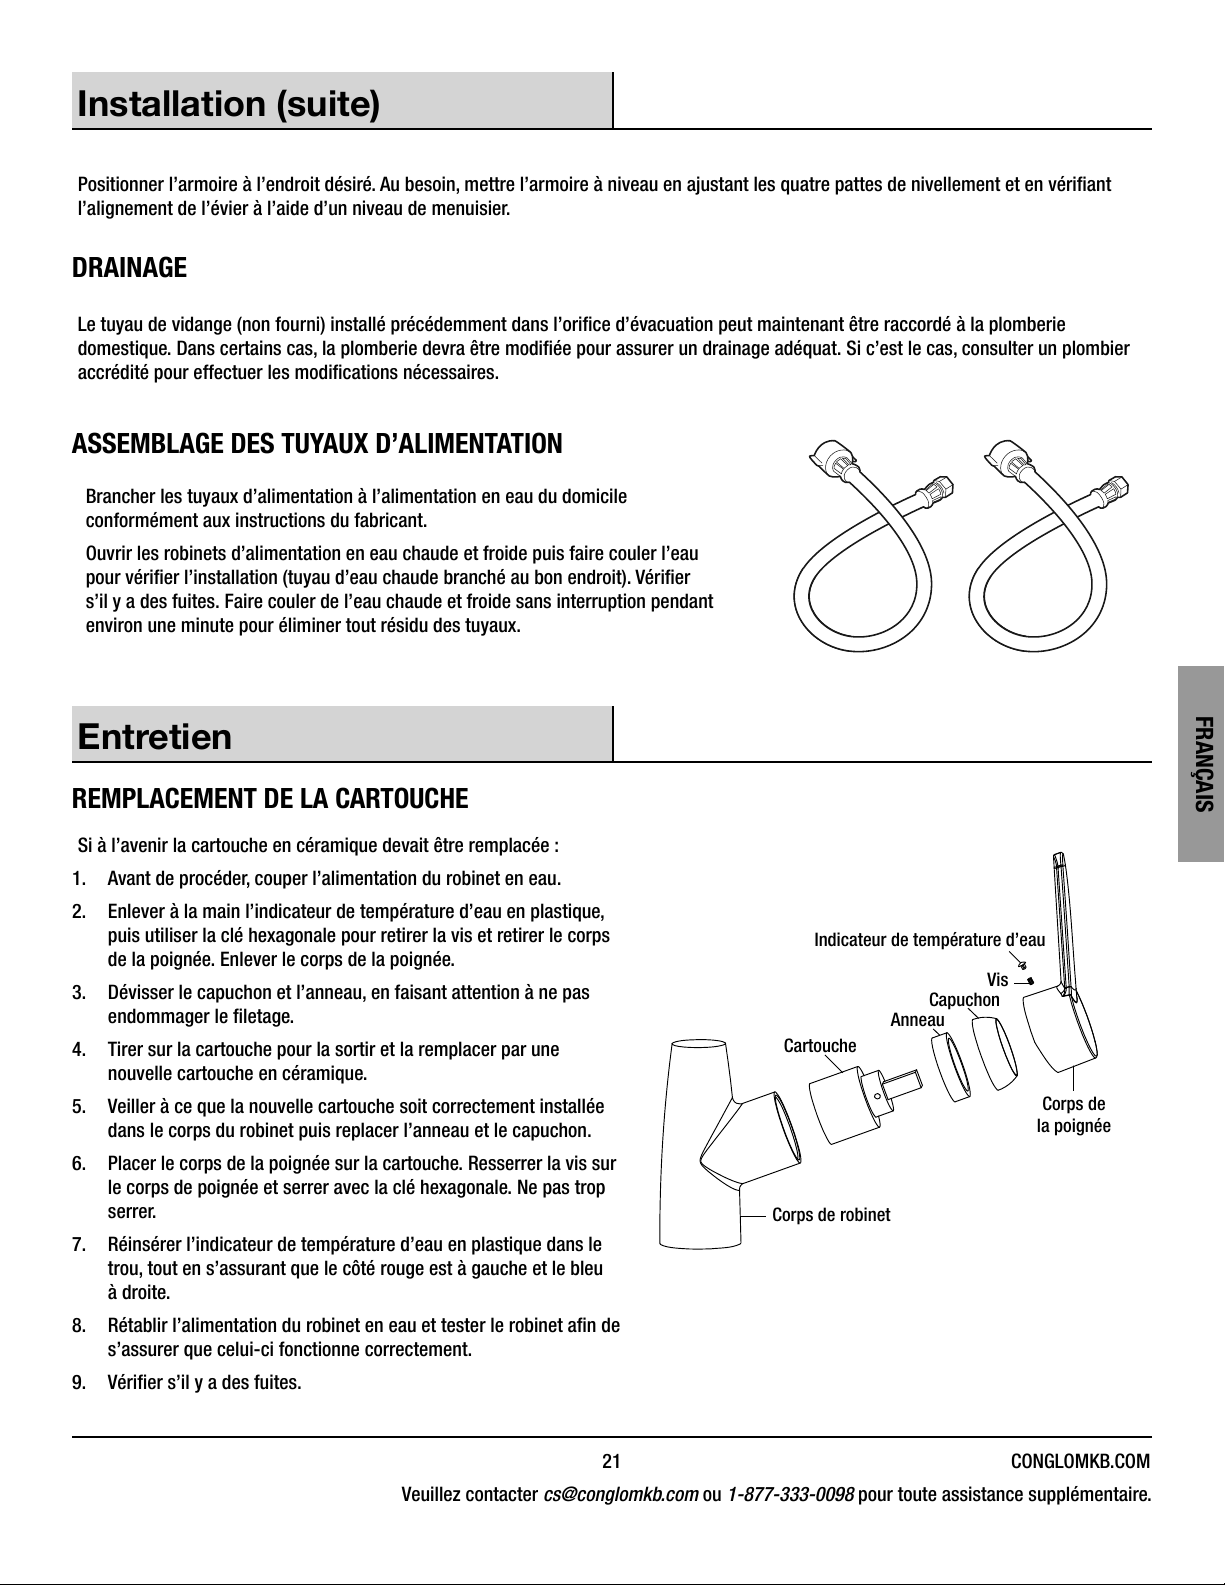
REMPLACEMENT DE LA CARTOUCHE
Si à l’avenir la cartouche en céramique devait être remplacée :
1. Avant de procéder, couper l’alimentation du robinet en eau.
2. Enlever à la main l’indicateur de température d’eau en plastique,
puis utiliser la clé hexagonale pour retirer la vis et retirer le corps
de la poignée. Enlever le corps de la poignée.
3. Dévisser le capuchon et l’anneau, en faisant attention à ne pas
endommager le letage.
4. Tirer sur la cartouche pour la sortir et la remplacer par une
nouvelle cartouche en céramique.
5. Veiller à ce que la nouvelle cartouche soit correctement installée
dans le corps du robinet puis replacer l’anneau et le capuchon.
6. Placer le corps de la poignée sur la cartouche. Resserrer la vis sur
le corps de poignée et serrer avec la clé hexagonale. Ne pas trop
serrer.
7. Réinsérer l’indicateur de température d’eau en plastique dans le
trou, tout en s’assurant que le côté rouge est à gauche et le bleu
à droite.
8. Rétablir l’alimentation du robinet en eau et tester le robinet an de
s’assurer que celui-ci fonctionne correctement.
9. Vérier s’il y a des fuites.
FRANÇAIS
Indicateur de température d’eau
Vis
Capuchon
Anneau
Cartouche
Corps de
la poignée
Corps de robinet
21 CONGLOMKB.COM
Veuillez contacter cs@conglomkb.com ou 1-877-333-0098 pour toute assistance supplémentaire.
Page 22
Soin et Nettoyage
ÉVIER UTILITAIRE ARMOIRE
À faire À faire
- Après l’utilisation, toujours rincer votre évier avec de l’eau de
robinet pour diluer et enlever les dépôts.
- Si possible, sécher à la serviette après toute utilisation pour
éviter les traces d’eau. Si les traces d’eau se produisent,
nettoyer avec une solution douce de vinaigre et d’eau suivie
d’un bon rinçage.
- Employer du savon liquide, un produit nettoyant de ménage
général, ou une faible solution de vinaigre et d’eau pour le
nettoyage régulier.
- N’utiliser que des tampons à récurer en plastique
recommandés pour une utilisation dans les éviers en acier
inoxydable, et ne les utiliser que dans la cuve de l’évier.
Frotter dans la direction des lignes du ni satiné.
À ne pas faire À ne pas faire
- Éviter de laisser sécher ou reposer sur la surface de l’évier
tout résidu de nourriture, de détergent, de savon, de graisse
ou de condiment pendant des périodes prolongées.
- Ne jamais employer des produits abrasifs car ils peuvent
ternir et rayer le ni.
FRANÇAIS
- Ne pas utiliser des tampons à récurer dans l’évier car ils
peuvent ternir le poli.
- Ne jamais utiliser des tampons de laine d’acier car ils
laissent des particules de fer sur l’évier et mènent à la
corrosion.
- Ne jamais laisser des casseroles en acier ou en font dans
votre évier pendant des périodes prolongées car elles
mènent à la corrosion.
- Éliminer la poussière et la saleté sèche avec un linge doux
et humide.
- Nettoyer les taches de graisse, d’huile, de peinture et
d’encre avec de l’alcool à friction. Après avoir enlevé la
tache, rincer immédiatement avec de l’eau..
- Éviter que la surface de votre armoire entre en contact avec
des produits tels l’acétone (dissolvant pour vernis à ongles),
le vernis à ongles, la solution pour nettoyage à sec, la
solvant à laque, la gazoline, l’huile de pin, etc.
- Éviter d’utiliser une lame de rasoir ou tout autre instrument
coupant qui pourrait égratigner la surface.
Votre évier est fabriqué avec de l’acier inoxydable de la plus haute qualité, moyennant l’apport des soins appropriés il vous fournira un
excellent rendement pendant plusieurs années.
ÉLIMINATION DES RAYURES, TACHES ET IMPERFECTIONS, ET RESTAURATION DES SURFACES:
Les petites taches de rouille qui apparaissent régulièrement dans l’évier sont habituellement causées par l’interaction de l’acier
avec les produits chimiques qui se trouvent dans de nombreuses substances auxquelles les éviers sont couramment exposés. Elles
peuvent également apparaitre lorsque d’autres objets sont placés ou laissés dans l’évier. Les rayures, quant à elles, sont causées
par l’usure normale.
Pour enlever les rayures et les taches dans l’évier, frottez-les à l’aide d’un tampon à récurer non métallique (p. ex., Scotch-BriteMD)
et d’un nettoyant légèrement abrasif (p. ex., Vim
l’acier. Lorsque vous avez terminé, rincez l’évier avec de l’eau et essuyez-le à l’aide d’une serviette pour permettre qu’une couche
externe protectrice se forme. Vous pouvez également utiliser cette procédure pour redonner à toutes les surfaces de l’évier leur éclat.
QL045
22
MD
ou Barkeeper’s FriendMD). Frottez toujours les surfaces dans le sens du grain de
Page 23
Pièces de rechange
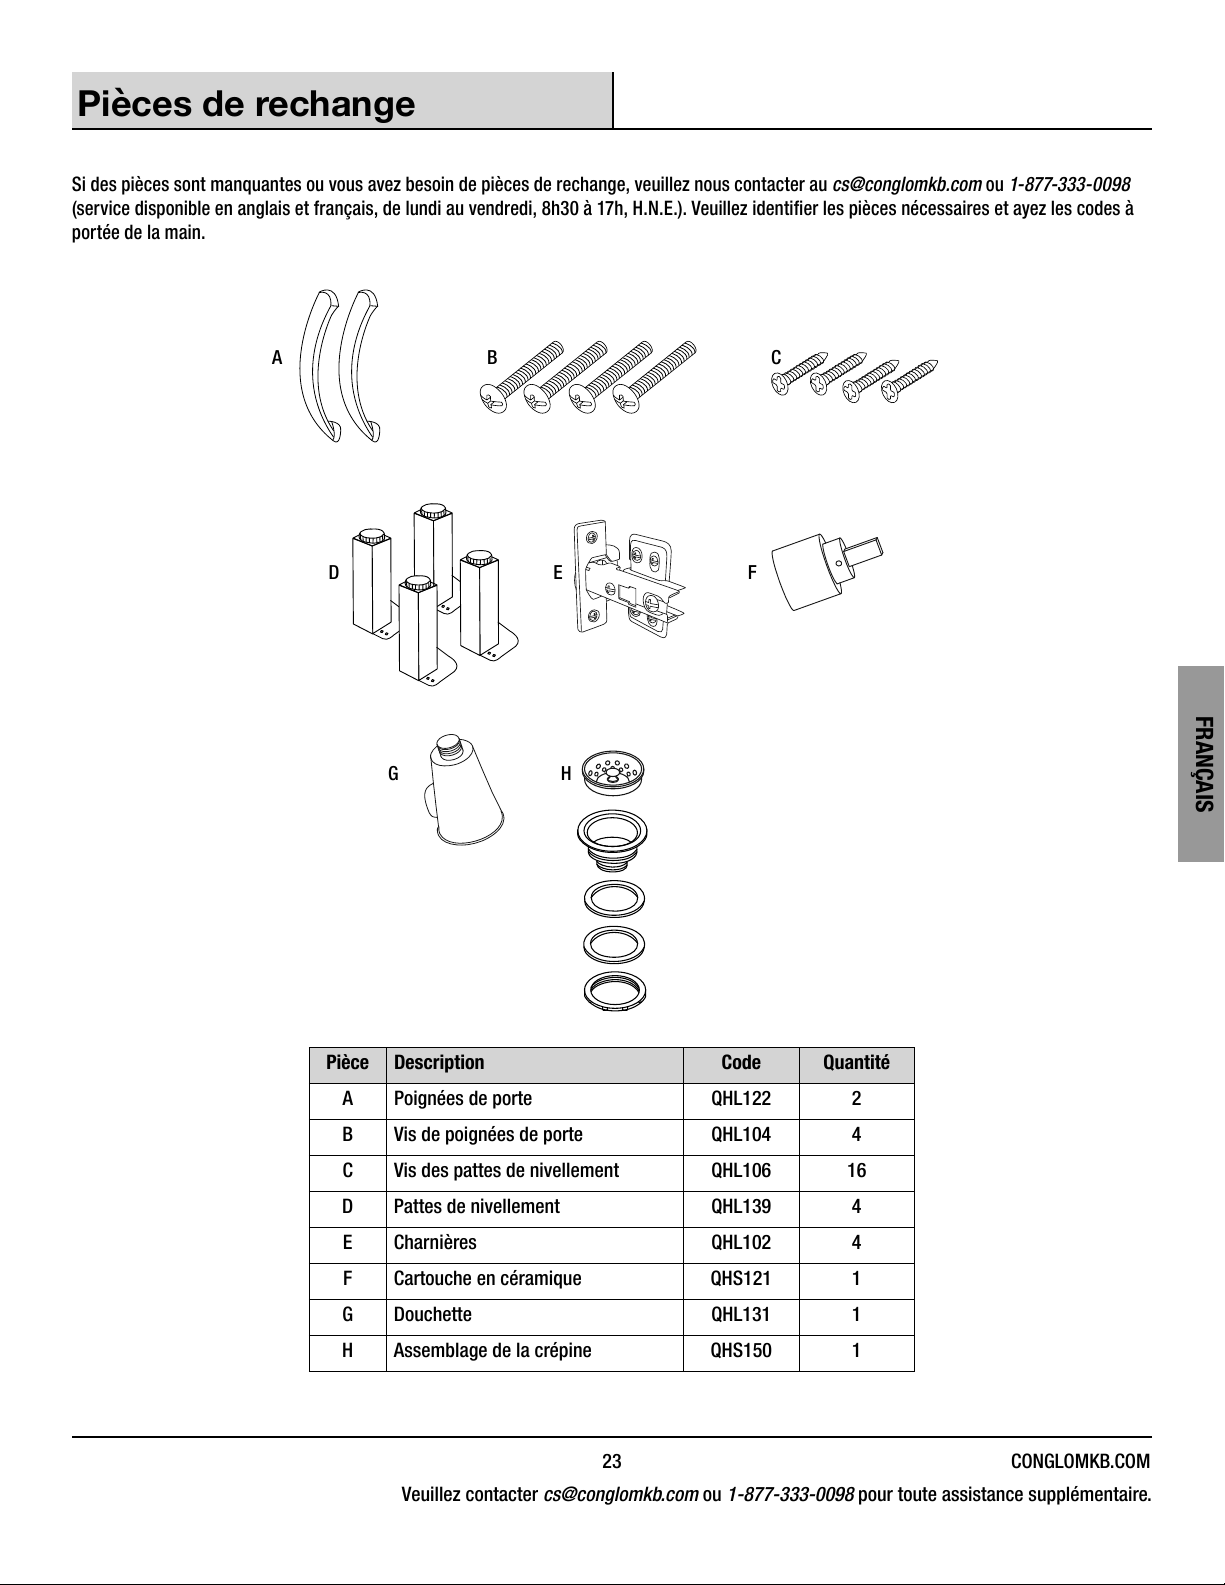
Si des pièces sont manquantes ou vous avez besoin de pièces de rechange, veuillez nous contacter au cs@conglomkb.com ou 1-877-333-0098
(service disponible en anglais et français, de lundi au vendredi, 8h30 à 17h, H.N.E.). Veuillez identier les pièces nécessaires et ayez les codes à
portée de la main.
A
D
B C
E F
FRANÇAIS
G
H
Pièce Description Code Quantité
A Poignées de porte QHL122 2
B Vis de poignées de porte QHL104 4
C Vis des pattes de nivellement QHL106 16
D Pattes de nivellement QHL139 4
E Charnières QHL102 4
F Cartouche en céramique QHS121 1
G Douchette QHL131 1
H Assemblage de la crépine QHS150 1
23 CONGLOMKB.COM
Veuillez contacter cs@conglomkb.com ou 1-877-333-0098 pour toute assistance supplémentaire.
Page 24
Imported by / Importé par :
St-Laurent, Québec, H4S 2C3
1-877-333-0098 | [email protected]
(Service available in English and French, Monday - Friday from 8:30am - 5pm EST) /
(service disponible en anglais et français, de lundi au vendredi, 8h30 à 17h, H.N.E.)
www.conglomkb.com
Made in China / Fabriqué en Chine
Retain this manual for future use.
 Loading...