

Page 1
DE SIMPLE À REMARQUABLE
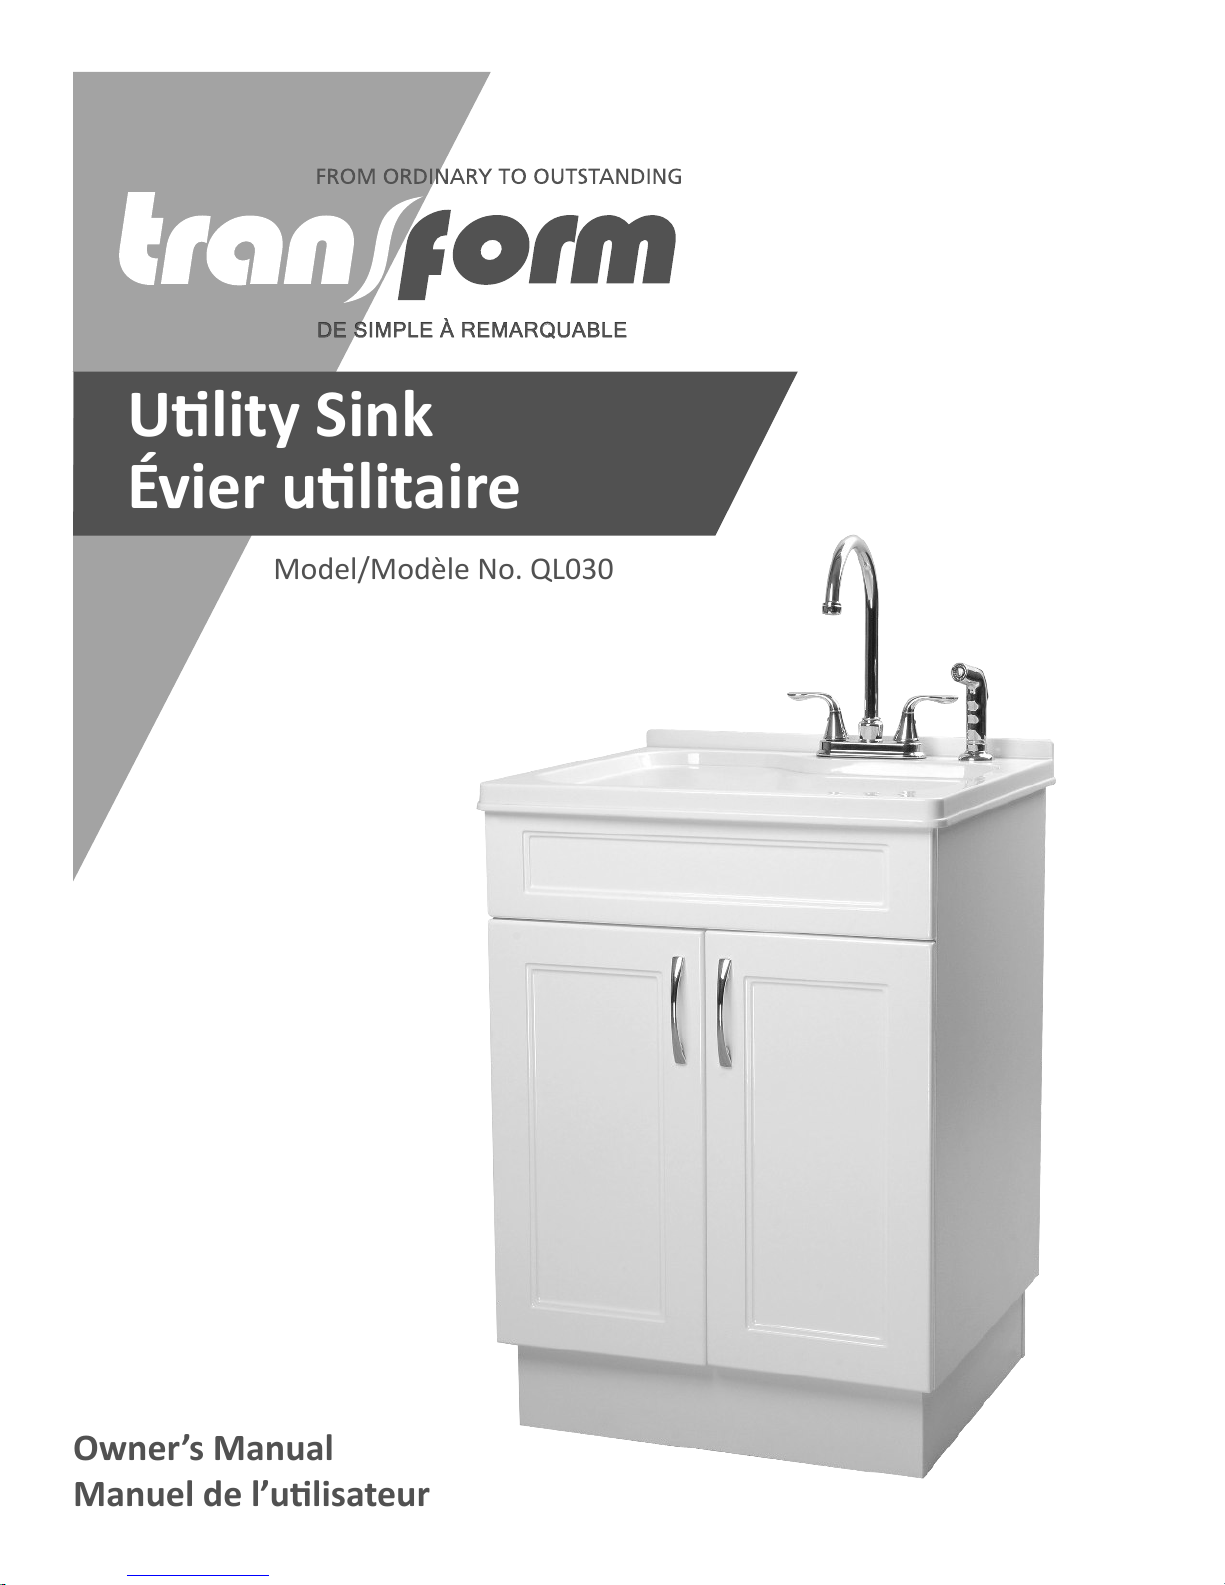
Ulity Sink
Évier ulitaire
Model/Modèle No. QL030
Owner’s Manual
Manuel de l’ulisateur
Page 2
Table of Contents
Table of Contents ............................2
Safety Information ............................ 2
Warranty ..................................3
One Year Limited Warranty ...........................3
Warranty Claim Procedure ...........................3
Pre-Installation .............................. 4
Tools/Materials Required ............................4
Package Contents .................................5
Installation ................................. 6
Base Installation ..................................6
Door Handle Installation .............................6
Safety Information
READ AND SAVE THESE INSTRUCTIONS
1. Inspect your unit before proceeding. Once you unpack your unit,
check for chips, scratches, cracks, dents or scuff marks. If any
damage is noticed, do not install.
2. Use this unit only in the manner intended by the manufacturer. If
you have any questions, contact the manufacturer.
3. Installation work and plumbing must be done by qualied
person(s) in accordance with all applicable codes and standards.
4. Protect the entire surface during installation.
5. All holes drilled into the unit must be done from the nished
surface side with extreme care and caulked very carefully to
form a watertight barrier.
Faucet and Sprayer Installation .......................7
Strainer Installation ................................7
Mounting the Utility Sink ............................8
Placement .......................................8
Supply Line Assembly ..............................8
Maintenance ...............................8
Cartridge Replacement .............................8
Care and Cleaning ............................ 9
Utility Sink .......................................9
Cabinet ..........................................9
Service Parts .............................. 10
MANUEL DE L’UTILISATEUR ..........................11
DANGER: Always wear safety goggles and gloves in order
to avoid personal injury.
2
QL030
Page 3
Warranty
ONE YEAR LIMITED WARRANTY
A thorough inspection must be made before installation and any damage must be promptly reported. We will not be liable for failures or
damage that could have been discovered or avoided by proper inspection and testing prior to installation.
Conglom Kitchen & Bath warrants this product to be free from defects in materials or workmanship for one (1) year from the date of purchase.
Proof of purchase (original sales receipt) from the original consumer purchaser must be made available to Conglom Kitchen & Bath for all
warranty claims.
This warranty is non-transferable and shall be voided if the unit is removed from its initial installation or if it is not installed following the
manufacturer’s instructions. It does not apply in the event of product damage due to the use of other than genuine Conglom Kitchen & Bath
replacement parts, (Replacement parts may be obtained by e-mail at cs@conglomkb.com or by calling 1-877-333-0098 between 8:30 am
- 5:00 pm EST) installation error, abuse, misuse or improper care and maintenance (whether performed by a plumber, contractor, service
provider or member of the purchaser’s household). The warranty excludes damage due to aggressive air or water conditions, harsh or
abrasive cleaners and/or materials.
Under no circumstance shall we be held liable for personal injury or property damage resulting from improper installation or use of this
product. We will not be held liable for inconvenience caused by loss of use of this product, costs incurred for labour or materials, removal
and installation of replacement units, or any other incidental or consequential damages. Costs relating to obtaining access for repair or
replacement are the responsibility of the user.
Our obligation shall be limited to the repair or replacement of a unit (at our discretion) that may prove, by our sole examination, to be defective
under normal use and service during the warranty period.
Any failure of this product that is not traceable to a defect in material or workmanship is not covered by this warranty. These non-warrantable
items include, but are not limited to:
- Improper installation not in accordance with manufacturer’s instructions.
- Dents and/or scratches incurred during shipping, handling, or installation.
- Change in colour or nish due to chemical usage.
- Damage caused by failure to follow care and cleaning guidelines, including damage caused by the use of abrasive cleaners.
- Alterations made to the unit by the purchaser or installer.
- Damage caused by accidental impact, re, ood, freezing, and normal wear.
- Bends and warping caused by forced connections, over-tightened ttings, and inadequate support during installation.
- This warranty does not extend to commercial and institutional installation or use.
WARRANTY CLAIM PROCEDURE
If a claimable defect occurs or replacement parts are needed, please contact our customer service team at cs@conglomkb.com or 1-877-333-
0098 (8:30 am - 5 pm, EST, Monday - Friday).
Before you make your call, please ensure that you have:
- Model number or description.
- Proof of sale.
- Details regarding the defect and/or part number.
- Name(s) and address(es) of the owner and/or installer.
3 CONGLOMKB.COM
Please contact cs@conglomkb.com or 1-877-333-0098 for further assistance.
Page 4
Pre-Installation
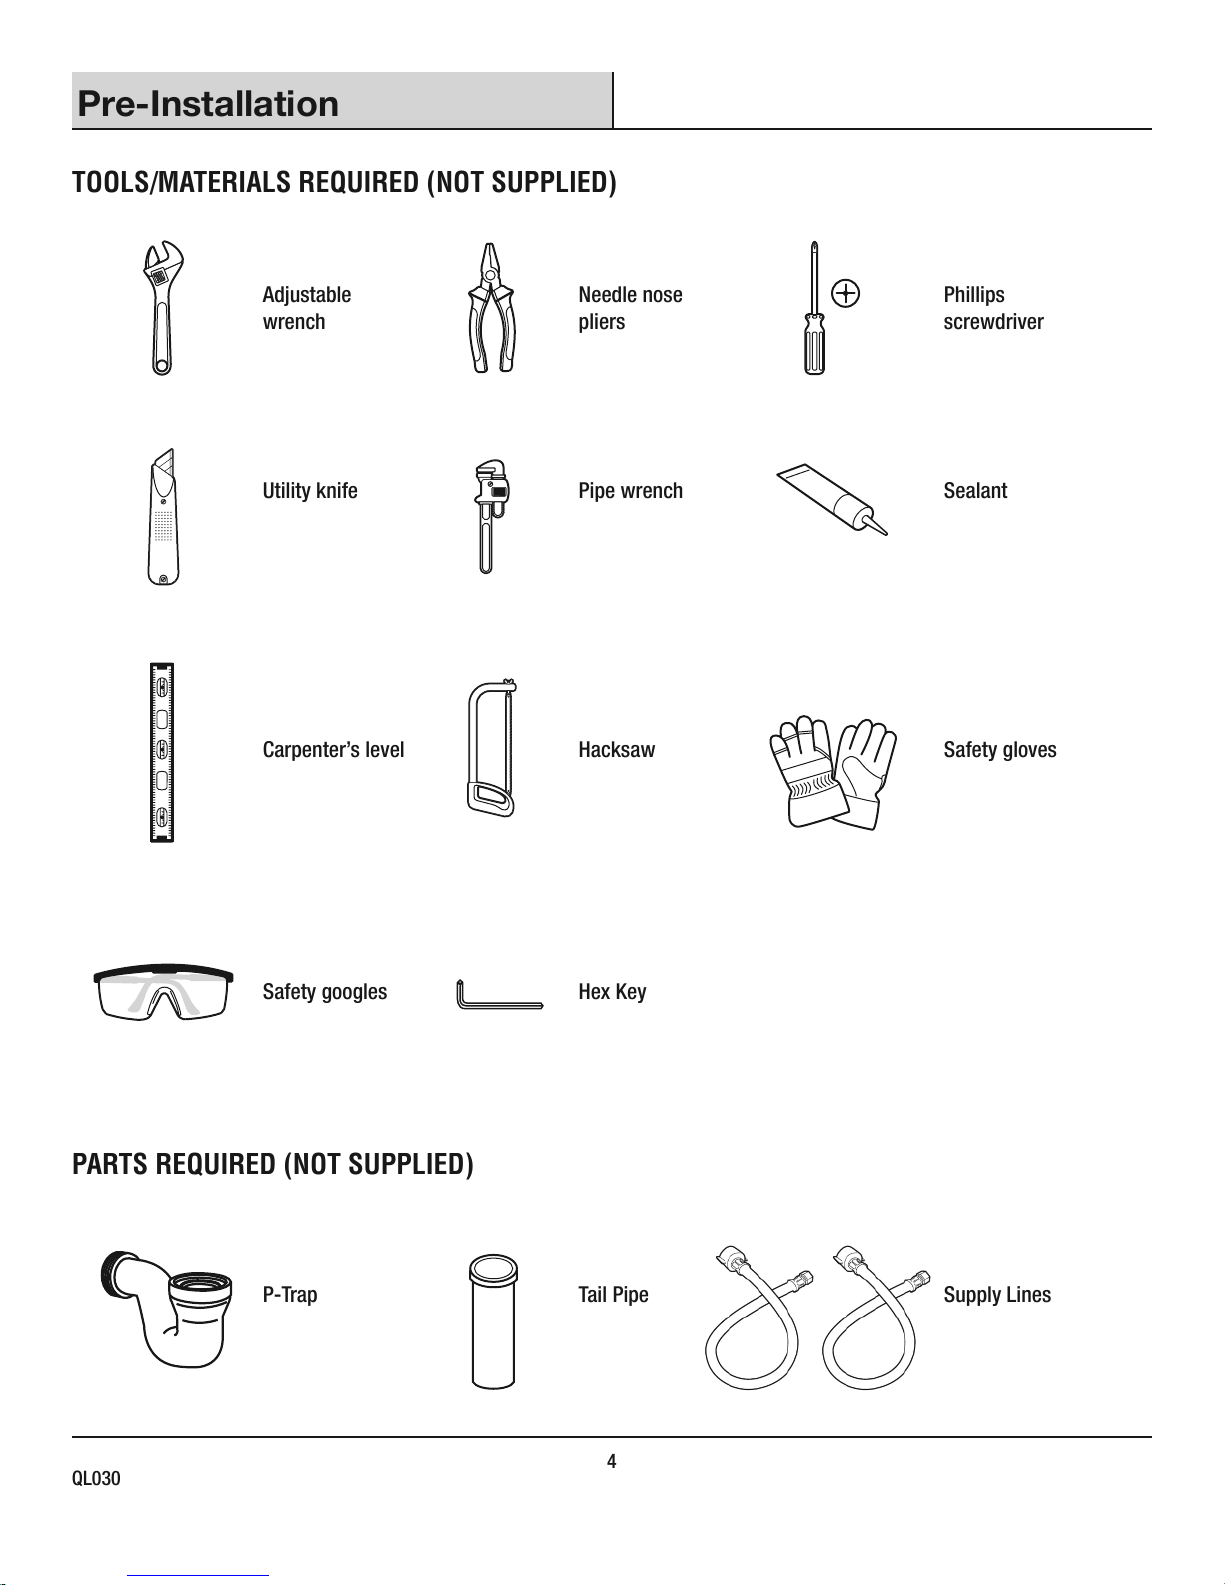
TOOLS/MATERIALS REQUIRED (NOT SUPPLIED)
Adjustable
wrench
Utility knife Pipe wrench Sealant
Carpenter’s level Hacksaw Safety gloves
Needle nose
pliers
Phillips
screwdriver
Safety googles Hex Key
PARTS REQUIRED (NOT SUPPLIED)
P-Trap Tail Pipe Supply Lines
4
QL030
Page 5
Pre-Installation (continued)
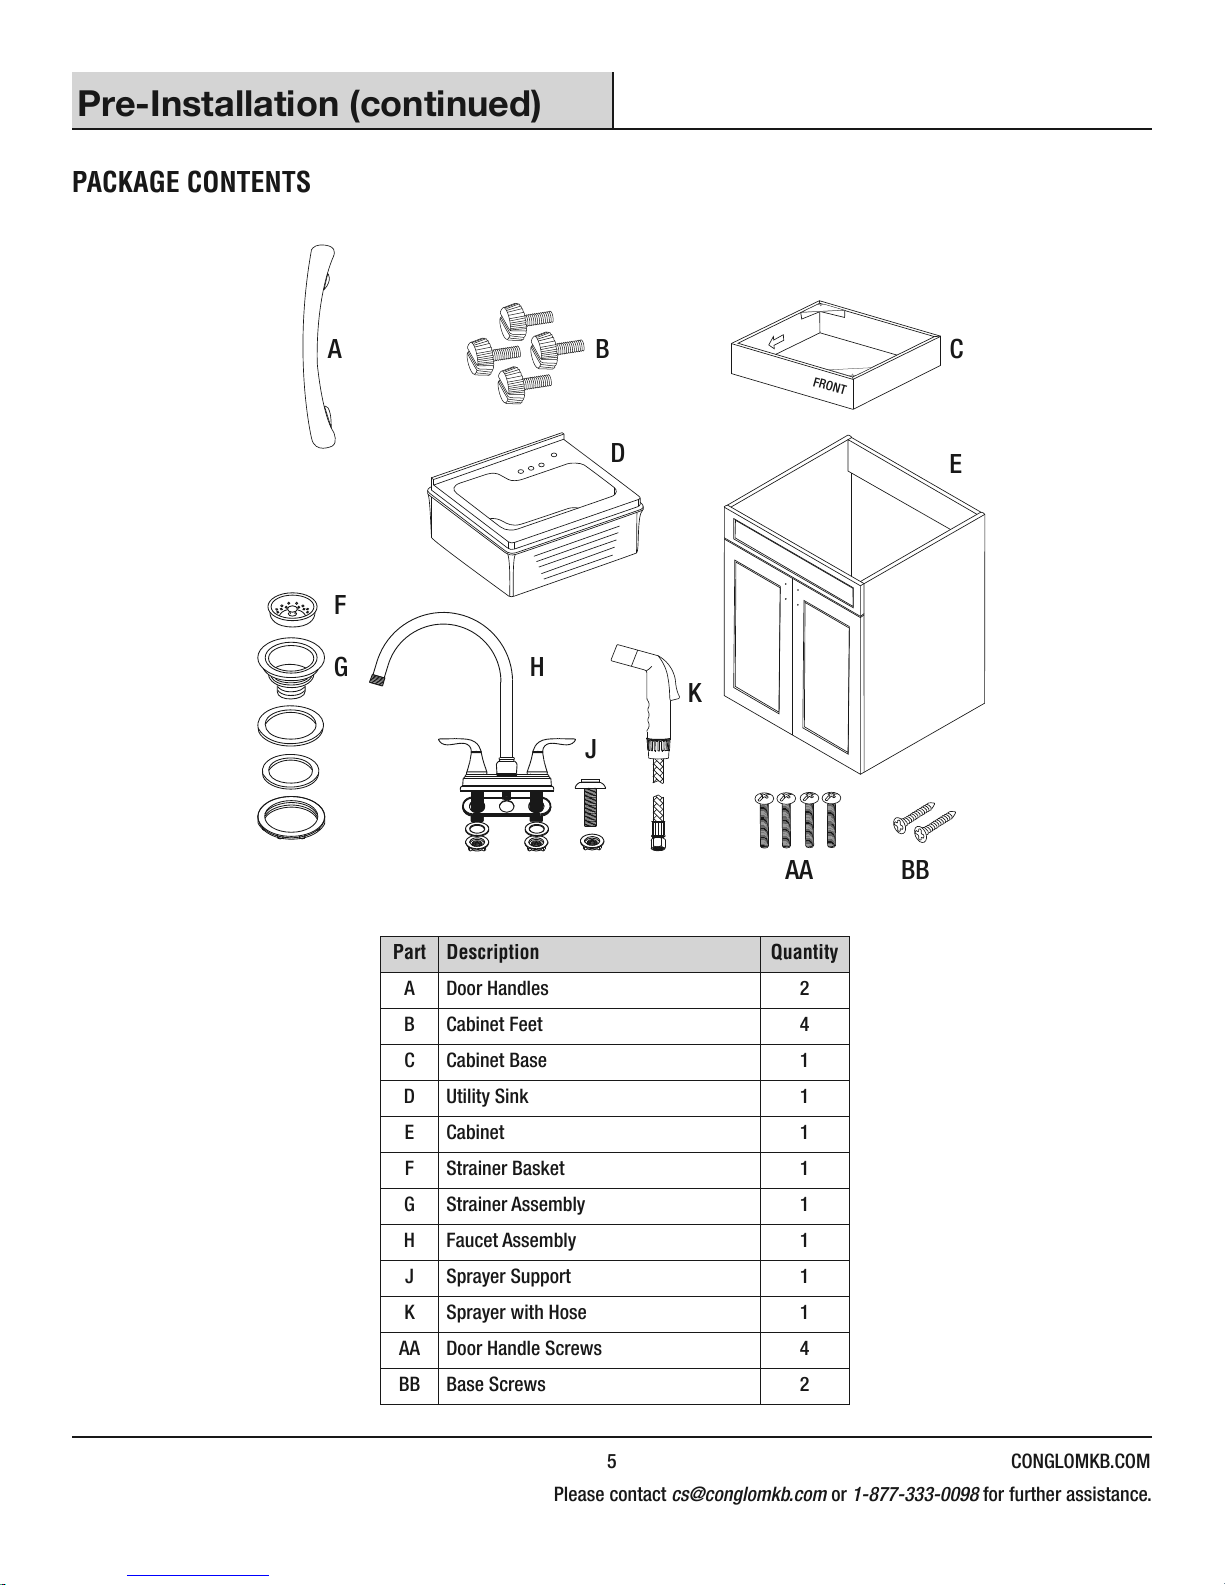
PACKAGE CONTENTS
A B C
FRONT
D
F
HG
K
J
Part Description Quantity
A Door Handles 2
B Cabinet Feet 4
AA
E
BB
C Cabinet Base 1
D Utility Sink 1
E Cabinet 1
F Strainer Basket 1
G Strainer Assembly 1
H Faucet Assembly 1
J Sprayer Support 1
K Sprayer with Hose 1
AA Door Handle Screws 4
BB Base Screws 2
5 CONGLOMKB.COM
Please contact cs@conglomkb.com or 1-877-333-0098 for further assistance.
Page 6

Installation
BASE INSTALLATION DOOR POSITION ADJUSTMENT
A thorough inspection must be made before installation and any
damages or missing parts must be promptly reported. Do not proceed
with the installation. Do not dispose of packaging before you are
satised with your new utility sink.
1. Unpack the unit and place the sink (D) on a blanket or cardboard
to protect the surface.
2. Turn the cabinet (E) upside down onto the protective surface.
3. Gently attach the cabinet base (C) onto its proper location. Using
the supplied base screws (BB), attach the base to the cabinet.
4. Attach cabinet feet (B) to the base.
5. Gently place the cabinet upright.
CAUTION: Do not place side load onto feet when righting
the cabinet.
C
BB
B
If the doors need to be repositioned, the hinges can be
adjusted to ensure a precise t with the cabinet.
1. The lateral adjustment screw adjusts the door left
or right.
1
2. The horizontal adjustment screw adjusts the door
forward or backward.
2
E
DOOR HANDLE INSTALLATION
1. Insert the door hand screws (AA) into the pre-drilled holes on
each door.
2. Attach the door handles (A) and hand tighten the door handle
screws (AA).
3. Repeat on other door.
3. The vertical adjustment screw adjusts the door up
or down.
3
6
QL030
Page 7
Installation (continued)
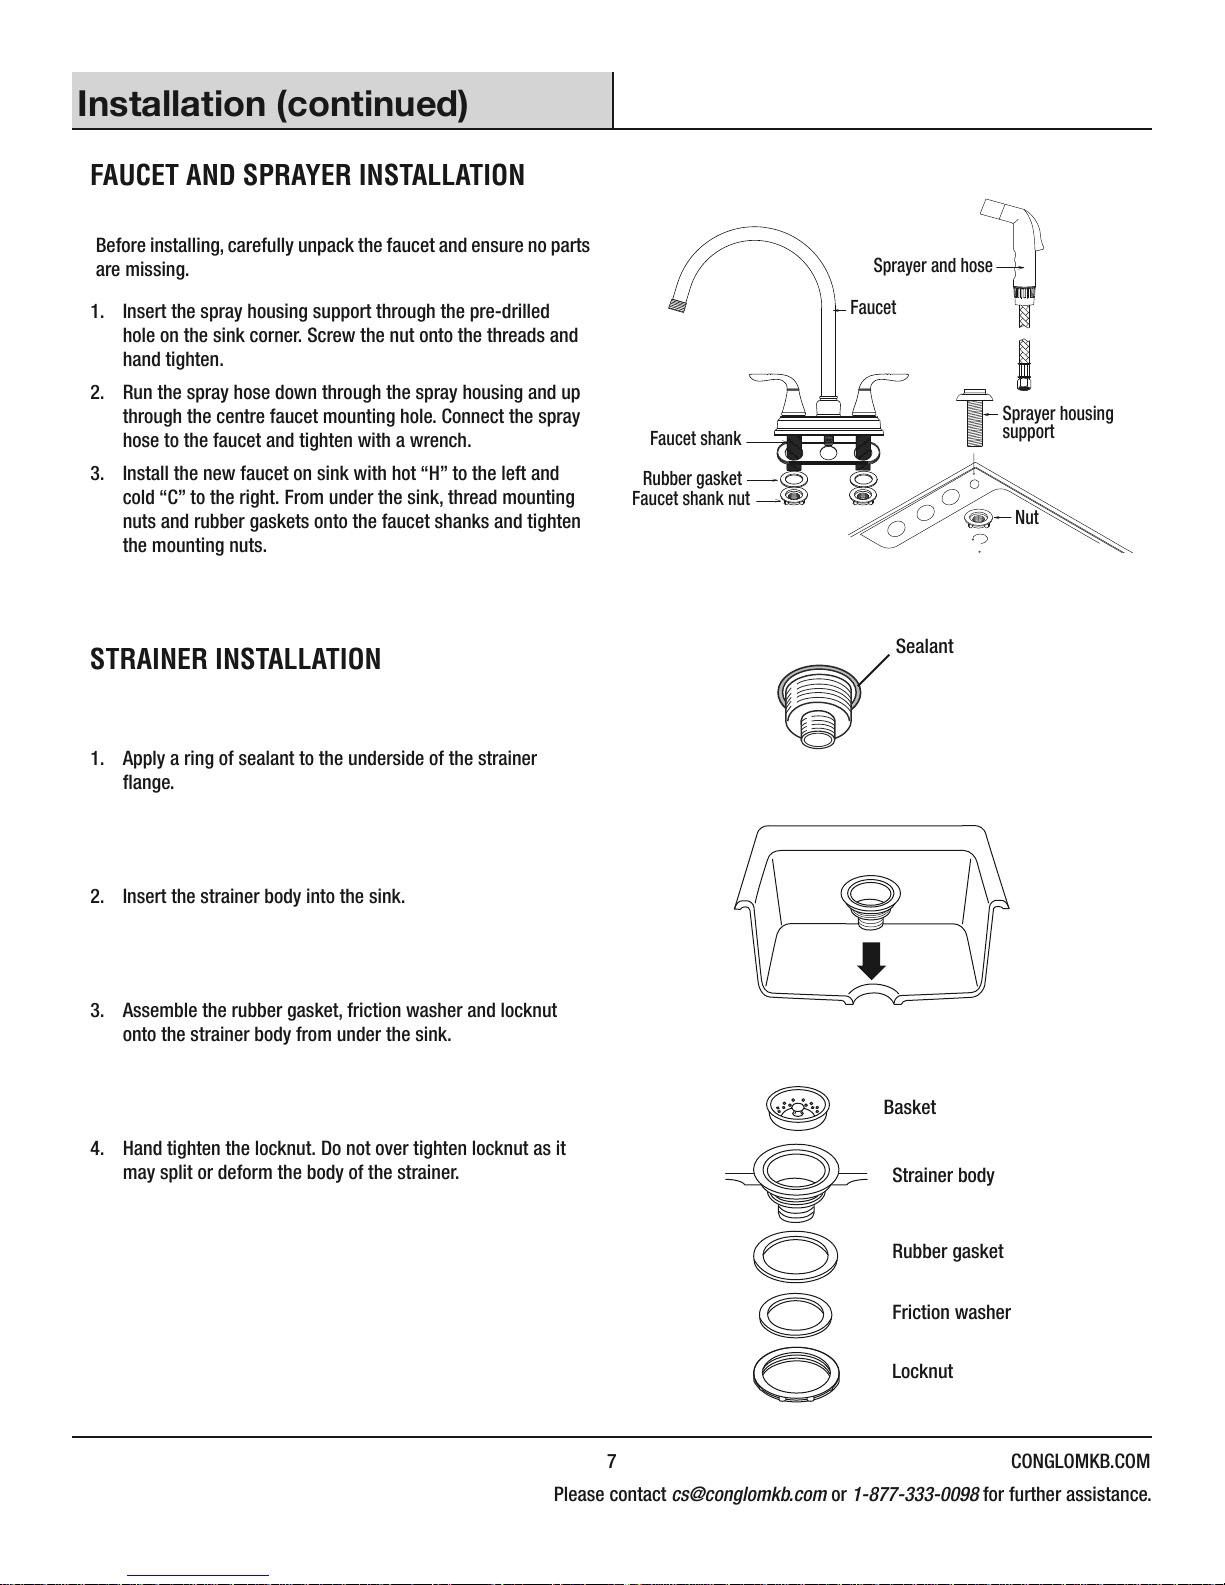
FAUCET AND SPRAYER INSTALLATION
Before installing, carefully unpack the faucet and ensure no parts
are missing.
1. Insert the spray housing support through the pre-drilled
hole on the sink corner. Screw the nut onto the threads and
hand tighten.
2. Run the spray hose down through the spray housing and up
through the centre faucet mounting hole. Connect the spray
hose to the faucet and tighten with a wrench.
3. Install the new faucet on sink with hot “H” to the left and
cold “C” to the right. From under the sink, thread mounting
nuts and rubber gaskets onto the faucet shanks and tighten
the mounting nuts.
STRAINER INSTALLATION
1. Apply a ring of sealant to the underside of the strainer
ange.
Faucet shank
Rubber gasket
Faucet shank nut
Sprayer and hose
Faucet
Sprayer housing
support
Nut
Sealant
2. Insert the strainer body into the sink.
3. Assemble the rubber gasket, friction washer and locknut
onto the strainer body from under the sink.
Basket
4. Hand tighten the locknut. Do not over tighten locknut as it
may split or deform the body of the strainer.
7 CONGLOMKB.COM
Please contact cs@conglomkb.com or 1-877-333-0098 for further assistance.
Strainer body
Rubber gasket
Friction washer
Locknut
Page 8
Installation (continued)
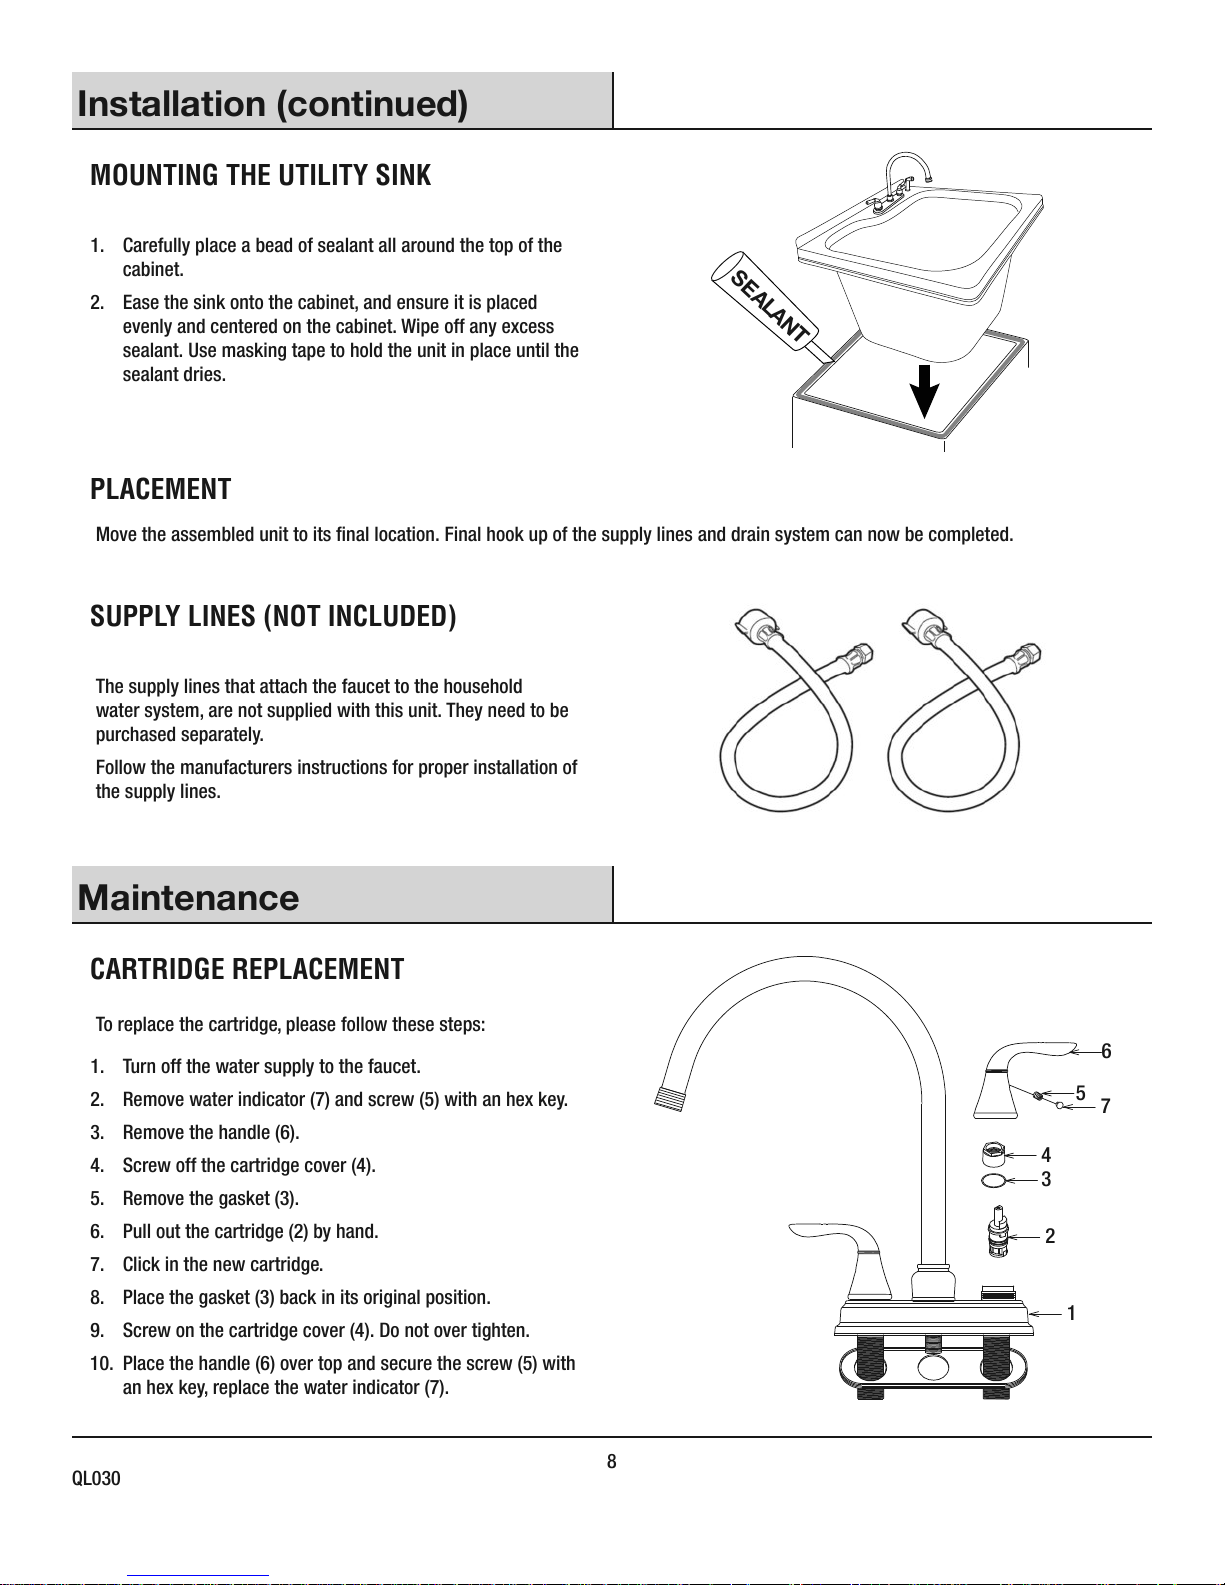
MOUNTING THE UTILITY SINK
1. Carefully place a bead of sealant all around the top of the
cabinet.
2. Ease the sink onto the cabinet, and ensure it is placed
evenly and centered on the cabinet. Wipe off any excess
sealant. Use masking tape to hold the unit in place until the
sealant dries.
PLACEMENT
Move the assembled unit to its nal location. Final hook up of the supply lines and drain system can now be completed.
SUPPLY LINES (NOT INCLUDED)
The supply lines that attach the faucet to the household
water system, are not supplied with this unit. They need to be
purchased separately.
Follow the manufacturers instructions for proper installation of
the supply lines.
S
EA
L
A
N
T
Maintenance
CARTRIDGE REPLACEMENT
To replace the cartridge, please follow these steps:
1. Turn off the water supply to the faucet.
2. Remove water indicator (7) and screw (5) with an hex key.
3. Remove the handle (6).
4. Screw off the cartridge cover (4).
5. Remove the gasket (3).
6. Pull out the cartridge (2) by hand.
7. Click in the new cartridge.
8. Place the gasket (3) back in its original position.
9. Screw on the cartridge cover (4). Do not over tighten.
10. Place the handle (6) over top and secure the screw (5) with
an hex key, replace the water indicator (7).
8
QL030
6
5
7
4
3
2
1
Page 9
Care and Cleaning
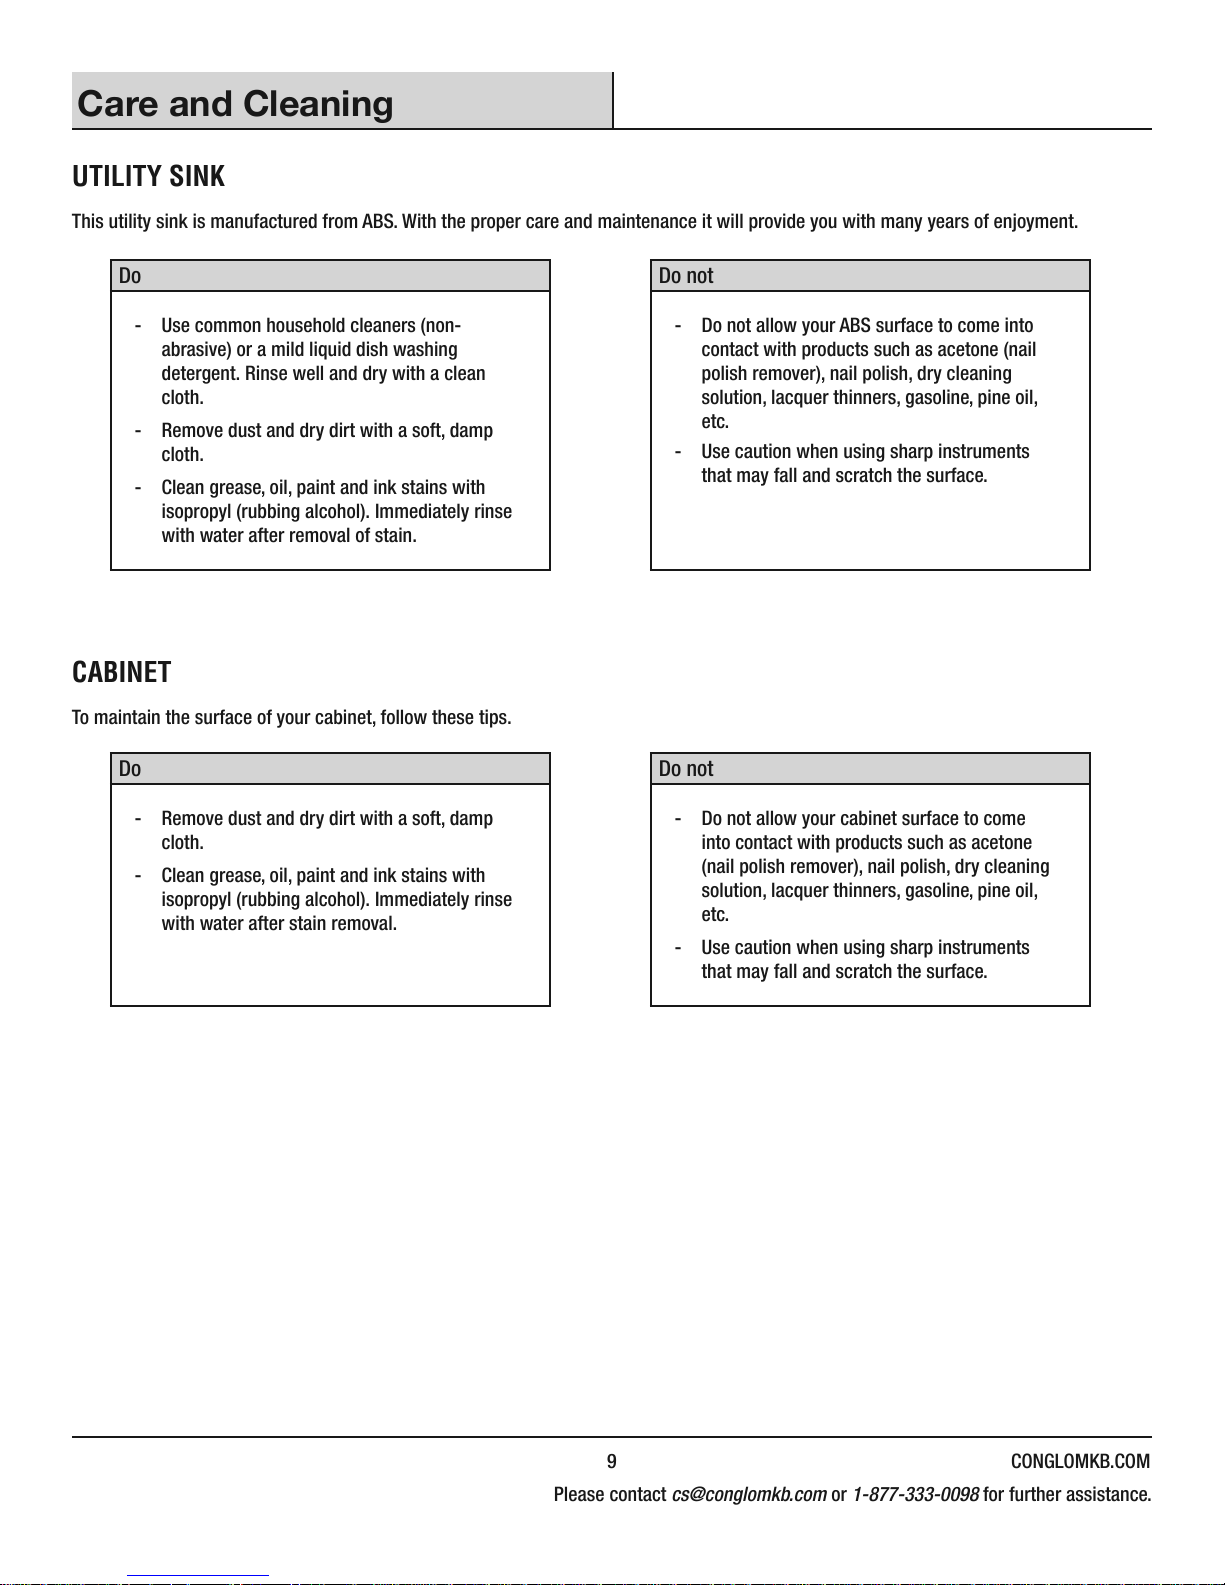
UTILITY SINK
This utility sink is manufactured from ABS. With the proper care and maintenance it will provide you with many years of enjoyment.
Do Do not
- Use common household cleaners (non-
abrasive) or a mild liquid dish washing
detergent. Rinse well and dry with a clean
cloth.
- Remove dust and dry dirt with a soft, damp
cloth.
- Clean grease, oil, paint and ink stains with
isopropyl (rubbing alcohol). Immediately rinse
with water after removal of stain.
CABINET
To maintain the surface of your cabinet, follow these tips.
Do Do not
- Remove dust and dry dirt with a soft, damp
cloth.
- Clean grease, oil, paint and ink stains with
isopropyl (rubbing alcohol). Immediately rinse
with water after stain removal.
- Do not allow your ABS surface to come into
contact with products such as acetone (nail
polish remover), nail polish, dry cleaning
solution, lacquer thinners, gasoline, pine oil,
etc.
- Use caution when using sharp instruments
that may fall and scratch the surface.
- Do not allow your cabinet surface to come
into contact with products such as acetone
(nail polish remover), nail polish, dry cleaning
solution, lacquer thinners, gasoline, pine oil,
etc.
- Use caution when using sharp instruments
that may fall and scratch the surface.
9 CONGLOMKB.COM
Please contact cs@conglomkb.com or 1-877-333-0098 for further assistance.
Page 10
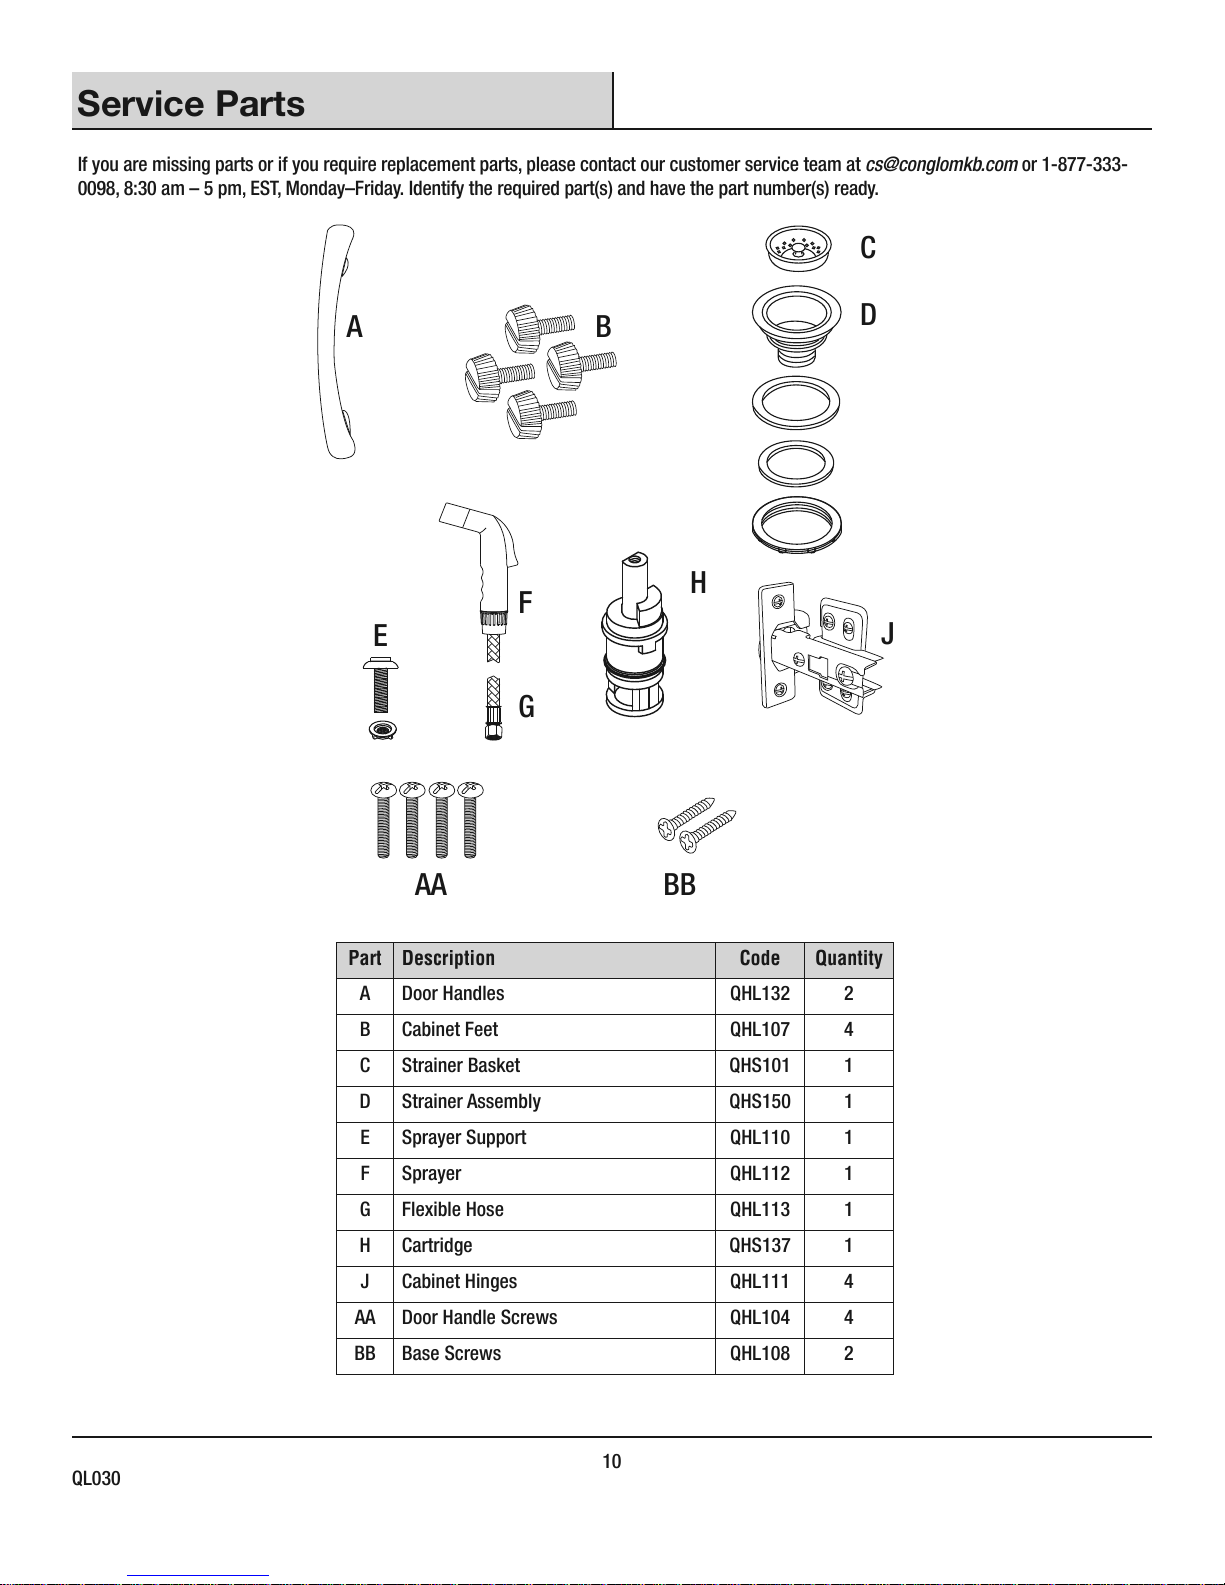
Service Parts
If you are missing parts or if you require replacement parts, please contact our customer service team at cs@conglomkb.com or 1-877-333-
0098, 8:30 am – 5 pm, EST, Monday–Friday. Identify the required part(s) and have the part number(s) ready.
C
A
B
D
H
F
E
G
AA BB
Part Description Code Quantity
J
A Door Handles QHL132 2
B Cabinet Feet QHL107 4
C Strainer Basket QHS101 1
D Strainer Assembly QHS150 1
E Sprayer Support QHL110 1
F Sprayer QHL112 1
G Flexible Hose QHL113 1
H Cartridge QHS137 1
J Cabinet Hinges QHL111 4
AA Door Handle Screws QHL104 4
BB Base Screws QHL108 2
10
QL030
Page 11
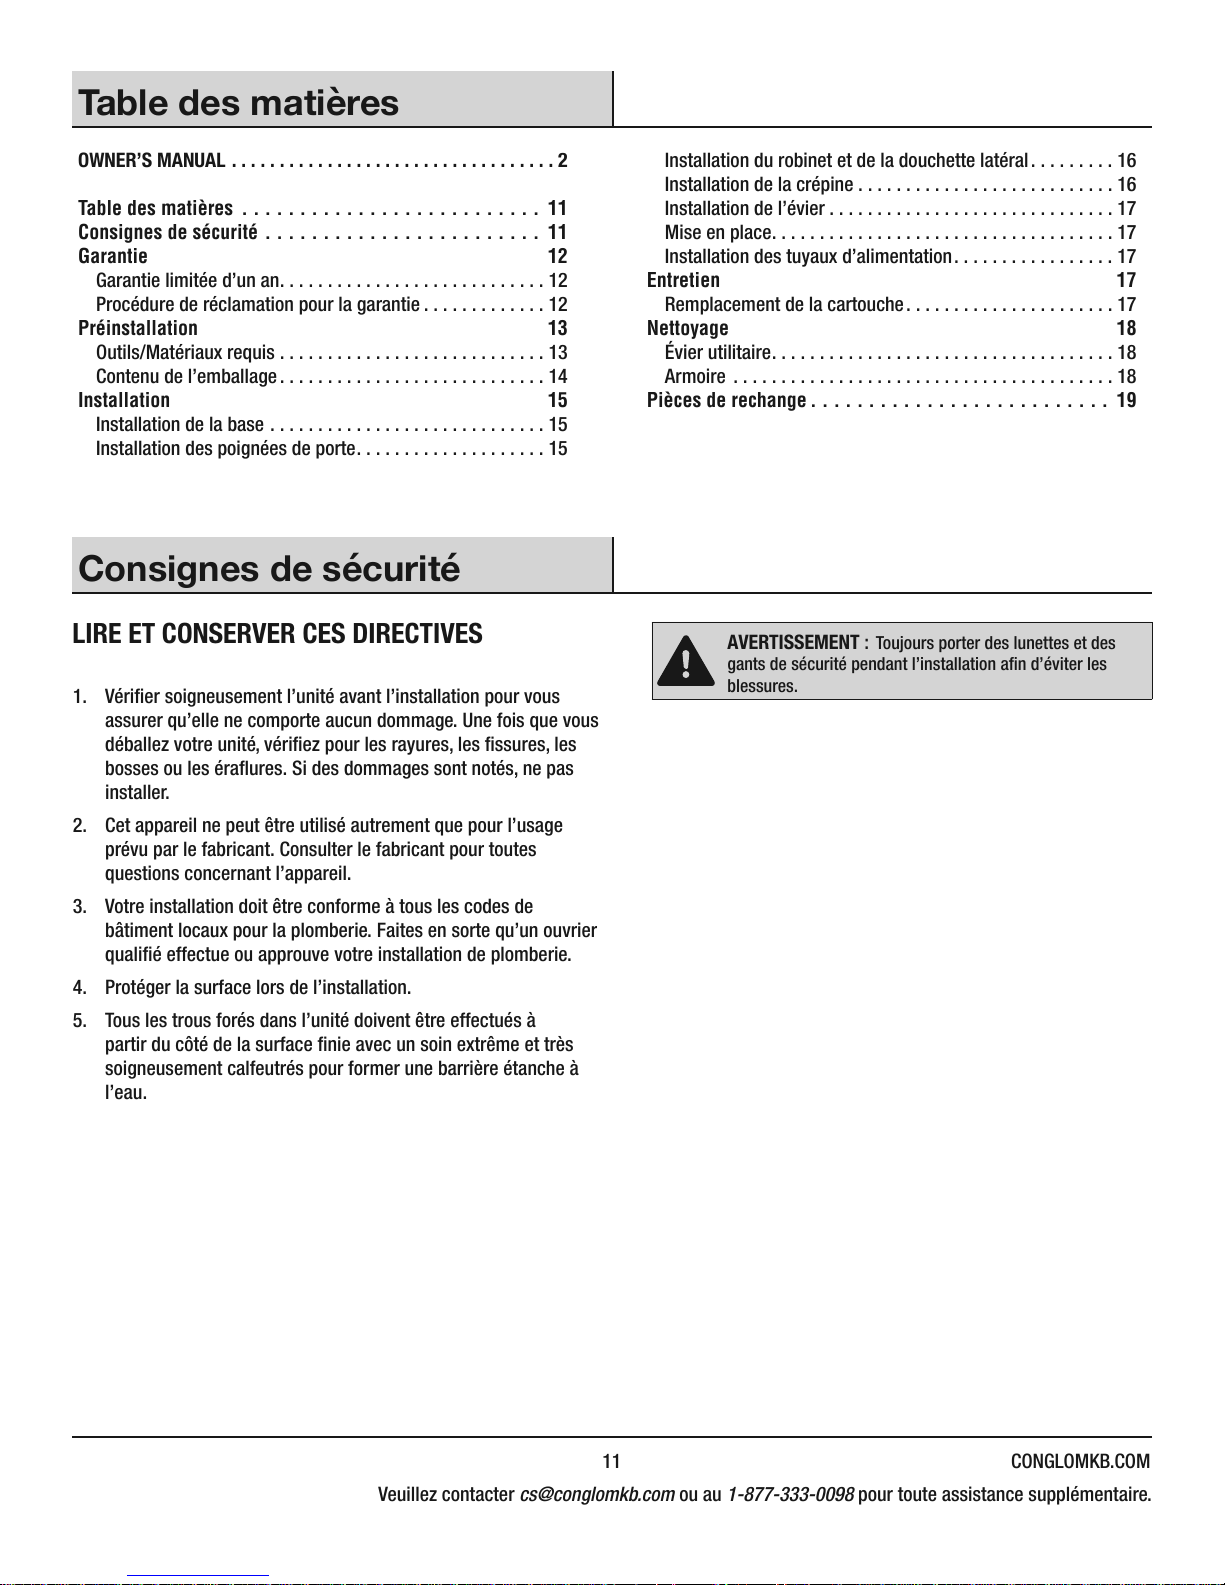
Table des matières
OWNER’S MANUAL ..................................2
Table des matières .......................... 11
Consignes de sécurité ........................ 11
Garantie .........................................12
Garantie limitée d’un an ............................12
Procédure de réclamation pour la garantie .............12
Préinstallation ....................................13
Outils/Matériaux requis ............................13
Contenu de l’emballage ............................14
Installation .......................................15
Installation de la base .............................15
Installation des poignées de porte ....................15
Consignes de sécurité
LIRE ET CONSERVER CES DIRECTIVES
1. Vérier soigneusement l’unité avant l’installation pour vous
assurer qu’elle ne comporte aucun dommage. Une fois que vous
déballez votre unité, vériez pour les rayures, les ssures, les
bosses ou les éraures. Si des dommages sont notés, ne pas
installer.
2. Cet appareil ne peut être utilisé autrement que pour l’usage
prévu par le fabricant. Consulter le fabricant pour toutes
questions concernant l’appareil.
3. Votre installation doit être conforme à tous les codes de
bâtiment locaux pour la plomberie. Faites en sorte qu’un ouvrier
qualié effectue ou approuve votre installation de plomberie.
4. Protéger la surface lors de l’installation.
5. Tous les trous forés dans l’unité doivent être effectués à
partir du côté de la surface nie avec un soin extrême et très
soigneusement calfeutrés pour former une barrière étanche à
l’eau.
Installation du robinet et de la douchette latéral .........16
Installation de la crépine ...........................16
Installation de l’évier ..............................17
Mise en place ....................................17
Installation des tuyaux d’alimentation .................17
Entretien .........................................17
Remplacement de la cartouche ......................17
Nettoyage ........................................18
Évier utilitaire ....................................18
Armoire ........................................18
Pièces de rechange .......................... 19
AVERTISSEMENT : Toujours porter des lunettes et des
gants de sécurité pendant l’installation an d’éviter les
blessures.
11 CONGLOMKB.COM
Veuillez contacter cs@conglomkb.com ou au 1-877-333-0098 pour toute assistance supplémentaire.
Page 12
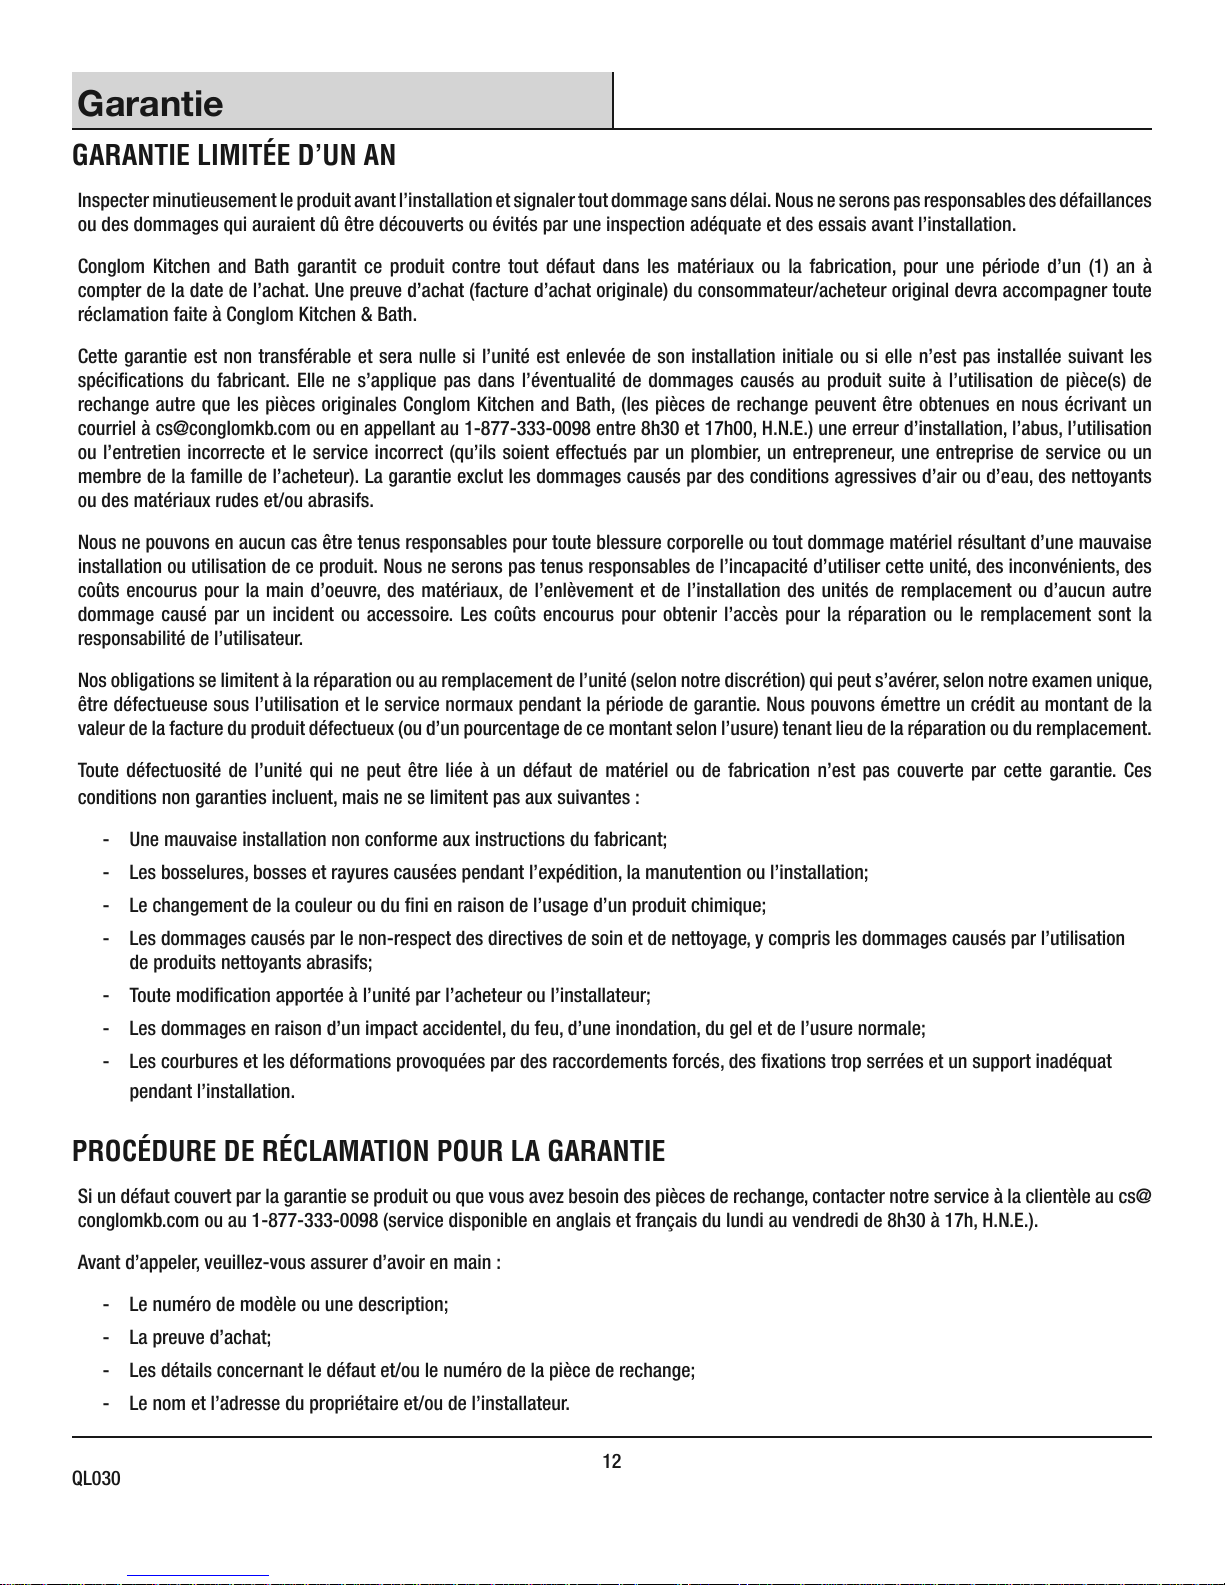
Garantie
GARANTIE LIMITÉE D’UN AN
Inspecter minutieusement le produit avant l’installation et signaler tout dommage sans délai. Nous ne serons pas responsables des défaillances
ou des dommages qui auraient dû être découverts ou évités par une inspection adéquate et des essais avant l’installation.
Conglom Kitchen and Bath garantit ce produit contre tout défaut dans les matériaux ou la fabrication, pour une période d’un (1) an à
compter de la date de l’achat. Une preuve d’achat (facture d’achat originale) du consommateur/acheteur original devra accompagner toute
réclamation faite à Conglom Kitchen & Bath.
Cette garantie est non transférable et sera nulle si l’unité est enlevée de son installation initiale ou si elle n’est pas installée suivant les
spécications du fabricant. Elle ne s’applique pas dans l’éventualité de dommages causés au produit suite à l’utilisation de pièce(s) de
rechange autre que les pièces originales Conglom Kitchen and Bath, (les pièces de rechange peuvent être obtenues en nous écrivant un
courriel à cs@conglomkb.com ou en appellant au 1-877-333-0098 entre 8h30 et 17h00, H.N.E.) une erreur d’installation, l’abus, l’utilisation
ou l’entretien incorrecte et le service incorrect (qu’ils soient effectués par un plombier, un entrepreneur, une entreprise de service ou un
membre de la famille de l’acheteur). La garantie exclut les dommages causés par des conditions agressives d’air ou d’eau, des nettoyants
ou des matériaux rudes et/ou abrasifs.
Nous ne pouvons en aucun cas être tenus responsables pour toute blessure corporelle ou tout dommage matériel résultant d’une mauvaise
installation ou utilisation de ce produit. Nous ne serons pas tenus responsables de l’incapacité d’utiliser cette unité, des inconvénients, des
coûts encourus pour la main d’oeuvre, des matériaux, de l’enlèvement et de l’installation des unités de remplacement ou d’aucun autre
dommage causé par un incident ou accessoire. Les coûts encourus pour obtenir l’accès pour la réparation ou le remplacement sont la
responsabilité de l’utilisateur.
Nos obligations se limitent à la réparation ou au remplacement de l’unité (selon notre discrétion) qui peut s’avérer, selon notre examen unique,
être défectueuse sous l’utilisation et le service normaux pendant la période de garantie. Nous pouvons émettre un crédit au montant de la
valeur de la facture du produit défectueux (ou d’un pourcentage de ce montant selon l’usure) tenant lieu de la réparation ou du remplacement.
Toute défectuosité de l’unité qui ne peut être liée à un défaut de matériel ou de fabrication n’est pas couverte par cette garantie. Ces
conditions non garanties incluent, mais ne se limitent pas aux suivantes :
- Une mauvaise installation non conforme aux instructions du fabricant;
- Les bosselures, bosses et rayures causées pendant l’expédition, la manutention ou l’installation;
- Le changement de la couleur ou du ni en raison de l’usage d’un produit chimique;
- Les dommages causés par le non-respect des directives de soin et de nettoyage, y compris les dommages causés par l’utilisation
de produits nettoyants abrasifs;
- Toute modication apportée à l’unité par l’acheteur ou l’installateur;
- Les dommages en raison d’un impact accidentel, du feu, d’une inondation, du gel et de l’usure normale;
- Les courbures et les déformations provoquées par des raccordements forcés, des xations trop serrées et un support inadéquat
pendant l’installation.
PROCÉDURE DE RÉCLAMATION POUR LA GARANTIE
Si un défaut couvert par la garantie se produit ou que vous avez besoin des pièces de rechange, contacter notre service à la clientèle au cs@
conglomkb.com ou au 1-877-333-0098 (service disponible en anglais et français du lundi au vendredi de 8h30 à 17h, H.N.E.).
Avant d’appeler, veuillez-vous assurer d’avoir en main :
- Le numéro de modèle ou une description;
- La preuve d’achat;
- Les détails concernant le défaut et/ou le numéro de la pièce de rechange;
- Le nom et l’adresse du propriétaire et/ou de l’installateur.
12
QL030
Page 13
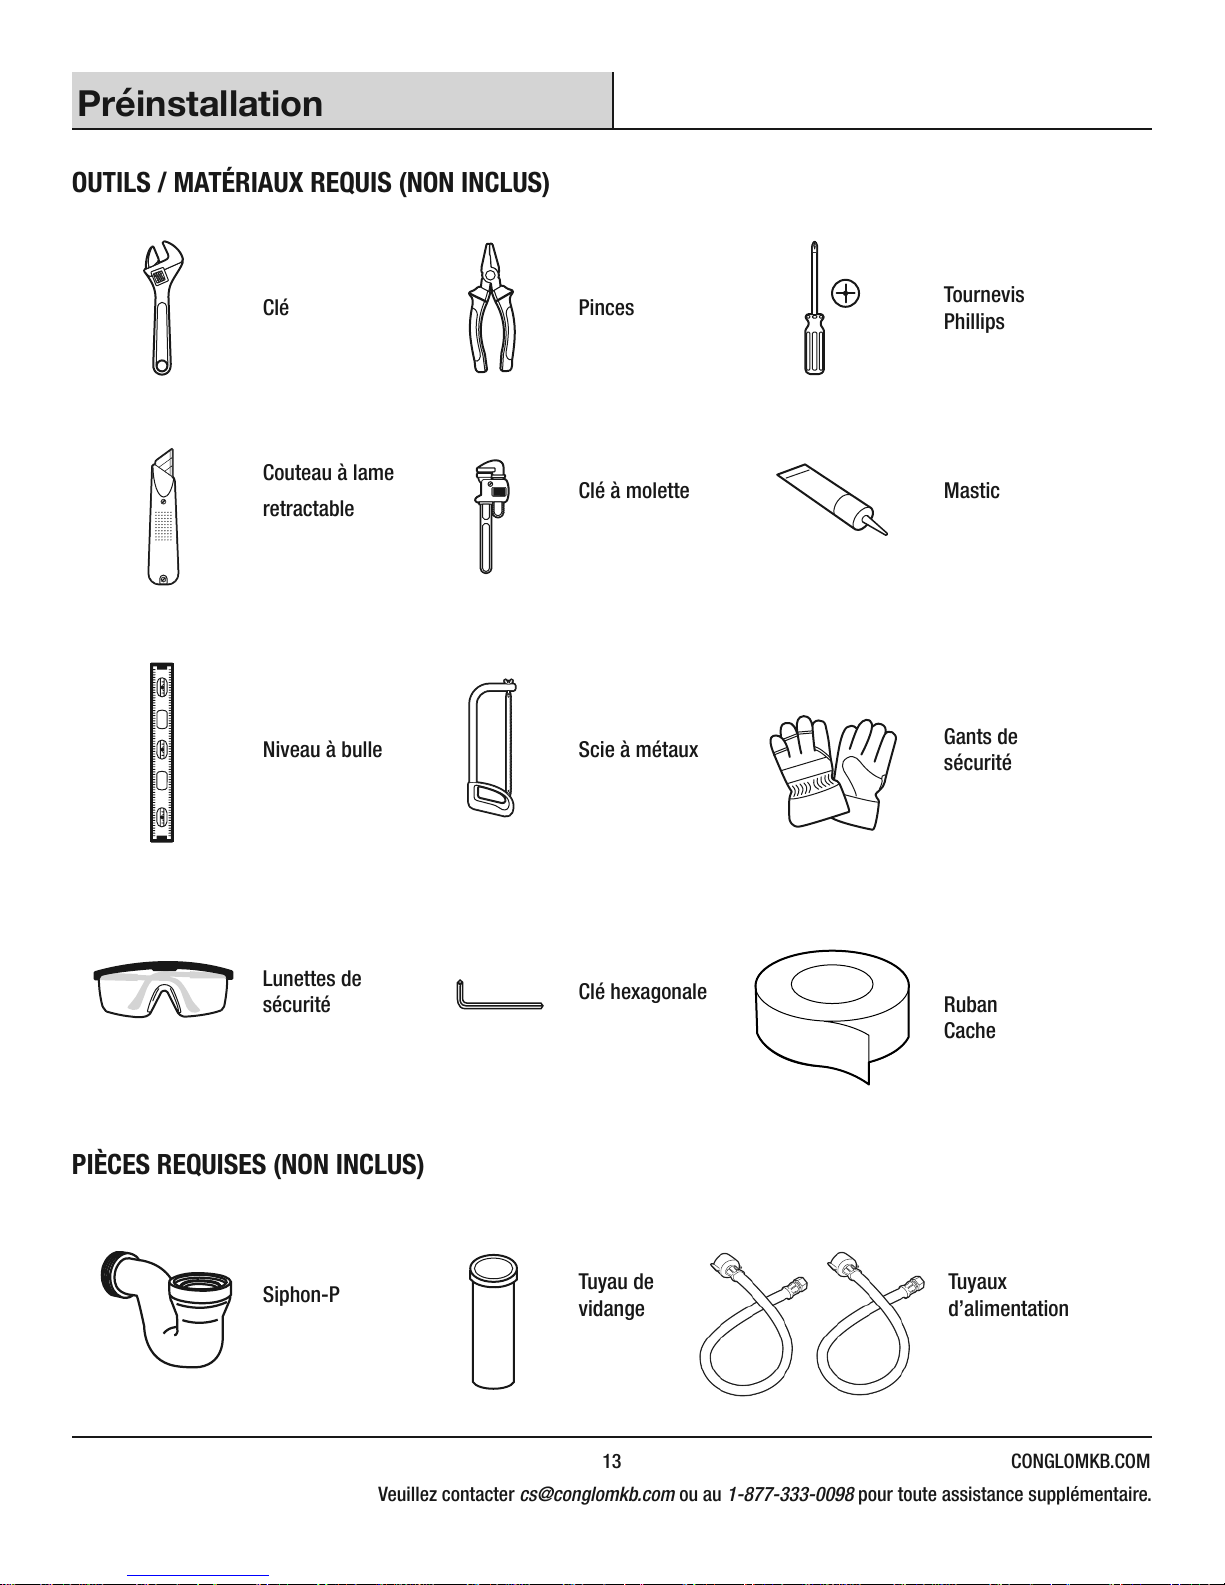
Préinstallation
OUTILS / MATÉRIAUX REQUIS (NON INCLUS)
Clé Pinces
Couteau à lame
Clé à molette Mastic
retractable
Niveau à bulle Scie à métaux
Tournevis
Phillips
Gants de
sécurité
Lunettes de
sécurité
Clé hexagonale
Ruban
Cache
PIÈCES REQUISES (NON INCLUS)
Siphon-P
Tuyau de
vidange
Tuyaux
d’alimentation
13 CONGLOMKB.COM
Veuillez contacter cs@conglomkb.com ou au 1-877-333-0098 pour toute assistance supplémentaire.
Page 14
Préinstallation (suite)
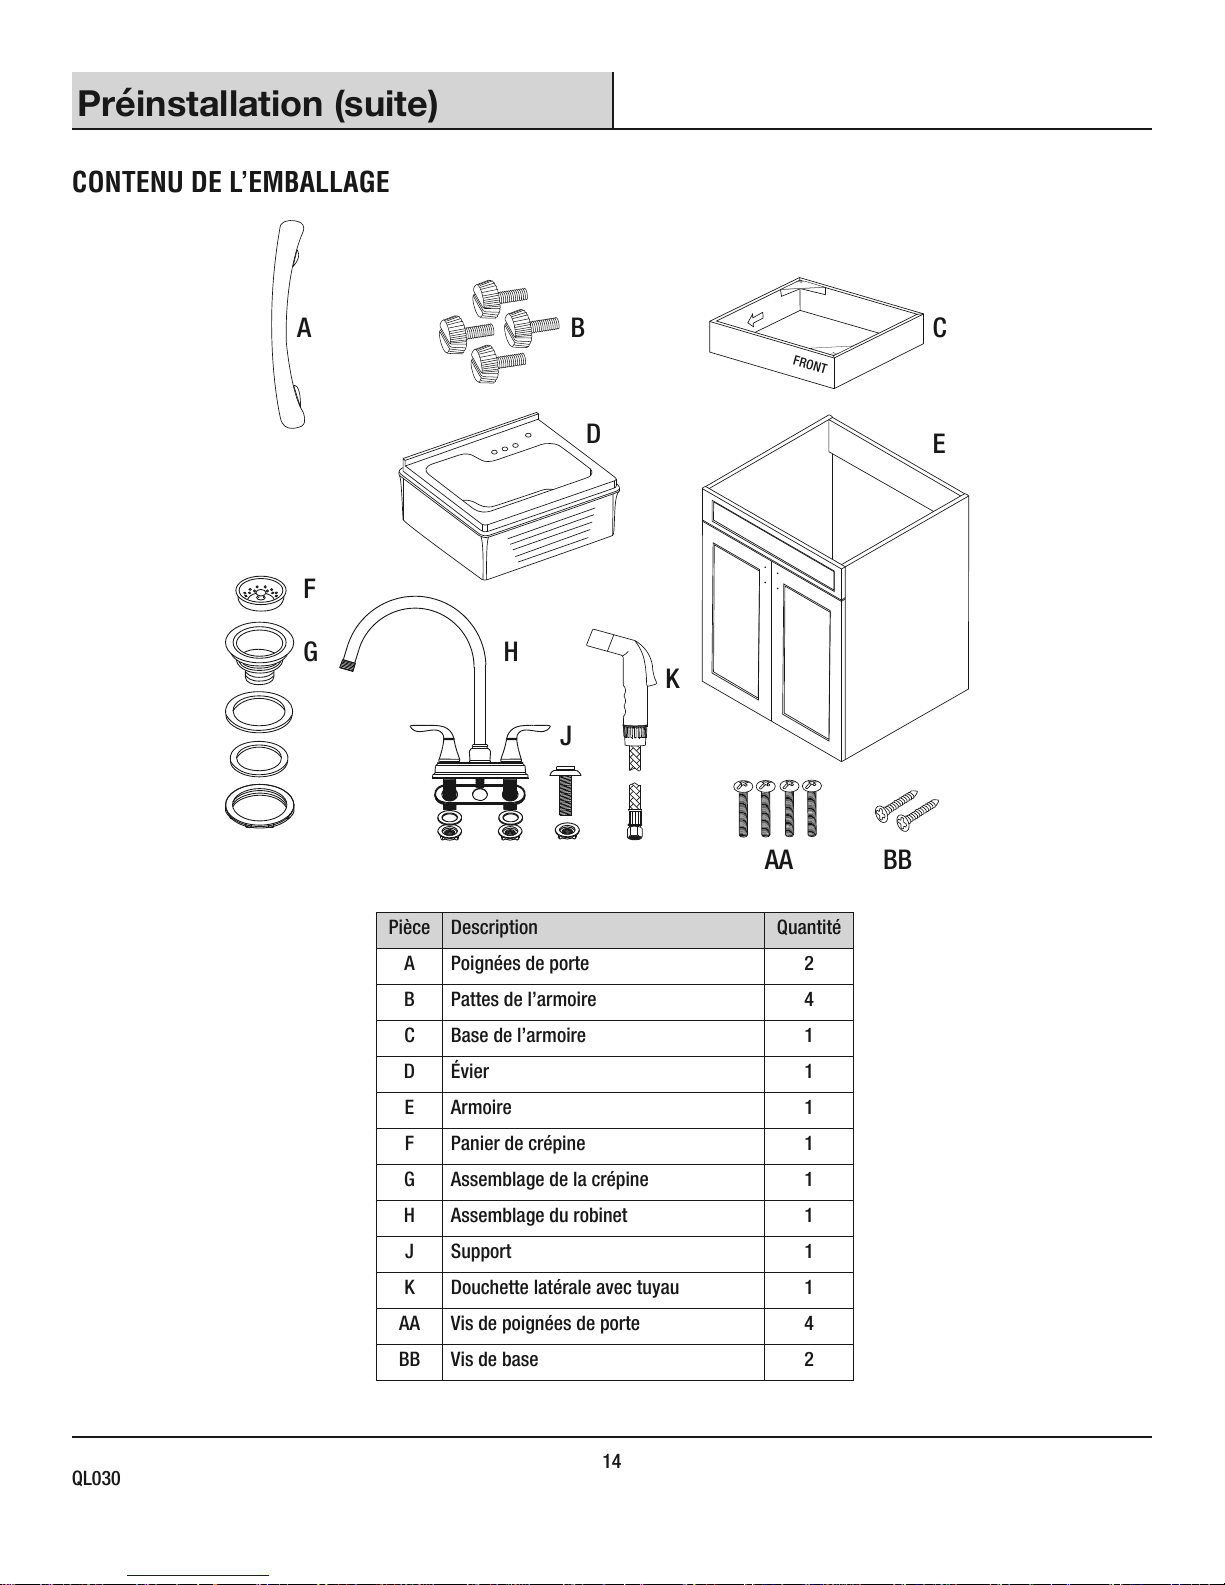
CONTENU DE L’EMBALLAGE
A B C
FRONT
D
E
F
HG
K
J
AA
Pièce Description Quantité
A Poignées de porte 2
B Pattes de l’armoire 4
BB
C Base de l’armoire 1
D Évier 1
E Armoire 1
F Panier de crépine 1
G Assemblage de la crépine 1
H Assemblage du robinet 1
J Support 1
K Douchette latérale avec tuyau 1
AA Vis de poignées de porte 4
BB Vis de base 2
14
QL030
Page 15
Installation
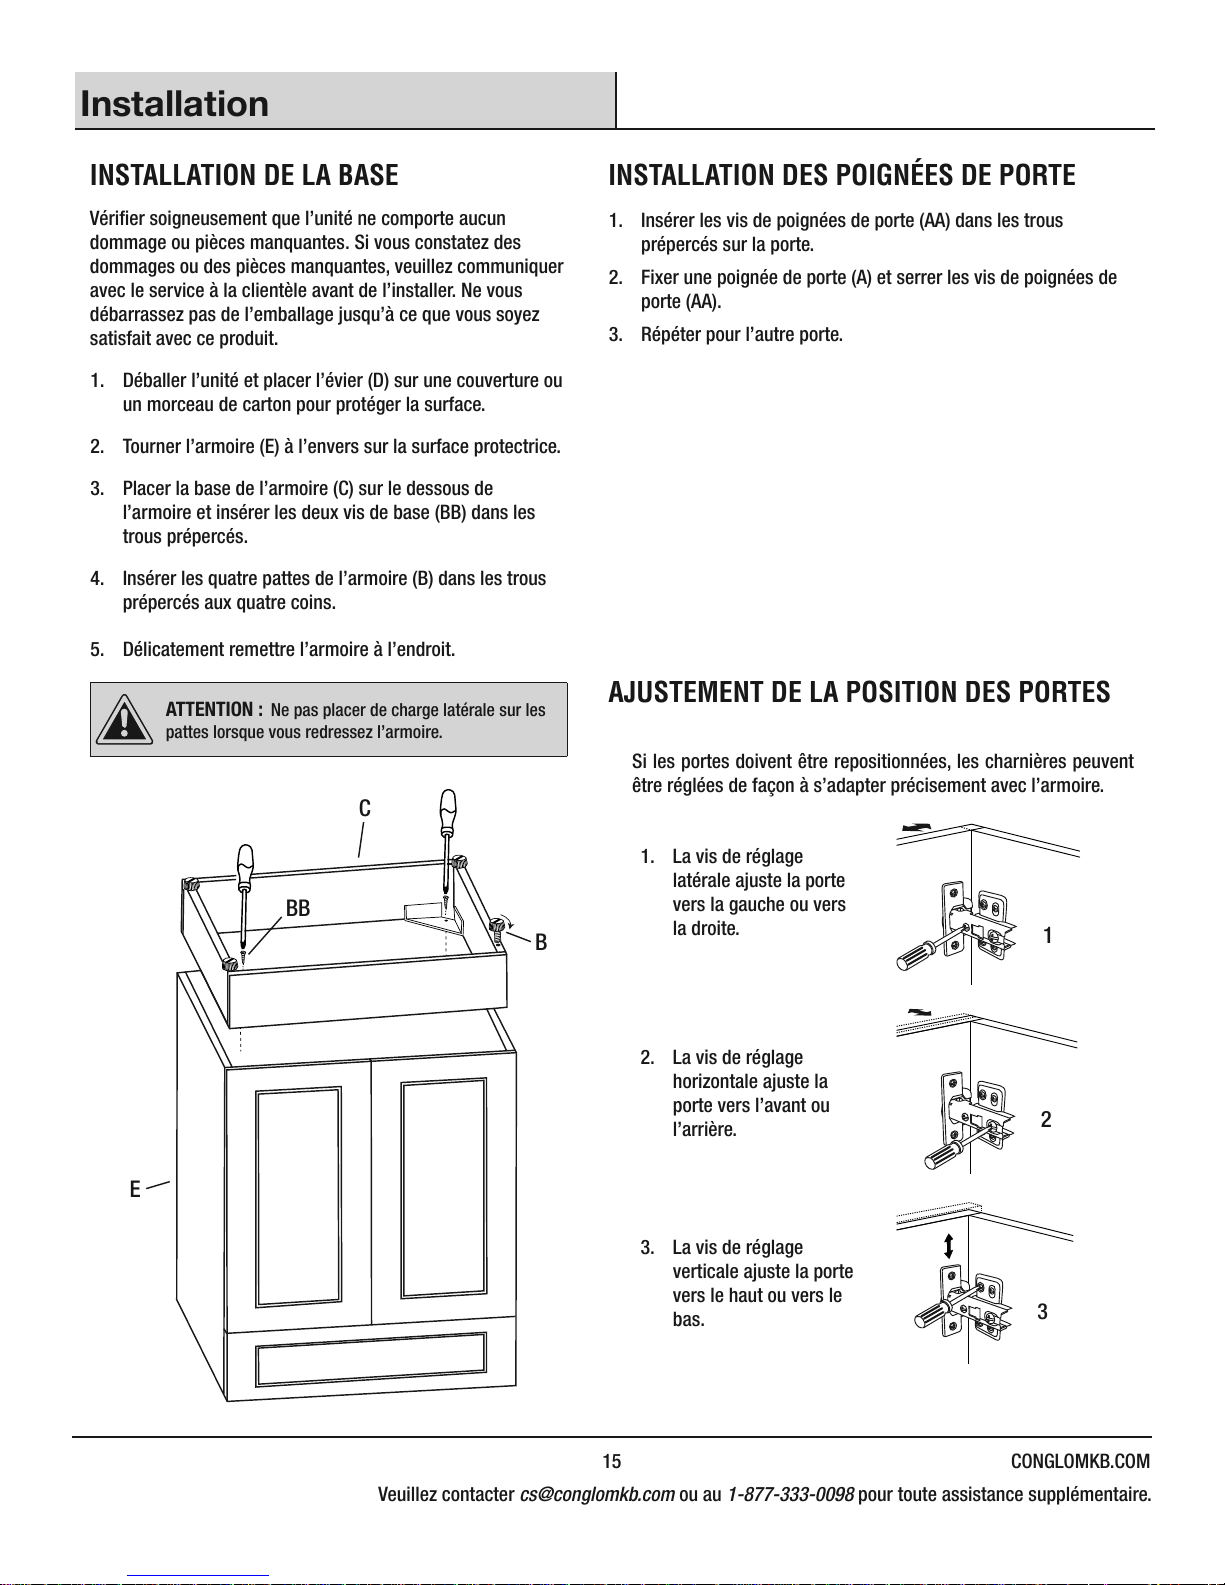
INSTALLATION DE LA BASE INSTALLATION DES POIGNÉES DE PORTE
Vérier soigneusement que l’unité ne comporte aucun
dommage ou pièces manquantes. Si vous constatez des
dommages ou des pièces manquantes, veuillez communiquer
avec le service à la clientèle avant de l’installer. Ne vous
débarrassez pas de l’emballage jusqu’à ce que vous soyez
satisfait avec ce produit.
1. Déballer l’unité et placer l’évier (D) sur une couverture ou
un morceau de carton pour protéger la surface.
2. Tourner l’armoire (E) à l’envers sur la surface protectrice.
3. Placer la base de l’armoire (C) sur le dessous de
l’armoire et insérer les deux vis de base (BB) dans les
trous prépercés.
4. Insérer les quatre pattes de l’armoire (B) dans les trous
prépercés aux quatre coins.
5. Délicatement remettre l’armoire à l’endroit.
ATTENTION : Ne pas placer de charge latérale sur les
pattes lorsque vous redressez l’armoire.
C
1. Insérer les vis de poignées de porte (AA) dans les trous
prépercés sur la porte.
2. Fixer une poignée de porte (A) et serrer les vis de poignées de
porte (AA).
3. Répéter pour l’autre porte.
AJUSTEMENT DE LA POSITION DES PORTES
Si les portes doivent être repositionnées, les charnières peuvent
être réglées de façon à s’adapter précisement avec l’armoire.
1. La vis de réglage
latérale ajuste la porte
BB
B
vers la gauche ou vers
la droite.
2. La vis de réglage
horizontale ajuste la
porte vers l’avant ou
l’arrière.
1
2
E
3. La vis de réglage
verticale ajuste la porte
vers le haut ou vers le
bas.
3
15 CONGLOMKB.COM
Veuillez contacter cs@conglomkb.com ou au 1-877-333-0098 pour toute assistance supplémentaire.
Page 16
Installation (suite)
INSTALLATION DU ROBINET ET DE LA
DOUCHETTE
Avant d’installer le robinet et la douchette, déballer le robinet en
vériant attentivement qu’aucune pièce ne manque.
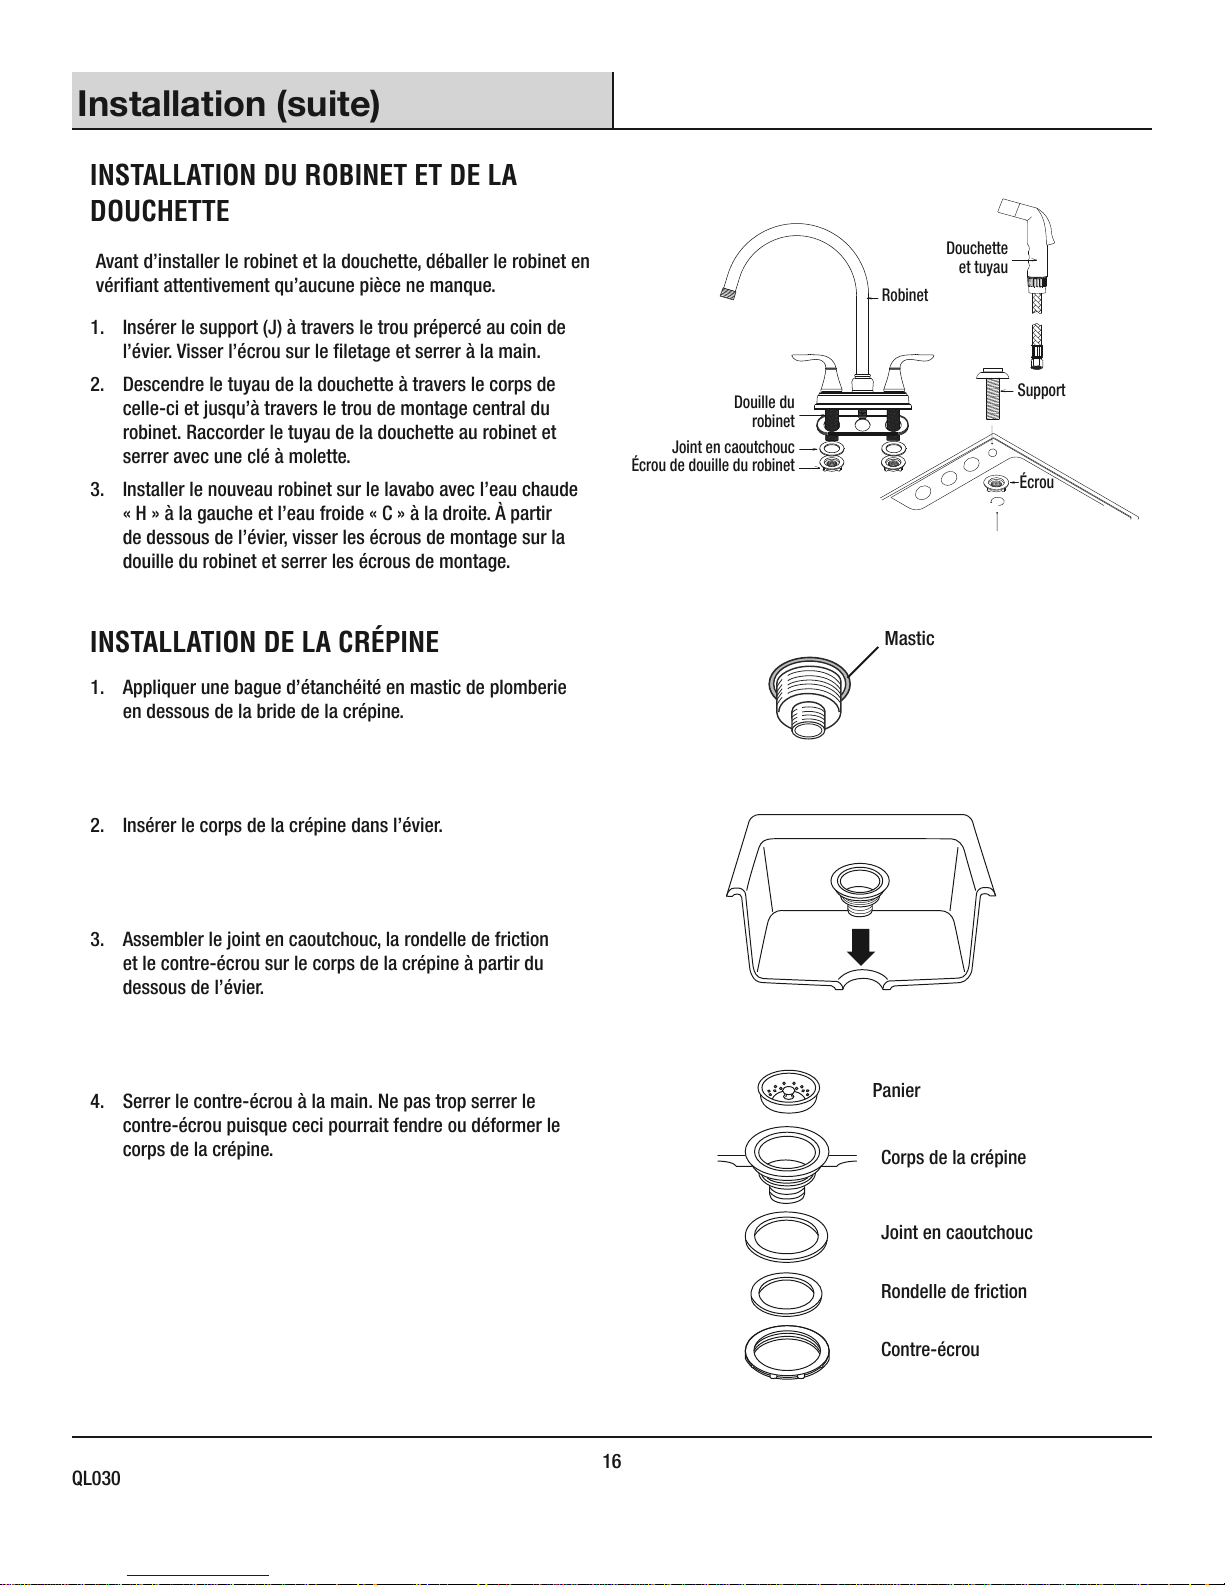
1. Insérer le support (J) à travers le trou prépercé au coin de
l’évier. Visser l’écrou sur le letage et serrer à la main.
2. Descendre le tuyau de la douchette à travers le corps de
celle-ci et jusqu’à travers le trou de montage central du
robinet. Raccorder le tuyau de la douchette au robinet et
serrer avec une clé à molette.
3. Installer le nouveau robinet sur le lavabo avec l’eau chaude
« H » à la gauche et l’eau froide « C » à la droite. À partir
de dessous de l’évier, visser les écrous de montage sur la
douille du robinet et serrer les écrous de montage.
Douille du
robinet
Joint en caoutchouc
Écrou de douille du robinet
Douchette
et tuyau
Robinet
Support
Écrou
INSTALLATION DE LA CRÉPINE
1. Appliquer une bague d’étanchéité en mastic de plomberie
en dessous de la bride de la crépine.
2. Insérer le corps de la crépine dans l’évier.
3. Assembler le joint en caoutchouc, la rondelle de friction
et le contre-écrou sur le corps de la crépine à partir du
dessous de l’évier.
4. Serrer le contre-écrou à la main. Ne pas trop serrer le
contre-écrou puisque ceci pourrait fendre ou déformer le
corps de la crépine.
Mastic
Panier
Corps de la crépine
16
QL030
Joint en caoutchouc
Rondelle de friction
Contre-écrou
Page 17
Installation (suite)
INSTALLATION DE L’ÉVIER
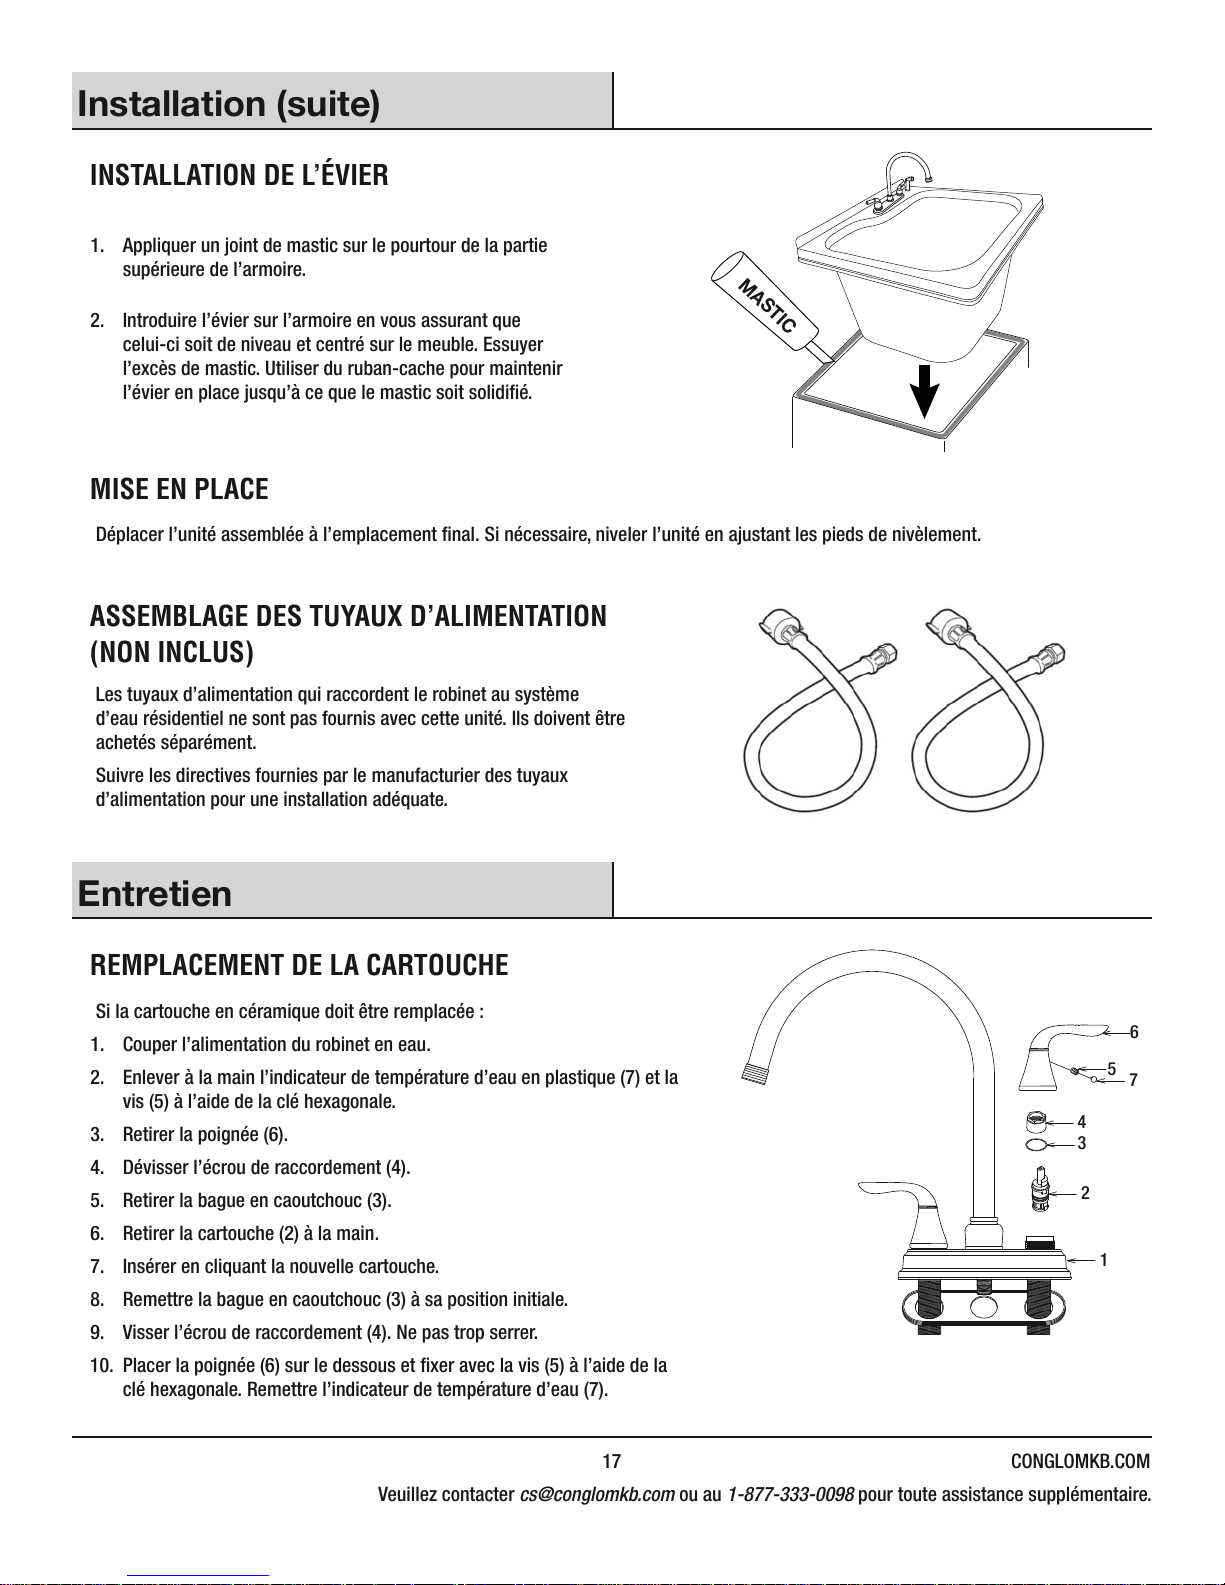
1. Appliquer un joint de mastic sur le pourtour de la partie
supérieure de l’armoire.
2. Introduire l’évier sur l’armoire en vous assurant que
celui-ci soit de niveau et centré sur le meuble. Essuyer
l’excès de mastic. Utiliser du ruban-cache pour maintenir
l’évier en place jusqu’à ce que le mastic soit solidié.
MISE EN PLACE
Déplacer l’unité assemblée à l’emplacement nal. Si nécessaire, niveler l’unité en ajustant les pieds de nivèlement.
ASSEMBLAGE DES TUYAUX D’ALIMENTATION
(NON INCLUS)
MASTIC
Les tuyaux d’alimentation qui raccordent le robinet au système
d’eau résidentiel ne sont pas fournis avec cette unité. Ils doivent être
achetés séparément.
Suivre les directives fournies par le manufacturier des tuyaux
d’alimentation pour une installation adéquate.
Entretien
REMPLACEMENT DE LA CARTOUCHE
Si la cartouche en céramique doit être remplacée :
1. Couper l’alimentation du robinet en eau.
2. Enlever à la main l’indicateur de température d’eau en plastique (7) et la
vis (5) à l’aide de la clé hexagonale.
3. Retirer la poignée (6).
4. Dévisser l’écrou de raccordement (4).
5. Retirer la bague en caoutchouc (3).
6. Retirer la cartouche (2) à la main.
7. Insérer en cliquant la nouvelle cartouche.
8. Remettre la bague en caoutchouc (3) à sa position initiale.
9. Visser l’écrou de raccordement (4). Ne pas trop serrer.
10. Placer la poignée (6) sur le dessous et xer avec la vis (5) à l’aide de la
clé hexagonale. Remettre l’indicateur de température d’eau (7).
6
5
7
4
3
2
1
17 CONGLOMKB.COM
Veuillez contacter cs@conglomkb.com ou au 1-877-333-0098 pour toute assistance supplémentaire.
Page 18
Soin et Nettoyage
ÉVIER UTILITAIRE
Votre évier est fabriqué à partir d’ABS. Moyennant l’apport des soins appropriés il vous fournira un excellent rendement pendant plusieurs
années.
À faire À ne pas faire
- Utiliser des produits de nettoyage ménagers
(non abrasifs) ou un liquide détergent à
vaiselle doux. Bien rincer et assécher avec un
linge propre.
- Éliminer la poussière et la saleté sèche avec
un linge doux et humide.
- Nettoyer les taches de graisses, d’huile,
de peinture et d’encre avec de l’alcool à
friction. Après avoir enlevé la tache, rincer
immédiatement avec de l’eau.
- Éviter que la surface en ABS n’entre en
contact avec des produits tels que l’acétone
(dissolvant pour vernis à ongles), vernis à
ongles, solution pour nettoyage à sec, solvant
à laque, gazoline, huile de pin, etc.
- Utiliser avec prudence les instruments
coupants qui pourraient égratigner la surface.
ARMOIRE
Pour maintenir la surface de votre armoire, veuillez respecter les recommandations suivantes.
À faire À ne pas faire
- Éliminer la poussière et la saleté sèche avec
un linge doux et humide.
- Nettoyer les taches de graisse, d’huile,
de peinture et d’encre avec de l’alcool à
friction. Après avoir enlevé la tache, rincer
immédiatement avec de l’eau.
- Ne laissez pas la surface de l’armoire entrer
en contact avec les produits suivants: acétone
(dissolvant à ongles), vernis à ongles, solution
de nettoyage à sec, diluants à peinture-laque,
essence, huile de pin, etc.
- Soyez prudent lorsque vous utilisez des
instruments tranchants qui risquent de tomber
et de rayer la surface.
18
QL030
Page 19
Pièces de rechange
Si des pièces sont manquantes ou si vous avez besoin de pièces de rechange, veuillez nous contacter au cs@conglomkb.com ou 1-877-333-
0098 (du lundi au vendredi, 8h30 à 17h, H.N.E.). Veuillez identier les pièces nécessaires et ayez les codes à portée de la main.
C
B
A
H
F
E
G
AA BB
Pièce Description Code Quantité
D
J
A Poignées de porte QHL101 2
B Pattes de l’armoire QHL107 4
C Panier de crépine QHS101 1
D Assemblage de la crépine QHS150 1
E Support QHL110 1
F douchette QHL112 1
G Tuyaux exible QHL113 1
H Cartouche QHS137 1
J Charnières QHL111 4
AA Vis de poignées de porte QHL104 4
BB Vis de base QHL108 2
19 CONGLOMKB.COM
Veuillez contacter cs@conglomkb.com ou au 1-877-333-0098 pour toute assistance supplémentaire.
Page 20

DE SIMPLE À REMARQUABLE
Imported by / Importé par :
Made in China / Fabriqué en Chine
 Loading...