

Page 1
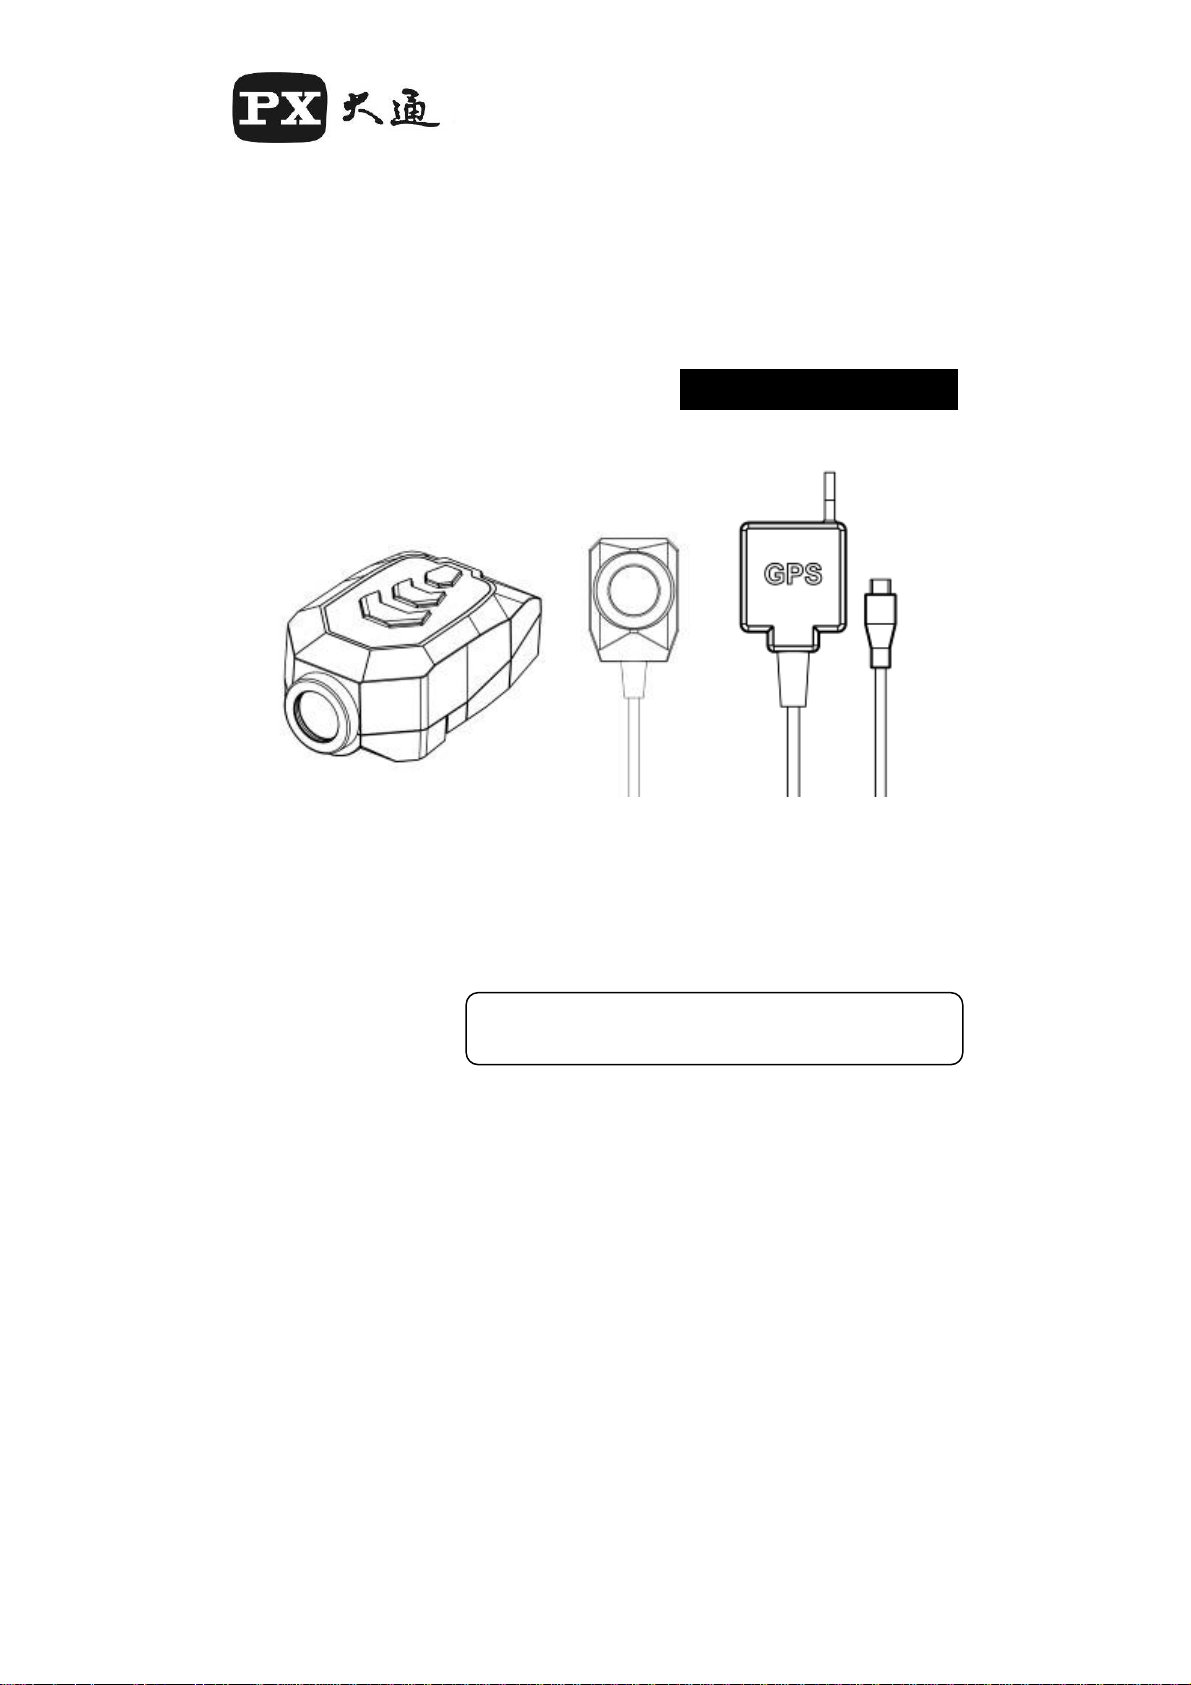
WIFI Bike & Motor Cam
(Motor Accessory)
User’s Manual
B52Q Series
- 1 -
Page 2

Table of Contents
1. Precautions before Use
2. Introduction
3. Features
4. Package Content
5. Notice for First time use
6. Installation
7. Product Appearance
8. Quick APP Installation Guide
9. APP UI Description
10. Trouble Shooting
11. Specification
12. Series Difference
13. FCC Statement
- 2 -
Page 3

Precautions before Use
Recording Mode
(1) Once the system is powered on, it will enter loop recording
mode. (The recording LED is flashing).
(2) To exit the loop recording mode, please stop recording first
Press [Loop] key Press Start Recording.
Now, it’s normal recording.
(The recording LED is ON permanently)
Formatting your SD Card
Long press [Loop/WIFI] key for 8 sec, system will response with
5 sec’s Continuous beep sound.
Press the Snapshot key within 5 sec. will start formatting your
SD card.
Before formatting, please put your system into standby mode.
(Stop recording .)
After SD card formation, system will enter standby mode .
Please restart the system.
Restore to Factory Default
Long press [Loop] key for 20 sec., system will prompt with
continuous beep sound for 5 sec. Press [Snapshot] key
within 5 sec., the system will restore to factory default settings.
Hot key for File Backup
Long press [Snapshot] key for 2 sec., the system will back up
the previous and current recording files to your Backup folder in
the SD card.
- 3 -
Page 4

Definition of Recording Space
(1) SD card space used by current recording mode. Normal
recording will force deleting loop recording space when the
space is not enough for its operation. When this happened,
system will display warning LED and sound for the insufficient
memory space.
(2) Loop recording cannot delete other files on the memory card.
It can only delete older loop recording files to make room for
the current recording.
(3) If use a brand-new memory card in loop recording, the whole
SD card space can be used for loop recording.
(4) When SD card is full while in loop recording mode. If you stop
recording and try to start normal recording again.
Then system will delete older loop recording files to make
space for the normal recording.
Suppose a 16G SD card is used for the system, it can save
video files for around 120 min.
Eg. 1: For loop recording only, it can save video files for 120 min
and can do the loop recording continuously.
Eg.2 : For normal recording only, it can save video files up to
120 min, then the “could not recording” LED and warning sound
will prompt by the system. You need to replace the SD card in
order to continue recording.
Eg. 3: If you loop recording for 100 min, then do a normal
recording for around 100 min. Under this case, the system
will use the left 20 min for the normal recording, then delete
older loop recording files total of 80 min to make room to do the
- 4 -
Page 5

normal recording.
Introduction
B62G is a Camera specialized for Bike & Motor. It equips
with water proof ability, anti-shake and share functions
using WiFi.
Features
Anti-Shake(EIS + Stable Construction)
Water Proof Mechanical (IPX5)
One hot key to back up file to system and smartphone.
Quick release lock design, with Screw & Quick Release
installation
HD Video Record (1080@30)
Support loop / normal recording
WIFI Transmission for files browsing and sharing.
Controls Record/Snapshot/File Browsing/File Sharing via
APP
1 Hours continuous recording
100% Recording Successful Rate
Warning for error of SD Card
APP available
Low wind resistance, wind diversion design
Video Noise Reduction
Auto Date/Time Correction via APP
Quick Snap Shot button
Snap Shot while recording Simultaneous
WDR Technology
Video & Trail Player in PC
- 5 -
Page 6
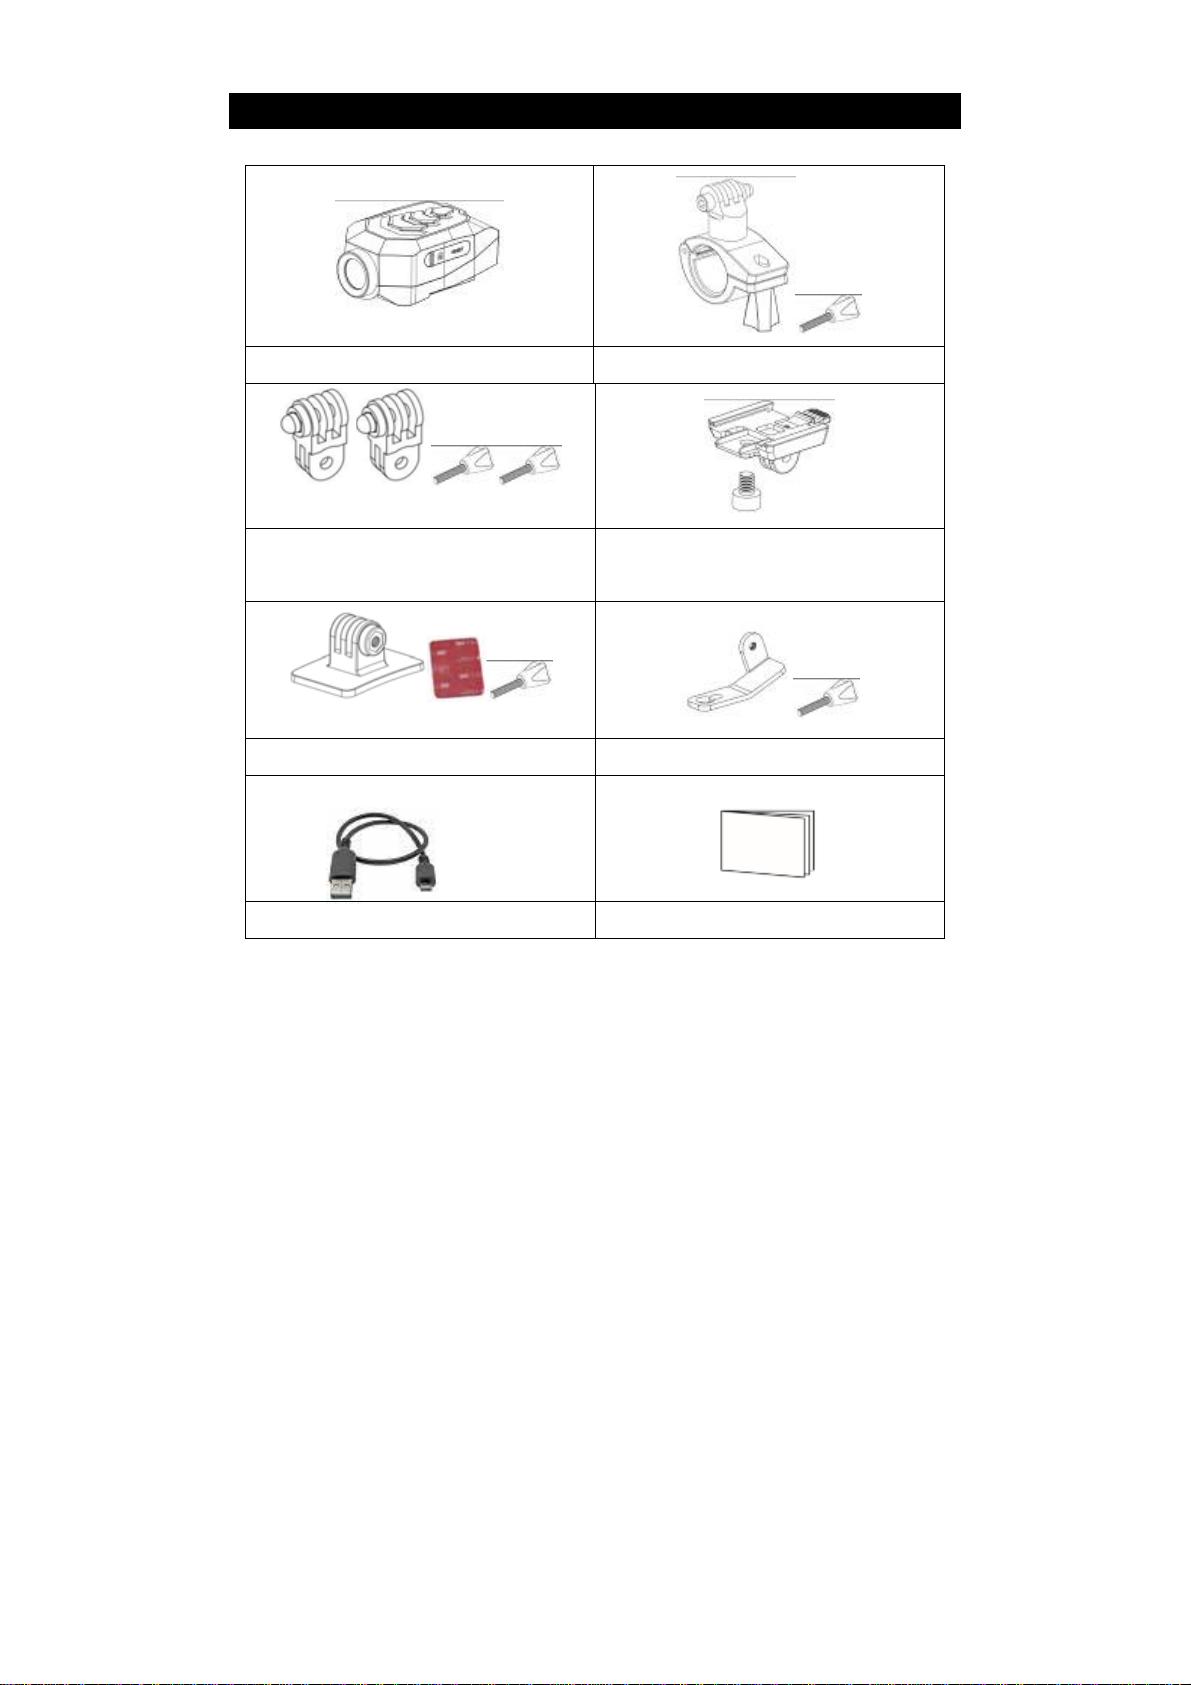
< Main unit >
Main unit Handle Bar Holder
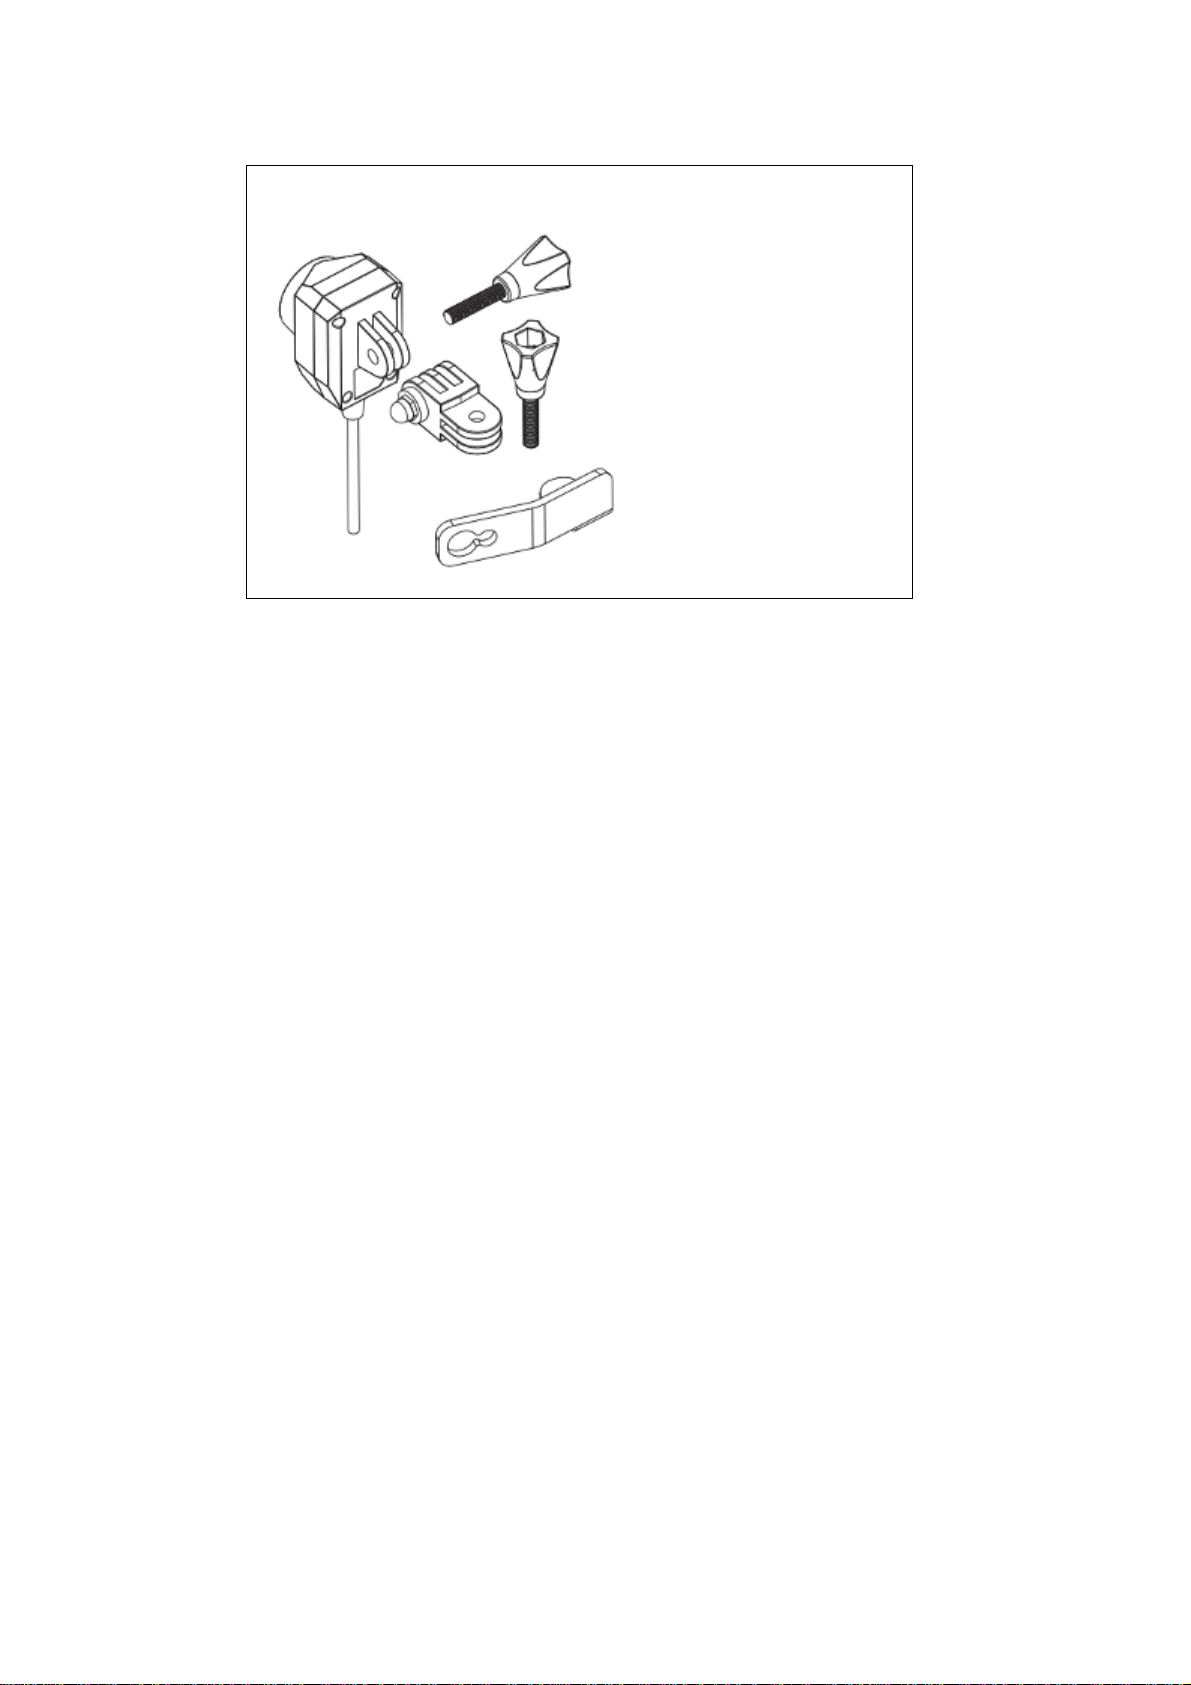
Package Content
Adjusting arm
screw
Quick Release Lock Base &
Adhesive Mount Universal Mount
Charging Cable
User Manual
- 6 -
Page 7
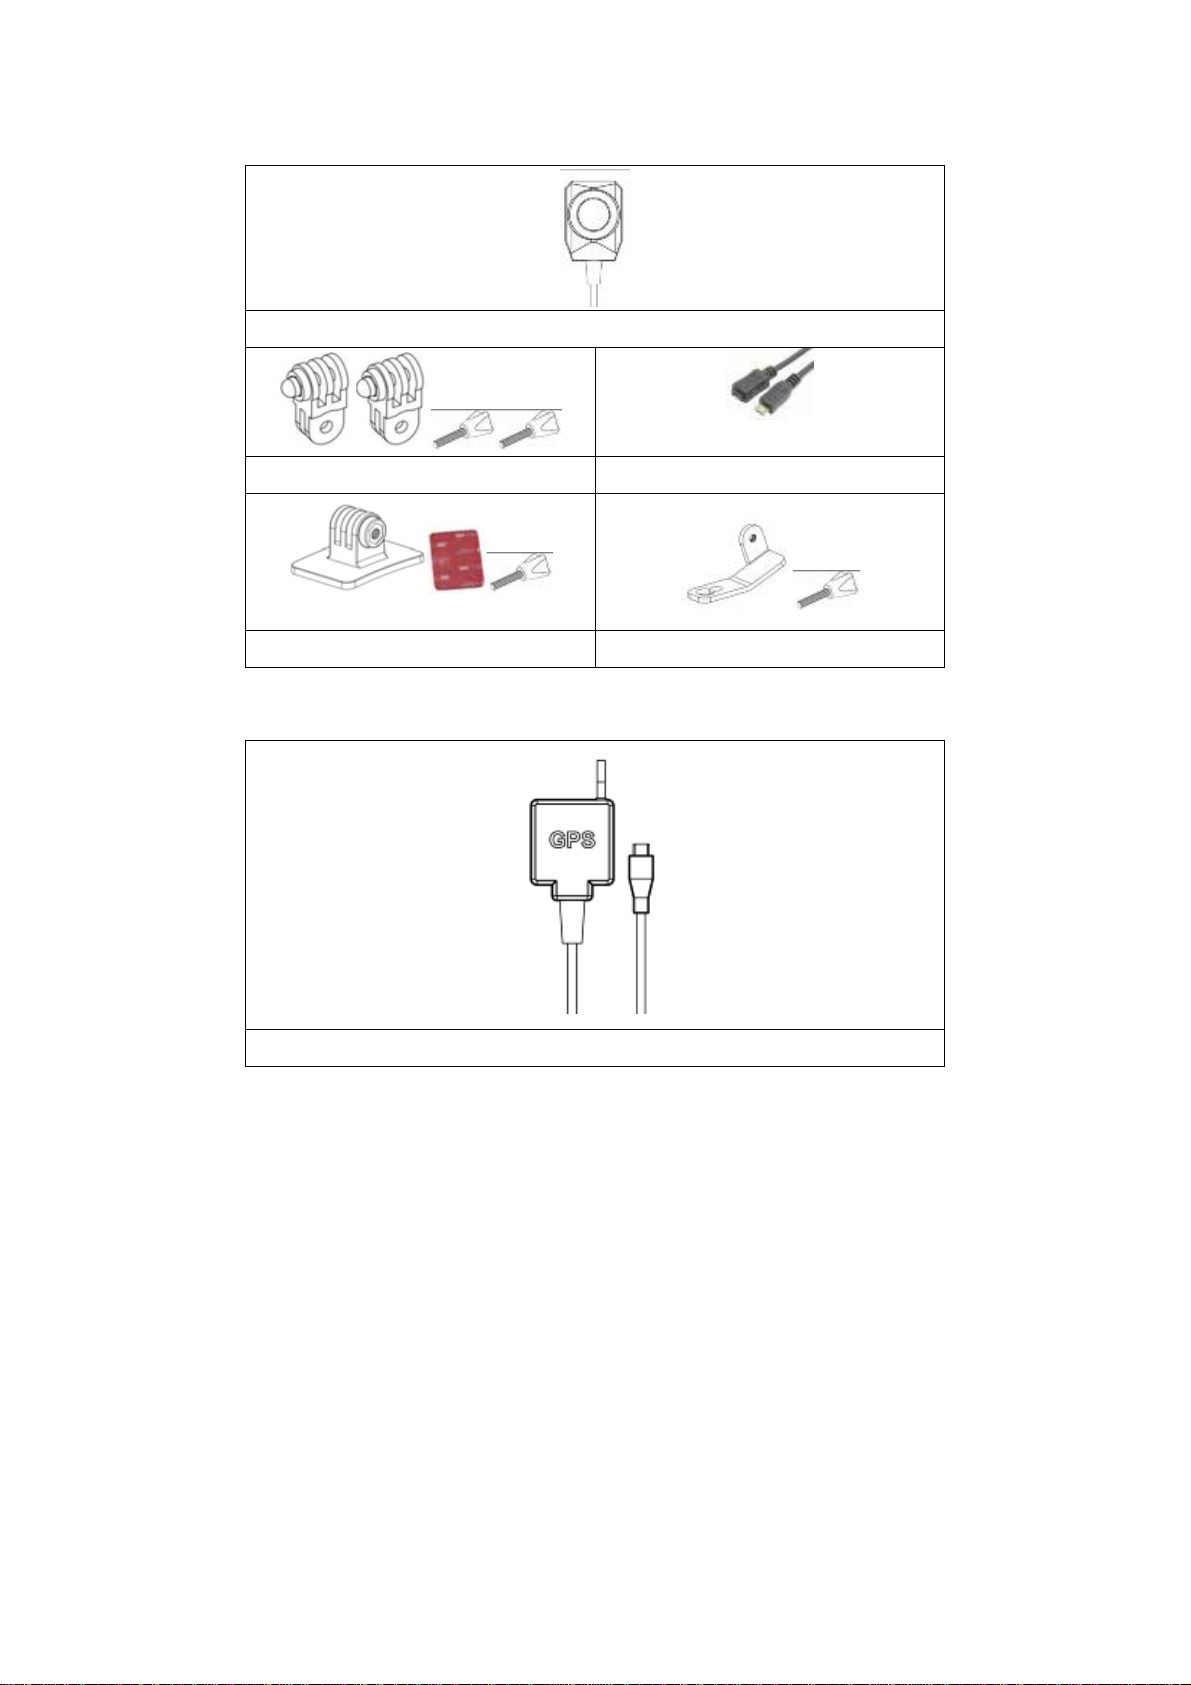
< Rear Cam >
Rear Cam
Adjusting arm
Adhesive Mount Universal Mount
< B-GPS >
3M Extension cable
B-GPS
- 7 -
Page 8

Notice For First-Time Use
(1) Please read this manual before using the system. Make sure
the content of the package is complete. If there is anything
missing or damaged, please contact the original dealer right
away.
(2) Please use SD card with Class 10 8GB or above. (The system
can support up to 32GB)
(3) This product does not guarantee to be compatible with all brands
of SD card.
(4) Don’t remove the SD card during recording. Please turn off the
system then remove the SD card. Improper operation will
damage your SD card or cause data lost.
(5) Pro-long operation may cause temperature rise of the Bike cam.
This is normal, no need to worry and use it as usual.
(6) Please don’t repair the system yourself. When it needs repair,
please contact your dealer or our Customer Service Department.
NCC Warning
Article 12 Low-power radio-frequency motors qualified by type
approval shall not change frequency, power or alter the
characteristics and functions of the original design without
permission.
Article 14 The use of low-power RF motors shall not affect the safety
of air navigation and interference with legitimate communications.
- 8 -
Page 9
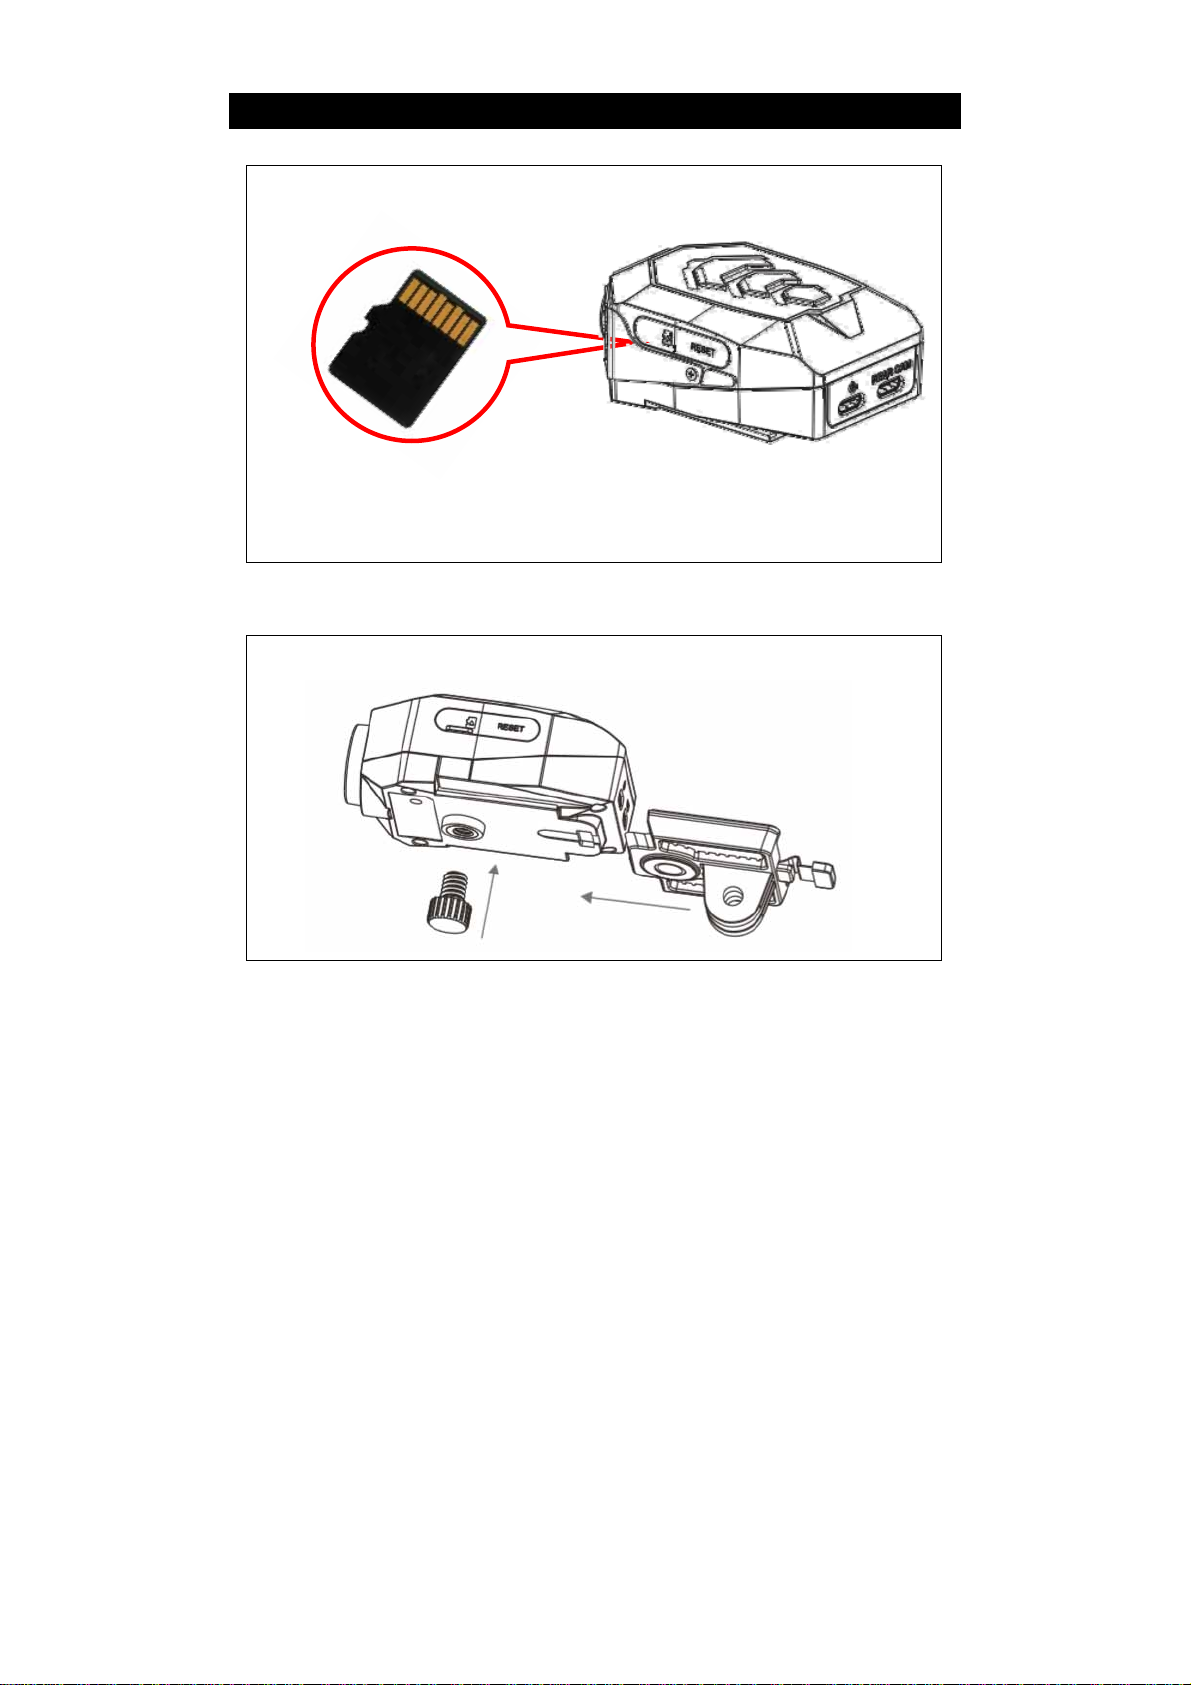
<main unit >
Insert Memory Card.
Installation
* Ensure SD Card is inserted in correct direction
* Use only microSD SDHC C10 or higher level
* 8G or higher capacity SD Card recommended
Install Quick Release Lock Base
- 9 -
Page 10
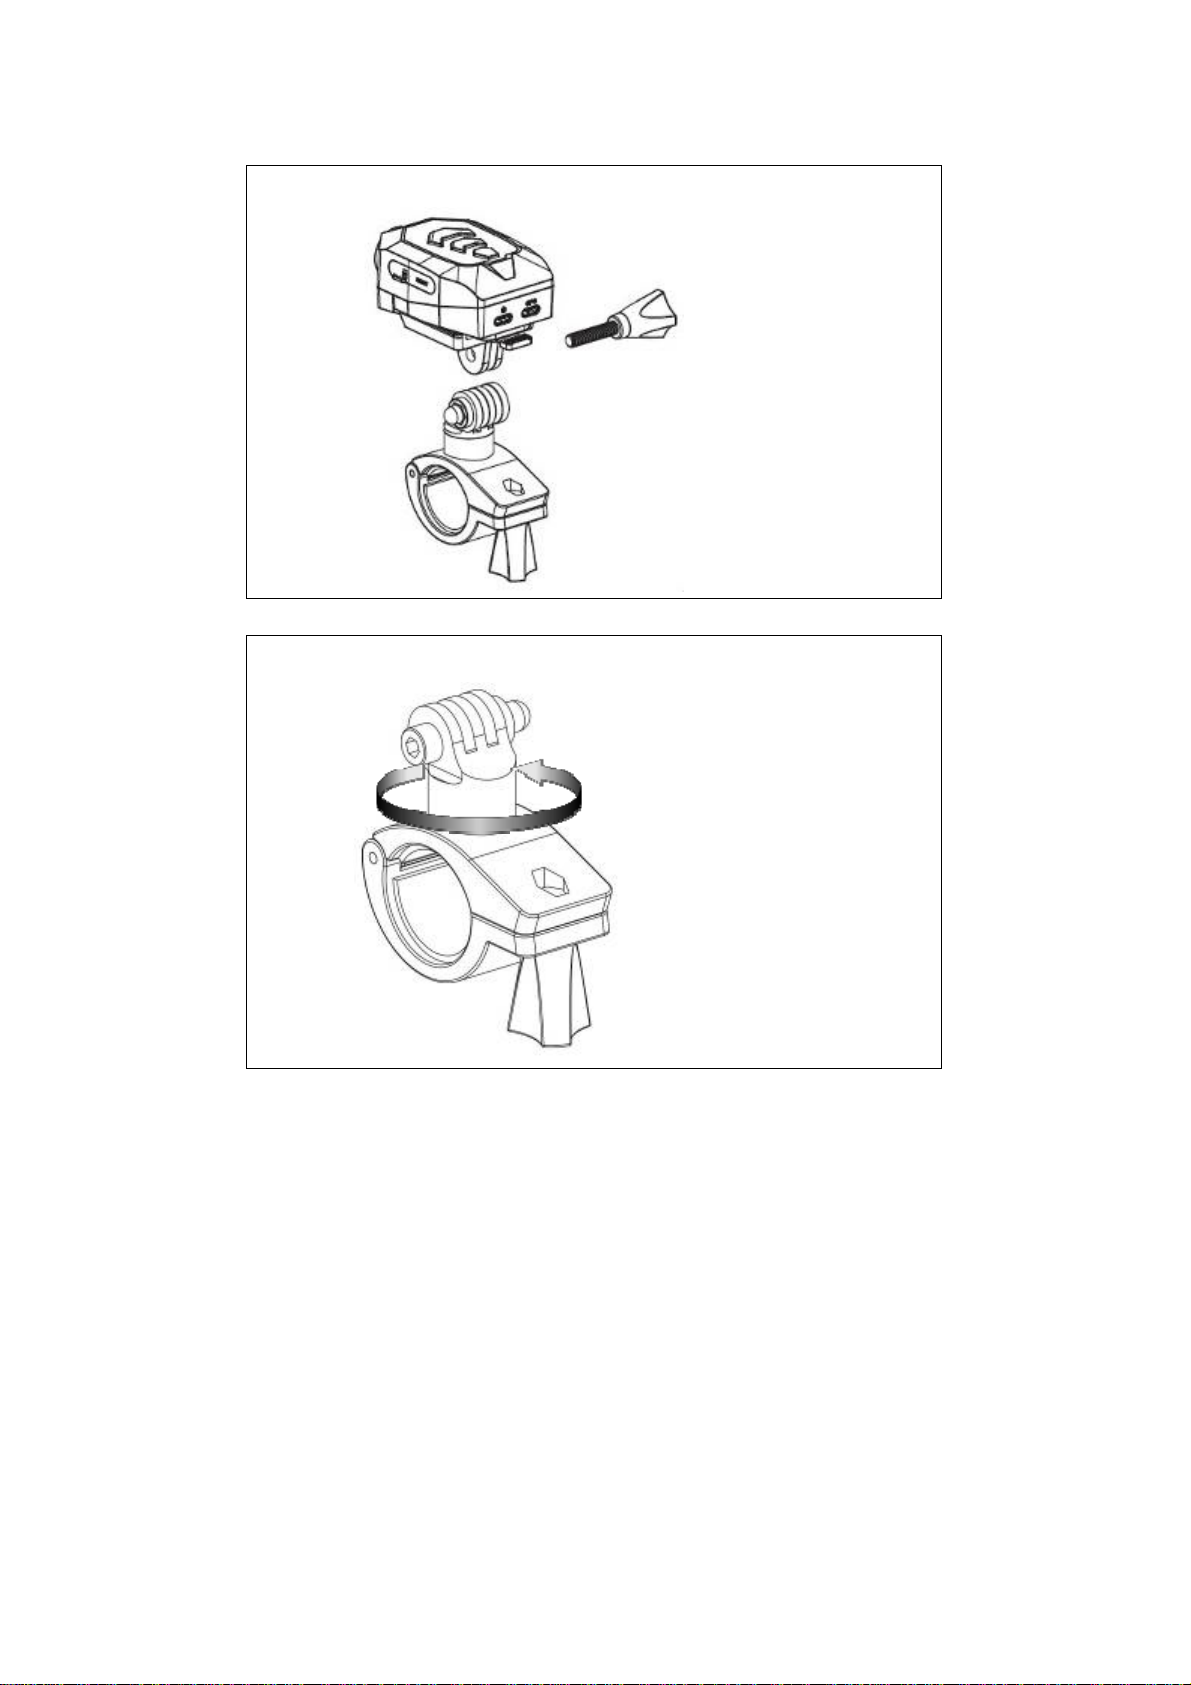
Install Handle Bar Holder
360 Rotatable Holder mount
- 10 -
Page 11
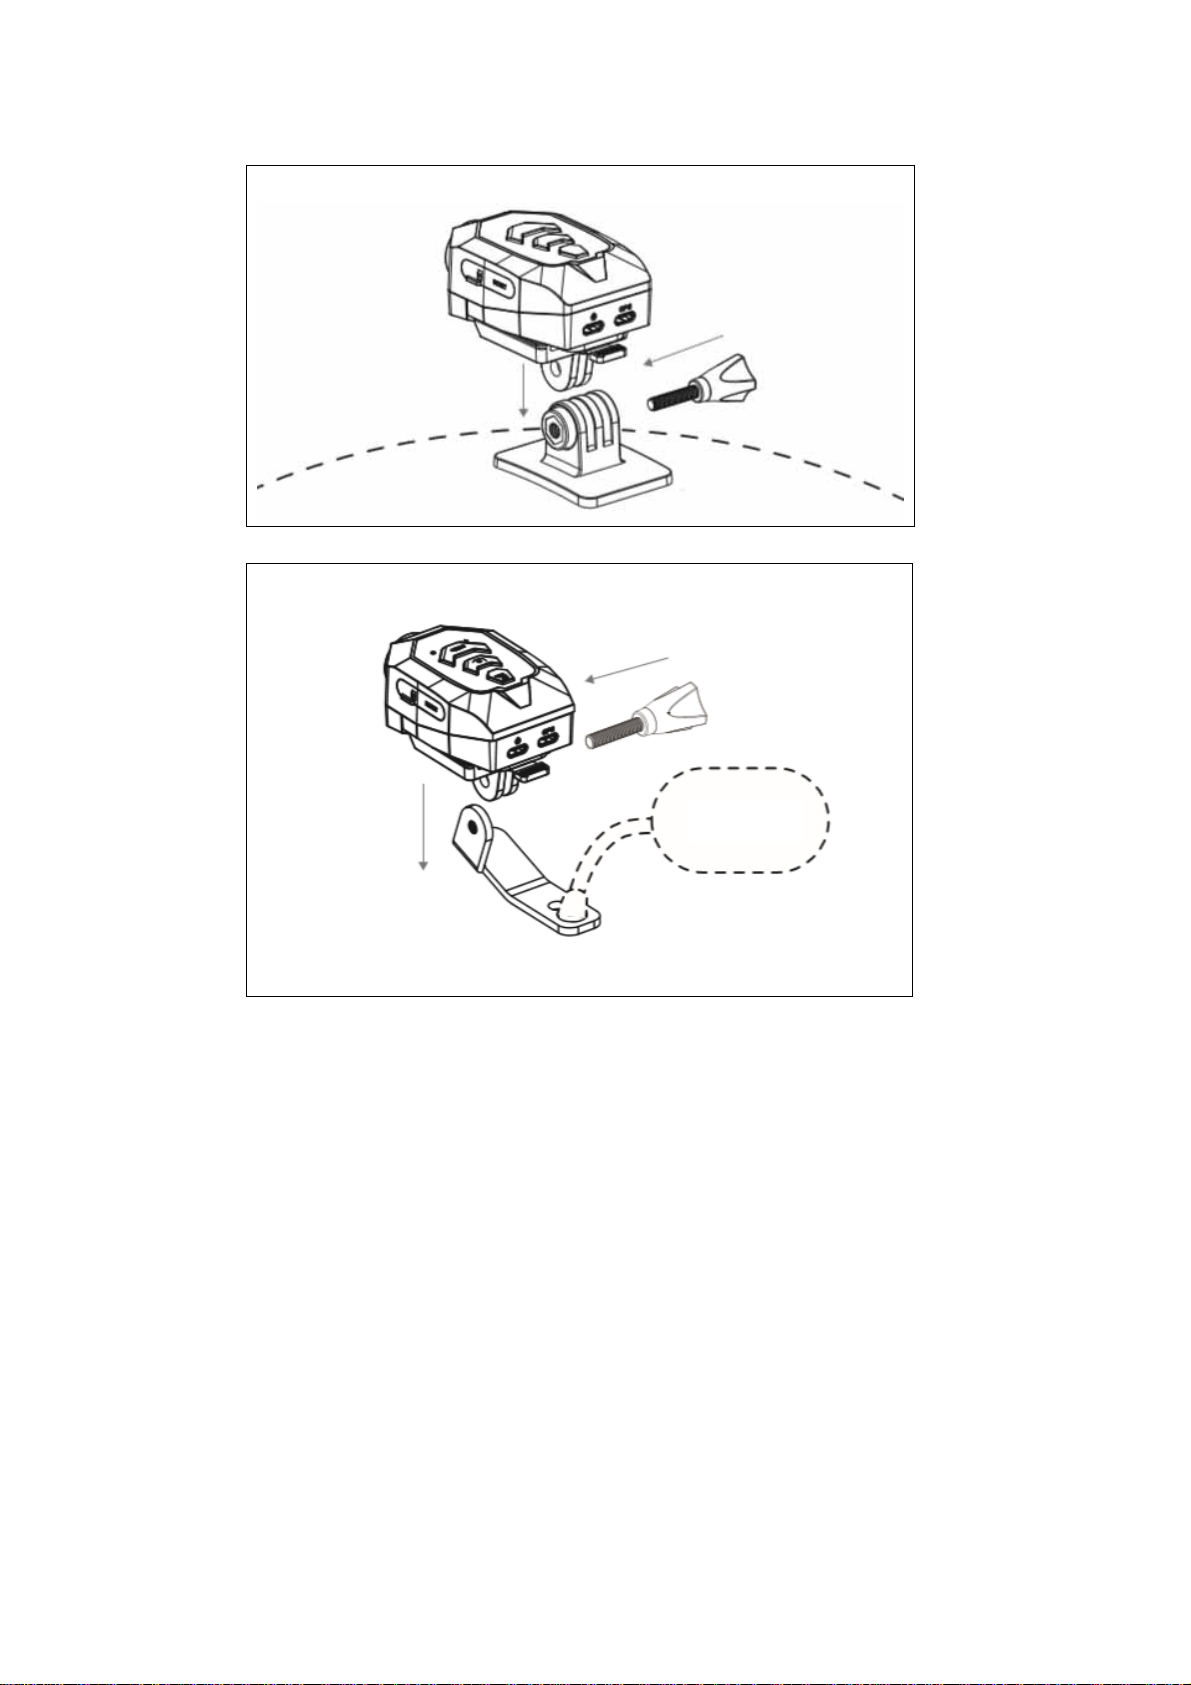
Install Adhesive Mount
Install Universal Mount
- 11 -
Page 12
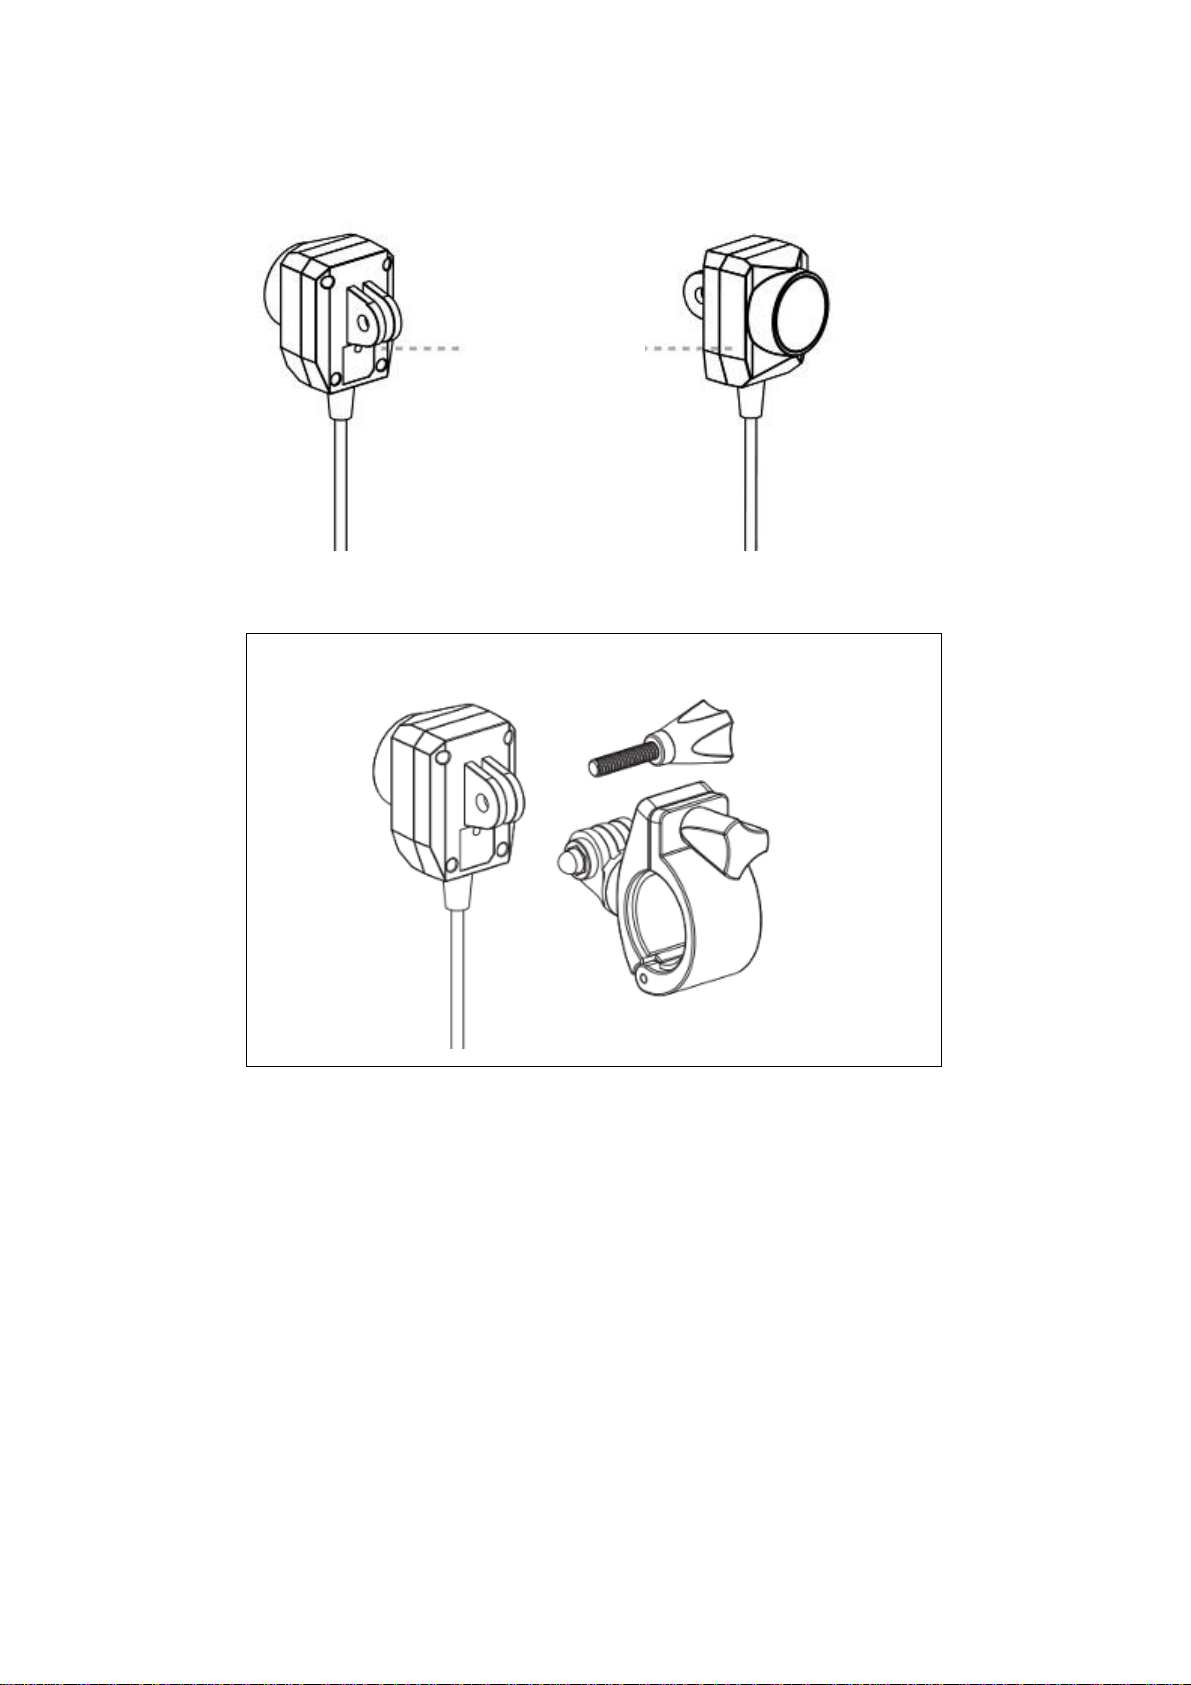
< Rear Cam >
Install Handle Bar Holder
Blue LED
lights up
- 12 -
Page 13
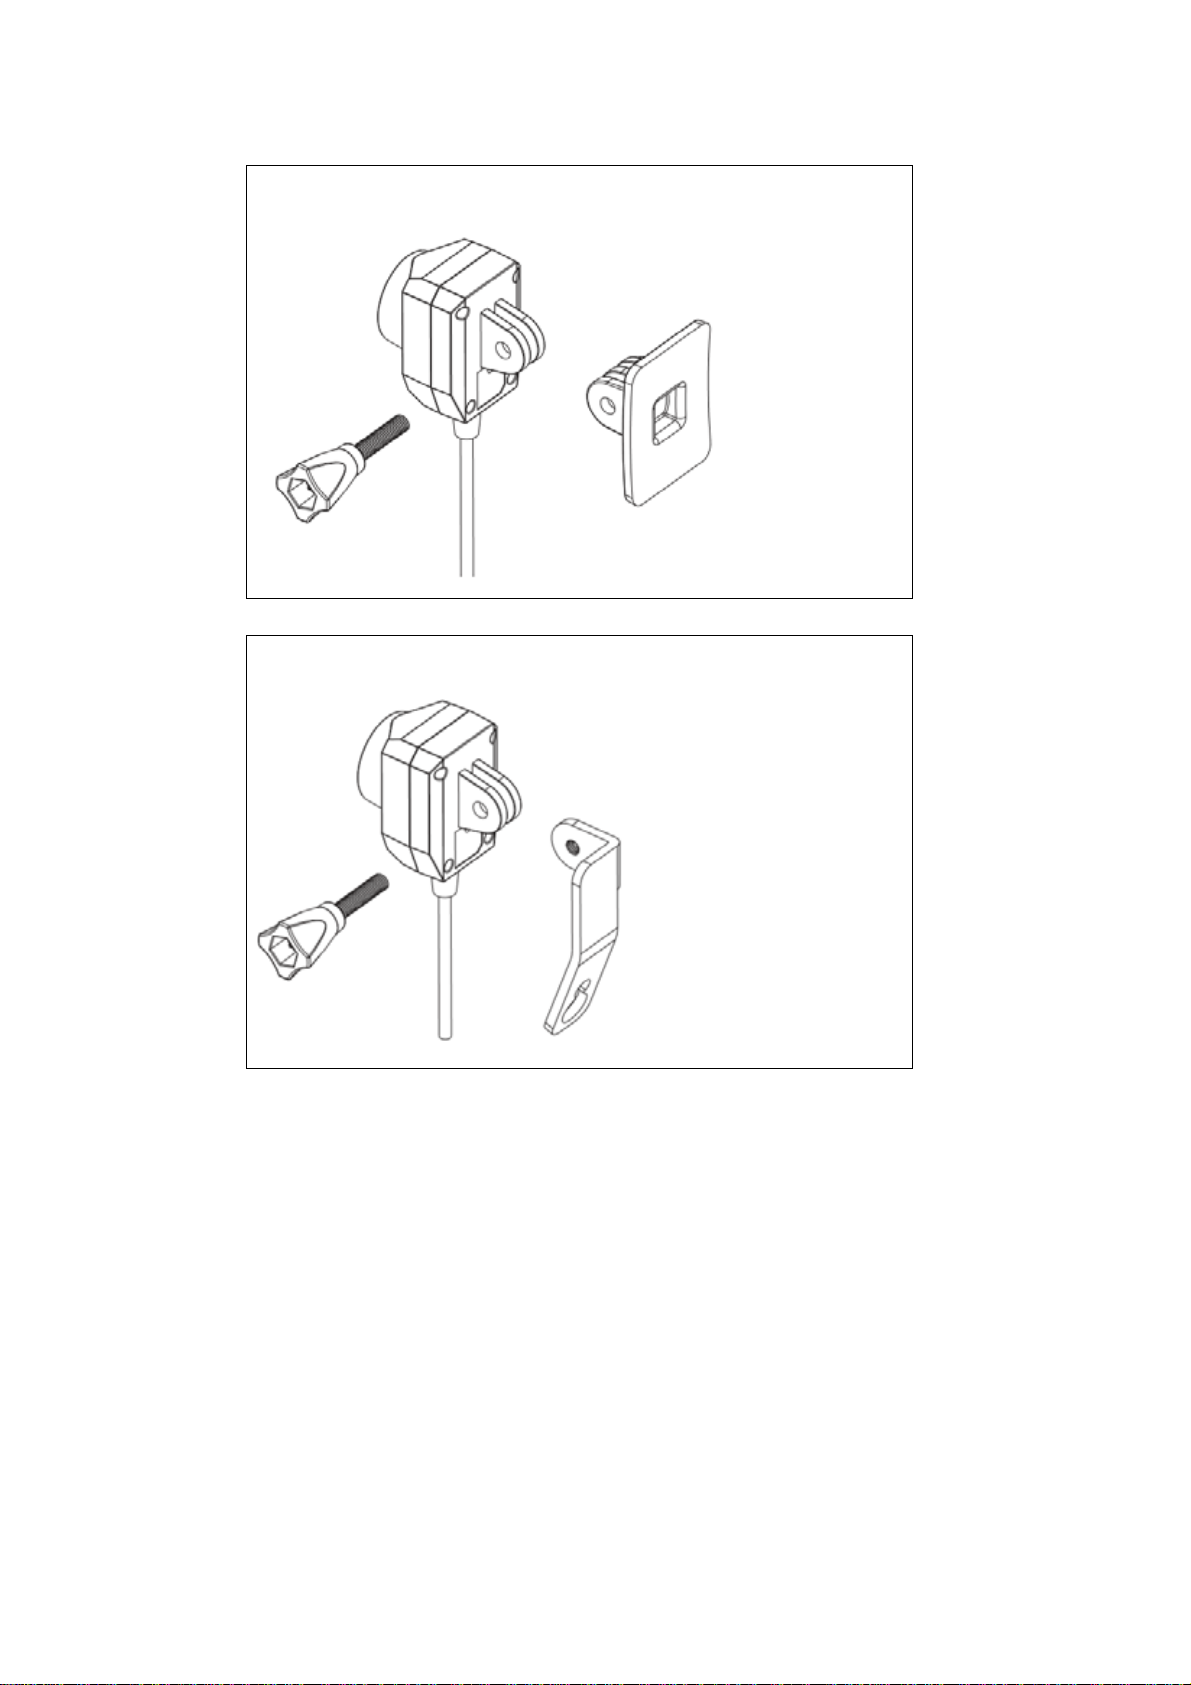
Install Adhesive Mount
Install Universal Mount
- 13 -
Page 14
Install Universal Mount &
Adjusting arm
- 14 -
Page 15
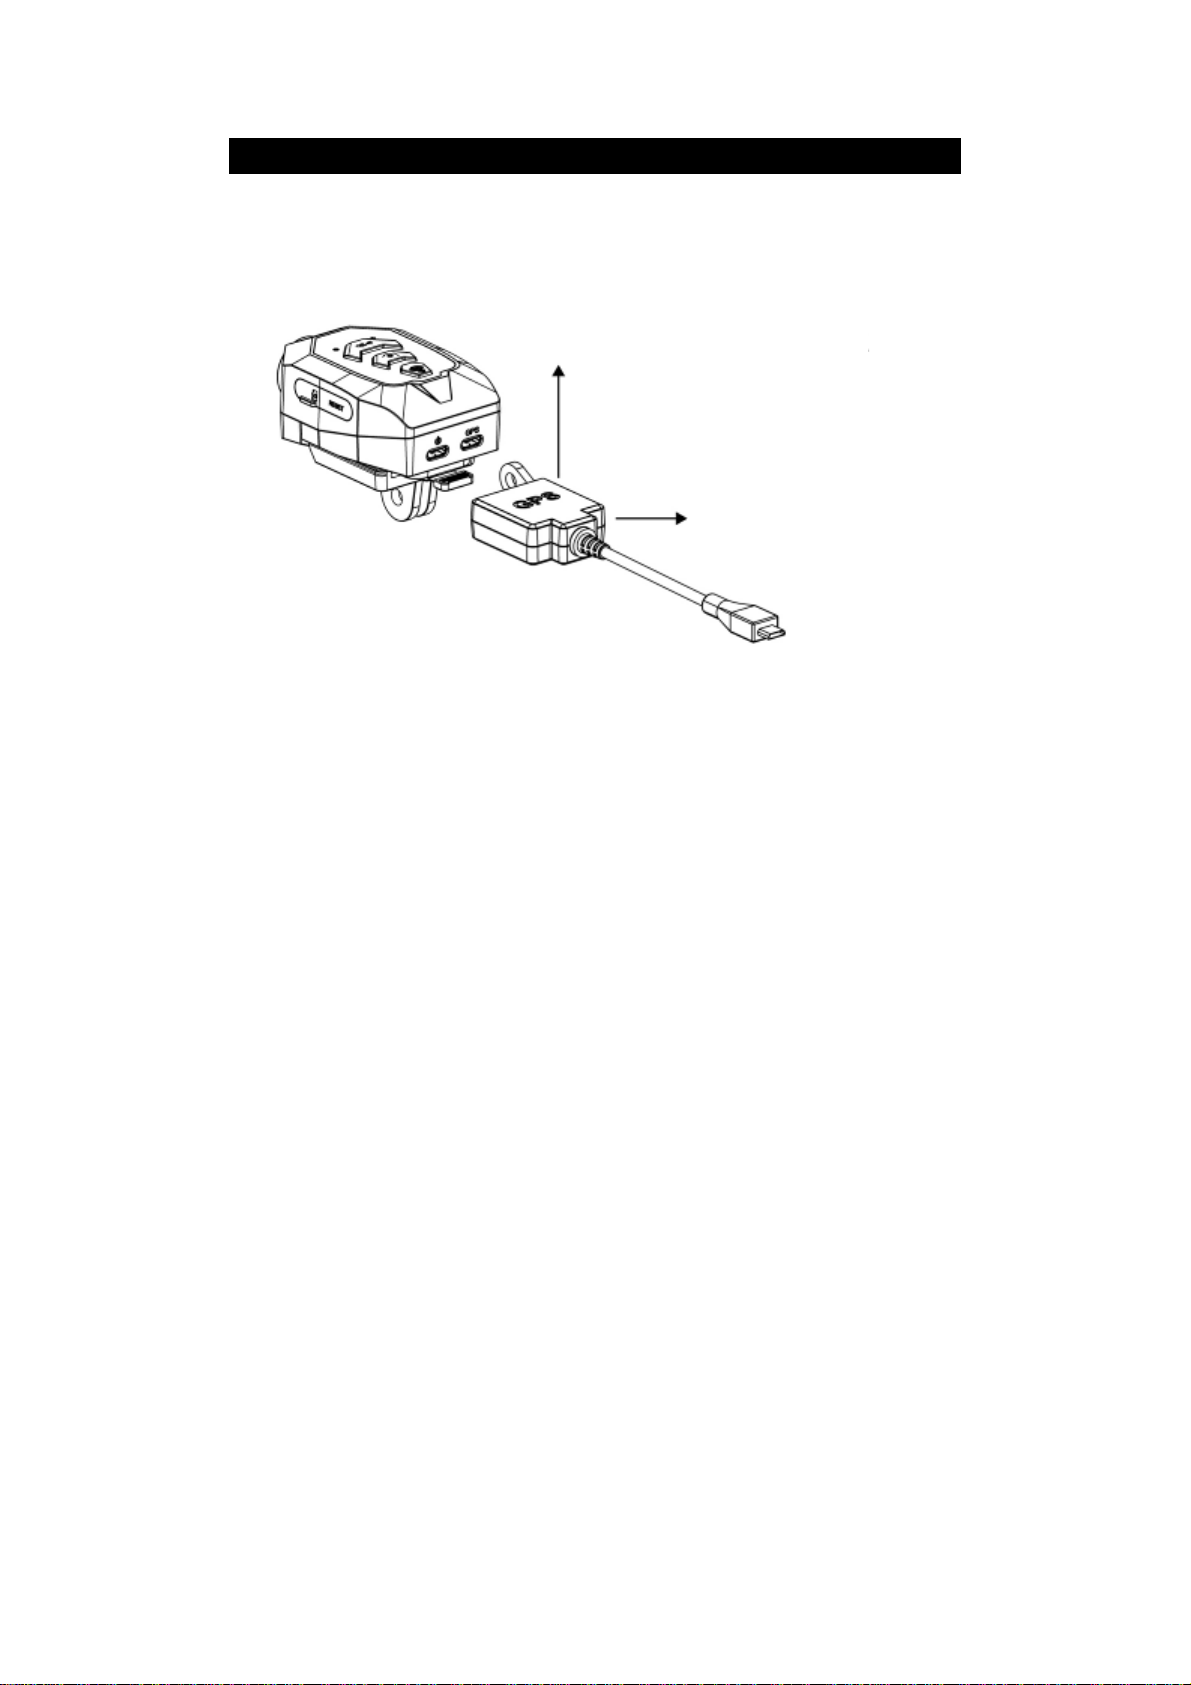
< B-GPS >
Installation diagram
Installation position
GPS LED flashing
When Positioning
Successfully
- 15 -
Page 16

Bicycle tube holder
Handle Bar
Host & Quick
release base
Handle Bar Holder
Extended interface
Hand screw
GPS Receiver
GPS Plug
- 16 -
Page 17

Motor side mirror holder
Side mirror
Host & Quick
release base
Side mirror holder
Extended interface
Hand Screw
GPS Receiver
GPS Plug
- 17 -
Page 18

r
Motor adhesive holder
Host & Quick
release base
Side mirror
holde
Flat place
Extended interface
Hand Screw
GPS Receiver
GPS Plug
- 18 -
Page 19

Motor Universal mount
Host & Quick
release base
Universal mount
Extended interface
Hand Screw
GPS Receiver
GPS Plug
- 19 -
Page 20

Computer program Interface
Computer program name:GVPlayer
Program download area:
1) Trans website download
area(http://www.px.com.tw/file/B52%20video.rar)
2) https://drive.google.com/open?id=0B7GBHEgWCJt0SDR0Ty01
U2J0S1U
Map
Video Play
Tracker
Files List
Files Group List
Instructions:
- To provide the use of the GPS function recorder.
- When using this function, the computer must be connected to the
Internet.
- After the map function is turned on, the information in the window
will be updated with the video playback.
- The GPS information above provides the user with the
coordinates and speed information.
- 20 -
Page 21

- When there is GPS information in the image file, there will be a
map of the image file on the trajectory.
- Green line represents the whole trajectory.
- Purple line represents the trajectory of the play.
Open and close the map window interface
Users can retrieve their coordinates in Google Earth, Google
Map
Loop play
When the image file is finished
Video Flip
Open File
Pause
Play
Slow Wave
- 21 -
Page 22

Fast Wave
Screenshot
Stop
Select the map system
Select Language
(English / Simplified Chinese / Traditional Chinese / German /
Italian / Latvian / Polish / Romanian / Slovak / Ukrainian /
French / Korean / Japanese / Spanish / Russian / Portuguese)
- 22 -
Page 23
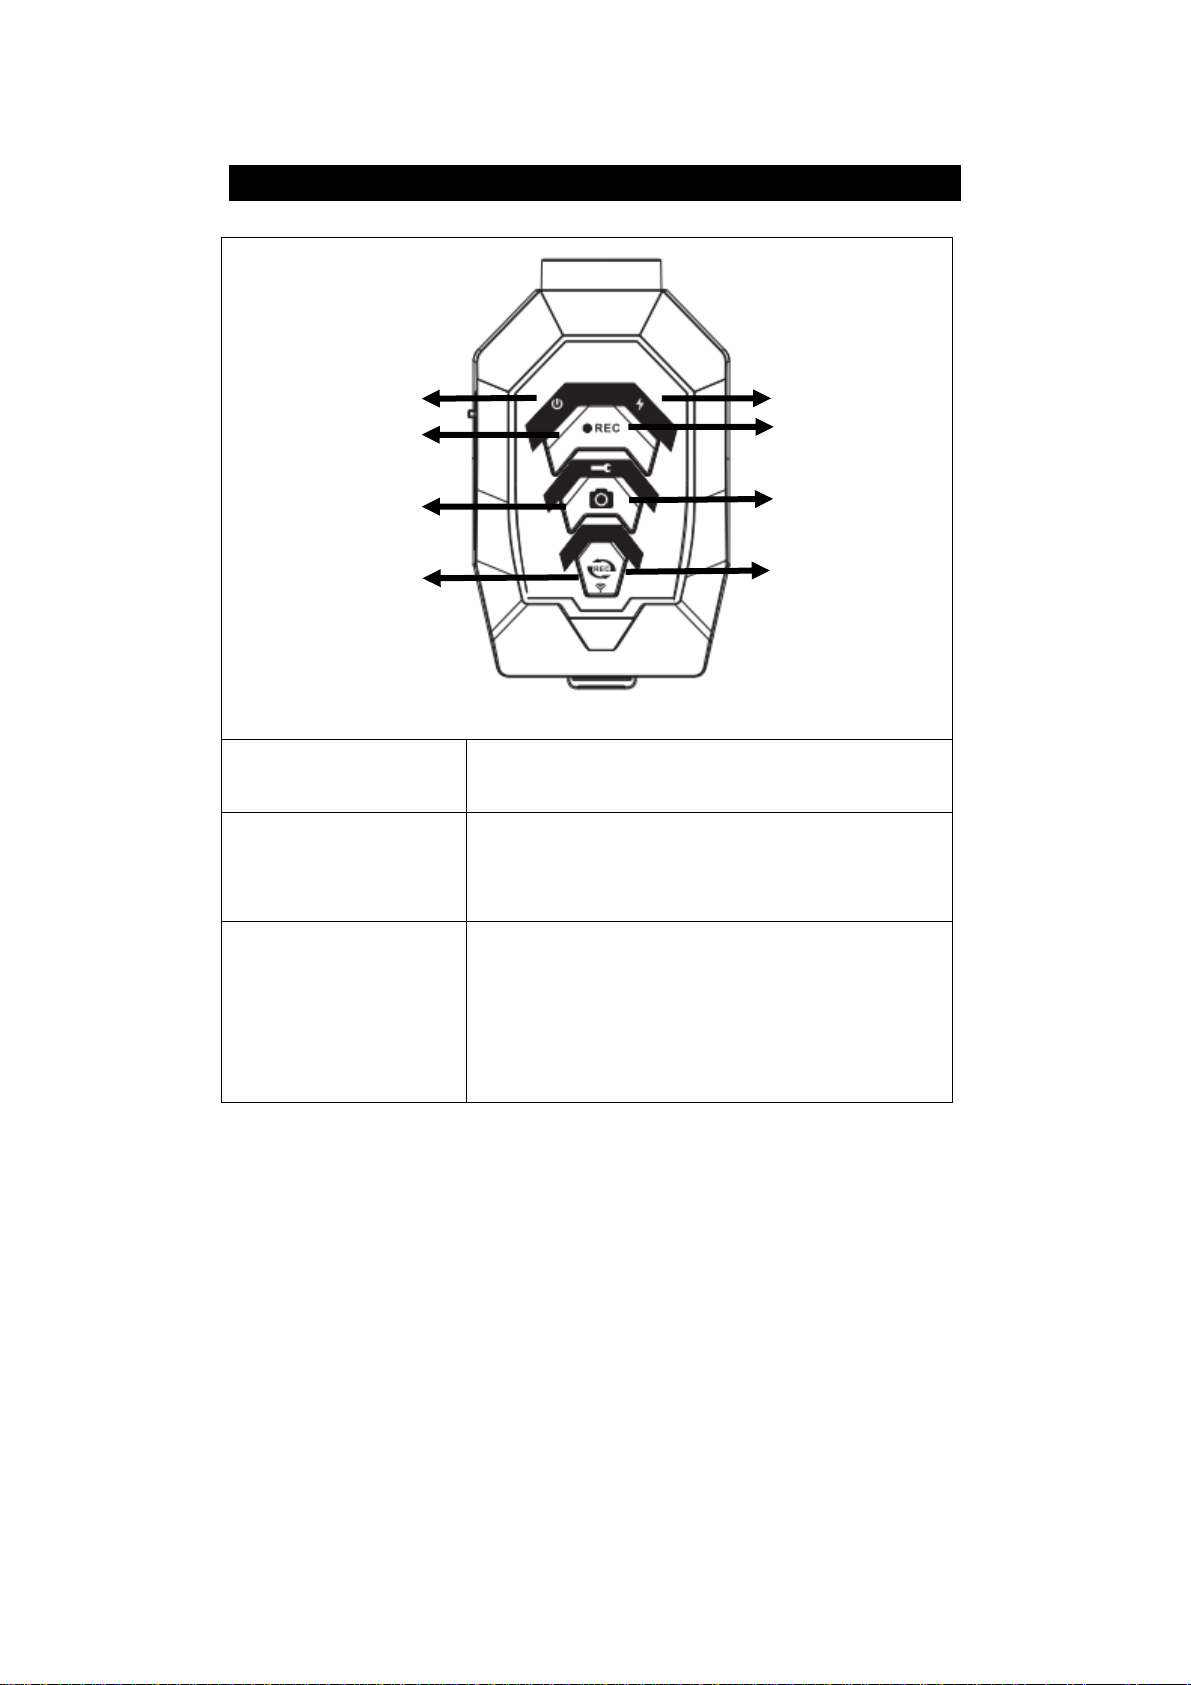
Product Appearance
< Main Unit >
1 2
A 3
B 4
C 5
A:Power / Record
B:Shutter
C:WIFI On/Off or
Loop Recording
Power ON/OFF:Press 2 seconds
Record ON/OFF:Press to start / stop
Push for photo shot
Long press 2 sec. to backup 2 files
(before/current)
WIFI ON/OFF:Press 2 seconds
Loop Recording ON/OFF:Push to start / stop
Formatting SD card: Long press for 8 sec.
Restore Factory Setting: Long press for 20 sec.
- 23 -
Page 24

1: Power LED
2: Charging LED
3: Record LED
4: Alarm LED
5: WIFI LED
Power On: Blue LED ON.
Power Off: Blue LED Off
Low Power: Red LED ON.
Charging: Blue LED flashes.
Fully Charged: Blue LED Off
Recording: Blue LED ON
Loop Recording: Blue LED flashing
Record Off: Blue LED Off
No Memory Card inserted: Blue LED ON
Memory Card full: Blue LED flashing
Memory Card inserted: Blue LED Off
WIFI On: Blue LED ON
WIFI Connected: Blue LED flashing
WIFI Disconnected: Blue LED Off
- 24 -
Page 25

< Main Unit (IO) >
A
D
B
C
F
E
G
A
B
C
D
Open the water proof cover to find:
(1)SD Card Slot & (2) RESET KEY
Rear Cam port:Connect to Rear Cam
Power input:
* DC5V / 1A power supply
* Micro USB (Female) port
1/4” Screw Hole (connect to Sport Cam or tripod)
E
F
G
Quick Release
Speaker
MIC
- 25 -
Page 26

< Rear Cam (IO) >
H
I
Connect to mounting accessories
Connect Camcorder
- 26 -
Page 27

Quick APP Installation Guide
* Download “GoRiding” APP from:
* Play Store for Android System
* Apple Store for iOS System
Step 1. Ensure Front Cam WiFi function is enabled.
* If the WiFi LED indicator is not ON, means WiFi is not
enabled, please push “WiFi” button to enable it.
Step 2. Ensure smartphone’s WiFi has connected to Front Cam.
- 27 -
Page 28

*Open WiFi of your Smartphone
* For first WiFi connection, select device name "GoRiding"
* Default Password: 1234567890 (10 digits number)
Step 3. Open the APP, tap “CONNECT TO YOUR CAMERA”
icon to enter setting page.
1. Tap “CONNECT TO YOUR
CAMERA” icon
- 28 -
Page 29

2. We will lead you to Wi-Fi Setting, if
you didn’t connect camera’s Wi-Fi.
3. Select the device you want to
connect to and tap “Connect” to
complete the connection.
* A tutorial window will guide you for
first connection, please follow the
guide to set up.
* Or you can scroll down the screen,
the APP will auto connect the device.
Device SSID/Password rename is required for first
connection
Rename device name and password
password requires 8 digits
(letters or numbers)
For the security, please
change the device name
and password
- 29 -
Page 30

< Main Page >
Options
When name/password is confirmed to
change, system will initialize.
APP UI Description
Connected
Devices List
LIVE VIEW
MY MEDIA
VIDEO REVIEW
- 30 -
Page 31

MOMENTS
Notes:
1. Enter “CONNECT TO YOUR CAMERA”,select Device.
< Options>
HOME
MY MEDIA
MAP
- 31 -
Page 32

< Connected Device List >
- Left Windows:Select Device name (GoRiding-xxxxxx).
- Rightwindows:Select Done.
SETTINGS
- 32 -
Page 33

< SETTINGS >
SSID change
Password change
Format SD Card
Firmware Version
Notice:
If you change SSID/Password after WiFi Settings,
- 33 -
Page 34

It is required to redo the WiFi Settings, a tutorial window
will show up to guide the WiFi Settings.
< LIVE VIEW >
Front Cam Preview
Icons from left to right:
Remained SD Card for Videos
Power %
Close the window and return to
main page
Preview
Icons from left to right:
* Snapshot
* Cam Switch
* Record start/stop
* SETTINGS
- 34 -
Page 35

Enter F R
Rear Cam Preview
- 35 -
Page 36

< SETTINGS >
Resolution:1080P
UpsideDown:UpsideDown / Normal
Sound:With Sound / Without Sound
LoopVideo:1Min / 2Min / 3Min / 5Min
- 36 -
Page 37

< MY MEDIA >
Display the recorded video file on SD card, you can choose the
desired video.
Smart phone video
review
----------------------------------------- ------------------------------------------------------------------------------------------------------------------------------------
Smart phone photo
review
Display the snapshot of photo on SD card. You can choose desired
photo to show on Smartphone
- 37 -
Page 38
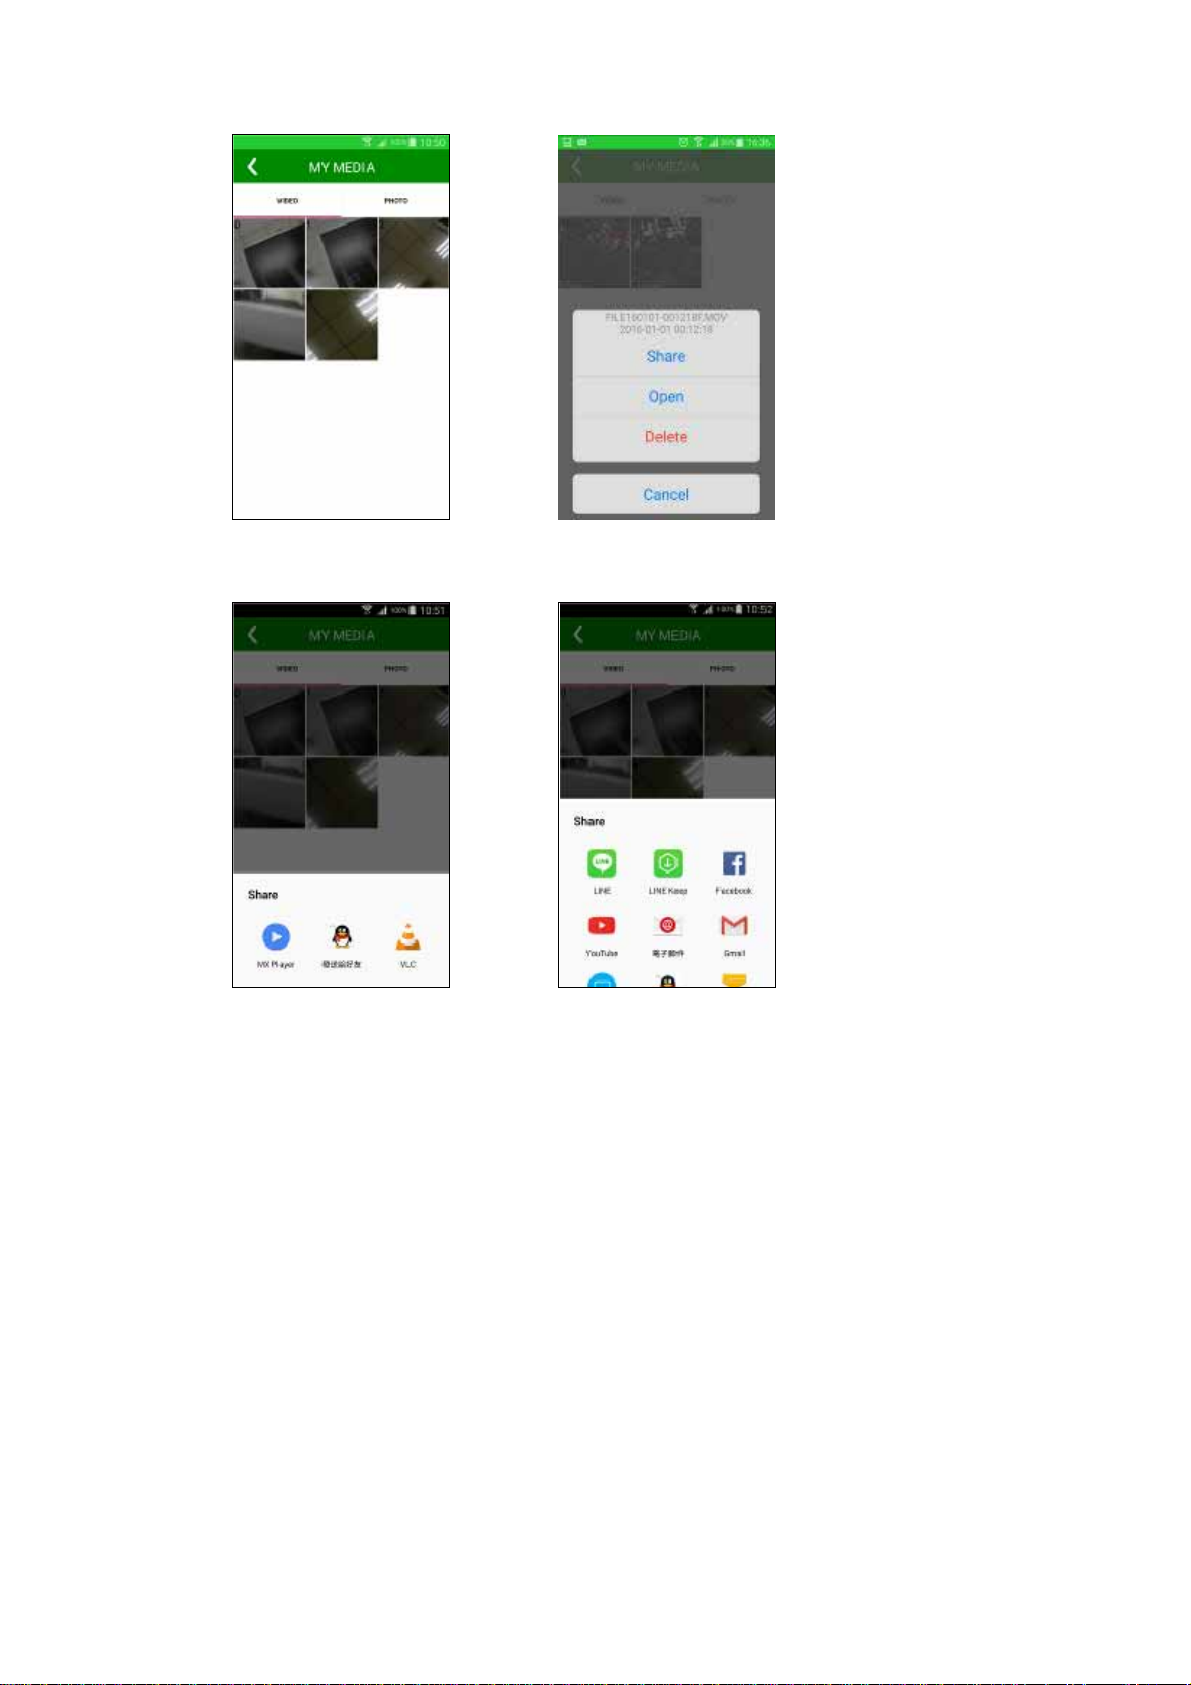
< Smart phone video review>
Video Review Tap to enter options
----------------------------------------- ------------------------------------------------------------------------------------------------------------------------------------
Browse & Playback Share
Notice:
Browse & Playback: Play videos with smart phone’s media player
Share: Share videos with smart phone’s APP.
- 38 -
Page 39

< Smart phone photo review>
Photo Review Tap to enter options
----------------------------------------- ------------------------------------------------------------------------------------------------------------------------------------
Open & Playback Share
*Notice:
“Share” only supports APPs in smart phone.
- 39 -
Page 40

< Video Review >
Video Review Tap to enter options
----------------------------------------- ------------------------------------------------------------------------------------------------------------------------------------
Open & Playback Save B62G video to smart phone
Notice:
Browse & Playback: Play videos with smart phone’s media player
- 40 -
Page 41

DCIM:Recycle video file
LOCK:Non-loop video file
BACKUP:Backup File
- 41 -
Page 42

< Moments >
Photo Review Tap to enter options
----------------------------------------- ------------------------------------------------------------------------------------------------------------------------------------
Browse & Playback Save B62G photo to smart phone
- 42 -
Page 43

Trouble Shooting
Q1:Bike Cam could not boot up?
Ans.:
(1) Press Power key for 2 sec. then release. (If still could not boot
up, do the following)
(2) Use mobile power supply or DC power cable as power supply
for the Bike Cam, the system should boot up and charging at the
same time. Make sure the Charging LED is ON or the system is
turned ON. If not, do the following.
(3) Please contact your original dealer or our customer service
Dept.
Q2:Can this Bike Cam operate without external power source?
Ans.:
B62G is built-in with 1100mAh lithium battery. When it is fully
charged, it can continuous recording for about 1 hours. You can
use the APP to check the capacity of the battery.
Note: If you use the rear cam at the same time, the recording time
will be reduced to 1 hour.
Q3:When play the video files in PC, it will pause from time to
time?
Ans.:
(1) Make sure your SD card is Class 10 or above.
(2) Please make sure your computer meets the following
requirement: CPU 2.0GHz, Memory 1GB and above.
(3) Turn off all the resident programs.
(4) Copy the file to your computer first before playback.
(5) Use other video player program.
Q4:Recorded picture is fuzzy?
Ans.:
Please make sure there is not fingerprints or grease on B62G’s lens.
- 43 -
Page 44

Q5:What is the maximum capacity/speed for the memory card
to be used with the B62G? How long can it records?
Ans :
B62G can support up to 32G for the memory card. Class10 level or
above type of SD card is recommended. 1 min recording is about
120MB of SD card. Front / rear cam recording for 1min. is about
240MB.
Memory Card Dual Cam Full HD (1080@30)
8GB about 30 min.
16GB about 60 min.
32GB about 120 min.
Q6:Memory card is damaged and cannot be recorded?
Ans.:
(1) Memory card is a consumer type product. It has a cyclic R/W life
mechanism. Too much read and write will make the memory card
reach its limit and result with various problems in R/W. So we
strongly recommend to format the memory card every 3 months.
(2) If after formatting, still could not recording normally, please
contact your SD card dealer or send it back for repair.
(3) Memory card of Class 10 level or above is recommended.
Q7: Phone / tablet cannot find the B62G, nor make connection?
Ans.:
(1) Please check to see if B62G’ WiFi is ON?
(2) Please check to see if Smart Phone’s WiFi is ON?
(3) Please make sure the B62G is selected in App’s WiFi devices
list.
- 44 -
Page 45

(4) Restart the APP, and then connect again.
(5) If still failed to connect, please contact PX customer service
Dept.
Q8. : The recorded date/time is not correct?
Ans.:
Before us the B62G, connect to GoRiding APP once System will
calibrate the system time to the local time.
Q9: Mobile supported system?
Ans.:
iOS: version 8.2 or above
Android: Version 4.0.3 or above.
Q10.: There is only one resolution for the photo mode?
Ans.:
This is because B62G use Snapshot for Photo mode, it supports only
1920x1080 resolution.
Q11 : When playback video files in Android system, the video
might distorted or flashback?
Ans.:
(1) Because the video file format is MOV(1080), some smart phone
does not support 1080@30 MOV playback.
(2) When this happened, please switch to 1080@30 resolution for
the recording.
Q12: PC system configuration for the video player program?
Ans.:
Windows XP/7/8/10
- 45 -
Page 46

Specification
Main unit & Rear Cam
IC Chip (Front cam)AIT 8328P
(Reae cam)AIT 8437D
Dynamic Record
Resolution
Dynamic Record
Format
Dynamic Video Ratio 16:9
Video Bit-Rate Average 20Mbps
Static Photo Format JPG,
Static Photo Ratio 16:9
Image Sensor (Front cam)OV 4689
Optical Format (Front cam)1/3”
Pixel Size (Front cam)4.1M pixel
Record Angle (Front cam)FOV(D) 122°
Lens Aperture (Front cam)F1.8
Power Supply 1. Built-in Lithium Battery
Lithium Battery Yes,1100mAh
Memory Card Support up to 32GB(MicroSD/SDHC)
USB type USB 2.0 High Speed
Six-axis Sensor Built-in GYRO-Sensor
Full HD 1080@30
.Mov
(Front cam)FULL HD 1920x1080
(Rear cam)HD 1280x720
(Rear cam)AR0330
(Rear cam)1/3”
(Rear cam)3M pixel
(Rear Cam)FOV(D) 178°
(Rear cam)F2.5
2. External DC 5V/1A power supply
* Frequency 60Hz
- 46 -
Page 47

Mic
Speaker
Yes
Yes
Wi-Fi Yes, 802.11 b/g/n
EIS Anti-shake Yes
Photo Shot Shot Shutter
APP Shutter
Cloud Share Yes, share via smartphone
WDR
Date/Time
Yes
Yes
Flip Yes, 180°
PS. APP Setup
Record Mode 1/2/3/5 minutes in length per record
I/O 1. Power in (micro USB)
2. EXTRA Option (micro USB)
Rear Cam
Safety BSMI、NCC、CE
Water Proof Level IPX5
LED Indicator Power LED / Power LED
Charge LED / Alarm LED
WiFi LED
Language Traditional Chinese/English
Color Silver Grav
Size (Front cam)74mm * 45mm * 32mm
(Rear cam)43mm * 32mm * 45mm
Weight (Front cam)85g
(Rear cam)41g
Working Temp -20℃ ~ 55℃(Charging 45℃)
Storage Temp.
-10℃ ~ 30℃ (RH 85%)
(For one year only)
- 47 -
Page 48

GPS
● Receiver type:GPS system
● Chip:U-blox 7020
● Frequency:L1 1575.42MHz
● Baud rate:9600bps
● Consumption:0.5W(max) (DC 5V 10mA)
● Waterproof:Ultrasonic pressing
● Interface:USB 2.0
● Operating temperature:-40 ~ 80℃℃
● Size:32 x 53 x 14 (mm) with cable 100mm (SR-SR)
● Weight:26 (g)
- 48 -
Page 49

Series Difference
Differences
Model Series
B52Q
B52
B52X
B52G
B52R
B51
B51X
B51G
B51R
B62
B62G
B61
B61G
Quick
Charge
WIFI GPS
V V V
V
V
V V
V
Rear
Bike Mount
Cam
V V V B52-V*.**
V
V
V V V V V M62-V*.**
V V V B51-V*.**
V V V M62-V*.**
V
Motorbike
kit
V V B52Q-V*.**
V
V V B52-V*.**
V V B52-V*.**
V V B51-V*.**
V V B51-V*.**
V V M61-V*.**
V V M61-V*.**
Mount kit
V B51-V*.**
FW
Version
B52-V*.**
- 49 -
Page 50

FCC Statement
This device complies with part 15 of the FCC Rules. Operation is subject to the following
two conditions:
(1) This device may not cause harmful interference, and
(2) this device must accept any interference received, including interference that may
cause undesired operation.
NOTE: This equipment has been tested and found to comply with the limits for a Class B
digital device, pursuant to part 15 of the FCC Rules. These limits are designed to provide
reasonable protection against harmful interference in a residential installation.
This equipment generates, uses and can radiate radio frequency energy and, if not installed
and used in accordance with the instructions, may cause harmful interference to radio
communications. However, there is no guarantee that interference will not occur in a
particular installation.
If this equipment does cause harmful interference to radio or television reception, which can
be determined by turning the equipment off and on, the user is encouraged to try to correct
the interference by one or more of the following measures:
Reorient or relocate the receiving antenna.
—
Increase the separation between the equipment and receiver.
—
Connect the equipment into an outlet on a circuit different from that to which the receiver
—
is connected.
Consult the dealer or an experienced radio/TV technician for help
—
Changes or modifications not expressly approved by the party responsible for compliance
could void the user’s authority to operate the equipment.
.
- 50 -
Page 51

Declaration of Compliance
Hereby we, Trans Electric Co., Ltd, declare that the radio
equipment type B52Q series is in compliance with Directive
2014/53/EU.
The full text of the EU declaration of conformity is available at
the following internet address: www.px.com.tw
Radio Frequency Power Claim
item Radio Frequency Output Power
WLAN 2.4GHz 802.11b 10dBm
2.4GHz 802.11g 10dBm
2.4GHz 802.11n HT20 10dBm
- 51 -
 Loading...