

Transcension Commander 192, BOTE35 User Manual
Commander 192
www.prolight.co.uk
USER MANUAL
ORDER CODE: BOTE35
0
4
8
2
10
0
2
4
6
8
10
10
8
6
4
2
0
10 MI N 0 SEC
0.1 /SEC
30 SE C
FADE
TIME
SPEED
BANK UP BANK DOWN PROGRAM
AUTO/DEL
PAGE SELECT
MUSIC/
BANK COPY
ADD
PROGRAM
CHASE 1 CHASE 2 CHASE 3
CHASE 4 CHASE 5 CHASE 6 TAP SYNC
DISPLAY
BLACKOUT
0
4
8
2
10
0
4
8
2
10
0
4
8
2
10
0
4
8
2
10
0
4
8
2
10
0
4
8
2
10
9
SCENE 1
FIXTURE 1
FIXTURE 2
FIXTURE 3
FIXTURE 5
FIXTURE 4
FIXTURE 6
FIXTURE 7
FIXTURE 8
FIXTURE 9
FIXTURE 11
FIXTURE 10
FIXTURE 12
FIXTURES
SCENE 2 SCENE 3 SCENE 4 SCENE 5 SCENE 6 SCENE 7
SCENE 8
10 11 12 13 14 15 16
A: 1/8
A: 9-16
SCENE
COMMANDER 192

1, Before you begin
1.1: Safety warnings ..........................................................................................................................2
3
1.2: What is included ..........................................................................................................................4
1.3: Unpacking instructions .................................................................................................................4
2, Introduction
2.1: Features .......................................................................................................................................4
2.2: General Overview ........................................................................................................................4
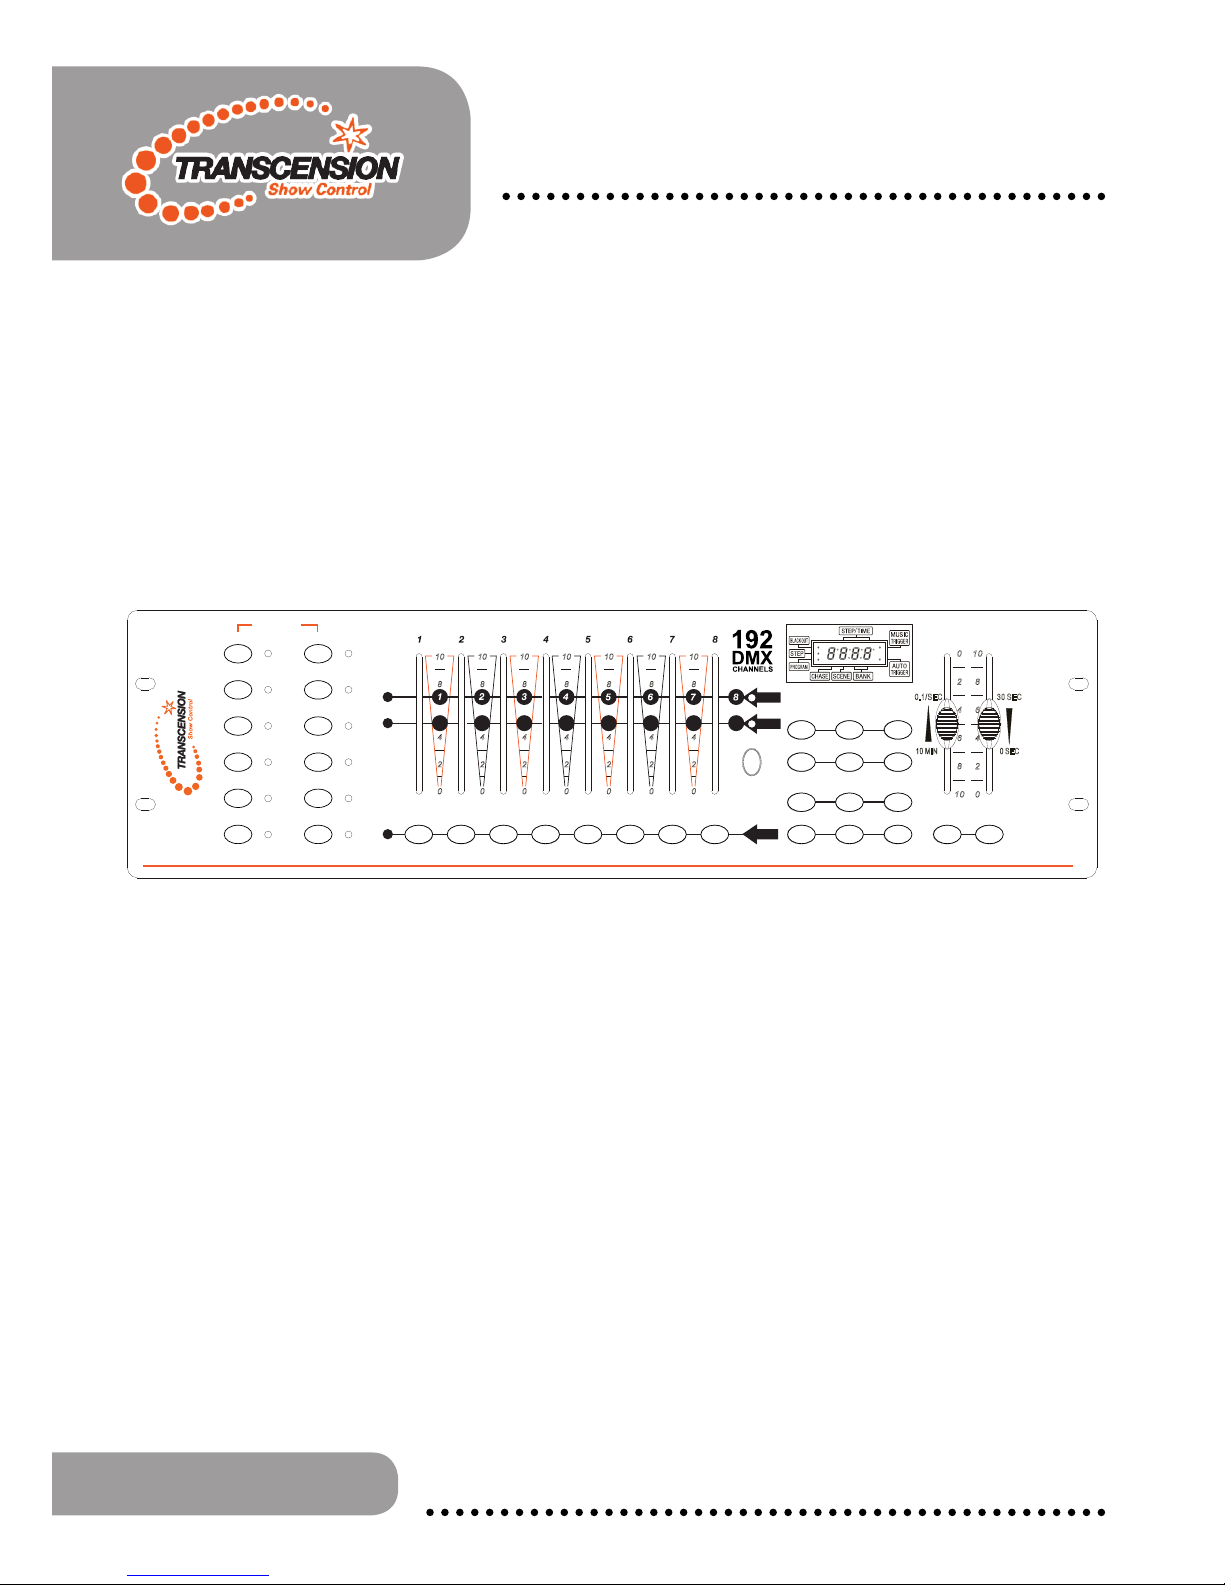
2.3: Product Overview (front panel) ....................................................................................................5
2.4: Product Overview (back panel) ....................................................................................................5
2.5: Overview Identication .................................................................................................................6
3, Operating instructions
3.1 Setup
3.1.1: Setting up the System ...................................................................................................6
3.1.2: Fixture Addressing ........................................................................................................7
3.1.3: Pan and Tilt channels ....................................................................................................7
3.1.4: Resetting the System ....................................................................................................8
3.1.5: Copy Scanner ............................................................................................................ ...8
3.1.6: Fade Time Assign ..........................................................................................................8
3.2 Operation
3.2.1: Manual Mode ................................................................................................................8
3.2.2: Review Scene or Chase ................................................................................................9
3.3 PROGRAMMING
3.3 Programming
3.3.1: Entering Program Mode .................................................................................... ....... ...9
3.3.2: Create a Scene ................................................................................................... ..........9
3.3.3: Running a Program .....................................................................................................10
3.3.4: Checking a Program ...................................................................................................10
3.3.5: Editing a Program .......................................................................................................10
3.3.6: Copy a Program ..........................................................................................................10
3.4 Chase programming
3.4.1: Create a Chase.................................................................... .......................................11
3.4.2: Running a Chase .........................................................................................................11
3.4.3: Checking a Chase .......................................................................................................11
3.4.4: Edit Chase (Copy Bank Into Chase) ...........................................................................11
3.4.5: Edit Chase (Copy Scene Into Chase) .........................................................................12
3.4.6: Edit Chase (Insert Scene Into a Chase) ......................................................................12
3.4.7: Delete a scene in a Chase ..........................................................................................12
3.4.8: Delete a Chase ...........................................................................................................12
3.4.9: Delete all Chase Programs .........................................................................................13
3.5 Scene programming (steps)
3.5.1: Insert a scene ..............................................................................................................13
3.5.2: Copy a scene ..............................................................................................................13
3.5.3: Delete a scene ............................................................................................................14
3.5.4: Delete all scenes .........................................................................................................14
3.6 Playback
3.6.1: Sound-Mode ...............................................................................................................14
3.6.2: Auto-Mode ..................................................................................................................14
3.6.3: Blackout ......................................................................................................................14
4. Appendix
4.1: DMX 512.........................................................................................................................15
4.2: DMX Linking ...................................................................................................................15
16
4.3: DMX Dipswitch quick reference chart ............................................................................17
4.4: Technical specications ..................................................................................................18
WARNING
FOR YOUR OWN SAFETY, PLEASE READ THIS USER MANUAL CAREFULLY
BEFORE YOUR INITIAL START-UP!
CAUTION!
Keep this equipment away from rain,
moisture and liquids.
SAFETY INSTRUCTIONS
Every person involved with the installation, operation & maintenance of this
equipment should:
- Be competent
- Follow the instructions of this manual
CAUTION! TAKE CARE USING THIS EQUIPMENT!
HIGH VOLTAGE-RISK OF ELECTRIC SHOCK!!
Before your initial start-up, please make sure that there is no damage caused during
transportation. Should there be any, consult your dealer and do not use the
equipment.
To maintain the equipment in good working condition and to ensure safe operation, it is necessary
for the user to follow the safety instructions and warning notes written in this manual.
Please note that damages caused by user modications to this equipment are not
subject to warranty.
2

IMPORTANT:
The manufacturer will not accept liability for any resulting damages caused
by the non-observance of this manual or any unauthorised modication to the
equipment.
• Never let the power-cable come into contact with other cables. Handle the power-cable
and all mains voltage connections with particular caution!
• Never remove warning or informative labels from the equipment.
• Do not open the equipment and do not modify the equipment.
• Do not connect this equipment to a dimmer-pack.
• Do not switch the equipment on and off in short intervals, as this will reduce the
system’s life.
• Only use the equipment indoors.
• Do not expose to ammable sources, liquids or gases.
• Always disconnect the power from the mains when equipment is not in use or before
cleaning! Only handle the power-cable by the plug. Never pull out the plug by pulling the
power-cable.
• Make sure that the available voltage is between 220v/240v.
• Make sure that the power-cable is never crimped or damaged. Check the equipment and
the power-cable periodically.
• If the equipment is dropped or damaged, disconnect the mains power supply immediately.
Have a qualied engineer inspect the equipment before operating again.
• If the equipment has been exposed to drastic temperature uctuation (e.g. after
transportation), do not switch it on immediately. The arising condensation might damage
the equipment. Leave the equipment switched off until it has reached room temperature.
• If your product fails to function correctly, discontinue use immediately. Pack the unit
securely (preferably in the original packing material), and return it to your Prolight dealer
for service.
• Only use fuses of same type and rating.
• Repairs, servicing and power connection must only be carried out by a qualied
technician. THIS UNIT CONTAINS NO USER SERVICEABLE PARTS.
• WARRANTY; One year from date of purchase.
OPERATING DETERMINATIONS
If this equipment is operated in any other way, than those described in this manual,
the product may suffer damage and the warranty becomes void.
Incorrect operation may lead to danger e.g.: short-circuit, burns and electric shocks etc.
Do not endanger your own safety and the safety of others!
Incorrect installation or use can cause serious damage to people and property.
3

1.2 What is included:
1) DMX-512 controller
2) DC 9-12V 500mA, 90V~240V Power adaptor
3) Manual
1.3 Unpacking instructions:
parts are present, and have been received in good condition. Notify the shipper immediately and retain
packing material for inspection if any parts appear damaged from shipping or the carton itself shows signs
2. INTRODUCTION
2.1 Features
• DMX512
• Controls 12 intelligent lights of up to 16 channels each (total 192 channels)
• 23 banks, each with 8 scenes; 6 chases, each with up to 184 scenes
• Record up to 6 chases with fade time and speeds
• 8 sliders for direct control of channels
• Built-in microphone for music mode
• Auto mode program controlled by fade time sliders
• DMX in/out: 3 pin XLR
• 19” Rackable
2.2 General Overview
16 channels each and up to 184 programmable scenes. Six chase banks can contain up to 184 steps
composed of the saved scenes and in any order. Programs can be triggered by music, automatically or
manually. All chases can be executed sequentially.
access scanner and scene buttons and an LED display indicator for easier navigation of controls and
menu functions.
4

SERIAL NO :
POWER
DC INPUT
9V 500mA
DMX
OUTPUT
LAMP
0
4
8
2
10
0
2
4
6
8
10
10
8
6
4
2
0
10 MI N 0 SEC
0.1 /SEC
30 SE C
FADE
TIME
SPEED
BANK UP BANK DOWN PROGRAM
AUTO/DEL
PAGE SELECT
MUSIC/
BANK COPY
ADD
PROGRAM
CHASE 1 CHASE 2 CHASE 3
CHASE 4 CHASE 5 CHASE 6 TAP SYNC
DISPLAY
BLACKOUT
0
4
8
2
10
0
4
8
2
10
0
4
8
2
10
0
4
8
2
10
0
4
8
2
10
0
4
8
2
10
9
SCENE 1
FIXTURE 1
FIXTURE 2
FIXTURE 3
FIXTURE 5
FIXTURE 4
FIXTURE 6
FIXTURE 7
FIXTURE 8
FIXTURE 9
FIXTURE 11
FIXTURE 10
FIXTURE 12
FIXTURES
SCENE 2 SCENE 3 SCENE 4 SCENE 5 SCENE 6 SCENE 7
MADE IN CHINA
www.prolight.co.uk
SCENE 8
10 11 12 13 14 15 16
A: 1/8
A: 9-16
SCENE
COMMANDER 192
0
4
8
2
10
0
2
4
6
8
10
10
8
6
4
2
0
10 MI N 0 SEC
0.1 /SEC
30 SE C
FADE
TIME
SPEED
BANK UP BANK DOWN PROGRAM
AUTO/DEL
PAGE SELECT
MUSIC/
BANK COPY
ADD
PROGRAM
CHASE 1 CHASE 2 CHASE 3
CHASE 4 CHASE 5 CHASE 6 TAP SYNC
DISPLAY
BLACKOUT
0
4
8
2
10
0
4
8
2
10
0
4
8
2
10
0
4
8
2
10
0
4
8
2
10
0
4
8
2
10
9
SCENE 1
FIXTURE 1
FIXTURE 2
FIXTURE 3
FIXTURE 5
FIXTURE 4
FIXTURE 6
FIXTURE 7
FIXTURE 8
FIXTURE 9
FIXTURE 11
FIXTURE 10
FIXTURE 12
FIXTURES
SCENE 2 SCENE 3 SCENE 4 SCENE 5 SCENE 6 SCENE 7
SCENE 8
10 11 12 13 14 15 16
A: 1/8
A: 9-16
SCENE
COMMANDER 192
2.3 Product Overview (front)
2.4 Product Overview (rear panel)
Note: For the Overview Identication please see page 6.
5
 Loading...