

Transcend PF710 User Manual

PF710
User’s Manual

Table of Contents
Introduction ............................................................................................ 3
Package Contents ..................................................................................................................3
Features ..................................................................................................................................3
System Requirements............................................................................................................4
Safety Precautions................................................................................. 5
General Use ............................................................................................................................5
Backing Up Data.....................................................................................................................5
First Time Use......................................................................................... 6
Turn on PF710 ........................................................................................................................6
Using a memory card or USB flash drive.............................................................................8
Volume control and headphones..........................................................................................8
Navigation Buttons.................................................................................................................8
Remote Control ......................................................................................................................9
Connecting to a Computer.................................................................. 10
System connection for Windows® 2000, XP and Vista......................................................10
System connection for Mac™ OS 10.0 or later...................................................................11
System connection for Linux™ Kernel 2.4 or later.............................................................12
Home ..................................................................................................... 13
Photo.....................................................................................................................................13
Music..................................................................................................................................... 13
Clock and Calendar..............................................................................................................13
Settings.................................................................................................................................13
Photo..................................................................................................... 14
Thumbnail Mode...................................................................................................................14
Photo View Mode..................................................................................................................15
Slideshow Mode ...................................................................................................................16
Music..................................................................................................... 19
Music Explorer......................................................................................................................19
Music Player .........................................................................................................................20
Clock and Calendar.............................................................................. 21
Clock and Calendar..............................................................................................................21
Settings................................................................................................. 23
Language ..............................................................................................................................23
Date/Time Setting.................................................................................................................24
Orientation............................................................................................................................25
Display...................................................................................................................................25
Restore defaults ...................................................................................................................26

Firmware upgrade ................................................................................................................26
Troubleshooting................................................................................... 27
Specifications....................................................................................... 28
Warranty................................................................................................ 29
Terminology.......................................................................................... 30
2

Introduction
Congratulations on purchasing Transcend’s PF710. Now it’s easy to display your photo collection at home
or at the office. The PF710 lets you conveniently access and playback photos and music from a variety of
sources: USB Flash drives, all sorts of memory cards, or the PF710’s own on-board memory. PF710 can
be operated easily with both its navigation buttons and the included remote control. It s easy image-rotating
feature allows you to display your PF710 in either portrait or landscape position. The on-board storage
space you save your favorite pictures and music inside PF710 for instant playback wit hout even h aving to
use a memory card. PF710 can also be connected to a PC via the USB port for direct access to its internal
memory or any memory cards that are plugged into it. This User’s Manual will help you get the most from
your new device. Please read it in carefully before using the PF710.
Package Contents
Upon purchasing your Transcend PF710, please make sure each of the following is included:
z PF710 *1
z Remote control (battery included) *1
z Tabletop stand *1
z Power adapter *1
Introduction Introduction
z USB cable *1
z User’s Manual CD *1
z Quick Start Guide *1
z Warranty Card *1
Features
z Bright 7” high-resolution widescreen color TFT LCD panel
z Built-in stereo speakers and headphone jack
z Supports USB flash drives and SD/SDHC/MMC/MS/CF memory cards
z Fully compliant with Hi-Speed USB 2.0 and backwards compatible with USB 1.1
z Direct USB connection to your PC for easy file transfer
z Built-in memory – works even without a memory card
z Auto power on/off
z Slideshow, thumbnail, still picture, and zoom-in viewing options
z View photos with background music
z Attractive Themes to accent your pictures with
z Important date/event reminder
z Clock, alarm and calendar functions
3

System Requirements
System requirements for connecting PF710 to a computer:
1. 100~240V voltage power outlet for the DC adaptor.
2. Desktop or notebook computer with a working USB port.
3. One of the following Operating Systems (OS):
z Windows
z Windows
z Windows
z Mac™ OS 10.0, or later
z Linux™ Kernel 2.4, or later
®
2000
®
XP
®
Vista
Introduction
4

Safety Precautions
These usage and safety guidelines are IMPORTANT! Please follow them carefully to ensure your own
personal safety and help protect your PF710 from potential damage.
General Use
z Avoid using or placing this product in an extreme temperature environment.
z Never allow this product to become damp or wet from water or any other liquids.
z Do not use this product in environments with strong magnetic fields or excessive vibration.
z Do not use a damp cloth to wipe or clean the exterior case or the LCD panel.
z Only use the Transcend provided DC adapter for use with the PF710. Use of other DC adapters may
cause a fire or explosion.
z To protect your health and your hearing, keep the music volume of PF710 below 80 decibels and do
not listen for an extended period of time.
Backing Up Data
z Transcend does NOT take any responsibility for data loss or damage during operation. If you
plan to plug a memory card or USB pen drive into PF710, we strongly advise that you first backup the
data in those storage devices to a computer or other storage medium before using them in PF710.
z To ensure Hi-Speed USB 2.0 data transfer rates when connecting your PF710 to a computer, please
check that the computer has the relevant USB drivers. If you are not sure how to check this, please
consult the computer or motherboard User’s Manual for USB driver information.
Precautions
5
First Time Use
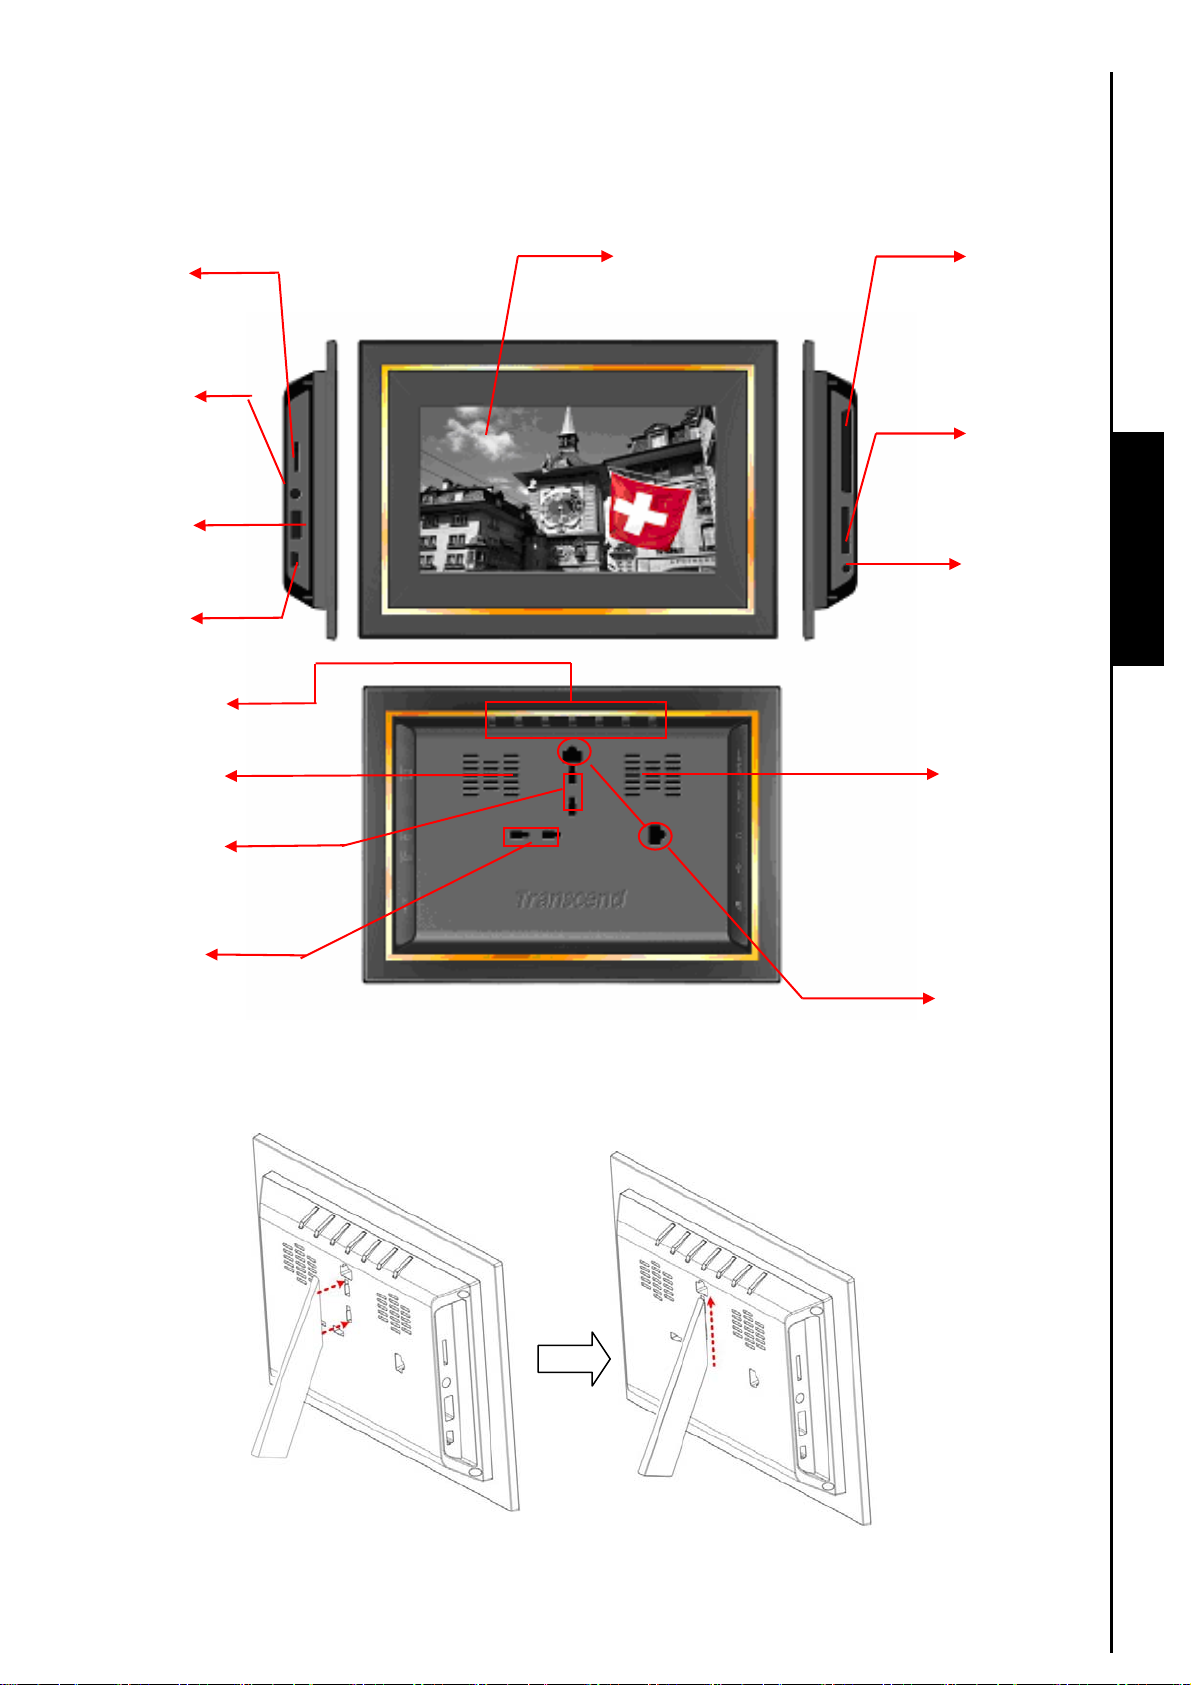
Volume control
Headphone jack
USB A-T ype
connector
Mini-B USB
connector
Navigation
Buttons
Right speaker
Stand holes
CF slot LCD panel
SD/SDHC/
MMC/MS slot
DC Power
input
Left speaker
First Time Use
(landscape)
Stand holes
(portrait)
Turn on PF710
Figure 1: PF710
Wall-hanging
holes
Figure 2: Attaching the tabletop stand to PF710(Landscape)
6
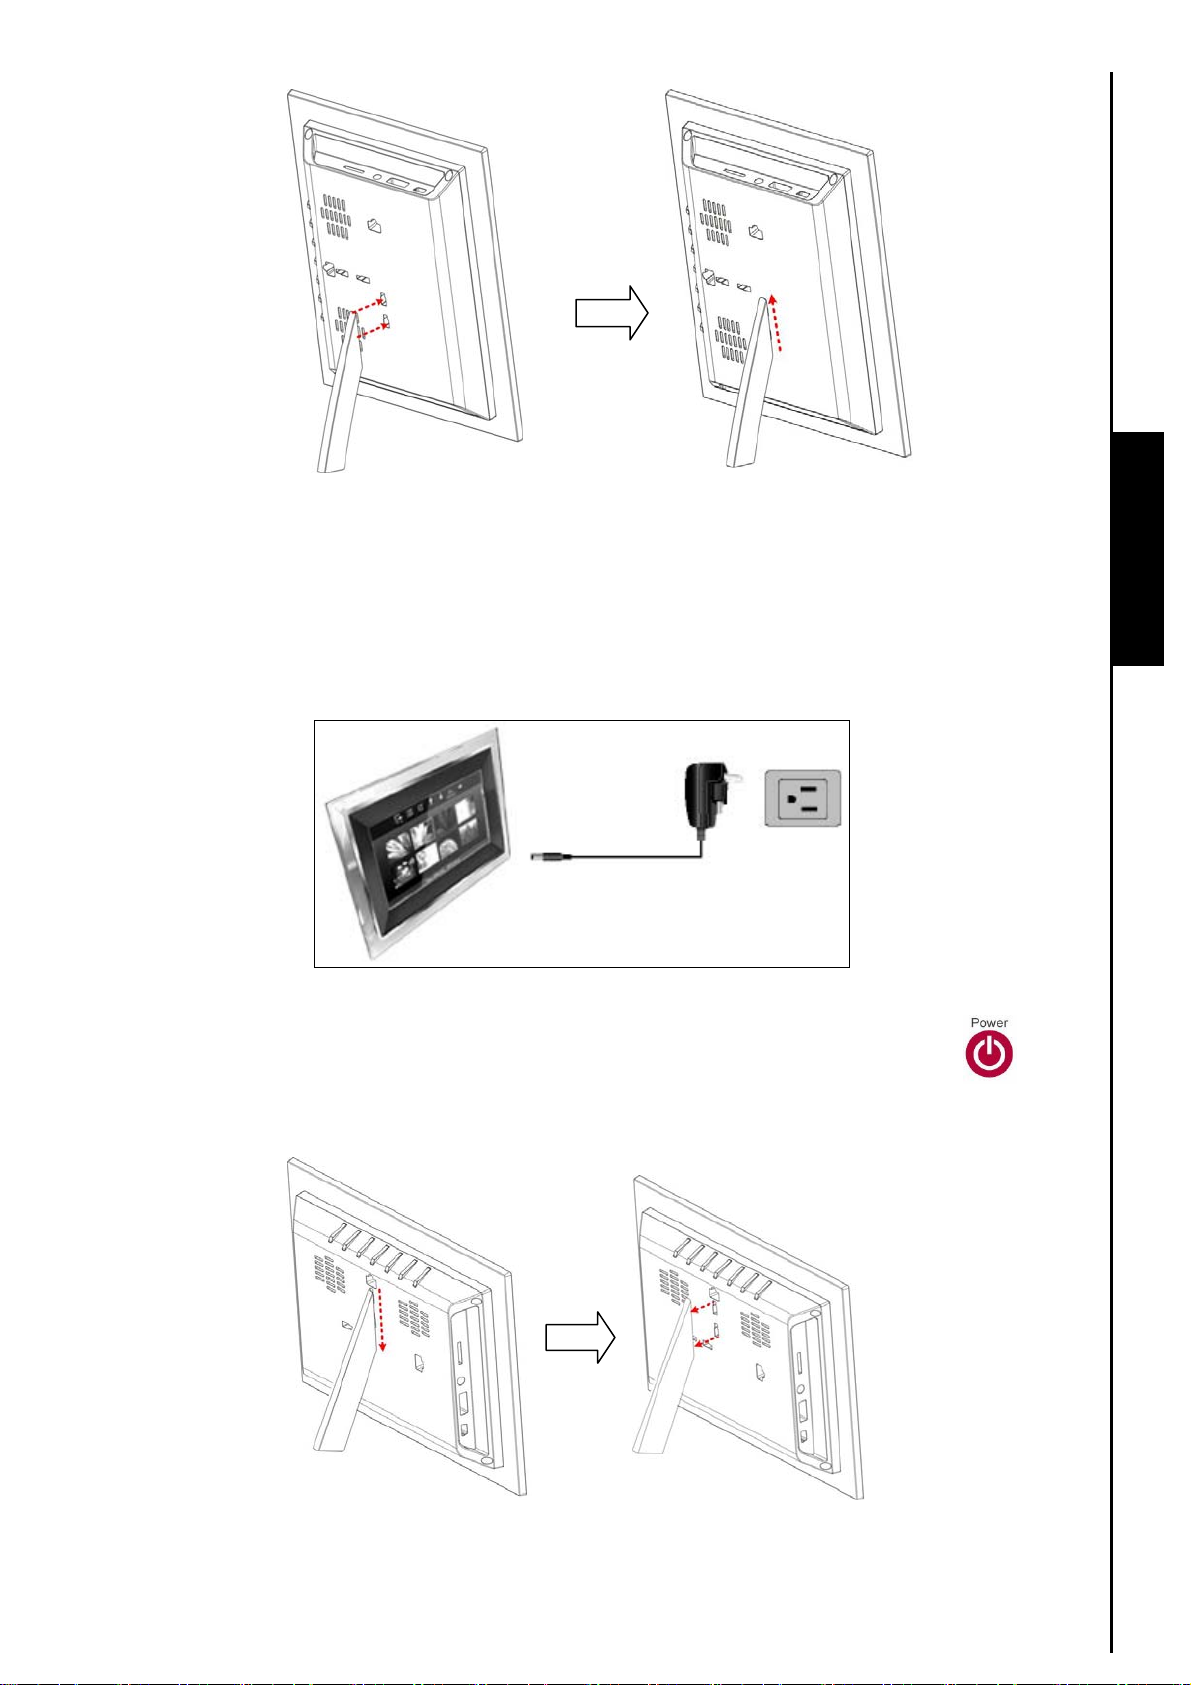
Figure 3: Attaching the tabletop stand to PF710(Portrait)
1. Attach the Tabletop Stand to the back of the PF710 using the stand holes (Landscape) shown above.
Landscape configuration is recommended for initial use.
2. Connect the power adapter cable to the DC input jack on your PF710.
First Time Use
3. Plug the power adapter into a wall outlet.
Figure 4: Plug in the power adapter
4. Press and hold the EXIT button for 3 seconds to power on/off your PF710, or press on the
remote control (with the PF710 facing you, EXIT is the navigation button on the far left).
Figure 5: Removing the tabletop stand from PF710(Landscape)
7
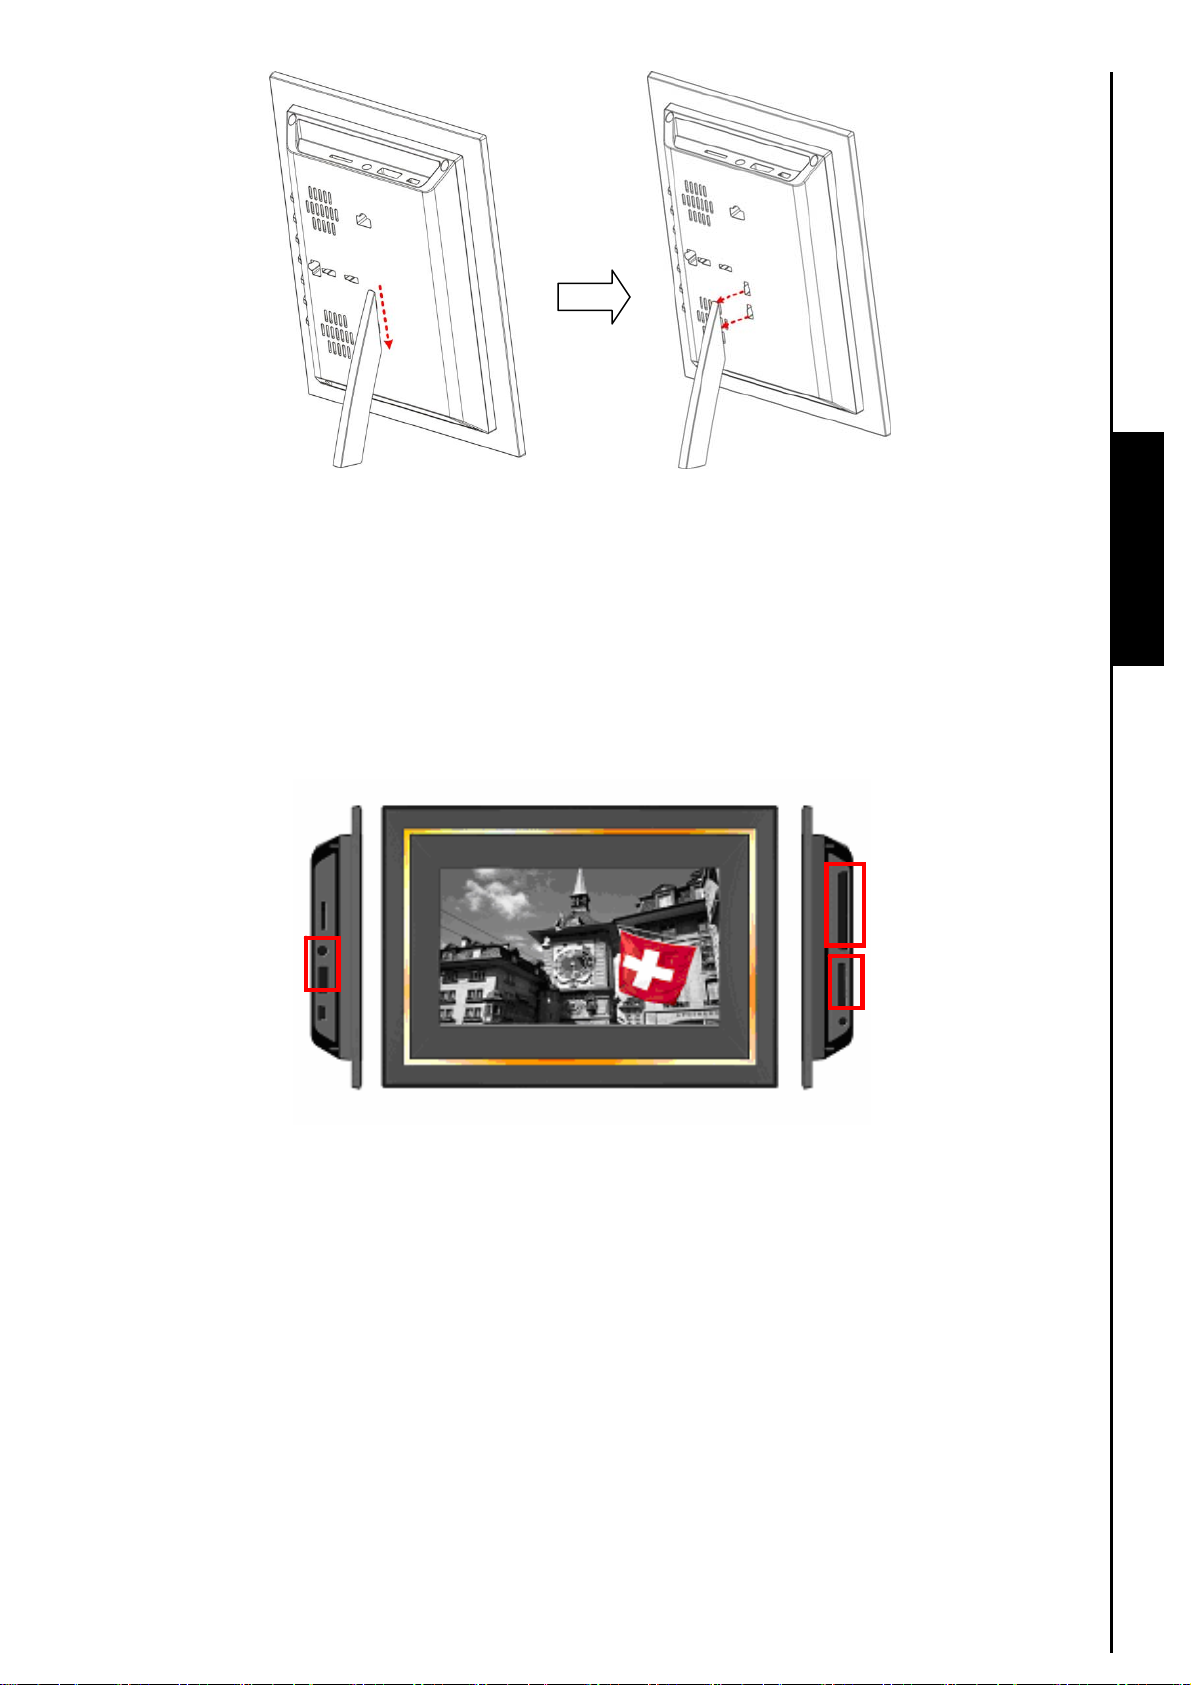
Figure 6: Removing the tabletop stand from PF710(Portrait)
Using a memory card or USB flash drive
1. Insert a memory card into its appropriate card slot on the right-hand side of PF710 or plug a USB flash
drive to the USB A-Type connector on the left-hand side.
2. Once a memory card or USB flash drive is plugged in, PF710 will automatically begin slideshow
playback of all photos available on your memory card or flash drive.
First Time Use
3. PF710 will revert to the Home menu if you unplug a memory card or USB flash drive while in use.
Figure 7: USB flash drive slot and memory card slots
Volume control and headphones
The volume control wheel is located on the upper left side of PF710. Move it up to increase volume, and
scroll down to decrease volume. Press inward on (click) the volume control wheel to mute. You can plug
headphones into your PF710’s headphone jack to enjoy your music more personally. The built-in
speakers will be disabled while headphones are plugged in,
Navigation Buttons
There are seven convenient navigation buttons located on the backside of the PF710, which are
represented in this manual with capital letters (ex: EXIT = “exit” button on back of unit). From left to right
(with the screen facing you) are: EXIT, OPTION, OK, UP, DOWN, LEFT, RIGHT. The menu options
displayed in the OSD are mapped to the navigation buttons located behind each icon.
8
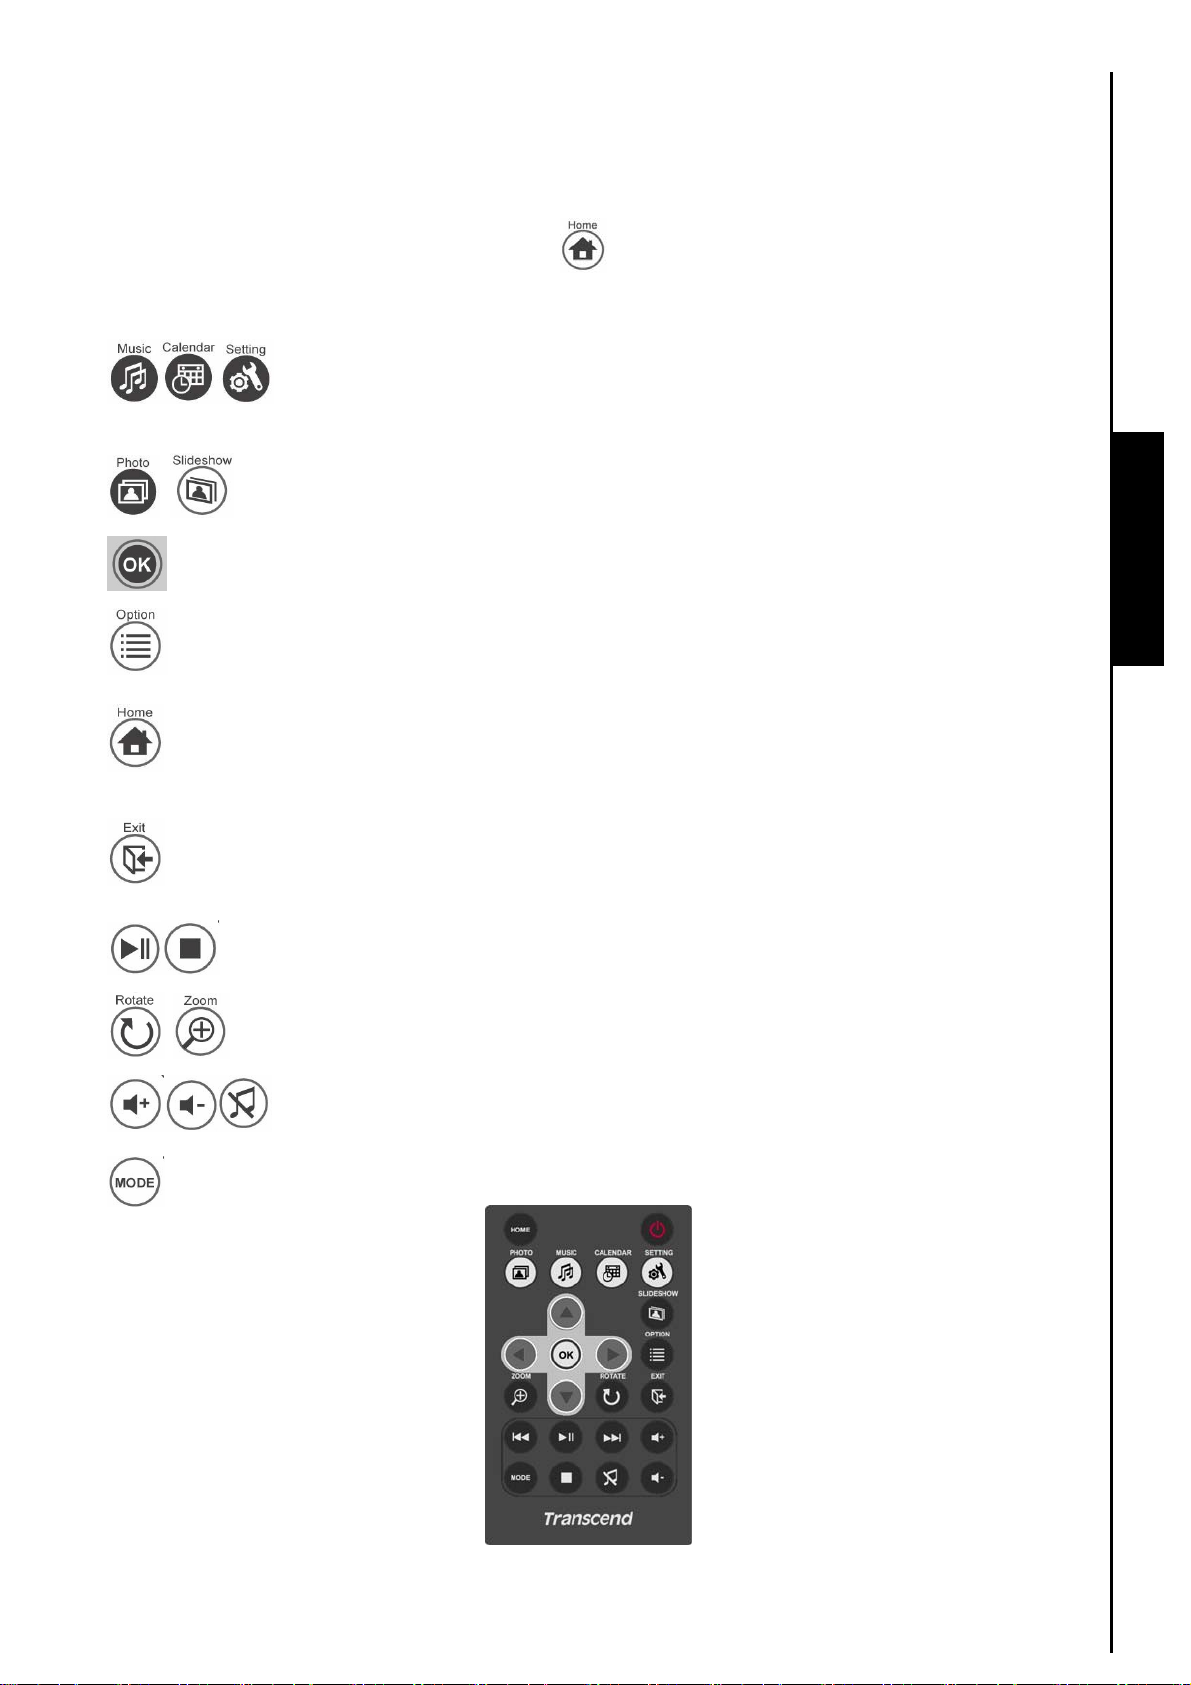
Remote Control
Your PF710 comes with a compact, easy to use remote control. You can operate your PF710 with either
the navigation buttons on the back of the PF710 or by using the remote control. Note that when using the
remote control you should always aim it directly at the front of your PF710 and make sure there are no
obstacles in the way. All icons like shown in this User’s Manual and the Quick Start Guide represent
functions that you can access directly from the remote control for easy, straightforward operation of your
PF710.
z : These menus can be directly accessed by pressing one of these shortcut buttons no
matter what menu/mode the PF710 is currently in.
z : Switch between Thumbnail and Slideshow modes.
z : Select the item you want to view or function you want to perform.
z : Show additional functions available for the current mode.
First Time Use First Time Use
z : Jump back to the Home menu no matter what menu/mode the PF710 is currently in.
z : Go back to the last page or menu.
z : Play/pause, or stop music.
z : Rotate or zoom-in on photos displayed in Photo View mode.
z : Adjust music volume (up / down / mute).
z : Cycle between music play modes.
Figure 8: Remote control
9
 Loading...