

Page 1
1
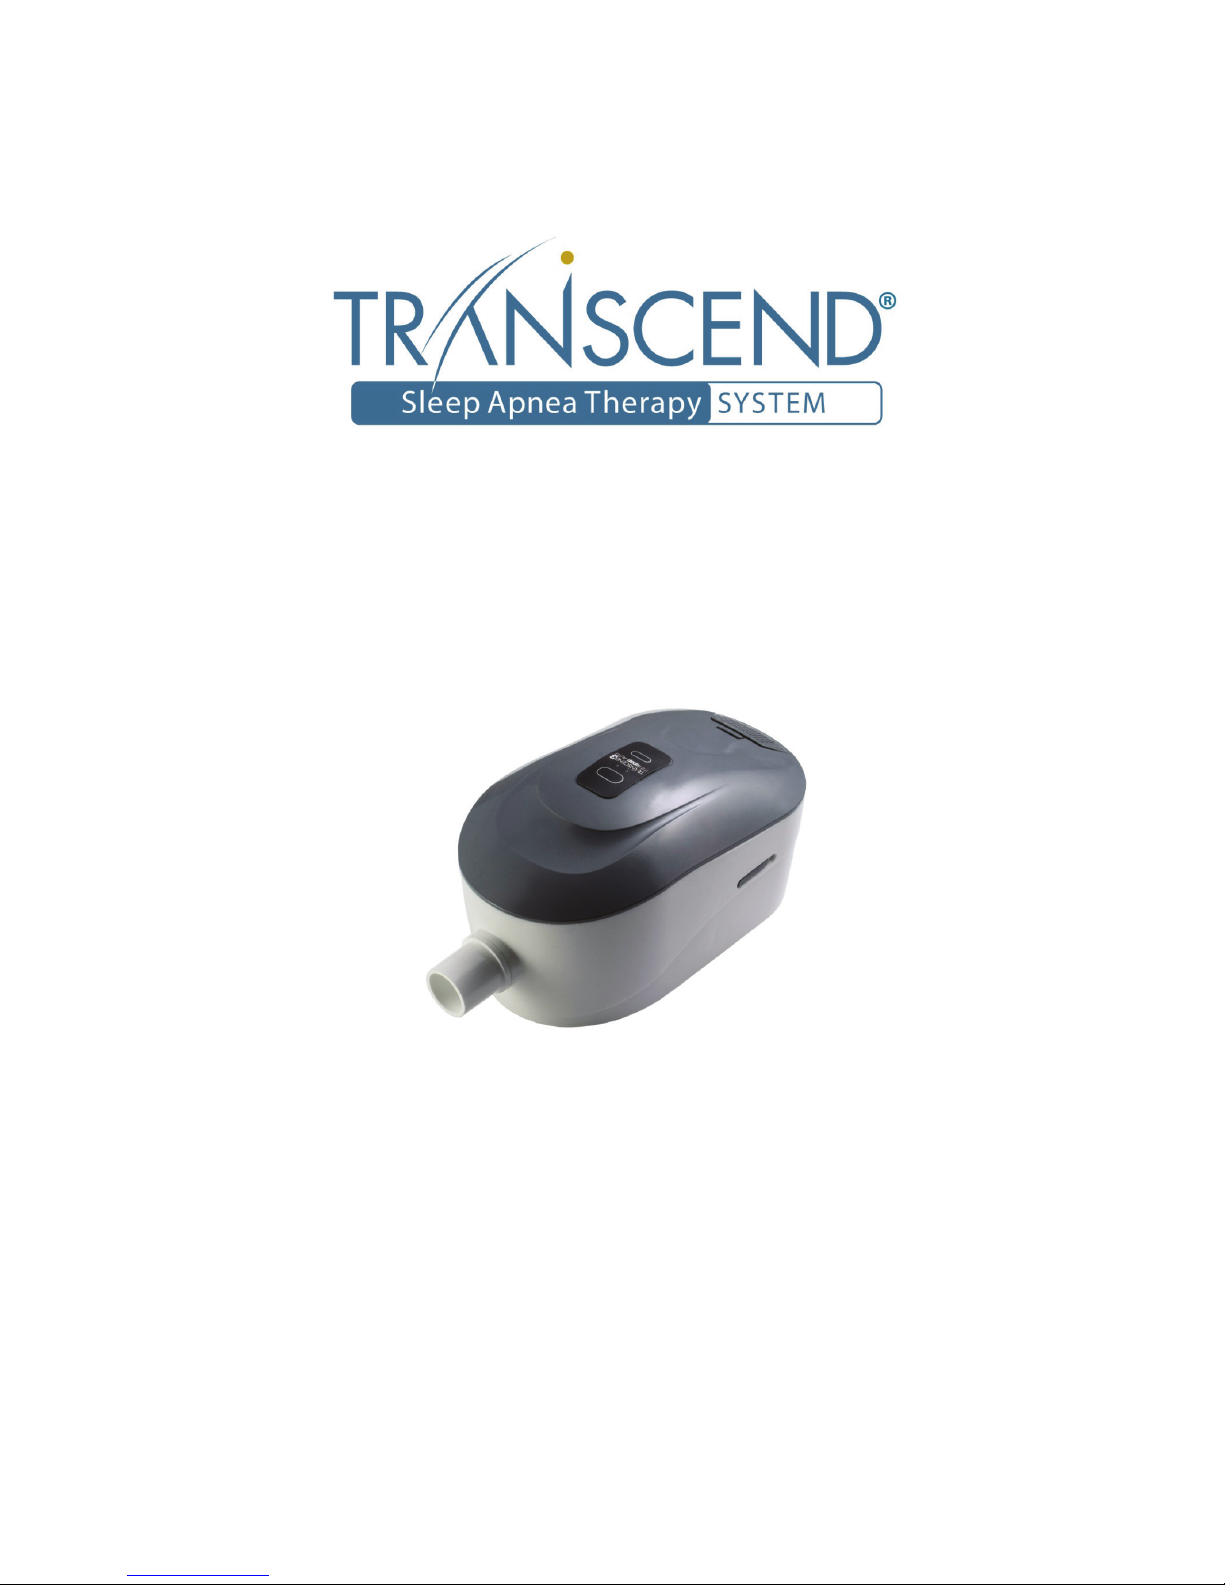
Transcend 3 miniCPAP™
Quick Guide
Page 2

2
Table of Contents
ENGLISH ………………………………………… 3
FRANÇAIS ………………………………………… 15
DEUTSCH ………………………………………… 28
ITALIANO ………………………………………… 42
ESPAÑOL ………………………………………… 56
NEDERLANDS ………………………………………… 71
Page 3

3
Transcend 3 miniCPAP Quick Guide Page 2
Introduction
Thank you for choosing Transcend, the leading innovator in portable CPAP therapy. The
Transcend 3 miniCPAP provides positive airway pressure to users in the range of 4 to 20
cm
H2O as prescribed by the clinician. The Transcend 3 miniCPAP product family includes
the Transcend 3 miniCPAP and the Transcend 3 miniCPAP Auto. Buttons and LED lights
facilitate control and provide operational feedback. A DC power jack and a USB port are
also incorporated into the Transcend 3 miniCPAP.
Note: For detailed device descriptions and troubleshooting, download the
Transcend 3 miniCPAP user manual at www.mytranscend.com/support or by
calling Somnetics customer service at 877-621-9626 to request a copy.
Precautions when using a computer with Transcend 3 miniCPAP
The following precautions are cited for the safety of the patient and/or the person
operating the computer as required to meet IEC 60601-1-1 safety regulations.
Definitions A computer compliant with 60950-1 safety standards is one that complies
with UL 60950-1 or IEC 60950-1 safety standards.
• Do not plug any devices into the Transcend 3 miniCPAP USB port other than a computer
that is compliant with 60950-1 safety standards. Attaching any other device to the
Transcend 3 miniCPAP USB port may damage Transcend and may not be safe for the user.
• In order to reduce the risk of leakage currents, use an isolation transformer which is IEC
60601-1 approved to power your computer.
• Do not plug your computer compliant with 60950-1 safety standards or your Transcend into
a multiple portable socket outlet (i.e. power strip).
• When using your computer compliant with 60950-1 safety standards, follow the
manufacturer’s cleaning instructions.
• When using your computer compliant with 60950-1 safety standards, follow the
manufacturer’s instructions for conducting preventative maintenance.
• Do not attach Transcend 3 miniCPAP USB port to your computer compliant with 60950-1
safety standards during preventative maintenance of your computer.
• Do not touch your computer compliant with 60950-1 safety standards and any exposed
metal on Transcend 3 miniCPAP or on Transcend 3 miniCPAP cables at the same time.
• Do not touch exposed metal on your computer compliant with 60950-1 safety standards or
exposed metal on connectors or cables
• For clinicians, do not simultaneously touch the computer compliant with 60950-1 safety
standards and the patient.
• Do not use computers that have internal voltages that are accessible without the use of
tools in order to gain access to such voltages.
Warnings
• Do not allow water to enter this device. Transcend 3 miniCPAP should not be
exposed to environmental conditions where the system may get wet.
• This device is not intended for life support.
ENGLISH
Page 4

4
Transcend 3 miniCPAP Quick Guide Page 3
• The Transcend 3 miniCPAP must be set up and adjusted by a trained provider
before being used for therapy ramp and pressure.
• The air temperature produced by this device can be as much as 10ºF higher than
the temperature of the room. Exercise caution if the room temperature is warmer
than 90ºF (32ºC).
• Do not block or otherwise obstruct the exhalation ports of the mask. Follow the
manufacturer’s instructions included with your mask.
• This equipment is not suitable for use with oxygen or in the presence of a
flammable anesthetic mixture with air or oxygen, or with nitrous oxide. Sources of
oxygen must be located more than 1 meter from the equipment to avoid the risk of
fire and burns.
• The Transcend 3 miniCPAP is only to be used with the supplied or recommended
accessories. Use of accessories not recommended may result in increased
electromagnetic emissions or decreased electromagnetic immunity of the PAP
system and may be potentially unsafe.
• The Transcend 3 miniCPAP is not defibrillation proof.
• Do not attempt to sterilize Transcend 3 miniCPAP.
• If the device is to be used by multiple patients a main flow bacteria filter should be
installed in-line between the device and the breathing circuit tubing to prevent
contamination.
• The device should be used only with masks and connectors recommended by
Somnetics or a health care professional. A mask should not be used unless the
device is turned on and is properly delivering ramp or therapy pressure. The
exhalation port(s) associated with the mask should never be blocked. Explanation
of the Warning: The device is intended to be used with masks or connectors
specifically designed to have exhalation ports to allow continuous flow of air out of
the mask. When the device is in operation, air flow from the device flushes exhaled
air out through the mask exhalation port. When the device is not operating,
however, fresh air will not be provided through the mask and exhaled air may be
rebreathed.
• Failure to use a mask or accessory that minimizes rebreathing of carbon dioxide or
permits spontaneous breathing can cause asphyxiation.
• Do not position the equipment in bed. Covering breathing tubes with a blanket or
heating them can affect the quality of therapy or injure the user.
• To prevent disconnection of the tubing during use, only tubes in compliance with
ISO 5367 or ISO 80601-2-74 should be used.
• Strangulation hazard from power cord and air tube. These can become wrapped
around a neck and STRANGLE. Keep power cord and air tube more than 3 feet from
a baby’s crib and out of baby’s reach. Keep cord and tube out of children’s reach.
• Small parts are unlikely to be expelled from the Transcend 3 miniCPAP enclosure,
but in case of severe damage internal components may fragment and create a
swallowing or choking hazard if they get out of the enclosure.
ENGLISH
Page 5

5
Transcend 3 miniCPAP Quick Guide Page 4
Cautions
• Federal law (United States) restricts this device to sale by, or on the order of, a
physician.
• Power the Transcend 3 miniCPAP only with the Somnetics-supplied power supplies,
mobile power adapter, or batteries.
• Discontinue use of the Transcend 3 miniCPAP and contact your physician if
respiratory or skin irritations occur.
• Do not introduce objects into the Transcend 3 miniCPAP air inlet or air outlet.
• Inspect the power supply for signs of wear or damage before each use. Replace the
power cord if necessary.
• Somnetics recommends replacing the air delivery tubing (hose) after every three
months of use.
• To protect the environment, some parts and accessories of the Transcend 3
miniCPAP, including optional batteries, must be disposed of in accordance with local
regulations.
• The equipment must not be covered or positioned in such a way that adversely
affects the performance of the equipment, as it may also create a safety issue.
Examples of this would include:
o The equipment must not be positioned in a bed.
o The equipment should not be placed anywhere other than on a firm, flat
surface.
o Do not position in a location where pets or children can access equipment.
o Do not position near an open window or other location where dust, or pests
(insects) can affect equipment safety and/or performance.
o Do not position next to a curtain that blocks the flow of cooling air, thereby
causing the equipment to overheat.
o Do not block the air intake port, thereby interfering with therapy.
DBP
Device contains DBP (a phthalate). Significant exposure to DBP may interfere
with the normal development of the male reproductive tract. Testing has
demonstrated that DBP exposure levels are well below established limits.
Women who are pregnant or nursing may wish to discuss the benefits and risks
of this device with a physician.
ENGLISH
Page 6

6
Transcend 3 miniCPAP Quick Guide Page 5
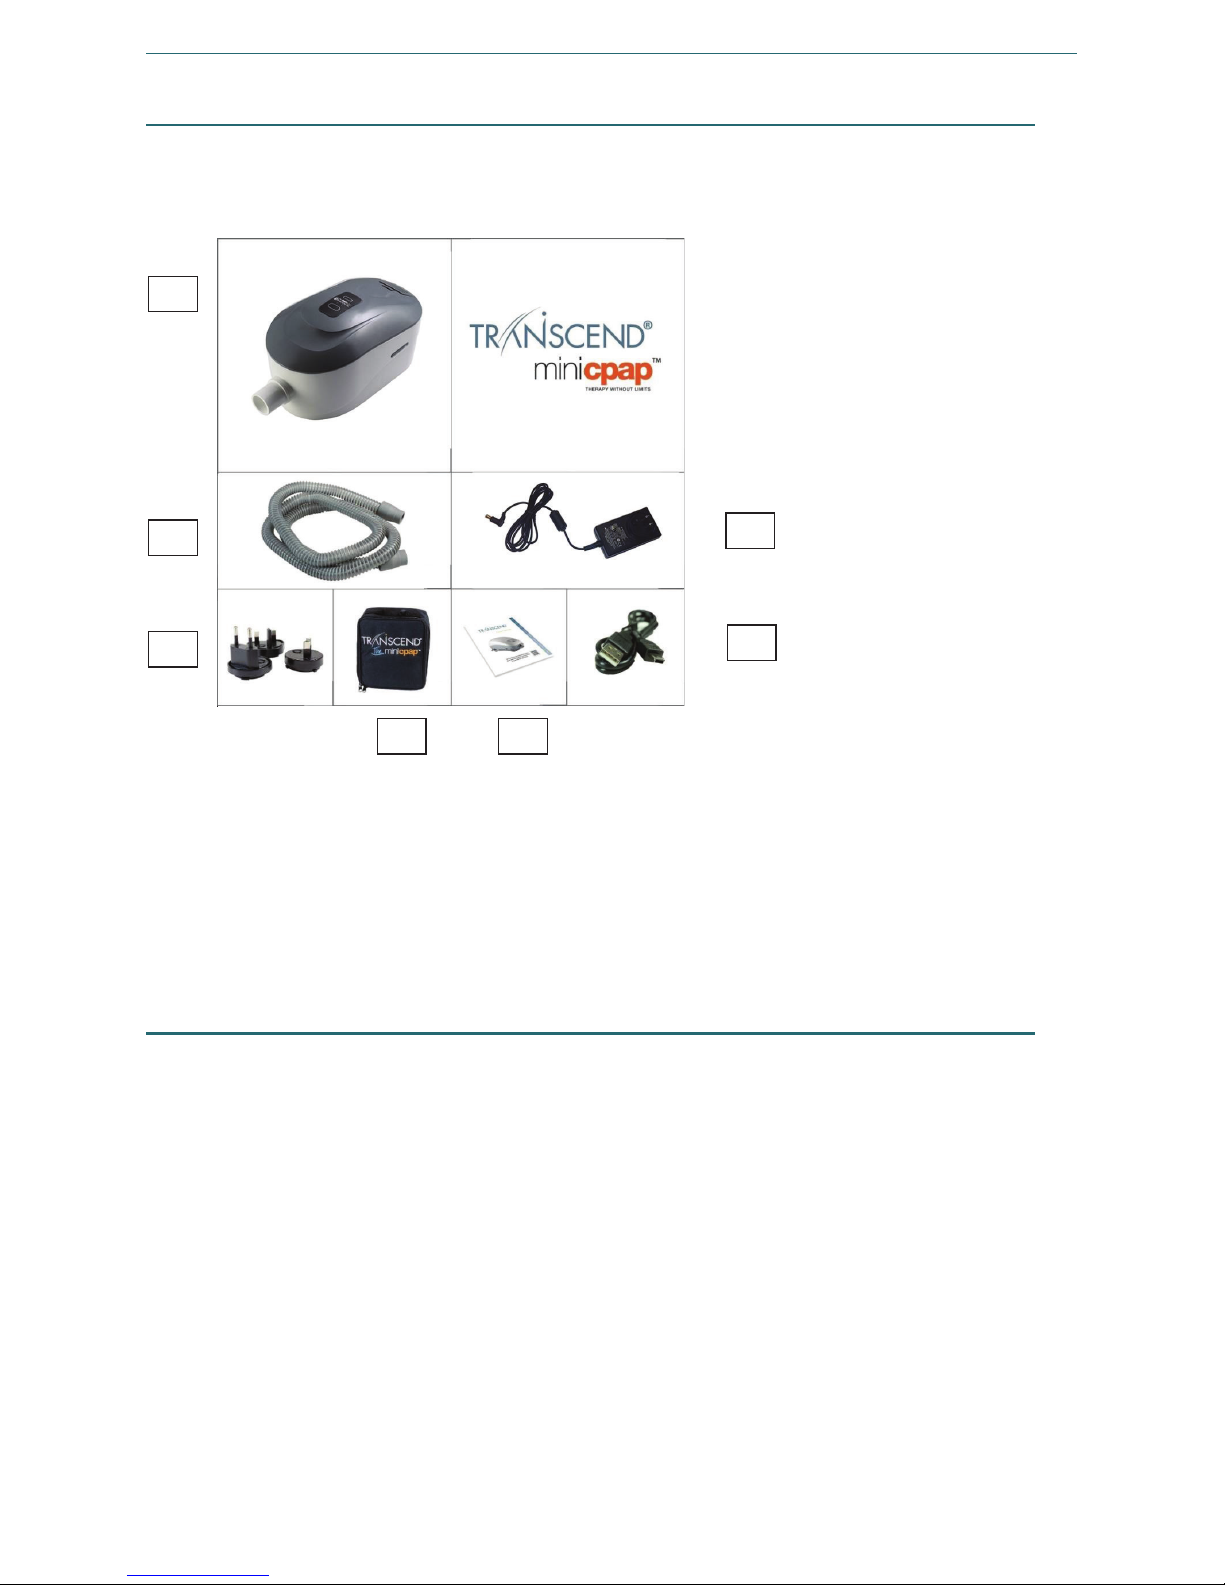
Components of the Transcend 3 miniCPAP
Begin by unpacking all items from the Transcend travel bag and inspect them to ensure
they were not damaged during shipment. Report any missing or damaged items to the
home healthcare provider that provided the product to you.
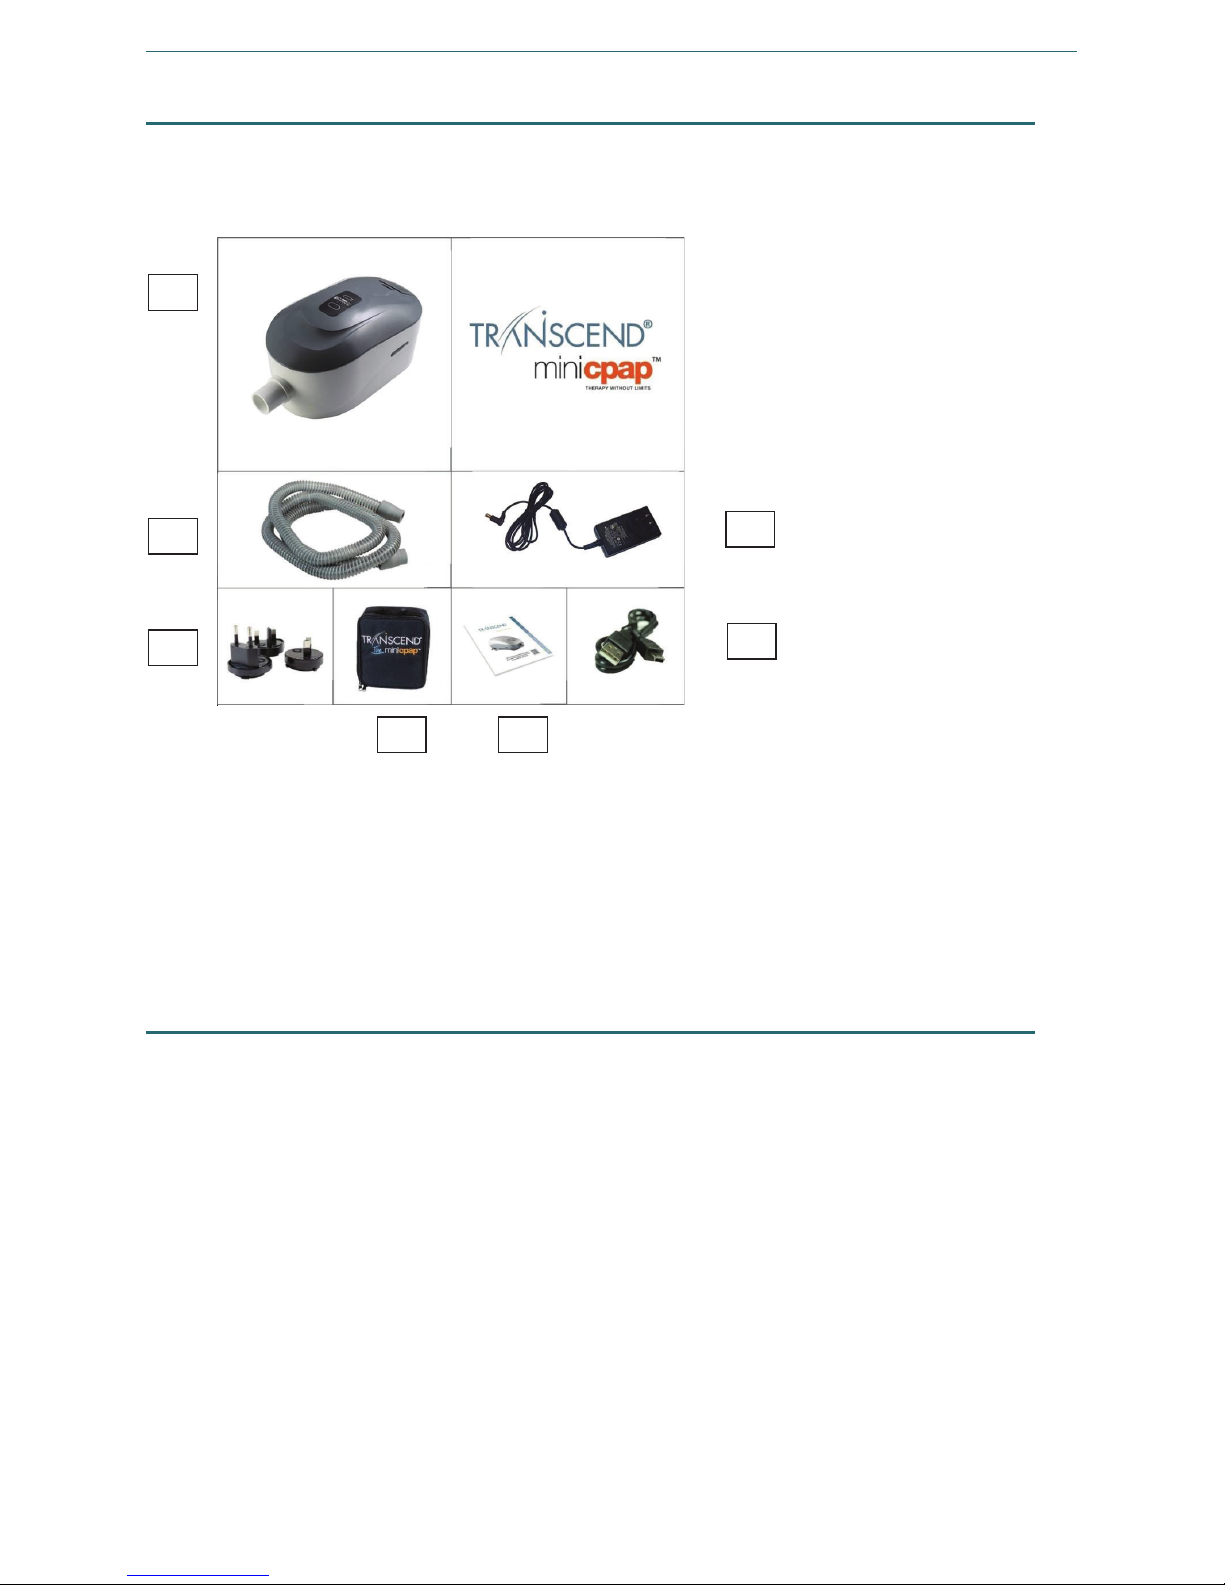
1 Transcend 3 miniCPAP Auto or
Transcend 3 miniCPAP
2 Air Supply Tube (Compatible with
standard 22 mm connector)
3 Multi-plug universal power supply
(PSA2)
4 Changeable plug pack
5 Transcend Travel bag
6 Transcend 3 miniCPAP Quick Guide
7 USB Cable
What’s not included (all sold separately)
• Transcend Mobile Power Adapter
• Transcend P
4
Battery
• Transcend P
8
Battery
• Transcend Portable Solar Battery Charger (to be used as an alternative charging
source for Transcend P
4
and P8 batteries)
• Patient Mask
1
2
4
3
7
5
6
ENGLISH
Page 7
7
Transcend 3 miniCPAP Quick Guide Page 6
Assembling the Transcend 3 miniCPAP
1. Attach the air supply tube to the air outlet on the Transcend 3 miniCPAP device.
2. Connect the mask to the opposite end of the air supply tube.
3. Plug the power supply barrel connector into the Transcend 3 miniCPAP power jack
on the rear of the device.
4. Connect power supply to a wall outlet.
Using the Multi-plug Universal Power Supply (PSA2)
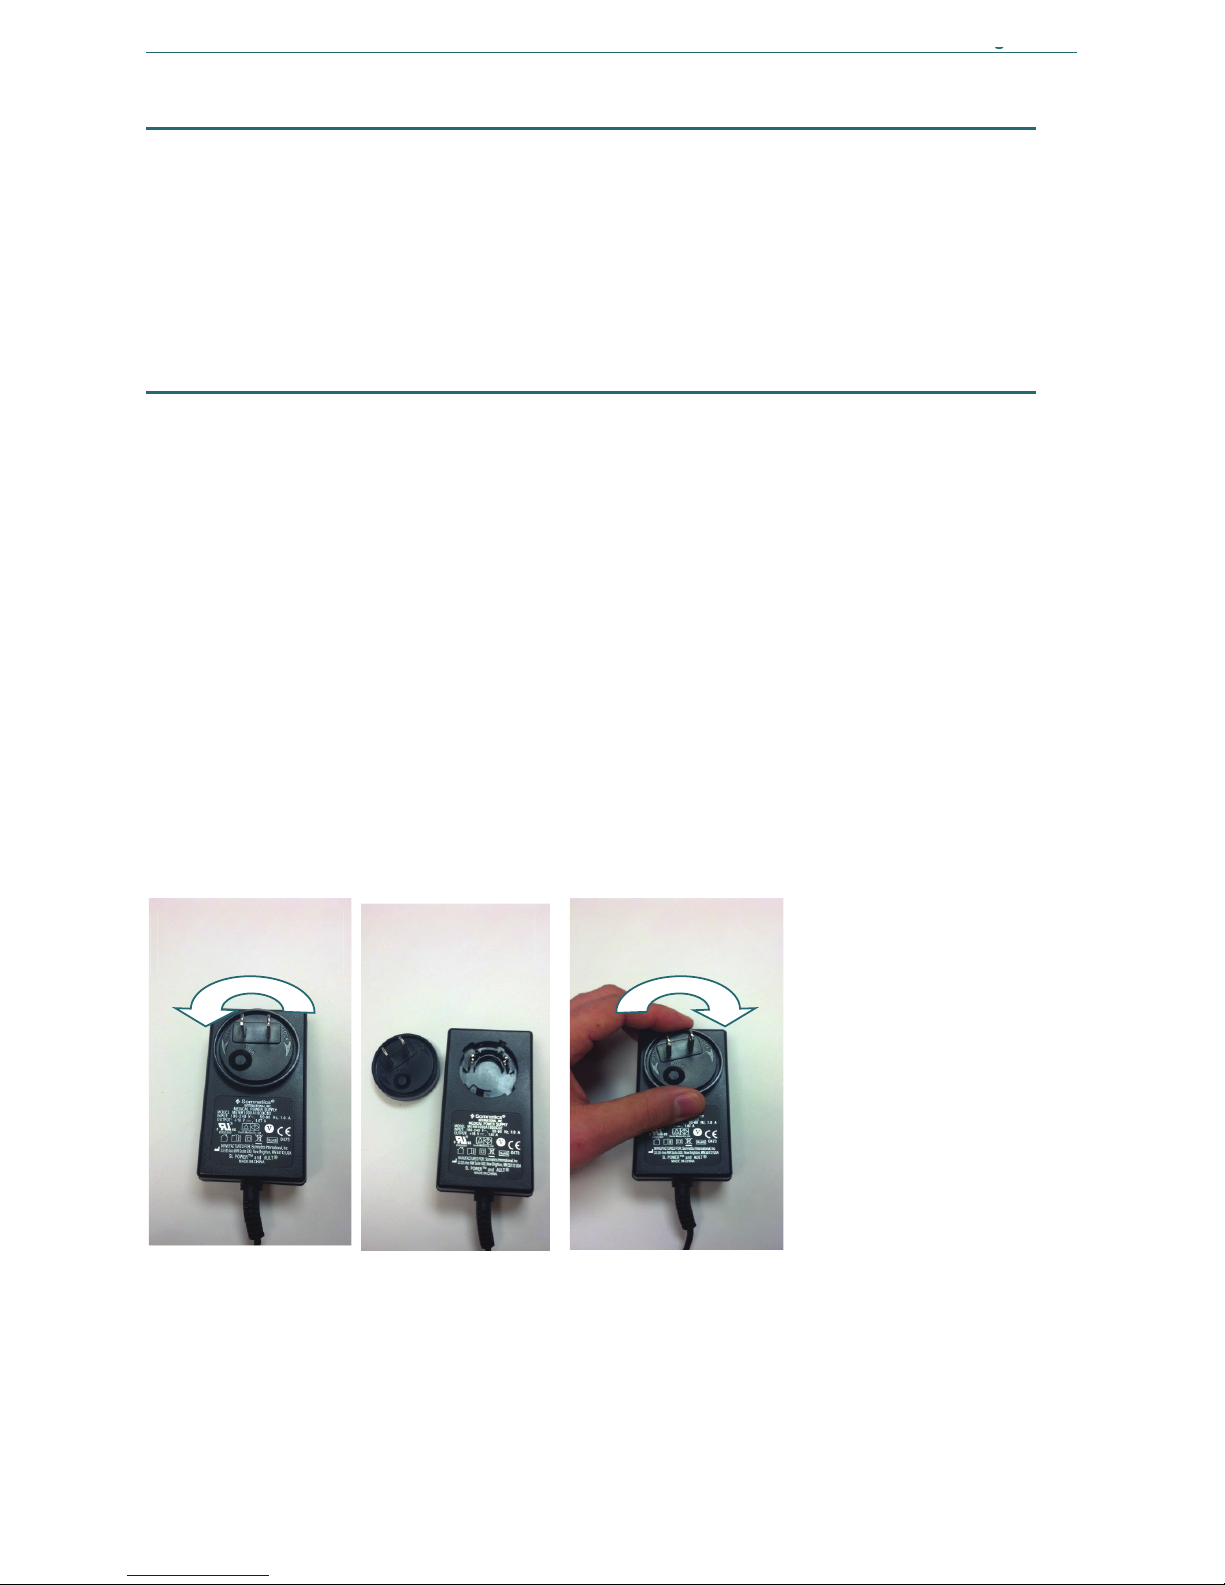
The Multi-plug Universal Power Supply (PSA2) and Changeable Plug Pack containing three
(3) exchangeable plugs are contained with each Transcend 3 miniCPAP. The changeable
plug packs are suitable for use in most countries around the world.
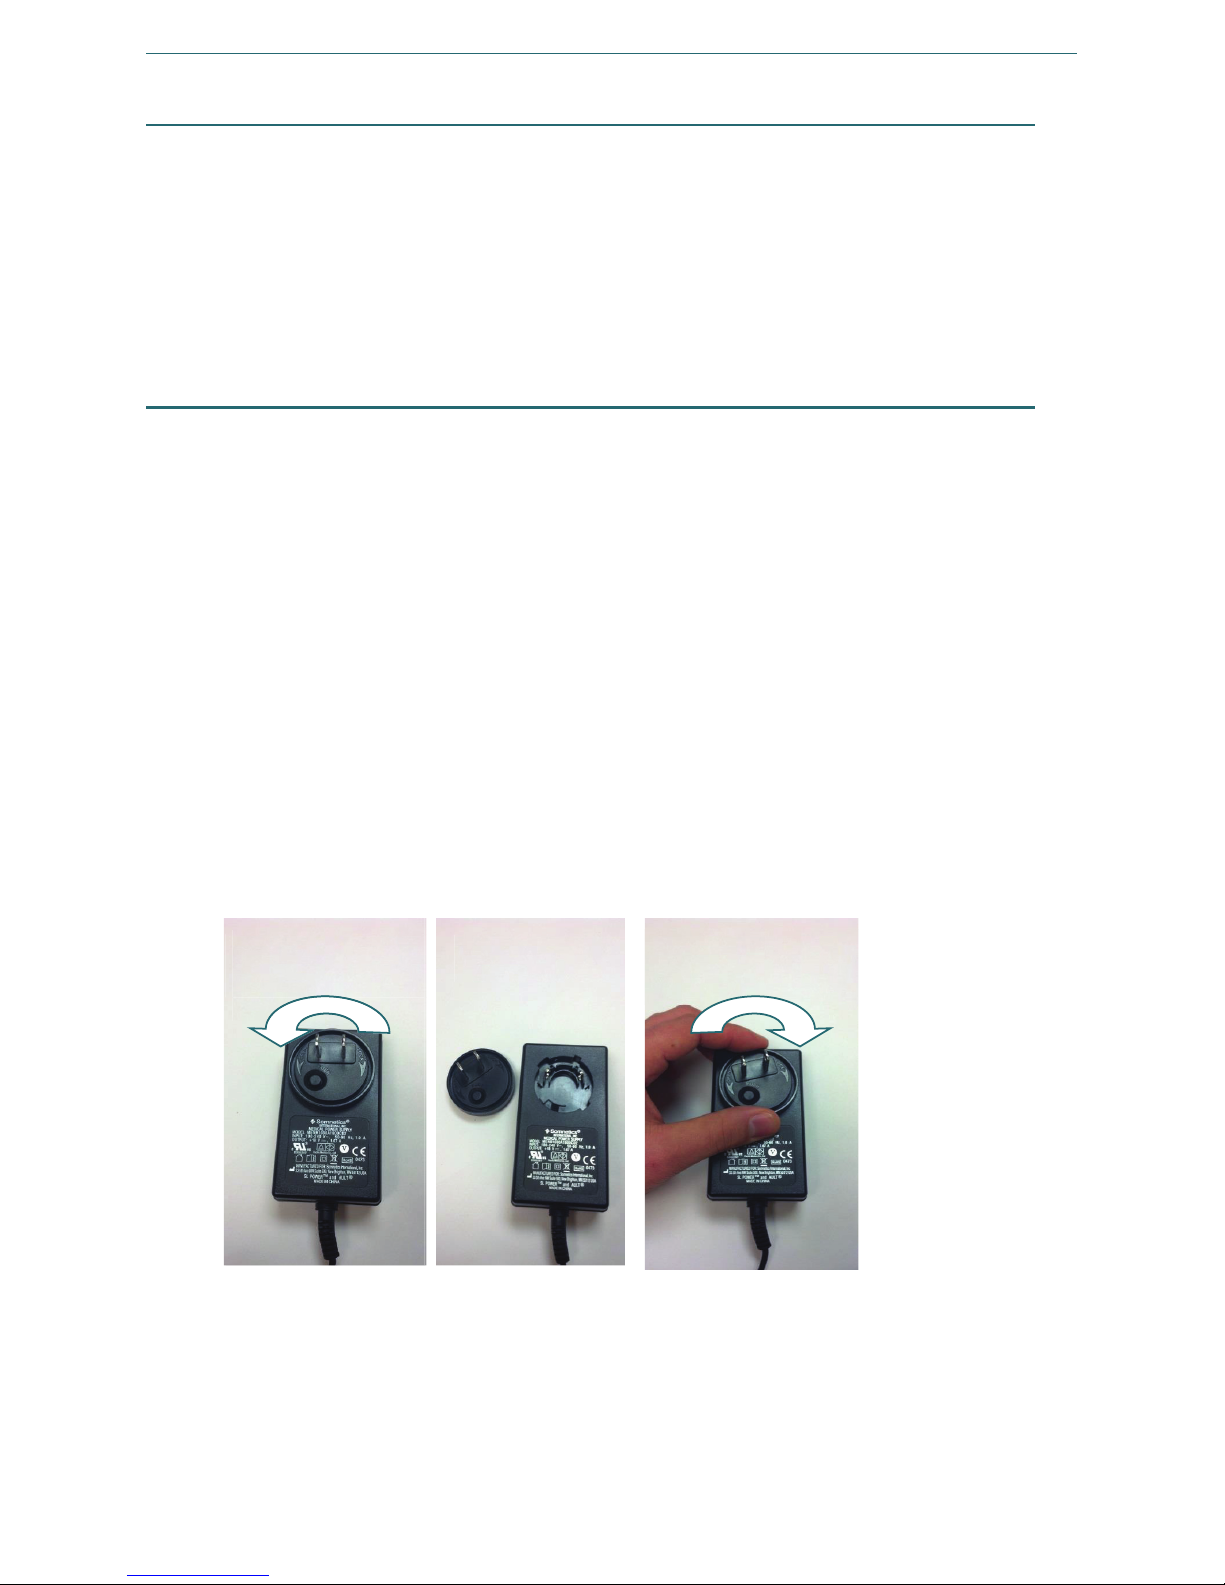
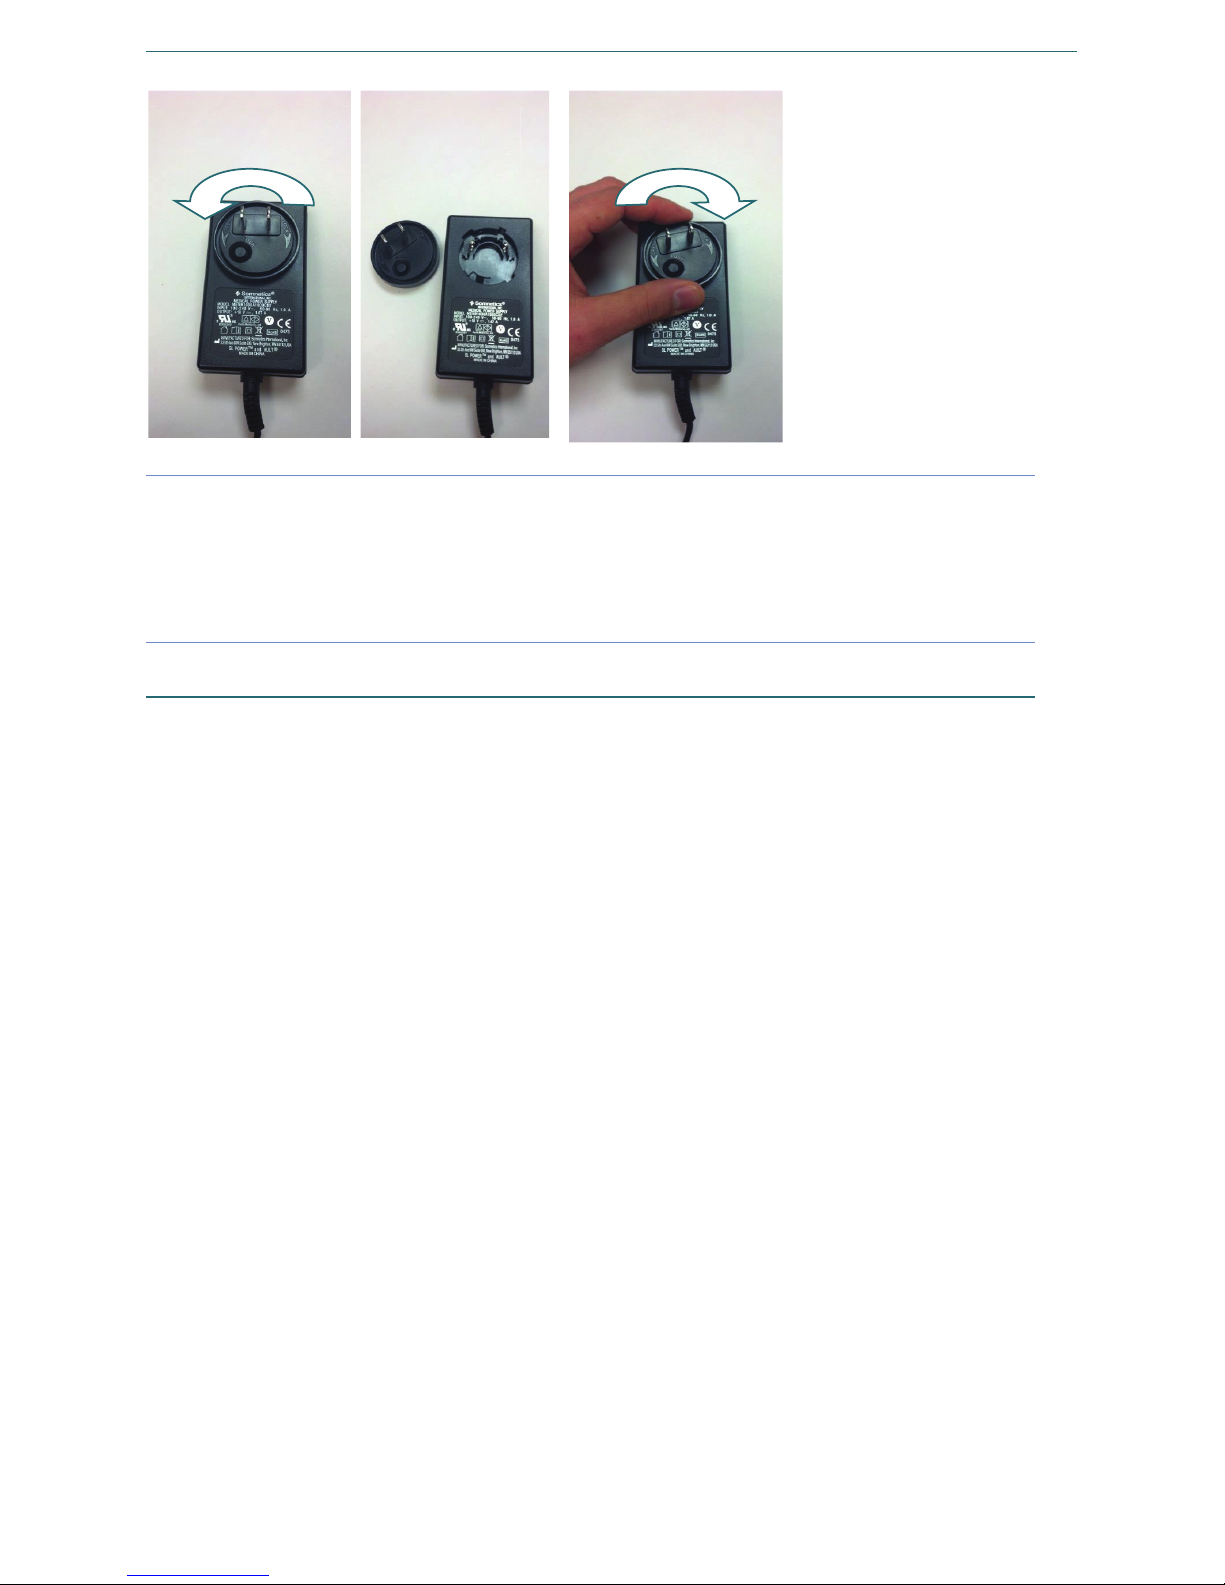
1. Determine which plug is required to power the device based upon the outlet style.
2. If the correct plug is not already attached to the Power Supply remove the
attached plug by depressing the button on the detachable plug and turning the
plug in a counterclockwise motion until it releases from the power supply.
3. Attach the desired plug by lining up the protruding tabs on the back of the plug
with the gaps on the Power Supply and gently pushing the plug into the slot. Turn
the plug clockwise until it clicks into place. You should hear an audible click.
4. Insert the barrel connector of power supply into power jack on the back of the
Transcend 3 miniCPAP device.
5. Insert the other end of the power supply into an AC line power outlet.
6. The Transcend 3 miniCPAP power-up LED flash sequence should initiate. Once the
power-up LED flash sequence is complete the LED lights will turn off. This
sequence indicates that power is being supplied to the Transcend 3 miniCPAP and
that it has successfully entered Standby Mode.
Reattach: Insert
plug and turn
Remove
Plug
Remove:
Depress button
and turn
ENGLISH
Page 8
8
Transcend 3 miniCPAP Quick Guide Page 7
Note Use only the Somnetics-supplied Universal Power Supplies. Do not use a power
converter or voltage transformer with the PSA2 Universal Power Supply.
Note Make certain that the plug attachment is fully secured to the Power Supply before
inserting the power supply into the wall outlet.
Transcend 3 miniCPAP Device
The Transcend 3 miniCPAP comes ready to generate and regulate continuous positive
airway pressure therapy for delivery to the interface (mask). An external power source
connects to the Transcend 3 miniCPAP to supply power to the device.
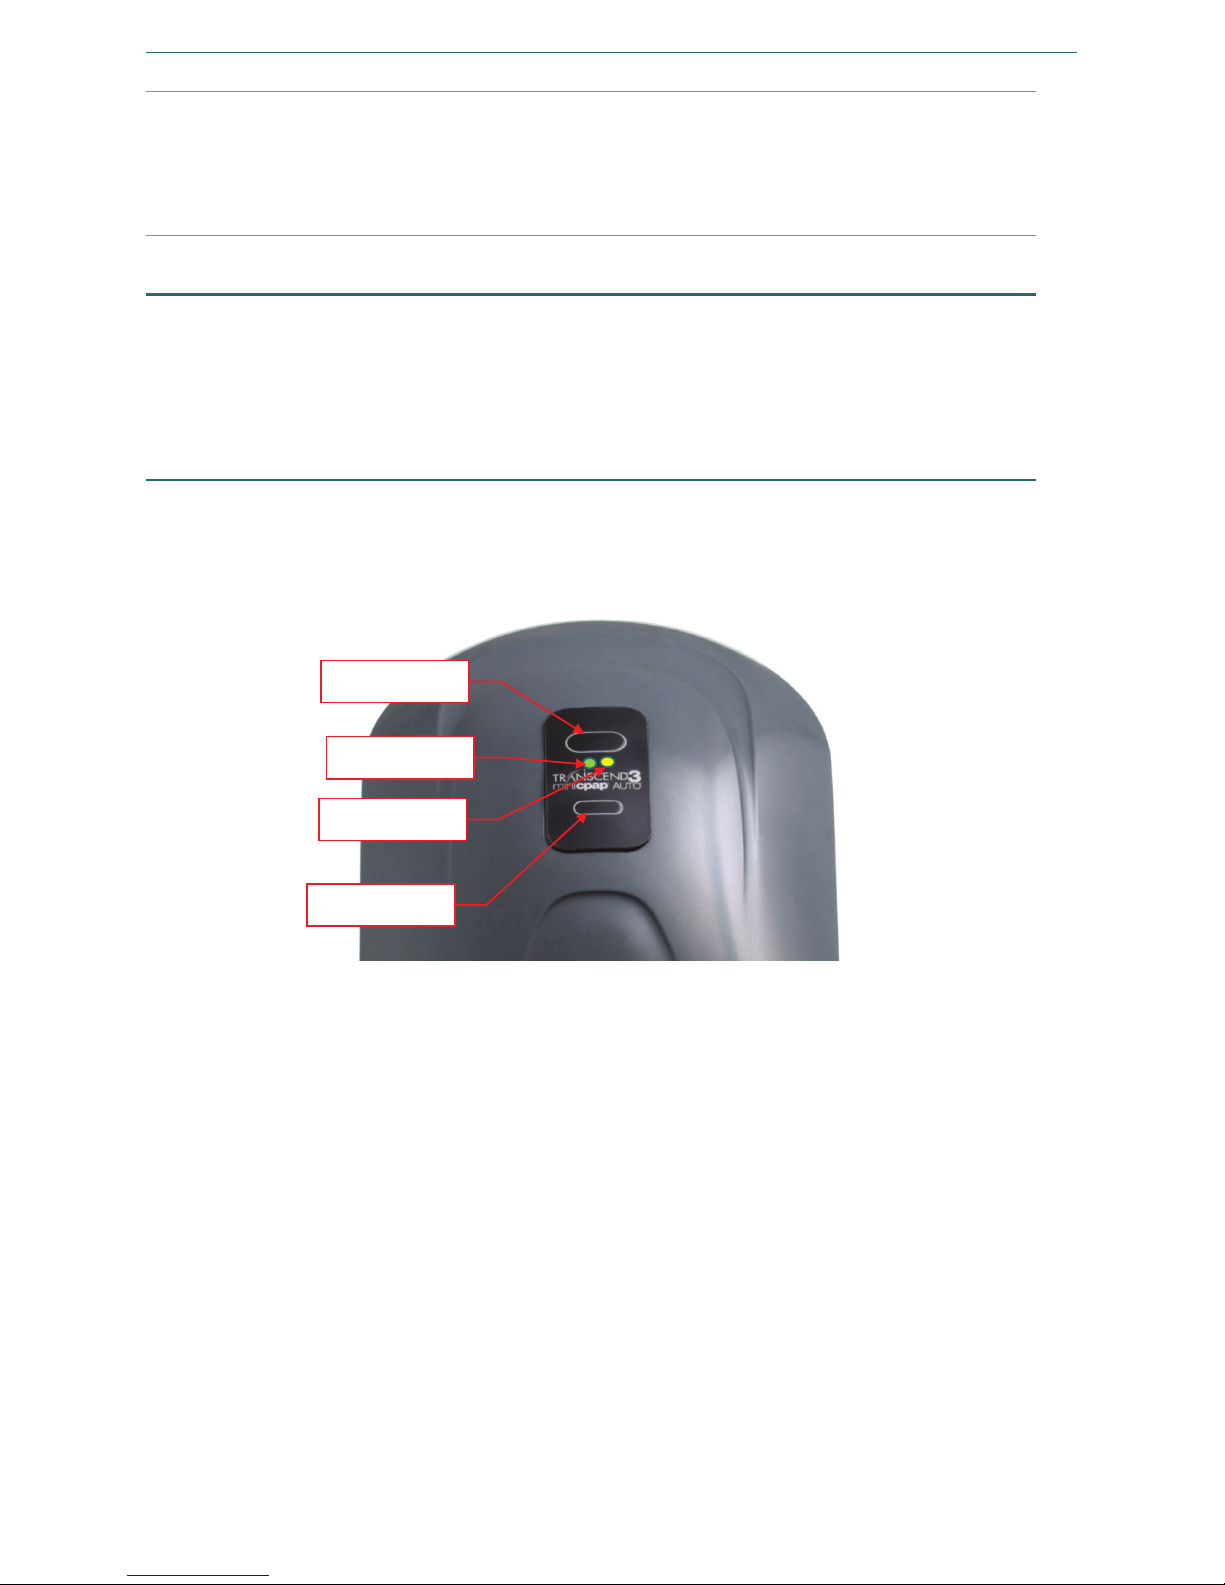
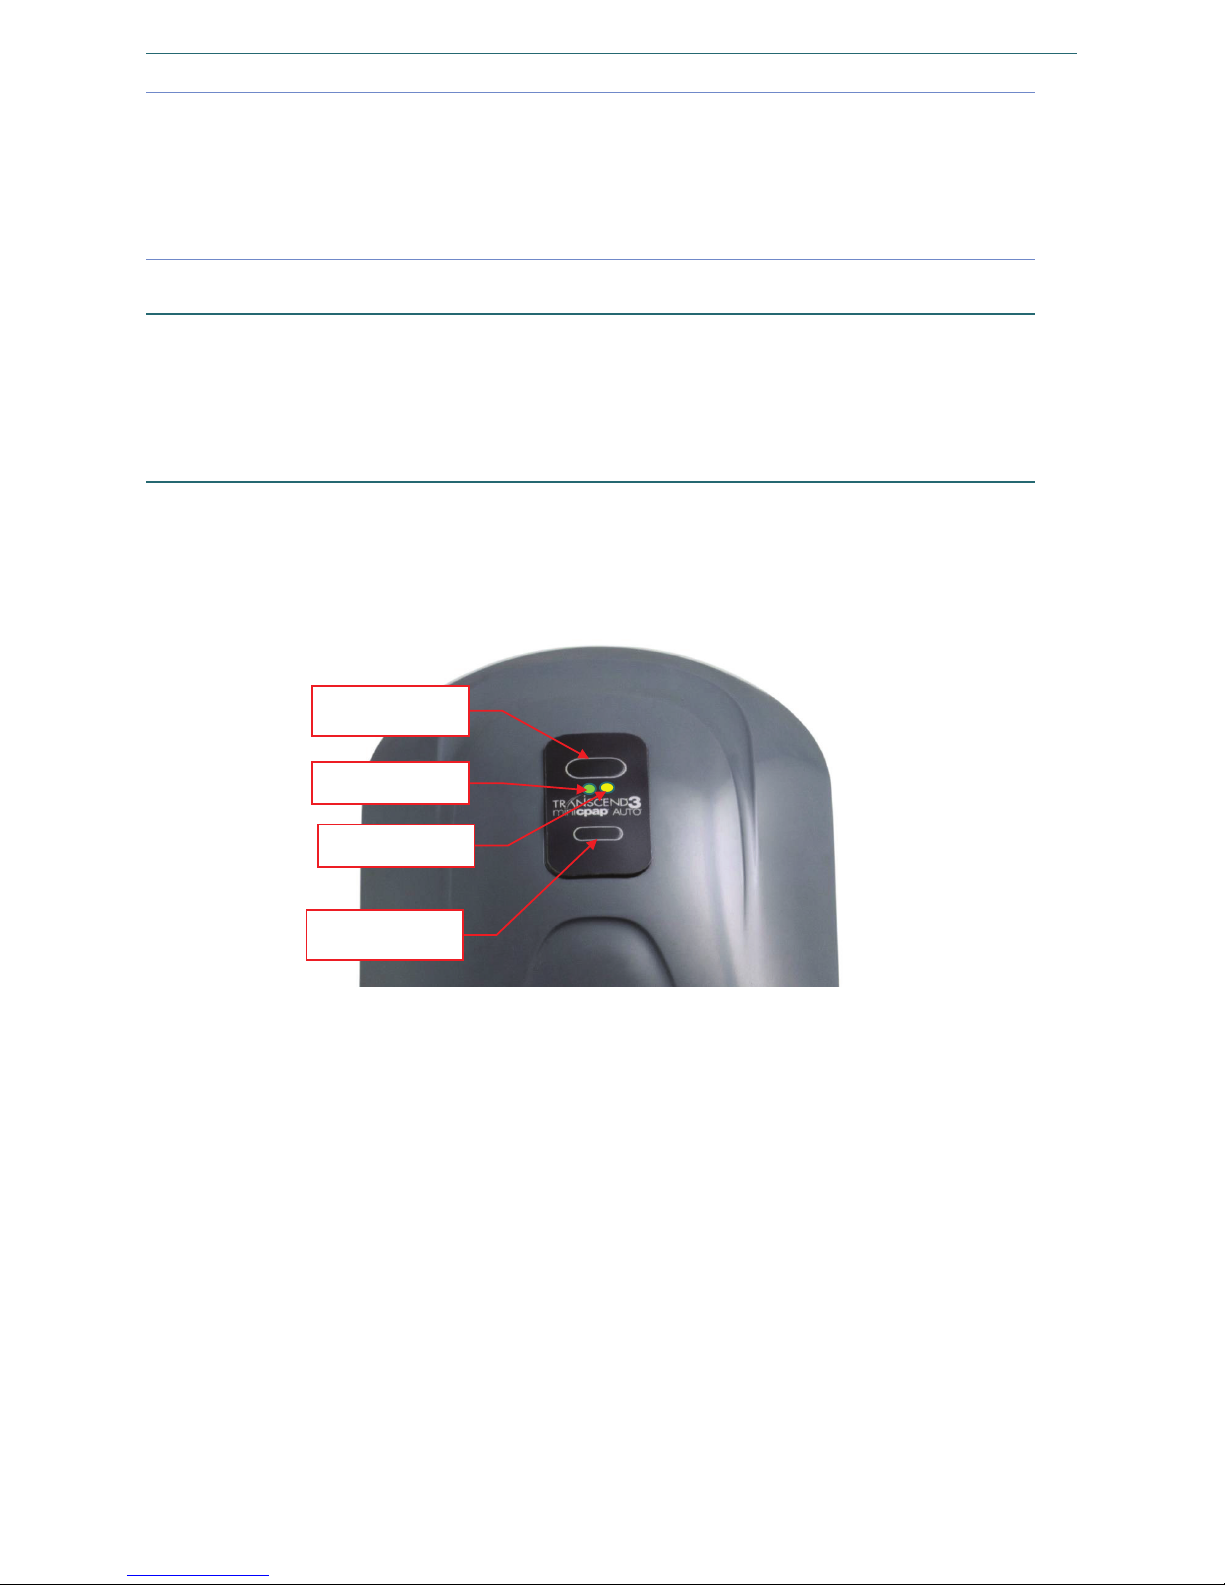
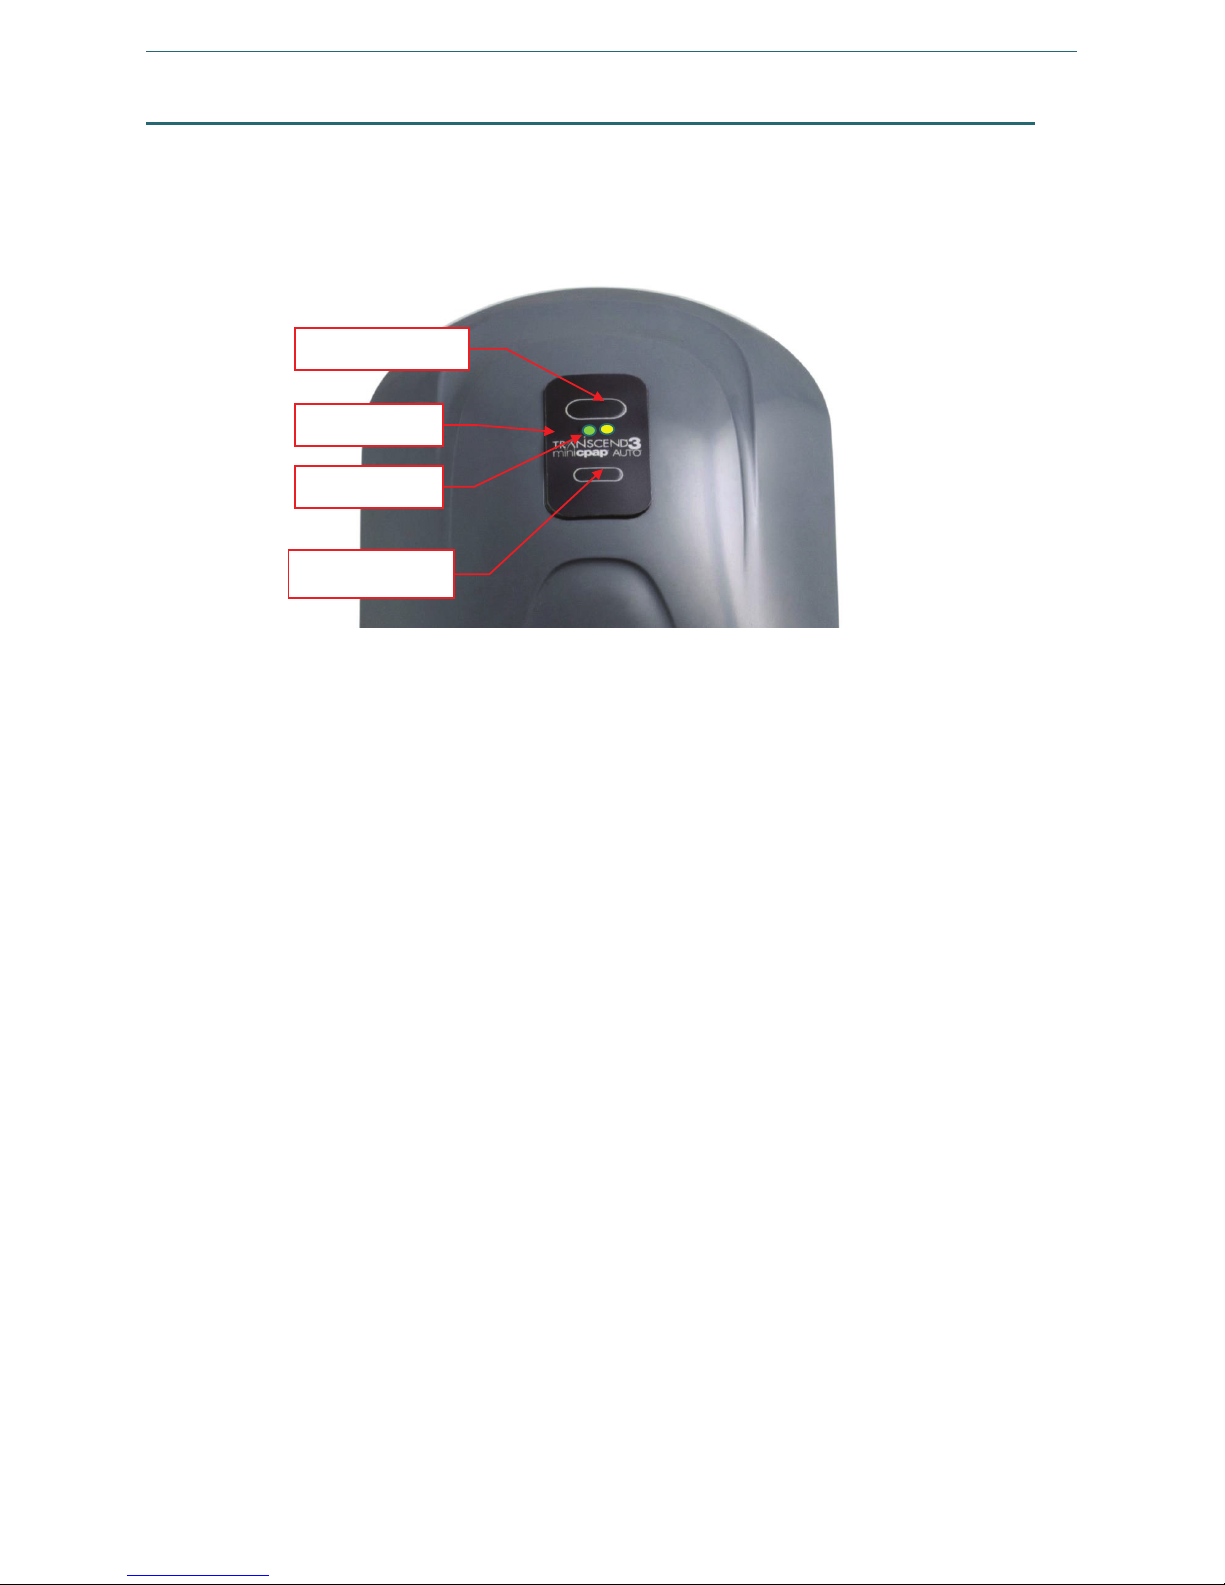
Control panel
The Transcend 3 miniCPAP control panel has two pushbuttons used to activate the blower
and the pressure ramp feature. There are also two LED lights, including a green LED for
indicating normal operational modes and a yellow LED that indicates fault conditions.
Power button
Ramp button
Green LED
Yellow LED
ENGLISH
Page 9
9
Transcend 3 miniCPAP Quick Guide Page 8
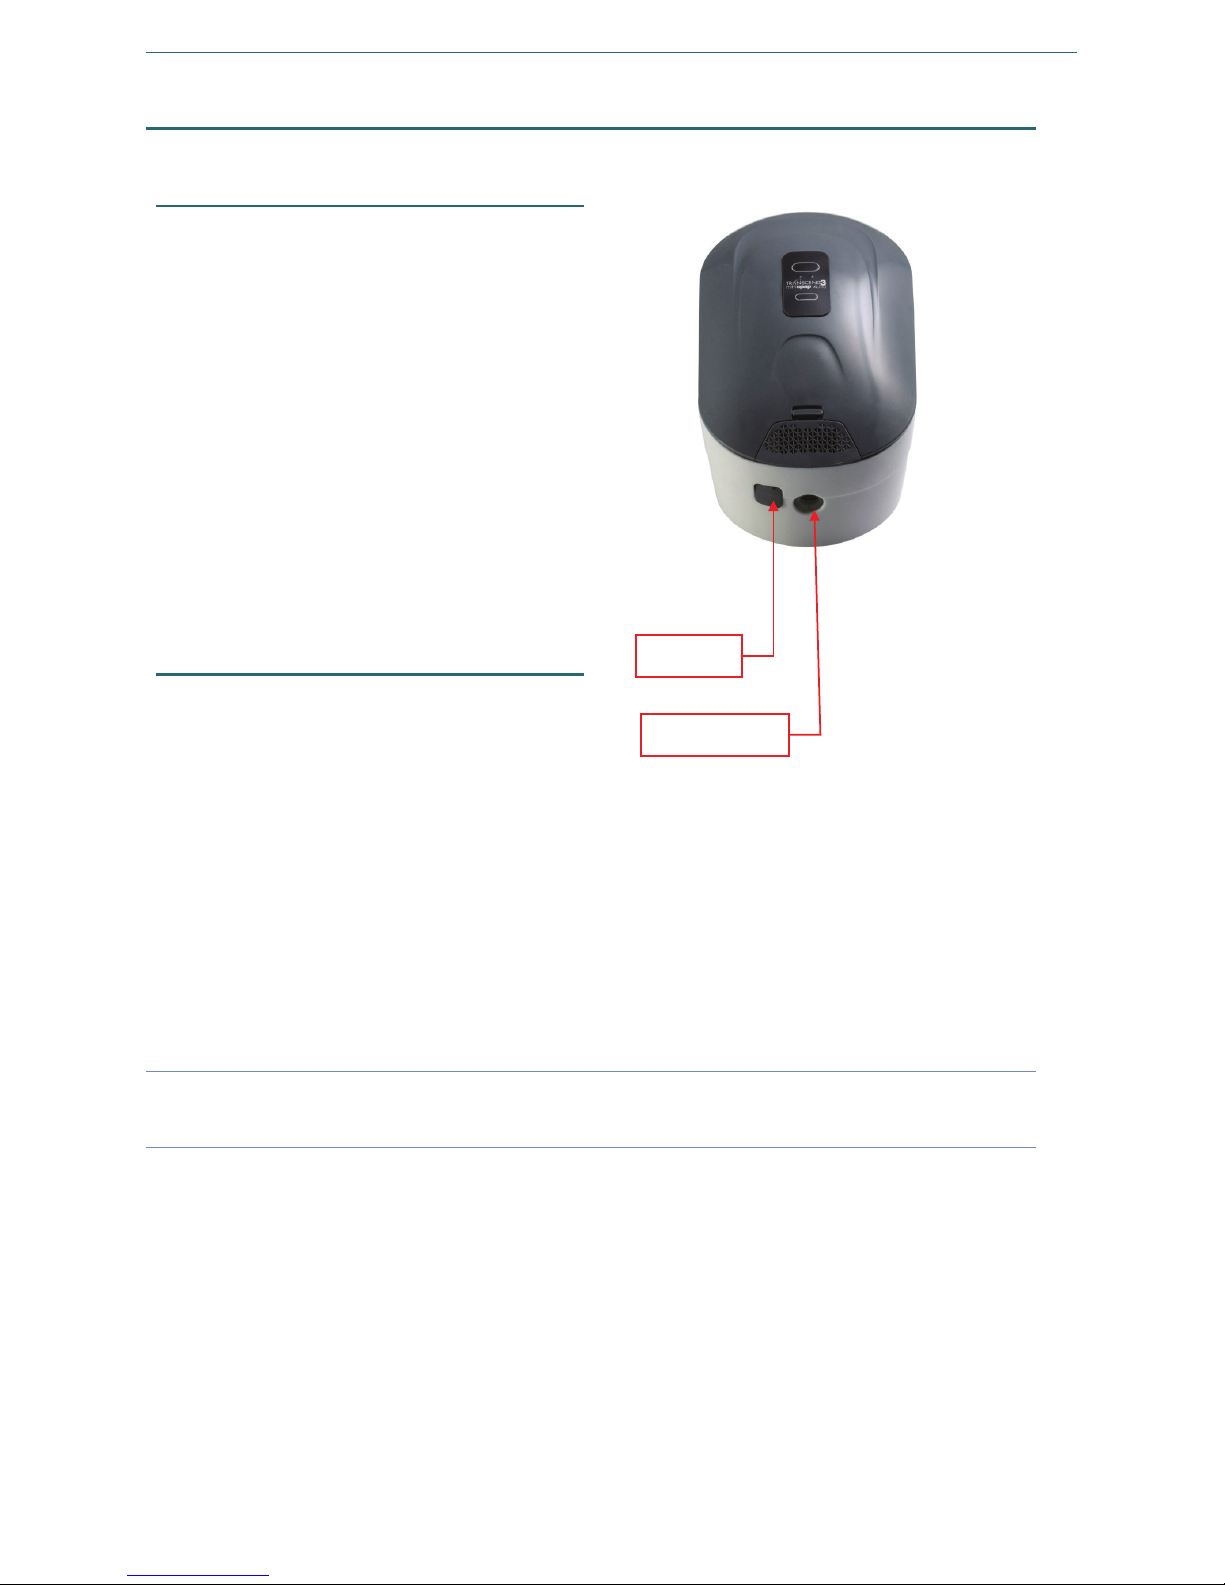
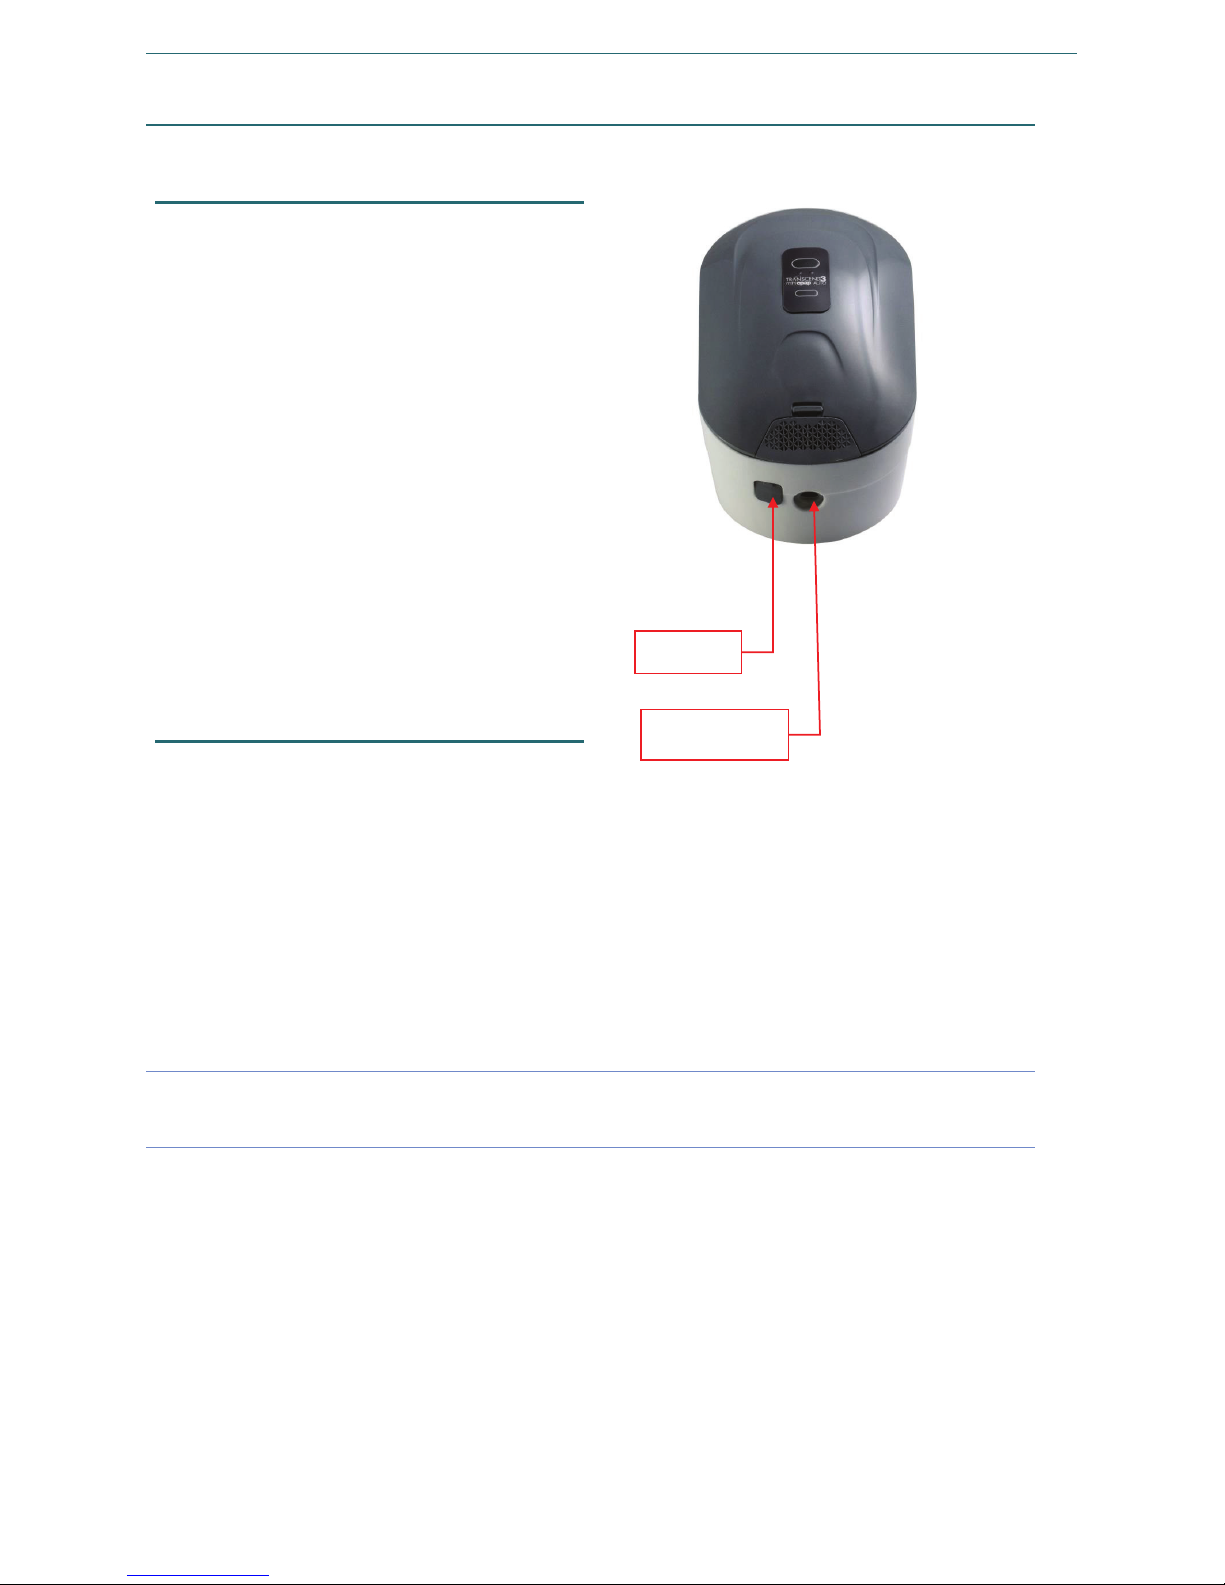
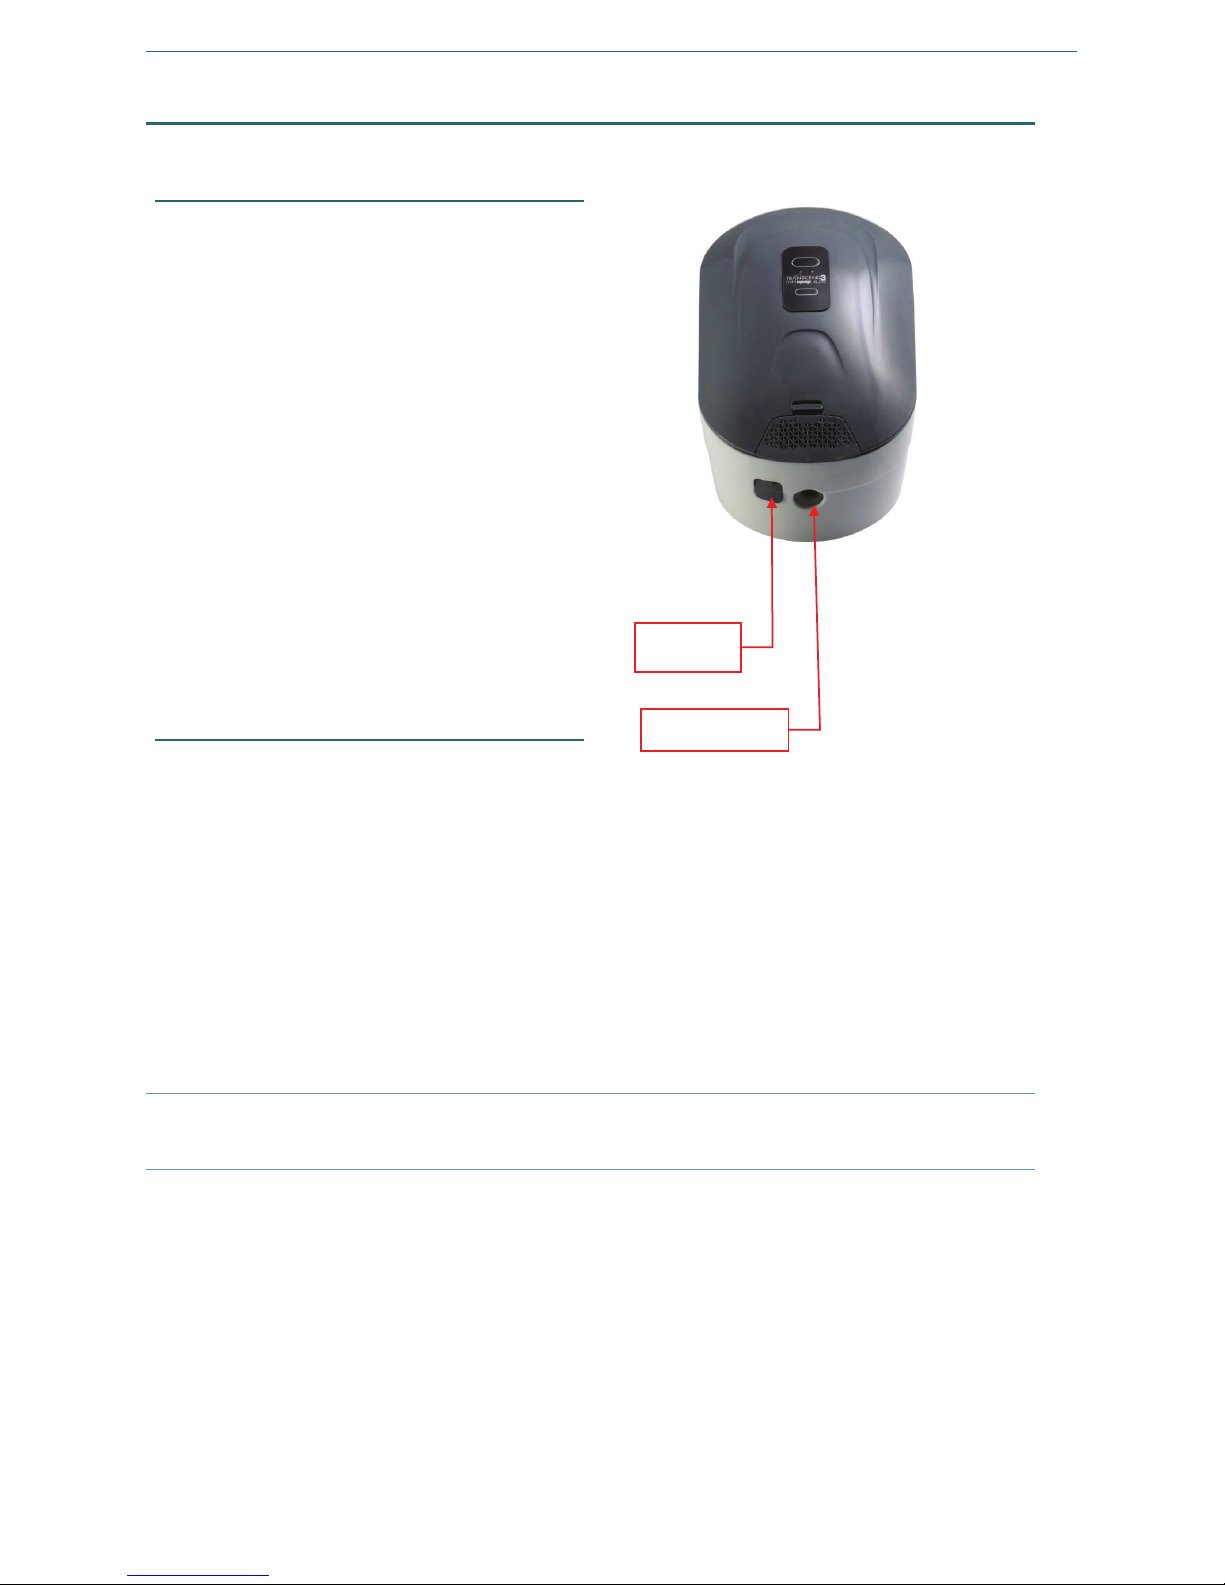
Power connection jack and USB port
Power Jack
The power jack accepts the barrel plug of
the output cable from a DC power source
to operate the Transcend 3 miniCPAP.
A variety of power sources may be used to
power the Transcend 3 miniCPAP. An AC to
DC converting power supply is provided
with your device and should be used when
powering the device by line (wall outlet)
power.
An optional mobile power adapter connects
to a DC power outlet, such as that found in
an Automobile, truck, RV, boat, or similar
vehicle.
Optional Transcend battery packs are also
available to power the Transcend 3
miniCPAP.
USB port
A mini-AB USB port is provided for direct
data exchange between the Transcend 3
miniCPAP and a computer via a USB data
cable. This interface allows the clinician to
configure the Transcend 3 miniCPAP for
prescription pressure, ramp settings and
Auto settings and provides access to
therapy compliance information that can
be viewed by the user and emailed to the
clinician.
Note It may be necessary to unplug the cables and reconnect to ensure a good
connection.
USB port
Power jack
ENGLISH
Page 10

10
Transcend 3 miniCPAP Quick Guide Page 9
Using the Transcend 3 miniCPAP
The control panel of the Transcend 3 miniCPAP has two pushbuttons that activate the
blower and initiate the pressure ramp feature. There are also two LED lights, including a
green LED for indicating normal operational modes and a yellow LED for indicating fault
conditions. The Transcend 3 miniCPAP operational status is displayed by LED illumination
states.
When a power source is connected to the device the Transcend 3 miniCPAP power-up LED
flash sequence should initiate. Once the power-up LED flash sequence is complete the LED
lights will turn off. This sequence indicates that power is being supplied to the Transcend
3 miniCPAP and that it has successfully entered Standby Mode. During therapy delivery,
the LED lights remain off to avoid disturbing the patient and/or bed partner.
Note If the Transcend 3 miniCPAP loses power while delivering therapy it will resume
delivering therapy as soon as power is restored and you press the power button.
The device will repeat the power-up LED flash sequence prior to the blower
restarting.
Standard user modes
Normal operation consists of four modes:
Off
When the device is not connected to a power source the device is off. Control
panel LEDs are both off.
Standby
When power is applied to the device it completes the power-up LED
sequence and enters Standby Mode. Standby Mode is also initiated by
pressing the power button when the device is in On Mode or if the mask is
removed while in On Mode. As long as power is supplied to the device it will
remain in Standby Mode until On or Drying Mode is initiated.
On
When in On Mode the blower is working and regulated device therapy
pressure is being generated. The LED lights remain off. On Mode is initiated
by pressing the power button when the device is in Standby Mode and the
mask is worn by the patient.
Drying
To initiate Drying Mode depress the Ramp button and press the Power button
simultaneously. When in Drying Mode the blower runs at a low speed for 30
minutes. During Drying Mode the LED lights remain off and blower pressure
is not regulated to provide therapy.
ENGLISH
Page 11

11
Transcend 3 miniCPAP Quick Guide Page 10
Starting therapy
• Connect the Transcend 3 miniCPAP to a power source and allow it to enter Standby
Mode.
• Be sure your user interface is fit firmly in place before initiating therapy.
• To initiate therapy press the Power button. Pressing the Power button when Transcend
3 miniCPAP is in Standby Mode will initiate On Mode. Air flow will begin as the blower
delivers or ramps to prescribed therapy pressure.
Using the ramp function
The Ramp feature lets users acclimate to air flow by starting at a lower pressure and
gradually increasing to the prescribed pressure setting as the user falls asleep. The
software section of this manual displays how to modify ramp settings on your device.
To accelerate the rate of the pressure increase during Ramp, hold the Ramp button down
until the device reaches a comfortable therapy pressure. When the Ramp button is
released the device will continue in Ramp Mode until it reaches the prescribed therapy
pressure.
• Be sure the Transcend 3 miniCPAP is in On Mode. If not, press the power button.
• Adjust your mask to eliminate mask leaks.
• Press the Ramp button. The pressure will drop to the Ramp starting pressure and will
gradually increase over a preset length of time until reaching the prescribed therapy
pressure.
Note Momentarily pressing the Ramp button during ramped pressure delivery will not
affect the pressure delivered. To stop the gradual pressure increase of the ramp
function, turn off the device by pressing the Power button. The next time the
blower is turned on it will deliver the prescribed therapy pressure.
Note In the event of power loss during ramp, the Transcend 3 miniCPAP will resume at
the full prescribed pressure as soon as power is restored.
Using the EZEX function
The EZEX function is a special feature that decreases therapy pressure on exhalation.
This feature is designed to provide additional comfort to the patient by reducing the
amount of resistance they experience as they exhale.
There are four EZEX settings: OFF, 1, 2 or 3; progressively increasing the amount of
pressure relief from none to maximum. The software section of the user manual displays
how to modify EZEX settings.
Note: To download the Transcend 3 miniCPAP user manual visit
www.mytranscend.com/support or call Somnetics customer service at 877-621-9626 to
request a copy.
ENGLISH
Page 12
12
Transcend 3 miniCPAP Quick Guide Page 11
Ending therapy
To end the delivery of therapy while the blower is on, press the Power button to
deactivate the blower and return the device to Standby Mode. It is recommended the
user initiate the Drying Mode function after each therapy session to dry the device
interior.
Drying mode
At the end of each therapy session it is recommended the user initiates the Drying Mode.
To initiate Drying Mode depress the Ramp button and press the Power button
simultaneously. When in Drying Mode the blower runs at a low speed for 30 minutes.
During Drying Mode the LED lights remain off and blower pressure is not regulated to
provide therapy. Using the Drying Mode flushes air through the system to remove traces
of moisture from the interior of the device and airway circuit. After the 30-minute drying
cycle, the blower will turn off and the device will automatically enter Standby Mode.
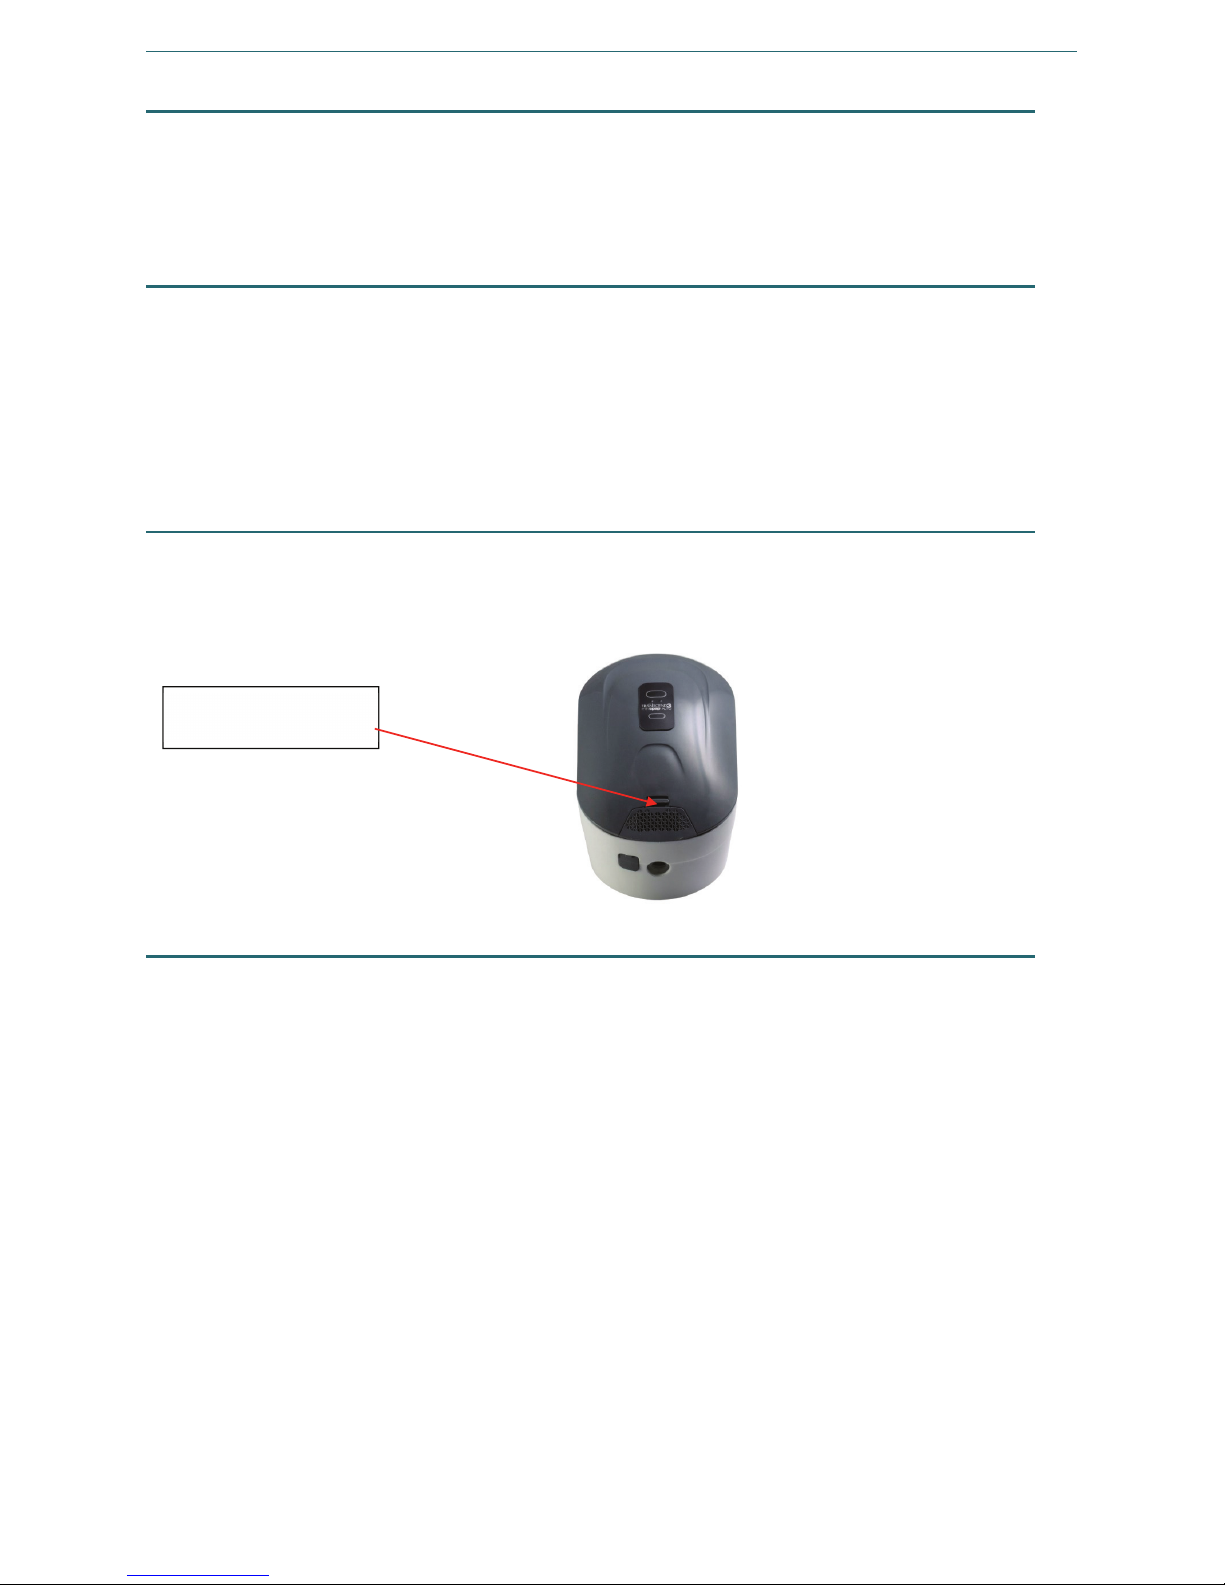
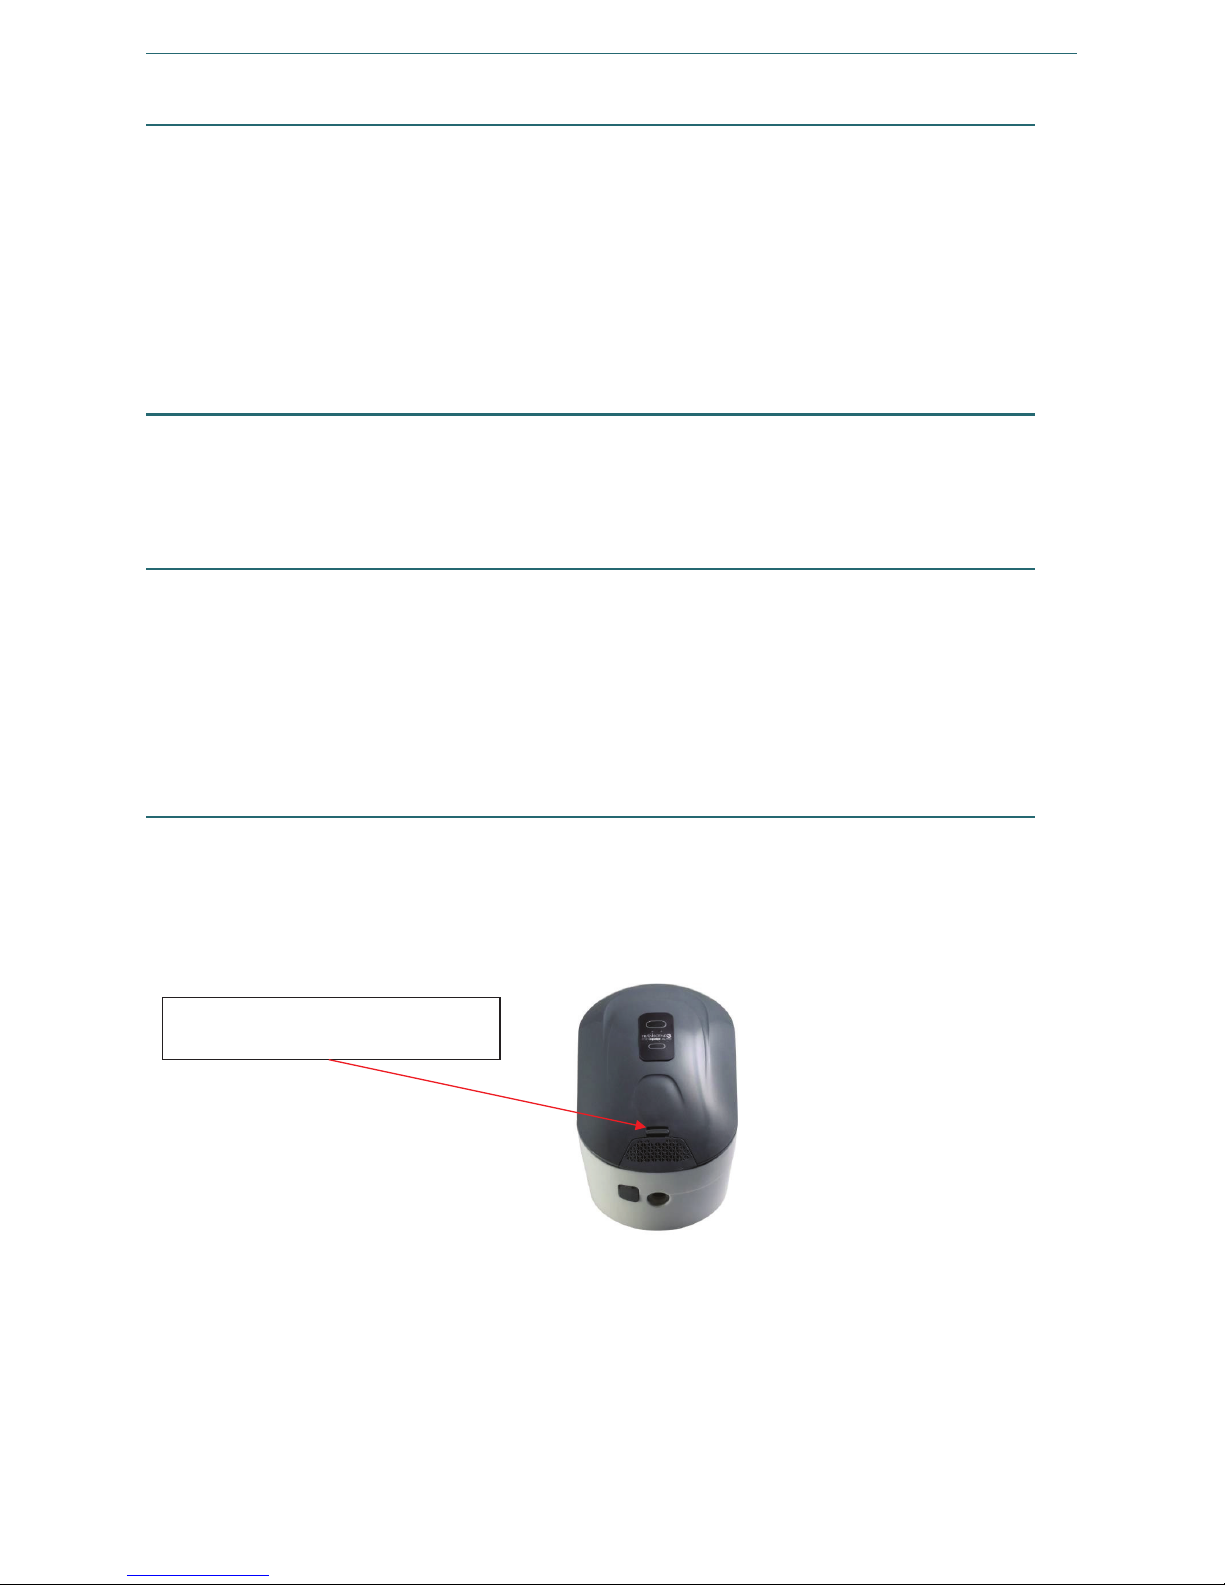
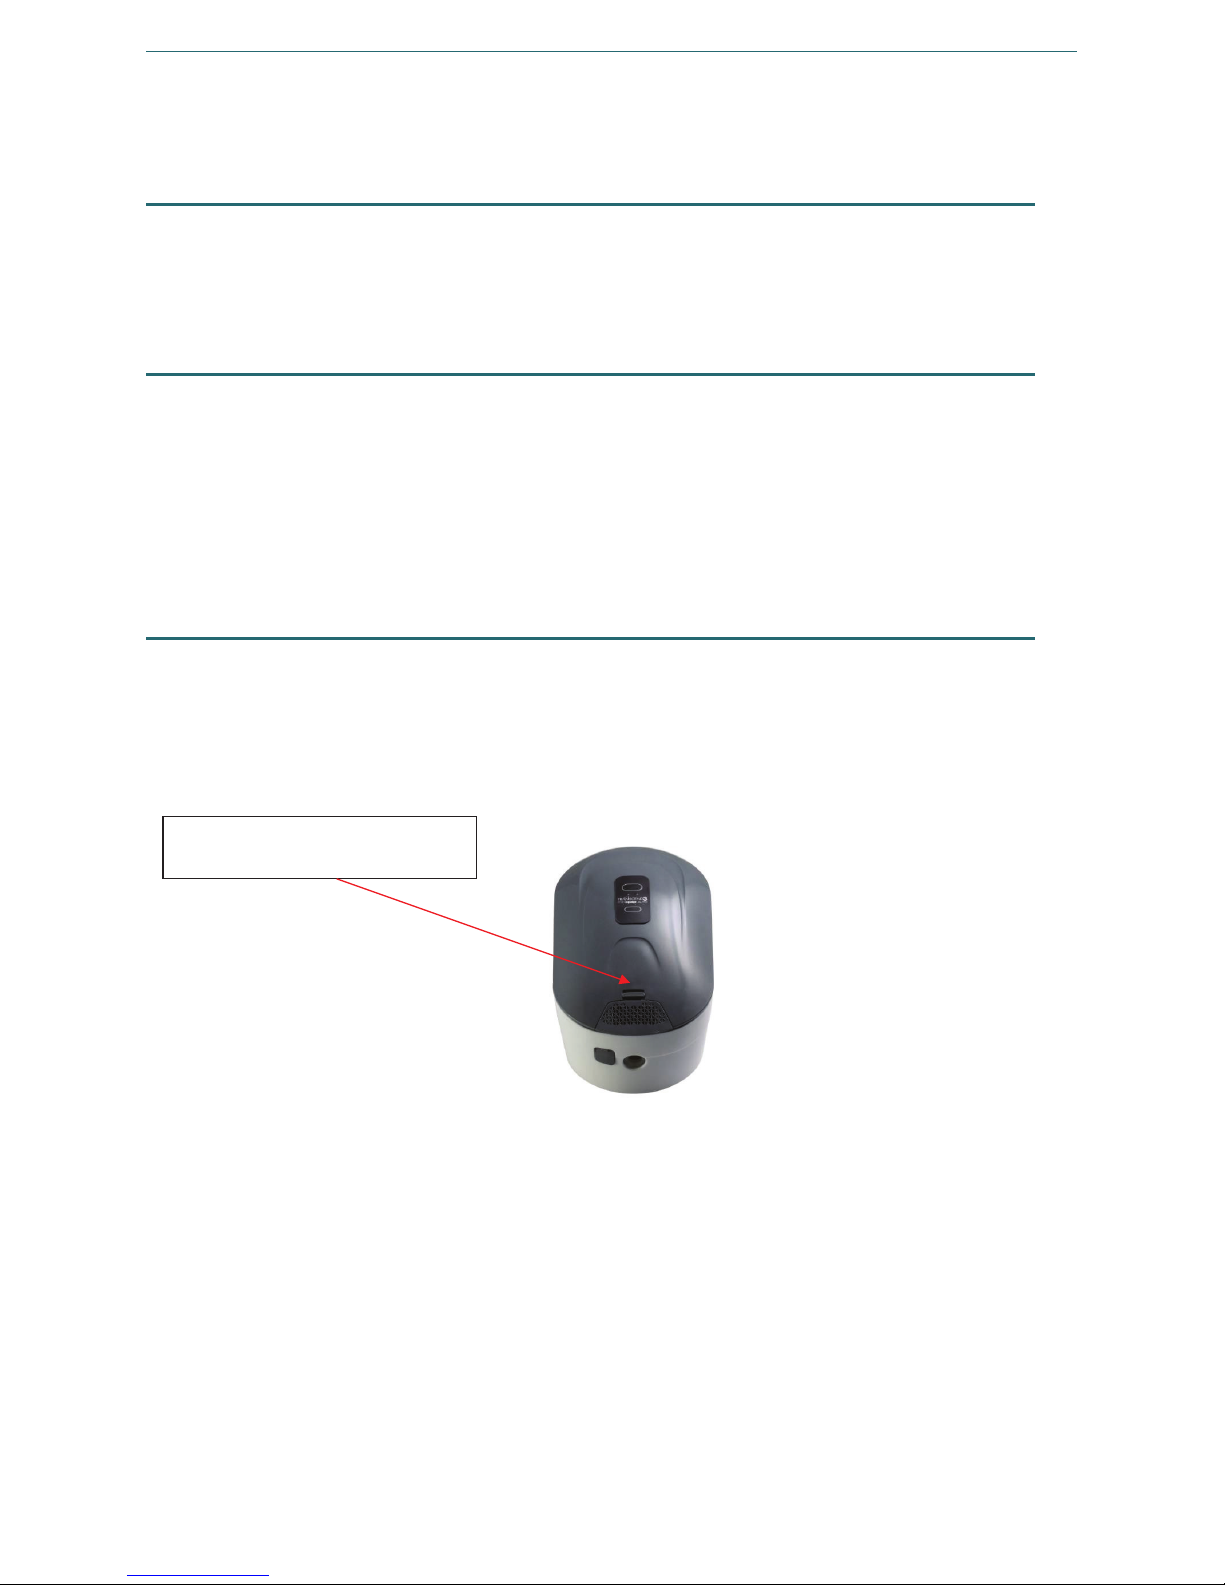
Replacing the Filter Media
The Transcend 3 miniCPAP Filter Media should be replaced every six months at minimum.
Remove the filter assembly by pulling the tab on the back of the device to release it. Then
pull the filter assembly away from the device. Discard the entire filter assembly and
replace with a new one.
Caring for your Transcend 3 miniCPAP and its components
Warnings:
• Unplug the Transcend 3 miniCPAP before cleaning.
• Do not submerge the Transcend 3 miniCPAP or power supply in liquid.
• Prevent water from entering any openings of the device.
• Do not use harsh or abrasive cleaning agents to clean the device or any
components.
• Do not attempt to sterilize the Transcend 3 miniCPAP.
• Do not place cleaning materials, such as a cloth or liquid, into the device air inlet or
air outlet connector.
Pull tab to release
filter assembly.
ENGLISH
Page 13

13
Transcend 3 miniCPAP Quick Guide Page 12
Cleaning the Exterior
Follow these instructions to clean the exterior of the Transcend 3 miniCPAP.
1. Unplug the power supply prior to cleaning and disconnect the device from power cords.
2. Mix a solution of 5% mild liquid detergent in distilled water (1.6 fl oz liquid detergent
per quart of distilled water). Mild detergent should contain biodegradable anionic
surfactants and no phosphate.
3. Submerge a lint-free cotton cloth into the detergent solution.
4. Wring excess water from the cloth then wipe the exterior of the Transcend 3 miniCPAP
device for approximately 20 seconds using a gentle, back and forth wiping motion from
the front to back of the device. Apply firm pressure and ensure contact with all
accessible contact surfaces to adequately remove soil buildup.
5. Rinse the cloth in clear water to remove residual cleaning solution.
6. Wring excess water from the cloth then wipe the Transcend 3 miniCPAP using a gentle
front to back wiping motion to remove any detergent solution remaining on its surface.
Wipe the device with a dry, lint-free cotton cloth until the device is fully dry.
Cleaning of Accessories
The following accessory should be cleaned with a 5% solution of mild liquid detergent in
distilled water (1.6 fl oz liquid cleaning detergent per quart of distilled water). Mild
detergent should contain biodegradable anionic surfactants and no phosphate. Follow
these steps to clean the accessories.
Accessory Periodic Cleaning Cycle Product Service Life
Air Supply Tube
Daily
3-Month
1. Fully immerse the air supply tube in the cleaning solution.
2. While immersed, thoroughly wipe the surface with a lint-free cotton cloth. Apply firm
pressure and ensure contact with all accessible contact surfaces to adequately remove
soil buildup.
3. Clean the inside of the air supply tube by lifting, then lowering the ends of the tube
while the tube is filled with cleaning solution.
4. Rinse air supply tube by immersing in distilled water. Move the air supply tube in a
back and forth motion for approximately10 seconds to remove cleaning agent residue.
5. Rinse the air supply tube in distilled water by fully immersing. Lift, then lower, the
ends of the tube while the tube is filled with water. Repeat this motion for
approximately 10 seconds to remove cleaning agent residue.
6. Dry the outside of the air supply tube with a dry, lint-free cotton cloth. Allow the tube
to air dry until the inside of the tube is dry. Length of drying time will depend on
ambient conditions.
ENGLISH
Page 14
14
Transcend 3 miniCPAP Quick Guide Page 13
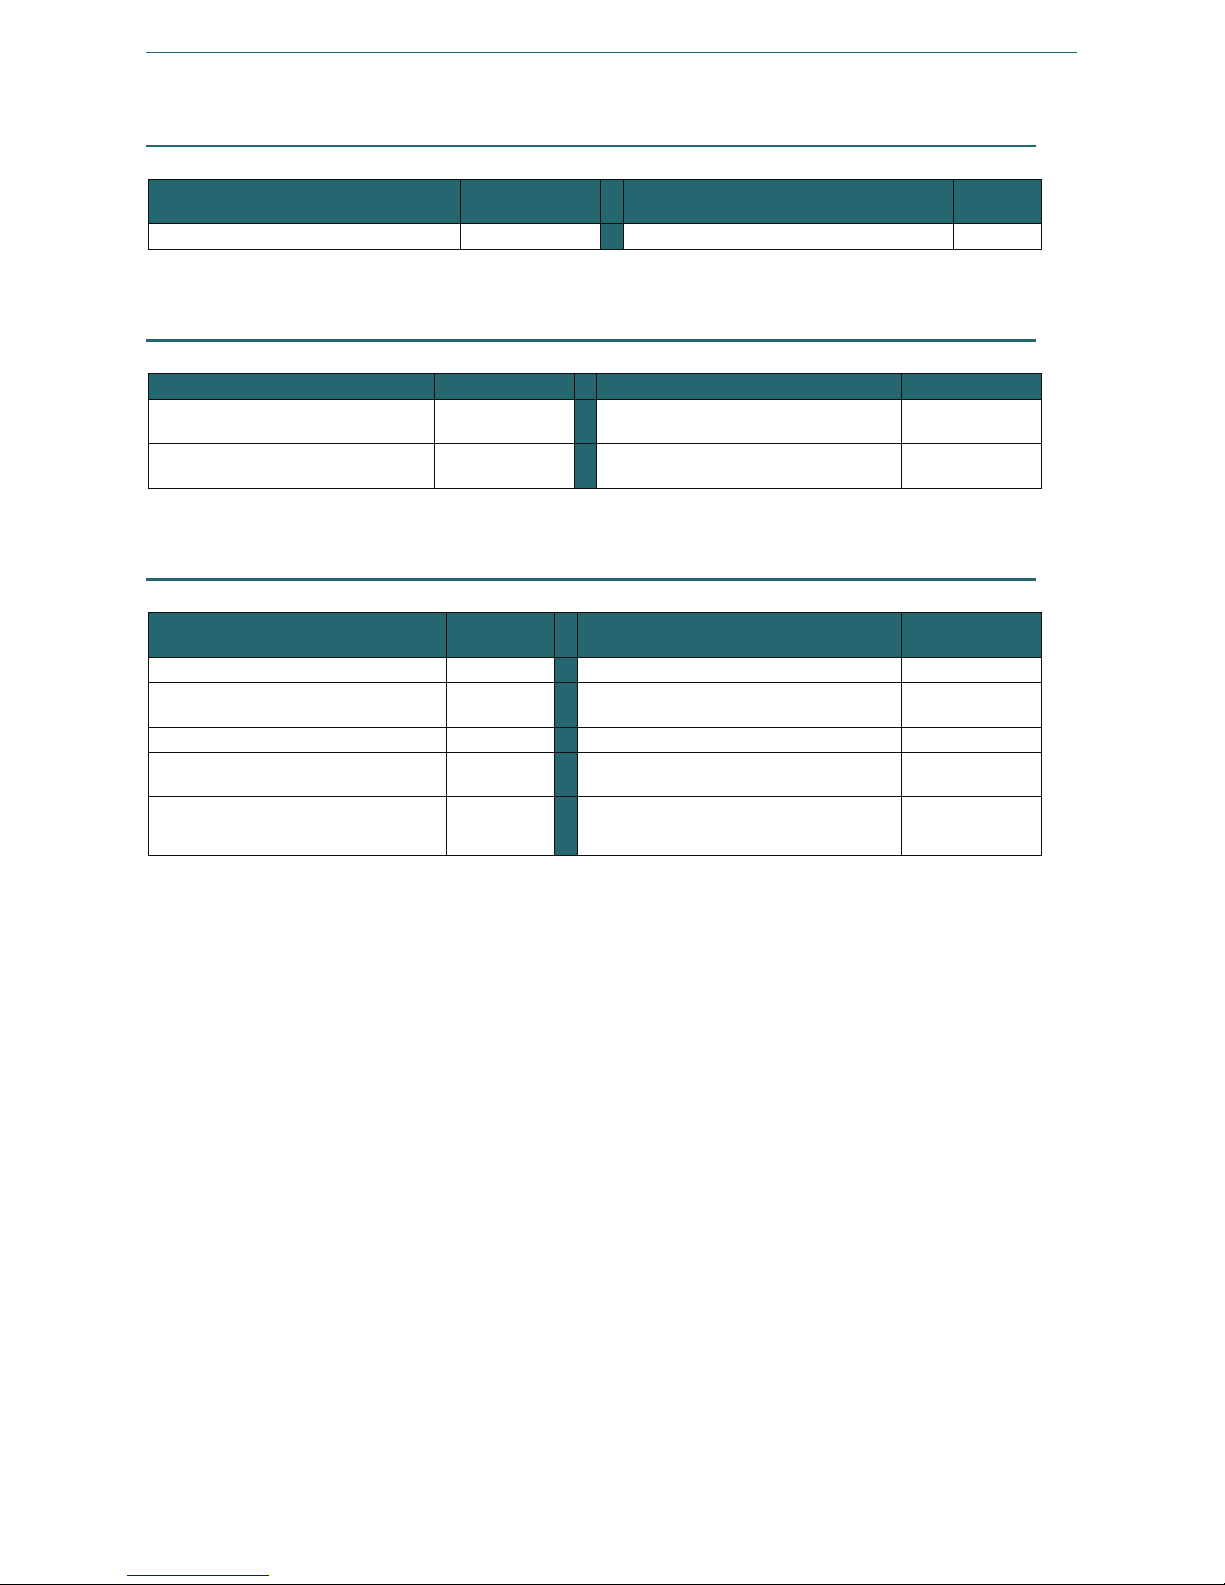
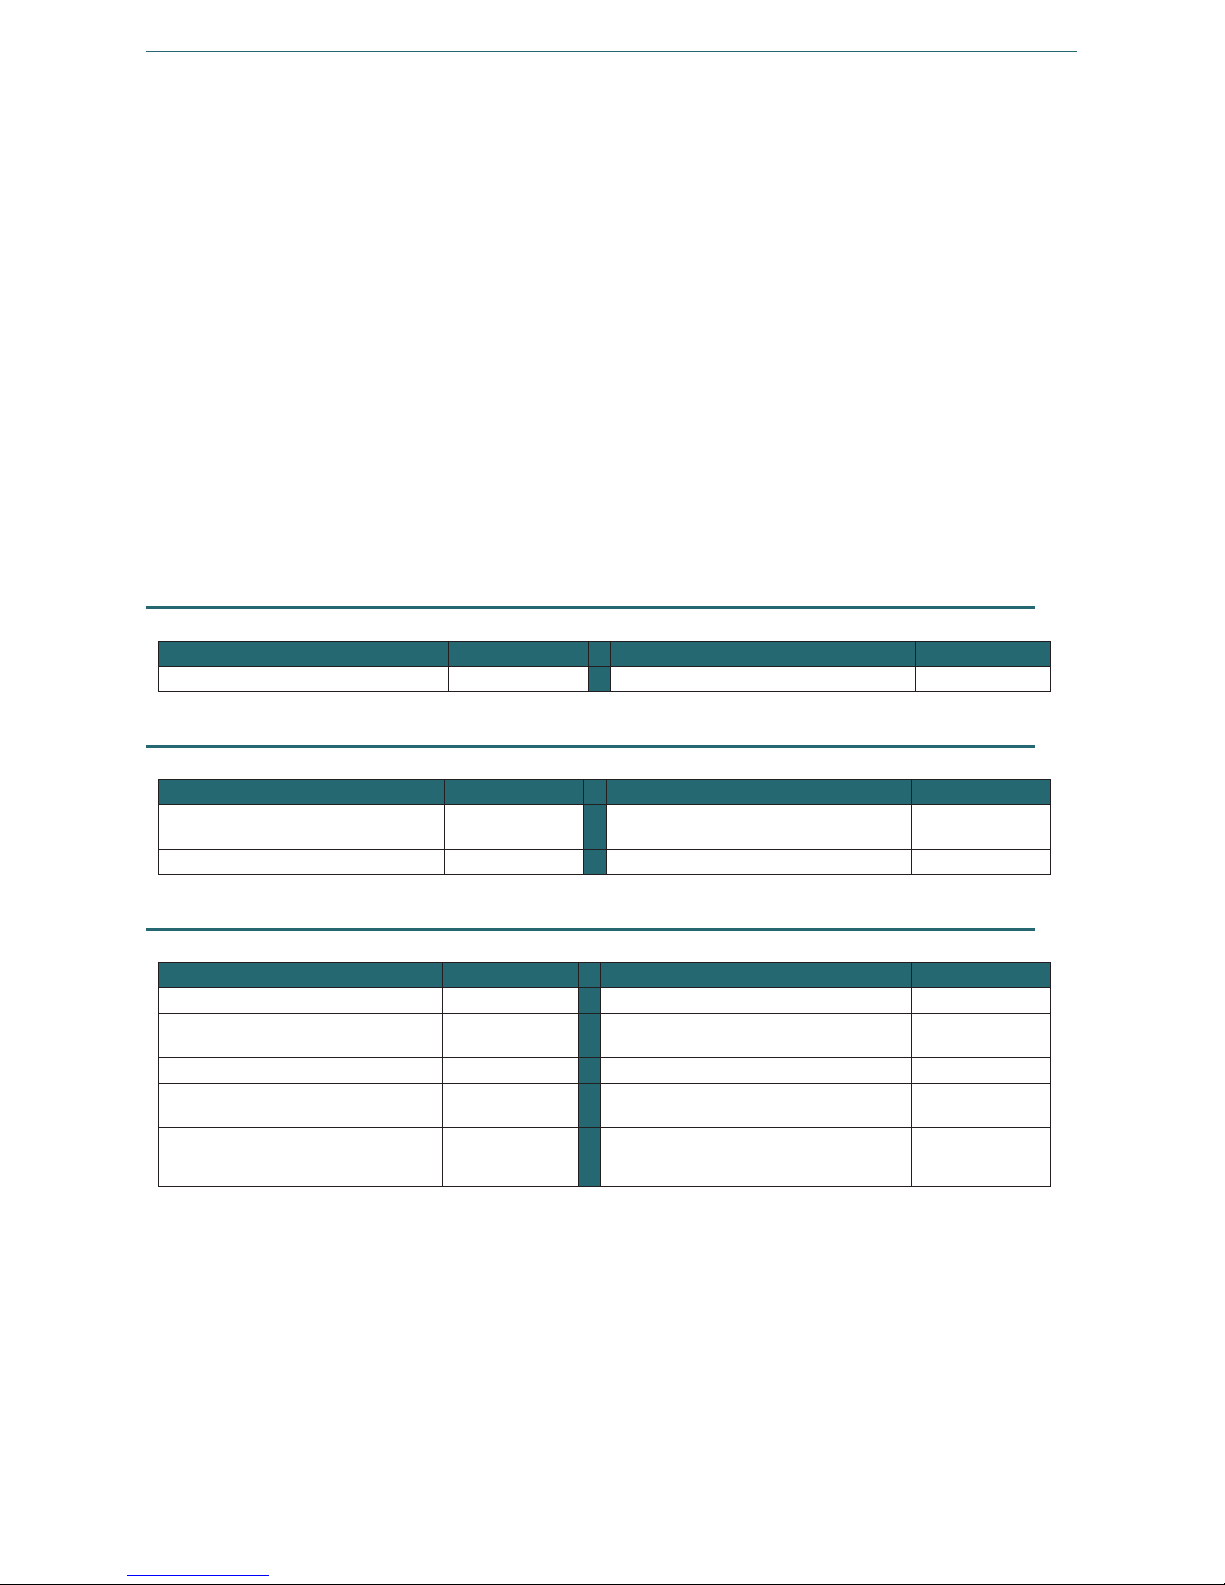
Disposable parts
Item Part number Item Part
number
Transcend 3 Filter Assembly
503109
Standard 6-foot hose
503081
Accessories
Item
Part number
Item
Part number
Transcend P8 Battery
503023
Transcend Mobile Power Adapter
(MPA1)
503029
Transcend P4 Battery
503026
Transcend Portable Solar Battery
Charger
503056
Replacement parts
Item Part
number
Item Part number
Transcend 3 miniCPAP Auto
503104
Transcend Travel Bag
503012
Transcend 3 miniCPAP Auto
Service Unit
503105
Multi-plug Universal Power Supply
(PSA2)
503059
Transcend 3 miniCPAP
503106
Changeable Plug Pack
503060
Transcend 3 miniCPAP Service
Unit
503107
USB cable
503020
Multi-plug Universal Power Supply
Set
(Contains 503059 & 503060)
503078
ENGLISH
Page 15
15
Transcend 3 miniCPAP™
Guide rapide
FRANÇAIS
Page 16

16
Guide rapide Transcend 3 miniCPAP Page 2
Introduction
Merci d'avoir choisi Transcend., chef de file de l’innovation en matière de systèmes
de traitement CPAP portables. Le système Transcend 3 miniCPAP fournit une pression
positive aux utilisateurs dans une plage de 4 à 20 cmH
2
O, telle que prescrite par le
médecin. La gamme de produits Transcend 3 miniCPAP inclut le Transcend 3 miniCPAP et
le Transcend 3 miniCPAP Auto. Les boutons et les voyants lumineux facilitent le contrôle
et fournissent un feedback opérationnel. Une prise d’alimentation en courant continu
et un port USB sont également inclus dans l’appareil Transcend 3 miniCPAP.
Remarque : Pour obtenir une description plus détaillée de l’appareil, ainsi
que des procédures de dépannage, consultez le manuel utilisateur du
Transcend 3 miniCPAP sur www.mytranscend.com/support. Vous pouvez
également contacter le service client Somnetics au 877-621-9626 pour
en demander un exemplaire.
Précautions lors de l’utilisation d’un ordinateur avec
Transcend 3 miniCPAP
Conformément aux règlementations de sécurité CEI 60601-1-1, les précautions suivantes
sont nécessaires à la sécurité du patient et/ou de l’opérateur informatique.
Définitions Les ordinateurs conformes aux normes de sécurité 60950-1 respectent les
normes de sécurité UL 60950-1 ou CEI 60950-1.
• Seul un ordinateur conforme aux normes de sécurité 60950-1 peut être connecté au port
USB du Transcend 3 miniCPAP. La connexion de tout autre périphérique au port USB du
Transcend 3 miniCPAP peut endommager le système Transcend et mettre en danger
l’utilisateur.
• Afin de réduire le risque de courant de fuite, utilisez un transformateur de séparation
conforme à la norme CEI 60601-1 pour alimenter l’ordinateur.
• Ne branchez pas l’ordinateur conforme aux normes de sécurité 60950-1 ou le système
Transcend sur une multiprise.
• Suivez les consignes de nettoyage du fabricant de l’ordinateur conforme aux normes de
sécurité 60950-1.
• Suivez les consignes d’entretien préventif du fabricant de l’ordinateur conforme aux normes
de sécurité 60950-1.
• Ne connectez pas l’ordinateur conforme aux normes de sécurité 60950-1 au port USB du
Transcend 3 miniCPAP lors de l’exécution de travaux d’entretien préventif.
• Ne touchez pas l’ordinateur conforme aux normes de sécurité 60950-1 en même temps
qu’une partie métallique exposée du système Transcend 3 miniCPAP ou des câbles du
système Transcend 3 miniCPAP.
• Ne touchez aucune partie métallique exposée de l’ordinateur conforme aux normes de
sécurité 60950-1, des connecteurs ou des câbles
• Les médecins ne doivent pas toucher simultanément l’ordinateur conforme aux normes de
sécurité 60950-1 et le patient.
• N’utilisez pas d’ordinateurs sur lesquels la tension interne est accessible sans l’aide d’outils.
FRANÇAIS
Page 17

17
Guide rapide Transcend 3 miniCPAP Page 3
Avertissements
Empêchez l’eau de pénétrer dans l’appareil. L’appareil Transcend 3 miniCPAP ne
doit pas être conservé dans un environnement humide.
Cet appareil n’a pas pour but de maintenir la vie.
Le système Transcend 3 miniCPAP doit être configuré et ajusté par un professionnel
de la santé formé avant d’être utilisé pour la phase d’augmentation et la pression
de traitement.
La température de l’air produit par l’appareil peut être supérieure d’environ -12 °C
(10 °F) à celle de la pièce. Soyez vigilant si la température de la pièce dépasse
32 °C (90 °F).
Ne bloquez pas et n’obstruez pas les orifices d’expiration du masque. Respectez les
instructions du fabricant incluses avec le masque.
Cet équipement n’est pas compatible avec l’utilisation d’oxygène. De même, ne
l’utilisez pas en présence d’un mélange anesthésique inflammable d’air ou d’oxygène
ou avec du protoxyde d’azote. Les sources d'oxygène doivent être situées à plus
de 1 mètre de l'équipement, afin d'éviter tout risque d'incendie et de brûlure.
Le système Transcend 3 miniCPAP doit uniquement être utilisé avec les accessoires
fournis et recommandés. L’utilisation d’accessoires non recommandés peut
provoquer une augmentation des émissions électromagnétiques ou une diminution
de l’immunité électromagnétique du système de PAP et peut être potentiellement
dangereuse.
Le système Transcend 3 miniCPAP n’est pas anti-défibrillateur.
Ne tentez pas de stériliser l’appareil Transcend 3 miniCPAP.
Si l’appareil est utilisé par plusieurs patients, un filtre antibactérien stoppant le flux
principal des bactéries doit être installé entre l’appareil et le tuyau du circuit
respiratoire afin d’empêcher toute contamination.
L’appareil doit être utilisé uniquement avec des masques et des connecteurs
recommandés par Somnetics ou par un professionnel de la santé. Utilisez le
masque uniquement lorsque l’appareil est sous tension et délivre la phase
d’augmentation ou la pression de traitement. Les orifices d’expiration reliés
au masque ne doivent jamais être bloqués. Explication de cet avertissement :
l’appareil est conçu pour fonctionner avec des masques et des connecteurs spéciaux
dotés d’orifices d’expiration permettant à l’air de sortir continuellement du masque.
Lorsque l’appareil est en fonctionnement, l’air frais de l’appareil chasse l’air expiré,
via les orifices d’expiration du masque. Cependant, lorsque l’appareil est hors
tension, il n’y a pas assez d’air frais apporté dans le masque et il est possible
que de l’air expiré soit de nouveau inhalé.
Le fait de ne pas utiliser un masque ou un accessoire qui réduit au minimum la
réinspiration de dioxyde de carbone ou qui permet une respiration spontanée peut
entraîner une asphyxie.
Ne placez pas l'équipement dans le lit. Le fait de recouvrir les tuyaux respiratoires
d'une couverture ou de les chauffer peut affecter la qualité du traitement ou blesser
l'utilisateur.
Pour éviter le débranchement du tuyau pendant l'utilisation, seuls des tuyaux
conformes à la norme ISO 5367 ou ISO 80601-2-74 doivent être utilisés.
FRANÇAIS
Page 18

18
Guide rapide Transcend 3 miniCPAP Page 4
Risque de strangulation avec le cordon d'alimentation et le tuyau d'air. Ces deux
éléments peuvent s'entourer autour du cou et ÉTRANGLER. Tenez le cordon
d'alimentation et le tuyau d'air à plus d'un mètre du berceau et hors de portée
d'un bébé. Tenez le cordon et le tuyau hors de portée des enfants.
Il existe peu de risque que de petites pièces s'échappent du boîtier du
Transcend 3 miniCPAP ; cependant, en cas de dommage important, des
composants internes peuvent se briser et représenter un risque d'étouffement
en cas d'ingestion s'ils sortent du boîtier.
Mises en garde
Selon la loi fédérale américaine, cet appareil ne peut être vendu que par un
médecin ou sur ordonnance d’un médecin.
Branchez le système Transcend 3 miniCPAP uniquement avec l’alimentation,
l’adaptateur mobile ou les batteries fournis par Somnetics.
En cas d’irritation des voies respiratoires ou d’irritations cutanées, cessez d’utiliser
l’appareil Transcend 3 miniCPAP et contactez votre médecin.
N’introduisez pas d’objets dans les systèmes d’entrée ou de sortie d’air de l’appareil
Transcend 3 miniCPAP.
Avant chaque utilisation, vérifiez que l’alimentation ne présente pas de signes
d’usure ou de détérioration. Si nécessaire, remplacez le cordon d’alimentation.
Somnectics recommande de remplacer le tuyau (flexible) d’alimentation en air
après trois mois d’utilisation.
Par souci environnemental, certains éléments et accessoires du système
Transcend 3 miniCPAP, dont les batteries optionnelles, doivent être mis au rebut
conformément aux réglementations locales en vigueur.
L'équipement ne doit pas être recouvert ou positionné de telle sorte que le
fonctionnement ou les performances de l'équipement soient affectés négativement, car
cela risque de provoquer également un problème de sécurité. En voici des exemples :
o L'équipement ne doit pas être placé dans un lit.
o L'équipement ne doit pas être placé ailleurs que sur une surface stable et plane.
o Ne placez pas l'appareil dans un endroit dans lequel les animaux
domestiques ou les enfants peuvent accéder à l'équipement.
o Ne le placez pas vers une fenêtre ouverte ou à tout autre endroit où la
poussière ou les parasites nuisibles (insectes) peuvent affecter la sécurité
et/ou les performances de l'équipement.
o Ne placez pas l'appareil à côté d'un rideau (qui bloque le flux d'air de
refroidissement, ce qui entraîne une surchauffe de l'équipement).
o N'obstruez pas l'orifice d'admission d'air, pour ne pas interférer avec
le traitement.
DBP
L'appareil contient du DBP (un phtalate). Une exposition importante au DBP
peut interférer avec le développement normal de l'appareil reproducteur
masculin. Les essais ont démontré que les niveaux d'exposition au DBP sont
bien inférieurs aux limites établies. Les femmes enceintes ou qui allaitent
peuvent discuter des avantages et des risques de cet appareil avec un médecin.
FRANÇAIS
Page 19
19
Guide rapide Transcend 3 miniCPAP Page 5
Composants du Transcend 3 miniCPAP
À la réception du système Transcend, sortez tous les éléments de l’emballage et vérifiez
qu’ils n’ont pas été endommagés pendant le transport. Signalez les dommages ou
éléments manquants au fournisseur santé qui vous a procuré le produit.
1 Transcend 3 miniCPAP Auto ou
Transcend 3 miniCPAP
2 Tube d'alimentation en air (compatible
avec le connecteur standard 22 mm)
3 Alimentation universelle multiprise
(PSA2)
4 Lot de fiches interchangeables
5 Sac de transport Transcend
6 Guide rapide du Transcend 3 miniCPAP
7 Câble USB
Accessoires non inclus (vendus séparément)
Adaptateur électrique mobile Transcend
Batterie P
4
Transcend
Batterie P
8
Transcend
Transcend Portable Solar Charger (à utiliser comme source de chargement
alternative pour les batteries Transcend P
4
et P8)
Masque patient
1
2
4
3
7
5
6
FRANÇAIS
Page 20
20
Guide rapide Transcend 3 miniCPAP Page 6
Assemblage du système Transcend 3 miniCPAP
1. Fixez le tuyau d'alimentation d'air sur la sortie d'air de l'appareil
Transcend 3 miniCPAP.
2. Branchez le masque à l’autre extrémité du tuyau d’alimentation en air.
3. Branchez le connecteur cylindrique de l’alimentation dans la prise d'alimentation
du Transcend 3 miniCPAP, située à l'arrière de l'appareil.
4. Branchez l’alimentation à une prise murale.
Utilisation de l’alimentation universelle multiprise (PSA2)
L’alimentation universelle multiprise (PSA2) et le lot de fiches interchangeables contenant
trois (3) fiches interchangeables sont inclus dans chaque appareil Transcend 3 miniCPAP.
Le lot de fiches interchangeables est utilisable dans la plupart des pays du monde.
1. Identifiez la fiche à utiliser en fonction du type de prise.
2. Si la prise n’est pas équipée de la bonne fiche, retirez cette dernière en appuyant
sur le bouton situé dessus et tournez-la dans le sens inverse des aiguilles d’une
montre jusqu’à ce qu’elle se détache du câble d’alimentation.
3. Pour fixer la fiche souhaitée, alignez les languettes de la fiche sur les interstices de
l’alimentation et insérez délicatement la fiche. Tournez dans le sens des aiguilles
d’une montre jusqu’à ce que la fiche soit enclenchée (vous entendrez un clic).
4. Branchez le connecteur cylindrique du câble d’alimentation dans la prise
d’alimentation située à l’arrière du système Transcend 3 miniCPAP.
5. Insérez l’autre extrémité du câble dans la prise secteur.
6. Les voyants lumineux de l’appareil Transcend 3 miniCPAP clignotent. Une fois la
séquence de clignotement de démarrage des voyants terminée, ceux-ci
s’éteignent. Cela indique que l’appareil Transcend 3 miniCPAP est sous tension et
que le mode de veille est activé.
Réassemblage :
insérez la fiche
et tournez
Retrait de
la fiche
Retrait : appuyez
sur le bouton
et tournez
FRANÇAIS
Page 21
21
Guide rapide Transcend 3 miniCPAP Page 7
Note Utilisez uniquement l’alimentation universelle fournie par Somnetics. N’utilisez pas
de convertisseur de secteur, ni de transformateur de tension avec l’alimentation
universelle PSA2.
Note Assurez-vous que la fiche est bien fixée à l’alimentation avant de brancher
l’alimentation dans la prise murale.
Appareil Transcend 3 miniCPAP
L’appareil Transcend 3 miniCPAP est prêt à générer et à réguler le traitement de pression
positive continue à fournir à l’interface (masque). Une source d’alimentation externe
se branche sur l’appareil Transcend 3 miniCPAP pour l’alimenter.
Panneau de commande
Le panneau de commande du Transcend 3 miniCPAP est composé de deux boutons
servant à activer la ventilation et la fonction de phase d’augmentation de la pression.
Il est également composé de deux voyants lumineux : un vert pour indiquer les modes
de fonctionnement normaux et un jaune pour indiquer les pannes.
Bouton
Marche/Arrêt
Bouton de phase
d’augmentation
Voyant vert
Voyant jaune
FRANÇAIS
Page 22
22
Guide rapide Transcend 3 miniCPAP Page 8
Prise d’alimentation et port USB
Prise d’alimentation
La prise d’alimentation reçoit le connecteur
cylindrique du câble de sortie d’une source
d’alimentation c.c. pour alimenter
l’appareil Transcend 3 miniCPAP.
Diverses sources d’alimentation peuvent
être utilisées pour faire fonctionner
l’appareil Transcend 3 miniCPAP.
Un convertisseur de courant alternatif
en courant continu est fourni avec
l’appareil et doit être utilisé lorsque
l’appareil est alimenté sur le secteur
(prise murale).
Un adaptateur mobile optionnel permet
de brancher l’appareil sur une source
d’alimentation c.c. (voiture, camion,
camping-car, bateau ou véhicule similaire).
Des batteries Transcend sont disponibles
en option pour alimenter le système
Transcend 3 miniCPAP.
Port USB
Un port USB mini-AB permet l’échange
direct de données entre le système
Transcend 3 miniCPAP et un ordinateur
via un câble de données USB. L’interface
permet au médecin de configurer l’appareil
Transcend 3 miniCPAP selon les
paramètres de phase d’augmentation,
de pression et Auto prescrits, et fournit
au patient des informations de conformité
du traitement, qui peuvent être envoyées
par courrier électronique au médecin.
Note Il peut être nécessaire de débrancher et de rebrancher les câbles pour assurer une
bonne connexion.
Port USB
Prise
d’alimentation
FRANÇAIS
Page 23

23
Guide rapide Transcend 3 miniCPAP Page 9
Utilisation du système Transcend 3 miniCPAP
Le panneau de commande du Transcend 3 miniCPAP est composé de deux boutons
servant à activer la ventilation et à lancer la fonction de phase d’augmentation de la
pression. Il est également composé de deux voyants lumineux : un vert pour indiquer
les modes de fonctionnement normaux et un jaune pour indiquer les pannes. L’état de
fonctionnement du système Transcend 3 miniCPAP est indiqué par les voyants lumineux.
Lorsqu’une source d’alimentation est connectée à l’appareil Transcend 3 miniCPAP,
les voyants clignotent. Une fois la séquence de clignotement de démarrage des voyants
terminée, ceux-ci s’éteignent. Cela indique que l’appareil Transcend 3 miniCPAP est sous
tension et que le mode de veille est activé. Pendant le traitement, les voyants sont éteints
pour ne pas déranger le patient et/ou son conjoint.
Note Si le système Transcend 3 miniCPAP n’est plus alimenté pendant le traitement,
celui-ci reprendra dès que l’alimentation sera rétablie et que vous aurez appuyé
sur le bouton Marche/Arrêt. Les voyants lumineux clignoteront de nouveau avant
que la ventilation ne soit redémarrée.
Modes d’utilisation standard
Le fonctionnement standard est composé de quatre modes :
Arrêt
Lorsque l’appareil n’est pas branché sur une source d’alimentation, il est hors
tension. Les voyants lumineux du panneau de contrôle sont tous deux éteints.
Veille
Lorsque l’appareil est connecté à une source d’alimentation, les voyants
clignotent et l’appareil se met en mode de veille. Le mode de veille est
également activé lorsque le patient appuie sur le bouton Marche/Arrêt alors
que l’appareil est en marche ou lorsqu’il retire le masque en mode de
marche. Tant que l’appareil est alimenté, il reste en mode de veille jusqu’à
ce que le mode de marche ou de séchage soit activé.
Marche
Lorsque le mode de marche est activé, la ventilation fonctionne et l’appareil
produit la pression de traitement paramétrée. Les voyants restent éteints.
Le mode de marche est activé lorsque le patient appuie sur le bouton
Marche/Arrêt alors que l’appareil est en mode de veille et que le patient
le porte.
Séchage
Pour activer le mode de séchage, appuyez sur le bouton de phase
d’augmentation et appuyez en même temps sur le bouton Marche/Arrêt.
En mode de séchage, la ventilation fonctionne à faible vitesse pendant
30 minutes. Pendant le mode de séchage, les voyants restent éteints et
la pression de la ventilation n’est pas réglée pour fournir un traitement.
FRANÇAIS
Page 24

24
Guide rapide Transcend 3 miniCPAP Page 10
Début du traitement
Branchez l’appareil Transcend 3 miniCPAP à une source d’alimentation et laissez-le
passer en mode de veille.
Assurez-vous que votre interface utilisateur (masque) est correctement placée avant
de démarrer le traitement.
Pour démarrer le traitement, appuyez sur le bouton Marche/Arrêt. Appuyer sur le
bouton Marche/Arrêt lorsque l’appareil Transcend 3 miniCPAP est en mode de
veille permet de lancer le mode de marche. Le débit d’air commencera lorsque
le générateur d’air produira ou augmentera progressivement vers la pression
de traitement prescrite.
Utilisation de la fonction de phase d’augmentation
La fonction de phase d’augmentation permet à l’utilisateur de s’habituer au débit d’air en
envoyant d’abord une pression basse, puis en l’augmentant progressivement, pendant
que vous vous endormez, pour atteindre la pression qui vous a été prescrite. La section
de ce manuel consacrée au logiciel indique comment modifier les paramètres de la phase
d'augmentation sur votre appareil.
Pour accélérer le rythme d’augmentation de la pression, maintenez enfoncé le bouton
de phase d’augmentation jusqu’à ce que l’appareil atteigne une pression de traitement
confortable. Une fois le bouton de phase d’augmentation relâché, l’appareil fonctionne
en mode de phase d’augmentation jusqu’à ce qu’il atteigne la pression de traitement
prescrite.
Vérifiez que l’appareil Transcend 3 miniCPAP est en mode de marche. S’il ne l’est pas,
appuyez sur le bouton Marche/Arrêt.
Ajustez votre masque de manière à supprimer les fuites.
Appuyez sur le bouton de phase d’augmentation. La pression baisse pour atteindre la
pression de démarrage de la phase d’augmentation et augmente progressivement au
cours d’une période prédéfinie jusqu’à atteindre la pression de traitement prescrite.
Note Le fait d’appuyer rapidement sur le bouton Rampe pendant que cette fonction est
activée n’affecte pas la pression fournie. Pour arrêter la fonction d’augmentation
progressive de la pression, mettez l’appareil hors tension en appuyant sur le bouton
Marche/Arrêt. À la prochaine mise sous tension de l’appareil, la ventilation fournira
la pression de traitement prescrite.
Note Si l’appareil n’est plus alimenté pendant la phase d’augmentation, le système
Transcend 3 miniCPAP redémarrera à la pression finale prescrite dès que
l’alimentation aura été rétablie.
FRANÇAIS
Page 25
25
Guide rapide Transcend 3 miniCPAP Page 11
Utilisation de la fonction EZEX
La fonction EZEX est une fonctionnalité spéciale qui permet de diminuer la pression
de traitement lors de l’expiration. Cette fonction est conçue pour apporter un confort
supplémentaire aux patients en réduisant la résistance qu’ils rencontrent lors de l’expiration.
Il existe quatre paramètres EZEX : OFF, 1, 2 ou 3 ; ces paramètres augmentent
progressivement la limitation de pression de zéro au maximum. La section de ce manuel
consacrée au logiciel indique comment modifier les paramètres EZEX.
Remarque : Pour télécharger le manuel utilisateur du Transcend 3 miniCPAP, accédez
à www.mytranscend.com/support. Vous pouvez également contacter le service client
Somnetics au 877-621-9626 pour en demander un exemplaire.
Fin du traitement
Pour arrêter le traitement alors que la ventilation fonctionne, appuyez sur le bouton
Marche/Arrêt pour désactiver la ventilation et replacer l’appareil en mode de veille.
Nous conseillons de lancer le mode de séchage après chaque séance de traitement afin
de sécher l’intérieur de l’appareil.
Mode de séchage
À la fin du traitement, il est conseillé de lancer le mode de séchage. Pour activer le mode
de séchage, appuyez sur le bouton de phase d’augmentation et appuyez en même temps
sur le bouton Marche/Arrêt. En mode de séchage, la ventilation fonctionne à faible vitesse
pendant 30 minutes. Pendant le mode de séchage, les voyants restent éteints et la
pression de la ventilation n’est pas réglée pour fournir un traitement. Le mode de séchage
propulse de l’air dans le système afin de supprimer toute trace d’humidité à l’intérieur
de l’appareil et du circuit respiratoire. Après un cycle de séchage de 30 minutes,
la ventilation s’arrête et l’appareil passe automatiquement en mode de veille.
Remplacement du filtre
Le filtre du Transcend 3 miniCPAP doit être remplacé tous les six mois au moins.
Retirez le filtre en tirant sur la languette située à l'arrière de l'appareil pour le dégager.
Retirez ensuite la structure du filtre de l’appareil. Jetez la structure du filtre et remplacez-
la par un filtre neuf.
Tirez sur la languette pour
débloquer la structure du filtre.
FRANÇAIS
Page 26

26
Guide rapide Transcend 3 miniCPAP Page 12
Entretien du système Transcend 3 miniCPAP et de
ses composants.
Avertissements :
• Débranchez l’appareil Transcend 3 miniCPAP avant de le nettoyer.
• Ne plongez pas l’appareil Transcend 3 miniCPAP, ni son alimentation, dans
un liquide.
• Empêchez l’eau d’entrer par les ouvertures de l’appareil.
• N’utilisez pas de produits nettoyants abrasifs ou agressifs pour nettoyer l’appareil
ou ses composants.
• Ne tentez pas de stériliser l’appareil Transcend 3 miniCPAP.
• Ne posez pas de produits nettoyants, tels qu’un chiffon ou un liquide, sur les
connecteurs d’entrée ou de sortie d’air de l’appareil.
Nettoyage de l’extérieur de l’appareil
Procédez comme suit pour nettoyer l’extérieur de l’appareil Transcend 3 miniCPAP.
1. Débranchez l’alimentation de l’appareil avant de le nettoyer et enlevez les câbles
d’alimentation.
2. Mélangez 5 % de détergent liquide doux dans de l’eau distillée (48 ml de détergent
liquide par litre d’eau distillée). Les détergents doux doivent contenir des tensioactifs
anioniques biodégradables mais pas de phosphate.
3. Plongez un chiffon en coton non pelucheux dans la solution détergente.
4. Essorez l’excès d’eau du chiffon et essuyez l’extérieur de l’appareil Transcend 3 miniCPAP,
de l’avant vers l’arrière, pendant 20 secondes environ. Frottez assez fermement et
veillez à accéder à toutes les surfaces afin de retirer correctement toutes les saletés.
5. Rincez le chiffon à l’eau claire afin de retirer les résidus de la solution détergente.
6. Essorez le chiffon et essuyez l’appareil Transcend 3 miniCPAP en frottant doucement
de manière à retirer les restes de solution détergente de la surface de l’appareil.
À l’aide d’un chiffon sec, en coton et non pelucheux, séchez complètement l’appareil.
Nettoyage des accessoires
Les accessoires suivants doivent être nettoyés à l’aide d’une solution de 5 % de détergent
liquide doux mélangé dans de l’eau distillée (48 ml de détergent liquide par litre d’eau
distillée). Les détergents doux doivent contenir des tensioactifs anioniques biodégradables
mais pas de phosphate. Procédez comme suit pour nettoyer les accessoires.
Accessoire Fréquence de nettoyage Durée de vie du produit
Tuyau d’alimentation en air
Tous les jours 3 mois
FRANÇAIS
Page 27
27
Guide rapide Transcend 3 miniCPAP Page 13
1. Immergez totalement le tuyau d’alimentation en air dans la solution détergente.
2. Une fois le réservoir immergé, essuyez minutieusement sa surface avec un chiffon en
coton non pelucheux. Frottez assez fermement et veillez à accéder à toutes les
surfaces afin de retirer correctement toutes les saletés.
3. Nettoyez l’intérieur du tuyau d’alimentation en air en remplissant le tuyau de la
solution détergente, en bouchant les extrémités et en le secouant.
4. Rincez le tuyau d’alimentation en air en l’immergeant dans de l’eau distillée. Secouez
le tuyau d’alimentation en air d’avant en arrière pendant 10 secondes environ afin de
retirer les résidus de la solution détergente.
5. Rincez le tuyau d’alimentation en air en l’immergeant dans de l’eau distillée. Secouez
de haut en bas le tuyau rempli d’eau. Répétez cette action pendant 10 secondes
environ afin de retirer les résidus de détergent.
6. Séchez l’extérieur du tuyau d’alimentation en air à l’aide d’un chiffon sec, en coton et
non pelucheux. Laissez le tuyau sécher à l’air libre jusqu’à ce que l’intérieur du tuyau
soit sec. Le temps de séchage dépendra des conditions environnementales.
Pièces jetables
Élément
Référence
Élément
Référence
Structure de filtre du Transcend 3
503109
Flexible standard de 182 cm
503081
Accessoires
Élément
Référence
Élément
Référence
Batterie P8 Transcend
503023
Mobile Power Adapter (MPA1)
Transcend
503029
Batterie P4 Transcend
503026
Chargeur de batteries portable
solaire Transcend
503056
Pièces de rechange
Élément
Référence
Élément
Référence
Transcend 3 miniCPAP Auto
503104
Sac de transport Transcend
503012
Unité Transcend 3 miniCPAP Auto
503105
Alimentation universelle multiprise
(PSA2)
503059
Transcend 3 miniCPAP
503106
Lot de fiches interchangeables
503060
Unité Transcend 3 miniCPAP
503107
Câble USB
503020
Ensemble d’alimentation
universelle multiprise
(Contient 503059 & 503060)
503078
FRANÇAIS
Page 28
28
Transcend 3 miniCPAP™
Kurzanleitung
DEUTSCH
Page 29

29
Kurzanleitung für 3 miniCPAP Seite 2
Einführung
Vielen Dank, dass Sie sich für Transcend, den Innovationsführer für tragbare CPAPTherapie, entschieden haben. Transcend 3 miniCPAP versorgt Nutzer mit positivem
Atemwegsdruck im Bereich 4 bis 20 cm
H2O, je nach Anweisung des Klinikarztes.
Die Transcend 3 miniCPAP Produktreihe umfasst den Transcend 3 miniCPAP und den
Transcend 3 miniCPAP Auto. Tasten und LED-Lampen vereinfachen die Steuerung und
bieten Betriebsrückmeldungen. Ebenfalls im Transcend 3 miniCPAP integriert sind eine
DC-Strombuchse und ein USB-Anschluss.
Hinweis: Detaillierte Beschreibungen und Vorgehensweisen zur Problemlösung
finden Sie im Benutzerhandbuch Transcend 3 miniCPAP, das Sie von
www.mytranscend.com/support herunterladen oder beim Kundendienst von
Somnetics unter Rufnummer +1 877-621-9626 anfordern können.
Vorsichtsmaßnahmen bei der Verwendung eines Computers
mit Transcend 3 miniCPAP
Folgende Vorsichtsmaßnahmen werden aus Sicherheitsgründen für den Patienten
und/oder den Bediener des Computers angeführt, um das Einhalten der
Sicherheitsbestimmungen IEC 60601-1-1 zu gewährleisten.
Definitionen Ein den Vorgaben der Norm 60950-1 für medizinisch-technische Geräte
entsprechender Computer ist ein Gerät, das die Normen UL 60950-1 oder
IEC 60950-1 erfüllt.
Stecken Sie keine Geräte in den USB-Anschluss von Transcend 3 miniCPAP außer Computer,
die dem Sicherheitsstandard der Norm 60950-1 entsprechen. Durch den Anschluss anderer
Geräte an den USB-Anschluss des Transcend 3 miniCPAP kann dieser beschädigt und die
sichere Verwendung für den Benutzer gefährdet werden.
Verwenden Sie für die Stromversorgung Ihres Computers einen nach IEC 60601-1
zugelassenen Trenntransformator, um das Risiko von Leckströmen zu reduzieren.
Stecken Sie Ihren der Norm 60950-1 für medizinisch-technische Geräte entsprechenden
Computer oder Ihr Transcend nicht in eine tragbare Mehrfachsteckdose (Steckerleiste).
Folgen Sie bei der Verwendung Ihres dem 60950-1 Sicherheitsstandard entsprechenden
Computers den Reinigungshinweisen des Herstellers.
Folgen Sie bei der Verwendung Ihres dem 60950-1 Sicherheitsstandard entsprechenden
Computers den Anweisungen des Herstellers bei der Durchführung vorbeugender Wartung.
Schließen Sie während der vorbeugenden Wartung nicht den USB-Anschluss des
Transcend 3 miniCPAP an Ihren dem 60950-1 Sicherheitsstandard entsprechenden
Computer an.
Berühren Sie nicht gleichzeitig Ihren dem 60950-1 Sicherheitsstandard entsprechenden
Computer und freiliegende Metallteile des Transcend 3 miniCPAP oder der Transcend-Kabel.
Berühren Sie keine freiliegenden Metallteile Ihres dem 60950-1 Sicherheitsstandard
entsprechenden Computers, der Anschlüsse oder Kabel.
Für Klinikärzte: Berühren Sie nicht gleichzeitig den dem 60950-1 Sicherheitsstandard
entsprechenden Computer und den Patienten.
Verwenden Sie keine Computer, die über interne Versorgungsspannungen verfügen, auf die
ohne Werkzeuge zugegriffen werden kann.
DEUTSCH
Page 30

30
Kurzanleitung für 3 miniCPAP Seite 3
Warnungen
Es darf kein Wasser in das Gerät eindringen. Transcend 3 miniCPAP sollte keinen
Umweltbedingungen ausgesetzt werden, bei denen das System nass werden könnte.
Dieses Gerät ist nicht zur Lebenserhaltung vorgesehen.
Das Transcend 3 miniCPAP System muss von einer ausgebildeten Fachkraft
eingerichtet und eingestellt werden, bevor es für die Therapie-Rampen- und
Druckfunktion verwendet werden kann.
Die von diesem Gerät erzeugte Lufttemperatur darf um bis zu -12 °C (10 °F) höher
als die Raumtemperatur sein. Vorsicht ist bei Raumtemperaturen geboten, die
32 °C (90 °F) übersteigen.
Die Exhalationsöffnungen der Maske dürfen weder blockiert noch auf andere Weise
behindert werden. Folgen Sie den Herstelleranweisungen, die im Lieferumfang ihrer
Maske enthalten sind.
Dieses Gerät eignet sich nicht für den Einsatz mit Sauerstoff oder in Umgebungen
mit entzündlichen Narkosegasmischungen mit Luft, Sauerstoff oder Lachgas.
Sauerstoffquellen müssen mehr als 1 Meter vom Gerät entfernt sein, um die Gefahr
von Bränden und Verbrennungen zu vermeiden.
Das Transcend 3 miniCPAP System darf nur mit den mitgelieferten und
empfohlenen Zubehörteilen verwendet werden. Die Verwendung nicht empfohlenen
Zubehörs kann zu erhöhten elektromagnetischen Abstrahlungen oder verringerter
elektromagnetischer Störfestigkeit des PAP-Systems führen und ist potenziell als
nicht sicher einzuschätzen.
Das Transcend 3 miniCPAP System ist nicht gegen Defibrillation beständig.
Versuchen Sie nicht, den Transcend 3 miniCPAP zu sterilisieren.
Wenn das Gerät von mehreren Patienten verwendet werden soll, sollte ein
Hauptstrom-Bakterienfilter zusammen mit Gerät und Schlauchsystem installiert
werden, um Kontaminierung zu vermeiden.
Es sollte nur mit von Somnetics oder einer medizinischen Fachkraft empfohlenen
Masken und Konnektoren verwendet werden. Eine Maske sollte nur dann verwendet
werden, wenn das Gerät eingeschaltet ist und den Rampen- oder Therapiedruck
ordnungsgemäß bereitstellt. Die zur Maske zugehörigen Exhalationsöffnungen
dürfen niemals blockiert werden. Erklärung der Warnung: Das Gerät ist für den
Einsatz mit Spezialmasken oder Konnektoren vorgesehen, die für den
kontinuierlichen Luftstrom aus der Maske heraus über Exhalationsöffnungen
verfügen. Wenn das Gerät in Betrieb ist, drückt der Luftstrom die ausgeatmete Luft
vom Gerät durch die Exhalationsöffnung der Maske heraus. Wenn das Gerät jedoch
nicht ordnungsgemäß funktioniert, wird durch die Maske keine ausreichende
Frischluft zugeführt und Ausatemluft möglicherweise wieder eingeatmet.
Die Nichtverwendung einer Maske oder Zusatzvorrichtung, die die Rückatmung von
Kohlendioxid minimiert oder Spontanatmung zulässt, kann zu Erstickungen führen.
Stellen Sie das Gerät nicht im Bett auf. Das Abdecken der Atemschläuche mit einer
Decke oder deren Erwärmung kann die Qualität der Therapie beeinträchtigen oder
den Anwender verletzen.
Um ein Lösen des Schlauches während des Gebrauchs zu verhindern, sollten nur
Schläuche nach ISO 5367 oder ISO 80601-2-74 verwendet werden.
DEUTSCH
Page 31

31
Kurzanleitung für 3 miniCPAP Seite 4
Strangulationsgefahr durch Stromkabel und Luftschlauch. Diese können sich um
den Hals wickeln und zu STRANGULATION führen. Stromkabel und Luftschlauch
müssen mindestens 1 m vom Kinderbett entfernt und für Kleinkinder unerreichbar
eingesetzt werden. Bewahren Sie Kabel und Schlauch außerhalb der Reichweite von
Kindern auf.
Es ist unwahrscheinlich, dass vom Gehäuse des Transcend 3 miniCPAP kleine Teile
ausgestoßen werden, aber bei schweren Schäden können interne Komponenten
zersplittern und eine Verschluckungs- oder Erstickungsgefahr darstellen, wenn
sie aus dem Gehäuse austreten.
Vorsichtsmaßregeln
Laut Gesetz (USA) darf dieses Gerät ausschließlich von einem Arzt oder im Auftrag
eines Arztes gekauft werden.
Das Transcend 3 miniCPAP System darf nur mit dem von Somnetics gelieferten
Netzteil, mobilen Netzadapter oder mit Batterien (Akku) betrieben werden.
Stellen Sie die Verwendung des Transcend 3 miniCPAP ein und konsultieren Sie
Ihren Arzt, wenn Reizungen von Atemwegen oder Haut auftreten.
Führen Sie keine Gegenstände in den Luftein- oder -auslass ein.
Überprüfen Sie das Stromkabel vor jedem Einsatz auf Zeichen von Abnutzung
oder Schäden. Ersetzen Sie es, falls erforderlich.
Somnetics empfiehlt, den Austrittsschlauch nach dreimonatigem Gebrauch
zu ersetzen.
Aus Gründen des Umweltschutzes müssen einige Teile und Zubehörteile des
Transcend 3 miniCPAP, einschließlich optionale Akkus, gemäß den örtlichen
Bestimmungen entsorgt werden.
Das Gerät darf nicht abgedeckt oder so aufgestellt werden, dass der Betrieb oder
die Leistung des Gerätes beeinträchtigt wird, da dies auch ein Sicherheitsproblem
verursachen kann. Beispiele hierfür sind unter anderem:
o Das Gerät darf nicht in einem Bett aufgestellt werden.
o Das Gerät darf nur auf einem festen, ebenen Untergrund aufgestellt werden.
o Stellen Sie es nicht an einem Ort auf, wo Haustiere oder Kinder Zugang
zum Gerät haben.
o Stellen Sie es nicht in die Nähe eines offenen Fensters oder an einem
anderen Ort auf, an dem Staub oder Schädlinge (Insekten) die Sicherheit
und/oder Leistung des Geräts beeinträchtigen können.
o Stellen Sie das Gerät nicht neben einen Vorhang, der den Kühlluftstrom
blockiert, und dadurch eine Überhitzung verursacht.
o Die Luftansaugöffnung darf nicht blockiert werden und dadurch die
Therapie stören.
DBP
Gerät enthält DBP (ein Phthalat). Eine signifikante Exposition gegenüber DBP
kann die normale Entwicklung der männlichen Fortpflanzungsorgane
beeinträchtigen. Tests haben gezeigt, dass die DBP-Expositionswerte weit unter
den festgelegten Grenzwerten liegen. Frauen, die schwanger sind oder stillen,
können die Vorteile und Risiken dieses Gerätes mit einem Arzt besprechen.
DEUTSCH
Page 32
32
Kurzanleitung für 3 miniCPAP Seite 5
Komponenten des Transcend 3 miniCPAP
Packen Sie als Erstes alle Artikel aus der Transcend Reisetasche aus und untersuchen
Sie sie auf Transportschäden. Melden Sie dem Hauspflegedienst, der Ihnen das Produkt
bereitgestellt hat, alle fehlenden oder beschädigten Teile.
1 Transcend 3 miniCPAP Auto oder
Transcend 3 miniCPAP
2 Luftzufuhrschlauch (kompatibel mit
Standard 22 mm Stecker)
3 Universal-Netzteil mit Mehrfachsteckern
(PSA2)
4 Austauschsteckersatz
5 Transcend Reisetasche
6 Kurzanleitung für Transcend 3 miniCPAP
7 USB-Kabel
Nicht enthalten (alles separat erhältlich)
Mobiler Transcend Netzadapter
Transcend P
4
Akku
Transcend P
8
Akku
Transcend Portable Solar Charger (für den Einsatz als alternative Aufladequelle
für Transcend P
4
und P8 Akku)
Patientenmaske
1
2
4
3
7
5
6
DEUTSCH
Page 33

33
Kurzanleitung für 3 miniCPAP Seite 6
Zusammenbau des Transcend 3 miniCPAP
1. Befestigen Sie den Luftzuführungsschlauch am Luftauslass des
Transcend 3 miniCPAP Gerätes.
2. Verbinden Sie die Maske mit dem anderen Ende des Luftzuführungsschlauches.
3. Stecken Sie den Hohlstecker des Netzteils in die Strombuchse des
Transcend 3 miniCPAP an der Rückseite des Gerätes.
4. Verbinden Sie das Netzteil mit einer Wandsteckdose.
Verwenden des Universal-Netzteils mit Mehrfachsteckern
(PSA2)
Das Universal-Netzteil des Transcend 3 miniCPAP mit Mehrfachsteckern (PSA2) und
Austauschsteckersatz enthält einen Austauschsteckersatz mit drei (3) austauschbaren
Steckern, die sich für die meisten Länder weltweit eignen. Die Austauschsteckersätze
können weltweit in den meisten Ländern verwendet werden.
1. Welcher Stecker zur Stromversorgung des Gerätes benötigt wird, hängt vom
Steckdosentyp ab.
2. Wenn sich im Netzteil nicht bereits der korrekte Stecker befindet, entfernen Sie
den verwendeten Stecker, indem Sie ihn herunterdrücken und gegen den
Uhrzeigersinn drehen, bis er sich aus dem Netzteil löst.
3. Zum Anbringen des gewünschten Steckers, richten Sie die hervorstehenden Stifte
an seiner Rückseite an den Öffnungen im Netzteil aus und drücken Sie sie
vorsichtig in die Schlitze. Drehen Sie den Stecker im Uhrzeigersinn, bis er
einrastet. Es sollte ein Klicken zu hören sein.
4. Stecken Sie den Hohlstecker des Netzteils in die Strombuchse an der Rückseite des
Transcend 3 miniCPAP Gerätes.
5. Stecken Sie das andere Ende des Netzteils in eine AC-Steckdose ein.
6. Der Transcend 3 miniCPAP sollte eine Ablaufkette der LED-Startanzeige
durchlaufen. Sobald die Ablaufkette der LED-Startanzeige durchlaufen ist, gehen
die LED-Anzeigen aus. Dies ist ein Hinweis darauf, dass der Transcend 3 miniCPAP
mit Strom versorgt wird und erfolgreich in den Standbymodus gewechselt ist.
DEUTSCH
Page 34
34
Kurzanleitung für 3 miniCPAP Seite 7
Note Verwenden Sie nur das von Somnetics mitgelieferte Universal-Netzteil. Verwenden
Sie mit dem PSA2 Universal-Netzteil keinen Stromumwandler oder
Spannungstransformator.
Note Stellen Sie sicher, dass der aufgesteckte Stecker vollkommen sicher auf dem
Netzteil sitzt, bevor Sie es in die Steckdose stecken.
Das Transcend 3 miniCPAP Gerät
Der Transcend 3 miniCPAP wird einsatzbereit geliefert, um kontinuierlichen, positiven
Atemwegdruck (continuous positive airway pressure, CPAP) zur Schnittstelle (Maske) zu
generieren und ihn zu regulieren. Zur Energieversorgung wird der Transcend 3 miniCPAP
an eine externe Stromquelle angeschlossen.
Wieder anbringen:
Stecker einstecken
und drehen
Stecker
entfernen
Entfernen:
Knopf drücken
und drehen
DEUTSCH
Page 35
35
Kurzanleitung für 3 miniCPAP Seite 8
Bedienfeld
Das Bedienfeld des Transcend 3 miniCPAP hat zwei Drucktasten, mit denen Gebläse und
Druckrampenfunktion aktiviert werden. Ebenfalls vorhanden sind zwei LEDs, einschließlich
einer grünen zur Anzeige der normalen Betriebsmodi, und eine gelbe, die auf
Fehlerzustände hinweist.
Ein-/Ausschalttaste
LeistungsrampenTaste
Grüne LED
Gelbe LED
DEUTSCH
Page 36
36
Kurzanleitung für 3 miniCPAP Seite 9
Strombuchse und USB-Anschluss
Strombuchse
Für den Betrieb des Transcend 3 miniCPAP
wird der runde Stecker des
Ausgangskabels einer DC-Stromquelle
in die Strombuchse gesteckt.
Zur Stromversorgung des
Transcend 3 miniCPAP können eine
Vielzahl von Stromquellen verwendet
werden. Ein AC/DC-Gleichrichter ist
im Lieferumfang Ihres Gerätes enthalten
und sollte verwendet werden, wenn Ihr
Gerät über die Wandsteckdose mit
Strom versorgt wird.
Ein optionaler mobiler Stromadapter
wird mit einer DC-Steckdose verbunden,
z. B. im Auto, Lkw, Wohnmobil,
Boot oder ähnlichen Fahrzeugen.
Zur Stromversorgung des
Transcend 3 miniCPAP werden auch
optionale Transcend Akkupacks angeboten.
USB-Anschluss
Ein USB Mini-AB-Anschluss ist für den
direkten Datenaustausch zwischen dem
Transcend 3 miniCPAP und einem Computer
über ein USB-Datenkabel vorhanden. Über
diese Schnittstelle kann der Klinikarzt für
den Transcend 3 miniCPAP den
verschriebenen Druck, Rampen- und
allgemeine-Einstellungen konfigurieren.
Sie bietet außerdem Informationen zur
Therapie-Compliance, die vom Nutzer
angezeigt und dem Klinikarzt per E-Mail
gesandt werden können.
Note Möglicherweise müssen sie abgezogen und neu verbunden werden, um eine gute
Verbindung zu gewährleisten.
USBAnschlus
Strombuchse
DEUTSCH
Page 37

37
Kurzanleitung für 3 miniCPAP Seite 10
Verwenden des Transcend 3 miniCPAP
Das Bedienfeld des Transcend 3 miniCPAP hat zwei Drucktasten, mit denen Gebläse und
Druckrampenfunktion aktiviert werden. Ebenfalls vorhanden sind zwei LEDs, einschließlich
einer grünen zur Anzeige der normalen Betriebsmodi, und eine gelbe, die auf
Fehlerzustände hinweist. Der Betriebsstatus des Transcend 3 miniCPAP wird durch
verschiedene LED-Beleuchtungszustände angezeigt.
Wenn eine Stromquelle mit dem Gerät verbunden wird, sollte der Transcend 3 miniCPAP
eine Ablaufkette der LED-Startanzeige durchlaufen. Sobald die Ablaufkette der LEDStartanzeige durchlaufen ist, gehen die LED-Anzeigen aus. Dies ist ein Hinweis darauf,
dass der Transcend 3 miniCPAP mit Strom versorgt wird und erfolgreich in den
Standbymodus gewechselt ist. Während der Therapie bleiben die LEDs aus, um den
Patienten und/oder Bettpartner nicht zu stören.
Note Wenn die Stromzufuhr zum Transcend 3 miniCPAP während der Therapie
unterbrochen wird, nimmt er die Therapie wieder auf, sobald es wieder mit Strom
versorgt wird und Sie die Ein-/Aus-Taste gedrückt haben. Das Gerät wiederholt die
Ablaufkette der LED-Startanzeige, bevor das Gebläse wieder startet.
Standard-Benutzermodi
Der Normalbetrieb besteht aus vier Modi:
Aus
Wenn das Gerät an keine Stromquelle angeschlossen ist, ist es
ausgeschaltet. Keine der beiden LEDs des Bedienfeldes leuchtet.
Standby
Wenn das Gerät mit Strom versorgt wird, durchläuft es die LED-Ablaufkette
der Startsequenz und geht in den Standbymodus über. Der Standbymodus
wird auch durch Drücken der Einschalttaste initiiert, wenn das Gerät
eingeschaltet ist oder wenn die Maske im eingeschalteten Zustand entfernt
wird. So lange wie das Gerät mit Strom versorgt wird, bleibt es im
Standbymodus, bis die Einschalttaste gedrückt oder der Trocknungsmodus
initiiert wird.
Ein
Im Einschaltmodus arbeitet das Gebläse und das Gerät generiert regulierten
Therapiedruck. Die LED-Anzeigen leuchten nicht. Der Einschaltmodus wird
durch Drücken der Ein-/Aus-Taste initiiert, wenn sich das Gerät im
Standbymodus befindet und der Patient die Maske trägt.
Trocknung
Drücken Sie dazu die Rampentaste und gleichzeitig die Ein-Aus-Taste. Im
Trocknungsmodus arbeitet das Gebläse 30 Minuten lang mit niedriger
Geschwindigkeit. Während des Trocknungsmodus bleiben die LED-Leuchten
aus und es wird vom Gebläse kein Druck reguliert, um die Therapie
bereitzustellen.
DEUTSCH
Page 38

38
Kurzanleitung für 3 miniCPAP Seite 11
Die Therapie beginnen
Verbinden Sie den Transcend 3 miniCPAP mit einer Stromquelle und lassen Sie ihn in
den Standbymodus übergehen.
Stellen Sie sicher, dass die Schnittstelle sicher sitzt, bevor Sie die Therapie initiieren.
Drücken Sie dazu die Ein-/Aus-Taste. Wenn Sie die Ein-/Aus-Taste des
Transcend 3 miniCPAP im Standbymodus drücken, wird dadurch der Einschaltmodus
aktiviert. Der Luftstrom beginnt, sobald das Gebläse den Ihnen verschriebenen
Rampen- oder Therapiedruck bereitstellt.
Verwendung der Rampenfunktion
Die Rampenfunktion gewöhnt den Nutzer an den Luftstrom, indem zunächst schwächerer
Druck bereitgestellt wird, der sich langsam, während er einschläft, auf die ihm
verschriebene Druckeinstellung erhöht. Im Softwarebereich dieses Handbuchs wird
gezeigt, wie Sie die Rampeneinstellungen auf Ihrem Gerät ändern können.
Um die Rate des sich graduell steigernden Drucks im Rampenmodus zu beschleunigen,
halten Sie die Leistungsrampen-Taste so lange gedrückt, bis Sie einen angenehmen
Therapiedruck erreicht haben. Wenn die Rampentaste freigegeben wird, setzt das Gerät
den Rampenmodus so lange fort, bis der verschriebene Therapiedruck erreicht ist.
Achten Sie darauf, dass sich der Transcend 3 miniCPAP im Einschaltmodus befindet.
Ist dies nicht der Fall, drücken Sie die Ein-/Aus-Taste.
Passen Sie den Sitz Ihrer Maske an, um Leckagen zu verhindern.
Drücken Sie die Rampentaste. Der Druck fällt auf den Rampen-Startdruck und steigt
im Laufe einer festgelegten Zeit langsam an, bis es den Ihnen verschriebenen
Therapiedruck erreicht hat.
Note Ein kurzes Drücken der Rampentaste während der Bereitstellung im Rampenmodus
hat keinen Einfluss auf den abgegebenen Druck. Um den graduellen Druck der
Rampenfunktion anzuhalten, schalten Sie das Gerät durch Drücken der Ein-/Aus-
Taste aus. Wenn das Gebläse das nächste Mal eingeschaltet wird, liefert es den
verschriebenen Therapiedruck.
Note Wenn während des Rampenbetriebs der Strom ausfällt, nimmt der
Transcend 3 miniCPAP den Betrieb mit dem vollen verschriebenen Druck wieder
auf, sobald es mit Strom versorgt wird.
Verwenden der EZEX Funktion
Die EZEX Funktion ist eine Spezialfunktion zum Senken des Therapiedrucks beim
Ausatmen. Sie bietet zusätzlichen Komfort für den Patienten, indem der Widerstand beim
Ausatmen reduziert wird.
Es gibt vier Einstellungen, AUS, 1, 2 oder 3, die von keine bis maximale eine schrittweise
Druckentlastung bereitstellen. Im Softwarebereich des Handbuchs wird gezeigt, wie Sie
die EZEX-Einstellungen auf Ihrem Gerät ändern können.
DEUTSCH
Page 39
39
Kurzanleitung für 3 miniCPAP Seite 12
Hinweis: Das Benutzerhandbuch Transcend 3 miniCPAP kann von
www.mytranscend.com/support heruntergeladen oder beim Kundendienst
von Somnetics unter Rufnummer +1 877-621-9626 angefordert werden.
Therapie beenden
Um die Therapie zu beenden, während das Gebläse arbeitet, drücken Sie die Ein-/AusTaste, um es zu deaktivieren und das Gerät in den Standbymodus zu versetzen. Wir
empfehlen, nach jeder Therapiesitzung den Trocknungsmodus zu initiieren, um das Innere
des Gerätes zu trocknen.
Trocknungsmodus
Wir empfehlen, nach jeder Therapiesitzung den Trocknungsmodus zu initiieren. Drücken
Sie dazu die Rampentaste und gleichzeitig die Ein-Aus-Taste. Im Trocknungsmodus
arbeitet das Gebläse 30 Minuten lang mit niedriger Geschwindigkeit. Während des
Trocknungsmodus bleiben die LED-Leuchten aus und es wird vom Gebläse kein
Druck reguliert, um die Therapie bereitzustellen. Im Trocknungsmodus wird Luft
durch das System geblasen, um Feuchtigkeitsspuren aus dem Geräteinneren und
dem Luftwegkreislauf zu entfernen. Nach 30-minütiger Trockenzeit schaltet sich
das Gebläse aus und das Gerät wechselt automatisch in den Standbymodus.
Ersetzen des Filtermediums
Das Transcend 3 miniCPAP Filtermedium sollte mindestens alle sechs Monate
ausgetauscht werden.
Entfernen Sie das Filterteil, indem Sie die Lasche auf der Rückseite des Gerätes
hochziehen, um es zu lösen. Ziehen Sie den Filter dann aus dem Gerät heraus.
Entsorgen Sie das gesamte Filterteil und ersetzen Sie es durch ein neues.
Ziehen Sie die Lasche hoch,
um das Filterteil zu lösen.
DEUTSCH
Page 40

40
Kurzanleitung für 3 miniCPAP Seite 13
Pflege Ihres Transcend 3 miniCPAP und der Komponenten
Warnungen:
Trennen Sie die Stromverbindung des Transcend 3 miniCPAP vor dem Säubern.
Tauchen Sie den Transcend 3 miniCPAP oder das Netzteil nicht in Flüssigkeit ein.
Vermeiden Sie Wassereinlass in die Geräteöffnungen.
Verwenden Sie keine scharfen oder aggressiven Reinigungsmittel zum Säubern
der Komponenten.
Versuchen Sie nicht, den Transcend 3 miniCPAP zu sterilisieren.
Legen Sie keine Reinigungsmittel, beispielsweise Lappen oder Flüssigkeit, in den
Luft-Einlass-/Auslassanschluss des Gerätes.
Reinigen des äußeren Gehäuses
Folgen Sie diesen Anweisungen, um das Äußere des Transcend 3 miniCPAP zu reinigen.
1. Bevor Sie mit dem Säubern beginnen, trennen Sie die Stromverbindung und ziehen Sie
das Stromkabel vom Gerät ab.
2. Mischen Sie eine Lauge, bestehend aus 5 % mildem Geschirrspülmittel und
destilliertem Wasser (47 ml flüssiges Reinigungsmittel je Liter destilliertes Wasser).
Das milde Reinigungsmittel sollte biologisch abbaubare anionische Tenside und keine
Phosphate enthalten.
3. Tauchen Sie ein fusselfreies Baumwolltuch in die Lösung.
4. Wringen Sie das Tuch aus und wischen Sie das Äußere des Transcend 3 miniCPAP ca.
20 Sekunden vorsichtig ab. Drücken Sie bei allen zugänglichen Kontaktoberflächen
fester auf, um vorhandene Schmutzstellen zu entfernen.
5. Spülen Sie das Tuch in klarem Wasser aus, um die Seifenlauge zu entfernen.
6. Wringen Sie das Tuch aus und wischen Sie den Transcend 3 miniCPAP ab, um eventuell
vorhandene Reste der Seifenlauge zu entfernen.
Wischen Sie das Gerät mit einem trockenen, fusselfreien Tuch vollständig trocken.
Reinigen des Zubehörs
Das folgende Zubehör sollte mit einer Lauge, bestehend aus 5 % mildem
Geschirrspülmittel und destilliertem Wasser (47 ml flüssiges Reinigungsmittel je Liter
destilliertes Wasser) gereinigt werden. Das milde Reinigungsmittel sollte biologisch
abbaubare anionische Tenside und keine Phosphate enthalten. Folgen Sie diesen Schritten
zum Reinigen des Zubehörs.
Zubehör
Regelmäßiger
Reinigungszyklus
Produktlebensdauer
Luftzuführungsschlauch
Täglich 3 Monate
DEUTSCH
Page 41
41
Kurzanleitung für 3 miniCPAP Seite 14
1. Tauchen Sie den Luftzuführungsschlauch vollständig in die Reinigungslösung ein.
2. Wischen Sie die Oberfläche mit einem fusselfreien Baumwolltuch ab, während sich das
Teil in der Lauge befindet. Drücken Sie bei allen zugänglichen Kontaktoberflächen
fester auf, um vorhandene Schmutzstellen zu entfernen.
3. Säubern Sie das Innere des Luftzuführungsschlauchs, indem Sie ihn mit Lauge füllen
und die Schlauchenden zuerst anheben und dann senken.
4. Spülen Sie den Luftzuführungsschlauch ab, indem Sie ihn in destilliertes Wasser
tauchen. Bewegen Sie ihn ca. 10 Sekunden im Wasser hin und her, um
Laugenrückstände zu entfernen.
5. Spülen Sie den Luftzuführungsschlauch in destilliertem Wasser, indem Sie ihn
vollständig eintauchen. Heben Sie die Schlauchenden des mit Wasser gefüllten
Schlauchs zunächst an und senken Sie sie dann. Wiederholen Sie diese Bewegung ca.
10 Sekunden lang, um Laugenrückstände zu entfernen.
6. Trocknen Sie das Äußere des Luftzuführungsschlauchs mit einem trocknen, fusselfreien
Baumwolltuch. Lassen Sie den Schlauch so lange trocknen, bis sein Inneres trocken ist.
Die Dauer der Trockenzeit hängt von den Umgebungsbedingungen ab.
Einwegteile
Artikel
Teilenummer
Artikel
Teilenummer
Transcend 3 Filterrahmen
503109
1,82 m langer Standard-Schlauch
503081
Zubehör
Artikel
Teilenummer
Artikel
Teilenummer
Transcend P8 Akku
503023
Mobiler Transcend Netzadapter
(MPA1)
503029
Transcend P4 Akku
503026
Tragbares Transcend Solar-Ladegerät
503056
Ersatzteile
Artikel
Teilenummer
Artikel
Teilenummer
Transcend 3 miniCPAP Auto
503104
Transcend Reisetasche
503012
Transcend 3 miniCPAP Auto
Wartungseinheit
503105
Universal-Netzteil mit
Mehrfachsteckern (PSA2)
503059
Transcend 3 miniCPAP
503106
Austauschsteckersatz
503060
Transcend 3 miniCPAP
Wartungseinheit
503107
USB-Kabel
503020
Universal-Netzteil mit
Mehrfachsteckern
(Enthält 503059 & 503060)
503078
DEUTSCH
Page 42
42
ITALIANO
Transcend 3 miniCPAP
™
Guida rapida
Page 43

43
Guida rapida di Transcend 3 miniCPAP Pagina 2
Introduzione
Grazie per aver scelto Transcend, leader nell'innovazione per le soluzioni portatili di
trattamento delle apnee notturne. Il sistema per il trattamento delle apnee notturne
Transcend 3 miniCPAP fornisce la pressione positiva delle vie aeree in un intervallo
compreso tra 4 e 20 cm di
H2O come da prescrizione medica. La famiglia di prodotti
Transcend 3 miniCPAP include il dispositivo Transcend 3 miniCPAP e il Transcend 3
miniCPAP Auto. I pulsanti e le luci LED facilitano il controllo e offrono un riscontro
operativo. Nel sistema Transcend 3 miniCPAP sono anche integrati uno spinotto per
l'alimentazione CA e una porta USB.
Nota: Per una descrizione dettagliata e le procedure per la risoluzione dei
problemi, fare riferimento al Manuale Utente del dispositivo Transcend 3
miniCPAP disponibile all'indirizzo www.mytranscend.com/support o chiamando
il servizio clienti Somnetics al numero 877-621-9626 per richiedere una copia.
Precauzioni durante l'uso di un computer con il Transcend 3
miniCPAP
Le seguenti precauzioni sono menzionate per la sicurezza del paziente e/o dell’operatore
del computer come necessario affinché vengano rispettate le norme sulla sicurezza
IEC 60601-1-1.
Definizioni Un computer conforme agli standard di sicurezza 60950-1 soddisfa i requisiti
degli standard di sicurezza UL 60950-1 o IEC 60950-1.
Non collegare nessun dispositivo alla porta USB di Transcend 3 miniCPAP che non sia un
computer conforme agli standard di sicurezza 60950-1. Collegare qualsiasi altro dispositivo alla
porta USB di Transcend 3 miniCPAP potrebbe danneggiarlo e non essere sicuro per l’utente.
Per ridurre il rischio delle correnti di dispersione, utilizzare un trasformatore di isolamento
conforme a IEC 60601-1 per alimentare il proprio computer.
Non collegare il proprio computer conforme agli standard di sicurezza 60950-1 o il proprio
Transcend ad una prolunga a prese multiple (es. ciabatta elettrica).
Quando si impiega il proprio computer conforme agli standard di sicurezza 60950-1, seguire
le istruzioni sulla pulizia fornite dal produttore.
Quando si impiega il proprio computer conforme agli standard di sicurezza 60950-1, seguire
le istruzioni fornite dal produttore sulla manutenzione preventiva.
Non collegare il proprio computer conforme agli standard di sicurezza 60950-1 alla porta USB di
Transcend 3 miniCPAP durante le procedure di manutenzione preventiva del computer.
Non toccare contemporaneamente il proprio computer conforme agli standard di sicurezza
60950-1 e qualsiasi metallo esposto sul Transcend 3 miniCPAP o sui relativi cavi.
Non toccare alcun metallo esposto sul proprio computer conforme agli standard di sicurezza
60950-1, né sui connettori o sui cavi.
Ai medici si raccomanda di non toccare simultaneamente il computer conforme agli standard
di sicurezza 60950-1 e il paziente.
Non utilizzare computer con tensioni interne accessibili, senza l’ausilio di strumenti atti ad
accedere a tali tensioni.
ITALIANO
Page 44

44
Guida rapida di Transcend 3 miniCPAP Pagina 3
Avvisi
Non lasciare entrare acqua all'interno del dispositivo. Il dispositivo Transcend 3
miniCPAP non deve essere esposto a condizioni ambientali in cui potrebbe bagnarsi.
Questo dispositivo non è stato progettato per il supporto vitale.
Prima di essere utilizzato per la rampa e la pressione terapeutica, il dispositivo
Transcend 3 miniCPAP deve essere installato e configurato da un operatore
sanitario esperto.
La temperatura dell'aria prodotta da questo dispositivo può essere superiore di fino
a -12 °C (10 °F) rispetto alla temperatura ambiente. Prestare attenzione se la
temperatura ambiente è superiore a 32 °C (90 °F).
Non bloccare o ostruire le aperture per l'esalazione della maschera. Osservare le
istruzioni del produttore in dotazione con la maschera.
Apparecchiatura non idonea all'uso con ossigeno o in presenza di una miscela
anestetica infiammabile con aria o con ossigeno, o con protossido d'azoto. Le fonti
di ossigeno devono essere situate a più di 1 metro dall'apparecchiatura per evitare
il rischio di incendi e ustioni.
Il dispositivo Transcend 3 miniCPAP deve essere utilizzato solo con gli accessori in
dotazione o raccomandati. L'uso di accessori non raccomandati può causare un
aumento delle emissioni elettromagnetiche o una riduzione dell'immunità
elettromagnetica del sistema PAP e può essere potenzialmente pericoloso.
Il dispositivo Transcend 3 miniCPAP non è a prova di defibrillazione.
Non tentare di sterilizzare il sistema Transcend 3 miniCPAP.
Se il dispositivo deve essere utilizzato da più pazienti, per impedire contaminazioni
deve essere installato un filtro antibatterico per il flusso principale, in linea tra il
dispositivo e il tubo del circuito di respirazione.
Il dispositivo deve essere utilizzato solo con le maschere e i connettori consigliati da
Somnetics o da un operatore sanitario professionista. La maschera non deve essere
utilizzata a meno che il dispositivo sia acceso ed eroghi correttamente la pressione
della rampa e la pressione terapeutica. La(e) apertura(e) per la respirazione
associata(e) alla maschera non deve(ono) mai essere bloccata(e). Spiegazione
dell'avviso: il dispositivo è destinato ad essere utilizzato con maschere o connettori
appositamente progettati per disporre di aperture per la respirazione in modo da
consentire il flusso continuo dell'aria fuori dalla maschera. Quando il dispositivo
è in funzione, il flusso d'aria proveniente dal dispositivo fa defluire l'aria respirata
attraverso l'apertura per la respirazione della maschera. Tuttavia, quando il
dispositivo non è in funzione, l'aria fresca non verrà fornita attraverso la maschera
e l'aria respirata può essere respirata nuovamente.
Il mancato utilizzo di una maschera o di un accessorio che riduca al minimo la
rirespirazione dell'anidride carbonica o che consenta la respirazione spontanea
può causare asfissia.
Non posizionare l'apparecchiatura sul letto. Coprire le provette con una coperta o
riscaldarle può compromettere la qualità della terapia o ledere la salute dell'utente.
Per evitare lo scollegamento dei tubi durante l'uso, utilizzare solo tubi conformi alle
norme ISO 5367 o ISO 80601-2-74.
ITALIANO
Page 45

45
Guida rapida di Transcend 3 miniCPAP Pagina 4
Rischio di strangolamento con il cavo di alimentazione e il tubo di alimentazione
dell'aria. Si possono attorcigliare intorno al collo e causare uno STRANGOLAMENTO.
Mantenere sempre il cavo di alimentazione e il tubo dell'aria ad un distanza
superiore ad 1 metro dalla culla e dalla portata del bambino. Tenere il cavo e il tubo
lontani dalla portata dei bambini.
Benché sia raro che piccoli componenti possano essere espulsi dall'involucro del
Transcend 3 miniCPAP, in caso di grave danno del dispositivo e di fuoriuscita di
pezzi è possibile che alcuni frammenti di componenti interni possano essere ingoiati
o creare un rischio di soffocamento.
Avvertenze
La legge federale statunitense limita la vendita del dispositivo a o su prescrizione
di un medico.
Alimentare il dispositivo Transcend 3 miniCPAP solo con gli alimentatori forniti
da Somnetics, l'alimentatore portatile o le batterie.
In caso di irritazioni alle vie respiratorie o alla cute, smettere di utilizzare il
dispositivo Transcend 3 miniCPAP e contattare il proprio medico.
Non introdurre oggetti nella presa di ingresso/uscita dell'aria del sistema
Transcend 3 miniCPAP.
Prima di ogni utilizzo, ispezionare l’alimentatore per verificare se sono presenti
eventuali segni di usura o danni. Eventualmente, sostituire il cavo di alimentazione.
Somnetics consiglia di sostituire il condotto di alimentazione dell'aria (tubo) dopo
ogni tre mesi di utilizzo.
Per proteggere l'ambiente, alcune parti e accessori del dispositivo Transcend 3
miniCPAP, comprese le batterie opzionali, devono essere smaltiti conformemente
alla normativa vigente.
Per motivi di sicurezza, l'apparecchio non deve essere coperto o posizionato in
modo da comprometterne il funzionamento o le prestazioni. Esempi di ciò
potrebbero includere:
o L'apparecchio non deve essere posizionato sul letto.
o L'apparecchio deve essere collocato esclusivamente su una superficie piana
e stabile.
o Non posizionare in un luogo dove animali domestici o bambini possano avere
accesso all'attrezzatura.
o Non posizionare su finestre aperte o in altri luoghi in cui polvere o parassiti
(insetti) possano comprometterne la sicurezza e/o le prestazioni.
o Non posizionare vicino a una tenda che blocca il flusso d'aria di
raffreddamento, provocando il surriscaldamento del dispositivo.
o Non ostruire la porta di aspirazione dell'aria, interferendo così con la terapia.
DBP
Il dispositivo contiene DBP (uno ftalato). Un'esposizione significativa al DBP può
interferire con il normale sviluppo dell'apparato riproduttivo maschile. I test
hanno dimostrato che i livelli di esposizione al DBP sono ben al di sotto dei limiti
stabiliti. Le donne in gravidanza o in allattamento potrebbero voler discutere
i benefici e i rischi di questo dispositivo con un medico.
ITALIANO
Page 46
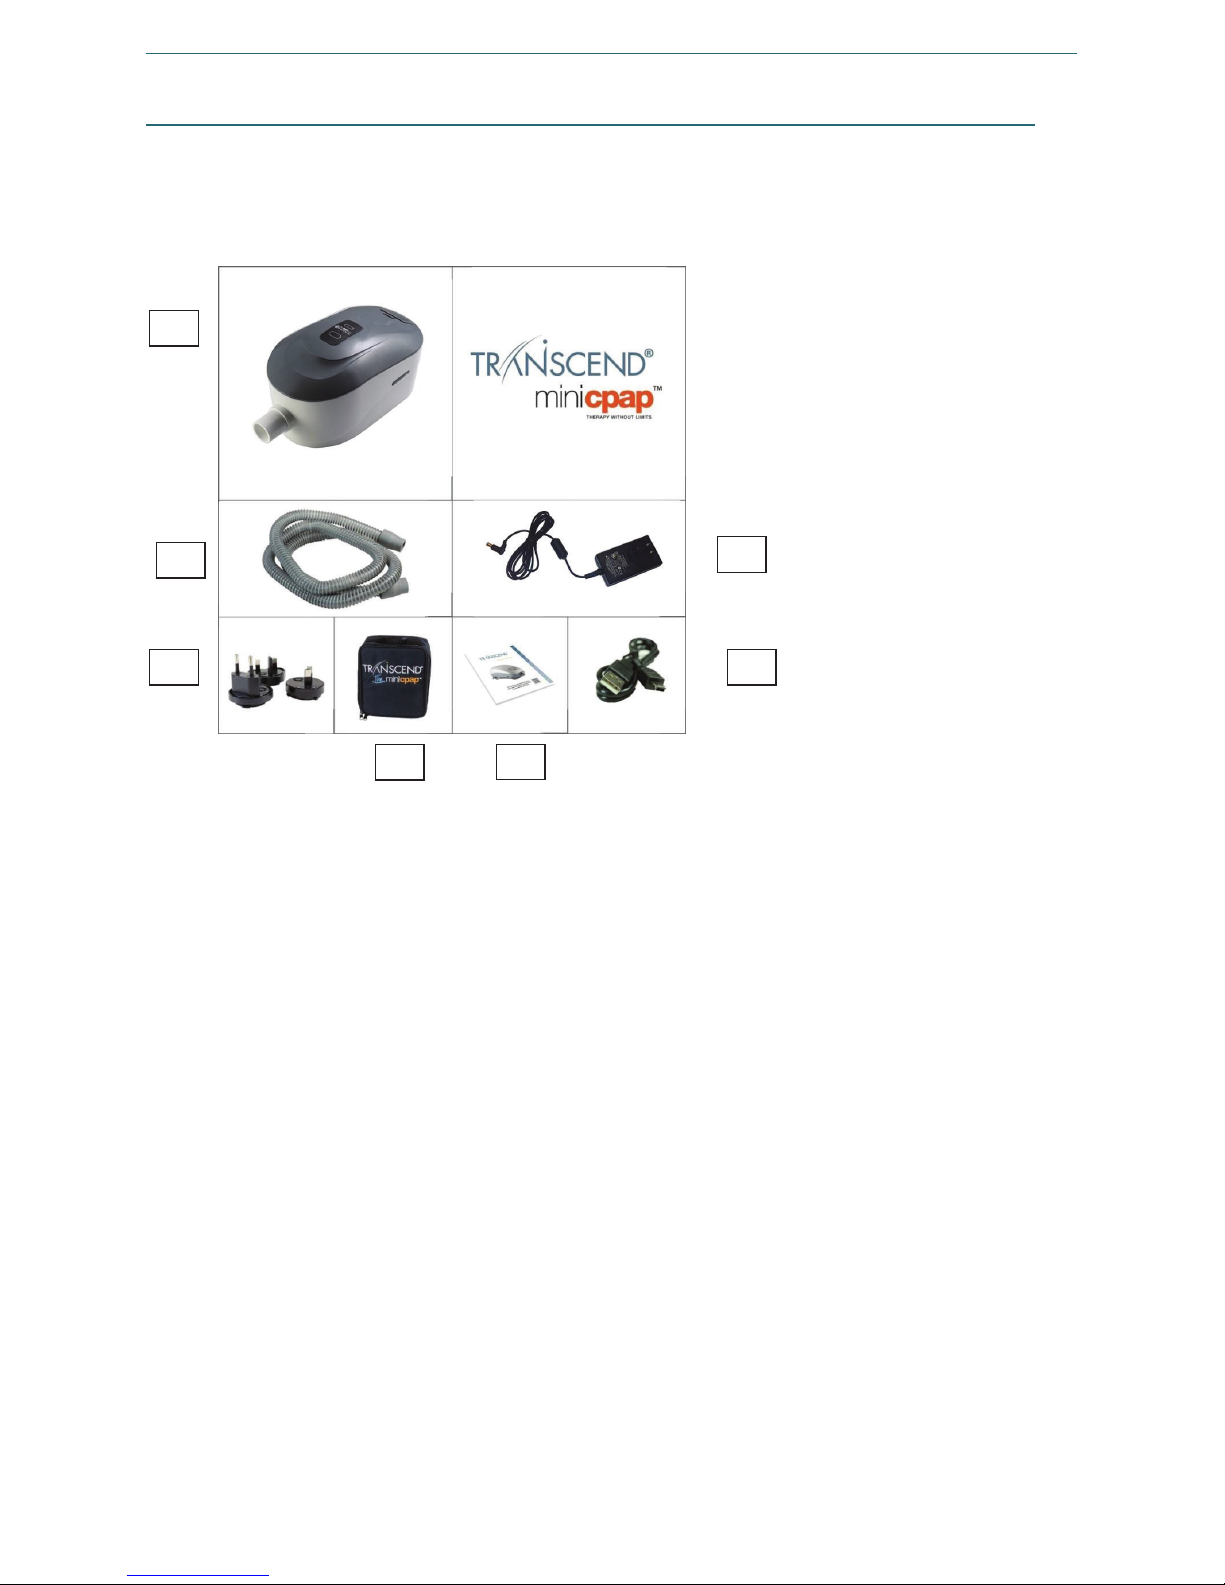
46
Guida rapida di Transcend 3 miniCPAP Pagina 5
Componenti di Transcend 3 miniCPAP
Iniziare a disimballare tutti gli articoli contenuti nella custodia da viaggio Transcend e
controllarli per assicurarsi che non siano stati danneggiati durante il trasporto. Segnalare
eventuali articoli mancanti o danneggiati al fornitore di prodotti sanitari per uso domestico
che ha consegnato il dispositivo Transcend.
1 Transcend 3 miniCPAP Auto o Transcend
3 miniCPAP
2 Tubo di alimentazione dell'aria
(compatibile con il raccordo standard da
22 mm)
3 Alimentatore universale multi-presa
(PSA2)
4 Confezione di spine intercambiabili
5 Custodia da viaggio Transcend
6 Guida rapida di Transcend 3 miniCPAP
7 Cavo USB
2
1
4 3 7
5
6
ITALIANO
Page 47

47
Guida rapida di Transcend 3 miniCPAP Pagina 6
Componenti inclusi (tutti i componenti seguenti vengono
venduti separatamente)
Alimentatore portatile Transcend
Transcend P
4
Battery
Transcend P
8
Battery
Caricabatterie portatile ad energia solare Transcend (da utilizzarsi come fonte
alternativa di ricarica per le batterie Transcend P
4
e P8)
Maschera paziente
Assemblaggio di Transcend 3 miniCPAP
1. Collegare il tubo di alimentazione dell'aria alla bocca di uscita dell'aria sul
dispositivo Transcend 3 miniCPAP.
2. Collegare la maschera all'estremità opposta del tubo di alimentazione dell'aria.
3. Collegare il connettore cilindrico dell'alimentatore allo spinotto di alimentazione del
Transcend 3 miniCPAP posizionato sul retro del dispositivo.
4. Collegare l'alimentatore a una presa a muro.
Utilizzo dell'alimentatore universale multi-presa (PSA2)
In dotazione con ciascun Transcend 3 miniCPAP sono presenti un alimentatore universale
multi-presa (PSA2) e una confezione di tre (3) spine intercambiabili. La confezione di
spine intercambiabili è adatta per l'uso nella maggior parte dei paesi di tutto il mondo.
1. Determinare il tipo di spina necessaria per alimentare il dispositivo in base al
modello della presa.
2. Se la spina corretta non è già collegata all'alimentatore, rimuoverla premendo il
tasto sulla spina staccabile e ruotandola in senso antiorario finché non si sgancia
dall'alimentatore.
3. Collegare la spina desiderata allineando le linguette sporgenti sul retro della stessa
con le fessure presenti sull'alimentatore e spingendo delicatamente la spina
nell'alloggiamento. Ruotare la spina in senso orario fino a quando non scatta in
posizione. Si dovrebbe sentire uno scatto.
4. Inserire il connettore cilindrico dell'alimentatore nello spinotto dell'alimentatore
posizionato sul retro del dispositivo Transcend 3 miniCPAP.
5. Inserire l'altra estremità dell'alimentatore a una presa della linea di alimentazione CA.
6. La sequenza di accensione delle luci LED del dispositivo Transcend 3 miniCPAP
dovrebbe avviarsi. Una volta che la sequenza di accensione delle luci LED è stata
completata, le luci LED si spengono. Questa sequenza indica che il dispositivo
Transcend 3 miniCPAP è attualmente alimentato e che ha completato l'accesso
alla modalità di standby.
ITALIANO
Page 48
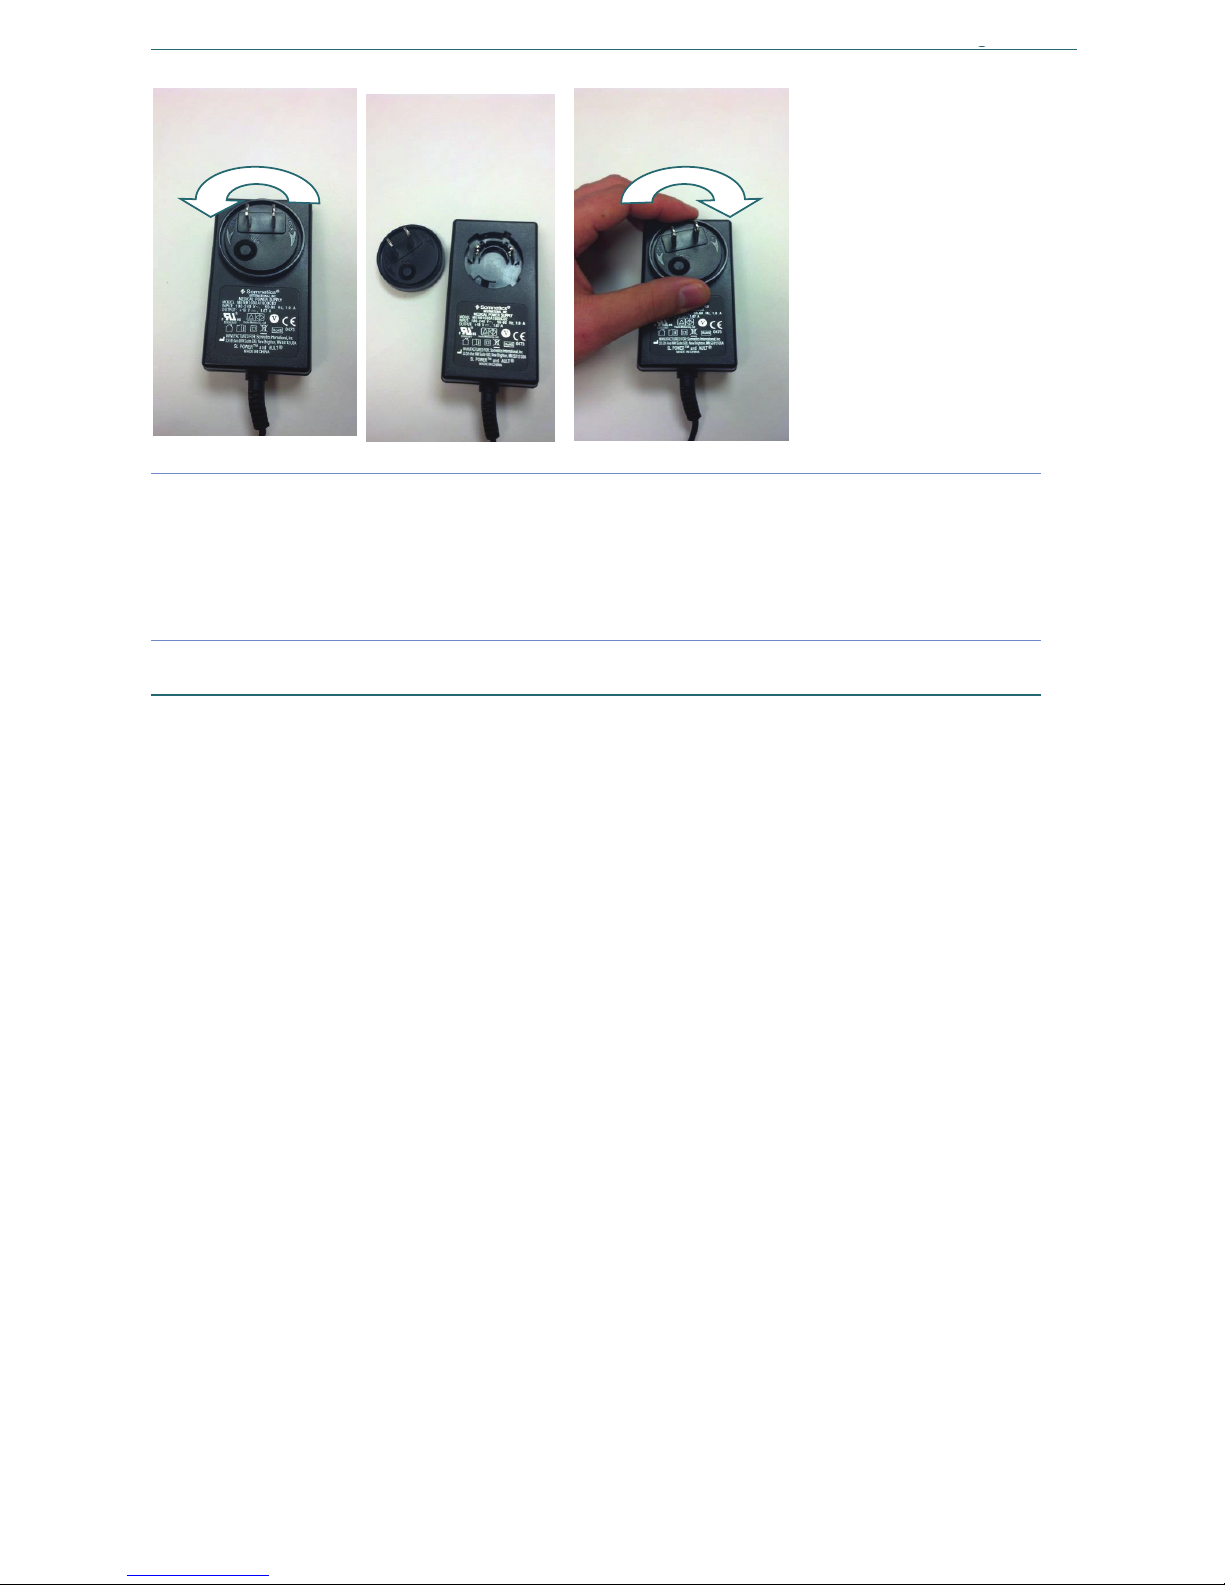
48
Guida rapida di Transcend 3 miniCPAP Pagina 7
Note Utilizzare solo gli alimentatori universali forniti da Somnetics. Non utilizzare un
convertitore di potenza o un trasformatore di tensione con l'alimentatore universale
PSA2.
Note Prima di inserire l'alimentatore nella presa a muro, assicurarsi che il collegamento
della spina sia completamente fissato all'alimentatore.
Dispositivo Transcend 3 miniCPAP
Il sistema Transcend 3 miniCPAP è predisposto per generare e regolare la terapia della
pressione continua positiva delle vie aeree per erogarla all'interfaccia (maschera).
Per erogare l'alimentazione nel dispositivo, al sistema Transcend 3 miniCPAP è necessario
collegare una fonte di alimentazione esterna.
Ricollegare: Inserire
la spina e ruotare
Rimuovere
la spina
Rimuovere:
Premere il pulsante
e ruotare
ITALIANO
Page 49
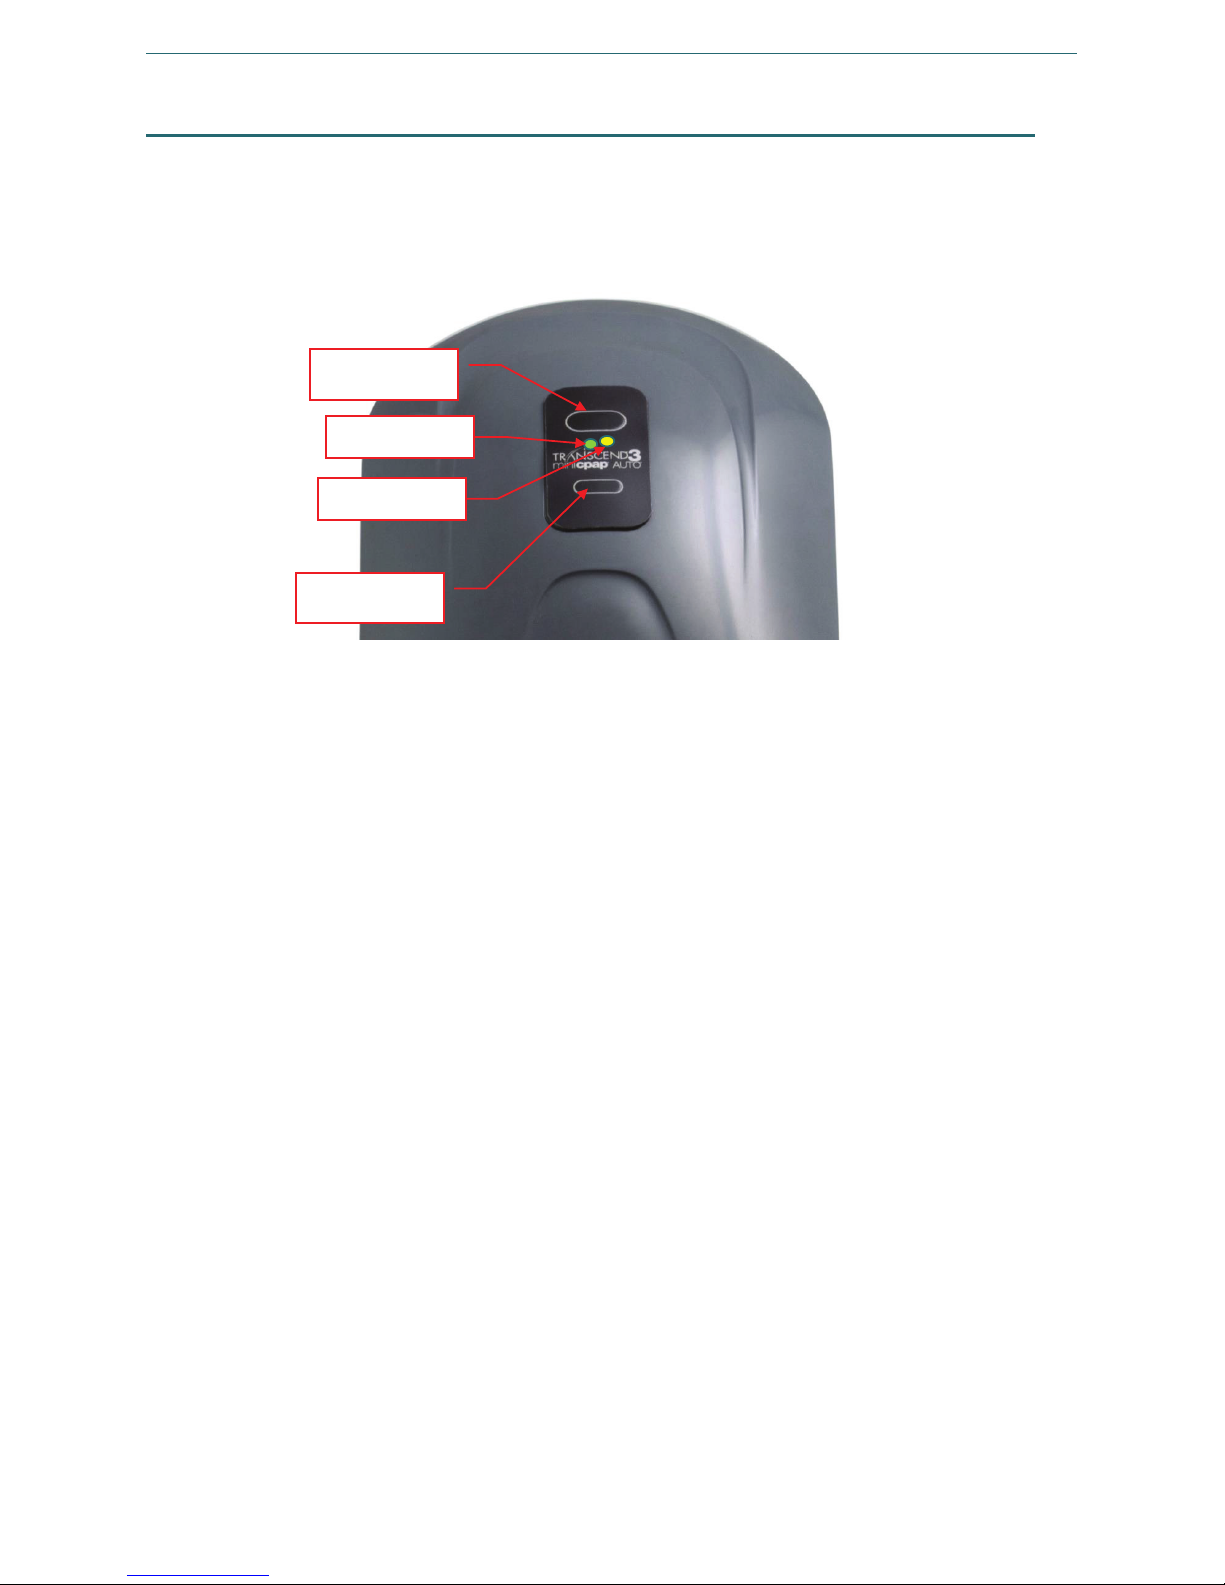
49
Guida rapida di Transcend 3 miniCPAP Pagina 8
Quadro di comando
Il quadro di comando del dispositivo Transcend 3 miniCPAP dispone di due pulsanti che
vengono utilizzati per attivare lo sfiato e la funzionalità della rampa della pressione.
Sono anche presenti due luci LED, inclusa una luce LED verde per indicare le modalità
di funzionamento normali e una luce LED gialla che indica le condizioni di errore.
Tasto di
accensione
Tasto della
rampa
Luce LED verde
Luce LED giallo
ITALIANO
Page 50
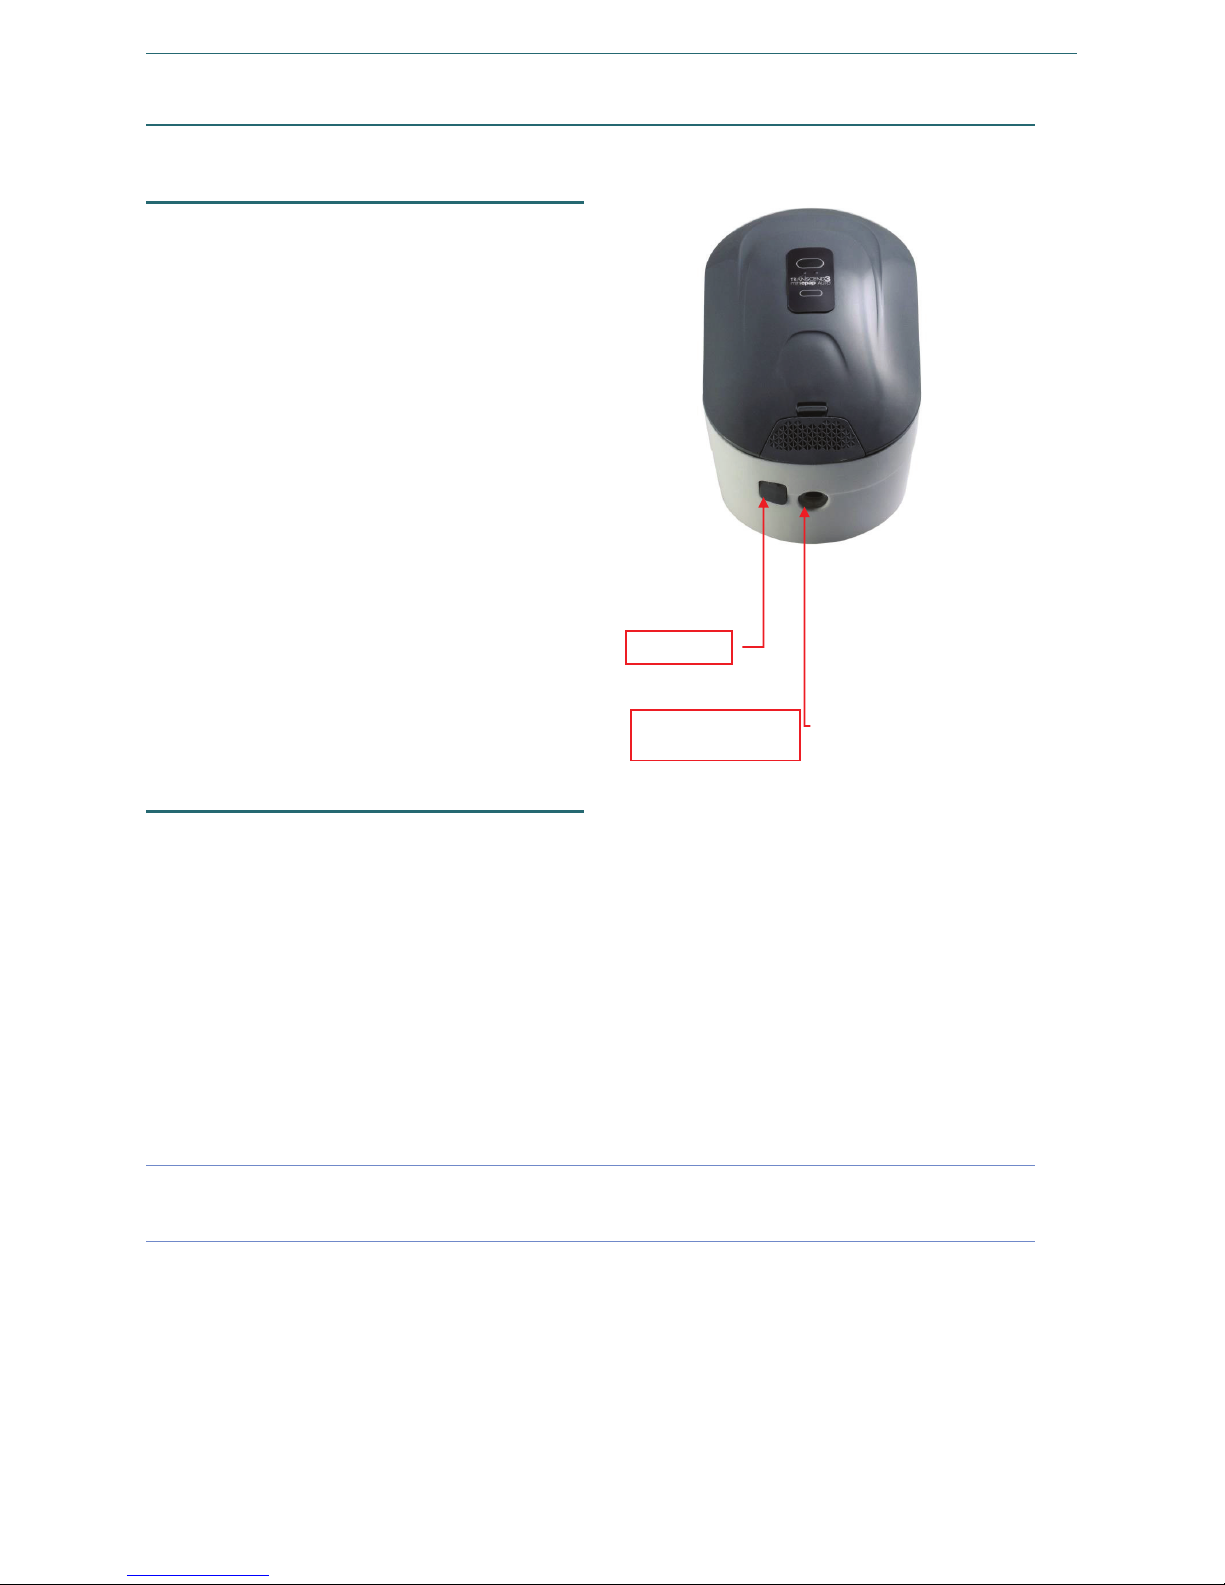
50
Guida rapida di Transcend 3 miniCPAP Pagina 9
Spinotto per il collegamento dell'alimentazione e porta USB
Spinotto dell'alimentazione
Per il funzionamento del dispositivo
Transcend 3 miniCPAP, lo spinotto
dell'alimentazione accetta la spina cilindrica
del cavo di uscita da una sorgente di
alimentazione CC.
Per alimentare il dispositivo Transcend 3
miniCPAP, è possibile utilizzare un'ampia
gamma di sorgenti di alimentazione.
Insieme al dispositivo viene fornito un
alimentatore per la conversione della
corrente da CA a CC, che deve essere
utilizzato quando il dispositivo viene
acceso con la linea di alimentazione
(presa a muro).
Alla presa della corrente continua va
collegato un alimentatore portatile
opzionale, come quelli che si trovano
nelle automobili, nei camion, nei camper,
nelle barche o in veicoli simili.
Per alimentare il sistema Transcend 3
miniCPAP, sono anche disponibili pacchi
batterie opzionali.
Porta USB
Per lo scambio diretto dei dati tra il
dispositivo Transcend 3 miniCPAP e un
computer tramite un cavo dati USB, è
prevista una porta mini-AB USB. Questa
interfaccia consente al medico di
configurare il dispositivo Transcend 3
miniCPAP per la prescrizione della
pressione, le impostazioni della rampa e
le impostazioni Auto e consente di accedere
ai dati sulla conformità terapeutica,
che possono essere visualizzati dall'utente
e inviati al medico.
Note Per garantire un buon collegamento, potrebbe essere necessario scollegare
e ricollegare i cavi.
Porta USB
Spinotto
dell'alimentazione
ITALIANO
Page 51

51
Guida rapida di Transcend 3 miniCPAP Pagina 10
Utilizzo del dispositivo Transcend 3 miniCPAP
Il quadro di comando del dispositivo Transcend 3 miniCPAP dispone di due pulsanti che
consentono di attivare lo sfiato e avviare la funzionalità della rampa della pressione.
Sono anche presenti due luci LED, inclusa una luce LED verde per indicare le modalità di
funzionamento normali e una luce LED gialla che indica le condizioni di errore. Lo stato
operativo del dispositivo Transcend 3 miniCPAP viene visualizzato dagli stati delle luci LED.
Quando una sorgente di alimentazione viene collegata al dispositivo, la sequenza
di accensione delle luci LED del dispositivo Transcend 3 miniCPAP dovrebbe avviarsi.
Una volta che la sequenza di accensione delle luci LED è stata completata, le luci LED si
spengono. Questa sequenza indica che il dispositivo Transcend 3 miniCPAP è attualmente
alimentato e che ha completato l'accesso alla modalità di standby. Durante la
somministrazione della terapia, le luci LED rimangono spente per non disturbare
il paziente e/o il compagno di letto.
Note Se il dispositivo Transcend 3 miniCPAP non dovesse più essere alimentato durante
la somministrazione della terapia, la somministrazione della terapia verrà riavviata
subito dopo che l'alimentazione è stata ripristinata e dopo che si è premuto il
pulsante di alimentazione. Prima che lo sfiato venga riavviato, il dispositivo ripeterà
la sequenza di accensione delle luci LED.
Modalità utente standard
Il normale funzionamento consiste in quattro modalità:
Spento
Quando il dispositivo non è collegato a una sorgente di alimentazione,
il dispositivo è spento. I LED del quadro di comando sono entrambi spenti.
Standby
Quando l'alimentazione viene applicata al dispositivo, la sequenza di
accensione delle luci LED viene completata ed il dispositivo entra nella
modalità di standby. La modalità di standby può anche essere avviata
premendo il pulsante di alimentazione quando il dispositivo è nella modalità
acceso o se la maschera viene rimossa nella modalità acceso. Finché
l'alimentazione viene fornita al dispositivo, esso rimarrà nella modalità
di standby fino quando vengono avviate le modalità acceso e asciugatura.
Acceso
Nella modalità acceso, lo sfiato è in funzione e viene generata la pressione
della terapia regolata dal dispositivo. Le luci LED rimangono spente.
La modalità acceso viene avviata premendo il tasto di alimentazione quando
il dispositivo è nella modalità di standby e la maschera viene indossata
dal paziente.
Asciugatura
Per avviare la modalità di asciugatura, premere simultaneamente il tasto
Rampa e il tasto di Accensione. Nella modalità di asciugatura, lo sfiato girerà
a bassa velocità per 30 minuti. Nella modalità di asciugatura, le luci LED
rimangono spente e la pressione dello sfiato non viene regolata per
somministrare la terapia.
ITALIANO
Page 52

52
Guida rapida di Transcend 3 miniCPAP Pagina 11
Avvio della terapia
Collegare il dispositivo Transcend 3 miniCPAP ad una fonte di alimentazione
e attendere che acceda alla modalità di standby.
Prima di iniziare la terapia, assicurarsi che l'interfaccia sia saldamente in posizione.
Per iniziare la terapia, premere il tasto di accensione. Se il tasto di accensione viene
premuto quando il dispositivo Transcend 3 miniCPAP è nella modalità di standby,
verrà avviata la modalità acceso. L'aria inizierà a defluire non appena la funzione
dello sfiato o della rampa si attiva con la pressione della terapia prescritta.
Uso della funzione della rampa
La funzione della rampa consente di acclimatare gli utenti al flusso dell'aria avviandosi
ad una pressione inferiore e aumentando gradualmente la regolazione della pressione
prescritta mentre l'utente si addormenta. La sezione del presente manuale dedicata al
software illustra come modificare le impostazioni della rampa sul proprio dispositivo.
Per accelerare la velocità di incremento della pressione durante l'utilizzo della rampa,
tenere premuto il tasto Rampa fino a quando il dispositivo raggiunge una pressione
terapica confortevole. Quando il tasto Rampa viene rilasciato, il dispositivo continuerà
nella modalità rampa fino a raggiungere la pressione terapica prescritta.
Accertarsi che il dispositivo Transcend 3 miniCPAP sia nella modalità acceso.
Altrimenti, premere il tasto di accensione.
Sistemare la maschera per evitare perdite.
Premere il tasto della rampa. La pressione scenderà alla pressione iniziale della rampa
e aumenterà gradualmente per un determinato lasso di tempo fino a raggiungere la
pressione terapica prescritta.
Note Se si preme momentaneamente il tasto Rampa quando la pressione viene erogata
dalla rampa, ciò non avrà nessun effetto sulla pressione erogata. Per arrestare
l'aumento graduale della pressione erogata dalla rampa, spegnere il dispositivo
premendo il tasto di accensione. La pressione terapica prescritta verrà erogata
all'accensione successiva dello sfiato.
Note Se durante l'utilizzo della rampa dovesse verificarsi un'interruzione dell'alimentazione,
il dispositivo Transcend 3 miniCPAP riprenderà ad erogare tutta la pressione prescritta
non appena l'alimentazione verrà ripristinata.
Utilizzo della funzionalità EZEX
La funzionalità EZEX è una caratteristica speciale che riduce la pressione terapica durante
la respirazione. Questa funzionalità è stata progettata per offrire comfort aggiuntivo al
paziente, riducendo la quantità di resistenza avvertita durante la respirazione.
La funzionalità EZEX è munita di quattro impostazioni: OFF, 1, 2 o 3 aumentano
progressivamente la quantità della pressione scaricata da nessuna a massima. La sezione
del manuale dedicata al software illustra come modificare le impostazioni EZEX.
ITALIANO
Page 53
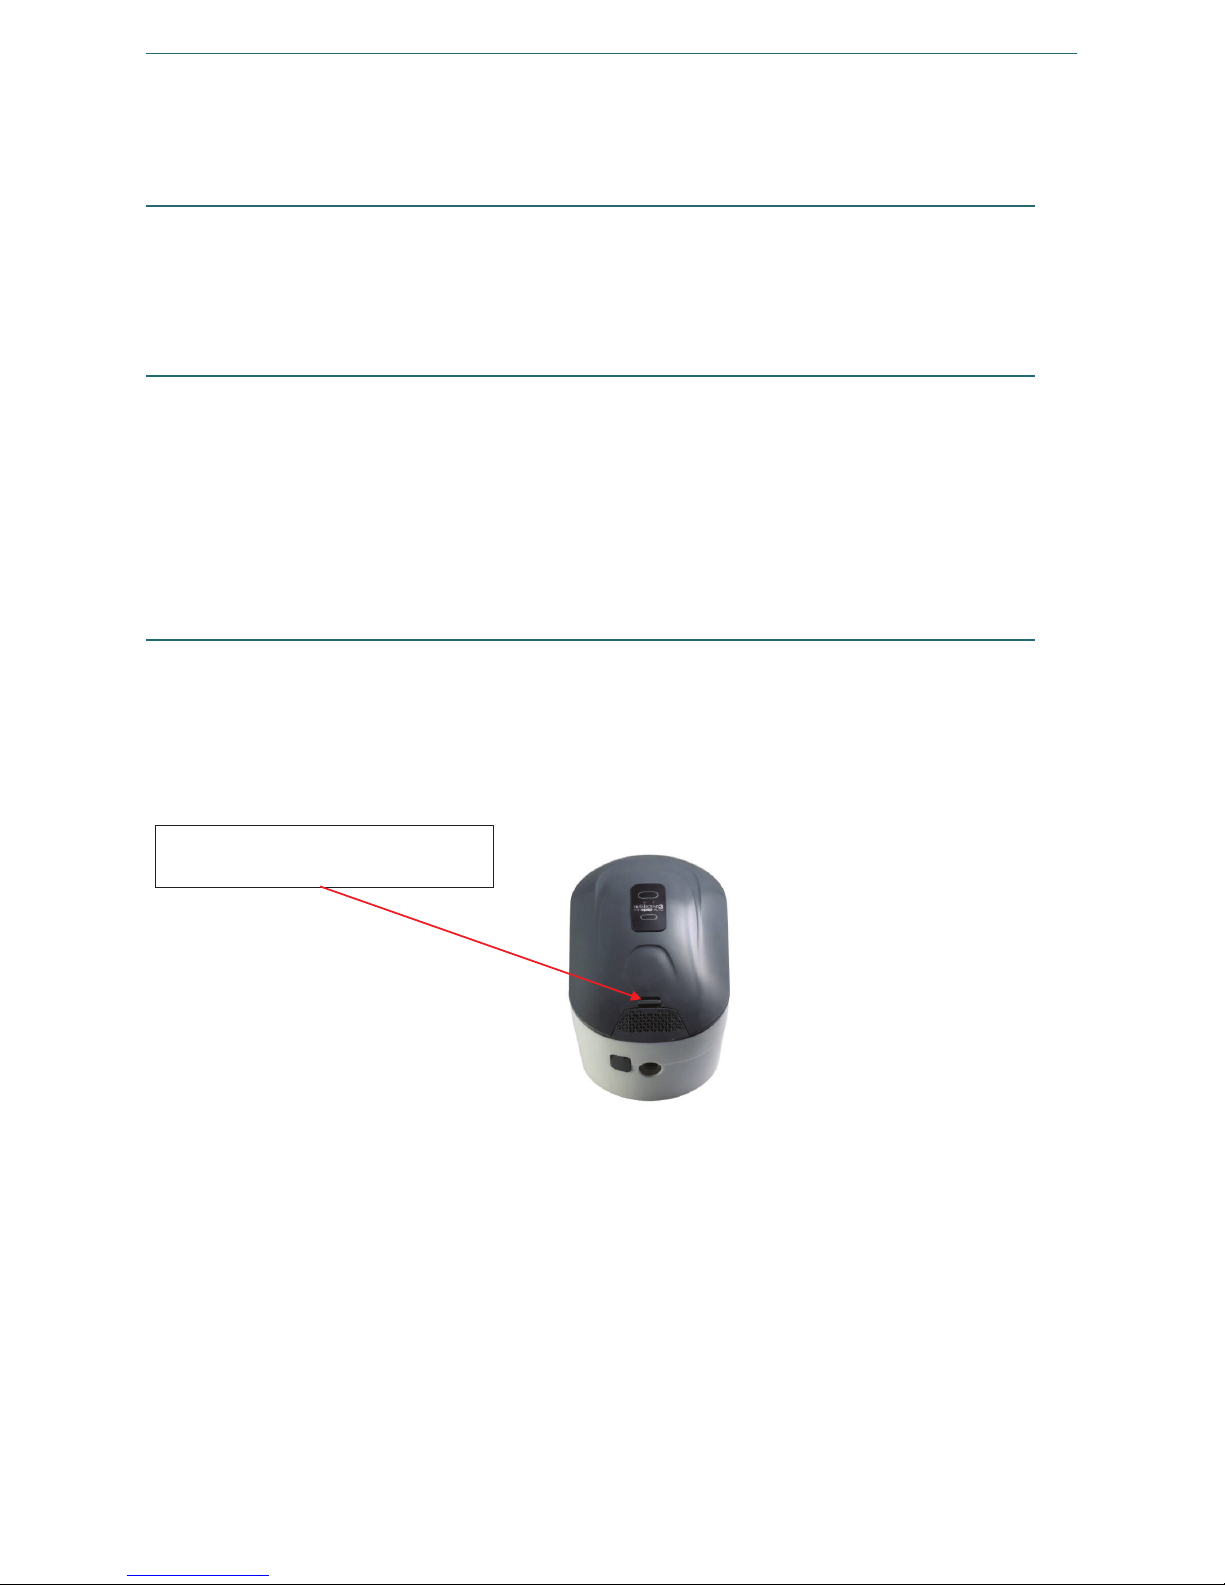
53
Guida rapida di Transcend 3 miniCPAP Pagina 12
Nota: Per scaricare il Manuale Utente del dispositivo Transcend 3 miniCPAP visitare
la pagina www.mytranscend.com/support o chiamare il servizio clienti Somnetics
al numero 877-621-9626 per richiedere una copia.
Arresto della terapia
Per fermare l'erogazione della terapia quando lo sfiato è acceso, premere il tasto
diAccensione per disattivare lo sfiato e ripristinare la modalità di standby del dispositivo.
Per asciugare l'interno del dispositivo, si consiglia di avviare la modalità di asciugatura
dopo ogni seduta terapica.
Modalità di asciugatura
Al termine di ciascuna seduta terapica, si consiglia di avviare la modalità di asciugatura.
Per avviare la modalità di asciugatura, premere simultaneamente il tasto Rampa e il tasto
di Accensione. Nella modalità di asciugatura, lo sfiato girerà a bassa velocità per 30 minuti.
Nella modalità di asciugatura, le luci LED rimangono spente e la pressione dello sfiato non
viene regolata per somministrare la terapia. Con la modalità di asciugatura è possibile
spurgare l'aria dal sistema e rimuovere le tracce di umidità ancora presenti all'interno dei
dispositivi e del circuito delle vie aeree. Dopo i 30 minuti richiesti dal ciclo di asciugatura,
lo sfiato si spegne e il dispositivo passa automaticamente alla modalità standby.
Sostituzione del supporto filtrante
Il supporto filtrante del dispositivo Transcend 3 miniCPAP deve essere sostituito almeno
ogni sei mesi.
Rimuovere il gruppo di filtraggio tirando la linguetta sul retro del dispositivo. Quindi,
estrarre il gruppo di filtraggio dal dispositivo. Rimuovere l'intero gruppo di filtraggio
e sostituirlo con uno nuovo.
Tirare la linguetta per il rilascio
del gruppo di filtraggio.
ITALIANO
Page 54

54
Guida rapida di Transcend 3 miniCPAP Pagina 13
Cura del dispositivo Transcend 3 miniCPAP e dei componenti
Avvisi:
Scollegare il dispositivo Transcend 3 miniCPAP prima di pulirlo.
Non immergere il dispositivo Transcend 3 miniCPAP o l'alimentatore in un liquido.
Evitare che l'acqua penetri nelle aperture del dispositivo.
Non usare detergenti aggressivi o abrasivi per pulire il dispositivo o qualsiasi
componente dello stesso.
Non tentare di sterilizzare il dispositivo Transcend 3 miniCPAP.
Non inserire materiali per la pulizia, quali un panno o liquido, all'interno del
connettore di ingresso/uscita dell'aria del dispositivo.
Pulizia delle parti esterne
Per pulire l'esterno del dispositivo Transcend 3 miniCPAP, attenersi alle seguenti istruzioni.
1. Scollegare l'alimentatore prima di pulirlo e scollegare il dispositivo dai cavi
dell'alimentazione.
2. Mescolare una soluzione di detergente liquido neutro al 5% con acqua distillata
(6,5 litri di detergente liquido per litro di acqua distillata). Il detergente delicato deve
contenere tensioattivi anionici biodegradabili e senza fosfati.
3. Immergere un panno di cotone privo di lanugine nella soluzione detergente.
4. Strizzare l'acqua in eccesso dal panno, quindi pulire la parte esterna del dispositivo
Transcend 3 miniCPAP per circa 20 secondi strofinando delicatamente avanti e indietro,
dalla parte anteriore fino alla parte posteriore del dispositivo. Per rimuovere
adeguatamente l'accumulo di sporcizia, applicare una pressione ferma e assicurare
il contatto con tutte le superfici di contatto accessibili.
5. Per rimuovere i residui della soluzione detergente, sciacquare il panno in acqua pulita.
6. Strizzare l'acqua in eccesso dal panno, quindi strofinare il dispositivo Transcend 3
miniCPAP con un movimento di strofinatura delicato per rimuovere tutta la soluzione
detergente rimasta sulla sua superficie.
Strofinare il dispositivo con un panno di cotone asciutto e privo di lanugine fino
a quando il dispositivo è completamente asciutto.
Pulizia degli accessori
I seguenti accessori devono essere puliti mescolando una soluzione di detergente liquido
neutro al 5% con acqua distillata (6,5 litri di detergente liquido per litro di acqua
distillata). Il detergente delicato deve contenere tensioattivi anionici biodegradabili
e senza fosfati. Seguire questa procedura per pulire gli accessori.
Accessorio Ciclo di pulizia periodico Ciclo di vita del prodotto
Tubo di alimentazione dell'aria
Quotidianamente 3 mesi
ITALIANO
Page 55
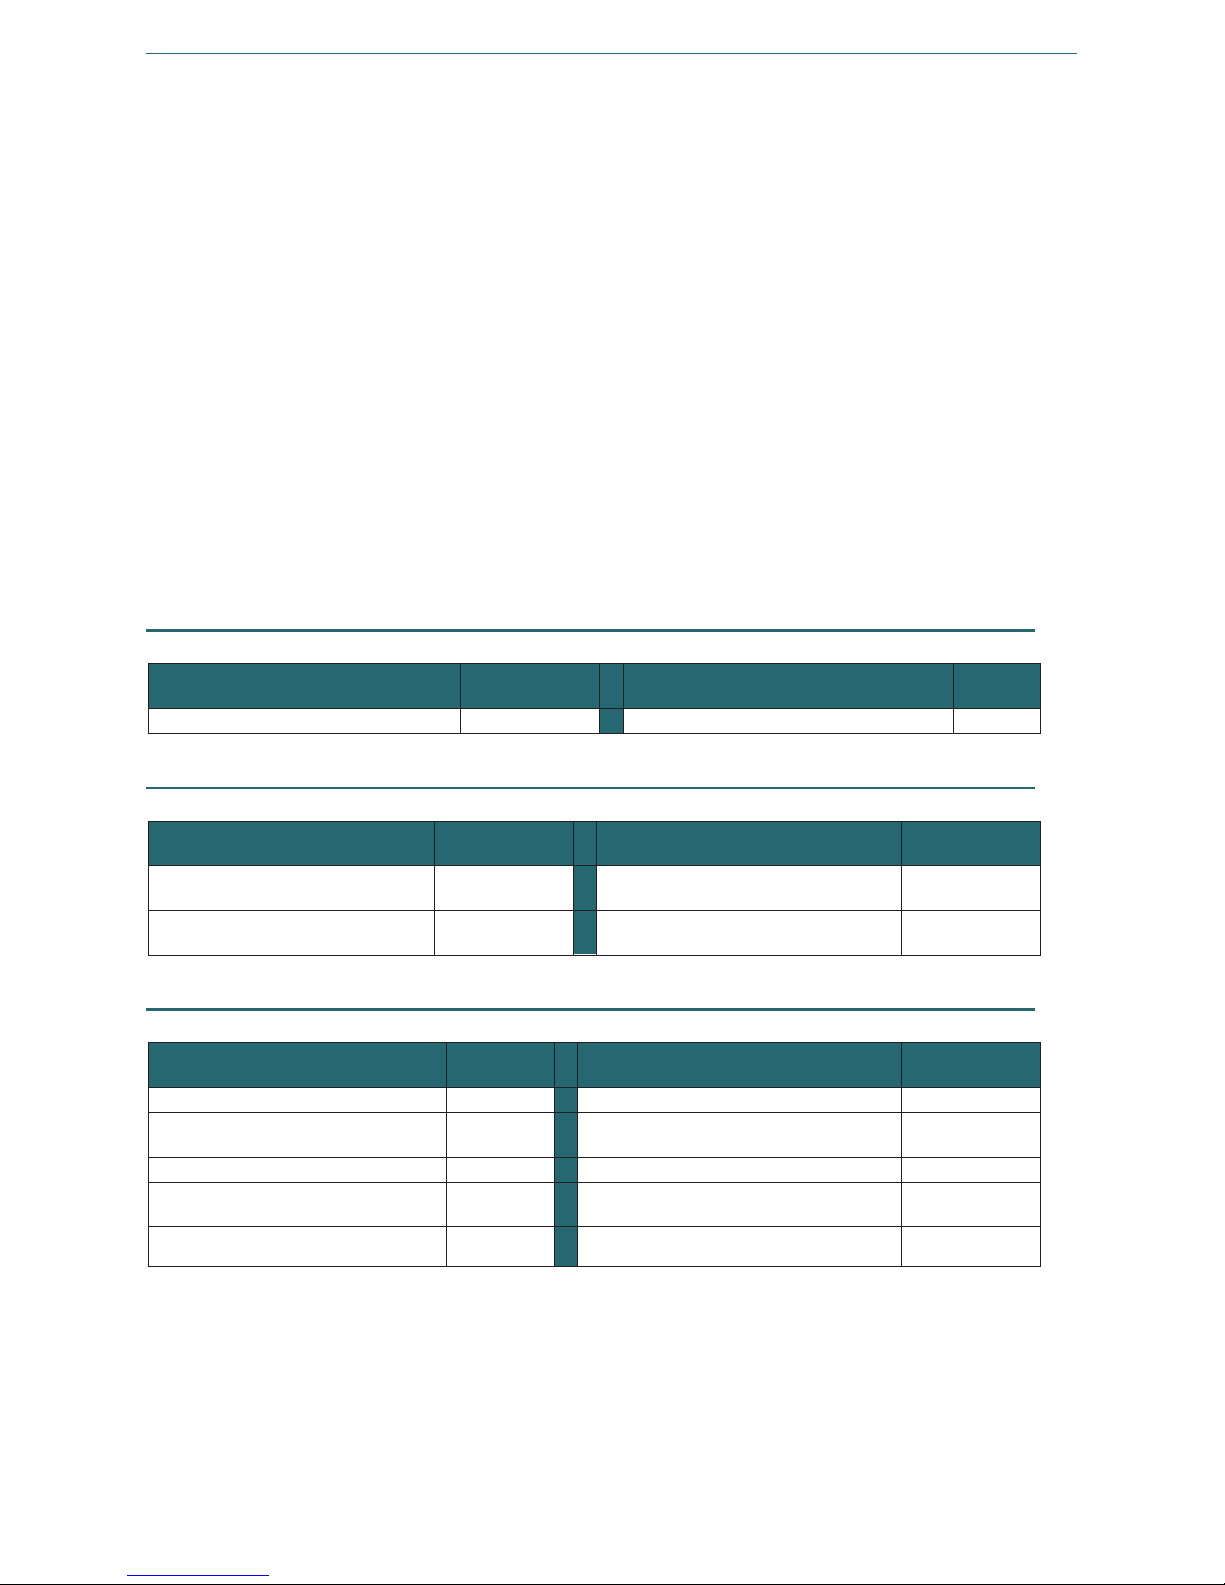
55
Guida rapida di Transcend 3 miniCPAP Pagina 14
1. Immergere completamente il tubo di alimentazione dell'aria nella soluzione detergente.
2. Mentre è immerso, pulire la superficie con un panno di cotone. Per rimuovere
adeguatamente l'accumulo di sporcizia, applicare una pressione ferma e assicurare
il contatto con tutte le superfici di contatto accessibili.
3. Pulire l'interno del tubo di alimentazione dell'aria sollevando e quindi abbassando
le estremità del tubo, mentre il tubo viene riempito con la soluzione detergente.
4. Sciacquare il tubo di alimentazione dell'aria immergendolo in acqua distillata. Spostare
il tubo di alimentazione dell'aria con un movimento avanti e indietro per circa
10 secondi in modo da rimuovere i residui della soluzione detergente.
5. Sciacquare il tubo di alimentazione dell'aria in acqua distillata, immergendolo
completamente. Sollevare, quindi abbassare le estremità del tubo mentre il tubo viene
riempito con acqua. Ripetere questo movimento per circa 10 secondi in modo da
rimuovere i residui della soluzione detergente.
6. Asciugare l'esterno del tubo alimentazione dell'aria con un panno di cotone asciutto
e privo di lanugine. Fare asciugare il tubo all'aria fino a quando l'interno del tubo
è asciutto. La durata del tempo di asciugatura dipende dalle condizioni ambientali.
Parti monouso
Articolo Codice
articolo
Articolo Codice
articolo
Gruppo di filtraggio Transcend 3
503109
Tubo standard da 1,8 m
503081
Accessori
Articolo Codice
articolo
Articolo Codice
articolo
Transcend P8 Battery
503023
Alimentatore portatile Transcend
(MPA1)
503029
Transcend P4 Battery
503026
Transcend Portable Solar Battery
Charger
503056
Parti di ricambio
Articolo Codice
articolo
Articolo Codice
articolo
Transcend 3 miniCPAP Auto
503104
Custodia da viaggio Transcend
503012
Unità di servizio Transcend 3
miniCPAP Auto
503105
Alimentatore universale multi-presa
(PSA2)
503059
Transcend 3 miniCPAP
503106
Confezione spine intercambiabili
503060
Unità di servizio Transcend 3
miniCPAP
503107
Cavo USB
503020
Alimentatore universale multi-presa
(Contiene 503059 e 503060)
503078
ITALIANO
Page 56
56
ESPANOL
˜
Transcend 3 miniCPAP
™
Guida rapida
Page 57

57
Guía rápida del dispositivo Transcend 3 miniCPAP Página 2
Introducción
Gracias por elegir a Transcend, el líder innovador en la terapia de CPAP portátil.
El dispositivo Transcend 3 miniCPAP suministra una presión positiva continua en las vías
aéreas de 4 a 20 cm de agua, según lo prescrito por el médico. La familia de productos
Transcend 3 miniCPAP incluye los dispositivos Transcend 3 miniCPAP y Transcend 3
miniCPAP Auto. Los botones y las luces LED facilitan el control y proporcionan feedback
del funcionamiento. El sistema Transcend 3 miniCPAP también incluye una toma de
alimentación de corriente continua y un puerto USB.
Nota: Si desea una descripción más detallada del dispositivo, junto procedimientos
para resolver problemas, descargue el manual de usuario de Transcend 3 miniCPAP
en www.mytranscend.com/support, o llame al servicio de atención al cliente de
Somnetics (877-621-9626) para solicitar un ejemplar.
Precauciones al utilizar un ordenador con Transcend 3
miniCPAP
Se mencionan las siguientes precauciones para la seguridad del paciente o de la persona
que maneja el ordenador, ya que se requieren para cumplir las normativas de seguridad
IEC 60601-1-1.
Definiciones Un ordenador que cumple con los estándares de seguridad 60950-1 es
un equipo que cumple con los estándares de seguridad UL 60950-1 o
IEC 60950-1.
No enchufe ningún dispositivo en el puerto USB del sistema Transcend 3 miniCPAP que
no sea un ordenador que cumpla con los estándares de seguridad 60950-1. La conexión
de cualquier otro dispositivo al puerto USB del Transcend 3 miniCPAP puede dañar el equipo
y puede no ser seguro para el usuario.
Para reducir el riesgo de corrientes de fuga, utilice un transformador de aislamiento que
disponga de la aprobación IEC 60601-1 para suministrar energía al ordenador.
No enchufe en una regleta el ordenador que cumpla con los estándares de seguridad
60950-1 o su equipo Transcend.
Al utilizar el ordenador que cumple con los estándares de seguridad 60950-1, siga las
instrucciones de limpieza del fabricante.
Al utilizar un ordenador que cumple con los estándares de seguridad 60950-1, siga las
instrucciones del fabricante para realizar un mantenimiento preventivo.
No conecte al puerto USB de Transcend 3 miniCPAP a su ordenador que cumple con los
estándares de seguridad 60950-1 durante el mantenimiento preventivo del ordenador.
No toque el ordenador que cumple con los estándares de seguridad 60950-1 y ningún
metal expuesto en Transcend 3 miniCPAP o en los cables de Transcend 3 miniCPAP al
mismo tiempo.
No toque ningún metal expuesto en el ordenador que cumple con los estándares de
seguridad 60950-1 o un metal expuesto en conectores o cables.
Los médicos no deben tocar simultáneamente el ordenador que cumple con los estándares
de seguridad 60950-1 y al paciente.
No utilice ordenadores con voltajes internos a los que se pueda acceder sin el uso de
herramientas.
ESPANOL
˜
Page 58

58
Guía rápida del dispositivo Transcend 3 miniCPAP Página 3
Advertencias
No introduzca agua en el dispositivo. El dispositivo Transcend 3 miniCPAP no debe
exponerse a condiciones medioambientales en las que el sistema pueda humedecerse.
Este dispositivo no está destinado para la reanimación cardiopulmonar.
El sistema Transcend 3 miniCPAP debe configurarse y ajustarse por un proveedor
cualificado antes de usarse para la rampa y presión terapéuticas.
La temperatura del flujo del aire producida por este dispositivo puede llegar a -12ºC
más que la temperatura de la habitación. Hay que actuar con precaución si la
temperatura de la habitación es superior a 32ºC.
No bloquee ni obstruya las aberturas de espiración de la mascarilla. Siga las
instrucciones del fabricante incluidas con la mascarilla.
No utilice este equipo con oxígeno o en presencia de una mezcla de anestésicos
inflamables con aire u oxígeno, o con óxido nitroso. Las fuentes de oxígeno deben
estar situadas a más de 1 metro del equipo para evitar el riesgo de incendio
y quemaduras.
El sistema Transcend 3 miniCPAP solo se puede utilizar con los accesorios
suministrados y recomendados. El uso de accesorios no recomendados puede provocar
un aumento de las emisiones electromagnéticas o a una disminución de la inmunidad
electromagnética del sistema PAP, lo que puede ser potencialmente peligroso.
El sistema Transcend 3 miniCPAP no es a prueba de desfibrilación.
No esterilice el sistema Transcend 3 miniCPAP.
Si son múltiples los pacientes que van a utilizar el dispositivo debe instalarse un
filtro antibacteriano entre el dispositivo y el tubo del circuito de respiración para
impedir los contagios.
El dispositivo solo debe utilizarse con mascarillas y conectores recomendados por
Somnetics o por los recomendados por el profesional médico. No se debe utilizar la
mascarilla hasta que se encienda el dispositivo y esté ofreciendo correctamente la
presión terapéutica o rampa. No deben obstruirse las aberturas de espiración de
la mascarilla. Explicación de la advertencia: El dispositivo está destinado a usarse
con mascarillas o conectores específicamente diseñados que tengan aberturas de
espiración para permitir un flujo de aire continuo fuera de la mascarilla. Cuando el
dispositivo funciona correctamente, el flujo de aire del dispositivo expulsa el aire
exhalado a través de la abertura de espiración de la mascarilla. Sin embargo,
cuando el dispositivo no está funcionando, no se suministrará suficiente aire fresco
por la mascarilla, por lo que el aire exhalado se puede reinhalar.
Si no se usa una mascarilla o accesorio que minimice la respiración de dióxido
de carbono o que permita la respiración espontánea, se puede producir asfixia.
No coloque el equipo en la cama. Cubrir los tubos de respiración con una manta
o calentarlos puede afectar la calidad de la terapia o lesionar al usuario.
Para evitar la desconexión de los tubos durante el uso, solo deben utilizarse tubos
que cumplan con las normas ISO 5367 o ISO 80601-2-74.
ESPANOL
˜
Page 59

59
Guía rápida del dispositivo Transcend 3 miniCPAP Página 4
Existe un peligro de estrangulación con el cable de alimentación o el tubo de aire.
Se pueden enrollar en torno al cuello y provocar la ESTRANGULACIÓN. Mantenga
el cable de alimentación y el tubo de aire a más de un metro de distancia de una
cuna de bebé y lejos del alcance de los niños. Mantenga el cable y el tubo fuera
del alcance de los niños.
Es improbable que piezas pequeñas salgan expulsadas del receptáculo del sistema
Transcend 3 miniCPAP, pero en caso de un daño importante, se pueden fragmentar
los componentes internos y provocar una situación de peligro por aspiración
o asfixia si salen del receptáculo.
Precauciones
La legislación federal de EE.UU. limita la venta de este dispositivo únicamente a
facultativos autorizados o por una orden facultativa.
El sistema Transcend 3 miniCPAP funciona únicamente con la fuente de alimentación
suministrada por Somnetics, con un adaptador de corriente portátil o con baterías.
Interrumpa el uso del sistema Transcend 3 miniCPAP y póngase en contacto con
el médico si se observan irritaciones respiratorias o cutáneas.
No introduzca objetos a la entrada o salida de aire del sistema Transcend 3 miniCPAP.
Inspeccione la fuente de alimentación en busca de signos de desgaste o daño antes
de cada uso. Reemplace el cable de alimentación si es necesario.
Somnetics recomienda sustituir el tubo de salida después de tres meses de uso.
Para proteger el medioambiente, algunas piezas y accesorios del sistema Transcend
3 miniCPAP deben desecharse, incluyendo las baterías opcionales, de acuerdo con
la normativa local.
El equipo no debe cubrirse ni colocarse de manera que afecte negativamente al
rendimiento del equipo, ya que también puede crear un problema de seguridad.
Algunos ejemplos de ello son:
o El equipo no debe colocarse en una cama.
o El equipo no debe colocarse en ningún otro lugar que no sea sobre una
superficie firme y plana.
o No lo coloque en un lugar donde las mascotas o los niños puedan acceder
al equipo.
o No lo coloque en una ventana abierta u otro lugar donde el polvo o las plagas
(insectos) puedan afectar a la seguridad o al rendimiento del equipo.
o No lo coloque junto a una cortina que bloquee el flujo de aire de refrigeración
y provoque así un sobrecalentamiento del equipo.
o No bloquee el orificio de entrada de aire, interfiriendo así con la terapia.
DBP
El dispositivo contiene DBP (un ftalato). La exposición significativa al DBP puede
interferir con el desarrollo normal del tracto reproductivo masculino. Las pruebas
han demostrado que los niveles de exposición al DBP están por debajo de los
límites establecidos. Las mujeres que están embarazadas o amamantando pueden
tratar los beneficios y riesgos de este dispositivo con un médico.
ESPANOL
˜
Page 60
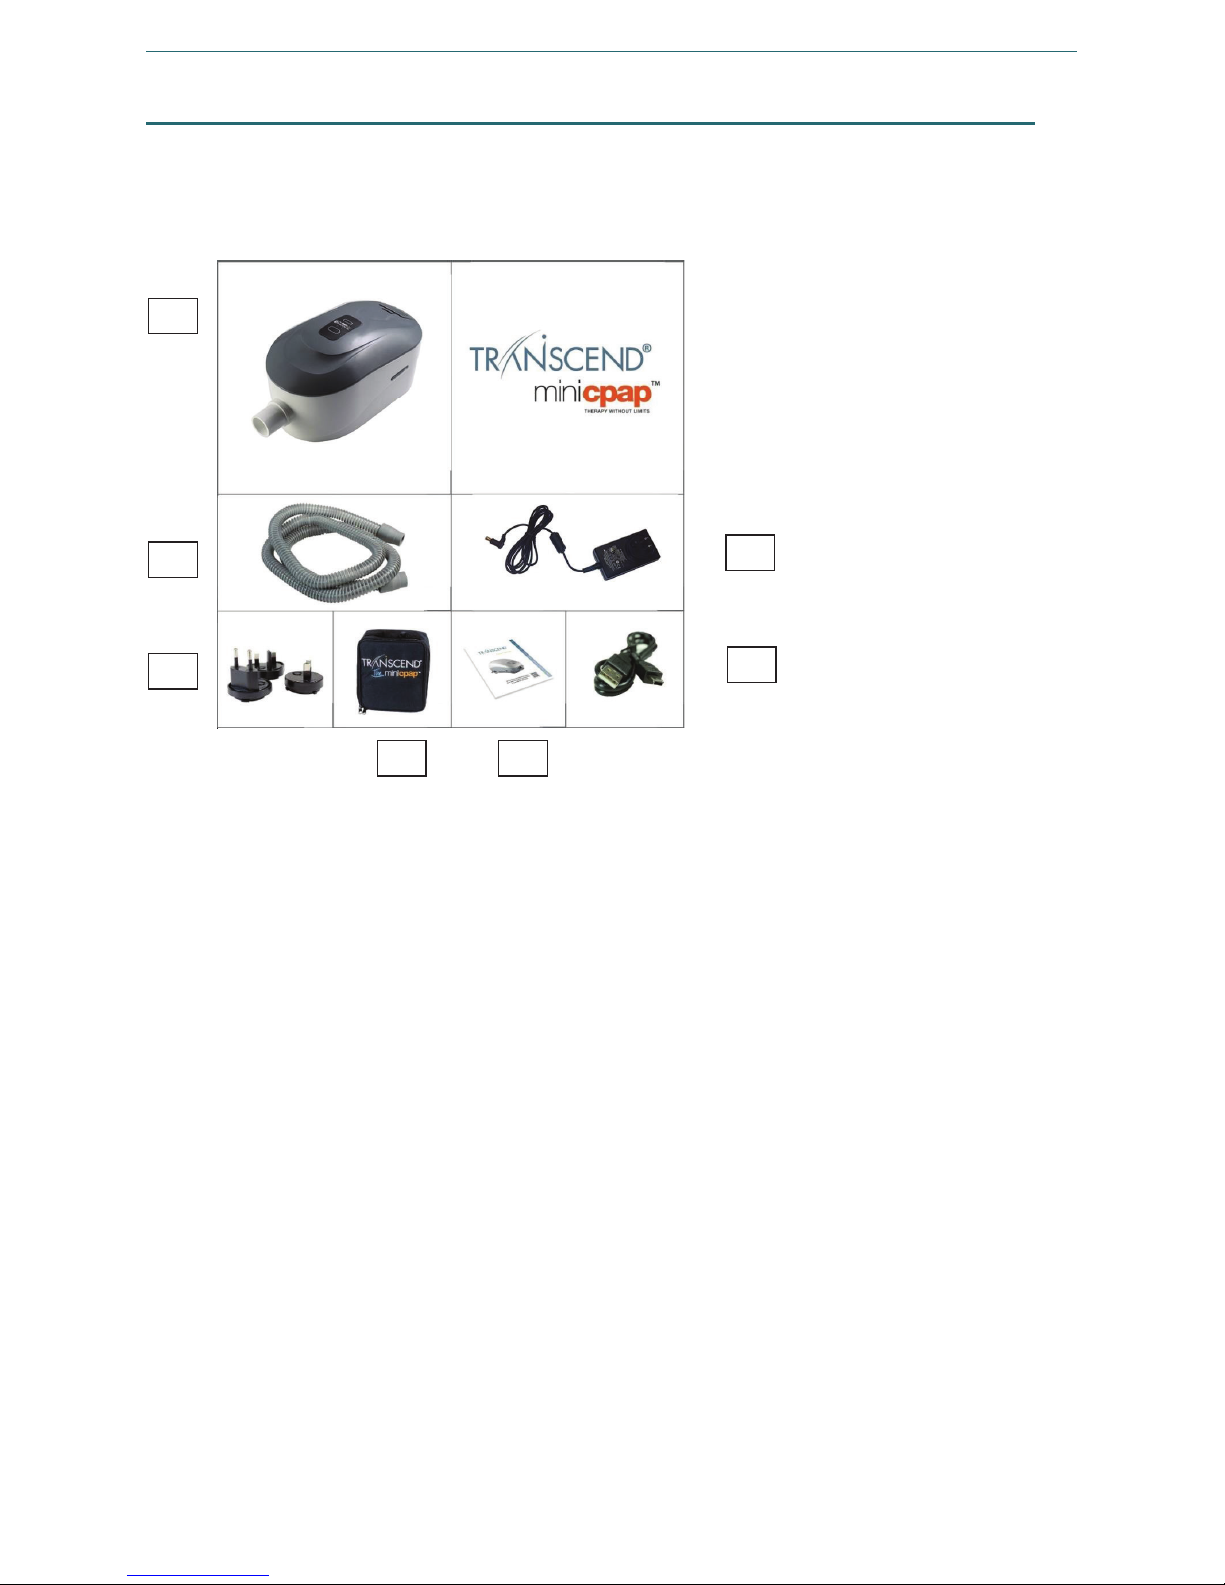
60
Guía rápida del dispositivo Transcend 3 miniCPAP Página 5
Componentes del Transcend 3 miniCPAP
Comience desembalando todas las piezas de la bolsa de viaje de Transcend e inspecciónelas
para asegurarse de que no se han dañado durante el envío. Informe de cualquier pieza
que falte o que esté dañada al distribuidor de productos sanitarios que le haya
suministrado el producto.
1 Transcend 3 miniCPAP Auto o Transcend
3 miniCPAP
2 Tubo de suministro de aire (compatible
con el conector estándar de 22 mm)
3 Fuente de alimentación universal con
varios enchufes (PSA2)
4 Paquete de enchufes intercambiables
5 Bolsa de viaje de Transcend
6 Guía rápida del dispositivo Transcend 3
miniCPAP
7 Cable USB
1
2
4
3
7 5 6
ESPANOL
˜
Page 61

61
Guía rápida del dispositivo Transcend 3 miniCPAP Página 6
Elementos no incluidos (se venden por separado)
Adaptador de corriente portátil Transcend
Batería Transcend P
4
Batería Transcend P
8
Cargador solar de baterías portátil Transcend (para usarse como fuente de carga
alternativa de las baterías Transcend P
4
y P8)
Mascarilla para el paciente
Montaje del sistema Transcend 3 miniCPAP
1. Conecte el tubo de suministro de aire a la salida de aire del dispositivo Transcend 3
miniCPAP.
2. Conecte la mascarilla al extremo opuesto del tubo de suministro de aire.
3. Enchufe el conector redondo de la fuente de alimentación en el conector de
alimentación de Transcend 3 miniCPAP en la parte posterior del dispositivo.
4. Conecte la fuente de alimentación a una toma de pared.
Uso de la fuente de alimentación universal con varios enchufes
(PSA2)
La fuente de alimentación universal con varios enchufes (PSA2) y el paquete de enchufes
intercambiables con tres (3) enchufes intercambiables se incluyen en todos los Transcend
3 miniCPAP. Los paquetes de enchufes intercambiables son adecuados para su uso en la
mayoría de los países de todo el mundo.
1. Determine qué tipo de enchufe se requiere para suministrar energía al dispositivo
en función del tipo de toma.
2. Si el enchufe correcto no está ya conectado a la fuente de alimentación, extraiga
el enchufe conectado apretando el botón que se encuentra en el enchufe extraíble
y girando el enchufe hacia la izquierda hasta que se suelte de la fuente de
alimentación.
3. Para conectar el enchufe correcto, alinee las lengüetas que sobresalen en la parte
posterior del enchufe con los orificios de la fuente de alimentación y empújelos
suavemente hasta que estén correctamente colocados. Gire el enchufe hacia
la derecha hasta que oiga un chasquido, lo que significa que está colocada
correctamente. Debería oír un "clic".
4. Introduzca el conector redondo de la fuente de alimentación en la toma situada
en la parte trasera del dispositivo Transcend 3 miniCPAP.
5. Introduzca el otro extremo de la fuente de alimentación en una toma de alimentación
de corriente alterna.
ESPANOL
˜
Page 62
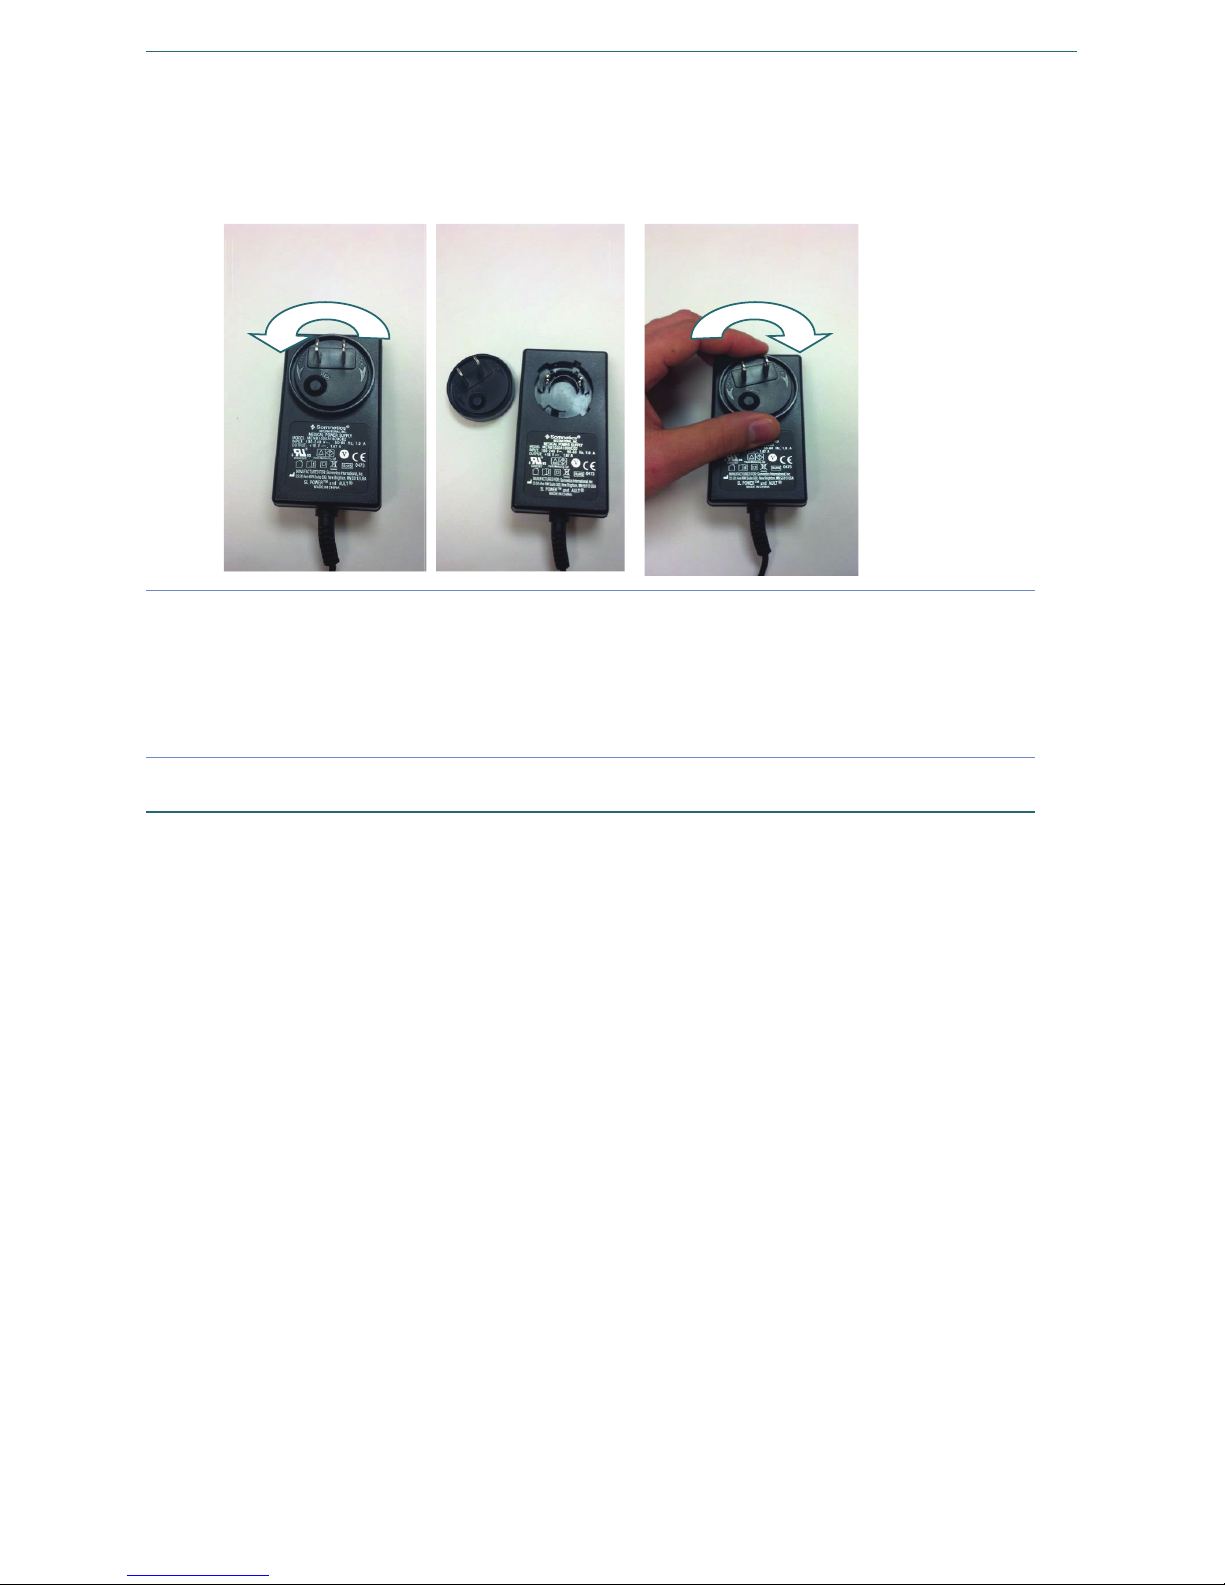
62
Guía rápida del dispositivo Transcend 3 miniCPAP Página 7
6. Se debería iniciar una secuencia de parpadeos del LED de encendido del Transcend
3 miniCPAP. Cuando la secuencia de parpadeos haya acabado, las luces LED se
apagarán. Esta secuencia indica que se está suministrando corriente eléctrica al
dispositivo Transcend 3 miniCPAP y que este ha entrado correctamente en el modo
de espera.
Note Utilice solo fuentes de alimentación suministradas por Somnetics. No utilice un
convertidor de potencia o un transformador de voltaje con la fuente de alimentación
universal PSA2.
Note Asegúrese de que el enchufe está firmemente conectado a la toma de alimentación
antes de introducir la fuente de alimentación en la toma de pared.
Dispositivo Transcend 3 miniCPAP
Transcend 3 miniCPAP está preparado para generar y regular el suministro de una terapia
de presión continua en las vías aéreas a la interfaz. Una fuente de alimentación externa se
conecta al sistema Transcend 3 miniCPAP para suministrar corriente eléctrica al dispositivo.
Recolocación:
Inserte el enchufe
y gire
Retire el
enchufe
Extraer: Pulse
el botón y gire
ESPANOL
˜
Page 63
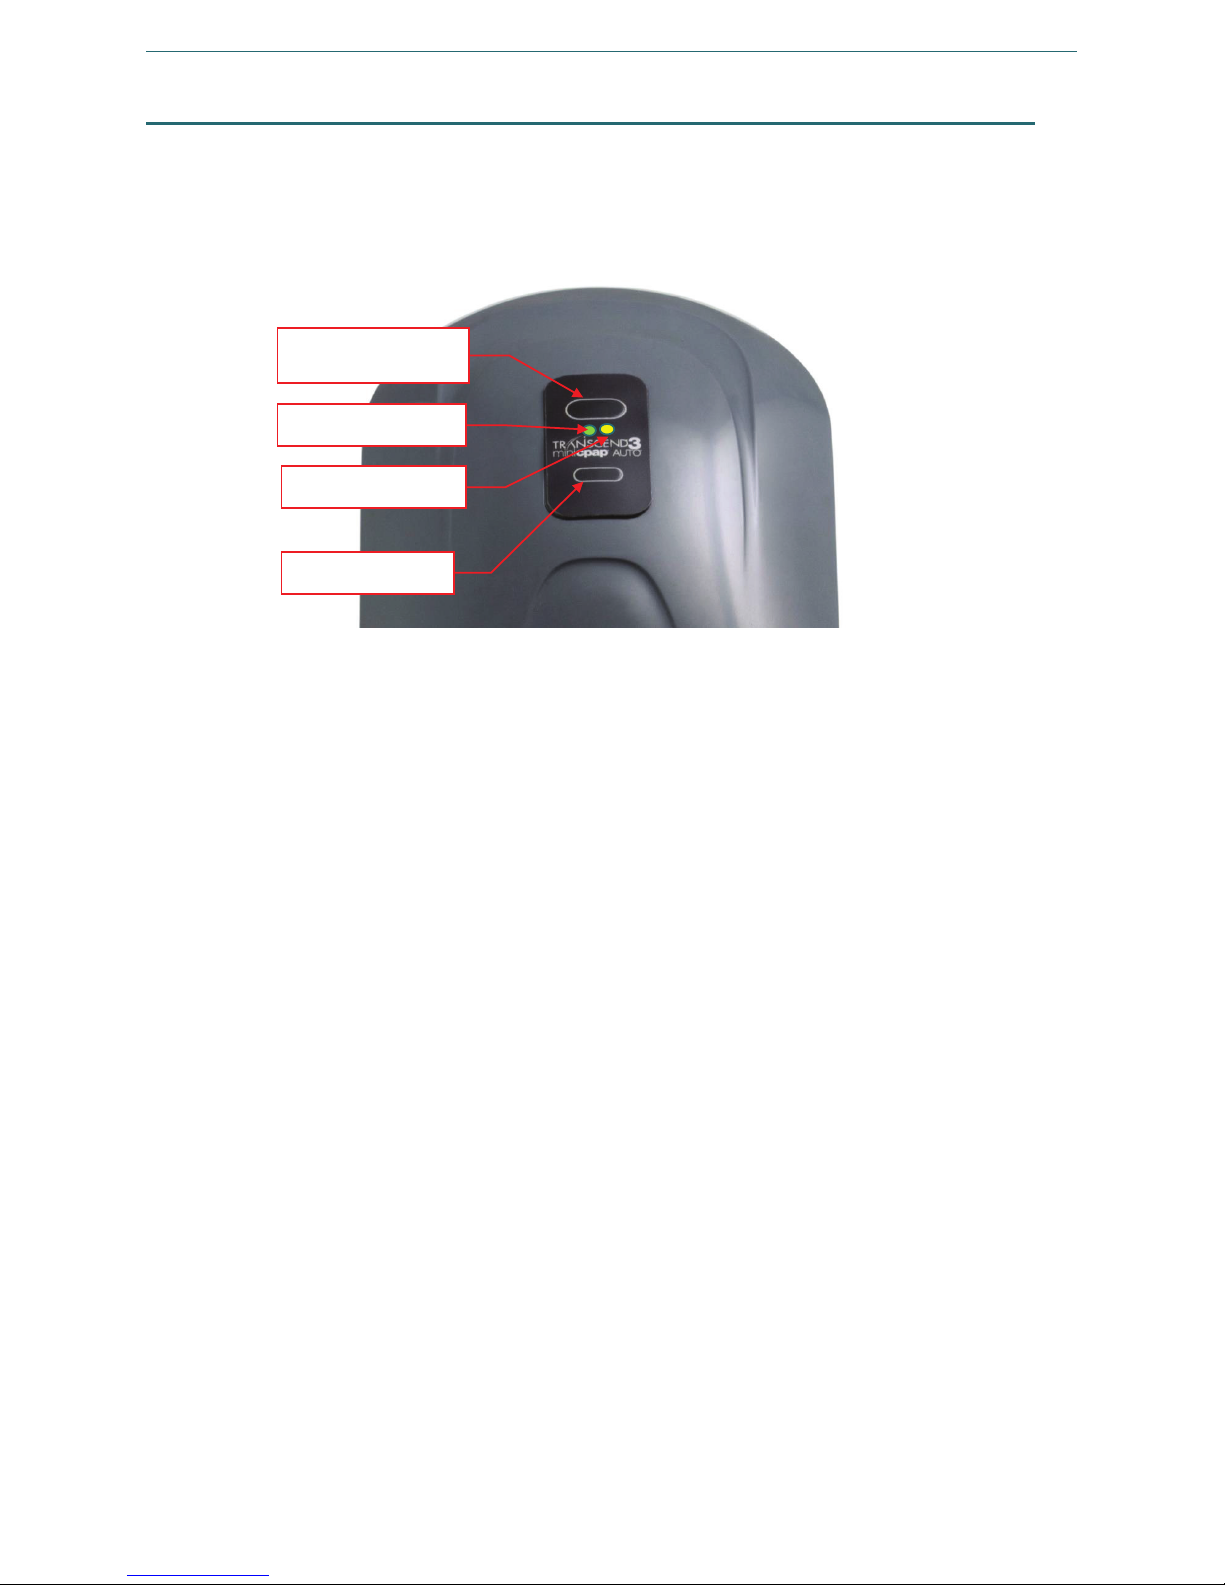
63
Guía rápida del dispositivo Transcend 3 miniCPAP Página 8
Panel de control
El panel de control del sistema Transcend 3 miniCPAP cuenta con dos botones pulsadores
que se utilizan para activar el respirador y la función de rampa de presión. También
dispone de dos luces LED, un LED verde para indicar los modos de funcionamiento
normales y un LED amarillo que indica una condición de fallo.
Botón de
encendido/apagado
Botón Rampa
LED verde
LED amarillo
ESPANOL
˜
Page 64
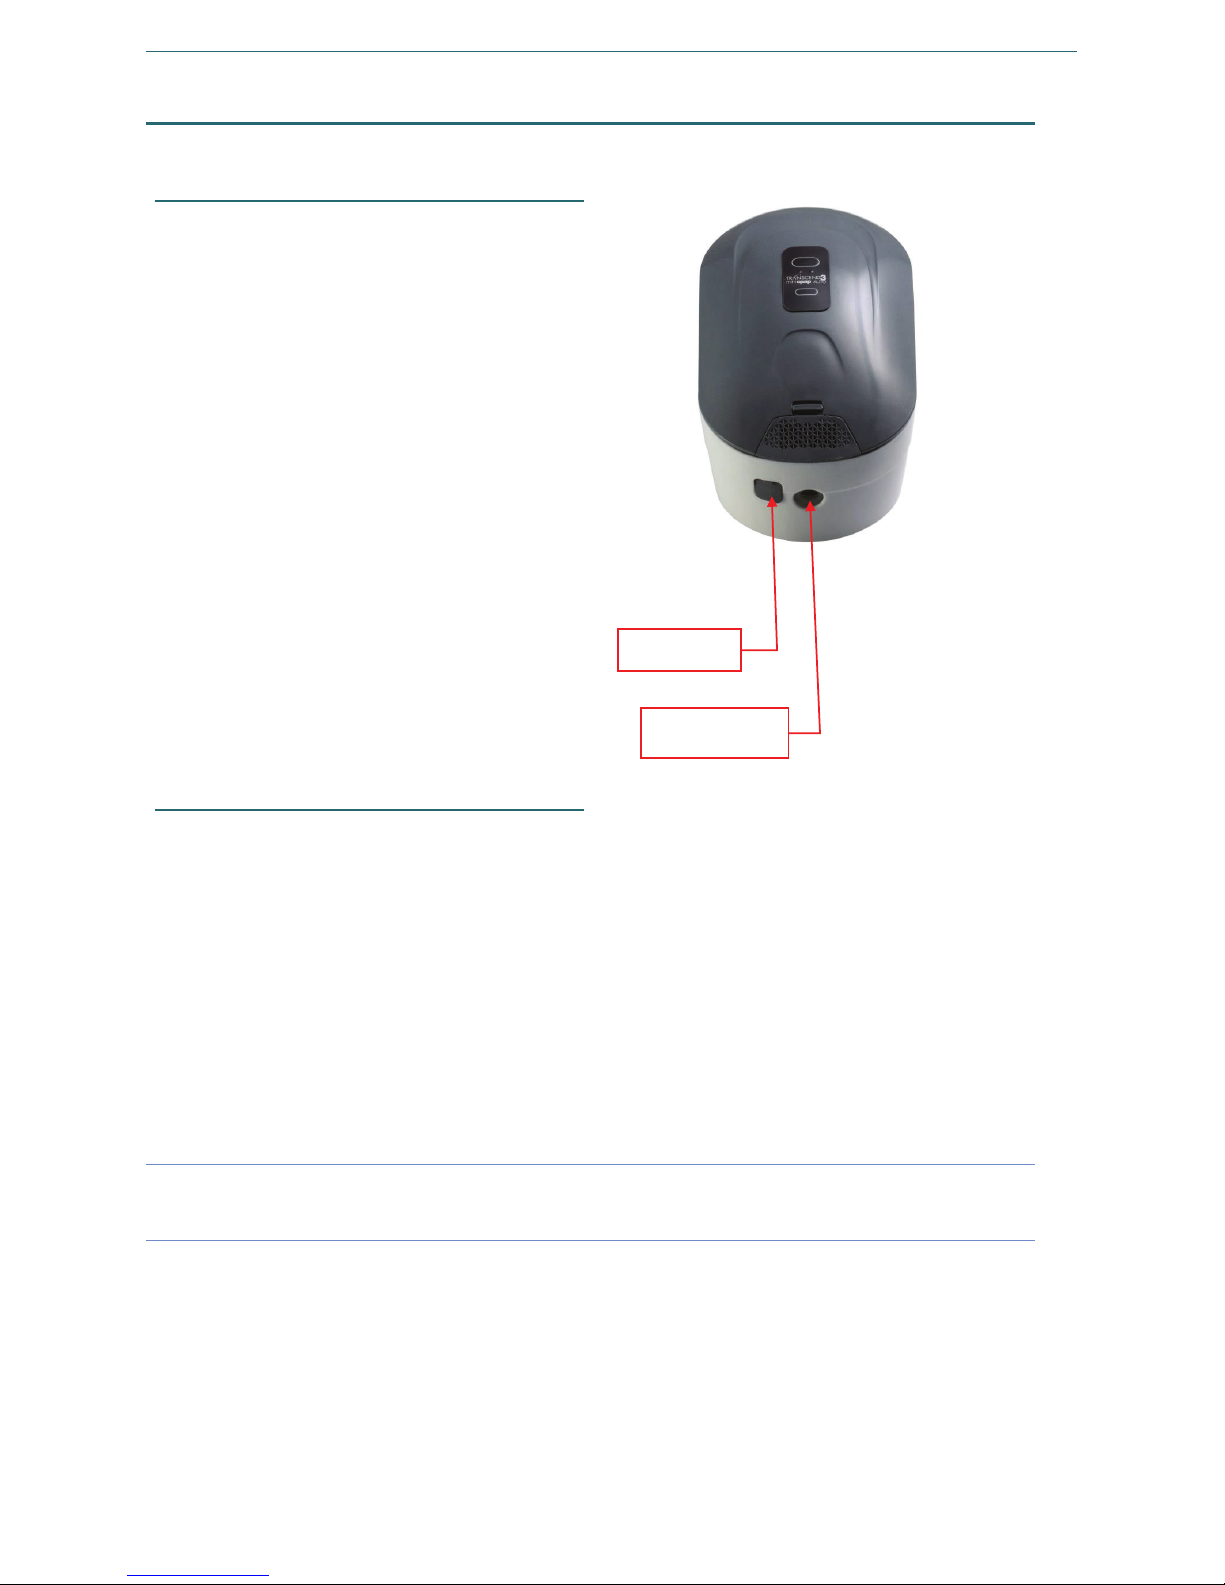
64
Guía rápida del dispositivo Transcend 3 miniCPAP Página 9
Enchufe de conexión de alimentación y puerto USB
Toma de alimentación
Para que funcione el dispositivo Transcend
3 miniCPAP, hay que enchufar el cable de
alimentación de corriente continua en la
toma de alimentación del dispositivo.
El dispositivo Transcend 3 miniCPAP
admite una variedad de fuentes de
energía. Se incluye en el dispositivo una
fuente de alimentación que convierte la
corriente alterna en corriente continua y
debe utilizarse al alimentar el dispositivo
por una línea de alimentación (toma de
pared).
Un adaptador de alimentación portátil
opcional se conecta a una toma de
alimentación de corriente continua, como
la que se encuentra en los automóviles,
camiones, autocaravanas, barcos o
vehículos similares.
Asimismo están disponibles paquetes de
baterías Transcend opcionales para
suministrar alimentación al Transcend 3
miniCPAP.
Puerto USB
Se incluye un puerto USB mini-AB para el
intercambio directo de datos entre el
dispositivo Transcend 3 miniCPAP y un
ordenador, a través de un cable de datos
USB. Esta interfaz permite al médico
configurar el dispositivo Transcend 3
miniCPAP de acuerdo con la presión
prescrita, los ajustes de rampa y Auto
y proporciona acceso a la información
de adherencia terapéutica que puede ver
el usuario y enviar por correo electrónico
al médico.
Note Si lo estima oportuno, desenchufe los cables y vuelva a enchufarlos para
cerciorarse de que están perfectamente conectados.
Puerto USB
Toma de
alimentación
ESPANOL
˜
Page 65

65
Guía rápida del dispositivo Transcend 3 miniCPAP Página 10
Uso del dispositivo Transcend 3 miniCPAP
El panel de control del dispositivo Transcend 3 miniCPAP cuenta con dos botones de
pulsación que activan el respirador e inician la función de rampa de la presión. También
dispone de dos luces LED, un LED verde para indicar los modos de funcionamiento
normales y un LED amarillo que indica una condición de fallo. El estado de funcionamiento
de dispositivo Transcend 3 miniCPAP aparece indicado por los estados de iluminación
del LED.
Cuando una fuente de alimentación está conectada al dispositivo Transcend 3 miniCPAP,
se debe iniciar una secuencia de parpadeos del LED de encendido. Cuando la secuencia
de parpadeos haya acabado, las luces LED se apagarán. Esta secuencia indica que se está
suministrando corriente eléctrica al dispositivo Transcend 3 miniCPAP y que este ha
entrado correctamente en el modo de espera. Durante el suministro de la terapia, los LED
permanecen apagados para evitar molestar al paciente o al compañero de habitación.
Note Si el dispositivo Transcend 3 miniCPAP pierde energía mientras se suministra la
terapia, reanudará el aporte de la terapia tan pronto como se restaure la energía
y se pulse el botón de encendido/apagado. El dispositivo repetirá la secuencia del
parpadeo del LED de encendido antes del reinicio del respirador.
Modos de uso estándar
El funcionamiento normal consiste en cuatro modos:
Apagado
Cuando el dispositivo no está conectado a una fuente de alimentación,
se apaga. Los dos LED del panel de control están apagados.
En espera
Cuando se suministra corriente al dispositivo, completa la secuencia del LED
de encendido y pasa al modo en espera. El modo en espera también se
inicia pulsando el botón de encendido/apagado cuando el dispositivo está
en modo encendido o si la mascarilla se ha retirado mientras está en modo
encendido. Mientras se le suministre corriente al dispositivo, permanecerá
en modo de espera hasta que se encienda o se inicie el modo de secado.
Encendido
Cuando está en modo de encendido, el respirador está funcionando y se
genera la presión terapéutica regulada en el dispositivo. Las luces LED
se apagarán. El modo de encendido se inicia pulsando el botón de
encendido/apagado cuando el dispositivo está en modo en espera y el
paciente lleva puesta la mascarilla.
Secado
Para iniciar el modo de secado, pulse el botón de rampa y pulse el botón
de encendido/apagado simultáneamente. Cuando está en modo de secado,
el respirador funciona a baja velocidad durante 30 minutos. Cuando está
en modo de secado, las luces LED permanecen apagadas y la presión del
respirador no está regulada para suministrar terapia.
ESPANOL
˜
Page 66

66
Guía rápida del dispositivo Transcend 3 miniCPAP Página 11
Inicio de la terapia
Conecte el Transcend 3 miniCPAP a una fuente de alimentación para que pase al
modo de espera.
Asegúrese de que la mascarilla está firmemente sujeta en su sitio antes de iniciar
la terapia.
Para iniciar la terapia, pulse el botón de encendido/apagado. Si pulsa el botón de
encendido/apagado cuando el dispositivo Transcend 3 miniCPAP está en modo de
espera, se iniciará el modo de encendido. El flujo de aire comenzará cuando el
respirador suministre o aumente la presión terapéutica prescrita.
Uso de la función de rampa
La función de rampa permite que el usuario se vaya adaptando al flujo de aire,
comenzando con una presión más baja y aumentándola gradualmente hasta el ajuste
de presión prescrita cuando duerme. La sección de software de este manual muestra
cómo modificar los ajustes de la rampa en su dispositivo.
Para acelerar la tasa del aumento de presión durante la rampa, mantenga pulsado el
botón de rampa hasta que el dispositivo alcance una presión de terapia que le resulte
cómoda. Cuando el botón de rampa se suelta, el dispositivo continuará en modo de rampa
hasta que alcance la presión terapéutica prescrita.
Asegúrese de que el dispositivo Transcend 3 miniCPAP está en modo de encendido
(ON). Si no es así, pulse el botón de encendido/apagado.
Ajuste la mascarilla para eliminar las posibles fugas.
Pulse el botón de rampa. La presión descenderá a la presión de rampa inicial y
volverá a aumentar gradualmente durante un tiempo preestablecido hasta que
alcance la presión de terapia prescrita.
Note Si se pulsa momentáneamente el botón de rampa durante el suministro de presión
en rampa, no afectará a la presión suministrada. Para detener el aumento gradual
de la presión de la función de rampa, apague el dispositivo pulsando el botón de
encendido. La próxima vez que se encienda el respirador, éste suministrará la
presión de terapia recetada.
Note En caso de pérdida de corriente eléctrica durante la rampa, el dispositivo
Transcend 3 miniCPAP se reanudará a la presión completa prescrita tan pronto
como se restaure la corriente eléctrica.
ESPANOL
˜
Page 67

67
Guía rápida del dispositivo Transcend 3 miniCPAP Página 12
Uso de la función EZEX
La función EZEX es una característica especial que hace descender la presión terapéutica
en la espiración. Esta característica está pensada para ofrecer un confort adicional al
paciente a reducir la resistencia que experimentan cuando exhalan.
EZEX tiene cuatro posibles ajustes: DESACTIVADO, 1, 2 y 3, que aumentan
progresivamente la disminución de la presión, desde ninguna hasta el máximo. La sección
de software de este manual de usuario muestra cómo modificar los ajustes de EZEX.
Nota: Para descargar el manual de usuario de Transcend 3 miniCPAP, visite
www.mytranscend.com/support, o llame al servicio de atención al cliente de Somnetics
(877-621-9626) para solicitar un ejemplar.
Finalización de la terapia
Para finalizar el suministro de terapia mientras el respirador está encendido, pulse el
botón de encendido/apagado para desactivar el respirador y devolver al dispositivo al
modo en espera. Se recomienda al usuario iniciar la función de modo de secado después
de cada sesión de terapia para secar el interior del dispositivo.
Modo de secado
Al finalizar cada sesión de terapia, se recomienda al usuario iniciar el modo de secado.
Para iniciar el modo de secado, pulse el botón de rampa y pulse el botón de
encendido/apagado simultáneamente. Cuando está en modo de secado, el respirador
funciona a baja velocidad durante 30 minutos. Cuando está en modo de secado, las luces
LED permanecen apagadas y la presión del respirador no está regulada para suministrar
terapia. Con el modo de secado, se lanza aire a través del sistema para retirar los restos
de humedad que puedan haber quedado en el interior del dispositivo y en el circuito de
vías aéreas. Después del ciclo de secado de 30 minutos, el respirador se apagará y el
dispositivo pasará automáticamente al modo de secado.
Sustitución del sistema de filtro
El sistema de filtro del dispositivo Transcend 3 miniCPAP debe reemplazarse cada seis
meses como mínimo.
Retire el conjunto del filtro tirando de la lengüeta en la parte posterior del dispositivo para
liberarla. A continuación, tire del conjunto del filtro y sáquelo del dispositivo. Deseche el
conjunto completo del filtro y reemplácelo por uno nuevo.
ESPANOL
˜
Page 68
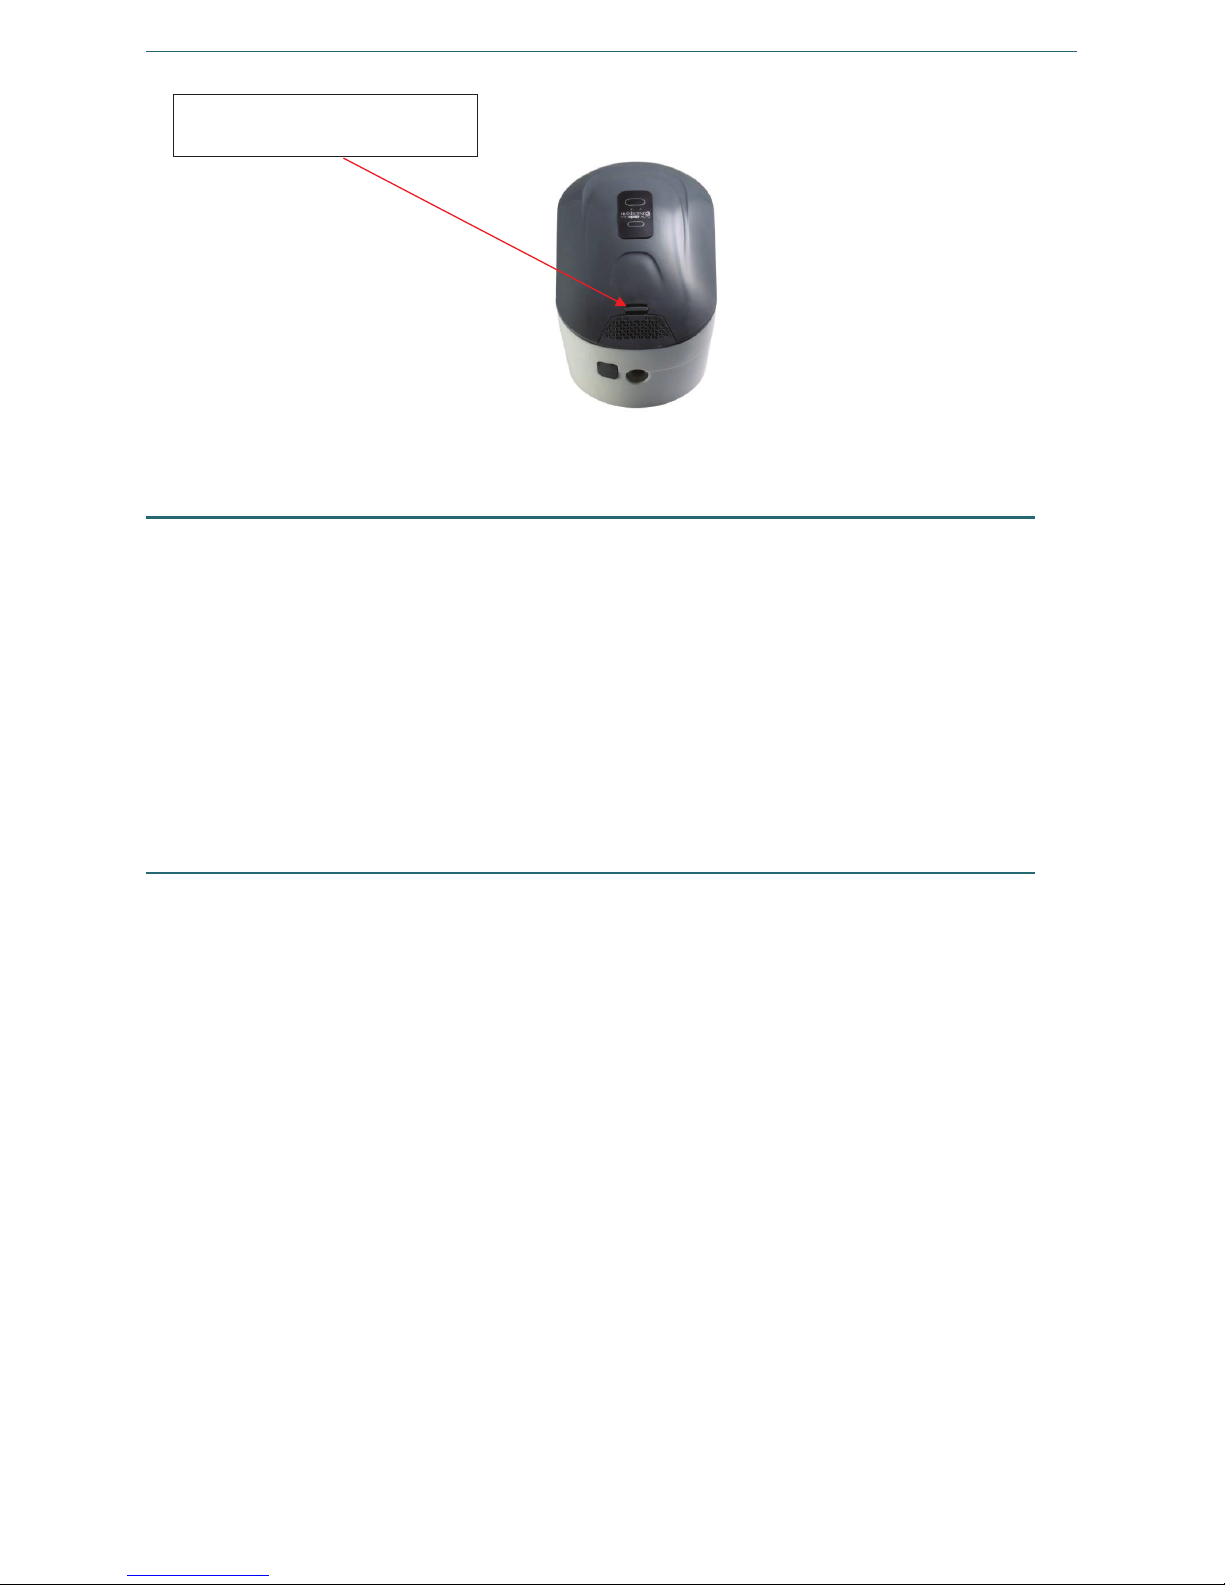
68
Guía rápida del dispositivo Transcend 3 miniCPAP Página 13
Mantenimiento del sistema Transcend 3 miniCPAP y de sus
componentes
Advertencias:
Desenchufe el dispositivo Transcend 3 miniCPAP antes de la limpieza.
No sumerja el dispositivo Transcend 3 miniCPAP o la fuente de alimentación
en líquidos.
Evite que el agua entre en las aberturas del dispositivo.
No utilice agentes limpiadores agresivos o abrasivos para limpiar el dispositivo
o ningún componente.
No esterilice el sistema Transcend 3 miniCPAP.
No coloque materiales de limpieza, como un paño o líquido, en la entrada de aire
del dispositivo o en el conector de salida de aire.
Limpieza del exterior
Siga estas instrucciones para limpiar el exterior del dispositivo Transcend 3 miniCPAP.
1. Desenchufe la fuente de alimentación antes de limpiarlo y desconecte el dispositivo de
los cables de alimentación.
2. Mezcle una solución al 5% de detergente líquido suave en agua destilada (50 cm
3
de
detergente líquido por cuarto de agua destilada). El detergente suave debe contener
tensioactivos aniónicos biodegradables y carecer de fosfatos.
3. Sumerja un paño de algodón que no suelte pelusas en la solución detergente.
4. Escurra el exceso de agua del paño y, a continuación, limpie el exterior del dispositivo
Transcend 3 miniCPAP durante unos 20 segundos con un suave movimiento de barrido
desde el frente a la parte trasera. Aplique una presión firme y asegúrese de que se
retiran todas las acumulaciones de suciedad en todas las superficies de contacto
accesibles.
5. Aclare el paño en agua del grifo para eliminar la solución de limpieza que pudiera
quedar.
Tire de la lengüeta para
soltar el conjunto del filtro.
ESPANOL
˜
Page 69

69
Guía rápida del dispositivo Transcend 3 miniCPAP Página 14
6. Escurra el exceso de agua del paño y, a continuación, limpie el dispositivo Transcend 3
miniCPAP mediante un suave movimiento de delante hacia atrás para eliminar
cualquier resto de solución detergente que pueda haber quedado en la superficie.
Seque el dispositivo con un paño de algodón seco que no suelte pelusas hasta que el
dispositivo esté completamente seco.
Limpieza de los accesorios
Los siguientes accesorios deben limpiarse con una solución al 5 % de detergente líquido
suave en agua destilada (50 cm
3
de detergente líquido por cuarto de agua destilada).
El detergente suave debe contener tensioactivos aniónicos biodegradables y carecer
de fosfatos. Siga estos pasos para limpiar los accesorios.
Accesorio
Ciclo de limpieza
periódico
Tiempo de servicio del
producto
Tubo de suministro
de aire
Diariamente 3 meses
1. Sumerja completamente el tubo de suministro de aire en la solución limpiadora.
2. Mientras está sumergido, frote la superficie con un paño de algodón que no suelte
pelusas. Aplique una presión firme y asegúrese de que se retiran todas las
acumulaciones de suciedad en todas las superficies de contacto accesibles.
3. Limpie el interior del tubo de suministro de aire levantándolo y después bajando los
extremos del tubo mientras se llena con solución limpiadora.
4. Enjuague el tubo de suministro de aire sumergiéndolo en agua destilada. Mueva el
tubo de suministro de aire en un movimiento de atrás adelante durante
aproximadamente 10 segundos para eliminar cualquier residuo de agente limpiador.
5. Enjuague el tubo de suministro de aire en agua destilada sumergiéndolo
completamente. Levante y luego baje los extremos del tubo mientras éste se llena
de agua. Repita este movimiento durante unos 10 segundos para eliminar cualquier
residuo de agente limpiador.
6. Seque el exterior del tubo de suministro de aire con un paño de algodón seco y que
no suelte pelusas. Deje secar al aire el tubo hasta que esté completamente seco el
interior. La duración del tiempo de secado dependerá de las condiciones ambientales.
ESPANOL
˜
Page 70
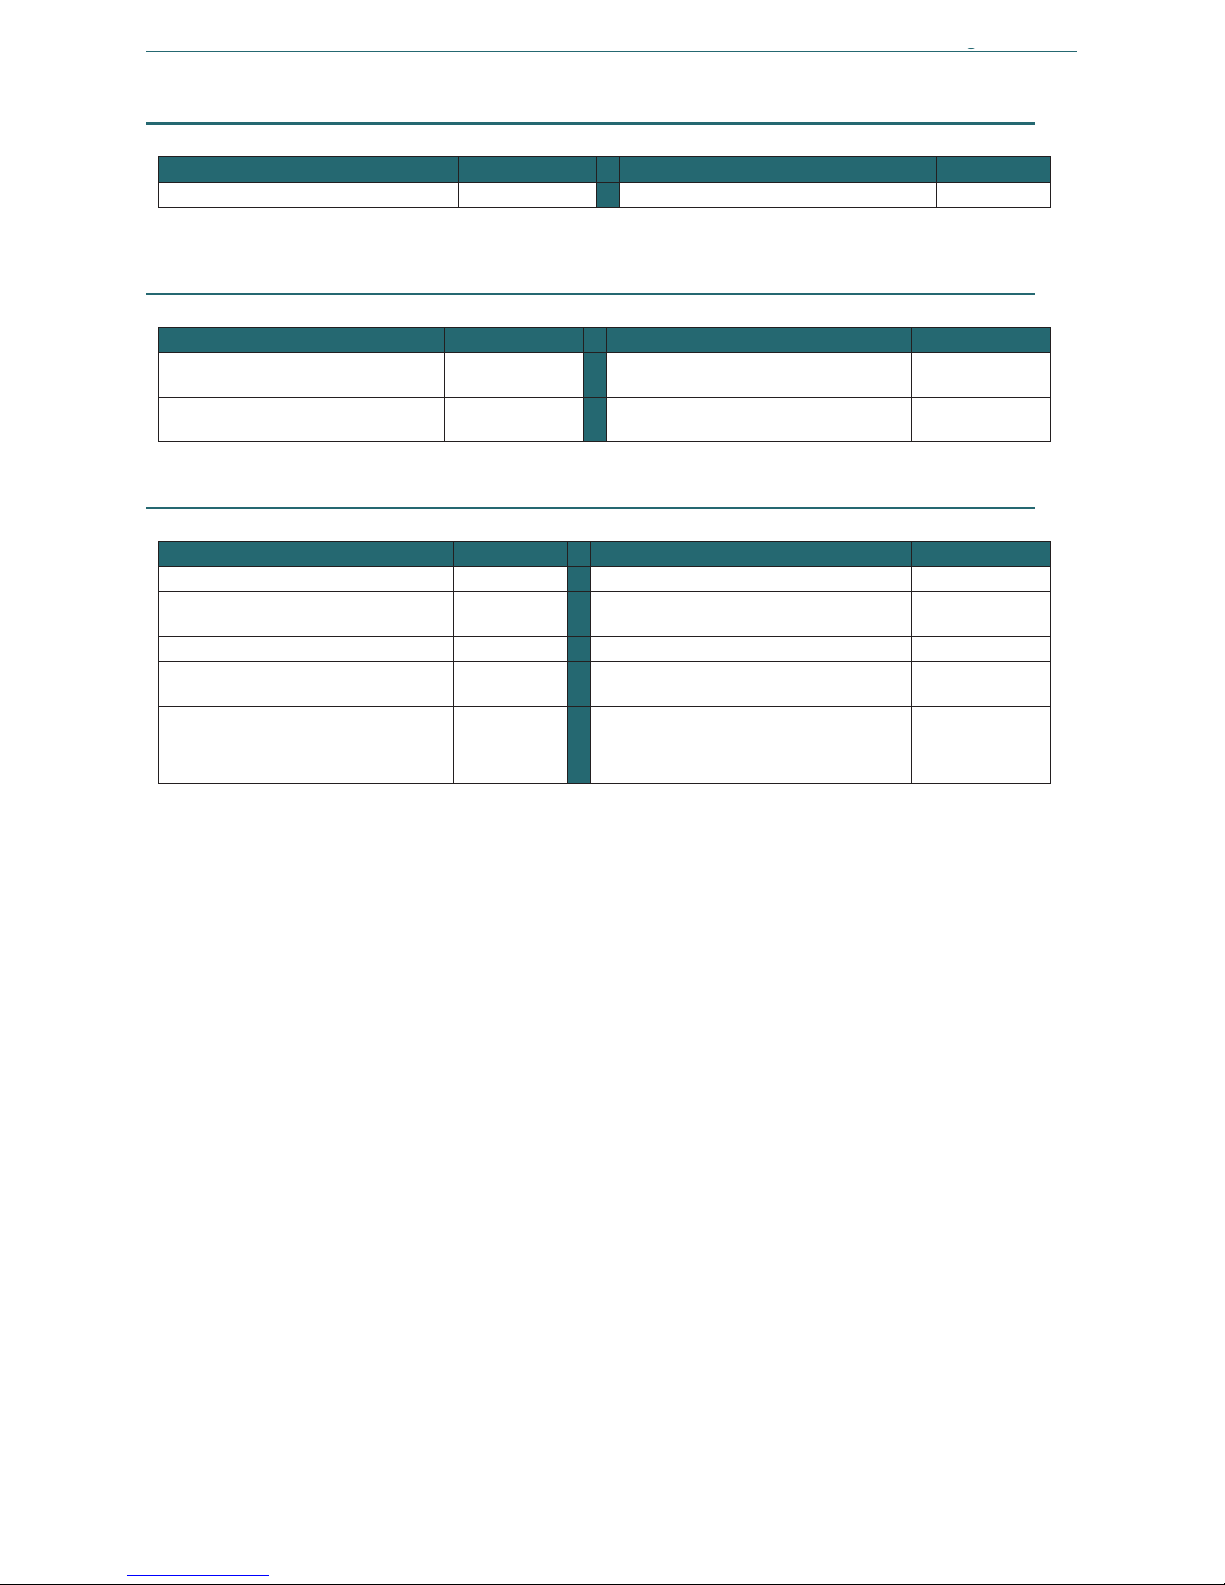
70
Guía rápida del dispositivo Transcend 3 miniCPAP Página 15
Piezas desechables
Pieza
Referencia
Pieza
Referencia
Conjunto del filtro Transcend 3
503109
Tubo estándar de 183 cm
503081
Accesorios
Pieza
Referencia
Pieza
Referencia
Batería Transcend P8
503023
Adaptador portátil de corriente
Transcend (MPA1)
503029
Batería Transcend P4
503026
Cargador solar de baterías portátil
Transcend
503056
Piezas de sustitución
Pieza
Referencia
Pieza
Referencia
Transcend 3 miniCPAP Auto
503104
Bolsa de viaje de Transcend
503012
Unidad de servicio del dispositivo
Transcend 3 miniCPAP Auto
503105
Fuente de alimentación universal con
varios enchufes (PSA2)
503059
Transcend 3 miniCPAP
503106
Paquete de enchufes intercambiables
503060
Unidad de servicio Transcend 3
miniCPAP
503107
Cable USB
503020
Conjunto de la fuente de
alimentación universal con varios
enchufes
(contiene 503059 y 503060)
503078
ESPANOL
˜
Page 71
71
NEDERLANDS
Transcend 3 miniCPAP™
Quick Guide
Page 72

72
Transcend 3 miniCPAP Quick Guide Pagina 2
Inleiding
Hartelijk dank dat u Transcend hebt gekozen, de toonaangevende innovator op het gebied
van draagbare CPAP-therapie. De Transcend 3 miniCPAP levert positieve druk op de
luchtwegen bij gebruikers binnen het bereik van 4 tot 20 cm
H2O zoals voorgeschreven
door de arts. De productserie Transcend 3 miniCPAP bestaat uit de Transcend 3 miniCPAP
en de Transcend 3 miniCPAP Auto. De knoppen en lampjes vergemakkelijken de bediening
en bieden operationele feedback over het systeem. Er zijn tevens een voedingsaansluiting
en USB-poort geïntegreerd in de Transcend 3 miniCPAP.
NB: download de gebruikershandleiding van de Transcend 3 miniCPAP van
www.mytranscend.com/support voor gedetailleerde apparaatbeschrijvingen
en probleemoplossing of bel de klantenservice van Somnetics op 877-621-9626
om een exemplaar aan te vragen.
Voorzorgsmaatregelen bij gebruik van een computer
met Transcend 3 miniCPAP
De volgende voorzorgsmaatregelen worden vermeld voor de veiligheid van de patiënt
en/of de persoon die de computer bedient, om te voldoen aan de veiligheidsvoorschriften
van IEC 60601-1-1.
Definities Een computer die voldoet aan de veiligheidsnormen van 60950-1, voldoet
tevens aan de veiligheidsnormen van UL 60950-1 of IEC 60950-1.
Sluit geen andere apparaten aan op de USB-poort van de Transcend 3 miniCPAP dan een
computer die voldoet aan de veiligheidsnormen van 60950-1. Door een ander apparaat op
de USB-poort van de Transcend 3 miniCPAP aan te sluiten, kunt u de Transcend
beschadigen en is het apparaat mogelijk niet veilig voor de gebruiker.
Om het risico van lekstroom te verminderen dient u een volgens IEC 60601-1 goedgekeurde
scheidingstransformator te gebruiken om uw computer van stroom te voorzien.
Sluit uw computer (die aan de veiligheidsnormen van 60950-1 voldoet) of uw Transcend
niet aan op een draagbaar stekkerblok (d.w.z. een stroomstrip).
Volg bij het gebruik van uw computer (die aan de veiligheidsnormen van 60950-1 voldoet)
de reinigingsinstructies van de fabrikant.
Volg bij het gebruik van uw computer (die aan de veiligheidsnormen van 60950-1 voldoet)
de instructies van de fabrikant voor preventief onderhoud.
Sluit tijdens preventief onderhoud van uw computer (die aan de veiligheidsnormen van
60950-1 voldoet), de computer niet aan op de USB-poort van de Transcend 3 miniCPAP.
Raak uw computer (die aan de veiligheidsnormen van 60950-1 voldoet) en blootliggend
metaal op de Transcend 3 miniCPAP of de snoeren van de Transcend 3 miniCPAP niet
tegelijk aan.
Raak geen blootliggend metaal op uw computer (die aan de veiligheidsnormen van 60950-1
voldoet) of blootliggend metaal op aansluitpunten of kabels aan.
Voor medische zorgverleners: raak niet tegelijk uw computer (die aan de veiligheidsnormen
van 60950-1 voldoet) en de patiënt aan.
Gebruik geen computers met interne spanning die toegankelijk is zonder gereedschap dat
geschikt is voor toegang tot dergelijke spanning.
NEDERLANDS
Page 73

73
Transcend 3 miniCPAP Quick Guide Pagina 3
Waarschuwingen
Laat geen water in dit apparaat komen. De Transcend 3 miniCPAP mag niet worden
blootgesteld aan omstandigheden waarin het systeem nat kan worden.
Dit apparaat is niet bedoeld voor beademing.
De Transcend 3 miniCPAP moet worden ingesteld en aangepast door een opgeleide
zorgverlener voordat deze wordt gebruikt voor behandeling met geleidelijke
drukverhoging (ramp) en druk.
De luchttemperatuur die dit apparaat produceert kan wel -12 °C (10 °F) hoger zijn
dan de omgevingstemperatuur. Wees voorzichtig als de kamertemperatuur hoger is
dan 32 °C (90 °F).
Blokkeer of sluit de uitademingsopeningen van het gezichtsmasker niet op andere
wijze af. Volg de instructies van de fabrikant bij uw gezichtsmasker.
Deze apparatuur is niet geschikt voor gebruik met zuurstof of in aanwezigheid van
brandbare anesthesiemengsels met lucht, zuurstof of lachgas. Zuurstofbronnen
moeten zich op meer dan 1 meter van de apparatuur bevinden om het risico op
brand en brandwonden te voorkomen.
De Transcend 3 miniCPAP is uitsluitend bedoeld voor gebruik met de meegeleverde
of aanbevolen accessoires. Het gebruik van niet-aanbevolen accessoires kan leiden
tot hogere elektromagnetische emissies of een verminderde elektromagnetische
immuniteit van het PAP-systeem en kan onveilig zijn.
De Transcend 3 miniCPAP is niet defibrillatorbestendig.
Probeer de Transcend 3 miniCPAP niet te steriliseren.
Als het apparaat gebruikt wordt door meerdere patiënten, moet een mainflow
bacteriefilter worden geïnstalleerd in de lijn tussen het apparaat en de slangen
van het ademcircuit om besmetting te voorkomen.
Het apparaat mag alleen worden gebruikt met maskers en aansluitingen die door
Somnetics of door een medische zorgverlener zijn aanbevolen. Er dient geen
masker te worden gebruikt tenzij het apparaat is ingeschakeld en het de juiste
geleidelijke drukverhoging (ramp) en druk levert. De uitademingsopening(en)
van het masker mogen nooit worden geblokkeerd. Uitleg van de Waarschuwing:
Het apparaat is bedoeld voor gebruik met maskers of aansluitingen die specifiek
zijn ontworpen voor uitademingsopeningen voor een doorlopende luchtstroom
uit het masker. Wanneer het apparaat in werking is, voert de luchtstroom de
uitgeademde lucht uit de uitademingsopening van het masker. Als het apparaat
echter niet functioneert wordt er geen frisse lucht ingevoerd door het masker
en kan uitgeademde lucht opnieuw worden ingeademd.
Het niet gebruiken van een masker of accessoire dat de herinademing van
kooldioxide minimaliseert of spontane ademhaling mogelijk maakt, kan verstikking
veroorzaken.
Plaats het apparaat niet in bed. Het afdekken of verwarmen van
beademingsslangen met een deken kan de kwaliteit van de therapie beïnvloeden of
de gebruiker verwonden.
Om te voorkomen dat de slang tijdens het gebruik wordt losgekoppeld, mogen
alleen slangen worden gebruikt die voldoen aan ISO 5367 of ISO 80601-2-74.
NEDERLANDS
Page 74

74
Transcend 3 miniCPAP Quick Guide Pagina 4
Gevaar voor wurging door het stroomsnoer en de luchtslang. Deze kunnen om de
nek worden gewonden en WURGEN. Houd het stroomsnoer en de luchtslang op
meer dan 1 meter afstand van een babyledikantje en buiten het bereik van de
baby. Houd het snoer en de slang buiten het bereik van kinderen.
Het is onwaarschijnlijk dat kleine deeltjes uit de kast van de Transcend 3 miniCPAP
worden geworpen, maar bij zware schade kunnen interne onderdelen in kleine
stukken breken en gevaar voor inslikken of verstikking veroorzaken wanneer ze uit
de kast van het apparaat komen.
Waarschuwingen
De Amerikaanse wet beperkt de verkoop van dit apparaat tot verkoop aan een arts
of in opdracht van een arts.
Voorzie de Transcend 3 miniCPAP alleen van stroom met de door Somnetics
geleverde netvoedingsvoorzieningen, mobiele voedingsadapter of accu's.
Staak het gebruik van de Transcend 3 miniCPAP en neem contact op met uw arts
indien er ademhalingsproblemen of huidirritaties optreden.
Steek geen objecten in de luchtinlaat of luchtuitlaat van de Transcend 3 miniCPAP.
Controleer het elektriciteitssnoer op slijtage of beschadiging vóór elk gebruik.
Vervang het netsnoer indien noodzakelijk.
Somnetics raadt aan om de luchtslang om de drie maanden te vervangen.
Om het milieu te beschermen, dienen bepaalde onderdelen en accessoires van
de Transcend 3 miniCPAP, inclusief de optionele accu's, volgens de plaatselijke
wetgeving te worden verwijderd.
Het apparaat mag niet zodanig afgedekt of geplaatst worden dat de werking of de
prestaties van het apparaat negatief worden beïnvloed, omdat dit een onveilige
situatie kan veroorzaken. Voorbeelden hiervan zijn onder andere:
o De apparatuur mag niet in een bed worden geplaatst.
o De apparatuur mag alleen op een stevige, vlakke ondergrond worden geplaatst.
o Plaats het apparaat niet op een plaats waar huisdieren of kinderen er
toegang toe hebben.
o Plaats het apparaat niet bij een open raam of op een andere plaats waar stof,
zonlicht of ongedierte (insecten) de veiligheid en/of prestaties van het
apparaat kunnen beïnvloeden.
o Plaats het apparaat niet naast een gordijn dat de koelluchtstroom blokkeert,
waardoor het apparaat oververhit raakt.
o Blokkeer de luchtaanzuigopening niet en verstoor zo de therapie niet.
DBP
Apparaat bevat DBP (een ftalaat). Significante blootstelling aan DBP kan de
normale ontwikkeling van het mannelijke voortplantingsorgaan verstoren.
Testen hebben uitgewezen dat de blootstellingsniveaus voor DBP ver onder de
vastgestelde limieten liggen. Vrouwen die zwanger zijn of borstvoeding geven
kunnen de voordelen en risico's van dit apparaat met een arts bespreken.
NEDERLANDS
Page 75
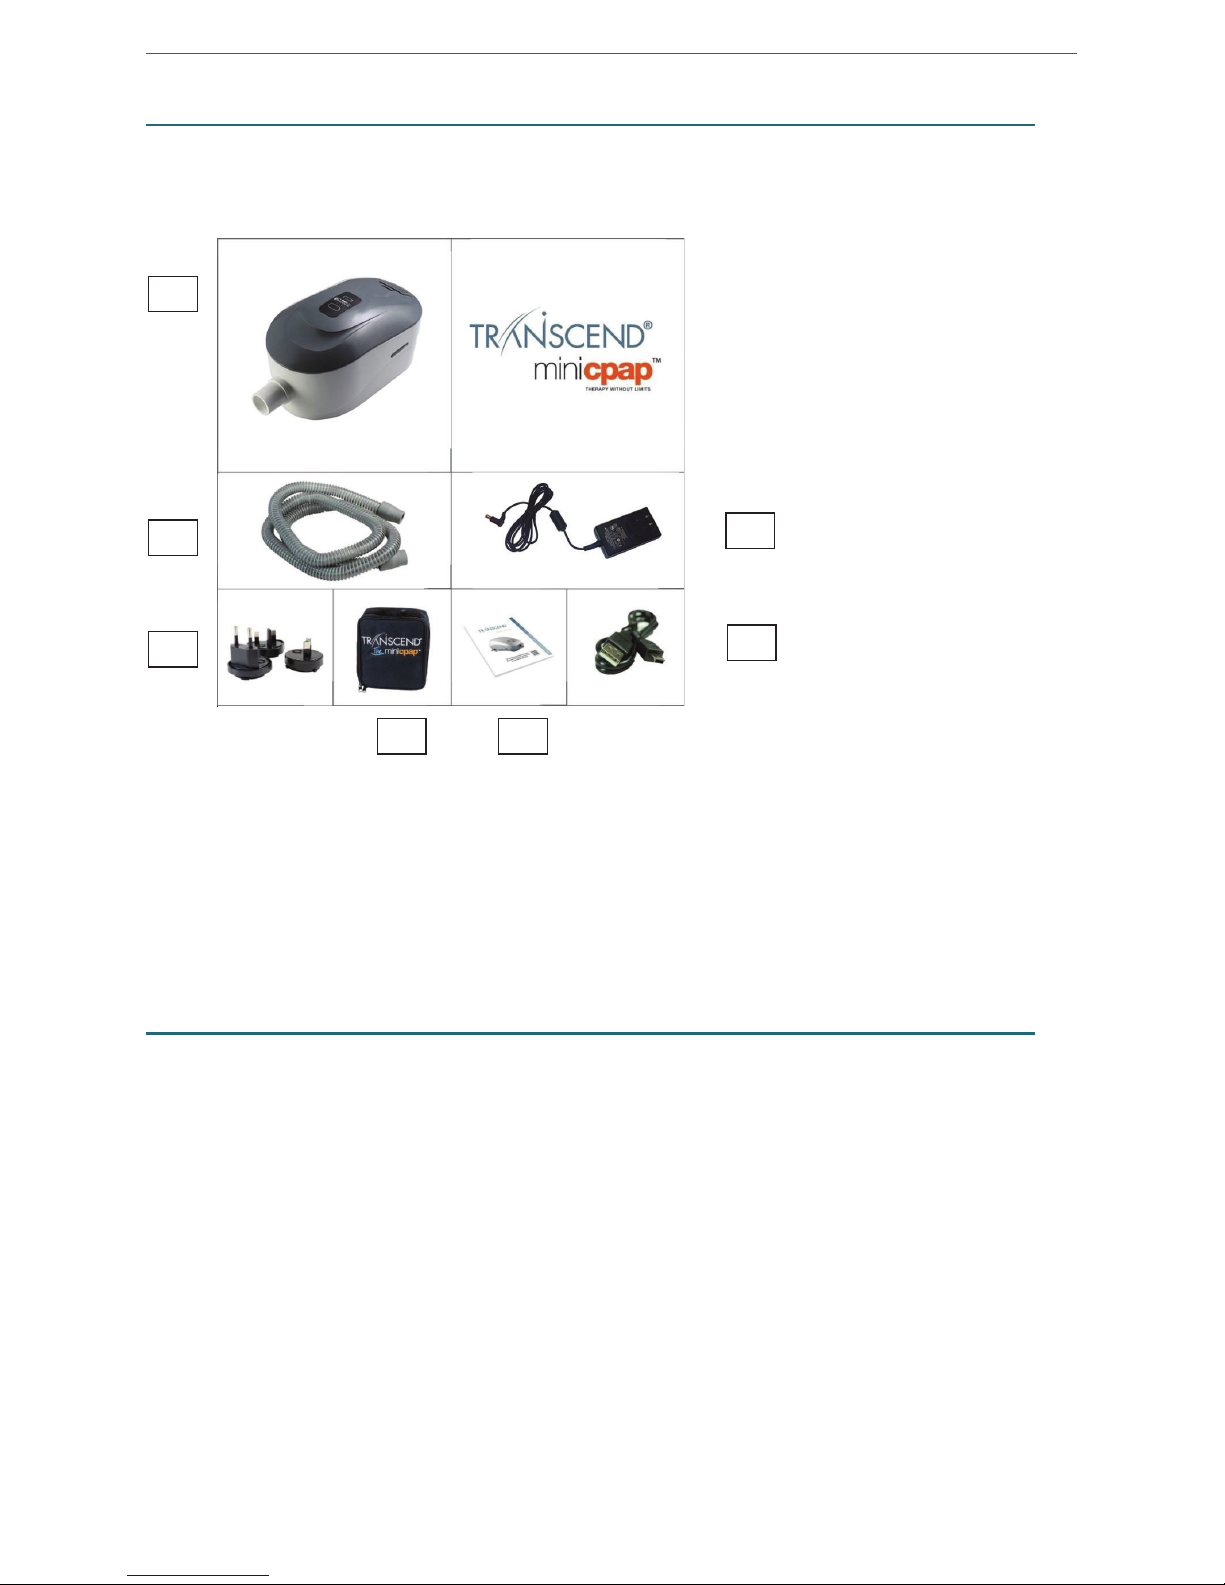
75
Transcend 3 miniCPAP Quick Guide Pagina 5
Onderdelen van de Transcend 3 miniCPAP
Pak eerst alle artikelen uit de Transcend-reistas en controleer of deze niet zijn beschadigd
tijdens het vervoer. Meld alle ontbrekende of beschadigde artikelen aan de
thuiszorgleverancier die u het product heeft geleverd.
1 Transcend 3 miniCPAP Auto of
Transcend 3 miniCPAP
2 Luchttoevoerslang (compatibel met
standaard 22 mm connector)
3 Universeel voedingsapparaat met
meerdere stekkers (PSA2)
4 Verwisselbare stekkerset
5 Transcend-reistas
6 Transcend 3 miniCPAP Quick Guide
7 USB-kabel
Niet inbegrepen (worden apart verkocht)
Transcend mobiele voedingsadapter
Transcend P
4
Battery
Transcend P
8
Battery
Transcend draagbare zonnelader voor accu's (bedoeld voor gebruik als alternatieve
oplaadbron voor Transcend P
4
- en P8-accu's)
Patiëntenmasker
1
2
4
3
7
5
6
NEDERLANDS
Page 76
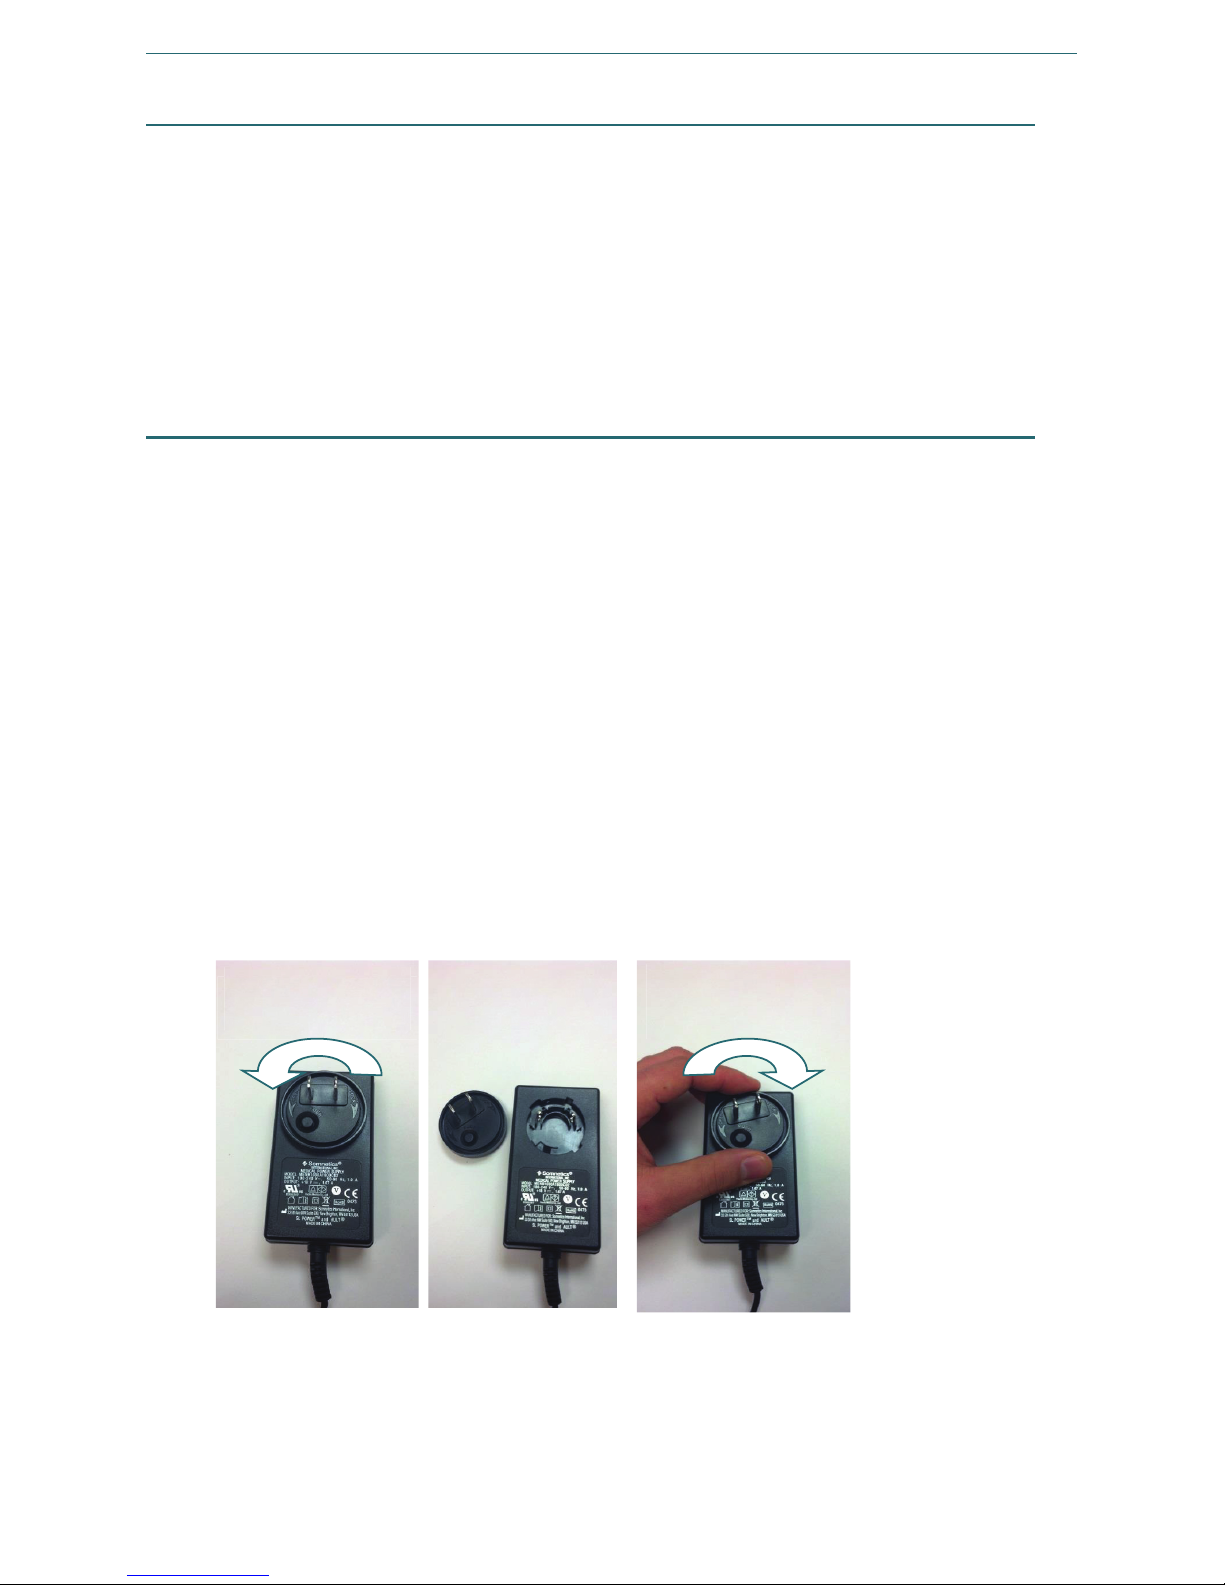
76
Transcend 3 miniCPAP Quick Guide Pagina 6
De Transcend 3 miniCPAP monteren
1. Bevestig de luchttoevoerslang aan de luchtuitvoer van het Transcend 3 miniCPAP-
apparaat.
2. Sluit het andere uiteinde van de luchttoevoerslang aan op het masker.
3. Steek ronde connector van het voedingsapparaat in het elektrische aansluitpunt
van de Transcend 3 miniCPAP op de achterkant van het apparaat.
4. Sluit de stroomtoevoer aan op een wandstopcontact.
Het universele netvoedingsapparaat met meerdere stekkers
gebruiken (PSA2)
Met elke Transcend 3 miniCPAP worden het universeel voedingsapparaat met meerdere
stekkers (PSA2) en de verwisselbare stekkerset met drie (3) verwisselbare stekkers
meegeleverd. De verwisselbare stekkersets zijn geschikt voor gebruik in de meeste
landen.
1. Bepaal welke stekker u nodig hebt op basis van de stijl van het stopcontact.
2. Indien de juiste stekker nog niet is bevestigd aan het voedingsapparaat, verwijdert
u de bevestigde stekker door de knop op de afneembare stekker in te drukken en
de stekker linksom draaien tot deze loskomt van het voedingsapparaat.
3. U plaatst de gewenste stekker door de uitsteeksels achterop de stekker uit te
lijnen met de uitsparingen in het voedingsapparaat. Duw de stekker voorzichtig in
de opening. Draai de stekker rechtsom tot deze vastklikt. U moet een klik horen.
4. Steek de ronde connector van het voedingsapparaat in het elektrische aansluitpunt
aan de achterkant van het Transcend 3 miniCPAP-apparaat.
5. Plaats het andere uiteinde van de voeding in een stopcontact.
6. Het knipperende opstartpatroon van het stroomlampje van de Transcend 3
miniCPAP start. Als het opstartpatroon van de knipperende lampjes is voltooid,
gaan de lampjes uit. Dit geeft aan dat de Transcend 3 miniCPAP voeding krijgt en
dat het apparaat nu stand-by staat.
Terugplaatsen:
stekker plaatsen
en draaien
Stekker
verwijderen
Verwijderen:
knop indrukken
en draaien
NEDERLANDS
Page 77
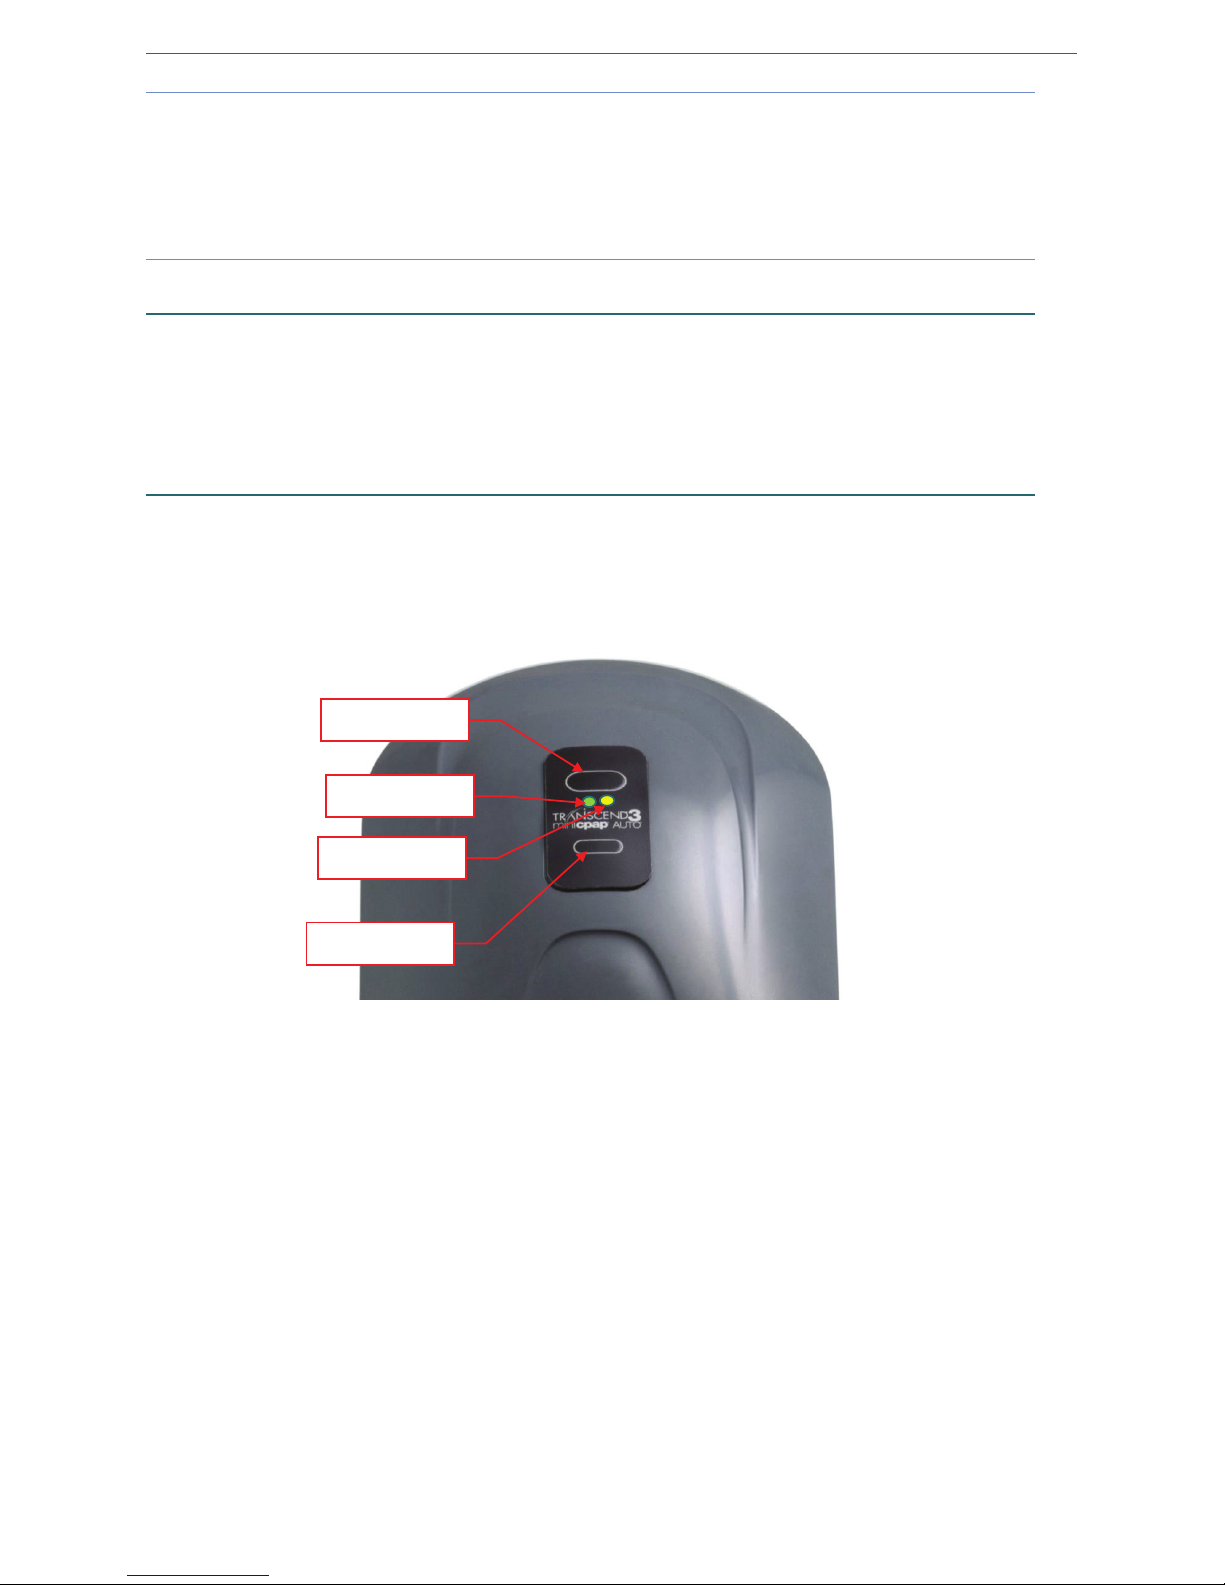
77
Transcend 3 miniCPAP Quick Guide Pagina 7
Note Gebruik uitsluitend de door Somnetics meegeleverde universele
netvoedingsapparaten. Gebruik geen stroomomvormer of voltage-omvormer
met het universele netvoedingsapparaat PSA2.
Note Zorg dat de stekker goed vast zit aan het voedingsapparaat voordat u het aansluit
op het stopcontact.
Transcend 3 miniCPAP-apparaat
De Transcend 3 miniCPAP is bij levering gereed om voortdurende positieve druk op de
luchtwegen (CPAP-therapie) te genereren en te reguleren voor levering aan het
gezichtsmasker. Er kan een externe voedingsbron worden aangesloten op de Transcend 3
miniCPAP om het apparaat te voorzien van stroom.
Bedieningspaneel
Het bedieningspaneel van de Transcend 3 miniCPAP heeft twee drukknoppen die worden
gebruikt om de blazer- en de ramp-drukfunctie te activeren. Er zijn ook twee led-lampjes:
een groen lampje dat een normale werking aangeeft en een geel lampje dat storingen
aangeeft.
Aan-/uitknop
Ramp-knop
Groen lampje
Geel lampje
NEDERLANDS
Page 78
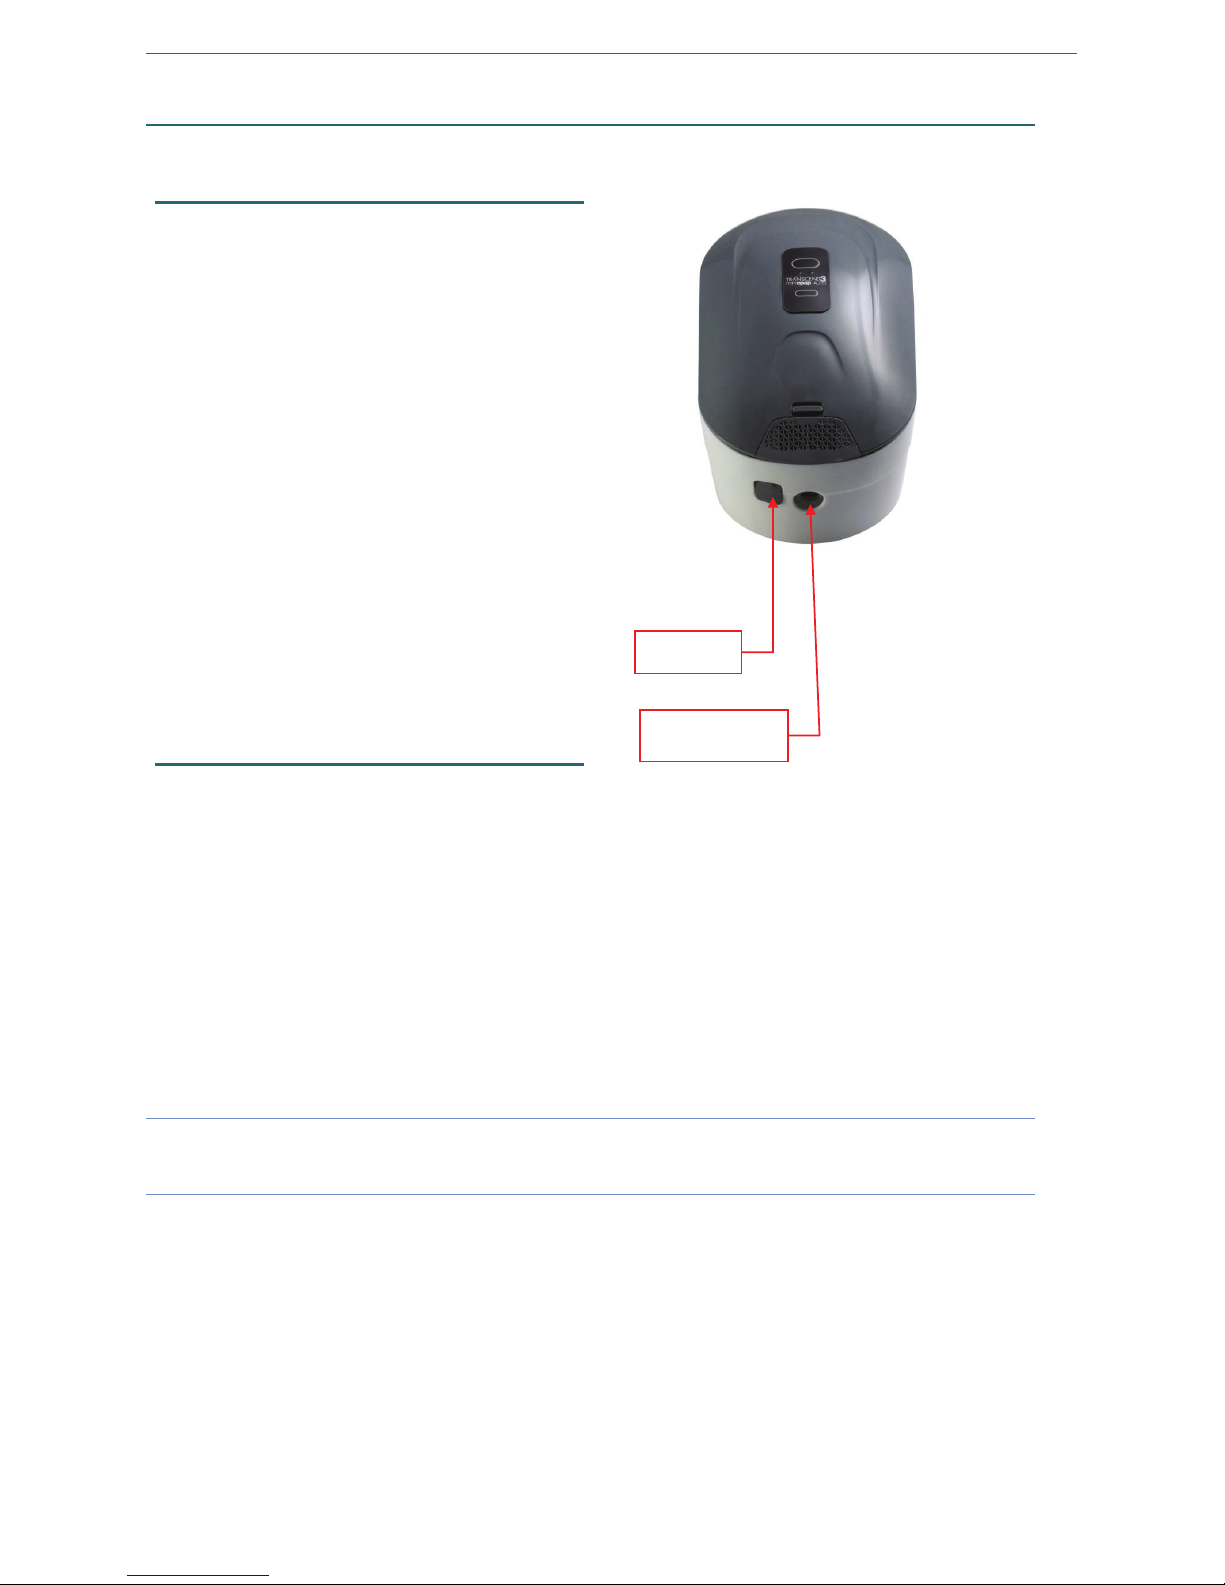
78
Transcend 3 miniCPAP Quick Guide Pagina 8
Elektrisch aansluitpunt en USB-poort
Elektrisch aansluitpunt
U kunt de ronde stekker van de
uitvoerkabel van een gelijkstroombron
aansluiten op het elektrische aansluitpunt
om de Transcend 3 miniCPAP te gebruiken.
Er kunnen diverse voedingsbronnen
worden gebruikt om de Transcend 3
miniCPAP van stroom te voorzien. Er
wordt bij uw apparaat een voedingsbron
meegeleverd die wisselstroom omzet naar
gelijkstroom die moet worden gebruikt om
het apparaat via het wandstopcontact van
stroom te voorzien.
De optionele mobiele voedingsadapter kan
worden aangesloten op een
gelijkstroombron, zoals in een auto,
vrachtwagen, camper, boot of
vergelijkbaar voertuig.
Er zijn tevens optionele Transcend-accu's
verkrijgbaar om de Transcend 3 miniCPAP
van stroom te voorzien.
USB-poort
Er is een mini-AB USB-poort aanwezig voor
rechtstreekse gegevensuitwisseling tussen
de Transcend 3 miniCPAP en een computer
via een USB-gegevenskabel. Deze
interface geeft de arts de mogelijkheid
om de Transcend 3 miniCPAP in te stellen
voor een voorgeschreven druk, geleidelijke
drukverhoging en Auto-instellingen.
De interface biedt tevens toegang tot
therapietrouwgegevens die de gebruiker
kan bekijken en die via e-mail naar de arts
kunnen worden verzonden.
Note Het kan nodig zijn de snoeren te ontkoppelen en weer te bevestigen om een goede
aansluiting tot stand te brengen.
USB-poort
Elektrisch
aansluitpunt
NEDERLANDS
Page 79

79
Transcend 3 miniCPAP Quick Guide Pagina 9
De Transcend 3 miniCPAP gebruiken
Het bedieningspaneel van de Transcend 3 miniCPAP heeft twee drukknoppen die worden
gebruikt om de blazer- en de ramp-drukfunctie te initiëren. Er zijn ook twee lampjes: een
groen lampje dat een normale werking aangeeft en een geel lampje dat storingen aangeeft.
De operationele status van de Transcend 3 miniCPAP wordt aangegeven door de lampjes.
Wanneer er een voedingsbron wordt aangesloten op het apparaat, begint het lampje van
de Transcend 3 miniCPAP in een bepaalde volgorde te knipperen. Als het opstartpatroon
van de knipperende lampjes is voltooid, gaan de lampjes uit. Dit geeft aan dat de
Transcend 3 miniCPAP voeding krijgt en dat het apparaat nu stand-by staat. Tijdens de
therapie blijven de lampjes uit om te voorkomen dat de patiënt en/of een persoon naast
de patiënt in zijn/haar nachtrust wordt gestoord.
Note Indien er tijdens de therapie een onderbreking ontstaat in de voeding van de
Transcend 3 miniCPAP, zal de therapie worden hervat op het moment dat de
voeding wordt hersteld en u op de aan-/uitknop drukt. Het apparaat herhaalt het
opstartpatroon van de knipperende lampjes voordat de blazerfunctie weer start.
Standaardgebruikersmodi
De normale werking bestaat uit vier modi:
Uit
Als het apparaat niet is aangesloten op een voedingsbron, staat het apparaat
uit. Beide lampjes op het bedieningspaneel zijn uit.
Stand-by
Als het apparaat van stroom wordt voorzien, wordt het opstartpatroon van
knipperende lampjes uitgevoerd alvorens het apparaat in de stand-bymodus
gaat. De stand-bymodus wordt ook geïnitieerd wanneer u op de aan-/uitknop
drukt als het apparaat aanstaat of als het masker wordt verwijderd terwijl
het apparaat aanstaat. Zolang het apparaat van stroom wordt voorzien,
blijft het in de modus Stand-by staan tot de modus Aan of de modus Drogen
wordt gestart.
Aan
Wanneer de blazer in de modus Aan staat, werkt deze en wordt er
gereguleerde druktherapie gegenereerd door het apparaat. De lampjes
blijven uit. De modus Aan wordt geïnitieerd door op de aan-/uitknop te
drukken wanneer het apparaat in de stand-bymodus staat en de patiënt
het masker draagt.
Drogen
Om de modus Drogen te starten, drukt u tegelijkertijd op de Ramp-knop en
op de aan-/uitknop. Wanneer het apparaat in de modus Drogen staat, draait
de blazer gedurende dertig minuten op lage snelheid. In de modus Drogen
blijven de lampjes uit en wordt de blazerdruk niet gereguleerd voor therapie.
NEDERLANDS
Page 80

80
Transcend 3 miniCPAP Quick Guide Pagina 10
De therapie beginnen
Sluit de Transcend 3 miniCPAP aan op een stroombron en laat het apparaat in de
stand-bymodus gaan.
Zorg dat uw masker goed op zijn plaats zit voordat u de therapie start.
Om de therapie te starten, drukt u op de aan-/uitknop. Wanneer u op de aan-/uitknop
drukt wanneer de Transcend 3 miniCPAP stand-by staat, wordt de modus Aan gestart.
De luchtstroom begint wanneer de blazer de voorgeschreven therapiedruk toedient of
de therapiedruk opvoert.
De ramp-functie gebruiken
De ramp-functie geeft gebruikers de kans om te wennen aan de luchtstroom door met een
lagere druk te beginnen en deze geleidelijk op te voeren tot de voorgeschreven druk
wanneer de gebruiker in slaap valt. In het softwaregedeelte van deze handleiding staat
weergegeven hoe rampinstellingen op uw apparaat kunnen worden aangepast.
Om de druk sneller op te voeren, houdt u de Ramp-knop ingedrukt tot het apparaat een
comfortabele therapiedruk heeft bereikt. Wanneer de Ramp-knop wordt losgelaten, blijft
het apparaat in de Ramp-modus tot het de voorgeschreven therapiedruk bereikt.
Controleer of de Transcend 3 miniCPAP aanstaat. Zo niet, druk dan op de aan-/uitknop.
Pas uw masker aan om lekken te vermijden.
Druk op de Ramp-knop. De druk wordt nu verlaagd tot de ramp-startdruk en wordt
geleidelijk verhoogd gedurende een ingestelde tijd tot de druk de voorgeschreven
therapiedruk heeft bereikt.
Note Als de ramp-knop tijdens de geleidelijk toenemende druk even wordt ingedrukt,
beïnvloedt dit de toegediende druk niet. Om de geleidelijke drukverhoging van
de ramp-functie te beëindigen, schakelt u het apparaat uit door op de aan-/uitknop
te drukken. De volgende keer dat de blazer wordt ingeschakeld, wordt de
voorgeschreven therapiedruk toegediend.
Note In het geval dat er sprake is van een onderbreking in de stroomtoevoer, hervat
de Transcend 3 miniCPAP de werking op de volledig voorgeschreven druk zodra
de stroomtoevoer is hersteld.
De EZEX-functie gebruiken
De EZEX-functie is een speciale functie die de therapiedruk bij uitademing vermindert.
Deze functie beoogt de patiënt extra comfort te geven door de mate van weerstand die de
patiënt bij het uitademen ondervindt, te verminderen.
Er zijn vier EZEX-instellingen: UIT, 1, 2 of 3; de instellingen vergroten de mate van
drukverlaging steeds verder van niets tot het maximum. In het softwaregedeelte van de
gebruikershandleiding staat weergegeven hoe EZEX-instellingen kunnen worden aangepast.
NB: download de gebruikershandleiding van de Transcend 3 miniCPAP van
www.mytranscend.com/support of bel de klantenservice van Somnetics op 877-621-9626
om een exemplaar aan te vragen.
NEDERLANDS
Page 81
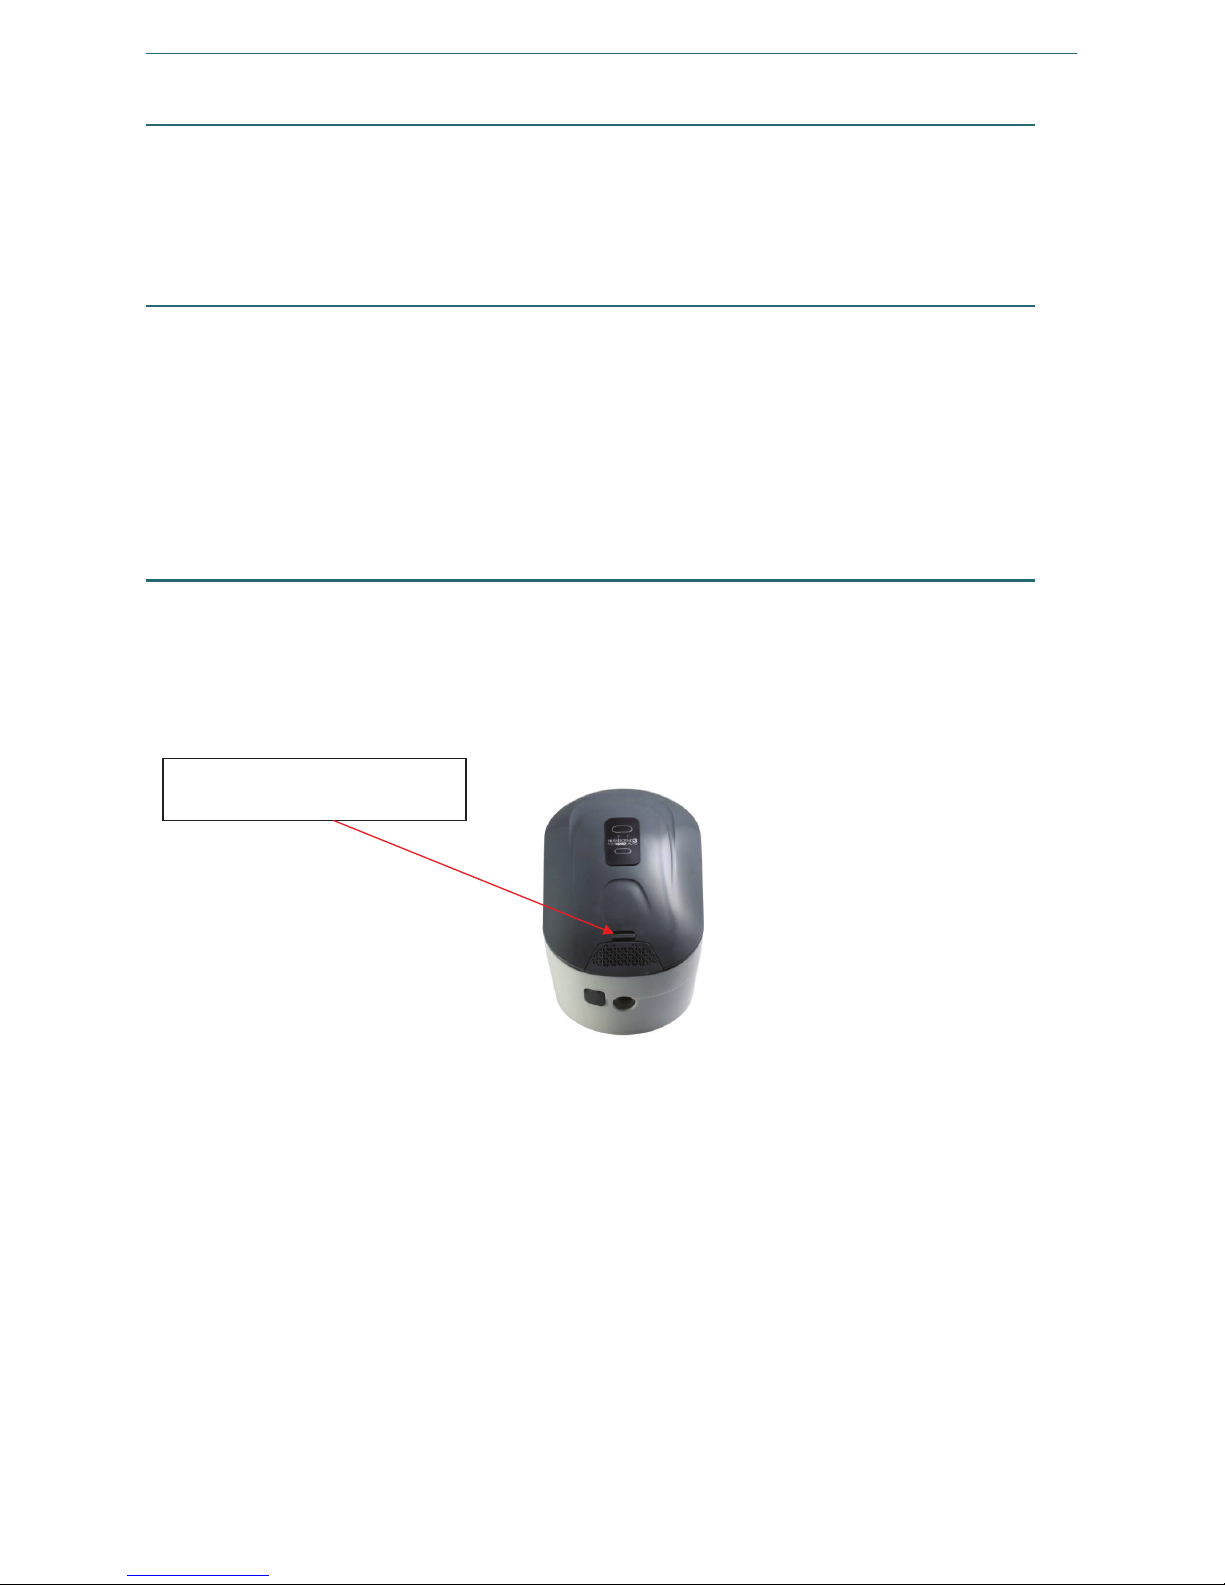
81
Transcend 3 miniCPAP Quick Guide Pagina 11
De therapie beëindigen
Om de therapie te beëindigen terwijl de blazer aanstaat, drukt u op de aan-uitknop om de
blazer te deactiveren en het apparaat in de stand-bymodus te zetten. De gebruiker wordt
aanbevolen om na elke therapiesessie de modus Drogen te starten om de binnenzijde van
het apparaat te drogen.
De modus Drogen
Aan het einde van elke therapiesessie wordt de gebruiker aanbevolen om de modus
Drogen te starten. Om de modus Drogen te starten, drukt u tegelijkertijd op de Rampknop en op de aan-/uitknop. Wanneer het apparaat in de modus Drogen staat, draait de
blazer gedurende dertig minuten op lage snelheid. In de modus Drogen blijven de lampjes
uit en wordt de blazerdruk niet gereguleerd voor therapie. De modus Drogen laat lucht
door het systeem stromen om vochtresten te verwijderen uit de binnenzijde van het
apparaat en het luchtcircuit. Na de 30 minuten durende droogcyclus wordt de blazer
uitgeschakeld en gaat het apparaat in stand-by.
De filtermedia vervangen
De filtermedia van de Transcend 3 miniCPAP moeten minimaal elke zes maanden worden
vervangen.
Verwijder het filtersysteem door aan het lipje aan de achterkant van het apparaat te
trekken om het los te maken. Trek het filtersysteem weg van het apparaat. Gooi het hele
filtersysteem weg en vervang het door een nieuwe.
Trek aan het lipje om het
filtersysteem los te maken.
NEDERLANDS
Page 82

82
Transcend 3 miniCPAP Quick Guide Pagina 12
Uw Transcend 3 miniCPAP en de onderdelen onderhouden
Waarschuwingen:
Haal de stekker uit de Transcend 3 miniCPAP voordat u begint met reinigen.
Dompel de Transcend 3 miniCPAP of de stroomtoevoer niet onder in vloeistof.
Zorg dat er geen water in de openingen van het apparaat kan lopen.
Gebruik geen agressieve of schurende reinigingsmiddelen om het apparaat of een
van de onderdelen te reinigen.
Probeer de Transcend 3 miniCPAP niet te steriliseren.
Plaats geen reinigingsmiddelen, zoals een doek of vloeistof, in de luchttoevoer van
het apparaat of de luchtuitvoeraansluiting.
De buitenkant reinigen
Volg deze instructies om de buitenkant van de Transcend 3 miniCPAP te reinigen.
1. Haal de stekker van de stroomtoevoer uit het stopcontact voordat u begint met
reinigen en haal alle stroomkabels los van het apparaat.
2. Maak een mengsel van 5% mild vloeibaar reinigingsmiddel met gedestilleerd water
(50 ml vloeibaar reinigingsmiddel per liter gedestilleerd water). Het milde
reinigingsmiddel dient afbreekbare anionische oppervlakte-actieve stoffen te bevatten
maar geen fosfaten.
3. Dompel een pluisvrije katoenen doek onder in de reinigingsoplossing.
4. Wring het overtollige water uit de doek en veeg vervolgens over de buitenkant van het
Transcend 3 miniCPAP-apparaat gedurende circa twintig seconden met een rustige
beweging heen en weer, van voor naar achter op het apparaat. Pas stevige druk toe en
zorg dat alle toegankelijke oppervlakken goed worden afgenomen en dat opgebouwd
vuil wordt verwijderd.
5. Spoel de doek in schoon water om restanten van de reinigingsoplossing te verwijderen.
6. Wring overtollig water uit de doek en veeg de Transcend 3 miniCPAP vervolgens
schoon met een rustige beweging van voor naar achter om eventuele restanten van
het reinigingsmiddel aan de buitenkant te verwijderen.
Veeg het apparaat af met een droge, pluisvrije, katoenen doek tot het apparaat
helemaal droog is.
NEDERLANDS
Page 83

83
Transcend 3 miniCPAP Quick Guide Pagina 13
De accessoires reinigen
Het volgende accessoire dient te worden gereinigd met een mengsel van 5% mild
reinigingsmiddel met gedestilleerd water (50 ml vloeibaar reinigingsmiddel per liter
gedestilleerd water). Het milde reinigingsmiddel dient afbreekbare anionische
oppervlakte-actieve stoffen te bevatten maar geen fosfaten. Volg deze stappen om de
accessoires te reinigen:
Accessoire
Regelmatige
reinigingscyclus
Levensduur van het
product
Luchttoevoerslang
Dagelijks 3 maanden
1. Dompel het de luchttoevoerslang volledig onder in de reinigingsoplossing.
2. Houd het waterreservoir ondergedompeld en maak het oppervlak goed schoon met
een pluisvrije, katoenen doek. Pas stevige druk toe en zorg dat alle toegankelijke
oppervlakken goed worden afgenomen en dat opgebouwd vuil wordt verwijderd.
3. Reinig de binnenkant van de luchttoevoerslang door deze op te tillen en vervolgens
de uiteinden van de slang omlaag te houden terwijl de slang is gevuld met de
reinigingsoplossing.
4. Spoel de luchttoevoerslang door deze onder te dompelen in gedestilleerd water.
Beweeg de luchttoevoerslang naar voren en naar achteren gedurende circa tien
seconden om het resterende reinigingsmiddel te verwijderen.
5. Spoel de luchttoevoerslang in gedestilleerd water door de slang volledig onder te
dompelen. Terwijl de slang is gevuld met water tilt u de uiteinden van de slang op en
beweegt u deze vervolgens weer omlaag. Herhaal deze beweging gedurende circa tien
seconden om het resterende reinigingsmiddel te verwijderen.
6. Droog de buitenkant van de luchttoevoerslang met een droge pluisvrije, katoenen doek
af. Laat de slang aan de lucht drogen tot deze van binnen droog is. Hoe lang het duurt
voordat de slang droog is, is afhankelijk van de omgevingsomstandigheden.
NEDERLANDS
Page 84
84
Transcend 3 miniCPAP Quick Guide Pagina 14
Wegwerponderdelen
Item
Onderdeelnummer
Item
Onderdeelnummer
Transcend 3 filtersysteem
503109
Standaardslang van 1,80 m
(6 ft)
503081
Accessoires
Item
Onderdeelnummer
Item
Onderdeelnummer
Transcend P8 Battery
503023
Transcend mobiele
voedingsadapter (MPA1)
503029
Transcend P4 Battery
503026
Transcend draagbare
zonnelader voor accu's
503056
Vervangende onderdelen
Item
Onderdeelnummer
Item
Onderdeelnummer
Transcend 3 miniCPAP Auto
503104
Transcend-reistas
503012
Transcend 3 miniCPAP Auto
Service Unit
503105
Universeel voedingsapparaat
met meerdere stekkers (PSA2)
503059
Transcend 3 miniCPAP
503106
Verwisselbare stekkerset
503060
Transcend 3 miniCPAP
Service Unit
503107
USB-kabel
503020
Set universeel
voedingsapparaat met
meerdere stekkers
(Bevat 503059 en 503060)
503078
NEDERLANDS
Page 85

85
Page 86

86
Page 87

87
Page 88
88
Transcend 3 miniCPAP Quick Guide Page 14
Corporate headquarters Somnetics International, Inc.
Email [email protected]
Web http://www.mytranscend.com/
Telephone 651.621.1800
Toll-free telephone 877.621.9626
Fax 651.204.0064
Somnetics International, Inc.
33 5th Avenue NW, Suite 500
New Brighton, Minnesota 55112 USA
2797
Authorized Representative (MDD 93/42/EEC)
Atlantico Systems Ltd.
34 Oldfield
Kingston
Galway, Ireland
TEL. +35391443609
©2019 Somnetics International, Inc. All rights reserved.
103937 Rev 01 2019-03
© 2019 Somnetics International, Inc. All rights reserved.
2019-03 REF 103937 REV A
 Loading...