

Page 1
11/29/2009
1
•Protect
•Connect
•Organise
•Grow
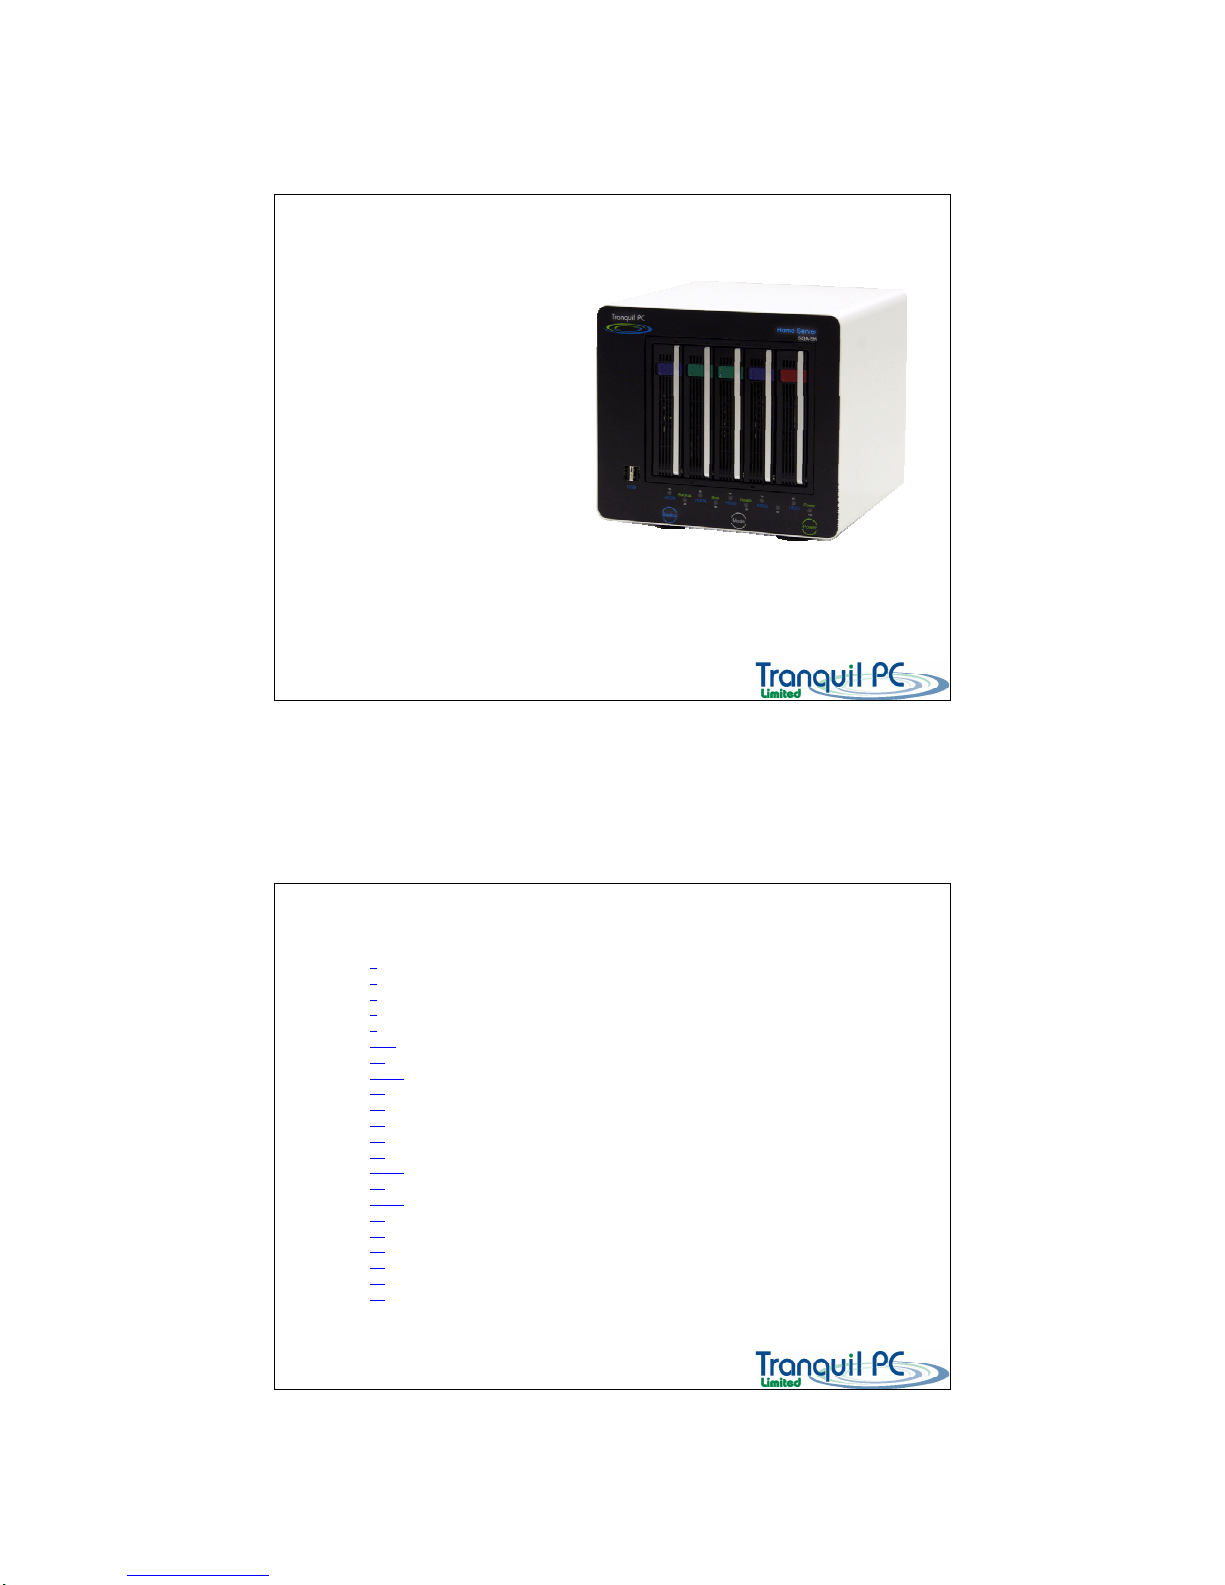
Tranquil PC SQA-5H Home Server
D03_ WHS_PP1_UK
Installation Guide
3 Welcome
4 Contents of your box
5 The front panel
6 The rear panel
7 Connecting up
8-16 Initialising your Home Server
17 Installing the Connector software on additional PC
18-21 Status indicators
22 Mode button functions
23 Logon to your Home Server
24 User accounts / Guest account
25 Creating a new User account
26 Share your Media
27-28 Server backup
29 Backup button
30-31 Add a new HDD
32 Add external storage
33 Recover your PC
34 Recover your Home Server
35 Care and Maintenance
36 Specification
37 Warranty
Index
D03_ WHS_PP1_UK
Page 2

11/29/2009
2
Thank you for purchasing this high quality Home Server. This appliance, if cared for and used
correctly will provide many years of service. Reading through all of these simple instructions
will reduce any potential setup problems.
The Tranquil Harmony Home Server is a small, low power, near silent appliance that will
provide enhancements and security to you digital home information.
The unit, is designed for 24/7 operation. You will now be able to backup all of your connected
PCs, expand your own storage, create shares for common digital files, ie music and pictures,
duplicate your important files for security, share and access your files via the internet and even
remotely control your connected PCs.
Welcome
D03_ WHS_PP1_UK
Back to Index page
Please check the contents of your packing box, before proceeding. You should have the
following items :
1. SQA-5H Home Server unit (incl hard disk HDD)
2. 80W AC/DC power adapter
3. Power cable (country specific)
4. Quick start guide (read this first)
5. Media kit including :
Start up + Windows Home Server Connector CD
PC Restore CD
Windows Home Server Recovery DVD + USB boot key
6. Ethernet cable
Please check all of the contents are present before proceeding to use your appliance
In your box
D03_ WHS_PP1_UK
Back to Index page
Page 3

11/29/2009
3
The front panel
D03_ WHS_PP1_UK
1) HDD carriers
3) Backup
button
2) USB2.0 ports
4) Mode
button
5) Power
button
Back to Index page
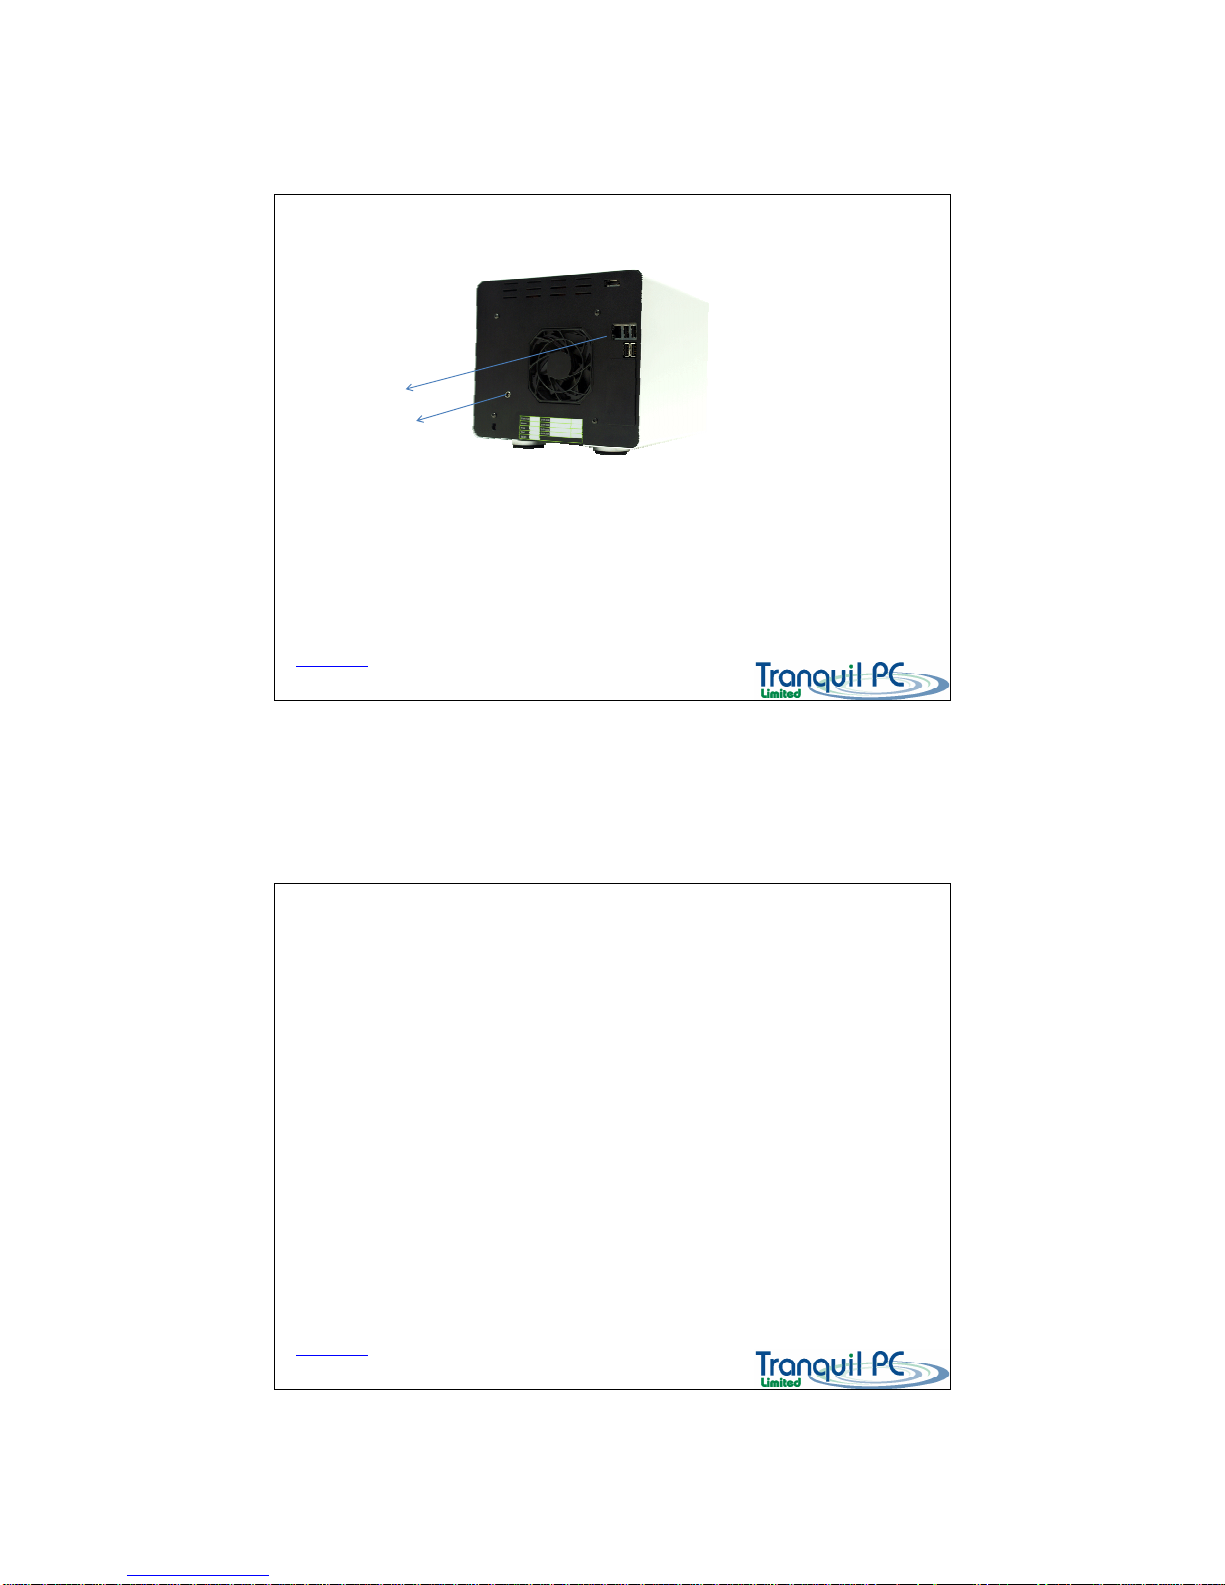
The rear panel
D03_ WHS_PP1_UK
1) 12V DC
Power In
2) Desk Lock
3) eSATA
4) Ethernet
5) USB2.0
6) USB2.0
7) USB2.0
8) USB2.0
9) Service panel
Back to Index page
Page 4
11/29/2009
4
Planning your installation
Ideally your Home Server should be located in open space, ie a desk, shelf etc. If you plan to install it into a
small space (cupboard) then please ensure there is suitable ventilation. You will need a near-by mains power
outlet, and a wired LAN (Ethernet) connection to the router.
There is a quiet fan in the Home Server, to move cool air over the internal components. The Home Server is
very quiet, but we recommend that it should not be installed in ‘quiet rooms’ such as a bedroom.
Connecting up
D03_ WHS_PP1_UK
1) Ethernet cable
To your router
2) 12V Power Plug
To your Power supply
Back to Index page
Initialising your Home Server
D03_ WHS_PP1_UK
Once your Home Server is plugged into your home network, and powered up, it is ready to be
initialised. This process only takes place once. It will take approximately 10 -15 minutes to complete.
You will need you COA licence number – which is found on the label on the back of the Home Server
(you can enter the COA number at a later time, if it is helpful).
To start the process – please run the option from the start up CD – Initialise your Home Server.
It is advisable to check that any installed firewall software on your PC does not stop the process.
Please accept any firewall prompts to trust the Home Server Connector software, or add Home Server
Connector software to the trusted applications list of your firewall software.
Back to Index page
Page 5
11/29/2009
5
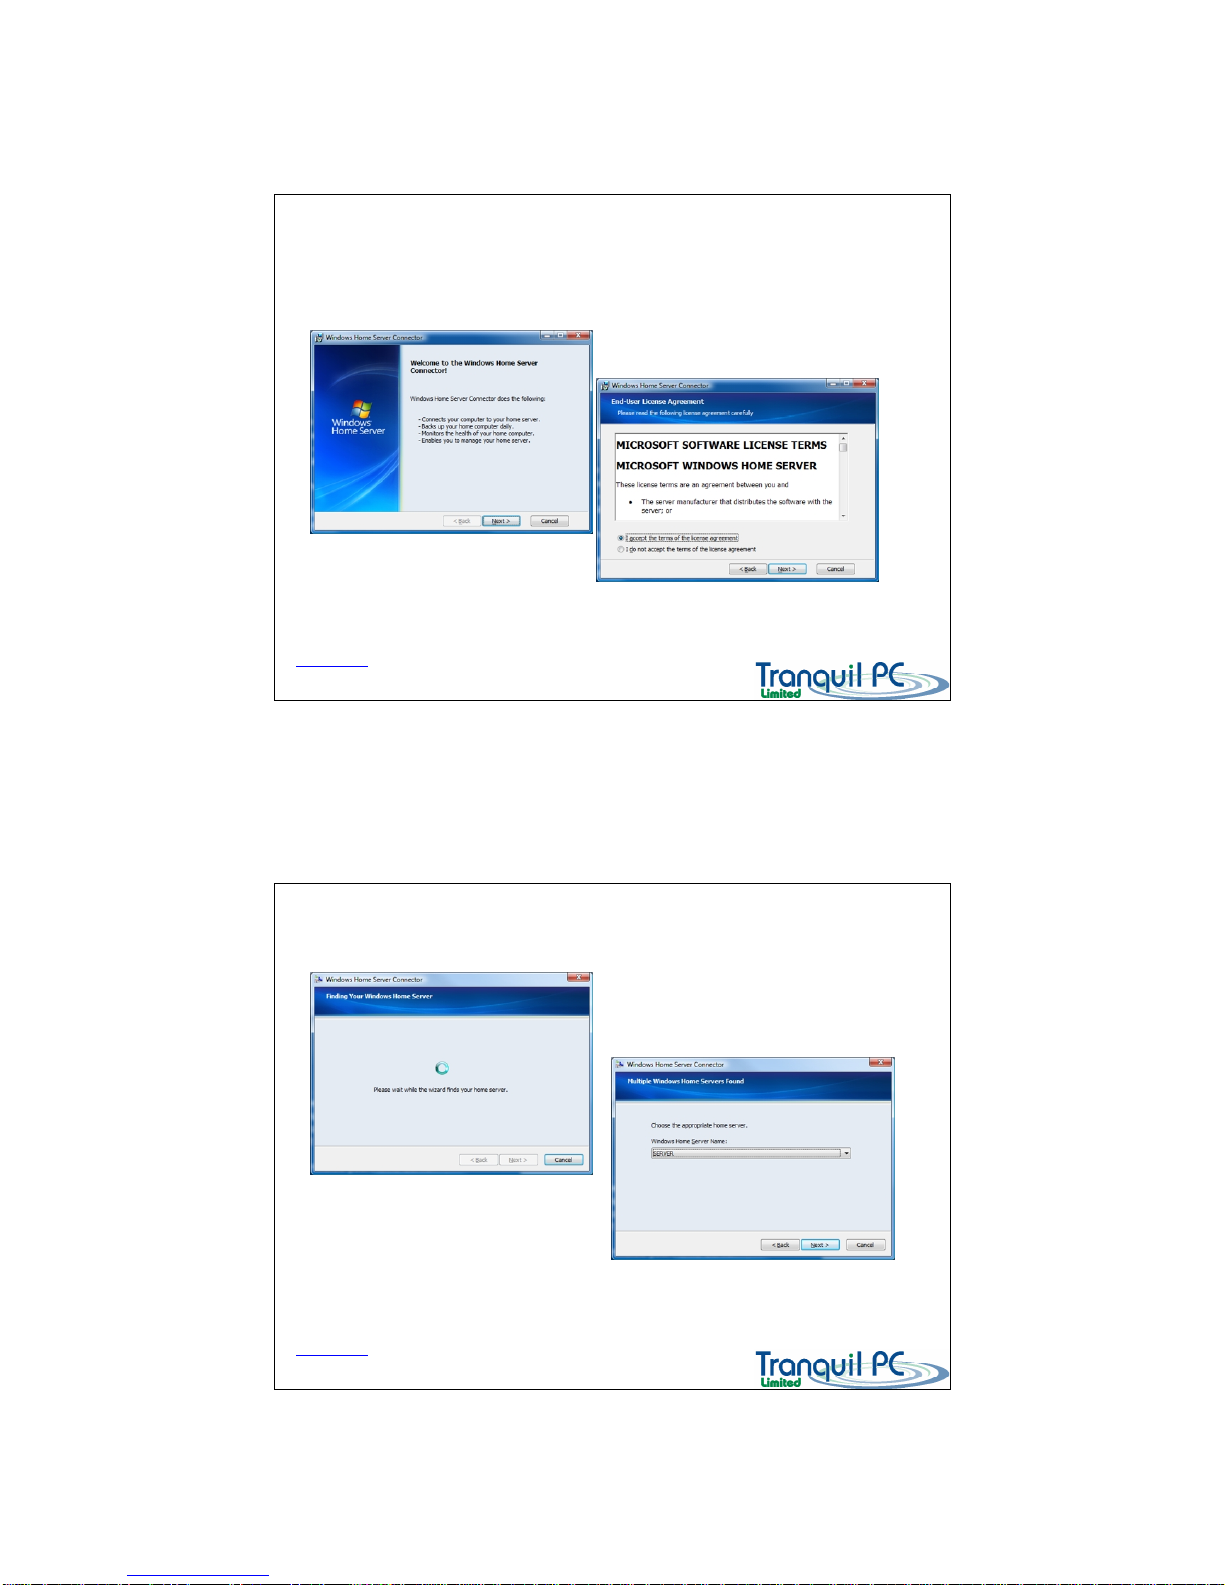
Initialising your Home Server – Start up
D03_ WHS_PP1_UK
Please run the Initialise Your Server, from the CD index page.
Back to Index page
Initialising your Home Server – Searching
D03_ WHS_PP1_UK
Back to Index page
Page 6
11/29/2009
6
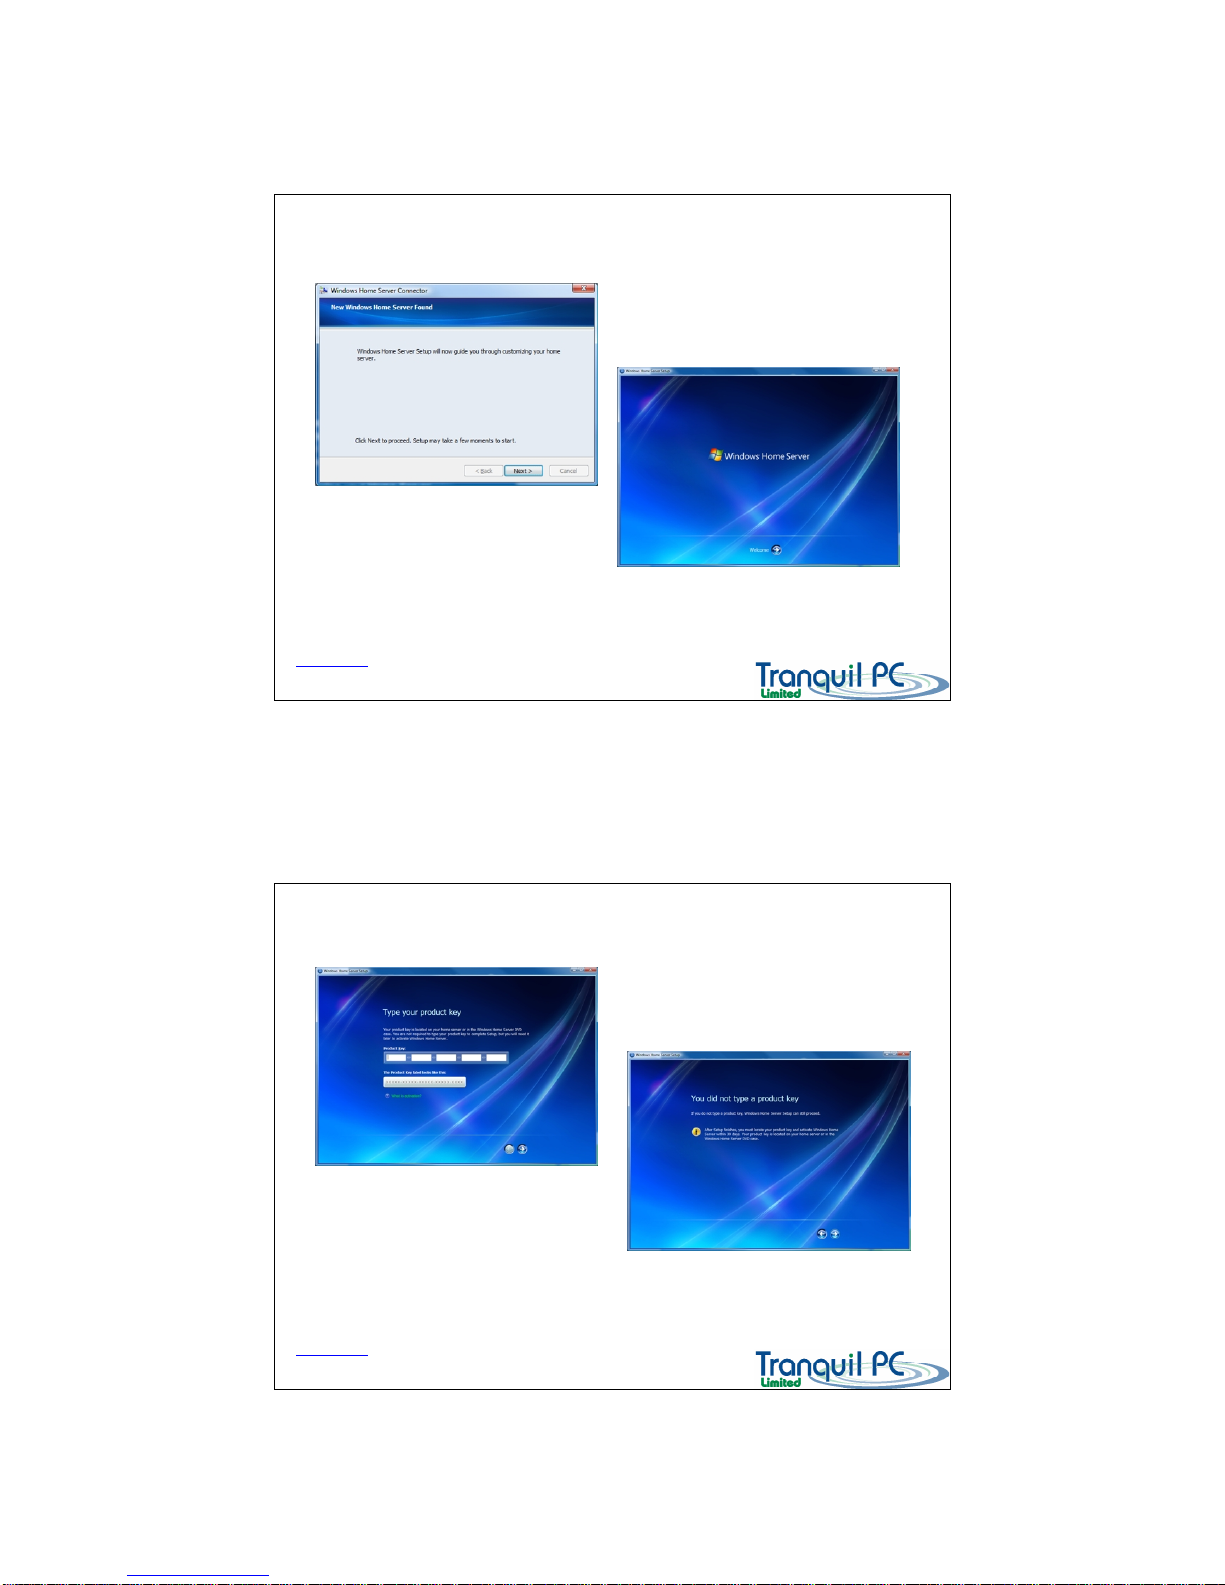
Initialising your Home Server - Setup
D03_ WHS_PP1_UK
Back to Index page
Initialising your Home Server – COA licence
D03_ WHS_PP1_UK
If you do not type a product key (COA sticker)
you can enter it later.
Back to Index page
Page 7
11/29/2009
7
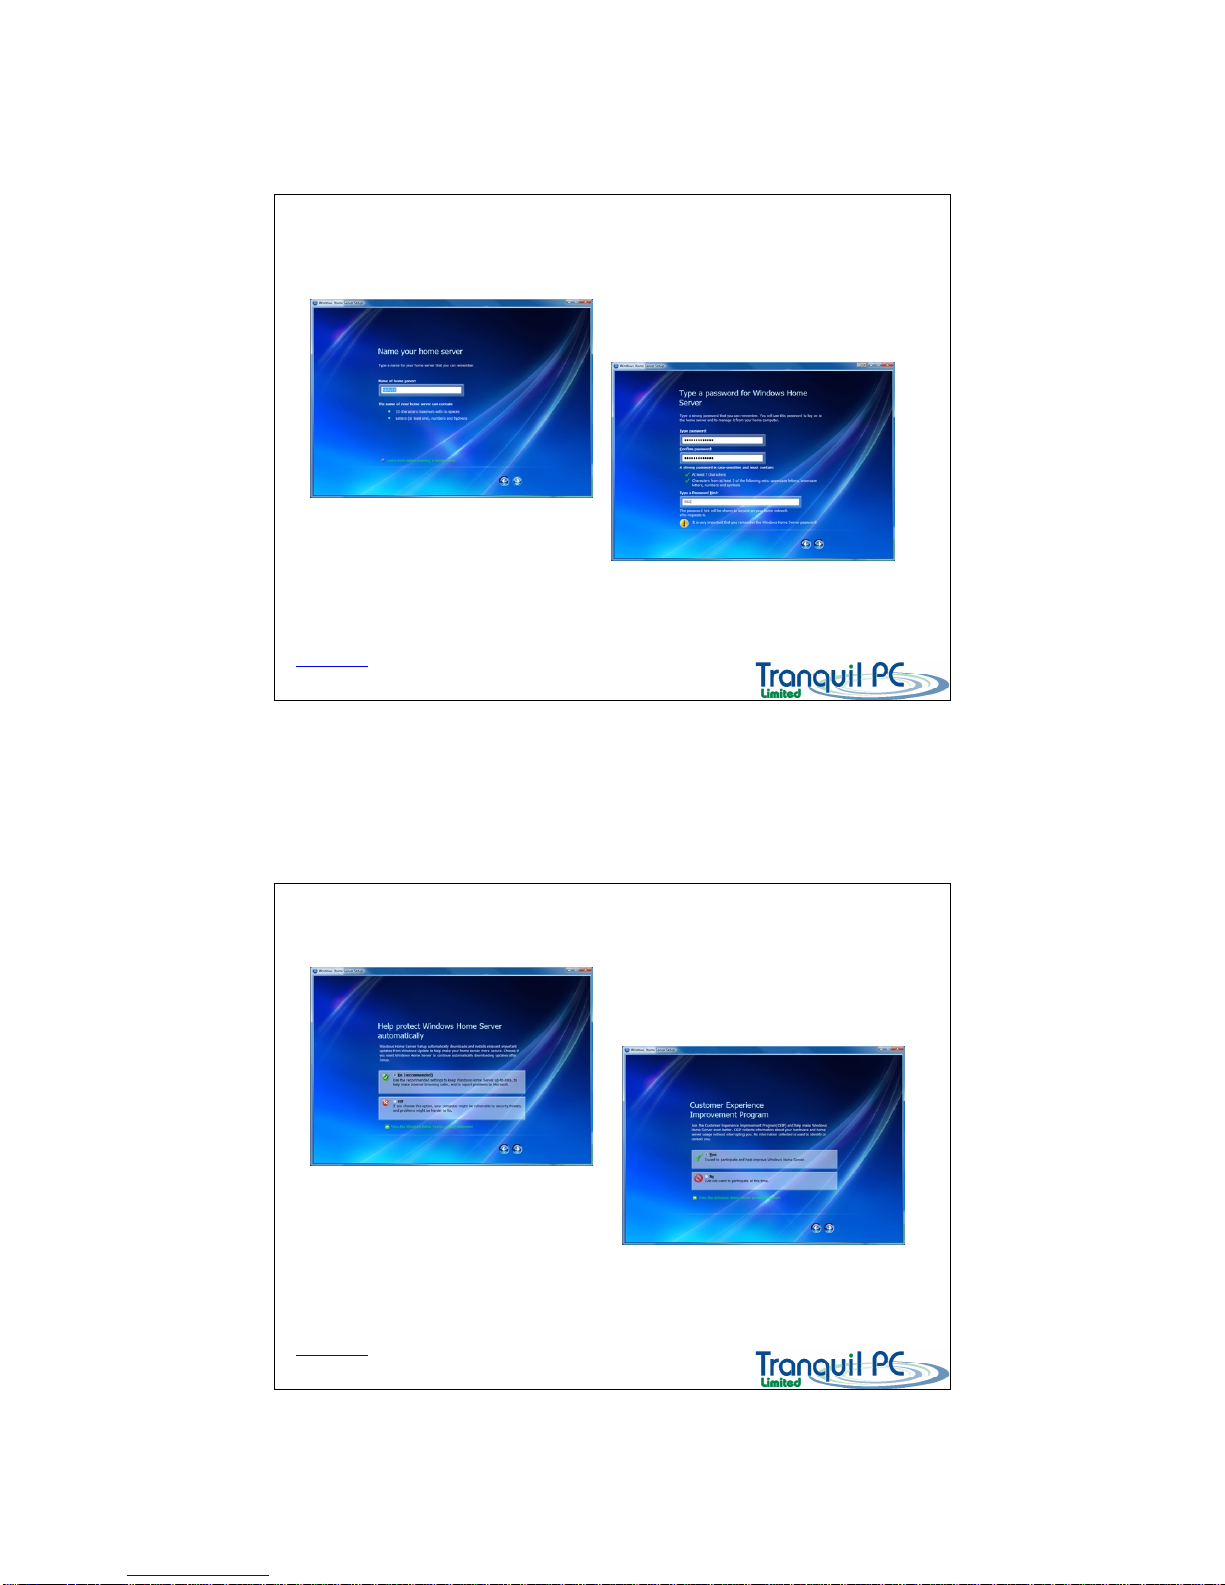
Initialising your Home Server – Server Name
and Password
D03_ WHS_PP1_UK
Give your Home Server a name
REMEMBER the password. It is very important
you do not loose or forget it
Back to Index page
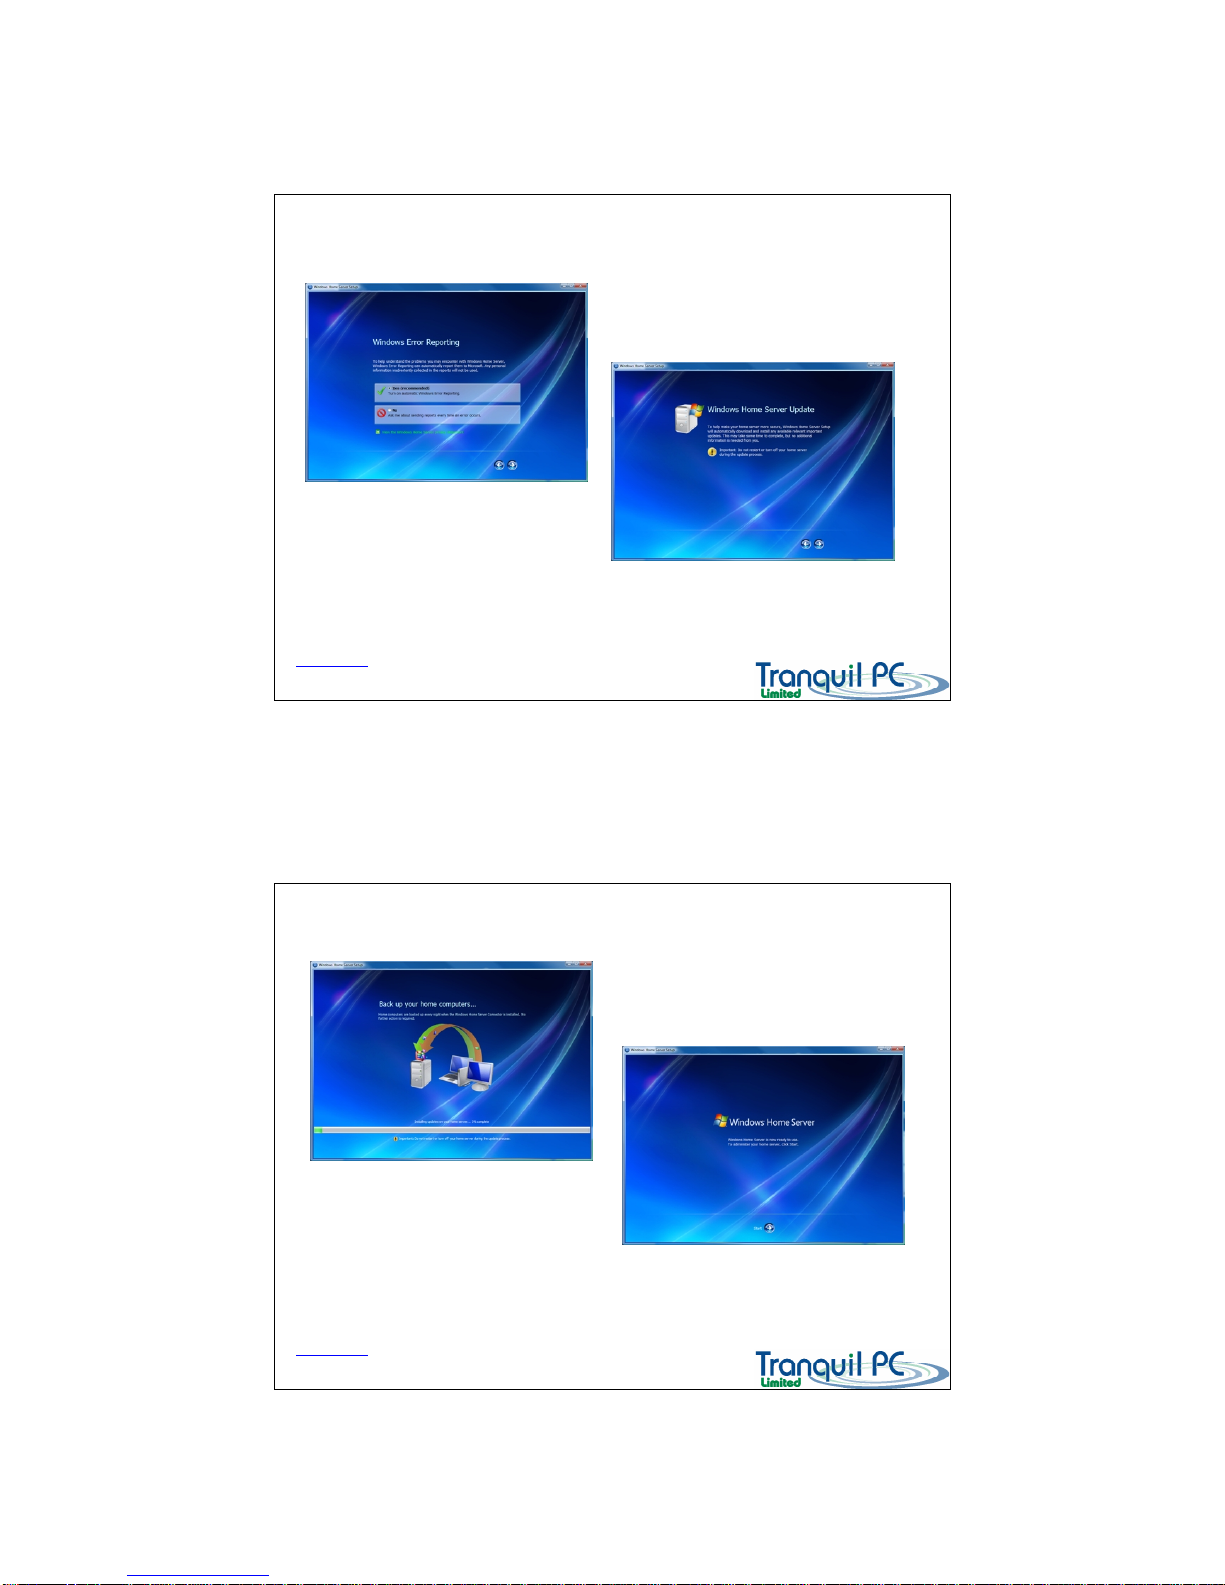
Initialising your Home Server - Updates
D03_ WHS_PP1_UK
Back to Index page
Page 8
11/29/2009
8
Initialising your Home Server –Almost done
D03_ WHS_PP1_UK
Back to Index page
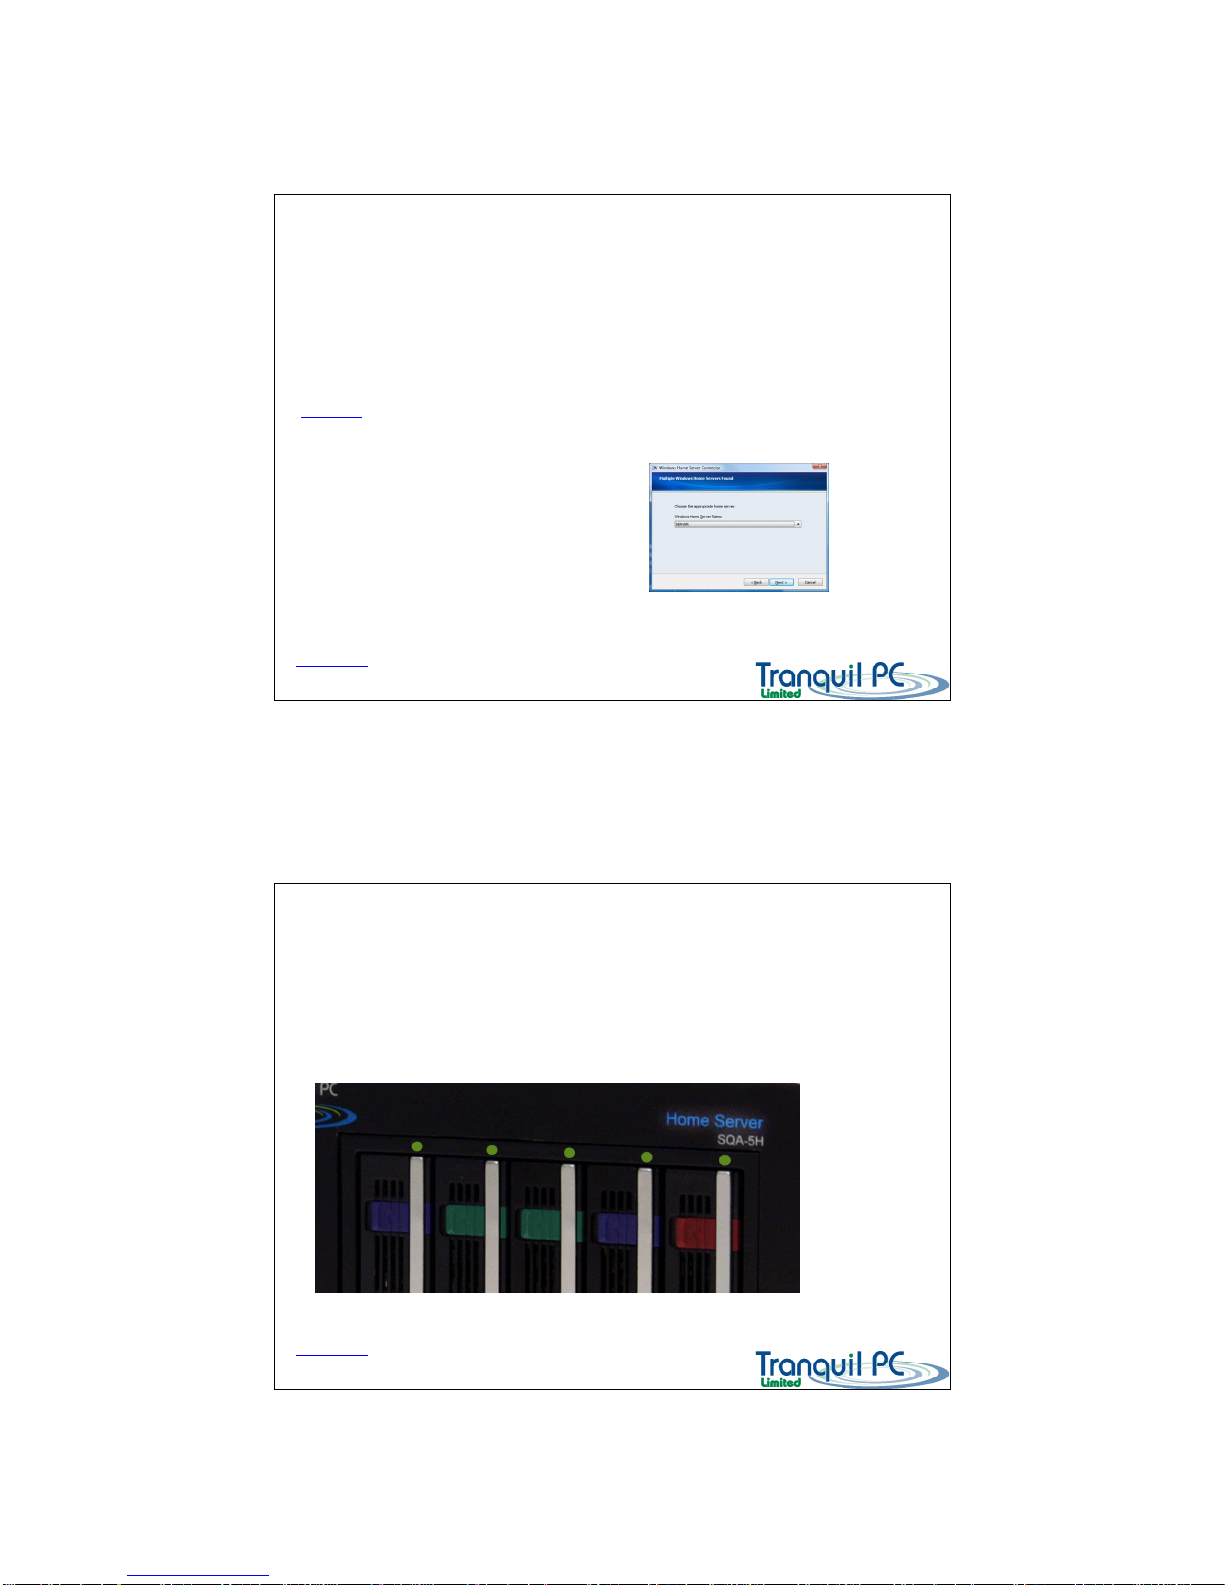
Initialising your Home Server - Completed
D03_ WHS_PP1_UK
Your Home Server will now get any new updates
and prepare itself for operation.
Once you see the ‘Start’ button the Home Server
is ready for normal use.
Back to Index page
Page 9
11/29/2009
9
Installing on other PCs
D03_ WHS_PP1_UK
You need to run the Connector software on each of the PCs that you which to protect / backup.
You can install the Connector, either by inserting the START UP CD into each additional PC, and run the
‘Install Connector on additional PCs’ option from the index screen, or you can install directly
from the Home Server itself.
To install directly from the Home Server, please open a web browser page and enter
\\SERVER
(where SERVER is the name of your Home Server) –then you will prompted to
enter security details – the User is Administrator, and the password is your Home Server
password. Then click on the software folder, then the Home Server Connector Software folder
– finally run the file ‘setup.exe’
You will be guided through the installation process.
Back to Index page
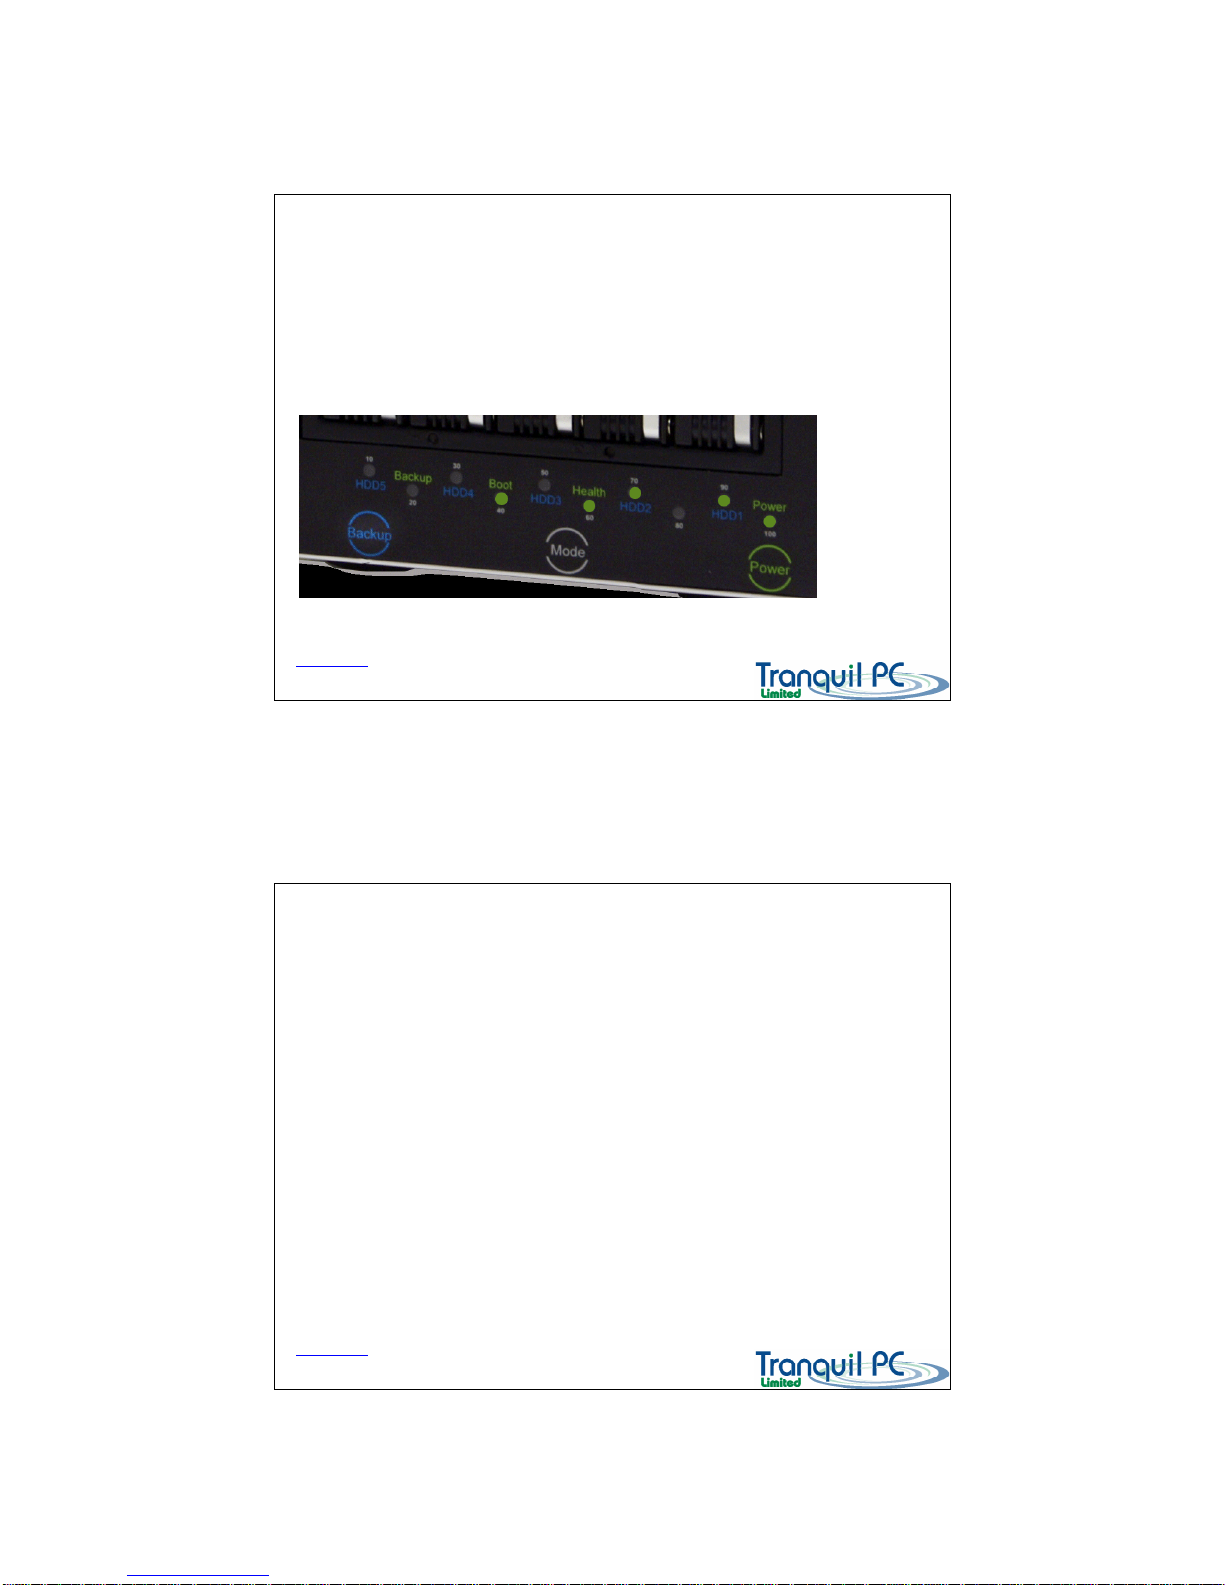
The front panel status indicators - upper
D03_ WHS_PP1_UK
The front panel of the SQA-5H has numerous multi-coloured indicators to let you know what is going
on with your Home Server.
There is an LED above each Hard Disk bay – GREEN indicates a HDD is present in the bay, RED indicates
the disk is in use (accessed).
Back to Index page
Page 10
11/29/2009
10
The front panel status indicators - lower
D03_ WHS_PP1_UK
The Power LED should normally be Green
Each HDD bay that is in use should be Green
The Health LED should be Green
The Boot LED should be Green
Green LEDs indicate system is running in good order
Back to Index page
The front panel status indicators - lower
D03_ WHS_PP1_UK
LED Status :
Power ON OFF = System off
LAN Connected to router Disconnected from router
Health OK Needs immediate attention Needs attention
Boot Booted OK Booting (flashing)
Backup Backup completed Backup failed Backup in progress (flashing)
HDD (all) Mounted and Healthy Failed Disk un-mounted
Back to Index page
Page 11
11/29/2009
11
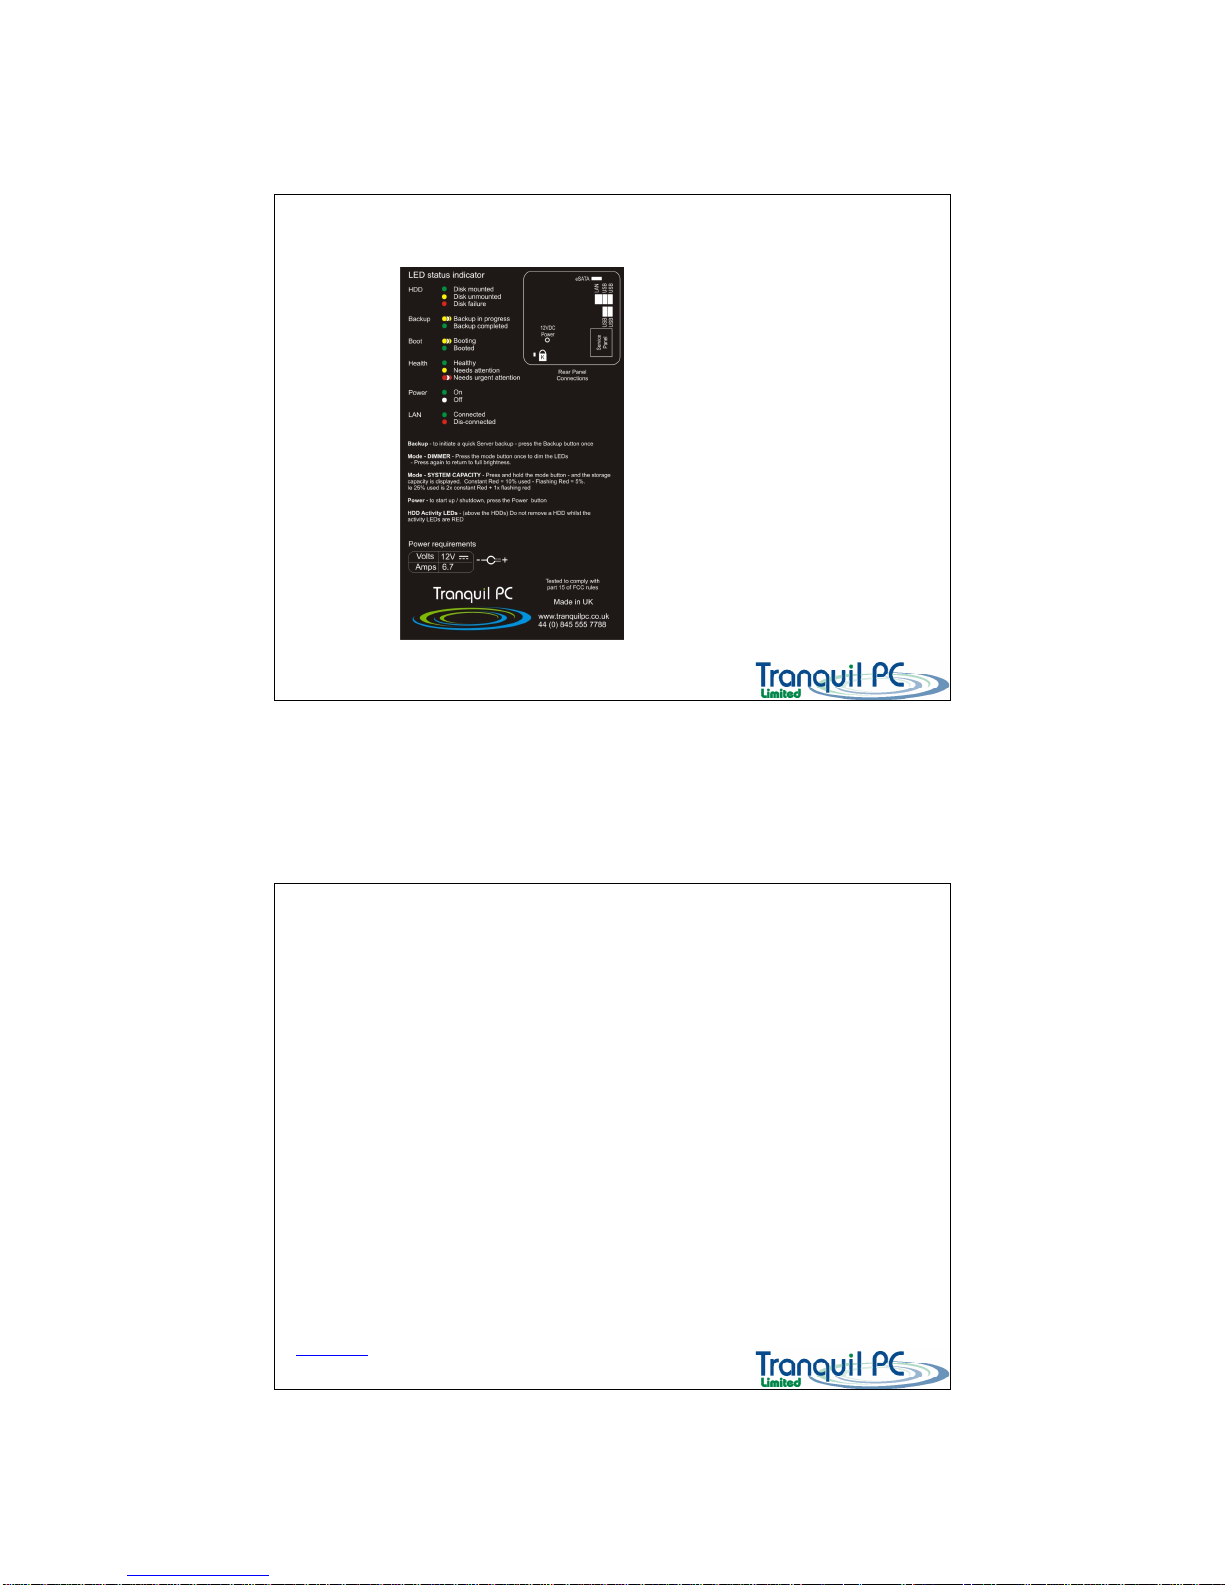
The front panel status indicators - Label
D03_ WHS_PP1_UK
On the bottom of the Home Server there
is a small quick reference label, for your
convenience.
The front panel status indicators - MODE
D03_ WHS_PP1_UK
The MODE button can be used to a) control the brightness of the front LEDs and b) check the storage capacity of
the Home Server Storage used / free.
To DIM the LEDs, press the MODE button once, to bring back to full brightness, press again
To check the STORAGE used on your Home Server – press and hold the MODE button
For each 10% used there will be a solid red LED, for each 5% used a flashing red LED –
ie 25% would be two solid red LEDs and the third LED would be flashing. Percentages used are rounded
up or down to the nearest 5%
Remaining space is displayed as green LEDs.
Back to Index page
Page 12
11/29/2009
12
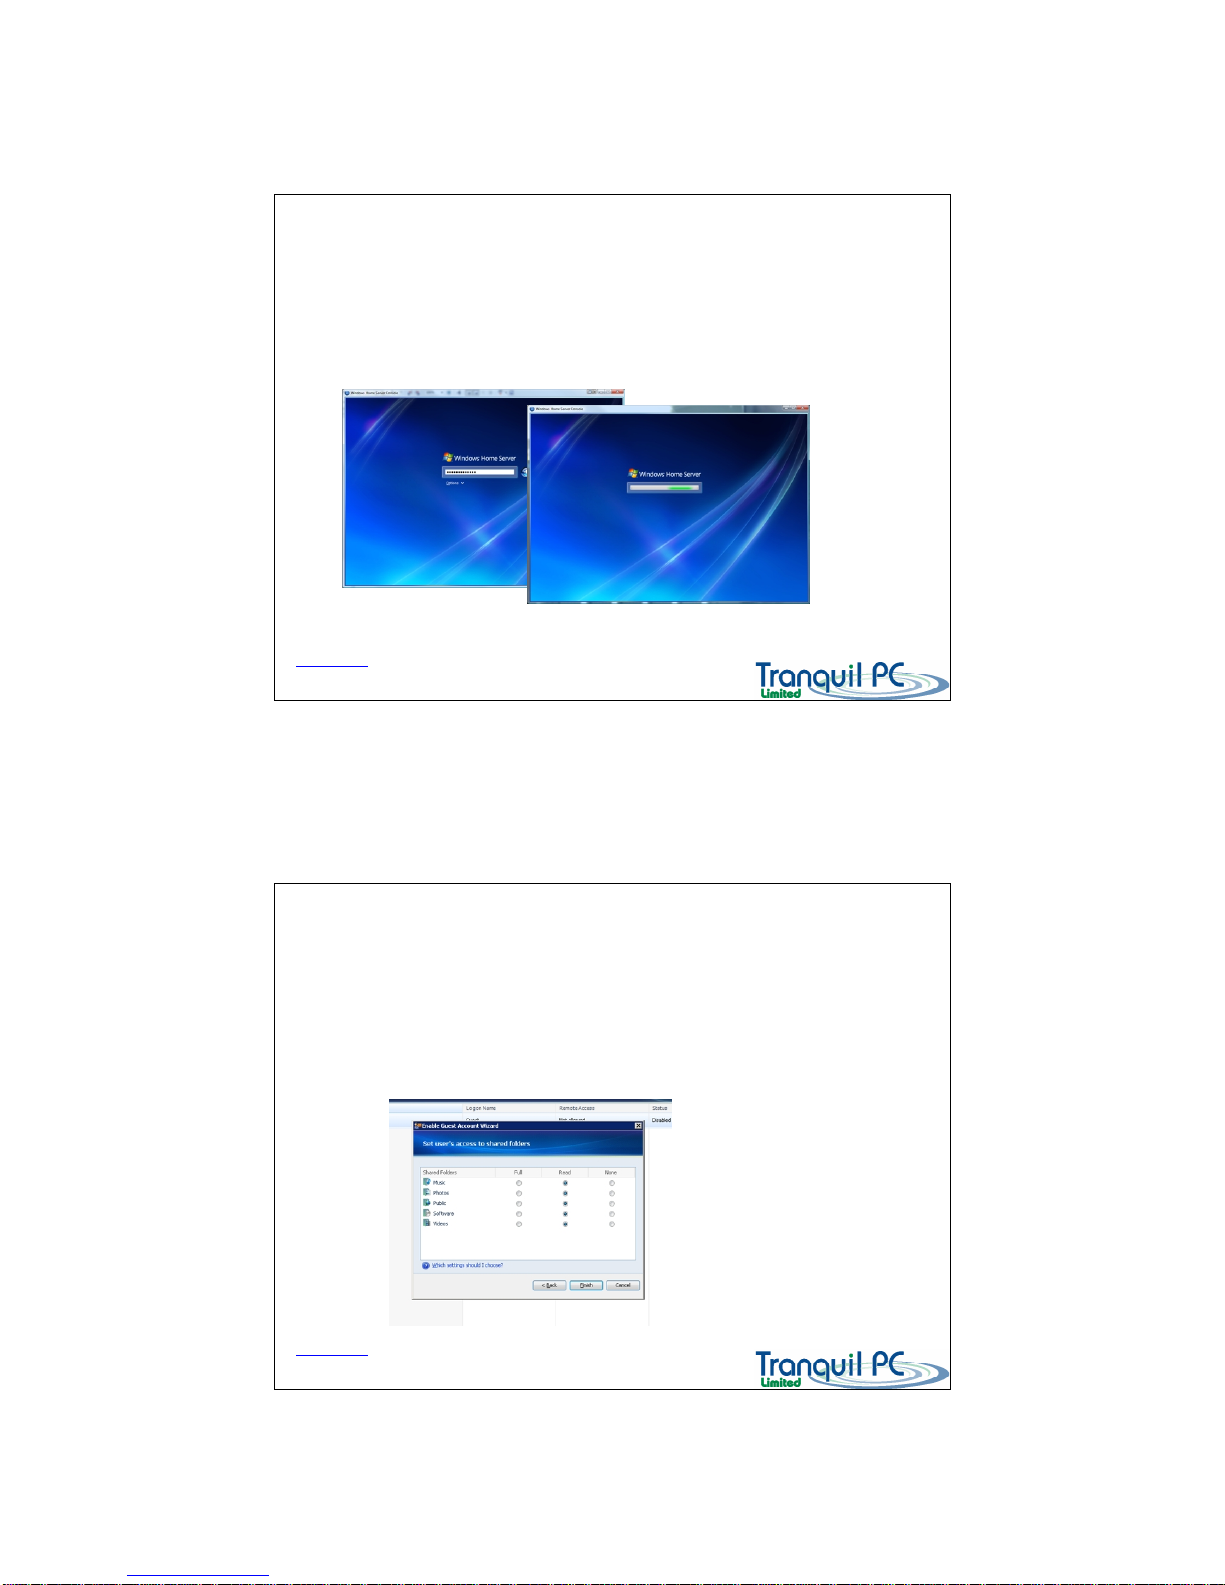
Logon to your Server
D03_ WHS_PP1_UK
The Home Server Console is the control centre for your system.
You can open the console, by clicking on the Home Server icon, near to your clock in the
system tray.
You may need to enter your Home Server password, then you will be logged onto the
Console
Back to Index page
Home Server Console – User accounts
D03_ WHS_PP1_UK
Your Home Server can have numerous ‘User Accounts’ for local and remote access.
Each User Account allows you to control what data (folders) each user is allowed to see or change.
The Guest account, which is by default disabled, allows any user to access any files or folders to which they are
granted access, without the use of a logon or password.
Back to Index page
Page 13
11/29/2009
13
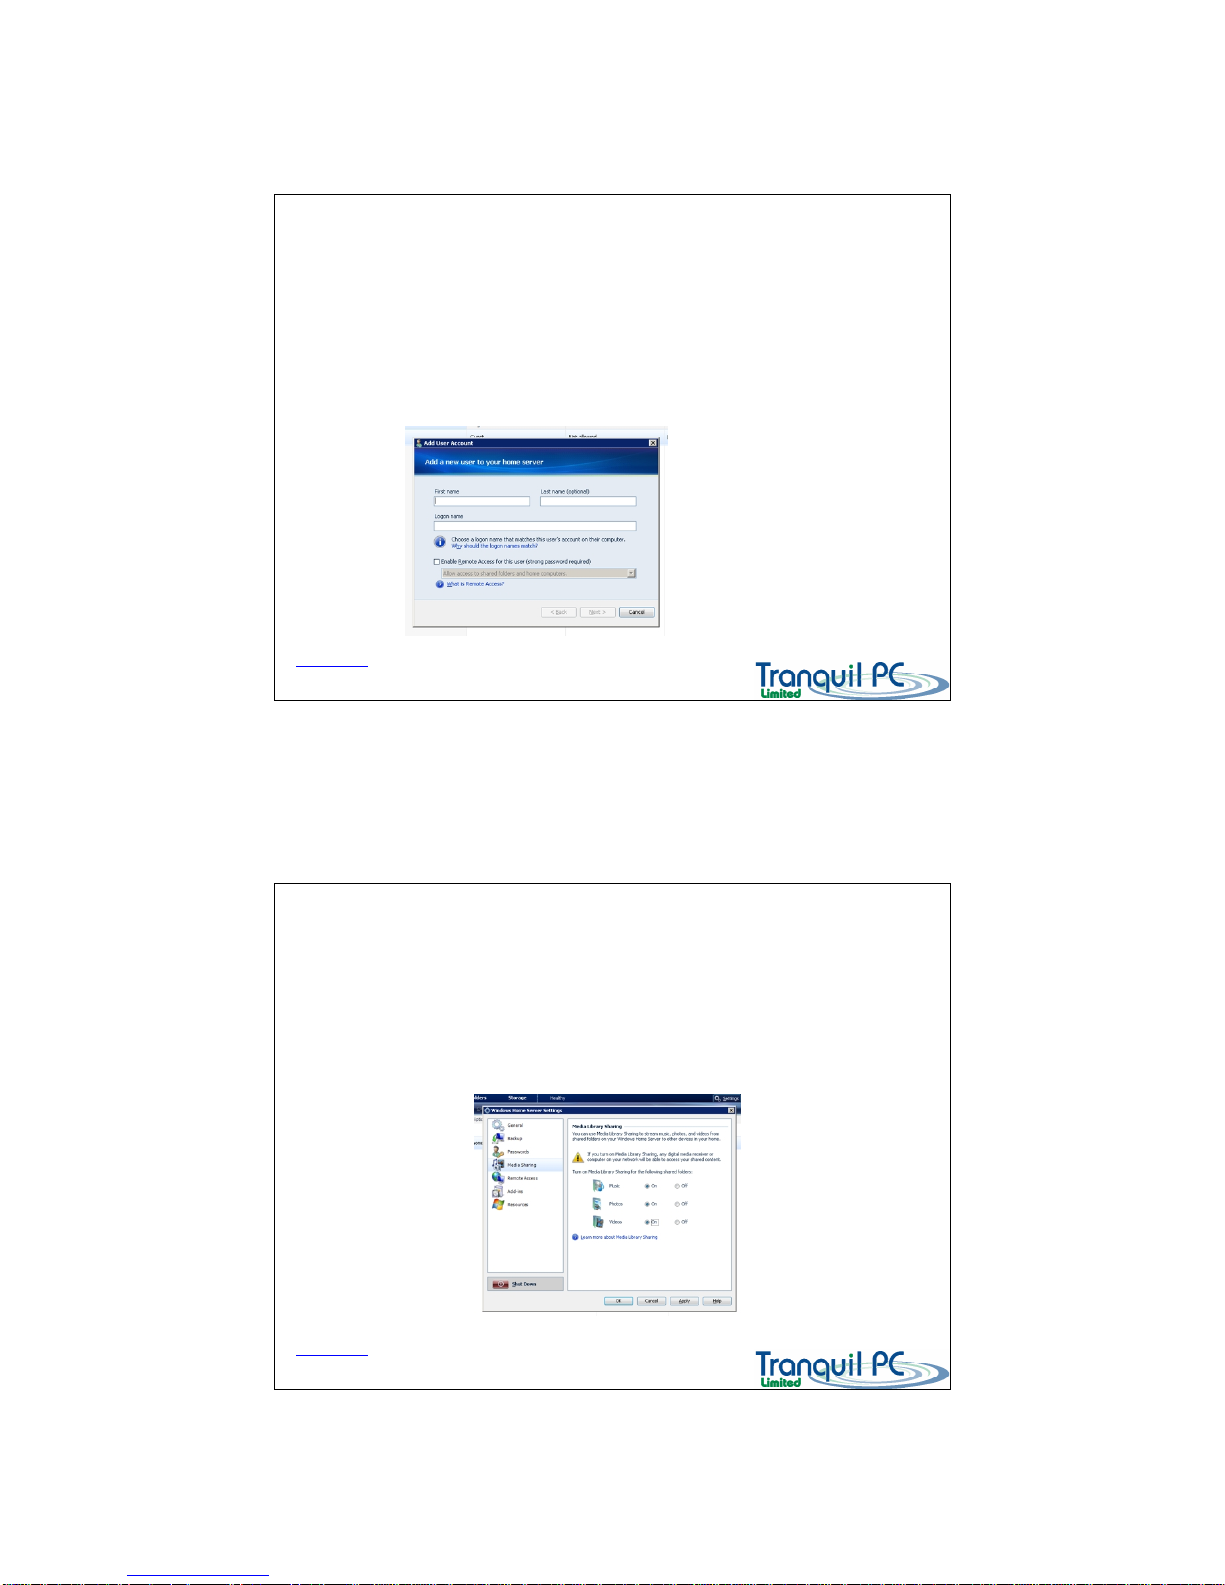
Home Server Console –
Creating a User account
D03_ WHS_PP1_UK
You can create accounts for both local and remote family members.
If you want to set up an account for ‘remote access’ to a specific folder, then the user must use a ‘strong’
password.
When setting up local users, if you use logon names and passwords the same as the local PC they are using,
these users will automatically be able to logon to their shared folders, saving time.
Back to Index page
Home Server Console – Share your Media
D03_ WHS_PP1_UK
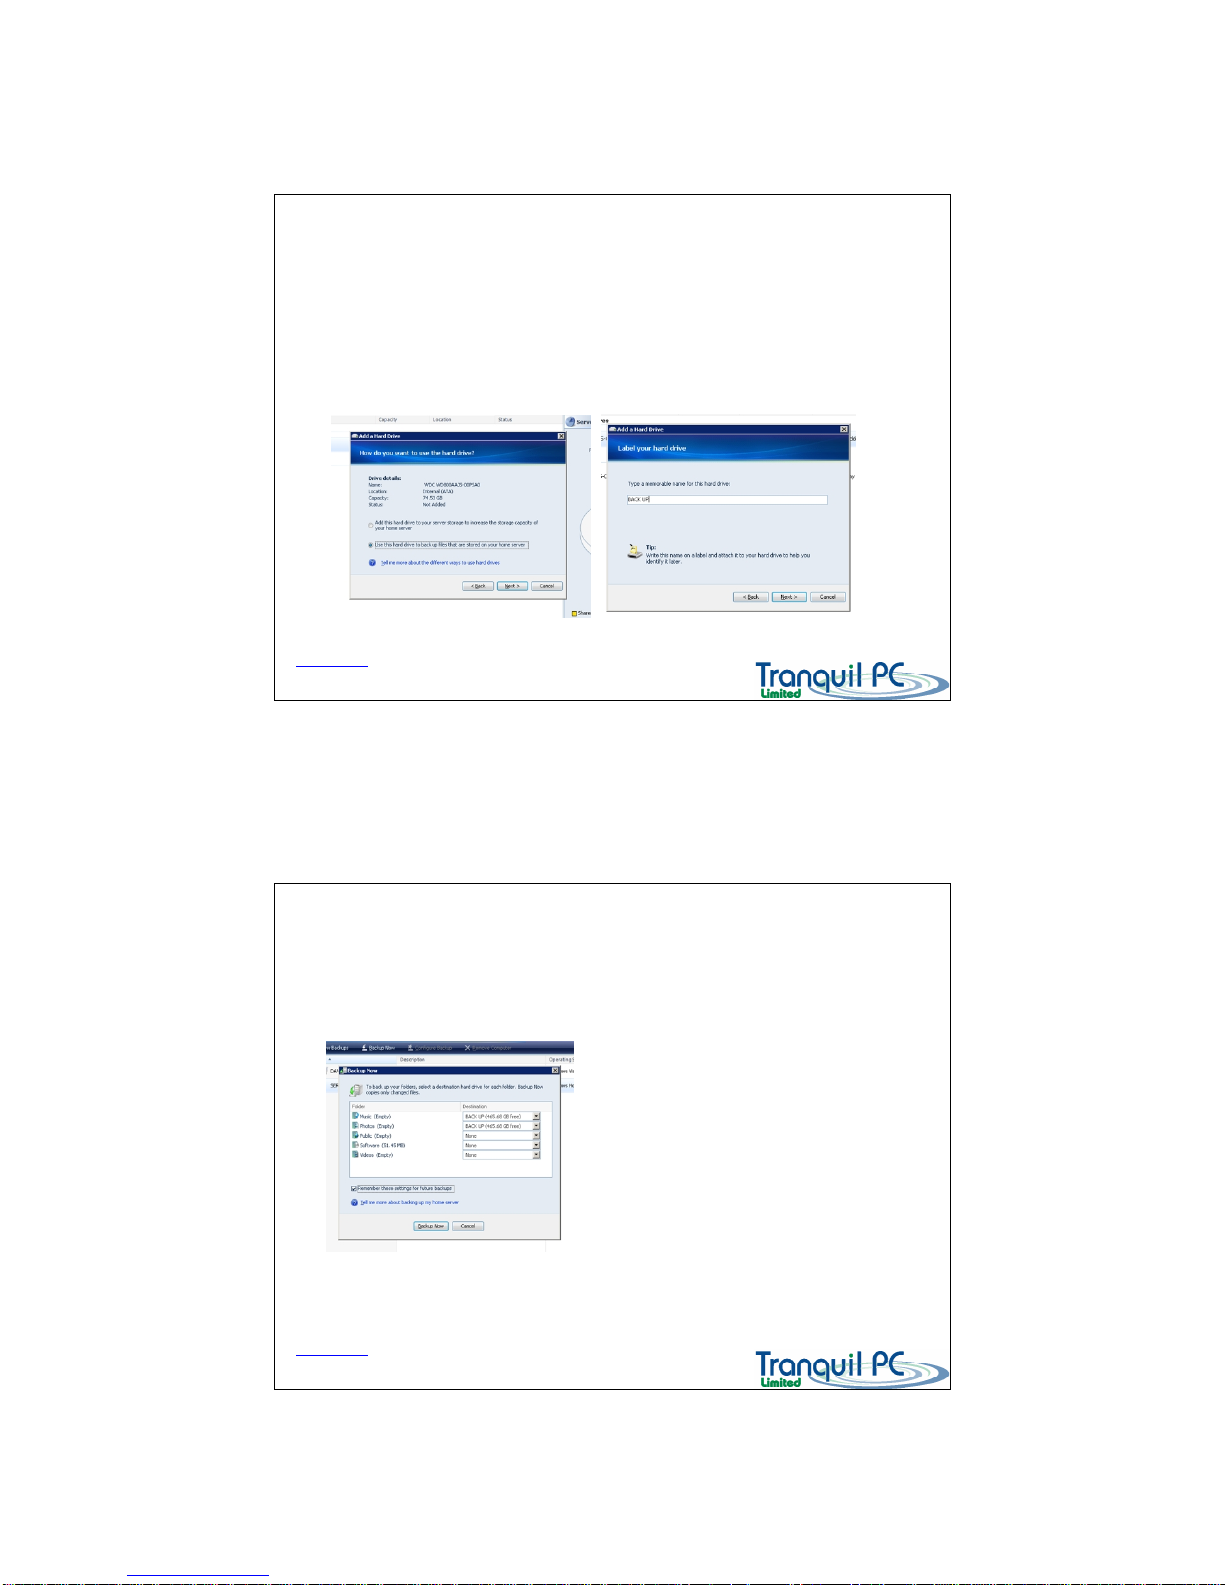
The Home Server has a built in Media Sharing Server. This means that many of today’s Digital Media Players or
Digital Media Receivers can stream music etc from the Home Server, very easily.
The Home Server’s Media Server is based on Windows Media Connect 2 (WMC2).
You need to enable Media Sharing, by using the Settings tab on the Console – then selecting Media Sharing, as
shown below
Back to Index page
Page 14
11/29/2009
14
Home Server Console – Server Backup
D03_ WHS_PP1_UK
The Home Server can not only backup all of your PCs, it can back itself up to a removable HDD.
This means that valuable information (folders) can be backed up and the data removed to another location for
safe keeping.
Once a HDD has been added as a ‘Backup’ drive (see below Adding a HDD – Console), you can open ‘Server
Storage’ and set up a Server Backup sequence.
Back to Index page
Home Server Console – Server Backup
D03_ WHS_PP1_UK
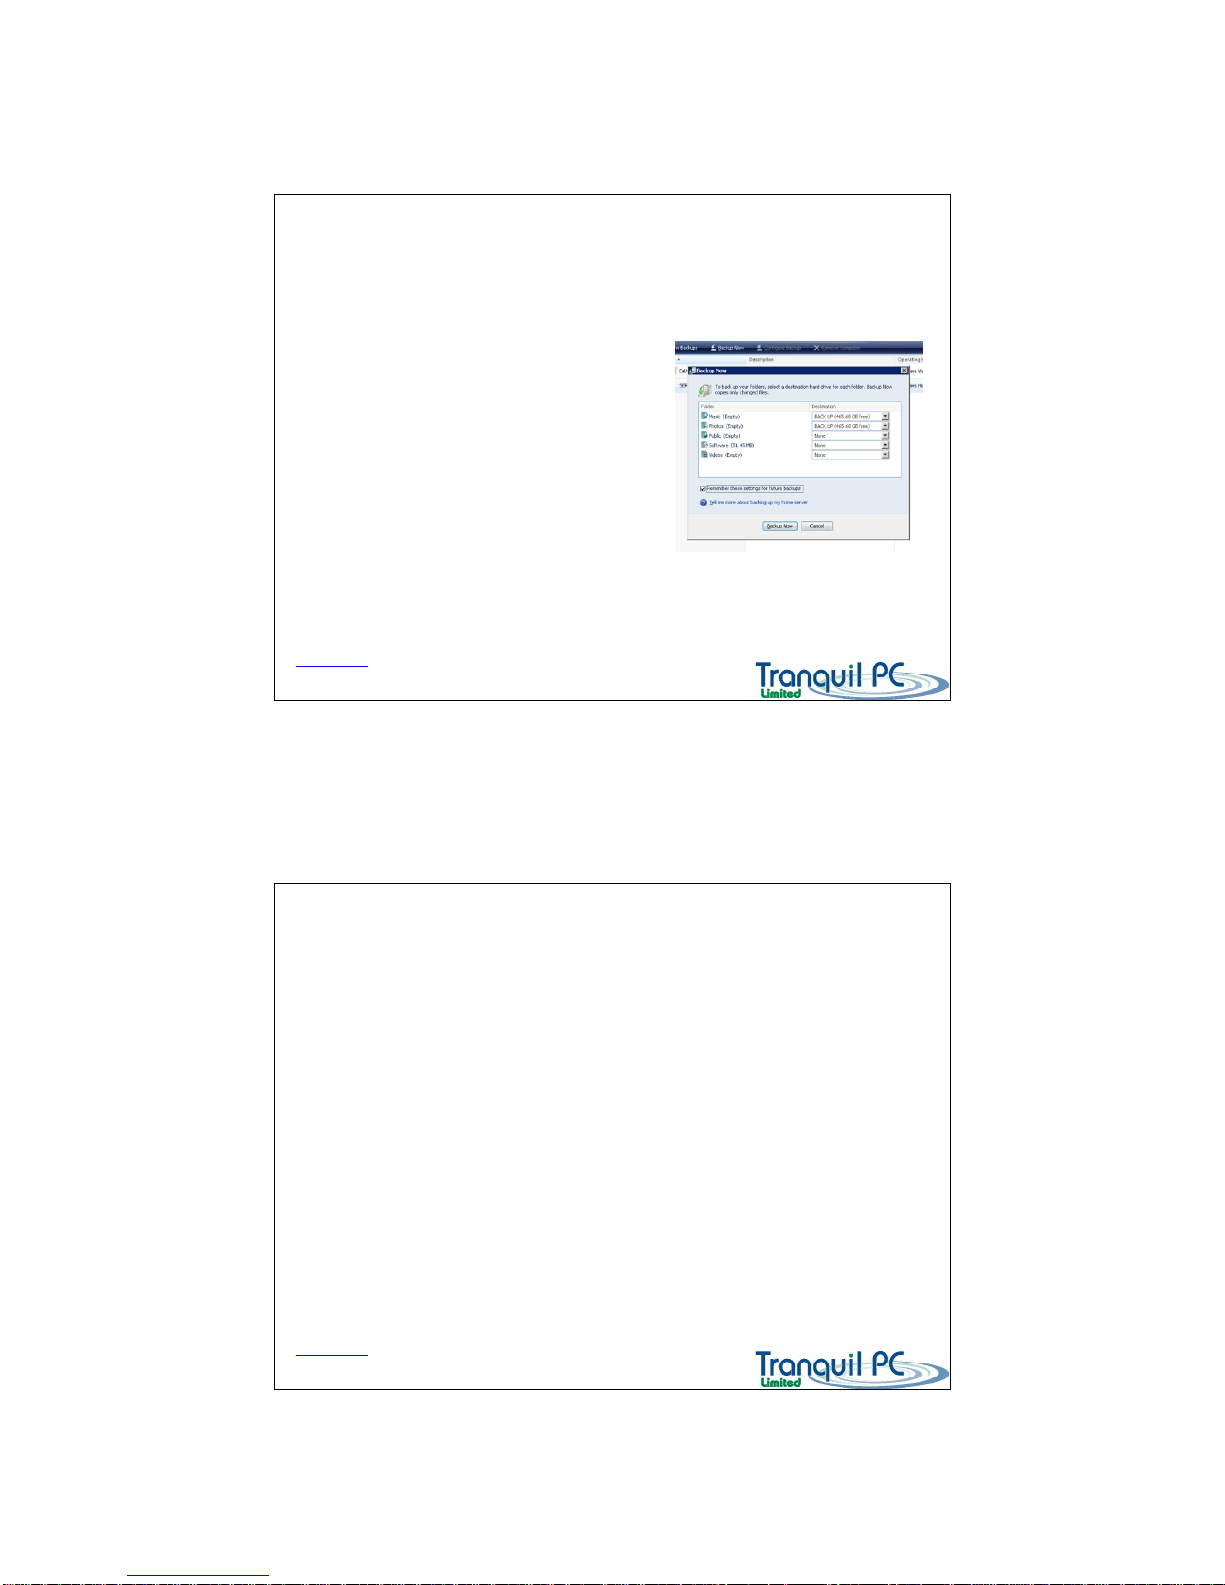
Once you have opened the Server - you can select which folders you wish to be backed up to
the newly added ‘backup HDD’
After you have selected the folders you
want to back up, please click ‘Remember
these settings for future backups.
This setting is used when you use the one
touch backup button
Back to Index page
Page 15
11/29/2009
15
Home Server Console – Backup button
D03_ WHS_PP1_UK
You can either run a server backup to your nominated backup hard disk by using the console,
or you can use the Backup button on the front panel of the Home Server
Using the Backup button
To initiate a previously ‘remembered’ backup, simple
insert / add your nominated backup HDD to the Server
and press the blue Backup button.
As the backup progresses, the LED will flash yellow once the
backup is completed the LED will be green for a few
moments, then go off.
If there is a fault with the backup, for any reason, you will see
a red LED. If the Backup button operation fails, open the
console for information why the backup failed.
Back to Index page
Adding a new Hard Disk - Hardware
D03_ WHS_PP1_UK
The adding of extra Hard Disk Drives (HDDs) to you server is easy.
To eject the empty HDD carrier, just push the coloured tab to the left, and the alloy lever is released, push the
lever down, then pull the carrier out.
Lay you new HDD on a desk, with the data connectors away from you, and then carefully open the alloy
carrier side bars, so that you can position them over the edges of the HDD. There are 4x steel pins which then
should engage into the holes in the side of the HDD. Press the sides together, so that the HDD is firmly held in
place.
Then re-insert the HDD and carrier back into the Server.
Please note adding HDD2 requires a power down of the Server, before it can be added.
Adding HDD3, HDD3 and HDD5 does not require a power down.
RED Tabs – indicate ‘non Hot Swap’ – GREEN -BLUE Tabs indicate ‘Hot Swap’
TIP : You may want to make a note of the date the HDD is added to your server, on the labels
provided. This can be useful for tracking how long the HDDs have been in service
Back to Index page
Page 16
11/29/2009
16
Adding a new Hard Disk - Console
D03_ WHS_PP1_UK
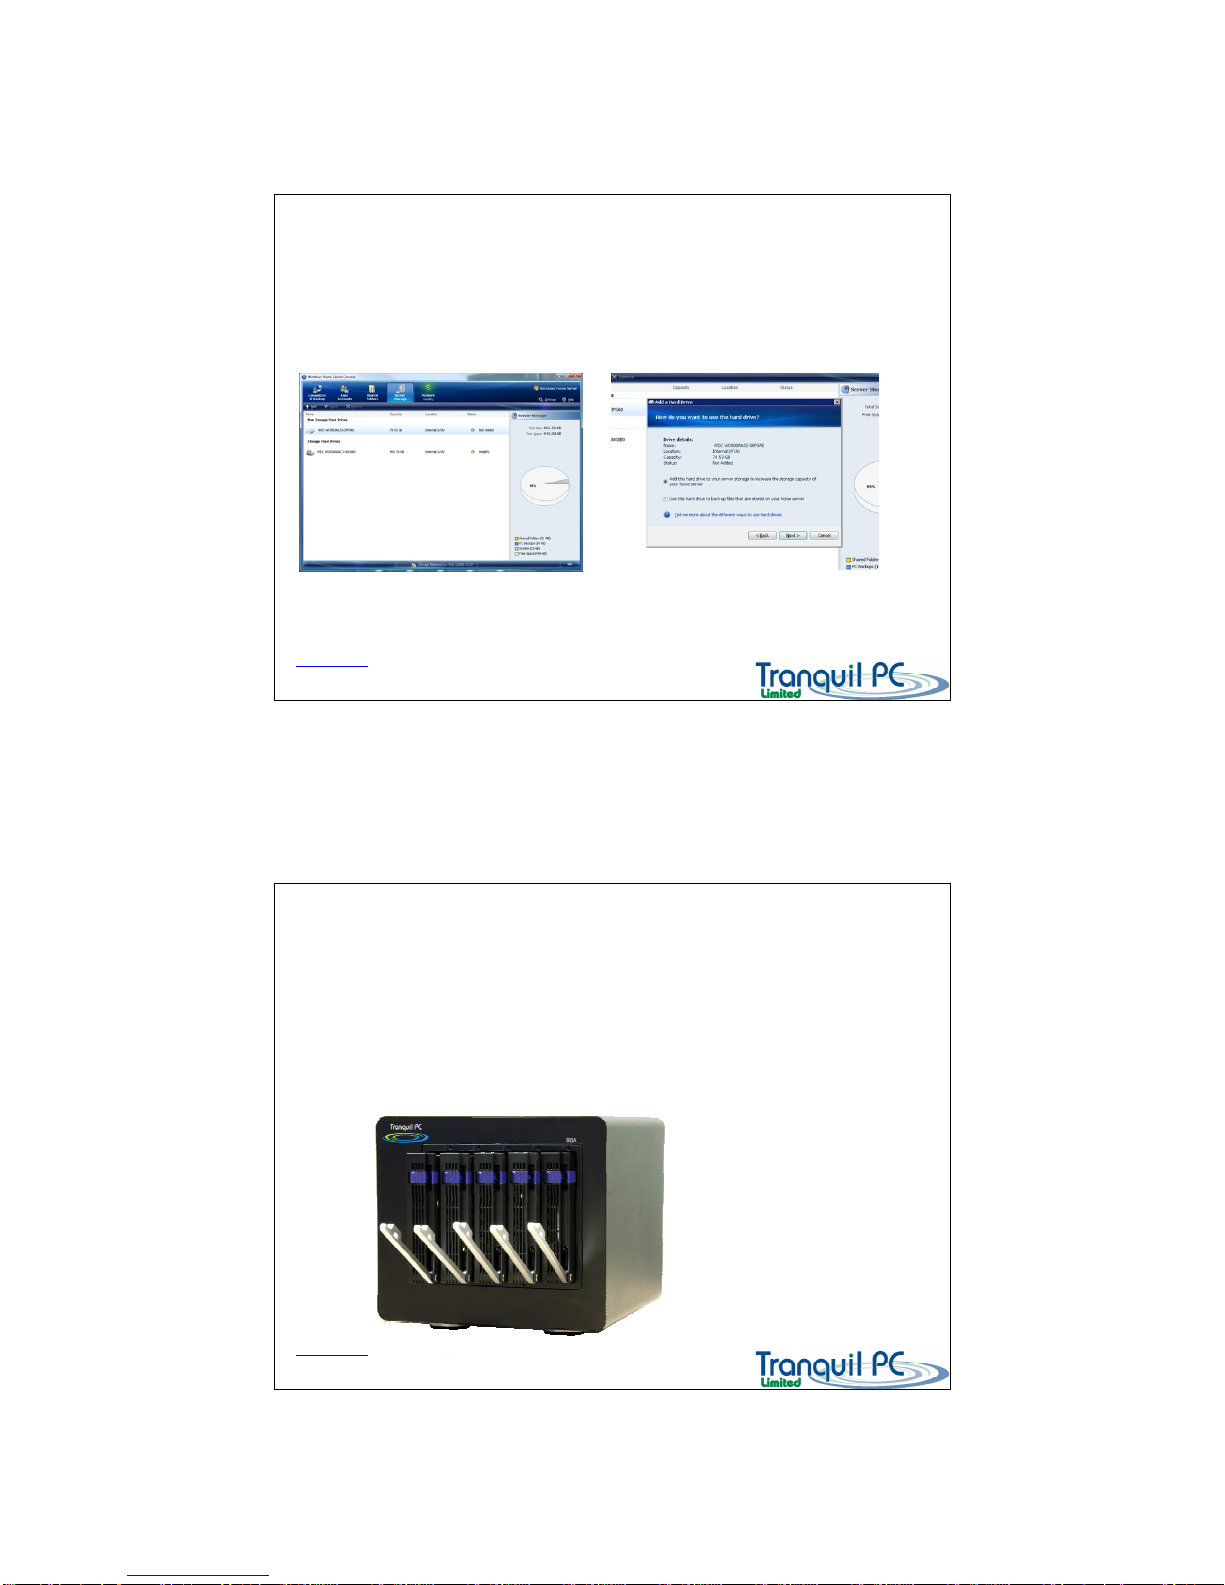
Once you have added the HDD to the Home Server, you can then ‘add’ it to the system storage using the
Console.
You can add a HDD either to increase the System Storage, or to use the HDD as a Server Backup drive. (see
SERVER BACKUP)
Back to Index page
Adding a new Hard Disk – USB and SQA-Ex
D03_ WHS_PP1_UK
You can also add USB HDDs to your Home Server in the same way.
If you need to expand your Home Server beyond the 5x HDDs, with fast access, you can consider the SQA-Ex
unit. It is exactly the same size as the SQA-5H, with the same tool-less HDD carriers
A single high speed data link is all that is required to double your Home Server storage to a massive 10TB
(using 10x 1TB HDDs)
Back to Index page
Page 17

11/29/2009
17
Recovering your PC
D03_ WHS_PP1_UK
If your home PC fails for any reason, ie HDD failure, VIRUS attack etc it is possible that with the Home you can
easily recover not only your DATA, but an image of the whole PC HDD. This assumes that the PC that needs
fixing was part of the Home Server PC group, and it has been backed up recently.
This is achieved by using the Home Server PC Restore CD. Insert this CD into the broken PC, and boot off the
CD – you may need to change the boot order (BIOS) to be able to boot off a CD.
Once booted, follow the on screen prompts, which will guide you through the PC Recovery process.
Of course, if the fault was a hardware failure in the PC, then you must repair that failure (ie HDD) first.
If your PC can’t be recovered, and a new one is required, then although you may have lost your applications
etc, your DATA is still safe. To get access to your PC data – please review the backup history for the PC and
then open a recent backup – this allows you then to copy all of your data to your new PC.
Back to Index page
Recovering your Home Server
D03_ WHS_PP1_UK
Although it is unlikely, you may need to recover the Home Server itself.
In the event that you have lost your Home Server password, or the Server primary HDD fails, or there is
another terminal system failure, you can easily recover the Home Server, and your user data.
During this process, you will loose User account, Remote access settings etc and computer backups.
To start a Home Server Recovery, simply plug in the USB card (in the media kit) into you Home Server, and turn
it on. If the Primary HDD has failed, then this may need to be replaced first.
Then insert the Home Server Recovery DVD into a network connected PC, with a DVD drive and follow the on
screen process.
You will be given the option to recover the DATA that has been duplicated to additional HDDs
The whole recovery process takes only 20-30 minutes.
After completion of the recovery, the Server must be re-initialised again, as before.
Back to Index page
Page 18

11/29/2009
18
Care and Planned Maintenance
D03_ WHS_PP1_UK
The Home Server and more so, the data on it are very valuable to you.
We do recommend a few simple steps to ensure that it is taken care of and continues to provide many years
of trouble free service.
1. Keep the Server in a reasonably well ventilated location – keep it cool
2. Do not place any thing around or on top of the unit which may reduce air flow
3. Replace the main system fan on a regular (annual) basis (the fan is hot swap) – and data coded
4. Inspect the HDD surface from time to time, to check for dust / dirt build up
5. Keep the front and rear of the unit clean
Tranquil PC offer a Life Server policy – effectively providing a life time warranty on your Home Server.
Please contact your supplier, or Tranquil PC to learn more about Life Server.
Back to Index page
Specification
D03_ WHS_PP1_UK
Unit dimensions 213 (W) x 221 (D) x 195 (H) - incl feet
Unit construction Enamelled steel (typically >70% recycled materials)
CPU cooling Internal CPU and chipset aluminium heat sink (fan less)
CPU 64 bit ready Intel Atom 330 (2x1.6GHz) Dual Core
Memory 1x DDR2 533/667MHz (up to 2GB)
HDD
1 - 5x 3.5" Western Digital (Green Power) - or user fitted
3.5" SATA2 HDDs
Colour options Satin Black
Front panel
Power, Mode and Backup switches, multi-
coloured status
LEDs and 2x USB2.0
Rear panel
12V DC power in / 4x USB2.0 / 10/100/1000 LAN /
eSATA (with Port Multiplier). Desk Lock
Weight Base unit (nett) 6Kg (1x HDD fitted)
Packing box 310 (W) x 320 (D) x 290 (H) (external)
Power supply
Universal (50/60Hz - 110/240V) External AC/DC with
country specific power cord
HDD support 1 - 5x 3.5” HDD supported (SATA2)
Working temp Maximum 44’C ambient
Acoustics ~23dBA (1x HDD)
HDD Cooling
Hot swap 8cm Fan, with optimised speed / acoustic
control
Mounting options Desk
Power consumption 29W (base unit, with 1x HDD)
Software
Windows Home Server PP1 pre-installed
Media Pack, with Connector, Restore CDs and
Installation DVD
System / Data recovery system included.
Back to Index page
Page 19

11/29/2009
19
Warranty
D03_ WHS_PP1_UK
Tranquil PC provide a 36 month return to base (RTB) warranty – subject to certain conditions.
You must register this product within 28 days of purchase to validate the warranty. Please
register your purchase by clicking on the Warranty Registration link on the CD index page.
The benefits and conditions of the warranty will be provided upon registration.
For technical support – please click on the Help link found on the CD index page.
(CD Index page – is the main page you see upon running the START UP CD, in your media kit)
Back to Index page
 Loading...