

Page 1
Integrated Zone™ System
T
M
Copy
Temp
Outdoor
Fan
Heat/Cool
Exit
Zone
Day/Clock
Cool
Time/Temp
Period
Point
Hold Set
PM
Wed
SCHEDULER
MASTER
An American-Standard Company
THE TRANE COMPANY
Unitary Products Group
6200 T roup Highway
Tyler, TX 75707
Page 2

TABLE OF
CONTENTS
Page
1 .......................................................................... Introduction
2 .......................................................................... Glossary of Terms
3 .......................................................................... Overview
4–5...................................................................... Getting Started
6–11 .................................................................... Basic Procedures
12–15 .................................................................. Setback Programming
16–20 .................................................................. Overrides
21–24 .................................................................. System Set-Up
25–27 .................................................................. Other Features
28 ........................................................................ Factory Settings and Specifications
29 ........................................................................ Index
Page 3

INTRODUCTION You’re a very bright person.
How do we know?
Well, for one thing you just bought a T rane
Master Scheduler , the communications interface
for the T rane Integrated Zone
means you’ve opted for energy efficiency, lower
utility bills and doing a little something to save the
planet–all in one bold move.
You have, at the same time, provided yourself
with many options for controlling, scheduling and
programming your zoned air conditioning system.
As you know, this is an instruction manual for
the Master Scheduler .
Even the most intuitive trailblazers need a road
map sometimes, so this manual was designed to be
as self-explanatory as possible.
The Master Scheduler is a computer, but that’s the
last time we’ll mention it. These instructions are in
plain English with only a couple of unusual words
like setpoint and setback. No technical talk, no
complicated diagrams. All you have to do to become
a Master Scheduler expert is follow the simple steps
in this booklet.
But before we begin, you might want to spend a
few moments looking over the glossary of terms on
the next page. It will make those unusual words we
mentioned earlier more meaningful.
TM
System. This
1
Page 4

GLOSSARY
Sleep
TERMS
OF
Setpoint – The desired temperature setting. (heating or cooling).
Setback – Energy conserving setpoints for certain periods of the day.
LCD – Liquid crystal display
Default Settings – Factory settings for various periods. (easily changed)
Period – Portion of the day when different setpoints may be desired.
Examples:
Wake
Away
Return
Dead Band – The difference in degrees between the cooling and heating
setpoints (min. 4°F). For the typical setpoints of 78° cooling
and 72° heating the dead band is (78 – 72) or 6°F.
Home Automation – Computer control and/or monitoring of the air conditioning system.
2
Page 5

OVERVIEW
Before getting into the nuts and bolts of how to
work with your Master Scheduler , let us take a brief
look at some of the rules it can play:
1. Your installer, (of a zoned system) may have
chosen to use an analog sensor , (thermister)
to control one or more of the zones. He would
then utilize the Master Scheduler as an
interface between the analog sensor
and the system controller , which is
designed to communicate with a digital
thermostat. He could also use the Master
Scheduler as one of the zone thermostats, if
desired. (in addition to its interface role.)
2. When programming setback times and
temperatures, (which we will soon be doing,)
the Master Scheduler can be used to copy
this data from any period to any other period,
in the same zone, other zones, or all zones (a
real time saver).
3. On a zoned system, the Master Scheduler
can be used to override any or all zone
thermostats. (It takes local control away from
the thermostat and substitutes your input to
the Master Scheduler .)
3
Page 6
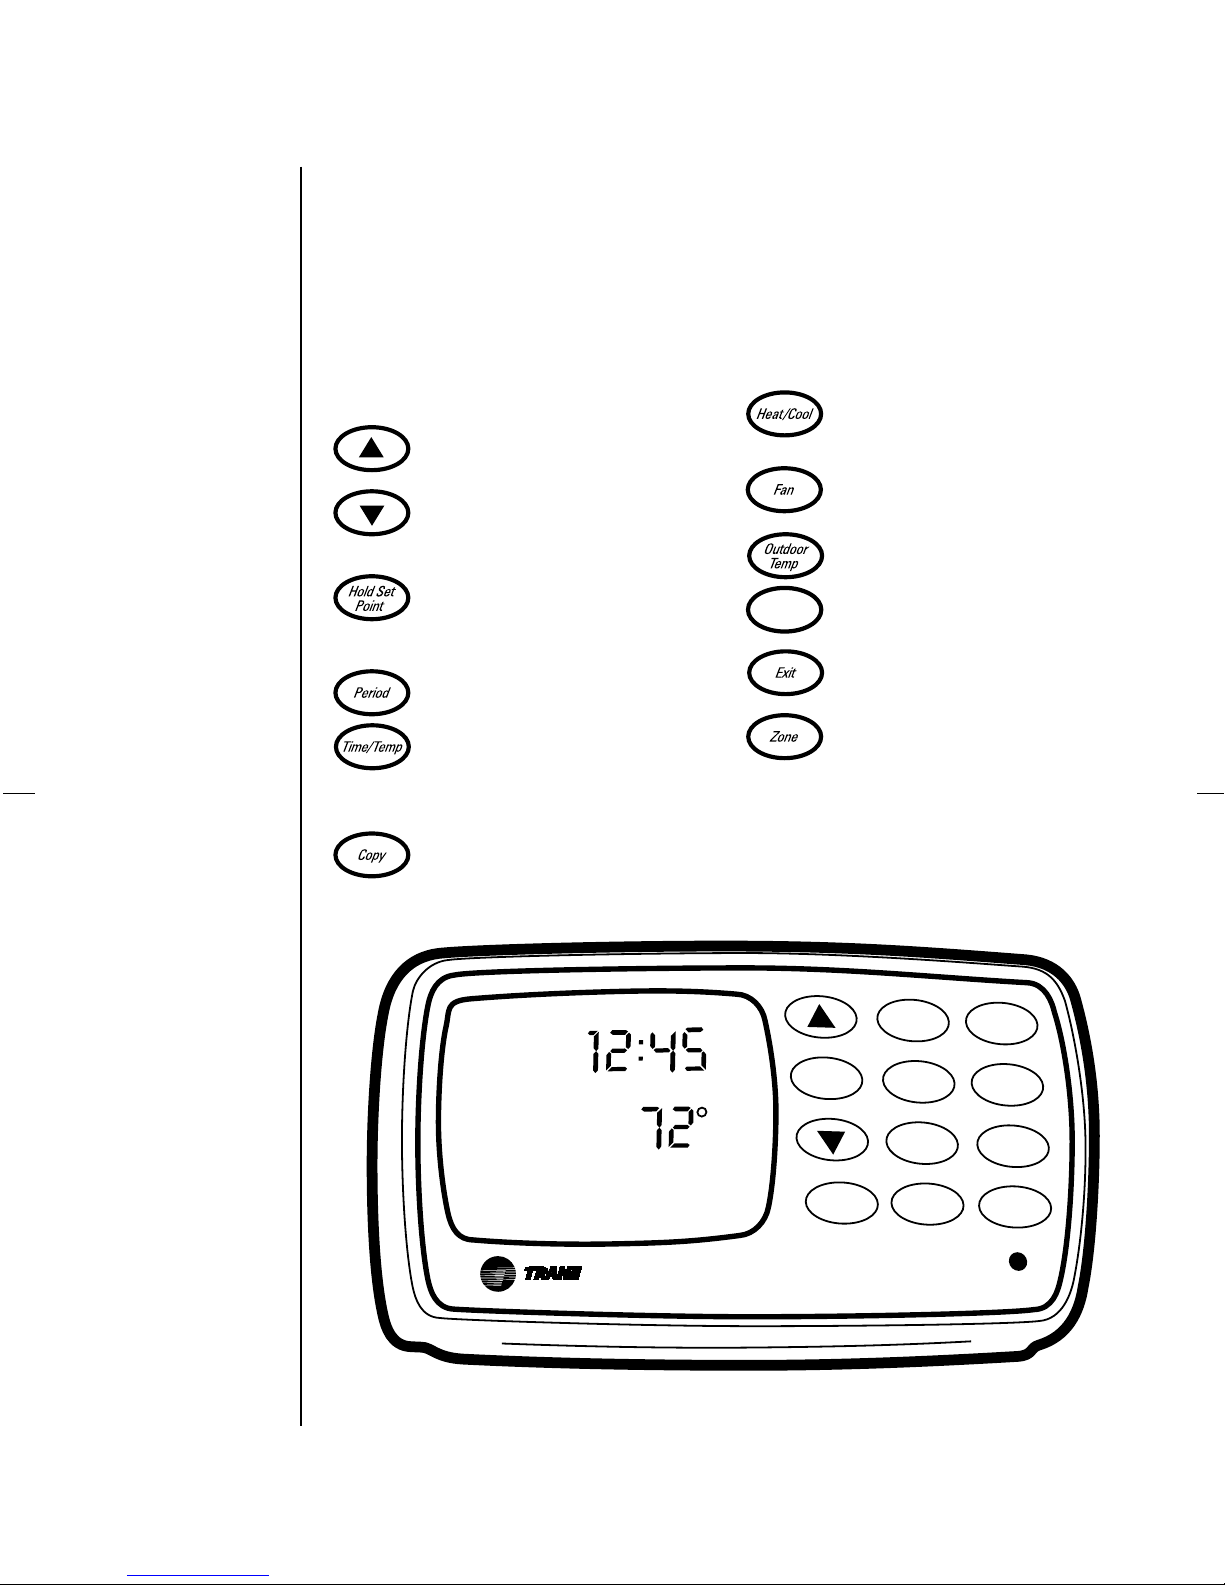
GETTING
STARTED
How T o Bring The Master Scheduler , T o Life.
You can start by pushing the right buttons.
Adjusts settings in various modes;
pressed once, they reveal current setpoints; pressed more than once they
temporarily adjust temperature settings.
Permits you to override scheduled setpoints in order to schedule temporary
temperature adjustments.
Initiates setback scheduling.
Programs setback time and
temperature setpoints.
Copies information to other
periods/zones.
Day/Clock
Selects operational modes: cool, heat,
auto, emergency heat, & off.
T oggles between automatic or
continuous fan operation.
Displays outside temperature.
Initiates setting the clock
Returns normal display to the Liquid
Crystal Display (LCD).
Selects zone number .
Note: The flashing green light in the lower
right corner indicates your sensor is
communicating with the system.
4
Wed
M
T
Integrated Zone™ System
PM
Cool
Hold Set
Point
Zone
Period
Time/Temp
Day/Clock
Exit
Heat/Cool
Fan
Outdoor
Temp
Copy
Page 7

What The Master Scheduler Can Do For You:
For one thing, it can take a load off your mind.
Once you’ve set a schedule on the Master
Scheduler , it will maintain comfort control for
you. Energy efficiency and lower utility bills are
now the Master Scheduler’ s job, not yours. The
thermostat will adjust when it’ s supposed to, and it
won’t forget, as a mere mortal might.
It will remember what you tell it, even during
emergencies. You’ll be happy to know that –
unlike your VCR and other electronic digital clocks
– the Master Scheduler won’t forget its
setpoints during a power failure. You have
plenty of other things to worry about when that
happens. You probably won’ t find the instruction
manual by then anyway, so that’s why we’ve factory
installed three button batteries for power backup.
Simply activate them and don’t worry about a
power failure knocking out your Master Scheduler
thermostat.
When the LCD clock flashes, it’ s time to
replace your batteries.* But even when you have to
change your batteries, your Master Scheduler
won’t forget it’ s schedule.
The Master Scheduler will stay in touch with
you and your Integrated Zone
TM
System. A little
green light will flash to let you know it’ s talking
with the heat pump or air conditioner. That’s good.
The last thing you want is a senseless sensor .
5
*Of course, the hours, minutes and day indicators will flash when we
are setting the clock (even when the batteries are OK).
Page 8

BASIC
PROCEDURES
R
eady, Set…Relax.
Scheduling begins with three simple steps:
1. Remove the front of the Master Scheduler
from its mounting bracket. On the back side
you’ll see the batteries on the left edge.
Remove the plastic insulating strip from
between the batteries.
2. Replace the Master Scheduler to its
mounting bracket.
3. Read on.
6
Page 9
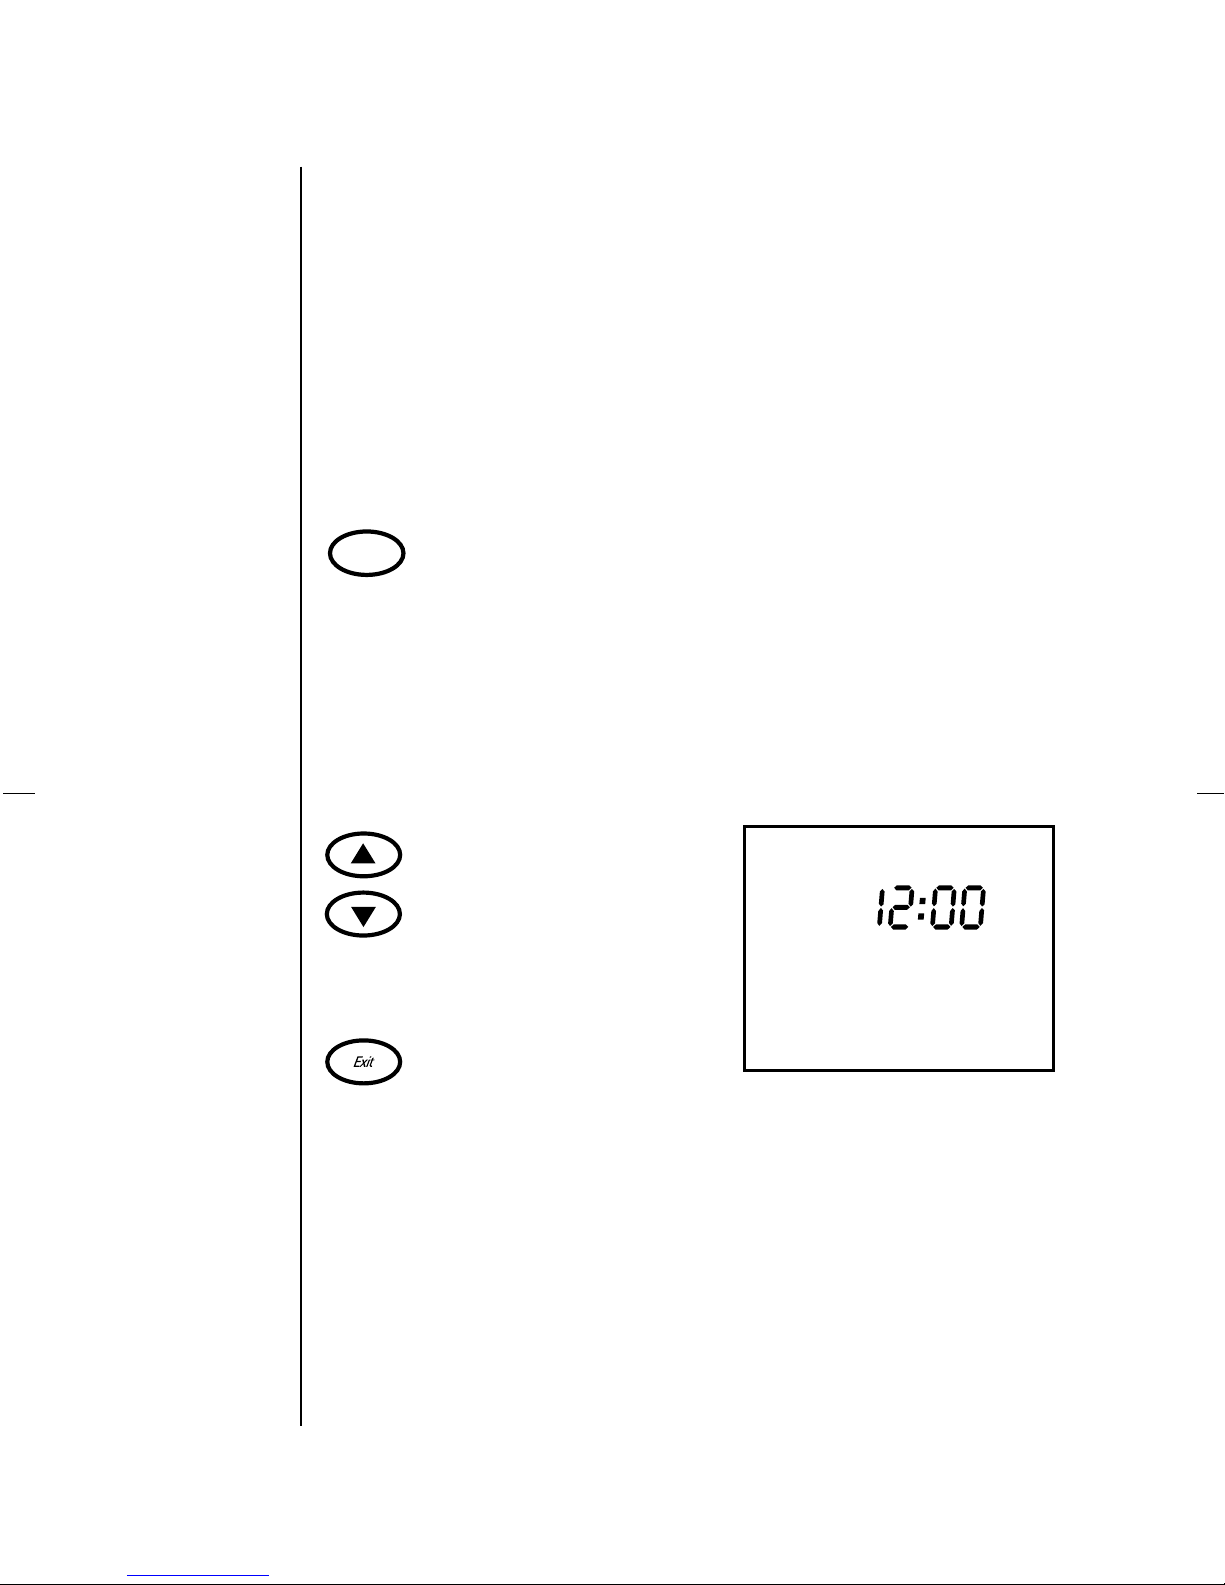
BASIC
PROCEDURES:
C
LOCK
Your First Question Is Probably Going T o Be:
HOW DO I MAKE IT STOP FLASHING?
Answer: T ell the Master Scheduler
what time it is.
TIME, PLEASE?
Day/Clock
CLOCK triggers the Set Time mode. It
also hides everything else on the LCD
so you can focus on the job at hand.
Keep pressing CLOCK. Whatever
flashes – digits or words – may be set
with the UP or DOWN ARROW keys.
Settings go in the following order:
hours, minutes, days. But you’ve
probably already figured that out.
The clock is preset to display standard
time. If you prefer a 24-hour clock
(military time), see page 21.
EXIT locks in the correct time and day,
as well as returns normal display to the
LCD.
Set
Time
AM
Mon
Note – 12:00 PM is Noon, 12:00 AM is Midnight.
7
Page 10
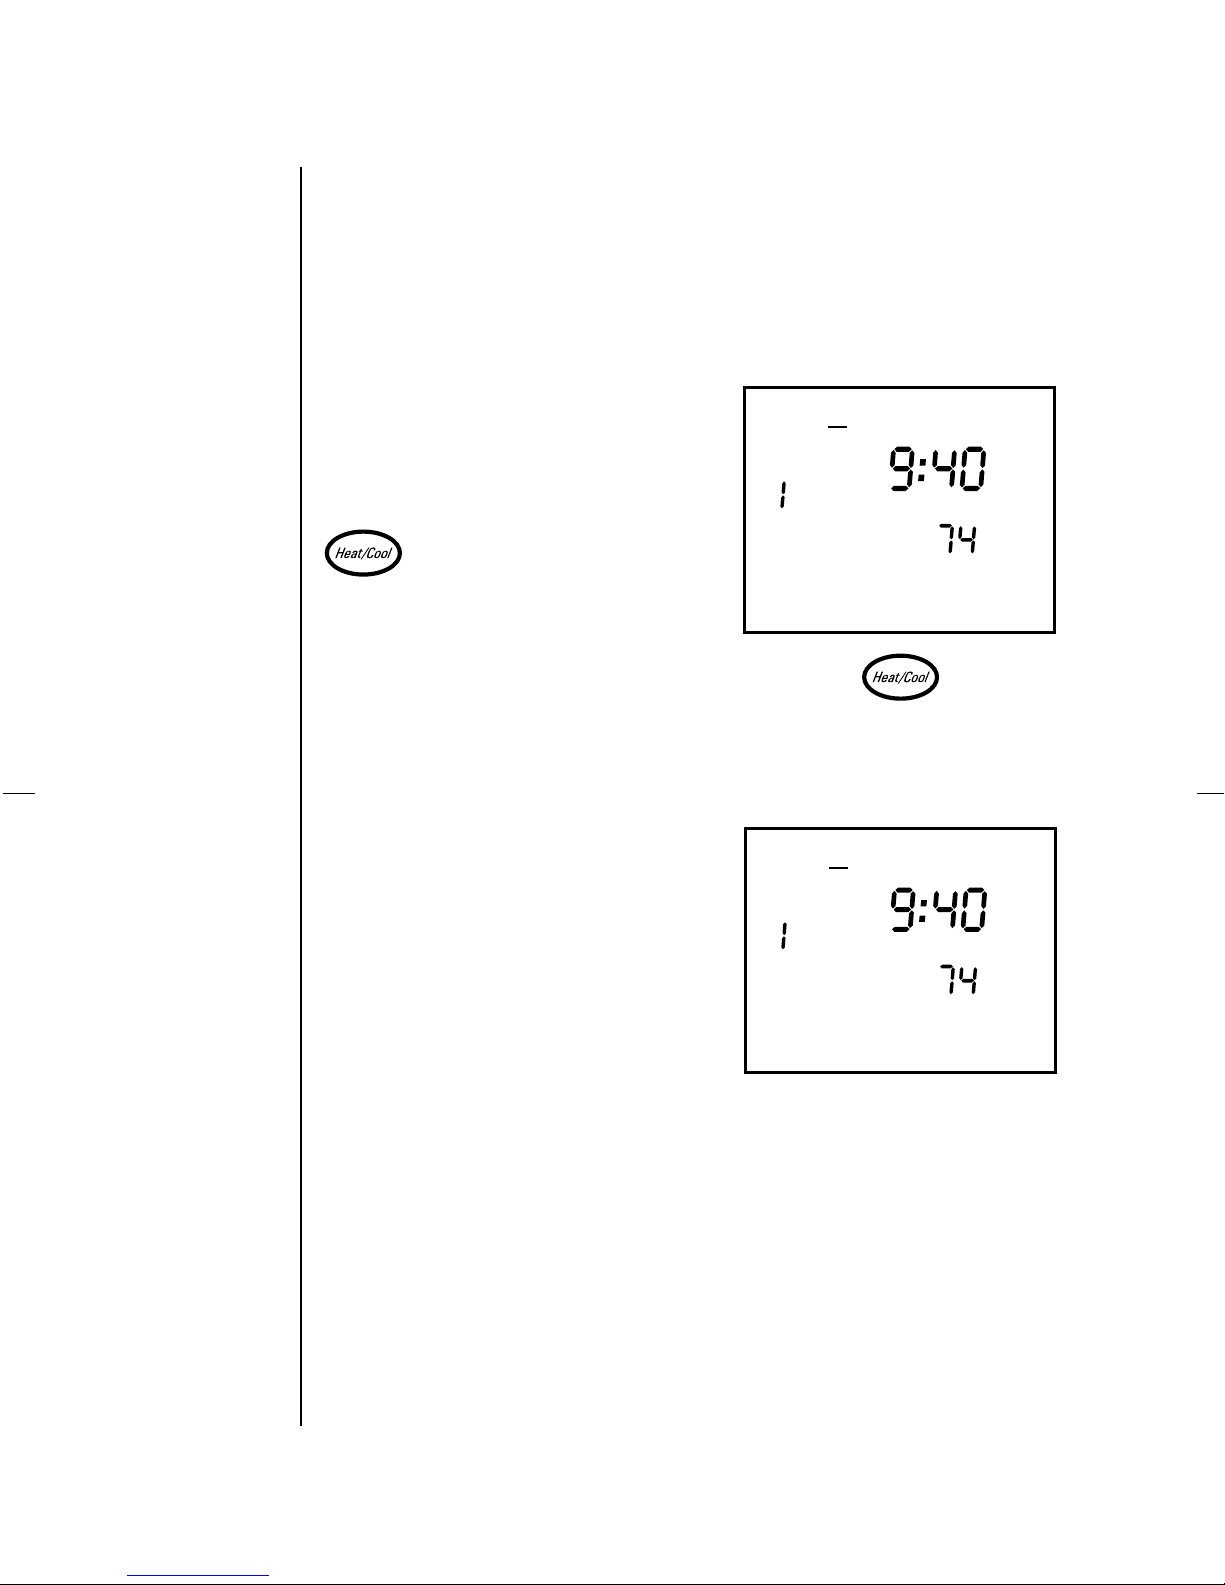
BASIC
PROCEDURES:
M
ODE
What Makes Y ou Comfortable?
Depends on the season, right?
HEA T/COOL sets the mode, just as the
flip switch did on your old thermostat.
But HEA T/COOL gives you more options.
As you press HEAT/COOL,
the LCD offers
•
Cool
•
Heat
•
Auto
– the Master Scheduler
decides which mode, cooling or
Zone
M-F
P2
PM
Wed
Cool
heating, is needed to maintain
M-F
the setpoint; an excellent feature
for in-between seasons when
days are warm and nights are
chilly.
•
Emergency Heat (Emerg Ht)
Zone
–
P2
PM
Wed
Heat
directs the auxiliary heat source
to kick in (if your system has
one). The compressor won’t run
in this mode.
•
Off
8
Page 11

BASIC
PROCEDURES:
F
AN
How’ s Y our Circulation?
FAN toggles between:
•
Fan On
continuously, going to 50
percent speed when the
compressor isn’t running
(variable speed blower , only)
•
Automatic
when the compressor is on
Fan On
is displayed when the fan is
in continuous operation.
– the fan runs
– the fan runs only
Zone
Zone
Sun
Sun
P1
AM
Sat
Cool
P1
AM
Sat
Cool
Fan On
9
Page 12

BASIC
PROCEDURES:
T
EMPERATURE
A Matter Of Degrees.
• T o check the outdoor temperature,
press OUTDOOR TEMP. The outdoor
temperature ranges from - 20°F to
120° F .(Note: If the outdoor sensor
is not installed, the outdoor
temperature displayed on the
thermostat will be -13°F or lower)
Press OUTDOOR TEMP again or
EXIT to return to the normal LCD
display. Or wait a minute, and the
normal LCD display will return on
its own.
• Setpoints are the heating and
cooling temperatures you prefer .
Press either ARROW once to see the
setpoint of the current mode
(cooling or heating). They are
displayed by the set of flashing
numbers on the left, next to the
words Set Pt. The actual indoor
temperature is indicated on the right.
Press the HEA T/COOL button to
toggle between heating and cooling
setpoints. Press EXIT when you’ve
seen enough.
Zone
Cool
Outdoor Temp
Temp
Set Pt
10
T o change setpoints temporarily, see
pages 16-17.
Page 13

BASIC
PROCEDURES:
Z
ONES
A Matter Of Degrees.
• ZONE moves the Master Scheduler
from zone to zone in your Integrated
TM
Zone
pressed, the next zone in your
system will be displayed.
System. Each time ZONE is
Zone
Zone
M-F
M-F
P1
PM
Wed
Cool
P1
PM
Wed
Cool
11
Page 14

SETBACK
Wake
PROGRAMMING:
S
CHEDULING
ow For The Master Scheduler’ s Reason For Being.
N
Setback scheduling. What’ s that, you say?
Setback means different temperature set-points
for different times and days. It’ s why you bought
the Master Scheduler , right? And it’ s a feature
you’ll love, especially when you begin to notice
the savings on your utility bills.
• Press PERIOD to start scheduling.
(The word Schedule will light up.)
The six setback periods will be
displayed in sequence when you
continue to press PERIOD. An arrow
marks the current setback for
M-FP1M-FP2SatP1SatP2SunP1Sun
Zone
P1
P2
SCHEDULE
NoonMidnt Midnt
P2
AM
CoolHeat
12
You’ll also see the
timeandtemperaturecorresponding to each
period.
Naturally, the Master Scheduler will accept whatever
time you enter into each of the setback periods.
• Press ZONE to select the zone you wish to
program.
• Press TIME/TEMP until the hours flash,
then press either ARROW to reach or
change the hour you want to initiate
this setpoint. Press TIME/TEMP again to
adjust the minutes in 10-minute
intervals.The bars at the bottom of the
display will graphically show the
relationship between this period and
adjacent periods.
M-FP1M-FP2SatP1SatP2SunP1Sun
Zone
P1
P2
Note: There is no need to program a “stop” time.
(This is determined by the “start” time of the next
time period.)
SCHEDULE
CoolHeat
NoonMidnt Midnt
P2
AM
Page 15

SETBACK
PROGRAMMING:
S
CHEDULING
• Press TIME/TEMP again to reach or
change the Heat setpoint; set it with
the ARROWS. Follow the same
procedure for your Cool setpoint.
Note: The Cooling setpoint will always be at
least four degrees higher than the Heating
setpoint. If one setpoint infringes on the required
four-degree separation, the Master Scheduler will
automatically adjust the other to maintain the
difference.
• Press PERIOD to advance to the next
M-FP1M-FP2SatP1SatP2SunP1Sun
Zone
P1
P2
SCHEDULE
NoonMidnt Midnt
P2
AM
CoolHeat
13
setback period. EXIT will return the
LCD’ s normal display once you’ve
scheduled all setpoints.
Congratulations! You’ve mastered the most
important element of your Master Scheduler .
Ready to move on?
M-FP1M-FP2SatP1SatP2SunP1Sun
Zone
Heat
P1
P2
SCHEDULE
NoonMidnt Midnt
P2
AM
Page 16

SETBACK
PROGRAMMING:
C
OPYING
• This is where the COPY button can
save some time, particularly with a
zoned system. Let’ s assume that you want to
utilize the same time and temperature values
during time period that you have already
programmed into time period.
Sat
P1
M-F
P1
All you need to do is select time period
with the PERIOD button. Depress the COPY
button, and select time period with the
Sat
P1
ERIOD button. Depress the COPY button again
and it is done.
Utilizing the ZONE button in this copying
sequence allows you to copy any period of any
zone to any other period in any other zone.
M-F
P1
14
Page 17

SETBACK
PROGRAMMING:
C
OPYING
• T o copy a complete zone’ s schedule
to another zone press COPY while
not in the setback programming
sequence.
• Press ZONE to specify the zone from
which you wish to copy.
• Press the appropriate ARROW to
select the zone to which you wish to
copy. Select ALL if you wish to copy
to all zones.
Copy
Zone
SCHEDULE
To
15
• Press COPY again to confirm selects
or EXIT to abort the copy.
How’ s that for a time saver!
Zone
SCHEDULE
To
Page 18

OVERRIDES:
EMPORARY
T
SETPOINT
Change Can Do A Body Good.
Maybe you’re mostly happy with your new
schedule, but right now you wish the temperature
were different. There’ s a way to temporarily override
your scheduled setpoints until the next setback
period rolls around or until you change your mind
again, whichever comes first.
• Press either ARROW , and you’ll see
the current setpoint on the left side of
the LCD (next to Set Point). The
current indoor temperature is to
the right.
• Press the appropriate ARROW to
change the setpoint temperature.
T emporary
indicate you’ve changed the setpoint from your original selection.
will now be displayed to
Zone
Cool
TemporaryTemporary
Set PtSet Pt
Zone
TemporaryTemporary
Temp
AM
Tue
Cool
16
• Press EXIT once you have reached
your temporary setpoint and wish
to return to the LCD’ s normal
display. Notice that
T emporary
is
now flashing.
Page 19

OVERRIDES:
EMPORARY
T
SETPOINT
• Press EXIT again to cancel the temporary
setpoint and return to the scheduled
setpoint. (If you don’t cancel the
temporary setpoint, it will automatically
be cancelled when the next time period
starts.)
• Remember , when you lower the
cooling setpoint or increase the
heating setpoint, the Master Scheduler
will automatically adjust the opposite
setpoint to maintain the required
four-degree difference.
17
Page 20

OVERRIDES: HOLD
SETPOINT
H
old that T emperature.
Say you’re going on vacation. Maybe you have
picky houseguests. Or you’re keeping unusual
hours. For whatever reason, you want the Master
Scheduler to maintain a constant temperature in a
zone, but you don’t want to reschedule all the
setback temperatures you entered earlier. Here’s
how to HOLD that constant temperature.
• Press either ARROW to display and
change the setpoint to a new
temperature. Then press HOLD SET
POINT to lock in your new selection.
Zone
Cool
TemporaryTemporary
Set PtSet Pt
Temp
18
That’ s where it will stay until you tell it
otherwise.
• Press EXIT to return the LCD to its
normal display. HOLD should now
be blinking.
• T o cancel HOLD and return to your
original schedule, press EXIT or
HOLD SET POINT.
The “HOLD SET POINT” command will
stay in effect until you cancel it.
Zone
Hold
M-F
P1
AM
Tue
Cool
Page 21

OVERRIDES:
OCAL
L
When viewing a zone that you are scheduling
with the Master Scheduler and LOCAL is next to
the zone number , this indicates that the zone’ s
settings have been changed at the zone sensor .
A zone’ s setting may be changed at either
location at any time.
Pressing EXIT at either location will revert to
the Master Scheduler’ s settings.
Zone
LOCAL
AM
Sat
Cool
19
Page 22

OVERRIDES:
OCK
L
• If you want to prevent the Master
Scheduler’ s settings from being
changed use the LOCK LOCAL
feature.
• Press the ZONE button to move to
the zone you wish to lock.
• While holding down EXIT , press the
ZONE button.
LOCK will appear next to the zone
number on the LCD.
Zone
Zone
LOCK
M-F
M-F
P2
AM
PM
Wed
Heat
P2
AM
PM
Wed
Heat
20
• The Master Scheduler’ s settings will
not be able to be changed until you
repeat the above sequence to remove
the LOCK.
Page 23

SYSTEM
SET-UP
G
etting Really Fancy.
Let’ s say you prefer military time on your LCD
clock. Or you’d rather see the temperature in
Celsius degrees. Or you think the temperature
reading needs adjusting. Or you just feel like
going beyond the basics.
• While holding down EXIT , press
OUTDOOR TEMP. Hold both keys
simultaneously until System Set-Up
appears in the upper left corner of
the LCD. (This will take
approximately three seconds.)
21
Now the Master Scheduler will begin to talk to
you. Watch for messages where the clock is
normally displayed.
• The first Set-Up, is the time format.
If you operate on a 24-hour clock
and you don’t have to think twice to
remember that 1500 hours means
3:00 p.m., this one’ s for you. When
the letters hr appear , press either
ARROW to toggle between 12 and
24 to choose the number of hours
on your clock.
SYSTEM SET-UP
Page 24

SYSTEM
SET-UP
• Press HEA T/COOL again to initiate the
next Set-Up which enables you to
change from Fahrenheit to Celsius.
When the word T emp comes up under
the clock, press the ARROW keys to
choose between F and C.
Here’ s something you need to know:
When you change this setting, all of the
setpoints and setbacks you scheduled so
carefully will revert to factory settings.
• Press HEA T/COOL again and you’ll
see Addr for the zone address. This
will allow you to set the zone
address for the Master Scheduler
(the zone whose temperature the
Master Scheduler will measure and
control).
SYSTEM SET-UP
Temp
SYSTEM SET-UP
22
• Use the arrow keys to change to the
appropriate zone. Leave at 0 (zero) if
the Master Scheduler is used only to
schedule other zones.
Page 25

SYSTEM
SET-UP
• Press HEA T/COOL again to calibrate the
zones’ indoor temperature readings.
Indoor temperature calibration is best
left to professionals. But if you and your
independent thermometer say the
Master Scheduler is off and you really
want to change it yourself, use the
ARROW keys to change the calibration
of the indoor temperature sensor . Y ou’re
in this mode when the letters
CA
L
appear .
• Press HEA T/COOL again to move to
the last set-up and you’ll be able to
specify the zones of your Integrated
TM
Zone
System the Master Scheduler
will schedule.
SYSTEM SET-UP
Zone
SYSTEM SET-UP
Zone
23
• Press ZONE to change to each zone.
SYSTEM SET-UP
Zone
Page 26

SYSTEM
SET-UP
• Press the ARROW keys to specify if
each zone is to be scheduled or not
scheduled by the Master Scheduler .
If a zone is set-up to be scheduled
by the Master Scheduler , most
functions described in previous
sections (Basic Procedures, Setback
Programming and Overrides) may be
controlled for that zone at the Master
Scheduler .
• Press EXIT to return to normal
operations.
A word of advice: If you press other
combinations of buttons simultaneously, you
could launch yourself into technoland. Simply
press EXIT or don’t press anything and in one
minute the LCD will return to normal.
You have now completed the set-up and
scheduling of your Master Scheduler .
SYSTEM SET-UP
Zone
24
Page 27

OTHER
FEATURES
O
ther things That May Come Up.
• The speed bar (System Speed %) along
the bottom of the LCD tells you what
capacity and speed your compressor is
operating. (If the system has more than
one speed.)
•
Aux Ht
(auxiliary heat) lights up
when any kind of supplemental
heating kicks in.
•
Service
lights up as a cry for attention.
Refer to the T roubleshooting section.
Zone
M-F
SERVICE
P1
PM
Wed
Emerg Ht
Aux Ht
System Speed %
1000
25
Page 28

OTHER
FEATURES:
T
ROUBLE-
SHOOTING
T
roubleshooting.
The LCD says the
is -14°F or below.
The green light stops flashing.
Whenever unwanted words appear on
the LCD.
Outdoor T emperature
• The system is not connected to an
outdoor sensor .
• Be sure that the Master Scheduler
is properly plugged into its
subbase.
• Call a technician.
26
• Pressing EXIT will usually return
the LCD to its normal display.
Page 29

OTHER
FEATURES:
T
ROUBLE-
SHOOTING
The setpoint isn’t where you thought
you set it.
• You may have set the Heating
and Cooling set points less than
four degrees apart so the Master
Scheduler automatically adjusted
one of your points. Simply go to
the Setback program mode and
check your setpoints.
The word Service flashes.
27
• Press HEA T/COOL and set the
operating mode to Off or Emerg
Ht. If Service still flashes, call
your T rane dealer for service.
Zone
M-F
SERVICE
P1
PM
Wed
Cool
Page 30

FACTORY
SETTINGS
AND
SPECIFICATIONS
Factory Default Settings
M-F/P1 M-F/P2 Sat/P1 Sat/P2 Sun/P1 Sun/P2
Time 6:30 am 10:00 pm 8:00 am 11:00 pm 9:00 am 10:30 pm
Cooling 78°F/27°C 75°F/25°C 77°F/26°C 74°F/24°C 76°F/25°C 73°F/23°C
Setpoint
Heating 70°F/23°C 65°F/20°C 69°F/22°C 64°F/19°C 68°F/21°C 63°F/18°C
Setpoint
Note: 76°F = 24.44°C (24°) all others match.
DEFAULT SET-UP MODE SETTINGS (Factory Settings)
• Fahrenheit T emperatures
• 12 Hour Time
• 0 Zone Address
REPLACEMENT BATTERIES
Eveready
28
#357
#A76
Page 31

INDEX
Addr.................................................................22
ARROW keys......................................................4
Auto...................................................................8
Aux Ht –Auxiliary Heat.....................................25
Batteries....................................................... 6, 28
CLOCK key ........................................................7
Cool...................................................................8
Emerg Ht –Emergency Heat ............................... 8
EXIT................................................................... 4
Fan key ..........................................................4, 9
FAN O N..............................................................9
Four-degree buffer zone ...................................13
Heat ................................................................... 8
HEAT/COOL key................................................. 4
Hold.................................................................18
HOLD SETPOINT key ......................................... 4
Indoor temperature calibration ......................... 23
LED light............................................................4
Military time .................................................... 21
Outdoor T emp ..................................................10
OUTDOOR TEMP key.........................................4
PERIOD key ....................................................... 4
SCHEDULE...................................................... 12
SERVICE.......................................................... 25
Setpoints ......................................................... 10
Set Time ............................................................ 7
Setback programming...................................... 12
Speed bar ........................................................25
SYSTEM SET-UP .............................................21
System Speed %..............................................25
T emperature format .......................................... 22
T emporary........................................................16
Time format...................................................... 21
TIME/TEMP key ................................................. 4
Troubleshooting ............................................... 26
Zone address ................................................... 22
29
 Loading...