

Page 1
▲
WARNING
!
▲
WARNING
!
TZONE950AC52ZA
18-HD64D1-1
ComfortLink™ II Installation Guide
Other Installation Guides may be necessary, based on system configuration.
A complete list of other optional components is shown below.
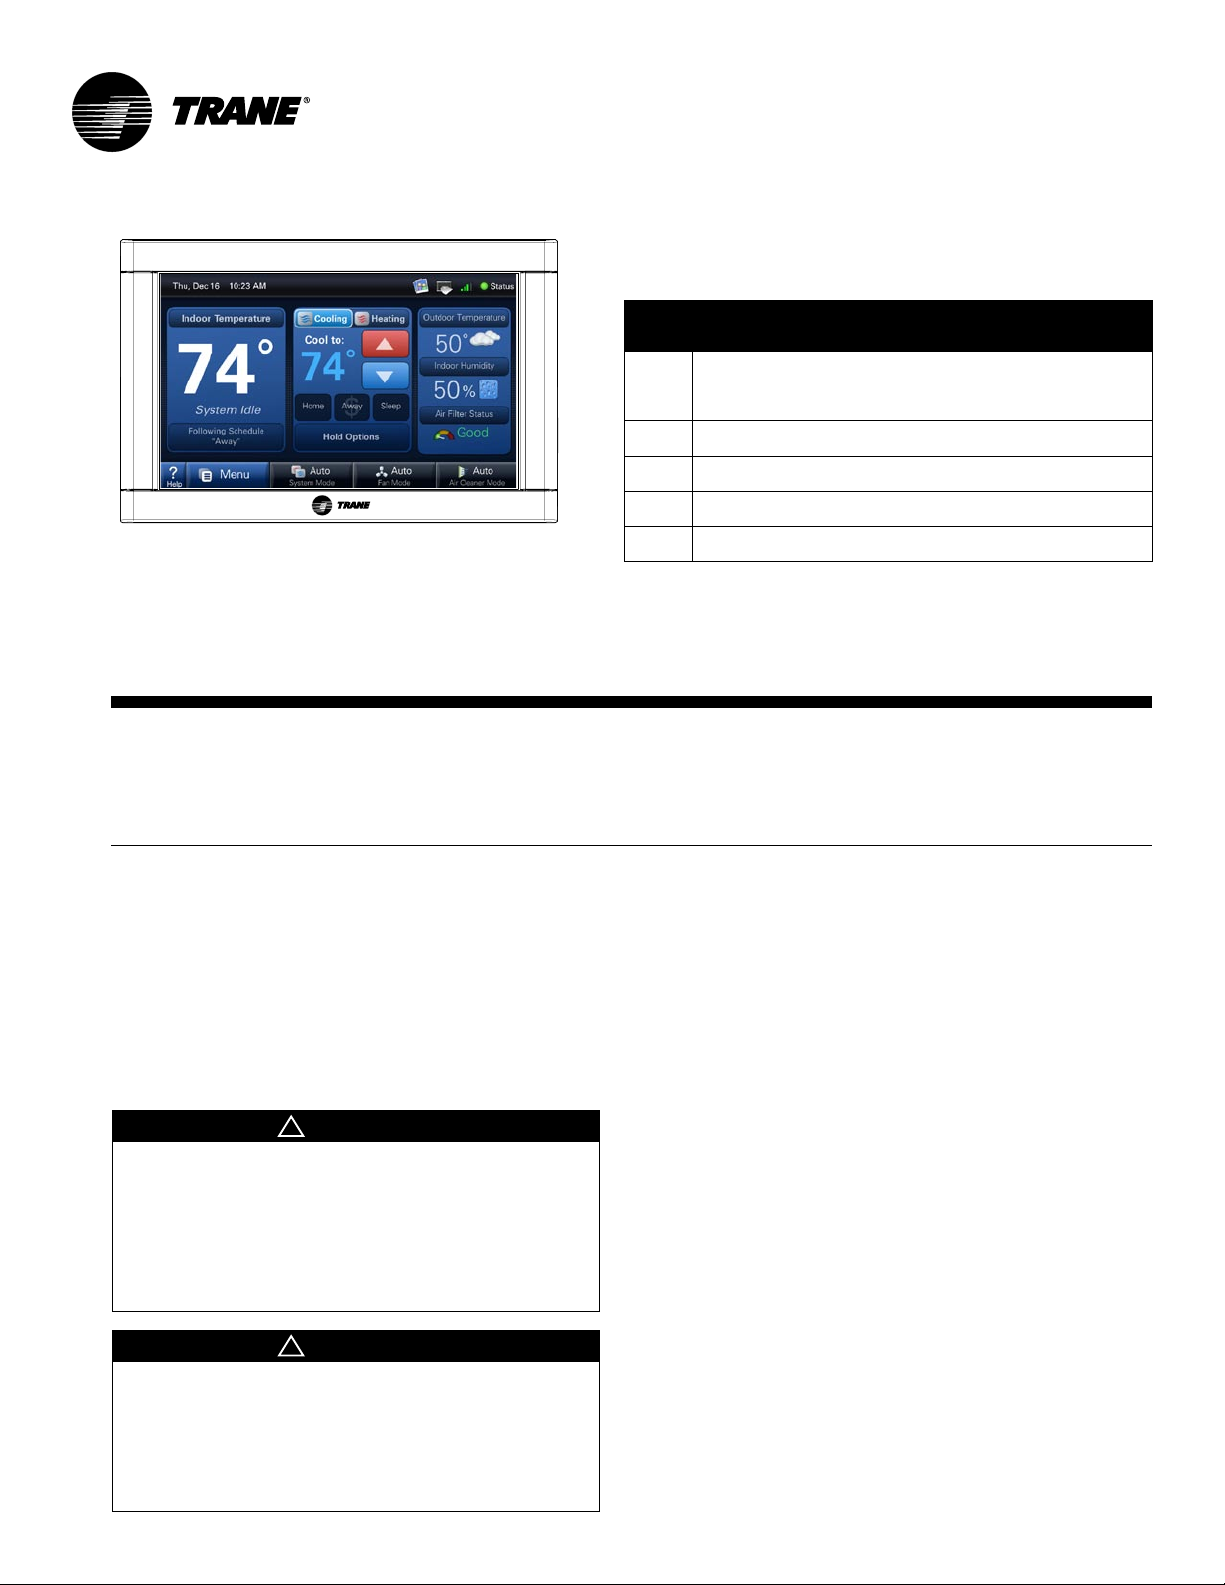
1 Thermostat
Relay Panel
2
For use with 24V indoor systems (optional)
Zone Panel (optional)
3
Zone Sensor with Display (optional)
4
Zone Sensor (optional)
5
Zone Dampers (optional)
6
ALL phases of this installation must comply with NATIONAL, STATE AND LOCAL CODES
IMPORTANT — This Document is customer property and is to remain with this unit.
These instructions do not cover all variations in systems or provide for every possible contingency to be met in connection with
the installation. Should further information be desired or should particular problems arise which are not covered sufficiently for the
purchaser’s purposes, the matter should be referred to your installing dealer or local distributor.
Section 1. Safety
Table of Contents
This information is intended for use by individuals possessing adequate backgrounds of electrical and mechanical
experience. Any attempt to repair a central air conditioning
product may result in personal injury and/or property damage. The manufacturer or seller cannot be responsible for
the interpretation of this information, nor can it assume any
liability in connection with its use.
LIVE ELECTRICAL COMPONENTS!
During installation, testing, servicing, and troubleshooting of this product, it may be necessary to work with live
electrical components. Failure to follow all electrical safety
precautions when exposed to live electrical components
could result in death or serious injury.
Section 1. Safety ................................................1
Section 2. General Information .........................2
Section 3. Physical Installation ........................5
Section 4. Wiring ................................................7
Section 5. Installer Setup ..................................9
Section 6. Advanced Features ........................13
Section 7. Troubleshooting .............................17
Section 8. Installer Setup Parameters ...........18
NOTE: See the User’s Guide for
wireless setup information.
03/11
Page 2
Section 2. General Information
2.1 Overview
The ComfortLink II Thermostat is a Communicating
7-inch color touch screen that provides an easy-touse interface to the end user.
The thermostat is a communicating wall mounted
control that allows a user to control an HVAC and
zoning system.
With the addition of the 24VAC Relay Panel, conventional HVAC systems can also be controlled
and zoned.
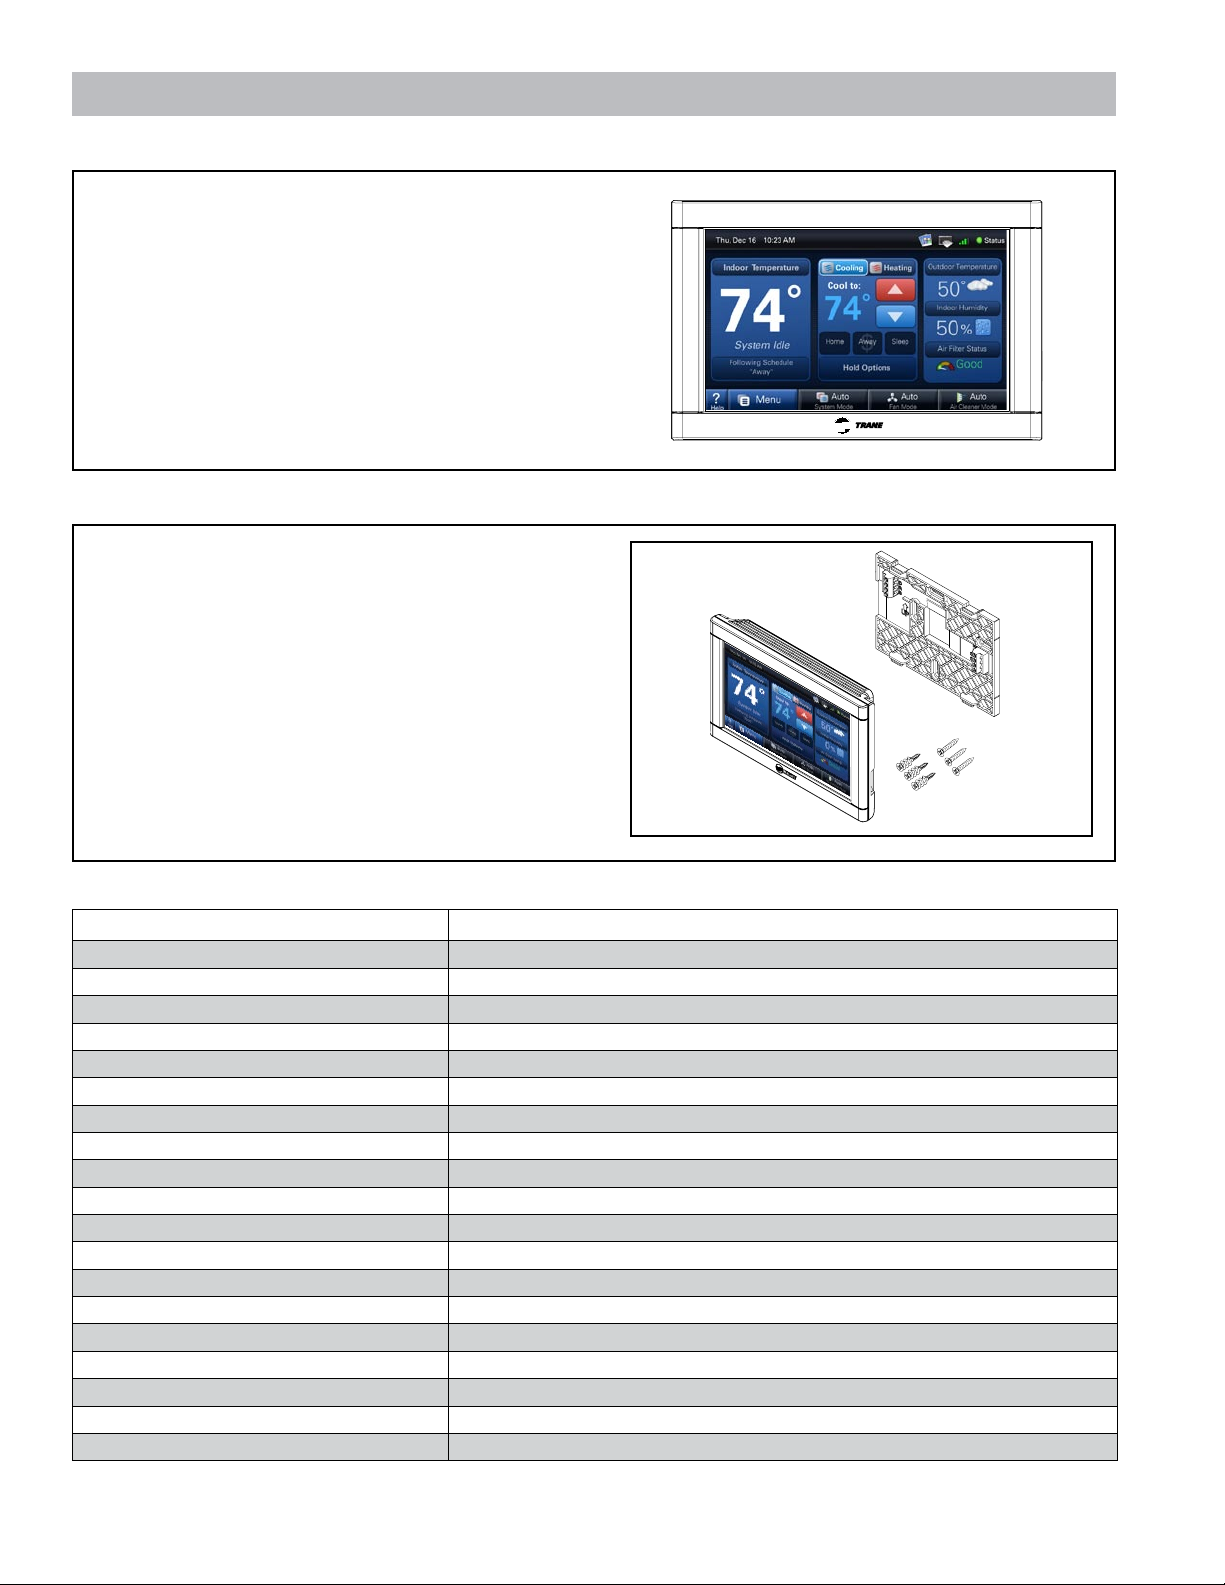
2.2 Contents in Box
The following parts are included in product model
TZONE950AC52ZA:
1 - Thermostat
1 - Sub-Base
3 - SnapSkru® Wall Achors
3 - 1” Screws
2.3 Specifications
Specification Description
Product Model: TZONE950AC52ZA
Product: ComfortLink II Thermostat
Size: 7.3” width x 4.3” height x 1.2” depth
Storage Temperature -40°F to 175°F, 5% to 95% RH non-condensing
Operating Temperature: 25°F to 126°F, 5% to 90% RH non-condensing
Input Power: 24 VAC from HVAC System (Range: 18-32 VAC)
Power Consumption: 7 VA*
Wire usage: Minimum 18 gauge NEC approved control wiring
Zone Sensor Wireless Range (802.15.4): 60 ft. through 3 standard walls
Wireless Connectivity Range (802.11 b/g): Varies with router model and placement
Communications: ComfortLink II - 3 wire connection
System Modes: Heat, Cool, Auto, Emergency Heat
Fan Modes: On, Auto, Circulate
Cooling Setpoint Temperature Range: 60°F to 99°F, 1°F resolution
Heating Setpoint Temperature Range: 55°F to 90°F, 1°F resolution
Indoor Temperature Display Range: 20°F to 119°F
Outdoor Temperature Display Range: -31°F to 119°F
Indoor Humidity Display Range: 0% to 99%, 1% resolution
Minimum Cycle Off Time Delay: Compressor: 5 minutes, Heat: 1 minute
* On every application, 24VAC loads should be reviewed to be sure the indoor unit control power transformer is adequately sized. See the Relay
Panel Installer’s Guide for guidelines.
2 18-HD64D1-1
Page 3
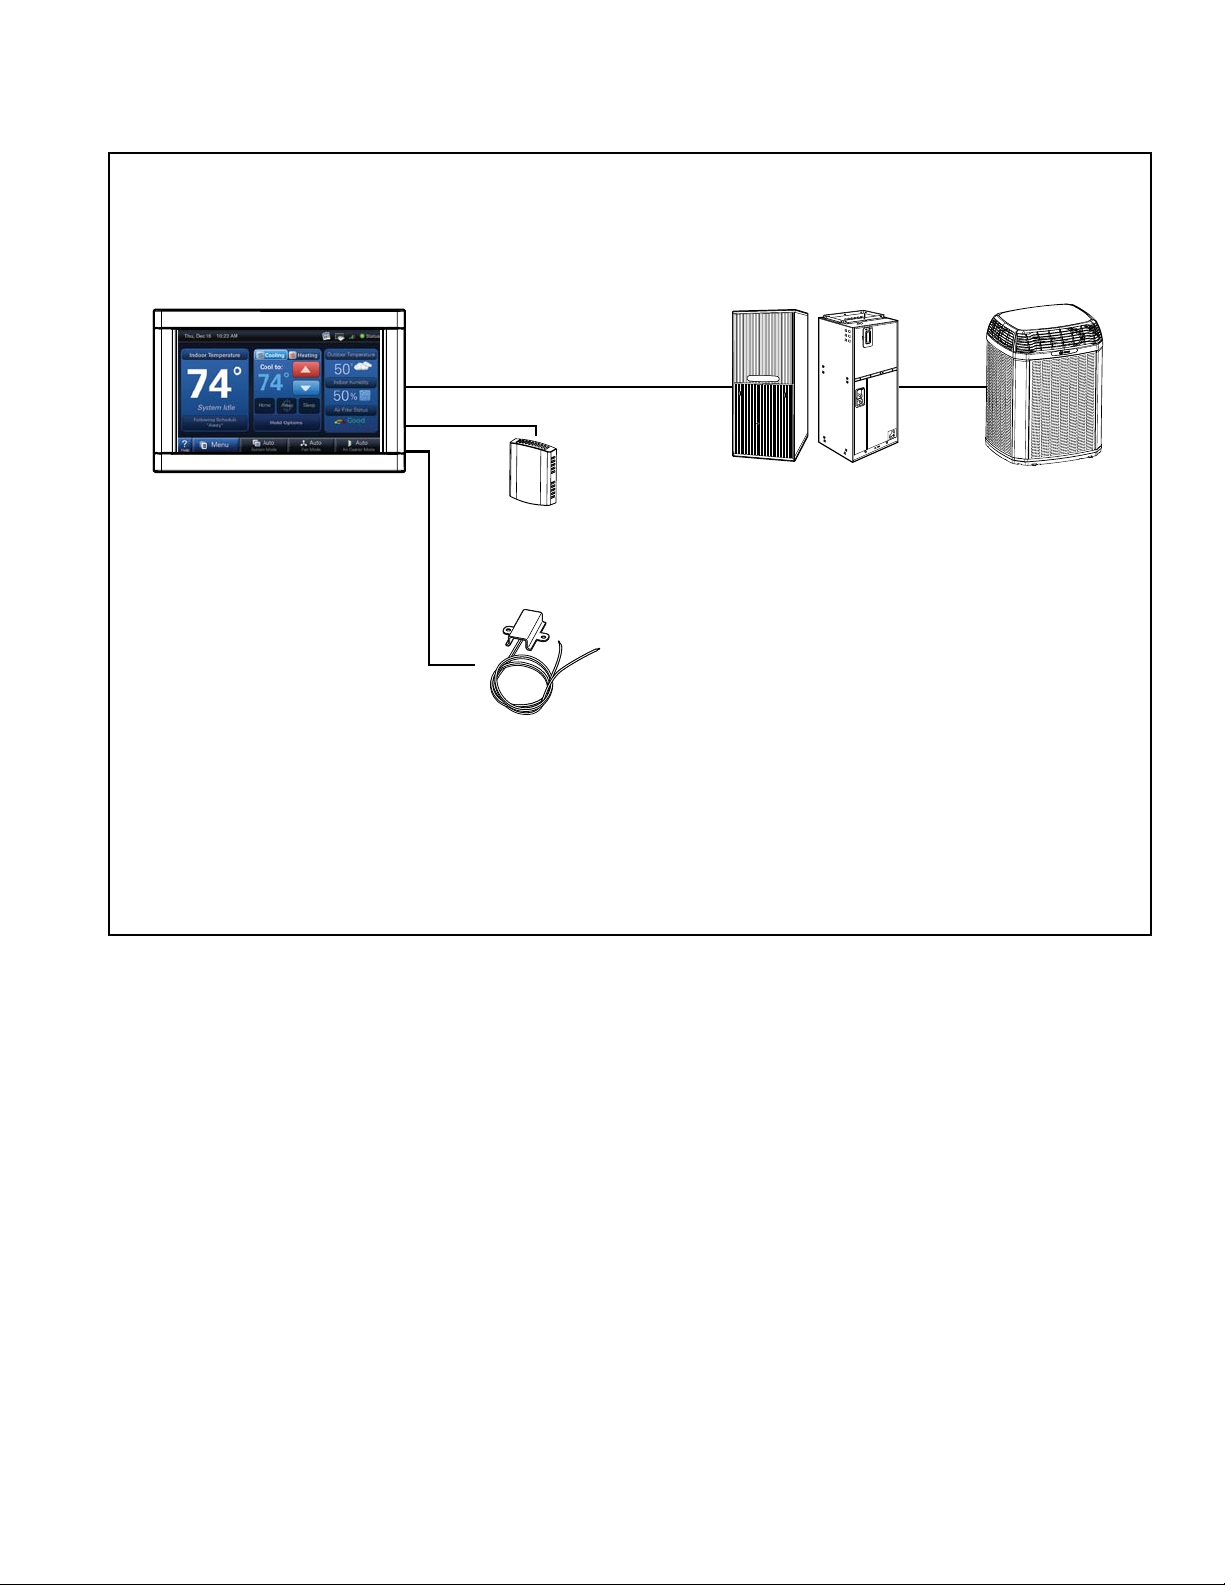
2.4 ComfortLink II System Connections
Thermostat
TZONE950AC52ZA
Outdoor Unit
Indoor Unit
Communicating System
Wired Remote
Outdoor Sensor*
BAYSEN01ATEMPA
Wired Remote
Sensor*
ZZSENSAL0400AA
*Optional
18-HD64D1-1 3
Page 4
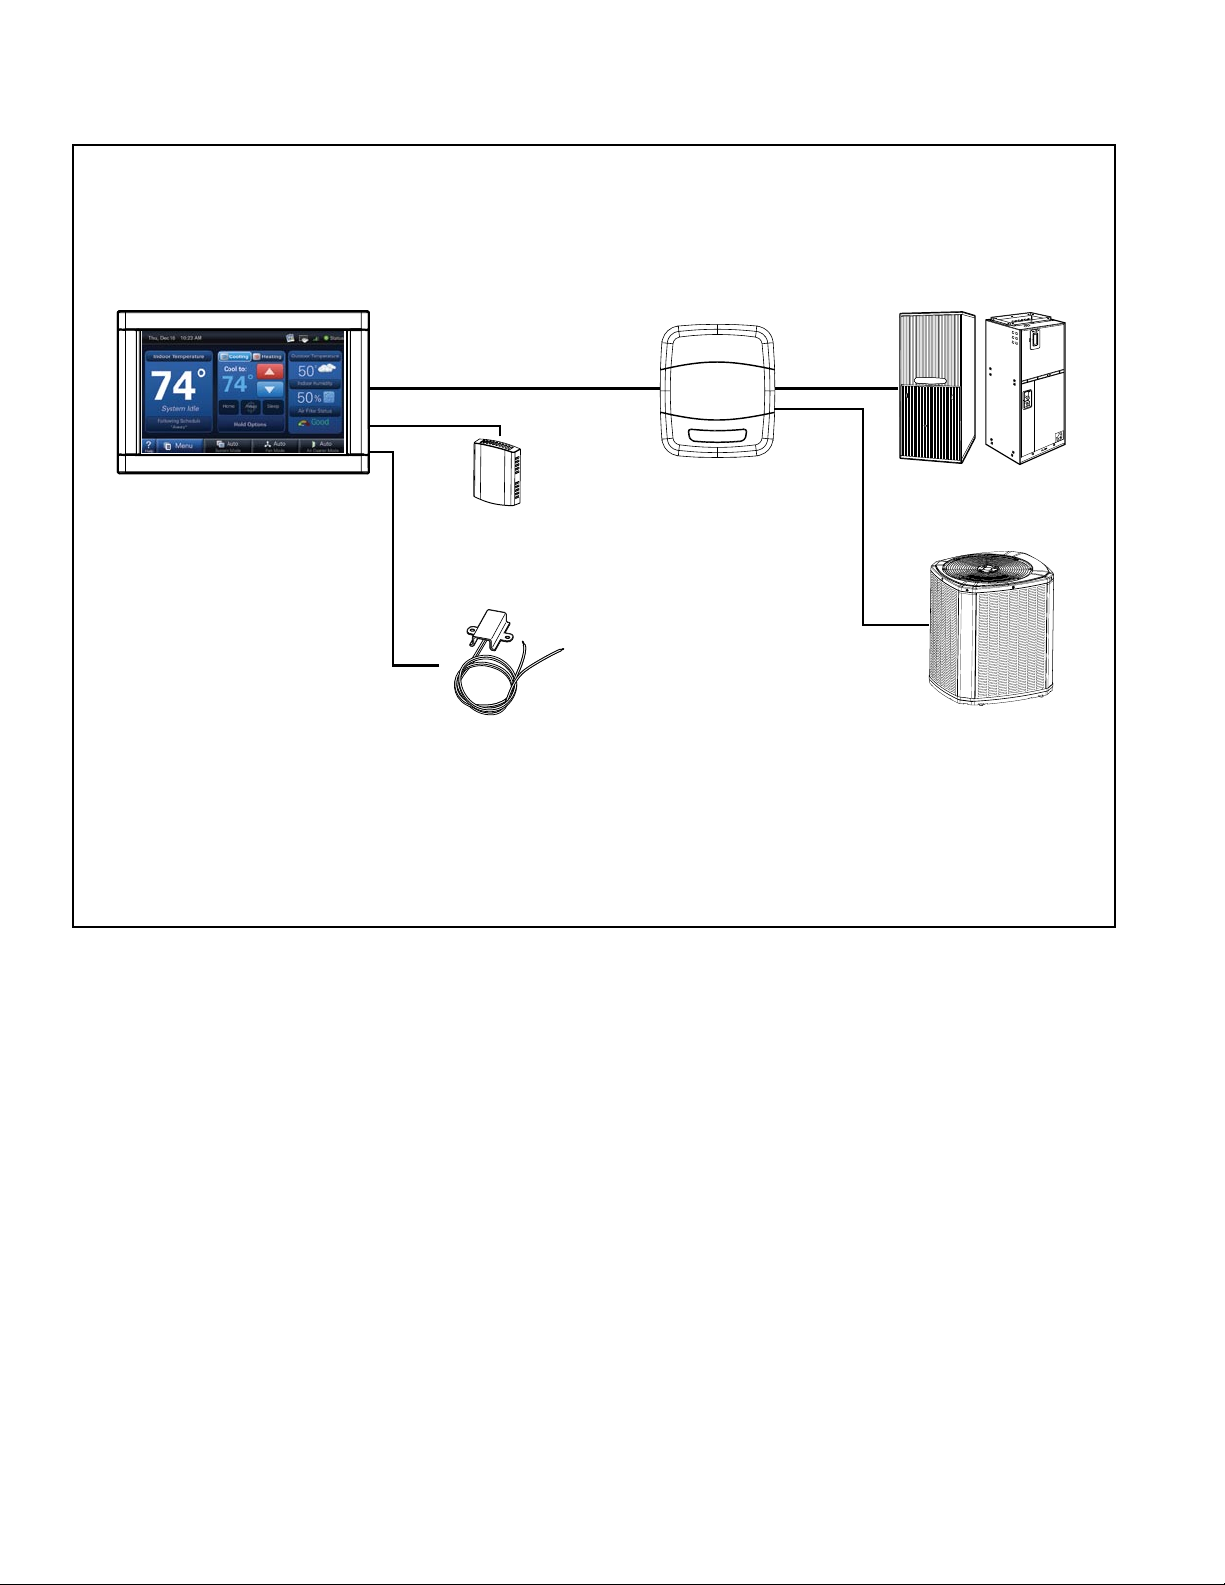
Thermostat
TZONE950AC52ZA
Thermostat
TZONE950AC52ZA
Outdoor Unit
Indoor Unit
Relay Panel
BAY24VRPAC52DA
Relay Panel
Outdoor Unit
Indoor Unit
Communicating System
24V System
Wired Remote
Outdoor Sensor*
BAYSEN01ATEMPA
Wired Remote
Sensor*
ZZSENSAL0400AA
Wired Remote
Outdoor Sensor
BAYSEN01ATEMPA
Wired Remote
Sensor*
ZZSENSAL0400AA
2.4 ComfortLink II System Connections (Continued)
*Optional
4 18-HD64D1-1
Page 5
5 FEET
[1.5 METERS]
YES
NO
NO
NO
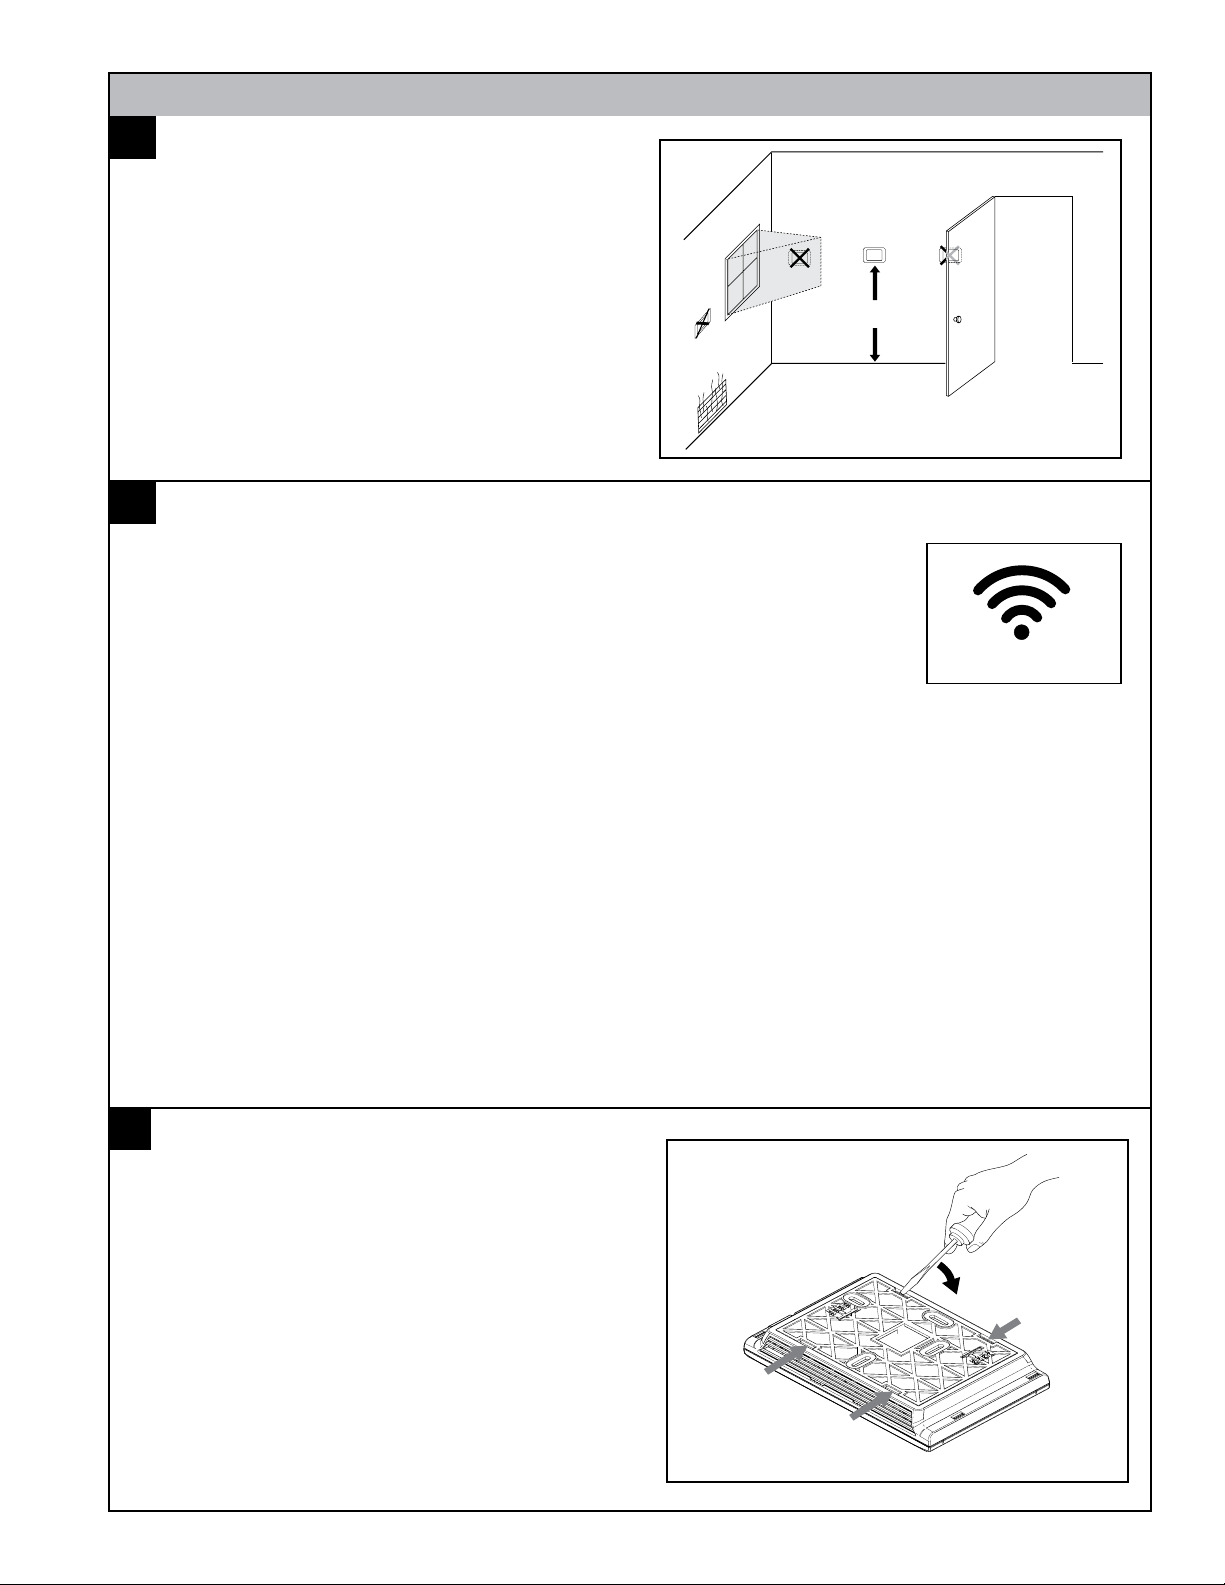
Section 3. Physical Installation
Wireless
Temperature Sensing Considerations
1A
The thermostat sensor is designed for installation
in climate controlled living spaces. It is recommended to place the sensor in central locations
with good circulation. Avoid exterior walls and areas near windows, doors, vents or concealed pipes
or chimneys.
Wireless Reception Considerations
1B
If enabling wireless, choose a mounting location that ensures adequate signal strength.
A wireless device may have significantly different signal strengths if its position changes relative to other wireless devices. If the thermostat shows poor signal strength, you
may be able to improve the signal strength by moving the thermostat a short distance
in any direction.
Considerations to Maximize Signal Strength:
Do not mount the thermostat • more than 30 feet from the wireless router (through no more than three
interior walls).
Do not mount the thermostat in areas where • electromagnetic emissions from other devices, appliances
or wiring can interfere with the thermostat’s communication. (i.e. wireless phones, security systems, wireless internet cameras)
Do not mount the thermostat in • recessed areas, near metal objects, or near structures. (i.e. doors, appli-
ances, entertainment centers or shelving units)
Do not mount the thermostat closer than • 2 inches to any pipes, duct work, or other metal obstructions.
Do not have • metal obstructions, concrete or brick walls between the thermostat and the wireless router
it will be connected to.
NOTE: See the User’s Guide for wireless setup information (weather, multi-system and remote software update functionality).
Removing Sub-Base Wall Plate
2
Remove sub-base plate from the thermostat by inserting a small flat blade screwdriver into the notch
at each of the four tabs as shown.
Gently pry the sub-base away from the the thermostat.
NOTE: This tight fit is normal and ensures that the
thermostat is held securely to the sub-base when
mounted on the wall.
18-HD64D1-1 5
Page 6
Mounting Sub-Base to Wall
Optional Hole
3
Be sure wires are routed through the center of the
base plate and are long enough to connect to terminals.
Select and mark three holes.
NOTE: The three hole locations indicated at right
are recommended. The top location is an optional
mounting screw location.
A level may be used to ensure professional appearance.
4A
Mounting to Studs
Attach base to wall using 3 screws provided. The
locations indicated provide the most secure mounting and are recommended.
Three (3)
Recommended
Screw
Locations
NOTE: Since moderate force is required when removing the thermostat from the sub-base, the subbase must be securely attached to the wall.
Do not overtighten screws to avoid damaging the
sub-base.
4B
Mounting to Drywall
®
If mounting to drywall, supplied SnapSkru
the wall. These connectors will ensure that the control is adequately supported.
NOTE: Since moderate force is required when removing the thermostat from the sub-base, a firmly mounted sub-base is essential.
connectors must be used to mount the thermostat sub-base to
1) Press tip of SnapSkru® anchor into drywall using #2 Phillips
screwdriver or screw gun. Drive
anchor clockwise into drywall until
anchor stops flush with wall.
6 18-HD64D1-1
2) Place sub-base over anchor
and insert screw.
3) Tighten screw flush with subbase. Screw “pops” open anchor,
locking anchor on wall.
Do not overtighten screws to avoid
damaging the sub-base.
Page 7

▲
CAUTION
!
▲
WARNING
!
D
R
B
Section 4. Wiring
LIVE ELECTRICAL COMPONENTS!
During installation, testing, servicing, and troubleshooting of this product, it may be necessary to work with live electrical components. Failure
to follow all electrical safety precautions when exposed to live electrical
components could result in death or serious injury.
CAUTION: EQUIPMENT DAMAGE HAZARD - Improper wiring can lead
to equipment damage. Follow the terminal connection information carefully to ensure the control is wired properly. After wires are secure, bare
wires MUST NOT touch each other. See the Field Wiring Diagrams for
specific system applications.
NOTE: The maximum total cable length for the entire communicating system is 500 feet 18 AWG. The maximum distance of any single
cable from a transformer is 250 feet 18 AWG.
NOTE:
Use 18-gauge color-coded thermostat cable for proper wiring. Shielded cable is not typically required. •
Keep this wiring at least one foot away from large inductive loads such as Electronic Air Cleaners, motors, line starters, lighting bal-•
lasts and large distribution panels.
Failure to follow these wiring practices may introduce electrical interference (noise) which can cause erratic system operation. •
All unused thermostat wire to be grounded at indoor unit chassis ground only. Shielded cable may be required if the above wiring •
guidelines cannot be met. Ground only one end of the shield to the system chassis.
5
Power Connections
The thermostat is powered via 24 VAC from the indoor unit. On every application, 24VAC loads should be reviewed to be sure the indoor unit control power transformer is adequately sized. The ComfortLink II thermostat
draws approximately 4VA more than the typical communicating thermostat.
6
Connect Wiring
Optional Connections
Connect wiring to terminals as
shown.
Route wiring within the plastic
channel as shown so that it does
Terminal Description
RS Remote Sensor
RS Remote Sensor
ODT Outdoor Temperature Sensor
ODT Outdoor Temperature Sensor
not interfere with thermostat when
reinstalling. Do not overlap wires.
Plug the opening with non-flammable insulation to prevent drafts from
affecting the thermostat.
Replace Thermostat
7
Replace unit flat onto sub-base being careful to
align unit correctly with the sub-base before applying force.
Thermostat Connections
Terminal Description
D Data
R
B 24 VAC (common)
24 VAC (hot)
Thermostat should fit snug and not “rock” when
properly installed. Check wire routing if sub-base is
unstable.
18-HD64D1-1 7
Page 8

Red
Brown
Blue
Red
Brown
Blue
B
D
R
24V Single Stage Cooling
B
D
R
W1
W2
W3
G
Y2
B
O
BK
D
Y1
R
W1
W2
W3
G
Y2
B
O
BK
D
Y1
R
Yellow
Yellow
Blue
Blue
Brown
Brown
Blue
Blue
Thermostat
Relay Panel
Red
Brown
Blue
B
D
R
BDR
Indoor Unit
Communicating Indoor Unit
Communicating
Outdoor Unit
Communicating System
Communicating Indoor with Non-Communicating Outdoor
24V System
24V Outdoor Unit
Communicating Indoor Unit
Relay Panel
*See Relay Panel
Installer’s Guide
for specific wiring
instructions.
Thermostat
Thermostat
Field Wiring
8
8 18-HD64D1-1
Page 9

Section 5. Installer Setup
9
Power-Up
Communicating Equipment
Discovery mode begins when the thermostat is first installed and power is connected. For communicating equipment, the thermostat automatically configures standard equipment parameters.
24V Equipment (Using a Relay Panel)
Equipment will need to be configured manually through the Installer’s Setup menu in the thermostat. See the
following section for more details.
10
Basic Navigation
The home screen displays default temperature settings and parameters.
Pressing a button will display additional information
or a new menu screen.
Help: Screens contain a Help button
which provides additional information.
Screens that are self-explanatory will not
list additional help.
Example (Air Cleaner Mode):
Pressing the “Air Cleaner Mode” button
on the home screen allows selection of
options from a list.
Example (Menu):
Pressing the “Menu” button on the home
screen shows additional icons to adjust
settings.
Buttons shown will vary depending on
system type and configuration.
18-HD64D1-1 9
Page 10

11
Installer Setup Menu
Enter the Installer’s Setup screen by navigating to:
Home screen --> Menu --> Service --> Technician
Access --> Proceed* --> Installer Setup
*NOTE: Press and hold the “Technician Access”
button for 5 seconds to enter the Installer Setup
screen.
NOTE: See Section 8 for a complete list of menus
and parameters that can be set in the Installer
Setup menus.
10 18-HD64D1-1
Page 11

11A
Installer Setup Menu - Standard
Standard
Pressing the “Standard” button allows manual selection and configuration of basic equipment components.
NOTE: In communicating system, components will
be discovered automatically so this manual setup is
not required.
Example:
The “Standard” screens allows selection of noncommunicating equipment.
11B
Installer Setup Menu - Advanced
Advanced
Equipment settings may be adjusted to alter the
default settings to fine-tune a system’s operation.
Installed accessories and comfort options may be
configured in the Advanced screen.
NOTE: Icons available in this menu will vary based
on equipment configuration.
Example:
Press the “Comfort” button to enable or disable comfort settings such as dehumidification (at right).
18-HD64D1-1 11
Page 12

11C
Installer Setup Menu - Restore
Equipment Defaults
CAUTION: “Restore Equipment Defaults” returns
the thermostat to factory settings. ALL settings and
data will be lost.
11D
Installer Setup Menu - Reset
Advanced Settings
“Reset Advanced Settings” resets the Advanced
Settings which were configured in the Installer Menu
(settings such as system lockouts, accessories, air
flow and comfort options).
12
Wireless Networking
NOTE: See the thermostat’s User’s Guide for wireless setup information.
12 18-HD64D1-1
Page 13

Section 6. Advanced Features
Feature Description
The 1-Touch Presets allows for an immediate change to the setpoint status. Set the desired temper-
1-Touch Presets
Aggressive Recovery
Air Cleaner Mode
Alert Indication
ature for the three status modes (Home, Away & Sleep). The thermostat will remain in the selected
mode until another mode is selected or the program reaches a new schedule period.
Aggressive Recovery: This option disables the 10 minute inhibit anytime the thermostat sees more
than a 2° change (such as moving from one program time frame to another). This applies to heating & cooling modes.
Heating Aggressive Recovery: This option disables the 10 minute inhibit based on outdoor temperature in heating mode only. The value for outdoor temperature can be set from 0°–70°.
Heating Aggressive Recovery can only be enabled if Aggressive Recovery is disabled.
There is a 10 minute “inhibit” period between first and second stage compressor as well as compressor heating & supplemental strip heat. This 10 minute inhibit period minimizes the cycling of higher
capacity request due to drafts around the thermostat or marginal load conditions.
There are three options when setting the Air Cleaner Mode:
Auto--the air cleaner will run whenever the blower is running.
Quick Clean--the thermostat will energize the air cleaner at 100% output and blower at 100% air flow
for a 3-hour run cycle.
Allergy Clean--the thermostat will energize the air cleaner at 100% output and blower at 100% air
flow for a 24-hour cycle.
System alerts will be indicated on the home screen of the thermostat with two options: “Close” or
“Dealer Contact Information”.
Selecting “Dealer Contact Information” will display the dealer screen. •
Selecting the “Close” option will move the alert to the top right corner of the home screen. •
Pressing the icon button in the top right corner of the screen will recall the alert to the home
screen.
All alerts will remain until resolved.
Backlight
Blower On / Off Delays
Brightness
Calibration
Control Response Rate
Customizable Home
Screen
Critical Alert – indicates the loss of heating or cooling operation. Only critical alerts will be displayed on the home screen. These alerts will flash red when “closed” and moved to the top right
corner of the thermostat.
Major Alerts – indicates the loss of system functionality, but the system is still operational. Major
alerts will be displayed as a solid yellow icon in the upper right corner of the thermostat.
The backlight of the thermostat will increase anytime the screen is pressed (active mode) and dim
after a time period of non-activity (standby mode). This timeout period between active mode and
standby mode can be customized from 5–60 seconds.
Blower on / off profiles can be set independently for heating and cooling modes. There are blower
delays specific for variable speed, non variable speed and hydronic heat applications.
The brightness of the screen can be customized for viewing preferences. Screen brightness can be
set for daytime and nighttime modes.
The Ambient Light Setting icon sets the amount of room light required to shift the display between
daytime and nighttime settings.
The sensors (indoor, remote and outdoor) can be individually calibrated for temperature and humidity. The indoor sensors may be calibrated to plus or minus 5° or 5% humidity in increments of 1 .
The outdoor sensor may be calibrated to plus or minus 10° in 1° increments.
This feature changes the response rate of the thermostat. Selecting a “faster” response rate will
maintain a tighter tolerance of indoor temperatures, but increases the cycling of the system.
Options such as screen brightness, screen savers, background colors, screen calibration and customized shortcuts can all be modified to create a personalized home screen.
18-HD64D1-1 13
Page 14

Feature Description
The cycle rate affects the cycle time of the system. With a 50% load value, a cycle rate of 3 will
allow the system to run for 10 minutes and be off for 10 minutes; completing 3 cycles in one hour. A
cycle rate of 5 would allow the system to cycle on and off at 6 minute intervals. The higher the cycle
Cycle Rate
Dealer Information
Dehumidification
Diagnostics
Dual Fuel Options
Emergency Heat
Equipment List
Fan Options
Help Screens
History Runtime
rate, the more often the system turns on and off.
The actual amount of time the system will be “on” or “off” will be reflective in the load value of the
home. Higher load value demands will increase system run time and decrease system off time.
Lower load value demands will decrease system run time and increase system off time.
Dealer contact information, including name, address, website and multiple phone numbers may be
entered. In addition, a dealer logo (which must be named dealer.jpg) can be uploaded through the
use of an SD card. File size should not exceed 3 MB.
There are two requirements before dehumidification is enabled:
Dehumidification must be enabled through the Installer Setup.•
The indoor relative humidity must be above the desired setpoint.•
The system will take the following actions once this condition is met:
The blower will reduce air flow proportional to the amount of RH error. The thermostat evaluates •
the percentage of humidity error and how long the error has existed to determine the amount of
air flow reduction, up to 30% reduction.
If overcooling is enabled, the thermostat will engage a 1 degree of overcooling for each 10% of •
RH error. A maximum amount of overcooling can be configured to 1, 2 or 3 degrees.
Fan off delays will be eliminated.•
Smart Continuous Fan
Continuous fan operation will be interrupted when indoor relative humidity exceeds desired humidity
setpoint. A humidity icon will be displayed along with the fan icon to indicate that blower on options
have been disabled due to high humidity conditions. Smart Continuous Fan will not interrupt the fan
circulate mode.
Diagnostics are displayed as current alerts (what is currently happening in the system) and alert history (what has occurred in the past, but are no longer present). The alert screen describes the alert,
when the alert happened, the severity level of the alert as well as a problem description and possible
causes to assist with troubleshooting. Up to the last 30 days are displayed.
The change over from heat pump to furnace can be set based on three options:
Comfort• –This is strictly based on indoor temperature demand. The furnace will take over when
the heat pump can no longer maintain the indoor heating demand.
Operating Cost• –The HSPF of the heat pump and AFUE of the furnace must be entered along
with cost of electricity and fuel. The thermostat calculates an economic balance point for system
change over.
Outdoor Temperature• –The changeover from heat pump to furnace is based on outdoor tem-
perature which can be set from 0–70° (thermal balance point).
The furnace will take over anytime the HP is unable to maintain indoor temperature, regardless of the dual fuel option chosen.
The heat pump will be disabled and the furnace / heat strips are enabled any time the thermostat is
set to Emergency Heat.
This lists the model and serial number for all communicating components.
The model and serial numbers for non communicating components can be manually entered.
There are three options available for blower operation:
Auto• –the blower runs when there is a call for cooling or heating.
On• –the blower will run continually with a fan only call. The continuous fan speed for variable
speed motors can be adjusted from 35%–100%. A call for heating or cooling will supersede a
fan only call and the blower will run at a speed that matches the staging of the equipment.
Circulate• –this provides all the features of “fan on”, but the blower will only run a percentage of
the time when there is no call for heating or cooling. The blower can be set to circulate from
10–55 minutes of every hour.
The bottom left corner of all screens has a Help icon with a question mark. This icon provides assistance for the screen that is currently being displayed. Screens that are self explanatory will not list
additional help. Pressing the Help icon on these screens will display “No additional help available”.
The History Runtime screen provides information on system run time in comparison to the indoor
and outdoor temperatures (average indoor along with the high & low outdoor temps). This history
can be viewed on a weekly or monthly basis.
14 18-HD64D1-1
Page 15

Feature Description
The History Screen provides system cycle information. Cycle counts and run time can be viewed
History Screen
Humidification
Installer Setup
Load Value
Lockouts
Multi Systems
Photo Album
Reminder Screens Reminders can be set for filters, UV lamps, humidifier pads, and various other service reminders.
Restore
for first stage and second stage compressor operation, W1 & W2 heating and defrost cycles. This
information can be viewed in a 24 hour, 1 week or 2 week period.
There are two options available for humidification:
Indoor RH setpoint• —this controls the humidifier based on the desired indoor humidity setpoint
(options from 10%–45%).
Frost Control setpoint• --The thermostat references the outdoor temperature and indoor envi-
ronment to calculate the risk of frost or condensation on interior walls and windows. A scale of
0 to 10 allows for customized settings based on the insulation properties of the home. A higher
number may be selected for well insulation homes, whereas a lower number should be selected
on poorly insulation homes. A lower number should be utilized if condensation is observed.
There are two control options for enabling humidification:
Humidification with an active call for heat.•
Humidification without an active call for heat (thermostat energizes blower and humidifier). •
Humidification is only available when in the heating mode (or in the auto mode when the last
call was for heating). A 60 second minimum blower off delay is enforced if “steam” humidification is selected.
There are two categories for Installer Setup.
Standard• —this is the basic system settings such as heat pump or cooling only, single or multi
stage, compressor type, etc. This is the basic system set up that is self discovered in communicating mode, but requires manual input when using a Relay Panel for 24 volt configurations.
Advanced• —this provides advanced configuration of the system such as cycles per hour, mini-
mum run times, humidification and dehumidification setpoints, blower delays and temperature
lockouts to name a few of the customizable features in this set up.
Load Value is a numerical representation of the needed capacity to satisfy the setpoint. Proportional
(distance from setpoint) error plus integral (time away from setpoint) error is used to calculate load
value.
System lockouts will disable a certain function of the system under specific outdoor temperatures:
Compressor Heating Lockout• – will lockout all compressor operation below a set outdoor tem-
perature (from 5°–70°). This value must be set lower than the auxiliary heat lockout.
Auxiliary Heating Lockout• – will lock out auxiliary heat stages above a set outdoor tempera-
ture (from 40°–70°). This value must be set higher than the compressor heating lockout.
Defrost Heater Balance Point• for W1, W2 & W3 – will lock out specific auxiliary heat stages
when above a set outdoor temperature. (W1 setpoint is from 40°–55°, W2 & W3 setpoints are
from 5°–55°). This feature does not apply to dual fuel systems.
Compressor Cooling First Stage Lockout• – will lock out the first stage compressor above a
set outdoor temperature. (from 80°–120°)
Compressor Heating First Stage Lockout• – will lock out the first stage compressor below a
set outdoor temperature. (from 0°–50°)
Furnace First Stage Heating Lockout• – will lock out first stage furnace operation below a set
outdoor temperature. (from 15°–50°)
First stage lockouts are not available with zoning.
Multiple thermostats that control individual systems can be linked. Multiple systems can be controlled from any thermostat location. A wireless home network is required for multi system functionality.
Allows the customization of a photo album screen saver. An SD card is required to view the pictures.
Photos may be in .jpg, .jpeg, .bmp, .png, or .gif file formats and must be smaller than 3 MB each.
There are three levels of restore:
Restore from the Setting Screen• – this restores all personal configurations, such as program
schedules and home screen customization to their default setting.
Reset Advanced Options from the Install Set Up screen• – this restores all the advanced set
up selections such as system lockouts, accessories, air flow and comfort options to their default
setting.
Restore Equipment Default• – this restores the thermostat to its “out of the box” condition. All
settings will be set to their factory default condition.
18-HD64D1-1 15
Page 16

Feature Description
The History Runtime screen provides information on system run time in comparison to the indoor
Runtime History
Scheduling
Screen Cleaning Mode
Screen Layout The Screen Layout icon allows for customization of what is displayed on the home screen.
SD Card Logging
Security
Setpoint Dead Band This sets the temperature band between heating and cooling setpoints while in the auto mode.
Software Updates
Stage Inhibit
System Report
System Status
System Test
Technician Access
Screens
Vacation Mode
Warm Air Discharge
Weather
and outdoor temperatures (average indoor along with the high & low outdoor temps). This history
can be viewed on a weekly or monthly basis.
Allows for 7 day programming with one to six scheduled time periods per day.
There are two options available for setting a schedule:
Guided Setup• – a step by step interactive process for setting up a schedule.
Manual Setup• – a direct modification to an existing schedule which skips the interactive set up
wizard from the guided set up.
Scheduling is not required. The thermostat can operate as a non programmable thermostat.
The Clean Screen Mode creates a 30 second screen lockout. The screen can be touched and
cleaned without changing settings. There is an icon “Press and Hold to Exit” which will exit this mode
if necessary--eliminating the 30 second lock out.
The thermostat has the ability to log all information to a SD Card. A typical 24 hour log will consist
of 12 to 20 megabytes of information. The thermostat will overwrite the oldest data once the card
becomes full.
Security initiates a keypad lockout. The thermostat can only be accessed by a four digit pass code
which can be configured in two different formats:
Pin Lock: When the Pin Lock is selected, the thermostat is completely locked. The user will need to
enter a four digit password to change any setting (the default is “1234”).
Guest mode: The enabling of this mode allows a guest to change the temperature up to 5° in either
direction from setpoint and access to the weather, but cannot change the mode or any customized
settings.
The thermostat is field software upgradable. Insert a SD card and press the Software Update icon,
and updates will begin automatically.
To prevent the next stage of capacity from being initialized, when the current capacity stage will
satisfy the load a stage inhibit function is utilized.
The System Report Screen provides a real time in depth look at operating conditions. While similar
to the System Status screen, the system report adds additional information for service technicians.
The System Status screen shows the snapshot of what the system is doing; including system mode,
air flow percentage and reminders.
The System Test feature allows a technician to lock the system into a particular mode of operation
for up to 30 minutes.
The “Technician Access” icon has a 5 second hold delay to enter the technician service screens.
After this 5 second hold delay, the technician will see a “Caution!” screen noting that only a trained
HVAC technician should proceed into this area.
Through an interactive calendar, pick the date, time and temperature to begin and end a vacation set
back period.
Enabling Warm Air Discharge will reduce the variable speed blower air flow by 20% when in compressor heating operation. Warm air discharge only applies to compressor heating and is disabled
when hydronic, fossil fuel or electrical heat (including supplement heat) modes are activated.
The Weather feature displays the outdoor temperature, 5-day forecast and local Doppler radar. The
weather screen is available once Wireless Service to the internet and Remote Services are enabled.
16 18-HD64D1-1
Page 17

Section 7. Troubleshooting
Symptom Possible Causes Action
Thermostat displays an alert
code on the screen.
Display will not come on Loss of 24VAC between R & B at the thermo-
Indoor temperature display is
incorrect.
Indoor humidity display is incorrect.
Room temperature overshoots
when the Heat/Cool setting is
changed more than 2°.
Heating will not come on. 1) System mode is not set to heat/Auto or set-
Cooling will not come on. 1) System mode is not set to cool/Auto or the
Heating or Cooling is displayed,
but no warm or cool air is coming
from the registers.
Fan runs all the time 1) Fan mode is set to On, Circulate or Clean
Fan is set to ON but not running. 1) Humidity control is engaged.
Cooling or Heating cycles too
fast or too slow (narrow or wide
temperature swings).
Heat pump is not turning on; only
furnace or electric heat strips are
running.
Cannot change system mode to
desired setting.
Screen does not respond properly to a button press
“No System Found” displayed on
the thermostat
Slow or no response to any button presses
Alert Code is present. Refer to the Alert Code Addendum. Check the
stat.
Indoor temperature display needs calibration. Calibrate temperature sensor from thermostat
Indoor humidity display needs calibration. Calibrate humidity sensor from the thermostat
1) Oversized heating/cooling equipment under
current conditions. Control cannot respond fast
enough to prevent overshooting.
2) Improper location of thermostat.
3) Aggressive recovery is activated.
point is set too low.
2) Minimum off time delay is being enforced.
3) Heating system may require service.
setpoint is too high.
2) Minimum off time delay is being enforced.
3) Cooling system may require service.
1) There is a fan delay as the heating or cooling
equipment turns on.
2) Equipment is not working properly.
mode
2) There is a failure in the indoor unit
2) Blower motor is not functioning.
1) Check the location of the thermostat for
drafts.
2) Cycles per hour or aggressive recovery is
improperly set.
1) Outdoor temperature is below compressor
lockout temperature setting.
2) Compressor heating lockout is enabled and
outdoor temp sensor is out of calibration or
failed.
Equipment is not configured properly. Check the standard installer set up screen to
Screen is out of calibration Remove thermostat from sub base and reset.
Internal error Reboot the thermostat via onscreen button.
Internal error Remove the thermostat from the sub base and
Alert icons in the diagnostic screen.
1) Check wiring between R & B to see if R & D, or
B & D have been reversed.
2) Check transformer for 24VAC output.
3) Check for broken or shorted thermostat wire.
menu.
menu.
1) Compare heat load calculation to equipment
chosen.
2) Relocate thermostat (or use remote sensor) if
thermostat is in “dead” spot (poor or no air circulation).
3) Deactivate aggressive recovery.
1) Set mode to heat and raise the setpoint above
the room temperature.
2) Wait for 5 minutes and recheck heating equipment.
3) Check/repair system.
1) Set mode to cool and lower the setpoint below
the room temperature.
2) Wait for 5 minutes and recheck cooling equipment.
3) Check/repair system.
1) Wait a minute for blower delays and recheck
registers.
2) Check/repair system.
1) Check thermostat settings to see if fan is set to
On, Circulate or Clean mode.
2) Check indoor unit for failures (such as tripped
heating limit).
1) If indoor humidity is higher than desired setpoint, the blower will cycle off with the equipment.
2) Check/repair system.
1) Seal all air leaks behind thermostat. Relocate
thermostat or apply remote indoor temperature
sensor.
2) Adjust cycle rates and aggressive recovery
features in the advanced installer set up.
1) Check/repair outdoor sensor or wiring.
2) Adjust the compressor lockout temperature
setting if desired.
ensure equipment is properly configured.
Follow the calibration instructions when the thermostat reboots.
reset.
18-HD64D1-1 17
Page 18

Section 8. Installer Setup Parameters*
*Each Bold heading below corresponds to a menu in the Installer Setup. All possible options are shown for the menu
and each submenu. Selections shown in any particular system will be dependent on system type and configuration.
Standard
Outdoor Unit Type None Cooling Only Heat Pump
Outdoor Unit Stages 1 2
Compressor Type
Indoor Unit Type Electric Gas/Oil Hydronic
Indoor Unit Heat Stages None 1 2 3 Modulating
Indoor Unit Blower Type Variable Speed Non Variable Speed
Advanced
Equipment
Compressor Cooling Cycles Per Hour 2 3 4 5 6
1st Stage Compressor Heating Cycles Per Hour 2 3 4 5 6
2nd Stage Compressor Heating Cycles Per Hour 2 3 4 5 6
Compressor Heating Cycles Per Hour 2 3 4 5 6
1st Stage Compressor Cooling Cycles Per Hour 2 3 4 5 6
2nd Stage Compressor Cooling Cycles Per Hour 2 3 4 5 6
Compressor Minimum On Time - Minutes 3
1st Stage Compressor Minimum On Time - Minutes 3
2nd Stage Compressor Minimum On Time - Minutes 3
Indoor Heater Cycles Per Hour 2 3 4 5 6
1st Stage Indoor Heater Cycles Per Hour 2 3 4 5 6
2nd Stage Indoor Heater Cycles Per Hour 2 3 4 5 6
3rd Stage Indoor Heater Cycles Per Hour 2 3 4 5 6
Indoor Heater Minimum On Time - Minutes 1
1st Stage Indoor Heater Minimum On Time - Minutes 1
2nd Stage Indoor Heater Minimum On Time - Minutes 1
3rd Stage Indoor Heater Minimum On Time - Minutes 1
Sensors
Select Outdoor Temperature Sensor None
Calibrate Outdoor Temperature Sensor - Degrees +/- 5 increments
Calibrate Indoor Temperature Sensor - Degrees
Calibrate RH sensor
Single Compressor
Two Stage
Zone x +/- 5
increments
Zone x +/- 5
increments
Two Compressor
Two Stage
Sensor Wired to
Comfort Control
CLII/ AccuLink
Outdoor Sensor
Sensor Wired to
Relay Panel
Accessories
Filtration Type Installed
Number of Air Cleaners Installed 1 2
Humidifier Installed Ye s No
Humidifier Type Steam Bypass/Powered
Humidifier Control RH Control Frost Control
Humidifier Control Option
UV Light Installed None Ye s
ERV Installed None Ye s
Comfort
Enable Dehumidification Disable Enable
Dehumidification Overcooling Limit - Degrees 0 1 2 3
Control Response Rate Normal Fast
Aggressive Recovery > 2° Setpoint Change Disable Enable
Heating Aggressive Recovery Disable
Heating Aggressive Recovery - Outdoor Temperature 0 to 70
Comm Air Cleaner
Discovered
Humidify with
Active Heat Call
Air Cleaner Media Filter
Humidify without
Active Heat Call
18 18-HD64D1-1
Page 19

Warm Air Discharge Disable Enable
Airflow
VS Blower On Delay - Cooling No Delay
1 Minute @ 50%, 7.5 Minutes @ 80%
1 Minute @ 50%, 4 Minutes @ 80%
7.5 Minutes @ 80%
4 Minutes @ 80%
1 Minute @ 50%
30 Seconds @ 35%
VS Blower Off Delay - Cooling No Delay
1.5 Minutes @ 100%
45 Seconds @ 100%
30 Seconds @ 50%
1.5 Minutes @ 50%
3 Minutes @ 50%
30 seconds @ 35%
VS Blower On Delay - Compressor Heating No Delay
1 Minute @ 50%, 7.5 Minutes @ 80%
1 Minute @ 50%, 4 Minutes @ 80%
7.5 Minutes @ 80%
4 Minutes @ 80%
1 Minute @ 50%
30 Seconds @ 35%
VS Blower Off Delay - Compressor Heating No Delay
1.5 Minutes @ 100%
45 Seconds @ 100%
30 Seconds @ 50%
1.5 Minutes @ 50%
3 Minutes @ 50%
30 seconds @ 35%
Non VS Blower On Delay - Cooling (Seconds) No Delay 15 30 90
Non VS Blower Off Delay - Cooling No Delay 30 60 90
Non VS Blower On Delay - Compressor Heating No Delay 15 30
Non VS Blower Off Delay - Compressor Heating No Delay 30 60 90
Hydronic Heat Blower On Delay No Delay 30 60
Hydronic Heat Blower Off Delay No Delay 30 60 90
Compressor Low Stage Air Flow % - Cooling 35-60 55-80
Compressor Low Stage Air Flow % - Compressor Heating 35-60 55-80
Lockouts
Compressor Heating Lockout Disable Enable
Compressor Lockout - Outdoor Temperature 5 - 70
Auxiliary Heat Lockout Disable Enable
Auxiliary Heat Lockout - Outdoor Temperature 40 -70
Defrost Heater Balance Point (W1) Disable Enable
Defrost Heater Balance Point (W1) - Outdoor Temperature 40 - 55
Defrost Heater Balance Point (W2) Disable Enable
Defrost Heater Balance Point (W2) - Outdoor Temperature 5 - 55
Defrost Heater Balance Point (W3) Disable Enable
Defrost Heater Balance Point (W3) - Outdoor Temperature 5 - 55
Compressor Cooling 1st Stage Lockout Disable Enable
Compressor Cooling 1st Stage Lockout - Outdoor Temperature 80 - 120
Compressor Heating 1st Stage Lockout Disable Enable
Compressor Heating 1st Stage Lockout - Outdoor Temperature 0 - 50
Furnace Heating 1st Stage Lockout Disable Enable
Furnace Heating 1st Stage Lockout - Outdoor Temperature 0 - 50
18-HD64D1-1 19
Page 20

6200 Troup Highway
Tyler, TX 75707
© 2011 Trane
The manufacturer has a policy of continuous product and product data improvement and it reserves the right to change design and specifications without notice.
Representative-only illustrations included in this document.
 Loading...