

Page 1

User Guide
© Trance Audio, Inc., U.S.A.
Page 2

!
2!
THE AMULET M™
Dual-Mono Guitar Pickup System User Guide
© 2012-2013 Trance Audio, Inc.™ All Rights Reserved
Trance Audio, Inc., P.O. Box 256, Santa Cruz, CA 95061
Tel: (831) 688-9699 email: info@tranceaudio.com | www.tranceaudio.com
Warranty
This warranty covers all defects in materials and workmanship for a period of one
year from the date of purchase by the original owner. Cases may arise where our
Service Department or one of Trance Audio's authorized service centers will ask
for a copy of your sales receipt to facilitate warranty service. Please keep your
purchase receipt in a safe place.
Trance Audio™ does not cover:
• Damages due to improper or inadequate maintenance, accident, abuse,
misuse, alteration, unauthorized repairs, tampering, or failure to follow normal
operating procedures as outlined in the owner’s manual. • Deterioration or
damage of the cabinet. • Damages occurring during any shipment of the product
for any reason. • Any product that has been modified by anyone other than
Trance Audio, Inc.
Limitation of Implied Warranties
No warranty is expressed or implied. Trance Audio specifically disclaims the
implied warranties of merchantability and fitness for a particular purpose.
Exclusion of Certain Damages
Trance Audio’s liability for a product found defective is limited to repair or
replacement of the unit, at our option. In no event shall Trance Audio be liable for
damages based on inconvenience, whether incidental or consequential, loss of
use of the unit, loss of time, interrupted operation or commercial loss, or any
other consequential damages.
Some states do not allow limitation of the duration of implied warranties or the
exclusion or limitation of incidental or consequential damages, so the above
limitations and exclusions may not apply to you.
How To Obtain Warranty Service
All Trance Audio products are manufactured with the highest standards of
quality. If you find that your transducer or preamp does require service, it may be
done by an authorized Trance Audio service center. Please contact Trance Audio
at (831) 688-9699. We will either refer you to an authorized service center or ask
that you return your transducer or preamp to the factory. When returning a
product to the factory, you will be issued a Return Authorization number. Please
label all cartons, shipping documents and correspondence with this number.
CAUTION
Trance Audio recommends that Acoustic Lens™ and Amulet M™
installation be done by a professional luthier or guitar repair technician.
Installers: Please read the following instructions carefully, and
please contact us by phone or email with any questions. We will not
be responsible for any damage to the guitar or personal injury
resulting from installation of this product.
Page 3

!
3!
First of all, thank you for purchasing what we feel is the finest acoustic
guitar pickup system available today. As you use your Amulet M, we're
quite sure you'll feel the same way.
The heart of the Amulet M is the Acoustic Lens™ pickups. Our Acoustic
Lens pickups deliver crispness and accuracy, coupled with incredible
warmth and presence. The Amulet M’s preamp perfectly complements
this incredible transducer. Super-wide dynamic range, low distortion and
low noise were the primary design goals behind the Amulet M preamp.
Dual pickups allow you to adjust the bass and treble balance of your
guitar without using any EQ whatsoever. The Amulet M system lets you
hear your acoustic guitar as you've never heard it before.
The on-board Dual Mono preamp is designed to perfectly complement
the Acoustic Lens' unique requirements and to amplify the low level
signals from the pickups as soon as possible. The signal that leaves your
guitar through the endpin jack is high level, low impedance, and most of
all, high quality. Power is provided by an on-board 9-volt battery with
more than 100 hours of battery life available. The output signal
presented to your mixer or power amp is the true sound of your guitar, in
microscopic wondrous detail. From here, the signal can be routed to a
mixer, effect unit or power amplifier, and then to a high quality speaker
system.
Our goal at Trance Audio is to further state-of-the-art, acoustic guitar
music. The Amulet M series provides the true sound of your acoustic
guitar and is designed to interface easily with any audio device.
The Amulet M™ consists of:
• Acoustic Lens™ Transducers (pair)
• Dual Mono Preamp/Endpin (installed inside the guitar)
• Battery bag with Battery clip
The Amulet M-V™ adds:
• Soundhole-mounted Volume Control and battery indicator
(with cable)
The Amulet M-VT™ adds:
• Soundhole-mounted Volume/Tone control with battery
(with cable)
Page 4
!
4!
Page 5

!
5!
DUAL MONO PREAMP FEATURES
Amulet M™
The Amulet M utilizes our newly-designed Acoustic Engine™
technology, providing each transducer with its own extremely low noise
preamp, and providing the ability to easily balance between the two
transducers to get the exact response desired from your instrument.
These signals are combined to a monaural signal, and buffered to
produce a hum and noise-free signal at the endpin jack that’s ready to
plug into any system. This allows you to get the maximum dynamic
range and lowest noise possible from the transducers to produce a clear,
defined sound that easily captures the nuances and dynamics of your
performance.
BUILT-IN LOW CUT FILTER
The Amulet M system includes our high quality low cut filter built into its
circuitry. This filter eliminates any subsonic information below 40 Hz that
might cause noise or distortion in your amplification rig. This filter has
been carefully engineered to leave the low end response of your guitar
intact, even when tuned to far below normal pitch.
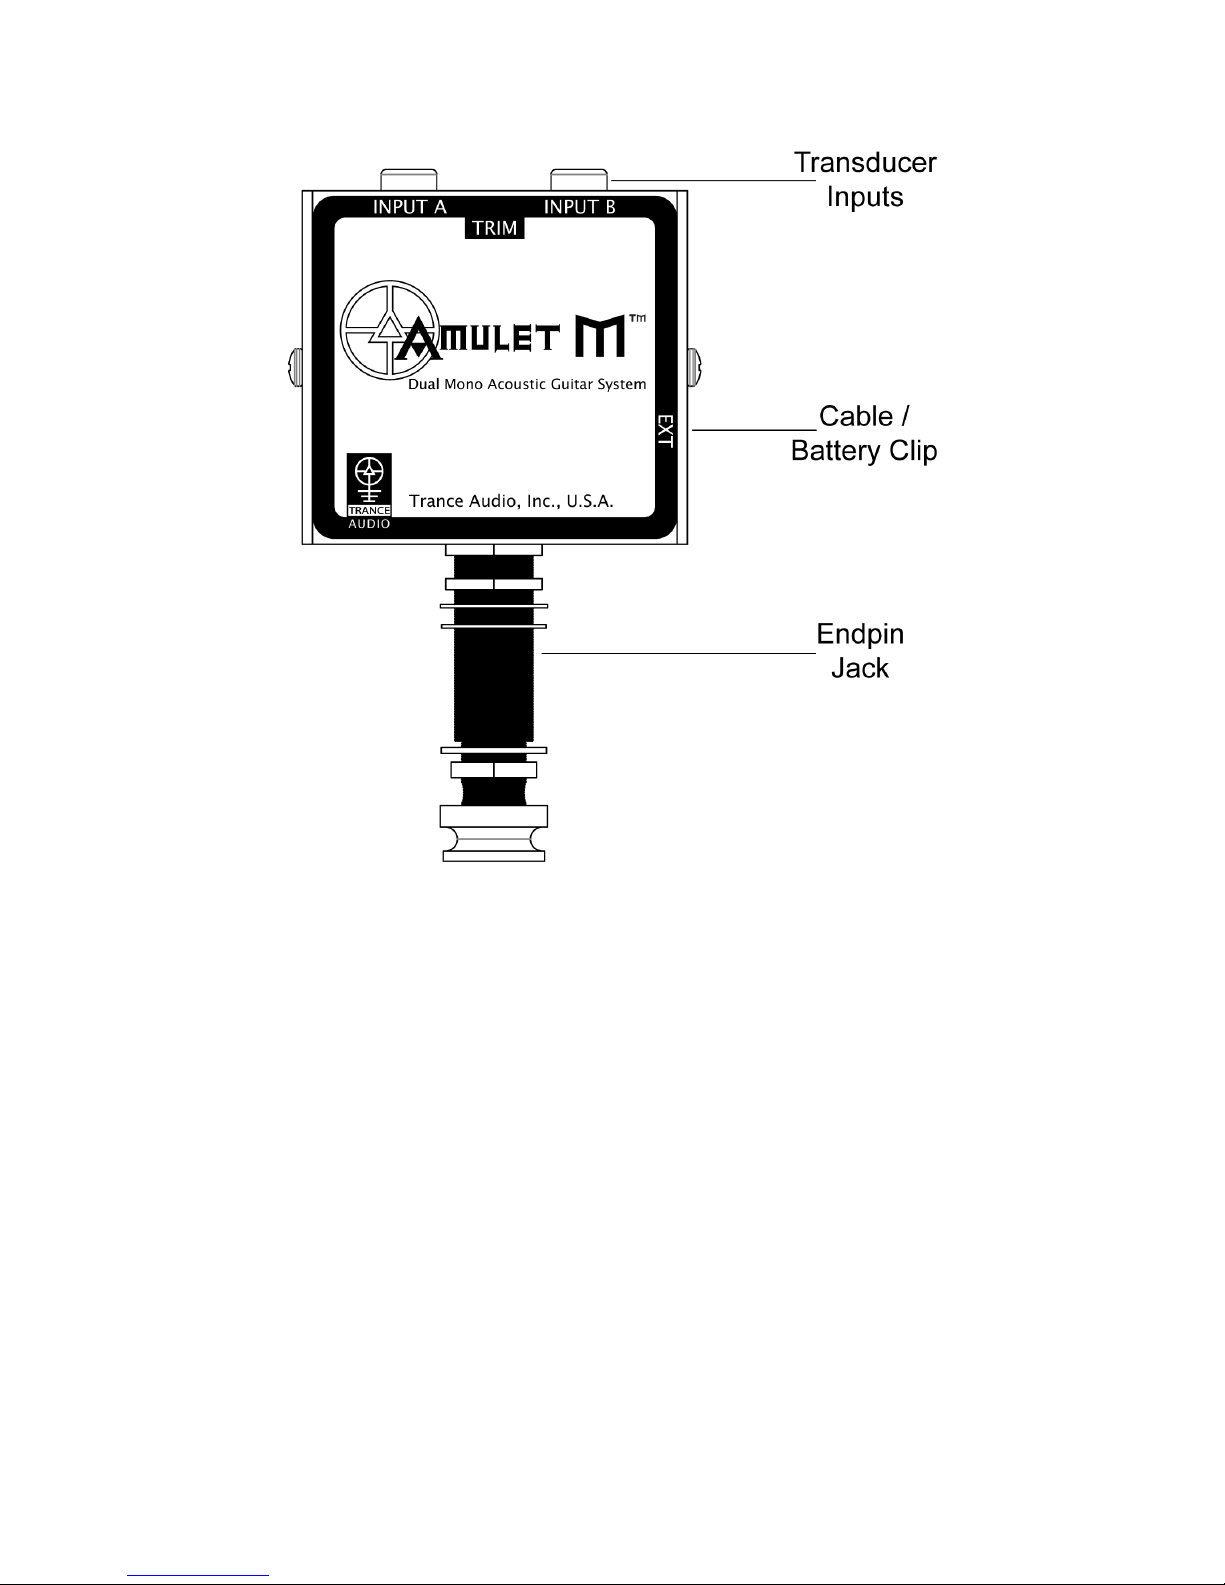
ENDPIN JACK
The endpin jack serves as the audio output of the system, the power
on/off switch, and also as the strap button where you can secure the
back of the strap for your instrument. A high-quality Switchcraft jack is
used to insure a long and trouble-free performance. The endpin jack
connects your instrument via a standard ¼” MONO guitar cable to your
amplifier, external effects device or mixer. It also serves as the on/off
switch for the system, so be sure to unplug the cable when not in use to
preserve battery life.
NOTE: Use of a STEREO ¼” cable (sometimes called a TRS
connector) will not allow the system to properly power up, and
must be avoided.
Page 6
!
6!
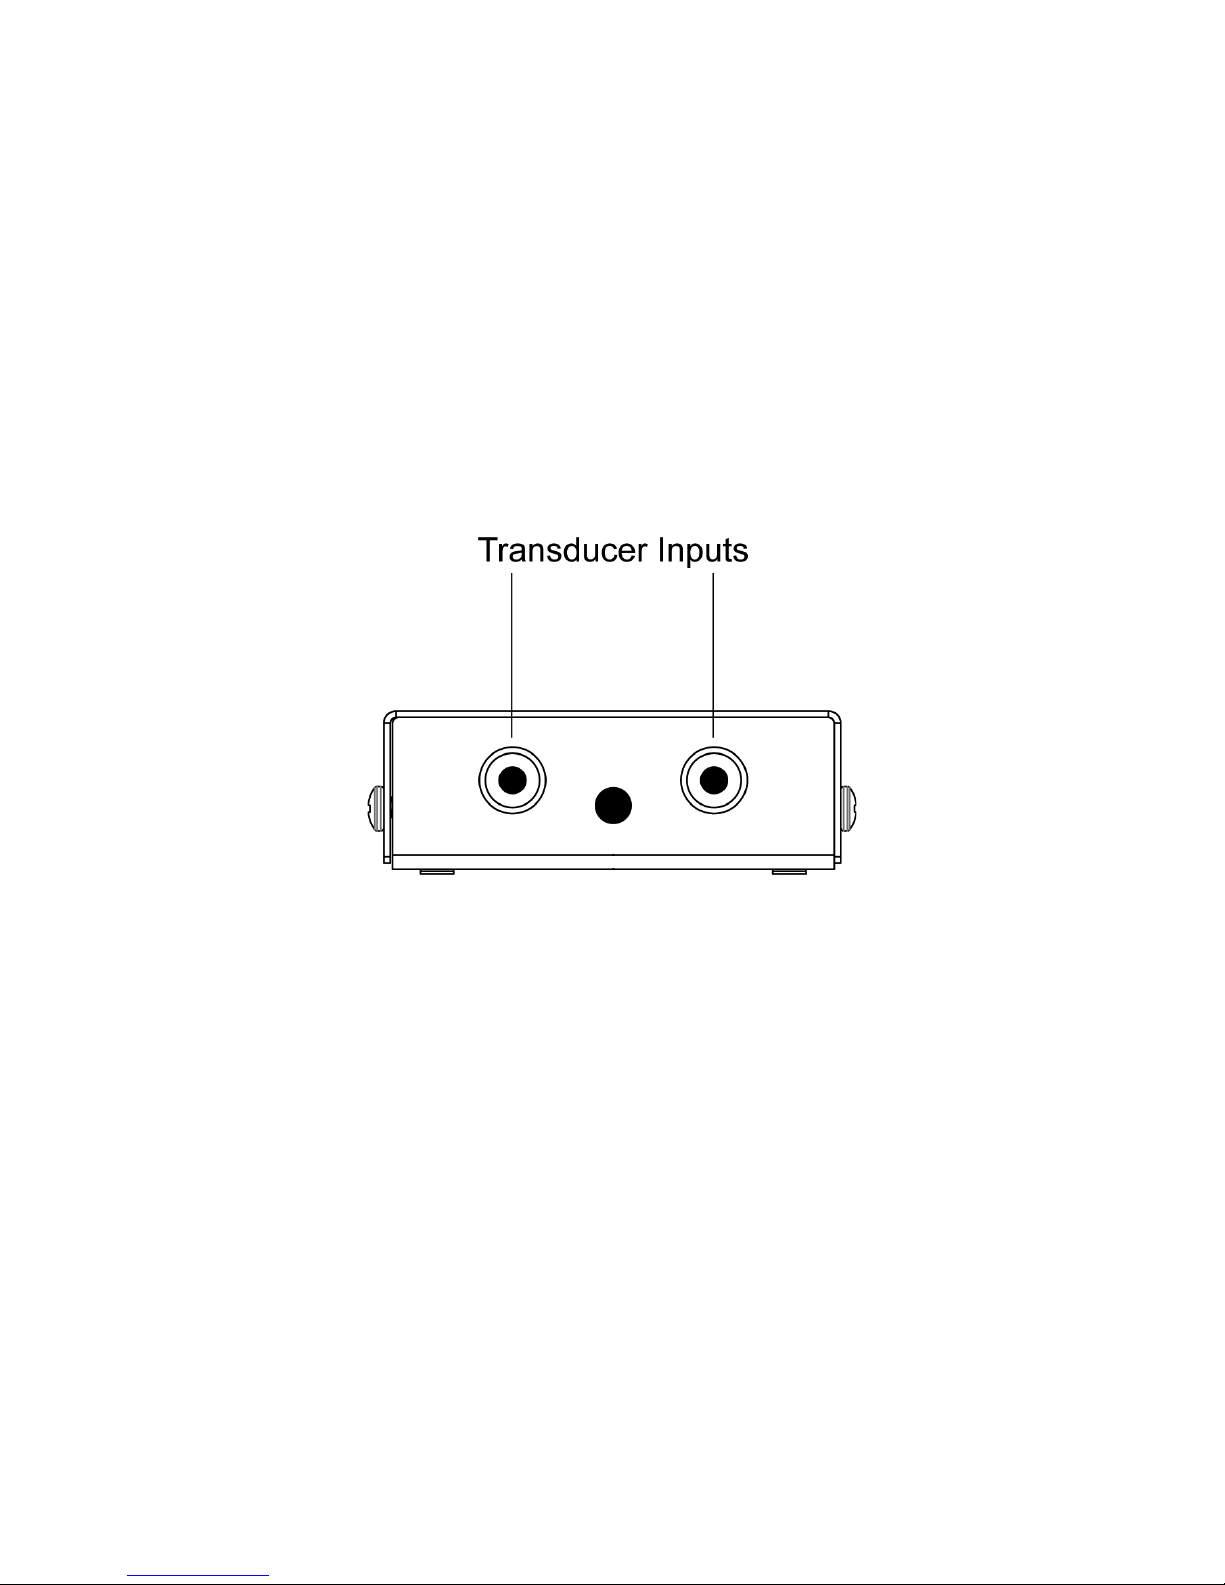
TRANSDUCER INPUTS:
INPUT A
This input typically has the Bass side Acoustic Lens™ transducer
plugged into it in most installations. Its gain is variable, and can be set
using the TRIM potentiometer, located between the Input A and Input B
jacks.
INPUT B
This input typically has the Treble side Acoustic Lens transducer plugged
into it in most applications. Its gain is fixed, and is not affected by the
TRIM control.
Note: The frequency response of the INPUT A and INPUT B
preamplifiers is identical, and the Bass and Treble side Acoustic
Lenses can be plugged into either one with no change in
performance, if so desired. Both input jacks have a shorting
design and will not produce hum or buzz if nothing is plugged in.
Page 7

!
7!
TRIM Control
The TRIM control is accessible through the hole located between the
INPUT A and INPUT B jacks. This control can be adjusted using a small
flat-bladed screwdriver or a #1 size Phillips head screwdriver. Its location
allows it to be adjusted using a long screwdriver through the soundhole
of the instrument, if you don’t wish to remove the electronics.
Like any regular volume control, it has mechanical stops at each
end of the rotation, so take care when adjusting not to try to force it
past its limits, or you will damage it.
The TRIM control affects the gain of the INPUT A preamplifier ONLY, so
it essentially acts as a balance control for the system. Turning the control
to the left (CCW) increases the gain of the INPUT A preamplifier, and
makes the Bass side Acoustic Lens louder in the mix. Turning the control
to the right (CW) decreases the gain of the INPUT A preamplifier, making
the INPUT B Acoustic Lens louder in the mix. Careful adjustment will
allow you to tune in the exact balance between the bass and treble
strings of your instrument. The adjustment range is typically +/- 3dB,
wide enough to accommodate any desired balance. This is a “set and
forget“ type control, so once the proper balance is found, it will usually
not require any further adjustment.
Page 8

!
8!
EXT (Cable/Battery Clip)
The EXT connector allows you to interface your AMULET M system to a
variety of controls designed to fit your particular working style. The
available options are:
AMULET M This option allows for a no-frills setup that provides just the
battery connections to a 9-volt battery. This provides a plug-and play
system with no onboard controls to worry about.
AMULET M-V This option provides a soundhole-mounted volume
control thumbwheel, and an integrated low battery warning LED
indicator. This allows you to set the volume of your guitar from your
instrument, and make on-the fly changes during performance. When the
thumbwheel is rotated to the right (towards the bridge) the volume is
increased. When rotated to the left (towards the neck) the volume is
gradually reduced, until it is completely muted at the full left position. The
volume control is specially tapered to give you a smooth range of gain
control. It’s always a good idea to lower the volume all the way when
plugging or unplugging your guitar cord in order to protect your speakers.
Page 9

!
9!
NOTE: These descriptions of the way the controls operate are
based on having the controls mounted on the right side of the
soundhole, so they are visible to the right-handed player. The
controls can also be mounted on the left side of the soundhole if
desired, and doing so will reverse the positions of the controls,
as well as their operation (i.e. rotating the volume thumbwheel
towards the neck on this type of installation will increase the
volume).
The LED battery indicator will glow very dimly during operation, and
when the battery voltage drops to the point where it needs to be
replaced, the LED will flash brightly at 1 second intervals, alerting you
that you have a few hours or so to replace the battery without
compromising the audio performance of the system. The system will
operate at peak performance for 100+ hours (with a standard alkaline
battery) before the battery needs to be changed.
AMULET M-VT This option includes all the features of the AMULET M-V
option, and adds a tone control thumbwheel as well. When rotated
completely to the right (towards the bridge) the control allows the full
range sound of the transducers to come through. When rotated to the left
(towards the neck of the instrument) the upper frequencies are gradually
reduced, allowing you to make any desired tonal mix right from your
instrument. The thumbwheel control is designed to make subtle changes
to the upper frequencies for the first half of the rotation to allow for more
precise control, and makes increasingly larger changes for deeper
sculpting of the tone in the second half of the rotation.
NOTE: When you unplug the cable from an M-V or M-VT
system, you will notice that the LED battery indicator will blink for
a few seconds after being unplugged. This is normal, and shows
that the voltages inside are powering down and the system is
shutting off. It is recommended that you make sure that the
volume thumbwheel is set to a lower (or off) position when
plugging into an amplifier and then adjusting to the desired level
to avoid any unpleasant surprises.
Page 10

!
10!
Installing Your Amulet M System
Pick a clear workbench-type place to work on your guitar to install the
transducers and system. Make sure the work surface is clean, well-lit
and preferably padded to help avoid scratching or damaging the finish of
your instrument while working on it.
Please see the Acoustic Lens installation Guide online at
http://tranceaudio.com/manuals/TranceTemplateInstall.pdf
for details on pickup placement.
The Acoustic Lens pickup leads are long enough to allow them to
connect to the preamp outside of the instrument while the guitar is on the
bench during the initial setup of the system. This can really come in
handy, allowing you to easily try different placements of the pickups to
get the proper string balance and tone while plugging and unplugging the
pickups from the preamp. This can often be more difficult to do if the
preamp is already installed inside the guitar. This also makes for an easy
final adjustment of the TRIM control once you have the pickups properly
positioned, and the guitar strung up and tuned. Once the preamp is
installed, you can still reach the TRIM adjustment with a long
screwdriver, but you usually have to loosen at least the middle strings to
get soundhole access, and it’s more difficult (but not impossible) to find
the trimmer location hole with the preamp inside the instrument.
Once you’ve positioned the Lenses for your listening evaluation, you can
feed the pickup leads through the endpin hole in the bottom of the guitar.
An easy way to do this is to tape the pickup connector to an old guitar
string that's been fed through the endpin hole, then pull it back through,
taking care not to scratch your instrument.
Once you’ve got the pickups installed where you want them on your
instrument, and the balance adjusted with the TRIM control, you can
finish installing the Amulet M preamp inside your instrument.
Page 11

!
11!
The Amulet M can be installed to accommodate having the
Thumbwheel Controls on either side of the soundhole. This allows
setup for either right or left handed players, or allows you to make the
choice to have the controls visible to you while you’re playing (allowing
you to, for example, place favorite settings markers or dots on the
Thumbwheels), or hidden from view on the opposite side of the
soundhole.
The Amulet M preamp should be installed in the instrument with the EXT
jack facing the side of the guitar where the Thumbwheel Controls are
going to be installed.
NOTE : The cable that connects to the EXT jack has a keyed design
so that it only plugs in correctly with the plug oriented in ONE
DIRECTION. If you look at the side of the small black plugs on the
connector cable, you will see a small ridge on either side of the plug,
closer to one side than the other. If you look closely at the connector
(either the Amulet M EXT jack or the connector on the soundhole
Thumbwheel controls) that it plugs into, you’ll see a slot cut into each
side, that will mate with the ridges on the connector, but ONLY WHEN IT
IS PLUGGED IN CORRECTLY. This is called a polarized connector, and
it insures that all of the cable wires get hooked up correctly during
installation. Make sure the two are lined up correctly, and don’t try to
force the plug in. If it won’t go, this would be the probable reason!
Page 12

!
12!
For installation of the system with no controls (battery clip only)
install the Amulet M preamp so that the EXT jack will be facing down
while the instrument is being played. This assures that the battery bag
and battery will safely sit at the bottom side of the instrument while
playing. For Amulet M-V or M-VT systems, install the battery bag on or
near the neck block for easy battery access.
You can place the assembled system on top of the guitar to figure out
where the best locations would be for the cable clip(s) along the side of
the instrument with the Thumbwheel Controls installed (cover the top
with a T-shirt or other soft cloth to prevent finish scratches).
Make sure that the cable will be held securely between the controls and
the preamp so it won’t be rattling against the side, back or top of the
guitar (which would be picked up and amplified), but still has enough
slack to make sure that the connections stay secure and are not pulled
loose. The volume board connector cable uses the larger adhesive “C”
clips, which are shipped already attached to the cable. During the
installation process, you can decide on the adhesive locations inside the
guitar for these clips, and whether you will use one or both of the
supplied large “C” clips.
The system is also supplied with a single smaller “C” clip. This clip
is used to hold the excess pickup cables securely inside the guitar after
the installation is complete, and keep them from rattling around during
your performance. An excellent way to accomplish this is to tie both
cables together in a loose single knot, and clip the bottom part of this
loop into the small clamp which is stuck to the middle of the back of the
guitar, about halfway between the bridgeplate and the preamp. You can
adjust the size of this loose loop/knot to take up any extra cable slack
and keep the pickup wires secure.
Page 13

!
13!
It is very important to prepare the surface of the guitar in any spot
where you are going to apply adhesives, whether it is the Velcro
patch used for the battery bag, the stick on cable holders, the
volume control board or the pickups themselves. The surfaces inside
a guitar collect dust and dirt, and the process of finishing a guitar will
often leave behind sawdust as well as lacquer or other types of spray.
After deciding where the adhesive parts are going to be placed, prepare
these surfaces by lightly sanding them with 100 grit sandpaper on a
small sanding block to remove any surface contamination. Blow out any
dust using compressed air if possible, and wipe these surfaces with a
small clean cloth that has been very lightly moistened with Windex to
pick up any remainder. Let these areas dry completely (at least a half an
hour) before applying the adhesive items. Not cleaning and preparing the
surface will cause premature failure of the adhesive.
Once the "C" clips are placed, install the preamp with the pickups
plugged in and the cable attached to the EXT jack. After tightening the
endpin jack correctly, attach the other end of the cable to the Volume
Control board (if applicable) and install it properly at the edge of the
soundhole with the thumbwheels extending enough to allow for easy
access while playing. Be sure that it is firmly adhered along the entire
length of the adhesive strip and press it in place for a minute or so to
allow it to bond securely. Finally, clip the cable into the "C" clips along
the side and adjust the cable so it is held securely without placing excess
tension on the EXT jack or the volume board assembly.
When installing the Thumbwheel Controls in the soundhole, it is not
only very important to properly clean the area where it will be installed,
but also be sure to pick an area where the entire adhesive surface of the
controls can be securely attached. Most guitars will have enough free
area around the soundhole to accomplish this*, but if a brace is blocking
the area, then have your luthier or repair person see about making and
attaching a same-thickness shim to properly extend the area where the
controls can be attached. If the adhesive is only partly attached to a flat
surface, it will be much more likely to come loose at some point.
*Note:
the Thumbwheel Volume Control board dimensions are .5" x 1.25";
the Thumbwheel Volume/Tone Control board dimensions are .5" x 2"
Page 14

!
14!
Installing Your Amulet M Preamp/Endpin
PLEASE NOTE: For installation of the Amulet M endpin jack, the endpin
jack hole needs to be a standard size of 1/2”. If your instrument does not
already have an endpin jack hole, this must be performed by a
professional luthier or an experienced guitar repair technician as damage
to your guitar can result if done incorrectly.
The Amulet M's endpin can accommodate an endblock depth up to 7/8".
This isn't an issue for most modern guitars, but some older instruments
may have thicker endblocks. If needed, you can check the endblock
depth yourself. While looking in the endblock hole, insert a piece of stiff
but flexible wire of any sort (like an old guitar string) and look to see
when it reaches the inside end of the endblock. Mark the part of the wire
that is flush with the outside the endblock hole with a marker or a piece
of tape, or bend it at a right angle to the body of the guitar so when you
remove the wire from the endblock hole, you can clearly see the depth
and measure with it with a ruler. If you find your endblock is thicker than
7/8", Trance Audio can supply you with a specially-designed preamp with
an externally wired endpin that can accommodate an endblock up to
1 1/32" depth. Please contact us for details and cost. If your endblock is
thicker than 1 1/32", you will need to contact a luthier to get the endblock
internally counterbored to an appropriate depth.
Page 15

!
15!
Remove the Strap Nut, the Small Hex Nut and the Small Flat Washer
from the AMULET M endpin assembly.
Insert the endpin assembly through the endblock hole, making sure not
to allow the washers to fall off. The EXT connector on the side should be
oriented to the side where the thumbwheel controls (or the battery bag
for the no controls system) will be mounted.
Adjust the Large Hex Nut so the larger threads are about 1⁄16" shy of the
outside of the endblock.
Thread the Small flat Washer and Small Hex Nut, then insert a 3⁄32" (2.3
mm) or smaller diameter shaft through the small cross-drilled holes at the
front of the endpin shaft (a small screwdriver or drill bit should work well
for this). Make a note of the position of these holes when the preamp is
oriented correctly inside the guitar. You will keep them in this position as
you tighten the outer nut, so the preamp will stay properly oriented when
you are finished.
DO NOT hold the Amulet M enclosure to secure the endpin while
tightening the nut instead of using the small screwdriver or other
small shaft through the cross-drilled holes. This will damage the
Amulet M and void the warranty.
Tighten the nut with a 1/2" open end wrench while you hold the jack in
place and keep it and the preamp from turning with the small
screwdriver, drill bit, etc.
Install and hand tighten the Strap Nut.
Note: When properly installed, the end of the jack will be flush or slightly
ahead of the strap nut, so when a plug is inserted, it will snap securely in
place. If the end of the jack is recessed too much, the cable plug will not
engage properly, and may even fall out. Adjust the Large Hex Nut to
achieve a proper fit of the Strap Nut when installed.
Page 16

!
16!
Changing/installing the Battery
The Amulet M uses a standard 9-volt alkaline battery. Always make sure
that your guitar cable is unplugged from the endpin jack before
attempting to change the battery. Once a new battery is attached to the
battery cable, make sure it is secured in the battery bag with the Velcro
closure securely fastened, so it won’t come loose inside the instrument
while performing.
CONNECTING TO A MIXER
When you connect the Amulet to a high quality sound system, you gain
several benefits.
First, you have additional tone controls, which allows you to “fine tune”
your sound and allows you to position your sound in the stereo field. Yet
another benefit of using a mixer is that you can connect effects devices
to the mixer using the effects send and returns. This keeps the original
signal path pure and as short as possible, and helps keep any noise
generated by the effects to a minimum.
Remember that the sound system you plug into is just as important a link
in the chain as anything else (maybe more!). The flatter and wider the
frequency response, the better your Amulet M equipped guitar will
sound. Typical electric guitar amps have a poor frequency response for
acoustics, and should be avoided. Even some so-called acoustic amps
can have less than ideal performance, so be sure to shop around if
possible and select a system that works for you.
Page 17

!
17!
Installation of the Amulet M with battery clip and battery bag
Page 18

!
18!
Installation of the Amulet M-VT (or M-V) with cable
and soundhole-mounted controls
NOTE: CONTROLS MAY BE MOUNTED ON EITHER SIDE OF THE
SOUNDHOLE
Page 19

Page 20

!
1!
Trance Audio, Inc.
Tel: (831) 688-9699 email: info@tranceaudio.com | www.tranceaudio.com
Facebook: www.facebook.com/tranceaudio Twitter: @TranceAudioInc!
 Loading...