

Page 1
The$Amulet$M$Phantom$
The Amulet M Phantom™ has new features as well
as the ability to be powered via phantom power. To
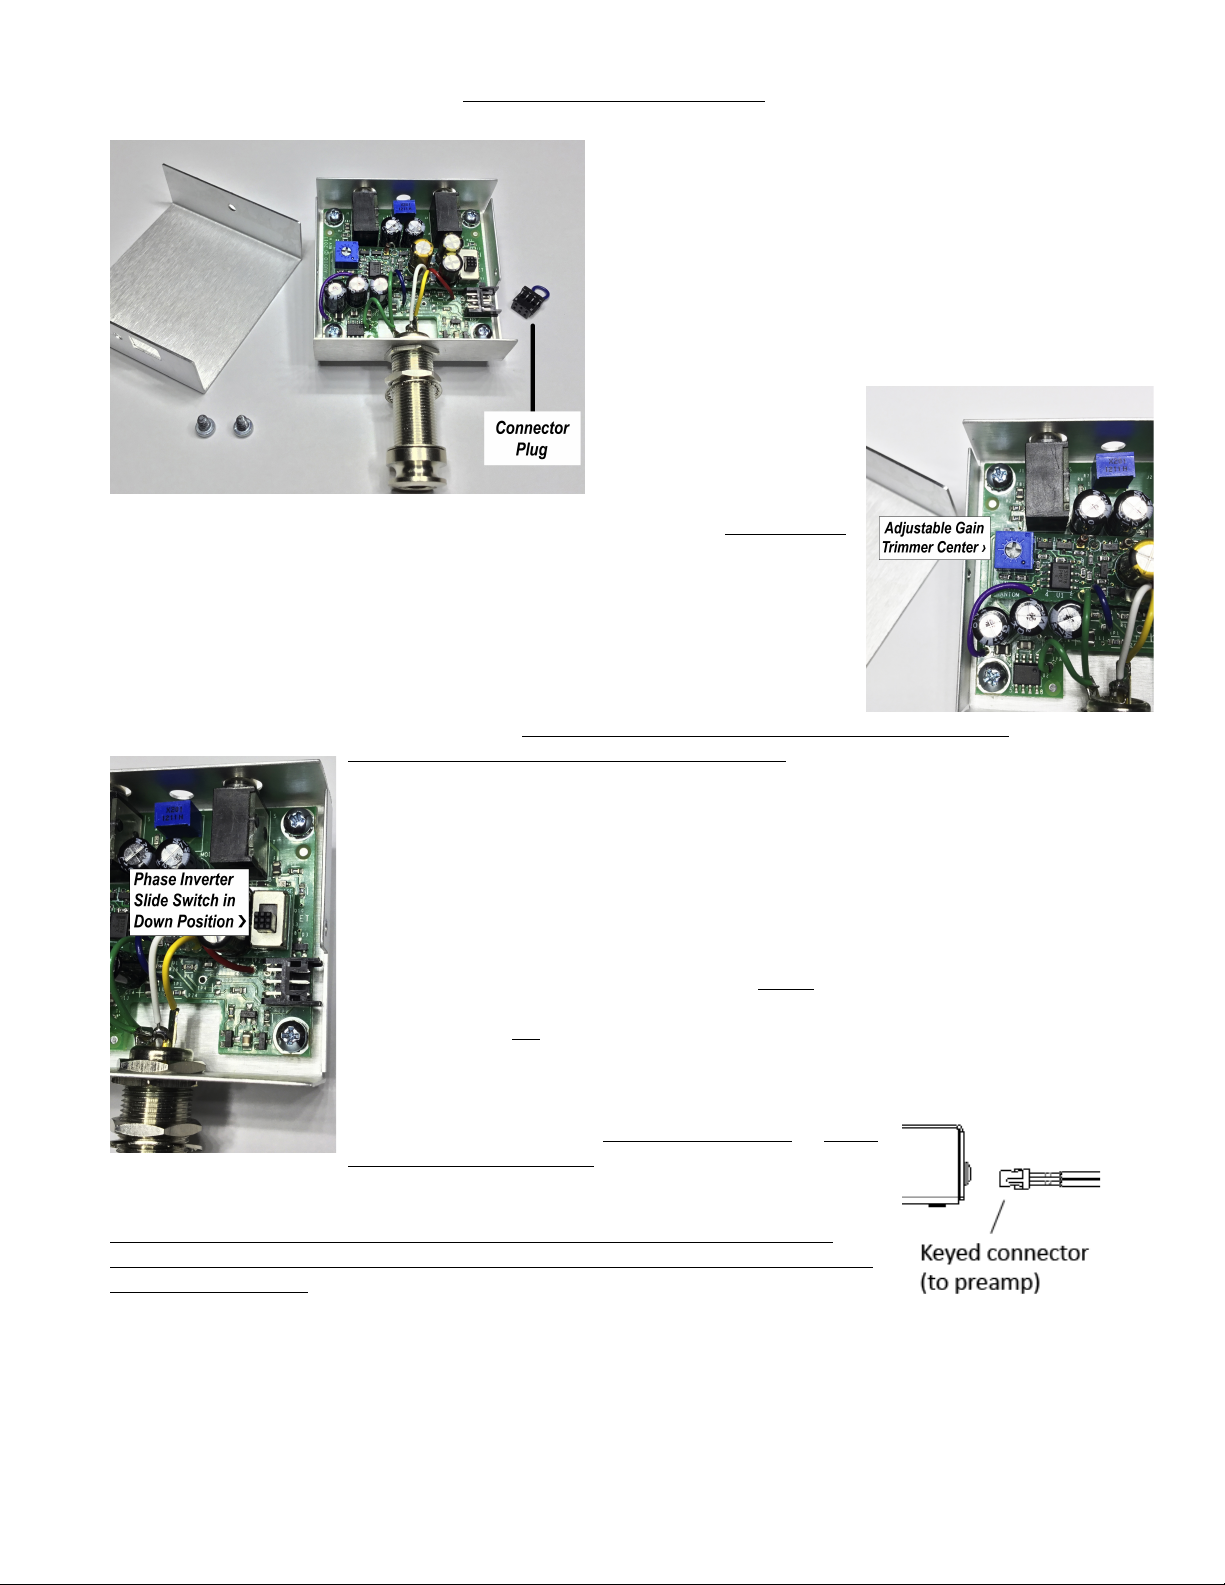
access these new features, unplug the keyed
Connector Plug on the side of the preamp, then
remove the two screws on the sides of the preamp
and remove the lid. Here you will find the new Gain
Trimmer and Phase Switch.
The Gain Trimmer allows you to vary the overall
gain of the preamp plus and minus 14dB. This allows
you to set the output to
precisely match your
amplifier or signal chain,
and also enables you to
match output levels
between multiple instruments. This trimmer, combined with the Trim Control
located between the two transducer inputs (see P.7 of your Amulet M User
Guide for more info) gives a wide range of customizable adjustment.
The Gain Trimmer can be adjusted with a small flat-bladed screwdriver or
a #1 size Phillips head screwdriver. When this Gain Trimmer is set to the
center of its rotation, the output is the same as a standard Amulet M
system. The gain increases as the trimmer is rotated clockwise, and
decreases with counterclockwise rotation. Be careful not to force the trimmer past the built in
mechanical stops at each end of the rotation.
The Phase Switch is an internal slide switch that allows you to invert the
phase of your signal, so you can perfectly match any additional pickups you
might use with your instrument in a multi-system setup. This can also be used
to help to increase gain before feedback in difficult monitoring situations.
Make sure when setting the Phase Switch that it is set completely to one side
or the other. If the switch is set in the middle, then there will be no output from
the preamp. When the switch is set to the Down position (towards the endpin
jack) the output is in-phase, the same as a standard Amulet M system. Setting
the switch in the Up position (towards the transducer input jacks) will set the
preamp output out-of-phase.
The small EXT Jack on the side of the preamp is
where the controls for the M-V volume control or M-VT
volume and tone controls are connected. If you are
using the system with no controls, you must insert the special Connector
Plug in this jack, or else there will be no sound from the system. (NOTE :
The Connector Plug and M-V/M-VT control cable that connects to the EXT
Jack has a keyed design so that it only plugs in correctly with the plug oriented
in ONE DIRECTION. If you look at the side of the small black plugs on the
connector cable, you will see a small ridge on either side of the plug, closer to
one side than the other. If you look closely at the connector (either the EXT
jack or the connector on the soundhole thumbwheel controls) that it plugs into,
you’ll see a slot cut into each side, that will mate with the ridges on the connector, but ONLY WHEN IT
IS PLUGGED IN CORRECTLY. This is called a polarized connector, and it ensures that all of the cable
wires get hooked up correctly during installation. Make sure the two are lined up correctly, and don’t try
to force the plug in. If it won’t go, this would be the probable reason!
!
Page 2

When you connect the M-V or M-VT controls be sure to use the new,
smaller single cable connector instead of the larger dual cable
connector that is used by the standard Amulet M systems. The clip on
the side of the Amulet M preamp (adjacent to the EXT Connector jack
where the cable plugs in) allows you to securely anchor the cable to the
preamp and prevent it from being pulled loose or disconnected by
vibration or cable routing problems.
Plug the cable into the keyed EXT jack, paying attention to the orientation. Gently make sure the plug is
inserted as far as it will go (the rear of it should be about even with the outside of the preamp), then
insert the cable into the clip on the side of the preamp, leaving a small loop of wire (as shown on P.14
of the Amulet M User Guide). This ensures that any cable tension will not pull or wiggle the plug loose
from the connector, which can cause intermittent (or no) operation of the system. (See P. 11-13 of the
Amulet M User Guide for additional info on installing the soundhole controls)
Using Phantom Power
Each Amulet M Phantom preamp has specific electronics designed to work with 48 volt phantom power
(it cannot be used with battery power). The Phantom preamp will not work with lower phantom power
voltages such as 24 or 12 volts. While this lower voltage might be useful for some types of small
microphones, it will not power the Amulet M Phantom correctly, so be sure and check the
manufacturer's info for any unit that you are considering for use with our system.
Most modern mixers have 48 volt phantom power built into their microphone preamp channels. This
means that you can plug the Amulet M Phantom directly into the mic input of your mixer, turn on 48V
phantom power and play. Some devices advertise phantom power capabilities, but actually have lower
phantom voltages which will not power our system, so be sure to carefully examine any manufacturers
literature for any device you are considering for this purpose. There are also instances where a device
may provide 48 volt phantom power, but at a much lower than usual current capability (just enough to
power a small microphone) and will not properly power our system. This is usually only the case with
very inexpensive gear.
If you're not using a mixer or other device that has the necessary 48 volt phantom power available,
there are a number of low-cost standalone phantom power supply units that are available from a variety
of sources. These typically have an input and output XLR connector, a connector for a plug in power
adapter, and internal electronics to supply phantom power.
A big advantage of this type of system is that you can treat the XLR output of a standalone phantom
power supply just as you would an active direct box; since the output is a balanced low impedance
signal, you can plug it directly into an XLR stage box or any other XLR input. If you need a standard
1/4" unbalanced output to interface to your amp, pedalboard, or other equipment, an inexpensive XLR
to 1/4" adapter can be used to easily provide this type of output.
Cable
The Amulet M Phantom uses a cable that has a stereo TRS 1/4" plug on one end, and a male XLR plug
on the other. This type of cable can be easily found at most music stores, or from online retailers. Make
sure you buy a good one; a cheap cable may have poor or intermittent connections at one or both ends
which can cause noise or pops in the audio. We offer an excellent cable from our Custom Shop, made
specifically for this application. It uses high quality Canare™ cable, and has a very rugged metal low
profile right angle TRS plug on the instrument end. This is the perfect type of connector as it allows you
to easily loop the cable through your strap, and its low profile keeps it out of the way as you move
around the stage or place your instrument in a stand. You can plug any standard microphone cable into
this cable to extend the length as desired, and the Amulet M Phantom balanced low impedance output
will keep your signal clean and interference-free.
Trance Audio, Inc. phone: (831)688-9699 email: info@tranceaudio.com
 Loading...