


Tranberg AS | P.O. Box 8033 | N-4068 Stavanger | Norway | Tel.: (47)51 57 89 00 | Fax.: (47)51 57 89 50
E-mail: info@tranberg.com | www.tranberg.com
Tranberg Systems | Hjulmagervej 15C | 7100 Vejle | Denmark | Tel.: (45) 75 85 83 80
E-mail: mail@tranbergsystems.com | www.tranbergsystems.com
TEF 9964
XENON HELIDECK FLOODLIGHT INDUSTRY
USER MANUAL
IMPORTANT
Read this instruction carefully before installing the
product
996A106032
TUM 1024 REV. E 06.02.14

TEF 9964 XENON HELIDECK FLOODLIGHT INDUSTRY USER MANUAL
INTRODUCTION
Thank you for purchasing this product!
For installation, maintenance and assurance of a long life
of this product, please follow this manual.
CONTENT IN BOX
The product is fully assembled, and ready for installation.
SAFETY PRECAUTIONS
Note that changes made to the product and/or installation
of components which do not conform to the approval,
may be a safety violation. The manufacturer will in no
circumstance be held responsible for such activity.
For your health and safety, always use safety gear suited
for the task. Be certain to follow codes, regulations and/or
specifi c procedures that are related to the installation.
TOOLS REQUIRED
Regular tools required for installation:
• 17 mm wrench –for assembling the fl oodlight.
• 13 mm wrench –for adjusting the angle of the light.
• 8 mm fl at screwdriver –for open/closing the cover of the
junction box.
• 3 mm fl at screwdriver –for installing the cable in the
terminal block.
• 5,5 mm fl at screwdriver –for removing the lamp insert.
• 32 mm wrench -to assembly the cable gland
• 30 mm wrench -to tighten the lock nut and the pressure
nut
MAINTENANCE INSTRUCTIONS
The luminaire should be inspected according to Company
routines. The manufacturer suggests regular check for
water intrusion/condensation which should be removed
immediately. Check the drain plug / drain hole function.
When cleaning, use only mild detergents. Alcohol or
petroleum based products may damage lens, paint or
plastic components.
RUBBER SEAL
Cable diameter Size Part No.
8,5 - 13,5mm Ø23/13x8mm 5002 0124
13 - 17mm Ø23/16x8mm 5002 0125
Be sure to install the cable in a way wich prevents water to penetrate into the enclosure through the cable gland,
also make sure to use the correct rubber seal when you install the luminaire
APPLICATIONS
• Floodlighting of helicopter landing areas
• For use safe area
• Floodlighting
APPROVALS
CSA
International, 216432
Canada
Complies with: CSA Standard C22.2 No 0-M91
CSA Standard C22.2 No 0.4-M1992
CSA Standard C22.2 No 43-M1984
CSA Standard C22.2 No 250.0-00
UL 1598-2000, First edition
UL 542-1999, Eight edition
UL 935-2001, Tenth edition

TEF 9964 XENON HELIDECK FLOODLIGHT INDUSTRY USER MANUAL
INSTALLATION INSTRUCTIONS
The fl oodlight should be installed according to the
calculated light distribution plan.
1.
The glass in front should
face the centre at the
helideck, unless stated
otherwise.
2.
Secure the fl oodlight to
the helideck by means
of four M10 bolts.
3.
Open the enclosure cover
on rear. Replace cable
gland gaskets as
required to match the cable
diameter. Unused cable
glands should always
be replaced with a blind plug.
4.
Connect cables and
replace the enclosure cover.
DIMENSIONS
5.
Luminaire housing shall be connected to earth potential by groundwire of min. crossection 2,5mm² / 14AWG

REPLACING XENON LIGHT BULB
Loosen clamps and remove front ring
Warning ! High voltage components inside lamp. Make sure to disconnect
power before opening.
Distance bracket
Distance bracket
Holding clip
Old version:
2. REMOVE HOLDING CLIP AND/OR DISTANCE
BRACKET
1. REMOVE FRONT RING
3. SLIDE OUT LAMP INSERT
New version:
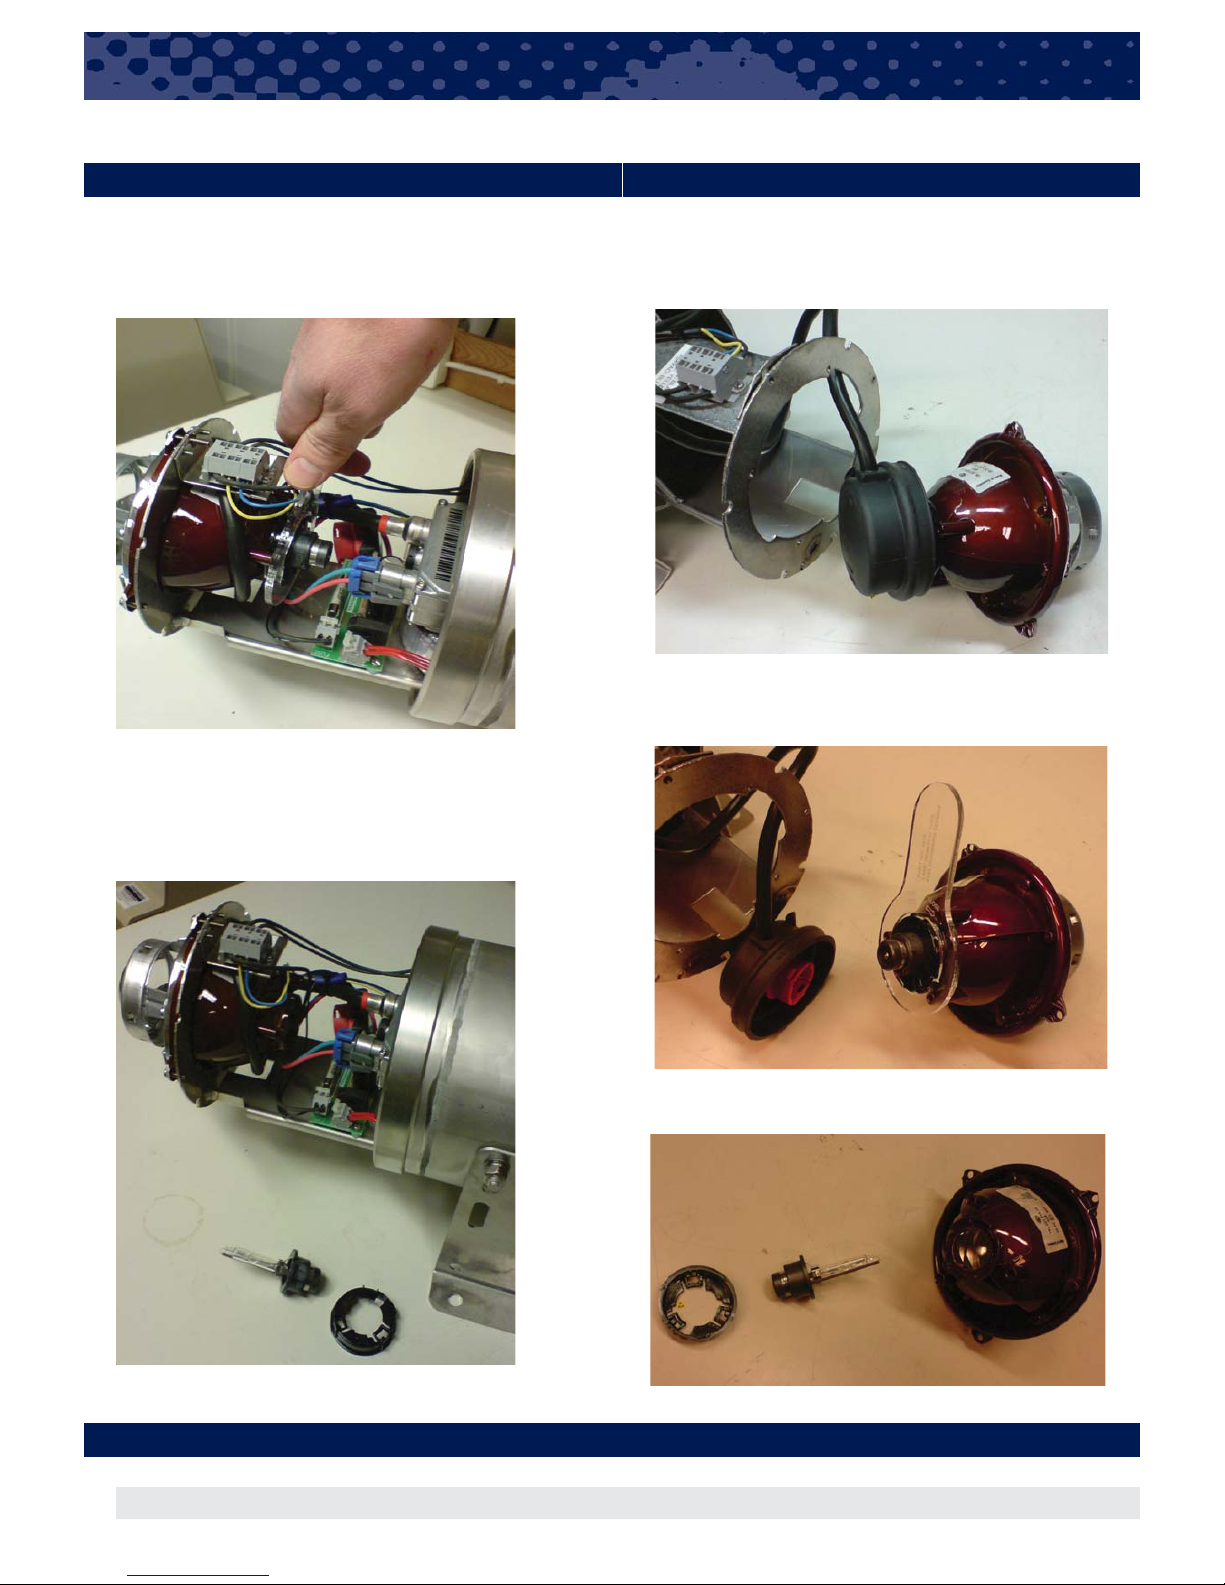
4a-1:
Disconnect the high voltage plug from the light bulb.
Position lamp removal tool over locking ring as shown
below. twist approx. 30 degrees anti-clockwise.
4a-2:
Remove xenon lamp
Xenon lamp
Locking ring
4b-1:
Disassemble the refl ector unit. 3 x M4 screws
Disconnect the hight voltage plug.
4b-2:
Position lamp removal tool over locking ring as shown
below. Twist approx. 30 degrees anti-clockwise.
4b-3:
Remove xenon lamp
Locking ring
Xenon lamp
4A. REMOVE LIGHT BULB, NEW VERSION 4B. REMOVE LIGHT BULB, OLD VERSION
Note: make sure the new xenon bulb is clean. Do not touch the glass part of the bulb.
Mount lamp back together in reversed order.
5. INSERT NEW XENON BULB

Tranberg AS | P.O. Box 8033 | N-4068 Stavanger | Norway | Tel.: (47)51 57 89 00 | Fax.: (47)51 57 89 50
E-mail: info@tranberg.com | www.tranberg.com
Tranberg Systems | Hjulmagervej 15C | 7100 Vejle | Denmark | Tel.: (45) 75 85 83 80
E-mail: mail@tranbergsystems.com | www.tranbergsystems.com
TEF 9964 XENON HELIDECK FLOODLIGHT INDUSTRY USER MANUAL
TECHNICAL DATA
Material: Acid proof stainless steel. Polycarbonate front glass.
Input voltage: 230/254 VAC 50/60Hz
110/120 VAC 50/60Hz
24 VDC
Power consumption: 50Watt
IP-rating without drain plug: IP 66/67 ( according to EN 60529)
IP-rating with drain plug: IP 66
Cable glands: 2 X M25, cable diam.: 8,5 - 13,5mm
13,0 - 17,0mm
Area of use: Safe area
Weight: 10 kg.
SPARE PARTS
Part No.
Xenon Lamp, D2S. 35W, For TEF 9964 9400074
Front Glass 3141
High Voltage Igniter Unit Xenon 9400103
Locknut for Xenon D2S 9400108
Transformer W/ Mounting Bracket for 9964, 230/254 VAC 4386
Transformer W/ Mounting Bracket for 9964, 110 VAC 4387
Rectifi er For 9964 Xenon Helideck Light 3069
Cable Gland E704/3C/M25, Cable diameter Ø8,5-13,5mm/ 13-17mm 6143915
Complete Insert for TEF 9964 230/254V 3173
Complete Insert for TEF 9964 110V 3249
Complete Insert for TEF 9964 24V 4210
Tool for Replacing Xenon Lamp in TEF 9964 Helideck Floodlight 4676
Tool for Helideck Lights 4627

Tranberg AS | P.O. Box 8033 | N-4068 Stavanger | Norway | Tel.: (47)51 57 89 00 | Fax.: (47)51 57 89 50
E-mail: info@tranberg.com | www.tranberg.com
Tranberg Systems | Hjulmagervej 15C | 7100 Vejle | Denmark | Tel.: (45) 75 85 83 80
E-mail: mail@tranbergsystems.com | www.tranbergsystems.com
 Loading...