

Page 1
OPERATORS MANUAL
TRAK-IT TOOL MODEL W3-21FRH / W3-34CDH
Page 2

2
INDEX
INHALTSVERZEICHNIS
INDEX
INHOUDSOPGAVE
INDICE
ENGLISH Page 3 to 24 Page
DEUTSCH Page 25 to 46 Page
FRANÇAIS Page 47 to 68 Page
NEDERLANDS
Page 69 to 90 Page
ESPAÑOL Page 91 to 112 Page
DEFINITIONS OF SIGNAL WORDS
WARNING: Indicates a potentially hazardous situation which, if not avoided, could result in death or serious injury.
CAUTION: Indicates a potentially hazardous situation which, if not avoided, may result in minor or moderate injury.
NOTE: Emphasizes essential information.
DEFINITIONEN DER HINWEISBEZEICHNUNGEN
ACHTUNG! Zeigt eine eventuell gefährliche Situation an, die den Tod oder schwere Verletzungen zur Folge haben
könnte, wenn sie nicht vermieden wird.
VORSICHT! Zeigt eine eventuell gefährliche Situation an, die leichte oder mittelschwere Verletzungen zur Folge
haben könnte, wenn sie nicht vermieden wird.
HINWEIS: Hebt wichtige Informationen hervor.
DÉFINITIONS DES DIFFÉRENTS DEGRÉS D’ AVERTISSEMENTS
AVERTISSEMENT Indique une situation éventuellement dangereuse qui, si elle n’est pas contournée, pourrait provoquer la
mort ou des blessure sérieuses.
ATTENTION Indique une situation éventuellement dangereuse qui, si elle n’est pas contournée, pourrait provoquer
des blessures légères à moyennement sérieuses.
REMARQUE Souligne des informations importantes.
BETEKENIS VAN GEBRUIKTE WOORDEN
!WAARSCHUWING: Betekent dat er een potentiële gevaarlijke situatie is indien de gegeven informatie niet wordt opgevolgd,
met mogelijk ernstig letsel met dodelijke afloop als gevolg.
!LET OP: Betekent dat er een potentiële gevaarlijke situatie is indien de gegeven informatie niet wordt opgevolgd,
met mogelijk persoonlijk letsel als gevolg.
OPMERKING: Betekent dat er belangrijke informatie is.
DEFINICIÓN DE LAS INDICACIONES DE ADVERTENCIA
¡
ATENCIÓN! Indica una situación potencialmente peligrosa que podría causar la muerte o graves lesiones si no se
evita.
¡
PRECAUCIÓN! Indica una situación potencialmente peligrosa que podría causar lesiones menos graves o leves si no
se evita.
NOTA: Resalta informaciones importantes.
Page 3
3
ENGLISH
W3-21FRH / W3-34CDH
GAS POWERED FASTENING SYSTEM
INDEX
1. SAFETY INSTRUCTIONS
……………
4
2. SPECIFICATIONS &
TECHNICAL DATA
…………………
11
3. SAFETY DEVICE
……………………
12
4. HOW TO USE THE BATTERY AND
THE CHARGER
……………………
13
5. HANDLING OF FUEL CELL
………
17
6.
INSTRUCTIONS FOR OPERATION
…
20
7. MAINTAIN FOR PERFORMANCE
…
23
8. STORING
……………………………
23
9. TROUBLESHOOTING/REPAIRS
……
24
OPERATING and MAINTENANCE MANUAL
BEFORE USING THIS TOOL, STUDY THIS MANUAL TO ENSURE SAFETY WARNING
AND INSTRUCTIONS.
KEEP THESE INSTRUCTIONS WITH THE TOOL FOR FUTURE REFERENCE.
WARNING:
Page 4

4
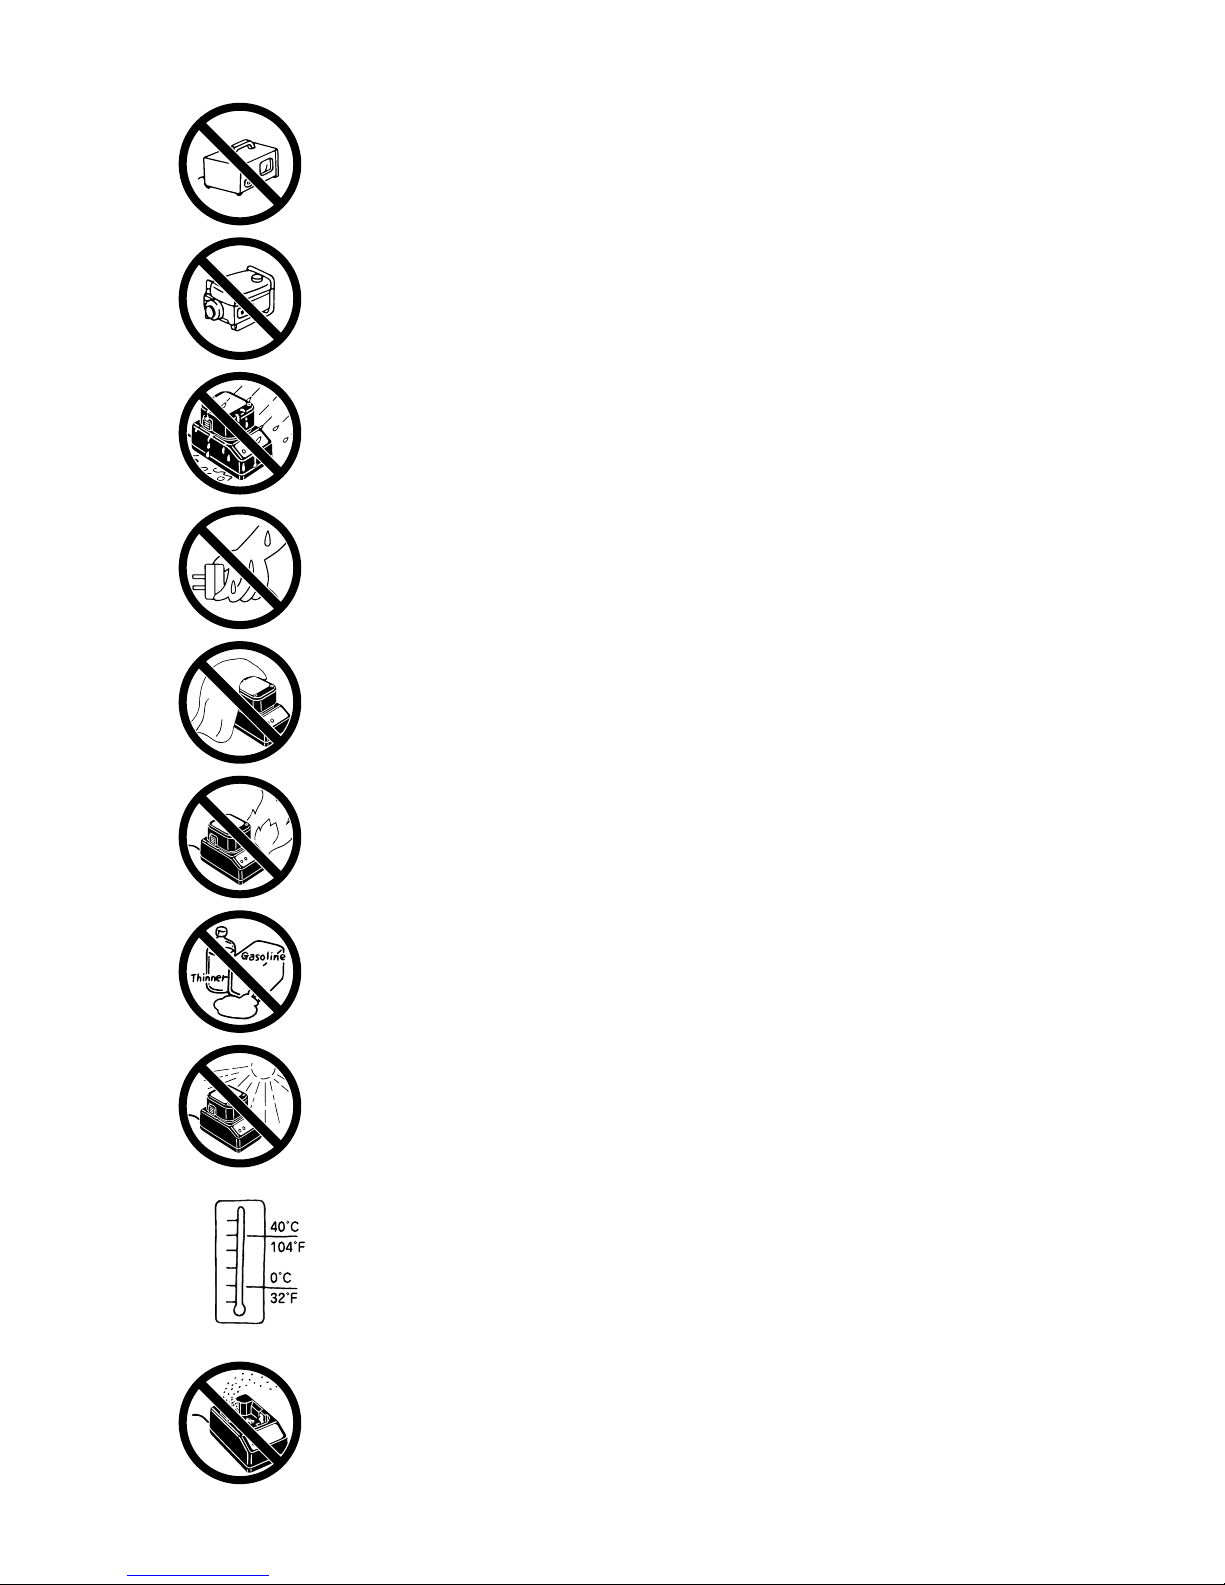
1. SAFETY INSTRUCTIONS
PRECAUTIONS ON USING THE TOOL
1. WEAR SAFETY GLASSES OR GOGGLES
Danger to the eyes always exists due to the possibility of dust being blown up by the exhausted air
or of a fastener flying up due to the improper handling of the tool. For these reasons, safety glasses
or goggles shall always be worn when operating the tool.
The employer and/or user must ensure that proper eye protection is worn. Eye protection equipment
must conform to the requirements of the American National Standards Institute, ANSI Z87.1 (Council
Directive 89/686/EEC of 21 DEC. 1989) and provide both frontal and side protection.
The employer is responsible to enforce the use of eye protection equipment by the tool operator
and all other personnel in the work area.
NOTE: Non-side shielded spectacles and face shields alone do not provide adequate protection.
2. EAR PROTECTION MAY BE REQUIRED IN SOME ENVIRONMENTS
As the working condition may include exposure to high noise levels which can lead to hearing
damage, the employer and user should ensure that any necessary hearing protection is provided
and used by the operator and others in the work area.
3. WEAR THE CLOTHINGS AND A PROTECTIVE GEAR SUITABLE FOR THE WORKING
ENVIRONMENT
Depending on the working environment, wear a long-sleeve work uniform and a protective gear
such as a helmet, safety shoes.
4. CAUTIONS FOR FUEL CELL
q
Be sure to set Fuel Cell.
w
Store Fuel Cell in well ventilated area.
e
Do not expose the Fuel Cell to the direct sunshine.
Do not place the Fuel Cell in a vehicle or a trunk where the temperature could rise. It could
explode. A used empty Fuel Cell still contains a combustible jet gas, which could swell and
explode a container into pieces.
r
Store the Fuel Cell at ambient temperature of 49°C (120°F) or lower.
The Fuel Cell contains the pressurized combustible gas. If it is exposed to the temperature
higher than 49°C (120°F), the gas could leak from it or burst, resulting in a fire.
WARNING:
TO AVOID SEVERE PERSONAL INJURY OR PROPERTY DAMAGE
BEFORE USING THE TOOL, READ CAREFULLY AND UNDERSTAND THE FOLLOWING
“SAFETY INSTRUCTIONS”. FAILURE TO FOLLOW WARNINGS COULD RESULT IN DEATH OR
SERIOUS INJURY.
49°C
120°F
Page 5
5
t
Do not breathe in the gas.
y
Do not incinerate or recycle the empty Fuel Cell.
u
Never jet the gas to the human body.
i
Do not remove the rubber plug from the bottom of the Fuel Cell except at disposal.
o
Do not make a hole in the Fuel Cell.
5. CAUTIONS FOR CHARGING METHOD, THE CHARGER AND THE BATTERY
q
Be sure to use Battery (Cat.#55583).
Be sure to use Battery (Cat.#55583) for the tool. Never connect the tool to a power source or
other rechargeable battery, dry cells or storage battery for automobiles.
Neglect of this could cause breakage, trouble, heat generation or combustion.
(See Page 11 for Battery (Cat.#55583))
w
Be sure to charge with Charger Base (Cat.#55618).
Be sure to charge the Battery with Charger Base (Cat.#55618).
If charged with other charger, it could fail to be properly charged as well as get broken, ignited or
generate the heat. (See Page 11 for Charger Base (Cat.#55618))
e
Charge the Battery prior to use.
The new Battery or the one which has not been used for a long period may not be fully charged
due to self-discharge. Be sure to charge it with Charger Base (Cat.#55618).
r
Charge the Battery at the specified voltage.
Be sure to charge, using a 100-240 V AC plug socket (for household use). Never charge at other
than the specified voltage. Neglect of this could cause combustion or heat generation.
Page 6

6
t
Never use a transformer such as a booster for the power source of the charger.
Neglect of this causes a trouble or burnout of the charger.
y
Never use an engine generator or DC power source to charge the Battery.
Neglect of this causes a trouble or burnout of the charger.
u
Never charge the Battery in the rain or in the place exposed to water splash or moisture.
If it is charged in the wet condition, it could cause an electric shock or short-circuiting, resulting
in a fire due to burnout or combustion.
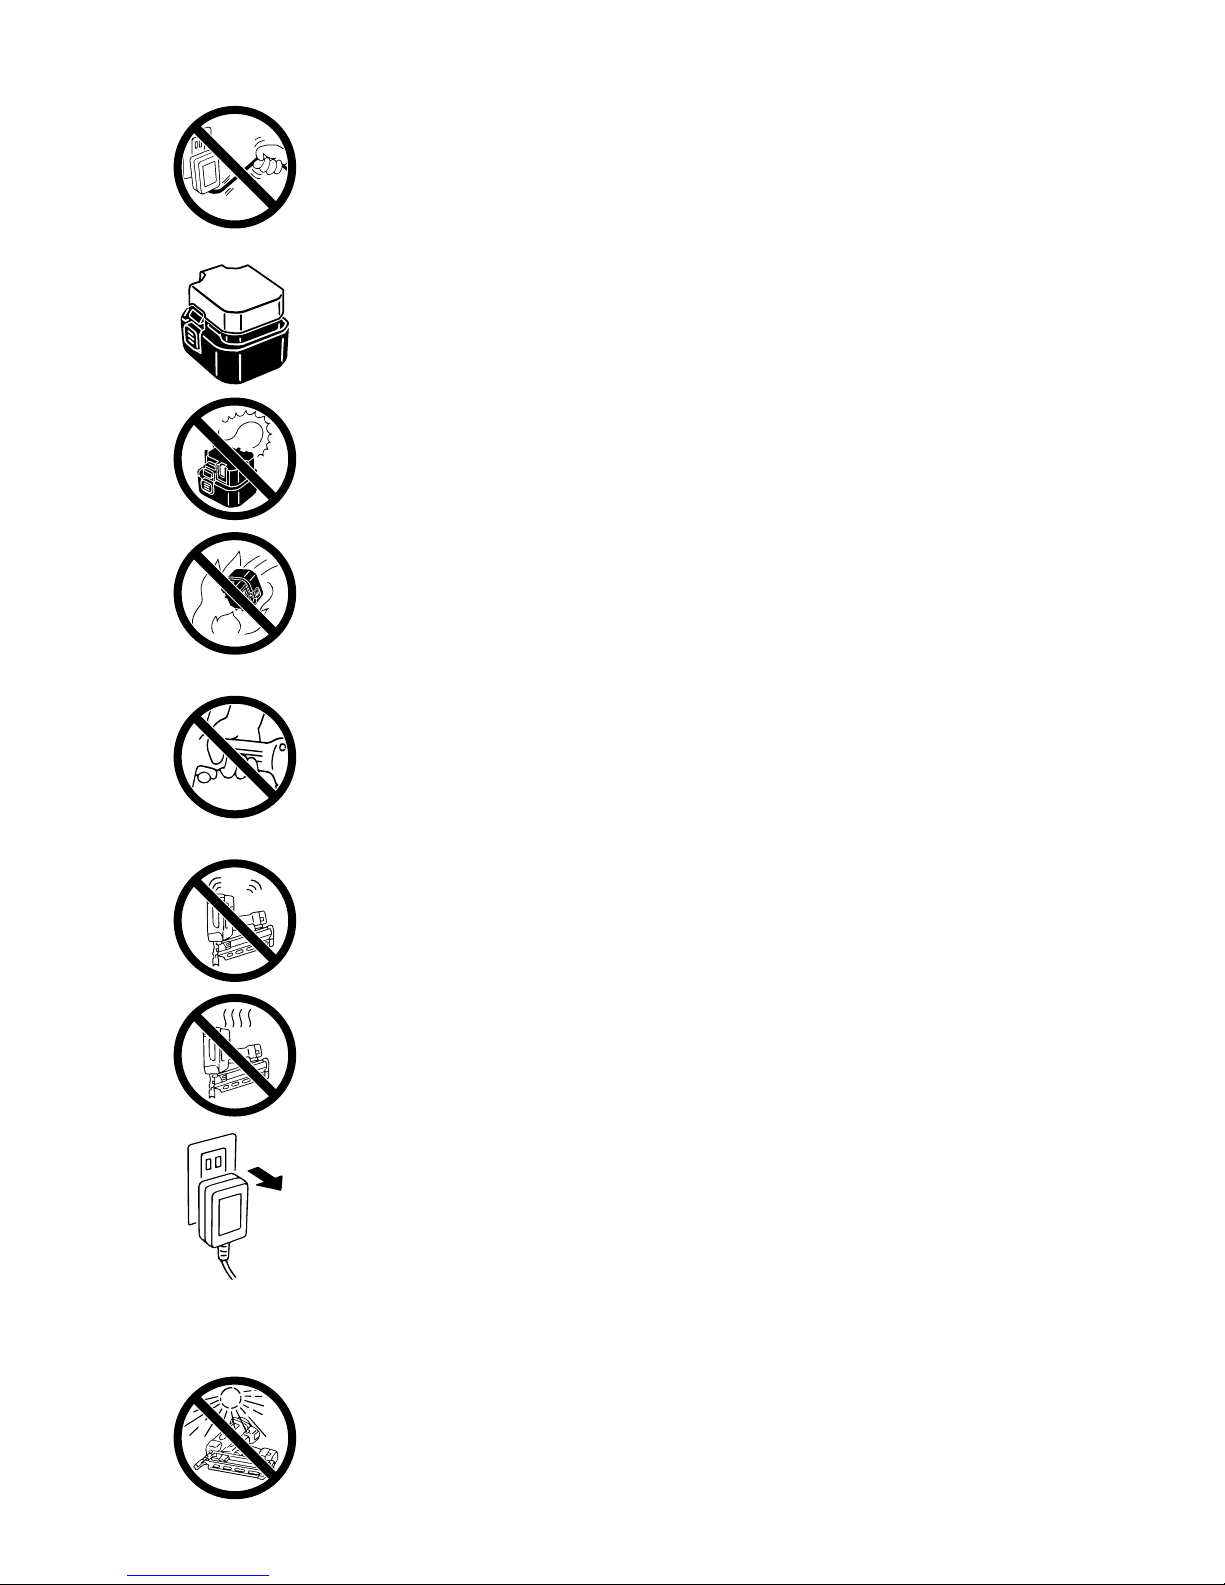
i
Never touch a power plug with a wet hand.
Holding it with a wet hand could cause an electric shock.
o
Never cover the charger in use with a cloth, and so on.
Putting a cover could generate the heat, resulting in a burnout or fire.
!0
Do not put the charger close to a fire.
!1
Do not charge the Battery near any combustible substance.
!2
Charge the Battery in a well-ventilated area, protected against the direct sunshine.
Charging in the direct sunshine could overheat the charger, resulting in a burnout or fire.
!3
Charge the Battery at ambient temperature of 0°C (32°F) to 40°C (104°F).
If the ambient temperature is less than 0°C (32°F) to 40°C (104°F), charging may not be
allowed, could result in a fire.
!4
Do not allow foreign objects into a ventilation hole or Battery plug socket in the charger.
They cause an electric shock or trouble. Use in the place free of dust.
Page 7

7
!56
Handle a power cord with care.
If you hold the power cord of the AC adapter to carry or pull it to disconnect from a plug socket, it
will be damaged, resulting in snapping or short-circuiting. Also, take care that it will not come into
contact with cutters, high-temperature substances, oil or grease. Replace the damaged power
cord with a new one.
!6
Once the Battery is disconnected from the tool body, be sure to cover it with a pack cap,
unless it is used.
In order to prevent short-circuiting, cover the terminal block (metal section) of the unused Battery
with the pack cap.
!7
Never short-circuit the terminal block (metal section) of the Battery.
If it is short-circuited, a large current will run to overheat the Battery, causing you a burn or
damage on it.
!8
Never throw the Battery into a fire.
Neglect of this could cause an explosion.
6. CARE SHOULD BE TAKEN WHEN CONNECTING THE BATTERY TO THE TOOL
When connecting the Battery to the tool, be sure to observe the following in order to prevent
malfunctioning.
1. Do not put your finger on the trigger.
2. Do not press the contact arm against the object.
3. Never put your finger or hand near the muzzle.
7. BE SURE TO CHECK WHEN THE BATTERY IS CONNECTED
Prior to using the tool, connect the Battery to it without pressing the contact arm against the object
and loading the nails and Fuel Cell, and be sure to check the following:
1. Check whether or not operating sound is heard, by only connecting the Battery.
※ If you connect the Battery and press the contact arm against the floor, and so on, the fan of the
tool will run, but this is not abnormal.
2. Check for heat generation or abnormal smell or sound.
If the tool is activated, generates the heat or emits abnormal smell or sound, it is an indication of
trouble. Using the tool in that condition results in an accident. If any abnormality is found, contact
your nearest authorized distributor.
8. UNPLUG THE CHARGER WHEN IT IS NOT USED
9. ONLY USE TOOL IN WELL VENTILATED AREA
If used in an ill-ventilated place, you could suffer from oxygen starvation.
10. AVOID THE DIRECT SUNSHINE
Do not place the tool in a vehicle or a trunk where the temperature could rise, because it could
explode. A used empty Fuel Cell still contains a combustible jet gas, which could swell and explode
a container into pieces.
Page 8

8
11. NEVER USE THE TOOL NEAR THE VOLATILE COMBUSTIBLE SUBSTANCES
Never use the tool near gasoline, thinner, gas, paint or adhesive agent, because it could ignite or
explode.
12. KEEP TOOL AWAY FROM FIRE
13. BE SURE TO USE THE TOOL IN THE WORKING ENVIRONMENT OF -7°C (19°F) TO 49°C
(120°F), BECAUSE THE TOOL BODY COULD BE DAMAGED, IGNITE OR EXPLODE
-7°C (19°F) or lower: The tool body could be damaged.
49°C (120°F) or higher: The Fuel Cell could be damaged, resulting in ignition or explosion.
14. DO NOT USE THE TOOL IN THE RAIN OR IN A VERY HUMID PLACE
Neglect of this causes a trouble.
15. NEVER DRIVE THE NAILS, FACING EACH OTHER
If you drive the nails, facing each other, an improperly driven nail may hit and injure the worker
facing you.
16. BEWARE OF THE HIGH TEMPERATURE OF THE TOOL
If the tool is used for a long period of time, the nose and contact arm will become hot. Be careful not
to get a burn.
17. WHEN USING THE HOOK, BE SURE TO RELEASE YOUR FINGER FROM THE TRIGGER
18. REMOVE THE FUEL CELL AND THE BATTERY AND EMPTY THE MAGAZINE WHEN THE
TOOL IS NOT IN USE
Always remove the Fuel Cell and the Battery from the tool and empty the magazine when operation
has been completed or suspended, when unattended, moving to a different work area, adjusting,
disassembling, or repairing the tool, and when clearing a jammed fastener.
19. INSPECT SCREW TIGHTNESS
Loose or improperly installed screws or bolts cause accidents and tool damage when the tool is put
into operation. Inspect to confirm that all screws and bolts are tight and properly installed prior to
operating the tool.
20. DO NOT TOUCH THE TRIGGER UNLESS YOU INTEND TO DRIVE A FASTENER
Never touch the trigger unless you intend to drive a fastener into the work. It is dangerous to walk
around carrying the tool with the trigger pulled, and this and similar actions should be avoided.
49°C
120°F
−7°C
19°F
Page 9
9
21. NEVER POINT THE DISCHARGE OUTLET TOWARD YOURSELF AND OTHER PERSONNEL
If the discharge outlet is pointed toward people, serious accidents may be caused when misfiring.
Be sure the discharge outlet is not pointed toward people when the Fuel Cell and the Battery are
inserted or not, loading and unloading the fasteners or similar operations.
22. USE SPECIFIED FASTENERS
The use of fasteners other than specified fasteners will cause the tool malfunction. Be sure to use
only specified fasteners when operating the tool.
23. PLACE THE DISCHARGE OUTLET ON THE WORK SURFACE PROPERLY
Failure to place the discharge outlet of the nose in a improper manner can result in a fastener flying
up and is extremely dangerous.
24. KEEP HANDS AND BODY AWAY FROM THE DISCHARGE OUTLET
When loading and using the tool, never place a hand or any part of body in fastener discharge area
of the tool. It is very dangerous to hit the hands or body by mistake.
25. DO NOT DRIVE FASTENERS CLOSE TO THE EDGE AND CORNER OF THE WORK AND THIN
MATE RIAL
The workpiece is likely to split and the fastener could fly free and hit someone.
26. DO NOT DRIVE FASTENERS ON TOP OF OTHER FASTENERS
Driving fasteners of the top of other fasteners may cause deflection fasteners which could cause
injury.
27. REMOVING THE FASTENERS AFTER COMPLETING OPERATION
If fasteners are left in the magazine after the completion of operation, there is the danger of a serious
accident occurring prior to the resumption of operation, should the tool be handled carelessly, or
when inserting the Fuel Cell and the Battery. For this reason, always remove all fasteners remaining
in the magazine after completion of the operation.
28. CHECK OPERATION OF THE CONTACT TRIP MECHANISM FREQUENTLY IN CASE OF
USING A CONTACT TRIP TYPE TOOL
Do not use the tool if the trip is not working correctly as accidental driving of a fastener may result.
Do not interfere with the proper operation of the contact trip mechanism.
29. WHEN USING THE TOOL OUTSIDE OR ELEVATED PLACE
When fastening roofs or similar slanted surface, start fastening at the lower part and gradually work
your way up. Fastening backward is dangerous as you may loose your foot place.
30. NEVER USE THE TOOL IF ANY PORTION OF THE TOOL CONTROLS (e.g., TRIGGER, CONTACT
ARM) IS INOPERABLE, DISCONNECTED, ALTERED OR NOT WOKING PROPERLY
31. NEVER ACTUATE THE TOOL INTO FREE SPACE
This will avoid any hazard caused by free flying fasteners and excessive strain of the tool.
32. ALWAYS ASSUME THAT THE TOOL CONTAINS FASTENERS
Page 10

10
33. RESPECT THE TOOL AS A WORKING IMPLEMENT
34. NO HORSEPLAY
35. NEVER LOAD THE TOOL WITH FASTENERS WHEN ANY ONE OF THE OPERATING CONTROLS
(e.g., TRIGGER, CONTACT ARM) IS ACTIVATED
36. TAKE GOOD CARE OF THE TOOL
Clean the tool with dry soft cloth. Never use wet cloth or volatile solutions such as thinner, benzine.
37. AVOID THE DIRECT SUNSHINE
Do not leave the tool or Charger in the direct sunshine for a long time.
OBSERVE THE FOLLOWING GENERAL CAUTION IN ADDITION TO
THE OTHER WARNINGS CONTAINED IN THIS MANUAL
•
Do not use the tool as a hammer.
•
The tool must be used only for the purpose it was designed.
•
Never remove, tamper with the operating controls (e.g., TRIGGER, CONTACT ARM)
•
Keep the tool, the Fuel Cell and the Battery in a dry place out of reach of children when not in
use.
•
Do not use the tool without Safety Warning label.
•
Do not modify the tool from original design or function without approval by CO., LTD.
Page 11
11
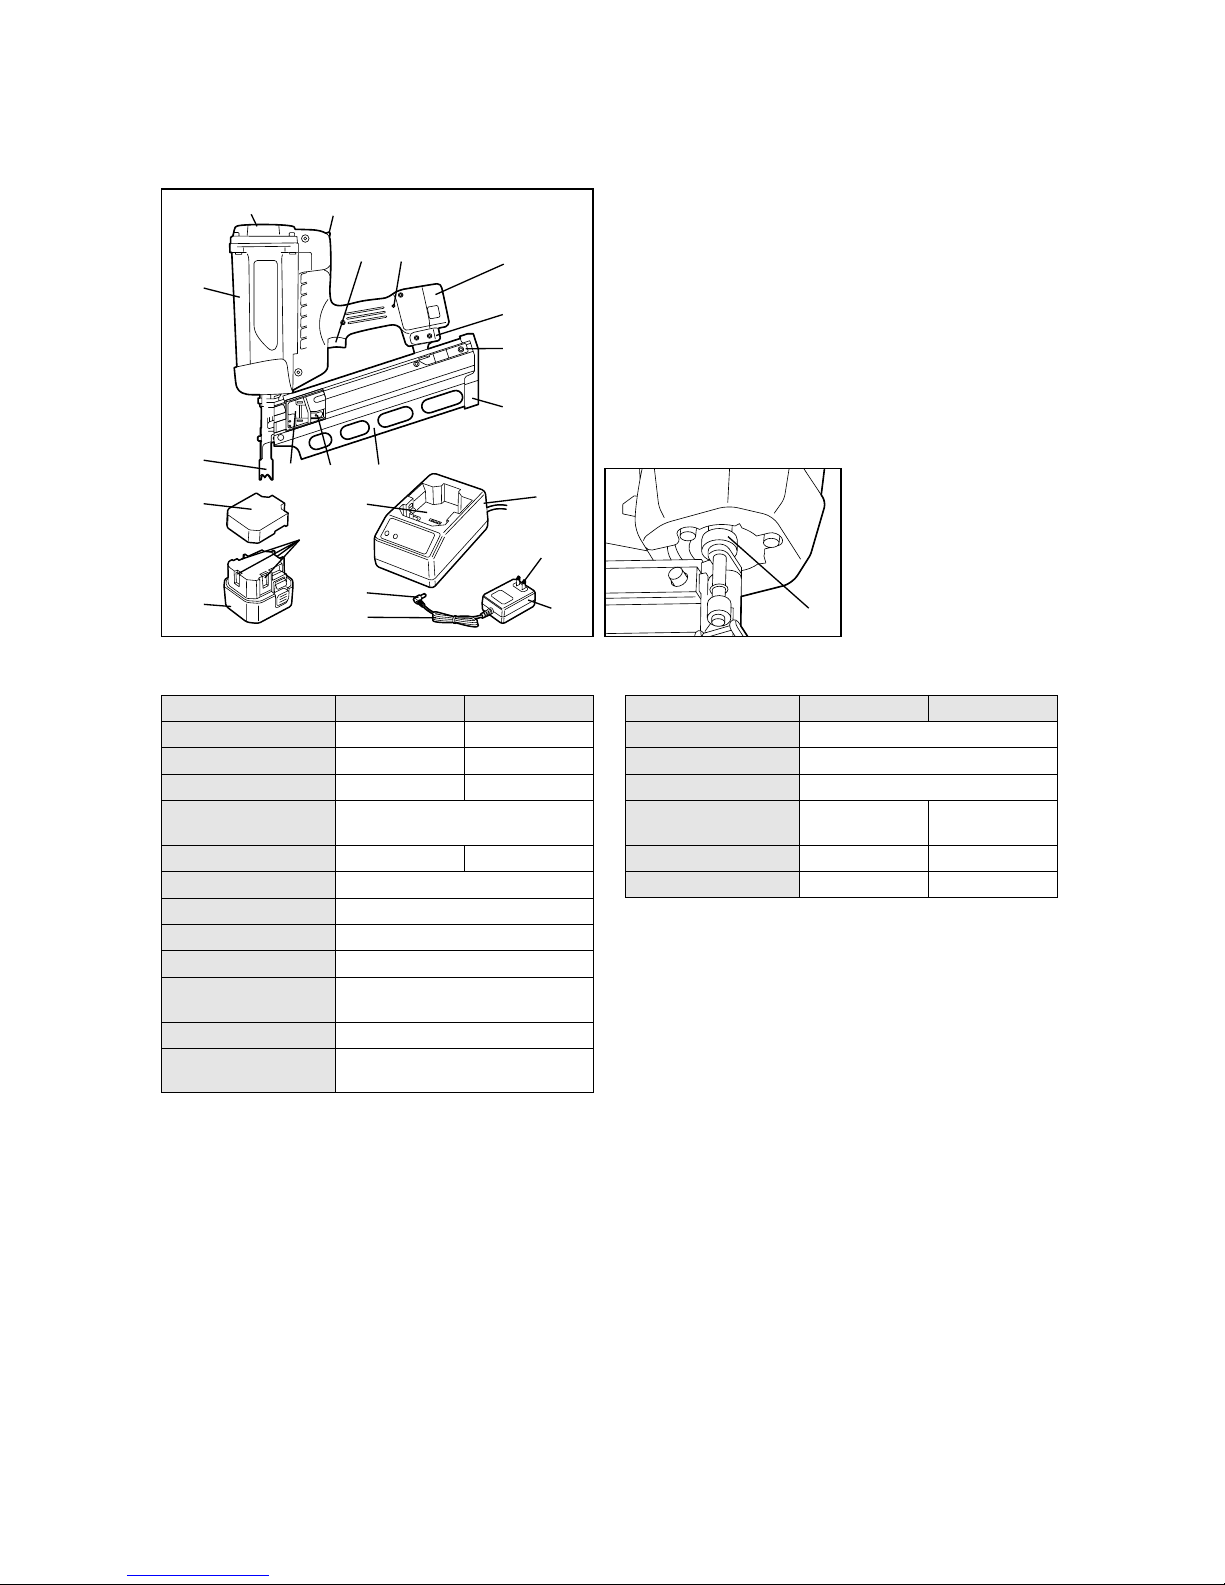
2. SPECIFICATIONS AND TECHNICAL DATA
1. NAME OF PARTS
2. TOOL SPECIFICATIONS
q
e
w
rt
y
u
i
!1 !2 !3
!8
!9
@0
!0
!5
!6
!7
!4
@1
@2
@3
o
q
Air Filter Cover
w
Actuator
e
Housing
r
LED
t
Trigger
y
Battery
u
Hook
i
Nail Stopper
o
Depth Adjustment Dial
!0
Contact Arm
!1
Follower Holder
!2
Follower
!3
Magazine
!4
Magazine Foot
!5
Pack Cap
!6
Terminal Block
!7
Battery (Cat.#55583)
!8
Battery Setting Hollow
!9
Jack
@0
Power Cord
@1
Charger Base(Cat.#55618)
@2
Power Plug
@3
AC Adapter
3. FASTENER SPECIFICATIONS
4. TECHNICAL DATA
q
NOISE
A-weighted single-event ------ LWA, 1s, d 105.4 dB
sound power level
A-weighted single-event ------ Lp A , 1s, d 98.8 dB
emission sound pressure
level at work station
These values are determined and documented in accordance to EN12549 : 1999.
w
VIBRATION
Vibration characteristic value
= 4.46 m/s
2
These values are determined and documented in accordance to ISO 8662-11.
This value is a tool-related characteristic value and does not represent the influence to the hand-arm-system when using the tool.
An influence to the hand-arm-system when using the tool will for example depend on the gripping force, the contact pressure
force, the working direction, the workpiece, the workpiece support.
PRODUCT NO. W3-21FRH W3-34CDH
HEIGHT
15˝ (382 mm) 15-3/8˝ (391 mm)
WIDTH
4-3/8˝ (111 mm) 4-3/8˝ (110 mm)
LENGTH
15˝ (379 mm) 13-3/8˝ (340mm)
WEIGHT
7.8 lbs. (3.5 kg)
(including Fuel Cell and Battery)
LOADING CAPACITY 32 nails (1 strip) 40 nails (1 strip)
BATTERY Battery (Cat.#55583)
BATTERY CAPACITY
6V DC, 1.5 Ah
CHARGER Charger Base (Cat.#55618)
POWER SOURCE 100-240V AC, 50 or 60 Hz
POWER CONSUMPTION
8VA (10V 800mA)
(Rated output)
CHARGING TIME 150 minutes at maximum
ACCESSORIES
Goggles, carrying case, Battery,
Charger
PRODUCT NO. W3-21FRH W3-34CDH
NAIL LENGTH 2˝ to 3-1/2˝ (50 to 90 mm)
SHANK DIAMETER .113˝ to .131˝ (2.9 to 3.3 mm)
SHANK TYPE Smooth, Ring, Screw
HEAD DIAMETER
.267˝ to .295˝ .256˝ to .303˝
(6.8 to 7.5 mm) (6.5 to 7.7 mm)
COLLATION ANGLE 21 degree 34 degree
HEAD Full round head Clipped head
Page 12
12
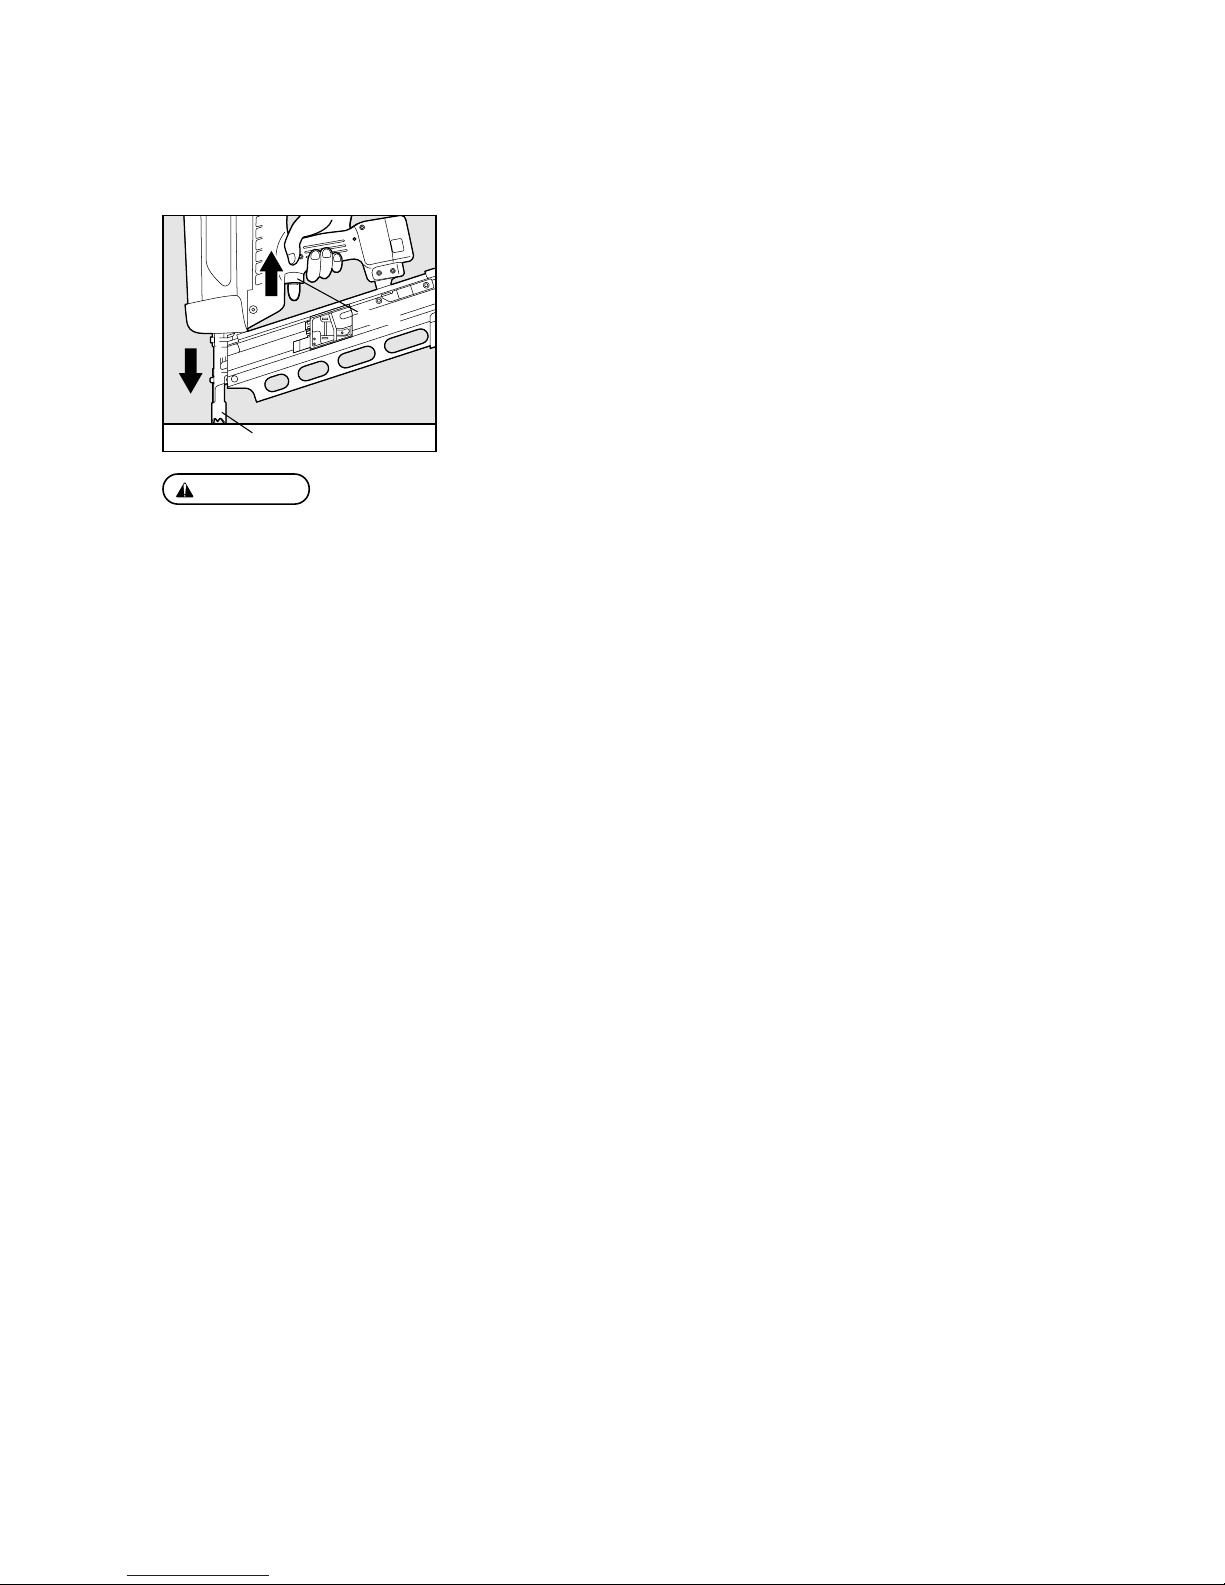
3. SAFETY DEVICES
The tool is provided with the following safety devices in order to secure safety for nail driving work.
Mechanical Safety Device
This tool is to prevent discharge of nails unless the Contact Arm and Trigger have been
activated simultaneously. The nails are not discharged by neither simply pulling the
Trigger nor applying the Contact Arm to the nails driving object. The nails are
discharged only after applying the Contact Arm to the object and pulling the Trigger.
Trigger
Contact Arm
CAUTION:
●
Prior to using the tool, be sure to inspect it to see whether the safety devices function
properly. Do not use it if they do not function properly.
Prior to using the tool, check whether the safety devices function properly. With no nails
loaded, install the Battery and Fuel Cell to check.
※
In the following cases, the safety devices are out of order. Never use the tool.
1. An operating sound is emitted by simply pulling the trigger.
2. The tool starts dry-fire operation by simply applying the contact arm to the object.
※
A fan running sound is heard, this is OK.
If any abnormality is found, contact your nearest authorized distributor for
inspection/repairing.
Page 13
13
4. HOW TO USE THE BATTERY AND THE CHARGER
WARNING:
●
Be sure to charge Battery (Cat.#55583) for the tool with Charger Base (Cat.#55618).
If charged with other charger, the Battery could fail to be properly charged as well as get
broken, ignited or generate the heat.
●
Do not put the Battery close to a fire.
●
Do not leave the Battery in the direct sunshine.
●
Do not charge or use the Battery in the wet condition with a liquid such as water, sea water,
milk, soft drink, soap water.
●
Unplug the charger when it is not used.
●
Be sure to charge at 0 to 40°C to avoid the possibility of fire.
●
Do not give a strong shock such as hitting with a hammer, stamping or dropping.
WARNING:
●
In order to prevent short-circuiting, be sure to cover the terminal block (metal section) of the
Battery with the Pack Cap (wind the insulating tape) for recycling.
<Battery cells in Battery Pack>
・
Nominal voltage: 1.2 V/piece
・
Quantity used in 1 pack: 5 pieces
CAUTION:
●
When the Battery is discharged or is not used for a long period, remove it from the Charger.
●
After setting the Battery in the tool, do not hold it to carry around.
PROPER USE OF BATTERY
q
Fully charge and discharge the Battery.
If you repeat charging the Battery while not fully discharged more than half the capacity, the number
of nails drivable by each charging could decrease dramatically, shortening the life of the Battery. It is
recommended to use it until the LED of the tool has been illuminated in red, running out of electricity.
w
Use two Batterys alternately.
To ensure the longer life of the Battery, it is recommended to use two of them alternately, preparing a
spare one.
The Battery for the tool uses nickel-hydrogen batteries which are a precious recyclable resource. Once
the Battery runs out of life, take it to your nearest distributor without disposing of it.
Recycling the Nickel-Hydrogen Battery
Page 14

14
Green LED Red LED Status Description
1.
2.
3.
4.
5.
6.
HOW TO USE THE CHARGER
The special purpose charger Base (Cat.#55618) has the LEDs (green, red) which indicate the status of
the charger and Battery.
The following cases are considered to be the problems. Replace the charger and Battery with new ones.
●
The green LED is not turned on if the power plug of the charger is plugged into a 100-240 V AC (for
household use) plug socket. (With the Battery unset)
※
Check with another electric appliance to see whether electricity is available at the plug socket.
●
Neither green nor red LED is turned on or blinks if the Battery is set in the Charger.
●
The green LED is not turned on 150 minutes after the red one has been turned on.
●
The red LED is not turned on if the Battery is set in the charger.
Battery Charger problems
○
ON
●
OFF
Power-on
The charger has been plugged in. (Power-on status:
Battery unset)
●
OFF
○
ON
Charging The Battery is being charged.
○
ON
●
OFF
Charge Completed The Battery has been completed charged.
Blinking Blinking
High temparature
alarm
The Battery is hot. (Remove it from the Charger and
cool it down for a while before charging.)
○
ON
○
ON
Battery alarm The Battery is defective. (Replace it with a new one)
Blinking
○
ON
Battery high
temparature alarm
The Battery is defective and hot. (Replace it with a
new one.)
Page 15
15
WARNING:
HOW TO CHARGE
●
Charge the Battery at the specified voltage.
Be sure to charge from a 100-240 V AC (for household use) plug socket. Use of the nonspecified voltage not only causes a trouble, but also is dangerous.
●
Handle the power cord with care.
Do not use the Charger whose power cord is damaged.
●
Use a proper plug socket.
Use of the rickety or slack plug socket causes an accident due to overheat. If this is the case,
use another proper one.
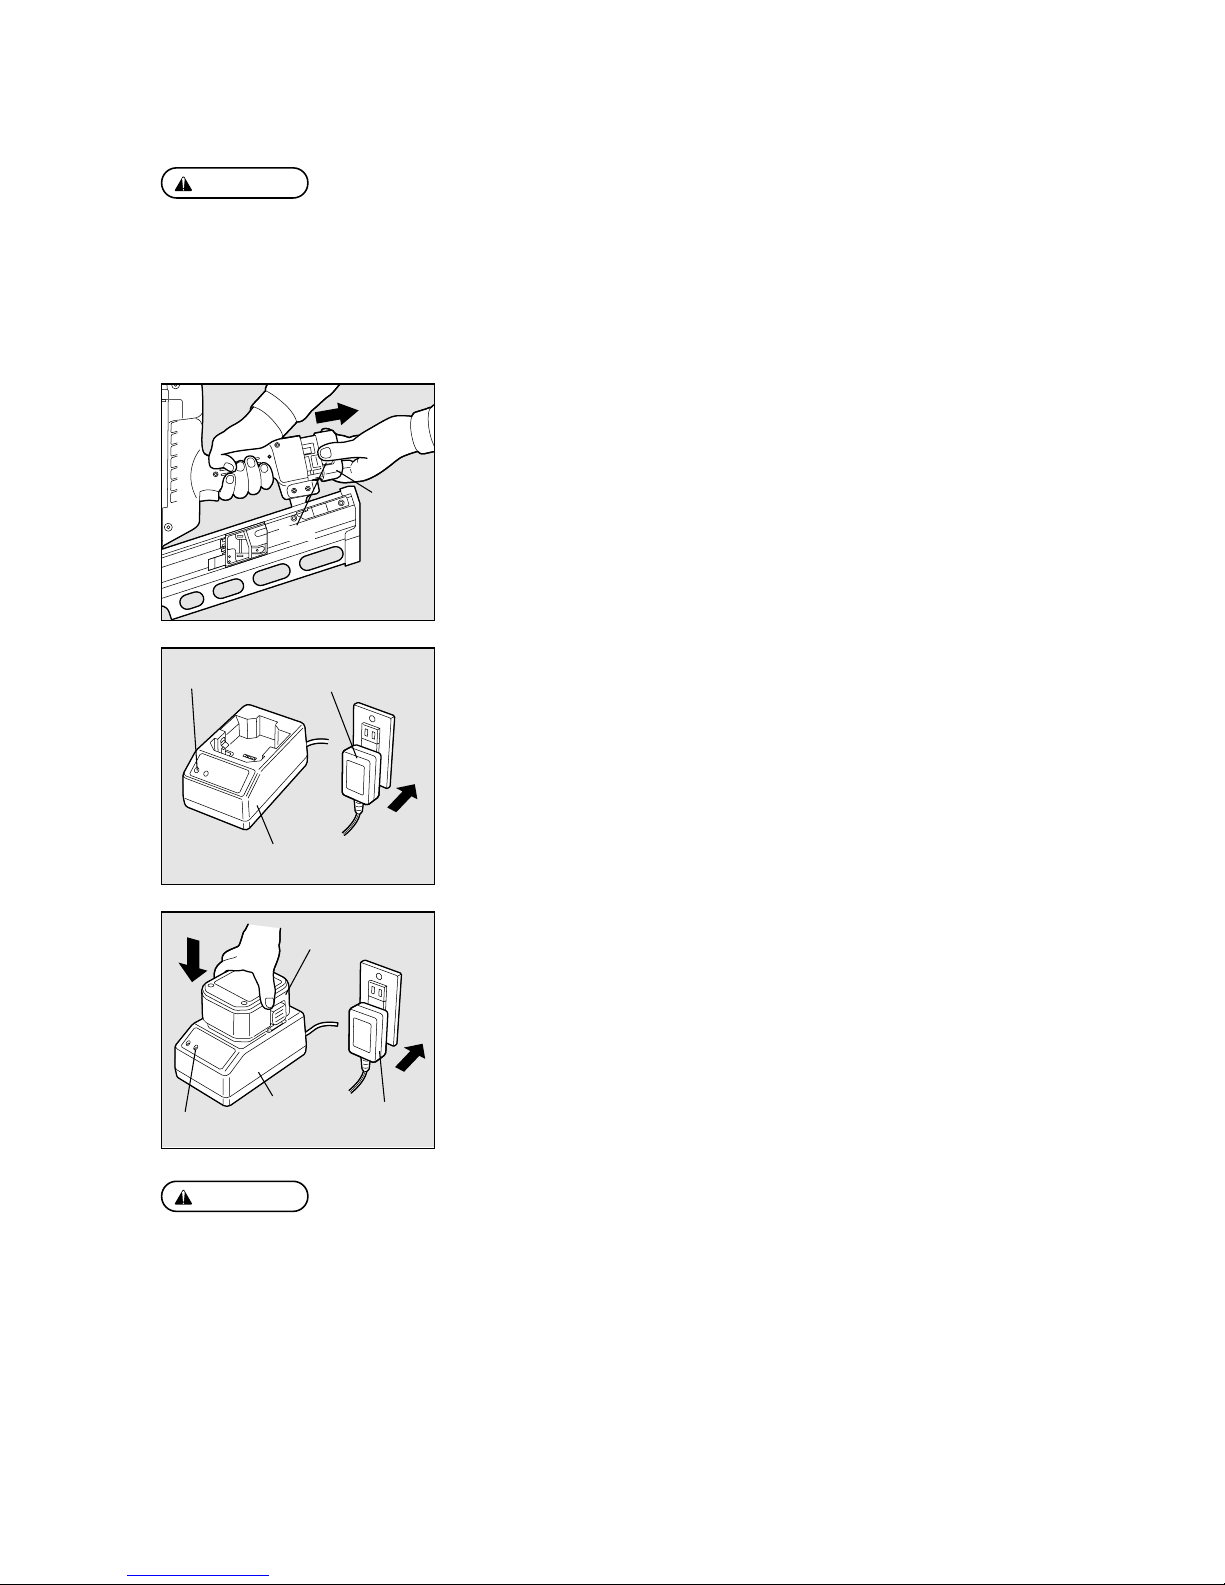
q
If the Battery is used up, remove it from the tool.
Firmly holding the tool body, press the latches on both side of the Battery with your
fingers to remove.
Battery
w
Insert the AC adapter’s jack into the Charger and plug the power plug into a
plug socket.
The green LED is turned on to inform you of the power-on status.
Green LED
Charger
100-240 V
AC Power Adapter
Latch
CAUTION:
●
Do not try to charge the Battery which has been fully charged. The life of the Battery could be
shortened.
e
Charge the Battery.
1. Set the Battery firmly in the charger.
2. Once it is set in the charger, charging will start automatically. The red LED is turned
on to inform you that charging is under way.
3. The maximum charging time is approx. 150 minutes. The charging time depends on
the temperature, supply voltage or remaining battery capacity. Once charging is fully
completed, the green LED will be illuminated to inform you that charging has been
completed. If the fully charged Battery is set in the charger again, the red LED will be
turned on again, indicating that it is being charged. This is not an abnormality. After a
while, the green LED will be turned on to indicate completion of charging.
r
The Illuminated Green LED Indicates completion of charging.
1. Holding down the charger, remove the Battery.
2. Disconnect the AC adapter’s power plug from the plug socket.
Now Charging is complete.
Battery
Red LED
Charger
100-240 V
AC Power Plug
Page 16

16
CAUTION:
●
After completing your work or when the tool is not used, be sure to remove the Battery Pack
from the tool to store it. (Remove the Fuel Cell and nails as well)
If it is left connected, the electric power will be consumed in the standby state.
In the following cases the Battery Pack must be charged for 24 HOURS to reach top performance:
・
Upon purchasing the tool.
・
When the tool has not been used for 1 month or longer.
・
When it is clear that you can drive less nails even when fully charged.
After the Charge Complete lamp has been turned on, leave the Battery set in the Charger for about
another 24 hours.
Preventing the Battery Pack from becoming inactive
Page 17
17
5. HANDLING OF FUEL CELL
The Fuel Cell is doubly structured; the inner container has been filled with a liquid fuel gas and the outer
one with a propellant gas (another pressurized gas).
Like squeezing a toothpaste tube, the inner fuel gas is pushed out by the pressure of the propellant gas,
thus being used up to the last without wasting it. Because of this structure, the combustible propellant
gas in the outer container remains even after the fuel gas in the inner container has been used.
Therefore, utmost care should be taken when disposing the empty Fuel Cell.
WARNING:
●
Be sure to use the Fuel Cell exclusively designed for the Gas powered Fastening System.
●
Never smoke a cigarette when attaching or operating a metering valve.
●
Do not remove the rubber plug from the bottom of the Fuel Cell except at disposal.
●
Do not make a hole in the Fuel Cell.
●
Be careful not to breathe in the gas.
Breathing in the gas could cause sleepiness, dizziness or nausea.
●
Never jet the gas to the human body.
●
Do not incinerate or recycle the empty Fuel Cell.
(See Page 19 for disposal of the Fuel Cell)
WARNING:
●
Attach the metering valve properly to the Fuel Cell.
Attach it firmly until it has “clicked.”
Unless it is properly attached, the fuel gas will not be jetted from the metering valve. Also, the
gas could leak, causing danger to you.
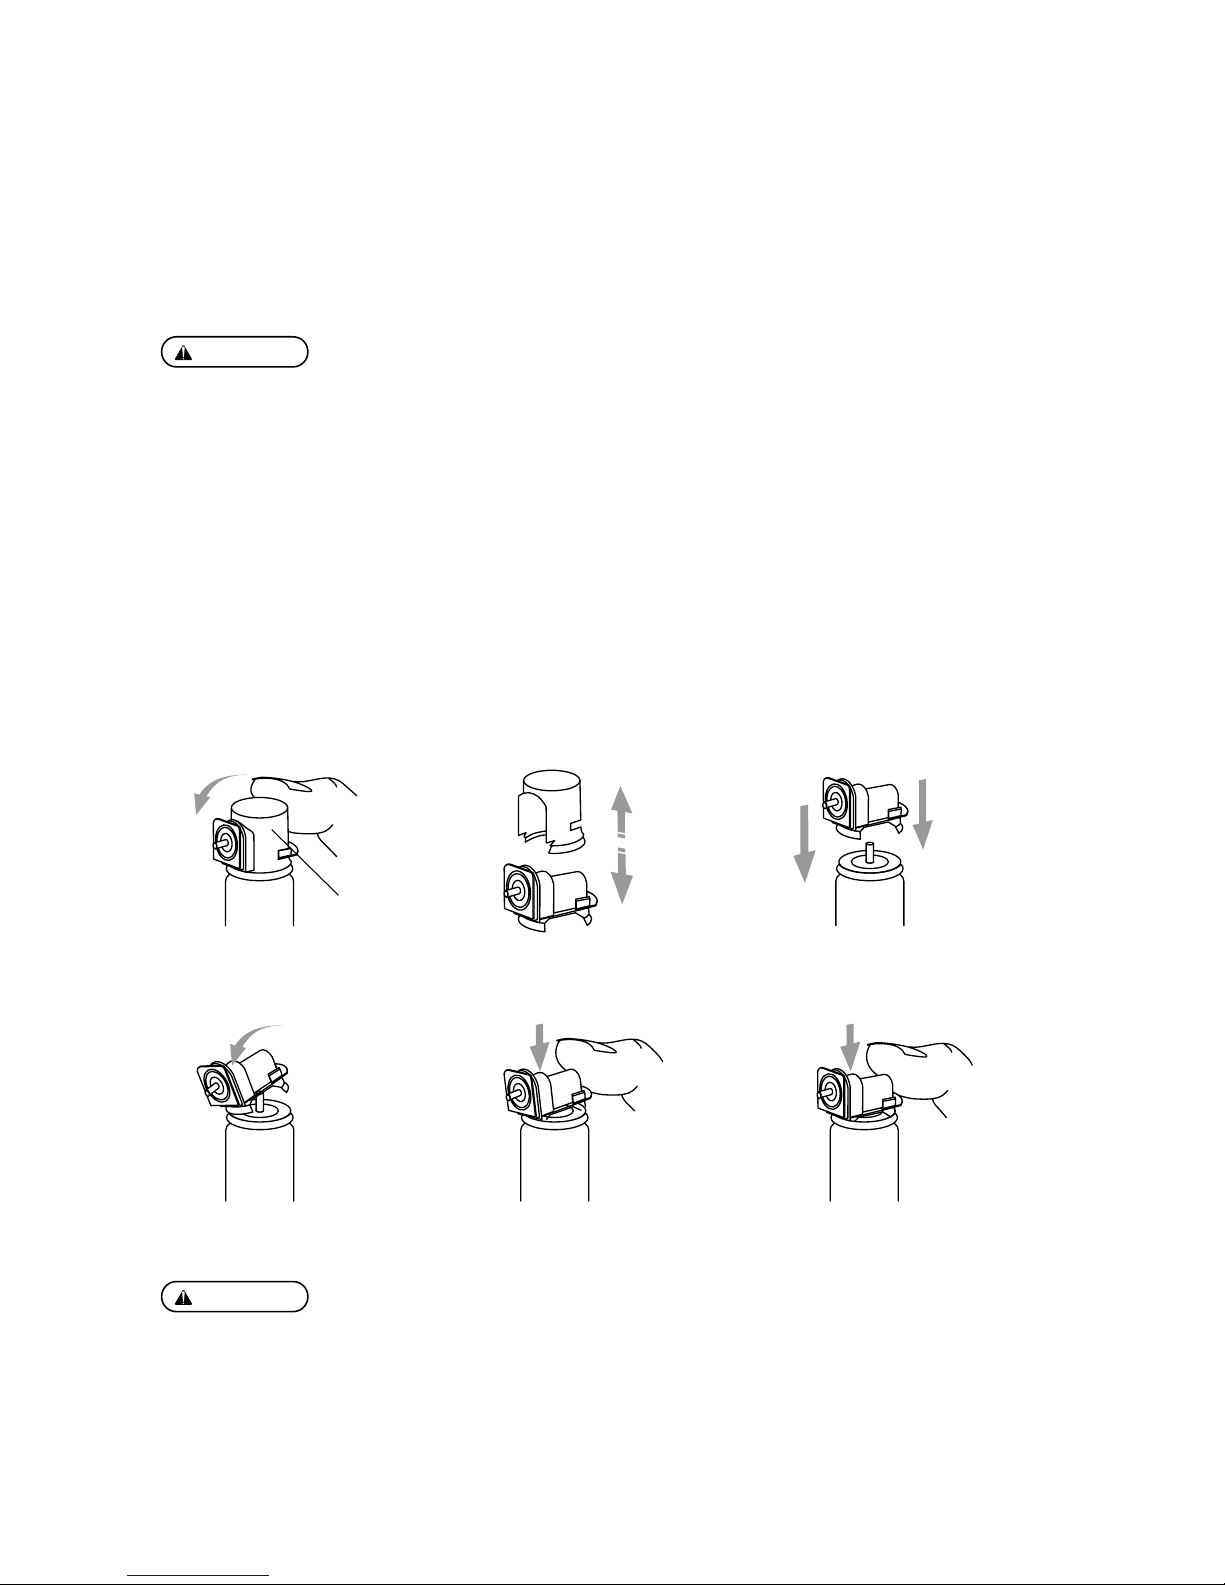
ATTACHING THE METERING VALVE TO THE FUEL CELL
The metering valve is designed to jet a constant amount of fuel gas into the combustion chamber of the
tool.
1. Push to release the valve. 2. Separate valve from cap. 3. Align ridges square.
4. Push in the front ridge first 5. Push in the rear ridge until it 6. Push in horizontally. It clicks again.
5. has clicked.
metering Valve
Page 18
18
WARNING:
INSERTING THE FUEL CELL IN TO THE TOOL
●
Be sure to release your finger from the Trigger.
●
Do not press the Contact Arm against the object.
2
1
q
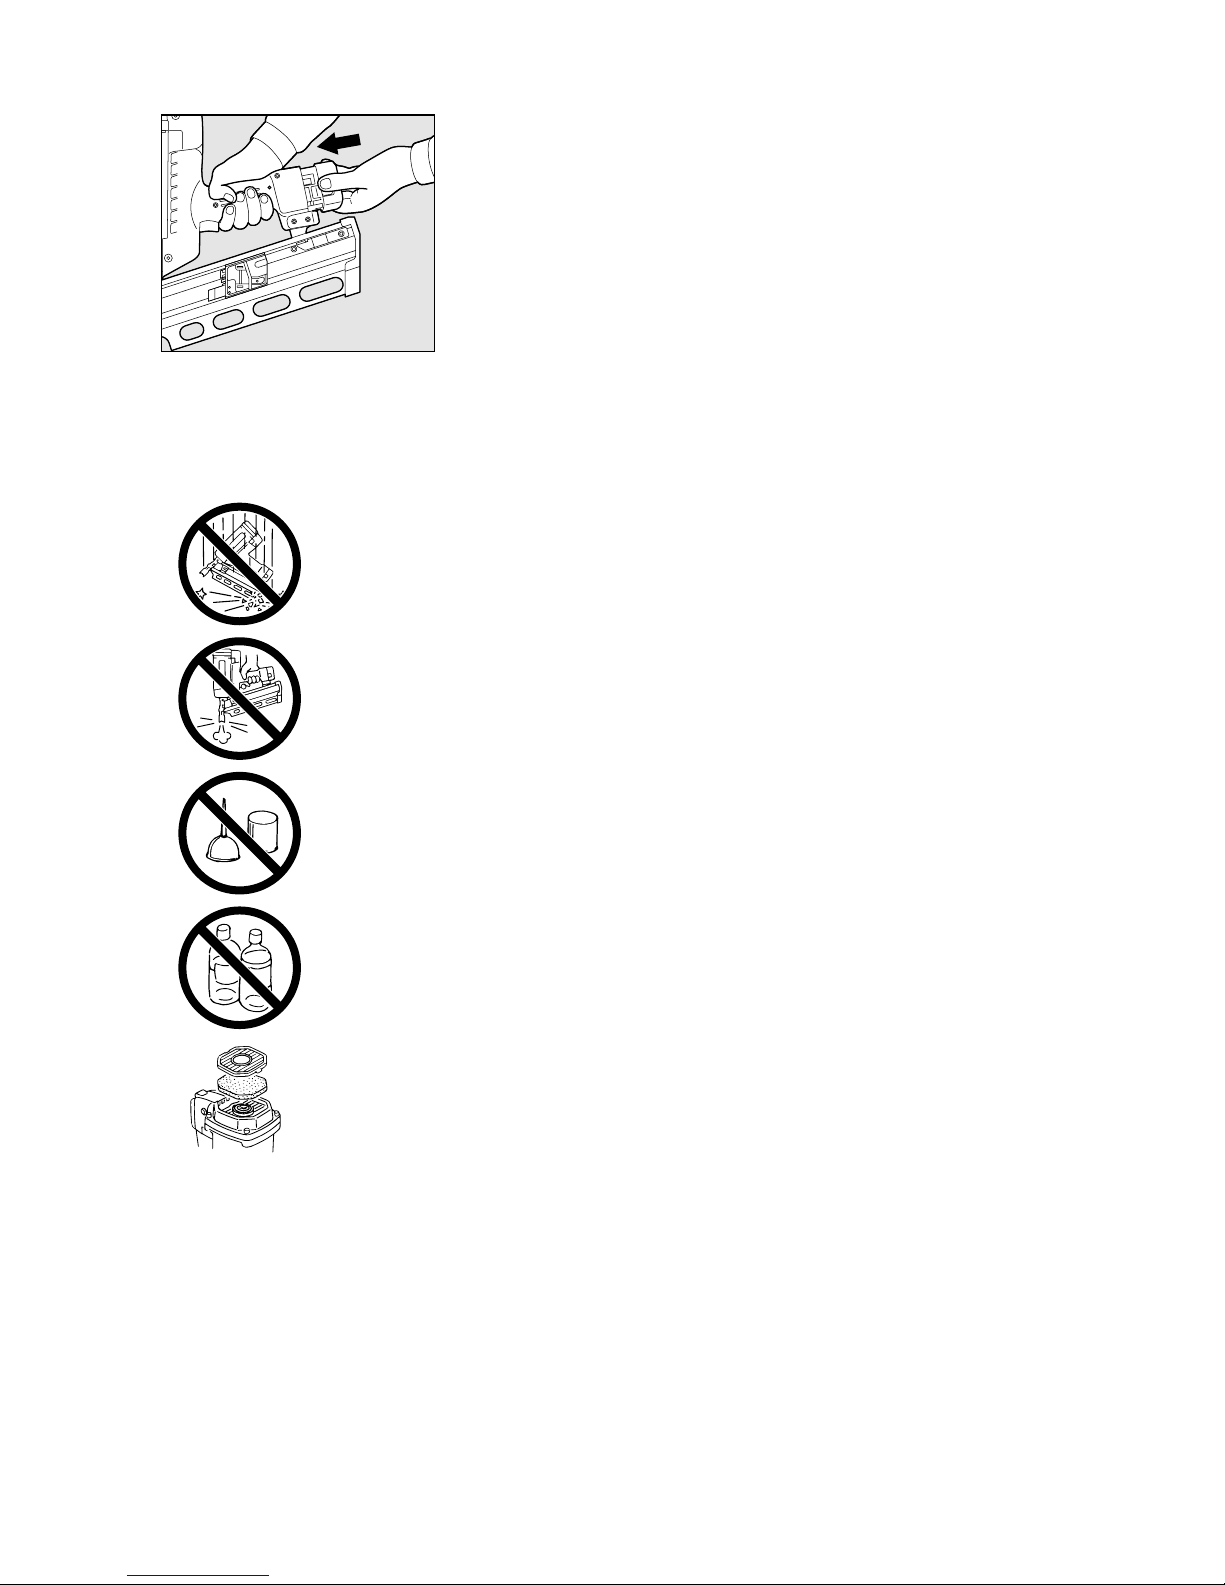
Push up and pull the Actuator to this side to open it.
Actuator
w
Directing the Valve Stem of the Metering Valve forward (toward the Air Filter Cover),
set the Fuel Cell.
Metering Valve
e
When you open the Actuator, you can see a Red Adapter.
Fit the Valve Stem into this adapter.
Red Adapter
r
Put the Actuator over the Metering Valve and push it down to latch.
Fuel Cell
Page 19

19
DISPOSING OF THE USED FUEL CELL
Combustible jet gas still remains in the used Fuel Cell.
WARNING:
●
Do not throw the used Fuel Cell into a fire.
●
Never smoke a cigarette.
●
Never breathe in the gas.
Page 20
20
6. INSTRUCTIONS FOR OPERATION
Read section titled “SAFETY INSTRUCTIONS”.
1. BEFORE OPERATION
q
Wear Safety Glasses or Goggles.
w
Do not insert the Fuel Cell and Battery.
e
Inspect screw tightness.
r
Check operation of the Contact Arm & Trigger if moving smoothly.
t
Insert the Fuel Cell and Battery.
y
Hold the tool with finger-off the Trigger, then push the Contact Arm against the work-piece. (The
tool must not operate.)
u
Hold the tool with Contact Arm free from work-piece and pull the Trigger. (The tool must not
operate.)
i
Remove the Fuel Cell and Battery.
WARNING:
WARNING:
2. OPERATION
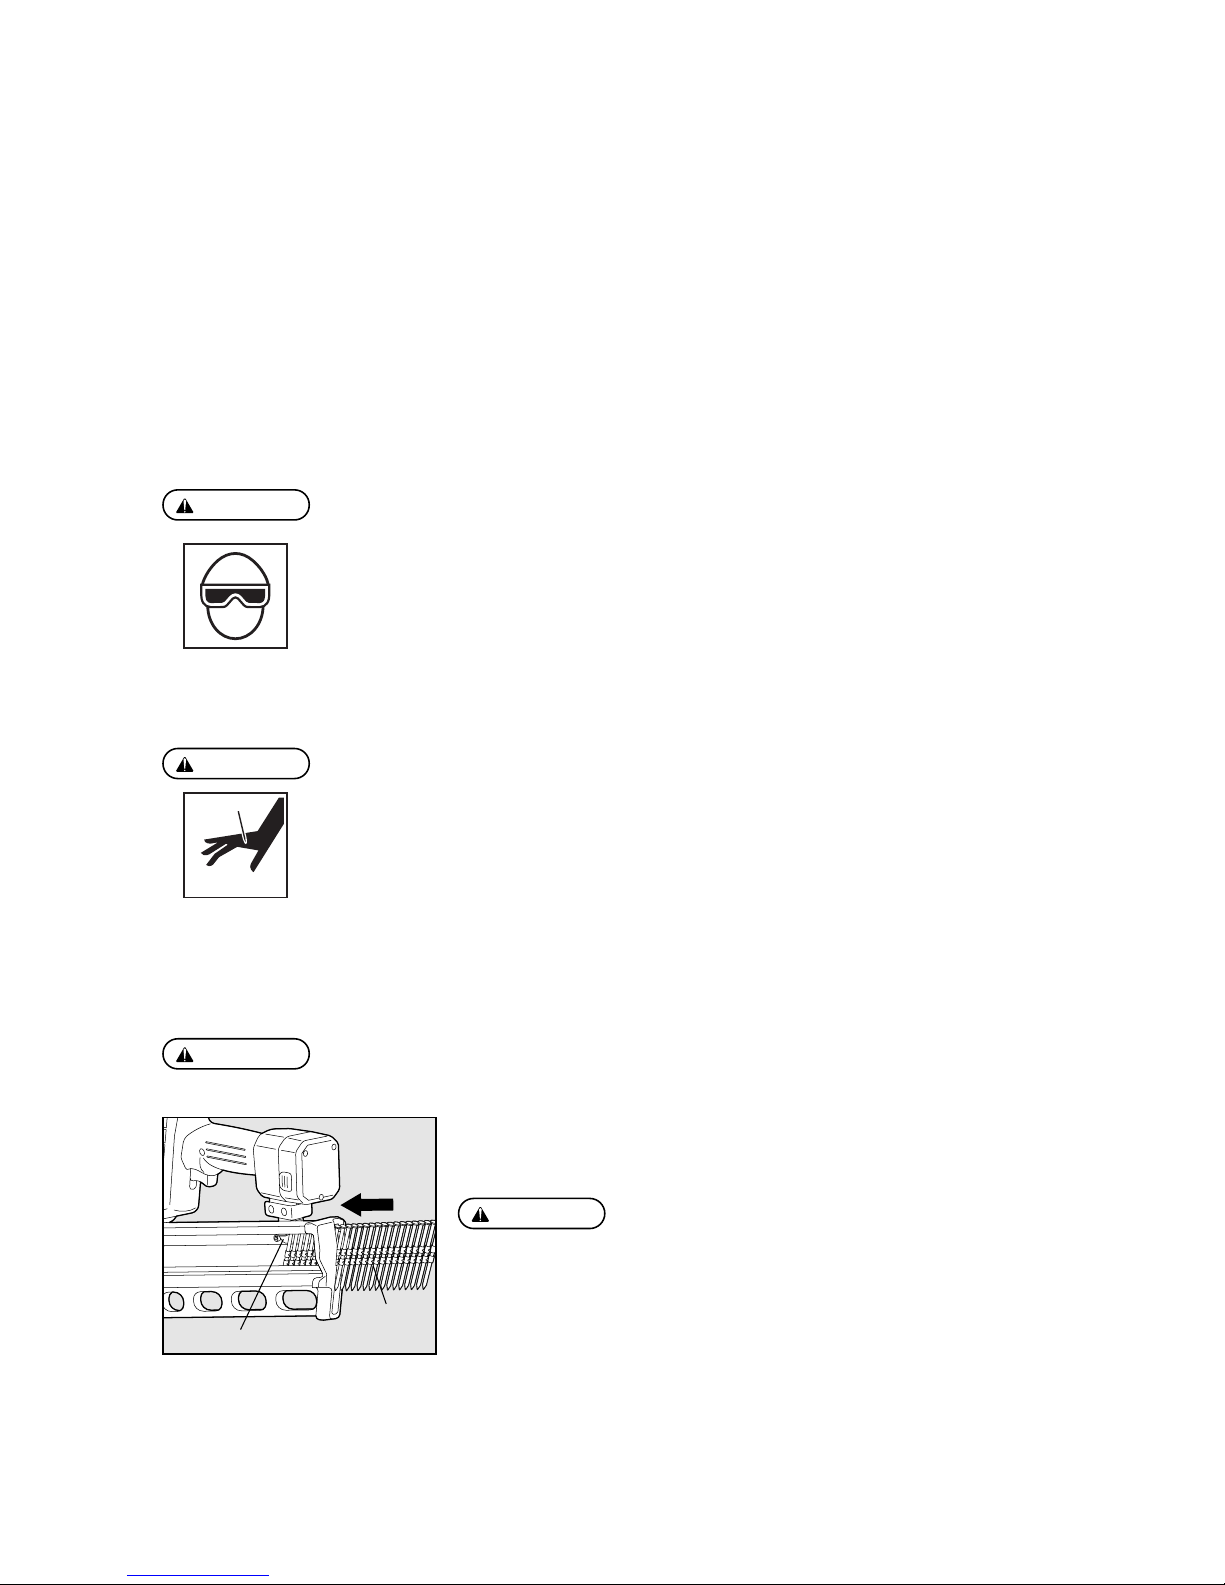
Wear safety glasses or goggles
Danger to the eyes always exists due to the possibility of dust being blown up by the exhausted air or of
a fastener flying up due to the improper handling of the tool. For these reasons, safety glasses or
goggles shall always be worn when operating the tool.
The employer and/or user must ensure that proper eye protection is worn. Eye protection equipment
must conform to the requirements of the American National Standards Institute, ANSI Z87.1 (Council
Directive 89/686/EEC of 21 DEC. 1989) and provide both frontal and side protection.
The employer is responsible to enforce the use of eye protection equipment by the tool operator and all
other personnel in the work area.
NOTE: Non-side shielded spectacles and face shields alone do not provide adequate protection.
Keep hands and body away from the discharge outlet
When driving the fasteners because of dangerous of hitting the hands or body by mistake.
Procedure
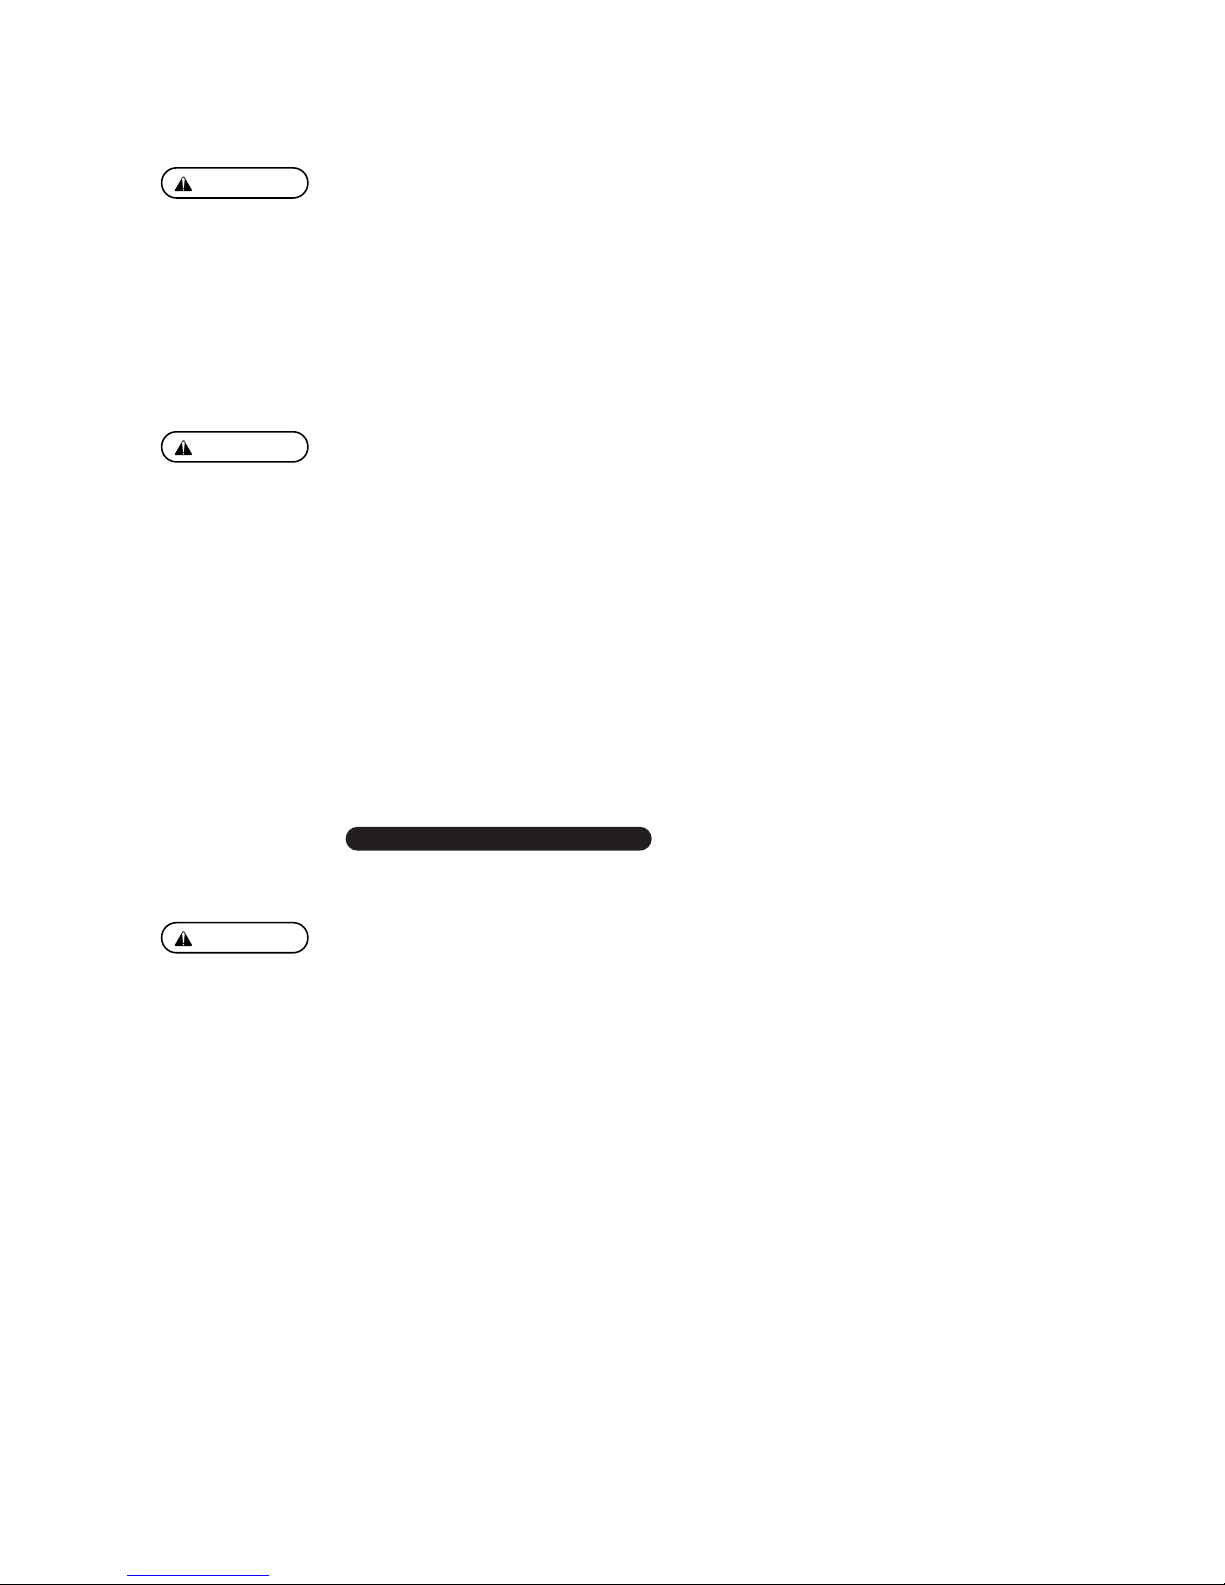
q
Load the nails into the slit in the rear of the Magazine until they reach in front of the
Nail Stopper.
WARNING:
LOADING THE NAILS
●
When loading the nails, be sure to release the finger from the Trigger.
●
Do not press the Contact Arm against the object.
Nails
●
Abrupt release of the Pusher Holder causes jamming of nails or dry-firing.
CAUTION:
Nail Stopper
Page 21

Follower Holder
21
w
Pull the Follower Holder as far to the rear and of the magazine and release it gently.
●
Never put your face above the tool. Reaction of the tool may cause an
unexpected injury.
●
Never bring your hand or finger close to the discharge outlet.
WARNING:
WARNING:
2
1
q Press the nose of the Contact Arm
against the object.
w Pull the Trigger.
HOW TO DRIVE THE NAILS
Procedure
q
Install the Battery and Fuel Cell.
w
Press the nose of the Contact Arm against where you want to drive the nails.
The fan motor is activated, the fuel gas is jetted, mixing the fuel with the air.
e
Firmly pressing the Contact Arm, pull the Trigger. The nails are driven into the object
by combustion of the fuel.
●
Prior to starting work, be sure to check whether the tool functions as
mentioned above.
●
If the tool is used for a long period of time, it could get hot and burn you.
If any abnormality is found, contact your nearest authorized distributor for
inspection and repairing.
※
The fan keeps running for approx. 10 seconds even after driving the nails.
WARNING:
r
The nails are not shot even if the Contact Arm is applied to the object with the
Trigger pulled. Release the Trigger and repeat Step
w
.
DRIVING DEPTH ADJUSTMENT
●
ALWAYS remove Fuel Cell and Battery before making adjustment.
●
The Depth Adjustment Dial may be hot.
The driving depth adjustment is made by adjusting the Depth Adjustment Dial.
q
With Fuel Cell and Battery install, drive a few nails into a representative material
sample to determine if adjustment is necessary.
w
If adjustment is required, remove Fuel Cell and Battery.
e
Refer to the mark on the Magazin for direction to turn the Adjustment Dial.
r
Reinstall Fuel Cell and Battery.
Adjustment Dial
Deeper Shallow
CAUTION:
Page 22
22
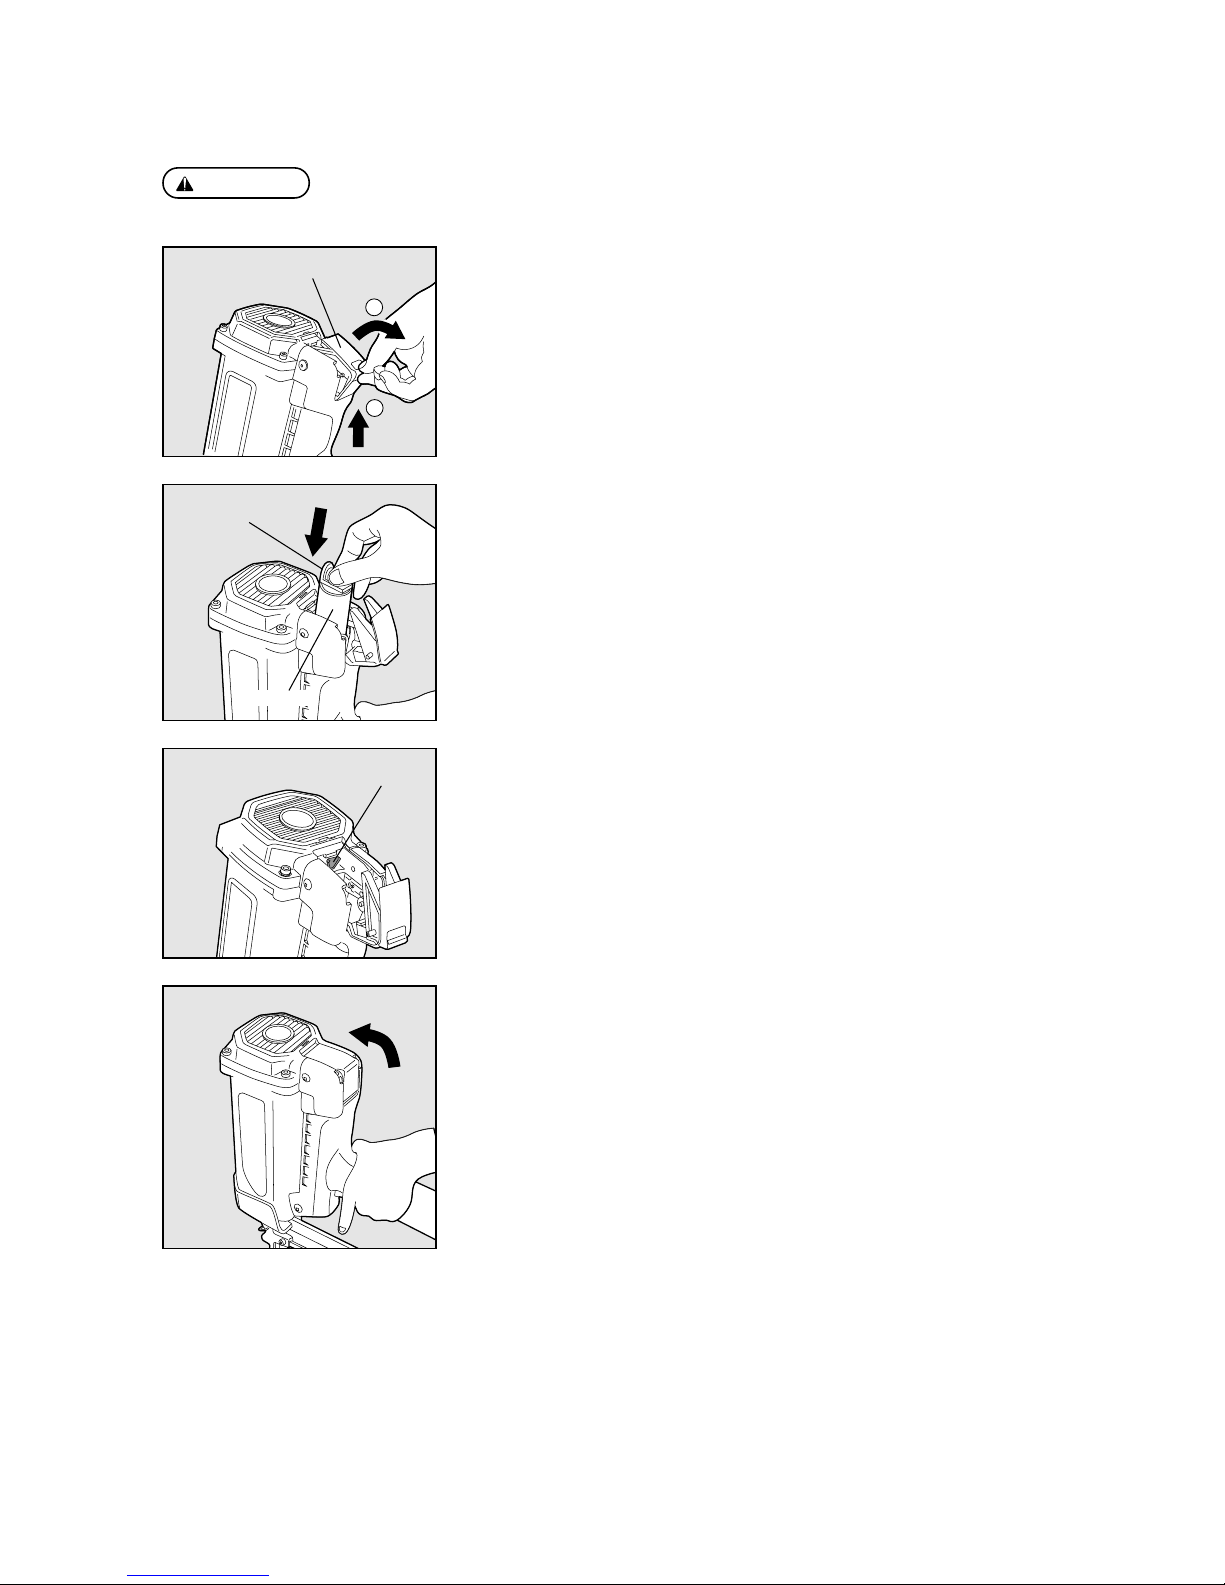
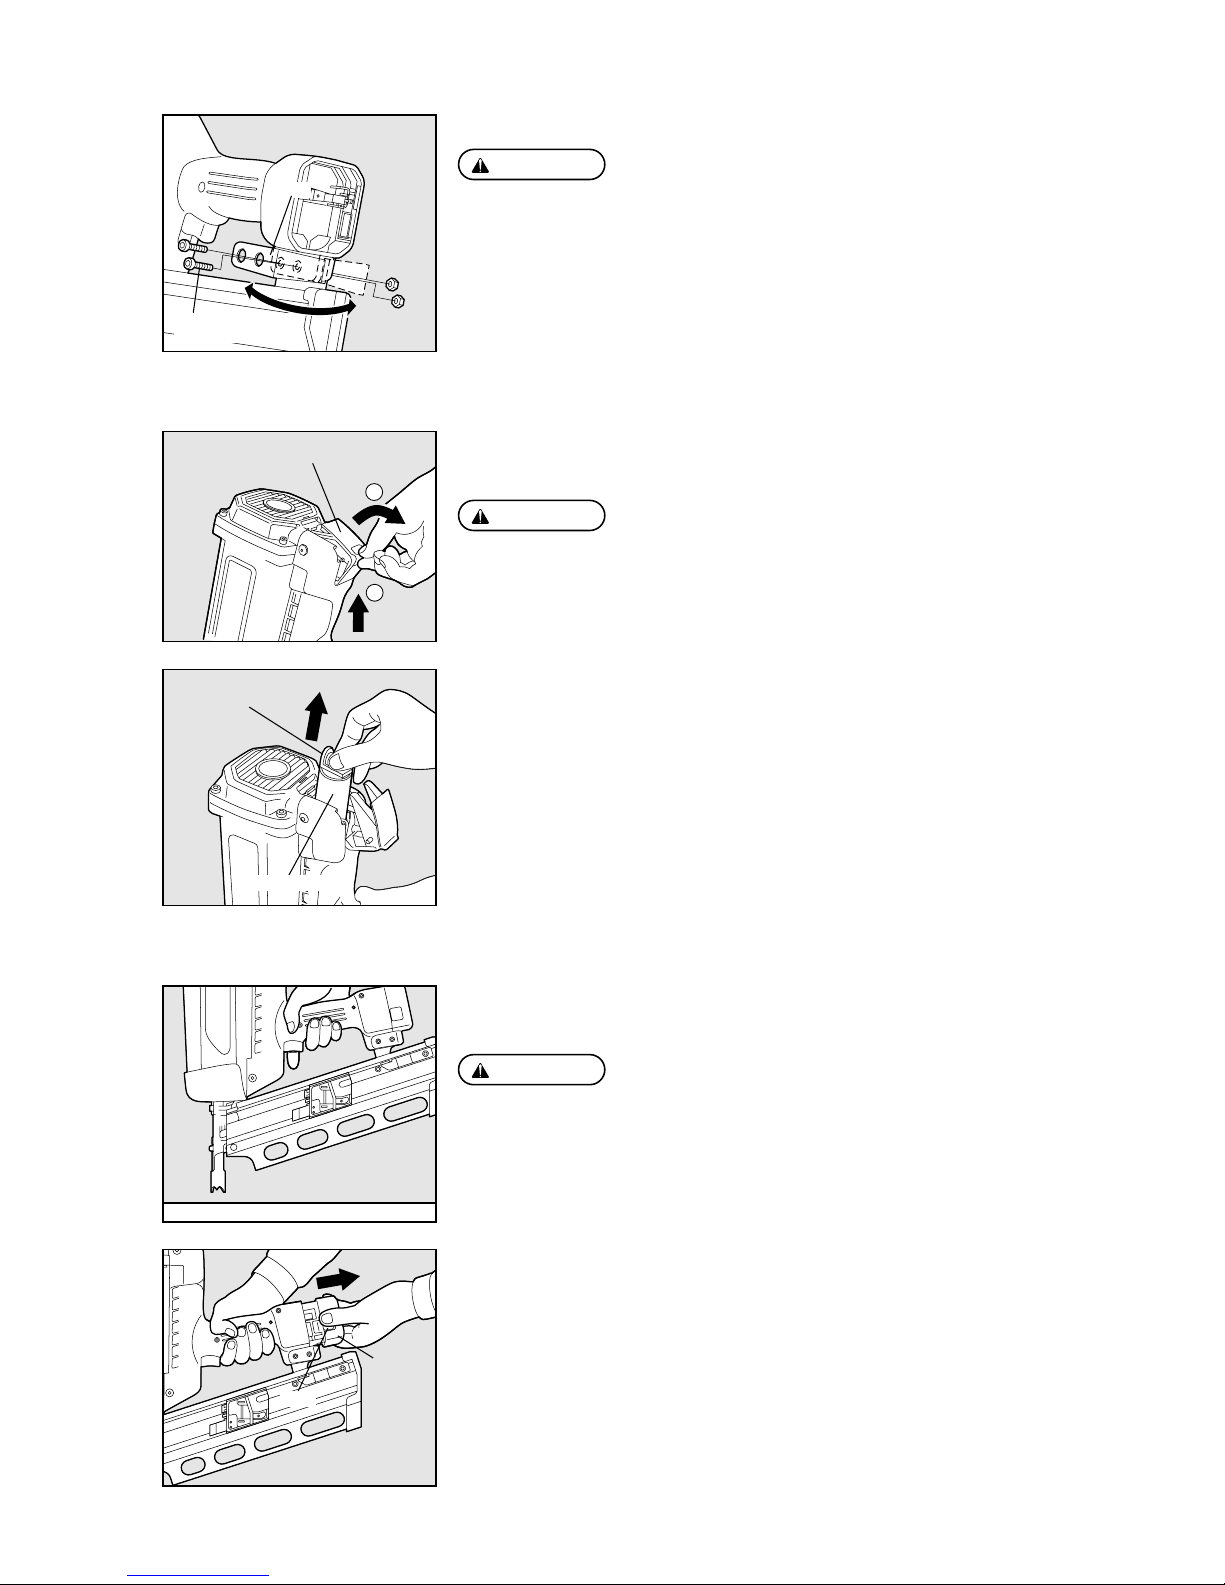
REPLACING THE FUEL CELL
If the Fuel Gas is low, the nails cannot be driven.
●
Be sure to release the Trigger.
●
Do not press the Contact Arm against the object.
q
Push up and pull the Actuator to this side to open it.
WARNING:
REPLACING THE BATTERY
If the Battery is low, the red LED of the tool will be turned on.
●
Be sure to remove the Fuel Cell.
●
Release the Trigger.
●
Do not press the Contact Arm against the object.
WARNING:
w
Grab the Metering Valve and remove the used Fuel Cell.
e
Set the new Fuel Cell.
(See Page 18 for the setting method)
q
Firmly holding the main body, press the latches on both sides of the Battery to
remove it.
2
1
Actuator
Valve Stem
Fuel Cell
●
Remove the Fuel Cell and Battery.
WARNING:
CHANGING THE HOOK DIRECTION
The Hook can be directed in the two directions. Remove the hexagon socket head bolts
with hexagon wrench, change the direction, and then, put back the bolts to reassemble.
Hexagon Socket
Head Bolt
Hook
Battery
Latch
Page 23
23
7. MAINTAIN FOR PERFORMANCE
1. HANDLE THE TOOL WITH CARE
Never drop, collide or hit the tool against a hard material. It may be deformed, cracked or damaged.
2. DO NOT TRIGGER THE TOOL WITH NO NAILS LOADED
If you repeatedly operate the tool with no nails loaded, the durability of each section will be
reduced.
3. DO NOT LUBRICATE THE TOOL
Never lubricate the Tool because it will cause problems.
4. INSPECT THE TOOL PERIODICALLY
In order to maintain the performance of the tool, clean and inspect the tool periodically. To have it
inspected, contact your nearest distributor.
5. CLEAN THE AIR FILTER
Clean the Air Filter every other day. Open the Air Filter Cover with a regular screwdriver, remove
the Air Filter from the inside and clean it with Compressed air.
8. STORING
q
When not in use for an extended period, apply a thin coat of the lubricant to the steel parts to avoid
rust.
w
Do not store the tool in a cold weather environment. Keep the tool in a warm area.
e
When not in use, the tool should be stored in a warm and dry place. Keep out of reach of children.
r
All quality tools will eventually require servicing or replacement of parts because of wear from
normal use.
w
Install the newly charged Battery into the Housing until it has clicked.
(See Page 15 for the charging method)
e
Install the Fuel Cell.
(See Page 18 for the Installation method)
Page 24
24
e
Phenomenon Check Item
The Battery cannot be charged.
・
The AC adapter’s power plug is firmly connected to the
plug socket.
・
The AC adapter’s jack is firmly inserted into the charger.
・
The Battery is properly set in the charger.
・
The charger’s LED is turned on.
While charging, the charger, AC
adapter and power cord are
heated, emit abnormal sound or
generate heat.
・
Stop using them immediately and consult your nearest
distributor.
The pins cannot be driven.
・
The tool body is properly loaded with the pins, Battery and
Fuel Cell.
・
Check the LEDs of the tool body.
・
The gas still remains in the Fuel Cell.
・
The Fuel Cell is not out of life.
・
The battery capacity is still remaining.
・
The nails are not jamming.
・
The Contact Arm is properly pressed against the object.
9. TROUBLE SHOOTING/REPAIRS
q
The repairs shall be carried out only by the Powers authorised distributer.
w
Removing Jammed Nail
WARNING:
●
Remove the Fuel Cell and Battery.
Procedure
q
Take out the nails from the inside of the Magazine.
w
Remove nails that are jammed inside the Nose by using a punch or slotted screw
driver.
Page 25
25
DEUTSCH
W3-21FRH / W3-34CDH
GASBETRIEBENES BEFESTIGUNGSSYSTEM
VERZEICHNIS
1. SICHERHEITSVORSCHRIFTEN
……
26
2. SPEZIFIKATIONEN UND
TECHNISCHE DATEN
………………
33
3. SICHERHEITSVORRICHTUNGEN
…
34
4. VERWENDUNG VON AKKU UND
LADEGERÄT
………………………
35
5.
HANDHABUNG DER BRENNSTOFFZELLE…39
6.
BETRIEBSANWEISUNGEN
…………
42
7.
WICHTIGE PUNKTE ZUR AUFRECHTERHALTUNG
DER LEISTUNGSFÄHIGKEIT
…………………
45
8. LAGERUNG
…………………………
45
9.
STÖRUNGSBESEITIGUNG/INSTANDSETZUNG
…
46
BETRIEBSANLEITUNG
LESEN SIE VOR INBETRIEBNAHME DES GERÄTES DIE GEBRAUCHS- UND SICHERHEITS-
HINWEISE. BITTE BEWAHREN SIE DIE GEBRAUCHS- UND SICHERHEITSHINWEISE AUF,
DAMIT SIE AUCH SPÄTER EINGESEHEN WERDEN KÖNNEN.
ACHTUNG:
Page 26
26
1. SICHERHEITSVORSCHRIFTEN
VORSICHTSHINWEISE ZUM GEBRAUCH DES WERKZEUGS
1. SCHUTZBRILLE TRAGEN
Durch das austretende Gas aufgewirbelter Staub und Nageldübel, die durch unsachgemäße
Handhabung des Werkzeugs aus diesem geschleudert werden oder von einem Gegenstand
abprallen, stellen eine stetige Gefahr für die Augen dar. Daher ist beim Einsatz des Werkzeugs
stets eine Schutzbrille zu tragen.
Der Arbeitgeber und/oder Benutzer ist für einen ausreichenden Augenschutz verantwortlich. Die
Augenschutzausrüstung muss dem Standard ANSI Z87.1 (Council Directive 89/688/EEC vom 21.
Dez. 1989) entsprechen und sowohl Frontal- als auch Seitenschutz bieten.
Der Arbeitgeber ist für die Durchsetzung des Augenschutzgebrauchs durch den Werkzeugbenutzer
und alle anderen Mitarbeiter im Arbeitsbereich verantwortlich.
HINWEIS: Eine Brille ohne Seitenschutz oder ein Gesichtsschutz allein bietet keine ausreichende
Schutzwirkung.
2. IN GEWISSEN UMGEBUNGEN KANN EIN GEHÖRSCHUTZ ERFORDERLICH SEIN
Da die Arbeitsbedingungen eine Aussetzung hoher Geräuschpegel einschließen können, die dem
Gehör schaden, sind der Arbeitgeber und der Benutzer für die Bereitstellung eines ggf.
erforderlichen Gehörschutzes und die Verwendung durch den Werkzeugbenutzer und alle anderen
Personen im Arbeitsbereich verantwortlich.
3. ZUR ARBEITSUMGEBUNG PASSENDE KLEIDUNG UND SCHUTZAUSRÜSTUNG TRAGEN
Je nach Arbeitsumgebung einen langärmeligen Arbeitsanzug sowie Schutzausrüstung wie
Schutzhelm, Sicherheitsschuhe u. dgl. tragen.
4. VORSICHTSHINWEISE ZU BRENNSTOFFZELLEN
q
Unbedingt -Brennstoffzellen verwenden.
w
Brennstoffzellen nicht an einem schlecht belüfteten Platz aufbewahren.
e
Brennstoffzellen nicht direkt dem Sonnenlicht aussetzen.
Brennstoffzellen nicht in einem Fahrzeug oder einem anderen geschlossenen Behälter
aufbewahren, in dem hohe Temperaturen herrschen können, da sie explodieren kann. Auch
verbrauchte, leere Brennstoffzellen enthalten noch Gasreste, die sich ausdehnen und den
Behälter zum Explodieren bringen können.
r
Brennstoffzellen bei Umgebungstemperaturen von maximal 49°C (120°F) lagern.
Brennstoffzellen enthalten brennbares Gas, das unter Druck steht. Bei Temperaturen oberhalb
49°C (120°F) kann Gas austreten oder die Zelle bersten und einen Brand verursachen.
WARNUNG:
ZUR VERMEIDUNG VON SCHWEREN KÖRPERVERLETZUNGEN UND SACHSCHÄDEN
VOR GEBRAUCH UNBEDINGT DIE FOLGENDEN “SICHERHEITSVORSCHRIFTEN” LESEN
UND VERSTEHEN. NICHTBEACHTUNG VON WARNHINWEISEN KANN DEN TOD ODER
SCHWERE KÖRPERVERLETZUNGEN ZUR FOLGE HABEN.
49°C
120°F
Page 27

27
t
Das Gas nicht einatmen.
y
Leere Brennstoffzellen nicht verbrennen oder recyceln.
u
Das Gas nicht auf den menschlichen Körper sprühen.
i
Den Gummistopfen an der Unterseite der Brennstoffzelle nicht entfernen. Der Stopfen
darf erst bei der Entsorgung der Zelle entfernt werden.
o
Brennstoffzellen nicht punktieren.
5. VORSICHTSHINWEISE ZU AKKU, LADEGERÄT UND LADEVERFAHREN
q
Unbedingt den Battery (Cat.#55583) verwenden.
Das Werkzeug darf nur mit dem Battery (Cat.#55583) betrieben werden. Eine
Spannungsversorgung über ein Stromnetz oder mit einem Akku unterschiedlichen Typs,
Trockenzellen oder einer Fahrzeugbatterie ist nicht zulässig.
Nichtbeachtung kann einen Defekt, eine Funktionsstörung, Wärmeentwicklung oder einen Brand
verursachen. (Weitere Informationen zum Battery (Cat.#55583) siehe Seite 33.)
w
Unbedingt mit Charger Base (Cat.#55618) laden.
Der Akku muss mit dem Charger Base (Cat.#55618) geladen werden.
Bei Verwendung eines anderen Ladegeräts wird der Akku unter Umständen nicht
vorschriftsmäßig geladen oder kann beschädigt werden, sich stark erwärmen oder sich
entzünden. (Weitere Informationen zum Charger Base (Cat.#55618) siehe Seite 33.)
e
Den Akku vor Gebrauch laden.
Ein Akku, der neu erworben oder längere Zeit nicht benutzt wurde, ist aufgrund seiner
kontinuierlichen Selbstentladung nicht voll aufgeladen. Daher unbedingt mit dem Charger Base
(Cat.#55618) laden.
r
Den Akku von einem Netz mit der vorgeschriebenen Spannung laden.
Das Ladegerät an eine Steckdose mit 100-240 V Wechselstrom (Haushaltsnetz) anschließen.
Nur an Stromnetze mit der vorgeschriebenen Spannung anschließen. Nichtbeachtung kann
starke Wärmeentwicklung oder ein Entzünden zur Folge haben.
Page 28
28
t
Niemals Transformatoren wie z. B. einen Spannungsverstärker als Stromquelle für das
Ladegerät verwenden.
Nichtbeachtung dieses Punkts kann eine Störung oder ein Durchbrennen des Ladegeräts zur
Folge haben.
y
Zum Laden des Akkus keinen motorgetriebenen Generator und auch keine
Gleichstromquelle verwenden.
Nichtbeachtung dieses Punkts kann eine Störung oder ein Durchbrennen des Ladegeräts zur
Folge haben.
u
Den Akku niemals im Regen oder an anderen Orten aufladen, wo er Spritzwasser oder
Feuchtigkeit ausgesetzt ist.
Aufladen in feuchter Umgebung kann einen elektrischen Schlag oder Kurzschluss und im
Extremfall ein Brand durch Durchbrennen oder Entzündung zur Folge haben.
i
Den Netzstecker niemals mit nassen oder feuchten Händen anfassen.
Berührung mit nassen oder feuchten Händen kann einen elektrischen Schlag zur Folge haben.
o
Das Ladegerät bei Gebrauch nicht mit einem Lappen o. dgl. zudecken.
Es kann sich bei Zudeckung stark erwärmen und ein Durchbrennen oder einen Brand
verursachen.
!0
Das Ladegerät von offenen Flammen fernhalten.
!1
Den Akku nicht in der Nähe brennbarer Stoffe aufladen.
!2
Den Akku an einem gut belüfteten Ort und vor Sonnenlicht geschützt aufladen.
Beim Laden in direkt einfallendem Sonnenlicht kann sich das Ladegerät überhitzen, was ein
Durchbrennen oder einen Brand verursachen kann.
!3
Den Akku bei Umgebungstemperaturen zwischen 0°C (32°F) und 40°C (104°F) aufladen.
Bei einer Umgebungstemperatur unter 0°C (32°F) oder über 40°C (104°F) wird der Akku nicht
ordnungsgemäß geladen und es kann ein Brand entstehen.
!4
Darauf achten, dass keine Fremdkörper in die Belüftungsöffnung oder die Akkuaufnahme
des Ladegeräts gerät.
Dies kann einen elektrischen Schlag oder eine Störung verursachen. Das Ladegerät an einem
staubfreien Ort verwenden.
Page 29
29
!56
Das Netzteilkabel vorsichtig handhaben.
Das Netzteil nicht am Kabel tragen und auch nicht durch Ziehen am Kabel von der Steckdose
trennen, da dies eine Beschädigung des Kabels (Kabelbruch oder Kurzschluss) verursachen
kann. Außerdem darauf achten, dass das Netzteilkabel nicht mit Schneidwerkzeugen, heißen
Substanzen, Öl und Fett in Berührung kommt. Im Falle einer Beschädigung das Netzteil(kabel)
durch ein neues ersetzen.
!6
Die Akkukappe stets aufsetzen, wenn der Akku nicht im Werkzeug sitzt und nicht
verwendet wird.
Diese Kappe, die über dem Klemmenblock (Metallteil) angebracht wird, verhindert einen
Kurzschluss, während der Akku nicht in Gebrauch ist.
!7
Den Klemmenblock (Metallteil) am Akku nicht kurzschließen.
Bei kurzgeschlossenen Klemmen fließt ein starker Strom, der ein Erwärmen des Akkus und
Verbrennungen oder eine Beschädigung verursachen kann.
!8
Den Akku nicht ins Feuer werfen.
Nichtbeachtung dieses Hinweises kann eine Explosion zur Folge haben.
6. VORSICHT BEIM EINSETZEN DES AKKUS IN DAS WERKZEUG
Beim Einsetzen des Akkus in das Werkzeug folgende Punkte beachten, um eine Funktionsstörung
zu vermeiden.
1. Den Finger nicht auf den Auslöser legen.
2. Den Kontaktarm nicht gegen einen Gegenstand drücken.
3. Finger und Hände nicht in den Bereich der Mündung bringen.
7. BEI DER ANBRINGUNG DES AKKUS STETS EINE FUNKTIONSPRÜFUNG DURCHFÜHREN
Vor Gebrauch des Werkzeugs zunächst nur den Akku anbringen (weder Nageldübel noch
Brennstoffzelle laden), ohne den Kontaktarm gegen einen Gegenstand zu drücken, und folgende
Funktionsprüfung durchführen:
1. Prüfen, ob das Betriebsgeräusch zu hören ist, wenn lediglich der Akku eingesetzt ist.
※ Wenn der Kontaktarm bei eingesetztem Akku auf den Boden o. dgl. gedrückt wird, läuft der
Lüfter des Werkzeugs, was jedoch normal ist.
2. Auf Wärmeentwicklung oder ungewöhnliche Geruchs- bzw. Geräuschentwicklung prüfen.
Wenn das Werkzeug im aktivierten Zustand Wärme entwickelt oder einen ungewöhnlichen Geruch
oder ein komisches Geräusch erzeugt, deutet dies auf eine Störung hin. Eine Verwendung des
Werkzeugs in diesem Zustand kann einen Unfall verursachen. Sollte etwas Ungewöhnliches
gefunden werden, den nächsten autorisierten -Händler benachrichtigen.
8. BEI NICHTGEBRAUCH DES LADEGERÄTS DAS NETZTEIL AUS DER STECKDOSE ZIEHEN
9. DAS WERKZEUG NICHT AN EINEM SCHLECHT BELÜFTETEN ORT VERWENDEN
Bei Einsatz an einem schlecht belüfteten Ort kann Sauerstoffmangel auftreten.
10. DIREKTE SONNENBESTRAHLUNG VERMEIDEN
Das Werkzeug nicht in einem Fahrzeug oder einem anderen geschlossenen Behälter aufbewahren,
in dem hohe Temperaturen herrschen können, da es explodieren kann. Auch verbrauchte, leere
Brennstoffzellen enthalten noch Gasreste, die sich ausdehnen und den Behälter zum Explodieren
bringen können.
Page 30

30
11. DAS WERKZEUG NIEMALS IN DER NÄHE FLÜCHTIGER; BRENNBARER SUBSTANZEN
VERWENDEN
Das Werkzeug niemals in der Nähe von Benzin, Verdünner, Gas, Lack oder Klebemitteln
verwenden, die es diese entzünden und eine Explosion verursachen kann.
12. DAS WERKZEUG VON OFFENEN FLAMMEN FERNHALTEN
13. DAS WERKZEUG BEI UMGEBUNGSTEMPERATUREN VON -7°C (19°F) bis 49°C (120°F)
VERWENDEN, DA ES ANDERNFALLS BESCHÄDIGT WERDEN, SICH ENTZÜNDEN ODER
EXPLODIEREN KANN
-7 °C und darunter: Das Gehäuse des Werkzeugs kann beschädigt werden.
49 °C und darüber: Die Brennstoffzelle kann beschädigt werden und einen Brand oder eine
Explosion verursachen.
14. DAS WERKZEUG NICHT IM REGEN ODER AN SEHR FEUCHTEN ORTEN VERWENDEN
Nichtbeachtung dieses Hinweises kann eine Störung zur Folge haben.
15. BEIM EINTREIBEN VON NAGELDÜBELN DARAUF ACHTEN, DASS SICH PERSONEN NICHT
GEGENÜBER STEHEN
Hierbei könnte ein “Fehlschuss” eine Verletzung des gegenüberstehenden Arbeiters verursachen.
16. DIE HEISSEN TEILE DES WERKZEUGS NICHT BERÜHREN
Nach längerem Betrieb sind das Nasenstück und der Kontaktarm sehr heiß. Bei Berührung besteht
Verbrennungsgefahr.
17. BEI VERWENDUNG DES HAKENS UNBEDINGT DEN FINGER VOM AUSLÖSER NEHMEN
Wenn der Haken verwendet wird, muss der Finger vom Auslöser genommen werden.
18. NACH GEBRAUCH DES WERKZEUGS DIE BRENNSTOFFZELLE SOWIE DEN AKKU
ENTFERNEN UND DAS MAGAZIN LEEREN
Nach der Arbeit sowie vor Arbeitspausen oder Verlassen des Arbeitsplatzes, Wechseln des
Arbeitsplatzes, Einstellen, Zerlegen oder Instandsetzen des Werkzeugs und zum Entfernen eines
gestauten Befestigungsteils immer die Brennstoffzelle sowie den Akku aus dem Werkzeug nehmen
und das Magazin leeren.
19. AUF GELOCKERTE SCHRAUBEN UNTERSUCHEN
Gelockerte oder unzureichend angezogene Schrauben können beim Betrieb Schäden am
Werkzeug hervorrufen. Vor Gebrauch des Werkzeugs daher sicherstellen, dass alle Schrauben
vorschriftsmäßig installiert und fest angezogen sind.
20. DEN AUSLÖSER NUR BERÜHREN, WENN EIN BEFESTIGUNGSTEIL EINGETRIEBEN
WERDEN SOLL
Der Auslöser darf nur betätigt werden, wenn ein Befestigungsteil in die Arbeitsfläche eingetrieben
werden soll. Tragen des Werkzeugs mit betätigtem Auslöser ist gefährlich, und derartige
Handlungen sind daher unbedingt zu vermeiden.
49°C
120°F
−7°C
19°F
Page 31

31
21. DIE MÜNDUNG NIEMALS AUF SICH ODER ANDERE PERSONEN RICHTEN
Wenn die Mündung auf Personen gerichtet wird, können “Fehlschüsse” schwere Unfälle
verursachen. Daher steht darauf achten, dass die Mündung nicht auf andere Personen gerichtet
wird, auch dann nicht, wenn die Brennstoffzelle und der Akku entfernt wurden oder
Befestigungsteile geladen bzw. herausgenommen werden.
22. DIE VORGESCHRIEBENEN BEFESTIGUNGSTEILE VERWENDEN
Die Verwendung unzulässiger Befestigungsteile verursacht eine Funktionsstörung des Werkzeugs.
Daher immer die für dieses Werkzeug vorgeschriebenen Befestigungsteile verwenden.
23. DIE MÜNDUNG ORDNUNGSGEMÄSS AN DER ARBEITSFLÄCHE ANSETZEN
Wenn die Mündung am Nasenstück nicht richtig angesetzt wird, kann das einzutreibende
Befestigungsteil von der Fläche abprallen und nach oben geschleudert werden, was extrem
gefährlich ist.
24. HÄNDE UND KÖRPER VON DER MÜNDUNG FERNHALTEN
Beim Laden von Befestigungsteilen und Arbeiten mit dem Werkzeug Hände und andere Körperteile
nicht in den Bereich der Mündung am Werkzeug bringen, um eine Verletzung durch ein
versehentliches Eintreiben zu vermeiden.
25. BEFESTIGUNGSTEILE NICHT IM RANDBEREICH BZW. IN ECKEN DER ARBEITSFLÄCHE
ODER IN DÜNNES MATERIAL EINTREIBEN
Das Material kann reißen, und das dabei abprallende Befestigungsteil kann eine Person treffen und
verletzen.
26. BEFESTIGUNGSTEILE NICHT ÜBEREINANDER EINTREIBEN
Beim Eintreiben eines Befestigungsteils über einem anderen kann dieses abprallen und eine
Verletzung verursachen.
27. ENTFERNEN DER BEFESTIGUNGSTEILE NACH DER ARBEIT
Nach der Arbeit im Magazin verbleibende Befestigungsteile können beim nächsten Gebrauch des
Werkzeugs, bei der Handhabung des Werkzeugs sowie beim Einlegen der Brennstoffzelle bzw. des
Akkus einen schweren Unfall verursachen. Aus diesem Grunde müssen alle im Magazin
verbleibenden Befestigungsteile bei Beendigung der Arbeit entfernt werden.
28. BEI VERWENDUNG EINES WERKZEUGS MIT KONTAKTAUSLÖSUNG DIE FUNKTION DES
KONTAKTAUSLÖSUNGSMECHANISMUS REGELMÄSSIG PRÜFEN
Das Werkzeug keinesfalls verwenden, wenn die Kontaktauslösung nicht einwandfrei funktioniert, da
dies gefährliche “Fehlschüsse” zur Folge haben kann. Keine eigenmächtigen Eingriffe am
Kontaktauslösungsmechanismus vornehmen.
29. BEIM EINSATZ DES WERKZEUGS IM FREIEN ODER AN EINEM ERHÖHTEN ORT
Beim Befestigen von Dachteilen und auf anderen schrägen Flächen am tiefer liegenden Ende der
Fläche beginnen und nach oben arbeiten. Arbeiten in entgegengesetzter Richtung ist gefährlich, da
man leicht das Gleichgewicht verlieren kann.
30. DAS WERKZEUG NIEMALS VERWENDEN; WENN EINES SEINER BEDIENTEILE (AUSLÖSER,
KONTAKTARM) NICHT BZW. NICHT EINWANDFREI ARBEITET ODER ENTFERNT BZW.
ABGEÄNDERT WURDE
31. BEI WERKZEUGBETÄTIGUNG NICHT IN DIE LUFT SCHIESSEN
Dies könnte eine Verletzung Umstehender zur Folge haben und belastet das Werkzeug unnötig.
32. IMMER DAVON AUSGEHEN, DASS DAS MAGAZIN DES WERKZEUGS BEFESTIGUNGSTEILE
ENTHÄLT
Page 32

32
33. DAS WERKZEUG ALS ARBEITSGERÄT SCHÄTZEN
34. KEINEN UNFUG MIT DEM WERKZEUG TREIBEN
35. KEINE BEFESTIGUNGSTEILE IN DAS WERKZEUG LADEN, WÄHREND EINES DER
BEDIENTEILE (AUSLÖSER, KONTAKTARM) AKTIVIERT IST
36. DAS WERKZEUG VORSCHRIFTSMÄSSIG PFLEGEN
Das Werkzeug mit einem weichen Lappen säubern. Niemals einen nassen Lappen oder flüchtige
Reinigungsmittel wie Verdünner oder Benzin verwenden.
37. VOR DIREKT EINFALLENDEM SONNENLICHT SCHÜTZEN
Werkzeug und Ladegerät nicht längere Zeit in direktem Sonnenlicht ablegen.
NEBEN DEN ANDEREN WARNHINWEISEN IN DIESER ANLEITUNG DIE
FOLGENDEN ALLGEMEINEN VORSICHTSMASSREGELN BEACHTEN
•
Das Werkzeug nicht als Hammer verwenden.
•
Das Werkzeug darf nur für den Zweck verwendet werden, für den es vorgesehen ist.
•
Bedienteile (AUSLÖSER, KONTAKTARM) niemals entfernen oder manipulieren.
•
Das Werkzeug, Brennstoffzellen und Akkus bei Nichtgebrauch an einem trockenen Platz
außerhalb der Reichweite von Kindern aufbewahren.
•
Das Werkzeug nicht ohne Warnschild verwenden.
•
Die ursprüngliche Konstruktion bzw. Funktionsweise des Werkzeugs darf ohne Genehmigung
von CO., LTD. nicht abgeändert werden.
Page 33

33
2. SPEZIFIKATIONEN UND TECHNISCHE DATEN
1. TEILEBEZEICHNUNGEN
2. WERKZEUGSPEZIFIKATIONEN
q
e
w
rt
y
u
i
!1 !2 !3
!8
!9
@0
!0
!5
!6
!7
!4
@1
@2
@3
o
q
Luftfilterabdeckung
w
Brennstoffzellenabdeckung
e
Gehäuse
r
LED-Anzeige
t
Auslöser
y
Akku
u
Haken
i
Nageldübelanschlag
o
Einstellrad
!0
Kontaktarm
!1
Schieberhalter
!2
Schieber
!3
Magazin
!4
Endabdeckung
!5
Akkukappe
!6
Klemmenblock
!7
Akku (Cat.#55583)
!8
Akkuaufnahme
!9
Stecker
@0
Netzteilkabel
@1
Ladegerät (Cat.#55618)
@2
Netzstecker
@3
Netzteil
3. BEFESTIGUNGSTEILSPEZIFIKATIONEN
4. TECHNISCHE DATEN
q
GERÄUSCH
A-bewertet, einzelnes Ereignis ------ LWA, 1s, d 105.4 dB Schallleistungspegel
A-bewertet, einzelnes Ereignis ------ Lp A , 1s, d 98.8 dB Emissionsschalldruckpegel am Arbeitsplatz
Ermittlung und Dokumentierung dieser Werte gemäß EN12549 : 1999.
w
SCHWINGUNGEN
Schwingungsverhalten = 4.46 m/s
2
Ermittlung und Dokumentierung dieses Werts gemäß ISO 8662-11.
Dieser Wert ist ein werkzeugbezogener Eigenschaftswert und gibt keine Auskunft über den Einfluss auf Hand und Arm beim
Einsatz des Werkzeugs. Dieser Einfluss ist unter anderem von der Kraft abhängig, mit der das Werkzeug gehalten wird, sowie
der Andruckkraft, der Ausrichtung des Werkzeugs, dem Versorgungsstrom, dem Werkstück und der Werkstückunterlage.
PRODUKT-NR. W3-21FRH W3-34CDH
HÖHE 382 mm 391 mm
BREITE 111 mm 110 mm
LÄNGE 379 mm 340 mm
GEWICHT
3.5 kg (7.8 lbs.)
(einschließlich Brennstoffzelle und Akku)
MAGAZIN-FASSUNGSVERMÖGEN
32 Nageldübel/ 40 Nageldübel/
1 Streifen 1 Streifen
AKKU Battery (Cat.#55583)
AKKUKAPAZITÄT
6 V Gleichspannung, 1.5 Ah
LADEGERÄT Charger Base (Cat.#55618)
NETZANSCHLUSSWERTE
100-240 V, 50 oder 60 Hz
LEISTUNGSAUFNAHME
8VA (10V 800mA)
(Nennwert)
LADEZEIT max. 150 Minuten
ZUBEHÖR
Schutzbrille, Tragekoffer, Akku,
Ladegerät,
PRODUKT-NR. W3-21FRH W3-34CDH
NAGELDÜBEL-LÄNGE
50 bis 90 mm
SCHAFTDURCHMESSER
2.9 bis 3.3 mm
SCHAFTTYPEN glatt, gerillt, mit Gewinde
KOPFDURCHMESSER
6.8 bis 7.5 mm 6.5 bis 7.7 mm
WINKEL 21 Grad 34 Grad
KOPF Rundkopf Verkürzter Kopf
Page 34

34
3. SICHERHEITSVORRICHTUNGEN
Das Werkzeug ist mit den folgenden Sicherheitsvorrichtungen ausgestattet, um für ausreichende
Sicherheit beim Eintreiben von Nageldübeln zu sorgen.
Mechanische Sicherheitsvorrichtung
Dieses Werkzeug ist so konzipiert, dass ein Nageldübel nur ausgestoßen wird, wenn
sowohl der Kontaktarm als auch der Auslöser gleichzeitig aktiviert sind. Wenn entweder
nur der Betätigungsarm gedrückt oder nur der Kontaktarm auf der Eintriebsfläche
angesetzt wird, stößt das Werkzeug keinen Nageldübel aus. Nageldübel können nur
eingetrieben werden, wenn der Kontaktarm auf der Fläche angesetzt ist und der
Auslöser gedrückt wird.
Auslöser
Kontaktarm
VORSICHT:
●
Vor Gebrauch des Werkzeugs dieses unbedingt auf einwandfreie Funktion der
Sicherheitsvorrichtungen überprüfen. Das Werkzeug erst verwenden, wenn sichergestellt ist,
dass es einwandfrei arbeitet.
Bevor das Werkzeug gebraucht wird, zunächst prüfen, ob die Sicherheitsvorrichtungen
ordnungsgemäß arbeiten. Für diese Prüfung bei leerem Magazin (keine Nageldübel geladen)
die Brennstoffzelle und den Akku einlegen.
※
In den folgenden Fällen arbeiten die Sicherheitsvorrichtung nicht. Das Werkzeug darf in
diesem Zustand nicht verwendet werden.
1. Bei alleinigem Drücken des Auslösers (ohne Ansetzen des Kontaktarms) wird ein
Betriebsgeräusch erzeugt.
2. Das Werkzeug startet Trockenauslösung-Betrieb bei einfachem Andrücken des
Kontaktarms an das Werkstück.
※
Ein Lüftergeräusch wird hörbar, was jedoch normal ist.
Falls etwas Ungewöhnliches entdeckt wird, das Werkzeug beim nächsten von autorisierten
Händler überprüfen/instand setzen lassen.
Page 35

35
4. VERWENDUNG VON AKKU UND LADEGERÄT
WARNUNG:
●
Der Battery (Cat.#55583) für das Werkzeug muss mit dem Charger Base (Cat.#55618) geladen
werden. Bei Verwendung eines anderen Ladegeräts wird der Akku unter Umständen nicht
vorschriftsmäßig geladen oder kann beschädigt werden, sich stark erwärmen oder sich
entzünden.
●
Den Akku nicht in die Nähe offener Flammen bringen.
●
Den Akku nicht in der Sonne liegen lassen.
●
Den Akku nicht laden oder verwenden, wenn er nass oder feucht ist (durch Einwirkung von
Flüssigkeiten wie Wasser, Meerwasser, Milch und andere Getränke, Seifenlauge).
●
Das Ladegerät bei Nichtgebrauch von der Steckdose trennen.
●
Bei Temperaturen von 0˚C bis 40˚C laden, um Brandgefahr auszuschließen.
●
Vor starken Schlägen und Stößen schützen (z. B. Hammerschlag, Fußtritt oder Fall).
WARNUNG:
●
Um die Gefahr eines Kurzschlusses auszuschließen, vor der Recycling-Entsorgung den
Klemmenblock (Metallteil) des Akkus mit der Kappe abdecken (zur sicheren Befestigung mit
Klebeband umwickeln).
<Zellen im Akku>
・
Nennspannung: 1,2 V/Zelle
・
Zellen pro Akku: 5 Stück
VORSICHT:
●
Wenn der Akku verbraucht ist oder voraussichtlich längere Zeit nicht gebraucht wird, diesen
aus dem Ladegerät nehmen.
●
Das Werkzeug beim Tragen nicht am eingesetzten Akku halten.
ORDNUNGSGEMÄSSER GEBRAUCH DES AKKUS
q
Den Akku voll aufladen und dann bis zur völligen Entleerung verwenden.
Wenn der Akku wiederholt bei noch verbleibender Restspannung wieder aufgeladen wird, nimmt die
Zahl der pro Ladevorgang eintreibbaren Nageldübel unter Umständen drastisch ab, und die
Lebensdauer des Akkus verkürzt sich. Es wird empfohlen, den Akku zu verwenden, bis er sich völlig
entleert hat (rote LED-Anzeige am Werkzeug leuchtet).
w
Zwei Akkus abwechselnd verwenden.
Zur Akkuschonung wird empfohlen, mit zwei Akkus zu arbeiten, die abwechselnd verwendet werden.
Der Akku für dieses Werkzeug besteht aus Zellen mit Nickel-Wasserstoff, einem wertvollen RecyclingMaterial. Sobald ein Akku das Ende seiner Lebensdauer erreicht hat, diesen beim nächsten
autorisierten Händler abgeben; nicht auf normale Weise entsorgen.
Recycling des Nickel-Wasserstoff-Akkus
Page 36

36
Grüne LED-Anzeige Rote LED-Anzeige Status Beschreibung
1.
2.
3.
4.
5.
6.
VERWENDUNG DES LADEGERÄTS
Das Spezialladegerät Charger Base (Cat.#55618) weist LED-Anzeigen (grün, rot) auf, die über den
Status von Ladegerät und Akku informieren.
Die folgenden Symptome lassen auf eine Störung schließen. In solchen Fällen Ladegerät und Akku
ersetzen.
●
Die grüne LED-Anzeige leuchtet nicht auf, wenn der Netzstecker des Ladegeräts an eine Steckdose
anschlossen wird (100 - 240 V, Haushaltsnetz), ohne dass ein Akku im Ladegerät eingesetzt ist.
※
Mit einem anderen Elektrogerät prüfen, ob Spannung an der Steckdose anliegt.
●
Weder die grüne noch die rote LED-Anzeige leuchtet auf, wenn der Akkus in das Ladegerät
eingesetzt wird.
●
Die grüne LED-Anzeige leuchtet bei beendetem Ladevorgang nicht auf (150 Minuten nach
Aufleuchten der roten LED-Anzeige).
●
Die rote LED-Anzeige leuchtet nicht auf, wenn der Akkus in das Ladegerät eingesetzt wird.
Störungssymptome an Ladegerät und Akku
○
AN
●
AUS
Wird mit Strom
versorgt
Das Ladegerät ist am Stromnetz angeschlossen.
(Ladegerät wird mit Strom versorgt; kein Akku eingesetzt)
●
AUS
○
AN
Ladevorgang läuft Der Akku wird geladen.
○
AN
●
AUS
Ladevorgang
beendet
Der Akku ist voll aufgeladen.
Blinkt Blinkt
Temperaturalarm
Der Akku ist heiß. (Den Akku aus dem Ladegerät nehmen
und vor dem erneuten Laden eine Weile abkühlen lassen.)
○
AN
○
AN
Akkualarm
Der Akku ist defekt. (Durch einen neuen Akku
ersetzen.)
Blinkt
○
AN
Akkuüberhitzung
Der Akku ist defekt und heiß. (Durch einen neuen
Akku ersetzen.)
Page 37

37
WARNUNG:
LADEN DES AKKUS
●
Den Akku mit der vorgeschrieben Netzspannung laden.
Das Ladegerät muss an eine Steckdose mit 100 - 240 V (Haushaltsnetz) angeschlossen
werden. Der Anschluss an eine Stromversorgung mit abweichender Spannung hat nicht nur
Funktionsstörungen zur Folge, sondern ist darüber hinaus gefährlich.
●
Das Netzteilkabel mit Vorsicht behandeln.
Das Ladegerät nicht mit beschädigtem Netzteilkabel verwenden.
●
An eine geeignete Steckdose anschließen.
Ein wackeliger oder lockerer Sitz in der Steckdose kann einen Unfall durch Überhitzung
verursachen. In solchen Fällen eine andere Steckdose verwenden.
q
Falls der Akku verwendet wurde und im Werkzeug eingesetzt ist, diesen vom
Werkzeug lösen.
Das Werkzeuggehäuse gut festhalten, die Zungen an beiden Seiten des Akkus mit
den Fingern zusammendrücken und den Akku herausziehen.
Akku
w
Das Kabel des Netzteils an das Ladegerät anschließen und den Netzstecker an
eine Steckdose anschließen.
Die grüne LED-Anzeige leuchtet auf und bestätigt, dass das Ladegerät mit Strom
versorgt wird.
Grüne LED-Anzeige
Ladegerät
Netzteil (100-240 V)
Zunge
VORSICHT:
●
Nicht versuchen, einen voll aufgeladenen Akku erneut zu laden. Dies verkürzt die
Lebensdauer des Akkus.
e
Den Akku laden.
1. Den Akku fest in das Ladegerät einsetzen.
2. Der Ladevorgang setzt automatisch ein, sobald der Akku im Ladegerät sitzt.
Aufleuchten der roten LED-Anzeige bestätigt, dass der Ladevorgang läuft.
3. Die Ladezeit beträgt ca. 150 Minuten, hängt jedoch von der Temperatur, der
Versorgungsspannung und der Restspannung des Akkus ab. Nach dem
Ladevorgang macht die grüne LED-Anzeige durch Leuchten darauf aufmerksam,
dass der Akku voll aufgeladen ist. Wenn ein voll geladener Akku erneut in das
Ladegerät eingesetzt wird, leuchtet wieder die rote LED-Anzeige auf und zeigt damit
einen erneuten Ladevorgang an. Dies ist jedoch normal. Nach einer Weile leuchtet
dann die grüne LED-Anzeige auf und bestätigt, dass der Akku voll aufgeladen ist.
r
Leuchten der grünen LED-Anzeige bestätigt, dass der Ladevorgang
abgeschlossen ist.
1. Das Ladegerät festhalten und den Akku herausziehen.
2. Das Netzteil aus der Steckdose ziehen.
Der Akku ist damit voll aufgeladen.
Akku
Rote LED-Anzeige
Ladegerät
Netzsteckdose
(100-240 V)
Page 38

38
VORSICHT:
●
Nach Beendigung der Arbeit oder wenn das Gerät nicht verwendet werden soll, immer den
Akku zur Lagerung aus dem Gerät nehmen. (Auch Gaspatrone und Nägel entnehmen)
Bei fortgesetztem Netzanschluss wird auch im Standby-Zustand weiter Strom aufgenommen.
Führen Sie in den folgenden Fällen Erhaltungsladen aus, um volle Leistung zu erzielen:
・
Nach dem Kauf des Geräts.
・
Wenn das Gerät 1 Monat oder länger nicht verwendet wurde.
・
Wenn es klar ist, dass Sie auch in geladenem Zustand weniger Nägel eintreiben können.
Nachdem das Laden-Fertig-Lämpchen aufleuchtet, den Akku etwa weitere 24 Stunden eingesetzt
lassen.
Über Erhaltungsladen
Page 39

39
5. HANDHABUNG DER BRENNSTOFFZELLE
Die Brennstoffzelle hat eine Doppelkonstruktion: ein innerer Behälter ist mit dem Brennstoffgas gefüllt,
ein äußerer mit Treibgas (ein weiteres, unter Druck stehendes Gas).
Das innere Brennstoffgas wird wie bei einer Zahnpastatube vom umliegenden Treibgas herausgedrückt
und so ohne Verschwendung vollständig aufgebraucht. Durch diese Konstruktion bedingt, verbleibt das
brennbare Treibgas auch nach Aufbrauchen des Brennstoffgases in der Brennstoffzelle.
Daher müssen leere Brennstoffzellen mit der entsprechenden Vorsicht entsorgt werden.
WARNUNG:
●
Ausschließlich Brennstoffzellen verwenden, die speziell für das Gasbetriebene
Befestigungssystem vorgesehen sind.
●
Beim Anbringen oder Betätigen des Strahlventils nicht rauchen.
●
Den Gummistopfen am Boden der Brennstoffzelle erst bei der Entsorgung entfernen.
●
Die Brennstoffzelle nicht punktieren.
●
Das Gas nicht einatmen.
Einatmen des Gases kann Müdigkeit, Benommenheit und Übelkeit hervorrufen.
●
Das Gas nicht auf den menschlichen Körper sprühen.
●
Leere Brennstoffzellen nicht verbrennen oder recyceln.
(Hinweise zur Entsorgung von Brennstoffzellen siehe Seite 41.)
WARNUNG:
●
Das Strahlventil vorschriftsmäßig an der Brennstoffzelle anbringen.
Das Ventil gut befestigen, so dass es mit einem "Klicken" einrastet.
Wenn das Strahlventil nicht ordnungsgemäß angebracht ist, wird kein Brennstoff
eingesprüht. Dies könnte außerdem ein gefährliches Lecken des Gases zur Folge haben.
ANBRINGUNG DES STRAHLVENTILS AN DER BRENNSTOFFZELLE
Das Strahlventil ist so ausgelegt, dass es eine konstante Menge Brennstoffgas in die
Verbrennungskammer des Werkzeugs sprüht.
1. Drücken, um das Ventil zu entfernen. 2. Ventil von Kappe trennen. 3. Kanten gerade ausrichten.
4. Vordere Kante hineindrücken. 5. Hintere Kante bis zum 6. Waagrecht drücken, bis ein weiterer
5. Einrasten hineindrücken. 6. Klickton hörbar wird.
Strahlventil
Page 40

40
WARNUNG:
EINSETZEN DER BRENNSTOFFZELLE
●
Den Finger vom Auslöser nehmen.
●
Der Kontaktarm darf nirgendwo aufliegen.
2
1
q
Die Brennstoffzellenabdeckung nach oben und dann zur Seite drücken, um sie zu
öffnen.
Brennstoffzellenabdeckung
w
Die Strahldüse nach vorn (in Richtung Luftfilterabdeckung) ausrichten und die
Brennstoffzelle einsetzen.
Strahldüse
e
Bei geöffneter Brennstoffzellenabdeckungskappe ist ein roterAdapter sichtbar.
Die Strahlduse in diesen Adapter einpassen.
Roter Adapter
r
Die Brennstoffzellenabdeckung wieder schließen und bis zum Einrasten nach unten
drücken.
Brennstoffzelle
Page 41

41
ENTSORGUNG DER VERBRAUCHTEN KRAFTSTOFFZELLE
Entflammbares Düsengas befindet sich immer noch in der verbrauchten Kraftstoffzelle.
WARNUNG:
●
Nicht die verbrauchte Kraftstoffzelle in ein Feuer werfen.
●
Niemals eine Zigarette rauchen.
●
Niemals das Gas einatmen.
Page 42

42
6. BETRIEBSANWEISUNGEN
Den Abschnitt mit der Überschrift “SICHERHEITSVORSCHRIFTEN” lesen.
1. VOR INBETRIEBNAHME
q
Schutzbrille tragen.
w
Brennstoffzelle und Akku noch nicht einsetzen.
e
Auf gelockerte Schrauben untersuchen.
r
Funktion und Leichtgängigkeit von Kontaktarm und Auslöser prüfen.
t
Brennstoffzelle und Akku einsetzen.
y
Werkzeug halten, ohne den Auslöser zu drücken, und den Kontaktarm gegen das Werkstück
drücken. (Das Werkzeug darf nicht arbeiten.)
u
Werkzeug mit nicht am Werkstück angesetztem Kontaktarm halten und den Auslöser drücken. (Das
Werkzeug darf nicht arbeiten.)
i
Brennstoffzelle und Akku wieder entfernen.
WARNUNG:
WARNUNG:
2. BETRIEB
Schutzbrille tragen
Durch das austretende Gas aufgewirbelter Staub und Nageldübel, die durch unsachgemäße
Handhabung des Werkzeugs aus diesem geschleudert werden oder von einem Gegenstand abprallen,
stellen eine stetige Gefahr für die Augen dar. Daher ist beim Einsatz des Werkzeugs stets eine
Schutzbrille zu tragen.
Der Arbeitgeber und/oder Benutzer ist für einen ausreichenden Augenschutz verantwortlich. Die
Augenschutzausrüstung muss dem Standard ANSI Z87.1 (Council Directive 89/688/EEC vom 21. Dez.
1989) entsprechen und sowohl Frontal- als auch Seitenschutz bieten.
Der Arbeitgeber ist für die Durchsetzung des Augenschutzgebrauchs durch den Werkzeugbenutzer und
alle anderen Mitarbeiter im Arbeitsbereich verantwortlich.
HINWEIS: Eine Brille ohne Seitenschutz oder ein Gesichtsschutz allein bietet keine ausreichende
Schutzwirkung.
Hände und Körper von der Mündung fernhalten
Es besteht jederzeit die Gefahr, dass ein versehentlich ausgestoßener Nageldübel eine Hand oder
einen anderen Körperteil trifft.
Vorgang
q
Die Nageldübel durch den Schlitz am hinteren Ende des Magazins einführen, bis sie
am vorderen Ende den Nageldübelanschlag erreichen.
WARNUNG:
LADEN DER NAGELDÜBEL
●
Zum Laden von Nageldübeln unbedingt den Finger vom Auslöser nehmen.
●
Der Kontaktarm darf nirgendwo aufliegen.
●
Abruptes Loslassen des Drücker-Halters führt zu Nagelstau oder
Fehlauslösungen.
VORSICHT:
Nagel
Nageldübel
Page 43

EINTREIBTIEFENEINSTELLUNG
●
IMMER Kraftstoffzelle und Akku vor Einstellungen aus dem Werkzeug
entfernen.
●
Prüfen, ob die Einstellscheibe erhitzt ist.
Die Eintreibtiefeneinstellung wird mit der Einstellscheibe vorgenommen.
q
Bei angebrachter Kraftstoffzelle und Akku einige Nägel in eine typische
Materialprobe eintreiben, um zu bestimmen, ob Einstellung erforderlich ist.
w
Wenn Einstellung erforderlich ist, Kraftstoffzelle und Akku entfernen.
e
Beim Drehen der Einstellscheibe die Richtungsmarkierung am Magazin beachten.
r
Kraftstoffzelle und Akku entfernen.
r
Es wird kein Nageldübel ausgestoßen, wenn der Kontaktarm bei bereits gedrücktem
Auslöser gegen die Fläche gedrückt wird. Den Auslöser loslassen und Schritt
w
wiederholen.
Schieberhalter
43
w
Den Schieberhalter bis zum hinteren Ende des Magazins ziehen und vorsichtig
loslassen.
●
Das Gesicht niemals über das Werkzeug bringen. Der Rückschlag des
Werkzeugs könnte eine Verletzung verursachen.
●
Hände und Finger nicht in den Bereich der Mündung bringen.
WARNUNG:
WARNUNG:
2
1
q Press the nose of the Contact Arm
against the object.
w Pull the Trigger.
EINTREIBEN VON NAGELDÜBELN
Vorgang
q
Akku und Brennstoffzelle einsetzen.
w
Die Nase des Kontaktarms gegen die Fläche drücken, in die der Nageldübel
eingetrieben werden soll. Der Lüftermotor läuft an, und Brennstoffgas wird zur
Vermischung mit Luft eingesprüht.
e
Kontaktarm und Endabdeckung fest andrücken und den Auslöser drücken. Der
Nageldübel wird durch die Verbrennung des Brennstoffs in die Fläche getrieben.
●
Vor Arbeitsbeginn prüfen, ob das Werkzeug vorschriftsmäßig funktioniert, wie
an früherer Stelle beschrieben.
●
Nach längerem Gebrauch kann das Werkzeug heiß werden und
Verbrennungen verursachen.
Falls etwas Ungewöhnliches entdeckt wird, das Werkzeug beim nächsten von
autorisierten Händler überprüfen/instand setzen lassen.
※
Der Lüfter läuft auch nach dem Eintreiben eines Nageldübels etwa 10
Sekunden lang weiter.
WARNUNG:
Einstellrad
Tiefer Höher
q
Die Nase des Kontaktarms gegen die
Fläche drücken.
w
Den Auslöser drücken.
VORSICHT:
Page 44

44
AUSWECHSELN DER BRENNSTOFFZELLE
Wenn das Brennstoffgas aufgebraucht ist, können keine Nageldübel mehr eingetrieben
werden.
●
Den Finger vom Auslöser nehmen.
●
Der Kontaktarm darf nirgendwo aufliegen.
q
Die Brennstoffzellenabdeckung nach oben und dann zur Seite drücken, um sie zu
öffnen.
WARNUNG:
AUSWECHSELN DES AKKUS
Wenn der Akku leer ist, leuchtet die rote LED-Anzeige am Werkzeug.
●
Unbedingt die Brennstoffzelle aus dem Werkzeug nehmen.
●
Den Finger vom Auslöser nehmen.
●
Der Kontaktarm darf nirgendwo aufliegen.
WARNUNG:
w
Das Strahlventil fassen und die verbrauchte Brennstoffzelle entfernen.
e
Eine neue Brennstoffzelle einsetzen.
(Verfahren zum Einsetzen siehe Seite 40.)
q
Das Werkzeuggehäuse gut festhalten, die Zungen an beiden Seiten des Akkus mit
den Fingern zusammendrücken und den Akku herausziehen.
2
1
Brennstoffzellenabdeckung
Strahldüse
Brennstoffzelle
●
Kraftstoffzelle und Akku entfernen.
WARNUNG:
ÄNDERN DER HAKENRICHTUNG
Der Haken kann in zwei Richtungen gestellt werden. Die Innensechskantschraube mit
dem als Zubehör mitgelieferten Sechskantschlüssel 4 entfernen, die Richtung ändern,
und dann die Schrauben zum Wiederzusammenbau zurücksetzen.
Innensechskants
chrauben
Haken
Zunge
Akku
Page 45

45
7.
WICHTIGE PUNKTE ZUR AUFRECHTERHALTUNG DER LEISTUNGSFÄHIGKEIT
1. DAS WERKZEUG PFLEGLICH BEHANDELN
Nicht fallen lassen und nirgendwo anstoßen. Dies könnte Verformungen, Risse und Defekte
verursachen.
2. DAS WERKZEUG NICHT AUSLÖSEN, WENN KEINE NAGELDÜBEL GELADEN SIND
Wenn das Werkzeug mit leerem Magazin wiederholt ausgelöst wird, leidet die Lebensdauer der
einzelnen Teile.
3. DAS WERKZEUG NICHT SCHMIEREN
Niemals das Werkzeug schmieren, da dies zu Funktionsstörungen führt.
4. DAS WERKZEUG REGELMÄSSIG ÜBERPRÜFEN
Damit die Leistung des Werkzeugs voll erhalten bleibt, sollte es regelmäßig gesäubert und
überprüft werden. Die Überprüfung vom nächsten autorisierten Händler durchführen lassen.
5. LUFTFILTER SÄUBERN
Den Luftfilter alle zwei Tage säubern. Die Luftfilterabdeckung mit einem normalen Schraubendreher
öffnen, den Luftfilter herausnehmen und mit Druckluft-Reinigungsspray o. dgl. säubern.
8. LAGERUNG
q
Vor längerem Nichtgebrauch die Stahlteile dünn mit Schmiermittel benetzen, um Korrosion zu
verhindern.
w
Das Werkzeug nicht draußen in kalter Umgebung lagern. Es muss an einem warmen Ort aufbewahrt
werden.
e
Bei Nichtgebrauch sollte das Werkzeug an einem warmen und trockenen Platz außerhalb der
Reichweite von Kindern aufbewahrt werden.
r
Jedes Qualitätswerkzeug enthält Verschleißteile, die auch unter normalen Einsatzbedingungen nach
längerem Gebrauch ersetzt werden müssen und eine entsprechende Wartung erfordern.
w
Einen frisch geladenen Akku so in das Gehäuse einsetzen, dass er mit einem
Klicken einrastet.
(Verfahren zum Laden siehe Seite 37.)
e
Die Brennstoffzelle einsetzen.
(Verfahren zum Einsetzen siehe Seite 40.)
Page 46

46
e
Symptom Prüfpunkt
Der Akku kann nicht geladen
werden.
・
Sitz des Netzteilsteckers in der Steckdose.
・
Anschluss des Netzteilkabels am Ladegerät.
・
Sitz des Akkus im Ladegerät.
・
LED-Anzeigen am Ladegerät.
Erwärmung von Ladegerät, Netzteil
und Kabel beim Ladevorgang oder
ungewöhnliche Geräusch- oder
Wärmeentwicklung.
・
Die Teile nicht weiterverwenden und Kontakt mit dem
nächsten autorisierten Händler aufnehmen.
Nageldübel werden nicht
eingetrieben.
・
Bestückung des Werkzeugs mit Nageldübeln, Akku und
Brennstoffzelle.
・
LED-Anzeigen am Werkzeuggehäuse.
・
Gasvorrat in der Brennstoffzelle.
・
Funktionstüchtigkeit der Brennstoffzelle.
・
Akku-Ladezustand.
・
Die Nägel sind nicht gestaut.
・
Andruck des Kontaktarms auf der Fläche.
9. STÖRUNGSBESEITIGUNG/INSTANDSETZUNG
q
Instandsetzungsarbeiten dürfen nur von einem durch Powers autorisierten Händler oder einer
Spezialwerkstatt durchgeführt werden.
w
Entfernen eines gestauten Nageldübels
WARNUNG:
●
Die Brennstoffzelle und dann den Akku entfernen.
Vorgang
q
Nach dem Entfernen der Nägel die Klappe schließen und sicherstellen, daß der
Sperrstift fest in den Stifthalter eingesetzt ist.
Page 47

47
FRANÇAIS
W3-21FRH / W3-34CDH
SYSTÈME DE FIXATION ACTIONNÉ PAR GAZ
TABLE DES MATIÈRES
1. INSTRUCTIONS DE SÉCURITÉ
……
48
2. CARACTÉRISTIQUES ET DONNÉES
TECHNIQUES
………………………
55
3. DISPOSITIF DE SÉCURITÉ
…………
56
4.
COMMENT UTILISER LA BATTERIE ET
LE CHARGEUR
………………………
57
5. MANIPULATION DE LA
CARTOUCHE DE GAZ
……………
61
6.
INSTRUCTIONS POUR LE FONCTIONNEMENT
…
64
7.
MAINTIEN DE LA PERFORMANCE
……
67
8. EMMAGASINAGE
…………………
67
9. DÉPANNAGE/RÉPARATIONS
………
68
MANUEL D’UTILISATION et D’ENTRETIEN
AVANT D’UTILISER CET OUTIL, LIRE CE MANUEL ET LES CONSIGNES DE SECURITE
AFIN DE GARANTIR UN FONCTIONNEMENT SUR.
CONSERVER CE MANUEL EN LIEU SUR AVEC L’OUTIL AFIN DE POUVOIR LE
CONSULTER ULTERIEUREMENT.
AVERTISSEMENT:
Page 48

48
1. INSTRUCTIONS DE SÉCURITÉ
PRÉCAUTIONS POUR L’UTILISATION DE L’OUTIL
1. PORTER DES LUNETTES DE SÉCURITÉ OU DE TRAVAIL
Un danger aux yeux existe toujours car de la poussière risque d’être projetée par l’air s’échappant
ou par une attache volant vers le haut en cas de manipulation incorrecte de l’outil. Pour ces
raisons, toujours porter des lunettes de sécurité ou de travail lorsque l’on utilise l’outil. Le patron
et/ou l’utilisateur doivent s’assurer qu’une protection appropriée des yeux est bien prévue.
L’équipement de protection des yeux doit répondre aux exigences de l’Institut des Normes
Nationales Américaines, ANSI Z87.1 (Directive du Conseil 89/686/EEC. du 21 déc. 1989) et
assurer une protection latérale et frontale.
Le patron est responsable pour imposer l’utilisation appropriée de l’équipement de protection des
yeux par l’opérateur de l’outil et par tout autre personnel dans la zone de travail.
NOTE: Les lunettes sans protection latérale et les boucliers de visage n’assurent pas une
protection appropriée.
2. UNE PROTECTION DES OREILLES PEUT ÊTRE EXIGÉE DANS CERTAINS
ENVIRONNEMENTS DE TRAVAIL
Comme les conditions de travail peuvent inclure une exposition à des niveaux élevés de bruit
pouvant causer des dommages auditifs, le patron et l’utilisateur devraient assurer une protection
auditive et une utilisation requise pour l’opérateur et autres personnes dans la zone de travail.
3. PORTER DES HABITS ET UN ÉQUIPEMENT DE PROTECTION APPROPRIÉS À
L’ENVIRONNEMENT DES OPÉRATIONS
Selon l’environnement des opérations, porter un uniforme de travail à longues manches et un
équipement de protection tel que casque et chaussures de sécurité.
4. PRÉCAUTIONS POUR LA CARTOUCHE DE GAZ
q
S’assurer de bien régler la cartouche de gaz .
w
Ne pas ranger la cartouche de gaz dans un endroit mal aéré.
e
Ne pas exposer la cartouche de gaz directement au soleil.
Ne pas placer la cartouche de gaz dans un véhicule ou un tronc où la température pourrait
s’élever. Elle pourrait exploser. Une cartouche de gaz vide et usée contient toujours du gaz
combustible de jet, qui pourrait gonfler et faire éclater le récipient en morceaux.
r
Ranger la cartouche de gaz à la température ambiante de 49˚C (120˚F) ou moins.
La cartouche de gaz contient un gaz combustible pressurisé. Si elle est exposée à une
température supérieure à 49˚C (120˚F), le gaz peut fuir ou exploser, ayant pour résultat un
incendie.
AVERTISSEMENT:
POUR ÉVITER TOUT RISQUE DE BLESSURES OU DE DÉGATS MATÉRIELS SÉRIEUX
AVANT D’UTILISER L’OUTIL, LIRE SOIGNEUSEMENT ET SE FAMILIARISER AVEC LES “INSTRUCTIONS
DE SÉCURITÉ” SUIVANTES. TOUT MANQUE D’OBSERVATION DES AVERTISSEMENTS PEUT AVOIR
COMME CONSÉQUENCE UN RISQUE MORTEL OU DES DOMMAGES SÉRIEUX.
49°C
120°F
Page 49

49
t
Ne pas respirer le gaz.
y
Ne pas incinérer ou réutiliser la cartouche de gaz vide.
u
Ne jamais projeter le gaz en direction d’une personne.
i
Ne pas enlever la prise en caoutchouc du fond de la cartouche de gaz excepté en cas de
mise au rebut.
o
Ne pas faire un trou dans la cartouche de gaz.
5. PRÉCAUTIONS POUR LA MÉTHODE DE CHARGE, LE CHARGEUR ET LA BATTERIE
q
S’assurer de bien utiliser Battery (Cat.#55583).
S’assurer d’utiliser Battery (Cat.#55583) pour l’outil. Ne jamais brancher l’outil à une source
d’alimentation ou à toute autre batterie rechargeable, piles sèches ou accumulateur pour
automobiles. Si cette précaution n’est pas observée, on risque de causer une rupture, un
problème, la génération de chaleur ou une combustion. (Voir Page 55 pour Battery
(Cat.#55583)).
w
S’assurer de bien charger avec Charger Base (Cat.#55618).
S’assurer de charger la batterie avec Charger Base (Cat.#55618).
Si elle est chargée par un autre type de chargeur, elle pourrait ne pas charger correctement et
risque même de se rompre, causer un incendie ou produire de la chaleur. (Voir Page 55 pour
Charger Base (Cat.#55618)).
e
Charger la batterie avant de l’utiliser.
La nouvelle batterie ou celle qui n’a pas été utilisée pendant une longue période pourrait ne pas
être entièrement chargée à cause d’une auto-décharge. S’assurer de la charger avec Charger
Base (Cat.#55618).
r
Charger la batterie à la tension indiquée.
S’assurer de charger, en utilisant la douille de prise de 100~240 V à c.a. (pour usage
domestique). Ne jamais charger à une autre tension que celle indiquée. Si cette précaution n’est
pas observée, on risque de causer une combustion ou une génération de chaleur.
Page 50

50
t
Ne jamais utiliser un transformateur tel que propulseur pour la source d’alimentation du
chargeur.
Si cette précaution n’est pas observée, un problème ou une brûlure se produira.
y
Ne jamais utiliser un générateur de moteur ou une source d’alimentation c.c. pour
charger la batterie.
Si cette précaution n’est pas observée, on risque de causer un problème ou une brûlure du
chargeur.
u
Ne jamais charger la batterie sous la pluie ou dans un endroit exposé à des
éclaboussures d’eau ou à l’humidité.
Si elle est chargée dans un endroit humide, elle pourrait causer une décharge électrique ou un
court-circuit, ayant pour résultat un incendie dû à la brûlure ou à la combustion.
i
Ne jamais toucher la prise d’alimentation avec une main humide.
Si on la saisit avec une main humide, on risque de causer une décharge électrique.
o
Ne jamais recouvrir le chargeur en fonctionnement avec un tissu, etc.
En recouvrant le chargeur, on risque de produire de la chaleur, ceci pouvant causer une brûlure
ou un incendie.
!0
Ne pas porter le chargeur à proximité d’un feu.
!1
Ne pas charger la batterie près d’une substance combustible.
!2
Charger la batterie dans un endroit bien aéré, avec protection contre exposition directe
du soleil.
Un charge effectuée directement au soleil peut surchauffer le chargeur, ayant pour résultat une
brûlure ou un incendie.
!3
Charger la batterie à la température ambiante de 0˚C (32˚F) à 40˚C (104˚F).
Si la température ambiante est inférieure à 0˚C (32˚F) ou supérieure à 40˚C (104˚F), on ne doit
pas effectuer le charge, car un incendie risque de se produire.
!4
Ne pas laisser des objets étrangers dans l’orifice de ventilation ou dans la prise de la
batterie du chargeur.
Ils peuvent causer une décharge électrique ou un problème. Utiliser l’outil dans un endroit
exempt de poussière.
Page 51

51
!56
Manipuler le câble d’alimentation avec soin.
Si vous saisissez le câble d’alimentation de l’adaptateur à c.a. pour le transporter ou le tirer afin
de le débrancher de la prise, il sera endommagé, avec comme résultat une rupture ou un courtcircuit. En outre, faire attention qu’il n’entre pas en contact avec des coupoirs, des susbtances,
de l’huile ou de la graisse à haute température. Remplacer le câble d’alimentation endommagé
par un nouveau câble.
!6
Une fois que la batterie est débranchée du corps de l’outil, s’assurer de le recouvrir avec
le chapeau à paquet, à moins qu’il ne soit utilisé.
Pour éviter tout court-circuit, recouvrir le bornier (section en métal) de la batterie inutilisée avec
le chapeau à paquet.
!7
Ne jamais court-circuiter le bornier (section en métal) de la batterie.
S’il est court-circuité, un courant intense circulera pour surchauffer la batterie, ceci pouvant vous
causer une brûlure.
!8
Ne jamais jeter la batterie dans un feu.
Si cette précaution n’est pas observée, on risque de causer une explosion.
6. PRENDRE BIEN SOIN LORSQUE L’ON BRANCHE LA BATTERIE À L’OUTIL
En branchant la batterie à l’outil, s’assurer de bien observer les points suivants afin d’éviter tout
défaut de fonctionnement.
1. Ne pas mettre son doigt sur le déclencheur.
2. Ne pas serrer le bras de contact contre l’objet.
3. Ne jamais mettre son doigt ou sa main près du museau de l’outil.
7. S’ASSURER DE BIEN VÉRIFIER QUAND LA BATTERIE EST BRANCHÉE
Avant d’utiliser l’outil, brancher la batterie sur l’outil sans serrer le bras de contact contre l’objet et
sans charger les clous et la cartouche de gaz, puis vérifier les points suivants:
1. Vérifier si un bruit de fonctionnement se produit, en branchant seulement la batterie.
※ Si vous branchez la batterie et serrez le bras de contact contre le plancher, etc., le ventilateur ou
l’outil fonctionneront, mais ceci ne constitue pas un fait anormal.
2. Vérifier s’il y a une génération anormale de chaleur, d’odeur ou de bruit.
Si l’outil est actionné, s’il produit de la chaleur ou émet une odeur ou un bruit anormal, ceci signifie
qu’il y a un problème. L’utilisation de l’outil dans cette condition aura comme conséquence un
accident. Si toute anomalie est observée, entrer en contact avec le distributeur autorisé le plus
proche.
8. DÉBRANCHER LE CHARGEUR QUAND IL N’EST PAS UTILISÉ
9. NE PAS UTILISER L’OUTIL DANS UN ENDROIT MAL AÉRÉ
S’il est utilisé dans un endroit mal aéré, vous pourriez souffrir d’un manque d’oxygène.
10. ÉVITER D’EXPOSER L’OUTIL DIRECTEMENT AU SOLEIL
Ne pas placer l’outil dans un véhicule ou un tronc où la température pourrait s’élever, parce qu’il
pourrait exploser. Une cartouche de gaz vide et usée contient toujours du gaz de jet combustible,
qui pourrait gonfler et faire éclater le récipient en morceaux.
Page 52

52
11. NE JAMAIS UTILISER L’OUTIL PRÈS DE SUBSTANCES COMBUSTIBLES VOLATILES
Ne jamais utiliser l’outil à proximité d’essence, de diluant, de gaz, de peinture ou d’adhésif, parce
qu’il pourrait causer un incendie ou une explosion.
12. NE PAS PORTER L’OUTIL À PROXIMITÉ D’UN FEU
13. UTILISER L’OUTIL DANS UN ENVIRONNEMENT DE TRAVAIL À UNE TEMPÉRATURE DE
–7˚C (19˚F) À 49˚C (120˚F), CAR LE CORPS DE L’OUTIL POURRAIT ÊTRE ENDOMMAGÉ,
CAUSER UN INCENDIE OU UNE EXPLOSION.
–7˚C (19˚F) ou moins. Le corps de l’outil peut s’endommager.
49˚C (120˚F) ou plus. La cartouche de gaz peut s’endommager, avec comme résultat une
combustion ou une explosion.
14. NE PAS UTILISER L’OUTIL SOUS LA PLUIE OU DANS UN ENDROIT TRÈS HUMIDE
Si cette précaution n’est pas observée, on risque de causer un problème.
15. NE JAMAIS POSER DES CLOUS EN FAISANT FACE L’UN PAR RAPPORT À L’AUTRE
Si vous posez des clous, en faisant face l’un par rapport à l’autre, un clou mal enfoncé risque de
frapper et blesser la personne se trouvant devant soi.
16. PRENDRE GARDE À LA HAUTE TEMPÉRATURE DE L’OUTIL
Si l’outil est utilisé pendant une longue période, son nez et son bras de contact se réchaufferont.
Faire attention à ne pas causer une brûlure.
17. LORSQUE L’ON UTILISE LE CROCHET, S’ASSURER DE BIEN DÉTACHER SON DOIGT DU
DÉCLENCHEUR
Lorsque l’on utilise le crochet, s’assurer de détacher son doigt du déclencheur.
18. ENLEVER LA CARTOUCHE DE GAZ ET LA BATTERIE, PUIS VIDER LE MAGASIN QUAND
L’OUTIL N’EST PAS EN FONCTIONNEMENT
Toujours enlever la cartouche de gaz et la batterie de l’outil, puis vider le magasin quand un travail
a été complété ou suspendu, au cas où il n’y a pas de surveillance, en se déplaçant à une zone de
travail différente, en cas de réglage, de démontage, ou de réparation de l’outil, et quand on dégage
une attache bloquée.
19. INSPECTER L’ÉTANCHÉITÉ DES VIS
Un desserrage ou une installation incorrecte des vis ou boulons peut causer un accident ou un
endommagement de l’outil quand celui-ci est en fonctionnement. Inspecter pour confirmer que tous
les boulons et vis sont installés fermement et correctement avant d’actionner l’outil.
20. NE PAS TOUCHER LE DÉCLENCHEUR À MOINS QUE L’ON VOUDRAIT POSER UNE
ATTACHE
Ne jamais toucher le déclencheur à moins que l’on voudrait poser une attache dans la pièce de
travail. Il est dangereux de marcher tout autour en transportant l’outil avec le déclencheur tiré. Ce
genre d’action devrait être évité.
49°C
120°F
−7°C
19°F
Page 53

53
21. NE JAMAIS DIRIGER LA SORTIE DE DÉCHARGE VERS SOI-MÊME ET VERS TOUTE AUTRE
PERSONNE
Si la sortie de décharge est dirigée vers d’autres personnes, des accidents sérieux peuvent être
causés en cas de ratés du moteur. S’assurer que la sortie de décharge n’est pas dirigée vers
d’autres personnes, que la cartouche de gaz et la batterie soient insérées ou non, lorsque l’on
charge et décharge les pointes ou que l’on effectue des opérations semblables.
22. UTILISER LES POINTES SPÉCIFIÉES
L’utilisation d’pointes autres que celles indiquées causera un défaut de fonctionnement de l’outil.
S’assurer d’utiliser seulement les pointes indiquées lorsque l’on utilise l’outil.
23. PLACER LA SORTIE DE DÉCHARGE CORRECTEMENT SUR LA SURFACE DE TRAVAIL
Si on ne place pas la sortie de décharge du nez de façon appropriée, on risque de causer la
projection de l’attache vers le haut et ceci est extrêmement dangereux.
24. ÉLOIGNER SES MAINS ET SON CORPS DE LA SORTIE DE DÉCHARGE
Lorsque l’on charge et utilise l’outil, ne jamais placer sa main ou une partie quelconque de son
corps sur l’endroit de décharge de l’attache de l’outil. Ceci est très dangereux car on risque de
frapper ses mains ou son corps par erreur.
25. NE PAS POSER L’ATTACHE PRÈS DU BORD ET DU COIN DE LA PIÈCE DE TRAVAIL ET
D’UN MATÉRIEL MINCE
La pièce de travail peut se fendre et l’attache pourrait se projeter librement et frapper l’opérateur ou
toute autre personne.
26. NE PAS POSER DES POINTES SUR D’AUTRES POINTES
La pose des pointes au dessus d’autres pointes peut causer une déflexion des pointes, ceci
pouvant causer des dommages.
27. COMMENT ENLEVER LES POINTES APRÈS AVOIR COMPLÉTÉ LES TRAVAUX
Si des pointes sont abandonnées dans le magasin après avoir complété les travaux, il y a risque
d’un accident sérieux se produisant avant la reprise des travaux, si l’outil est manipulé avec
négligence, ou en insérant la cartouche de gaz et la batterie. Pour cette raison, enlever toujours
toutes les pointes restantes dans le magasin à la fin des travaux.
28. VÉRIFIER LE FONCTIONNEMENT DU DISPOSITIF DE DÉCLENCHEMENT À CONTACT
FRÉQUEMMENT EN CAS D’UTILISATION D’UN OUTIL DE TYPE DE DÉCLENCHEMENT À
CONTACT
Ne pas utiliser l’outil si le déclenchement ne fonctionne pas correctement car ceci risque de
produire la pose accidentelle d’une attache. Ne pas interférer avec le fonctionnement approprié du
dispositif de déclenchement à contact.
29. EN CAS D’UTILISATION DE L’OUTIL À L’EXTÉRIEUR OU DANS UN ENDROIT ÉLEVÉ
Quand on exécute une fixation d’pointes sur les toits ou sur une surface inclinée semblable,
commencer par fixer les pointes à la partie inférieure et en opérant graduellement vers le haut. Une
fixation des pointes vers l’arrière est dangereuse car on risque de perdre son équilibre.
30. NE JAMAIS UTILISER L’OUTIL SI UNE PARTIE QUELCONQUE DES COMMANDES
DE L’OUTIL (PAR EXEMPLE, DÉCLENCHEUR, BRAS DE CONTACT) EST INOPÉRABLE,
DÉBRANCHÉE, MODIFIÉE OU NE FONCTIONNE PAS CORRECTEMENT
31. NE JAMAIS ENCLENCHER L’OUTIL DANS UN ESPACE LIBRE
Ceci permettra d’éviter tout risque de danger provoqué par des pointes projetées dans toutes les
directions et une contrainte excessive sur l’outil.
32. SUPPOSER TOUJOURS QUE L’OUTIL CONTIENT DES POINTES
Page 54

54
33. RESPECTER L’OUTIL COMME INSTRUMENT DE TRAVAIL
34. ÉVITER TOUTE MANIPULATION BRUTALE DE L’OUTIL
35. NE JAMAIS CHARGER L’OUTIL AVEC DES POINTES QUAND UNE COMMANDE QUELCONQUE
(PAR EXEMPLE, DÉCLENCHEUR, BRAS DE CONTACT) EST ACTIONNÉE
36. TRAITER L’OUTIL AVEC GRAND SOIN
Nettoyer l’outil avec un tissu souple et sec. Ne jamais utiliser un tissu humide ou des solutions
volatiles telles que diluant ou benzine.
37. ÉVITER TOUTE EXPOSITION DIRECTE DE L’OUTIL AU SOLEIL
Ne jamais laisser l’outil sur le chargeur dans un emplacement exposé directement au soleil.
OBSERVER LA NOTE DE “PRÉCAUTION” GÉNÉRALE SUIVANTE, EN PLUS
DES AUTRES AVERTISSEMENTS CONTENUS DANS CE MANUEL
•
Ne pas utiliser l’outil comme marteau.
•
L’outil doit être utilisé seulement pour les opérations pour lesquelles il a été conçu.
•
Ne jamais enlever et trifouiller les commandes (par exemple, DÉCLENCHEUR, BRAS DE
CONTACT).
•
Conserver l’outil, la cartouche de gaz et la batterie dans un endroit sec hors de la portée des
enfants quand ils ne sont pas utilisés.
•
Ne pas utiliser l’outil sans son étiquette d’avertissement de sécurité.
•
Ne pas modifier l’outil en s’éloignant de sa conception ou de sa fonction d’origine sans
l’approbation de , Co. Ltd.
Page 55

55
2. CARACTÉRISTIQUES ET DONNÉES TECHNIQUES
1. NOM DES PIÈCES
2. CARACTÉRISTIQUES DE L’OUTIL
q
e
w
rt
y
u
i
!1 !2 !3
!8
!9
@0
!0
!5
!6
!7
!4
@1
@2
@3
o
q
Couvercle de filtre à air
w
Couvercle de combustible
e
Corps
r
DEL
t
Déclencheur
y
Batterie
u
Crochet
i
Taquet de clous
o
Cadran de réglage
!0
Bras de contact
!1
Support de poussoir
!2
Poussoir
!3
Magasin
!4
Couvercle de queue
!5
Chapeau à paquet
!6
Bornier
!7
Batterie (Cat.#55583)
!8
Cavité de réglage de la
batterie
!9
Prise jack
@0
Câble d’alimentation
@1
Chargeur (Cat.#55618)
@2
Prise d’alimentation
@3
Adaptateur c.a.
3. CARACTÉRISTIQUES DES POINTES
4. DONNÉES TECHNIQUES
q
BRUIT
Événement simple pondéré A
Niveau d’alimentation du son ------ LWA, 1s, d 105.4 dB
Événement simple pondéré A
Niveau de pression acoustique d’émission à la station de travail ------ Lp A , 1s, d 98.8 dB
Ces valeurs sont déterminées et documentées selon la Norme EN12549: 1999.
w
VIBRATION
Valeur de vibration caractéristique = 4.46 m/s
2
Ces valeurs sont déterminées et documentées en conformité avec la Norme ISO 8662-11.
Cette valeur représente une valeur caractéristique ayant rapport à l’outil et n’affecte pas le système main-bras lorsque l’on
utilise l’outil. Une influence au système main-bras, par exemple lorsque l’on utilise l’outil, dépend de la force de saisie, la
pression de contact, la direction de travail, le réglage de l’alimentation, la pièce de travail, et le support de la pièce de travail.
No. DE PRODUIT W3-21FRH W3-34CDH
HAUTEUR 382 mm 391 mm
LARGEUR 111 mm 110 mm
LONGUEUR 379 mm 340 mm
POIDS
3.5 kg (7.8 lbs.)
(y compris la cartouche de gaz et la batterie)
CAPACITÉ DE CHARGEMENT
32 clous/bande 40 clous/bande
BATTERIE Batterie (Cat.#55583)
CAPACITÉ DE LA BATTERIE
6 V c.c., 1.5 aH
CHARGEUR Chargeur (Cat.#55618)
SOURCE D’ALIMENTATION
100~240 V, c.a., 50 ou 60 Hz
CONSOMMATION ÉLECTRIQUE
8 VA (10 V 800 mA)
(sortie nominale)
TEMPS DE CHARGE 150 minutes au maximum
ACCESSOIRES
Lunettes, étui pour le transport,
batterie, chargeur
No. DE PRODUIT W3-21FRH W3-34CDH
LONGUEUR DE CLOU
50 à 90 mm
DIAMÈTRE DE JAMBE
2.9 à 3.3 mm
TYPE DE JAMBE Vis à anneau lisse
DIAMÈTRE DE LA TÊTE
6.8 à 7.5 mm 6.5 à 7.7 mm
ANGLE DE RECUEIL 21 degrés 34 degrés
TÊTE
Tête ronde pleine
Tête taillée
Page 56

56
3. DISPOSITIFS DE SÉCURITÉ
L’outil est équipé des dispositifs de sécurité suivants afin d’assurer une bonne sécurité pour les travaux
de pose des clous.
Dispositif de sécurité mécanique
Cet outil permet d’éviter la décharge de clous à moins que le bras de contact et le
déclencheur n’aient été actionnés simultanément. Les clous ne sont déchargés ni en
tirant simplement le déclencheur, ni en appliquant le bras de contact à l’objet pour la
pose des clous. Les clous sont déchargés seulement après avoir appliqué le bras de
contact à l’objet et tiré le déclencheur.
Déclencheur
Bras de contact
PRÉCAUTION:
●
Avant d’utiliser l’outil, s’assurer de bien l’inspecter pour voir si les dispositifs de sécurité
fonctionnent correctement. Ne pas l’utiliser si ces dispositifs ne fonctionnent pas
correctement.
Avant d’utiliser l’outil, vérifier si les dispositifs de sécurité fonctionnent correctement. Sans
les clous chargés, installer la cartouche de gaz et la batterie pour contrôler.
※
Dans les cas suivants, les dispositifs de sécurité ne fonctionnent pas correctement, et il ne
faudrait jamais utiliser l’outil.
1. Un bruit de fonctionnement est émis en tirant simplement le déclencheur.
2. L’outil commence l’opération de déclenchement à vide en appliquant simplement le bras
de contact à l’objet.
※
Un bruit de fonctionnement du ventilateur est entendu, mais ceci n’est pas un problème.
Si un fait anormal est observé, prière d’entrer en contact avec le distributeur autorisé le plus
proche pour faire effectuer l’inspection ou la réparation de l’outil.
Page 57

57
4. COMMENT UTILISER LA BATTERIE ET LE CHARGEUR
AVERTISSEMENT:
●
S’assurer de bien charger Battery (Cat.#55583) pour l’outil Charger Base (Cat.#55618). Si elle
est chargée par un autre chargeur, la batterie pourrait ne pas charger correctement ou se
rompra, causera un incendie ou produira de la chaleur.
●
Ne pas mettre la batterie près d’un feu.
●
Ne pas exposer la batterie directement au soleil.
●
Ne pas charger ou utiliser la batterie en condition humide en présence de liquide tel qu’eau,
eau de mer, lait, boisson non alcoolique, eau savonneuse.
●
Débrancher le chargeur quand il n’est pas utilisé.
●
S’assurer de bien charger à 0˚C (32˚F) à 40˚C (104˚F) pour éviter tout risque d’incendie.
●
Ne pas appliquer un choc fort tel que frappe avec un marteau, emboutissage ou chute.
AVERTISSEMENT:
●
Afin d’éviter tout risque de court-circuit, s’assurer de recouvrir la bornière (section en métal)
de la batterie avec le chapeau à paquet (enrouler la bande isolante) pour le recyclage.
<Batteries utilisées>
・
Tension nominale: 1,2 V/pièce
・
Quantité utilisée dans 1 paquet : 5 pièces
PRÉCAUTION:
●
Quand la batterie est épuisée ou n’est pas utilisée pendant une longue période, l’enlever du
chargeur.
●
Après le réglage de la batterie dans l’outil, ne pas la maintenir pour la transporter.
UTILISATION APPROPRIÉE DE LA BATTERIE
q
Charger et utiliser la batterie complètement.
Si vous répétez le chargement de la batterie tandis que l’électricité accumulée reste toujours à plus
de la moitié de la capacité, le nombre de clous pouvant être posés à chaque charge pourrait
diminuer nettement, ceci raccourcissant la durée de service de la batterie. Nous recommandons de
l’utiliser jusqu’à ce que la DEL de l’outil soit illuminée en rouge, ceci indiquant une absence
d’électricité.
w
Utiliser deux batteries alternativement.
Pour assurer une durée de service plus longue de la batterie, nous recommandons d’utiliser deux
batteries alternativement, tout en prévoyant une batterie de service.
L’alimentation de l’outil utilise des batteries nickel-hydrogène qui constituent une ressource de recyclage
précieuse. Une fois que la durée de service de la batterie expire, la porter au distributeur le plus proche
pour la mettre au rebut.
Recyclage de la batterie nickel-hydrogène
Page 58

58
DEL verte DEL rouge État Description
1.
2.
3.
4.
5.
6.
COMMENT UTILISER LE CHARGEUR
Le chargeur d’application spéciale Charger Base (Cat.#55618) présente des DEL (verte, rouge) qui
indiquent l’état du chargeur et de la batterie.
Les cas suivants représentent des problèmes. Remplacer le chargeur et la batterie par des pièces
neuves.
●
La DEL verte n’est pas illuminée si la prise d’alimentation du chargeur est branchée à une prise à
c.a. de 100~240 V (pour l’usage domestique) (avec la batterie non réglée).
※
Vérifier avec un autre appareil électrique pour voir si l’électricité est présente à la prise
d’alimentation.
●
Ni la DEL verte, ni celle rouge est illuminée ou clignote si la batterie est placée dans le chargeur.
●
La DEL verte n’est pas illuminée 150 minutes après que la DEL rouge ait été illuminée.
●
La DEL rouge n’est pas illuminée si la batterie est placée dans le chargeur.
Problèmes du chargeur et de la batterie
○
ON (marche)
●
OFF (arrêt)
Alimentation en
contact
Le chargeur a été branché. (État de l’alimentation
en contact: batterie non réglée)
●
OFF (arrêt)
○
ON (marche)
Chargement La batterie est en phase de chargement.
○
ON (marche)
●
OFF (arrêt)
Chargement
complété.
La batterie a été bien chargée.
Clignotement Clignotement
Alarme de haute
température
La batterie est chaude. (L’enlever du chargeur et la laisser
refroidir pendant une certaine période avant de charger).
○
ON (marche)
○
ON (marche)
Alarme de batterie
La batterie est défectueuse. (La remplacer par une
batterie neuve).
Clignotement
○
ON (marche)
Alarme de haute
température de la batterie
La batterie est défectueuse et chaude.
(La remplacer par une batterie neuve).
Page 59

59
AVERTISSEMENT:
COMMENT CHARGER
●
Charger la batterie à la tension indiquée.
S’assurer de bien charger à partir d’une prise à c.a. de 100~240 V (pour l’usage domestique).
L’utilisation d’une tension non indiquée causera non seulement un problème, mais également
un risque de danger.
●
Manipuler le câble d’alimentation avec soin.
Ne pas utiliser un chargeur dont le câble d’alimentation est endommagé.
●
Utiliser une prise d’alimentation appropriée.
L’utilisation d’une prise faible ou lâche causera un accident à cause d’une surchauffe. Si ceci
se produit, utiliser une prise appropriée.
q
Si la batterie est utilisée une fois, puis ajustée dans le corps de l’outil, l’enlever de
l’outil. En maintenant fermement le corps de l’outil, serrer les verrous sur les deux
côtés de la batterie avec ses doigts pour l’enlever.
Batterie
w
Insérer la prise jack de l’adaptateur à c.a. dans le chargeur, puis brancher la
fiche à la prise d’alimentation.
La DEL verte est illuminée pour vous informer de l’état de l’alimentation en contact.
DEL verte
Chargeur
Adaptateur d’alimentation
c.a., 100~240 V
Verrou
PRÉCAUTION:
●
Ne pas tenter de charger la batterie qui a été entièrement chargée. La durée de service de la
batterie risque de se raccourcir.
e
Charger la batterie.
1. Ajuster la batterie fermement dans le chargeur.
2. Une fois qu’elle est placée dans le chargeur, la charge commencera
automatiquement. La DEL rouge est illuminée pour vous informer que la charge est
en cours.
3. Le temps de charge maximum est d’environ 150 minutes. Le temps de charge
dépend de la température, de la tension d’alimentation ou de la capacité résiduelle
de la batterie. Une fois que la charge est entièrement terminée, la DEL verte sera
illuminée pour vous informer que la charge a été accomplie. Si la batterie
entièrement chargée est placée dans le chargeur de nouveau, la DEL rouge sera
illuminée de nouveau, ceci indiquant qu’elle est en phase de chargement. Ceci n’est
pas anormal. Après un certain moment, la DEL verte sera illuminée pour indiquer la
fin de la charge.
r
La DEL verte illuminée indique la fin de la charge.
1. En maintenant le chargeur, enlever la batterie.
2. Débrancher la fiche d’alimentation de l’adaptateur de c.a. de la prise d’alimentation.
Vous avez terminé maintenant avec la charge.
Batterie
DEL rouge
Chargeur
Prise d’alimentation
c.a., 100~240 V
Page 60

60
PRÉCAUTION:
●
Après avoir complété les travaux ou quand la machine n’est pas utilisée, enlever la boîte
d’alimentation de la machine pour la ranger. (Enlever également la cartouche de gaz et les
clous).
Si l’outil reste branché, de l’énergie électrique sera consommée durant la mise en attente.
Dans les cas suivants, exécuter la charge d’entretien pendant 24 heures afin de réaliser entièrement la
performance de l’outil:
・
à l’achat de la machine
・
quand la machine n’a pas été utilisée pendant un mois ou davantage
・
quand il est clair que l’on enfonce moins de clous même si l’outil est chargé.
Après que le témoin de “Charge complète” s’illumine, laisser la batterie dans le chargeur pendant
environ 24 heures.
Concernant la charge d’entretien
Page 61

61
5. MANIPULATION DE LA CARTOUCHE DE GAZ
La cartouche de gaz présente une double structure; le récipient intérieur a été rempli de gaz
combustible liquide tandis que celui externe l’est avec un gaz de jet (un autre gaz pressurisé).
De la même manière que lorsque l’on presse un tube à pâte dentifrice, le gaz combustible intérieur est
expulsé sous l’effet de la pression du gaz de jet, qui sera utilisé jusqu’à la fin sans gaspillage. Grâce à
cette structure, le gaz de jet de combustible dans le récipient externe demeurera même après que le
gaz combustible dans le récipient intérieur a été épuisé. Par conséquent, un soin devrait être pris
lorsque l’on met la cartouche de gaz vide au rebut.
AVERTISSEMENT:
●
S’assurer d’utiliser une cartouche de gaz exclusivement conçue pour le système de fixation
actionné par gaz .
●
Ne jamais fumer une cigarette durant les travaux de fixation ou en opérant avec une soupape
à jet.
●
Ne pas enlever la prise en caoutchouc du fond de la cartouche de gaz, sauf en cas de mise au
rebut.
●
Ne pas faire un trou dans la cartouche de gaz.
●
Faire attention à ne pas respirer le gaz, car ceci peut causer somnolence, vertige ou nausée.
●
Ne jamais projeter le gaz vers une personne.
●
Ne pas incinérer ou réutiliser la cartouche de gaz vide. (Voir la page 63 pour la mise au rebut
de la cartouche de gaz)
AVERTISSEMENT:
●
Fixer la soupape à jet correctement à la cartouche de gaz.
L’attacher fermement jusqu’à ce qu’il ait cliqueté.
À moins qu’il ne soit fixé correctement, le gaz combustible ne sera pas projeté de la soupape
à jet. En outre, le gaz peut fuir, ceci pouvant causer un danger.
FIXATION DE LA SOUPAPE À JET À LA CARTOUCHE DE GAZ
La soupape à jet est conçue pour projeter une quantité de gaz combustible constante dans la chambre
de combustion de l’outil.
1. Pousser pour libérer la soupape. 2. Séparer la soupape du chapeau. 3. Aligner les bords.
4. Pousser le bord avant. 5. Pousser le bord arrière jusqu’à ce 6. Pousser horizontalement - il cliquette
5. qu’il ait cliqueté. 6. de nouveau.
Soupape à jet
Page 62

62
AVERTISSEMENT:
RÉGLAGE DE LA CARTOUCHE DE GAZ
●
S’assurer de détacher son doigt du déclencheur.
●
Ne pas serrer le bras de contact contre l’objet.
2
1
q
Soulever et tirer le chapeau de la cartouche de gaz vers ce côté pour l’ouvrir.
Chapeau de la cartouche de gaz
w
En dirigeant la buse à jet de la soupape à jet en avant (vers le couvercle du filtre
d’air), régler la cartouche de gaz.
Buse à jet
e
Quand on ouvre le chapeau de la cartouche de gaz, il est possible de voir
l’adaptateur rouge.
Ajuster la soupape à jet dans l’adaptateur.
Adaptateur rouge
r
Mettre le chapeau de la cartouche de gaz au-dessus de la soupape à jet et
l’abaisser pour verrouiller.
Cartouche de gaz
Page 63

63
COMMENT METTRE AU REBUT LA CARTOUCHE DE GAZ USÉE
Le gaz de jet combustible reste toujours dans la cartouche de gaz usée.
AVERTISSEMENT:
●
Ne pas jeter la cartouche de gaz usée dans le feu.
●
Ne jamais fumer une cigarette.
●
Ne jamais respirer le gaz.
Page 64

64
6. INSTRUCTIONS POUR LE FONCTIONNEMENT
Prière de lire la section intitulée “INSTRUCTIONS DE SÉCURITÉ”.
1. AVANT LE FONCTIONNEMENT
q
Porter des lunettes de sécurité ou de protection.
w
Ne pas insérer la cartouche de gaz et la batterie.
e
Inspecter l’étanchéité des vis.
r
Vérifier le fonctionnement du bras de contact et du déclencheur pour voir si ceux-ci se déplacent
sans à-coup.
t
Insérer la cartouche de gaz et la batterie.
y
Saisir l’outil avec le doigt éloigné du déclencheur, puis pousser le bras de contact contre la pièce de
travail. (L’outil ne doit pas fonctionner).
u
Maintenir l’outil avec le bras de contact sans la pièce de travail et tirer le déclencheur. (L’outil ne doit
pas fonctionner).
i
Enlever la cartouche de gaz et la batterie.
AVERTISSEMENT:
AVERTISSEMENT:
2. FONCTIONNEMENT
Porter des lunettes de sécurité ou de protection.
Un danger aux yeux existe toujours car de la poussière risque d’être projetée par l’air s’échappant ou
par une attache volant vers le haut en cas de manipulation incorrecte de l’outil. Pour ces raisons,
toujours porter des lunettes de sécurité ou de travail en opérant l’outil. Le patron et/ou l’utilisateur
doivent s’assurer qu’une protection appropriée des yeux est bien prévue.
L’équipement de protection des yeux doit répondre aux exigences de l’Institut des Normes Nationales
Américaines, ANSI Z87.1 (Directive du Conseil 89/686/EEC. du 21 déc. 1989) et assurer une protection
latérale et frontale.
Le patron est responsable pour imposer l’utilisation de l’équipement de protection des yeux par
l’opérateur de l’outil et par tout autre personnel dans la zone de travail.
NOTE: Les lunettes sans protection latérale et les boucliers de visage n’assurent pas une protection
appropriée.
Maintenir les mains et le corps éloignés de la sortie de décharge, lorsque l’on pose les pointes
car on risque de frapper violemment ses mains ou son corps par erreur.
Procédé
q
Charger les clous dans la fente à l’arrière du magasin jusqu’à ce qu’ils atteignent la
partie avant du taquet de clous.
AVERTISSEMENT:
CHARGEMENT DES CLOUS
●
Lorsque l’on charge les clous, s’assurer de détacher son doigt du déclencheur.
●
Ne pas serrer le bras de contact contre l’objet.
●
Un dégagement brusque du support de poussoir causera un bourrage des
clous ou un déclenchement à vide.
PRÉCAUTION:
Clous
Taquet de clous
Page 65

RÉGLAGE DE LA PROFONDEUR D’ENFONCEMENT
●
TOUJOURS enlever la cartouche de gaz et la batterie avant d’effectuer le
réglage.
●
Vérifier si le cadran de réglage a été chauffé.
Le réglage de la profondeur d’enfoncement s’effectue en réglant le cadran de réglage.
q
La cartouche de gaz et la batterie étant ajustées, enfoncer quelques clous dans un
échantillon matériel type pour déterminer si le réglage est nécessaire.
w
Si le réglage est nécessaire, enlever la cartouche de gaz et la batterie.
e
Se référer à la marque sur le magasin pour la direction de rotation du cadran de
réglage.
r
Installer de nouveau la cartouche de gaz et la batterie.
r
Les clous ne sont pas tirés même si le bras de contact est appliqué à l’objet avec le
déclencheur tiré. Libérer le déclencheur et répéter l’étape
w
.
Support du poussoir
65
w
Tirer le support du poussoir jusqu’au fond du magasin, puis le libérer doucement.
●
Ne jamais mettre son visage au-dessus de l’outil. Une réaction de l’outil peut
causer une blessure inattendue.
●
Ne jamais mettre sa main ou un doigt près du museau.
AVERTISSEMENT:
AVERTISSEMENT:
2
1
q Press the nose of the Contact Arm
against the object.
w Pull the Trigger.
COMMENT POSER LES CLOUS
Procédé
q
Ajuster la cellule de batterie et de combustible.
w
Presser le nez du bras de contact contre l’emplacement où l’on veut poser le clou.
Le moteur du ventilateur est actionné, le gaz combustible est projeté, en mélangeant
le combustible à l’air.
e
En pressant fermement le bras de contact et le couvercle de queue, tirer le
déclencheur. Les clous sont enfoncés dans l’objet par la combustion du combustible.
●
Avant de commencer les travaux, vérifier si l’outil fonctionne bien comme
mentionné ci-dessus.
●
Si l’outil est utilisé pendant longtemps, il pourrait être chauffé et vous brûler.
Si une anomalie quelconque est observée, entrer en contact avec le
distributeur autorisé le plus proche pour faire effectuer l’inspection et la
réparation.
※
Le ventilateur continue à fonctionner pendant environ 10 secondes même
après avoir enfoncé le clou.
AVERTISSEMENT:
Cadran de réglage
Plus profond Plus haut
q
Presser le nez du bras de contact contre
l’objet.
w
Tirer le déclencheur.
PRÉCAUTION:
Page 66

66
REMPLACEMENT DE LA CARTOUCHE DE GAZ
Si le gaz combustible est épuisé, les clous ne peuvent pas être enfoncés.
●
S’assurer de bien libérer le déclencheur.
●
Ne pas serrer le bras de contact contre l’objet.
q
Soulever et tirer le chapeau de cartouche de gaz vers ce côté pour l’ouvrir.
AVERTISSEMENT:
REMPLACEMENT DE LA BATTERIE
Si la batterie est épuisée, la DEL rouge de l’outil sera illuminée.
●
S’assurer d’enlever la cartouche de gaz.
●
Libérer le déclencheur.
●
Ne pas serrer le bras de contact contre l’objet.
AVERTISSEMENT:
w
Pincer la soupape à jet et enlever la cartouche de gaz usée.
e
Eine neue Brennstoffzelle einsetzen.
Ajuster la nouvelle cartouche de gaz.
(Voir la page 62 pour la méthode de réglage).
q
En maintenant fermement le corps principal, serrer les verrous des deux côtés de la
batterie pour l’enlever.
2
1
Chapeau de cartouche de gaz
Buse à jet
Cartouche de gaz
●
Enlever la cartouche de gaz et la batterie.
AVERTISSEMENT:
COMMENT CHANGER LA DIRECTION DU CROCHET
Le crochet peut être orienté dans les deux directions. Enlever les boulons à tête de
douille hexagonale avec la clef accessoire hexagonale 4, changer la direction, puis
remettre les boulons en position pour remonter.
Boulons à tête
creuse hexagonale
Crochet
Batterie
Verrou
Page 67

67
7. MAINTIEN DE LA PERFORMANCE
1. MANIPULER L’OUTIL AVEC SOIN
Ne jamais laisser tomber, faire heurter ou frapper l’outil contre une surface dure. Elle peut être
déformée, fendue ou cassée.
2. NE PAS DÉCLENCHER L’OUTIL SANS AVOIR CHARGÉ LES CLOUS
Si vous actionnez à plusieurs reprises l’outil sans avoir chargé les clous, la durée de service de
chaque section sera réduite.
3. NE PAS LUBRIFIER L’OUTIL
Ne jamais lubrifier l’outil parce qu’il causera un problème.
4. INSPECTER L’OUTIL PÉRIODIQUEMENT
Afin de maintenir une bonne performance de l’outil, le nettoyer et l’inspecter périodiquement. Pour
effectuer son inspection, entrer en contact avec le distributeur le plus proche.
5. NETTOYER LE FILTRE À AIR
Nettoyer le filtre à air tous les deux jours. Ouvrir le couvercle du filtre à air avec un tournevis
normal, enlever le filtre à air de l’intérieur et le nettoyer avec un chiffon d’air, etc.
8. EMMAGASINAGE
q
Quand l’outil n’est pas en fonctionnement pendant une période prolongée, appliquer une couche
mince de lubrifiant aux pièces en acier pour éviter la rouille.
w
Ne pas ranger l’outil dans un emplacement froid. Placer l’outil dans un emplacement chaud.
e
Quand il n’est pas utilisé, l’outil devrait être rangé dans un endroit chaud et sec. Éloigner l’outil de la
présence des enfants.
r
Tout outil de qualité exigera un entretien ou le remplacement des pièces en raison de l’usure causée
par une utilisation normale.
w
Ajuster la batterie qui vient d’être chargée dans le corps principal jusqu’à ce qu’elle
ait cliqueté. (Voir la page 59 pour la méthode de charge).
e
Ajuster la cartouche de gaz.
(Voir la page 62 pour la méthode de réglage)
Page 68

68
e
Phénomène Item de contrôle
La batterie ne peut pas être
chargée.
・
La fiche d’alimentation de l’adaptateur à c.a. est branchée
fermement à la prise d’alimentation.
・
La prise jack de l’adaptateur à c.a. est inséré fermement
dans le chargeur.
・
La batterie est placée correctement dans le chargeur.
・
La DEL du chargeur est illuminée.
Durant le chargement, le chargeur,
l’adaptateur à c.a. et le câble
d’alimentation sont chauffés,
émettent un bruit anormal ou
produisent de la chaleur.
・
Cesser de les utiliser immédiatement et consulter le
distributeur plus proche.
Les clous ne peuvent pas être
enfoncés.
・
Le corps de l’outil est chargé correctement avec des clous,
la batterie et du combustible.
・
Vérifier les DEL du corps de l’outil.
・
Le gaz demeure toujours dans la cartouche de gaz.
・
La durée de service de la cartouche de gaz n’a pas expiré.
・
La capacité de batterie est encore résiduelle.
・
Aucun bourrage de clous.
・
Le bras de contact est serré correctement contre l’objet.
9. DÉPANNAGE/RÉPARATIONS
q
Les réparations seront effectuées seulement par les distributeurs autorisés ou par d’autres
spécialistes.
w
Enlèvement des clous bloqués
AVERTISSEMENT:
●
Enlever la cartouche de gaz, puis la batterie.
Procédé
q
Après avoir enlevé les clous, fermer la porte et s’assurer que la goupille de verrou a
été ajustée fermement dans le support de goupille.
Page 69

69
NEDERLANDS
W3-21FRH / W3-34CDH
GAS-TACKER
INDEX
1.
VEILIGHEIDS VOORZORGMAATREGELEN…70
2. SPECIFICATIES EN TECHNISCHE
GEGEVENS
…………………………
77
3. VEILIGHEIDSVOORZIENINGEN
……
78
4. GEBRUIK VAN DE BATTERIJ EN
OPLADER
…………………………
79
5.
OMGANG MET DE GASCARTRIDGE…83
6. AANWIJZINGEN VOOR GEBRUIK
…
86
7. ONDERHOUD VOOR OPTIMALE
WERKING
…………………………
89
8. OPSLAG
……………………………
89
9.
OPLOSSEN VAN PROBLEMEN/REPARATIE…90
HANDLEIDING VOOR BEDIENING EN ONDERHOUD
LEES VOOR DE VEILIGHEID EN EEN OPTIMALE WERKING DEZE HANDLEIDING
ALVORENS GEBRUIK GOED DOOR.
BEWAAR DEZE GEBRUIKSAANWIJZING TER REFERENTIE BIJ HET GEREEDSCHAP.
WAARSCHUWING:
Page 70

70
1. VEILIGHEIDS VOORZORGMAATREGELEN
VOORZORGEN VOOR GEBRUIK VAN HET GEREEDSCHAP
1. DRAAG EEN VEILIGHEIDSBRIL OF GEZICHTSBESCHERMING
Uw ogen zouden kunnen worden beschadigd door eventueel stof of andere deeltjes die door de
afgevoerde lucht worden opgeblazen of door bijvoorbeeld een spijker die vanwege een onjuist
gebruik van het gereedschap rond wordt geslingerd en in uw ogen komt.
De eventuele werkgever en/of gebruiker dienen te controleren dat er beslist gezichtsbescherming of
een veiligheidsbril wordt gedragen. De veiligheidsbril moet aan de vereisten van het “American
National Standards Institute”, ANSI Z87 1 (“Council Directive” 89/686/EEC van 21 december 1989)
voldoen en een goede bescherming aan zowel de voor- als zijkant van het gezicht leveren.
De werkgever is verantwoordelijk voor het feit dat de gebruiker van het gereedschap en eventueel
ander personeel in de werkruimte gezichtsbescherming of een veiligheidsbril draagt.
OPMERKING: Een veiligheidsbril of gezichtsbescherming zonder afdekking aan de zijkant geeft
niet voldoende bescherming.
2. OORBESCHERMING KAN IN BEPAALDE GEVALLEN VEREIST ZIJN
Tijdens de werkzaamheden wordt de gebruiker mogelijk aan lawaai blootgesteld, dat beschadiging
van het gehoor kan veroorzaken. In dat geval dienen de eventuele werkgever en/of gebruiker te
verzekeren dat de vereiste oorbescherming aanwezig is en deze door de gebruiker en eventuele
andere personen in de werkruimte wordt gedragen.
3. DRAAG VOOR DE WERKZAAMHEDEN PASSENDE WERKKLEDING EN BESCHERMENDE
TOEBEHOREN
Afhankelijk van de werkzaamheden dient een werkuniform met lange mouwen en bijbehorende
bescherming, bijvoorbeeld een helm en speciale beschermende werkschoenen, te worden
gedragen.
4. VOORZORGEN VOOR DE GASCARTRIDGE
q
Plaats de gascartridge op de juiste wijze.
w
Bewaar de gascartridge in een goed geventileerde ruimte.
e
Stel de gascartridge niet aan het directe zonlicht bloot.
Plaats de gascartridge niet in een voertuig, kofferbak of ruimte waar de temperatuur snel kan
stijgen. De gascartridge zou anders namelijk kunnen ontploffen. Een gebruikte, lege
gascartridge bevat nog steeds ontvlambaar, hoge-druk drijfgas dat door warmte kan uitzetten en
ontploffen.
r
Bewaar de gascartridge bij een temperatuur van 49˚C (120˚F) of lager.
De gascartridge bevat ontvlambaar, hoge-druk gas. Indien blootgesteld aan een hogere
temperatuur dan 49˚C (120˚F), kan gas gaan lekken, de cartridge barsten of ontploffen met
brand tot gevolg.
WAARSCHUWING:
VOORKOM ERNSTIG LETSEL EN BESCHADIGING
LEES DE VOLGENDE “VOORZORGSMAATREGELEN” ALVORENS GEBRUIK VAN HET
GEREEDSCHAP GOED DOOR EN ZORG DAT U DEZE GOED BEGRIJPT. HET NIET OPVOLGEN
VAN DE WAARSCHUWINGEN KAN ERNSTIG LETSEL MET DODELIJK AFLOOP VEROORZAKEN.
49°C
120°F
Page 71

71
t
Adem het gas niet in.
y
Verbrand en recycle een lege gascartridge niet.
u
Spuit het gas niet in of naar personen.
i
Verwijder de rubberen dop aan de onderkant van de gascartridge niet, tenzij u de
cartridge weggooit.
o
Maak geen gat in de gascartridge.
5. VOORZORGEN VOOR HET OPLADEN, DE OPLADER EN DE BATTERIJ
q
Gebruik beslist de Cat.#55583 batterij.
Gebruik beslist de Cat.#55583 batterij voor het gereedschap. Sluit het gereedschap niet op een
andere stroombron aan en gebruik geen andere oplaadbare batterij, droge-cel batterij of autoaccu. Het gebruik van een verkeerde stroombron kan beschadiging, problemen, hitte-opwekking
en/of brand veroorzaken. (Zie bladzijde 77 voor details aangaande de Cat.#55583 batterij.)
w
Gebruik beslist de Cat.#55618 oplader voor het opladen.
Gebruik beslist de Cat.#55618 oplader voor het opladen van de batterij.
Door het gebruik van een andere oplader wordt de batterij mogelijk slechts gedeeltelijk
opgeladen, beschadigd, kortgesloten of hitte opgewekt met vonken of brand tot gevolg. (Zie
bladzijde 77 voor details aangaande de Cat.#55618 oplader.)
e
Laad de batterij alvorens gebruik op.
Een nieuwe batterij of een batterij die langdurig niet is gebruikt, is mogelijk gedeeltelijk vanzelf
ontladen. Laad derhalve de batterij met de oplader (Cat.#55618) indien nodig alvorens gebruik
op.
r
Laad de batterij met het aangegeven voltage op.
Steek de stekker voor het opladen in een 100-240 V wisselstroom stopcontact (voor normaal
huishoudelijk gebruik). Laad beslist niet met een ander voltage op, daar hierdoor hitte zou
kunnen worden opgewekt met brand tot gevolg.
Page 72

72
t
Gebruik beslist geen transformator als extra stroombron voor de oplader.
Het gebruik van een transformator kan problemen en beschadiging van de oplader veroorzaken.
y
Gebruik beslist geen generator of gelijkstroombron voor het opladen van de batterij.
Het gebruik van een verkeerde stroombron kan problemen en beschadiging van de oplader
veroorzaken.
u
Laad de batterij niet in de regen of op plaatsen die aan water of vocht onderhevig zijn.
Het opladen onder natte omstandigheden kan een elektrische schok of kortsluiting veroorzaken
met mogelijk brand als gevolg.
i
Raak de stekker nooit met natte handen aan.
Het vasthouden van de stekker met natte handen kan een elektrische schok veroorzaken.
o
Bedek de oplader tijdens gebruik niet met een doek of andere voorwerpen.
Er wordt hitte opgewekt indien de oplader tijdens gebruik bedekt is, met mogelijk brand als
gevolg.
!0
Plaats de oplader niet dicht bij een vuur.
!1
Laad de batterij niet in de buurt van ontvlambare middelen op.
!2
Laad de batterij in een goed geventileerde ruimte en niet in het directe zonlicht op.
De oplader wordt oververhit indien u de batterij in een warme ruimte of in het directe zonlicht
oplaadt, met mogelijk brand als gevolg.
!3
Laad de batterij bij een temperatuur tussen 0˚C (32˚F) en 40˚C (104˚F) op.
De batterij kan mogelijk niet worden opgeladen bij een lagere of hogere temperatuur dan 0˚C
(32˚F) en 40˚C (104˚F) met mogelijk brand als gevolg.
!4
Steek geen voorwerpen in de ventilatie-openingen en aansluitingen voor de batterij in de
oplader.
U zou anders problemen of een elektrische schok kunnen krijgen. Gebruik de oplader niet in een
stoffige ruimte.
Page 73

73
!56
Wees voorzichtig met het netsnoer.
Het netsnoer wordt beschadigd indien u aan het netsnoer of de adapter trekt voor het
ontkoppelen of dragen, met beschadiging of kortsluiting als gevolg. Let op dat het netsnoer niet
in contact komt met snijders, zeer hete voorwerpen, olie en vet. Vervang het netsnoer indien het
beschadigd is.
!6
Plaats de afdekking op de batterij indien deze van het gereedschap is verwijderd.
Voorkom kortsluiting en plaats de afdekking op het aansluitgedeelte (metalen gedeelte) van de
batterij indien u deze niet gebruikt.
!7
Sluit het aansluitgedeelte (metalen gedeelte) van de batterij beslist niet kort.
De batterij zal oververhitten met brandwonden of beschadiging als gevolg indien het
aansluitgedeelte wordt kortgesloten.
!8
Gooi de batterij beslist niet in een vuur.
Dit zou namelijk een ontploffing kunnen veroorzaken.
6. LET OP WANNEER U DE BATTERIJ OP HET GEREEDSCHAP PLAATST
Voorkom problemen en let derhalve op de volgende punten voor het verbinden van de batterij met
het gereedschap:
1. Houd uw vinger niet op de trekker.
2. Druk de contactarm niet tegen een voorwerp.
3. Plaats uw vingers of handen niet bij de uitlaat voor spijkers.
7. CONTROLEER HET VOLGENDE NADAT DE BATTERIJ IS AANGESLOTEN
Alvorens gebruik van het gereedschap moet u de batterij plaatsen, met de contactarm niet tegen
een voorwerp gedrukt en geen spijkers en gascartridge geladen, en de volgende punten
controleren:
1. Controleer of u wel of niet het geluid van de werking hoort met alleen de batterij aangesloten.
※ Indien u de batterij heeft aangesloten en de contactarm bijvoorbeeld tegen de vloer drukt, zal de
ventilator van het gereedschap gaan draaien. Dit is normaal.
2. Controleer of er abnormale hitte wordt opgewekt, een vreemde geur of geluid wordt
gereproduceerd.
Abnormale hitte, een vreemde geur of geluid bij het inschakelen van het gereedschap betekent dat
de werking niet juist is. Het onder deze omstandigheden gebruiken van het gereedschap kan
ernstige ongelukken veroorzaken. Raadpleeg beslist direct de plaats van aankoop of een erkend
distributeur.
8. ONTKOPPEL DE OPLADER WANNEER NIET IN GEBRUIK
9. GEBRUIK HET GEREEDSCHAP UITSLUITEND IN EEN GOED GEVENTILEERDE RUIMTE
U krijgt mogelijk niet genoeg zuurstof indien u het gereedschap in een slecht geventileerde ruimte
gebruikt.
10. VERMIJD HET DIRECTE ZONLICHT
Plaats het gereedschap niet in een voertuig, kofferbak of ruimte waar de temperatuur snel kan
stijgen. Het gereedschap zou anders namelijk kunnen ontploffen. Een gebruikte, lege gascartridge
bevat nog steeds ontvlambaar, hoge-druk drijfgas dat door warmte kan uitzetten en ontploffen.
Page 74

74
11. GEBRUIK HET GEREEDSCHAP NIET IN DE BUURT VAN ONTVLAMBARE MIDDELEN
Voorkom brand of ontploffingen en gebruik het gereedschap derhalve beslist niet bij benzine,
thinner, gas, verf of lijm.
12. HOUD HET GEREEDSCHAP UIT DE BUURT VAN VUUR
13. GEBRUIK HET GEREEDSCHAP UITSLUITEND BIJ EEN TEMPERATUUR TUSSEN -7˚C
(19˚F) EN 49˚C (120˚F). HET GEREEDSCHAP KAN ANDERS NAMELIJK WORDEN
BESCHADIGD, GAAN BRANDEN OF ONTPLOFFEN.
-7˚C (19˚F) of lager: Het gereedschap wordt mogelijk beschadigd.
49˚C (120˚F) of hoger: De gascartridge kan worden beschadigd met brand of ontploffing als gevolg.
14. GEBRUIK HET GEREEDSCHAP NIET IN DE REGEN OF OP ZEER VOCHTIGE PLAATSEN
Gebruik in een natte omgeving veroorzaakt problemen.
15. VERMIJD GEBRUIK TEGENOVER IEMAND ANDERS
Werk beslist niet tegenover elkaar, daar een verkeerd ingeschoten spijker uw collega tegenover u
zou kunnen verwonden.
16. HET GEREEDSCHAP WORDT HEET
Bij langdurig gebruik van het gereedschap wordt de kop en de contactarm heet. Wees voorzichtig.
17. BIJ GEBRUIK VAN DE HAAK MOET U UW VINGER VAN DE TREKKER HOUDEN
18. VERWIJDER DE GASCARTRIDGE EN DE BATTERIJ EN LEEG HET MAGAZIJN WANNEER
HET GEREEDSCHAP NIET MEER WORDT GEBRUIKT
Verwijder na het voltooien of bij het onderbreken van de werkzaamheden, in geval van afwezigheid
en het verplaatsen naar een andere lokatie, afstellen, demonteren of repareren van het
gereedschap en het verwijderen van een vastgelopen spijker, altijd de gascartridge en de batterij
van het gereedschap en leeg het magazijn.
19. INSPECTEER OF ALLE SCHROEVEN STEVIG ZIJN AANGETROKKEN
Losse of verkeerd geplaatste schroeven en bouten van het gereedschap kunnen ongelukken en
beschadiging veroorzaken wanneer het gereedschap in werking wordt gesteld. Controleer derhalve
alvorens gebruik of alle schroeven en bouten van het gereedschap stevig en juist zijn geplaatst.
20. RAAK DE TREKKER NIET AAN, TENZIJ U EEN SPIJKER WILT INSCHIETEN
Raak de trekker niet aan, tenzij u een spijker wilt inschieten. Het is uitermate gevaarlijk om
bijvoorbeeld rond te lopen met de trekker ingedrukt. Voorkom ongelukken en wees altijd uitermate
voorzichtig.
49°C
120°F
−7°C
19°F
Page 75

75
21. RICHT DE SPIJKERUITLAAT BESLIST NIET NAAR UZELF EN ANDERE PERSONEN
Er zouden ernstige ongelukken kunnen gebeuren indien de uitlaat voor de spijkers naar personen
is gericht en per ongeluk verkeerd wordt geschoten. Richt de uitlaat derhalve niet naar mensen,
ongeacht of de gascartridge en batterij wel of niet zijn geplaatst, tijdens het laden of ontladen van
spijkers en andere werkzaamheden.
22. GEBRUIK UITSLUITEND DE GESPECIFICEERDE SPIJKERS OF BEVESTIGINGSONDERDELEN
Het gebruik van andere bevestigingsonderdelen dan de gespecifceerde kan een onjuiste werking
veroorzaken. Gebruik derhalve met dit gereedschap uitsluitend de gespecificeerde
bevestigingsonderdelen.
23. PLAATS DE SPIJKERUITLAAT JUIST OP HET WERKOPPERVLAK
Indien de uitlaat van de kop niet juist op het werkoppervlak is geplaatst, zouden spijkers
bijvoorbeeld weg kunnen schieten met mogelijk ernstige ongelukken als gevolg.
24. HOUD UW HANDEN EN LICHAAM UIT DE BUURT VAN DE SPIJKERUITLAAT
Bij het laden en gebruik van het gereedschap mag u uw handen of andere lichaamsdelen niet bij de
uitlaat voor de spijkers houden. Het is uitermate gevaarlijk indien lichaamsdelen per ongeluk bij de
uitlaat worden gehouden.
25. SCHIET SPIJKERS NIET DICHT BIJ EEN RAND OF HOEK VAN HET WERKOPPERVLAK OF
IN ZEER DUN MATERIAAL IN
Het werkoppervlak zou anders namelijk kunnen splijten, een spijker kan los schieten en ongelukken
veroorzaken.
26. SCHIET GEEN SPIJKERS BOVEN OP ANDERE SPIJKERS IN
Een spijker boven een andere spijker kan kromtrekken of wegschieten met mogelijk ernstig letsel
als gevolg.
27. VERWIJDER DE SPIJKERS NA DE WERKZAAMHEDEN
Verwijder de spijkers uit het magazijn na de werkzaamheden. Het is uitermate gevaarlijk indien er
nog spijkers in het magazijn zitten en het gereedschap bijvoorbeeld per ongeluk verkeerd wordt
behandeld of de gascartridge en de batterij worden geplaatst. Leeg derhalve beslist het magazijn na
gebruik.
28. CONTROLEER DE WERKING VAN HET CONTACTLOOP-MECHANISME REGELMATIG IN
GEVAL VAN HET GEBRUIK VAN CONTACTLOOP-GEREEDSCHAP
Gebruik het gereedschap niet indien de contactloop niet juist functioneert daar spijkers anders
mogelijk verkeerd worden ingeschoten. Verstoor de werking van het contactloop-mechanisme niet.
29. BIJ GEBRUIK VAN HET GEREEDSCHAP BUITENSHUIS OF OP HOGE PLAATSEN
In geval van het vastzetten van een dak of ander verhoogd oppervlak, moet u altijd bij het lagere
gedeelte starten en geleidelijk naar boven toewerken. Het tegengesteld werken is uitermate
gevaarlijk omdat u gemakkelijk mis zou kunnen stappen.
30. GEBRUIK HET GEREEDSCHAP BESLIST NIET INDIEN EEN VAN DE GEREEDSCHAPREGELAARS
(b.v. TREKKER, CONTACTARM) NIET FUNCTIONEERT, IS ONTKOPPELD, IS GEWIJZIGD
OF ONJUIST FUNCTIONEERT
31. START HET GEREEDSCHAP NIET ZOMAAR IN EEN OPEN RUIMTE
Spijkers zouden anders namelijk weg kunnen worden geschoten of het gereedschap wordt
overmatig belast.
32. GA ER ALTIJD VANUIT DAT ER SPIJKERS IN HET GEREEDSCHAP ZIJN GELADEN
Page 76

76
33. BEHANDEL HET GEREEDSCHAP VOORZICHTIG EN WEES VERANTWOORDELIJK
34. HET GEREEDSCHAP IS GEEN SPEELGOED
35. LAAD BESLIST GEEN SPIJKERS IN HET GEREEDSCHAP WANNEER EEN VAN DE
REGELAARS (bijv. TREKKER, CONTACTARM) IS GEACTIVEERD
36. BEHANDEL HET GEREEDSCHAP GOED
Reinig het gereedschap met een droge, zachte doek. Gebruik beslist geen natte doek en vluchtige
middelen zoals benzine en thinner.
37. VERMIJD HET DIRECTE ZONLICHT
Laat het gereedschap en de oplader niet voor langere tijd in het directe zonlicht liggen.
LET BEHALVE DE ALGEMENE VOORZORGEN EN ANDERE WAARSCHUWINGEN IN
DEZE HANDLEIDING TEVENS OP DE VOLGENDE PUNTEN
•
Gebruik het gereedschap niet als hamer.
•
Gebruik het gereedschap uitsluitend voor het doel waarvoor het is ontworpen.
•
Verwijder of verander geen onderdelen of regelaars van het gereedschap (bijv. trekker,
contactarm).
•
Bewaar het gereedschap, de gascartridge en de batterij op een droge plaats, buiten het bereik
van kleine kinderen.
•
Gebruik het gereedschap niet zonder het veiligheid-waarschuwingslabel bevestigd.
•
Verander het gereedschap en de werking beslist niet zonder vooraf toestemming van Powers
te hebben gekregen.
Page 77

77
2. SPECIFICATIES EN TECHNISCHE GEGEVENS
1. NAMEN VAN ONDERDELEN
2. SPECIFICATIES VAN HET GEREEDSCHAP
q
e
w
rt
y
u
i
!1 !2 !3
!8
!9
@0
!0
!5
!6
!7
!4
@1
@2
@3
o
q
Luchtfilterafdekking
w
Actuator
e
Behuizing
r
Indicator (LED)
t
Trekker
y
Batterij
u
Haak
i
Spijkerstopper
o
Diepte-afstelschijf
!0
Contactarm
!1
Volghouder
!2
Volger
!3
Magazijn
!4
Magazijnvoetje
!5
Batterij-afdekking
!6
Aansluitgedeelte
!7
Batterij (Cat.#55583)
!8
Gedeelte voor plaatsen
batterij
!9
Aansluitstekker
@0
Netsnoer
@1
Oplader (Cat.#55618)
@2
Netstekker
@3
Netadapter
3.
SPECIFICATIES VAN BEVESTIGINGSONDERDELEN
4. TECHNISCHE GEGEVENS
q
BEDRIJFSLAWAAI
A-gewogen single-event ------ LWA, 1s, d 105.4 dB
geluidsdrukniveau
A-gewogen single-event ------ Lp A , 1s, d 98.8 dB
emissie geluidsdruk
niveau bij werkstation
Deze waarden zijn bepaald en vastgelegd in overeenstemming met EN12549: 1999.
w
TRILLINGEN
Trilling karakteristieke waarde = 4.46 m/s
2
Deze waarde is bepaald en vastgelegd in overeenstemming met ISO 8662-11.
Deze waarde is een karakteristieke waarde van het gereedschap en representeert niet de invloed op hand-arm tijdens gebruik
van het gereedschap.
Invloed op hand-arm tijdens gebruik van het gereedschap is bijvoorbeeld afhankelijk van de greepkracht, de contactdruk, de
werkrichting, het te bewerken materiaal, ondersteuning van de werkzaamheden, etc.
PRODUCTNUMMER W3-21FRH W3-34CDH
HOOGTE 382 mm 391 mm
BREEDTE 111 mm 110 mm
LENGTE 379 mm 340 mm
GEWICHT
3.5 kg (7.8lbs.)
(inclusief gascartridge en batterij)
LAADCAPACITEIT
32 spijkers (1 strip) 40 spijkers (1 strip)
BATTERIJ Batterij (Cat.#55583)
CAPACITEIT BATTERIJ
6 V gelijkstroom, 1.5 Ah
OPLADER Oplader (Cat.#55618)
STROOMBRON
100-240 V wisselstroom, 50 of 60 Hz
STROOMVERBRUIK
8 VA (10 V 800 mA)
(Nominaal vermogen)
OPLAADTIJD Maximaal 150 minuten
TOEBEHOREN
Veiligheidsbril, draaghouder,
batterij, oplader
PRODUCTNUMMER W3-21FRH W3-34CDH
SPIJKERLENGTE
50 t/m 90 mm
DIAMETER SCHACHT
2.9 t/m 3.3 mm
TYPE SCHACHT Glad, ring, schroef
DIAMETER KOP 6.8 t/m 7.5 mm 6.5 t/m 7.7 mm
DRAAIHOEK 21 graden 34 graden
KOP
Geheel ronde kop
D-kop
Page 78

78
3. VEILIGHEIDSVOORZIENINGEN
Dit gereedschap heeft de volgende veiligheidsvoorzieningen zodat het inschieten van spijkers veilig kan
worden uitgevoerd.
Mechanische veiligheidsvoorziening
Dit gereedschap is dusdanig ontworpen dat er uitsluitend spijkers kunnen worden
ingeschoten wanneer de contactarm en de trekker tegelijkertijd geactiveerd zijn.
Spijkers worden niet ingeschoten wanneer uitsluitend de trekker wordt ingedrukt of
uitsluitend de contactarm op het werkoppervlak is geplaatst. Voor het schieten van
spijkers moet u dus de contactarm op het werkoppervlak plaatsen én vervolgens de
trekker indrukken.
Trekker
Contactarm
LET OP:
●
Inspecteer het gereedschap beslist alvorens gebruik en controleer dat de
veiligheidsvoorzieningen juist functioneren. Gebruik het gereedschap niet indien deze
voorzieningen niet werken.
Controleer de veiligheidsvoorzieningen dus eerst. Plaats de batterij en gascartridge zonder
spijkers geplaatst om de controle uit te voeren.
※
In de volgende gevallen werken de veiligheidsvoorzieningen onjuist. Gebruik het gereedschap
dan beslist niet.
1. U hoort het geluid van de werking wanneer uitsluitend de trekker wordt ingedrukt.
2. Het gereedschap start de werking wanneer uitsluitend de contactarm op het werkoppervlak
wordt geplaatst.
※
Het geluid van het draaien van een ventilator is normaal.
Raadpleeg in geval van een onjuiste werking de plaats van aankoop of een erkend
distributeur.
Page 79

79
4. GEBRUIK VAN DE BATTERIJ EN OPLADER
WAARSCHUWING:
●
Laad de batterij (Cat.#55583) voor het gereedschap beslist met de gespecificeerde oplader
(Cat.#55518) op. De batterij kan mogelijk niet juist met een andere oplader worden opgeladen
of kan door het gebruik van een andere oplader worden beschadigd, verhit of brand
veroorzaken.
●
Plaats de batterij niet in de buurt van een vuur.
●
Laat de batterij niet in het directe zonlicht liggen.
●
Laad de batterij niet op en gebruik hem niet bij natte omstandigheden, bijvoorbeeld bij water,
aan het strand en voorkom dat er vloeistoffen als water, melk, limonades, etc. op komen.
●
Ontkoppel de oplader wanneer niet in gebruik.
●
Voorkom brand en laad derhalve op bij een temperatuur tussen 0˚C en 40˚C.
●
Stel niet aan schokken, stoten onderhevig en laat niet vallen.
●
Voorkom kortsluiting en bedek het aansluitgedeelte (metalen gedeelte) van de batterij met de
batterij-afdekking (en wikkel om met isolatieband) alvorens deze voor recycling in te leveren.
<Batterijcellen in batterij>
・
Nominaal voltage: 1,2 V per stuk
・
Hoeveel in 1 pak: 5 stuks
●
Verwijder de batterij van de oplader wanneer de batterij is ontladen of lang niet zal worden
gebruikt.
●
Houd het gereedschap na het plaatsen van de batterij niet aan de batterij vast.
JUIST GEBRUIK VAN DE BATTERIJ
q
Volledig opladen en ontladen van de batterij.
Indien u de batterij herhaaldelijk oplaadt zonder dat deze meer dan de helft is ontladen, zal het
aantal spijkers dat met een volledig geladen batterij kan worden verwerkt aanzienlijk kleiner worden
omdat de gebruikstijd van de batterij korter wordt. Gebruik de batterij derhalve totdat de LEDindicator van het gereedschap rood oplicht, ten teken dat de batterij bijna geheel leeg is.
w
Afwisselend gebruik van twee batterijen.
Voor een langere levensduur van de batterij, wordt het afwisselend gebruiken van twee batterijen
aanbevolen.
De batterij voor het gereedschap bevat twee nikkel-waterstof batterijcellen die moeten worden
gerecycled. Gooi de batterij net zomaar weg, maar lever als klein chemisch afval in.
Recycling van de nikkel-waterstof batterij
LET OP:
LET OP:
Page 80

80
Groene LED Rode LED Status Beschrijving
1.
2.
3.
4.
5.
6.
GEBRUIK VAN DE OPLADER
De speciaal ontworpen oplader (Cat.#55618) heeft LED-indicators (groen en rood) die de status van de
oplader en de batterij tonen.
De volgende gevallen duiden op problemen en u moet de oplader en batterij door nieuwe vervangen.
●
De groene LED-indicator licht niet op wanneer de stekker van de oplader in een 100-240 V
wisselstroom stopcontact (voor huishoudelijk gebruik) is gestoken.
※
Controleer met andere elektrische apparatuur of er werkelijk stroom op het stopcontact staat.
●
De groene en de rode LED-indicators lichten niet op of knipperen niet wanneer de batterij in de
oplader is geplaatst.
●
De groene LED-indicator licht niet 150 minuten na het oplichten van de rode LED-indicator op.
●
De rode LED-indicator licht niet op wanneer de batterij in de oplader wordt geplaatst.
Problemen met het opladen
○
AAN
●
UIT
Stroom
ingeschakeld
De oplader is aangesloten. (Stroom-aan status:
batterij niet geplaatst.)
●
UIT
○
AAN
Opladen De batterij wordt opgeladen.
○
AAN
●
UIT
Opladen voltooid De batterij is geheel opgeladen.
Knipperend Knipperend
Waarschuwing hoge
temperatuur
De batterij is heet. (Verwijder van de oplader en laat
even afkoelen alvorens op te laden.)
○
AAN
○
AAN
Waarschuwing
batterij
De batterij is defect. (Koop een nieuwe batterij.)
Knipperend
○
AAN
Waarschuwing hoge
temperatuur batterij
De batterij is defect en heet. (Koop een nieuwe
batterij.)
Page 81

81
OPLADEN
●
Laad de batterij met het gespecificeerde voltage op. Steek de stekker van de netadapter in een
100-240 V wisselstroom stopcontact (voor huishoudelijk gebruik). Het gebruik van een ander
voltage kan problemen veroorzaken en is tevens zeer gevaarlijk.
●
Behandel het netsnoer voorzichtig.
Gebruik de oplader niet indien het netsnoer is beschadigd.
●
Gebruik een goed stopcontact. Het gebruik van een los of beschadigd stopcontact kan
oververhitting en ernstige ongelukken veroorzaken. Steek de stekker beslist niet in een
beschadigd stopcontact.
q
Verwijder de batterij van het gereedschap indien de batterij leeg is.
Houd de behuizing van het gereedschap goed vast en druk met uw vingers op de
vergrendelingen aan beide zijkanten van de batterij om deze te ontkoppelen.
Batterij
w
Steek de aansluitstekker van de netadapter in de oplader en steek vervolgens
de stekker in een stopcontact.
De groene LED-indicator licht op ten teken dat de stroom is ingeschakeld.
Groene LED-indicator
Oplader
100-240 V wisselstroom
netadapter
Vergrendeling
●
Probeer een geheel opgeladen batterij niet verder op te laden. De levensduur van de batterij
zal anders korter worden.
e
Laad de batterij op.
1. Plaats de batterij goed in de oplader.
2. Het laden start automatisch zodra de batterij is geplaatst. De rode LED-indicator licht
op ten teken dat de batterij wordt opgeladen.
3. De maximale oplaadtijd is ongeveer 150 minuten. De oplaadtijd is afhankelijk van de
omgevingstemperatuur, het voltage en de resterende batterijspanning. Nadat de
batterij geheel is opgeladen, licht de groene LED-indicator op ten teken dat het
opladen is voltooid. Indien een geheel opgeladen batterij weer in de oplader wordt
geplaatst, zal de rode LED-indicator weer oplichten. Dit duidt niet op een defect en
de groene LED-indicator zal snel weer oplichten ten teken dat het opladen is
voltooid.
r
De opgelichte groene LED-indicator toont dat het opladen is voltooid.
1. Houd de oplader vast en verwijder de batterij.
2. Trek de stekker van de netadapter uit het stopcontact.
De batterij is nu klaar voor gebruik.
Batterij
Rode LED-indicator
Oplader
100-240 V wisseslstroom
stopcontact
WAARSCHUWING:
LET OP:
Page 82

82
●
Verwijder de batterij van het gereedschap en berg op een veilige plaats op nadat de
werkzaamheden zijn voltooid of wanneer het gereedschap niet wordt gebruikt. (Verwijder
tevens de gascartridge en spijkers.) Indien u de batterij niet verwijdert, blijft het gereedschap
standby geschakeld en wordt dus onnodig stroom verbruikt.
In de volgende gevallen moet de batterij gedurende 24 UUR worden opgeladen voor het weer verkrijgen
van de volledige capaciteit.
・
Na aankoop van het gereedschap.
・
Indien het gereedschap langer dan 1 maand niet werd gebruikt.
・
Indien u met een geheel opgeladen batterij aanzienlijk minder spijkers kunt inschieten.
Laat de batterij gedurende ongeveer 24 uur in de oplader nadat de groene indicator is opgelicht.
Verversen van de batterij
LET OP:
Page 83

83
5. OMGANG MET DE GASCARTRIDGE
De gascartridge heeft een dubbele structuur; de binnenste container is gevuld met een vloeibare
gasvormige brandstof en de buitenste container met een drijfgas (tevens een drukgas). Het binnenste
brandstofgas wordt door de druk van het drijfgas in de buitenste container omhoog gedrukt en geheel
opgebruikt. Vanwege deze structuur blijft er brandbare drijfgas in de buitenste container, ook wanneer
het gas in de binnenste container geheel op is. U dient derhalve uitermate voorzichtig te zijn wanneer u
de lege gascartridge weggooit.
●
Gebruik uitsluitend de gascartridge die uitsluitend voor het gas-gestuurd gereedschap voor
vastzetten is ontworpen.
●
Rook beslist niet tijdens het bevestigen of bedienen van de doseerklep.
●
Verwijder de rubber plug aan de onderkant van de gascartridge niet, tenzij u de cartridge moet
weggooien.
●
Maak geen gat in de gascartridge.
●
Adem het gas niet in.
Het inademen van het gas veroorzaakt slaperigheid, duizeligheid en misselijkheid.
●
Spuit het gas beslist niet naar mensen.
●
Verbrand een lege gascartridge niet en probeer niet opnieuw te vullen.
(Zie bladzijde 85 voor details aangaande het weggooien van de gascartridge.)
●
Bevestig de doseerklep juist op de gascartridge.
De klep moet op de cartridge vastklikken. Er wordt geen gas via de doseerklep ingespoten
indien de klep niet juist is bevestigd. Wees voorzichtig en bevestig goed. Gas zou namelijk
kunnen lekken indien de klep niet juist is bevestigd met ongelukken als gevolg.
BEVESTIGEN VAN DE DOSEERKLEP AAN DE GASCARTRIDGE
De doseerklep is ontworpen voor een inspuiten van een constante, juiste hoeveelheid brandstofgas in
de verbrandingskamer van het gereedschap.
1. Drukken om de klep te ontgrendelen. 2. Verwijder de dop van de klep. 3. Breng randen in lijn.
4. Druk de voorste rand eerst op de 5. Druk de achterste rand omlaag 6. Druk horizontaal in zodat u weer een
4. cartridge. 5. zodat deze vastklikt. 6. klik hoort.
Doseerklep
WAARSCHUWING:
WAARSCHUWING:
Page 84

84
PLAATSEN VAN DE GASCARTRIDGE IN HET GEREEDSCHAP
●
Houd uw vingers beslist niet op de trekker.
●
Druk de contactarm beslist niet tegen het werkoppervlak.
2
1
q
Druk omhoog en trek de actuator in de richting die in de afbeelding wordt getoond
om te openen.
Actuator
w
Richt het ventiel van de doseerklep naar voren (in de richting van de
luchtfilterafdekking) en plaats de gascartridge.
Ventiel
e
Wanneer u de actuator opent, kunt u een rode adaptor zien.
Plaats het ventiel in deze adaptor.
Rode adaptor
r
Plaats de actuator over de doseerklep en druk omlaag om te vergrendelen.
Gascartridge
WAARSCHUWING:
Page 85

85
WEGGOOIEN VAN EEN GEBRUIKTE GASCARTRIDGE
Er is nog brandbaar drijfgas in een gebruikte gascartridge.
●
Gooi een gebruikte gascartridge beslist niet in een vuur.
●
Rook niet.
●
Adem het gas niet in.
WAARSCHUWING:
Page 86

86
6. AANWIJZINGEN VOOR GEBRUIK
Lees eerst het “VOORZORGEN VOOR DE VEILIGHEID” gedeelte goed door.
1. ALVORENS GEBRUIK
q
Draag een veiligheidsbril of gezichtsbescherming.
w
Plaats de gascartridge en batterij nog niet.
e
Inspecteer of alle schroeven vast zijn gedraaid.
r
Controleer of de contactarm en trekker juist kunnen worden bewogen.
t
Plaats de gascartridge en batterij.
y
Houd het gereedschap vast maar houd uw vinger niet op de trekker. Druk vervolgens de contactarm
tegen het werkoppervlak. (Het gereedschap dient niet te starten.)
u
Houd het gereedschap vast maar houd de contactarm niet tegen het werkoppervlak en druk op de
trekker. (Het gereedschap dient niet te starten.)
i
Verwijder de gascartridge en batterij.
2. BEDIENING
Draag een veiligheidsbril of gezichtsbescherming.
Uw ogen zouden kunnen worden beschadigd door eventueel stof of andere deeltjes die door de
afgevoerde lucht worden opgeblazen of door bijvoorbeeld een spijker die vanwege een onjuist gebruik
van het gereedschap rond wordt weggeschoten en in uw ogen komt. U moet derhalve altijd een
veiligheidsbril dragen tijdens gebruik van het gereedschap.
De eventuele werkgever en/of gebruiker dienen te controleren dat er beslist oog- of gezichtsbescherming
of een veiligheidsbril wordt gedragen. De veiligheidsbril moet aan de vereisten van het “American
National Standards Institute”, ANSI Z87 1 (“Council Directive” 89/686/EEC van 21 december 1989)
voldoen en een goede bescherming aan zowel de voor- als zijkant van het gezicht leveren.
De werkgever is verantwoordelijk voor het feit dat de gebruiker van het gereedschap en eventueel ander
personeel in de werkruimte oogbescherming draagt.
OPMERKING: Een veiligheidsbril of gezichtsbescherming zonder afdekking aan de zijkant geeft niet
voldoende bescherming.
Houd uw handen en lichaam uit de buurt van de spijkeruitlaat.
Bij het inschieten van spijkers of bevestigingsonderdelen moet u om ongelukken te voorkomen
uw handen en lichaam uit de buurt van de spijkeruitlaat houden.
Procedure
q
Laad de spijkers via de gleuf aan de achterkant van het magazijn totdat ze bij de
voorkant van de spijkerstopper zijn.
LADEN VAN SPIJKERS
●
Houd uw vinger beslist niet op de trekker tijdens het laden van spijkers.
●
Druk de contactarm beslist niet tegen het werkoppervlak.
●
Laat de drukkerhouder niet te snel los, daar de spijkers anders vast kunnen
lopen of per ongeluk wegschieten.
Spijkers
Spijkerstopper
WAARSCHUWING:
WAARSCHUWING:
WAARSCHUWING:
LET OP:
Page 87

AFSTELLEN VAN DE DIEPTE
●
Verwijder ALTIJD beslist de gascartridge en batterij alvorens de diepte voor
het inschieten van spijkers af te stellen.
●
De afstelschijf voor de diepte is mogelijk heet.
U kunt de diepte voor het inschieten van spijkers met de afstelschijf bepalen.
q
Schiet met de gascartridge en batterij geplaatst een paar spijkers in een voorbeeld
van het uiteindelijk te behandelen materiaal en bepaal de diepte.
w
Verwijder de gascartridge en batterij indien de diepte moet worden afgesteld.
e
Zie de markering op het magazijn voor de richting waarin u de afstelschijf moet
draaien.
r
Plaats de gascartridge en batterij weer terug.
r
De spijkers worden niet achtereenvolgend ingeschoten wanneer de contactarm
tegen het oppervlak is gedrukt en de trekker is ingedrukt. U moet de trekker loslaten
en vervolgens stap
w
herhalen.
Volghouder
87
w
Trek de volghouder zo ver als mogelijk naar de achterkant van het magazijn en laat
voorzichtig los.
●
Voorkom eventueel letsel door onverwachte bewegingen van het gereedschap
en houd derhalve uw gezicht beslist niet boven het gereedschap.
●
Plaats uw handen en vingers beslist niet bij de spijkeruitlaat.
2
1
q Press the nose of the Contact Arm
against the object.
w Pull the Trigger.
INSCHIETEN VAN SPIJKERS
Procedure
q
Plaats de batterij en gascartridge.
w
Druk de kop van de contactarm tegen het werkoppervlak waarin u spijkers wilt
inschieten. De ventilator start, het gas wordt ingespoten en de brandstof wordt met
lucht gemengd.
e
Druk de contactarm goed tegen het oppervlak en druk de trekker in. De spijkers
worden nu met behulp van de brandstofverbranding in het oppervlak geschoten.
●
Controleer alvorens de werkzaamheden te starten dat het gereedschap als
hierboven beschreven functioneert.
●
Het gereedschap wordt warm en kan brandwonden veroorzaken indien het
langdurig achterelkaar wordt gebruikt. Let goed op. Raadpleeg de plaats van
aankoop of een erkend distributeur voor inspectie of reparatie indien het
gereedschap niet normaal lijkt te functioneren.
※
De ventilator blijft na het inschieten van spijkers nog ongeveer 10 seconden
draaien.
Afstelschijf
Dieper Minder diep
q
Druk de kop van de contactarm goed tegen
het oppervlak.
w
Druk de trekker in.
WAARSCHUWING:
WAARSCHUWING:
WAARSCHUWING:
LET OP:
Page 88

88
VERVANGEN VAN DE GASCARTRIDGE
U kunt geen spijkers inschieten wanneer de gascartridge bijna leeg is.
●
Laat de trekker beslist los.
●
Druk de contactarm niet tegen het werkoppervlak.
q
Druk de actuator omhoog en trek in de richting die in de afbeelding wordt getoond
om te openen.
VERVANGEN VAN DE BATTERIJ
De rode LED-indicator van het gereedschap licht op wanneer de batterij bijna leeg is.
●
Verwijder beslist de gascartridge.
●
Laat de trekker beslist los.
●
Druk de contactarm niet tegen het werkoppervlak.
w
Houd de doseerklep vast en verwijder de gebruikte, bijna lege gascartridge.
e
Plaats een nieuwe gascartridge.
(Zie bladzijde 84 voor het plaatsen van de cartridge.)
q
Houd de behuizing stevig vast en druk op de vergrendelingen aan beide zijkanten
van de batterij om deze te verwijderen.
2
1
Actuator
Ventiel
Gascartridge
●
Verwijder de gascartridge en batterij.
VERANDEREN VAN DE HAAKRICHTING
De haak kan in twee verschillende richtingen worden geplaatst. Verwijder de
zeshoekige schroefbouten met een inbussleutel en verander de richting. Plaats daarna
de bouten weer terug.
Zeshoekige
schroefbouten
Haak
Batterij
Vergrendeling
WAARSCHUWING:
WAARSCHUWING:
WAARSCHUWING:
Page 89

89
7. ONDERHOUD VOOR OPTIMALE WERKING
1. BEHANDEL HET GEREEDSCHAP MET ZORG
Laat niet vallen, stoot niet en sla niet tegen een hard oppervlak. Het gereedschap zal anders
namelijk vervormen, barsten of anderszijds worden beschadigd.
2. DRUK DE TREKKER NIET IN WANNEER ER GEEN SPIJKERS ZIJN GELADEN
Indien u het gereedschap herhaaldelijk bedient zonder spijkers geplaatst, zal de levensduur van de
diverse onderdelen aanzienlijk korter worden.
3. SMEER HET GEREEDSCHAP NIET
Voorkom problemen en smeer derhalve het gereedschap nooit.
4. INSPECTEER HET GEREEDSCHAP REGELMATIG
Voor het behouden van een optimale werking van het gereedschap moet u het regelmatig
schoonmaken en inspecteren. Raadpleeg de plaats van aankoop of een erkend distributeur voor
inspectie.
5. REINIG HET LUCHTFILTER
Reinig het luchtfilter ongeveer na iedere twee dagen gebruik. Open de luchtfilterafdekking met een
normale schroevendraaier en verwijder het luchtfilter. Blaas het luchtfilter met perslucht schoon.
8. OPSLAG
q
Voorkom roestvorming en breng derhalve een dun laagje smeermiddel op de stalen onderdelen van
het gereedschap aan wanneer u het voor langere tijd niet gaat gebruiken.
w
Bewaar het gereedschap niet in een zeer koude ruimte. Bewaar bij een normale tot warme
temperatuur.
e
Bewaar het gereedschap wanneer niet in gebruik in een warme en droge ruimte. Houd beslist buiten
het bereik van kleine kinderen.
r
Kwalitatief hoogwaardig gereedschap moet, ook bij normaal gebruik, van tijd tot tijd worden
onderhouden en onderdelen moeten na een bepaalde tijd mogelijk worden vervangen vanwege
slijtage.
w
Plaats de vers opgeladen batterij in het gereedschap. De batterij moet vastklikken.
(Zie bladzijde 81 voor details aangaande het opladen.)
e
Plaats een gascartridge.
(Zie bladzijde 84 voor het plaatsen van de cartridge.)
Page 90

90
e
Probleem Controlepunt
Batterij kan niet worden opgeladen
・
Controleer of de stekker stevig in een stopcontact is
gestoken.
・
Controleer of de netadapter stevig met de oplader is
verbonden.
・
Controleer of de batterij goed in de oplader is geplaatst.
・
Controleer of de LED-indicator van de oplader is opgelicht
Tijdens het opladen worden de
oplader, netadapter en het
netsnoer heet en hoort u een
abnormaal geluid of wordt er hitte
opgewekt
・
Stop het gebruik direct en raadpleeg de plaats van
aankoop of distributeur
Spijkers kunnen niet worden
ingeschoten
・
Controleer dat spijkers, de batterij en gascartridge in het
gereedschap zijn geplaatst.
・
Controleer de LED-indicators op het gereedschap.
・
Controleer of er nog gas in de gascartridge is.
・
Controleer of de gascartridge op is.
・
Controleer of de batterij opgeladen is.
・
Controleer of spijkers zijn vastgelopen.
・
Controleer dat de contactarm stevig tegen het
werkoppervlak is gedrukt.
9. OPLOSSEN VAN PROBLEMEN/REPARATIE
q
Laat reparatie uitsluitend uitvoeren door een erkend distributeur of handelaar.
w
Verwijderen van vastgelopen spijkers
●
Verwijderen van de gascartridge en batterij
Procedure
q
Verwijder alle spijkers uit het magazijn.
w
Verwijder de in de kop vastgelopen spijkers met een platte schroevendraaier of
ander geschikt voorwerp.
WAARSCHUWING:
Page 91

91
ESPAÑOL
W3-21FRH / W3-34CDH
SISTEMA DE FIJACIÓN IMPULSADO POR GAS
ÍNDICE
1.
INSTRUCCIONES DE SEGURIDAD
……
92
2.
CARACTERÍSTICAS Y DATOS TÉCNICOS…99
3. DISPOSITIVO DE SEGURIDAD
……
100
4.
CÓMO UTILIZAR LA BATERÍA Y EL
CARGABATERÍA
……………………
101
5.
MANIPULACIÓN DE LA CÉLULA DE
COMBUSTIBLE
……………………
105
6. INSTRUCCIONES PARA EL
FUNCIONAMIENTO
………………
108
7.
MANTENIMIENTO DEL RENDIMIENTO
…………
111
8. ALMACENAJE
……………………
111
9.
BÚSQUEDA DE AVERÍAS/REPARACIONES…112
MANUAL DE OPERACIONES MANTENIMIENTO
PARA EVITAR GRAVES DAÑOS PERSONALES O EN LA PROPIEDAD.
ANTES DE EMPLEAR LA HERRAMIENTA, LEER CON ATENCIÓN Y COMPRENDER
LOS SIGUIENTES INSTRUCCIONES DE SEGURIDAD.
ATENCIÓN:
Page 92

92
1. INSTRUCCIONES DE SEGURIDAD
PRECAUCIONES PARA EL USO DE LA HERRAMIENTA
1. LLEVAR GAFAS DE PROTECCIÓN O TRABAJO
Un peligro a los ojos existe siempre ya que el polvo puede estar proyectado por el aire que se
escapa o por una punta que vuela hacia arriba en caso de manipulación incorrecta de la
herramienta. Por estas razones, siempre llevar gafas de protección o trabajo cuando se utiliza la
herramienta. El dueño y/o el usuario deben asegurar que una protección apropriado de los ojos
está proporcionada.
El equipamiento de protección de los ojos debe cumplir con las exigencias del Instituto de las
Normas Nacionales Americanas, ANSI Z87.1 (Directiva del Consejo 89/686/EEC. del 21 de Dic. de
1989) y asegurar protección lateral y frontal.
El dueño es responsable para imponer el uso apropriado del equipamiento de protección de los
ojos por el operador de la herramienta y por cualquier otro personal en la zona de trabajo.
NOTA: Gafas sin protección lateral y escudos de cara no aseguran una protección apropriado.
2. UNA PROTECCIÓN DE LAS OREJAS PUEDE SER NECESARIA EN ALGUN AMBIENTE DE
TRABAJO
Como las condiciones de trabajo pueden incluir una exposición a elevados niveles de ruido que
pueden causar daños auditivos, el dueño y el usuario deberían proveer una protección auditiva y
una uso requerida para el operador y otras personas en la zona de trabajo.
3. LLEVAR ROPAS Y UN EQUIPAMIENTO DE PROTECCIÓN APROPRIADOS EN EL AMBIENTE
DE LAS OPERACIONES
Según el ambiente de las operaciones, llevar ropas de trabajo de largas mangas y un
equipamiento de protección como casco y zapatos de seguridad.
4. PRECAUCIONES PARA LA CÉLULA DE COMBUSTIBLE
q
Asegurarse de ajustar correctamente la célula de combustible .
w
No almacenar la célula de combustible en un lugar mal ventilado.
e
No exponer la célula de combustible directamente al sol.
No colocar la célula de combustible en un vehículo o un tronco donde la temperatura podría
elevarse. Podría estallar. Una célula de combustible vacía y usada contiene siempre gas
combustible de chorro, que podría inflar y hacer estallar el recipiente en pedazos.
r
Almacenar la célula de combustible a la temperatura ambiente de 49˚C (120˚F) o menos.
La célula de combustible contiene un gas combustible de presión. Si se expone a una
temperatura superior a 49˚C (120˚F), el gas puede escapar o estallar, causando así un incendio.
ADVERTENCIA:
PARA EVITAR TODO RIESGO DE HERIDAS O DAÑOS MATERIALES SERIOS
ANTES DE UTILIZAR LA HERRAMIENTA, SE RECOMIENDA LEER CUIDADOSAMENTE Y FAMILIARIZARSE
CON LAS “INSTRUCCIONES DE SEGURIDAD” SIGUIENTES. UNA FALTA DE OBSERVACIÓN DE LAS
ADVERTENCIAS PUEDE TENER COMO CONSECUENCIA UN RIESGO MORTAL O DAÑOS SERIOS.
49°C
120°F
Page 93

93
t
No respirar el gas.
y
No incinerar o reutilizar la célula de combustible vacía.
u
Nunca ventear el gas en dirección de una persona.
i
No retirar la toma de goma del fondo de la célula de combustible, excepto en caso de
puesta al rechazo.
o
No hacer un agujero en la célula de combustible.
5. PRECAUCIONES PARA EL MÉTODO DE CARGA, EL CARGABATERÍA Y LA BATERÍA
q
Asegurarse de utilizar correctamente Battery (Cat.#55583).
Asegurarse de utilizar Battery (Cat.#55583) para la herramienta. Nunca conectar la herramienta
a una fuente de alimentación o cualquier otra batería recargable, pilas secas o acumulador para
automóviles. Si no se observa esta precaución, hay riesgo de causar una ruptura, un problema,
la generación de calor o una combustión. (Véase Página 99 para Battery (Cat.#55583)).
w
Asegurarse de cargar correctamente con Charger Base (Cat.#55618).
Asegurarse de cargar la batería con Charger Base (Cat.#55618).
Si se carga usando otro tipo de cargabatería, no podría cargar correctamente y también corre el
riesgo de romperse, causar un incendio o producir calor. (Véase Página 99 para Charger Base
(Cat.#55618)).
e
Cargar la batería antes de utilizarla.
La nueva batería o la que no se utilizó por un largo período de tiempo podría no cargarse
enteramente debido a una autodescarga. Asegurarse de cargarla con Charger Base
(Cat.#55618).
r
Cargar la batería a la tensión indicada.
Asegurarse de cargar, utilizando la toma de 100~240 V de c.d. (para uso doméstico). Nunca
cargar a otra tensión que aquélla indicada. Si no se observa esta precaución, hay riesgo de
causar una combustión o una generación de calor.
Page 94

94
t
Nunca utilizar un transformador como propulsor « booster » para la fuente de
alimentación del cargabatería.
Si no se observa esta precaución, un problema o una quemadura se producirá.
y
Nunca utilizar un generador de motor o una fuente de alimentación de c.d. para cargar la
batería.
Si no se observa esta precaución, hay riesgo de causar un problema o una quemadura del
cargabatería.
u
Nunca cargar la batería bajo la lluvia o en un lugar expuesto a salpicaduras de agua o a la
humedad.
Si se carga en un lugar húmedo, podría ocurrir una descarga eléctrica o un cortocircuito,
causando así un incendio debido a quemadura o combustión.
i
Nunca tocar la toma de alimentación con una mano húmeda.
Si se la agarra con una mano húmeda, hay riesgo de causar una descarga eléctrica.
o
Nunca cubrir el cargabatería en funcionamiento con un tejido, etc.
Si se cubre el cargabatería, hay riesgo de producir calor, causando así una quemadura o un
incendio.
!0
No desplazar el cargabatería cerca de un fuego.
!1
No cargar la batería cerca de una sustancia combustible.
!2
Cargar la batería en un lugar bien ventilado, con protección contra exposición directa del
sol.
Una carga efectuada directamente al sol puede recalentar el cargabatería, causando así una
quemadura o un incendio.
!3
Cargar la batería a la temperatura ambiente de 0˚C (32˚F) a 40˚C (104˚F).
Si la temperatura ambiente es menor de 0˚C (32˚F) o mayor de 40˚C (104˚F), no se debe
efectuar la carga, ya que se puede producirse un incendio.
!4
No se deben dejar objetos extraños en el orificio de ventilación o en la toma de la batería
del cargabatería.
Pueden causar una descarga eléctrica o un problema. Utilizar la herramienta en un lugar libre
de polvo.
Page 95

95
!56
Manejar el cable de alimentación con cuidado.
Si se coge el cable de alimentación del adaptador de c.d. para transportarlo o extraerlo con el
fin de desconectarlo de la toma, se dañará, causando así una ruptura o un cortocircuito.
Además tenga cuidado que no entra en contacto con cortafríos, materias, aceite o grasa a alta
temperatura. Sustituir al cable de alimentación dañado por un nuevo.
!6
Una vez que la batería se desconecta del cuerpo de la herramienta, asegurarse de
cubrirla con el casquillo de paquete, a menos que esté utilizada.
Para evitar cualquier cortocircuito, cubrir el bloque de bornes (sección de metal) de la batería
inutilizada con el casquillo de paquete.
!7
Nunca poner en cortocircuito el bloque de bornes (sección de metal) de la batería.
Si se pone en cortocircuito, una corriente intensa circulará para recalentar la batería, causando
así una quemadura.
!8
Nunca deshacerse de la batería en un fuego.
Si no se observa esta precaución, hay riesgo de causar una explosión.
6. TENGA CUIDADO AL CONECTAR LA BATERIA A LA HERRAMIENTA
Al conectar la batería a la herramienta, asegurarse de observar correctamente los puntos
siguientes con el fin de evitar cualquier defecto de funcionamiento.
1. No poner su dedo sobre el gatillo.
2. No apretar el brazo de contacto contra el objeto.
3. Nunca poner su dedo o su mano cerca de la nariz de la herramienta.
7. ASEGURARSE DE COMPROBAR APROPRIADAMENTE AL CONECTAR LA BATERÍA
Antes de utilizar la herramienta, conectar la batería sobre la herramienta sin apretar el brazo de
contacto contra el objeto y sin cargar los clavos y la célula de combustible, luego comprobar los
siguientes puntos:
1. Comprobar si un ruido de funcionamiento se produce, conectando solamente la batería.
※ Si se conecta la batería y se aprieta el brazo de contacto contra el piso, etc, el ventilador o la
herramienta funcionarán, pero esto no constituye un hecho anormal.
2. Comprobar si hay una generación anormal de calor, olor o ruido.
Si se opera la herramienta, si produce calor o se emite un olor o un ruido anormal, entonces esto
significa que hay un problema. El uso de la herramienta en esta condición causará un accidente. Si
se observa cualquier anomalía, consulte al distribuidor autorizado más cercano a su zona de
residencia.
8. DESCONECTAR EL CARGABATERÍA CUANDO NO SE UTILIZA
9. NO UTILIZAR LA HERRAMIENTA EN UN LUGAR MAL VENTILADO
Si se utiliza la herramienta en un lugar mal ventilado, Ud. podría sufrir de una falta de oxígeno.
10. EVITAR EXPONER LA HERRAMIENTA DIRECTAMENTE AL SOL
No colocar la herramienta en un vehículo o un tronco donde la temperatura podría elevarse, con
riesgo de explosión. Una célula de combustible vacía y usada contiene siempre gas de chorro
combustible, que podría inflar y hacer estallar el recipiente en pedazos.
Page 96

96
11. NUNCA UTILIZAR LA HERRAMIENTA CERCA DE SUSTANCIAS COMBUSTIBLES
VOLATILES
Nunca utilizar la herramienta cerca de gasolina, diluyente, gas, pintura o pegamento, porque podría
causar un incendio o una explosión.
12. NO DESPLAZAR LA HERRAMIENTA CERCA DE UN FUEGO
13. UTILIZAR LA HERRAMIENTA EN UN AMBIENTE DE TRABAJO A UNA TEMPERATURA DE
-7˚C (19˚F) A 49˚C (120˚F), YA QUE EL CUERPO DE LA HERRAMIENTA PODRIA DAÑARSE,
CAUSAR UN INCENDIO O UNA EXPLOSIÓN.
-7˚C (19˚F) o menos. El cuerpo de la herramienta puede dañarse.
49˚C (120˚F) o más. La célula de combustible puede dañarse, causando así una combustión o una
explosión.
14. NO UTILIZAR LA HERRAMIENTA BAJO LA LLUVIA O EN UN LUGAR MUY HUMEDO
Si no se observa esta precaución, hay riesgo de causar un problema.
15. NUNCA COLOCAR CLAVOS CON DOS PERSONAS ENFRENTANDOSE UNA CON
RESPECTO A LA OTRA
Si se colocan clavos, con dos personas enfrentándose una con respecto a la otra, un clavo mal
insertado corre el riesgo de golpear y herir a la persona que se encuentra ante sí.
16. TENGA CUIDADO A LA ALTA TEMPERATURA DE LA HERRAMIENTA
Si se utiliza la herramienta por un largo período de tiempo, su nariz y su brazo de contacto se
recalentarán. Tenga cuidado de no causar quemadura.
17. CUANDO SE UTILIZA EL GANCHO, ASEGURARSE DE QUITAR SU DEDO DEL GATILLO
Cuando se utiliza el gancho, asegurarse de quitar su dedo del gatillo.
18. RETIRAR LA CÉLULA DE COMBUSTIBLE Y LA BATERIA, LUEGO VACIAR EL CARGADOR
DE PUNTAS CUANDO LA HERRAMIENTA NO ESTÁ EN FUNCIONAMIENTO.
Siempre retirar la célula de combustible y la batería de la herramienta, luego vaciar el cargador de
puntas cuando se ha completado o suspendido un trabajo, en caso de que no hay vigilancia,
desplazándose a una diferente zona de trabajo, en caso de ajuste, desmontaje o reparación de la
herramienta, y cuando se remueva una punta atascada.
19. COMPROBAR LA ESTANQUEIDAD DE LOS TORNILLOS
Un aflojamiento o una instalación incorrecta de los tornillos o pernos puede causar un accidente o
un daño de la herramienta durante su funcionamiento. Comprobar que se han instalados todos los
pernos y tornillos firmemente y correctamente antes de operar la herramienta.
20. NO TOCAR EL GATILLO A MENOS QUE SE QUISIERA COLOCAR UNA PUNTA
Nunca tocar el gatillo a menos que se quisiera colocar una punta en la parte de trabajo. Es
peligroso desplazarse alrededor transportando la herramienta con el gatillo extraído. Esto tipo de
acción debería evitarse.
49°C
120°F
−7°C
19°F
Page 97

97
21. NUNCA DIRIGIR LA SALIDA DE DESCARGA HACIA SÍ MISMO Y HACIA CUALQUIER OTRA
PERSONA
Si la salida de descarga se dirige hacia otras personas, accidentes serios pueden causarse en
caso de fracasados del motor. Asegurar que la salida de descarga no se dirige hacia otras
personas, aun si la célula de combustible y la batería estén insertadas o no, cuando se cargan y
descargan las puntas o se efectúan operaciones similares.
22. UTILIZAR LAS PUNTAS ESPECIFICADAS
El uso de puntas distintas de las indicadas causará un defecto de funcionamiento de la
herramienta. Asegurarse de utilizar solamente las puntas indicadas cuando se opera la
herramienta.
23. COLOCAR LA SALIDA DE DESCARGA CORRECTAMENTE SOBRE LA SUPERFICIE DE
TRABAJO
Si no se coloca la salida de descarga de la nariz de manera apropriado, hay riesgo de causar la
proyección de la punta hacia arriba y esto es muy peligroso.
24. ALEJAR SUS MANOS Y SU CUERPO DE LA SALIDA DE DESCARGA
Cuando se carga y opera la herramienta, nunca colocar su mano o otra parte de su cuerpo sobre el
lugar de descarga de la punta de la herramienta. Esto es muy peligroso ya que hay riesgo de tocar
sus manos o su cuerpo por error.
25. NO COLOCAR LA PUNTA CERCA DEL BORDE Y LA ESQUINA DE LA PARTE DE TRABAJO
Y DE UN MATERIAL FINO
La parte de trabajo puede romperse y la punta podría proyectarse libremente y tocar al operador o
a cualquier otra persona.
26. NO COLOCAR PUNTAS SOBRE OTRAS PUNTAS
La instalación de puntas sobre otras puntas puede causar una deflexión de las puntas, causando
así daños.
27. CÓMO RETIRAR LAS PUNTAS DESPUÉS DE COMPLETAR LOS TRABAJOS
Si se abandonan algunas puntas en el cargador de puntas después de completar los trabajos, hay
riesgo de un accidente serio que se produce antes de reanudar los trabajos, si se maneja la
herramienta con negligencia, o insertando la célula de combustible y la batería. Por esta razón,
retirar siempre todos las puntas restantes del cargador de puntas al completar los trabajos.
28. COMPROBAR EL FUNCIONAMIENTO DEL DISPOSITIVO DE DISPARO DE CONTACTO
FRECUENTEMENTE EN CASO DE USO DE UNA HERRAMIENTA DE TIPO DE DISPARO DE
CONTACTO
No utilizar la herramienta si el disparo no funciona correctamente ya que esto corre el riesgo de
producir la instalación accidental de una punta. No interferir con el funcionamiento apropriado del
dispositivo de disparo de contacto.
29. EN CASO DE USO DE LA HERRAMIENTA AL AIRE LIBRE O EN UN LUGAR ELEVADO
Cuando se realiza una fijación de puntas sobre los techos o una superficie inclinada similar,
comenzar fijando las puntas en la parte inferior y operando poco a poco hacia arriba. Una fijación
de las puntas por atrás es peligrosa ya que hay riesgo de perder su equilibrio.
30. NUNCA UTILIZAR LA HERRAMIENTA SI UNA PARTE CUALQUIERA DE LOS CONTROLES DE
LA HERRAMIENTA (POR EJEMPLO GATILLO, BRAZO DE CONTACTO) ESTE INOPERABLE,
DESCONECTADA, MODIFICADA O NO FUNCIONA CORRECTAMENTE
31. NUNCA ENGANCHAR LA HERRAMIENTA EN UN ESPACIO LIBRE
Esto permitirá evitar cualquier riesgo de peligro causado por puntas proyectadas en todas las
direcciones y una dificultad excesiva sobre la herramienta.
32. SUPONER SIEMPRE QUE LA HERRAMIENTA CONTIENE PUNTAS
Page 98

98
33. RESPETAR LA HERRAMIENTA COMO INSTRUMENTO DE TRABAJO
34. EVITAR TODA MANIPULACIÓN BRUTAL DE LA HERRAMIENTA
35. NUNCA CARGAR LA HERRAMIENTA CON PUNTAS CUANDO SE ACTIVA UN CONTROL
CUALQUIER (POR EJEMPLO, GATILLO, BRAZO DE CONTACTO).
36. TRATAR LA HERRAMIENTA CON GRAN CUIDADO
Limpiar la herramienta con un tejido flexible y seco. Nunca utilizar un tejido húmedo o soluciones
volátiles como diluyente o bencina.
37. EVITAR TODA EXPOSICIÓN DIRECTA DE LA HERRAMIENTA AL SOL
Nunca dejar la herramienta sobre el cargabatería en un sitio expuesto directamente al sol.
OBSERVAR LA NOTA DE “PRECAUCIÓN” GENERAL SIGUIENTE, ADEMÁS
DE LAS OTRAS ADVERTENCIAS CONTENIDAS EN CE MANUAL
•
No utilizar la herramienta como martillo.
•
La herramienta debe utilizarse solamente en caso de operaciones para las cuales se ha
diseñada.
•
Nunca retirar y estropear los controles (por ejemplo, GATILLO, BRAZO DE CONTACTO).
•
Conservar la herramienta, la célula de combustible y la batería en un lugar seco fuera del
alcance de los niños cuando no se utilizan.
•
No utilizar la herramienta sin su etiqueta de advertencia de seguridad.
•
No modificar la herramienta alejándose de su concepción o función de origen sin la
aprobación de , CO Ltd.
Page 99

99
2. CARACTERÍSTICAS Y DATOS TÉCNICOS
1. NOMBRE DE LAS PARTES
2. CARACTERÍSTICAS DE LA HERRAMIENTA
q
e
w
rt
y
u
i
!1 !2 !3
!8
!9
@0
!0
!5
!6
!7
!4
@1
@2
@3
o
q
Casquillo de filtro de aire
w
Casquillo de combustible
e
Cuerpo
r
DEL
t
Gatillo
y
Batería
u
Gancho
i
Bloque de clavos
o
Cuadrante de ajuste
!0
Brazo de contacto
!1
Soporte de botón
!2
Botón
!3
Cargador de puntas
!4
Casquillo de cola
!5
Casquillo de paquete
!6
Bloque de bornes
!7
Batería (Cat.#55583)
!8
Cavidad de ajuste de la
batería
!9
Toma jack
@0
Cable de alimentación
@1
Cargabatería (Cat.#55618)
@2
Toma de alimentación
@3
Adaptador CA
3. CARACTERÍSTICAS DE LAS PUNTAS
4. DATOS TÉCNICOS
q
RUIDO
Evento simple ponderado A
Nivel de alimentación del sonido ------ LWA, 1s, d 105.4 dB
Evento simple ponderado A
Nivel de presión acústico de emisión a la estación de trabajo ------ Lp A , 1s, d 98.8 dB
Estos valores se determinan y documentan según la Norma EN12549: 1999.
w
VIBRACIÓN
Valor característico de vibración = 4.46 m/s
2
Se determinan y documentan estos valores en conformidad con la Norma ISO 8662-11.
Este valor representa un valor característico que tiene informe a la herramienta y no afecta al sistema mano-brazo al utilizar la
herramienta. Una influencia al sistema mano-brazo, por ejemplo al usar la herramienta, depende de la fuerza de agarre, la
presión de contacto, la dirección de trabajo, el ajuste de la alimentación, la parte de trabajo y el soporte de la parte de trabajo.
N˚ DE PRODUCTO W3-21FRH W3-34CDH
ALTURA 382 mm 391 mm
ANCHURA 111 mm 110 mm
LONGITUD 379 mm 340 mm
PESO
3.5 kg (7.8 lbs.)
(incluidas la célula de combustible y la batería)
CAPACIDAD DE CARGA
32 clavos/banda 40 clavos/banda
BATERÍA Batería (Cat.#55583)
CAPACIDAD DE LA BATERÍA
6 V c.d., 1.5 aH
CARGADOR DE PUNTAS
Cargado (Cat.#55618)
FUENTE DE ALIMENTACIÓN
100~240 V, c.a., 50 ó 60 Hz
CONSUMO ELÉCTRICO
8 VA (10 V 800 mA)
(salida nominal)
TIEMPO DE CARGA 150 minutos al máximo
ACCESORIOS
Gafas, estuche para el transporte,
batería, cargabatería
N˚ DE PRODUCTO W3-21FRH W3-34CDH
LONGITUD DE CLAVO
50 a 90 mm
DIÁMETRO DE PIERNA
2.9 a 3.3 mm
TIPO DE PIERNA Tornillo de anillo liso
DIÁMETRO DE LA CABEZA
de 6.8 a 7.6 mm. de 6.5 a 7.7 mm.
ÁNGULO DE COLACIÓN
21 grados 34 grados
CABEZA
Cabeza redonda
Cabeza acortada
llena
Page 100

100
3. DISPOSITIVOS DE SEGURIDAD
La herramienta se equipa de los dispositivos de seguridad siguientes con el fin de asegurar una buena
seguridad para los trabajos de instalación de los clavos.
Dispositivo mecánico de seguridad
Esta herramienta permite evitar la descarga de clavos a menos que el brazo de
contacto y el gatillo se hayan impulsado simultáneamente. Los clavos no se descargan
ni extrayendo simplemente el gatillo, ni aplicando el brazo de contacto al objeto para la
instalación de los clavos. Los clavos se descargan solamente después de aplicar el
brazo de contacto al objeto y extraer el gatillo.
Gatillo
Brazo de contacto
PRECAUCIÓN:
●
Antes de utilizar la herramienta, asegurarse de comprobarlo para ver si los dispositivos de
seguridad funcionan correctamente. No utilizarla si los dispositivos no funcionan de modo
apropriado. Antes de utilizar la herramienta, comprobar si los dispositivos de seguridad
funcionan correctamente. Sin los clavos cargados, instalar la célula de combustible y la
batería para controlar.
※
En los casos siguientes, los dispositivos de seguridad no funcionan correctamente, entonces
nunca utilizar la herramienta.
1. Se emite un ruido de funcionamiento extrayendo simplemente el gatillo.
2. La herramienta comienza la operación de disparo a vacío aplicando simplemente el brazo
de contacto al objeto.
※
Se oye un ruido de funcionamiento del ventilador, pero esto no es un problema.
Si se observa un hecho anormal, consulte al distribuidor autorizado más cercano a su zona
de residencia para efectuar la inspección o reparación de la herramienta.
 Loading...