


OPERATORS MANUAL
TRAK-IT TOOL MODEL C3, C3 ST

2
TABLE OF CONTENTS
SUBJECT PAGE
INTRODUCTION AND WARRANTY 3-4
AN OVERVIEW OF THE TRAK-IT TOOL 5-6
SAFETY INSTRUCTIONS 7-9
BATTERY AND CHARGER 10-11
FUEL CELL AND METERING VALVE 11-12
PREPARING THE TRAK-IT TOOL FOR USE 14
TRAK-IT TOOL OPERATION 15
SERVICING 16-18
TROUBLESHOOTING 19-20
World Headquarters
Powers Fasteners
2 Powers Square
New Rochelle, NY 10801
USA
www.powers.com
Country Location Phone Website
USA New York 914-235-6300 www.powers.com
Canada Ontario 905-673-7295 www.powers.com
Australia Melbourne +61-03-9553 3999 www.powers.com.au
New Zealand Auckland +64-9415 2425 www.powers.com.nz
Europe Netherlands +31-226-357-670 www.powerseurope.nl
Other New York +1-914 235 6300 www.powers.com
For Service, Sales, Products or Repair parts contact the Powers company
closest to you and ask for customer service.
TRAK-IT TOOL MODEL C3, C3 ST

INTRODUCTION
STATEMENT FROM POWERS FASTENERS
Powers Fasteners would like to thank you for purchasing the model C3 power fastening
tool. This tool has been designed and manufactured to the highest quality standards in
order to provide you with many years of trouble free performance. It is recommended that
this manual be read from cover to cover prior to operating the tool so as to become
familiar with all recommended safety warnings and precautions. Please note that the C3
tool, similar to other power fastening tools, will require minor routine maintenance to
keep it operating at optimum performance. Take note of the recommended maintenance
tips since proper maintenance will ultimately determine the life expectancy of the tool.
TRAK-IT TOOL OPERATING MANUAL
This manual is intended to familiarize you with the Powers Fasteners Trak-It tool. Unlike
other power fastening tools which are electric or use gunpowder, the Trak-It tool is
powered by an internal combustion linear motor which is similar to your car engine. The
tool ignites a proprietary fuel in the presence of air which drives a piston that strikes a
fastener. As you will see, the Trak-It tool is totally self-contained with a fuel cell, battery,
and a supply of fasteners.
For ease of use, this manual is divided into sections (see Contents). Each section of the
manual is written with you, the tool operator, in mind. We have left out all of the technical
terms so that you can readily understand how to get the maximum performance from your
Trak-It tool, and how to avoid damaging the tool or injuring yourself. But, to accomplish
this, we need you to do two things which you will see on the page below.
1.READ THE MANUAL FROM COVER TO COVER BEFORE USING THE TOOL.
2.FOLLOW ALL INSTRUCTIONS IN THE MANUAL.
The Trak-It tool should be handled like other power fastening tools that you use. When
used properly, it will meet your fastening needs. And, like most of your tools, when used
improperly it can cause injury. If you are going to allow others to use the Trak-It tool, it is
your responsibility to make sure that they also read and comply with the instructions in
this manual before attempting to operate the tool.
Should you have questions about the Trak-It system, or wish to obtain additional copies
of this manual, please feel free to contact the Powers Fasteners customer service
department at 1-914 235 6300 in the USA or www.powers.com. If purchased overseas
please locate our nearest factory location listed on page 2.
3
3
TRAK-IT TOOL MODEL C3, C3 ST

WARRANTY
POWERS FASTENERS warrants that new Trak-It power fastening tools, parts and
accessories will be free from defects in material and workmanship for the period shown
below, after the date of delivery to the original user.
ONE-YEAR UNLIMITED WARRANTY
A one-year warranty will apply to all parts, including all wear items, less battery and
charger.
SIX-MONTH UNLIMITED WARRANTY
A six-month warranty applies to both the battery and charger. This warranty will be void
in the case of mishandling or operator abuse.
WARRANTY STATEMENT
Powers Fasteners sole liability hereunder will be to replace any part or accessory which
proves to be defective within the specified time period. Any replacement part or accessory
provided in accordance with this warranty will carry a warranty for the balance of the
period of warranty applicable to the part it replaces.
This warranty is void as to any tool which has been subjected to misuse, abuse,
accidental or intentional damage, use with fasteners, fuel, battery, or battery chargers not
meeting POWERS FASTENERS specification, size, or quality, improperly maintained,
repaired with other than genuine Trak-It replacement parts, damaged in transit or
handling, or which, in POWERS FASTENERS opinion, has been altered or repaired in a
way that affects or detracts from the performance of the tool.
POWERS FASTENERS MAKES NO WARRANTY, EXPRESSED OR IMPLIED, RELATING TO
MERCHANTABILITY, FITNESS, OR OTHERWISE, EXCEPT AS STATED ABOVE and the
liability AS STATED ABOVE AND AS ASSUMED ABOVE is in lieu of all other warranties
arising out of, or in connection with, the use and performance of the tool, except to the
extent otherwise provided by applicable law. POWERS FASTENERS SHALL IN NO EVENT
BE LIABLE FOR ANY DIRECT, INDIRECT, OR CONSEQUENTIAL DAMAGES, INCLUDING,
BUT NOT LIMITED TO DAMAGES WHICH MAY ARISE FROM LOSS OF ANTICIPATED
PROFITS OR PRODUCTION, SPOILAGE OF MATERIALS, INCREASED COST OF
OPERATION OR OTHERWISE.
Powers Fasteners reserves the right to change specifications, equipment, or designs at
any time without notice and without incurring obligation.
4
4
TRAK-IT TOOL MODEL C3, C3 ST

OVERVIEW
The Trak-It tool is a self-contained, fully portable tool that uses liquid hydrocarbon fuel to
power a unique linear drive internal combustion motor.
In order for you to fully understand the information contained in this manual, you need a
basic understanding of the tool. The Trak-It tool is made up of three assemblies: the
Handle, the Motor, and the Magazine.
As you examine the Trak-It tool, become familiar with the three major assemblies and the
various components located in each of them.
The Handle Assembly contains the Fuel Cell, the Battery, Low Battery Voltage
Indicator Light, and the Trigger.
The Motor Assembly contains the Cover and Filter, the Motor Housing, the Nose
Piece, and the Contact Arm.
The Magazine Assembly contains the Follower, the Follower Release Lever, and
the Magazine Foot.
Dimension:
Activation Mode:
Full sequential actuation
Cycle Rate:
Intermittent Operation 2 to 3 pins per second
Continuous Operation 1000 pins per hour
Noise Level:
A-weighted single-event — LWA, 1 s, d 105.30 dB
sound power level
A-weighted single-event — LpA, 1 s, d 96.92 dB
emission sound pressure
level at work station
These values are determined and documented in accordance to EN12549 : 1999.
Vibration:
Vibration characteristic value = 3.70 m/s
2
These values are determined and documented in accordance to ISO 8662-11.
This value is a tool-related characteristic value and dose not represent the influence to the
hand-arm-system when using the tool. An influence to the hand-arm-system when using
the tool will for example depend on the gripping force, the contact pressure force, the
5
5
TRAK-IT TOOL MODEL C3, C3 ST
Weight※
Height
Length
Width
TRAK-IT C3 TRAK-IT C3 ST
8.2 pounds (3.7 kg) 7.9 pounds (3.6 kg)
15.3 inches (38.9 cm) 15.3 inches (38.9 cm)
17.3 inches (44.0 cm) 13.3 inches (33.9 cm)
4.2 inches (10.6 cm) 4.2 inches (10.6 cm)
TRAK-IT C3 XL
0.0 pounds (0.0 kg)
0.0 inches (00.0 cm)
0.0 inches (00.0 cm)
0.0 inches (00.0 cm)
※Includes tool and battery

6
6
TRAK-IT TOOL MODEL C3, C3 ST
Air Filter Cover, Air Filter And Cylinder Cap
Motor Assembly
Jam Clear Lever Unit
Nose Piece
Contact Arm
Follower
Magazine Foot
Magazine Assembly
Follower Release
Lever
Battery
Low Battery Voltage Indicator Light
Handle Assembly
Actuator
Trigger
working direction, the adjustment of mains supply, the workpiece, the workpiece support.
NOTE: EXCEEDING THESE RATES COULD CAUSE THE TOOL TO OVERHEAT,
RESULTING IN LOSS OF PERFORMANCE OR DAMAGE TO TOOL COMPONENTS.
BY USING THE TRAK-IT TOOL AT ITS RECOMMENDED OPERATION RATE YOU WILL BE
ABLE TO DRIVE SEVERAL THOUSAND FASTENERS IN A TYPICAL WORKDAY.
Maximum Fastener Size:
1-1/2 inch (38 mm) long x. 102 inch (2.59 mm) diameter shank
Magazine Capacity:
Battery :
6 volts D.C. (nickel metal hydride) – Provides enough energy to drive approximately 3000
fasteners on a full charge.
Charge time – Approx. 2-1/2 hours.
Fuel Cell:
Liquid hydrocarbon – Provides enough fuel to drive up to 1200 fasteners.
(Dangerous goods class 2.1 UN1075 2.7 fl oz/40g/80ml)
NOTE: POWERS FASTENERS DECLARES THAT THE MODEL TI-C TOOL IS IN
CONFORMANCE WITH THE EUROPEAN "MACHINES" DIRECTIVE.
NOTE: The triangle symbol marked as " " following its tool serial number indicates that
safety yoke is equipped with this tool.
TRAK-IT C3
42 fasteners
TRAK-IT C3 ST
22 fasteners

SAFETY INSTRUCTIONS
The following safety instructions have been included in this manual to provide you with
basic information necessary for safe operation of the Trak-It Tool. DO NOT ATTEMPT TO
OPERATE THIS TOOL UNTIL YOU HAVE READ AND UNDERSTOOD ALL SAFETY
PRECAUTIONS AND MANUAL INSTRUCTIONS.
Failure to follow all safety precautions and manual instructions can result in blindness,
severe personal injury, damage to personal property, and damage to the tool.
In addition to these instructions, additional training may be necessary, depending upon
the type of fastening you wish to do. Contact your Powers Fasteners customer service
representative for additional information.
DANGER
THE TRAK-IT TOOL IS AN INTERNAL COMBUSTION DEVICE. IT PRODUCES HOT
EXHAUST GASES THAT MAY IGNITE FLAMMABLE MATERIALS. THIS TOOL MUST NOT
BE USED IN A COMBUSTIBLE ENVIRONMENT OR IN THE PRESENCE OF COMBUSTIBLE
MATERIALS, SUCH AS FLAMMABLE CHEMICALS, ADHESIVES, GASOLINE, OR
SOLVENTS. CARE MUST BE TAKEN TO PREVENT A TOOL CONTAINING A FUEL CELL
FROM BEING EXPOSED TO TEMPERATURES IN EXCESS OF 120 ˚F (49 ˚C), SINCE THE
FUEL CELL COULD BURST RELEASING FLAMMABLE GAS.
THIS TOOL MUST BE OPERATED ONLY IN A WELL-VENTILATED ENVIRONMENT,
BECAUSE THE TOOL EXHAUSTS CARBON MONOXIDE SIMILAR TO A CHAINSAW OR
LAWN MOWER. EXPOSURE TO CARBON MONOXIDE MAY CAUSE DIZZINESS NAUSEA,
OR UNCONSCIOUSNESS.
THE TRAK-IT TOOL, THE FUEL CELLS, AND THE BATTERY CELL AND ITS CHARGER
SHOULD ALWAYS BE KEPT OUT OF THE REACH OF CHILDREN.
1. READ THIS MANUAL FROM COVER TO COVER. Always refer to this manual for
information about the safe operation and servicing of the Trak-It tool. If any portion
seems unclear, or you have any questions, contact your Powers Fasteners customer
service representative immediately.
2. WEAR EYE AND HEARING PROTECTION. Always wear hearing and eye protection
devices when you are operating the Trak-It tool or working in the vicinity of this tool.
Also, your eye protection must meet the requirement of ANSI STANDARD Z 87. 1 (Counsil
directive 89-686-EEC dated 21 Dec, 1989).
3. NEVER ASSUME THE TOOL IS EMPTY. Every time you pick up the Trak-It tool, check
the Magazine for fasteners. Never point the tool at anyone or yourself, even if you are
absolutely sure there are no fasteners in the tool. The fastener you did not see is the
fastener that can injure you or someone else.
7
7
TRAK-IT TOOL MODEL C3, C3 ST

4. NEVER ENGAGE IN "HORSEPLAY” WITH THE TOOL. The Trak-It tool is not a
toy...it is a power fastening tool. It is designed to drive a fastener through steel sheets
into concrete. To accomplish this task, it generates a tremendous amount of energy.
Fooling around, even when you are absolutely sure there are no fasteners in the tool, is
asking for an accident.
5. NEVER CARRY THE TOOL WITH YOUR FINGER ON, OR DEPRESSING, THE
TRIGGER. You must remember that the Trak-It tool operates in a specific sequence. The
Contact Arm acts as an operating feature that blocks the Trigger from completing the ignition
circuit. Should you unintentionally depress the Contact Arm while pulling the Trigger as
you are carrying the tool, it could discharge a fastener.
6. NEVER OPERATE A TOOL THAT IS MALFUNCTIONING. If you determine that the
Trak-It tool is not working properly, and the problem is more than a simple fastener jam,
stop using it immediately and refer to the Servicing Section of this manual. If the problem
cannot be corrected with one of the steps covered in the Servicing Section, report the
problem to your supervisor or Powers Fasteners customer service representative.
DO NOT ATTEMPT TO MAKE ANY ADDITIONAL REPAIRS TO THE TRAK-IT TOOL.
7. OPERATE THE TOOL ONLY ON THE WORK SURFACE. The Trak-It tool should be
operated only when it is in contact with the work surface. Always hold the tool firm and
perpendicular against the surface to be fastened. Stay at least two inches (50 mm) away
from the edge of the concrete.
8. NEVER FIXTURE THE TOOL. The Trak-It tool has been designed to be used as a
hand-operated tool. Never attempt to operate the tool by fixing it to a stationary work
surface or object. Operating the tool in a fixtured position may cause uncontrolled pin
discharge and result in injury to the operator or bystanders.
9. NEVER DISABLE OR REMOVE THE CONTACT ARM. The Trak-It tool is equipped
with a device called the Contact Arm. This device helps reduce the possibility of
accidental operation by preventing the tool from operating until it is fully depressed on the
work surface. The Contact Arm should never be disabled or removed. Do not use the
Trak-It tool if the Contact Arm is damaged or not working properly.
10. DO NOT LOAD FASTENERS WITH THE TRIGGER OR CONTACT ARM
DEPRESSED. When loading fasteners into the Trak-It tool, you must avoid pulling the
Trigger or while having the Contact Arm depressed. When the tool is placed on a
bench or other surface, the Contact Arm might be depressed. When you are loading
fasteners, you could accidentally pull the Trigger by grasping the Handle to steady the
tool. These two actions will cause the Trak-It tool to operate, discharging a fastener.
11. FASTENER REMOVAL OR CLEARING JAMS. Jams can easily be cleared from the
Nose Piece of the tool. Remember to always remove the Fuel Cell from the tool prior
to clearing a jam. For details on the procedure, please refer to the "Clearing a jam"
section of this manual.
8
8
TRAK-IT TOOL MODEL C3, C3 ST

12. NEVER ATTEMPT TO OPERATE THE TRAK-IT TOOL IF PARTS ARE LOOSE,
DAMAGED, OR MISSING. Make sure all screws and nuts are properly tightened and all
parts are properly installed and in good working order. If parts are missing, don't attempt to
make temporary repairs...contact your Customer Service Representative immediately.
13. NEVER DRIVE FASTENERS ON TOP OF OTHER FASTENERS OR TOO CLOSE TO
OTHER FASTENERS. Fastening on top of or too close to other fasteners can cause the
fastener to ricochet and cause serious injury. Fasten only in areas where the entire shank
can penetrate. Fastener spacing should be a minimum of 3" (76 mm).
14. NEVER FIRE INTO VERY HARD OR BRITTLE MATERIALS SUCH AS CAST IRON,
TILE, GLASS, OR ROCK. These materials can shatter, causing sharp fragments and/or
the fastener to fly freely
15. NEVER CARRY FASTENERS OR OTHER HARD OBJECTS IN THE SAME POCKET
OR CONTAINER WITH FUEL CELL. The Fuel Cell could be punctured, causing serious
injury.
16. NEVER ALLOW ANYONE TO USE THE TRAK-IT TOOL UNLESS THEY READ AND
UNDERSTAND THE TOOL MANUAL AND ALL SAFETY INSTRUCTIONS. It is the
tool owner's responsibility to make sure that all Trak-It tool users read and fully understand
all tool operation, safety and maintenance instructions.
17. FUEL CELL STORAGE. Fuel Cells contain flammable gases which are under pressure
and, must be stored in an area where they will not be exposed to direct sunlight an open
flame, sparks, or temperatures above 120° Fahrenheit (49° Celcius). Exposure to
temperatures above 120°F (49°C) may cause the Fuel Cells to leak or burst, releasing the
flammable gases and creating a risk of fire or explosion.
18. FUEL CELL DISPOSAL. Never attempt to puncture, crush, burn or refill a Fuel Cell.
Always dispose of empty Cells with trash that will not be burned. Also, never place the Fuel
Cell with other materials for reclamation or recycling.
19. TOOL STORAGE. At the end of every workday, remove the Battery Cell and store both the
tool and battery in the carrying case.
20. KEEP THE TOOL CLEAN. At the end of each work day, take a minute to wipe the Trak-It
tool with a clean rag. A dirty tool is more likely to jam or malfunction.
21. NEVER PLACE YOUR HAND OR FINGERS OVER THE NOSE OF THE TOOL. The
fastener or piston can seriously injure your hand in the event of an accidental discharge.
9
9
TRAK-IT TOOL MODEL C3, C3 ST

BATTERY AND CHARGER
BATTERY CELL AND CHARGER
The first step in preparing a new tool for operation is to fully charge the new Battery. New
Batteries are shipped discharged and must be charged for 24 hours before first use. All
subsequent charges will require a 2.5 hour minimum charge.
IMPORTANT NOTES
NOTE: BATTERY CONTAINS NICKEL METAL HYDRIDE AND MUST BE RECYCLED OR
DISPOSED OF PROPERLY.
THE TRAK-IT TOOL COMES WITH A MULTI-CELL BATTERY PACK AND ITS OWN
CHARGER. THIS BATTERY CELL AND CHARGER COMBINATION IS THE ONLY ONE
THAT WILL WORK WITH THE TRAK-IT TOOL. THE BASIC CHARGING INSTRUCTIONS
ARE AS FOLLOWS:
WARNING — CHEMICAL/EXPLOSION HAZARD READ ALL INSTRUCTIONS
BEFORE CHARGING OR USING BATTERY. FAILURE TO FOLLOW ALL INSTRUCTIONS
MAY RESULT IN FIRE, SEVERE BURNS, OR RELEASE OF TOXIC FUMES.
CHARGING INSTRUCTIONS
1. Connect the round plug of the transformer to the back of the charger base and plug the
transformer adapter into any wall outlet.
2. Place the battery firmly into the rectangular receiver of the charger base. The red LED will
appear indicating that the battery is charging.
3. The battery is fully charged when the green LED appears.
NOTE: WHEN CHARGING A NEW BATTERY FOR THE FIRST TIME, LEAVE THE BATTERY
IN THE CHARGER UNTIL THE CHARGER LED TURNS GREEN.
• Charger must be on a level surface.
• Do not charge battery when temperature is below 40 ˚F (5 ˚C).
• Do not drop battery or charger.
• Do not allow metal objects to come in contact with battery terminals.
• Do not puncture or attempt to open battery case or cells.
• Do not store battery where it will be subjected to temperatures above 120°F (49°C).
• Do not incinerate battery.
• Do not use a defective battery charger or one that overheats and/or smokes when plugged in.
INSERTING BATTERY
1. Load the Battery into the Trak-It tool handle. Battery is secure only after the two locking
latches snap into the locked position.
LOW BATTERY VOLTAGE INDICATOR LIGHT
On one side of the Handle is a small plastic lens. This is the Low Battery Voltage
Indicator Light.
The Low Battery Voltage Indictor Light will illuminate only when the battery voltage is low.
When the battery voltage is low, a red LED will illuminate indicating to the operator that it
is time to recharge the battery.
10
10
TRAK-IT TOOL MODEL C3, C3 ST

CHARGING LOGIC
The battery charger is provided with both a red and green LED indicator light. Please note
charger logic for the four (4) following conditions.
1. Red LED illuminated-battery is charging.
2. Green LED illuminated-battery is fully charged
3. Alternating red and green-battery is hot. (Remove battery from charger and allow to cool
before attempting to charge).
4. Red and green LEDs blinking simultaneously-battery is dead (Replace with a new battery).
FUEL CELL AND METERING VALVE
FUEL CONTAINER
DANGER — EXPLOSION/FIRE HAZARD
READ ALL SAFETY INSTRUCTIONS BEFORE USING OR HANDLING FUEL CELL.
FAILURE TO FOLLOW ALL HANDLING INSTRUCTIONS MAY RESULT IN EXPLOSION OR
FIRE, CAUSING SEVERE PERSONAL INJURY OR PROPERTY DAMAGE.
KEEP AWAY FROM HEAT, SPARKS, AND OPEN FLAME.
DO NOT PUNCTURE OR ATTEMPT TO OPEN FUEL CELL. CONTAINER IS NONREFILLABLE.
DO NOT INCINERATE OR ATTEMPT TO RECLAIM OR RECYCLE CONTAINER.
EXPOSURE TO TEMPERATURES ABOVE 120 ˚F (49 ˚C) MAY CAUSE CONTAINER TO
BURST, RELEASING FLAMMABLE GAS.
DO NOT SMOKE WHILE INSTALLING OR OPERATING METERING VALVE.
USE IN WELL VENTILATED AREA.
ALWAYS WEAR SAFETY GLASSES WITH SIDE SHIELDS THAT CONFORM TO ANSI STD.
Z87.1 WHEN OPERATING, SERVICING, OR LOADING FUEL INTO THE TOOL.
NEVER SPRAY TOWARDS FACE OR EYES. DOING SO MAY CAUSE SEVERE PERSONAL
INJURY.
DO NOT INHALE SPRAY.
KEEP OUT OF REACH OF CHILDREN.
WARNING
SUNLIGHT CAN RAISE THE INSIDE PRESSURE OF A FUEL CELL. EXCESSIVE
EXPOSURE TO SUNLIGHT MAY INCREASE THE FUEL CELL PRESSURE CAUSING IT TO
BURST. ALWAYS KEEP THE FUEL CELL IN A LOCATION THAT DOES NOT EXCEED 120
˚F (49 ˚C), AND ALWAYS KEEP OUT OF DIRECT SUNLIGHT.
There is a container within the Fuel Cell. This Inner Container actually holds the
Fuel. The space between the Inner Container and the Outer Cylinder is filled with a
different gas called the propellant, which is under pressure. Never attempt to remove the
rubber plug located at the bottom of the fuel cell. Removing the bottom plug will cause a
sudden release in pressure that can cause possible injury to you and others.
As the Fuel is used, propellant pressure actually "squeezes" the Inner Fuel Container
11
11
TRAK-IT TOOL MODEL C3, C3 ST
much as you would squeeze a tube of toothpaste. This squeezing action ensures that all of
the Fuel will be used, and that the Trak-It tool can operate in any position.
Because of this container-within-a-container design, you might hear the sound of fluid
when shaking the Fuel Cell after all the Fuel has been used. This is the propellant that
remains between the containers.
If you expose the empty Fuel Cell to extreme temperatures, the propellant gas will
expand and could cause the container to burst, releasing flammable gases.
METERING VALVE
The Metering Valve contains the Fuel Metering System that ensures that the correct
amount of fuel is injected into the combustion chamber. The BLUE Metering Valve is
the only valve that will operate properly with the Trak-It tool.
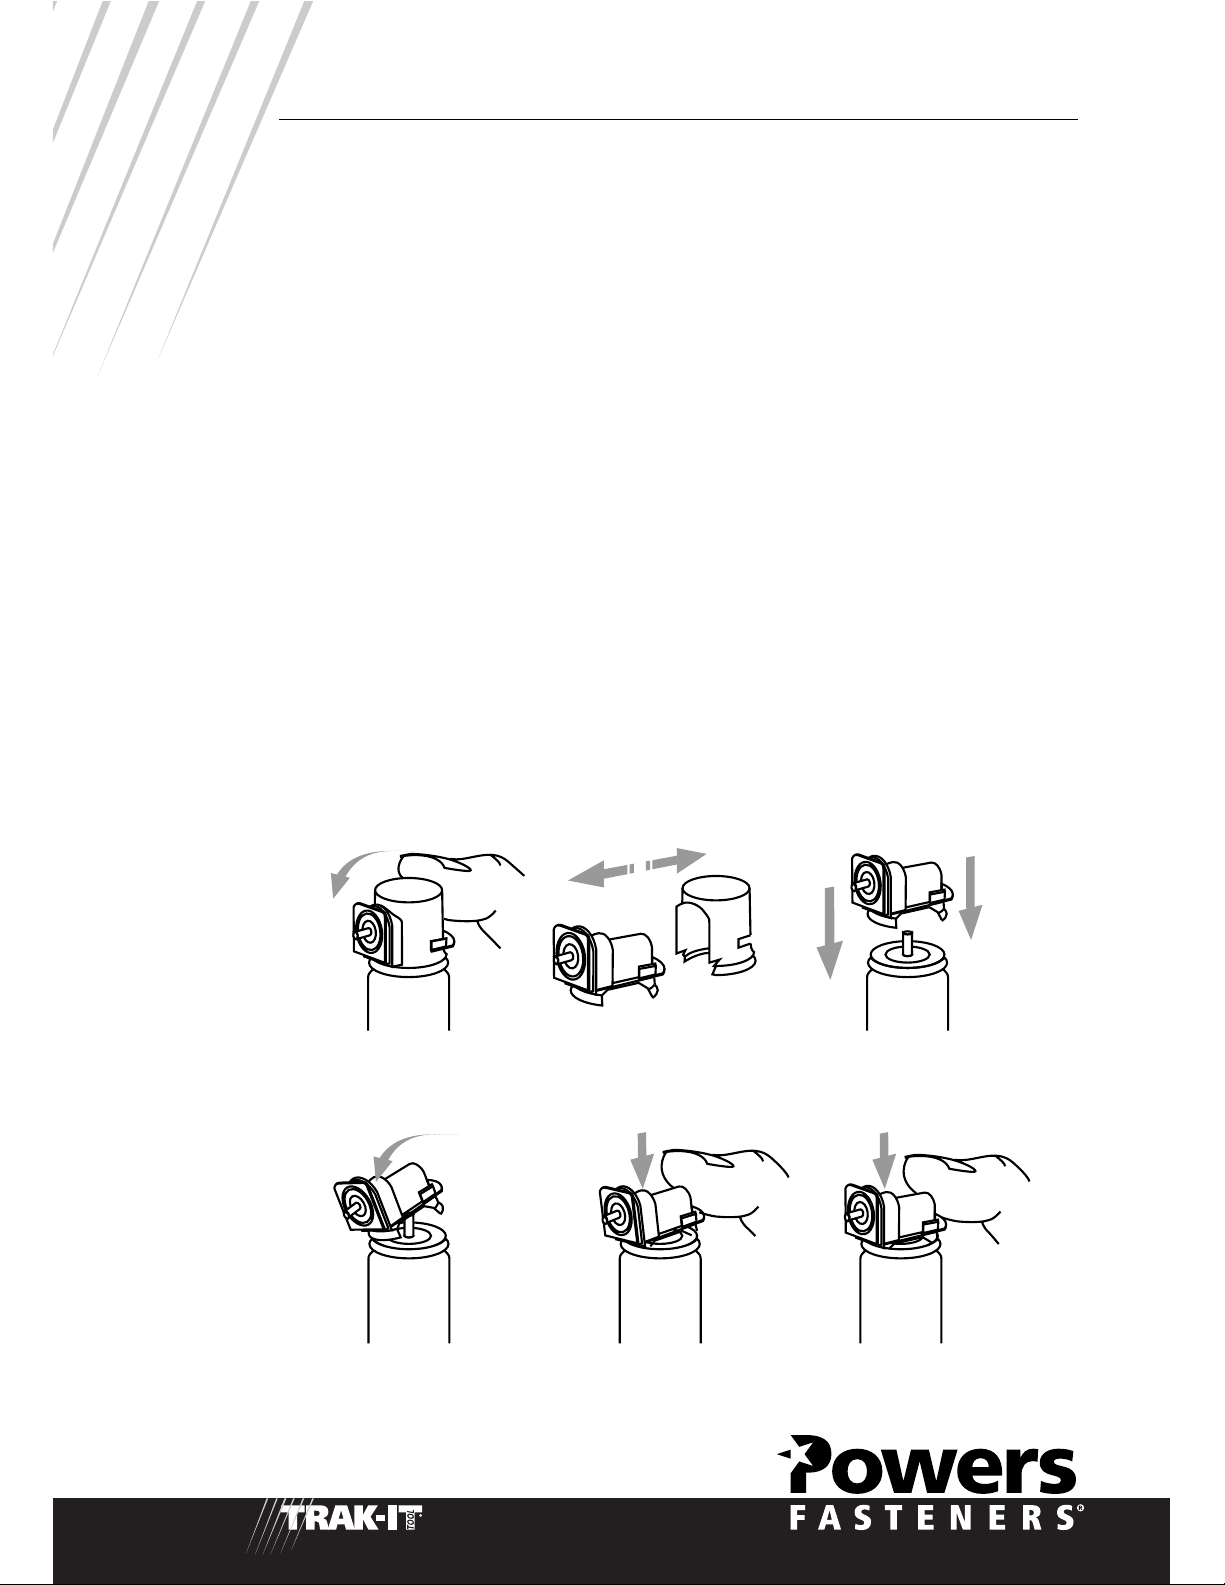
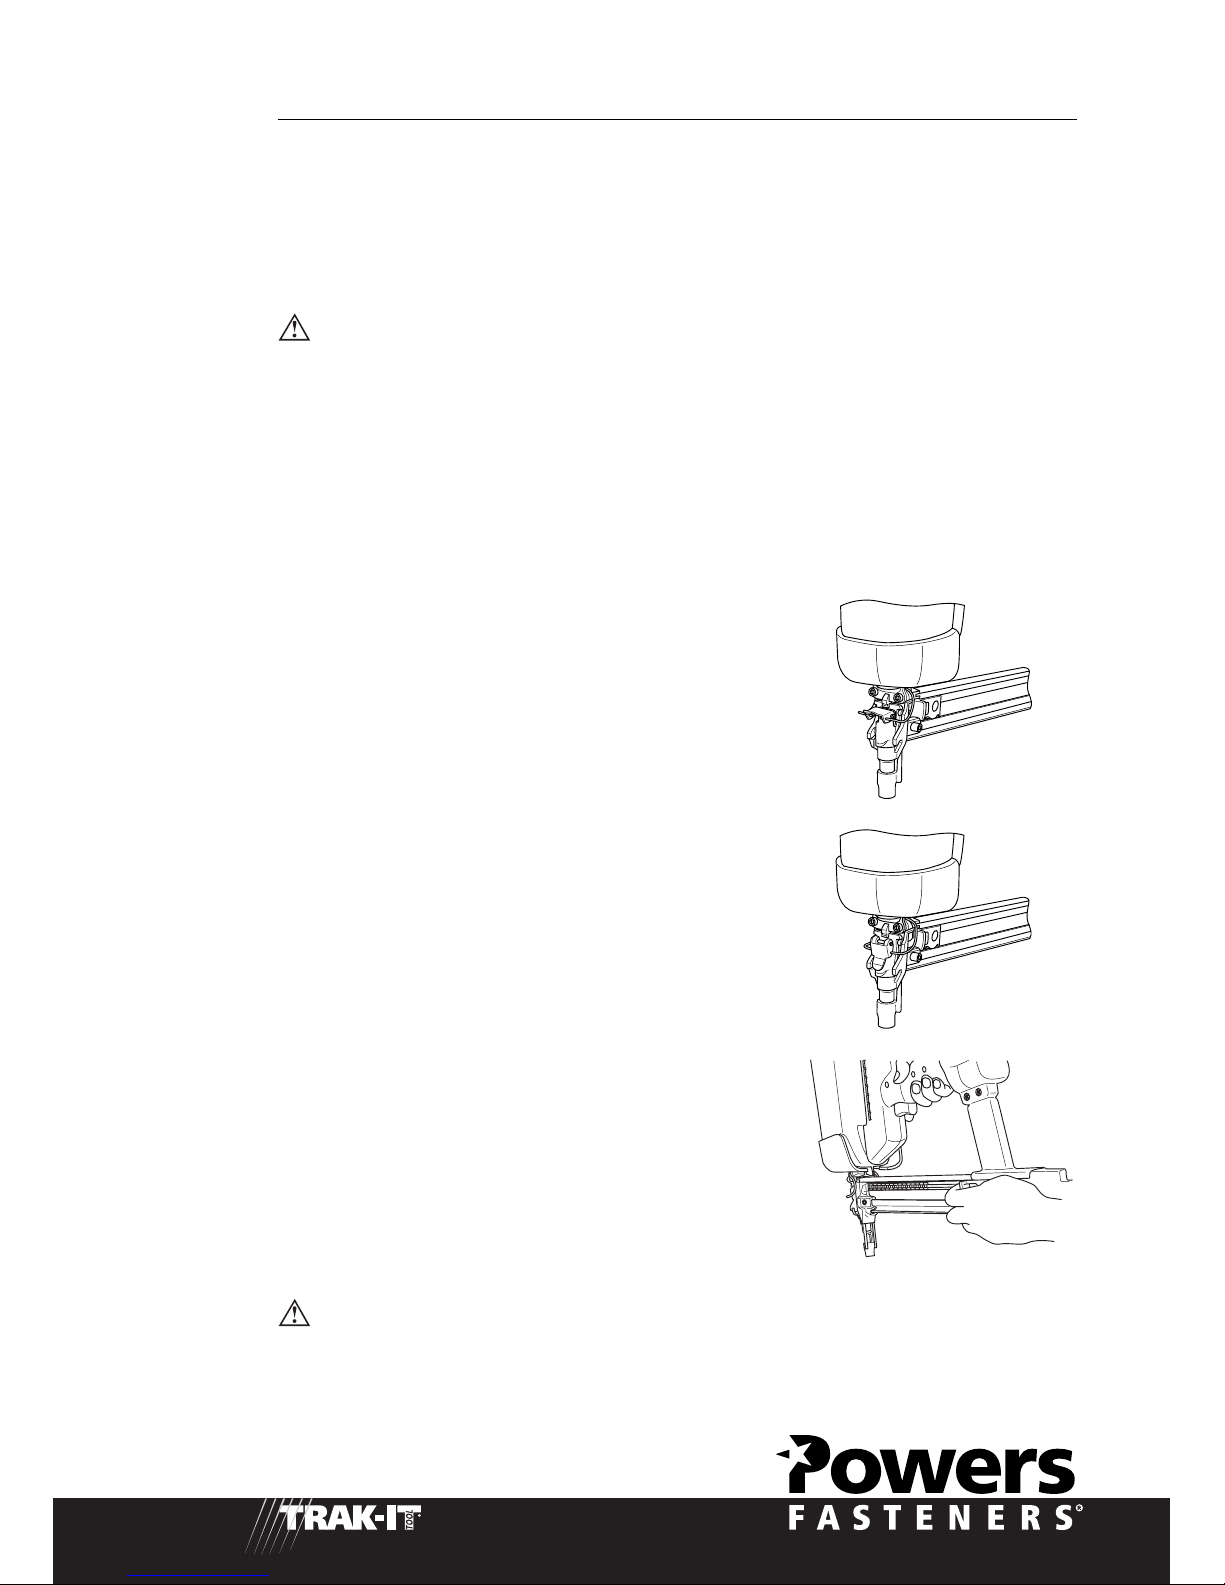
ATTACHING THE METERING VALVE TO THE
FUEL CELL
To attach the Metering Valve to the Fuel Cell, you begin by taking off the Protective
Shipping Cap, and removing the Metering Valve from inside the cap. Next, place the
Metering Valve on top of the Fuel Cell with the stem pointing forward and away from
your face and eyes. Engage the front lip of the Valve and then push down firmly on the
rear of the Valve. You should hear it click as it snaps into place.
12
12
1. Push to release value 2. Separate value from cap 3. Align ridges square
4. Push front
ridge first
5. Push down back
ridge 1st click
6. Push down flush
2nd click
TRAK-IT TOOL MODEL C3, C3 ST
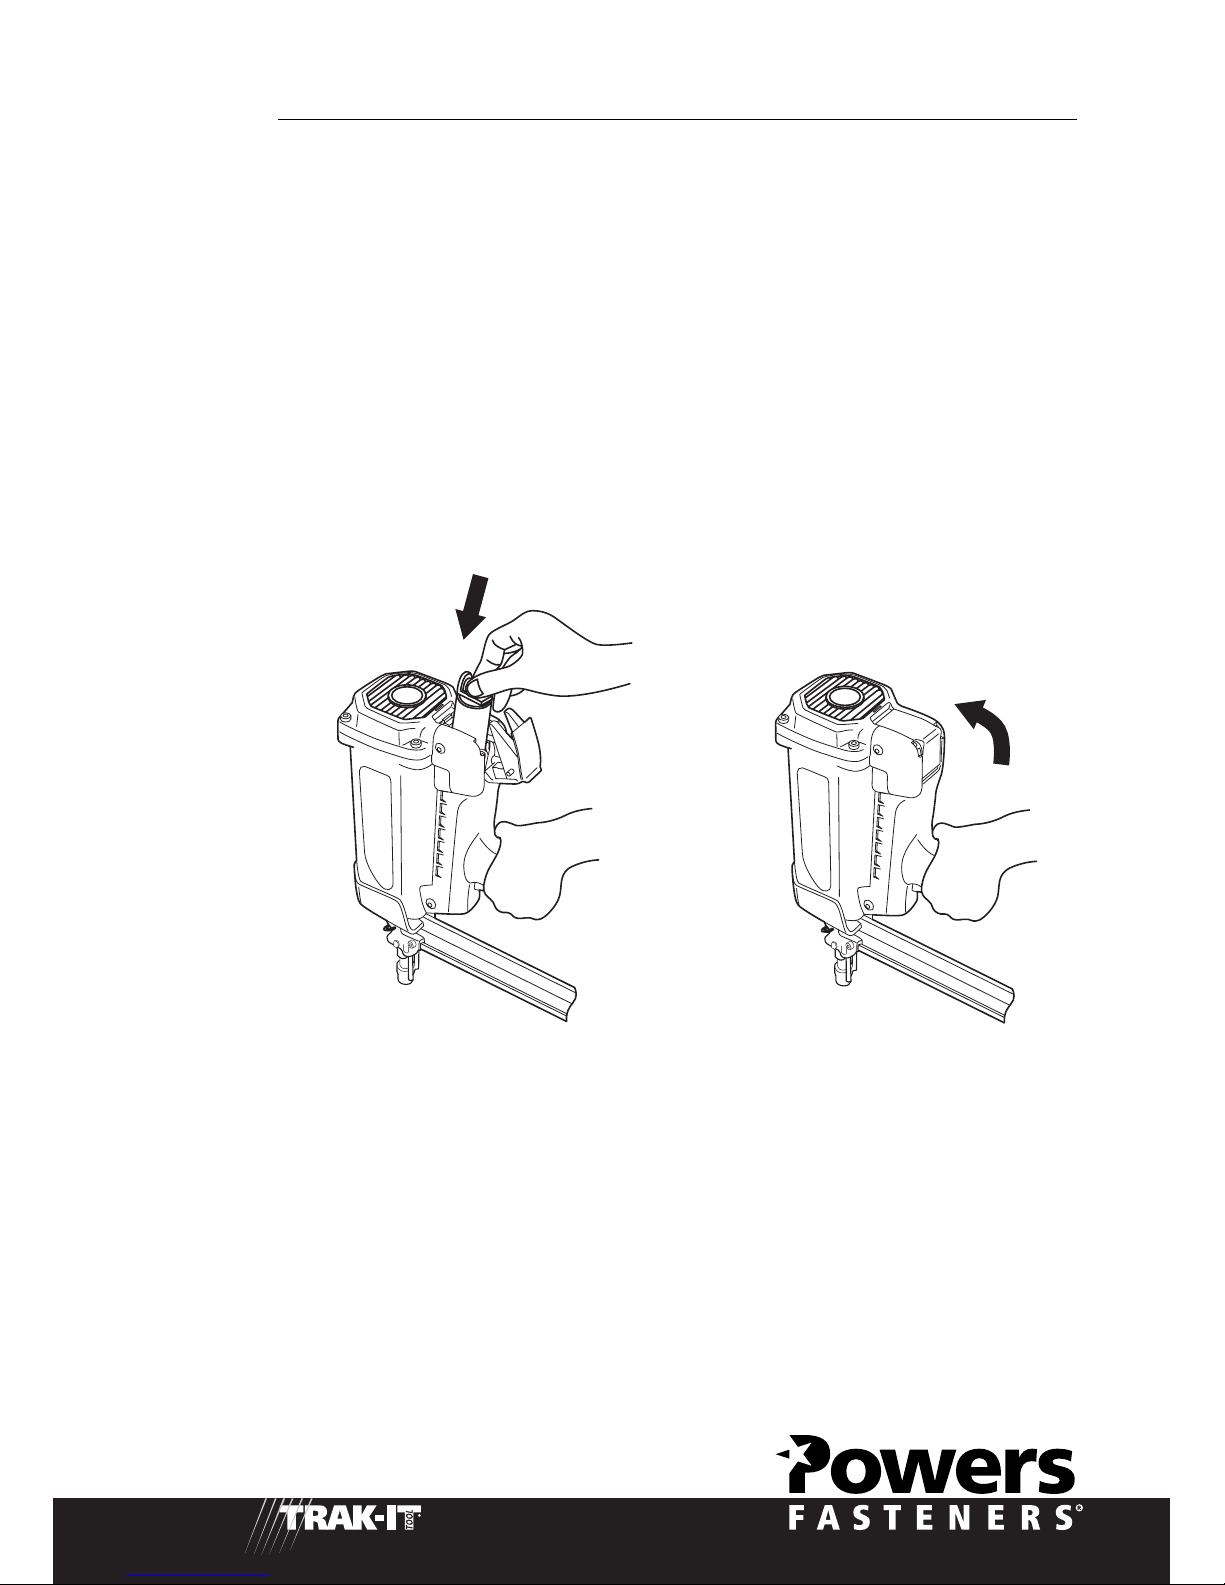
INSERTING THE FUEL CELL INTO THE TOOL
HANDLE
Next, with the Metering Valve Stem pointed toward the front of the tool, insert the
Metering Valve/Fuel Cell Assembly.
As you slide the Metering Valve/Fuel Cell Assembly into the Trak-It tool, you will
notice that there is a Blue Adaptor at the top of the Cylinder Pocket. This Adapter is
designed to ensure that the Metering Valve Stem is properly aligned with the small
hole, or orifice that leads to the Combustion Chamber. Insert the Metering Valve Stem
into the orifice of the Blue colored Adapter.
You complete the loading of Fuel into the Trak-It tool by closing the Actuator Door.
The Actlator door is closed by pressing the cover downward and forward simultaneously.
13
13
TRAK-IT TOOL MODEL C3, C3 ST
PREPARING THE TRAK-IT TOOL FOR USE
FASTENERS AND FUEL CELL
The Trak-It tool was designed specifically to be used only with Powers Fasteners fuel cells
and collated pin strips. Use of other consumables may cause tool damage and void your
warranty. Use only original Powers Fasteners consumables.
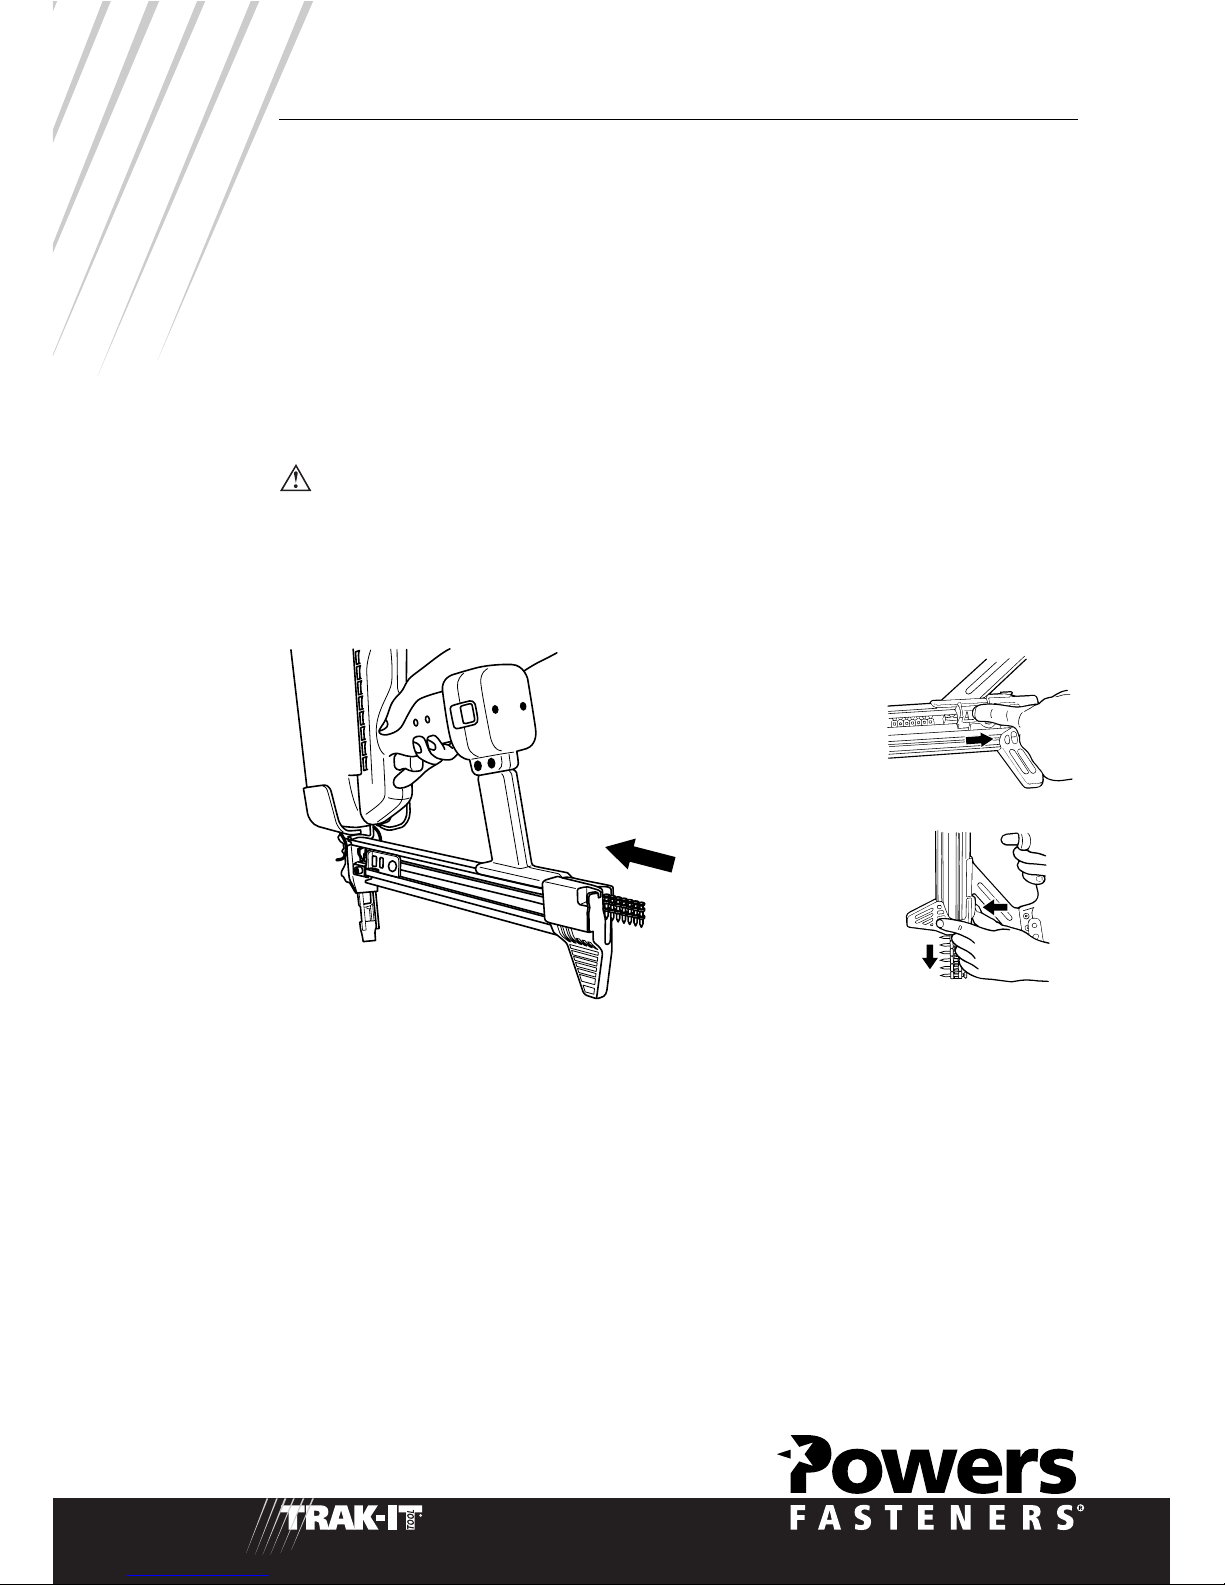
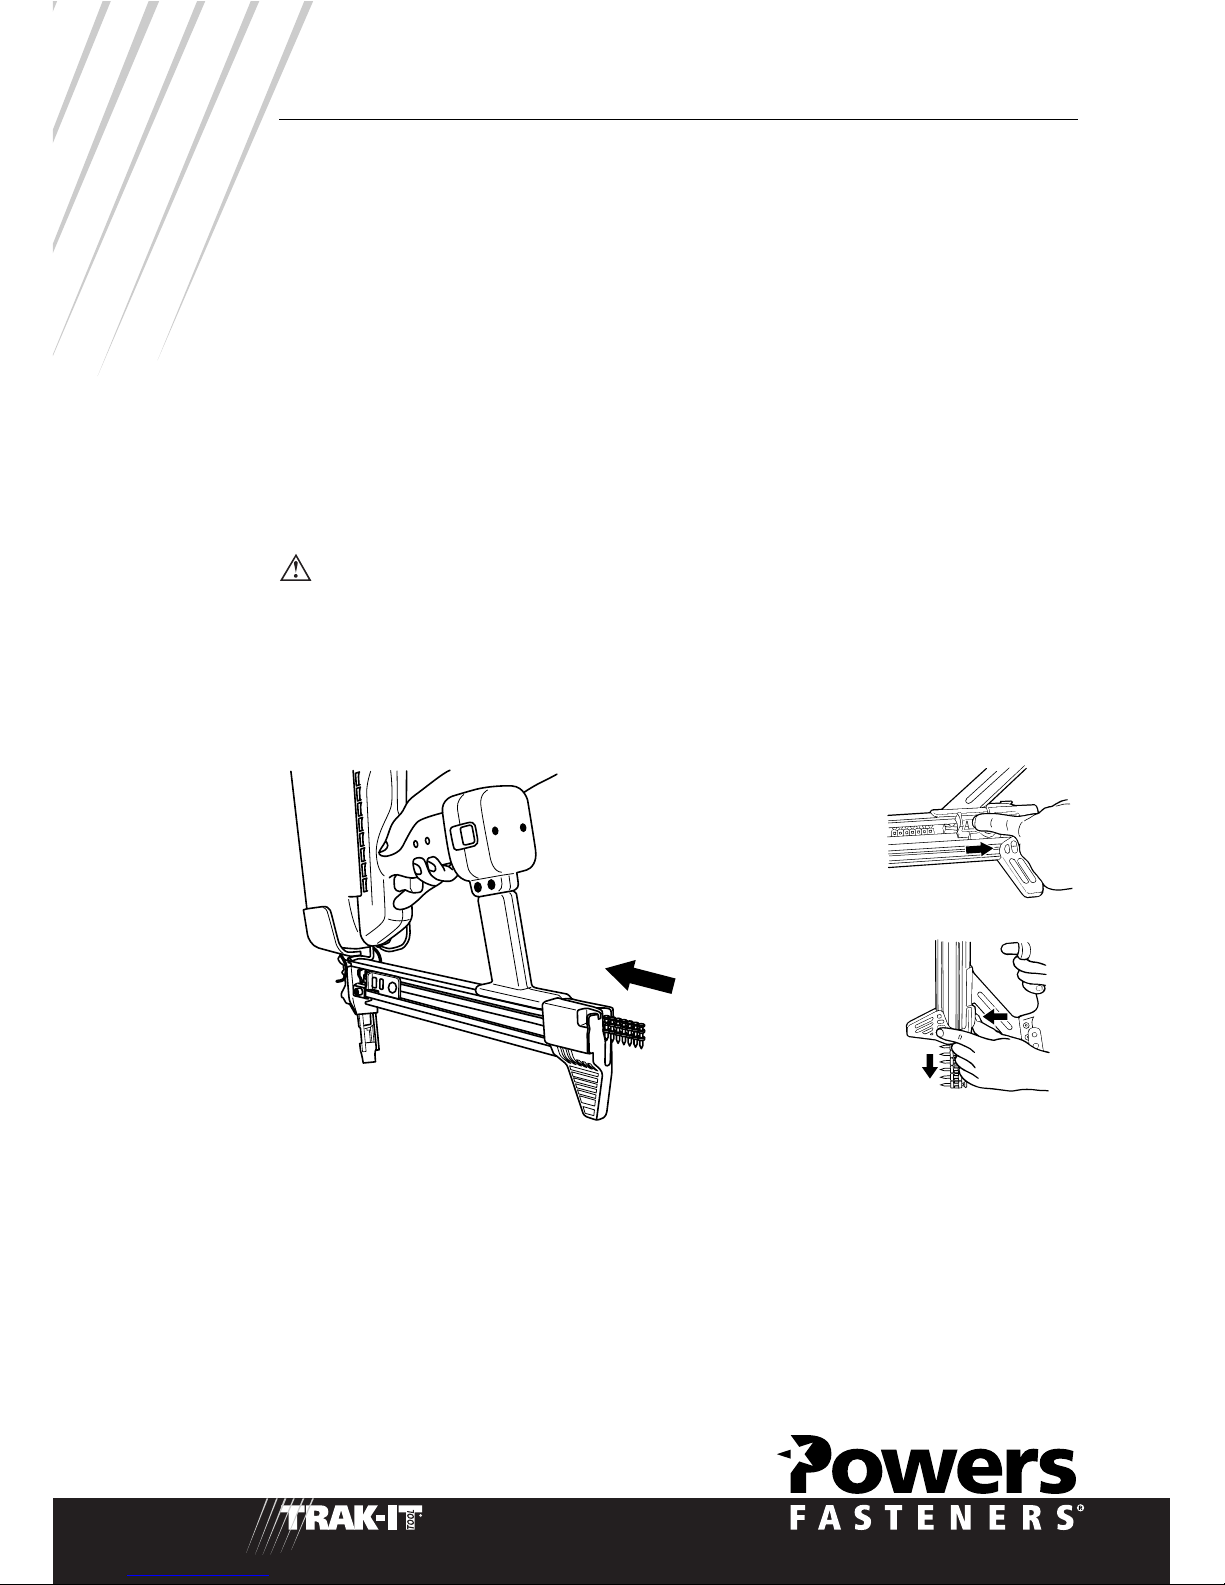
LOADING FASTENERS
The illustration below shows how to properly load fasteners into the Trak-It tool.
1. Load the fastener strips into the rear slot of the magazine.
2. Pull the carrier assembly back to the rear section of the magazine and gently release the
assembly in order to engage the fasteners.
CAUTION (PINCH POINT)
Do not allow follower to fly unrestrained when loading fasteners. Control the forward
movement upon release of the follower so that it gently engages the rearmost pin strip.
Allowing the follower to fly uncontrollably may result in a finger being pinched between
the follower and rearmost pin strip.
The Trigger on the Trak-It tool is automatically locked and will not operate when there are
no fasteners in the magazine and unless the Contact Arm is fully depressed. The purpose
of this feature is to prevent needless blank cycling (which wastes fuel) and causing
possible damage to tool components.
OUTDOOR WEATHER AND THE TRAK-IT TOOL
Use the Trak-It tool outdoors, in clear weather, when the Tool, Fuel Cell, and Battery are
between 20 ˚F (-7 ˚C) and 120 ˚F (49 ˚C). Colder temperatures may damage the Trak-It
Tool and Battery Cell. Hotter temperatures may damage the Tool and Fuel Cell.
Fuel should be stored out of direct sunlight in surroundings less than 120 ˚F (49 ˚C).
After extended periods of continuous use, cool the Tool by running the Fan Motor.
Operation when the Tool is less than 20 ˚F (-7 ˚C) may damage the tool. Fuel Cells at
cold temperatures lose the required propellant force for proper operation. Bring the Tool,
Battery Cell, and Fuel Cell above the minimum operating temperature.
14
14
TRAK-IT TOOL MODEL C3, C3 ST
UNLOADING THE FASTENERS
1. While pressing the
follower, pull back the
carrier assembly lightly,
and slide smoothly the
assembly toward the
front of the magazine.
2. Push the pin stopper and
slide the fastener strips
out of the magazine.
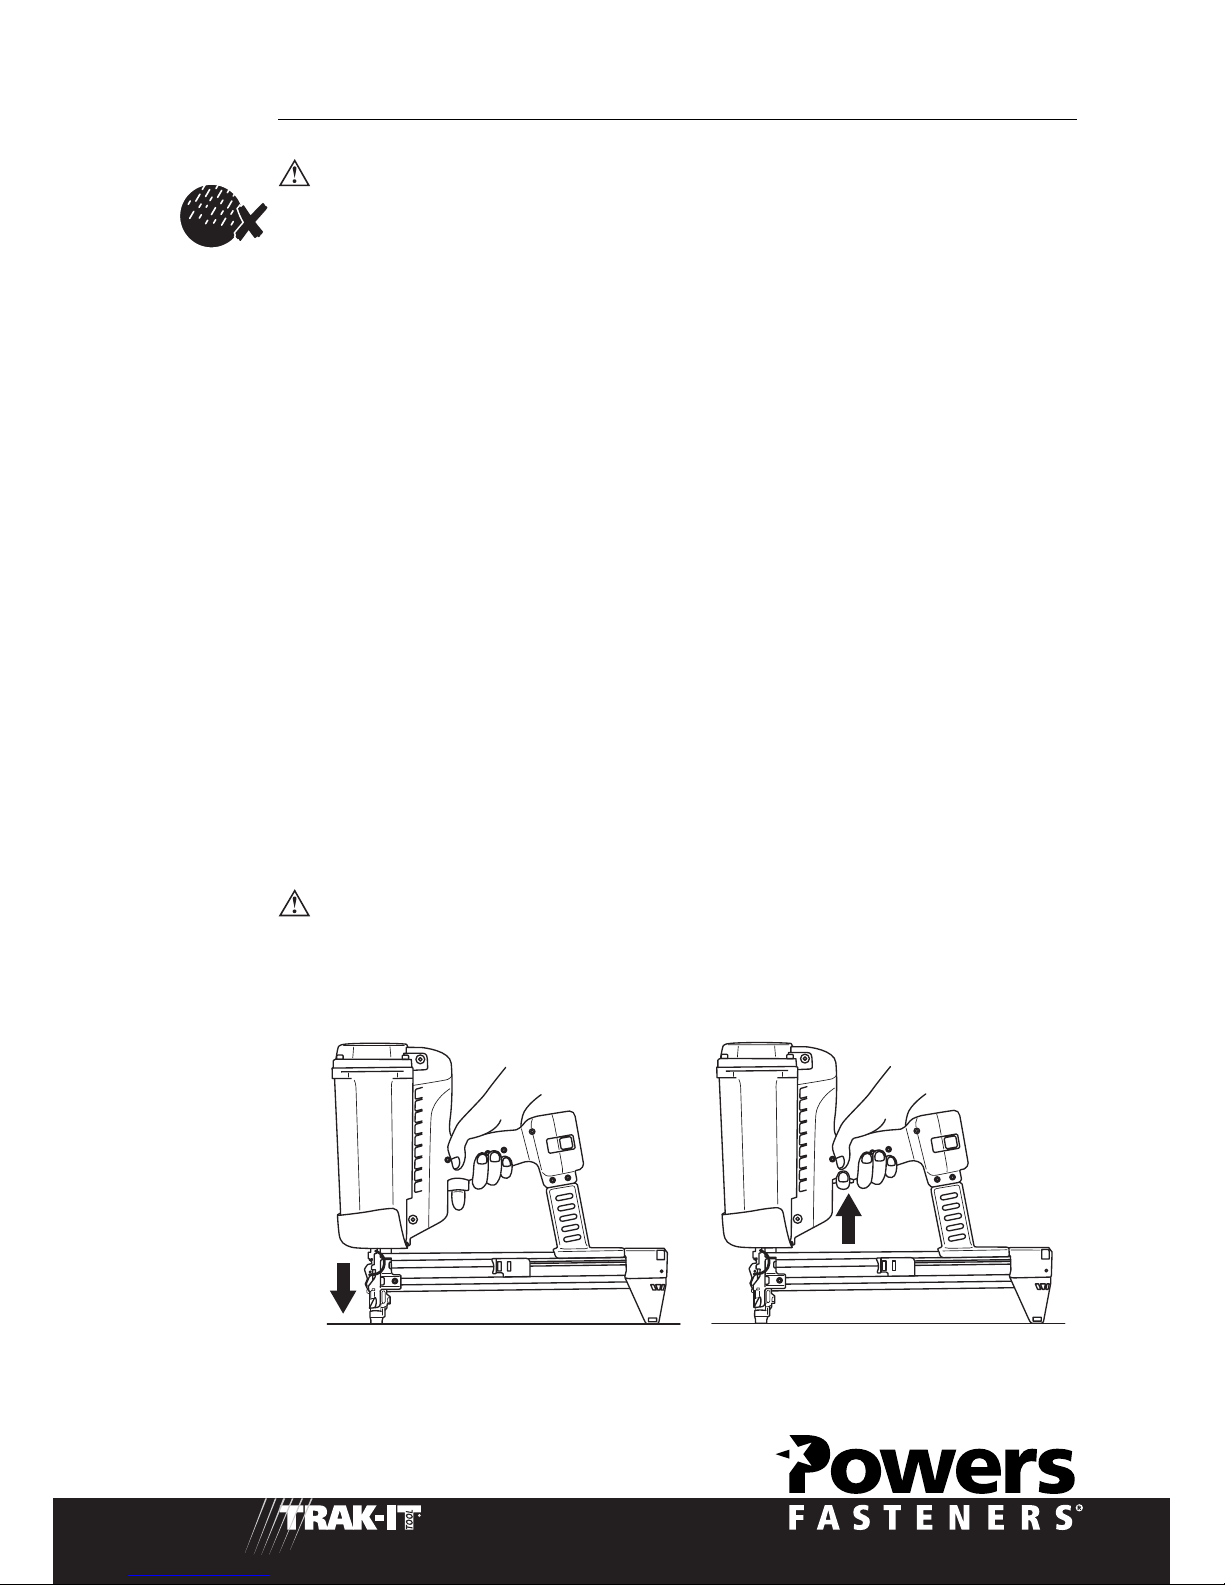
CAUTION — THE TRAK-IT TOOL SHOULD NOT BE USED IN THE RAIN OR WHERE
EXCESSIVE MOISTURE IS PRESENT. THESE CONDITIONS MAY RESULT IN DAMAGE
TO TOOL COMPONENTS AND CAUSE THE TOOL TO MALFUNCTION.
Trak-It Tool Operation
WARNING
The Trak-It tool has been designed to be used as a hand-operated tool. Never attempt to
operate the tool by fixing it to a stationary work surface or object. Operating the tool in a
fixtured position may cause uncontrolled pin discharge and result in injury to the operator
or bystanders.
PRESS CONTACT ARM AGAINST WORK SURFACE.
Fan Motor will turn on. Fuel is injected into the Combustion Chamber and mixed with air
by the Fan.
SQUEEZE THE TRIGGER
The Spark Plug sparks and the fuel/air mixture ignites. Combustion powers the Piston
Assembly, which in turn drives the fastener.
RELEASE TRIGGER - LIFT THE TOOL
The Combustion Chamber opens. Fan exhausts hot gases and cools internal
components.
NOTE: IF NO ADDITIONAL CYCLES ARE MADE, FAN WILL RUN FOR 8 SECONDS AND
THEN SHUT OFF.
WARNING
THE CONTACT ARM AND NOSE MAY BECOME HOT AFTER PROLONGED OR RAPID
USE.
15
15
TRAK-IT TOOL MODEL C3, C3 ST

SERVICING
Field service should be restricted to the following:
• CHECKING THE ENERGY LEVEL OF THE BATTERY
• RECHARGING THE BATTERY
• CHECKING THE FUEL CELL AND METERING VALVE
• REPLACING THE FUEL CELL
• CLEANING THE AIR FILTER
• CLEARING A JAM
Attempts to go beyond these procedures could result in serious personal injury or
damage to the Trak-It tool and voiding of the warranty.
There are certain problems that you may encounter when you are using the Trak-It tool
that you will be able to correct on the work site. The following field service procedures
are the only service procedures you should attempt. Anything else that may appear wrong
with the Trak-It tool should only be diagnosed and repaired by a fully trained service
technician. If you have any reason to believe that your problem is beyond the service
procedures in this manual, contact your Powers Fasteners customer service representative
immediately.
DANGER — NEVER ATTEMPT ANY MAINTENANCE OF THE TRAK-IT TOOL WITHOUT
FIRST REMOVING THE FUEL CELL AND BATTERY. MAINTENANCE SHOULD ONLY BE
STARTED AFTER THE TOOL IS COMPLETELY INOPERATIVE.
BATTERY CELL CHECK
Periodically check on the LED Battery Voltage Indicator Light---the LED in the
Handle of the Trak-It tool. When encountering a problem, the first step should always be
to make sure the Battery has enough energy to operate the tool. The battery has enough
energy when the Red LED remains unlit.
FUEL CELL CHECK
Another typical service condition will occur when the Fuel Cell becomes empty. A
typical symptom will be when the Trak-It tool's Fan operates but the tool does not drive
fasteners completely or fails to cycle at all. In this case, take the Fuel Cell out of the
tool, check to see if the Cell still contains fuel and that the Metering Valve is working.
To determine if there is any fuel left in the Fuel Cell simply place the Metering Stem
against a solid object, and gently push about three or four times. A small amount of fuel
should be released each time. Never perform this test near an open flame or sparks, while
smoking, or where the fuel may get into your eyes. If fuel is not released with each
operation of the Metering Valve, this indicates that there is no more fuel left in the
cylinder and it must be replaced. Dispose of the empty Fuel Cell properly.
AIR FILTER
Remove the Air Filter Cover by prying with a screw driver. The Air Filter will simply
lift out.
Tap the filter GENTLY or blow with compressed air to remove any dust. You should check
and clean the Air Filter every two days.
16
16
TRAK-IT TOOL MODEL C3, C3 ST
CLEARING A JAM
A typical problem you may encounter is having a jammed fastener. Because of the unique
design of the Trak-It tool, clearing a jammed fastener is quick and easy.
1. Remove fuel cell and battery from the tool.
2. Remove the fastener strips from the magazine.
CAUTION — FAILURE TO PULL THE FOLLOWER TO ITS BACK AND LOCKED
POSITION MAY RESULT IN PINS FLYING TOWARDS THE OPERATOR UPON OPENING
THE JAM CLEAR UNIT.
3. Open the Jam Clear Lever Unit located at the front of the nose piece.
4. Slide and swing the lever unit to its open position.
At this point, the jammed fastener should fall out. If the jammed fastener does not fall
out, carefully remove the fastener taking care not to damage the Nose Piece.
After you have removed the jammed fastener take the following steps to close the nose
piece door:
1. Swing and slide the Jam Clear Lever Unit back into its
closed position.
2. Snap the spring loaded latch back into its fully locked
position.
3. Load again the fastener strips into the magazine.
DANGER — MAKE SURE THAT THE JAM CLEAR LEVER UNIT IS FULLY CLOSED AND
SECURE. ATTEMPTING TO USE TOOL WITH THE JAM CLEAR LEVER UNIT IN A
PARTIALLY OPENED POSITION MAY RESULT IN LOSS OF FASTENER CONTROL,
DAMAGE TO TOOL, OR PIN DISCHARGE TOWARD TOOL OPERATOR.
17
17
TRAK-IT TOOL MODEL C3, C3 ST

If you find that the Trak-It tool fan does not operate after clearing a jam:
Check the condition of your Battery Cell.
END-OF-WORKDAY ROUTINE
At the end of each workday, conduct an end-of- workday routine. These simple steps are
based on maintaining the safety and operational efficiency of the Trak-It tool.
Before you leave the work-site:
1. Remove the Battery and store in the tool case if fully or partially charged. Always use the
Trak-It tool case for transporting and storing the tool.
2. Dispose of all empty Fuel Cells. Remember to dispose of these cells where they will not
be found by children, crushed, punctured, or burned.
3. If battery is low, place the Battery Cell in its Charger.
4. Wipe your Trak-It tool with a clean, soft cloth.
5. Check Contact Arm to ensure it is operating freely.
These simple steps will not only ensure that your Trak-It tool is ready to go to work the
next day, they will also ensure that you get the maximum efficiency from your tool.
TRAK-IT TOOL ACCESSORIES
A variety of accessories are available for the Trak-It tool:
55583 Battery
55618 Trak-It Tool Charger Base
55639 12 Volt Car Adapter
55619 110 Volt Adapter Card
55643 Carring Case
Contact your Powers Fasteners customer service representative for additional information.
18
18
TRAK-IT TOOL MODEL C3, C3 ST

19
19
TROUBLESHOOTING
SYMPTOM
Preparing Tool for Operation –
Battery/Charger Problems
1. Battery Cell does not appear to
accept charge. Green charger light
does not come on after several
hours.
2a. Red and green LEDs on charger
are blinking alterately.
2b.Red and green LEDs on charger
are blinking simultaneously.
Normal Stage of Operation
1. Fan does not run.
2. Fan does not run, or runs slower
than normal.
3. Fan runs intermittently.
Pre-Combustion/Combustion
Stage of Operation
1. Contact Arm does not depress
fully--tool does not operate.
2. Tool will not cycle--fan runs.
POSSIBLE PROBLEMS
1a. Inoperative indicator lights on
charger.
1b. Damaged charger.
2a. Battery is hot.
2b. Battery damaged or cycle life
exhausted.
1a. Battery is not charged.
1b. Battery Terminals or Handle battery
contacts are oily, dirty, or corroded.
1c. There is electrical short somewhere.
2. Battery is discharged
3. Battery is loose or contacts are bent.
1a. Lockout Bar is stuck in lockout
position.
1b. Contact Arm is bent, or build-up of
debris in track restricts operation.
1c. Follower is not behind strip.
1d. Cylinder head O-Ring pinched.
2a. Fuel Cell is empty.
2b. Spark wire out of spark plug.
2c. Spark does not occur.
SERVICE
1a. Try Battery in tool after 3 hours on charge cycle.
If tool functions properly charger lights are not
working correctly. Replace charger, or monitor
charging time to ensure Battery Cell has adequate
time for recharging. It's normal for Battery to feel
warm after properly charging.
1b. Discontinue use immediately and unplug from
power source. Replace charger and tag or dispose
of charger to prevent accidental reuse or connection
to power source.
2a. Remove battery from charger and allow to cool.
2b. Replace Battery .
1a. Charge Battery according to Operating Manual.
1b. Clean Battery Cell terminals Clean Handle Battery
Cell contacts as required
1c. The tool must be looked into by an Authorized
Powers Fasteners Service Technician.
2. Charge Battery Cell.
3. Snap battery back into its locked position. Bend
contacts back into proper position.
1a. Check safety cam bushing screw for excessive
tightness. Open nose piece door if necessary and
clean out build-up of debris from track
1b. Inspect Contact Arm for cleanliness and possible
damage. Clean track with cloth. If Contact Arm is
damaged return to Authorized Powers Fasteners
Customer Service Representative for Service.
1c. Put follower behind strip.
1d. Contact Authorized Powers Fasteners Customer
Service Representative for service.
2a. Replace Fuel Cell.
2b. Contact Authorized Powers Fasteners Distributor
Customer Service Representative for service.
2c. Contact Authorized Powers Fasteners Customer
Service Representative for service.
TRAK-IT TOOL MODEL C3, C3 ST

20
20
SYMPTOM
Power/Exhaust Stage of
Operation
1. Tool operates properly, but
fasteners do not drive fully.
2. Tool operates, but no fastener is
driven.
3. Tool operates erratically or appears
to be losing power.
Returning/Purging Stage of
Operation
1. Tool operated and drove fastener,
but piston did not return to up
position.
2. Combustion Chamber does not
drop after tool cycles.
POSSIBLE PROBLEMS
1a. Battery is discharged.
1b. Fuel Cell is low.
1c. There may be loss of seal in
combustion chamber.
2a. Fastener strip may be binding.
2b. Follower not properly engaged
behind fastener.
2c. Jammed fastener.
3a. Fuel Cell is low.
3b. Spark Plug wire is loose.
3c. Filter element is dirty, causing tool to
overheat.
3d. Tool Sleeve or O-Rings are dirty.
1a. Built-up dirt and debris on Piston or
in Nose bore.
1b. Mushrooming of Piston Tip.
1c. Exhaust ports on the Sleeve are dirty
or clogged.
1d. Tool (Sleeve) or O-Rings are dirty.
1e. Piston rings require replacement.
2. Contact Arm is bent, or tool is dirty.
SERVICE
1a. Charge Battery.
1b. Check Fuel Cell according to Operating Manual and
replace as required.
1c. Press Contact Arm against work piece for one
minute. Pull trigger. If fastener does not drive, there
is a leak that requires service.
2a. Use only fasteners meeting Powers Fasteners
specifications.
2b. Locate follower behind fastener strip and engage strip
according to instructions in Operating Manual.
2c. Clear jam according to Operating Manual.
3a. Check Fuel Cell according to Operating Manual.
3b. Contact Powers Customer Service Representative for
Service.
3c. Remove Filter element and clean according to
Operating Manual. Use compressed air to remove
stubborn debris.
3d. Return to Powers Fasteners Customer Service
Representative for Service.
1a. Return to Powers Fasteners Customer Service
Representative for Service.
1b. Return to Powers Fasteners Customer Service
Representative for Service.
1c. Return to Powers Fasteners Customer Service
Representative for Service.
1d. Return to Powers Fasteners Customer Service
Representative for Service.
1e. Return to Powers Fasteners Customer Service
Representative for Service.
2. Clean tool or replace Contact Arm as required.
TROUBLESHOOTING
TRAK-IT TOOL MODEL C3, C3 ST

21
BEDIENUNGSANLEITUN
TRAK-IT WERKZEUG MODELL C3, C3 ST

22
INHALTSVERZEICHNIS
THEMA Seite
EINLEITUNG 3-4
ÜBERSICHT 5-6
SICHERHEITSANWEISUNGEN 7-9
AKKU UND LADEGERÄT 10-11
KRAFTSTOFFZELLE UND MESSVENTIL 11
VORBEREITUNG DES TRAK-IT-WERKZEUGS ZUR VERWENDUNG 14
VERWENDUNG DES TRAK-IT-WERKZEUGS 15
WARTUNG 16-18
FEHLERSUCHE 19-20
Welt-Hauptsitz
Powers Fasteners
2 Powers Square
New Rochelle, NY 10801
USA
www.powers.com
Land Stadt Telefon Website
USA New York 914-235-6300 www.powers.com
Kanada Ontario 905-673-7295 www.powers.com
Australien Melbourne +61-03-9553 3999 www.powers.com.au
Neuseeland Auckland +64-9415 2425 www.powers.com.nz
Europa Niederlande +31-226-357-670 www.powerseurope.nl
Andere New York +1-914 235 6300 www.powers.com
Für Service, Verkauf, Produkte oder Reparaturteile wenden Sie sich an die
Powers-Vertretung in Ihrer Nähe und fragen Sie nach dem Kundendienst.
TRAK-IT WERKZEUG MODELL C3, C3 ST

23
3
EINLEITUNG
ERKLÄRUNG VON POWERS FASTENERS
Powers Fasteners dankt Ihnen für den Kauf des Befestigungswerkzeugs C3. Dieses
Werkzeug wurde mit den höchsten Qualitätsansprüchen entworfen und hergestellt, um
Ihnen viele Jahre störungsfreien Betrieb zu bieten. Wir empfehlen, diese Anleitung
vollständig durchzulesen, damit Sie sich mit allen Sicherheitshinweisen und
Vorsichtsmaßregeln vertraut machen. Bitte beachten Sie, dass das C3-Werkzeug, ebenso
wie andere Befestigungswerkzeuge, kleinere regelmäßige Wartungsarbeiten benötigt, um
es im optimalen Betriebszustand zu halten. Beachten Sie die empfohlenen
Wartungshinweise, da die richtige Wartung wesentlich zur Lebensdauer des Werkzeugs
beiträgt.
TRAK-IT WERKZEUG BEDIENUNGSANLEITUNG
Diese Anleitung soll dazu dienen, Sie mit dem Powers Fasteners Trak-It Werkzeug vertraut
zu machen. Anders als andere Befestigungs-Werkzeuge, die elektrisch arbeiten oder
Schießpulver verwenden, wird das the Trak-It-Werkzeug mit einem linearen
Verbrennungsmotor angetrieben, ähnlich dem Motor Ihres Autos. Das Werkzeug entzündet
einen speziellen Brennstoff bei Vorhandensein von Luft, der einen Kolben antreibt, der ein
Befestigungswerkzeug anschlägt. Wie Sie sehen werden, ist das Trak-It-Werkzeug
vollständig selbstversorgend konstruiert, mit einer Kraftstoffzelle, Batterie und einem
Vorrat an Befestigern.
Zur leichteren Verwendung ist diese Anleitung in Abschnitte unterteilt (siehe Inhalt).
Jeder Abschnitt der Anleitung ist mit dem Anwender, als Ihnen, im im Sinn geschrieben.
Wir haben alle technischen Ausdrücke weggelassen, so dass Sie leicht verstehen können,
wie Sie Ihr Trak-It-Werkzeug optimal ausnutzen und Schäden am Werkzeug oder
Verletzungen durch falsche Bedienung vermeiden. Um das zu erzielen, müssen Sie aber
zwei Dinge tun, wie Sie unten auf der Seite sehen.
1.LESEN SIE VOR DER VERWENDUNG DES WERKZEUGS DIESE
BEDIENUNGSANLEITUNG VOLLSTÄNDIG DURCH.
2.BEFOLGEN SIE ALLE ANWEISUNGEN IN DER ANLEITUNG.
Das Trak-It-Werkzeug soll gehandhabt werden wie andere Handarbeitswerkzeuge. Bei
richtiger Verwendung erfüllt es Ihre Befestigungsbedürfnisse. Wie die meisten Werkzeuge
kann es aber bei falscher Verwendung zu Verletzungen führen. Wenn Sie andere
Personen mit dem Trak-It-Werkzeug arbeiten lassen, sind Sie dafür verantwortlich, dass
auch anderen Anwender die Anweisungen in der Anleitung lesen und verstehen, bevor sie
das Werkzeug verwenden.
Falls Sie Fragen zum Trak-It-System haben oder zusätzliche Ausgaben dieser Anleitung
benötigen, wenden Sie sich bitte an den Kundendienst von Powers Fasteners unter 1-914
235 6300 in den USA oder gehen Sie im Internet zu www.powers.com. Bei Kauf in
anderen Ländern als den USA schlagen Sie bitte die nächste Kundendienstvertretung auf
Seite 2 nach.
TRAK-IT WERKZEUG MODELL C3, C3 ST

24
4
GARANTIE
POWERS FASTENERS garantiert, dass die neuen Trak-It-Befestigungswerkzeuge, Teile und
Zubehörartikel keine Material- oder Herstellungsdefekte im unten aufgeführten Zeitraum
aufweisen, beginnend mit der Übergabe an den ursprünglichen Anwender.
EIN JAHR UNBEGRENZTE GARANTIE
Eine einjährige Garantie wird für alle Teile, einschließlich Verschleißteile mit Ausnahme
von Akku und Ladegerät gegeben.
SECHS MONATE UNBEGRENZTE GARANTIE
Eine sechsmonatige Garantie wird für sowohl Akku als auch Ladegerät gegeben. Diese
Garantie wird bei falscher Behandlung oder unsachgemäßer Verwendung hinfällig.
GARANTIEERKLÄRUNG
Powers Fasteners übernimmt in alleiniger Verantwortung die Garantie dafür, jegliche Teile
oder Zubehörteile auszutauschen, die innerhalb des angegebenen Zeitraums Defekte
aufweisen. Für jedes Austauschteil oder im Zusammenhang mit dieser Garantie gelieferte
Zubehörteil wird eine neue Garantie entsprechend der restlichen Garantiezeit des ersetzten
Teils gegeben.
Diese Garantie wird hinfällig, wenn ein Werkzeug falscher Verwendung ausgesetzt,
versehentlich oder absichtlich beschädigt, oder mit Befestigern, Kraftstoff, Akku oder
Ladegeräten verwendet wird, die nicht der Spezifikation von POWERS FASTENERS
entsprechen oder falsche Größe oder Qualität haben, falsch gewartet wird, mit anderen als
Trak-It-Originalteile repariert wird, bei Transport oder Handhabung beschädigt wird, oder
nach Beurteilung von POWERS FASTENERS auf eine Weise modifiziert oder repariert
wurde, die die richtige Funktion des Werkzeugs beeinträchtigt.
ÜBER DEN OBEN BESCHRIEBENEN UMFANG HINAUS WERDEN VON POWERS
FASTENERS KEINE GARANTIEN JEGLICHER ART GEWÄHRT IM HINBLICK AUF
VERKAUFSFÄHIGKEIT, EIGNUNG FÜR EINEN BESTIMMTEN ZWECK ODER ANDERE, und
die Haftung WIE OBEN BESCHRIEBEN UND WIE OBEN ANGENOMMEN gilt für alle
anderen Garantien die in Verbindung mit der Verwendung und Leistung des Werkzeugs
entstehen, ausgenommen bis zu dem Umfang wie gesetzlich vorgeschrieben. POWERS
FASTENERS KANN KEINE VERANTWORTUNG FÜR FOLGESCHÄDEN JEGLICHER ART
ÜBERNEHMEN, WEDER DIREKT NOCH INDIREKT, EINSCHLIESSLICH ABER NICHT
BEGRENZT AUF SCHÄDEN, DIE AUS VERLUST VON ANGENOMMEN PROFITEN ODER
PRODUKTIONEN, VERDERBEN VON MATERIALIEN, GESTEIGERTEN
PRODUKTIONSKOSTEN U.A. ENTSTEHEN.
Powers Fasteners behält sich das Recht vor, Änderungen bei technischen Daten,
Ausrüstungen oder Design jederzeit ohne vorherige Ankündigung und ohne dadurch
entstehende Verpflichtungen vorzunehmen.
TRAK-IT WERKZEUG MODELL C3, C3 ST

25
5
ÜBERSICHT
Das Trak-It-Werkzeug ist ein selbstversorgendes, vollständig tragbares Werkzeug, das
flüssigen Kohlenwasserstoffkraftstoff zum Betrieb eines einzigartigen linearen
Verbrennungsmotors verwendet.
Um die in dieser Anleitung enthaltene Information vollständig verstehen zu können,
müssen Sie die Funktionsgrundlagen dieses Werkzeugs verstehen. Das Trak-It-Werkzeug
besteht aus drei Baugruppen: dem Handgriff, dem Motor und dem Magazin.
Wenn Sie das Trak-It-Werkzeug prüfen, machen Sie sich mit den drei wichtigsten
Baugruppen und den verschiedenen Komponenten in den einzelnen Baugruppen vertraut.
Die Griff-Baugruppe enthält die Kraftstoffzelle, den Akku, die Spannungsanzeigeleuchte
und den Auslöser.
Die Motor-Baugruppe enthält die Abdeckung und den Filter, das Motorgehäuse, die Nase
und den Kontaktarm.
Die Magazin-Baugruppe enthält den Ausstoßstempel, den Ausstoßstempel-Freigabehebel
und den Magazinfuß.
Abmessungen:
Aktivierungsmodus:
Volle sequenzielle Aktivierung
Zyklusrate:
Unterbrochener Betrieb 2 bis 3 Pins pro Sekunde
Kontinuierlicher Betrieb 1000 Pins pro Stunde
Geräuschpegel:
A-lmpulsschalleistungspegel — LWA, 1 s, d 105,30 dB
A-lmpulsschalldruckpegel — LpA, 1 s, d 96,92 dB
am Arbeitsplatz
Festlegung und Angabe der Werte gernäß EN12549 : 1999.
Schwingungen:
Schwingungskennwert = 3,70 m/s
2
Diese Werte werden entsprechend ISO8662-11 festgestellt und dokumentiert.
Dieser Wert hängt mit Eigenschaftswert des Werkzeugs zusammen und bedeut nicht den
Einfluß zum Hand/Arm-System, wenn Sie das Werkzeug verwenden. Ein Einfluß zum
Hand/Arm-System, wenn Sie das Werkzeug verwenden, wird zum Beispiel von der
ergreifenden Kraft, der Kontaktandruckkraft, der Arbeitsrichtung, der Einstellung der
Hauptluftzufuhr, des Werkstücks, des Werkstückträgers, abhängen.
HINWEIS: ÜBERSCHREITEN DIESER RATEN KANN ÜBERHITZUNG DES WERKZEUGS
BEWIRKEN, WODURCH LEISTUNGSVERLUST ODER SCHÄDEN AN
TRAK-IT WERKZEUG MODELL C3, C3 ST
Gewicht※
Höhe
Länge
Breite
TRAK-IT C3 TRAK-IT C3 ST
3.7 kg 3.6 kg
38.9 cm 38.9 cm
44.0 cm 33.9 cm
10.6 cm 10.6 cm
TRAK-IT C3 XL
0.0 pounds (0.0 kg)
0.0 inches (00.0 cm)
0.0 inches (00.0 cm)
0.0 inches (00.0 cm)
※Enthält Werkzeug und Akku

26
6
TRAK-IT WERKZEUG MODELL C3, C3 ST
Luftfilterabdeckung, Luftfilter und
Zylinderdeckel
Motor-Baugruppe
Staubehebungseinheit
Nasenstück
Kontaktarm
Ausstoßstempel
Magazinfuß
Magazin-Baugruppe
AusstoßstempelFreigabehebel
Griff-Baugruppe
Spannungsanzeigeleuchte
Akku
Betaätigungshebel
Auslöser
WERKZEUGBAUTEILEN BEWIRKT WERDEN.
DURCH VERWENDUNG DES TRAK-IT-WERKZEUGS UND SEINER EMPFOHLENEN
BETRIEBSRATE KÖNNEN SIE MEHRERE TAUSEND BEFESTIGUNGEN IN EINEM
TYPISCHEN ARBEITSTAG EINTREIBEN.
Maximale Befestigergröße:
Schaft 38 mm lang x 2,59 mm Durchmesser
Magazinfassungsvermögen:
Akkuzelle:
6 Volt Gleichstrom (Nickel-Metallhydrid) – Liefert ausreichend Energie zum Eintreiben
von ca. 3000 Befestigern mit einer vollen Ladung.
Ladezeit Ca. 2-1/2 Stunden.
Kraftstoffzelle:
Flüssiger Kohlenwasserstoff – Liefert genug Kraftstoff zum Antrieb für 1200 Befestigern.
(Gefahrengüterklasse 2.1 UN1075 2.7 fl oz/40g/80ml)
HINWEIS: POWER FASTNERS ERKLÄRT, DASS DAS WERKZEUG MODELL TI-C TOOL
DER EUROPÄISCHEN “MACHINEN”-RICHTLINIE ENTSPRICHT.
HINWEIS: Das Dreieckssymbol " " nach der Werkzeugseriennummer zeigt an, dass
dieses Werkzeug mit Sicherheitsjoch ausgestattet ist.
TRAK-IT C3
42 Befestiger
TRAK-IT C3 ST
22 Befestiger

27
7
SICHERHEITSANWEISUNGEN
Die folgenden Sicherheitsanweisungen sind in dieser Anleitung enthalten, um Ihnen die
grundlegende Information zu bieten, die für sicheren Betrieb des Trak-It-Werkzeugs
erforderlich ist. VERSUCHEN SIE NICHT, DIESES WERKZEUG ZU BEDIENEN, BEVOR SIE
ALLE VORSICHTSMASSREGELN UND ANWEISUNGEN IN DIESER ANLEITUNG GELESEN
UND VERSTANDEN HABEN.
Mißachtung von Sicherheitsmaßregeln und Anweisungen in dieser Anleitung kann zu
Erblindung, schweren Verletzungen, Sachschäden und Schäden am Werkzeug führen.
Neben diesen Anweisungen kann zusätzliche Ausbildung erforderlich sein, je nachdem
welche Befestigungsaufgaben ausgeführt werden sollen. Für weitere Auskünfte wenden
Sie sich an Ihre Kundendienstvertretung von Powers Fasteners.
GEFAHR
DAS TRAK-IT-WERKZEUG HAT EINEN INTERNEN VERBRENNUNGSANTRIEB. DIESER
ERZEUGT HEIßE ABGASE, DIE ENTFLAMMBARE MATERIALIEN ENTZÜNDEN KÖNNEN.
DIESES WERKZEUG DARF NICHT IN EINER BRENNBAREN UMGEBUNG ODER IN DER
NÄHE BRENNBARER STOFFE WIE ENTFLAMMBARE CHEMIKALIEN, KLEBSTOFFE,
BENZIN ODER ORGANISCHEN LÖSUNGSMITTELN VERWENDET WERDEN. ES MUSS
SICHERGESTELLT WERDEN, DASS EIN WERKZEUG MIT KRAFTSTOFFZELLE NICHT
TEMPERATUREN ÜBER 40 ˚C AUSGESETZT WIRD, DA DIE KRAFTSTOFFZELLE SONST
BERSTEN UND ENTFLAMMBARE GASE FREISETZEN KANN.
DIESES WERKZEUG MUSS IMMER AN EINEM GUT GELÜFTETEN ORT BETRIEBEN
WERDEN, DA DIE ABGASE DES WERKZEUGS KOHLENMONOXID ENTHALTEN, ÄHNLICH
WIE Z.B. BEI EINER KETTENSÄGE ODER EINEM RASENMÄHER MIT
VERBRENNUNGSMOTOR. DAS EINATMEN VON KOHLENMONOXID KANN ÜBELKEIT
ODER BEWUSSTLOSIGKEIT VERURSACHEN.
DAS TRAK-IT-WERKZEUG, DIE KRAFTSTOFFZELLEN, DER AKKU UND SEIN LADEGERÄT
MÜSSEN IMMER AUßER REICHWEITE VON KINDERN GEHALTEN WERDEN.
1. LESEN SIE DIESE BEDIENUNGSANLEITUNG VOLLSTÄNDIG DURCH. Richten
Sie sich bei Bedienung und Wartung des Trak-It-Werkzeugs immer nach dieser Anleitung.
Wenn Beschreibungen in der Anleitung unklar sind oder Fragen bestehen, wenden Sie
sich sofort an die nächste Kundendienstvertretung von Powers Fasteners.
2. AUGEN- UND OHRENSCHUTZ TRAGEN. Tragen Sie immer einen Ohren- und
Augenschutz, wenn Sie mit dem Trak-It-Werkzeug arbeiten oder sich in der Nähe des
Werkzeugs aufhalten. Der verwendete Augenschutz muss die Anforderungen der Norm
ANSI STANDARD Z 87 erfullen. 1 (Ratsrichlinie 89-686-EEC vom 21 Dez. 1989).
3. NIEMALS ANNEHMEN, DASS DAS WERKZEUG LEER IST. Jedes Mal, wenn Sie
das Trak-It-Werkzeug aufheben, prüfen Sie, ob sich Befestiger im Magazin befinden.
Richten Sie das Werkzeug niemals auf andere Personen oder sich selber, auch wenn Sie
ganz sicher sind, dass sich keine Befestiger im Werkzeug befinden. Der Befestiger, den
Sie nicht sehen, ist der, der Sie oder andere Personen verletzen kann.
4. ALBERN SIE NIEMALS MIT DEM WERKZEUG HERUM. Das Trak-It-Werkzeug ist
kein Spielzeug... es ist ein kraftvolles Arbeitswerkzeug. Es ist dafür konstruiert,
Befestigungsstifte durch Stahlbleche in Beton zu treiben. Um diese Aufgabe zu erfüllen,
TRAK-IT WERKZEUG MODELL C3, C3 ST

28
8
erzeugt es eine enorme Energiemenge. Mit dem Werkzeug zu spielen, auch wenn Sie
ganz sicher sind, daß es es leer ist, heißt, einen Unfall herauszufordern.
5. DAS WERKZEUG NIEMALS MIT DEM FINGER AM ODER BEI GEDRÜCKTEM
BETÄTIGUNGSHEBEL TRAGEN. Beachten Sie, dass das Trak-It-Werkzeug in einer
spezifischen Reihenfolge arbeitet. Der Kontaktarm fungiert als Funktionsmerkmal, dass
den Betätigungshebel daran hindert, den Zündschaltkreis fertigzustellen. Wenn Sie
versehentlich den Kontaktarm drücken, während Sie den Betätigungshebel ziehen wenn
Sie das Werkzeug tragen, könnte eine Befestigung herausgeschossen werden.
6. NIEMALS EIN NICHT RICHTIG FUNKTIONIERENDES WERKZEUG BEDIENEN.
Wenn festgestellt wird, dass ein Trak-It-Werkzeug nicht richtig arbeitet und das Problem
nicht nur ein einfacher Befestiger-Stau ist, hören Sie sofort mit dem Betrieb auf und lesen
Sie den Abschnit Wartung in dieser Anleitung. Wenn das Problem nicht mit einem der im
Abschnitt Wartung beschriebenen Schritte korrigiert werden kann, melden Sie das
Problem dem zuständigen Vorgesetzten oder der Kundendienstvertretung von Powers
Fasteners.
VERSUCHEN SIE NICHT, ZUSÄTZLICHE REPARATUREN AM TRAK-IT-WERKZEUG
VORZUNEHMEN.
7. BETREIBEN SIE DAS WERKZEUG NUR AUF DER ARBEITSOBERFLÄCHE.
Betreiben Sie das Trak-It-Werkzeug nur, wenn es die Arbeitsoberfläche berührt. Halten Sie
das Werkzeug fest und senkrecht gegen die zu befestigende Oberfläche. Halten Sie sich
mindestens fünf Zentimeter von der Betonkante fern.
8 NIEMALS DAS WERKZEUG BEFESTIGEN. Das Trak-It-Werkzeug wurde zur
Verwendung als Handwerkzeug konstruiert. Niemals versuchen, das Werkzeug stationär
durch Befestigung an einer Oberfläche oder einem Gegenstand zu betreiben. Wenn das
Werkzeug in fester Position betrieben wird, besteht die Gefahr unkontrollierten
Befestigungsstiftausstoßes, was eine Verletzungsgefahr für den Anwender oder andere
Personen in der Nähe darstellt.
9. NIEMALS DEN KONTAKTARM DEAKTIVIEREN ODER ENTFERNEN. Das Trak-It-
Werkzeug ist mit einem sogenannten Kontaktarm ausgestattet. Dieses Teil hilft, die Gefahr
versehentlichen Betriebs zu verhindern, indem es verhindert, dass das Werkzeug arbeitet,
bevor es vollständig auf die Arbeitsoberfläche gedrückt ist. Der Kontaktarm darf niemals
deaktiviert oder entfernt werden. Verwenden Sie nicht das Trak-It-Werkzeug, wenn der
Kontaktarm beschädigt ist oder nicht richtig arbeitet.
10. LADEN SIE KEINE BEFESTIGER BEI GEDRÜCKTEM BETÄTIGUNGSHEBEL
ODER EINGEDRÜCKTEM KONTAKTARM. Wenn Befestiger im Trak-It-Werkzeug
eingelegt werden, müssen Sie vermeiden, den Auslöser zu ziehen oder den Kontaktarm zu
drücken. Wenn das Werkzeug auf einer Bank oder ähnlichen Oberfläche abgelegt ist, kann
der Kontaktarm eingedrückt werden. Wenn Sie Befestiger einlegen, können Sie
versehentlich den Betätigungshebel ziehen, wenn Sie den Handgriff zum Halten des
Werkzeugs greifen. Durch diese beiden Aktionen wird das Trak-It-Werkzeug betätigt und
ein Befestiger ausgeschossen.
11. ENTFERNEN VON BEFESTIGERN ODER BEHEBEN VON STAUS. Staus können
leicht vom Nasenstück des Werkzeugs aus behoben werden. Denken Sie daran, immer
TRAK-IT WERKZEUG MODELL C3, C3 ST

29
9
die Kraftstoffzelle vor dem Beheben eines Staus zu entfernen. Einzelheiten zu diesem
Verfahren siehe Abschnitt “Beheben eines Staus” in dieser Anleitung.
12. NIEMALS VERSUCHEN, DAS TRAK-IT-WERKZEUG ZU BETREIBEN, WENN
TEILE LOCKER ODER BESCHÄDIGT SIND ODER FEHLEN. Stellen Sie sicher, dass
alle Schrauben und Muttern richtig festgezogen und alle Teile richtig installiert und in
gutem Betriebszustand sind. Wenn Teile fehlen, versuchen Sie nicht, provisorische
Reparaturen vorzunehmen... wenden Sie sich sofort an Ihren Kundendienstvertreter.
13. NIEMALS BEFESTIGER AUF ANDEREN BEFESTIGERN ODER ZU NAHE AN
ANDEREN BEFESTIGERN EINZUTREIBEN. Wenn Befestiger auf oder sehr nahe an
anderen Befestigern eingetrieben werden, können diese wegfliegen und schwere
Verletzungen verursachen. Treiben Sie Befestiger nur an Stellen ein, wo der ganze Schaft
eindringen kann. Zwischen Befestigern sollte ein Abstand von mindestens 76 mm
gehalten werden.
14. NIEMALS IN SEHR HARTE ODER BRÜCHIGE MATERIALIEN WIE GUSSEISEN,
KACHELN, GLAS ODER FELSEN EINTREIBEN. Diese Materialien können brechen
und bewirken, dass scharfe Fragmente und/oder Befestiger wegfliegen.
15. NIEMALS BEFESTIGER ODER ANDERE HARTE GEGENSTAND IN DER
GLEICHEN TASCHE ODER IM GLEICHEN BEHÄLTER WIE DIE
KRAFTSTOFFZELLE AUFBEWAHREN. Die Kraftstoffzelle kann durchlöchert werde,
was schwere Verletzungen verursachen kann.
16. NIEMALS ERLAUBEN, DASS DASS DAS TRAK-IT-WERKZEUG VON PERSONEN
VERWENDET WIRD, BEVOR DIESE DIE ANLEITUNG UND ALLE
SICHERHEITSANWEISUNGEN GRÜNDLICH GELESEN UND VERSTANDEN
HABEN. Es liegt in der Verantwortung des Anwenders, sicherzustellen, dass alle Trak-It-
Werkzeug-Anwender alle Anweisungen zur Bedienung, Sicherheit und Wartung des
Werkzeugs lesen und verstehen.
17. BRENNSTOFFZELLEN-LAGERUNG. Kraftstoffzellen enthalten entflammbare Gase, die
unter Druck stehen und müssen deshalb an einem Ort gelagert werden, wo sie nicht
direktem Sonnenlicht, offenen Flammen, Funken oder Temperaturen über 49°C ausgesetzt
sind. Wenn sie Temperaturen über 49 ˚C ausgesetzt werden, können die Kraftstoffzellen
lecken oder bersten, und es können entflammbare Gase freigesetzt werden und ein Risiko
von Feuer oder Explosionen bewirken.
18. ENTSORGEN VON BRENNSTOFFZELLEN. Niemals versuchen, eine Kraftstoffzelle zu
durchlöchern, zu zerquetschen, zu verbrennen oder aufzufüllen. Leer Zellen müssen
immer im Sondermüll entsorgt werden und dürfen nicht verbrannt werden. Auch zur
Entsorgung in mit Materialien zur Landaufschüttung und zum Recyling sind alte
Kraftstoffzellen nicht geeignet.
19. WERKZEUGLAGERUNG. Am Ende jedes Arbeitstags entfernen Sie die Akkuzelle und
legen Sie im Tragegehäuse ab.
20. WERKZEUG SAUBER HALTEN. Am Ende jedes Arbeitstags nehmen Sie sich die Zeit,
das Trak-It-Werkzeug mit einem sauberen Lappen sauberzuwischen. Ein schmutziges
Werkzeug ist anfälliger für Staus oder Fehlfunktionen.
21. NIEMALS DIE HAND ODER FINGER ÜBER DIE NASE DES WERKZEUGS
TRAK-IT WERKZEUG MODELL C3, C3 ST

30
10
HALTEN. Der Befestiger oder Kolben kann bei versehentlichem Auslösen Ihre Hand
schwer verletzen.
AKKU UND LADEGERÄT
AKKUZELLE UND LADEGERÄT
Der erste Schritt zur Vorbereitung eines neuen Werkzeugs ist, den neuen Akku voll zu
laden. Neue Akkus werden in entladenem Zustand ausgeliefert und müssen vor der ersten
Verwendung 24 Stunden lang aufgeladen werden. Alle nachfolgenden Ladevorgänge
erfordern mindesten 2,5 Stunden Ladung.
WICHTIGE HINWEISE
HINWEIS: DER AKKU ENTHÄLT NICKEL-METALLHYDRID UND MUSS RECYCELT ODER
SACHGEMÄß ENTSORGT WERDEN.
DAS TRAK-IT-WERKZEUG WIRD MIT EINEM MULTI-ZELLEN-AKKU UND SEINEM
EIGENEN LADEGERÄT GELIEFERT. DIESE KOMBINATION AUS AKKUZELLE UND
LADEGERÄT IST DIE EINZIGE, DIE MIT DEM TRAK-IT-WERKZEUG ARBEITET. DIE
GRUNDLEGENDEN LADEANWEISUNGEN SIND WIE FOLGT:
WARNUNG — CHEMISCHE/EXPLOSIONSGEFAHR LESEN SIE ALLE ANWEISUNGEN
VOR DEM LADEN ODER VERWENDEN DER BATTERIE DURCH. MIßACHTUNG DER
BEDIENUNGSANWEISUNGEN KANN BRÄNDE, SCHWERE VERBRENNUNGEN ODER
FREIGABE VON TOXISCHEN DÜNSTEN BEWIRKEN.
ANWEISUNGEN ZUM LADEN
1. Stecken Sie den runden Stecker des Transformators in die Rückseite der Ladegerät-Basis
ein und schließen Sie den Transformator-Adapter an eine Netzsteckdose an.
2. Setzen Sie den Akku fest in den rechteckigen Aufnehmer der Ladegerätbasis ein. Die rote
LED leuchtet auf und zeigt an, dass der Akku geladen wird.
3. Der Akku ist voll geladen, wenn die grüne LED aufleuchtet.
HINWEIS: LASSEN SIE DEN AKKU IM LADEGERÄT, BIS DIE LADEGERÄT-LED AUF
GRÜN UMSCHALTET.
• Das Ladegerät muss auf ebener Oberfläche stehen
• Laden Sie den Akku nicht bei Temperaturen unter 5 ˚C auf.
• Lassen Sie den Akku oder das Ladegerät nicht fallen.
• Lassen Sie nicht Metallgegenstände in Berührung mit den Akkukontakten kommen.
•Versuchen Sie nicht, das Akkugehäuse oder die Akkuzellen zu durchlöchern oder zu
öffnen.
• Lagern Sie den Akku nicht an Orten mit Temperaturen über 49 ˚C.
•Versuchen Sie nicht, den Akku zu verbrennen.
•Verwenden Sie kein defektes Ladegerät oder eines, das sich bei Netzanschluss überhitzt
und/oder Rauch abgibt.
AKKU EINSETZEN
1. Setzen Sie den Akku in den Griff des Trak-It-Werkzeugs ein. Der Akku ist erst dann
gesichert, wenn die beiden Sperrriegel in Geschlossen-Stellung einrasten.
SPANNUNGSANZEIGELEUCHTE
An einer Seite des Griffs befindet sich ein kleines Plastikdeckglas. Dies ist die
Spannungsanzeigeleuchte.
TRAK-IT WERKZEUG MODELL C3, C3 ST

31
11
Die Spannungsanzeigeleuchte leuchtet nur auf, wenn die Akkuspannung niedrig ist. Bei
niedriger Akkuspannung leuchtet eine rote LED auf, um den Anwender darauf
hinzuweisen, dass es Zeit zum Neuaufladen des Akkus ist.
LADELOGIK
Das Akkuladegerät ist mit einer roten und grünen LED-Anzeigeleuchte ausgestattet. Bitte
beachten Sie die Ladelogik für die folgenden vier (4) Zustände.
1. Rote LED leuchtet - Akku wird geladen.
2. Grüne LED leuchtet - Akku ist voll geladen
3. Abwechselnd rot und grün - Akku ist heiß. (Akku vor dem Aufladen vom Ladegerät
abnehmen und abkühlen lassen.)
4. Rote und grüne LEDs blinken gleichzeitig - Akku ist tot. (Durch neuen Akku ersetzen.)
KRAFTSTOFFZELLE UND MESSVENTIL
KRAFTSTOFFBEHÄLTER
GEFAHR — EXPLOSIONS-/FEUERGEFAHR
LESEN SIE ALLE SICHERHEITSANWEISUNGEN VOR DER VERWENDUNG ODER
HANDHABUNG DER KRAFTSTOFFZELLE DURCH.
WENN DIE HANDHABUNGSANWEISUNGEN NICHT BEFOLGT WERDEN, BESTEHT DIE
GEFAHR VON EXPLOSIONEN ODER BRÄNDEN, WAS ZU SCHWEREN VERLETZUNGEN
ODER SACHSCHÄDEN FÜHREN KANN.
VON HITZE, FUNKEN UND OFFENEN FLAMMEN FERNHALTEN.
DIE BRENNSTOFFZELLE NICHT DURCHLÖCHERN ODER ZU ÖFFNEN VERSUCHEN. DER
BEHÄLTER LÄSST SICH NICHT WIEDER AUFFÜLLEN.
NICHT VERSUCHEN, DEN BEHÄLTER WIEDERZUVERWENDEN ODER DEM RECYCLING
ZUZUFÜHREN.
WENN DER BEHÄLTER TEMPERATUREN ÜBER 49 ˚C AUSGESETZT WIRD, KANN ER
BERSTEN UND ENTFLAMMBARE GASE FREISETZEN.
BEIM EINBAU ODER BETRIEB DES MESSVENTILS NICHT RAUCHEN.
IMMER NUR AN GUT GELÜFTETEN ORTEN VERWENDEN.
BEI BEDIENUNG, WARTUNG ODER EINFÜLLEN VON KRAFTSTOFF IN DAS WERKZEUG
IMMER EINE SCHUTZBRILLE MIT SEITENBLENDEN, DIE ANSI Z87.1 ENTSPRICHT.
NIEMALS IN GESICHT ODER AUGEN SPRÜHEN. DABEI BESTEHT DIE GEFAHR
SCHWERER VERLETZUNGEN
DAS SPRAY NICHT EINATMEN.
AUSSER REICHWEITE VON KINDERN HALTEN.
WARNUNG
SONNENLICHT KANN DEN INNENDRUCK EINER KRAFTSTOFFZELLE STEIGERN. WENN
SIE ZU STARK SONNENLICHT AUSGESETZT WIRD, KANN DER INNENDRUCK DER
KRAFTSTOFFZELLE SO STARK ANSTEIGEN, DASS DIESE BIRST. DESHALB MUSS DIE
KRAFTSTOFFZELLE IMMER AN ORTEN AUFBEWAHRT WERDEN, WO DIE TEMPERATUR
NICHT 49 ˚C ÜBERSTEIGT, UND IMMER VOR DIREKTEM SONNENLICHT GESCHÜTZT
WERDEN.
In der Kraftstoffzelle befindet sich ein Behälter. In diesem Innenbehälter befindet sich der
Kraftstoff. Der Raum zwischen Innenbehälter und Außenzylinder ist mit einem anderen
TRAK-IT WERKZEUG MODELL C3, C3 ST

32
12
2. Ventil von Kappe trennen 3. Rillen gerade ausrichten
4. Vorne drücken
Rille zuerst
5. Hinten eindrücken
Rille 1. Klickstellung
6. Bündig eindrücken
2. Klickstellung
1. Drücken, um das Ventil
freizugeben
Gas, dem Treibgas, gefüllt, das unter Druck steht. Versuchen Sie niemals, den
Gummistopfen unten an der Kraftstoffzelle zu entfernen. Durch Entfernen des
Gummistopfens wird plötzlich Druck freigegeben, was zu Unfällen mit Verletzungen führen
kann.
Das Kraftstoff verwendet wird, “quetscht” der Treibgasdruck den Innenkraftstoffbehälter,
etwa so als wenn Sie eine Zahnpastatube quetschen. Durch diesen Quetschvorgang wird
sichergestellt, dass der gesamte Kraftstoff verwendet wird und dass das Trak-It-Werkzeug
in jeder Position arbeiten kann.
Wegen dieser Doppelbehälter-Konstruktion können Sie ein Geräusch von Flüssigkeit
hören, wenn Sie die Kraftstoffzelle schütteln, nachdem der Kraftstoff verbraucht ist. Dabei
handelt es sich um das Treibgas zwischen den Behältern.
Wenn die leere Kraftstoffzelle sehr hohen Temperaturen ausgesetzt wird, dehnt sich das
Treibgas aus und kann dazu führen, dass der Behälter birst und brennbare Gase abgibt.
MESSVENTIL
Das Messventil enthält das Kraftstoffmesssystem, das sicherstellt, dass die richtige
Kraftstoffmenge in die Brennkammer eingespritzt wird. Das BLAUE Messventil ist das
einzige Ventil, dass richtig mit dem Trak-It-Werkzeug arbeitet.
ANBRINGEN DES MESSVENTILS AN DIE
BRENNSTOFFZELLE
Zum Anbringen des Messventils an die Kraftstoffzelle nehmen Sie zuerst die TransportSchutzkappe ab und entfernen das Messventil von der Innenseite der Kappe. Dann setzen
Sie das Messventil oben auf die Kraftstoffzelle, wobei der Schaft nach vorne und von
Gesicht und Augen weg weist. Setzen Sie die vordere Lippe des Ventils ein und drücken
fest auf den hinteren Teil des Ventils. Sie sollten ein Klickgeräusch beim Einrasten hören.
TRAK-IT WERKZEUG MODELL C3, C3 ST

33
13
EINSETZEN DER BRENNSTOFFZELLE IN DEN
WERKZEUGGRIFF
Dann bei zur Vorderseite des Werkzeugs weisendem Messventilschaft die
Messventil/Kraftstoffzellen-Baugruppe einsetzen.
Während die Messventil/Kraftstoffzellen-Baugruppe in das Trak-It-Werkzeug eingesetzt
wird, werden Sie feststellen, dass sich oben auf der Zylindertasche ein blauer Adapter
befindet. Dieser Adapter ist dafür konstruiert, um sicherzustellen, dass der
Messventilschaft richtig mit dem kleinen Loch oder der Öffnung ausgerichtet ist, die zur
Brennkammer führt. Den Messventilschaft in die Öffnung am blauen Adapter setzen.
Sie beenden das Laden von Kraftstoff in das Trak-It-Werkzeug durch Schließen der
Stellgliedklappe. Die Stellgliedklappe wird geschlossen, indem die Abdeckung nach
unten und gleichzeitig nach vorne gedrückt wird.
TRAK-IT WERKZEUG MODELL C3, C3 ST
34
14
VORBEREITUNG DES TRAK-IT-WERKZEUGS
ZUR VERWENDUNG
BEFESTIGER UND BRENNSTOFFZELLEN
Das Trak-It-Werkzeug wurde speziell zur Verwendung mit Brennstoffzellen und kollatierten
Befestigerstreifen von Powers Fasteners konstruiert. Verwendung anderer Verbrauchsteile
führt zu Schäden und macht die Garantie hinfällig. Verwenden Sie nur OriginalVerbrauchsteile von Powers Fasteners.
BEFESTIGER EINLEGEN
Die Abbildung unten zeigt, wie Befestiger richtig in das Trak-It-Werkzeug eingelegt
werden.
1. Die Befestigerstreifen in den hinteren Schlitz der Magazin laden.
2. Die Trägerteile zurück zu dem hinteren Abschnitt der Magazin ziehen und die
Versammlung leicht freigeben, um sich die Befestiger zu engagieren.
VORSICHT (KLEMMPUNKT)
Den Ausstoßstempel nicht beim Einlegen von Befestigern unbehindert bewegen lassen.
Die Vorwärtsbewegung beim Freigeben des Ausstoßstempels kontrollieren, so dass er
sanft in den hintersten Stiftstreifen eingreift. Wenn der Ausstoßstempel sich ungehindert
bewegt, besteht die Gefahr des Einklemmens eines Fingers zwischen Ausstoßstempel und
hinterstem Stiftstreifen.
Der Betätigungshebel am Trak-It-Werkzeug wird automatisch gesperrt und arbeitet nicht,
wenn keine Befestiger im Magazin sind und wenn der Kontaktarm nicht ganz gedrückt ist.
Der Zweck dieses Merkmals ist es zu verhindern, dass unnötig durch Blindauslösungen
geschaltet wird (was Kraftstoff verschwendet) und Schäden an Werkzeugbauteilen zu
verhindern.
WETTER IM FREIEN UND DAS TRAK-IT-WERKZEUG
Verwenden sie das Trak-It-Werkzeug bei gutem Wetter im Freien, wenn Werkzeug,
Kraftstoffzelle und Akku zwischen -7 ˚C und 49 ˚C sind. Niedrigere Temperaturen können
das Trak-It-Werkzeug und die Akkuzelle beschädigen. Höhere Temperaturen können das
Werkzeug und die Kraftstoffzelle beschädigen.
TRAK-IT WERKZEUG MODELL C3, C3 ST
ENTLEERUNG DER BEFESTIGER
1. Beim Betätigen des
Nachfolgers, die
Trägerteile leicht
zurückziehen, und die
Versammlung in
Richtung zur Frontseite
der Magazin glatt
schieben.
2. 2. Den Stiftstopper
drücken und die
Befestigerstreifen aus der
Magazin heraus
schieben.

35
15
Kraftstoff sollte vor direktem Sonnenlicht geschützt in einer Umgebung mit Temperaturen
unter 49 ˚C gelagert werden. Nach längerem Gebrauch lassen Sie das Werkzeug durch
Laufen des Gebläsemotors abkühlen.
Verwendung bei Temperaturen von unter -7 ˚C kann zu Schäden am Werkzeug führen.
Kraftstoffzellen verlieren bei niedrigen Temperaturen die erforderliche Antriebskraft für
richtigen Betrieb. Bringen Sie das Werkzeug, die Akkuzelle und die Kraftstoffzelle über die
minimale Betriebstemperature.
VORSICHT — DAS TRAK-IT-WERKZEUG SOLL NICHT IM REGEN ODER BEI SEHR
STARKER FEUCHTIGKEIT VERWENDET WERDEN. DIESE BEDINGUNGEN KÖNNEN ZU
SCHÄDEN AN WERKZEUGBAUTEILEN FÜHREN UND FEHLFUNKTION DES WERKZEUGS
VERURSACHEN.
VERWENDUNG DES TRAK-IT-WERKZEUGS
WARNUNG
Das Trak-It-Werkzeug wurde zur Verwendung als Handwerkzeug konstruiert. Niemals
versuchen, das Werkzeug stationär durch Befestigung an einer Oberfläche oder einem
Gegenstand zu betreiben. Wenn das Werkzeug in fester Position betrieben wird, besteht
die Gefahr unkontrollierten Befestigungsstiftausstoßes, was eine Verletzungsgefahr für den
Anwender oder andere Personen in der Nähe darstellt.
DEN KONTAKTARM GEGEN DIE ARBEITSOBERFLÄCHE DRÜCKEN.
Der Gebläsemotor schaltet ein. Kraftstoff wird in die Brennkammer eingespritzt und durch
das Gebläse mit Luft gemischt.
DEN BETÄTIGUNGSHEBEL DRÜCKEN
Die Zündkerze feuert, und das Kraftstoff/Luft-Gemisch wird entzündet. Die Verbrennung
treibt die Kolbenbaugruppe an, die wiederum die Befestiger treibt.
BETÄTIGUNGSHEBEL LOSLASSEN - WERKZEUG ANHEBEN
Die Brennkammer öffnet. Das Gebläse entfernt heiße Gase und kühlt interne Bauteile.
HINWEIS: Wenn keine weiteren Arbeitszyklen vorgeommen werden, läuft das Gebläse 8
Sekunden lang und schaltet dann aus.
Warnung
Der Kontaktarm und die Nase kann nach längerer oder schneller Verwendung heiß sein.
TRAK-IT WERKZEUG MODELL C3, C3 ST

36
16
WARTUNG
Die Wartung vor Ort sollte sich auf die folgenden Punkte beschränken:
• DIE LADESTÄRKE DES AKKUS PRÜFEN
• DEN AKKU NEU AUFLADEN
• BRENNSTOFFZELLE UND MESSVENTIL PRÜFEN
• DIE KRAFTSTOFFZELLE ERSETZEN
• DEN LUFTFILTER REINIGEN
• EINEN STAU BEHEBEN
Wenn versucht wird, über diese Verfahren hinaus zu gehen, besteht die Gefahr schwerer
Verletzungen oder Schäden am Trak-It-Werkzeug, und die Garantie wird hinfällig.
Es gibt bestimmte Probleme, die bei der Verwendung des Trak-It-Werkzeugs auftreten
können, welche vor Ort behoben werden können. Die folgenden Wartungsarbeiten vor Ort
sind die einzigen Arbeiten, die Sie ausführen sollten. Wenn andere Störungen am Trak-ItWerkzeug vorliegen, müssen diese vom qualifizierten Wartungsdienst repariert werden.
Wenn Sie einen Grund haben, zu glauben, dass das Problem von den in dieser Anleitung
beschriebenen Wartungsverfahren nicht gedeckt wird, wenden Sie sich sofort an den
Powers Fasteners Kundendienst.
GEFAHR — NIEMALS VERSUCHEN, WARTUNG AM TRAK-IT-WERKZEUG
AUSZUFÜHREN, OHNE VORHER DIE KRAFTSTOFFZELLE UND DEN AKKU ZU
ENTFERNEN. WARTUNG DARF ERST AUSGEFÜHRT WERDEN, WENN DAS WERKZEUG
VOLLSTÄNDIG AUßER BETRIEB IST.
AKKUZELLEN-PRUFÜNG
Prüfen Sie regelmäßíg die LED-Akkuspannungsanzeigeleuchte — die LED im Griff des
Trak-It-Werkzeugs. Wenn ein Problem auftritt, muss der erste Schritt immer darin
bestehen, sicherzustellen, dass der Akku stark genug zum Betrieb des Werkzeugs ist. Der
Akku hat ausreichend Energie, wenn die rote LED erloschen bleibt.
KRAFTSTOFFZELLEN-PRÜFUNG
Ein weiterer typischer Wartungszustand tritt auf, wenn Kraftstoffzelle leer wird. Ein
typisches Symptom dafür ist, wenn das Gebläse des Trak-It-Werkzeugs arbeitet, aber das
Werkzeug Befestiger nicht vollständig oder überhaupt nicht eintreibt. In diesem Fall
nehmen Sie die Kraftstoffzelle aus dem Werkzeug, prüfen Sie, ob die Zelle Kraftstoff
enthält und ob das Messventil arbeitet. Zur Bestimmung, ob sich noch Kraftstoff in der
Kraftstoffzelle befindet, setzen Sie einfach den Messschaft gegen einen soliden
Gegenstand und drücken vorsichtig drei oder vier Mal. Jedes Mal sollte eine kleine
Kraftstoffmenge freigegeben werden. Führen Sie diesen Test niemals in der Nähe von
offenen Flammen oder Funken aus, während Sie rauchen, oder so dass Kraftstoff in die
Augen spritzen könnte. Wenn nicht bei jedem Betrieb des Messventils Kraftstoff austritt,
weist dies darauf hin, dass kein Kraftstoff mehr im Zylinder ist und dieser ersetzt werden
muss. Entsorgen Sie die leere Kraftstoffzelle richtig.
TRAK-IT WERKZEUG MODELL C3, C3 ST

37
17
LUFTFILTER
Entfernen Sie die Luftfilter-Abdeckung durch Loshebeln mit einem Schraubenzieher. Der
Luftfilter lässt sich einfach herausheben.
Klopfen Sie SANFT auf den Filter, oder blasen Sie mit Druckluft darauf, um jeglichen
Staub zu entfernen. Sie sollten den Luftfilter alle zwei Tage prüfen und reinigen.
EINEN STAU BEHEBEN
Ein typisches Problem, das auftreten kann, ist ein gestauter Befestiger. Wegen der
originellen Konstruktion des Trak-It-Werkzeugs lässt sich ein gestauter Befestiger schnell
und leicht entfernen.
1. Kraftstoffzelle und Akku aus dem Werkzeug entfernen.
2. Die Befestigerstreifen von der Magazin entfernen.
VORSICHT — WENN DER AUSSTOSSSTEMPEL NICHT ZURÜCK IN SPERRPOSITION
GEZOGEN WIRD, KÖNNEN STIFTE ZUM ANWENDER HIN HERAUSSCHIESSEN, WENN
DIE STAUBEHEBUNGSHEBEL-EINHEIT GEÖFFNET WIRD.
3. Öffnen Sie die Staubehebungshebel-Einheit vorne am Nasenstück.
4. Schieben und schwenken Sie die Nasenstücktür in ihre Offen-Stellung.
Jetzt sollten die gestauten Befestiger herausfallen. Wenn ein gestauter Befestiger nicht
herausfällt, entfernen Sie vorsichtig den Befestiger und achten Sie darauf, nicht das
Nasenstück zu beschädigen.
Wenn Sie den gestauten Befestiger entfernt haben, führen Sie folgende Schritte aus, um
die Nasenstücktür zu schließen:
1. Schwenken und schieben Sie die StaubehebungshebelEinheit in geschlossene Position zurück.
2. Schnappen Sie die federgespannte Verriegelung in voll
geschlossene Stellung zurück.
3. Die Befestigerstreifen in die Magazin wieder laden.
TRAK-IT WERKZEUG MODELL C3, C3 ST

38
18
GEFAHR — STELLEN SIE SICHER, DASS DIE STAUBEHEBUNGSHEBEL-EINHEIT GANZ
GESCHLOSSEN UND SICHER SIND. WENN VERSUCHT WIRD, DAS WERKZEUG MIT
STAUBEHEBUNGSHEBEL-EINHEIT IN TEILWEISE GEÖFFNETER STELLUNG ZU
VERWENDEN, BESTEHT DIE GEFAHR VON VERLUST DER KONTROLLE ÜBER DEN
BEFESTIGER, SCHÄDEN AM WERKZEUG, ODER STIFTABFEUERUNG IN RICHTUNG
ANWENDER.
Wenn Sie finden, dass das Gebläse des Trak-It-Werkzeugs nach der Staubehebung nicht
arbeitet:
Prüfen Sie den Betriebszustand der Akkuzelle.
ROUTINE AM ENDE DES ARBEITSTAGS
Am Ende jedes Arbeitstags führen Sie eine Routine aus. Diese einfachen Schritte dienen
dazu, die Sicherheit und Betriebseffizienz des Trak-It-Werkzeugs zu bewahren.
Bevor Sie den Arbeitsplatz verlassen:
1. Entfernen Sie den Akku und legen ihn im Tragegehäuse ab, wenn voll oder teilweise
geladen. Verwenden Sie immer das Trak-It-Werkzeug-Tragegehäuse zum Transportieren
und Ablegen des Werkzeugs.
2. Entsorgen Sie die alle leeren Kraftstoffzellen. Beachten Sie, dass diese Zellen so entsorgt
werden müssen, dass sie nicht von Kindern gefunden, zerquetscht, gelocht oder verbrannt
werden können und beachten Sie gesetzliche Vorschriften zur Entsorgung.
3. Bei schwachem Akku setzen Sie die Akkuzelle in das Ladegerät.
4. Wischen Sie das Trak-It-Werkzeug mit einem sauberen, weichen Lappen ab.
5. Prüfen Sie den Kontaktarm, um sicherzustellen, dass er frei arbeitet.
Diese einfachen Schritte stellen nicht nur sicher, dass das Trak-It-Werkzeug am nächsten
Tag arbeitsbereit ist, sondern sie garantieren auch, dass sie die optimale Effizienz von
Ihrem Werkzeug erhalten.
ZUBEHÖRTEILE FÜR DAS TRAK-IT-WERKZEUG
Eine Reihe von Zubehörteilen steht für das Trak-It-Werkzeug zur Verfügung:
55583 Akkuzellen
55618 Untersatz Trak-IT-Werkzeug-Ladegerät
55639 12 Volt Auto-Adapter
55619 110 Volt Adaptersschnur
55643 Tragenschachtel
Für weitere Auskünfte wenden Sie sich an Ihre Kundendienstvertretung von Powers
Fasteners.
TRAK-IT WERKZEUG MODELL C3, C3 ST

39
19
SYMPTOM
Vorbereitung des Werkzeugs zum
Betrieb - Akku/LadegerätProbleme
1. Akkuzelle scheint keine Ladung zu
akzeptieren. Grüne Ladeleuchte
leuchtet auch nach mehreren
Stunden nicht auf.
2a. Rote und grüne LEDs am Ladegerät
blinken abwechselnd.
2b.Rote und grüne LEDs am Ladegerät
blinken gleichzeitig.
Normale Betriebsstufe
1. Gebläse läuft nicht.
2. Gebläse läuft nicht, oder läuft
langsamer als normal.
3. Gebläse läuft nur unterbrochen.
Betriebsstufe
Vorverbrennung/Verbrennung
1. Kontaktarm lässt sich nicht voll
eindrücken — Werkzeug arbeitet
nicht.
2. Werkzeug schaltet nicht weiter —
Gebläse läuft.
MÖGLICHE URSACHEN
1a. Defekte Anzeigeleuchte am Ladegerät.
1b. Schadhaftes Ladegerät.
2a. Akku ist heiß.
2b. Akkuzelle beschädigt oder
Lebensdauer abgelaufen.
1a. Akkuzelle nicht geladen.
1b. Akkukontakte oder Handgriff-
Akkukontakte ölig, verschmutzt, oder
korrodiert.
1c. Ein elektrischer Kurzschluß liegt vor.
2. Akkuzelle ist entladen.
3. Akku ist locker oder Kontakte
verbogen.
1a. Sperrstange sitzt in Sperrposition fest.
1b. Kontaktarm verbogen, oder
Ansammlung von Schmutz in Laufrille
behindert Funktion.
1c. Ausstoßstempel ist nicht hinter
Streifen.
1d. Zylinderkopf-O-Ring eingedrückt.
2a. Kraftstoffzelle ist leer.
2b. Zündkabel von Zündkerze abgetrennt.
2c. Kein Funke.
WARTUNG
1a. Akkuzelle im Werkzeug nach 3 Stunden Ladezyklus
probieren. Wenn das Werkzeug richtig funktioniert,
arbeiten die Ladelämpchen nicht richtig. Ladegerät
ersetzen, oder Ladezeit prüfen, um sicherzustellen,
dass die Akkuzelle ausreichend Zeit zum Aufladen
hat. Es ist normal, dass sich die Batterie nach
richtigem Laden warm anfühlt.
1b. Sofort den Betrieb beenden und von der
Stromversorgung abtrennen. Ladegerät und Stecker
ersetzen oder das Ladegerät entsorgen, um
versehentliche Wiederverwendung oder Anschluss an
das Stromnetz zu vermeiden.
2a. Akku vor vom Ladegerät abnehmen und abkühlen
lassen.
2b. Akkuzelle ersetzen.
1a. Akkuzelle entsprechend Bedienungsanleitung laden.
1b. Akkuzellen-Kontakte Griffakkuzellenkontakte nach
Bedarf reinigen
1c. Das Werkzeug muss von einem Vertragstechniker von
Powers Fasteners geprüft werden.
2. Akkuzelle laden.
3. Akku in voll geschlossene Stellung zurückschnappen.
Kontakte in richtige Stellung zurückbiegen.
1a. Sicherheitsnockenbüchsen-Schraube auf zu festen
Sitz prüfen. Nasenstücktür öffnen wenn erforderlich
und Schmutzansammlungen aus Laufspur entfernen
1b. Kontaktarm auf Sauberkeit und mögliche Schäden
prüfen. Laufspur mit Lappen reinigen. Wenn die
Kontaktarm verschmutzt ist, bei der VertragsKundendienstvertretung von Powers Fasteners zur
Wartung einreichen.
1c. Ausstoßstempel hinter Streifen setzen.
1d. Zur Wartung wenden Sie sich an Ihre
Kundendienstvertretung von Powers Fasteners.
2a. Kraftstoffzelle ersetzen.
2b. Zur Wartung wenden Sie sich an Ihre Vertrags-
Kundendienstvertretung von Powers Fasteners.
2c. Zur Wartung wenden Sie sich an Ihre Vertrags-
Kundendienstvertretung von Powers Fasteners.
FEHLERSUCHE
TRAK-IT WERKZEUG MODELL C3, C3 ST

40
20
SYMPTOM
Betriebsstufe Arbeit/Auspuff
1. Werkzeug arbeitet richtig, aber
Befestiger werden nicht vollständig
eingetrieben.
2. Werkzeug arbeitet, aber kein
Befestiger wird eingetrieben.
3. Werkzeug arbeitet ungleichmäßig
oder scheint Leistung zu verlieren.
Betriebsstufe Rückkehr/Auspuff
1. Werkzeug arbeitete und trieb
Befestiger ein, aber kehrte nicht in
Oben-Stellung zurück.
2. Brennkammer wird nach
Werkzeugzyklus nicht abgesenkt.
MÖGLICHE URSACHEN
1a. Akkuzelle ist entladen.
1b. Kraftstoffzelle ist fast leer.
1c. Es kann ein Dichtungsverlust in der
Brennkammer vorliegen.
2a. Befestigerstreifen kann festsitzen.
2b. Ausstoßstempel sitzt nicht richtig
hinter Streifen.
2c. Festsitzender Befestiger.
3a. Kraftstoffzelle ist fast leer.
3b. Zündkabel ist locker.
3c. Filterelement ist schmutzig und
bewirkt Überhitzung des Werkzeugs.
3d. Werkzeugmanschette und O-Ringe
sind schmutzig.
1a. Schmutzansammlung auf Kolben oder
in Nasenbohrung.
1b. Pilzverformung der Kolbenspitze.
1c. Auspufföffnungen an Manschette sind
schmutzig oder verstopft.
1d. Werkzeug (Manschette) oder O-Ringe
sind schmutzig.
1e. Kolbenringe mussen ausgewechselt
werden.
2. Kontaktarm ist verbogen, oder
Werkzeug ist schmutzig.
WARTUNG
1a. Akkuzelle laden.
1b. Kraftstoffzelle entsprechend Bedienungsanleitung
prüfen und nach Bedarf ersetzen.
1c. Kontaktarm eine Minute lang gegen Werkstück
drücken. Betätigungshebel ziehen. Wenn der
Befestiger nicht eingetrieben wird, liegt ein Leck vor,
das Wartung erfordert.
2a. Nur Befestiger verwenden, die den Spezifikationen
von Powers Fasteners entsprechen.
2b. Ausstoßstempel hinter Befestiger-Streifen aufsuchen
und Streifen laut Anweisungen in
Bedienungsanleitung einsetzen.
2c. Stau entsprechend Bedienungsanleitung beheben.
3a. Kraftstoffzelle entsprechend Bedienungsanleitung
prüfen.
3b. Zur Wartung wenden Sie sich an Ihre
Kundendienstvertretung von Powers Fasteners.
3c. Filtereinsatz entfernen, und entsprechend
Bedienungsanleitung reinigen. Druckluft zum
Entfernen von hartnäckigem Schmutz verwenden.
3d. Zur Wartung bei der Kundendienstvertretung von
Powers Fasteners einreichen.
1a. Zur Wartung bei der Kundendienstvertretung von
Powers Fasteners einreichen.
1b. Zur Wartung bei der Kundendienstvertretung von
Powers Fasteners einreichen.
1c. Zur Wartung bei der Kundendienstvertretung von
Powers Fasteners einreichen.
1d. Zur Wartung bei der Kundendienstvertretung von
Powers Fasteners einreichen.
1e. Zur Wartung bei der Kundendienstvertretung von
Powers Fasteners einreichen.
2. Werkzeug reinigen, oder Kontaktarm nach Bedarf
ersetzen.
FEHLERSUCHE
TRAK-IT WERKZEUG MODELL C3, C3 ST

41
MODE D'EMPLOI
OUTIL TRAK-IT MODÉLE C3, C3 ST

42
TABLE DES MATIÉRES
SUJET PAGE
INTRODUCTION 3-4
VUE D'ENSEMBLE 5-6
INSTRUCTION DE SÉCURITÉ 7-9
CARTOUCHE DE GAZ ET SOUPAPE DE DOSAGE 11
PRÉPARATION DE L'APPAREIL TRAK-IT POUR SON UTILISATION 14
FONCTIONNEMENT DE L'APPAREIL TRAK-IT 15
ENTRETIEN 16-18
DÉPANNAGE 19-20
Siège
Powers Fasteners
2 Powers Square
New Rochelle, NY 10801
USA
www.powers.com
Pays Emplacement Téléhone Website
Etats-Unis New York 914-235-6300 www.powers.com
Europe Pays-Bas +31-226-357-670 www.powerseurope.nl
Canada Ontario 905-673-7295 www.powers.com
Australie Melbourne +61-03-9553 3999 www.powers.com.au
Nouvelle Zéande Auckland +64-9415 2425 www.powers.com.nz
Autre New York +1-914 235 6300 www.powers.com
Pour intervention après vente, les pièces détachées, produits ou réparation,
prière de contacter la compagnie Powers la plus proche de chez vous et
demander le service clientèle.
OUTIL TRAK-IT MODÉLE C3, C3 ST

43
3
INTRODUCTION
DÉCLARATION DE POWERS FASTENERS
Powers Fasteners souhaite vous remercier d'avoir acheté le cloueur électrique de modèle
C3. Cet appareil a été conçu selon des normes de hautes qualités afin de vous permettre
un utilisation sans ennui durant de nombreuses années. Nous vous recommandons de
lire soigneusement ce manuel avant de l'utiliser, afin de bien vous familiariser avec tous
les avertissements et précautions de sécurité recommandés. Veuillez noter que l'appareil
C3, semblable à d'autres cloueurs électriques et exigera un entretien de contrôle minime
pour continuer à fonctionner de la meilleure façon. Prenez note des conseils d'entretien
recommandés car un entretien approprié déterminera sa durée de vie.
MODE D'EMPLOI DE L'APPAREIL TRAK-IT
Ce mode d'emploi est prévu pour vous familiariser avec l'appareil Trak-It de Powers
Fasteners. A la différence des autres appareils Powers Fasteners qui sont électriques ou
utilisent de la poudre, l'appareil Trak-It est actionné par un moteur linéaire de combustion
interne qui est semblable à votre moteur de voiture. L'appareil met à feu un carburant de
propriété industrielle en présence de l'air qui conduit un piston à heurter une pointe.
Comme vous le verrez, l'appareil Trak-It est fait totalement d'un seul bloc avec une
cartouche de gaz, une batterie et un magasin de pointes.
Pour faciliter l'utilisation, ce mode d'emploi est divisé en sections (voir le contenu).
Chaque partie du mode d'emploi a été écrite en prenant en considération la commodité de
l'utilisateur : Nous avons mis de côté tous les termes techniques de sorte que vous
puissiez aisément comprendre comment obtenir la performance maximum de votre
appareil Trak-It et comment vous pouvez éviter d'endommager l'appareil ou de vous
blesser. Mais pour accomplir cela, il faut faire deux choses :
1.LIRE ENTIÈREMENT LE MANUEL AVANT D'UTILISER L'APPAREIL.
2.SUIVRE TOUTES LES INSTRUCTIONS DU MODE D'EMPLOI.
L'appareil Trak-It devra être manipulé comme d'autres outils d'ancrage mécanique que
vous utilisez. Quand il est utilisé correctement, il répond à vos besoins en matière de
clouage. Mais, comme la plupart de vos appareils, une mauvaise utilisation peut avoir des
conséquences graves : Si vous permettez à d'autres personnes d'utiliser l'appareil Trak-it,
vous serez responsable d'assurer que ces personnes lisent également ce mode d'emploi
et se conforment aux instructions avant de l'essayer.
Pour tout renseignement supplémentaire au sujet du système Trak-It, ou pour obtenir des
copies additionnelles de ce mode d'emploi, veuillez entrer en contact avec le département
de service clientèle de Powers Fasteners en appelant 1-914 235 6300 aux Etats-Unis ou
le site www.powers.com. En cas d'achat depuis l'étranger, veuillez localiser notre
emplacement d'usine le plus porche comme indiqué à la page 2.
OUTIL TRAK-IT MODÉLE C3, C3 ST

44
4
GARANTIE
POWERS FASTENERS garantie ci-après que les nouveaux appareils, pièces et accessoires
d'ancrage mécanique Trak-It sont exempts de défauts de matériel et d'exécution pour la
période indiquée, après la date de la livraison à l'utilisateur original.
GARANTIE LIMITÉE D'UNE ANNÉE
Une garantie d'une année s'appliquera à toutes les pièces, y compris les articles d'usure,
sauf batterie et chargeur.
GARANTIE LIMITÉE DE SIX MOIS
Une garantie de six mois s'applique à la batterie et au chargeur. Cette garantie sera
invalide dans le cas de manipulation négligée ou d'abus de l'opérateur.
RAPPORT DE GARANTIE
La responsabilité unique de Powers Fasteners comme mentionné ci-dessous sera de
remplacer n'importe quelle pièce ou accessoire s'avèrant défectueux au cours de la
période indiquée. Toute pièce ou tout accessoire de rechange fourni en conformité avec
cette garantie portera à son tour une période de garantie qui s'étendra jusqu'à la fin de
celle de la pièce d'origine.
Cette garantie est invalide pour n'importe quel appareil ayant été soumis à des
négligences, à un utilisation abusif ou à des pointes, un gaz, une batterie ou des
chargeurs de batterie ne correspondant pas aux spécifications, dimensions ou qualité de
POWERS FASTENERS, à une manutention incorrecte, à une réparation faite avec des
pièces autres que celles de rechange Trak-It, ou ayant été endommagé durant le transit ou
le transport, ou qui, selon le jugement de Powers Fasteners aurait été modifié ou réparé
d'une manière pouvant affecter ou réduire la performance de l'appareil.
POWERS FASTENERS NE FAIT AUCUNE GARANTIE, NI EXPRESSE, NIE IMPLICITE,
CONCERNANT LA VALEUR MARCHANDE, LE BON ÉTAT, OU TOUT AURE ÉLÉMENT QUE
CEUX SPÉCIFIÉS CI-DESSUS et la responsabilité COMME MENTIONNÉE ET ASSUMÉE
CI-DESSUS, excluant toutes autres garanties provenant de, oui en rapport avec
l'utilisation et la performance de l'appareil, sauf pour les limites stipulées par la loi
acceptable. POWERS FASTENERS NE SERA EN AUCUN CAS RESPONSABLE DES
DOMMAGES DIRECTS, INDIRECTS, OU CONSÉCUTIFS, Y COMPRIS, MAIS NON LIMITÉ
AUX DOMMAGES QUI PEUVENT RÉSULTER DE LA PERTE DE BÉNÉFICES OU DE
PRODUCTION PRÉVUS, LA DÉTÉRIORATION DES MATÉRIAUX, AUGMENTATION DU
COÛT D'OPÉRATION OU AUTRE.
Powers Fasteners se réserve le droit de changer les caractéristiques, l'équipement, ou la
conception à tout moment sans préavis et engagement.
OUTIL TRAK-IT MODÉLE C3, C3 ST

45
5
VUE D'ENSEMBLE
L'appareil Trak-It est un appareil d'un seul bloc et entièrement portatif qui utilise le
carburant d'hydrocarbure liquide pour actionner un moteur de combustion interne à
entraînement linéaire unique.
Afin que vous puissiez comprendre toutes les informations contenues dans ce mode
d'emploi, une compréhension de base de l'appareil est nécessaire. L'appareil Trak-It se
compose de trois ensembles, à savoir la poignée, le moteur et le magasin.
Pendant que vous examinez l'appareil Trak-It, familiarisez-vous avec les trois ensembles
principaux et leurs divers composants situés dans chacun d'eux.
L'ensemble poignée contient la cartouche de gaz, la batterie, le voyant de signalisation de
basse tension de la batterie et le déclencheur.
L'ensemble du moteur comprend le couvercle et le filtre, le logement du moteur, la pièce
du nez et le bras de contact.
L'ensemble du magasin contient le palpeur, le levier de libération du palpeur et le pied du
magasin.
Dimensions:
Mode d’activation:
Activation entièrement séquentielle
Taux de cycle:
Opération intermittente de 2 à 3 goupilles par seconde
Opération continue 1000 goupilles par heure
Niveau de bruit:
Niveau de puissance sonore pulsée par rapport à la courbe A — LWA, 1 s, d 105,30 dB
Niveau de pression acoustique pulsée par rapport à la courbe A — LpA, 1 s, d 96,92 dB
au poste de travail
Ces valeurs out été calculées et documentées, en conformité avac EN12549 : 1999.
Vibrations:
Valeur caractéristique de vibration = 3,70 m/s
2
Ces valeurs sont déterminées et documentées conformément à la norme ISO 8662-11.
Cette valeur représente une valeur caractéristique connexe à l'appareil et non l'influence
au système main-bras lorsque l'on utilise l'appareil. Une influence au système main-bras
lorsque l'on utilise l'appareil dépendra, par exemple, de la force de saisie, la force de
pression de contact, la direction de fonctionnement, le réglage de l'air principale, le lieu
de travail, le support d'objets de travail.
NOTE: SI CES TAUX SONT DÉPASSÉS, VOUS RISQUEZ DE CAUSER UNE SURCHAUFFE
A L'APPAREIL, AVEC COMME RÉSULTAT UNE DIMINUTION DU RENDEMENT ET DES
OUTIL TRAK-IT MODÉLE C3, C3 ST
Poids
※
Hauteur
Longueur
Largeur
TRAK-IT C3 TRAK-IT C3 ST
3.7 kg (8.2 livres) 3.6 kg (7.9 livres)
38.9 cm (15.3 pouces) 38.9 cm (15.3 pouces)
44.0 cm (17.3 pouces)
33.9 cm (13.3 pouces)
10.6 cm (4.2 pouces) 10.6 cm (4.2 pouces)
TRAK-IT C3 XL
0.0 pounds (0.0 kg)
0.0 inches (00.0 cm)
0.0 inches (00.0 cm)
0.0 inches (00.0 cm)
※Comprend les outils et la batterie
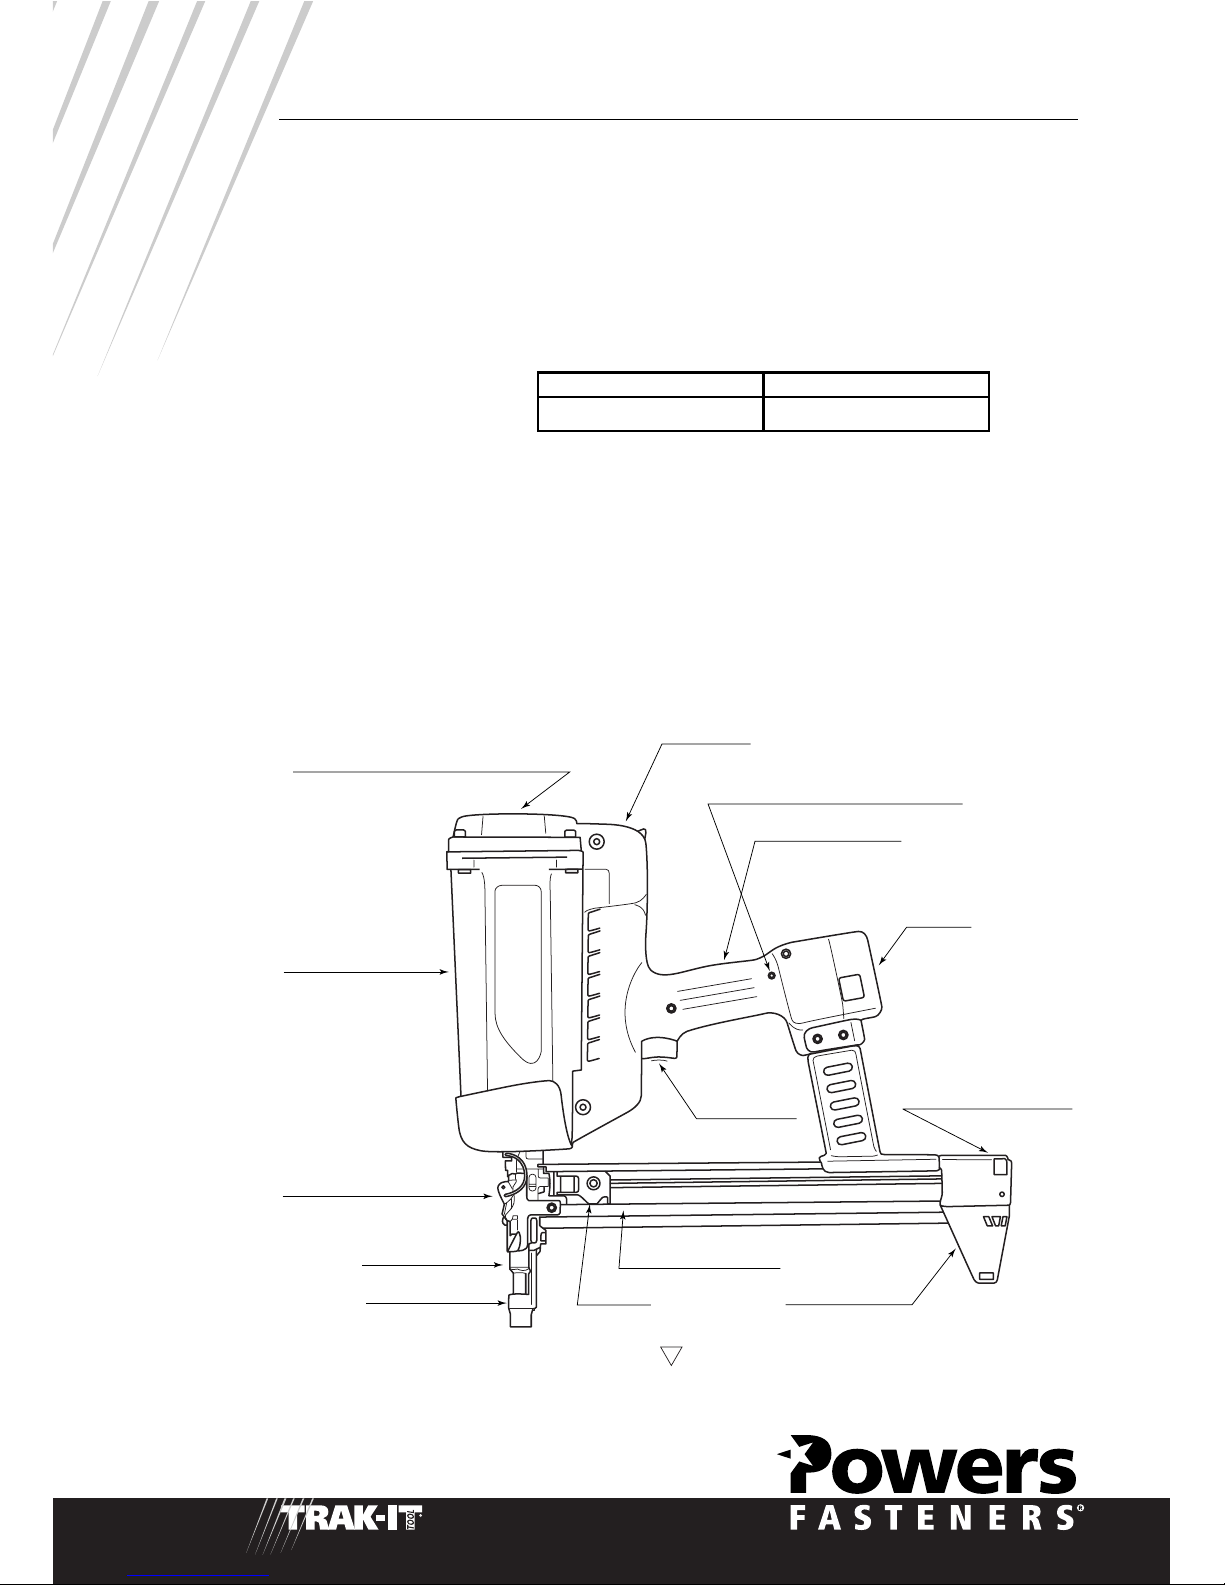
46
6
OUTIL TRAK-IT MODÉLE C3, C3 ST
Couvercle du filtre à air, filtre à air et
chapeau de cylindre
Ensemble moteur
Bloc du levier d’élimination
de bourrage
Pièce du nez
Bras de contact
Palpeur
Pied du magasin
Ensemble Magasin
Levier de
dégagement du palpeur
Batterie
Voyant de signalisation de tension
basse de la batterie
Ensemble poignée
Actionneur
Déclencheur
COMPOSANTS ENDOMMAGÉS.
EN UTILISQNT L'APPAREIL TRAK-IT À SON TAUX D'UTILISATION RECOMMANDÉ,
VOUS POURREZ EFFECTUER PLUSIEURS MILLIERS DE CLOUAGES EN UNE JOURNÉE
DE TRAVAIL.
Dimension maximum d'pointe:
Jambe - Longueur 38 mm (1-1/2 pouce) x Diamètre 2,59 mm (102 pouces)
Capacité du magasin:
Élément de la batterie:
6 volts de C.C. (Hydrure en métal de nickel) – fournit assez d'énergie pour placer environ
3000 pointes avec une pleine charge.
Temps de charge – Environ 2 heures 30 minutes.
Cartouche de gaz:
Hydrocarbure liquide - Fournit assez de carburant pour placer jusqu' à 1200 pointes.
(Articles dangereux Classe 2.1 UN1075 2,7 fl oz/40 g/80 ml)
NOTE: POWER FASTENERS DÉCLARE QUE L'APPAREIL DE MODÈLE TI-C EST EN
CONFORMITÉ AVEC LA DIRECTIVE EUROPÉENNE POUR LES "MACHINES".
NOTE: Le symbole de triangle marqué " " suivant son numéro de série d’outil indique
que le joug de sécurité est fourni avec cet outil.
TRAK-IT C3
42 pointes
TRAK-IT C3 ST
22 pointes

47
7
INSTRUCTIONS DE SÉCURITÉ
Les instructions de sécurité suivantes ont été incluses dans ce Mode d'Emploi pour vous
fournir les informations de base nécessaires pour l'utilisation en toute sécurité de
l'appareil Trak-It. NE PAS ESSAYER D'UTILISER CET APPAREIL AVANT D'AVOIR BIEN
LU ET COMPRIS TOUTES LES MESURES DE SÉCURITÉ ET INSTRUCTIONS DU MODE
D'EMPLOI.
Si vous ne respectez pas toutes les mesures de sécurité et instructions du Mode
d'Emploi, vous risquez de rendre aveugle, des blessures sérieuses, des dommages à la
propriété ainsi qu'à l'appareil.
En plus de ces instructions, une formation technique additionnelle peut être nécessaire,
selon le type de pointe que vous souhaitez exécuter. Prière d'entrer en contact avec le
représentant de service clientèle de Powers Fasteners pour obtenir d'autres
renseignements.
DANGER
L'APPAREIL TRAK-IT REPRÉSENTE UN DISPOSITIF INTERNE DE COMBUSTION. IL
PRODUIT DES GAZ D'ÉCHAPPEMENT CHAUDS QUI PEUVENT METTRE À FEU LES
MATÉRIAUX INFLAMMABLES. CET APPAREIL NE DOIT PAS ÊTRE UTILISÉ DANS UN
ENVIRONNEMENT CARBURANT OU EN PRÉSENCE DE MATÉRIAUX, CARBURANTS, TEL
QUE DES PRODUITS CHIMIQUES INFLAMMABLES, DES ADHÉSIFS, DE L'ESSENCE OU
DISSOLVANTS. UNE PRÉCAUTION DOIT ËTRE PRISE POUR EMPÊCHER TOUT
APPAREIL CONTENANT UNE CARTOUCHE DE GAZ D’ÊTRE EXPOSÉ À DES
TEMPÉRATURES DÉPASSANT 49 ˚C (120 ˚), PUISQUE LA CARTOUCHE DE GAZ
POURRAIT EXPLOSER EN LIBÉRANT LE GAZ INFLAMMABLE.
CET APPAREIL DOIT ÊTRE UTILISÉ SEULEMENT DANS UN ENVIRONNEMENT BIEN
AÉRÉ, CAR IL DÉGAGE DE L'OXYDE DE CARBONE SEMBLABLE UNE SCIE À CHAÎNE
OU À UNE TONDEUSE À GAZON. L'EXPOSITION À L'OXYDE DE CARBONE PEUT
CAUSER NAUSÉES OU ENTRAINER LA PERTE DE CONNAISSANCE DE L'OPÉRATEUR.
L'APPAREIL TRAK-IT, LES CARTOUCHES DE GAZ ET L'ÉLÉMENT DE LA BATTERIE ET
SON CHARGEUR DEVRONT TOUJOURS ÊTRE ÉLOIGNÉS DE LA PORTÉ DES ENFANTS.
1. LIRE CE MANUEL MINUTIEUSEMENT. Se référer toujours à ce mode d'emploi pour
les informations sur le fonctionnement en toute sécurité et l'entretien de l'appareil Trak-It.
Si une partie quelconque de ce Mode d'emploi vous semble peu claire, ou si vous avez
des questions à poser, prière d'entrer en contact immédiatement avec le représentant de
service clientèle Powers Fasteners.
2. PORTER DES LUNETTES DE PROTECTION POUR LES YEUX ET LES
OREILLES. Porter toujours les dispositifs de protection pour les yeux et les oreilles,
lors de l'utilisation de l'appareil Trak-It. Il en est de même pour les personnes étant à
proximité. En outre, la protection des yeux doit répondre à l'exigence de la norme ANSI Z
STANDARD 87.1 (Directive du Conseil 89-686-EEC en date du 21 Décembre 1989).
3. NE JAMAIS SUPPOSER QUE L'APPAREIL EST VIDE. Chaque fois que vous
saisissez l'appareil Trak-It, examinez le magasin pour vous assurer qu'il y a des pointes.
Ne jamais diriger l'appareil vers qui que se soit, même si vous êtes absolument sûr qu'il
n'y a aucune pointe dans l'appareil. La pointe que vous n'auriez pas vu risque d'être celle
OUTIL TRAK-IT MODÉLE C3, C3 ST

48
8
qui peut vous blesser ou blesser quelqu'un d'autre.
4. NE JAMAIS S'AMUSER AVEC L'APPAREIL. L'appareil Trak-It n'est pas un jouet…
c'est un appareil d'ancrage mécanique. Il est conçu pour enfoncer une pointe à travers des
tôles d'acier dans le béton. Pour accomplir cette tâche, il produit une quantité énorme
d'énergie. Si on s'amuse avec cet appareil, même lorsqu'on est absolument sûr qu'il n'y a
aucune pointe à l'intérieur, on risque de causer un accident.
5. NE JAMAIS PORTER L'APPAREIL AVEC SON DOIGT SUR LE DÉCLENCHEUR,
OU EN L'ENFONÇANT. Il faut se rappeler que l'appareil Trak-It fonctionne selon une
séquence spécifique. Le bras de contact agit en tant que dispositif de fonctionnement qui
empêche le déclencheur d'allumer le circuit d'allumage. Si on enfonce involontairement le
bras de contact tout en tirant le déclencheur pendant que l'on transporte l'appareil, il
pourrait décharger une pointe ;
6. NE JAMAIS UTILISER UN APPAREIL QUI FONCTIONNE MAL. Si vous déterminez
que l'appareil Trak-It ne fonctionne pas correctement, et que le problème est plus qu'un
simple bourrage d'une pointe, interrompre immédiatement l'utilisation de cet appareil et
se référer à la section d'entretien de ce Mode d'Emploi. Si le probléme ne peut pas être
corrigé avec une des mesures concerné par la section d'entretien, signaler le probléme au
surveillant ou au représentant de service clientèle de Powers Fasteners.
NE TENTEZ PAS D'EFFECTUER DES RÉPARATIONS SUR L'APPAREIL TRAK-IT VOUSMÊME.
7. UTILISER L'APPAREIL SEULEMENT SUR LA SURFACE DE TRAVAIL. L'appareil
Trak-It devra être opéré seulement quand il est en contact avec la surface de travail.
Toujours saisir l'appareil fermement et perpendiculairement contre la surface à clouer.
S'éloigner à au moins deux pouces (50 mm) du bord du béton.
8 NE JAMAIS FIXER L’APPAREIL. L’appareil Trak-It a été conçu pour être utilisé comme
outil actionné à la main. Ne jamais essayer d’actionner l’appareil en le fixant à une
surface de travail fixe ou un objet. Le fonctionnement de l’appareil en position fixe peut
causer une décharge non contrôlée de pointes et une blessure sérieuse à l’opérateur ou à
d’autres personnes se trouvant à proximité.
9. NE JAMAIS DÉSACTIVER OU ENLEVER LE BRAS DE CONTACT. L'appareil Trak-It
est équipé d'un dispositif désigné par bras de contact. Ce dispositif aide à réduire la
possibilité d'utilisation accidentelle en empêchant l'appareil de fonctionner jusqu'à ce
qu'il soit entièrement désengagé sur la surface de travail. Le bras de contact ne devra
jamais être désactivé ou enlevé. Ne pas utiliser l'appareil Trak-It si le bras de contact est
endommagé ou ne fonctionne pas correctement.
10. NE PAS CHARGER LES POINTES AVEC LE DÉCLENCHEUR OU LE BRAS DE
CONTACT ENFONCE. En chargeant des pointes dans l'appareil Trak-It, vous devez
éviter de tirer le déclencheur ou de maintenir le bras de contact enfoncé. Quand l'appareil
est placé sur un banc ou toute autre surface, le bras de contact pourrait être enfoncé.
Quand vous chargez les pointes, vous risquez de tirer accidentellement le déclencheur en
saisissant la poignée pour caler l'appareil. Ces deux actions feront fonctionner l'appareil
Trak-It, déchargeant ainsi une pointe.
11. ENLÈVEMENT DE POINTES ET ÉLIMINATION DE BOURRAGES. Les bourrages
OUTIL TRAK-IT MODÉLE C3, C3 ST

49
9
peuvent être facilement éliminés du nez de l'appareil. Se rappeler d'enlever toujours la
cartouche de gaz de l'appareil avant d'enlever un bourrage. Pour des détails sur ce
procédé, se référer à la section "Comment enlever le bourrage" de ce Mode d'Emploi.
12. NE JAMAIS TENTER D'UTILISER L'APPAREIL TRAK-IT SI LES PIÈCES SONT
DESSERRÉES, ENDOMMAGÉES OU MANQUANTES. S'assurer que tous les écrous
et vis sont bien serrés et que toutes les pièces sont installées correctement et en bon état
de marche. Si des pièces sont absentes, ne pas essayer de faire soi-même les réparations.
Prière de prendre contact avec le représentant de service clientèle immédiatement.
13. NE JAMAIS ENFONCER DES POINTES SUR D'AUTRES POINTES OU TROP
PRÈS DE CES POINTES. L'ancrage sur des pointes ou trop près de ces pointes risque
de faire ricocher et causer une blessure sérieuse. Effectuer l'ancrage seulement dans les
emplacements où la jambe entière peut pénétrer. L'espacement de pointes devrait être de
76 mm minimum.
14. NE JAMAIS TIRER DANS DES MATÉRIAUX TROP DURS OU FRAGILES TELS
QUE FER DE FONTE, TUILE, VERRE OU ROCHE. Ces matériaux peuvent se briser,
causant la projection violente de fragments pointus et/ou pointe.
15. NE JAMAIS PORTER LES POINTES OU AUTRES OBJETS DURS DANS LA
MÊME POCHE OU CONTENEUR AVEC LA CARTOUCHE DE GAZ. La cartouche de
gaz risque d'être perforée, ceci entraînant des dommages sérieux.
16. NE JAMAIS PERMETTRE À QUICONQUE D'UTILISER L'APPAREIL TRAK-IT À
MOINS QU'IL NE LISE ET COMPRENNE À FOND LES INSTRUCTIONS DU
MODE D'EMPLOI DE L'APPAREIL ET TOUTES LES PRÉCAUTIONS DE
SÉCURITÉ. Le propriétaire d'appareil est responsable d'assurer que tous les utilisateurs
d'appareil Trak-It lisent et comprennent à fond toutes les opérations de l'appareil, les
précautions de sécurité et les instructions d'entretien.
17. EMMAGASINAGE DE CARTOUCHES DE GAZ. Les cartouche de gaz contiennent des
gaz inflammables qui sont sous pression. Elles doivent donc être rangées dans un
emplacement où elles ne seront pas exposées à la lumière directe du soleil, aux flammes
aux étincelles, ou à des températures au-dessus de 49 ˚C. L'exposition aux températures
supérieures à 49 ˚C peut faire fuir ou éclater les cellules de carburant, ceci libérant les
gaz inflammables et créant un risque d'incendie ou d'explosion.
18. COMMENT SE DÉBARASSER DE CELLULES DE CARBURANT. Ne jamais essayer
de perforer, écraser, brûler ou remplir une cartouche de gaz. Toujours jeter les cellules
vides avec le détritus qui ne seront pas brûlé. Egalement ne jamais placer une cartouche
de gaz avec d'autres matériaux pour récupération ou recyclage.
19. RANGEMENT DE L'APPAREIL. À la fin de chaque jour de travail, enlever l'élément de
la batterie et le ranger dans son étui de transport.
20. MAINTENIR L'APPAREIL BIEN PROPRE. À la fin de chaque jour de travail, essuyer
l'appareil Trak-It pendant une minute avec un chiffon propre. Un appareil sale risque de
se bloquer ou mal fonctionner.
21. NE JAMAIS PLACER SA MAIN OU SES DOIGTS SUR LE NEZ DE L'APPAREIL.
La pointe ou le piston risque de blesser sérieusement la main de l'opérateur en cas d'une
décharge accidentelle.
OUTIL TRAK-IT MODÉLE C3, C3 ST

50
10
BATTERIE ET CHARGEUR
ÉLÉMENT ET CHARGEUR DE BATTERIE
La première mesure pour préparer un nouvel appareil à l'utilisation est de charger
entièrement la nouvelle batterie. De nouvelles batteries sont expédiées déchargées et
doivent être rechargées pendant 24 heures avant la première utilisation. Toutes les
charges suivantes exigeront une durée de charge minimum de 2 heures 30.
NOTES IMPORTANTES
NOTE: LA BATTERIE CONTIENT DE L'HYDRURE EN MÉTAL DE NICKEL ET DOIT ÊTRE
RECYCLÉE OU DÉBARASSÉE CORRECTEMENT.
L'APPAREIL TRAK-IT EST FOURNI AVEC UNE BOÎTE ALIMENTATION MULTI-ÉLÉMENTS
ET SON PROPRE CHARGEUR. CETTE COMBINAISON D'ÉLÉMENTS ET CHARGEUR DE
BATTERIE CONSTITUE LA SEULE QUI FONCTIONNERA AVEC L'APPAREIL TRAK-IT. LES
INSTRUCTIONS DE CHARGE DE BASE SONT COMME SUIT:
AVERTISSEMENT — RISQUE DE PRODUIT CHIMIQUE/EXPLOSION LIRE
ATTENTIVEMENT TOUTES LES INSTRUCTIONS AVANT DE CHARGER OU UTILISER LA
BATTERIE. SI ON N'OBSERVE PAS TOUTES LES INSTRUCTIONS, ON RISQUE D'AVOIR
COMME CONSÉQUENCE UN INCENDIE, DES BRÛLURES GRAVES OU LA LIBÉRATION
DES VAPEURS TOXIQUES.
INSTRUCTIONS POUR CHARGE
1. Relier la prise ronde du transformateur au dos de la base du chargeur et brancher
l'adaptateur du transformateur à une prise murale quelconque.
2. Placer la batterie fermement dans le récepteur rectangulaire de la base du chargeur. Le
voyant rouge s'illumine pour signaler que la batterie charge.
3. La batterie est entièrement chargée quand le voyant vert s'illumine.
NOTE: LAISSER LA BATTERIE DANS LE CHARGEUR JUSQU'À CE QUE LE VOYANT DE
LA BATTERIE DEVIENNE VERTE.
• Le chargeur doit être installé sur une surface à niveau.
• Ne pas charger la batterie quand la température est inférieur à 5 ˚C.
• Ne pas laisser tomber la batterie ou le chargeur.
• Ne pas laisser des objets en métal entrer en contact avec les bornes de la batterie.
• Ne pas perforer ou essayer d'ouvrir les éléments ou le logement de la batterie.
• Ne pas ranger la batterie là où elle sera soumise aux températures au-dessus de 49 ˚C.
• Ne pas incinérer la batterie.
• Ne pas utiliser une batterie ou un chargeur défectueux qui surchauffe et/ou fume une fois
branché.
INSERTION DE LA BATTERIE
1. Charger la batterie dans la poignée de l'appareil Trak-It. La batterie est bloquée seulement
après que les deux verrous de fermeture sont enclenchés en position de verrouillage.
VOYANT DE SIGNALISATION DE TENSION BASSE DE LA BATTERIE
Un petit objectif en plastique se trouve d'un côté de la poignée. Il représente le voyant de
signalisation de basse tension de la batterie.
Le voyant de signalisation de basse tension de la batterie s'illuminera seulement quand la
tension de la batterie est basse. Dans ce cas, un voyant rouge s'illuminera pour indiquer
OUTIL TRAK-IT MODÉLE C3, C3 ST

51
11
à l'opérateur qu'il est temps de recharger la batterie.
SÉQUENCE DE CHARGE
Le chargeur de la batterie est fourni de témoins d'indication DEL rouge et vert. Prière de
remarquer la séquence du chargeur pour les quatre (4) conditions suivantes:
1. La batterie avec voyant DEL rouge illuminé est en charge.
2. La batterie avec voyant DEL vert illuminé est entièrement chargée.
3. La batterie s'illuminant alternativement en rouge et vert est chaude (enlever la batterie du
chargeur et la laisser se refroidir avant de charger de nouveau).
4. La batterie avec voyants DEL clignotants simultanément en rouge et vert est épuisée
(remplacer par une nouvelle batterie).
CARTOUCHE DE GAZ ET SOUPAPE DE DOSAGE
CONTENEUR DE CARBURANT
DANGER — RISQUE D'EXPLOSION/INCENDIE
LIRE TOUTES LES INSTRUCTIONS DE SÉCURITÉ AVANT D’UTILISER OU DE
MANIPULER LA CARTOUCHE DE GAZ. SI ON N’OBSERVE PAS TOUTES LES
INSTRUCTIONS DE MANIPULATION, ON RISQUE DE CAUSER UNE EXPLOSION OU UN
INCENDIE, CECI ENTRAÎNANT DES BLESSURES OU DES DÉGATS MATÉRIELS SÉRIEUX.
S’ÉLOIGNER DE TOUTE SOURCE DE CHALEUR, D’ÉTINCELLES OU DE FLAMME.
NE PAS PERFORER OU ESSAYER D’OUVRIR. LE CONTENEUR N’EST PAS RÉUTILISABLE.
NE PAS INCINÉRER OU ESSAYER DE REPRENDRE OU RÉUTILISER LE CONTENEUR.
UNE EXPOSITION À UNE TEMPÉRATURE SUPÉRIEURE À 49˚C RISQUE DE FAIRE
ÉCLATER LE CONTENEUR, CECI LIBÉRANT LE GAZ INFLAMMABLE.
NE PAS FUMER EN INSTALLANT OU EN UTILISANT LA SOUPAPE DE DOSAGE.
UTILISER DANS UN ENDROIT BIEN AÉRÉ.
TOUJOURS PORTER DES LUNETTES DE PROTECTION AVEC DES PROTECTEURS
LATÉRAUX QUI SONT CONFORMES À LA NORME ANSI STD. Z87.1 LORSQUE L’ON
OPÈRE, MAINTIENT OU CHARGE DU CARBURANT DANS L’APPAREIL.
NE JAMAIS VAPORISER VERS SON VISAGE OU SES YEUX, POUR ÉVITER DE CAUSER
UNE BLESSURE SÉRIEUSE.
NE PAS INHALER LE JET.
ÉLOIGNER DE LA PORTÉE DES ENFANTS.
AVERTISSEMENT
LA LUMIÈRE DU SOLEIL PEUT FAIRE AUGMENTER LA PRESSION INTÉRIEURE D'UNE
CARTOUCHE DE GAZ. UNE EXPOSITION EXCESSIVE À LA LUMIÈRE DU SOLEIL
RISQUE D'AUGMENTER CETTE PRESSION, FAISANT ÉCLATER LA CELLULE.
MAINTENIR TOUJOURS LA CARTOUCHE DE GAZ DANS UN EMPLACEMENT QUI NE
DÉPASSE PAS 49 ˚C ET L'ÉLOIGNER DE LA LUMIÈRE DIRECTE DU SOLEIL.
Un conteneur se trouve dans la cartouche de gaz. Ce conteneur intérieur contient le
carburant. L'espace entre le conteneur intérieur et le cylindre externe est rempli d'un gaz
différent désigné par un propulseur, qui se trouve sous pression. Ne jamais essayer
d'enlever la prise en caoutchouc située au fond de la cartouche de gaz. L'enlèvement de
cette prise inférieure causera une libération de la pression pouvant entraîner de sérieuses
OUTIL TRAK-IT MODÉLE C3, C3 ST

52
12
blessures.
Lorsque le carburant est utilisé, la pression du propulseur "presse" effectivement le
conteneur de carburant intérieur comme lorsque l'on presse un tube de pâte dentifrice.
Cette action permet que tout le carburant sera utilisé et que l'appareil Trak-It peut
fonctionner sur n'importe quelle position.
Grâce à cette conception du conteneur se trouvant dans un conteneur, on pourrait
entendre le bruit du fluide en secouant la cartouche de gaz après que tout le carburant ait
été utilisé. Ceci signale la présence du propulseur restant entre les conteneurs.
Si on expose la cellule vide de carburant à des températures extrêmes, le gaz du
propulseur se dilate et pourrait faire éclater le conteneur, en libérant les gaz inflammables.
SOUPAPE DE DOSAGE
La soupape de dosage contient le systéme de mesure de carburant qui assure que la
quantité du carburant correcte est injectée dans la chambre de combustion. BLEUE est la
seule soupape qui permet un fonctionnement correct de l’appareil.
FIXATION DE LA SOUPAPE DE DOSAGE À LA
CARTOUCHE DE GAZ
Pour fixer la soupape de dosage à la cartouche de gaz, on commence par enlever le
chapeau protecteur d'expédition et par enlever la soupape de dosage de l'intérieur du
chapeau. Après cela, placer la soupape de dosage sur la cartouche de gaz avec la tige se
dirigeant en avant et loin de son visage et de ses yeux. Mettre l'embout sur la soupape,
puis abaisser fermement sur l'arrière de la soupape. Vous devrez l'entendre cliqueter
pendant qu'elle s'enclenche en position.
2. Séparer la soupape du chapeau. 3. Aligner le carré d'arrêtes.
4. Pousser l'arrête avant
d'abord.
5. Abaisser l'arrête en arrière
1er déclic.
6. Abaisser à affleurement
2éme déclic.
1. Pousser pour libérer
la soupape.
OUTIL TRAK-IT MODÉLE C3, C3 ST

53
13
INSERTION DE LA CARTOUCHE DE GAZ DANS
LA POINGEE DE L'APPAREIL.
Après cela, avec la tige de la soupape de dosage dirigée vers l'avant de l'appareil, insérer
l'ensemble soupape de dosage/cartouche de gaz.
Lorsque vous glissez l'ensemble soupape de dosage/cartouche de gaz dans l'appareil
Trak-It, vous noterez qu'il y a un adaptateur bleu au dessus de la poche du cylindre. Cet
adaptateur est conçu pour assurer que la tige de soupape de dosage soit alignée
correctement avec le petit trou, avec l'orifice qui conduit à la chambre de combustion.
Insérer la tige de la soupape de dosage dans l'orifice de l'adaptateur coloré en bleu.
Vous finalisez le chargement du carburant dans l'appareil Trak-It en fermant la porte de
l'actionneur. La porte de l'actionneur se ferme en pressant le couvercle vers le bas puis
en poussant vers l'avant :
OUTIL TRAK-IT MODÉLE C3, C3 ST

54
14
PRÉPARATION DE L'APPAREIL TRAK-IT POUR
SON UTILISATION
POINTES ET CARTOUCHES DE GAZ
L’appareil Trak-It a été conçu spécifiquement pour être utilisé seulement avec des
cartouches de gaz de Powers Fasteners et des bandes de pointes assemblées.
L’utilisation d’autres consommables peut endommager l’appareil et invalider votre
garantie. Utiliser seulement les consommables originaux de Powers Fasteners.
CHARGEMENT D'POINTES
L'illustration ci-dessous montre comment charger correctement des pointes dans
l'appareil Trak-It.
1. Charger les bandes d'attache dans la fente arrière du magasin.
2. Tirer l'ensemble du transporteur de nouveau à la partie arrière du magasin, puis libérer
doucement l'ensemble afin d'engager les attaches.
ATTENTION (PINCEMENT DE POINTES)
Ne pas laisser le palpeur voler en l’air lorsque l’on charge des pointes. Contrôler le
mouvement vers l’avant sur libération du palpeur de sorte qu’il engage doucement la
bande de pointes en dernière position. Si le palpeur vole en l’air de manière
incontrôlable, ceci risque de pincer le doigt de l’opérateur entre le palpeur et la bande de
pointes en dernière position.
Le déclencheur sur l'appareil Trak-It est bloqué automatiquement et ne fonctionnera pas
quand il n'y a aucune pointe dans le magasin et à moins que le bras de contact soit
complètement enfoncé. Le but de cette fonction est d'empêcher le clouage à vide inutile
(qui gaspille du carburant) et tout dommage possible des composants de l'appareil.
CONDITIONS METÉOROLOGIQUES ET L'APPAREIL TRAK-IT
Utiliser l'appareil Trak-It en dehors, par temps clair, quand l'appareil, la cartouche de gaz
et la batterie se trouvent entre 7 ˚C et 49 ˚C. Les températures plus froides peuvent
endommager la cellule d'appareil et la batterie Trak-It. Les températures plus élevées
peuvent endommager la cartouche de gaz et l'appareil.
Le carburant devrait être rangé loin de la lumière directe du soleil dans des endroit de
moins de 49 ˚C. Après des périodes prolongées d'utilisation continu, laisser refroidir
OUTIL TRAK-IT MODÉLE C3, C3 ST
DÉCHARGEMENT DES ATTACHES
1. Tout en serrant le
palpeur, retirer
l'ensemble du
transporteur légèrement,
puis faire glisser
doucement l'ensemble
vers l'avant du magasin.
2. Pousser la goupille
taquet et faire glisser les
bandes d'attache en
dehors du magasin.

55
15
l'appareil en faisant marcher le moteur du ventilateur.
Un fonctionnement quand l'appareil se trouve à moins de 7 ˚C risque d'endommager
l'appareil. Les cartouches de gaz confrontées aux températures froides perdent la force
nécessaire du propulseur pour un fonctionnement approprié. Mettre l'appareil, l'élément
de la batterie et la cartouche de gaz au-dessus de la température de fonctionnement
minimum.
ATTENTION — L'APPAREIL TRAK-IT NE DEVRAIT PAS ÊTRE UTILISÉ SOUS LA PLUIE
OU LÀ OÙ L'HUMIDITÉ EST EXESSIVE EST PRÉSENTE. CES CONDITIONS RISQUENT
D'AVOIR COMME CONSÉQUENCE DES DOMMAGES AUX COMPOSANTS DE
L'APPAREIL ET UN MAUVAIS FONCTIONNEMENT DE L'APPAREIL.
FONCTIONNEMENT DE L'APPAREIL TRAK-IT
AVERTISSEMENT
L’appareil Trak-It a été conçu pour être utilisé comme outil actionné à la main. Ne jamais
essayer d’actionner l’appareil en le fixant à une surface de travail fixe ou un objet. Le
fonctionnement de l’appareil en position fixe peut causer une décharge non contrôlée de
pointes et une blessure sérieuse à l’opérateur ou à d’autres personnes se trouvant à
proximité.
SERRER LE BRAS DE CONTACT CONTRE LA SURFACE DE TRAVAIL.
Le moteur du ventilateur se mettra en marche. Du carburant est injecté dans la chambre
de combustion, puis mélangé avec de l'air au moyen du ventilateur.
SERRER LE DÉCLENCHEUR
La bougie d'allumage produit des étincelles et le mélange de carburant/air se met à feu.
La combustion active l'ensemble du piston, qui actionne alternativement le dispostif
d'pointe.
LÂCHER LE DÉCLENCHEUR - SOULEVER L'APPAREIL.
La chambre de combustion s'ouvre. Le ventilateur fait échapper les gaz chauds et
refroidit les composants internes.
NOTE: SI AUCUN CYCLE ADDITIONNEL N'EST EXÉCUTÉ, LE VENTILATEUR
FONCTIONNERA PENDANT 8 SECONDES, PUIS S'INTERROMPERA.
AVERTISSEMENT
LE BRAS DE CONTACT ET LE NEZ PEUVENT SE RÉCHAUFFER APRÈS UNE UTILISATION
PROLONGÉE OU RAPIDE.
OUTIL TRAK-IT MODÉLE C3, C3 ST

56
16
ENTRETIEN
Votre champ d'intervention devra être limité à ce qui suit:
• VÉRIFICATION DU NIVEAU DE CHARGE DE LA BATTERIE
• RECHARGE DE LA BATTERIE
• VÉRIFICATION DE LA CARTOUCHE DE GAZ ET DE LA SOUPAPE DE DOSAGE
• REMPLACEMENT DE LA CARTOUCHE DE GAZ
• NETTOYAGE DU FILTRE À AIR
• ELIMINATION D'UN BOURRAGE
Si les instructions sur les conditions normales d'utilisation ne sont pas respectées, vous
risquez de causer des blessures ou des dommages sérieux à l'appareil Trak-It et
d'invalider la garantie.
Il y a certains problémes que l'on peut rencontrer quand on utilise l'appareil Trak-It et que
l'on peut corriger sur l'emplacement de travail. Les procédures suivantes de service de
champ sont les seules que l'on devrait adopter. Toute autre situation qui pourrait sembler
erronée avec l'appareil Trak-It devrait seulement être diagnostiquée et corrigée par un
technicien de service entièrement qualifié. Si on a n'importe quelle raison de croire que
le probléme se trouve au delà des procédures de service données dans ce Mode
d'Emploi, prière d'entrer immédiatement en contact avec le représentant de service
clientèle de Powers Fasteners.
DANGER — NE JAMAIS ESSAYER D'EFFECTUER UN ENTRETIEN DE L'APPAREIL
TRAK-IT SANS AVOIR ENLEVÉ TOUT D'ABORD LA CARTOUCHE DE GAZ ET LA
BATTERIE. L'ENTRETIEN DEVRAIT COMMENCER SEULEMENT APRÈS QUE L'APPAREIL
SOIT COMPLÈTEMENT INOPÉRANT.
CONTRÔLE DE L'ÉLÉMENT DE LA BATTERIE
Vérifier périodiquement le voyant DEL de tension de la batterie, le voyant dans la poignée
de l'appareil Trak-It. En cas de probléme, la première mesure devrait toujours être celle
de s'assurer que la batterie a suffisamment de charge pour actionner l'appareil. La batterie
a suffisamment de charge quand le voyant rouge reste éteinte.
CONTRÔLE DE CELLULES DE CARBURANT
Une autre condition typique de service se produira quand la cartouche de gaz devient
vide. Un symptôme typique se présentera quand le ventilateur de l'appareil Trak-It
fonctionne mais l'appareil n'enfonce pas les pointes complètement ou ne réussit pas à
exécuter un cycle. Dans ce cas, retirer la cartouche de gaz de l'appareil, vérifier pour voir
si elle contient toujours du carburant et si la soupape de dosage fonctionne normalement.
Pour déterminer s'il y a du carburant restant dans la cartouche de gaz; placer tout
simplement la tige de dosage contre un objet, et pousser doucement environ trois ou
quatre fois. Une petite quantité du carburant devrait être libérée à chaque fois. Ne jamais
effectuer cet essai près d'une flamme ou des étincelles, pendant que l'on fume, ou lorsque
le carburant risque d'entrer dans ses yeux. Si le carburant n'est pas libéré à chaque
fonctionnement de la soupape de dosage, ceci indique qu'il n'y a plus de carburant
restant dans le cylindre et il doit donc être remplacé. Se débarrasser de la cartouche de
gaz vide de manière approprié.
OUTIL TRAK-IT MODÉLE C3, C3 ST
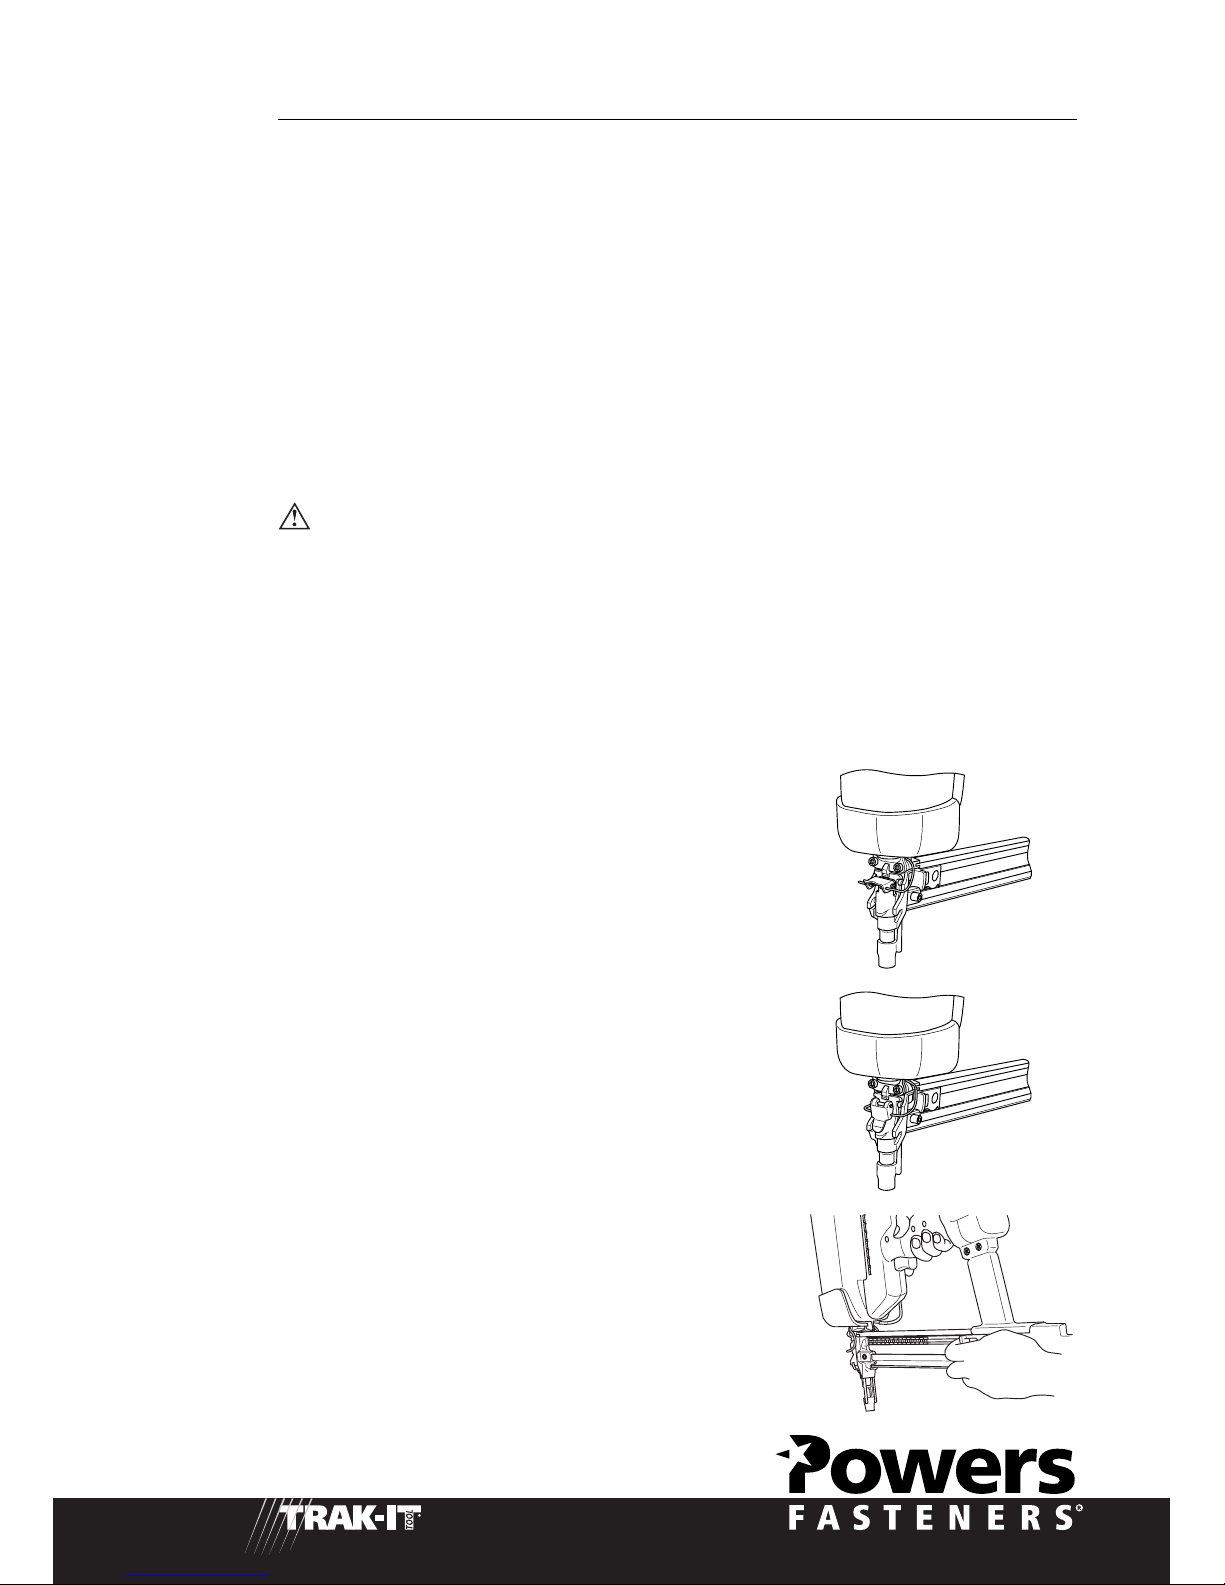
57
17
FILTRE À AIR
Enlever le couvercle du filtre à air en soulevant avec un tournevis. Le filtre à air se
soulèvera simplement.
Taper le filtre DOUCEMENT ou souffler avec de l'air comprimé pour enlever toute trace de
poussière. On devrait vérifier et nettoyer le filtre à air tous les deux jours.
COMMENT ÉLIMINER UN BOURRAGE
Un probléme typique que l'on peut rencontrer c'est une pointe bloquée. Grâce à la
conception unique de l'appareil Trak-It, il est possible de dégager une pointe bloquée
rapidement et facilement.
1. Enlever la cartouche de gaz et la batterie de l'appareil.
2. Enlever les bandes d'attache du magasin.
PRÉCAUTION — SI L'ON N'OUBLIE DE TIRER LE PALPEUR VERS SA PARTIE
POSTÉRIEURE ET EN POSITION DE BLOCAGE, LES GOUPILLES RISQUENT DE VOLER
DANGEREUSEMENT VERS L'OPÉRATEUR LORSQU'IL OUVRE LE BLOC DU LEVIER D
3. Ouvrir le bloc du levier d'élimination de bourrage situé à l'avant du bout du nez.
4. Glisser et faire osciller la porte du bout du nez à sa position d'ouverture.
Arrivé à ce point, l'pointe bloquée devrait tomber. Si l'pointe bloquée ne tombe pas,
l'enlever soigneusement en faisant attention à ne pas endommager le bout du nez.
Après avoir enlevé l'pointe bloquée, prendre les mesures suivantes pour fermer la porte
du bout du nez:
1. Faire osciller et glisser la porte du bout du nez de
nouveau dans sa position de fermeture.
2. Enclencher le bloc du levier d'élimination de bourrage de
nouveau dans sa position entièrement verrouillée.
3. Charger de nouveau les bandes d'attache dans le
magasin.
OUTIL TRAK-IT MODÉLE C3, C3 ST

58
18
DANGER — S'ASSURER QUE LE BLOC DU LEVIER D'ÉLIMINATION DE BOURRAGE
EST COMPLÈTEMENT FERMÉ ET BIEN BLOQUÉ. SI ON ESSAIT D'UTILISER L'APPAREIL
AVEC LE BLOC DU LEVIER D'ÉLIMINATION DE BOURRAGE DANS UNE POSITION
PARTIELLEMENT OUVERTE, ON RISQUE D'AVOIR COMME CONSÉQUENCE LA PERTE
DE CONTRÔLE DE L'POINTE, DES DOMMAGES À L'APPAREIL, OU UNE DÉCHARGE DE
GOUPILLE VERS L'OPÉRATEUR.
Si on constate que le ventilateur d'appareil Trak-It ne fonctionne pas après avoir éliminé
un bourrage:
Vérifier l'état de l'élément de la batterie.
CONTRÔLE EN FIN DE JOURNÉE DE TRAVAIL
À la fin de chaque journée de travail, effectuer un contrôle de contrôle. Ces mesures
simples sont basées sur le maintien de la sécurité et sur l'efficacité de fonctionnement de
l'appareil Trak-It.
Avant de quitter le chantier :
1. Enlever la batterie et la ranger dans la boîte d'outillage si elle est chargée entièrement ou
partiellement. Utiliser toujours la boîte d'outillage Trak-It pour transporter et ranger
l'appareil.
2. Se débarrasser de toutes les cellules de carburant vides. Se rappeler qu'il faut jeter ces
cellules là où elles ne seront pas retrouvées par des enfants, écrasées, perforées, ou
brûlées.
3. Si la batterie est épuisée, placer l'élément de la batterie dans son chargeur.
4. Essuyer l'appareil Trak-It avec un tissu propre et souple.
5. Contrôler le bras de contact pour s'assurer qu'il fonctionne bien.
Ces mesures de précaution simples assureront non seulement que l'appareil Trak-It est
prêt à fonctionner correctement le jour suivant, mais également que l'on obtiendra le
maximum de son rendement de l'appareil.
ACCESSOIRES D'APPAREIL TRAK-IT
Une variété d'accessoires sont disponible pour l'appareil Trak-It:
55583 Élément de la batterie
55618 Base de Chargeur d’outil Trak-IT
55639 12 Volt Adapteur de Voiture
55619 110 Volt Corde d'Adapteur
55643 Étui pour le transport
Prière d'entrer en contact avec le représentant de service clientèle de Powers Fasteners
pour tout renseignements supplémentaires.
OUTIL TRAK-IT MODÉLE C3, C3 ST

59
19
OUTIL TRAK-IT MODÉLE C3, C3 ST
SYMPTÔME
Préparation de l'appareil pour
l'utilisation - Problémes de
batterie/chargeur
1. L’élément de la batterie ne semble
pas accepter la charge. Le voyant
vert du chargeur ne s’illumine pas
après plusieurs heures.
2a. Les voyants rouge et verte sur le
chargeur clignotent tour à tour.
2b.Les voyants rouge et verte sur le
chargeur clignotent simultanément.
Étape normale de fonctionnement
1. Le ventilateur ne fonctionne pas.
2. Le ventilateur ne marche pas, ou
fonctionne plus lentement que
d'habitude.
3. Le ventilateur fonctionne par
intermittence.
Étape de
Précombustion/Combustion
1. Le bras de contact ne s’enfonce pas
complètement – l’appareil ne
fonctionne pas.
2. L'appareil ne tourne pas - le
ventilateur marche.
PROBLÈMES POSSIBLES
1a. Les voyants de signalisation "inopérant"
s'illuminent sur le chargeur.
1b.Chargeur endommagé.
2a. La batterie est en surchauffe.
2b.Élément de la batterie endommagé ou
durée de cycle épuisée.
1a. L’élément de la batterie n’est pas chargée
1b.Les bornes de la batterie ou les contacts
de batterie de la poignée sont huileux,
sales, ou corrodés.
1c. Il y a court-circuit quelque part.
2. L’élément de la batterie est déchargé.
3. La batterie est desserrée ou les contacts
sont pliés.
1a. La barre de verrouillage est coincée en
position de blocage.
1b.Le bras de contact est plié, ou des débris
sur la voie limitent le fonctionnement.
1c. Le palpeur ne se trouve pas derrière la
bande.
1d.Bague de culasse pincée.
2a. La cartouche de gaz est vide.
2b.Fil d'étincelle hors de la bougie
d'allumage.
2c. L'étincelle ne se produit pas.
SERVICE
1a. Tester l’élément de la batterie dans l’appareil après 3
heures en cycle de charge. Si l'appareil fonctionne
correctement mais si les voyants du chargeur ne
fonctionnent pas correctement. Remplacer le chargeur,
ou vérifer le temps de charge pour s’assurer que
l’élément de la batterie présente une durée appropriée
pour la recharge. Il est normal que la batterie soit
réchaufée après avoir correctement chargé.
1b.Interrompre l'utilisation de l'appareil immédiatement et
le débrancher de la source d'alimentation. Remplacer
le chargeur et l'étiquette, ou se débarasser du chargeur
pour empêcher toute réutilisation ou raccordement
accidentelle à la source d'alimentation.
2a. Enlever la batterie du chargeur et la laisser se refroidir
2b.Remplacer l’élément de la batterie.
1a. Charger l’élément de la batterie selon les instructions
du Mode d’Emploi.
1b.Nettoyer les bornes des éléments de la batterie, nettoyer
les contacts de la poignée, comme requis.
1c. L'appareil doit être vérifié par un technicien de service
de Powers Fasteners autorisé.
2. Charger l’élément de la batterie.
3. Enclencher la batterie de nouveau dans sa position de
verrouillage. Plier les contacts de nouveau dans la
position appropriée.
1a. Examiner la vis de douille de sécurité pour voir si le
serrage est excessif. Ouvrir la porte du bout du nez au
besoin, puis éliminer les débris de la voie
1b.Inspecter le bras de contact pour voir s’il est propre et
s’il y a des dommages. Nettoyer la voie avec le tissu.
Si le bras de contact est endommagé, le renvoyer au
représentant autorisé du service clientèle de Powers
Fasteners pour intervention.
1c. Mettre le palpeur derrière la bande.
1d.Entrer en contact avec le représentant autorisé du
service clientèle de Powers Fasteners pour intervention.
2a. Remplacer la cartouche de gaz.
2b.Entrer en contact avec le représentant autorisé du
service clientèle du distributeur de Powers Fasteners
pour intervention.
2c. Entrer en contact avec le représentant autorisé du
service clientèle de Powers Fasteners pour intervention.
DÉPANNAGE

60
20
OUTIL TRAK-IT MODÉLE C3, C3 ST
SYMPTÔME
Étape de puissance/échappement
1. L'appareil fonctionne correctement,
mais les attaches ne s'enfoncent pas
entièrement.
2. L'appareil fonctionne, mais aucune
pointe ne s'enfonce.
3. L'appareil fonctionne incorrectement
ou semble être en perte de
puissance.
Étape de retour/purge
1. L'appareil fonctionne et a enfoncé
l'pointe, mais le piston n'est pas
revenu à la position vers le haut.
2. La chambre de combustion ne chute
pas après le cyclage de l'appareil.
PROBLÈMES POSSIBLES
1a. L’élément de la batterie est déchargé.
1b.La cartouche de gaz est basse.
1c. Il peut y avoir perte de joint dans la
chambre de combustion.
2a. La bande d'pointe peut lier.
2b.Le palpeur n'est pas engagé correctement
derrière l'pointe.
2c. Pointe bloquée.
3a. La cartouche de gaz est basse.
3b.Le fil de bougie d'allumage est desserré.
3c. L'élément du filtre est sale, ceci
entraînant la surchauffe de l'appareil.
3d.La douille ou les bagues de l'appareil
sont sales.
1a. Saleté et débris déposés sur le piston ou
dans l'orifice du nez.
1b.Répandage du bout de piston.
1c. Les trous d'échappement sur la douille
sont sales ou obstrués.
1d.L'appareil (douille) ou les bagues sont
sales.
1e. Les segments de piston nécessitent le
remplacement.
2. Le bras de contact est plié, ou l’appareil
est sale.
SERVICE
1a. Charger l’élément de la batterie.
1b.Vérifier la cartouche de gaz selon les instructions du
Mode d'Emploi et la remplacer comme requis.
1c. Serrer le bras de contact contre la pièce de travail
pendant une minute. Tirer le déclencheur. Si l’pointe
ne s’enfonce pas, il y a une fuite qui exige l'intervention
du service clientèle Powers.
2a. Utiliser seulement des attaches se conformant aux
caractéristiques de Powers Fasteners.
2b.Localiser le palpeur derrière la bande d'pointe et
engager la bande selon les instructions du Mode
d'Emploi.
2c. Enlever le bourrage selon les instructions du Mode
d'Emploi.
3a. Vérifier la cartouche de gaz selon les instructions du
Mode d'Emploi.
3b.Entrer en contact avec le représentant du service
clientèle de Powers pour intervention.
3c. Enlever l'élément du filtre et nettoyer selon les
instructions du Mode d'Emploi. Utiliser de l'air
comprimé pour enlever les débris.
3d.Renvoyer au représentant du service clientèle Powers
Fasteners pour intervention.
1a. Renvoyer au représentant de service clientèle Powers
Fasteners pour intervention.
1b.Renvoyer au représentant de service clientèle Powers
Fasteners pour intervention.
1c. Renvoyer au représentant de service clientèle Powers
Fasteners pour intervention.
1d.Renvoyer au représentant de service clientèle Powers
Fasteners pour intervention.
1e. Renvoyer au représentant de service clientèle Powers
Fasteners pour intervention.
2. Nettoyer l’appareil ou remplacer le bras de contact
comme requis.
DÉPANNAGE

61
MANUAL DEL OPERADOR
HERRAMIENTA TRAK-IT MODELO C3, C3 ST

62
CONTENIDO
SUNTO Página
INTRODUCCIÓN 3-4
DESCRIPCIÓN 5-6
INSTRUCCIONES DE SEGURIDAD 7-9
BATERÍA Y CARGADOR 10-11
CÉLULA DE COMBUSTIBLE Y VÁLVULA DE MEDICIÓN 11-12
PREPARACIÓN DE LA HERRAMIENTA TRAK-IT PARA EL USO 14
OPERACIÓN DE LA HERRAMIENTA TRAK-IT 15
MANTENIMIENTO 16-18
LOCALIZACIÓN DE AVERÍAS 19-20
Oficinas centrales en el mundo
Powers Fasteners
2 Powers Square
New Rochelle, NY 10801
USA
www.powers.com
País Localización Teléfono Sitio web
E.E.U.U. Nueva York 914-235-6300 www.powers.com
Canadá Ontario 905-673-7295 www.powers.com
Australia Melbourne +61-03-9553 3999 www.powers.com.au
Nueva Zelandia Auckland +64-9415 2425 www.powers.com.nz
Europa Países Bajos +31-226-357-670 www.powerseurope.nl
Otra Nueva York +1-914 235 6300 www.powers.com
Para el servicio, las ventas, los productos o reparación de piezas, por favor
entre en contacto con la compañía Powers más cercana y pide el servicio de
cliente.
HERRAMIENTA TRAK-IT MODELO C3, C3 ST

63
3
INTRODUCCIÓN
DECLARACIÓN DE POWERS FASTENERS
Powers Fasteners quisiera agradecerle por la compra de la herramienta de fijación del
modelo C3. Esta herramienta se ha diseñado y se ha fabricado de acuerdo con los
estándares de la calidad más alta para proveer a usted muchos años de funcionamiento
sin apuro. Se recomienda leer cuidadosamente este manual de la cubierta anterior a la
posterior antes de usar la herramienta para llegar a ser familiar con todas las advertencias
y precauciones de seguridad recomendadas. Por favor observe que la herramienta C3,
similar a otras herramientas de fijación, requerirá un mantenimiento general de rutina para
un funcionamiento óptimo. Tome nota de los consejos de mantenimiento recomendados
puesto que un mantenimiento apropiado determinará la esperanza de vida de servicio de
la herramienta.
MANUAL DE OPERACIÓN DE LAS HERRAMIENTAS TRAK-IT
Este manual se provee para familiarizarle con la herramienta Trak-It de Powers Fasteners.
Desemejante de otras herramientas de fijación mecánica que son eléctricas o utilicen la
pólvora, la herramienta Trak-It se acciona por medio de un motor linear de combustión
interna similar al motor de su coche. La herramienta enciende un combustible patentado
en la presencia del aire accionando un pistón que clava un clavo. Pues usted verá, la
herramienta Trak-It es totalmente autónoma con una célula de combustible, una batería y
una fuente de clavos.
Para la facilidad de empleo, este manual se divide en secciones (véase el contenido).
Cada sección del manual se escribe tomando en cuenta el operador de la herramienta.
Hemos citado los términos técnicos de modo que usted pueda entender fácilmente cómo
conseguir el rendimiento máximo muy de su herramienta Trak-It y cómo evitar daño a la
herramienta o lesiones al operador. Pero, para esto, se deben efectuar dos cosas como
mencionado en la página a continuación.
1.LEA EL MANUAL A FONDO ANTES DE USAR LA HERRAMIENTA.
2.SIGA TODAS LAS INSTRUCCIONES DEL MANUAL.
La herramienta Trak-It se debe manejar como otras herramientas de fijación mecánica que
usted utilice. Cuando está utilizada correctamente, resolverá sus necesidades de fijación.
Pero, como la mayoría de sus herramientas, si está utilizada incorrectamente puede
causar lesiones. Si usted va a permitir que otras personas utilicen la herramienta Trak-It,
es su responsabilidad cerciorarse de que ellas también leen y se conforman con las
instrucciones de este manual antes de operar la herramienta.
Si usted tiene preguntas sobre el sistema Trak-It, o si desea obtener copias adicionales de
este manual, por favor consulte al departamento de servicio de los clientes de Powers
Fasteners llamando 1-914 235 6300 en los E.E.U.U. o el sitio www.powers.com. Si la
herramienta fue comprada en ultramar, localize el lugar más cercano de nuestra fábrica
mencionada en la página 2. También puede ponerse en contacto con su distribuidor
oficial.
HERRAMIENTA TRAK-IT MODELO C3, C3 ST

64
4
GARANTÍA
POWERS FASTENERS garante a continuación que las herramientas, las piezas y los
accesorios nuevos de fijación mecánica Trak-It estarán libres de defectos en material y
ejecución para el período indicado, después de la fecha de entrega al usuario original.
GARANTÍA ILIMITADA ANUAL
Una garantía anual se aplicará a todas las partes, incluyendo todos los artículos del
desgaste, excepto la batería y el cargador.
GARANTÍA ILIMITADA DE SEIS MESES
Una garantía de seis meses se aplica a la batería y al cargador. Esta garantía será inválida
en caso de mal manejar o de abuso por parte del operador.
DECLARACIÓN DE GARANTÍA
La responsabilidad única de Powers Fasteners como mencionado abajo será de substituir
cualquier parte o accesorio que se demuestren defectuosos dentro del período
especificado. Cualquier pieza o accesorio de recambio proporcionado de acuerdo con
esta garantía llevará una garantía para la balanza del período de garantía aplicable a la
pieza que se substituye.
Esta garantía es inválida para cualquier herramienta que se ha sujetado al uso erróneo, al
abuso, a daños accidentales o intencionales, al uso con clavos, combustible, batería o
cargadores de batería que no se conformen a especificaciones, tamaño o calidad de
POWERS FASTENERS, a la manutención incorrecta, reparación efectuada con piezas de
recambio que non sean Trak-It genuinas, dañadas en tránsito o durante el transporte, o
que, según el juicio de POWERS FASTENERS, se haya alterado o reparado de una manera
que afecta o reduzca el rendimiento de la herramienta.
POWERS FASTENERS NO HACE NINGUNA GARANTÍA, EXPLICITA O SUPUESTA,
REFERENTE A LA COMERCIABILIDAD, APTITUD, O DE OTRA MANERA, A MENOS QUE
COMO SE DECLARÓ ANTERIORMENTE y la responsabilidad COMO SE DECLARÓ
ANTERIORMENTE Y SEGÚN LO ASUMIDO ARRIBA está en lugar de todas las otras
garantías resultando de, o en conexión con el uso y el rendimiento de la herramienta,
excepto de otra manera proporcionado por la ley aplicable. POWERS FASTENERS EN
NINGÚN ACONTECIMIENTO SERÁ RESPONSABLE PARA LOS DAÑOS DIRECTOS,
INDIRECTOS, O CONSECUENTES CUALESQUIERA, INCLUYENDO, PERO NO LIMITADO
A LOS DAÑOS QUE PUEDEN RESULTAR DE LA PÉRDIDA DE BENEFICIOS ANTICIPADOS
O DE PRODUCCIÓN, DESPERDICIOS DE MATERIALES, AUMENTO DEL COSTE DE
OPERACIÓN O DE OTRA MANERA.
Powers Fasteners se reserva el derecho de cambiar las especificaciones, el equipo o el
diseño en cualquier momento sin preaviso y obligación.
HERRAMIENTA TRAK-IT MODELO C3, C3 ST

65
5
DESCRIPCIÓN
La herramienta Trak-It es una herramienta autónoma, completamente portable que utiliza
el combustible de hidrocarburo líquido para accionar un motor de combustión interna de
impulsión linear única.
Afin que usted entienda a fondo las informaciones contenidas en este manual, se necesita
poseer una comprensión básica de la herramienta. La herramienta Trak-It se compone de
tres conjuntos, es decir la manija, el motor y el cargador.
Mientras que se examina la herramienta Trak-It, familiarizarse con los tres conjuntos
principales y los varios componentes encontrados en cada uno de ellos.
El conjunto de la maneta contiene la célula de combustible, la batería, la lampada del
indicador de baja tensión de la batería y el disparador.
El conjunto del motor contiene la cubierta y el filtro, la cubierta del motor, la parte de
nariz y el brazo de contacto.
El conjunto del cargador contiene el seguidor, la palanca de liberación del seguidor y la
barra del cierre.
Dimensiones:
Método de activación:
Activación enteramente secuencial
Relación de ciclo:
Operación intermitente de 2 a 3 pernos por segundo
Operación continua 1000 pernos por hora
Nivel de ruido:
Nivel de potencia acústica por impulsos A — LWA, 1 s, d 105,30 dB
Nivel de intensidad acústica por impulsos A — LpA, 1 s, d 96,92 dB
en el pueslo de trabajo
La determinación y documentación de estos valores se realiza según EN12549 : 1999.
Vibraciones:
lndice de vibraciones = 3,70 m/s
2
Estos valores se determinan y se documentan de acuerdo con ISO8662-11.
Este valor es un valor caracteristico relacionade a la herramienta y no representa la
influencia al sistema mano-brazo al usar la herramienta. Una influencia al sistema manobrazo cuando se usa la herramienta, por ejemplo, dependerá de la fuerza de agarre, la
fuerza de presión de contaclo, la dirección de trabajo, el ajuste del suministro de aire
principal, el lugar de trabajo, el soporte de los objetos de trabajo.
NOTA: SI SE EXCEDEN ESTAS RELACIONES, SE PODÍA CAUSAR EL
SOBRECALENTAMIENTO A LA HERRAMIENTA, RESULTANDO EN UNA PÉRDIDA DE
HERRAMIENTA TRAK-IT MODELO C3, C3 ST
Peso
※
Altura
Longitud
Anchura
TRAK-IT C3 TRAK-IT C3 ST
3.7 kg 3.6 kg
38.9 cm 38.9 cm
44.0 cm 33.9 cm
10.6 cm 10.6 cm
TRAK-IT C3 XL
0.0 pounds (0.0 kg)
0.0 inches (00.0 cm)
0.0 inches (00.0 cm)
0.0 inches (00.0 cm)
※Incluye herramienta y batería

66
6
HERRAMIENTA TRAK-IT MODELO C3, C3 ST
Cubierta del filtro de aire, filtro de
aire y casquillo del cilindro
Conjunto de motor
Unidad de la palanca de
reparación atascos
Parte de la nariz
Brazo de contacto
Seguidor
Pie del cargador
Conjunto del Cargador
Palanca de liberación
del seguidor
Batería
Lampada del indicador de baja
tensión de la batería
Conjunto de la maneta
Actuador
Gatillo
RENDIMIENTO O UN DAÑO A LOS COMPONENTES DE LA HERRAMIENTA.
USANDO LA HERRAMIENTA TRAK-IT CON SU RELACIÓN RECOMENDADA, SE PODRÁ
CLAVAR VARIOS MILLARES SUJETADORES EN UN DÍA NORMAL DE TRABAJO.
Tamaño máximo del clavo:
Caña - Largo 38 mm x Diámetro 2,59 mm
Capacidad del cargador:
Célula de la batería:
C.D. 6 voltios (Hidruro de metal de níquel) – Proporciona bastante energía para clavar
aproximadamente 3000 sujetadores en una carga completa.
Tiempo de carga - aprox. 2,30 horas.
Célula de combustible:
Hidrocarburo líquido — Proporciona bastante combustible para clavar hasta 1200 clavos.
(Artículos peligrosos Clase 2.1 UN1075 2,7 fl oz/40g/80ml)
NOTA: NOTA: POWER FASTENERS DECLARA QUE LA HERRAMIENTA DE MODELO TI-C
ESTÁ EN CONFORMIDAD CON EL DIRECTORIO EUROPEO PARA “MÁQUINAS”.
NOTA: El símbolo de triángulo señalado por " " según su número de serie de
herramienta indica que el yugo de seguridad se proporciona con esta herramienta.
TRAK-IT C3
42 clavos
TRAK-IT C3 ST
22 clavos

67
7
INSTRUCCIONES DE SEGURIDAD
Las instrucciones de seguridad siguientes se han incluidas en este manual para proveer
las informaciones básicas necesarias para una operación segura de la herramienta Trak-It.
NO TRATE DE USAR ESTA HERRAMIENTA SIN LEER Y ENTENDER TODAS LAS
MEDIDAS DE SEGURIDAD Y LAS INSTRUCCIONES DEL MANUAL DEL OPERADOR.
Si no se observan todas las medidas e instrucciones de seguridad del manual del
operador se puede causar ceguera, heridas severas, daño a la propriedad y a la
herramienta.
Además de estas instrucciones, el entrenamiento adicional puede ser necesario,
dependiendo del tipo de fijación que usted desea hacer. Consulte al representante técnico
de los clientes de Powers Fasteners para más información.
PELIGRO
LA HERRAMIENTA TRAK-IT ES UN DISPOSITIVO DE COMBUSTIÓN INTERNA. PRODUCE
GAS DE ESCAPE CALIENTES QUE PUEDEN ENCENDER LOS MATERIALES
INFLAMABLES. ESTA HERRAMIENTA NO SE DEBE UTILIZAR EN UN AMBIENTE
COMBUSTIBLE O EN PRESENCIA DE MATERIALES COMBUSTIBLES, TALES COMO
PRODUCTOS QUÍMICOS INFLAMABLES, ADESIVOS, GASOLINA O SOLVENTES. SE
DEBE TOMAR CUIDADO PARA EVITAR QUE LA HERRAMIENTA QUE CONTIENE UNA
CÉLULA DE COMBUSTIBLE SEA EXPUESTA A TEMPERATURAS SUPERIORES A 49 ˚C,
PUESTO QUE LA CÉLULA DE COMBUSTIBLE PODRÍA EXPLOTAR LANZANDO GAS
INFLAMABLE.
ESTA HERRAMIENTA DEBE FUNCIONAR SÓLO EN UN AMBIENTE BIEN VENTILADO,
PORQUE LA HERRAMIENTA AGOTA EL MONÓXIDO DE CARBONO SIMILAR A UN
CORTACÉSPEDES O MOTOSIERRA. LA EXPOSICIÓN AL MONÓXIDO DE CARBONO
PUEDE CAUSAR NÁUSEA CON VÉRTIGOS O PÉRDIDA DEL SENTIDO.
La herramienta Trak-It, las células del combustible y la célula de la batería y su cargador
se deben guardar siempre fuera del alcance de niños.
1. LEA EL CONTENIDO DE ESTE MANUAL CUIDADOSAMENTE. Refiérase siempre a
este manual para información sobre la operación segura y el mantenimiento de la
herramienta Trak-It. Si cualquier porción parece confusa, o usted tiene cualquier
pregunta, por favor consulte inmediatamente al representante técnico de los clientes de
Powers Fasteners.
2. USE PROTECCIÓN PARA LOS OJOS Y EL OÍDO. Use siempre dispositivos de
protección para los ojos y el oído cuando usted está operando la herramienta Trak-It o
está trabajando en la vecindad de esta herramienta. También, su protección para los ojos
debe satisfacer al requisito de ANSI STANDARD Z 87. 1 (Directiva del Consejo 89-686EEC en fecha de 21 Dic. de 1989).
3. NUNCA ASUMA QUE LA HERRAMIENTA ES VACÍA. Cada vez que usted recoge la
herramienta Trak-It, compruebe el cargador para saber si hay clavos. Nunca oriente la
herramienta en cualquier persona o usted mismo, incluso si usted piensa que
absolutamente no hayan clavos en la herramienta. El clavo que usted no vio es el clavo
que puede lesionar.
HERRAMIENTA TRAK-IT MODELO TI-C

68
8
4. NUNCA JUGAR CON LA HERRAMIENTA. La herramienta Trak-It no es un juguete.
Es una herramienta de fijación mecánica. Fue diseñada para clavar un clavo a través de
hojas de acero en el hormigón. Para lograr esta tarea, genera una enorme cantidad de
energía. Nunca jugar con esta herramienta, aun cuando usted es absolutamente seguro
que no hayan clavos en la herramienta, para evitar accidentes.
5. NUNCA LLEVE LA HERRAMIENTA CON SU DEDO, O PRESIONANDO EL
DISPARADOR. Se sabe que la herramienta Trak-It funciona según una secuencia
específica. El brazo de contacto actúa como dispositivo de funcionamiento que impide al
disparador completar el circuito de la ignición. Si usted presiona inintencionalmente el
brazo de contacto mientras que tira del disparador y que usted está llevando la
herramienta, podría descargar un clavo.
6. NUNCA USE UNA HERRAMIENTA QUE ESTÉ FUNCIONANDO
INCORRECTAMENTE. Si usted piensa que la herramienta Trak-It no está funcionando
correctamente y el problema es más que un atasco simple del clavo, detengase a usarla
inmediatamente y refiérase a la sección de mantenimiento de este manual. Si el problema
no se puede corregir con uno de los pasos mencionados en la sección de mantenimiento,
explique el problema a su supervisor o consulte al representante técnico de los clientes
de Powers Fasteners.
NO HAGA REPARACIONES ADICIONALES A LA HERRAMIENTA TRAK-IT.
7. UTILICE LA HERRAMIENTA SÓLO EN LA SUPERFICIE DE TRABAJO. La
herramienta Trak-It debe ser operada sólo cuando está en contacto con la superficie de
trabajo. Siempre agarrar la herramienta firmemente y perpendicularmente contra la
superficie que se sujetará. Quede por lo menos a dos pulgadas (50 mm) lejos del borde
del hormigón.
8 NUNCA FIJAR EL APARATO. El aparato Trak-It se concibió para el uso como
herramienta impulsada por la mano. Nunca intentar impulsar el aparato fijándolo en una
superficie de trabajo fija o un objeto. El funcionamiento del aparato en posición fija puede
causar una descarga no controlada de las puntas y una herida seria al operador o a otras
personas que se encuentran a proximidad.
9. NUNCA DESACTIVE O QUITE EL BRAZO DE CONTACTO. La herramienta de Trak-It
es equipado de un dispositivo llamado brazo de contacto. Este dispositivo ayuda a reducir
la posibilidad de operación accidental evitando que la herramienta funcione hasta que se
presiona completamente en la superficie de trabajo. El brazo de contacto nunca debe ser
desactivado o quitado. No utilice la herramienta Trak-It si se daña el brazo de contacto o
no está funcionando correctamente.
10. NO CARGUE CLAVOS CON EL DISPARADOR O CON EL BRAZO DE CONTACTO
PRESIONADO. Al cargar clavos en la herramienta Trak-It, usted debe evitar de tirar del
disparador o mientras el brazo de contacto está presionado. Cuando la herramienta se
coloca en el banco u otra superficie, el brazo de contacto puede ser presionado. Cuando
usted está cargando clavos, podría tirar accidentalmente del disparador agarrando la
manija para estabilizar la herramienta. Estas dos acciones causarán el funcionamiento de
la herramienta Trak-It, descargando al mismo tiempo un clavo.
11. PALANCA LIMPIEZA ATASCOS. Los clavos pueden fácilmente extraerse de la parte
HERRAMIENTA TRAK-IT MODELO C3, C3 ST

69
9
de nariz de la herramienta. Recuerde que se debe quitar siempre la célula de combustible
de la herramienta antes de reparar un atasco. Para los detalles del procedimiento,
refiérase por favor a la Sección “Cómo reparar el atasco” de este manual.
12. NUNCA TRATE DE USAR LA HERRAMIENTA TRAK-IT SI SUS PIEZAS SON
FLOJAS, DAÑADAS O FALTAN. Cerciórese de que todos los tornillos y las tuercas
estén bien apretadas y todas las piezas están instaladas correctamente y en buen orden de
funcionamiento. Si las piezas faltan, no trate reparar temporalmente la herramienta.
Consulte inmediatamente al representante técnico de los clientes.
13. NUNCA CLAVE LOS CLAVOS ENCIMA DE OTROS CLAVOS O TAMBIÉN CERCA
DE OTROS CLAVOS. Si usted trate de clavo encima de otros clavos o cerca de ellos,
puede causar también el rebotado del clavo y lesión seria. Fije sólo en las áreas donde la
caña entera puede penetrar. El espaciamiento del clavo debe ser un mínimo de 76 mm.
14. NUNCA DISPARE EN MATERIALES MUY DUROS O FRÁGILES TALES COMO
HIERRO FUNDIDO, AZULEJO, CRISTAL O ROCA. Estos materiales pueden romper,
haciendo los fragmentos agudos y/o el clavo volar libremente
15. NUNCA LLEVE LOS CLAVOS U OTROS OBJETOS DUROS EN EL MISMO
BOLSILLO O CAJA CON LA CÉLULA DE COMBUSTIBLE. La célula de combustible
se podía pinchar, causando lesión seria.
16. NUNCA PERMITA A CUALQUIER PERSONA UTILIZAR LA HERRAMIENTA DE
TRAK-IT A MENOS QUE LEA Y ENTIENDA PERFECTAMENTE EL CONTENIDO
DEL MANUAL DEL OPERADOR DE LA HERRAMIENTA Y TODAS LAS
INSTRUCCIONES DE SEGURIDAD. Es responsabilidad del dueño de la herramienta
cerciorarse de que todos los usuarios de la herramienta Trak-It lean y entienden
perfectamente todas las instrucciones sobre la operación de la herramienta, la seguridad y
el mantenimiento.
17. ALMACENAJE DE LA CÉLULA DE COMBUSTIBLE. Las células del combustible
contienen gases inflamables que están bajo presión y se deben almacenar en un área
donde no serán expuestas a la luz directa del sol, a llama abierta, chispas o temperaturas
superiores a 49 ˚C. La exposición a temperaturas superiores a 49 ˚C puede hacer que las
células del combustible se escapan o explotan, lanzando gases inflamables y creando un
riesgo de incendio o explosión.
18. CÓMO TIRAR LA CÉLULA DE COMBUSTIBLE. Nunca pinchar, machacar, quemar o
rellenar una célula de combustible. Tire siempre las células vacías con basura que no será
quemada. También, nunca ponga la célula de combustible con otros materiales para
recuperación o reciclaje.
19. ALMACENAJE DE LA HERRAMIENTA. Al final de cada día laborable, quite la célula
de la batería y almacénela en su bolsa de transporte.
20. MANTENGA LA HERRAMIENTA LIMPIA. Al final de cada día del trabajo, tome un
minuto para limpiar la herramienta Trak-It con un trapo limpio. Una herramienta sucia
puede atorarse o funcionar incorrectamente.
21. NUNCA COLOQUE SU MANO O SUS DEDOS EN LA PARTE DE NARIZ DE LA
HERRAMIENTA. El clavo o el pistón puede dañar seriamente su mano en caso de una
descarga accidental.
HERRAMIENTA TRAK-IT MODELO C3, C3 ST

70
10
BATERÍA Y CARGADOR
CÉLULA Y CARGADOR DE LA BATERÍA
El primer paso en la preparación de una herramienta nueva para su uso es cargar
completamente la batería nueva. Se envían las baterías nuevas descargadas y se deben
cargarlas por 24 horas antes del primer uso. Todas las cargas subsecuentes requerirán
una carga mínima de 2,5 horas.
NOTAS IMPORTANTES
NOTA: LA BATERÍA CONTIENE HIDRURO DE METAL DE NÍQUEL Y SE DEBE RECICLAR
O TIRAR DE MODO APROPIADO.
LA HERRAMIENTA TRAK-IT SE PROPORCIONA CON UN PAQUETE DE BATERÍA MULTICÉLULA Y SU PROPIO CARGADOR. ESTA COMBINACIÓN DE CÉLULA Y CARGADOR
DE BATERÍA ES LA ÚNICA QUE FUNCIONARÁ CON LA HERRAMIENTA TRAK-IT. LAS
INSTRUCCIONES DE CARGA BÁSICAS SON COMO SIGUE:
ADVERTENCIA — PELIGRO DE PRODUCTO QUÍMICO/EXPLOSIÓN LEA
CUIDADOSAMENTE TODAS LAS INSTRUCCIONES ANTES DE CARGAR O DE USAR LA
BATERÍA. SI NO SE OBSERVAN TODAS LAS INSTRUCCIONES, SE CAUSARÁ
INCENDIO, QUEMADURAS SEVERAS O ESCAPE DE HUMOS TÓXICOS.
INSTRUCCIONES PARA CARGAR
1. Conecte el enchufe redondo del transformador con la parte posterior de la base del
cargador y inserte el adaptador del transformador en cualquier enchufe de pared.
2. Coloque la batería firmemente en el receptor rectangular de la base del cargador. El LED
rojo aparecerá para indicar que la batería está cargando.
3. La batería se carga completamente cuando aparece el LED verde.
NOTA: DEJE LA BATERÍA EN EL CARGADOR HASTA QUE EL LED DEL CARGADOR SE
ILUMINA EN COLOR VERDE.
• El cargador debe permanecer en una superficie llana.
• No cargue la batería cuando la temperatura está debajo de 5 ˚C.
• No caiga la batería o el cargador.
• No dejar objetos de metal en contacto con los terminales de la batería.
• No pinche ni trate de abrir la caja o las células de la batería.
• No almacene la batería donde será sujetada a temperaturas superiores a 49 ˚C.
• No incinere la batería.
• No utilice un cargador de batería defectuoso que se recalienta y/o no fuma cuando está
enchufado.
INSERCIÓN DE LA BATERÍA
1. Cargue la batería en la manija de la herramienta Trak-It. La batería es bien instalada sólo
después que los dos cierres de fijación se encajan a presión en posición de bloqueo.
LÁMPARA DEL INDICADOR DE BAJA TENSIÓN DE LA BATERÍA
En un lado de la manija hay una lente plástica pequeña. Ésta es la lámpara del indicador
de baja tensión de la batería.
La lámpara del indicador de baja tensión de la batería se iluminará sólo cuando la tensión
de la batería es baja y en este caso una LED roja se iluminará para indicar al operador que
se debe recargar la batería.
HERRAMIENTA TRAK-IT MODELO C3, C3 ST

71
11
LÓGICA DE CARGA
El cargador de batería se proporciona con una lampara roja y verde del indicador LED.
Observe por favor la lógica del cargador para las cuatro (4) condiciones siguientes.
1. LED roja iluminada – la batería está cargando.
2. LED verde iluminada - la batería se carga completamente.
3. Se alterna de color rojo y verde – la batería es caliente. (Quite la batería del cargador y
permita a la batería enfriarse antes de cargar nuevamente).
4. Las LED de color roja y verde parpadean simultáneamente – la batería es completamente
descargada (substituya por una batería nueva).
CARTUCHO DE GAS Y VÁLVULA DE
DOSIFICACIÓN
CONTENEDOR DE COMBUSTIBLE
PELIGRO — RIESGO DE EXPLOSIÓN/INCENDIO.
LEER TODAS LAS INSTRUCCIONES DE SEGURIDAD ANTES DE UTILIZAR O
MANIPULAR EL CARTUCHO DE GAS. SI NO SE OBSERVAN TODAS LAS
INSTRUCCIONES DE MANIPULACIÓN, SE CORRE EL RIESGO DE CAUSAR UNA
EXPLOSIÓN O UN INCENDIO, ESTO IMPLICANDO HERIDAS O DAÑOS MATERIALES
SERIOS.
ALEJARSE DE TODA FUENTE DE CALOR, CHISPAS O LLAMA.
NO PERFORAR O INTENTAR ABRIR. EL CONTENEDOR NO ES REUTILIZABLE.
NO INCINERAR O INTENTAR REANUDAR O REUTILIZAR EL CONTENEDOR.
UNA EXPOSICIÓN A UNA TEMPERATURA SUPERIOR A 49˚C CORRE EL RIESGO DE
HACER ESTALLAR EL CONTENEDOR, ESTO LIBERANDO EL GAS INFLAMABLE.
NO FUMAR AL INSTALAR O UTILIZAR LA VÁLVULA DE DOSIFICACIÓN.
USAR ESTE APARATO EN UN LUGAR BIEN VENTILADO.
SIEMPRE LLEVAR GAFAS DE PROTECCIÓN CON GUARDIAS LATERALES QUE SE
CONFORMAN A LA NORMA ANSI STD. Z87.1 CUANDO SE OPERA, SE EJECUTA LA
MANUTENCIÓN O SE CARGA EL COMBUSTIBLE EN EL APARATO.
NUNCA VAPORIZAR HACIA SU CARA O SUS OJOS, PARA EVITAR CAUSAR UNA
HERIDA SERIA.
NO INHALAR EL CHORRO.
ALEJAR DEL ALCANCE DE LOS NIÑOS.
ADVERTENCIA
LA LUZ DEL SOL PUEDE LEVANTAR LA PRESIÓN INTERIOR DE UNA CÉLULA DE
COMBUSTIBLE. LA EXPOSICIÓN EXCESIVA A LA LUZ DEL SOL PUEDE AUMENTAR LA
PRESIÓN DE LA CÉLULA DE COMBUSTIBLE QUE LA HACE EXPLOTAR. COLOQUE
SIEMPRE LA CÉLULA DE COMBUSTIBLE EN UN LUGAR DONDE LA TEMPERATURA NO
EXCEDA 49 ˚C Y SIEMPRE FUERA DE LA LUZ DIRECTA DEL SOL.
Hay un recipiente dentro de la célula de combustible. Este recipiente interno soporta el
combustible. El espacio entre el recipiente interno y el cilindro externo se llena de un gas
diferente llamado "propulsor", que está bajo presión. Nunca trate de quitar el enchufe de
goma situado en el fondo de la célula de combustible. Si se quita el enchufe inferior, se
HERRAMIENTA TRAK-IT MODELO C3, C3 ST

72
12
2. Separe la válvula del casquillo. 3. Alinee el cuadrado de
los cantos.
4. Empuje el canto
delantero.
5. Empuje hacia abajo el canto
trasero.
6. Empuje hacia abajo.
1. Empuje para liberar
la válvula.
causará una liberación repentina de la presión que puede causar lesiones al operador.
Mientras que se utiliza el combustible, la presión del propulsor "exprime" realmente el
recipiente interno del combustible como se exprimiría un tubo de crema dental. Esta
acción exprimidora asegura de que todo el combustible será utilizado y que la
herramienta Trak-It puede funcionar en cualquier posición.
Debido a este diseño de recipiente "dentro otro recipiente", usted puede oír el sonido del
líquido al sacudir la célula de combustible después de que se haya utilizado todo el
combustible. Éste es el propulsor que permanece entre los recipientes.
Si usted expone la célula de combustible vacía a temperaturas extremas, el gas del
propulsor ampliará y podría hacer que el recipiente explote, lanzando gases inflamables.
VÁLVULA DE MEDICIÓN
La válvula de medición contiene el sistema de medición de combustible que asegura de
que la cantidad de combustible correcta esté inyectada en la cámara de combustión. La
válvula de medición AZUL es la única válvula que funcionará correctamente con la
herramienta Trak-It.
CONEXIÓN DE LA VÁLVULA DE MEDICIÓN A LA
CÉLULA DE COMBUSTIBLE
Para conectar la válvula de medición a la célula de combustible, se quita en primer lugar
el casquillo protector de envío y se separa la válvula de medición por dentro del
casquillo. Después, coloque la válvula de medición encima de la célula de combustible
con el vástago dirigido adelante y lejos de su cara y sus ojos. Inserte el labio delantero
de la válvula y después empuje hacia abajo y firmemente en la parte posterior de la
válvula. Usted debe oírla chascar mientras que se encaja a presión en su posición.
HERRAMIENTA TRAK-IT MODELO C3, C3 ST

73
13
INSERCIÓN DE LA CÉLULA DE COMBUSTIBLE
EN LA MANIJA DE LA HERRAMIENTA
Luego, con el vástago de la válvula de medición dirigido al frente de la herramienta,
inserte el conjunto válvula de medición/célula de combustible.
Resbalando el conjunto válvula de medición/célula de combustible dentro de la
herramienta Trak-It, usted notará que hay un adaptador azul en la tapa del bolsillo del
cilindro. Este adaptador se diseña para asegurar de que el vástago de la válvula de
medición está alineado correctamente con el agujero pequeño, u orificio que conduce a la
cámara de combustión. Inserte el vástago de la válvula de medición en el orificio del
adaptador coloreado azul.
Usted termina el cargamento del combustible en la herramienta de Trak-It cerrando la
puerta del actuador. La puerta del actuador se cierra presionando la cubierta hacia abajo
y adelante simultáneamente.
HERRAMIENTA TRAK-IT MODELO C3, C3 ST

74
14
PREPARACIÓN DEL APARATO - TRAK-IT PARA
SU USO
PUNTAS Y CARTUCHOS DE GAS
El aparato Trak-It se concibió específicamente para un uso solamente con cartuchos de
gas de Powers Fasteners y bandas de puntas armadas. El uso de otros consumibles
puede dañar el aparato e invalidar su garantía. Usar solamente los consumibles originales
de Powers Fasteners.
CARGA DE LOS CLAVOS
La ilustración debajo indica cómo se cargan correctamente clavos en la herramienta TrakIt.
1. Cargar las bandas de lazo en la raja posterior del cargador.
2. Extraer el conjunto del palpador de nuevo a la parte posterior del cargador, luego liberar
suavemente el conjunto con el fin de insertar los lazos.
ATENCIÓN (PELLIZCO DE PUNTAS)
No dejar el sondeo volar en el aire cuando se encargan puntas. Controlar el movimiento
hacia el frente cuando se libera el sondeo de modo que inserte suavemente la banda de
puntas situada en última posición. Si el sondeo vuela en el aire de manera incontrolable,
esto corre el riesgo de agarrar el dedo del operador entre el sondeo y la banda de puntas
situada en última posición.
El disparador en la herramienta Trak-It se bloquea automáticamente y no funcionará
cuando no hay sujetadores en el cargador y a menos que el brazo de contacto se presiona
completamente. El propósito de esta característica es prevenir el ciclaje en blanco
innecesario que completa un ciclo (causando una pérdida de combustible) y daño a los
componentes de la herramienta.
TIEMPO AL AIRE LIBRE Y HERRAMIENTA TRAK-IT
Utilice la herramienta Trak-It al aire libre, con tiempo claro, cuando la temperatura
ambiente de la herramienta, la célula de combustible y la batería está entre 7 ˚C y 49 ˚C.
Temperaturas más frías pueden dañar la célula de la herramienta y la batería de Trak-It.
Temperaturas más calientes pueden dañar la célula de combustible y la herramienta.
El combustible se debe almacenar fuera de la luz directa del sol en ambientes con
HERRAMIENTA TRAK-IT MODELO C3, C3 ST
DESCARGA DE LOS LAZOS
1. Mientras se aprieta el
sondeo, retirar el
conjunto del palpador
ligeramente, luego hacer
deslizar suavemente el
conjunto hacia el frente
del cargador.
2. Empujar el pasador
bloque y hacer deslizar
las bandas de lazo fuera
del cargador.

75
15
temperatura inferior a 49 ˚C. Después de períodos extendidos de uso continuo, refresque
la herramienta operando el motor del ventilador.
Una operación de la herramienta a una temperatura inferior a 7 ˚C puede dañarla. Las
células del combustible en temperaturas frías pierden la fuerza de propulsor requerida
para una operación apropiada. Se debe operar la herramienta, la célula de la batería y la
célula de combustible a una temperatura superior a la temperatura mínima de
funcionamiento.
PRECAUCIÓN — LA HERRAMIENTA TRAK-IT NO SE DEBE UTILIZAR EN LA LLUVIA O
DONDE ESTÁ PRESENTE UNA HUMEDAD EXCESIVA. ESTAS CONDICIONES PUEDEN
CAUSAR DAÑO A LOS COMPONENTES DE LA HERRAMIENTA Y CAUSAR UN
FUNCIONAMIENTO INCORRECTO DE LA HERRAMIENTA.
FUNCIONAMIENTO DEL APARATO TRAK-IT
ADVERTENCIA
El aparato Trak-It se concibió para el uso como herramienta impulsada por la mano.
Nunca intentar impulsar el aparato fijándolo en una superficie de trabajo fija o un objeto.
El funcionamiento del aparato en posición fija puede causar una descarga no controlada
de las puntas y una herida seria al operador o a otras personas que se encuentran a
proximidad.
PRESIONE EL BRAZO DE CONTACTO CONTRA LA SUPERFICIE DE TRABAJO.
El motor del ventilador girará. El combustible se inyecta en la cámara de combustión y es
mezclado con aire por el ventilador.
PRESIONE EL GATILLO.
La bujía de encendido chispea y la mezcla de combustible/aire se enciende. La
combustión acciona el conjunto del pistón, que alternadamente acciona el sujetador.
SUELTE EL GATILLO - LEVANTE LA HERRAMIENTA
La cámara de combustión se abre. El ventilador libera gases calientes y refresca los
componentes internos.
NOTA: SI NO SE EFECTUAN NINGUNOS CICLOS ADICIONALES, EL VENTILADOR
FUNCIONARÁ POR 8 SEGUNDOS, LUEGO SE APAGARÁ.
ADVERTENCIA
EL BRAZO DE CONTACTO Y LA PARTE DE NARIZ PUEDEN LLEGAR A SER CALIENTES
DESPUÉS DE UN USO PROLONGADO O RÁPIDO.
HERRAMIENTA TRAK-IT MODELO C3, C3 ST

76
16
MANTENIMIENTO
El servicio de campo se debe limitar al siguiente:
• COMPROBACIÓN DEL NIVEL DE ENERGÍA DE LA BATERÍA
• RECARGAR LA BATERÍA
• COMPROBACIÓN DE LA CÉLULA DE COMBUSTIBLE Y DE LA VÁLVULA DE MEDICIÓN
• SUBSTITUIR LA CÉLULA DE COMBUSTIBLE
• LIMPIEZA DEL FILTRO DE AIRE
• LIMPIAR UN ATASCO
Si no se observan cuidadosamente las instrucciones relacionadas a estos procedimientos,
se causarán lesiones al operador o daño serio a la herramienta Trak-It, anulando así la
garantía.
Hay ciertos problemas que usted puede encontrar al utilizar la herramienta Trak-It y que
podrá corregir en el sitio mismo del trabajo. Los procedimientos siguientes de servicio
de campo son los únicos procedimientos de servicio que usted debe procurar. Cualquier
cosa que puede aparecer incorrecto con la herramienta Trak-It se debe diagnosticar y
reparar sólo por un técnico de servicio completamente entrenado. Si usted tiene alguna
razón de creer que su problema está más allá de los procedimientos de servicio como
mencionado en este manual, por favor consulte inmediatamente al representante técnico
de los clientes de Powers Fasteners.
PELIGRO — NUNCA REALIZE EL MANTENIMIENTO DE LA HERRAMIENTA TRAK-IT
SIN QUITAR PRIMERO LA CÉLULA Y LA BATERÍA DEL COMBUSTIBLE. EL
MANTENIMIENTO DEBE SER COMENZADO SÓLO DESPUÉS DE QUE LA HERRAMIENTA
SEA TOTALMENTE INOPERANTE.
CHEQUEO DE LA CÉLULA DE LA BATERÍA
Compruebe periódicamente con la lampada LED del indicador de tensión de la batería –
la lampada LED en la manija de la herramienta Trak-It. Al encontrar un problema, se debe
primeramente cerciorarse de que la batería tiene bastante energía para operar la
herramienta. La batería tiene bastante energía cuando la lampada LED roja permanece
apagada.
CHEQUEO DE LA CÉLULA DE COMBUSTIBLE
Otra condición típica del servicio ocurrirá cuando la célula de combustible llega a ser
vacía. Un síntoma típico será cuando el ventilador de la herramienta Trak-It funciona pero
la herramienta no clava clavos completamente ni puede terminar un ciclo. En este caso,
tome la célula de combustible de la herramienta, cheque para ver si la célula todavía
contiene combustible y si la válvula de medición está funcionando. Para determinar si
hay algún combustible remanente en la célula de combustible, coloque simplemente el
vástago medidor contra un objeto sólido y empujar suavemente aproximadamente tres o
cuatro veces. Una cantidad de combustible pequeña se debe liberar cada vez. Nunca
realice esta prueba cerca de una llama abierta o chispas, mientras que fuma, o donde el
combustible puede conseguir en sus ojos. Si el combustible no se libera con cada
operación de la válvula de medición, éste indica que no hay combustible remanente en el
cilindro, entonces debe ser substituido. Tire la célula vacía del combustible de modo
apropriado.
HERRAMIENTA TRAK-IT MODELO C3, C3 ST

77
17
FILTRO DE AIRE
Quite la cubierta del filtro de aire usando con un destornillador. El filtro de aire se
levantará simplemente.
Golpee ligeramente el filtro SUAVEMENTE o sople con aire comprimido para quitar
cualquier polvo. Usted debe comprobar y limpiar el filtro de aire cada dos días.
CÓMO REPARAR UN ATASCO
Un problema típico que usted puede encontrar será un clavo atascado. Debido al diseño
único de la herramienta Trak-It, la remoción de atasco de un sujetador es rápida y fácil.
1. Quite la célula y la batería del combustible de la herramienta.
2. Retirar las bandas de lazo del cargador.
PRECAUCIÓN — SI EL SEGUIDOR NO SE TIRA A SU PARTE POSTERIOR Y A SU
POSICIÓN DE CIERRE, LOS PERNOS PUEDEN VOLAR HACIA EL OPERADOR CUANDO
SE ABRE LA UNIDAD DE LA PALANCA DE REMOCIÓN DE ATASCADO.
3. Abra el pestillo cargado por muelle situado en el frente de la parte de nariz.
4. Resbale y haga pivotar la puerta de la parte de nariz en su posición abierta.
A este punto, el clavo atascado debe caer hacia fuera. En caso contrario, quite
cuidadosamente el sujetador sin dañar el pedazo de la parte de nariz.
Después de que usted haya quitado el clavo atascado, efectue los pasos siguientes para
cerrar la puerta de la parte de nariz:
1. Haga pivotar y resbale la unidad de la palanca de
remoción de atascado nuevamente dentro de su posición
cerrada.
2. Encaje el pestillo cargado por muelle nuevamente dentro
de su posición completamente bloqueada.
3. Cargar de nuevo las bandas de lazo en el cargador.
HERRAMIENTA TRAK-IT MODELO C3, C3 ST

78
18
PELIGRO — CERCIÓRESE DE QUE LA UNIDAD DE LA PALANCA DE REMOCIÓN DE
ATASCADO ES COMPLETAMENTE CERRADA Y SEGURA. EL USO DE LA HERRAMIENTA
CON LA UNIDAD DE LA PALANCA DE REMOCIÓN DE ATASCADO EN UNA POSICIÓN
PARCIALMENTE ABIERTA PUEDE CAUSAR LA PÉRDIDA DE CONTROL DEL CLAVO, UN
DAÑO A LA HERRAMIENTA O DESCARGA DEL PERNO HACIA EL OPERADOR DE LA
HERRAMIENTA.
Si usted encuentra que el ventilador de la herramienta Trak-It no funciona después de
eliminar un atasco:
Compruebe la condición de su célula de la batería.
RUTINA AL FINAL DE CADA DÍA LABORABLE
Al final de cada día laborable, efectue una rutina de día laborable. Estos pasos simples se
basan en mantener la seguridad y la eficacia operacional de la herramienta Trak-It.
Antes de dejar el sitio de trabajo:
1. Quite la batería y almacénela en la caja de herramienta si está cargada completamente o
parcialmente. Utilice siempre la caja de herramienta Trak-It para transportar y almacenar
la herramienta.
2. Tiras todas las células de combustible vacías. Siempre tirar estas células en lugares
donde no serán encontradas por los niños, machacadas, pinchadas o quemadas.
3. Si la batería es agotada, ponga la célula de la batería en su cargador.
4. Limpie su herramienta Trak-It con un paño limpio y suave.
5. Verifique el brazo de contacto para ver si está funcionando libremente.
Estos pasos simples asegurarán no sólo de que su herramienta Trak-It sea lista para
funcionar el día siguiente, pero que también usted consigará una eficacia máxima de su
herramienta.
ACCESORIOS DE LA HERRAMIENTA TRAK-IT
Una variedad de accesorios están disponibles para la herramienta Trak-It:
55583 Células de la batería
55618 Base de Cargador de la herramienta Trak-IT
55639 12 Voltio Adaptador del Coche
55619 110 Voltio Cuerda del Adaptador
55643 Estuche para el transporte
Por favor consulte al representante técnico de los clientes de Powers Fasteners para más
información.
HERRAMIENTA TRAK-IT MODELO C3, C3 ST

79
19
HERRAMIENTA TRAK-IT MODELO C3, C3 ST
LOCALIZACIÓN DE AVERÍAS
SÍNTOMA
Preparación de la herramienta
para operarla - Problemas de
batería/cargador
1. Parece que la célula de la batería no
acepta la carga. La luz verde del
cargador no se enciende después de
varias horas.
2a. Las lámparas LED roja y verde en el
cargador parpadean alternativamente.
2b.Las lampadas LED roja y verde en el
cargador parpadean simultáneamente.
Etapa normal de la operación
1. El ventilador no funciona.
2. El ventilador no funciona, o funciona
más lento que normalmente.
3. El ventilador funciona
intermitentemente.
Etapa de la operación de precombustión/combustión
1. El brazo de contacto no se presiona
completamente — la herramienta no
funciona.
2. La herramienta no completará un
ciclo – el ventilador funciona.
PROBLEMAS POSIBLES
1a. La lámpara del indicador "inoperante" se
ilumina en el cargador.
1b.Cargador dañado.
2a. La batería es caliente.
2b.Célula de la batería dañada o vida del
ciclo agotada.
1a. La célula de la batería no se carga.
1b.Los contactos de los terminales de la
batería o los de la manija de la batería
estan aceitosos, sucios o corroídos.
1c. Hay cortocircuito eléctrico en alguna
parte.
2. Se descarga la célula de la batería.
3. La batería es floja o los contactos están
doblados.
1a. La barra del cierre se pega en la posición
de cierre.
1b.El brazo de contacto está doblado, o la
acumulación de residuos en la pista
limita la operación.
1c. El seguidor no se encuentra detrás la tira.
1d.El anillo en O de la culata está apretado.
2a. La célula de combustible es vacía.
2b.Alambre de la chispa fuera de la bujía de
encendido.
2c. La chispa no ocurre.
SERVICIO
1a. Compruebe la célula de la batería en la herramienta
después de 3 horas en ciclo de carga. Si funciona la
herramienta correctamente, las lámparas del cargador
no están funcionando correctamente. Substituya el
cargador, o compruebe el tiempo de carga para
asegurar que la célula de la batería tiene tiempo
adecuado para recargar. Es normal que la batería está
caliente después de cargar correctamente.
1b.Detenga el uso inmediatamente y desenchúfe la
herramienta de la fuente de alimentación. Substituya el
cargador y la etiqueta o tira el cargador para prevenir su
reutilización o una conexión accidental a la fuente de
alimentación.
2a. Quite la batería del cargador y permita a la batería
enfriarse.
2b.Substituya la célula de la batería.
1a. Cargue la célula de la batería según las instrucciones
del manual del operador.
1b.Limpie los terminales de la célula de la batería. Limpie
los contactos de la célula de la batería de la manija,
según lo requerido
1c. La herramienta se debe verificar por un técnico
autorizado del servicio de Powers Fasteners.
2. Cargue la célula de la batería.
3. Coloque la batería nuevamente dentro de su posición
de bloqueo. Doble los contactos nuevamente dentro de
la posición apropiada.
1a. Compruebe el tornillo del buje de la leva de seguridad
para saber si está apretada excesivamente. Abra la
puerta de la parte de nariz en caso de necesidad y
limpie la acumulación de residuos de la pista.
1b.Examine el brazo de contacto para saber si hay limpieza
y daño posible. Limpie la pista con el paño. Si el
brazo de contacto es dañada, envíelo al representante
técnico de los clientes autorizado de Powers Fasteners
para el servicio.
1c. Ponga el seguidor detrás de la tira.
1d.Consulte al representante técnico de los clientes
autorizado de Powers Fasteners para el servicio.
2a. Substituya la célula de combustible.
2b.Consulte al representante técnico de los clientes
autorizado del distribuidor de Powers Fasteners para el
servicio.
2c. Consulte al representante técnico de los clientes
autorizado de Powers Fasteners para el servicio.

80
20
HERRAMIENTA TRAK-IT MODELO C3, C3 ST
LOCALIZACIÓN DE AVERÍAS
SÍNTOMA
Etapa de la operación de
potencia/escape
1. La herramienta funciona
correctamente, pero los clavos no
clavan completamente.
2. La herramienta funciona, pero no se
clava ningún clavo.
3. La herramienta funciona
irregularmente o parece que pierda
potencia.
Etapa de la operación de
regreso/purgado
1. La herramienta funcionó y clavó el
clavo, pero el pistón no volvió a la
posición ascendente.
2. La cámara de combustión no cae
después de ciclos de la herramienta.
PROBLEMAS POSIBLES
1a. Se descarga la célula de la batería.
1b.La célula de combustible es baja.
1c. Hay posible pérdida de sello en la
cámara de combustión.
2a. La tira del clavo puede atarse.
2b.Seguidor insertado incorrectamente
detrás del clavo.
2c. Clavo atascado.
3a. La célula de combustible es baja.
3b.El alambre de la bujía de encendido es
flojo.
3c. El elemento filtrante es sucio, causando
el sobrecalentamiento de la herramienta.
3d.La manga o los anillos en O de la
herramienta son sucios.
1a. Suciedad y residuos en el pistón o en el
agujero de la parte de nariz.
1b.Proliferado rápido de la extremidad del
pistón.
1c. Los puertos del extractor en la manga
son sucios o estorbados.
1d.La herramienta (manga) o los anillos en
O son sucios.
1e. Se deben reemplazer los anillos del
pistón.
2. El brazo de contacto está doblado, o la
herramienta es sucia.
SERVICIO
1a. Cargue la célula de la batería.
1b.Compruebe la célula de combustible según las
instrucciones del manual del operador y substitúyala
según lo requerido.
1c. Presione el brazo de contacto contra el pedazo del
trabajo durante un minuto. Tire el disparador. Si el
sujetador no clava, hay un escape que requiere servicio.
2a. Utilice sólo los clavos que se conforman con las
especificaciones de Powers Fasteners.
2b.Localice el seguidor detrás de la tira del clavo y inserte
la tira según las instrucciones del manual del operador.
2c. Remueve el atasco según las instrucciones del manual
del operador.
3a. Compruebe la célula de combustible según las
instrucciones del manual del operador.
3b.Consulte al representante técnico de los clientes de
Powers Customer para el servicio.
3c. Quite el elemento filtrante y limpie según las
instrucciones del manual del operador. Utilice el aire
comprimido para quitar los residuos remanentes.
3d.Envíelo al representante técnico de los clientes de
Powers Fasteners para el servicio.
1a. Envíelo al representante técnico de los clientes de
Powers Fasteners para el servicio.
1b.Envíelo al representante técnico de los clientes de
Powers Fasteners para el servicio.
1c. Envíelo al representante técnico de los clientes de
Powers Fasteners para el servicio.
1d.Envíelo al representante técnico de los clientes de
Powers Fasteners para el servicio.
1e. Envíelo al representante técnico de los clientes de
Powers Fasteners para el servicio.
2. Limpie la herramienta o substituya el brazo de contacto
según lo requerido.

81
HANDLEIDING
TRAK-IT SCHIETHAMER MODEL C3, C3 ST

82
INHOUDSOPGAVE
ONDERWERP BLADZIJDE
INLEIDING 3-4
OVERZICHT 5-6
VEILIGHEIDSINSTRUCTIES 7-9
BATTERIJ EN OPLADER 10-11
BRANDSTOFPATROON EN DOSEERKAP 11-12
KLAARMAKEN VOOR GEBRUIK VAN DE TRAK-IT SCHIETHAMER 14
GEBRUIK VAN DE TRAK-IT SCHIETHAMER 15
ONDERHOUD, SERVICE EN OPLOSSEN VAN PROBLEMEN 16-18
OPLOSSEN VAN PROBLEMEN 19-20
Wereld Hoofdkantoor
Powers Fasteners
2 Powers Square
New Rochelle, NY 10801
USA
www.powers.com
Land Locatie Telefoon Website
USA New York 914-235-6300 www.powers.com
Canada Ontario 905-673-7295 www.powers.com
Australië Melbourne +61-03-9553 3999 www.powers.com.au
Nieuw Zeeland Auckland +64-9415 2425 www.powers.com.nz
Europa Nederland +31-226-357-670 www.powerseurope.nl
Overig New York +1-914 235 6300 www.powers.com
Voor service, verkoop, productinformatie of vervangingsonderdelen dient u
contact op te nemen met uw dichtstbijzijnde Powers vestiging.
TRAK-IT SCHIETHAMER MODEL C3, C3 ST

83
3
INLEIDING
BOODSCHAP VAN POWERS FASTENERS
Bij deze wil Powers Fasteners u hartelijk bedanken voor de aanschaf van onze
schiethamer model C3. Dit gereedschap is ontworpen en gefabriceerd volgens de hoogste
kwaliteitsnormen om u te verzekeren van vele jaren probleemloos gebruik. U kunt het
beste deze handleiding helemaal doorlezen voor u het gereedschap gaat gebruiken zodat u
vertrouwd kunt raken met alle aanbevolen waarschuwingen en veiligheidsvoorzorgen.
Vergeet niet dat uw C3, net als andere schiethamers, regelmatig onderhoud behoeft om er
zeker van te kunnen zijn dat de machine zijn beste prestaties blijft leveren. Volg de in de
tekst genoemde onderhoudstips op, want goed onderhoud is de sleutel tot een lange
levensduur van uw kostbare gereedschap.
HANDLEIDING TRAK-IT SCHIETHAMER
Deze handleiding bevat de instructies voor gebruik van uw Powers Fasteners Trak-It. In
tegenstelling tot andere elektrisch aangedreven of op buskruit werkende gereedschappen,
wordt de Trak-It aangedreven door een lineaire interne verbrandingsmotor, een beetje
zoals een automotor. Binnenin wordt een speciale brandstof vermengd met lucht verbrand
waardoor een zuiger in beweging komt die gebruikte bevestiging inslaat. Uw Trak-It is
volledig onafhankelijk met zijn eigen brandstofpatroon, batterij en een voorraadje nagels.
Voor uw gemak is deze handleiding onderverdeeld in een aantal hoofdstukken (zie de
Inhoudsopgave). Elk van deze hoofdstukken is speciaal geschreven met u als
eindgebruiker in het achterhoofd. We hebben specialistische termen zoveel mogelijk
vermeden zodat u makkelijker de maximale prestaties uit uw Trak-It schiethamer kunt
halen zonder het apparaat te beschadigen of uzelf te verwonden. Maar voor het zover is
hebben we eerst uw medewerking nodig voor de twee punten hieronder.
1.LEES DE HANDLEIDING HELEMAAL, VAN KAFT TOT KAFT, VOOR U HET
GEREEDSCHAP GAAT GEBRUIKEN.
2.VOLG ALLE INSTRUCTIES IN DE HANDLEIDING STIPT OP.
Behandel uw Trak-It schiethamer op dezelfde manier als uw andere gereedschappen. Als
u dit gereedschap op de juiste manier gebruikt zal deze schiethamer u jarenlang van
dienst zijn. En, net als met ander gereedschap, als u het niet op de juiste manier gebruikt
kan het hele akelige verwondingen veroorzaken. Als u anderen met uw Trak-It
schiethamer laat werken is het uw verantwoordelijkheid erop toe te zien dat ook zij deze
handleiding lezen voor ze met het gereedschap aan de slag gaan en dat ze zich houden
aan de instructies.
Als u vragen heeft over het Trak-It systeem of als u extra handleidingen wilt hebben, neem
dan contact op met de klantenservice van Powers Fasteners via 1-914 235 6300 in de VS,
of www.powers.com. In andere landen kunt u onze dichtstbijzijnde vestiging vinden via de
lijst op bladzijde 2.
TRAK-IT SCHIETHAMER MODEL C3, C3 ST

84
4
GARANTIE
POWERS FASTENERS garandeert dat nieuwe Trak-It schiethamers, onderdelen en
toebehoren vrij zijn van materiaal- en fabricagefouten gedurende de onderstaande periode
aansluitend op de datum van levering aan de oorspronkelijke gebruiker.
ONBEPERKTE GARANTIE VOOR EEN JAAR
Er geldt een garantie van één jaar op alle onderdelen, inclusief de aan slijtage onderhevige
onderdelen, met uitzondering van de batterij en de oplader.
ONBEPERKTE GARANTIE VAN ZES MAANDEN
Er geldt een garantie van zes maanden op zowel de batterij als de oplader. De verleende
garantie vervalt bij oneigenlijk gebruik of verkeerd gebruik.
GARANTIEBEPALINGEN
Powers Fasteners aanvaardt uitsluitend aansprakelijkheid onder deze garantie voor het
vervangen van enig onderdeel of toebehoren dat binnen de opgegeven termijn kapot gaat.
Op in het kader van deze garantie verstrekte vervangingsonderdelen of vervangende
toebehoren rust een garantie die overeenkomt met de resterende garantieperiode die gold
voor het vervangen onderdeel of toebehoren.
Deze garantie vervalt ten aanzien van apparatuur die oneigenlijk of verkeerd is gebruikt,
die al dan niet opzettelijk beschadigd is, die gebruikt is met nagels., brandstof, batterijen
of batterijladers die niet voldoen aan de specificaties, afmetingen of kwaliteit zoals
voorgeschreven door POWERS FASTENERS, apparatuur die niet op de juiste manier is
onderhouden, die is gerepareerd met andere dan de originele Trak-It
vervangingsonderdelen, die beschadigd is tijdens transport of apparatuur die naar mening
van POWERS FASTENERS is gewijzigd of gerepareerd op een manier die , eventueel
nadelige, invloed heeft op de werking van het apparaat.
POWERS FASTENERS GEEFT GEEN GARANTIE, IMPLICIET OF EXPLICIET, MET
BETREKKING TOT VERKOOPBAARHEID OF GESCHIKTHEID VOOR VERMEENDE
DOELEINDEN OF ANDERSZINS, MET UITZONDERING VAN DE HIERBOVEN
OMSCHREVEN BEPALINGEN en de aansprakelijkheid ZOALS HIERBOVEN OMSCHREVEN
EN AANVAARD treedt in plaats van alle andere garanties als gevolg van of in verband met
het gebruik en de prestaties van het gereedschap, behoudens rechtens geldende
bepalingen. POWERS FASTENERS AANVAARDT GEEN ENKELE AANSPRAKELIJKHEID
VOOR ENIGE DIRECTE, INDIRECTE OF GEVOLGSSCHADE, INCLUSIEF, MAAR NIET
BEPERKT TOT, SCHADE ALS GEVOLG VAN WINSTDERVING OF GESTAAKTE
PRODUCTIE, ONGESCHIKT VOOR GEBRUIK GERAAKTE MATERIALEN, VERHOGING VAN
BEDRIJFSKOSTEN OF ANDERSZINS.
Powers Fasteners behoudt zich het recht voor de technische gegevens, apparatuur of het
ontwerp daarvan op elk willekeurig tijdstip te wijzigen zonder kennisgeving en zonder
enige daaruit voortvloeiende verplichting.
TRAK-IT SCHIETHAMER MODEL C3, C3 ST

85
5
OVERZICHT
Uw Trak-It schiethamer is een geheel op zichzelf staand en volledig draagbaar stuk
gereedschap met een interne lineaire verbrandingsmotor die loopt op een vloeibare, op
koolwaterstoffen gebaseerde brandstof.
Om de informatie in deze handleiding goed te kunnen begrijpen, moet u weten hoe het
gereedschap werkt. De Trak-It schiethamer bestaat in grote lijnen uit drie bestanddelen:
de handgreep, de motor en het magazijn.
Bekijk uw Trak-It maar eens goed zodat u een beetje vertrouwd raakt met deze drie
bestanddelen en de diverse onderdelen daarvan.
In de handgreep bevinden zich de brandstofpatroon, de batterij, een lampje voor als de
batterij bijna leeg is en de trekker.
Rond de motor treft u de motorklep en het filter, de motorbehuizing, het neusstuk en de
contactbeveiliging aan.
Het magazijn bestaat verder uit de volger, de ontgrendeling voor de volger en de
magazijnvoet.
Afmetingen:
Gebruiksfunctie:
Volledige achtereenvolgende activering
Schietsnelheid:
Stuk voor stuk; 2 tot 3 nagels per seconde
Continu; 1000 nagels per uur
Geluidsniveau:
A-Gewogen momentane geluidsniveau — LWA, 1 s, d 105,30 dB
A-Gewogen momentane geluidsdrukniveau — LWA, 1 s, d 96,92 dB
Deze waarden zijn vastgesteld en gedocumenteerd in overeenstemming met EN12549 :
1999.
Vibratie:
Karakteristieke vibratiewaarde = 3,70 m/s
2
Deze waarden zijn vastgesteld en gedocumenteerd in overeenstemming met ISO 8662-11:
Deze waarde is karakteristiek voor en afhankelijk van het gereedschap en geeft geen
indruk van de invloed op het hand-arm systeem bij gebruik van het gereedschap. De
invloed op het hand-arm systeem bij gebruik van het gereedschap hangt bijvoorbeeld ook
af van de kracht waarmee het gereedschap vastgehouden wordt, de contactdruk, de
richting waarin wordt gewerkt, hoe het snoer ligt, de manier waarop het werkstuk wordt
ondersteund.
OPMERKING: Als u probeert sneller te werken dan hier aangegeven, kan het
TRAK-IT SCHIETHAMER MODEL C3, C3 ST
Gewicht※
Hoogte
Lengte
Breedte
TRAK-IT C3 TRAK-IT C3 ST
3.7 kg 3.6 kg
38.9 cm 38.9 cm
44.0 cm 33.9 cm
10.6 cm 10.6 cm
TRAK-IT C3 XL
0.0 pounds (0.0 kg)
0.0 inches (00.0 cm)
0.0 inches (00.0 cm)
0.0 inches (00.0 cm)
※Bevat gereedschap en accu

86
6
TRAK-IT SCHIETHAMER MODEL C3, C3 ST
Afdekking luchtfilter, luchtfilter
& cilinderkap
Motoreenheid
Vastloper
verwijderingseenheid
Neusstuk
Contactbeveiliging
Volger
Magazijnvoet
Magazijneenheid
Ontgrendeling volger
Batterij
Batterij waarschuwingslampje
Hendeleenheid
Actuator
Trekker
gereedschap oververhit raken, waardoor de prestaties achteruit zullen gaan en er ook
schade kan ontstaan aan onderdelen van het gereedschap.
Door de Trak-It op de aanbevolen manier te gebruiken zult u op een doorsnee werkdag
toch nog in staat zijn ettelijke duizenden nagels in te slaan.
Maximum afmetingen nagels:
38 mm (1-1/2 inch) lang x 2,59 mm (0,102 inch) schachtdiameter
Capaciteit magazijn:
Oplaadbare batterij:
6 Volt gelijkstroom (nikkel-metaalhydride) – Levert voldoende energie voor ongeveer
3000 nagels indien volledig opgeladen.
Oplaadtijd – Ca. 2 - 2 1/2 uur.
Brandstofpatroon:
Vloeibare koolwaterstoffen - Bevat voldoende brandstof voor maximaal 1200 nagels.
(Gevaarlijke stoffen klasse 2.1 UN1075 40g/80ml/2,7 fl oz)
OPMERKING: OPMERKING: POWERS FASTENERS VERKLAART HIERBIJ DAT HET
GEREEDSCHAP MODEL TI-C VOLDOET AAN DE EUROPESE MACHINERICHTLIJN.
OPMERKING: Het driehoeksteken " " achter het serienummer van de schiethamer
geeft aan dat de schiethamer is voorzien van een beveiliging.
TRAK-IT C3
42 nagels
TRAK-IT C3 ST
22 nagels

87
7
VEILIGHEIDSINSTRUCTIES
De volgende veiligheidsinstructies zijn opgenomen in deze handleiding zodat u beschikt
over de informatie die u nodig heeft om veilig te kunnen werken met uw Trak-It
schiethamer. GEBRUIK DIT GEREEDSCHAP IN GEEN GEVAL VOORDAT U DEZE
VEILIGHEIDSINSTRUCTIES EN DE ANDERE INSTRUCTIES IN DEZE HANDLEIDING
ALLEMAAL HEEFT GELEZEN EN BEGREPEN.
Negeren van veiligheids- of andere instructies in deze handleiding kan leiden tot
blindheid, zeer ernstige verwondingen, schade aan persoonlijke eigendommen en schade
aan het gereedschap zelf.
Naast deze instructies heeft u wellicht aanvullende training nodig, afhankelijk van het
soort werk dat u wilt doen. Neem contact op met uw Powers Fasteners dealer voor meer
informatie.
GEVAAR
DE TRAK-IT SCHIETHAMER MAAKT GEBRUIK VAN INTERNE VERBRANDING.
HIERDOOR WORDEN HETE GASSEN GEPRODUCEERD DIE BRANDBARE MATERIALEN IN
BRAND KUNNEN STEKEN. DIT GEREEDSCHAP MAG NIET WORDEN GEBRUIKT IN EEN
BRANDGEVAARLIJKE OMGEVING OF IN DE BUURT VAN BRANDBARE MATERIALEN,
BIJVOORBEELD BRANDBARE CHEMISCHE STOFFEN, LIJM, BENZINE OF
OPLOSMIDDELEN. ZORG ERVOOR DAT HET GEREEDSCHAP EN DE
BRANDSTOFPATROON NIET WORDEN BLOOTGESTELD AAN HOGERE TEMPERATUREN
DAN 49 ˚C (120 ˚F), WANT DE BRANDSTOFPATROON KAN DAN BARSTEN WAARDOOR
ZEER BRANDBARE GASSEN VRIJKOMEN.
GEBRUIK DIT GEREEDSCHAP UITSLUITEND IN EEN GOED GEVENTILEERDE
OMGEVING, WANT DE UITLAATGASSEN BESTAAN DEELS UIT HET GIFTIGE
KOOLMONOXIDE, NET ALS BIJ EEN AUTOMOTOR. BLOOTSTELLING AAN
KOOLMONOXIDE KAN LEIDEN TOT DUIZELIGHEID, MISSELIJKHEID EN VERLIEZEN VAN
HET BEWUSTZIJN.
De Trak-It schiethamer, de brandstofpatronen en de oplaadbare batterij en oplader moeten
altijd buiten bereik van kinderen gehouden worden.
1. LEES DEZE HANDLEIDING HELEMAAL, VAN KAFT TOT KAFT. Raadpleeg deze
handleiding voor informatie over veilig gebruik en onderhoud van uw Trak-It schiethamer.
Als een bepaald gedeelte niet helemaal duidelijk is of als u andere vragen heeft, neem dan
direct contact op met uw Powers Fasteners dealer.
2. DRAAG BESCHERMINGSMIDDELEN VOOR UW OGEN EN OREN. Draag altijd
persoonlijke beschermingsmiddelen voor uw ogen en oren wanneer u met, of in de buurt
van, de Trak-It schiethamer werkt. Uw oogbescherming moet bovendien voldoen aan de
eisen van ANSI STANDARD Z 87.1 (Richtlijn van de Raad 89-686-EEG d.d. 21-12-1989).
3. GA ER NOOIT VAN UIT DAT DE SCHIETHAMER LEEG IS. Controleer zodra u de
Trak-It schiethamer oppakt of er nagels in het magazijn zitten. Richt de schiethamer nooit
op iemand of op uzelf, ook niet wanneer u er absoluut zeker van denkt te zijn dat er geen
nagels in zitten. De nagel die u niet gezien heeft is de nagel aan uw doodskist; juist die
kan u of iemand anders verwonden.
TRAK-IT SCHIETHAMER MODEL C3, C3 ST

88
8
4. GEEN GEINTJES MET EEN SCHIETHAMER. De Trak-It schiethamer is geen
speelgoed… het is een krachtig stuk gereedschap dat meer op een wapen lijkt. Het is
bedoeld om nagels dwars door staal in beton te slaan. Om dit te bereiken is een enorme
kracht en heel veel energie nodig. Geintjes uithalen en ermee spelen, ook, of misschien
juist, wanneer u zeker denkt te weten dat er geen nagels in de schiethamer zitten, is
vragen om ongelukken.
5. DRAAG DE SCHIETHAMER NOOIT MET UW VINGER AAN DE TREKKER OF
MET DE TREKKER INGEDRUKT. Vergeet nooit dat de Trak-It schiethamer op een zeer
bepaalde manier werkt. De contactbeveiliging werkt als een blokkering zodat de trekker
geen ontsteking veroorzaakt wanneer deze alleen wordt overgehaald. Als de
contactbeveiliging per ongeluk wordt ingedrukt terwijl de trekker al ingedrukt was,
bijvoorbeeld terwijl u de schiethamer draagt, dan kan er een nagel worden afgevuurd.
6. GEBRUIK HET GEREEDSCHAP NIET ALS ER IETS AAN MANKEERT. Als u merkt
dat de Trak-It schiethamer niet goed werkt en er is meer aan de hand dan gewoon een
vastgelopen nagel, stop dan onmiddellijk en raadpleeg het hoofdstuk over onderhoud,
service en het oplossen van problemen in deze handleiding. Als het probleem niet kan
worden opgelost via de stappen uit het hoofdstuk over onderhoud, service en het
oplossen van problemen, geef dan door wat er aan de hand is aan uw baas of aan de
Powers Fasteners dealer.
PROBEER ZELF GEEN REPARATIES UIT TE VOEREN AAN DE TRAK-IT SCHIETHAMER.
7. GEBRUIK DE SCHIETHAMER ALLEEN OP HET WERKSTUK WAAR U AAN
BEZIG BENT. De Trak-It schiethamer mag alleen worden gebruikt wanneer het contact
maakt met het werkstuk. Houd de schiethamer stevig vast en loodrecht op het oppervlak
dat bevestigd moet worden. Blijf tenminste 5 centimeter bij de rand van het beton
vandaan.
8 ZET DE SCHIETHAMER NIET VAST. De Trak-It schiethamer is ontworpen om met de
hand gebruikt te worden. Zet de schiethamer niet vast aan een werkbank of werkstuk of
ander object. Als u de schiethamer vastzet, kunnen er onbedoeld nagels worden
afgeschoten worden, hetgeen kan leiden tot verwonding van de gebruiker of omstanders.
9. DE CONTACTBEVEILIGING MAG NIET VASTGEZET OF VERWIJDERD WORDEN.
De zogenaamde contactbeveiliging werkt als beveiliging voor de Trak-It schiethamer. Dit
mechanisme helpt te voorkomen dat het apparaat per ongeluk afgaat door de ontsteking te
onderbreken totdat het volledig is ingedrukt tegen het werkstuk. Daarom mag deze
contactbeveiliging nooit worden vastgezet of verwijderd. Gebruik de Trak-It schiethamer
niet als de contactbeveiliging beschadigd is of niet goed werkt.
10. DOE GEEN NAGELS IN HET APPARAAT TERWIJL DE TREKKER OF DE
CONTACTBEVEILIGING INGEDRUKT IS. U mag de trekker of de contactbeveiliging
nooit indrukken terwijl u nagels in de Trak-It schiethamer doet. Wanneer de schiethamer
op een werkbank of zo ligt, kan de contactbeveiliging gemakkelijk ingedrukt worden. En
wanneer u nagels aan het laden bent zou u gemakkelijk per ongeluk de trekker over
kunnen halen wanneer u de handgreep vastpakt. Door deze twee handelingen zal de TrakIt schiethamer een nagel afvuren, met alle gevolgen van dien.
11. VERWIJDEREN VAN NAGELS OF VASTLOPERS. Een vastgelopen nagel kan
TRAK-IT SCHIETHAMER MODEL C3, C3 ST

89
9
gemakkelijk worden verwijderd uit het neusstuk van de schiethamer. Vergeet niet om eerst
de brandstofpatroon uit de schiethamer te halen voor u een vastloper verwijdert. Voor
meer informatie hieromtrent kunt u het hoofdstuk "Verwijderen van vastlopers" opslaan.
12. GEBRUIK DE TRAK-IT SCHIETHAMER NOOIT ALS ER ONDERDELEN LOS
ZITTEN, KAPOT ZIJN OF WEG ZIJN. Controleer of alle schroeven en moeren goed
vast zitten en of alle onderdelen op de juiste manier geïnstalleerd zijn en goed werken.
Als er onderdelen weg zijn, mag u niet proberen deze tijdelijk te repareren of vervangen.
Neem in plaats daarvan direct contact op met uw dealer.
13. SLA GEEN NAGELS BOVENOP ELKAAR OF TE DICHT BIJ ELKAAR. Als u een
nagel op een andere of te dicht bij een andere inslaat, kan de nieuwe nagel afketsen en
ernstige verwondingen veroorzaken. Sla nagels alleen in op plekken waar de schacht
helemaal in het materiaal past. De nagels moeten tenminste 76 mm (3 inch) uit elkaar
gehouden worden.
14. SLA GEEN NAGELS IN ZEER HARDE OF BROSSE MATERIALEN ZOALS
GIETIJZER, TEGELS, GLAS OF NATUURSTEEN. Deze materialen kunnen hierdoor
verbrijzeld worden, waardoor scherpe splinters en/of de nagel zelf in het rond kunnen
vliegen.
15. DOE NAGELS OF ANDERE HARDE VOORWERPEN NOOIT IN DEZELFDE ZAK,
TAS OF KOFFER ALS DE BRANDSTOFPATROON. De brandstofpatroon kan
hierdoor beschadigd raken en zo zeer ernstige verwondingen veroorzaken.
16. LAAT NOOIT IEMAND ANDERS DE TRAK-IT SCHIETHAMER GEBRUIKEN
VOORDAT ZE DEZE HANDLEIDING EN VEILIGHEIDSINSTRUCTIES HEBBEN
GELEZEN EN BEGREPEN. Het is de verantwoordelijkheid van de eigenaar ervoor te
zorgen dat alle gebruikers van de Trak-It schiethamer alle veiligheids- en andere
instructies voor gebruik en onderhoud hebben gelezen en goed hebben begrepen.
17. OPSLAG BRANDSTOFPATROON. Brandstofpatronen bevatten ontvlambare gassen
onder druk en moeten worden bewaard op een plek waar ze niet bloot kunnen staan aan
direct zonlicht, open vuur, vonken of temperaturen boven 49˚Celsius (120˚Fahrenheit).
Blootstelling aan temperaturen boven 49˚C (120˚F) kan leiden tot lekkage of zelfs
openbarsten van de brandstofpatronen, waardoor de ontvlambare gassen vrijkomen en er
grootgevaar voor brand en zelfs ontploffing ontstaat.
18. WEGGOOIEN BRANDSTOFPATROON. Probeer nooit een brandstofpatroon te
doorboren, te pletten, te verbranden of bij te vullen. Gooi gebruikte brandstofpatronen
weg met vuilnis dat niet zal worden verbrand. Doe gebruikte brandstofpatronen nooit bij
vuilnis voor recycling of hergebruik.
19. OPSLAG SCHIETHAMER. Aan het eind van de werkdag moet u de brandstofpatroon
uit de schiethamer halen en opbergen in de draagtas.
20. HOUD UW GEREEDSCHAP SCHOON. Aan het eind van de werkdag moet u even een
minuutje de tijd nemen om uw Trak-It schiethamer af te nemen met een schoon doekje.
Een vuile schiethamer loopt eerder vast en gaat eerder kapot.
21. PLAATS NOOIT UW HAND OF UW VINGERS OM DE NEUS VAN DE
SCHIETHAMER. Als het apparaat per ongeluk afgaat kan een nagel of zelfs alleen de
zuiger uw hand zeer ernstig verwonden.
TRAK-IT SCHIETHAMER MODEL C3, C3 ST

90
10
BATTERIJ EN OPLADER
OPLAADBARE BATTERIJ EN OPLADER
De eerste stap bij het klaarmaken van uw nieuwe schiethamer voor gebruik, is het volledig
opladen van de nieuwe batterij. Nieuwe batterijen worden ongeladen geleverd en moeten
?? uur lang worden opgeladen voor u ze in gebruik neemt. Daarna zal het minimaal ? uur
duren om de batterij weer op te laden.
BELANGRIJKE OPMERKINGEN
OPMERKING: DE BATTERIJ BEVAT NIKKEL-METAALHYDRIDE EN MOET ALS AFVAL
OP DE JUISTE MANIER WORDEN VERWERKT OF HERGEBRUIKT.
DE TRAK-IT SCHIETHAMER WORDT GELEVERD MET EEN MEERCELLIGE OPLAADBARE
BATTERIJ EN BIJBEHORENDE OPLADER. DEZE COMBINATIE VAN OPLAADBARE
BATTERIJ EN OPLADER IS DE ENIGE COMBINATIE DIE GESCHIKT IS VOOR DE TRAK-IT
SCHIETHAMER. HIER VOLGEN DE BASISINSTRUCTIES VOOR HET OPLADEN:
WAARSCHUWING — GEVAARLIJKE CHEMISCHE STOFFEN/EXPLOSIEGEVAAR
LEES ALLE AANWIJZINGEN VOOR U DE BATTERIJ GAAT OPLADEN EN GEBRUIKEN.
ALS U NIET ALLE INSTRUCTIES OPVOLGT, BESTAAT ER GEVAAR VOOR BRAND,
BRANDWONDEN EN HET VRIJKOMEN VAN GIFTIGE DAMPEN.
OPLAADINSTRUCTIES
1. Sluit de ronde stekker van de transformator in de aansluiting onderaan het laadstation en
steek de transformator in een stopcontact.
2. Plaats de batterij stevig in de rechthoekige uitsparing van het laadstation. Het rode LED
lampje zal gaan branden ten teken dat de batterij wordt opgeladen.
3. De batterij is helemaal opgeladen wanneer het groene LED lampje gaat branden.
OPMERKING: WANNEER U EEN NIEUWE BATTERIJ DE EERSTE KEER OPLAADT, MOET
U DE BATTERIJ IN DE LADER LATEN ZITTEN TOT HET LED LAMPJE VAN DE OPLADER
GROEN WORDT.
• De oplader moet op een horizontaal oppervlak geplaatst worden.
• Probeer de batterij niet op te laden wanneer de temperatuur lager is dan 5˚C(40˚F).
• Laat de batterij of de oplader niet vallen.
• Zorg ervoor dat metalen voorwerpen niet in contact kunnen komen met de contactjes van
de batterij.
• Zorg ervoor dat de behuizing van de batterij en de cellen daarvan niet doorboord raken en
probeer ze niet open te maken.
• Bewaar de batterij niet op een plek waar het warmer dan 49˚C (120˚F) kan worden.
• Probeer de batterij niet te verbranden.
• Gebruik geen kapotte oplader, of één die oververhit raakt en/of rook produceert wanneer er
stroom op staat.
INBRENGEN VAN DE BATTERIJ
1. Doe de batterij in de handgreep van de Trak-It schiethamer. De batterij zit pas goed
wanneer de twee vergrendelingen goed dicht zitten.
BATTERIJLAMPJE
Aan de ene kant van de handgreep zit een klein plastic venstertje. Dit is het
TRAK-IT SCHIETHAMER MODEL C3, C3 ST

91
11
waarschuwingslampje voor wanneer de batterij bijna leeg is.
Dit waarschuwingslampje zal oplichten wanneer het voltage van de batterij te laag dreigt te
worden. Wanneer het batterijvoltage te laag dreigt te worden, zal er een rood LED lampje
gaan branden om u te waarschuwen dat het tijd is de batterij op te laden.
AANDUIDINGEN OPLADER
De oplader is voorzien van een rood en een groen LED lampje. Hier volgen de
aanduidingen van deze lampjes in vier (4) verschillende gevallen.
1. Rode LED brandt - de batterij is aan het opladen.
2. Groene LED brandt - de batterij is helemaal opgeladen.
3. Om en om rood en groen - de batterij is te heet. (Neem de batterij van de oplader en laat
afkoelen voor u hem weer probeert op te laden.)
4. De rode en groene LED lampjes knipperen tegelijkertijd - de batterij kan niet meer worden
gebruikt. (Vervang door een nieuwe batterij.)
BRANDSTOFPATROON EN MEETKLEP
BRANDSTOFPATROON
GEVAAR — ONTPLOFFINGS-/BRANDGEVAAR
LEES ALLE VEILIGHEIDSINSTRUCTIES VOOR U DE BRANDSTOFPATROON HANTEERT
OF GEBRUIKT.
NIET OPVOLGEN VAN EEN INSTRUCTIE KAN LEIDEN TOT BRAND OF ONTPLOFFING,
MET ALS GEVOLG ZEER ERNSTIGE VERWONDINGEN OF SCHADE AAN PERSOONLIJKE
EIGENDOMMEN.
UIT DE BUURT VAN HITTE, VONKEN EN OPEN VUUR HOUDEN.
DE BRANDSTOFPATROON NIET DOORBOREN OF PROBEREN TE OPENEN. DE
PATROON KAN NIET WORDEN BIJGEVULD.
NIET VERBRANDEN OF PROBEREN DE PATROON TE HERGEBRUIKEN OF TE RECYCLEN.
BLOOTSTELLING AAN TEMPERATUREN BOVEN 49 ˚C (120 ˚F) KAN DE PATROON DOEN
BARSTEN, WAARDOOR ER BRANDBARE GASSEN VRIJKOMEN.
NIET ROKEN BIJ HET INSTALLEREN OF GEBRUIKEN VAN DE MEETKLEP.
ALLEEN GEBRUIKEN IN EEN GOED GEVENTILEERDE RUIMTE.
GEBRUIK ALTIJD EEN VEILIGHEIDSBRIL MET ZIJ-AFSCHERMING DIE VOLDOET AAN
ANSI STD. Z87.1 BIJ GEBRUIK, REPARATIE OF BIJVULLEN VAN DE SCHIETHAMER.
NOOIT IN DE RICHTING VAN GEZICHT OF OGEN SPUITEN. DIT KAN LEIDEN TOT
ERNSTIGE VERWONDINGEN.
GASSEN NIET INHALEREN.
BUITEN BEREIK VAN KINDEREN HOUDEN.
WAARSCHUWING
DOOR ZONLICHT KAN DE INTERNE DRUK VAN DE BRANDSTOFPATROON SNEL
OPLOPEN. TEVEEL ZONLICHT KAN DE DRUK DUSDANIG OPVOEREN DAT DE
BRANDSTOFPATROON BARST. BEWAAR DE BRANDSTOFPATROON DAAROM OP EEN
PLEK WAAR HET NIET WARMER WORDT DAN 49˚C (120˚F) EN HOUD DE PATROON UIT
DIRECT ZONLICHT.
Binnenin de brandstofpatroon bevindt zich een secundaire tank. Deze binnentank bevat
TRAK-IT SCHIETHAMER MODEL C3, C3 ST

92
12
2. Haal de meetklep uit de dop. 3. Breng randjes in lijn.
4. Druk eerst op
voorste rand.
5. Druk op achterste rand
1ste klik
6. Druk op plaats 2e klik
1. Druk de meetklep los.
eigenlijk de brandstof De ruimte tussen de binnentank en de buitencilinder van de
patroon is gevuld met een drijfgas dat onder druk staat. Probeer nooit de rubber plug aan
de onderkant van de brandstofpatroon te verwijderen. Verwijderen van deze plug zal de
druk plotseling doen afnemen waardoor u zichzelf of anderen zou kunnen verwonden.
In het gebruik "knijpt" het drijfgas als het ware de brandstof uit de binnentank, ongeveer
zoals u een tube tandpasta knijpt. Hierdoor kunt u er zeker van zijn dat alle brandstof
gebruikt wordt en dat uw Trak-It schiethamer in elke stand gebruikt kan worden.
vanwege dit dubbelwandige ontwerp is het mogelijk dat u nog een vloeistof hoort wanneer
u de brandstofpatroon heen en weer schudt nadat alle brandstof is verbruikt. Dit is het
restant van het drijfgas tussen de buitenwand en de binnentank.
Als u de lege brandstofcel aan extreme temperaturen blootstelt, zal het drijfgas gaan
uitzetten waardoor de patroon kan barsten en er licht ontvlambare gassen kunnen
vrijkomen.
MEETKLEP
De meetklep bevat het brandstofmeetsysteem dat ervoor zorgt dat de juiste hoeveelheid
brandstof in de verbrandingskamer wordt gespoten. De BLAUWE meetklep is de enige die
geschikt is voor de Trak-It schiethamer.
BEVESTIGEN VAN DE MEETKLEP AAN DE
BRANDSTOFPATROON
Om de meetklep aan de brandstofpatroon te kunnen bevestigen moet u eerst de
beschermdop verwijderen en de meetklep uit de dop halen. Plaats vervolgens de
meetklep op de brandstofpatroon met de nippel naar voren, van uw gezicht en ogen
vandaan wijzend. Pas eerst de voorste lip van de klep op zijn plaats en druk dan krachtig
op de achterkant van de klep. Als het goed is hoort u nu de meetklep op zijn plaats
vastklikken.
TRAK-IT SCHIETHAMER MODEL C3, C3 ST

93
13
INBRENGEN VAN DE BRANDSTOFPATROON IN
DE HANDGREEP
Doe vervolgens de brandstofpatroon met de meterklep erop met de nippel van de
meterklep naar de voorkant van de schiethamer wijzend in de handgreep.
Aan de bovenkant van de ruimte voor de patroon zult u een blauwe adapter kunnen zien
wanneer u de brandstofpatroon met de meterklep erop inbrengt. Deze adapter zorgt
ervoor dat de nippel van de meterklep precies voor het gaatje komt te zitten dat naar de
verbrandingskamer leidt. Zorg ervoor dat de nippel van de meterklep in de uitsparing van
de blauwe adapter valt.
Het laden van de brandstofpatroon in de Trak-It schiethamer wordt afgesloten door het
sluiten van de actuatorklep. Druk de Actuatorklep tegelijkertijd naar beneden en naar voren
om deze te sluiten.
TRAK-IT SCHIETHAMER MODEL C3, C3 ST

94
14
KLAARMAKEN VOOR GEBRUIK VAN DE TRAKIT SCHIETHAMER
NAGELS EN BRANDSTOFPATROON
De Trak-It schiethamer is speciaal ontworpen voor en mag alleen gebruikt worden met
Powers Fasteners brandstofpatronen en nagelstrips. Andere artikelen kunnen de
schiethamer beschadigen en maken de garantie ongeldig. Gebruik uitsluitend originele
Power Fasteners verbruiksartikelen.
LADEN VAN NAGELS
Op de afbeelding hieronder kunt u zien hoe u op de juiste manier de nagels in uw Trak-It
schiethamer moet doen.
1. Plaats de strook met spijkers in de achterste opening van het magazijn.
2. Trek de drukker naar de achterkant van het magazijn en laat voorzichtig los zodat de
drukker met de strook met spijkers contact maakt.
LET OP (KLEMMEN)
Laat de volger niet schieten bij het laden van nagels. Laat de volger voorzichtig naar
voren komen zodat deze rustig tegen de achterste nagelstrip aankomt. Als u de volger
zomaar laat schieten, kunt u uw vinger klemmen tussen de volger en de achterste
nagelstrip.
De trekker van de Trak-It schiethamer wordt automatisch vergrendeld en werkt niet
wanneer er geen nagels in het magazijn zitten en ook niet wanneer de contactbeveiliging
niet volledig ingedrukt is. De reden hiervoor is dat er zo geen brandstof verspild wordt en
er geen mogelijke beschadiging of slijtage van onderdelen van de schiethamer kan
optreden.
WEER EN WIND EN UW TRAK-IT SCHIETHAMER
U kunt de Trak-It schiethamer buiten gebruiken bij helder weer, wanneer de temperatuur
van de schiethamer, de brandstofpatroon en de batterij zich tussen -7˚C (20˚F) en 49˚C
(120˚F) bevindt. Bij lagere temperaturen kunnen de Trak-It schiethamer en de oplaadbare
batterij beschadigd raken. Ook bij hogere temperaturen kunnen de schiethamer en de
oplaadbare batterij beschadigd raken.
TRAK-IT SCHIETHAMER MODEL C3, C3 ST
VERWIJDEREN VAN SPIJKERS
1. Druk op de geleider, trek
de drukker iets naar
achteren en verschuif
vervolgens voorzichtig
naar de voorkant van het
magazijn.
2. Druk op de penstopper
en schuif de strook met
spijkers vervolgens uit
het magazijn.

95
15
Brandstofpatronen moeten uit de zon worden bewaard bij lagere temperaturen dan 49˚C
(120˚F). Wanneer u de schiethamer langere tijd achter elkaar gebruikt, kunt u deze
afkoelen door de ventilator aan te zetten.
Gebruik bij een lagere temperatuur dan -7˚C (20˚F) kan de schiethamer beschadigen. Bij
lage temperaturen kan het drijfgas in de brandstofpatroon de kracht verliezen die nodig is
voor normaal gebruik. Breng in voorkomende gevallen de temperatuur van de
schiethamer, brandstofpatroon en oplaadbare batterij boven de minimum
bedrijfstemperatuur.
LET OP — DE TRAK-IT SCHIETHAMER KAN NIET WORDEN GEBRUIKT IN DE REGEN
OF IN TE VOCHTIGE OMGEVINGEN. HIERDOOR KUNNEN ONDERDELEN VAN DE
SCHIETHAMER STORINGEN GAAN VERTONEN EN KAN DE SCHIETHAMER KAPOT
GAAN.
GEBRUIK VAN DE TRAK-IT SCHIETHAMER
WAARSCHUWING
De Trak-It schiethamer is ontworpen om met de hand gebruikt te worden. Zet de
schiethamer niet vast aan een werkbank of werkstuk of ander object. Als u de schiethamer
vastzet, kunnen er onbedoeld nagels worden afgeschoten worden, hetgeen kan leiden tot
verwonding van de gebruiker of omstanders.
DRUK DE CONTACTBEVEILIGING TEGEN HET WERKSTUK
De ventilator zal aanslaan. Brandstof wordt in de verbrandingskamer gespoten en door de
ventilator met lucht gemengd.
DRUK DE REKKER IN.
De bougie vonkt om het brandstof-luchtmengsel te ontsteken. Deze explosie levert de
kracht om de zuiger in beweging te brengen die op zijn beurt de nagel inslaat.
LAAT DE TREKKER LOS - TIL DE SCHIETHAMER OP.
De verbrandingskamer wordt geopend. De ventilator drijft de uitlaatgassen uit en koelt het
binnenwerk af.
OPMERKING: Als u niet opnieuw begint, zal de ventilator 8 seconden lang blijven lopen
en dan uit gaan.
Waarschuwing
Na gebruik voor langere tijd of snel achter elkaar kunnen de contactbeveiliging en het
neusstuk ook heet worden.
TRAK-IT SCHIETHAMER MODEL C3, C3 ST

96
16
ONDERHOUD, SERVICE EN OPLOSSEN VAN
PROBLEMEN
Een beperkt aantal werkzaamheden kunt u zelf ter plekke uitvoeren:
• CONTROLEREN VAN HET RESTERENDE BATTERIJNIVEAU
• OPLADEN VAN DE BATTERIJ
• CONTROLEREN VAN DE BRANDSTOFPATROON EN DE METERKLEP
• VERVANGEN VAN DE BRANDSTOFPATROON
• SCHOONMAKEN VAN HET LUCHTFILTER
• VERWIJDEREN VAN VASTLOPERS
Pogingen meer te doen dan deze procedures toestaan kan leiden tot zeer ernstige
verwondingen en schade aan de Trak-It schiethamer en tot vervallen van de garantie.
Er zijn bepaalde problemen die u in het werken met de Trak-It schiethamer kunt
tegenkomen, die u ter plekke kunt verhelpen. De hieronder beschreven procedures zijn de
enige service of onderhoudsprocedures die u zelf kunt uitvoeren. Als er iets anders mis is
met de Trak-It schiethamer mag deze alleen geïnspecteerd en gerepareerd worden door
een daartoe opgeleide onderhoudstechnicus. Als u vermoed dat uw probleem niet
opgelost kan worden met de in deze handleiding beschreven procedures, neem dan direct
contact op met uw Powers Fasteners dealer.
GEVAAR — VOER NOOIT WERKZAAMHEDEN AAN DE TRAK-IT SCHIETHAMER UIT
VOORDAT U DE BRANDSTOFPATROON EN DE BATTERIJ ERUIT GEHAALD HEBT. BEGIN
PAS MET DE GEPLANDE WERKZAAMHEDEN WANNEER DE SCHIETHAMER NIET MEER
KAN WERKEN.
CONTROLEREN VAN HET BATTERIJNIVEAU
Kijk regelmatig naar het LED lampje dat aangeeft of de batterij bijna leeg is --- Het LED
lampje in de handgreep van de Trak-It schiethamer. Wanneer er zich een probleem
voordoet is het eerste wat u moet doen altijd te controleren of de batterij nog voldoende
energie levert. De batterij levert nog voldoende energie wanneer het rode LED lampje uit
blijft.
CONTROLEREN VAN DE BRANDSTOFPATROON
Iets anders wat vaak voor zal komen is dat de brandstofpatroon leeg raakt. U zult dit
merken doordat de ventilator nog gewoon werkt, maar de nagels niet helemaal meer
worden ingedreven of de schiethamer helemaal niet meer afgaat. Neem in dit geval de
brandstofpatroon uit de schiethamer en controleer of er nog brandstof in zit en of de
meterklep nog werkt. Om te controleren of er nog brandstof in de patroon zit, hoeft u
alleen de nippel van de meterklep maar tegen een stevige ondergrond te houden en drie of
vier keer voorzichtig te drukken. Elke keer hoort er nu een klein beetje brandstof uit te
komen. Voer deze test nooit uit bij open vuur of vonken, terwijl u rookt of op een plek
waar u de brandstof in uw ogen kunt krijgen. Als er niet telkens een beetje brandstof uit
de meterklep komt, zit er geen brandstof meer in de patroon en moet u een nieuwe nemen.
Zorg ervoor dat de lege brandstofpatroon op de juiste manier wordt weggeworpen.
TRAK-IT SCHIETHAMER MODEL C3, C3 ST

97
17
LUCHTFILTER
Verwijder het deksel van het luchtfilter met behulp van een schroevendraaier. Het
luchtfilter kunt u nu eruit tillen.
Klop het filter VOORZICHTIG uit of blaas voorzichtig met perslucht om stof en vuil eruit te
verwijderen. U moet het luchtfilter tenminste elke twee dagen schoonmaken en
controleren.
VERWIJDEREN VAN VASTLOPERS
Nog een probleem waar u mee te maken zult krijgen is dat nagels soms vastlopen. Door
het unieke ontwerp van de Trak-It schiethamer is het verwijderen van een vastgelopen
nagel een fluitje van een cent.
1. Haal de brandstofpatroon en de batterij uit de schiethamer.
2. Verwijder de strook met spijkers uit het magazijn.
WAARSCHUWING — ALS U DE VOLGER NIET TERUGBRENGT EN VERGRENDELT,
KUNNEN ER NAGELS IN UW RICHTING GEWORPEN WORDEN WANNEER U DE
VASTLOPER VERWIJDERINGSEENHEID OPENT.
3. Open de vastloper verwijderingseenheid aan de voorkant van het neusstuk.
4. Verschuif en draai de verwijderingseenheid tot deze open staat.
De vastgelopen nagel hoort nu uit het apparaat te vallen. Als de vastgelopen nagel niet uit
het apparaat valt, moet u deze voorzichtig verwijderen zonder het neusstuk te beschadigen.
Nadat u de vastgelopen nagel heeft verwijderd, neemt u de volgende stappen om de klep
van het neusstuk weer te sluiten:
1. Draai en schuif de klep van het neusstuk terug in de
gesloten positie.
2. Doe de geveerde vergrendeling terug zodat deze volledig
vergrendeld is.
3. Laad de strook met spijkers opnieuw in het magazijn.
TRAK-IT SCHIETHAMER MODEL C3, C3 ST

98
18
GEVAAR — ZORG ERVOOR DAT DE VASTLOPER VERWIJDERINGSEENHEID GOED
DICHT EN VAST ZIT. ALS U DE SCHIETHAMER PROBEERT TE GEBRUIKEN TERWIJL DE
KLEP VAN HET NEUSSTUK NIET GOED DICHT IS, KAN DE NAGEL WEGSPRINGEN, KAN
DE SCHIETHAMER BESCHADIGD RAKEN EN KAN DE NAGEL ZELFS IN UW RICHTING
SPRINGEN, MET ALLE GEVOLGEN VAN DIEN.
Als u merkt dat de ventilator van de Trak-It schiethamer niet aanslaat nadat u een vastloper
verwijderd heeft:
Controleer de toestand van uw oplaadbare batterij.
WAT U MOET DOEN AAN HET EIND VAN ELKE WERKDAG
Er zijn bepaalde dingen die u aan het eind van elke werkdag moet doen. Volg deze
eenvoudige stappen om uw Trak-It schiethamer veilig en geschikt voor gebruik te houden.
Voor u de arbeidsplaats verlaat:
1. Haal de batterij uit het apparaat en berg deze op in de gereedschapskist als deze nog
geheel of gedeeltelijk geladen is. Gebruik altijd de Trak-It schiethamerkist voor het
opbergen en vervoeren van uw schiethamer.
2. Gooi alle lege brandstofpatronen op de juiste manier weg. Gooi de patronen niet weg op
een plek waar ze gemakkelijk gevonden kunnen worden door kinderen, of op een plek
waar ze kunnen worden doorboord, geplet of verbrand.
3. Als de batterij bijna leeg is, kunt u deze in zijn oplader doen.
4. Neem uw Trak-It schiethamer af met een schone, zachte doek.
5. Controleer of de contactbeveiliging soepel werkt.
Door middel van deze eenvoudige stappen kunt u er niet alleen van uitgaan dat u morgen
ook weer aan de slag kunt met uw Trak-It schiethamer, maar ook dat u de maximale
prestaties uit uw schiethamer haalt.
TRAK-IT SCHIETHAMER TOEBEHOREN
Er zijn verschillende accessoires verkrijgbaar voor de Trak-It schiethamer:
55583 Oplaadbare batterijen
55618 Trak-IT schiethamer oplader basis
55639 12 Volt Adapter van de Auto
55619 110 Volt Adapter Koord
55643 Draagkoffer
Neem contact op met uw Powers Fasteners dealer voor meer informatie.
TRAK-IT SCHIETHAMER MODEL C3, C3 ST

99
19
TRAK-IT SCHIETHAMER MODEL C3, C3 ST
OPLOSSEN VAN PROBLEMEN
SYMPTOOM
Klaar maken voor gebruik van de
schiethamer - Problemen met
batterij/oplader
1. De batterij kan niet worden
opgeladen. Ook na vele uren laden
gaat het groene lampje op de
oplader niet branden.
2a. De rode en groene LED lampjes op
de oplader knipperen om en om.
2b.De rode en groene LED lampjes op
de oplader knipperen tegelijkertijd.
Tijdens het werk
1. De ventilator loopt niet.
2. De ventilator loopt niet, of loopt
langzamer dan normaal.
3. De ventilator loopt onregelmatig.
Voor/tijdens de verbranding
1. De contactbeveiliging kan niet
helemaal worden ingedrukt - de
schiethamer doet het niet.
2. De schiethamer gaat niet af - de
ventilator loopt wel.
MOGELIJKE PROBLEMEN
1a. De indicatorlampjes op de oplader doen
het niet.
1b.De oplader is kapot.
2a. De batterij is heet.
2b.De oplaadbare batterij is kapot of aan het
eind van zijn bruikbare leven.
1a. De batterij is niet opgeladen.
1b.De contactjes van de batterij of in de
handgreep zijn vuil, vet of gecorrodeerd.
1c. Er is ergens kortsluiting.
2. De oplaadbare batterij is leeg.
3. De batterij zit los of de contactjes zijn
verbogen.
1a. De blokkeringstang zit vast in
blokkerende stand.
1b.De contactbeveiliging is verbogen of
opgehoopt vuil hindert de soepele
werking ervan.
1c. De volger zit niet achter de strip.
1d.De O-ring van de cilinder zit verkeerd.
2a. De brandstofpatroon is leeg.
2b.De elektrode van de bougie is kapot.
2c. Geen vonk.
SERVICE
1a. Laat de batterij 3 uur lang opladen en probeer hem dan
weer in de schiethamer. Als de schiethamer goed werkt,
doen de lampjes van de oplader het niet goed. Vervang
de oplader of houd de oplaadtijd in de gaten zodat de
batterij tijd genoeg heeft om helemaal op te laden.
Nadat de batterij helemaal is opgeladen is het normaal
als deze warm aanvoelt.
1b.Stop onmiddellijk en haal de stekker uit het stopcontact.
Vervang de oplader en gooi de oplader weg of geef er
een merkteken op zodat hij ook niet per ongeluk in het
stopcontact gestoken kan worden.
2a. Haal de batterij van de oplader en laat hem afkoelen.
2b.Vervang de oplaadbare batterij.
1a. Laad de batterij op volgens de instructies in de
handleiding.
1b.Maak de contactjes van de batterij en/of die in de
handgreep schoon.
1c. De schiethamer moet worden nagekeken door bevoegd
Powers Fasteners onderhoudspersoneel.
2. Laad de oplaadbare batterij op.
3. Zet de batterij weer op de juiste manier vast. Buig de
contactjes terug in de juiste stand.
1a. Controleer of de schroef bij de mof niet te vast zit.
Open indien nodig de klep van het neusstuk en maak de
onderdelen schoon.
1b.Controleer of de contactbeveiliging netjes schoon is en
niet beschadigd. Maak deze onderdelen schoon met een
doek. Als de contactbeveiliging beschadigd is, dient u
het apparaat voor reparatie te retourneren aan uw
Powers Fasteners dealer.
1c. Doe de volger achter de strip.
1d.Neem contact op met uw Powers Fasteners dealer en
verzoek om reparatie.
2a. Vervang de brandstofpatroon.
2b.Neem contact op met uw Powers Fasteners dealer en
verzoek om reparatie.
2c. Neem contact op met uw Powers Fasteners dealer en
verzoek om reparatie.

20
TRAK-IT SCHIETHAMER MODEL C3, C3 ST
OPLOSSEN VAN PROBLEMEN
SYMPTOOM
Tijdens inslaan/uitlaat
1. De schiethamer doet het wel, maar
de nagels worden niet helemaal
ingedreven.
2. De schiethamer doet het wel, maar
er wordt geen nagel ingedreven.
3. De schiethamer doet het
onregelmatig of lijkt vermogen te
verliezen.
Tijdens retourslag/uitdrijven
gassen
1. De schiethamer deed het en de nagel
is ingedreven, maar de zuiger is niet
helemaal teruggekeerd naar boven.
2. De verbrandingskamer valt niet open
nadat er een nagel ingedreven is.
MOGELIJKE PROBLEMEN
1a. De oplaadbare batterij is leeg.
1b.De brandstofpatroon is bijna leeg.
1c. De afdichting van de verbrandingskamer
is misschien niet in orde.
2a. De strip met nagels blijft misschien
steken.
2b.De volger zit niet goed achter de nagels.
2c. Vastgelopen nagel.
3a. De brandstofpatroon is bijna leeg.
3b.De elektrode van de bougie zit los.
3c. Het filterelement is vuil waardoor de
schiethamer oververhit raakt.
3d.Vuile mof of O-ringen.
1a. Opgehoopt vuil en viezigheid op de
zuiger of in de neusschacht.
1b.Uiteinde zuiger platgestampt.
1c. Uitlaatpoorten in de mof vuil of verstopt.
1d.Vuile schiethamer (mof) of O-ringen.
1e. De zuigerringen moeten vervangen
worden.
2. De contactbeveiliging is verbogen of de
schiethamer is vuil.
SERVICE
1a. Laad de oplaadbare batterij op.
1b.Controleer de brandstofpatroon volgens de instructies
in de handleiding en vervang indien nodig.
1c. Houd de contactbeveiliging één minuut lang tegen het
werkstuk gedrukt. Druk de trekker in. Als de nagel niet
wordt ingeslagen is er een lek dat gerepareerd moet
worden.
2a. Gebruik alleen nagels die voldoen aan de specificaties
van de fabrikant, Powers Fasteners.
2b.Zoek de volger op achter de nagelstrip en doe deze op
de goede manier volgens de handleiding achter de
strip.
2c. Verwijder de vastloper volgens de instructies uit de
handleiding.
3a. Controleer de brandstofpatroon volgens de instructies
in de handleiding.
3b.Neem voor reparatie contact op met uw Powers
Fasteners dealer.
3c. Verwijder het filterelement en maak dit schoon volgens
de instructies in de handleiding. Gebruik perslucht om
hardnekkig vuil te verwijderen.
3d.Retourneer aan uw Powers Fasteners dealer en verzoek
om reparatie.
1a. Retourneer aan uw Powers Fasteners dealer en verzoek
om reparatie.
1b.Retourneer aan uw Powers Fasteners dealer en verzoek
om reparatie.
1c. Retourneer aan uw Powers Fasteners dealer en verzoek
om reparatie.
1d.Retourneer aan uw Powers Fasteners dealer en verzoek
om reparatie.
1e. Retourneer aan uw Powers Fasteners dealer en verzoek
om reparatie.
2. Maak de schiethamer schoon of laat indien nodig de
contactbeveiliging vervangen.
 Loading...