


Instruction Manual
Version 1.1.6
© Trajet GmbH July 2008

Contents
1 General 4
1.1 Warranty conditions 5
1.2 Safety notice 5
2 Controls and connections 6
3 Installing and charging batteries 7
3.1 Installing 7
3.2 Charging condition display 8
3.3 Charging 8
4 Replacing the memory card 9
5 Connecting the camera 10
6 Transmitting data to a monitor 11
7 Operation and configuration 12
7.1 Turning on and off 12
7.2 Controls 13
7.3 Menu structure in the display 14
7.4 Live video preview 14
7.5 Recording 15
7.5.1 Start recording 15
7.5.2 Stop recording 16
7.5.3 Audio recording 16
7.6 Movies - Playback 17
7.7 Configuration settings 20
7.7.1 Set clock – setting time and date 20
7.7.2 Video resolution 20
7.7.3 Time overlay 21
7.7.4 Ring buffer 21
7.7.5 Language 21
7.7.6 Audio levels 22
7.7.7 Display brightness 23
7.7.8 Time zone 23
7.7.9 Input 1 – Changing between switch and pushbutton 24
7.8 Format Disk – Erasing the CF card 24
7.9 Reset settings 25
7.10 System information 26
© July 2008 Page 2/33
Instruction Manual

7.11 Firewire HDD 26
7.12 Turning off 27
8 Error messages 28
9 Update – updating firmware 29
10 Playback on a PC using the program Everec Player 30
11 Technical data 31
11.1 Technical data of the camera 32
11.2 CE conformity 33
© July 2008 Page 3/33
Instruction Manual

1 General
The Trajet Everec ME 1 is one of the smallest digital video recorders for personal use. Long battery life and high image and audio quality make it suitable for any number of applications.
Monitoring
Observation
Hidden investigation
Video documentation
Helmet camera
Service use
The system consists of the following components
Everec ME1 Video Recorder
Compact Flash Card (CF Card) 4 gbyte
Camera with microphone
Battery charging device
FireWire cable
2 Battery holders with 4 AA NiMH batteries
Aluminium case for secure transport and storage
CD ROM – Contents
Instruction manual
Everec Player
Everec codec for Windows Mediaplayer
© July 2008 Page 4/33
Instruction Manual

1.1 Warranty conditions
Trajet GmbH covers all parts of the system with a two-year warranty. Replacement of components
does not extend the warranty period.
Damage from the following causes is not covered by the warranty
improper use or treatment of the device
Use of incorrect or used batteries
1.2 Safety notice
Use only rechargeble batteries
Do not operate the recorder in the rain, and protect it from dampness.
Remove batteries from the recorder if it is not used for long periods to avoid damage caused by leakage.
Avoid exposure to direct sunlight; do not place the device on heaters or use it in dusty,
salty, or gas hazard environments.
Severe changes in temperature can result in internal condensation. Wait until the temperature has reached a steady level.
© July 2008 Page 5/33
Instruction Manual

2 Controls and connections
Figure 1: Everec ME1 – Side view
Figure 2: View from the bottom
© July 2008 Page 6/33
Instruction Manual
3 Installing and charging batteries
3.1 Installing
The Everec ME1 requires 4 Mignon AA NiMH batteries. Depending on the battery capacity and
the ambient temperature, you can record for about 4 hours or reach 10 hours standby time.
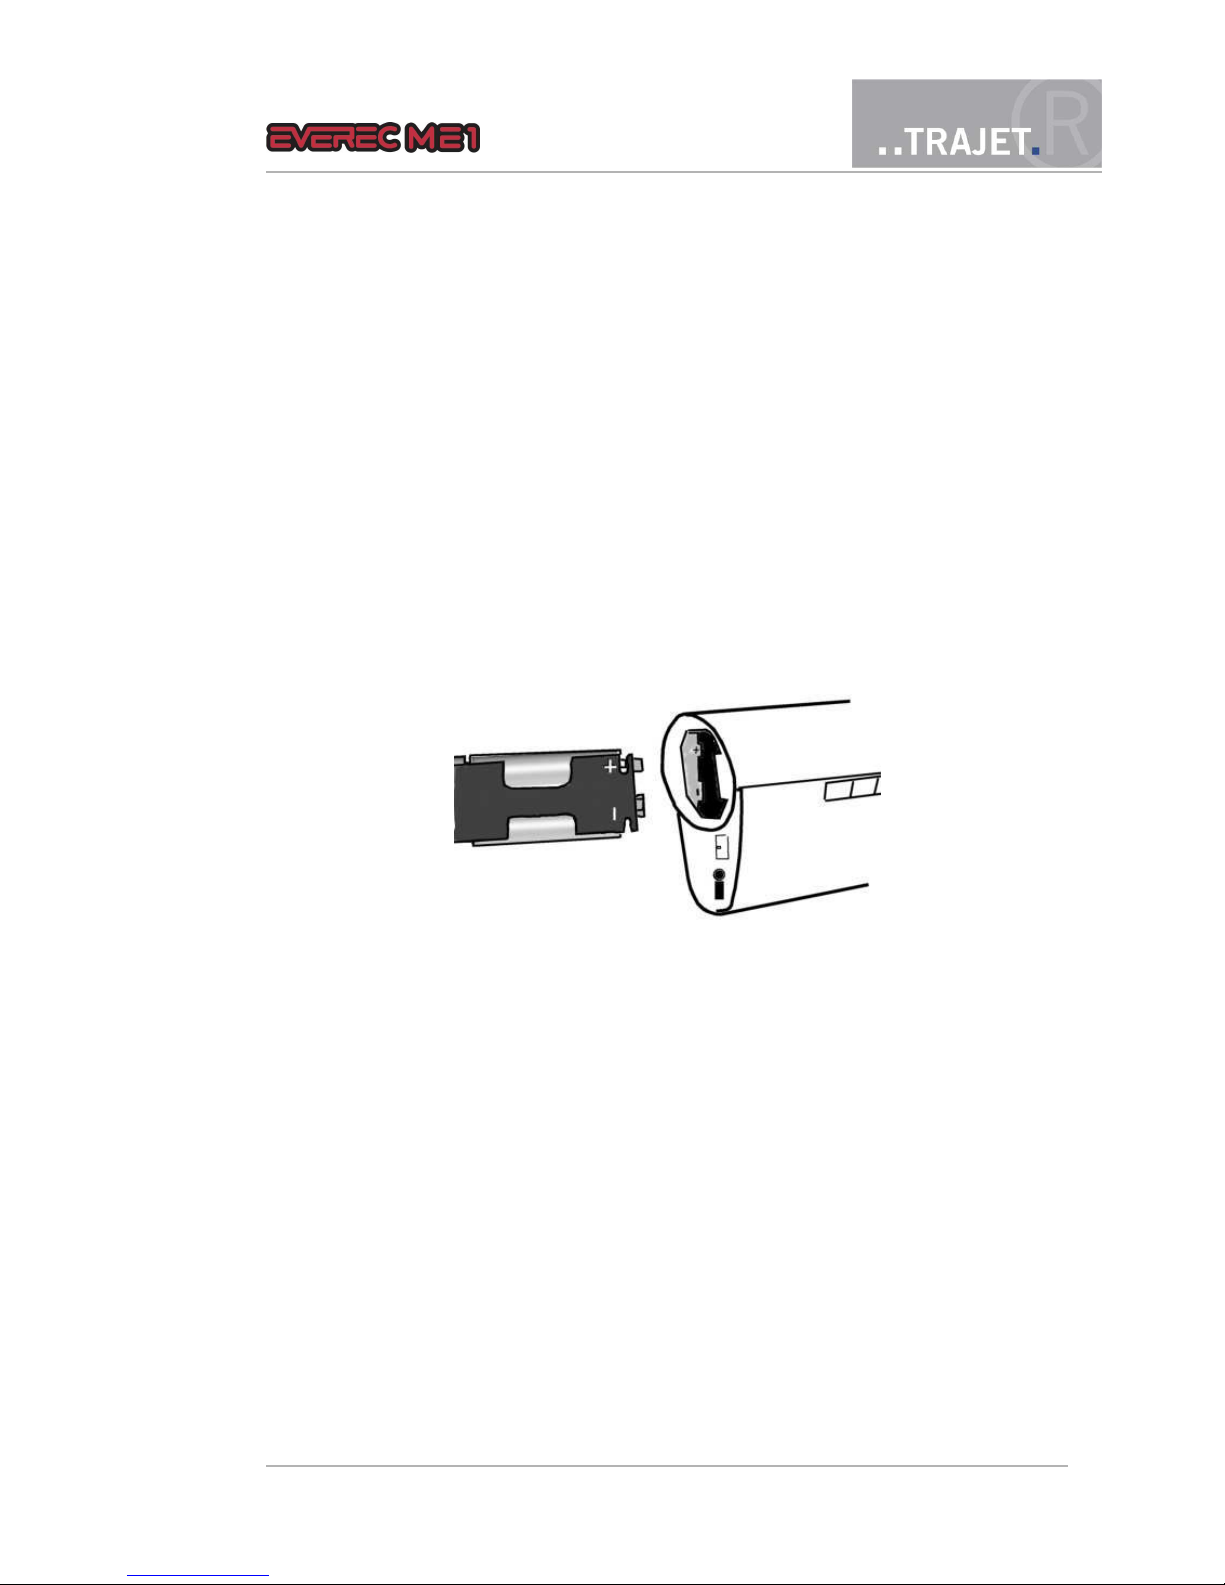
Figure 3: Changing batteries
To insert batteries, open the battery compartment cover at the base of the recorder by sliding it
toward the side with the monitor. The battery holder can be removed by shaking lightly. Insert 4
batteries, and check for correct polarity.
The symbol in the battery compartment of the Everec ME1 shows the correct direction to insert
the battery holder to ensure correct polarity. Insert the holder into the compartment, and close
the cover.
Note: Remove batteries from the recorder as soon as they are empty.
Remove batteries from the recorder if it is not used for long periods to avoid damage caused by
leakage.
Note: Do not dispose of batteries as household waste. Every user is obliged by law to return used
batteries . They may only be disposed of by an expert retailer or at battery collection sites (community collection sites or hazardous material mobile facilities).
© July 2008 Page 7/33
Instruction Manual
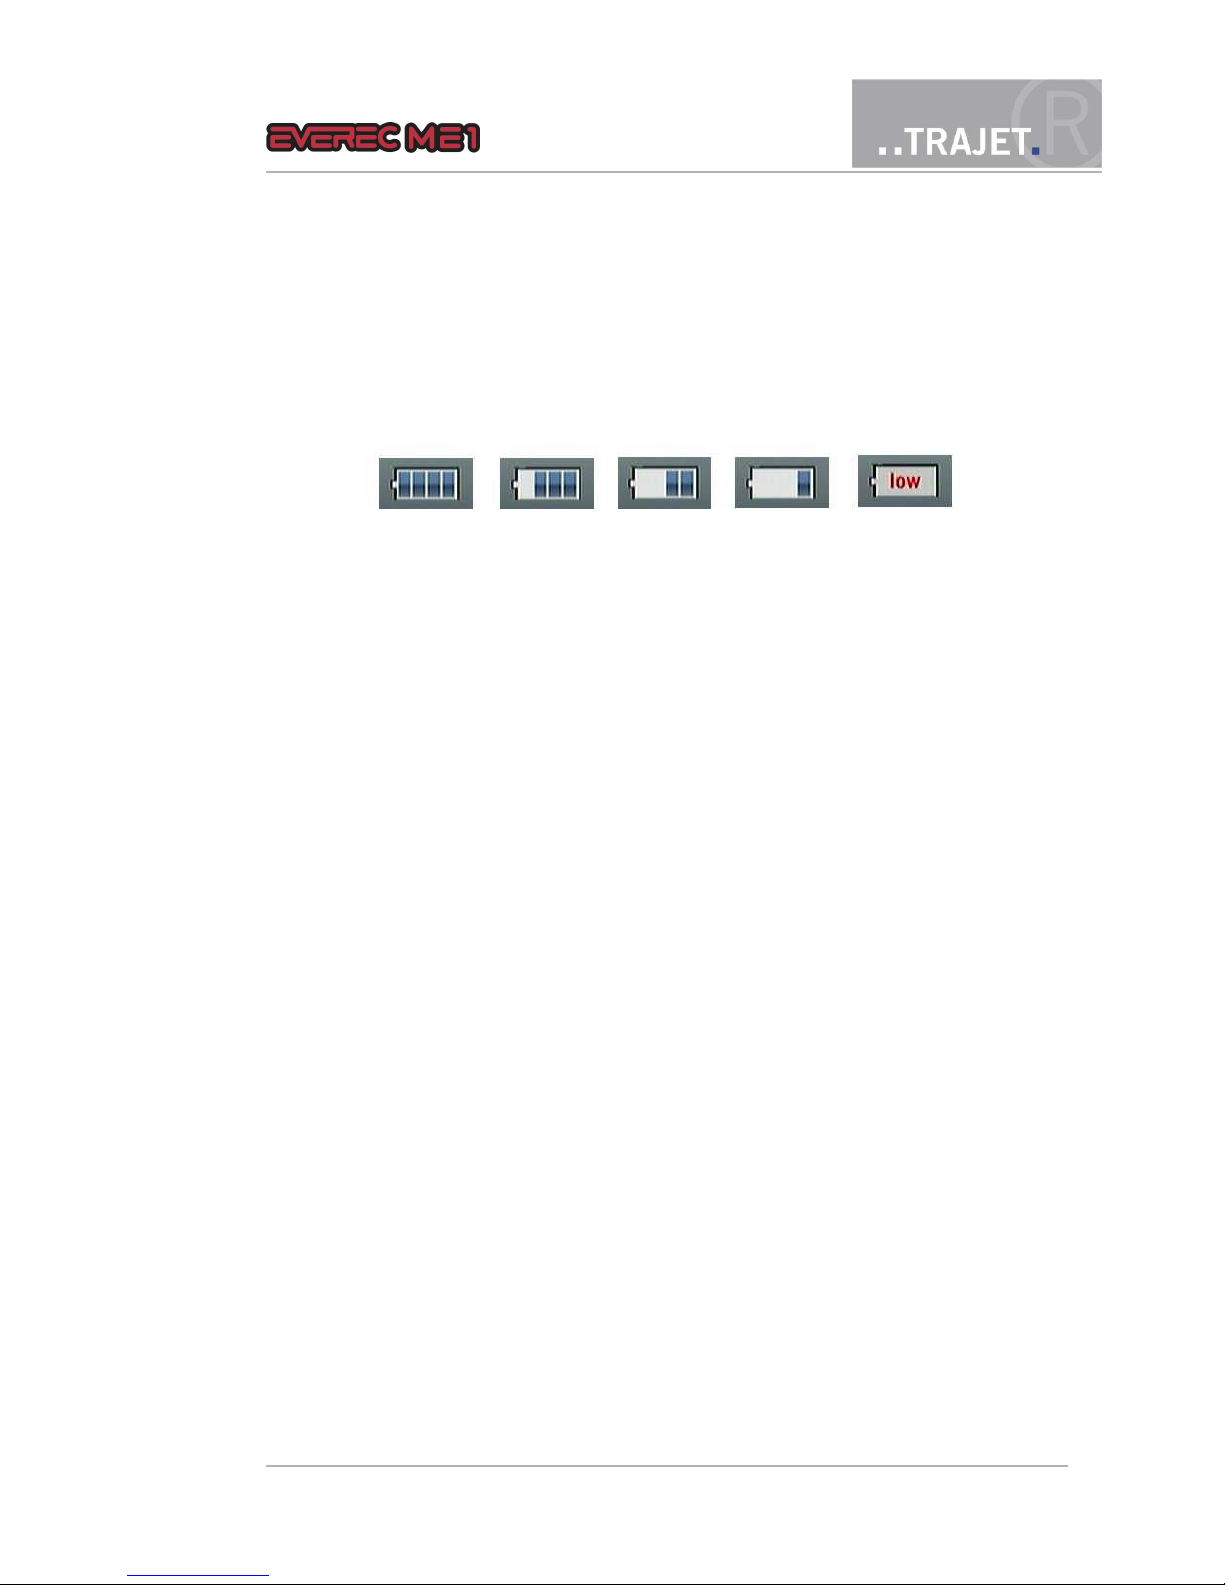
3.2 Charging condition display
When the recorder is turned on you can see the battery charging condition at the bottom of the
display, indicating full, three-quarter, half-full, quarter or empty.
3.3 Charging
The batteries can be recharged inside the Everec ME1.
If the charge status displays only one bar or "low" at the bottom of the display, or you cannot
switch on the recorder even when the batteries are inserted, then you need to charge the batteries.
Connect the supplied power supply to the Firewire connection at the bottom of the recorder.
Plug the power supply into a socket.
Press and hold the 'up arrow button' on the side of the recorder and switch the recorder
on.
LED 1 will flash for one second. Now release the arrow button.
The display shows „Charging“.
The LEDs indicate the length of the charging process. To begin with, LED 5 is illuminated
and LED 4 flashes. After 30 minutes, LED 5 and 4 are illuminated, and LED 3 flashes,
and so forth. If the batteries are completely empty to begin with, charging is completed
when LED 1 flashes and all other LEDs are illuminated.
Once the batteries are completely charged, the recorder switches itself off.
Caution: When charging the batteries, it is vital that you switch the Everec ME1 on while holding down
the arrow button. The charging process does not work simply by plugging the power supply into the
socket!
© July 2008 Page 8/33
Figure 4: Battery charging conditions
Instruction Manual
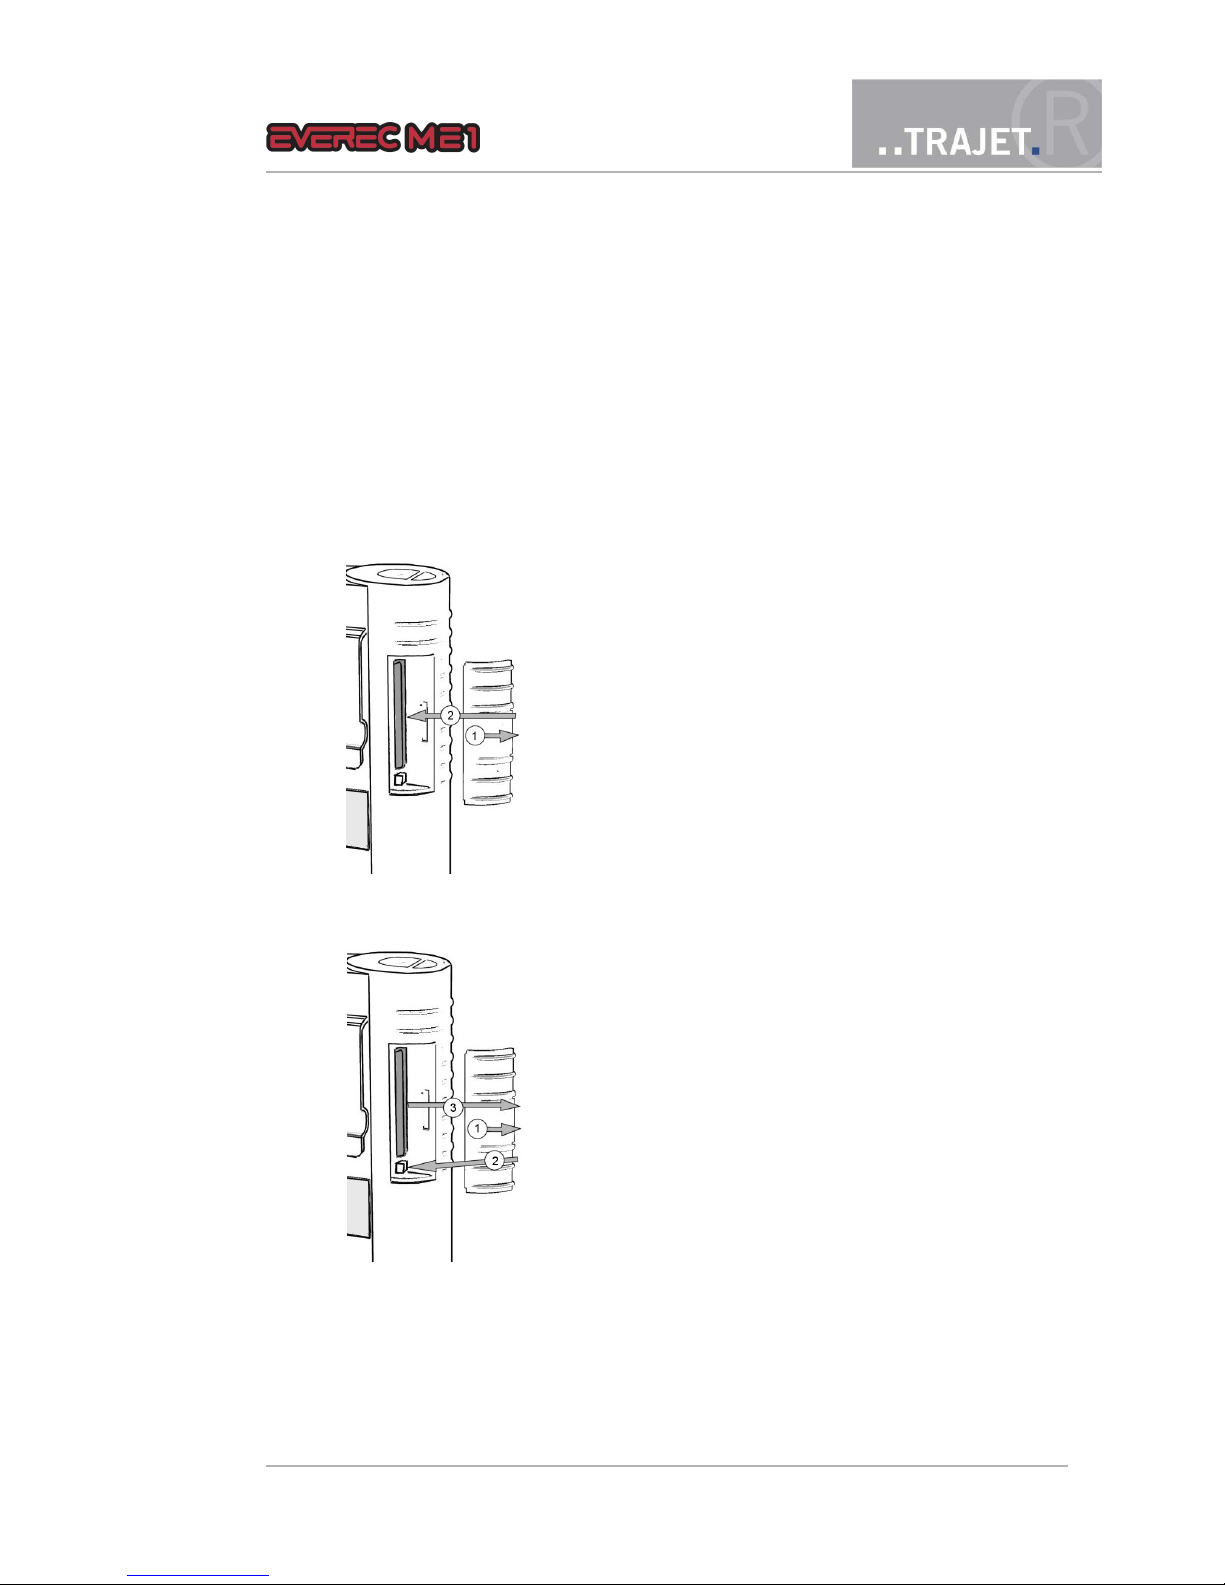
4 Replacing the memory card
The Everec ME1 requires Compact Flash cards (CF) or cards in CF format. One 4GB card is included.
Insertion
1. To insert the card, slide open the cover on the
side of the device.
2. Insert the card into the slot.
It can only be inserted in one direction, due to
its shape.
Removal
If a recording is to be archived, the card with the desired data must be removed from the recorder. The recording must have been completed.
1. Slide open the cover on the side of the device.
2. Press the eject button located on the right,
next to the card. The button springs back.
3. Press it again to eject the card sufficiently to
allow it to be pulled out.
Caution: Do not remove the memory card while a recording is running. The current recording will
not be properly completed, and may not be able to be replayed.
© July 2008 Page 9/33
Instruction Manual
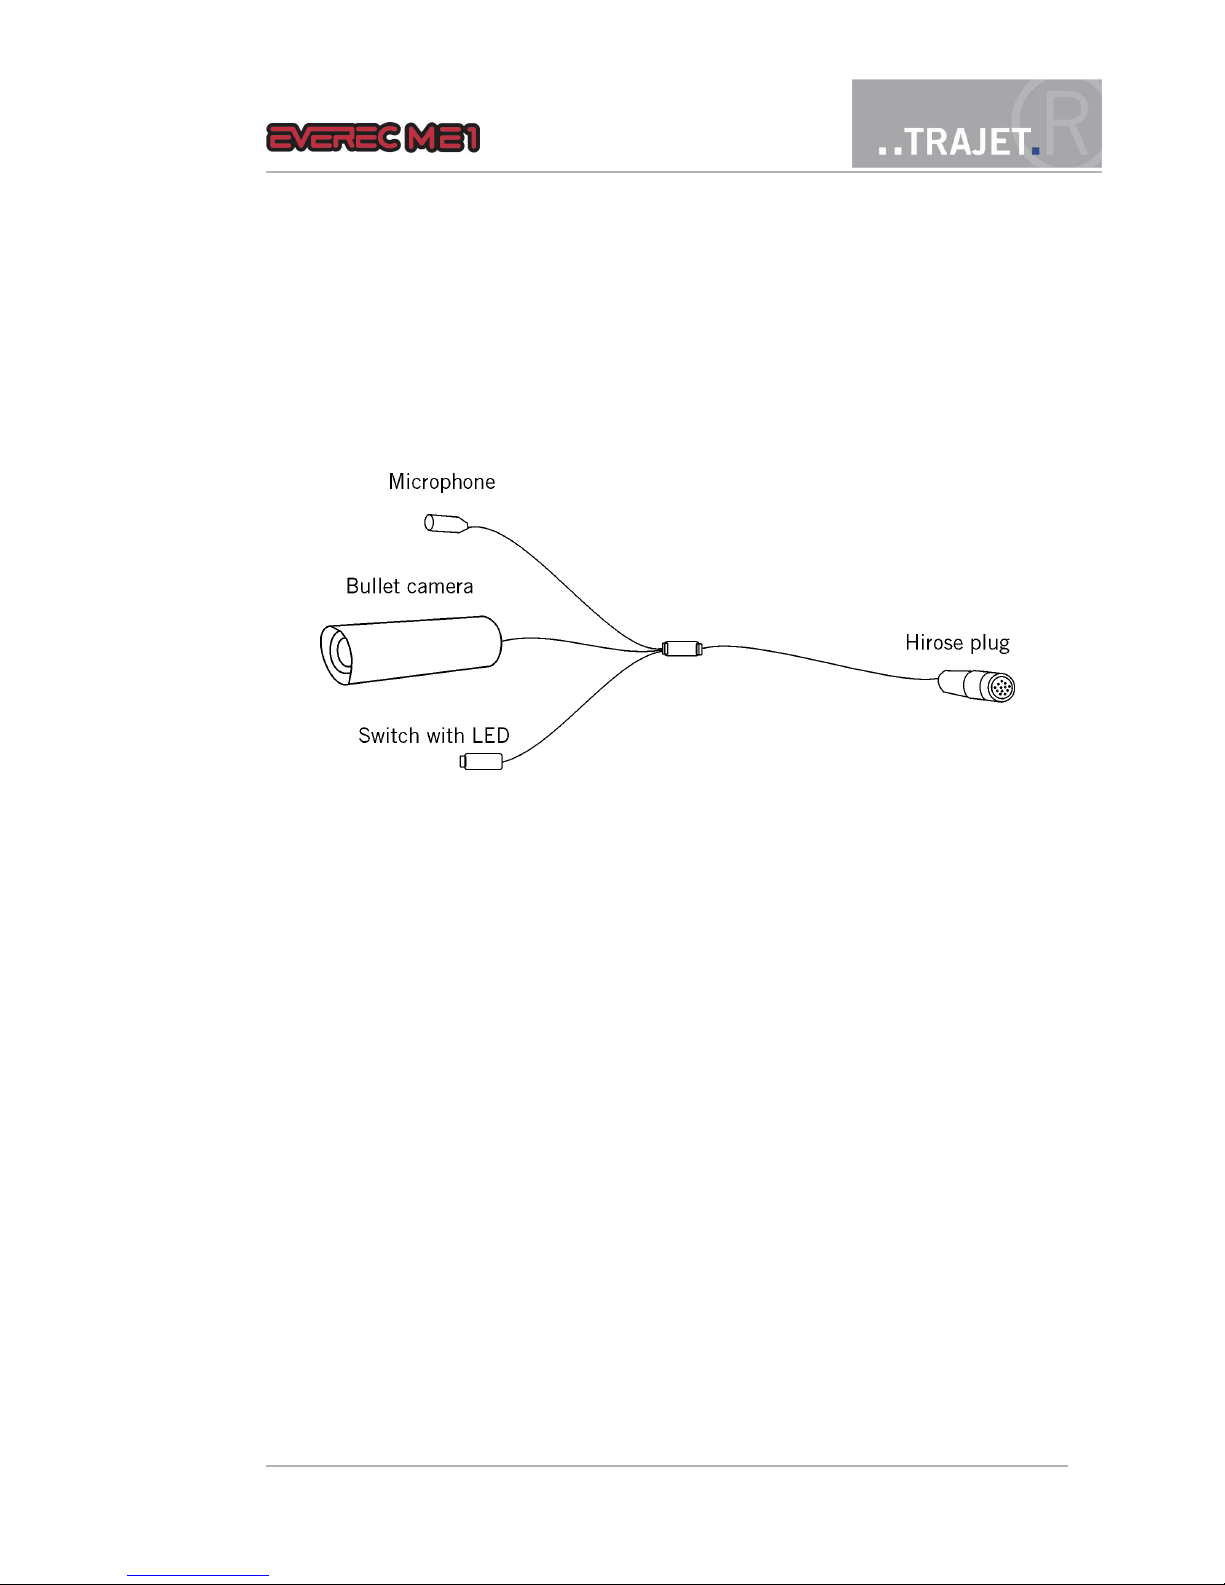
5 Connecting the camera
The Everec ME1 is supplied with a matching camera and microphone.
Figure 5: Camera with microphone
Connect the camera cable to the 12-pin Hirose connector (HR10A-12Pin) on top of the Everec
ME1 by inserting the connector slightly and turning it a little, until the contacts are in place; in
doing so, the arrow on the connector casing sits above the operating buttons. The cable is now
secure even if it is pulled.
To remove it, slide the outer housing of the plug upward, and pull out the plug.
The top side of the camera is marked with a dot.
Additional to camera and microphone there is a switch to start and stop recording at the cable. A
LED in the switch lights up as soon as the Everec ME1 is turned on and indicates that the recorder is ready to record. It is blinking while recording.
Note: Do not turn the plug while pulling it.
© July 2008 Page 10/33
Instruction Manual

6 Transmitting data to a monitor
By means of the video output it is possible to transmit
the contents of the display to a monitor. Connect the video/audio cable to the connector at the bottom of the
recorder and attach it to a monitor.
Now you can see all contents of the display also on the
monitor; with a loudspeaker connected you can hear
also the recorded audio data.
The video/audio cable is available as accessory from Trajet GmbH.
© July 2008 Page 11/33
Instruction Manual

7 Operation and configuration
7.1 Turning on and off
The Power switch is on the top side of
the recorder.
Press the switch again to start recording
Next to it is the button to stop recording.
Pressing the Power switch turns the recorder on. The power LED (LED 5) lights up. After approx.
10 seconds, the system is ready to start. You can see this by the illuminated display and the permanent illuminated record switch at the camera cable.
Turning off
If no recording is being made and no controls are activated the recorder switches itself off
after aprox. 2 minutes, to protect the batteries.
You can turn off the recorder manually using the menu, which is controlled by the buttons
on the side of the device. The last item in the main menu is “Power off”. If you select
this and press the “select” button, the recorder will switch off (see Section 7.10).
If you press the 'Stop / Back' button for longer than two seconds, the recorder switches
off.
© July 2008 Page 12/33
Instruction Manual

7.2 Controls
There are 4 buttons on the side of the recorder. Use them to navigate menus and activate nearly
all functions. The buttons have the following functions
Up arrow button
Down arrow button
Select
Stop/Back
At startup, the display shows a list of all recorded videos, or the message “No Movies” if the memory card is still blank. Using the buttons, navigate back and forth in the menus and start recording.
© July 2008 Page 13/33
Instruction Manual
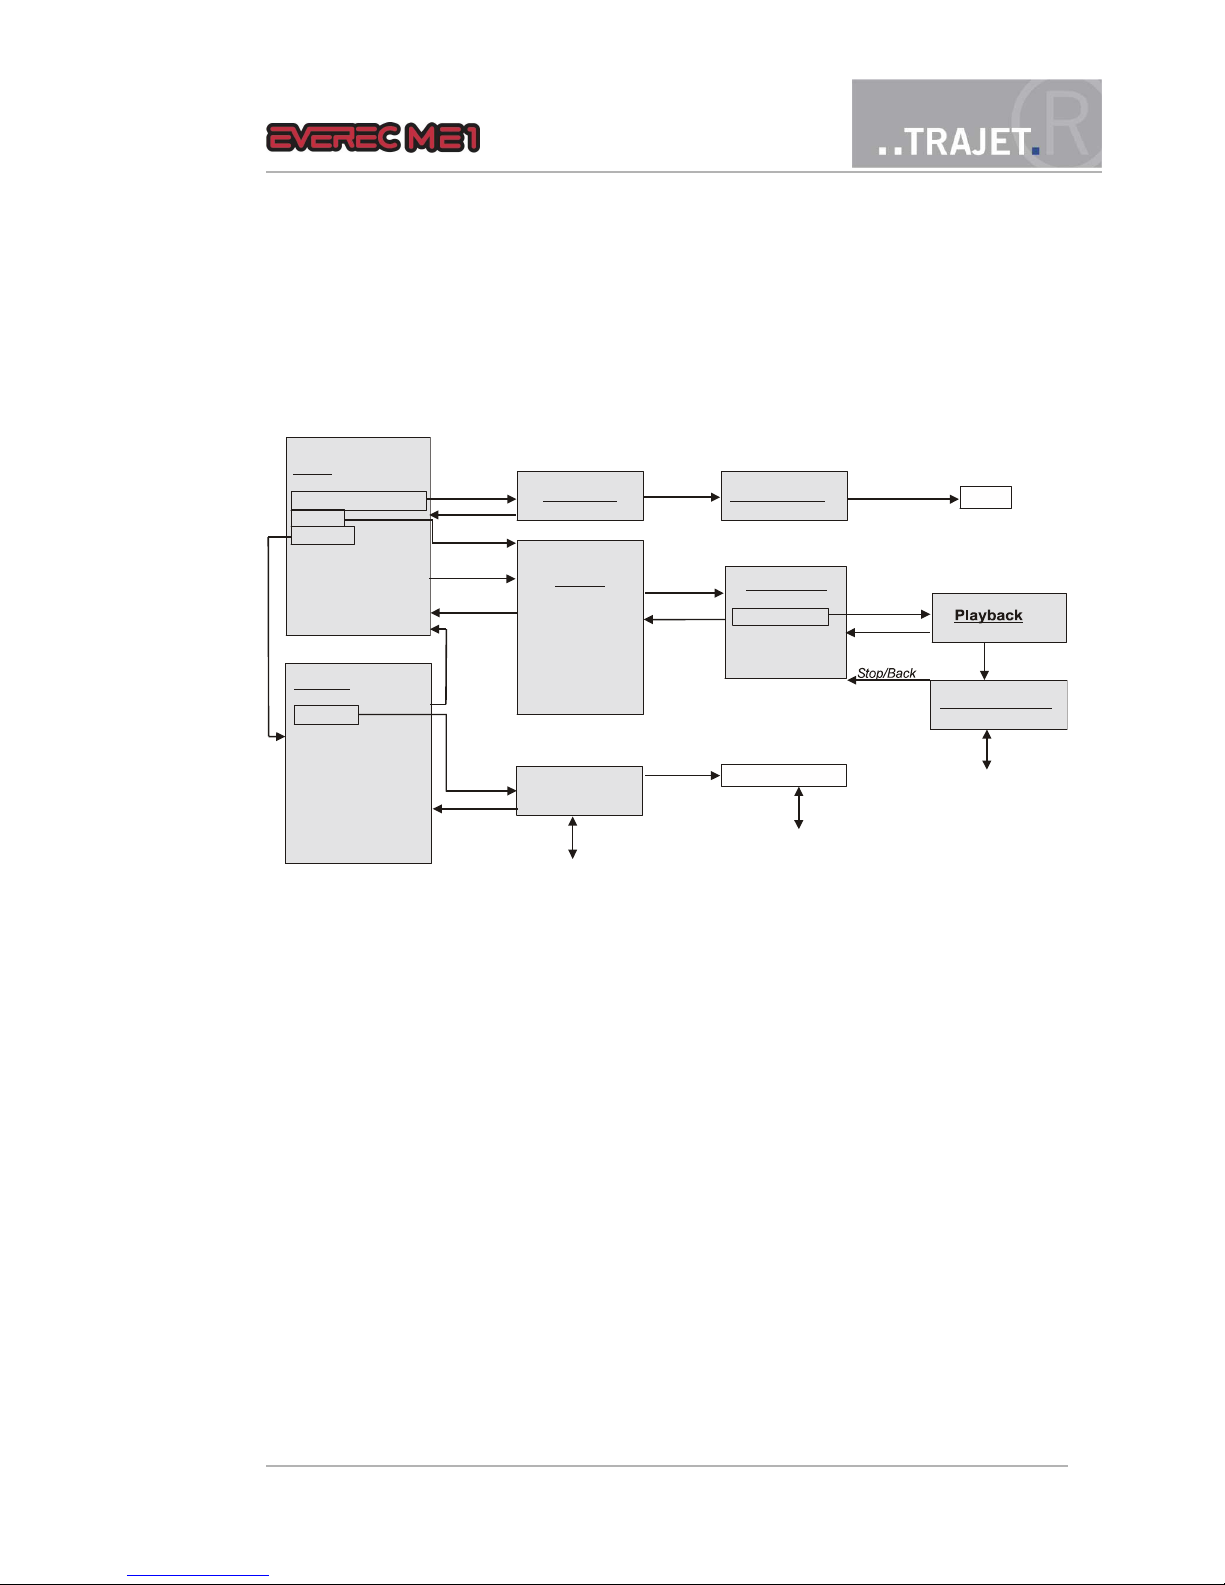
7.3 Menu structure in the display
The illustration shows the display screen (grey background) and which button (arrows) to use to
move from one menu to another.
The display always shows 3 menu entries. Scroll up or down using the arrow buttons to reach the
other entries. Select the desired entry by pressing the “select” button
7.4 Live video preview
The first entry in the menu is Live Video. When you press the “select” button, you will see the
current view of the camera on the monitor, without making a recording. In the bottom left of the
image you can see the date, and at the bottom right, the current time is displayed with hours, minutes, seconds, and milliseconds. These displays are also present in the recording.
© July 2008 Page 14/33
Figure 6: Menu structure
Instruction Manual
Select
Select
Select
Stop/Back
Stop/Back
Arrow buttons
Playback speed
Stop
Stop/Back
Select
Select
Next/previous number
Stop/Back
Select
Movies
RECxxx time
REC000 time
.
REC001 time
Select
Live Video Record Video
Movie infos
Play
Delete file
Menu
Live Video Preview
Movies
Options
Format Disk
Reset Settings
System Information
Firewire HDD
Power Off
Options
Set clock
Video Resolution
Time Overlay
Ring Buffer
Language
Audio Levels
Display Brightness
Timezone
Input 1
Set clock
Playback Pause
Adjust values
Arrow buttons
Select
Select
Stop/Back
Number selected
Arrow buttons
Stop recording
Stop/Back
Stop/Back

7.5 Recording
7.5.1 Start recording
Start recording by either
pressing the switch on the camera cable; the switch engages and the LED on the switch
flashes.
pressing the Power switch on the top of the recorder again
using the side buttons, press the “Select” button while live preview is running.
LED 1 - „Recording“ starts to blink.
A display is shown at the upper edge of the monitor, in addition to the live image.
The red dot indicates that recording is in progress
The bar indicates the space available in the storage medium. White indicates used memory, and free space is transparent.
The time code shows the run time of the current recording.
Note: The display switches itself off automatically after 40 seconds. Activate it again by pressing
any side button.
Figure 7: Recording
© July 2008 Page 15/33
Instruction Manual

7.5.2 Stop recording
Any recording started with the buttons on the recorder can be stopped by pressing the
'Stop recording' button on top of the recorder.
A recording started using the switch on the camera cable must be stopped by pressing
the switch again. This releases the switch, the LED in the switch stops blinking but illuminates permanently.
Next to the Power switch, on the top
of the recorder, is the button to stop
recording.
After stopping the recording the display shows again the menu activated before starting to record
If you have deactivated the ring buffer, the recording stops when there is only 10 mbyte free memory left. The recording also stops when the camera's video signal is interrupted.
Caution: Do not remove the memory card while a recording is running. The current recording will
not be properly completed, and is initially not be able to be replayed.With either the program “Video Analyse” or “Everec Player” the recording may be repared and playback is possible.
If the memory card is removed, the recorder turns itself off.
Note: If the batteries are not able to maintain the operational voltage while recording, the recording is stopped and a prompt to recharge the batteries is shown in the display
7.5.3 Audio recording
The microphone integrated into the camera cable is always used for the audio recording. The video file also contains the audio data. In the menu item “Audio Levels” you can adjust the gain of
the audio signal while recording and the volume during playback.
© July 2008 Page 16/33
Instruction Manual

7.6 Movies - Playback
The sub-menu “Movies” is displayed when you turn the recorder on. Here you can see a list of all
recorded videos, or the message If you want to play back or delete videos from this menu, select
the “Movies” item using the arrow buttons. Press the “Select” button to display the list. or “No
Movies” if the memory card is still blank. The most recently recorded film is shown at the top.
The videos are numbered sequentially, starting with REC000. Time and date indicate the beginning of the recording.
Note: Recordings transmitted to a PC will be shown in the Explorer with the time the recording
stopped.
Figure 8: List of recorded videos
© July 2008 Page 17/33
Instruction Manual

Figure 9: Playback - in the Pause status here
Select a video recording using the arrow buttons. The selected video has a blue background.
Press the “Select” button to reach a menu for this video, in which you can start playback, at normal speed at first.
Pressing the “Select” button again pauses the video.
Playback options, speed and direction, can be changed using the arrow buttons. The actual option is displayed at the top of the image, together with the duration of the recording.
© July 2008 Page 18/33
Instruction Manual
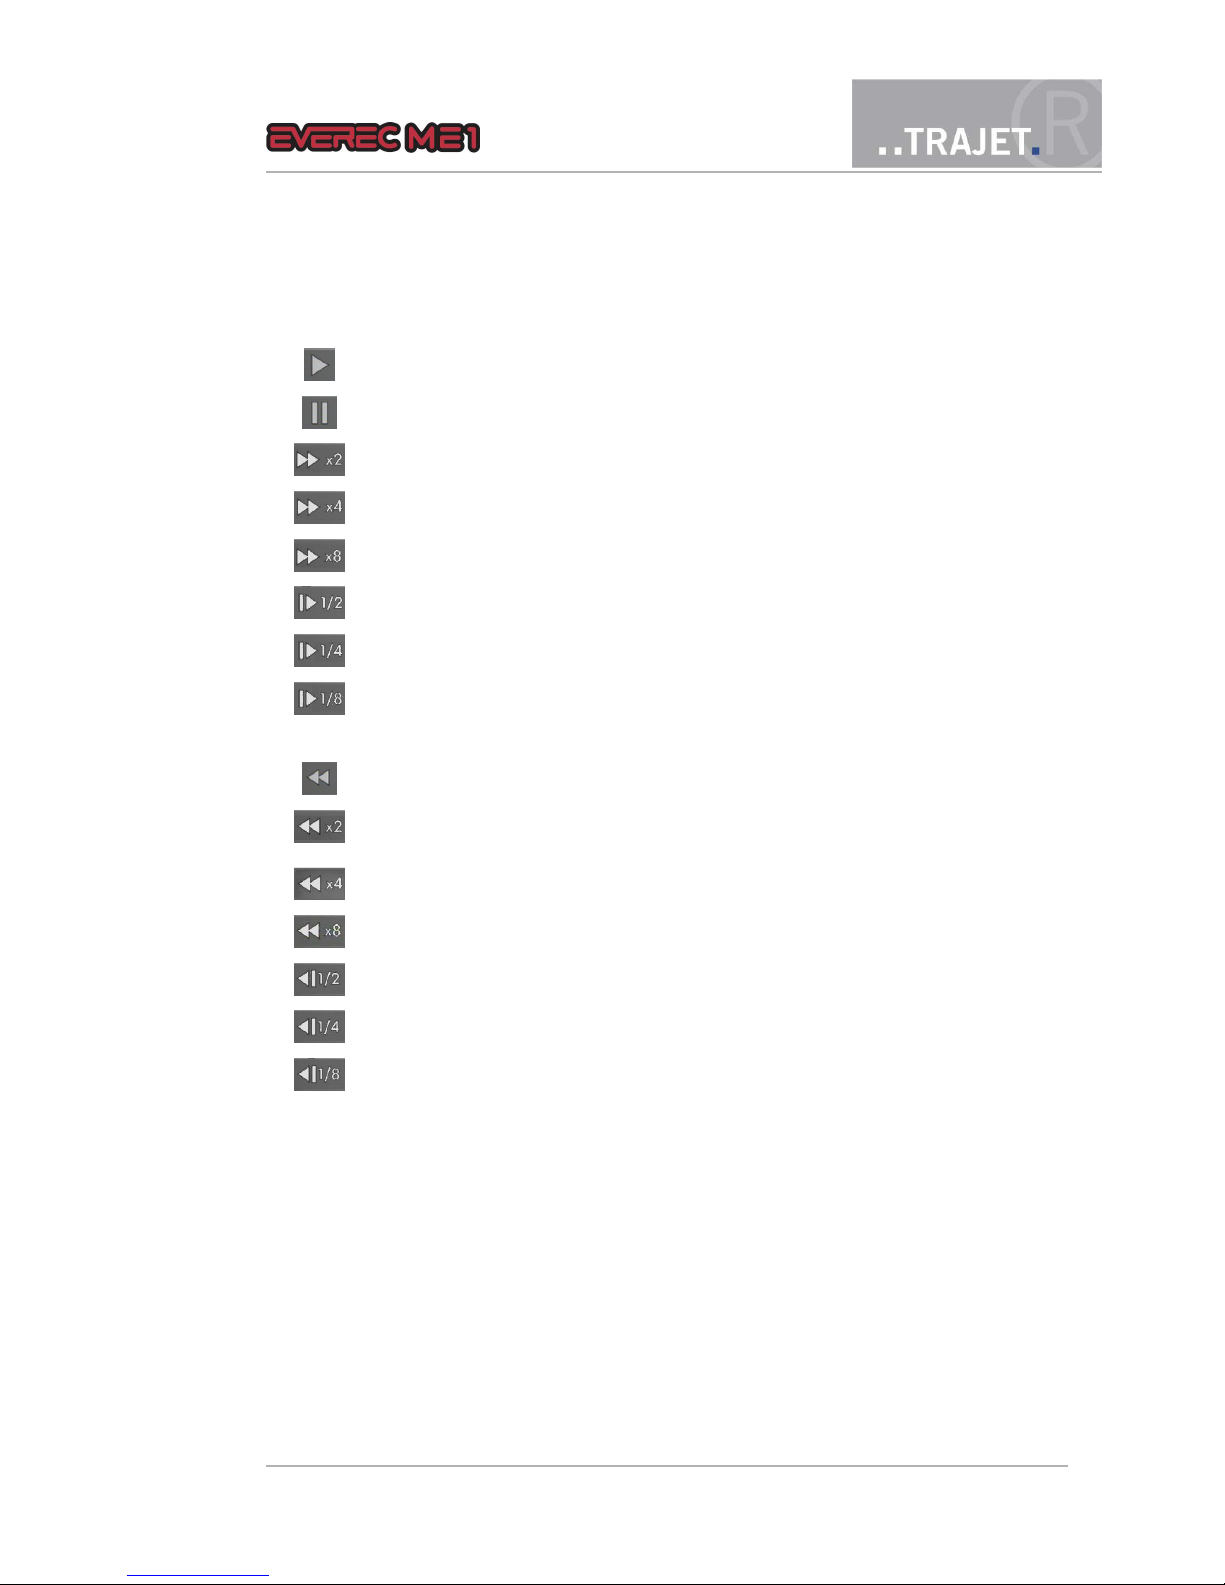
List of playback options
Playback at normal speed
Pause
Fast forward at double speed
Fast forward at four times normal speed
Fast forward at eight times normal speed
Slow forward at half speed
Slow forward at one-quarter speed
Slow forward at one-eighth speed
Reverse playback
Fast reverse at double speed
Fast reverse at four times speed
Fast reverse at eight times normal speed
Slow reverse at half speed
Slow reverse at one-quarter speed
Slow reverse at one-eighth speed
The bar shows the ratio between the length of the total recording and the length of the recording
which has been played back (white). The time indicates the duration of the recording already
played back.
Pressing the “Stop/Back” button ends playback. The display shows the information on this video
again.
© July 2008 Page 19/33
Instruction Manual

7.7 Configuration settings
Select the “Options” item from the menu, and press the “Select” button. You will see a submenu with configuration options.
7.7.1 Set clock – setting time and date
The device is set to the current time upon delivery. If you want to change it anyway, adjust the
system time with this menu item.
Move to the number to be adjusted using the arrow keys (the selected number now has a
light blue background)
Select with “Select” (the selected number now has a grey background)
Adjust the number using the arrow buttons.
Confirm with “Select.”
Exit the menu by selecting Ok with the “Select” button.
Figure 10: Setting time and date
7.7.2 Video resolution
With this menu item, you select the recording rate and therefore the storage space on the memory card.
720x576@25fps (frames per second)
720x288@50fps (frames per second)
720x288@25fps (frames per second)
© July 2008 Page 20/33
Instruction Manual

Figure 11: Setting the video resolution
Select the desired video quality and press the “Select” button. The setting is saved, and the display shows the Options menu again.
Recording using the MPEG process causes different amounts of data, depending on the image. If
the image changes drastically, then the amount of data is greater; if it remains about the same,
then the amount of data is reduced. The recorder tries to reach the choosen data rate adjusting
the compression. If there is a lot of movement in front of the camera the image quality is decreased.
7.7.3 Time overlay
With this menu item you can switch on or off the time overlay shown in the images in live view
and recording.
7.7.4 Ring buffer
With this menu item you can decide whether the recording should stop or overwrite the already
stored recordings when there is only 10 mbyte free memory left, beginning with the oldest.
On Overwrite the already stored recordings
Off Stop the recording
7.7.5 Language
With this menu item, you can select between German and English for the menu language. The
language is changed as soon as it is selected.
© July 2008 Page 21/33
Instruction Manual

Figure 12: Setting the language
Select the desired language and press the “Select” button. The setting is saved, and the display
shows the Settings menu again.
7.7.6 Audio levels
This menu item allows you to adjust the sound settings.
Volume Volume during playback
Gain Amplification of the input signal
Figure 13: Audio adjustments
You can adjust both settings with a slide control. When accessing the sub-menu the top of the
slide control is highlighted blue.
© July 2008 Page 22/33
Instruction Manual

To adjust the slide control against the scale
press the “Select” button, the slide scale is now shaded grey
move the slider up or down against the scale using the arrow keys.
press the “Select” button again, and lock the position. The colour of the slide control is
now blue again.
use the arrow keys to adjust the focus. A non-highlighted slide control is white.
exit the menu via OK with the “Select” button
7.7.7 Display brightness
You can adjust display brightness to levels from 1 to 8. 1 is the darkest setting. The digit is marked (blue shaded) when the sub-menu is accessed.
Figure 14: Setting the display brightness
press the “Select” button, the digit turns grey
adjust the digit by means of the arrow keys
pressing the “Select” button again fixes the setting. The digit is now blue shaded again.
using the arrow keys you can now adjust the focus
exit the menu via Ok with the “Select” button
If you leave the menu via „Cancel“ or „Stop/back“ the already set brightness remains.
7.7.8 Time zone
Here you can select the appropriate time zone for the location of the recorder CET (Central European Time) is preset.
© July 2008 Page 23/33
Instruction Manual

Select the desired time zone and press the “Select” button. The setting is saved, and the display
shows the Settings menu again.
7.7.9 Input 1 – Changing between switch and pushbutton
Integrated in the camera cable is a switch, the snaps in when pressed to start a recording. If it is
substituted by a pushbutton (that returns to basic position after being pressed), you must select
„Button“ here.
7.8 Format Disk – Erasing the CF card
With this menu, you can format the memory card if needed. Select “Format” and press the “Select” button. The CF card will be irreversibly formatted once this action is confirmed. There is
then no data on the card.
Figure 15: Formatting the memory card (CF card)
Press the “Stop/Back” button, or select “Cancel” and press “Select”, if you want to keep the
data on the disk.
Note: You can erase individual videos from the “Playback” menu.
© July 2008 Page 24/33
Instruction Manual

7.9 Reset settings
This menu item allows you to restore the default settings. Recordings stored on the CF card will,
however, be retained.
Figure 16: Reset to factory settings
© July 2008 Page 25/33
Instruction Manual

7.10 System information
The firmware version number and recorder serial number are displayed here.
Figure 17: System information
7.11 Firewire HDD
With Firewire mode you can transmit the video recordings directly to a PC.
To allow a connection between recorder and PC using the FireWire or IEEE 1394 interface you
can switch the recorder to FireWire mode.
To do this connect a FireWire cable to the connector at the bottom of the recorder and the according connector to the PC.
© July 2008 Page 26/33
Instruction Manual

Figure 18: Switching to Firewire mode
Select „Firewire HDD“ with the “Select” button
On the recorder is displayed „Firewire mode“
On the PC you can see the recorder now as a drive with name TRAJETDVHDD
It ist possible to copy or to move movies, to playback them with a Mediaplayer program or
to open and handle them with „Video Analyse“ od „Everec Player“
To exit the FireWire mode remove the cable from the recorder and press the “Select” button again.
In Firewire mode the recorder is supplied with power via the PC. The batteries are not used.
7.12 Turning off
If you press the 'Stop / Back' button for longer than two seconds, the recorder switches
off.
The last menu item, “Power Off” serves to switch off the recorder. Select “Switch off device” and press the “Select” button. The device shuts off.
© July 2008 Page 27/33
Instruction Manual

8 Error messages
The recorder displays the following messages on the screen in case of errors:
Message Cause
Camera not connected The camera is not (correctly) connected, or is malfunctioning
No camera signal While recording the camera signal is missing. (The recording
will be continued, when the video signal is back.
Memory card missing No CF card is present when switched on
Hard disc not readable A CF card is present, but not readable
Recording failed No recording can be made
Recording blank The recording file was created, but does not contain any data
Playback failed The recording cannot be played back, e.g. it was not comple-
ted correctly
Low Voltage The battery charge is to low for recording
If another message appears, then the recorder has an internal defect. Contact Trajet GmbH for
support.
© July 2008 Page 28/33
Instruction Manual

9 Update – u
pdating
firmware
It is possible to update the recorder’s firmware via an update. The Trajet GmbH will provide you
with new firmware in electronic form. The name of this file always starts with the letters “upd”,
and the extension is “.bin”.
The update procedure is as follows:
Copy the Firmware file on a Flash memory card, which you insert into the recorder.
Switch on the recorder order while holding down the “Stop Recording” button.
Release the button.
The device now performs the update. Initially, LED 1 flashes, then LED1 and LED 2 will
flash alternately. Do not switch off the recorder during this process.
At startup and in the System Information menu item, you will see the new version number.
© July 2008 Page 29/33
Instruction Manual

10 Playback on a PC using the program Everec
Player
Everec Player is a program with features that go well beyond the simple facility of playing back
films recorded with the Everec ME1.
Figure 19: Main window Everec Player
The program can be found on the CD-ROM that came as part of the package, in the directory
Software/Video analysis/. Install the program onto a PC meeting the following requirements:
Standard PC with card reader
RAM storage at least 512 MB
Windows XP, Service Pack 2
Direct X 9
Program instructions can be found on the CD-ROM in the directory Software/Video Analyse/Manual.
© July 2008 Page 30/33
Instruction Manual

11 Technical data
Camera input FBAS, 75 Ohm connector
Display 1.5 inch color display
Kamera plug Hirose HR10A-12Pin for analog cameras, prepared for Trajet
Megapixel cameras with up to 2048 x 1536 pixel
Audio input Standard line in, mono
Audio compression MP3, 128 kbs, 192kbs or VBR
Recording rate approx. 5 MBit per second
Video compression MPEG-4 at 25 fps and 704 x 576 pixel resolution
MJPEG at 2048 x 1536 pixel resolution
Video format Quicktime® mov Format
File system FAT32
Memory card Compact Flash card, 4 gbyte
Battery 4 x Standard Mignon AA NiMH
Battery life 10 hours standby or up to 4 hours continous recording, incl.
supply of the camera
Certification CE
Temperature range -10 to 65°C
Dimensions 70 x 33 x 135 mm
Weight approx. 280 g with battery and memory card
© July 2008 Page 31/33
Instruction Manual

11.1 Technical data of the camera
Housing: Condensation free IP64 bullet camera
Sensor 1/3 inch Sony CCD colour sensor
Opening angle 74°
Format PAL, Standard FBAS
Resolution 752 x 582 pixel with 580 TV lines
Temperature range -10 to 50°C
Min. Illumination 0,1 Lux at F 1.2
Dimensions 21mm Ø, length 70mm
Weight 78g
© July 2008 Page 32/33
Instruction Manual

11.2 CE conformity
DECLARATION OF CONFORMITY
Type of device: Digital data processing device
Product name: Everec ME1
We hereby declare that the named device, on the basis of its design and construction in the version introduced for sale by us, meets the directives of the European Union, in particular the EMC
directive per 89/336/EEC.
The following standards were reference in evaluating conformity:
Emitted interference: DIN EN 55022 : 2003-09, Class B
Noise immunity: DIN EN 55024 : 1998
The device listed above is therefore provided with the CE label.
Braunschweig, June, 6th 2007
Christian Helck
Managing Director, Trajet GmbH
© July 2008 Page 33/33
Instruction Manual
 Loading...