

Instruction Manual
Everec 260/261
Version 1.4
© Trajet GmbH March 2012

Contents
1 General information 4
1.1 Scope of delivery 5
2 Camera 6
2.1 Front view 6
2.2 Side view 7
2.3 LEDs 8
2.4 Lenses 8
3 Assembly 9
3.1 Fixing by adherence 9
3.2 Fixing with screws 12
4 Installation in a network 14
4.1 How to access your Everec 260/261 for the first time 14
5 Login and Liveview 15
6 The buttons 18
7 Configuration 20
7.1 Video 21
7.1.1 Streams 21
7.1.2 Privacy Masks 23
7.1.3 Overlay (Text in the image) 24
7.1.4 Audio (Everec 261 only) 24
7.2 Recording 25
7.2.1 Image 25
7.2.2 Video 27
7.3 Event - Motion Detection 30
7.4 System 32
7.4.1 Network 32
7.4.2 Time – settings 35
7.4.3 User - Creating users with different authorizations 37
8 Videos – List of the recordings in the internal memory 39
9 HTTP commands 41
9.1 Access to JPEG and Motion JPEG (MJPEG) 41
9.2 Direct camera commands 41
9.3 Configuration requests and settings 42
© March 2012 Page 2/48
Instruction Manual
Everec 260/261

10 Maintenance Mode - Administration 43
10.1 Deleting the internal memory 43
10.2 Factory Reset 44
10.3 Updating the firmware 44
11 Technical Data 46
12 Appendix 47
© March 2012 Page 3/48
Instruction Manual
Everec 260/261

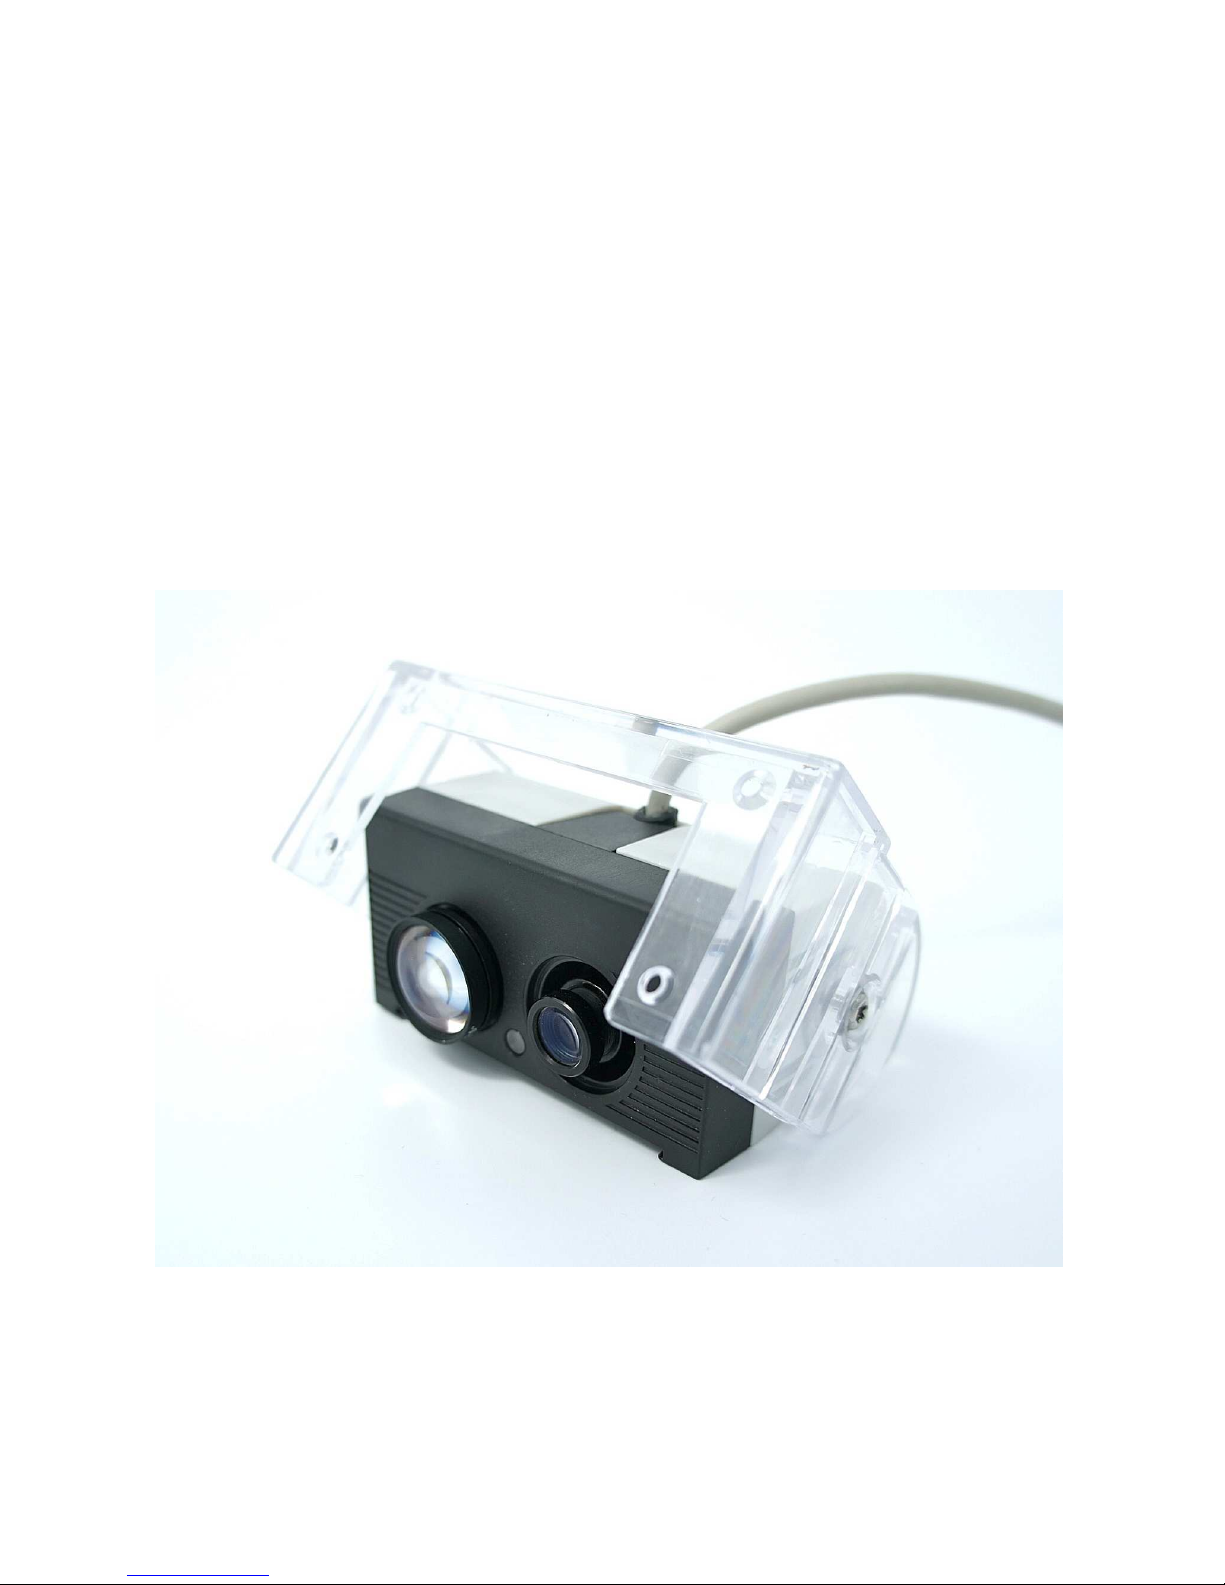
1 General information
The Everec 260/261 is a compact network camera especially developed for use in mobile applications. Although it is extremely lightweight in construction, it is also exceptionally sturdy. Its innovative design takes all the special requirements essential for installation in vehicles into account. One important characteristic is the protection of passengers in accidents, which has been
optimised through the housing design. Using a flexible device, installation times are reduced and
the orientation to the required image section is greatly simplified.
Two sensors and the associated lenses with fixed focal lengths allow switching between two views.
Here a two-stage zoom function is realised which, having no movable parts, is robust and maintenance-free. An LED on the front can be used to signal camera activity. This is used for example to
fulfil the marking obligation for video recordings.
The possible areas of application for this camera are numerous. The Everec 260/261 is the top
choice for police video safety precautions, video documentation at logistics companies, video monitoring in security vans or driver protection in taxis. In addition, the camera provides the best solution for customers in a wide range of mobile applications. Due to its modular construction, customer-optimised adaptation to highly specific tasks, such as the integration of GPS, audio recording or night vision suitability, is possible.
Notice: If applicable, familiarize yourself with the laws for the operation of supervision installations and ensure that you follow them in the installation of the Everec 260/261.
© March 2012 Page 4/48
Instruction Manual
Everec 260/261

1.1 Scope of delivery
The scope of delivery includes the following components :
Everec 260/261 incl. 0.75 m cable with RJ45 socket (cable type 1)
or
Everec 260/261 incl. cable (cable type 2)
Installation instructions
License information
Additionaly you can obtain the following components:
Power pack
© March 2012 Page 5/48
Instruction Manual
Everec 260/261
2 Camera
The Everec 260/261 is equipped with a plastic housing, which is screwed in a transparent
bracket. This allows to fix the camera in short time to smooth surfaces as window panes or screw
it to suitable surfaces, using the incorporated holes. The adjustment of the camera in the desired
angle after beeing mounted to any inclined surfaces is possible due to the flexible bracket.
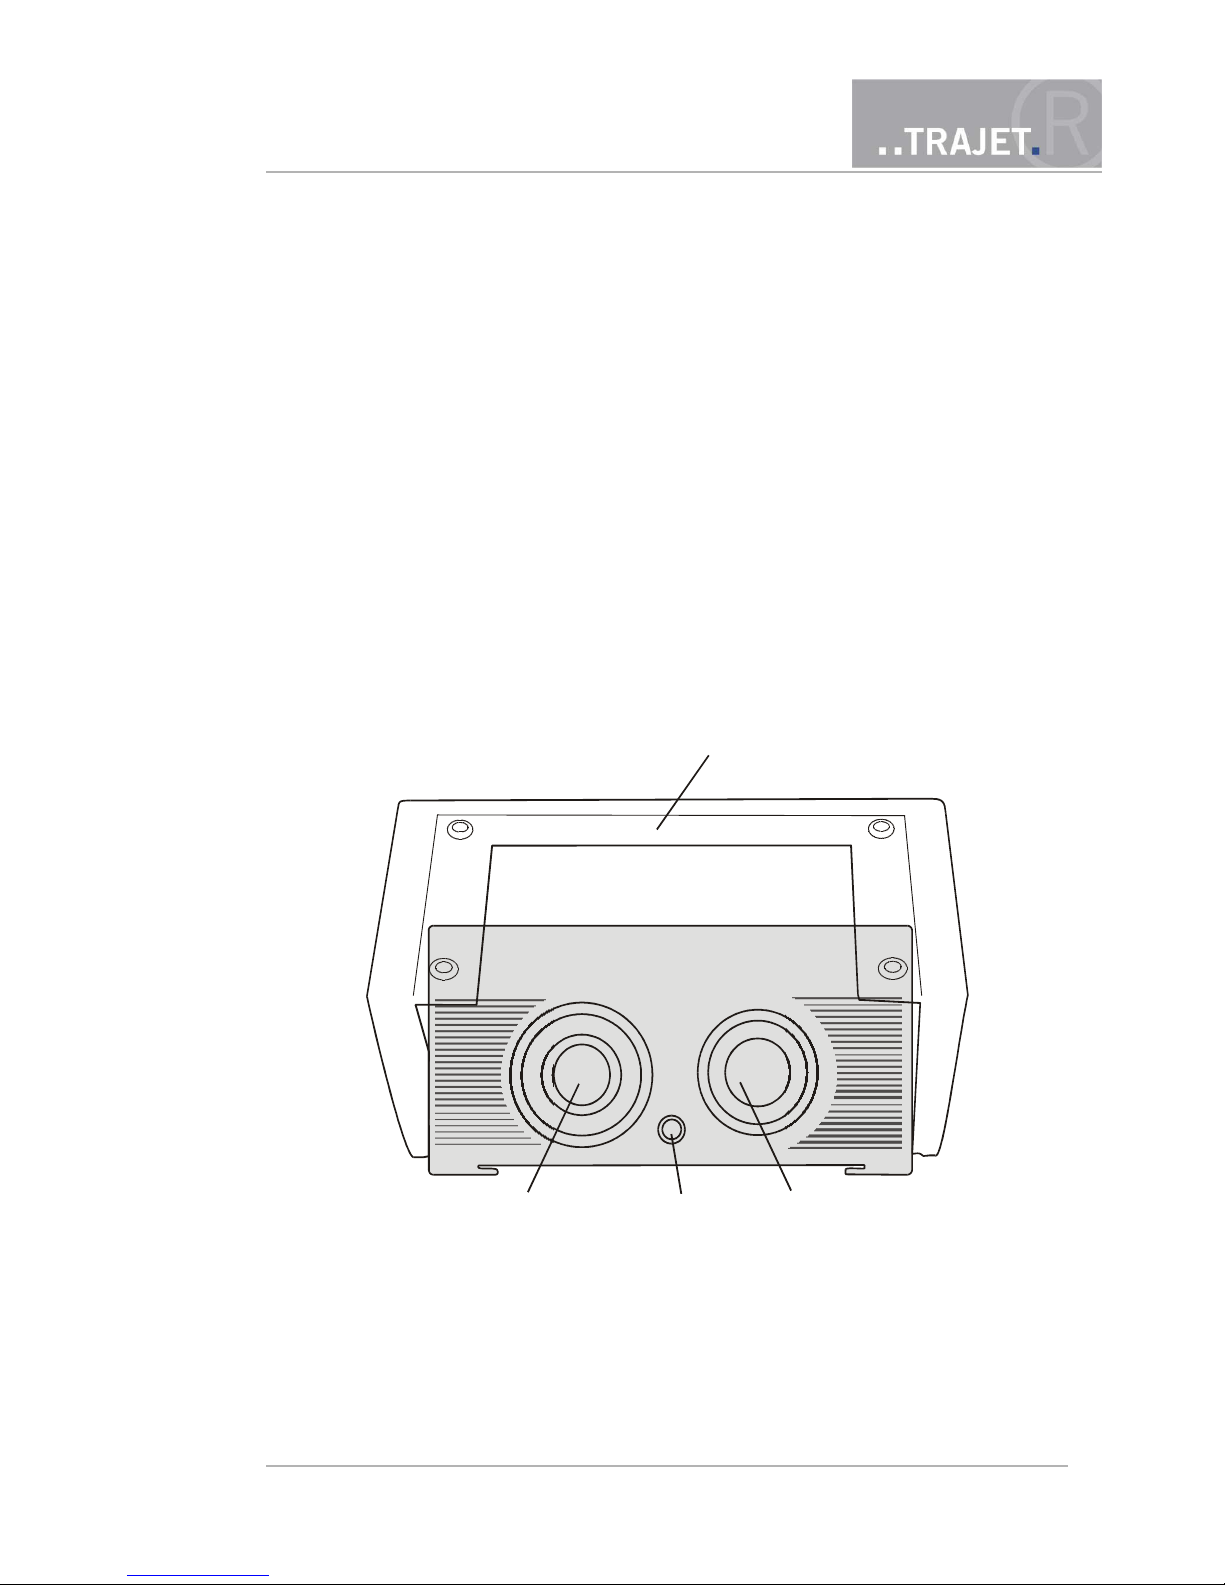
2.1 Front view
Figure 1: Front view Everec 260/261
© March 2012 Page 6/48
Transparent plastic bracket
Wide-angle lens
LED
Telephoto lens
Instruction Manual
Everec 260/261
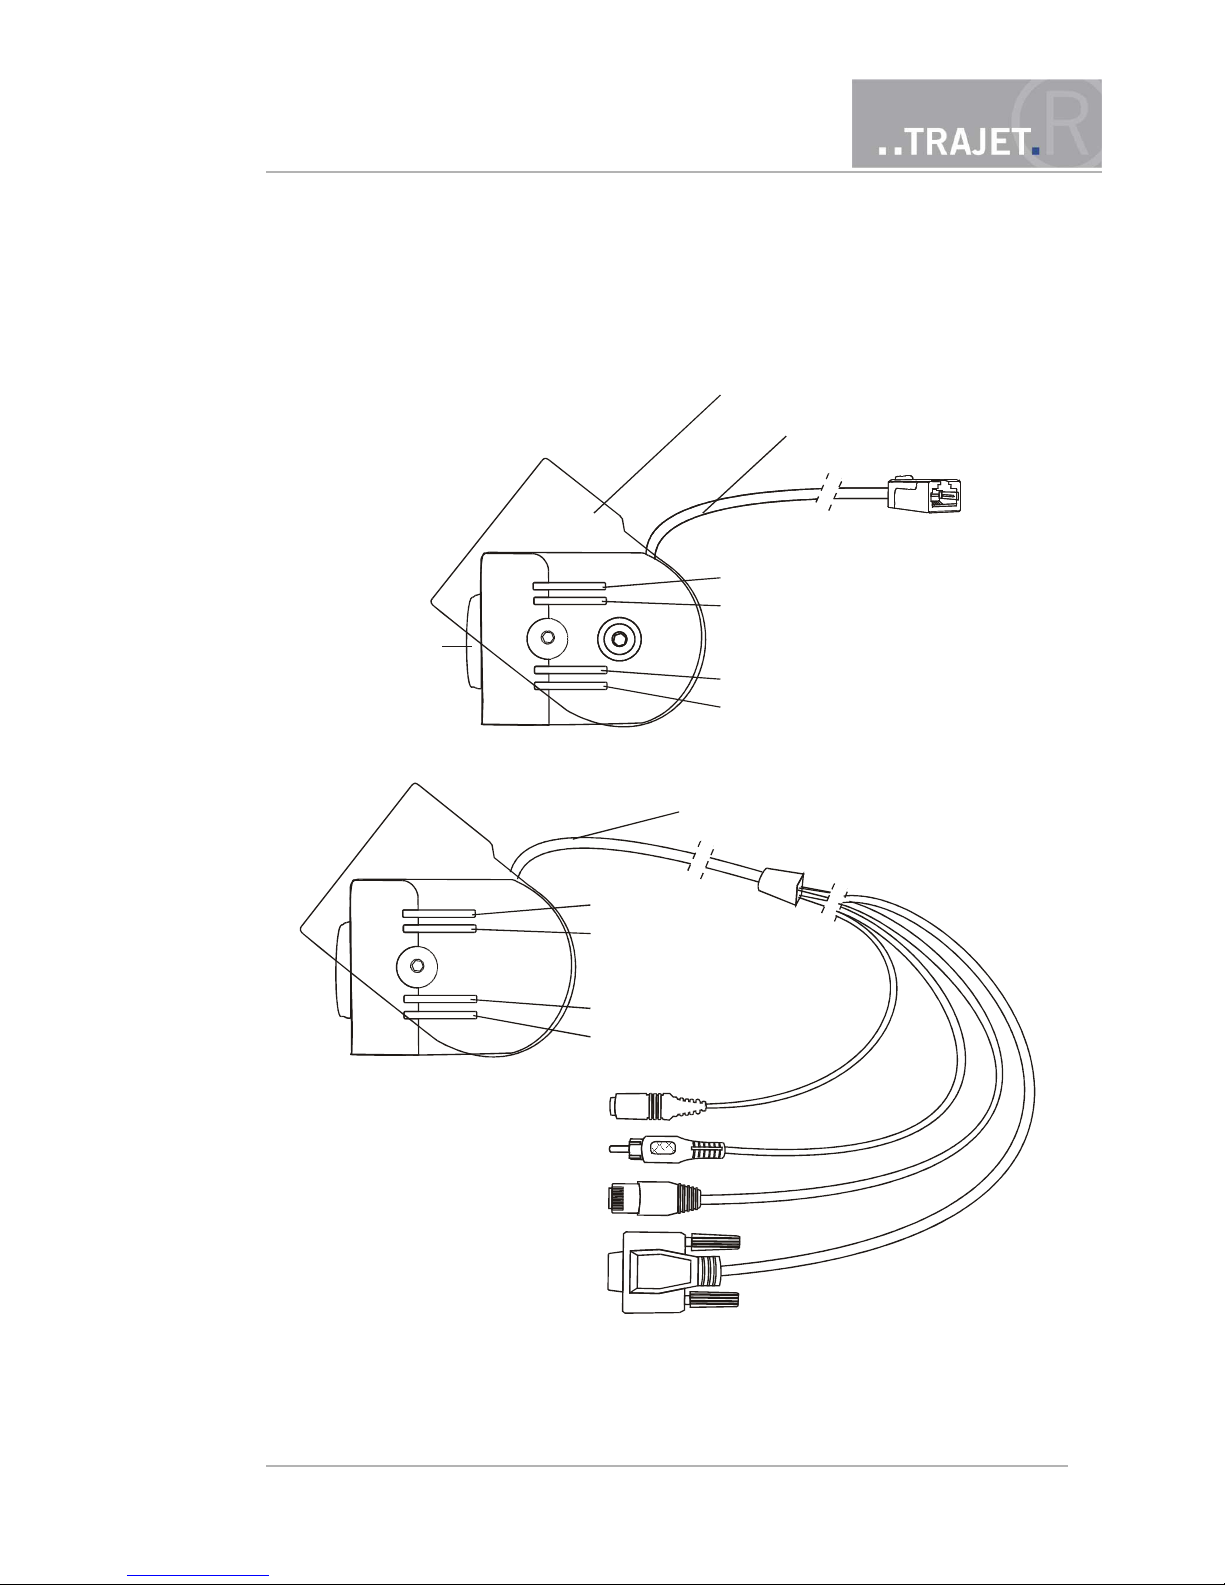
2.2 Side view
Figure 2: Side view Everec 260/261 – cable type 1 with RJ-45 socket
Figure 3: Side view Everec 260/261 – cable type 2
© March 2012 Page 7/48
Instruction Manual
Everec 260/261
transparent plastic mounting
LED Power
LED Ready
LED Link
LED Recording
Cable with RJ-45 socket
Objektivs
Power plug
Video out plug
RJ-45 network plug
General purpose IO serial
LED Power
LED Ready
LED Link
LED Recording
Cable

2.3 LEDs
The LEDs indicating the camera functions are located at one side of the camera.
LED P white is lit as soon as the Everec 260/261 has power
LED R red lights up shortly while booting, goes out then and is lit when
recording
LED M white flashes irregularly while booting , flashes when connected to
Ethernet
LED L white is lit when the system is fully booted
LED Front red controlled by HTTP commands, see chapter 9.
If an error occured while booting the LED R and M are blinking three times alternately. In this
case interrupt the power supply for a moment and perform the boot process again. If the LEDs resume blinking a system error occured; contact your dealer.
2.4 Lenses
The Everec 260/261 has 2 lenses:
wide-angle lens with 3.5mm focal length, aperture angle 80° and a focus range from 2 to
10 m
telephoto lens with 16 mm focal length, aperture angle 20° and a focus range from 4 m
to infinity
Switching from one lens to the other is done by clicking a button on the webpage, see chapter 6
or using HTTP commands, see chapter 9.
© March 2012 Page 8/48
Instruction Manual
Everec 260/261
3 Assembly
The Everec 260/261 is equipped with a self-adhesive foil at the bracket. You can stick the camera, therefore, on smooth flat surfaces, such as window panes, and screw on other surfaces. Besides, there are also 4 holes for a connection with screws.
The Everec 260/261 can be fixed in 2 different ways in the bracket so that a possible attachment
beneath a surface is possible, but the alignment always remains the right way.
Loosen the two screws on both sides with a Torx screwdriver, remove the camera, insert it the
other way around and tighten the screws again.
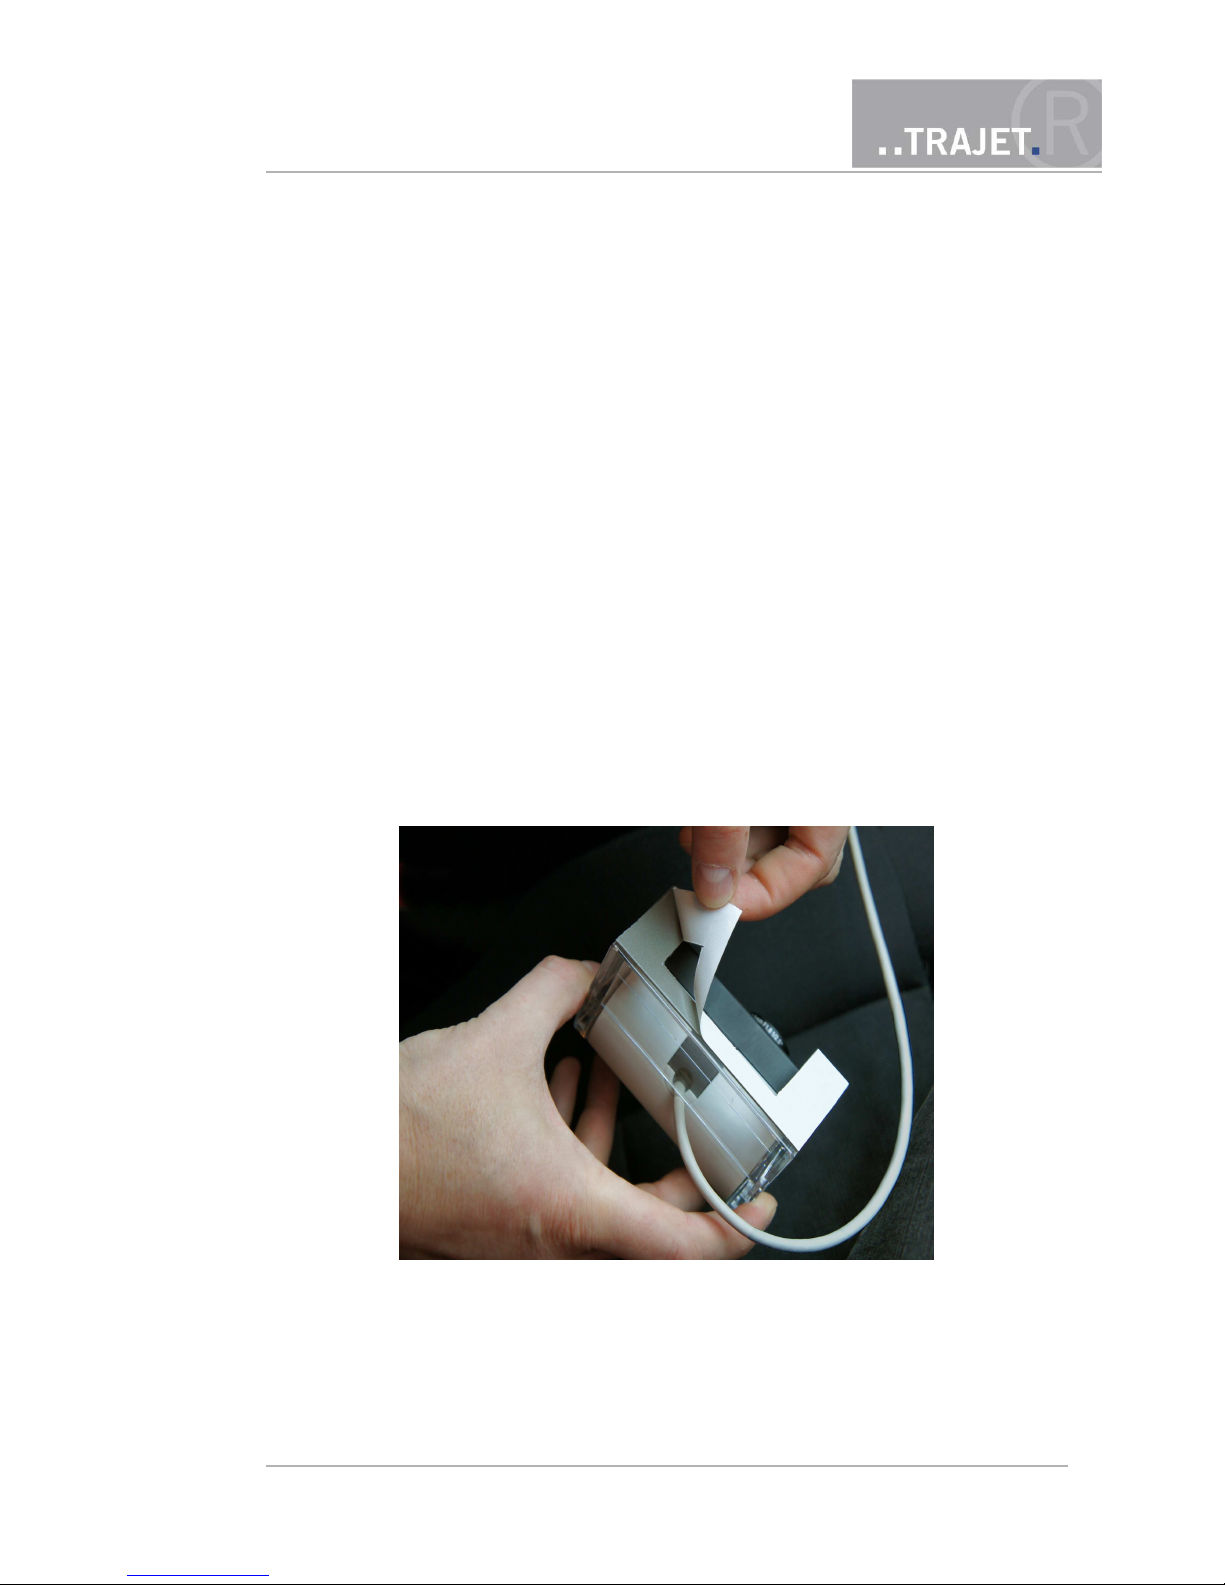
3.1 Fixing by adherence
First, clean the area where the camera should be placed. Then remove the protective
sheet from the bracket.
Figure 4: Fixing by adherence - removing the protective sheet
© March 2012 Page 9/48
Instruction Manual
Everec 260/261
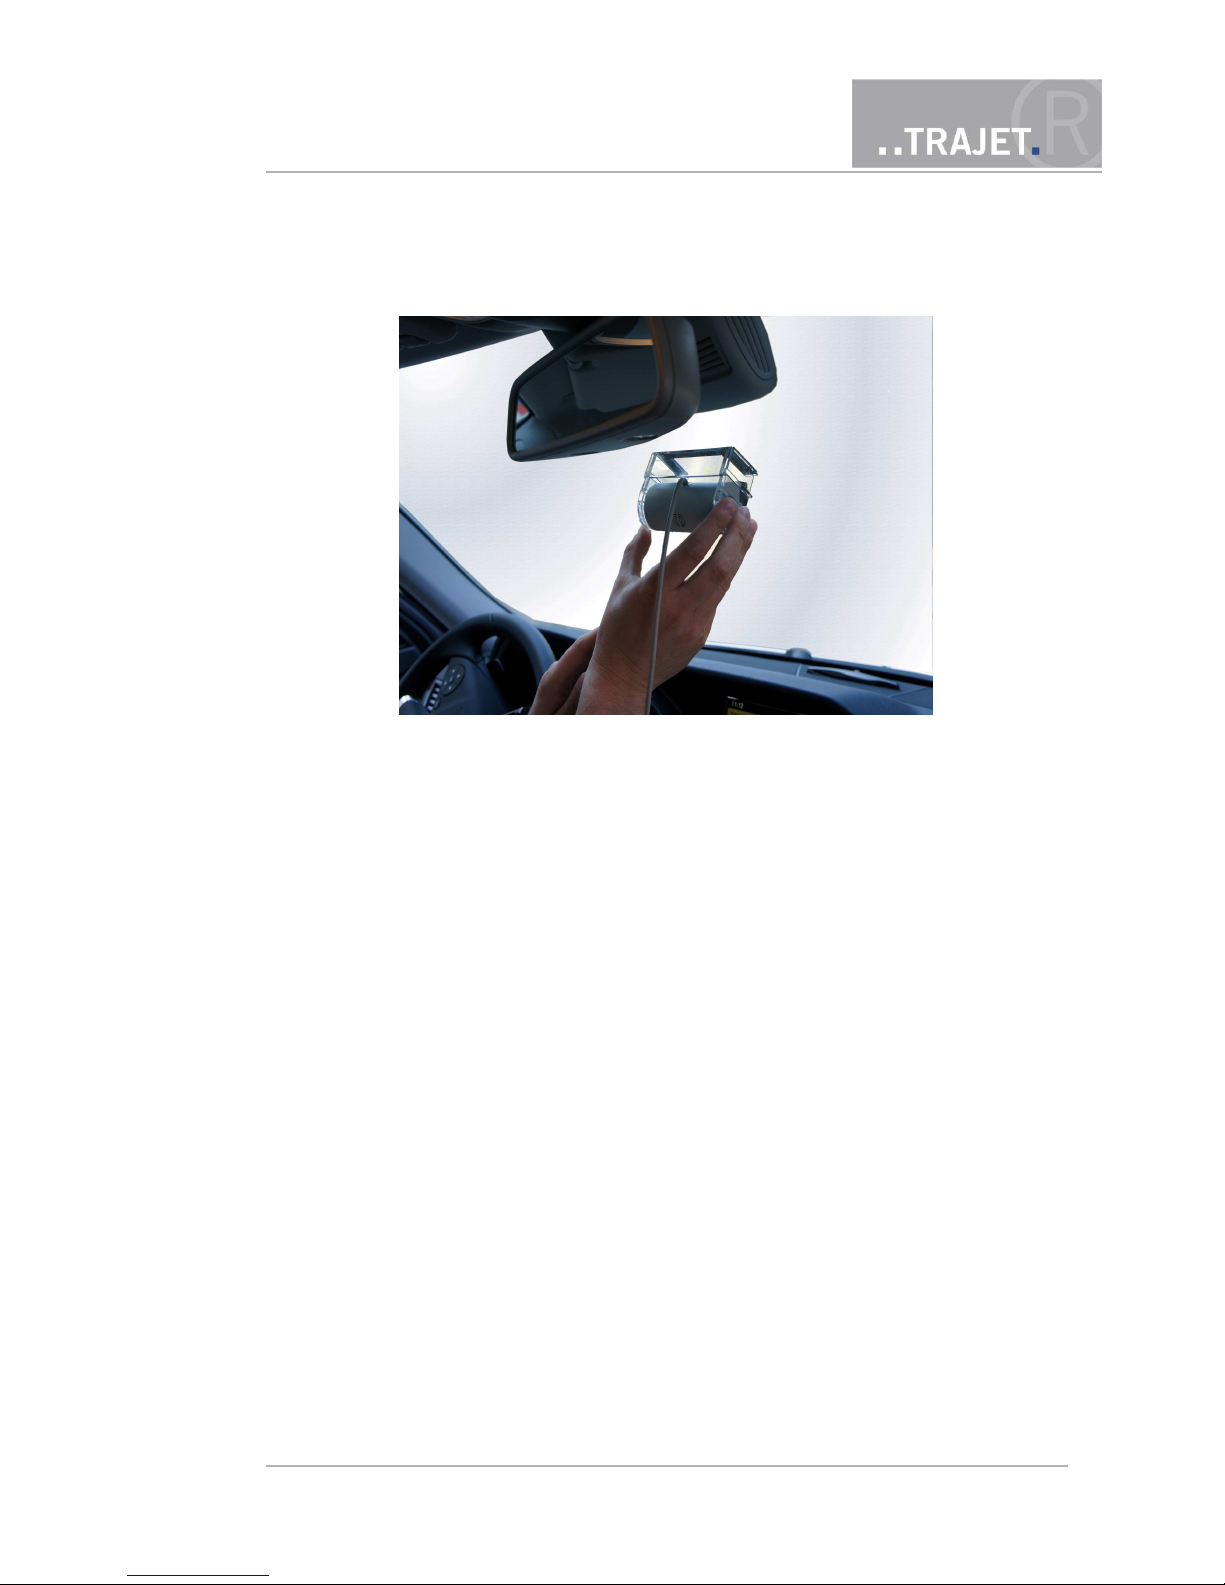
Press the adhesive surface only lightly at first, so that the position of the camera might be
changed again.
Figure 5: Fixing by adherence – positioning the camera
Check the correct adjustment of the camera by verifying the view angle with the camera
live view e.g. transmitted to a laptop.
Then press the bracket firmly. The camera is now fixed permanently.
Position the camera in the bracket so that the desired recording area is covered with both
lenses.
Connect the cable of the Everec 260/261 to a PoE switch (cable type 1: using an additional network cable). Secure the cable with suitable material so that it does not affect anything and accidental release is impossible.
© March 2012 Page 10/48
Instruction Manual
Everec 260/261
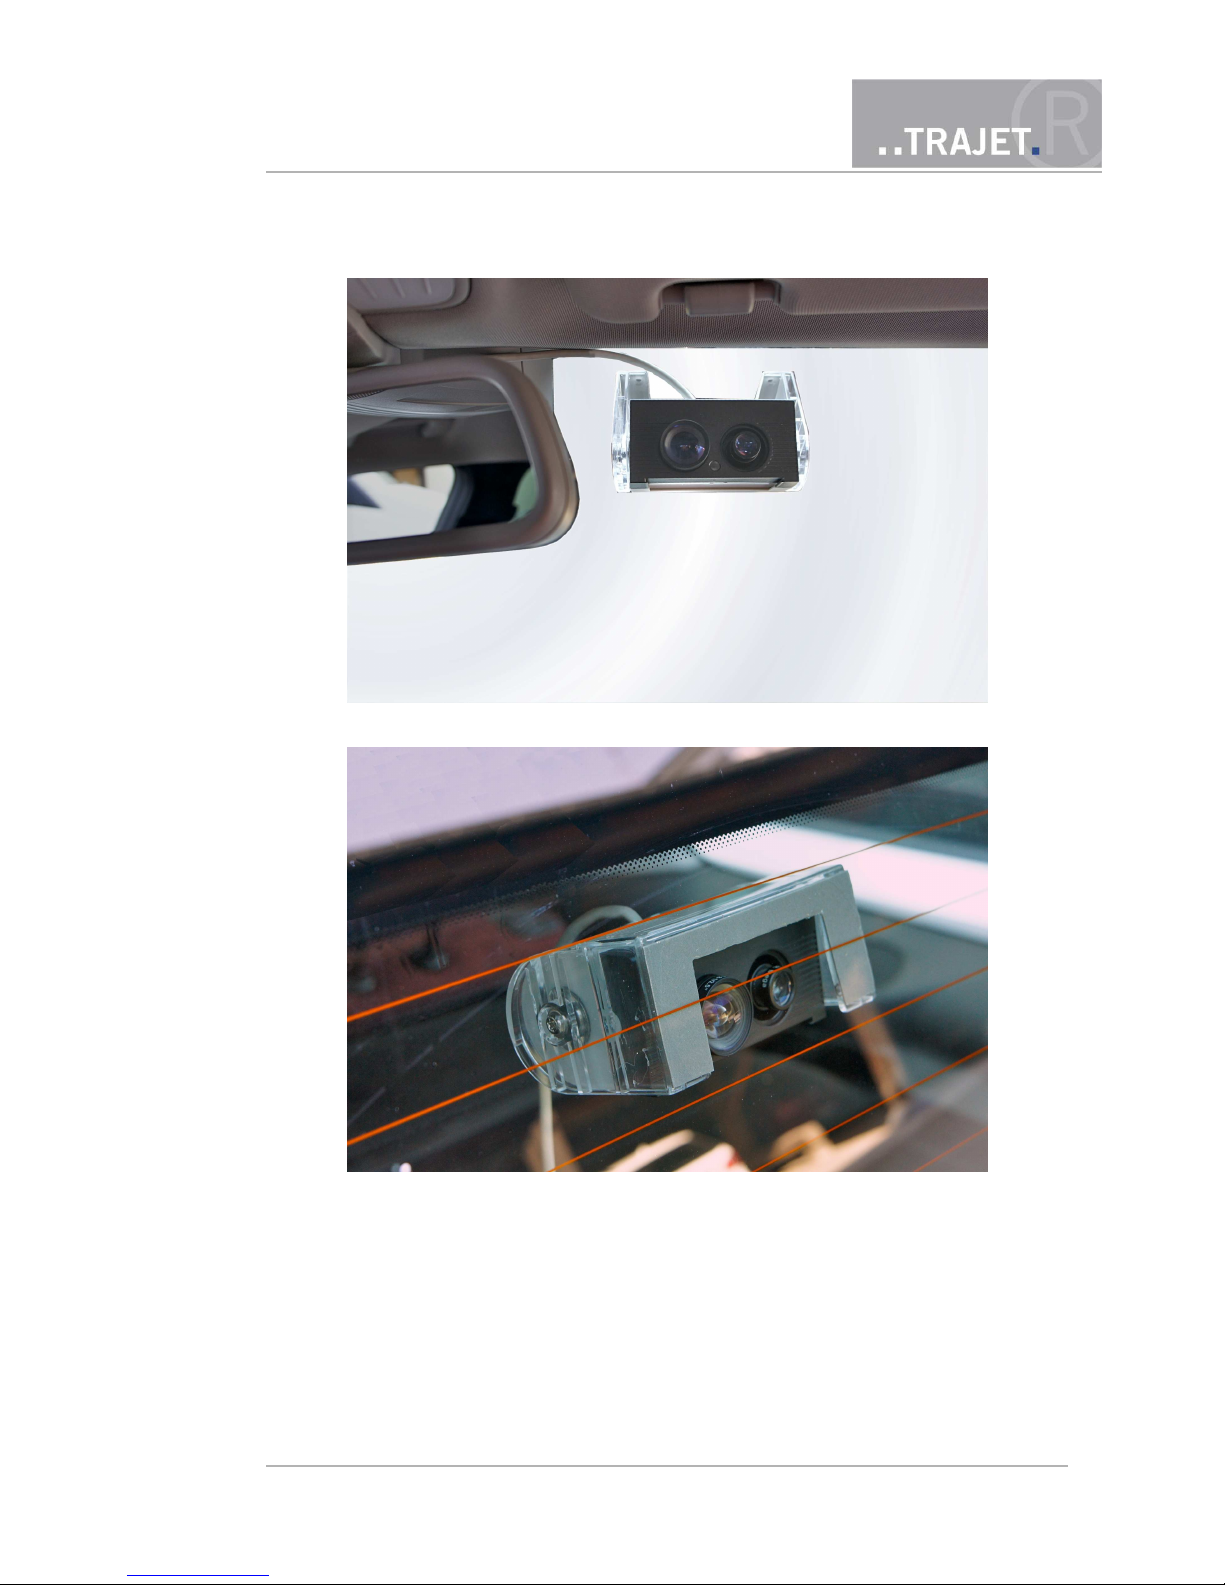
Figure 6: Passenger compartment surveillance – fixing to the wind screen
Figure 7: Rear assembly – fixing to the backlight
© March 2012 Page 11/48
Instruction Manual
Everec 260/261

3.2 Fixing with screws
Before mounting with screws make sure of the correct orientation of the camera. Hold it
or lightly fix it to the surface and verify the view angle with the view angle with the camera live view e.g. transmitted to a laptop. Mark the position of the bracket.
Loosen the two screws on both sides with a Torx screwdriver and remove the camera from
the bracket.
Fix the bracket with appropriate screws and reinsert the camera. Pay attention to the correct orientation, depending on the direction of the mounted bracket.
Connect the cable of the Everec 260/261 to a PoE switch (cable type 1: using a network
cable). Secure the cable with suitable material so that it does not affect anything and accidental release is not possible.
Attention: The camera cannot be supplied with power by a PoE injector.
Figure 8: Passenger compartment surveillance – Assembly on the dashboard
© March 2012 Page 12/48
Instruction Manual
Everec 260/261

Figure 9: Rear assembly – fixing under the roof liner
© March 2012 Page 13/48
Instruction Manual
Everec 260/261

4 Installation in a network
Upon delivery, the Everec 260/261 has a fixed IP address.
IP address 192.168.0.10
Net mask 255.255.255.0
Every time after resetting the configuration (factory reset) this IP address is active again.
4.1 How to access your Everec 260/261 for the first time
The Everec 260/261 requires an IP address to be accessible in the network.
For a start you can access the camera via the fixed IP address.
Use a network cable the connect the camera directly to a computer.
Under Windows assign an aditional IP address to the computer under “My Network Places, Properties, Local Area Connecion: Properties, TCP/IP: Properties, Advanced: add
TCP/IP address“, e.g. 192.168.0.11
Save the settings and open a browser. Enter the IP address of the camera and the login
page will be opened.
Read more over the login in chapter 5. Change the network configuration according to your preferences, see chapter 7.4.1.
© March 2012 Page 14/48
Instruction Manual
Everec 260/261

5 Login and Liveview
Accessing the Everec 260/261 can be done with the current versions of all standard browsers.
Open a browser and enter the IP address of the camera into the address line. You then access the
login page.
Figure 10: Login page
Upon delivery, the Everec 260/261 has a
user with name admin
and the password admin
For security reasons, you should change this password to avoid access to the camera by unauthorized users, see chapter 7.4.3.
Enter the set login name and the associated password and click on the button „Login“. Now you
will see the homepage with an MJPEG livestream.
© March 2012 Page 15/48
Instruction Manual
Everec 260/261

Figure 11: Live View in the browser
The Everec 260/261 provides 3 different data streams:
Stream 1 MPEG4 1280x720 pixel resolution
Stream 2 MJPEG (stream of the Live view page)
Stream 3 MPEG4 640x352 pixel resolution
The MPEG4 stream in 1280x720 resolution and the MPEG4 stream in 640x352 resolution can
be called up via the network by one network device each.
You can change the streams in data quantity and quality according to your requirements, see
chapter 7.1.1.
Transfer of the MPEG-4 streams
The transfer of the MPEG4 streams is done via the RTSP protocol. RTSP streams cannot be
played in the browser. Players that can play RTSP streams are for example the Quicktime Player
by Apple (free download for Windows and Mac under „http://www.apple.com/de/quicktime/“) or
© March 2012 Page 16/48
Instruction Manual
Everec 260/261

the VLC Media Player by VideoLan (free of charge download for Windows and Mac under
„http://www.videolan.org/vlc/“).
One or several computers can access one or several network cameras at the same time and show
the live streams. Every stream can also be integrated into a program to display several videos in
parallel.
The link under the MJPEG image automatically opens the Quicktime Player after clicking on the
browser Safari, and the stream is displayed there. However, Quicktime must be installed. To open
the link in the browser Firefox or Internet Explorer, an entry in the Windows registry may be necessary. Contact your administrator.
In case the link did not open a player, right-click the link and choose „Copy link into the clipboard”. In VLC Media Player, select „Open network stream“ in the menu „Media“ and paste the
copied link. Click the button “Play” and the stream is displayed.
© March 2012 Page 17/48
Instruction Manual
Everec 260/261

6 The buttons
After logging in, several buttons are displayed in the tab bar over the preview livestream, on the
left the active button „Live view“, next to that „Configuration“, „Videos“, „Maintenance“ and
„System information“. Klick a button to open the corresponding page.
The page „Configuration“ includes all configuration options of the Everec 260/261.
The page „Videos“ shows a table with all video files recorded on the internal memory of
the Everec 260/261. Every file has detailed information about time and video data. If audio is activated in Everec 261 you will also see information about audio data, that is included in the video files. You can download or delete files. If required, you can repair files, for example if a video recording was not correctly finalized due to a power outage, so
that it can be played in a player.
The page „Maintenance“ includes administration like setting the configuration back to
the factory settings, formatting the internal memory and installing new firmware.
If you started the maintenance mode on this page, all streams are stopped, meaning also
the recording. After finishing the maintenance mode, the recording is automatically restarted, but you must open a stream again.
The page „System Information“ contains information about the current network configuration, the available streams, the serial number and the firmware version of the Everec
260/261 and the operating time since that device was turned on last.
The recording button has different labels depending on the recording configuration.
Here you start a long period recording
The grey button indicates that no recording is active.
If event recording is configured, the recording button is
altered. By clicking you trigger an event.
If a long time recording has been started here the button
changes to „Stop recording“. A red dot shows the current recording.
If long time recording started in the configuration is running, the button is not visible. For the configuration of
the recordings see chapter 7.2.
© March 2012 Page 18/48
Instruction Manual
Everec 260/261

The lens button
The lens btton is used to select the lens.
Lens 1 wide-angle lens
Lens 2 telephoto lens
Switching between the lenses is done by clicking this
button or using HTTP commands, see chapter 9.
The logout button
By using the logout button on the top right, you can log
out again. The network camera then shows the login
page.
Reset and Save
The buttons “Reset“ to reset the changes and „Save“ to save the changes are located on
the right of the configuration pages.
© March 2012 Page 19/48
Instruction Manual
Everec 260/261

7 Configuration
The configuration pages can only be accessed if you are logged in as administrator, group “Admin”. If a user is logged in as „Guest“, he only sees the pages „Stream“ and „System Information“. If the maintenance mode is activated, this button is visible, but deactivated.
Click on the button „Configuration“ to access the configuration page. There you have the following setting options:
Video
Streams
Privacy Masks
Overlay
Audio (Everec 261 only)
Recording
Image
Video
Event
Motion Detection
System
Network
Time
User
Have you made changes on a configuration page and you leave it without clicking the buttons
„Save“ or „Cancel“, the following dialog window opens.
Figure 12: Dialogue window when leaving the page without saving
Here you are requested to „save“, set back the recently entered changes with „Discard“ or return
back to the page with „Cancel“.
© March 2012 Page 20/48
Instruction Manual
Everec 260/261

7.1 Video
Here are the configuration pages
Streams Setting and transmission of the video streams
Privacy Masks Blinding out areas in the image
Overlay Text overlays in the image
Audio Audio recording (Everec 261 only)
7.1.1 Streams
The camera is able to deliver 3 different streams. The MPEG-4 streams in high and low resolution
are played as network streams by different media players like for example VLC Media Player or
QuickTime Player, see chapter 5, the MJPEG stream is played in a browser. The streams are configured to maximum possible settings at first. If transmission in your network or your devices is
not possible with these parameters, you can lower them.
Figure 13: Configuration of the streams
© March 2012 Page 21/48
Instruction Manual
Everec 260/261

Common options
Here you choose the base frame rate, meaning the maximum number of images per second. The
available values are 25 fps or 30 fps.
Then you set the maximum exposure time between 0.5 msec and 500 msec. This automaticly
changes the maximum frame rate shown below.
The Everec 260/261 automatically regulates the maximum exposure time for an image. The darker the surroundings are, the longer the exposure times need to be. Maximum settings are 500
msec per frame, meaning the video recordings with these exposures can only be made with 2 fps
(frames per second). With long exposure times the image will be brighter but might be blurred
particularly with motion.
MPEG-4 1280x720
In this stream with the resolution 1280 x720 pixels (High Definition 720p) you can set the
images per second and the transmission rate. The higher the bit rate and frame rate the better is
the video, but more disk space is needed.
Frame rate (images per second – fps)
The frame rate depends on the set base frame rate and the maximum exposure time and
can be set with a sliding bar
at minimum exposure time
Base frame rate 30: from 30 fps to 0,02 fps
Base frame rate 25: from 25 fps to 0,01 fps
at maximum exposure time
Base frame rate 30: from 2 fps to 0.02 fps
Base frame rate 25: from 1,67 to 0,01 fps
Frame interval
The frame interval depends on the set frame rate and indicates how many milliseconds or
seconds are in between two images recorded or transferred.
Bit rate (kbit/s)
The bit rate depends on the set frame rate and is adjustable via a
sliding bar
from 1600 to 6000 kbit per second at maximum frame rate
from 0,9 to 3,3 kbit per second at minimal frame rate.
Notice: Recording with the resolution of 1280x720 is also done with the frame and bit rates set
here.
Notice: You cannot change the parameters of the second stream (640 x 352).
JPEG
For this stream with the resolution 640 x 352 pixels you can set the frames per second and the
image quality. The MJPEG stream is used for the live view, you can open it in an the browser by
clicking the link in the page „System information“.
© March 2012 Page 22/48
Instruction Manual
Everec 260/261

Frame rate (frames per second - fps)
The frame rate depends on the set maximum exposure and can be set via a sliding bar
from 15 fps to 0.02 fps at minimum exposure
from 1 fps to 0.02 fps at maximum exposure
Frame interval
The frame interval depends on the set frame rate and indicates how many milliseconds or
seconds are in between two images transferred.
Quality
Independent from exposure and frame rate adjustable via a sliding bar from 2 to 90
7.1.2 Privacy Masks
The Privacy Mask serves to protect privacy, areas that shall not be visible in the image are hidden
with square masks (masked). Rectangles are transparent on the configuration page for better positioning, in the stream and in the recording they are grey.
Figure 14: Placing the Privacy Masks – for passenger compartment surveillance the driver was masked
To place a mask, pull a rectangle open on the camera image in the desired direction by holding
the left mouse key. As soon as you let go of the mouse key, the rectangle is set. The area within
the blue frame is activated and can be moved or changed with mouse. You can create up to 4
rectangles, they can be changed later on and can overlap.
With the button „Remove Mask“ underneath the image you can remove the active rectangle
again. Save the settings with the button „Save“ or reverse your settings with the button „Reset“.
© March 2012 Page 23/48
Instruction Manual
Everec 260/261

The masked areas are covered in the live stream and in the recording with the set rectangles after
saving.
7.1.3 Overlay (Text in the image)
You can show two different overlays in the image, the current date and the ongoing time. The
date is always left, the time is on the right side of the image.
You can choose whether the overlays shall be displayed at the top or at the bottom of the image.
Figure 15: Overlay configuration
Save the settings with the button „Save“ or cancel your settings with the button „Reset“.
With HTTP commands you can also define any text line as an overlay, see chapter 9.
7.1.4 Audio (Everec 261 only)
Here you determine whether the audio shall be recorded. By using the sliding bar, you can vary
the volume on a scale of 1 to 100.
Figure 16: Audio settings
© March 2012 Page 24/48
Instruction Manual
Everec 260/261

7.2 Recording
The recording section is subdivided in:
Image Single image recording on the network on an FTP server or
NVR (Network Video Recorder)
Video Video recording internal or in a network
7.2.1 Image
The Everec 260/261 can transfer images over network, longterm or event triggered in three different sizes, to a network video recorder (NVR) or an FTP server.
You must configure the camera as a user on the server with write permissions. Then enter this login data and appropiate password on the configuration page of the camera.
Figure 17: Image transfer parameters
Image recording (jpeg)
Off no transfer
Long time recording continuous transfer until it is stopped again on this configuration
page
Alarm recording transfer of post alarm images for an adjustable duration
© March 2012 Page 25/48
Instruction Manual
Everec 260/261

If the alarm is to be activated by HTTP commands or an external alarm sensor activate:
• Input http://cam-ip/cmd?event=on
http://cam-ip/cmd?event=off
see chapter 9 for HTTP commands
or connect a trigger to the serial input of the camera on the
cable, see figure 6 (cable type 2 only).
If the alarm is to be activated by the integrated motion sensor activate:
• Motion detection The Everec 260/261 is able to detect motion in front of the
camera. The configuration page for the motion detection is
accessible under „Event - Motion Detection“, see chapter 7.3.
• Set the time that shall be recorded after the alarm (Post alarm duration). It is not possible to tranfer images prior to the alarm afterwards so this section is deactivated.
If there are further events during the after alarm period, the recording is extended for the
set post alarm time again.
Stream: Choose the size of the images to be transferred
• JPEG (1280x720)
• JPEG (640x352)
• JPEG (320x176)
Options
Send interval Shows the delay between consecutive images to be transferred. The
value can vary from 0.5 seconds to 60 minutes.
Quality The quality and thus also the size of the images can be adjusted via a
slider from 2 to 90.
Store
Here you choose the server to which the images shall be transferred.
Network video recorderr
The images will be transferred to the Everec NVR, a software solution that can be installed on any server. You must register the camera with its serial number on that server
before.
• Server address IP address or name of the NVR
• Port Preset port number for incoming images
• Status Here you will see wether a connection is established and the
number of images transferred or an error message if the connection has failed.
© March 2012 Page 26/48
Instruction Manual
Everec 260/261

Figure 18: Image transfer to NVR
File transfer protocol (ftp)
If the images are to be transferred via ftp, the FTP server to store the images on has to be
specified here.
• Server address IP address or name of the FTP server
• Path Directory where the images are to be saved. This will be created
automatically if the camera has the appropiate rights
• User The camera must be registered with user name and password
on the FTP server. Here you enter the user name
• Password Enter the user password to access the FTP server
• URL Here you see the entire URL consisting of the entered server
address and path
• Status Here you will see wether a connection is established and the
numer of images transferred or an error message if the connection has failed.
Figure 19: Image transfer to an FTP server
7.2.2 Video
The Everec 260/261 can be set to long time recording or alarm recording in the internal flash
memory or a data server in a network (NAS – Network attached storage).
The Everec 260/261 contains a built-in Micro SD card with 2 GByte memory capacity. A stream
can be saved on this card without straining the network in the current period. Later you can
download the recordings if required.
© March 2012 Page 27/48
Instruction Manual
Everec 260/261

Figure 20: Configuration of the recordings
Notice: The recording always runs with the frame and bit rates set on the page „Streams“ under
MPEG-4 (1280x720).
Video recording (mov/mpeg4)
Off no recording
Long time recording continuous recording until it is stopped again on this
configuration page
Alarm recording recording with pre-and post alarm images for an optional
duration
If the alarm is to be activated by an HTTP command or external alarm sensor activate:
• Input http://cam-ip/cmd?event=on
http://cam-ip/cmd?event=off
see chapter 9 for HTTP commands
or connect a trigger to the serial input of the camera on the
cable, see Figure. 6 (cable type 2 only).
If the alarm is to be activated by the integrated motion sensor activate:
• Motion detection The Everec 260/261 is able to detect motion in front of the
camera. The configuration page for the motion detection is
accessible under „Event - Motion Detection“, see chapter 7.3
• Set the time that is to be recorded prior to the alarm (Pre duration) and the time that
shall be recorded after the alarm (Post duration). If there is a further alarm notification
during the after alarm period, the recording is extended for the set post alarm time again
© March 2012 Page 28/48
Instruction Manual
Everec 260/261

as of this time. This also goes for further incoming notifications. The maximum recording
time in one file is determined with the option „Split file after (min)“.
Stream
• MPEG-4 (1280x720) Frame rate and bit rate setting under „Streams“
• MPEG-4 (641x352) Frame rate max. 5 fps, not editable
Options – Further settings
Auto delete activated – while a recording is running the oldest file is
constantly deleted if less than 100 MB free disk space is
available.
deactivated – The recording stops if the data carrier is full.
Split file after (min) Here you determine how long a recording file is, the next file
starts without a delay after that. The files with maximum record ing speed grow very large very fast. In order to keep the download
time shorter, it is recommended to limit the time to some
minutes.
Store
Here you can choose whether the videos are to be saved on the internal memory card or on an external server using the network protocol SMB (Server-Message-Block-Protokoll). This protocol
should be available on all actual NAS devices in Windows or MacOS networks.
Internal flash memory
Saves the videos on the internal Micro SD card
Figure 21: Saving the video fiiles on the internal card
© March 2012 Page 29/48
Instruction Manual
Everec 260/261

Network attached storage (NAS/SMB)
Saves the videos on a NAS or a shared directory on a PC (network share).
• Share: The specification of a network share starts with a double slash „//“ and
name or IP address of the device, the path is separated by slashes „/“ ,
eg..: //Test-NAS/shared-directory
or //192.168.0.1/shared-directory
• Path: The directory entered under Path is created by the camera.
• User The camera must be registered with user name and password
to access the server. Here you enter the user name
• Password Here you enter the user password
• Size (MB) Defines the maximum storage space the videos may use. A „0“
means use of all available storage space without restrictions.
• URL Here you see the entire URL consisting of the entered server
address and path
• Status Here you will see wether a connection is established or an error
message if the connection has failed.
Figure 22: Transfer of the videos via smb
Save the settings with the „Save“ button to start the recording.
7.3 Event - Motion Detection
With the help of the integrated motion detection you can start the event controlled recording. To
do this, determine up to 4 areas of interest in the image, in which motion shall be detected.
© March 2012 Page 30/48
Instruction Manual
Everec 260/261

Figure 23: Configuration of the motion detection – To prevent that the tree moving in the wind triggers recordings it was excluded
To place a mask, pull a square open on the camera image in the desired direction by holding the
left mouse key. As soon as you let go of the mouse key, the square is set. The area within the blue
frame is activated and can be moved or changed with mouse. With the button „Remove mask“
underneath the image you can remove it again. You can create up to 4 squares, they can be
changed later on and can overlap. Save the settings with the button „Save“ or reverse your settings with the button „Reset“.
If no areas were determined, the entire image is searched.
In chapter 7.2 „Recording“ you determine if you want to start recordings with the help of motion
detection.
Located above the image you will see more configuration options:
Display motion After activating a small square in the upper left corner of the camera image
shows movement. Without current movement it is grey, if motion is detected it is
red.
Sensitivity The sliding bar with a scale of 1 to is 100 serves to set the sensitivity. The higher
the value is, the more sensitive the system reacts to image changes. Adapt it to
your conditions on location.
© March 2012 Page 31/48
Instruction Manual
Everec 260/261

7.4 System
All system configurations are done on the following pages:
Network Setting of the network parameters
Time Time settings
User Administration of users
7.4.1 Network
On this configuration page you can set the way you want to address your Everec 260/261 in your
network, and enter the data of DNS servers.
Figure 24: Configuration of the network settings
© March 2012 Page 32/48
Instruction Manual
Everec 260/261

The camera can be accessed over the Bonjour (Zeroconf)-technology, over DHCP or with a fixed
set manually entered IP address in the network.
Bonjour
Bonjour is the Zeroconf technology by Apple. Zeroconf is a technology that provides automatic recognition of network services in IP networks and thus a simple linking of Zeroconf compatible
devices. The provided address range is between 169.254.1.0 and 169.254.254.255 with the
netmask 255.255.255.0.
Web browsers like Safari or Internet Explorer with installed „Bonjour“ or „Bonjour for Windows“
list the devices compatible with Bonjour that are available in the net, a connection is activated by
clicking.
The Bonjour technology in Safari
A free download of the "Safari" browser can be found on http://www.apple.com/de/safari/ Safari browser automatically recognizes "Bonjour" compatible
devices connected to the network.All "Bonjour"-compatible devices in the
network can be then seen in a list, where they can be selected by clicking
the symbol shown in the list or double-clicking the list item itself. Here, you
see the name stated on the configuration page with the addition HTTP.
Figure 25: Bonjour in Safari
© March 2012 Page 33/48
Instruction Manual
Everec 260/261

The Zeroconf Neighborhood Explorer
A program used under windows, with free download available on
„http://www.stg.com/zeroconf_explorer.html, which lists the devices equipped
with Zeroconf technology in Windows Explorer. If desired, an icon is installed
on the desktop that opens a window displaying the devices. By double-clicking
on a device entry the standard browser is opened and the starting page of the
device is displayed. You need administrator rights to install the program. If you
have any questions, ask your system administrator.
Figure 26: Windows Explorer with Zeroconf enty
If you want to access the Everec 260/261 over Bonjour, the Bonjour check box must be activated. Enter a name under which you want to access the camera. The name may not contain any
empty spaces and be 58 characters long at the most. In the delivery status the name is
„Everec260/261-[Serial number]“.
Notice: Bonjour sends and receives network packages on UDP port 5353. In your firewall configuration, ensure that this port is open.
DHCP
You can activate DHCP, if you have a DHCP-server in your network. If you have any questions, ask
your system administrator
The DHCP server will assign the connected camera an IP address. Please see the configuration
pages of the DHCP server for the Mac address belonging to the camera to see the IP address.
If you have DHCP activated, you cannot enter any IP addresses manually anymore. If you already
entered an IP address and activate DHCP then, the address is ignored. This entries are deactivated on the configuration page.
© March 2012 Page 34/48
Instruction Manual
Everec 260/261

Manual configuration - Manually set IP-connection
Here you assign the Everec 260/261 a fixed IP address under which it is always available. This
includes a subnet mask that corresponds to the network mask used in your network.
IP address here the camera is addressed in the network
Subnet mask determines which part of the IP address serves the definition of
the net and which serves the identification of the device, thus
the network class is specified.
Default gateway this is the IP address of the standard router that serves the
connection into other networks or other sub nets
Domain Name System (DNS)
The Domain Name System (DNS) associates the name of devices in networks with an IP address,
that means it provides the allocation of a name to a static (fixed assigned) IP address with the
help of databases.
Enter the IP address of one or 2 DNS servers here. This IP addresses are only applied after a restart of the camera.
DynDNS (dynamic Domain Name System)
The number of available static IP addresses is limited by their length. Thus, providers assign dynamic IP addresses for dialling in to the Internet that means usually a different IP address for
every time. If a network camera is to be available from the Internet this way, the user must know
the currently valid IP address. To ensure this, there are different providers that offer dynamic
DNS.
So you determine a name for the camera under which it shall be available in the Internet. If the
camera dials into the Internet, it connects with the DynDNS service first and declares its current
IP address that is then entered to the given name in a database.
If an internet user accesses this name now, the DynDNS provider can allocate it to the current IP
address, so that the connection can take place.
To be able to use this service, you need to register at a DynDNS provider. There are also different
free offers in this area. Create an account with the provider of your choice. Then select a host
name for the camera and enter the current IP address.
Name Host name for the camera that was registered at the DynDNS provider
User User name at the DynDNS provider
Password Associated password
7.4.2 Time – settings
The Everec 260/261 offers different options of updating the internal clock (Real-Time Clock). You
can match it with the time of the configuration computer, enter the time manually or match it
manually or automatically with an NTP server. The time is saved after turning off the camera by
an integrated battery.
© March 2012 Page 35/48
Instruction Manual
Everec 260/261

Figure 27: Time settings
Time zone The time signal of NTP servers is always based on GMT (Greenwich
Mean Time). For correct time display the selection of the right time zone
is necessary. The Everec 260/261 is set to the time zone CET or CEST
when delivered. If required, you can set a different time zone. Changing
from winter to summer time is done automatically depending on the set
time zone.
Local time This states the current date and time of the computer. With the button
„Synchronize camera time“ you can set the internal clock of the
Everec 260/261 to the time of the computer. This may take some time.
Manually Here you can enter the date and time manually. Format e.g.
2010-10-25 and 16:35:00, and set the internal clock of the
Everec 260/261 with the button „Set camera time“.
Synchronise the camera time with an NTP-server
The Network Time Protocol (NTP) is a standard for synchronization of clocks in computer
systems. The Everec 260/261 receives the GMT time signal from an NTP sever and then
conducts an automatic time comparison. If needed, activate this option. The time comparison with the NTP-server is then done automatically upon system start.
© March 2012 Page 36/48
Instruction Manual
Everec 260/261

Server Address Enter an NTP server here as a name or IP address.
With the button „Synchronize server time“ you can set the internal clock
of the Everec 260/261 immediately to the time of the NTP-server.
7.4.3 User - Creating users with different authorizations
Two different user groups can access the Everec 260/261 with different authorizations:
Admin
Guest
Figure 28: Configuration of users
The administrator (group Admin) has access to all configuration pages. You can set up several administrators, however it has to be at least one. Thus it is not possible to delete the last administrator.
You should change the pre-set password for safety reasons. Pay attention to capitalization in the
password, minimum character count is 5.
Before 2 identical at least 5 character long passwords are not entered , the buttons „Add“ and
„Edit“ remain deactivated.
© March 2012 Page 37/48
Instruction Manual
Everec 260/261

A user of the group „Guest“ may open the streams and has access to the live stream and system
information page.
Anonymous guest login
If activated it is possible to login without name and password. You may open the streams and
have access to the system information page.
Add new user
Select first to which group the new user shall belong.
Enter a name for the user.
Enter a password that is at least 5 characters long.
Repeat the password so that typing errors are excluded.
Click the „Add“ button.
The new user is now displayed in the table appearing on the left.
Leave the page after clicking the „Save“ button.
Change user password
Select the user from the table on the left.
Enter a password that has at least 5 characters.
Repeat the password so that typing errors are excluded.
Click the „Edit“ button .
Leave the page after clicking the „Save“ button.
Using the „Edit“ button you can also change the user group, but you must still enter the password again and repeat it.
Delete existing user
Select the user from the table on the left.
Click on the button „Delete“.
Leave the page after clicking the „Save“ button.
© March 2012 Page 38/48
Instruction Manual
Everec 260/261

8 Videos – List of the recordings in the internal
memory
You can only access this page if you are logged in as a user with administrator rights, group “Admin”. If a user is logged in as a „Guest“, he only sees the pages „Stream“ and „System information“.
Figure 29: List of recorded videos
Click the button „Videos“ to get to the list with recordings.
Here you see the video files available in the internal memory. The file name is composed from the
designation „REC“, the date and the time to recording start. The table also includes the size in
Megabyte, the length in minutes and the starting time.
Further specifications for the blue highlighted video file are visible on the right. To mark other
files, click them with the mouse or select by using the arrow keys of the keyboard. You then see
the specifications for the selected file on the right.
A file that was not finalized correctly is marked with „incomplete“ in the table. A current recording is not visible.
© March 2012 Page 39/48
Instruction Manual
Everec 260/261

Above the table you see the total size of the internal memory and the size of the memory that is
still available in Megabyte.
Underneath the table you will see the buttons „Refresh“, „Repair“, „Delete“ and „Download“.
Refesh Refreshes this page in the browser.
Repair To repair a file that was not finalized correctly e.g. due to a power outage,
the maintenance mode must be activated. The marked file is repaired so
that it can be played on a player..
Delete Deletes the highlighted files
Download Downloads the highlighted file. Downloading a file during recording is
not possible
Reparing a video file
Click the button „Maintenance“ in the top row of buttons.
Start the maintenance mode by clicking the button „Enter maintenance mode“ and return back
to the page „Videos“.
Highlight the recording to be repaired in the table of video files. As it was not ended correctly, it
will be marked with „incomplete“ in the column „Start time“ , and the specification of length in
minutes in missing. The “Repair” button is now activated.
Click „Repair“. The end of the file will now be written by the repair mechanism. The process may
take some time, depending on the size of the file. A dialogue window with time bar shows the
progress of the repair.
The successful repair is shown in a further dialogue window .
The video file is now displayed with the correct starting time and length in minutes.
© March 2012 Page 40/48
Instruction Manual
Everec 260/261

9 HTTP commands
The Everec 260/261 can be controlled using HTTP commands.They can be entered directly into
the address line of a browser or integrated in scripts and web sites.
If anonymous user is activated on the page „Configuration / System / User“, you will not need an
authentification to execute the HTTP commands. Else only users with administrator rights, group
“admin”, are allowed to use them.
All settings will be set to default by resetting the configuration with a factory reset.
9.1 Access to JPEG and Motion JPEG (MJPEG)
Access to JPEG and MJPEG you will have with
http://cam-ip/stream[1|2].mjpeg[?mode=[picture|stream]]
Stream1 here determines the full resolution (720P), stream2 has a resolution of 640x352.
Example for 720P streaming:
http://192.168.0.10/stream1.mjpeg?mode=stream
For setting the quality of the streams see chapterl 9.3.
9.2 Direct camera commands
Launching commands to the camera is done with
http://cam-ip/cmd?command[=val]
The following commands are specified:
© March 2012 Page 41/48
Instruction Manual
Everec 260/261

event=[on|off]
Triggers an event to start or stop (after post alarm time) a recording
reboot
Restarts the camera
cameraled=[on|off|blink]
Switches the camera front LED on/off/blinking. The state is not resumed after a reboot.
enable_overlay
disable_overlay
Switches the user defined text overlay on or off. See below for entering the text.
9.3 Configuration requests and settings
Configuration requests:
http://cam-ip/get?key
Configuration settings:
http://cam-ip/set?key1=val1[&key2=val2]...
Valid keys:
format=[720p|d1]
Switches the video format of stream 1 to 720p or D1.
720p resolution: 1280×720 pixels, D1 resolution: 720 x 576 pixels.
The readjustment requires a restart, which will be performed automatically
sensor=[0|1]
Switches to the stated image sensor (0 = wide angle lens, 1 = telephoto lens).
stream1_jpeg_quality=[0..100]
stream2_jpeg_quality=[0..100]
Sets the compression quality of JPEG stream 1 and 2 to the defined values.The streams
are called via HTTP commands, see above.
overlay_text=[free text]
Sets the user defined overlay text, this must be activated using a HTTP command, see
above.
© March 2012 Page 42/48
Instruction Manual
Everec 260/261
10 Maintenance Mode - Administration
You can only access this page if you are logged in as a user with administrator rights, group “admin”. If a user is logged in as „Guest“, he only sees the pages „Stream“ and „System Information“.
The page „Maintenance“ includes the administration like setting back the configuration to factory settings, formatting the internal memory and installing new firmware.
If you started the maintenance mode on this page, all streams are stopped, meaning also the recording. After ending the maintenance mode, the recording is automatically restarted, you must
open a stream again. If other users are logged in while maintenance mode is started, they automatically get a logout.
Notice: A further process that you need the maintenance mode for, is the repair of not properly finalized video files that is described in chapter 8.
10.1 Deleting the internal memory
All recorded video files in the internal memory of the Everec 260/261 are irretrievably deleted.
Click on the button „Maintenance“ in the top row of buttons.
Start the maintenance mode by clicking on the button „Enter maintenance mode“, the
button to stop the deletion of the internal memory is now activated. Streams and recordings are stopped.
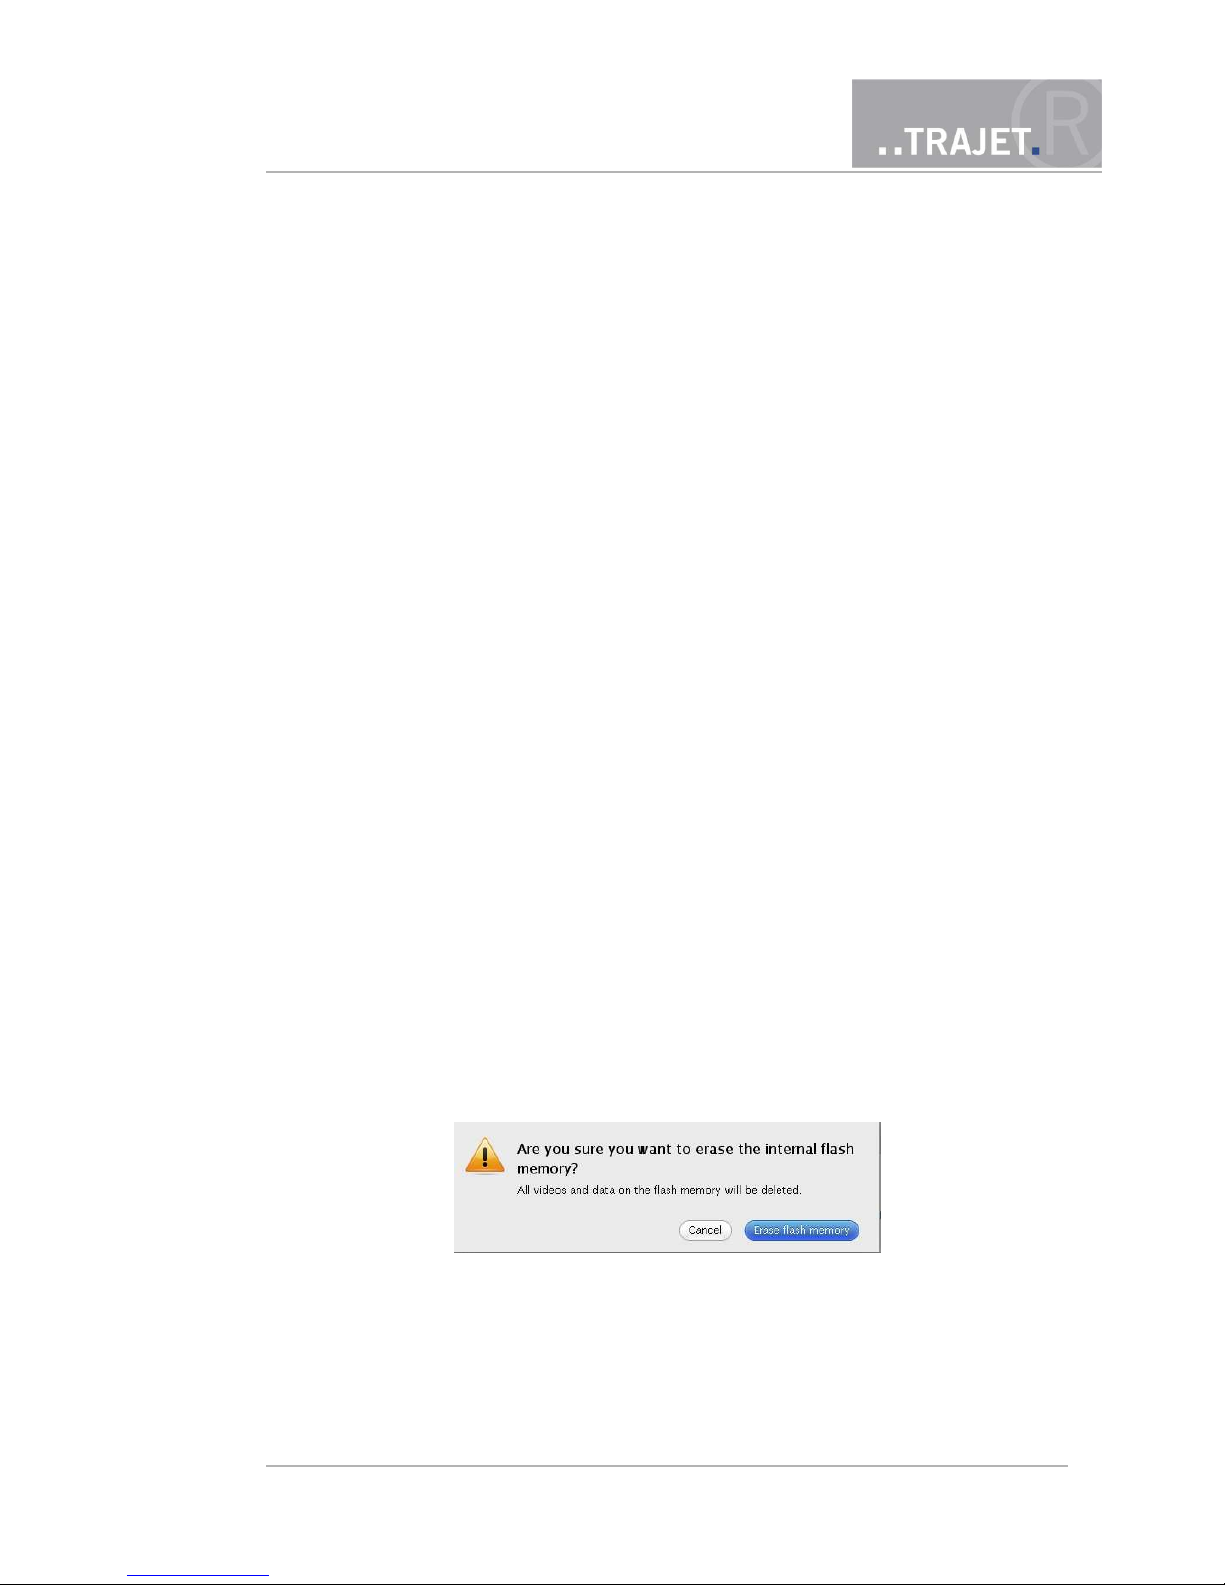
Click on the button „Erase flash memory“, to start the process. You will see the following
security question:
Click on „Erase flash memory“ here, and the deletion starts. You now see a display that
the process is underway. When this display disappears, the memory is deleted.
Click „Leave Maintenance mode“ to leave the maintenance mode.
© March 2012 Page 43/48
Instruction Manual
Everec 260/261

10.2 Factory Reset
To retrieve the Factory Reset, do as follows:
Click the button „Maintenance“ in the top row of buttons.
Start the maintenance mode by clicking the button „Enter maintenance mode“, the buttons to upload the firmware file are now activated. Streams and recording are stopped.
Click the button „Start resetting“ and you will see the following security question:
Click the button „Reset configuration“ and the configuration is set back to factory settings, meaning to the status of delivery.
The camera restarts. The IP address is 192.168.0.10 again, the default user „admin“
and the password „admin“.
10.3 Updating the firmware
The firmware of the Everec 260/261 is consistently improved and expanded, thus, it is possible
to update the firmware of the Everec 260/261. The company Trajet GmbH provides you with the
file with a new firmware in electronic form. The name of this file always starts with the letters
„upd“, and the ending is „.img“.
You can see the current version on the page „System Information“ under „Camera“. Click on the
button „System Information“ in the button bar. If a new version is available, you can update your
camera.
Follow the instructions below to update:
Click the button „Maintenance“ in the top row of buttons.
Start the maintenance mode by clicking the button „Enter maintenance mode“. The buttons to upload the firmware file are now activated. Streams and recordings are stopped.
Click the button „Search“. This way you can search for the file in the window that opens,
select the file and transfer it for upload into the text field.
© March 2012 Page 44/48
Instruction Manual
Everec 260/261

Click the button „Upload“. The file is now uploaded onto your Everec 260/261 over the
network. This process may take several minutes depending on the network bandwidth and
load. Do not interrupt the connection and do not switch off the camera. You will see the
progress display bar as below, showing you the time still required.
When the file is transferred, you will see a prompt to reboot.
The new firmware is installed when the camera is restarted.
The new version is visible on the page „System Information“ under „Camera“
© March 2012 Page 45/48
Instruction Manual
Everec 260/261

11 Technical Data
Kamera 2 * sensor
Resolution
Focal width
Angle
Recording distance
Sensitivity
Dynamics
1/2.5” RGB progressiv scan CMOS sensor
2592 * 1944 pixels
3,5 mm and 16 mm
80° and 20°
5cm – inf.
0.1 Lux
70 dB
Video Format
Resolution
Frame rate MPEG4
Frame rate MJPEG
Video overlay
MJPEG, MPEG4
1280 x 720 pixels
30 frames/second
30 frames/second
Time, date, customised
Audio
nur
Everec 261
Mikrofon
Bandbreite
Format
Zweikanal
15 kHz
MPEG1 Layer 3 (MP3)
Function Motion detection
Privacy masks
Network protocol
Recording
Power management
Adjustable with multiple regions of interest
User definable regions
HTTP, RTSP, RTP, RTCP, DHCP, UPnP,
Bonjour, NTP, SMB
Pre alarm, ring buffer
Integrated timer
Daten Housing
Dimensions
(W x L x H)
Weight
Temperature range
Interfaces
Power supply
Power consumption
Plastic housing
90mm x 50mm x 45mm
Windscreen installation
170g
-20ºC to 85ºC
10/100 Base-T Ethernet
Power over Ethernet
IEEE802.3a, Class 2 or 12V input
<4W
© March 2012 Page 46/48
Instruction Manual
Everec 260/261

12 Appendix
This product is licensed under the MPEG-4 Visual Patent Portfolio License for the personal and
non-commercial use of a consumer for
(i) encoding video in compliance with the MPEG-4 Visual Standard (MPEG-4 Video) and/or
(ii) decoding MPEG-4 video that was encoded by a consumer engaged in a personal and non-
commercial activity and/or was obtained from a video provider licensed by MPEG LA to
provide MPEG-4 video.
No license is granted or shall be implied for any other use. Additional information including that
relating to promotional, internal and commercial uses and licensing may be obtained from MPEG
LA, LLC. See http://www.mpegla.com .
WEEE Directive
The European Union has enacted Directive 2002/96/EC on Waste Electrical and Electronic Equipment (the WEEE Directive). This directive is only
applicable in European Union member states. A WEEE symbol (see left)
on this product or its documentation indicates that the product must not
be disposed of with other waste. The product must be disposed of via an
approved, environmentally safe recycling process.
© March 2012 Page 47/48
Instruction Manual
Everec 260/261

DECLARATION
OF
CONFORMANCE
Type of appliance: network camera
Product designation: Everec 260 / 261
We hereby declare that the design and manufacture of the designated device in the model marketed by us complies with the directives of the European Union, and in particular with the EMC
directive 89/336/EWG.
The following norms were consulted in assessing conformity:
Emitted interference: DIN EN 55022 : 2006, Class B
Interference resistance: DIN EN 55024 : 1998
The device detailed above may therefore carry the CE logo.
Braunschweig, November, 9th 2010
Christian Helck
Managing Director Trajet GmbH
© March 2012 Page 48/48
Instruction Manual
Everec 260/261
 Loading...