

spa
Piazzetta Albere, 3/4
36060 Romano d’Ezzelino (Loc. Fellette) - Vicenza - Italy
Tel. +39 (0) 424832777 - Fax +39 (0) 424832778
E-mail: tpaimpex@tpaimpex.it - web:http://www.tpaimpex.it
Stampa: Novaprint 0424.539449 - www.novaprint.it - cod. 10161094000
VC 6000
Steam and Detergent System
INSTRUCTIONS FOR USE
PROFESSIONAL
CLEANING SYSTEMS
VC 6000 FULL
Steam – Detergent and Vac. System
1
Before performing any operation on the machine, carefully read this manual.
It contains all the information necessary for accident-free operation, ensuring the safety of the
operator and all persons working nearby, and respect for the environment. Correct use of this
manual enables the user to keep the machine in good condition, reduces breakdowns and
consequently repair costs and machine down time.
Keep the manual in a suitable place where it can be easily accessed by the operator whenever
required.
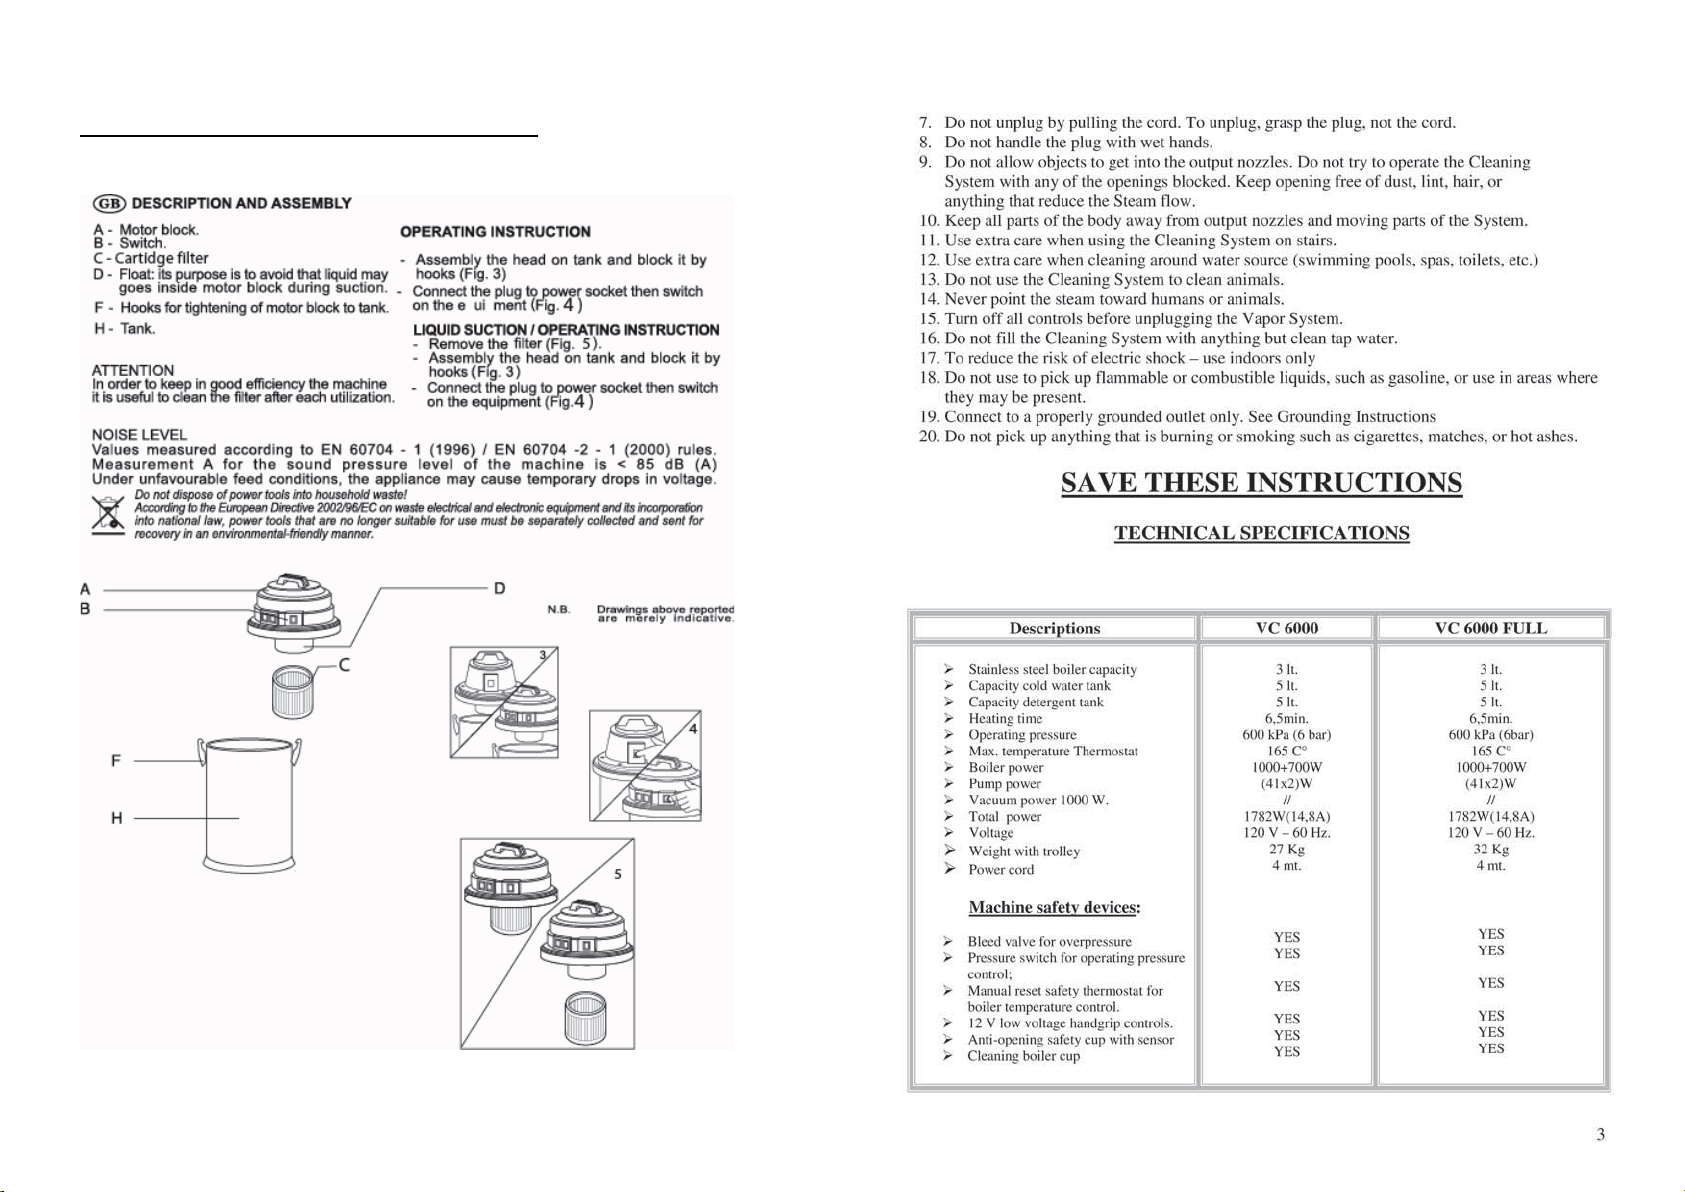
DESCRIPTION
INTRODUCTION
The product permits steam-cleaning of machinery, refrigerators, ovens, work tables, floors,
windows etc. reducing the use of detergents, disinfectants and solvents, and eliminating serious
problems of disposal, bad smells and toxic residues.
Cleaning System functions:
For commercial use
• Cleaning with steam
• Detergent injection
lluF 0006 CV 0006 CV
• Cleaning with steam
• Detergent injection
• Dust vacuum cleaning
• Liquid vacuum cleaning
WARNING!
TO PREVENT SCALDING OR BURNING, KEEP BODY AWAY FROM VAPOR OUTPUT NOZZLES.
IMPORTANT SAFETY INSTRUCTIONS
When using the Cleaning System, always use basic precaution, including the following:
Warning – To reduce the risk of fire, electrical shock or injury:
1. Do not leave appliance when plugged in. Unplug the Cleaning System from outlet when not in
use, or before servicing.
2. Do not allow the Cleaning System to be used as a toy. Close attention is necessary when the
system is being used around children. Never allow children to use or play with the system.
3. Use only as described in the manual. Only use original manufacturer attachments.
4. Do not use the Cleaning System with a damaged cord or plug. If the Cleaning System has been
dropped, damaged, left outdoors, or submersed in water, return the System to the SERVICE .
5. Do not pull or carry the Cleaning System by the cord.
6. Do not use the co
edges or corners. Never run appliances over the cord. Keep cord away from heated surfaces.
READ ALL INSTRUCTIONS BEFORE USING THE VAPOR CLEANING SYSTEM.
rd as a handle. Never close a door on the cord. Never pull it around
2
Wet & Dry Vacuum Cleaner (Only for VC 6000 Full)
10

8
Cleaning System details
10
1. Main switch with light
2. Boiler switch with light
3. Vacuum switch ( only VC 6000 FULL )
4. Socket
5. Pressure gauge
6. No water warning light
7. Work enable pilot light
8. Anti-opening cup with water level sensor
9. Steam adjustment
10. Water tank
11. Detergent tank
12. Detergent adjustment ( Only VC 6000 FULL)
13. Power cord
14. Cleaning boiler cup
15. Steam switch
16. Water switch
17. Red switch
18. Detergent connection tubes
19. Water connection tubes
20. Vacuum switch
21. Electrical sensor
22. “O” ring safety cup
Steam hose (1)
Steam/Vac hose (18)
Gru.Handle SW.SY (33)
4
13
14
2
1
VC 6000
VC 6000 FULL
11
GROUNDING INSTRUCTIONS
9
6
5
7
4
If the unit should malfunction or break down, grounding provides a path of least resistance of electrical
Current to reduce the risk of electrical shock. The uniti s equipped with a cord having an equipment grounding
3
12
conductor and grounding plug. The plug must be inserted into an appropriate outlet that is properly grounded
in accordance with all local codes and ordinaces.
WARNING – Improper connection of the equipment-grounding conduct
Shock. Check with a qualified electrican or service person if you are in doubt a sto whether the outlet is
Properly grounded. Do not modify the plug provide with the appliance – if i twill not fit the outlet, have a
proper outlet installed by a qualified electrician.
This units is designed for use with a normal 110/120 volt circuit, and has a grounded plu that looks like the
Plug illustrated in
May be used to connect the plug to a 2 pole receptable as shown in stretch (B) if a properly grounded outlet
is not available. The temporary adapter should only be used until a properly grounded outlet sketch (A) can
be installed by a qualified electrician. Whenever the adapter is used, it must be held in place by a metal screw.
sketch (A). A temporary adaptor that looks like the one illustrated in stretch (B) or (C)
or can result in a risk of electric
9

Cobra kit :
41 J8014 LARGE BRUSH
42 J7314 SMALL BRUSH
43 J8015 LIQUID SUCTION ACCESSORY WITH RUBBER STREAP
44 J8012 LIQUID SUCTION ACCESSORY WITH NYLON BRISTLES
45 J7326 LIQUID SUCTION ACCESSORY RUBBER/ NYLON
46 J7348 ECCENTRIC ACCESSORY WITH NATURAL HAIR BRISTLES
47 J7967 ECCENTRIC ACCESSORY WITH NYLON BRISTLES
48 J7664 DRY VACUUM ACCESSORY
49 J7905 MEASURE BOTTLE 1,7l
50 J7661 DE
TERGENT BOTTLE
MAINTENANCE
Cleaning the boiler
• Disconnect a power cord plug from general socket.
FOR VC 6000
• Disconnect a tank ( 10 and 11) connections.
• Take away a water and detergent tank.
• Unscrewing a discharge cup (14)
• Discharge a dirty water , if the water result to much dirty,
repeat for 2 or 3 times this operation.
• Close a discharge cup (14)
FOR VC 6000 FULL
• Disconnect a tank ( 10 and 11) connections.
• Take away a water and detergent tank.
• Take away a vacuum machine.
• Unscrewing a discharge cup (14)
• Unscrewing a safety cup (8)
• Discharge a dirty water , if the water result to much dirty , repeat for 2 or 3 times this
operation inserting a clean water from the hole of safety cup (8).
• Clean the safety cup electrical sensor (21) of calcium and , if damaged a “o” ring ( 22) .
• Close a discharge cup (14) and fill from the safety cup hole about 1 lt. of water.
• Close a safety cup (8) .
To restart the machine, follow the operations in the paragraph “Machine start”.
Check for any water leaks from the plug below the machine and tighten the plug if necessary.
8
: ONLY WITH COLD MACHINE
CAUTION
Detergent/Water Connection tubes
Detergent connection tubes Water connection tubes
Yellow IN Green IN
Red OUT Bleu OUT
Machine start
• Before you use this appliance, check that the electrical current is the same as the voltage on
the appliance’s type-plate.
Steam function
:
• Insert the plug into the socket.
• Fill the water tank (10) and ensure that the connection tube (19) is correctly fitted.
• Press the main switch (1) and after the sound stopped press the switch (2) the light goes on.
ONLY FOR FIRST STARTUP OR WITH AN EMPTY BOILER
• If the machine alarm is activated (red light 9 on + audible alarm),turn the switch 2 off,
leave it off for at least 5 seconds and then switch it on again.
• Wait for the boiler water filling pump to stop. Fil
required by the water level.
• The heating phase begins, lasting approx. 7 minutes. ( intermittent lamp)
• When pilot light 7 come fix, the machine is ready for use.
• Insert the hose pl
ug into the socket 4, ensuring that it is securely fitted.
• Press the steam button (15 steam function selection) and press the red switch (17) on the
handgrip and direct the steam jet towards the area to be cleaned.
CAUTION
Before beginning steam cleaning operations, drain the condensation left inside the steam hose
into a bucket or other suitable place.
• Fill the tank (11) with water.
• Press the steam button (16 water function selection) and press the red switch (17) on the
handgrip and direct the steam/water jet towards the area to be cleaned.
ling is automatically performed when
5

Steam and detergent injection :
• Empty the tank (11) of water
• Fill the detergent tank (11) with a mix of TPA detergent (97% of water + 3% of detergent)
and ensure that the connection tube (18) is correctly fitted.
• Start the machine as above.
• Press the red button (17) on the handgrip .
CAUTION
This machine has been designed for use with non-foaming and non-corrosive detergent. Use of
foaming and/or corrosive detergent could damage the machine! You are advised to use only
the detergent specified by the manufacturer.
Dust – liquid vacuum cleaning function
: (only VC 6000 FULL)
• Connect the steam + suction
handgrip to the steam socket 4
• Press the switch (20)
• Press the switch (3).
• Vacuum function start.
Cleaning information :
To have a best result of cleaning, use the follow system:
1. Melt the dirty with the steam/detergent function.
2. Vacuum the dirty
CAUTION
This machine is not suitable for collecting dangerous dust!
Water refill :
When the water in the boiler finishes, the machine emits an acoustic signal and the no water
warning light 6 ( intermittent lamp and sound signal). The steam outlet is blocked.
Perform the following operations:
• Fill the water tank (10) and ensure that the connection tube (19) is correctly fitted.
• Press the switch (17) to restore the cleaning system.
As the boiler is already under pressure, pilot light 7 comes on after a few seconds and the machine
is ready to resume work.
ACCESSORIES
Steam kit :
1 J8349 STEAM HOSE 3.3 m with handle and plug
2 M0006 EXTENSION (2)
3 M0041 FLOOR BRUSH
4 M0055 GLASS CLEANER
5 M0047 TRIANGULAR BRUSH
6 M0029/S12 STEAM LANCE MEDIUM L=250
7 J1565 STEAM LANCE LONG L=350 (Optional)
8 M0062 STEAM LANCE SHORT L=100 (Optional)
9 M0028 STEAM LANCE PLASTIC 1 HOLE
10 M0052 UPHOLST. BRUSH NYLON BRIST. (Optional)
D0024 ROUND BRUSH NYLON BRISTLES
11
12 D0025 TRIANG.BRUSH NYLON BRISTLES
13 J0681 TRIANG.BRUSH STAINL.STEEL B. (Optional)
14 G0018 DETAIL BRUSH NYLON BRISTLES
15 G0126 DETAIL BRUSH BRASS BRISTLES
16 G0125 DETAIL BRUSH STAINL.STEEL BRISTLES
17 J0680 ROUND BRUSH BRASS BRISTLES (Optional)
Steam / Vacuum kit :
18 J8317 STEAM/VAC HOSE 4 m with handle and plug
19 J5619 STEAM/VAC EXTENSION (2)
20 J5753 RECTANGULAR BRUSH AV 4 BRACKETS
21 J6267 RECTANGULAR BRUSH ACCESSORY
22 J5936 LIQUID SUCTION ACCESSORY
23 J5788 GLASS CLEANER GREY L=25
24 J5810 GLASS CLEANER GREY L=12
25 J5584 UPHOLSTERY BRUSH GREY AV
26 D4221 CARPET ACCESSORY MIDDLE SIZ BRUSH
27 J5418 DETAIL NOZZLE GREY AV 1 HOLE
28 J5659 DETAI
29 J5624 STEAM AND VAC TRASPARENT ACC.
FOR DETAIL STEAM NOZZLE
30 J5645 STEAM AND VAC TRASPARENT ACC.
FOR DETAIL STEAM NOZZLE
31 D0025 TRIANGULAR BRUSH
32 G0018 DETAIL BRUSH IN NYLON FOR NOZZLE
33 J7502 GRU. HANDLE SW-SY only vacuum
34 J0282 ROTATING BRUSH D.35 BLACK
35 J0285 NOZZLE LANCE D=35 BLACK
36 J0329 RADIATOR BRUSH D=35 BLACK
J0330 TELESCOPIC EXTENSION BLACK
37
WITH BUTTON
38 J0283 VAC BRUSH BLACK
39 J0286 VAC NOZZLE LARGE D=35 BLACK
40 J0287 MULTIPURPOSE BRUSH
L NOZZLE GREY AV 3 HOLE
6
7
 Loading...