

Page 1
Yard-Vue
TM
QUICK START GUIDE
V1 Jun19
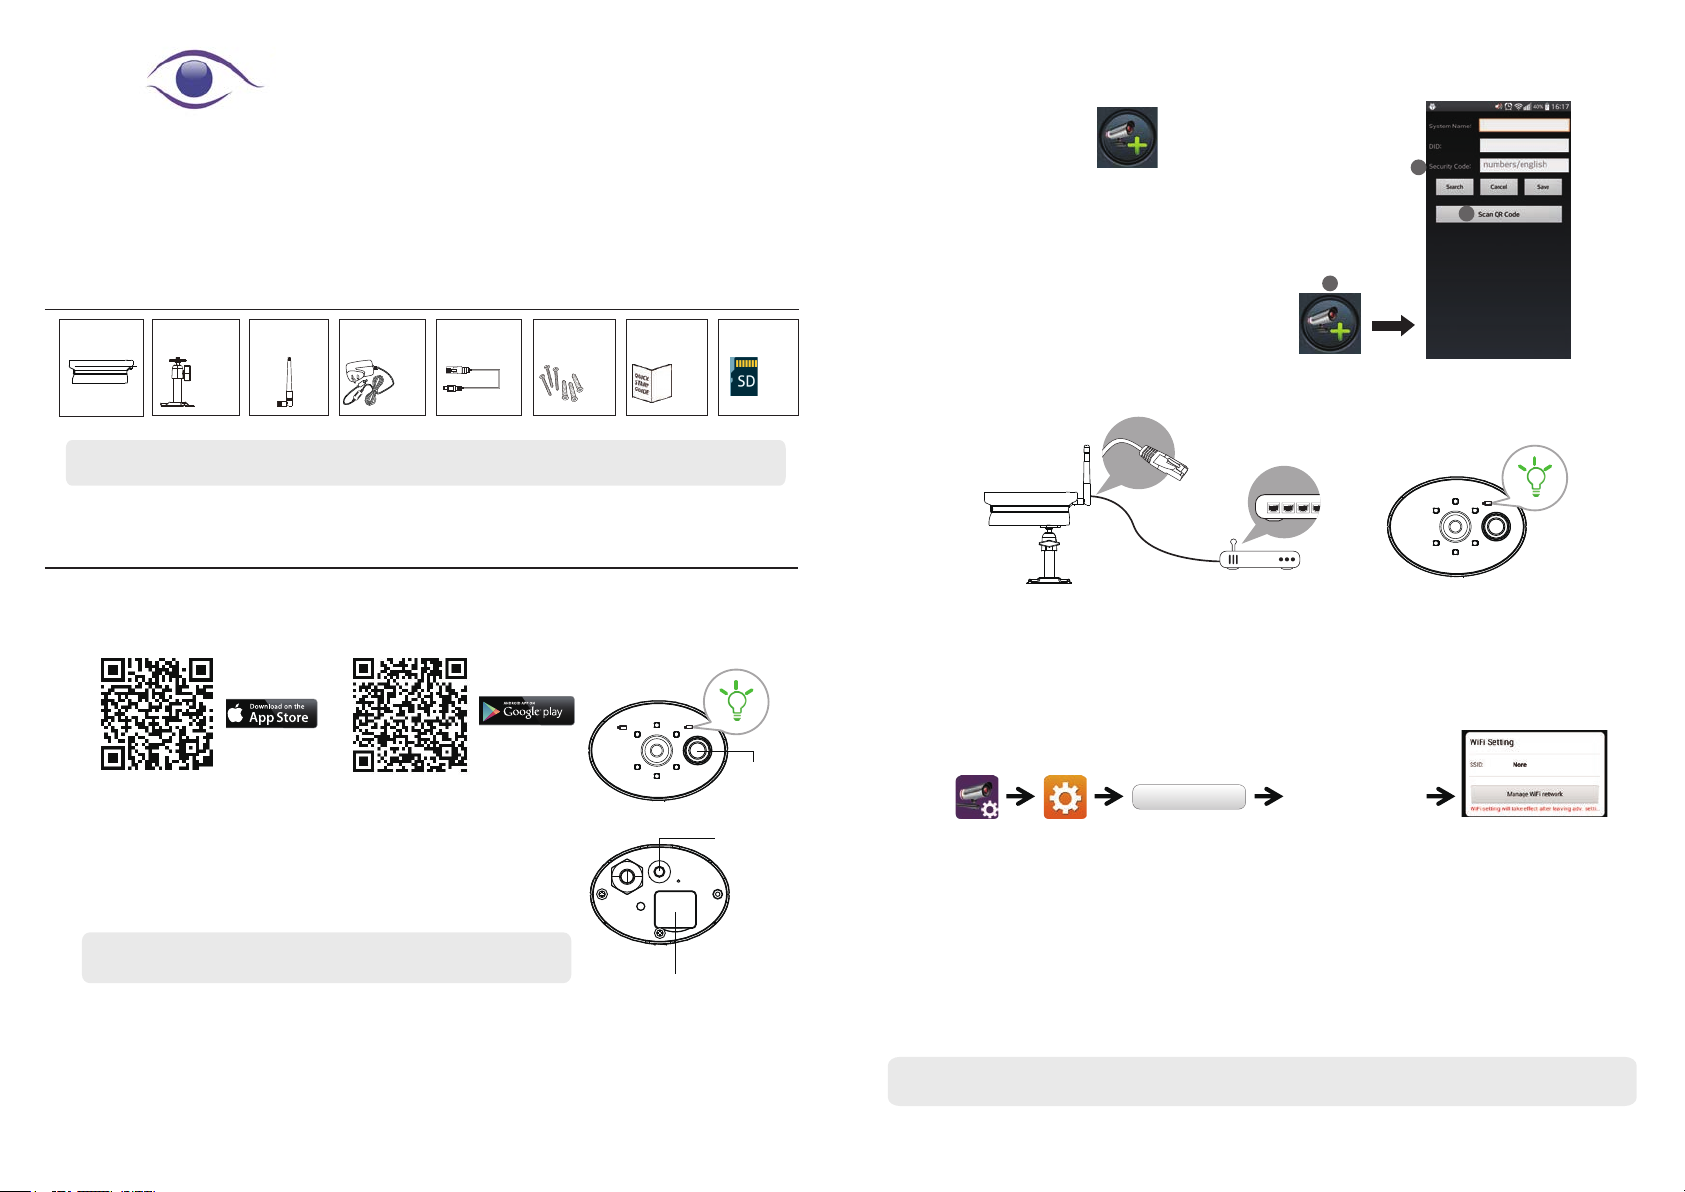
System Contents:
Power
Adapter
x 1
that a CLASS 10 memory card or above (8GB supplied) is utilised, as other kinds of
USB to RJ-45
Cable
x 1 x 1
Screw Pack
Quick Start
Guide
x 1x 1
8GB Micro
SD
x 1
x 1
Camera
Antenna
Wireless
APP Camera
Note: For video recording, ENSURE
memory card may cause unexpected results and should be avoided.
Camera Stand
x 1
SETTING UP THE CAMERA
1. APP DOWNLOAD
Please download and install the "OMGuard HD" APP to
your device.
(2) Launch the APP, tap to add the camera.
(3) Tap (QR code icon) and scan the QR code label on the back
of the camera to bring up the DID information. Or tap "search"
and select the camera DID (also printed on the camera label).
(4) Enter the default password 123456 and 'save' the settings.
2
4
3
3b. Alternatively, establish a connection via the Ethernet cable:
(1) Connect your mobile device to the Wi-Fi router. Connect the camera to the Wi-Fi router
with the supplied Ethernet cable. After powering the camera, it will take approx 40 seconds
to connect to the router. When completed/connected the green LED will stay ON.
(2) Launch the APP, tap the “Search” button to locate the camera.
(3) Enter the default password 123456 then 'save' the settings.
For iOS
For Android
2.Power the camera
Plug the camera in to a mains supply, via the supplied power
adapter, and check that the Red & Green LEDs are flashing,
which indicates the camera is ready for Wi-Fi setup. This process
should be completed within 1min; ensure that both LEDs are
flashing Red & Green.
Note: If the LEDs are not flashing, Red & Green, press and hold the
reset button for 5 seconds until the Red & Green LEDs start to flash.
USB to RJ45
Connector
3a. Direct Wireless Connection:
(1) Go to the Wi-Fi setting on your mobile device. Choose the Wi-Fi router with a
prefix of HD-xxxxxx (xxxxxx = Camera ID numbers). Enter the default password
12345678 and 'save' the settings.
Motion
Sensor
Antenna
4.Wi-Fi Setting
4a.
Advanced
4b. The camera will be offline for around 40 seconds to reboot for Wifi connection. When
the camera connects to the Wi-Fi router correctly, the Green LED will stay ON.
4c. In the Wi-Fi settings of your smart phone/tablet, make sure that he Wi-Fi router you are
connecting to is the same one as the camera. If not, manually connect to it.
Note: Be sure to choose your local home Wi-Fi router on your local network in the App
ADVANCED SETTINGS. The system will begin to count down and reboot the system.
The camera view will show on screen again after the Wi-Fi setting has been updated.
Note: Wi-Fi setting may fail if you leave the ethernet cable connected. Please remove the cable
after settings have been completed.
Enter Admin
Password (default
123456)
Choose the appropriate
Wi-Fi router for your local
network
Page 2
TM
Yard-Vue
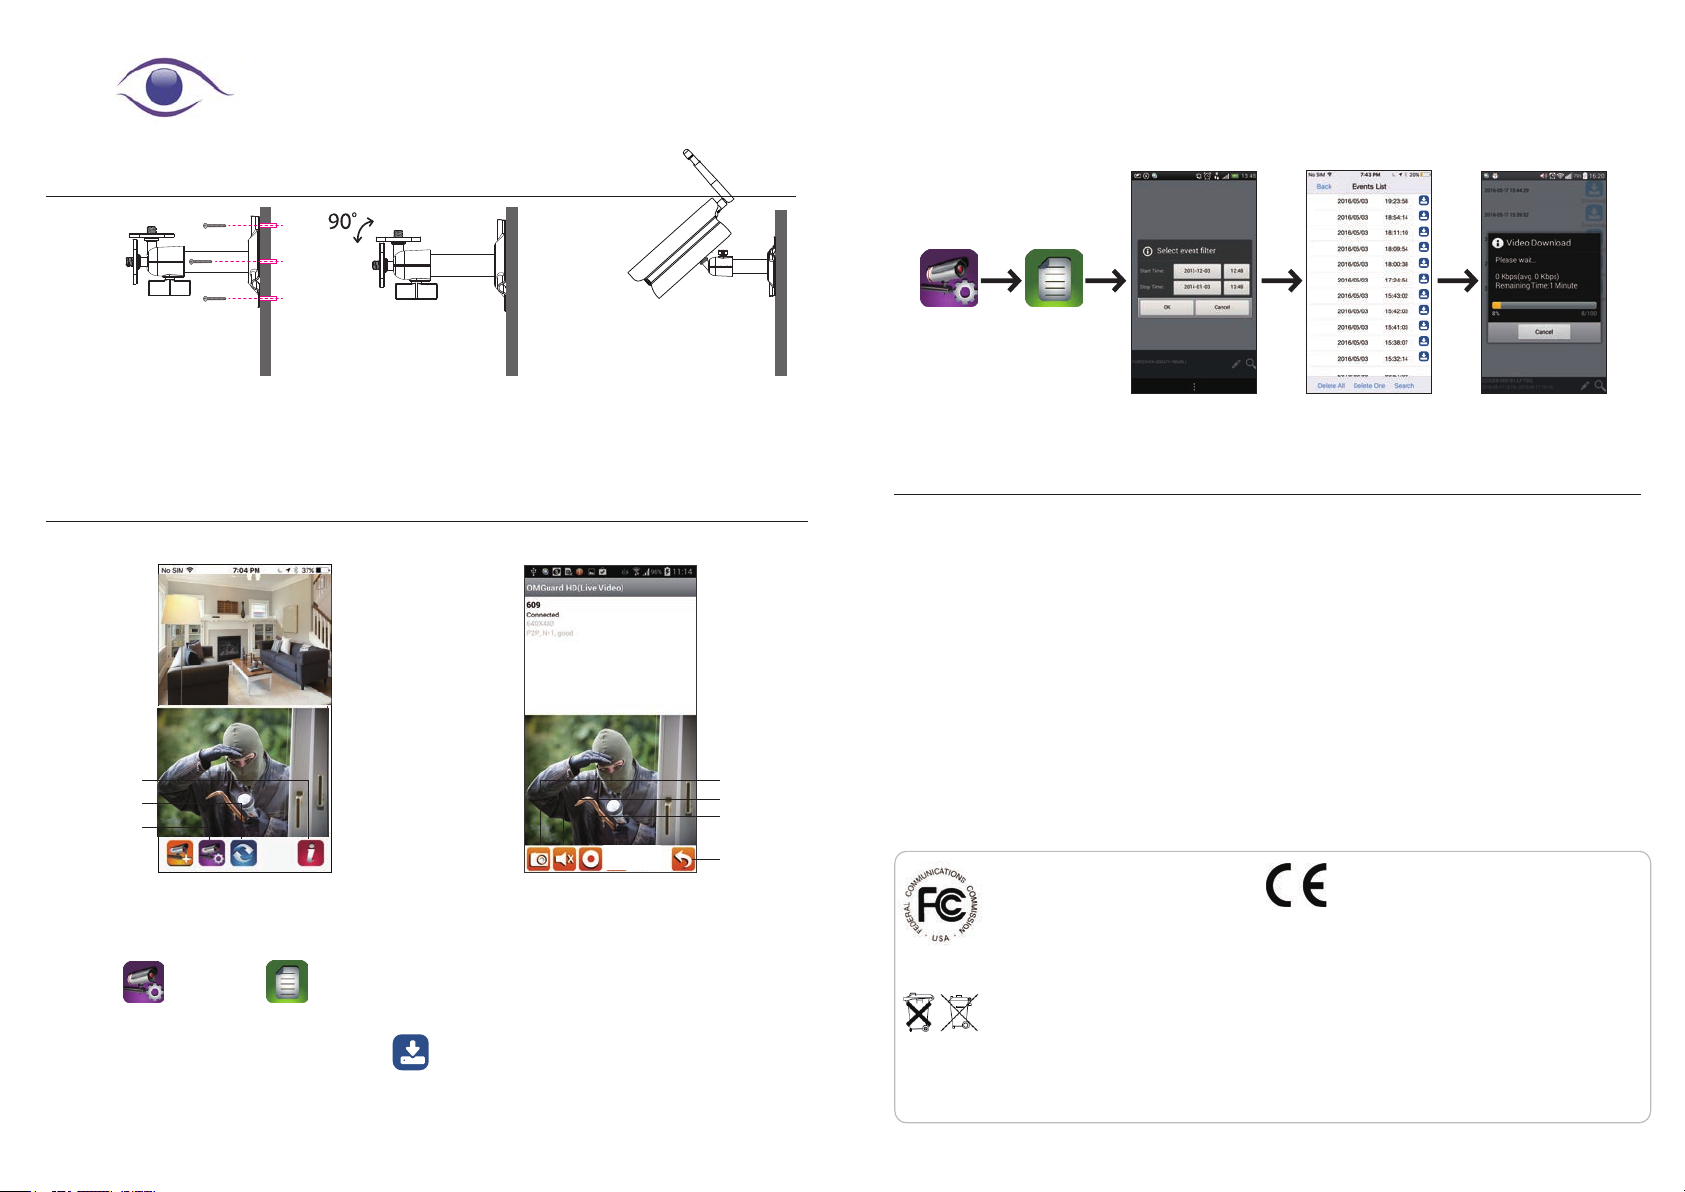
CAMERA INSTALLATION
Secure the camera
1 2 3
stand to a solid surface.
Loosen the thumb screw. Adjust to the required
viewing angle & tighten the
thumb screw.
(1) (1)-1
(2) (3) (4)
Download
Download
Download
Download
Download
Download
Download
Download
Download
Download
Download
Note:
Ensure that the camera is located in an area of Wi-Fi signal/reception.
LIVE VIEW / SNAPSHOT / PLAYBACK
Camera List
'Tap' a Snapshot
View, in Camera
List, to open a
single camera
Live View
Information
Refresh
Camera Setting
Add Camera
Follow the steps below for Event Playback.
1.
Tap and then the
2.
Select the time interval for the event list.
3.
Tap to select the file for playback.
4.
To store the files in the mobile device, tap
network due to large file/data size).
to download (best when connected to Wi-Fi or a 4G
Live-View
Snapshot
Mute
Video Record
Return
FACTORY DEFAULT SETTING
Press and hold the reset button on the power cable for 5 seconds and the system will
start the reset process. The system will restore to factory default and you may start
the Wi-Fi setup.
For further information please email:
FCC Compliance Statement: This device complies
with Part 15 of the FCC rules. Operation is
subjected to the following two conditions: (1)this
device may not cause harmful interference, and (2)
this device must accept any interferencereceived,
including interference that may cause undesired
operation.
If the camera system no longer functions or can no longer be repaired, it must be disposed of according to the valid statutory
regulations. Disposal of spent batteries/accumulators:
You are required by law (Battery Ordinance) to return all spent batteries and accumulators. Disposing of spent batteries/
accumulators with common household waste is prohibited! Batteries/accumulators that contain hazardous substances are
marked with the symbols on the side. These symbols indicate that it is prohibited to dispose of these batteries/accumulators in
the household waste. The abbreviations for the respective heavy metals are: Cd=cadmium, Hg=mercury, Pb=lead. You can
return spent batteries and accumulators that can no longer be charged to the designated collection points in your community,
outlets or wherever batteries or accumulators are sold. Following these instructions will allow you to fulÿll the legal
requirements and contribute to the protection of our environment!
Products with CE Marking comply with EMC Directive
(2014/30/EU); Low Voltage Directive (2014/35/EU); RED
(2014/53/EU); ROHS Directive (2011/65/EU) issued by
the Commission of the European Community.
Compliance with these directives implies conformity to
the following European Norms:
EMC: EN 301 489
LVD: EN 60950
Radio: EN 300 328
 Loading...