

Page 1
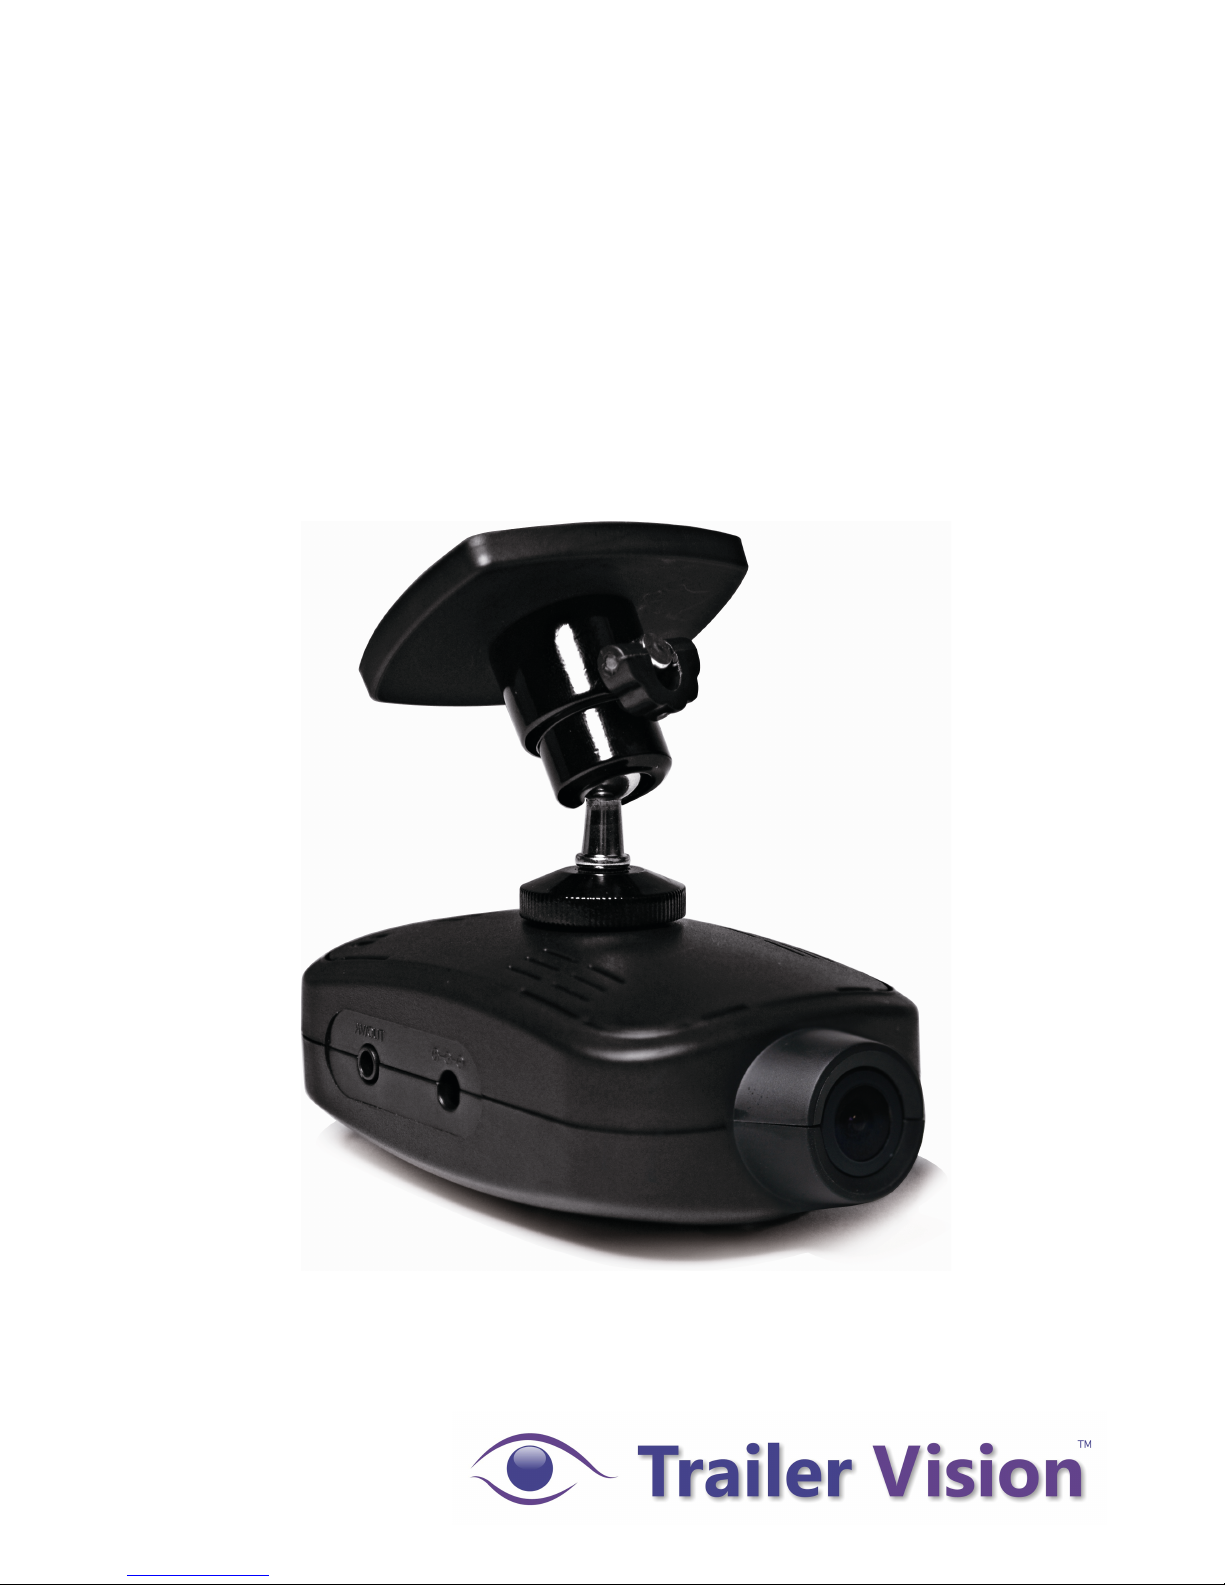
Recorder-Cam
™
Mobile DVR
User Manual
Page 2

Page 1
Recorder-Cam™
Windscreen Mounted Mobile DVR
Preface
This manual includes information about Recorder-Cam™, a
windscreen mounted mobile DVR/’accident recorder’.
Disclaimers
Recorder-Cam™ cannot guarantee to record all events.
Manufacturers and retailers are not liable for any lost data.
The unit’s recording function cannot be triggered if an
impact is too light for the G-Sensor to activate.
The unit stops all recording when it is connected to a
computer.
Page 3

Page 2
Index
1. Important Safeguards------------------------------------------- 3
2. GPS Accuracy ---------------------------------------------------- 5
3. Package Contents ----------------------------------------------- 5
4. Parts and Functions -------------------------------------------- 6
5. Main features ----------------------------------------------------- 8
6. Installation Guide ------------------------------------------------ 9
7. Operation ---------------------------------------------------------- 16
Recording --------------------------------------------------------- 16
Connecting to a Monitor --------------------------------------- 18
Connecting to a Computer ----------------------------------- 9
Backup the recorded video to a USB Flash Drive ------- 20
ECO Driving Indicator ------------------------------------------ 22
Turning off -------------------------------------------------------- 24
8. Using the Security Eye Program --------------------------- 25
Program Setup ------------------------------------------------- 27
Saving the video ----------------------------------------------- 28
Opening the video --------------------------------------------- 29
GPS Window --------------------------------------------------- 30
Buttons and Functions --------------------------------------- 31
9. Appendix----------------------------------------------------------- 32
Specifications----------------------------------------------------- 32
Battery Handling------------------------------------------------- 33
Page 4

Page 3
Important Safeguards
* Read the instructions – All safety and operating
instructions should be understood before using the
unit.
* Check your local traffic laws before mounting the unit,
as some countries may prohibit the use of suction
mounts on windscreens while driving.
1. Do not operate the unit while driving. Operating the unit can
distract the driver and increase the likelihood of an accident;
park before operating the unit.
2. When installing, mount the unit in a secure position so it
does not obstruct the driver’s view of the road, or prevent the
driver from operating the vehicle.
3. Do not attempt to disassemble or alter any part of the unit,
unless detailed in this manual.
4. Do not leave the unit exposed to a heat source, or in an
unattended vehicle at a high-temperature location.
Disconnect the power supply, immediately, if the unit emits
smoke, or noxious fumes.
5. Do not allow the unit to come into contact with, or become
immersed in, water or other liquids.
6. Do not clean the unit with substances containing alcohol,
Page 5

Page 4
benzene, or other flammable substances.
7. Do not puncture, subject to impact, or insert any foreign
objects into the unit.
8. Make sure the unit is installed securely. The windscreen
mount may not stay attached to the windscreen in all
circumstances. Do not mount the unit where it could become
a hazard if it detaches from the windscreen.
9. Only use the recommended power accessories.
10. Do not handle the power supply, or the unit, with wet
hands.
11. Disconnect the power supply when the unit is not in use.
12. Recording results may not be satisfactory when the light
conditions change quickly/dramatically. For example, when
the vehicle is entering, or leaving a dark tunnel.
13. A tinted windscreen may affect the brightness/contrast of
the recorded images.
14. A light impact, or shock, may not trigger the unit to record.
15. If the battery is severely damaged during an
impact/accident and fails to provide power to the unit, the
incident may not be recorded.
Page 6
Page 5
GPS Accuracy Level
The GPS Receiver is normally accurate to within 15 meters.
However, certain factors can affect the accuracy of GPS
receivers, such as being located in densely wooded areas,
underground, or in urban areas with tall buildings; in these
conditions the positioning error may reach 100+ meters.
Note: Heated windscreen elements may prevent GPS
reception; please test desired location before fitting.
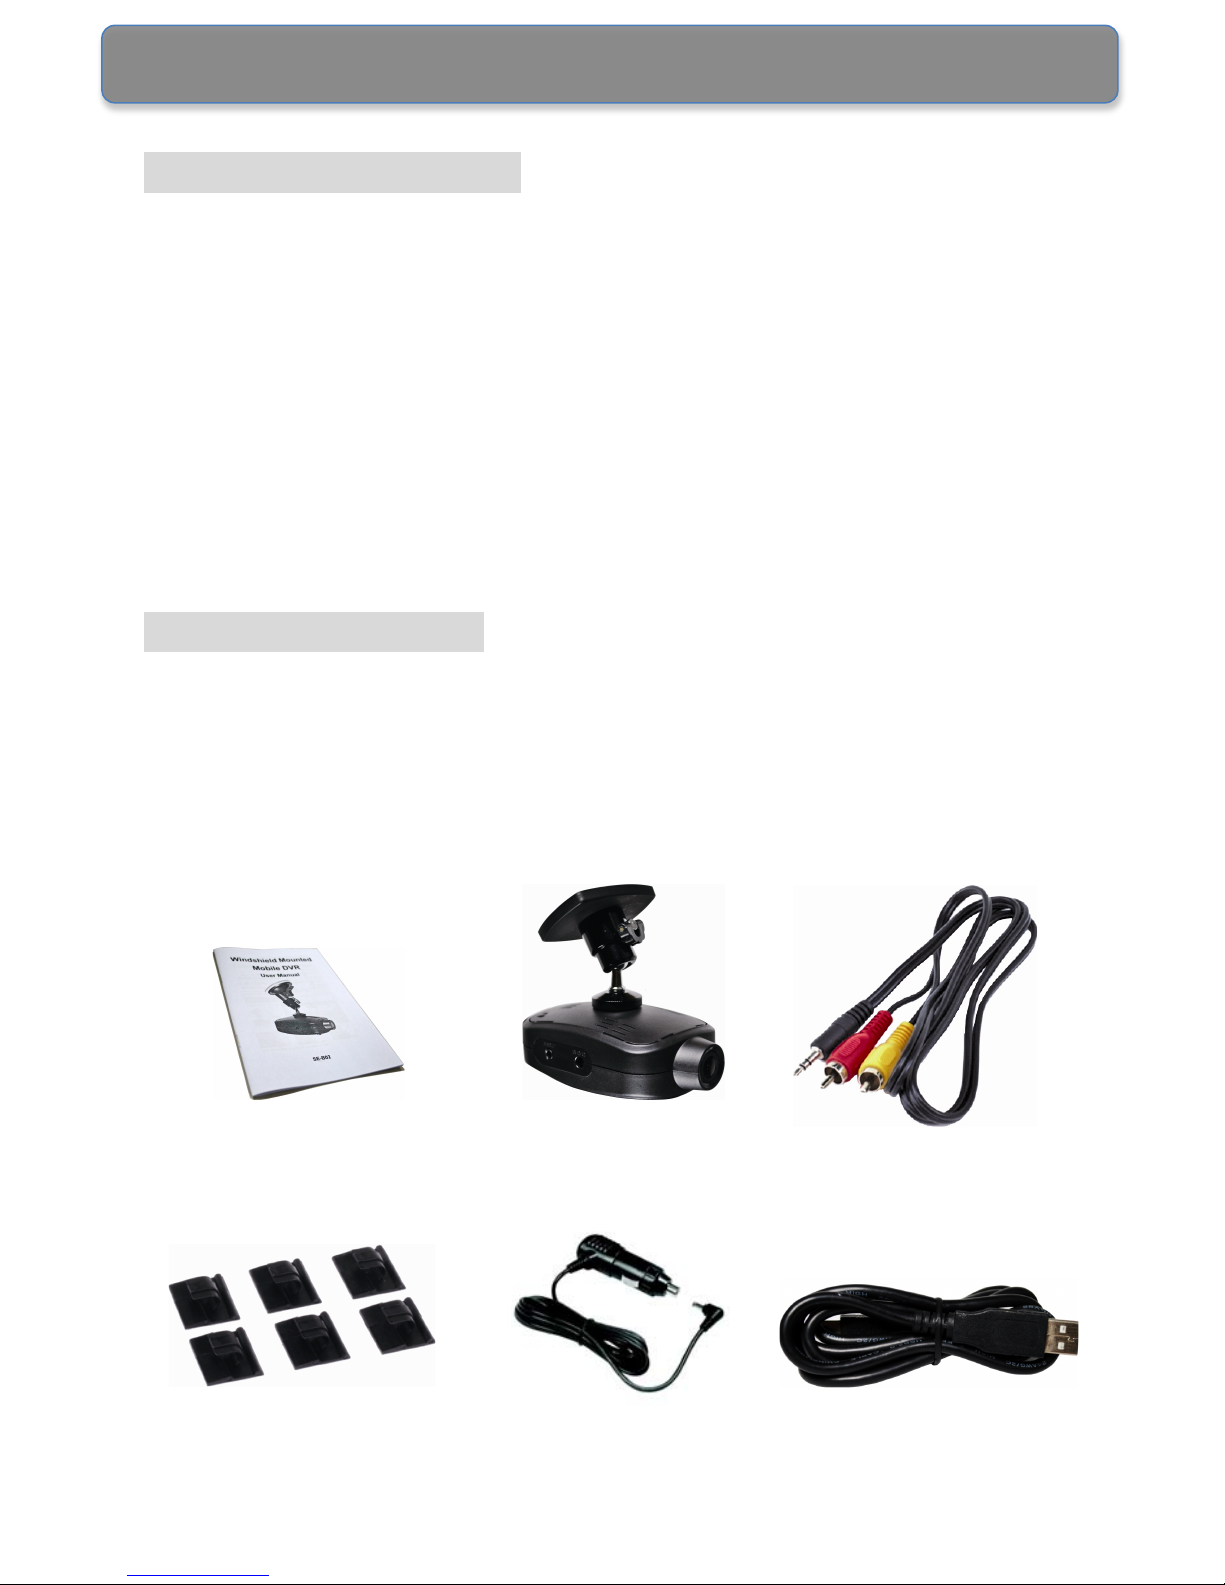
Package Contents
Please check that the box contains all the accessories listed
below. If any item is missing or damaged, please contact your
retailer.
User Manual
Main Unit
AV Cable
Cable Clips
Cigarette Lighter
Adapter
USB Cable
Page 7
Page 6
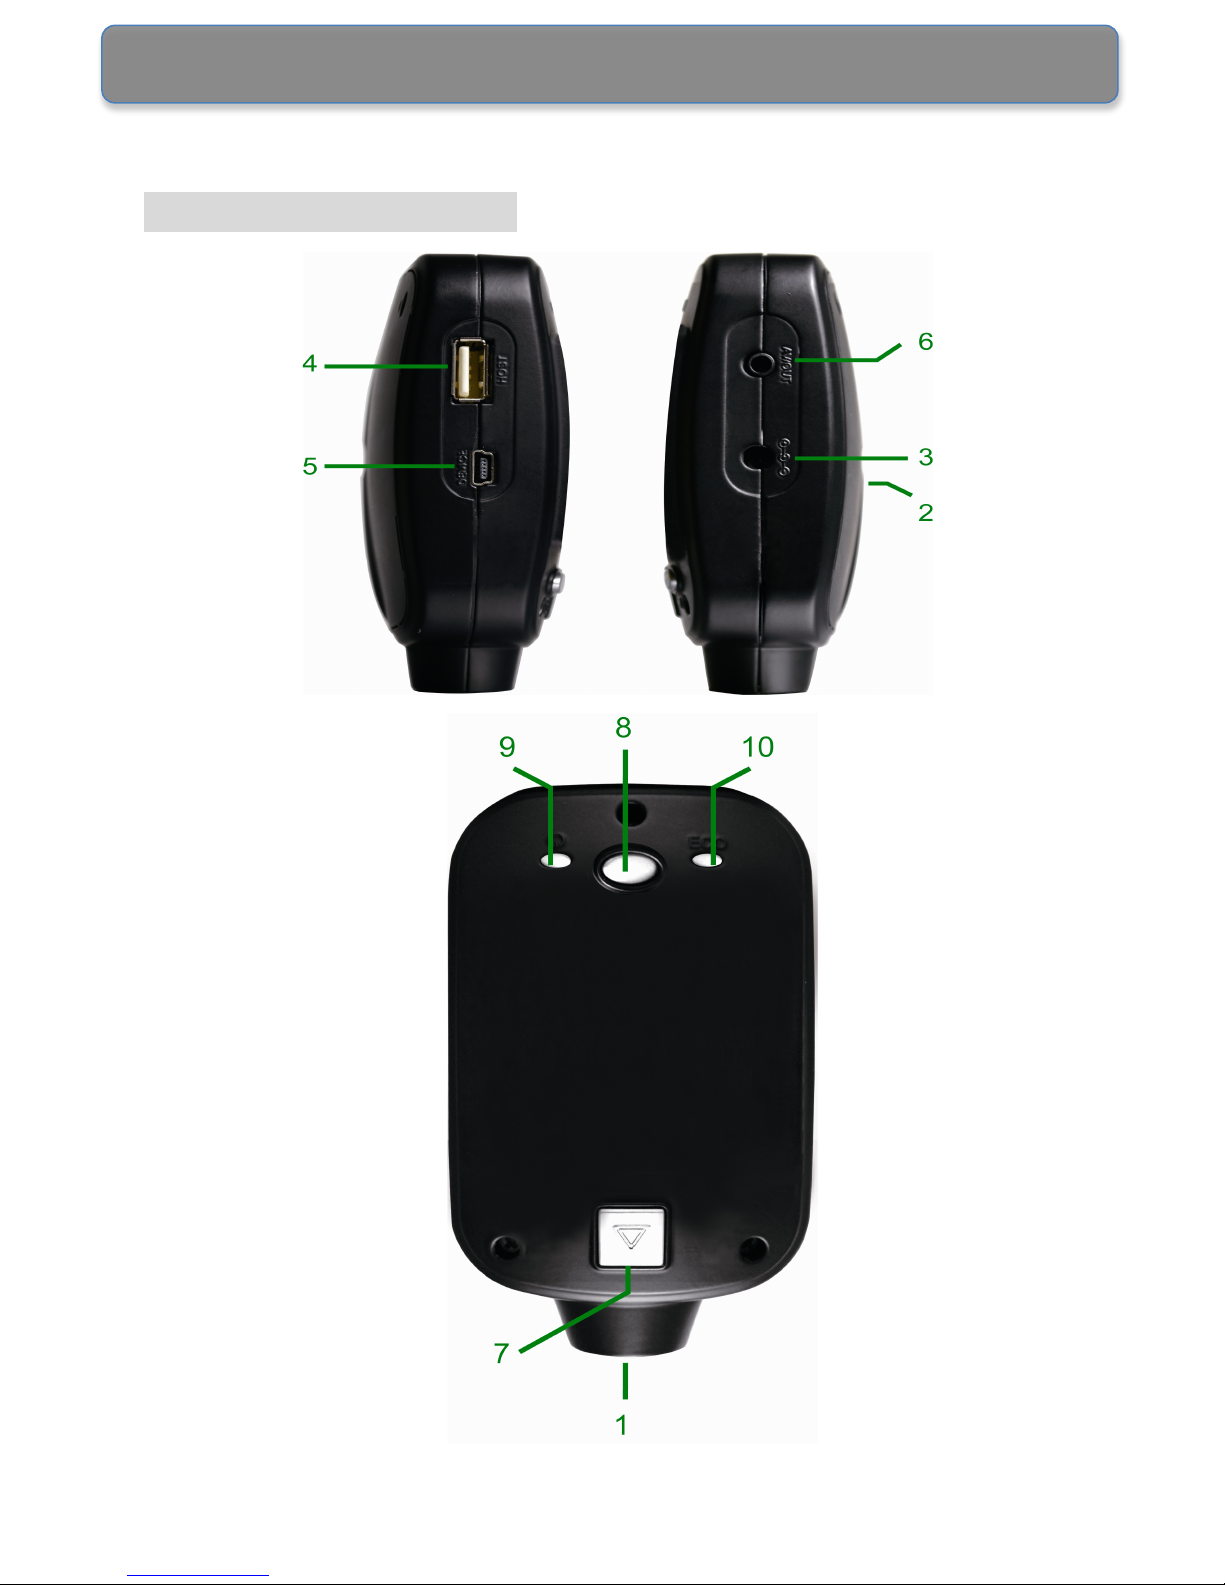
Parts and Functions
USB HOST
Mini USB
A/V Out
Charger Port
Mounting
Bracket Socket
ECO LED
Power LED
Camera
Manual
Record Button
Playback
Button:
Page 8

Page 7
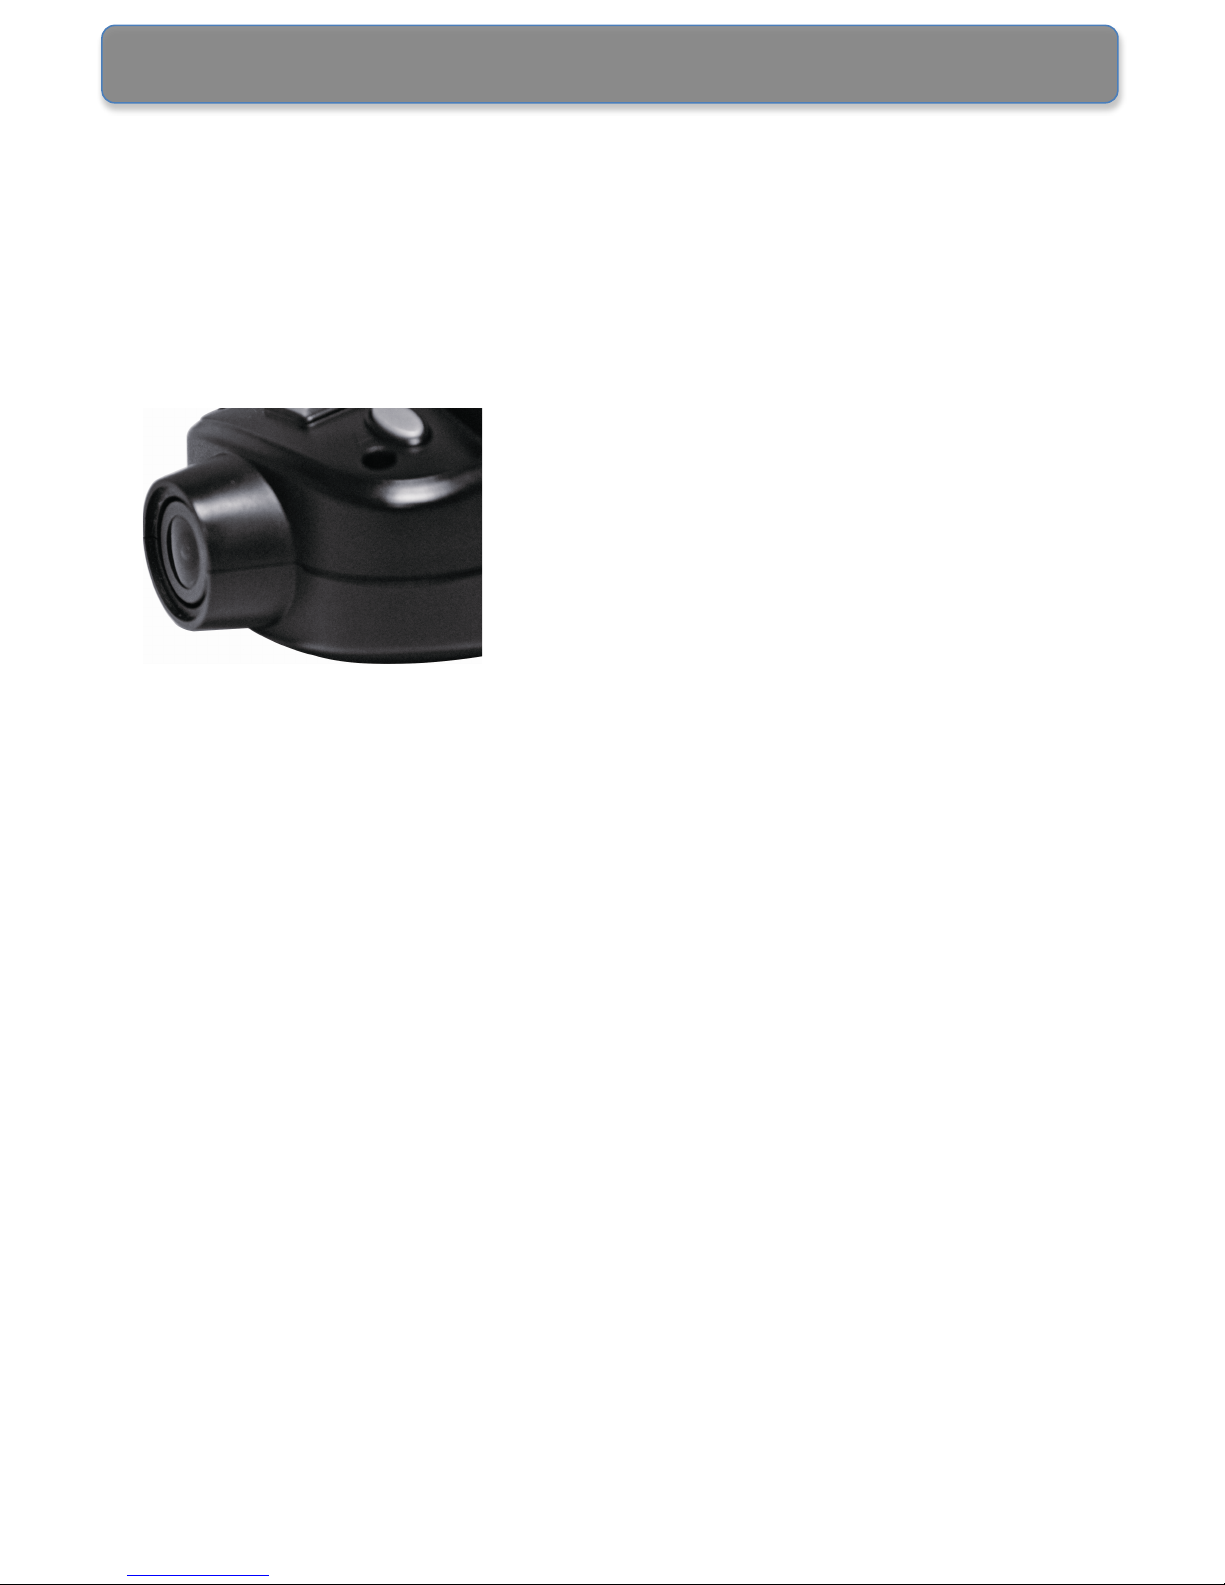
1. Camera: Please ensure that the camera lens is not
obstructed.
2. Mounting Bracket Socket: Use the bracket to mount the
unit on to the windscreen.
3. Charger Port: Connect the power cable to the charger port.
4. USB Host: Connect to a USB flash drive to backup the
recorded video.
5. Mini USB: Connect the unit to a computer via a USB cable.
6. A/V Out: Connect the AV cable to the A/V Out and plug the
other end of the cable to the Video In / Audio In ‘jacks’ of a
TV/monitor, to playback the recorded video.
7. Manual Record Button: Press to start recording manually
(records 30 seconds in total).
8. Playback Button: Press to start playback (when connected
to a monitor).
9. Power LED: The LED light is illuminated when the unit is
powered.
10. ECO LED: The ECO LED indicates efficient/economical
driving of the vehicle.
Page 9

Page 8
Main Features
1. Event Recording
The unit records 10 seconds pre ‘event’ and 20 seconds post
‘event’. An ‘event’ (or accident) could be a sudden
acceleration/braking, a sharp turn, or a collision/impact.
2. Excellent Recording Quality
H.264 compression provides excellent and clear video
recording/playback quality.
3. Manual Recording
The Manual Record feature enables the driver/user to record
when required/safe to do so, by a single button press; each
recording includes 10 seconds of video before the button is
pressed and 20 seconds afterwards.
4. Video Clip Auto Archive
The unit has three recording modes;
• Continuous: When the power is on, the DVR automatically
starts recording.
• Manual: When the Manual Record button is pressed, the
DVR records 30 seconds of video (see above).
• Sensor (‘Event’): When the units internal G-Sensor detects
an impact or collision etc, the DVR automatically records 30
seconds; 10 seconds before and 20 seconds after.
The unit automatically archives all of the recording clips and
overwrites the oldest data when the storage is full.
5. Easy Backup
Manual and Sensor recording can be saved to a USB Flash
Drive and downloaded to a computer for playback and analysis.
6. Event Analysis Program
The Secure Eye program can analyse the recorded video and
provides many functions, such as capturing a snapshot from the
video, print the image and converting the video to AVI files.
Page 10
Page 9
The Installation Guide
This guide explains how to use the unit and to achi.e.ve the
best recording results.
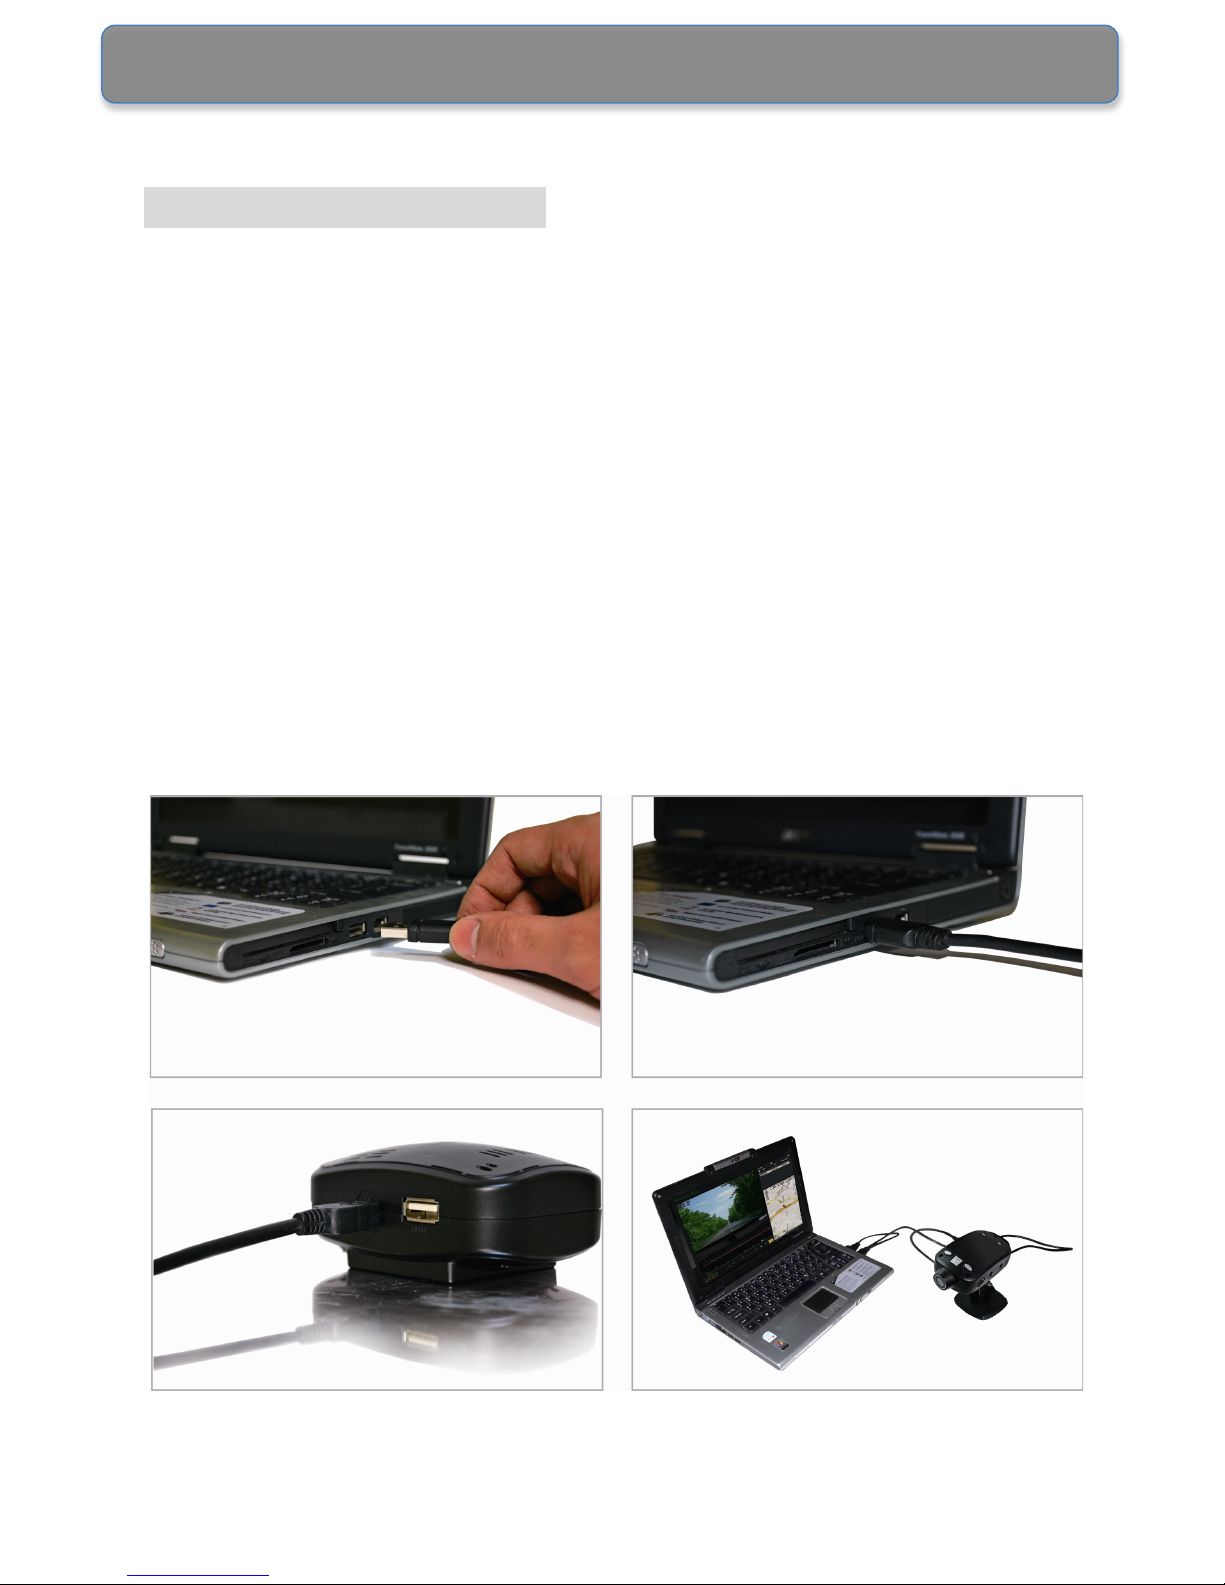
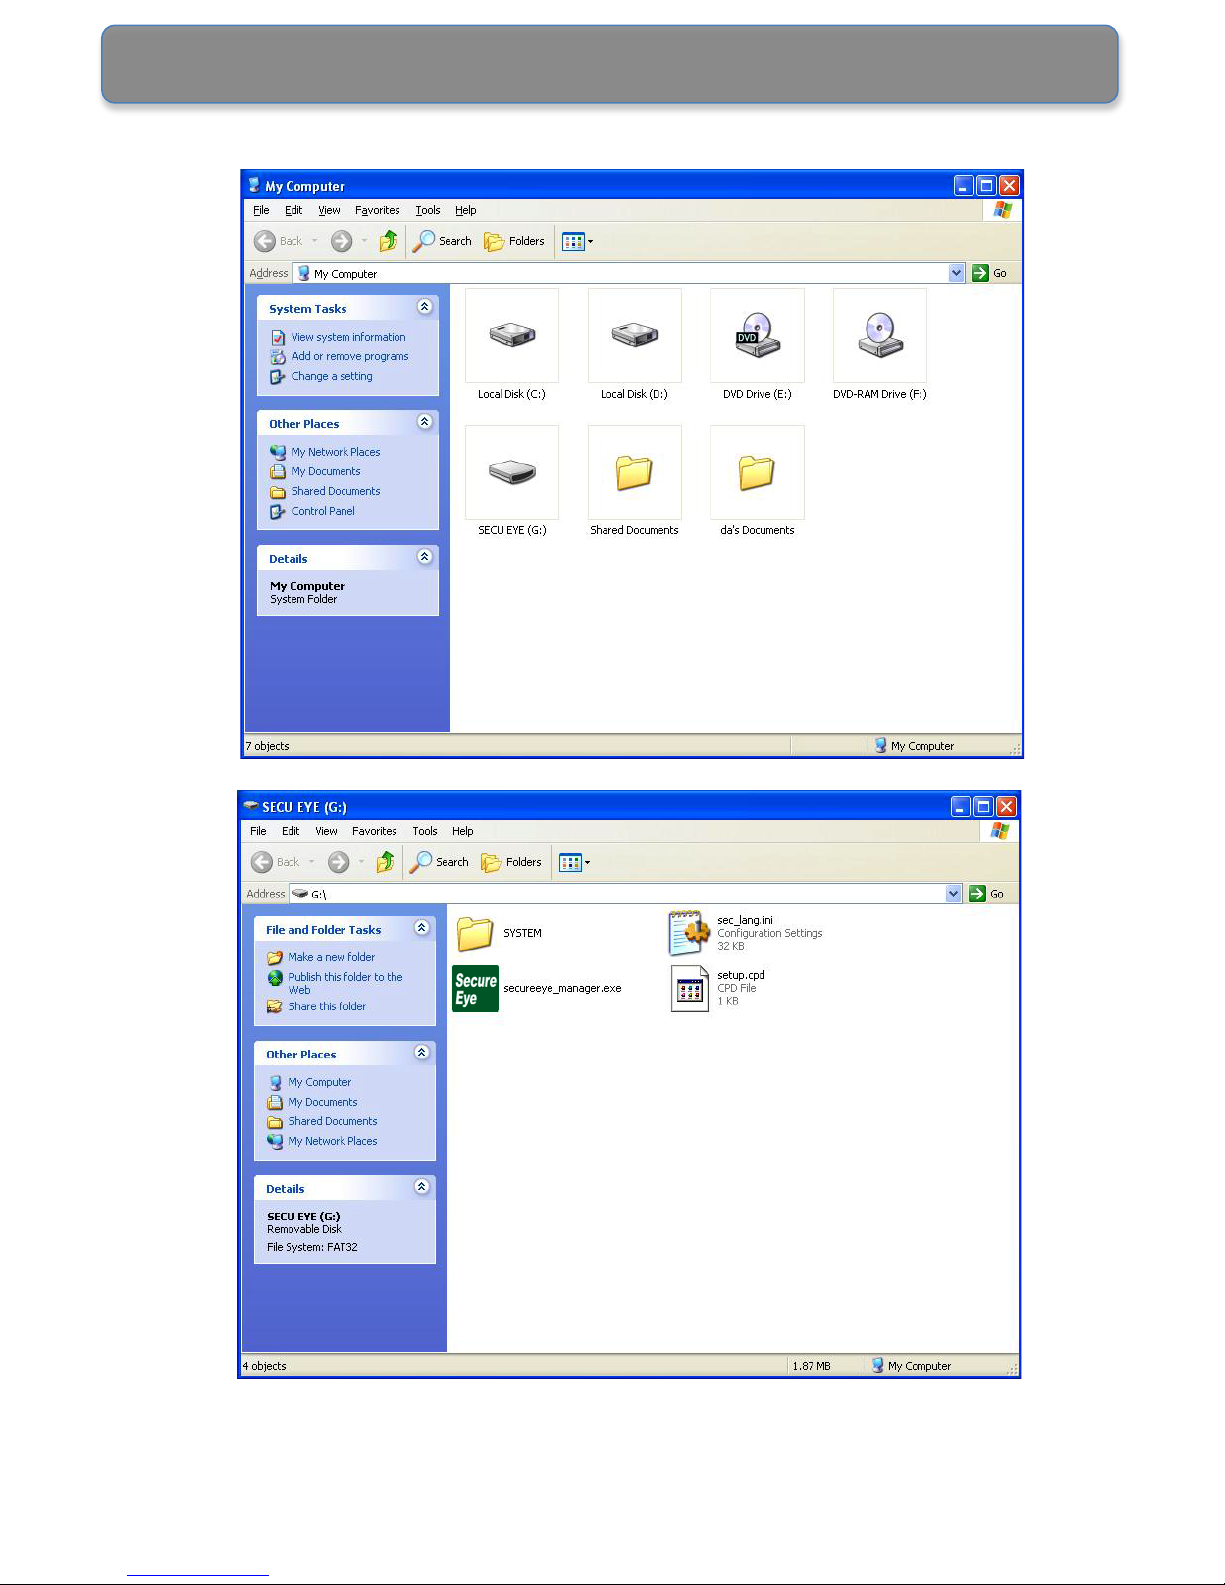
1. Connect the unit to your computer via the USB cable. Wait
approximately 2 minutes, or until the computer detects the
device.
2. Select the ‘Secu Eye’ folder and execute
‘Secureeye_manager.exe’ program.
Please see the following photos:
Page 11
Page 10
Page 12
Page 11
Note: Computer system time will automatically sync with
the software Time Setting. Therefore to avoid any
confusion, please ensure that the computer time is set to
local time.
Page 13
Page 12
Program Setup
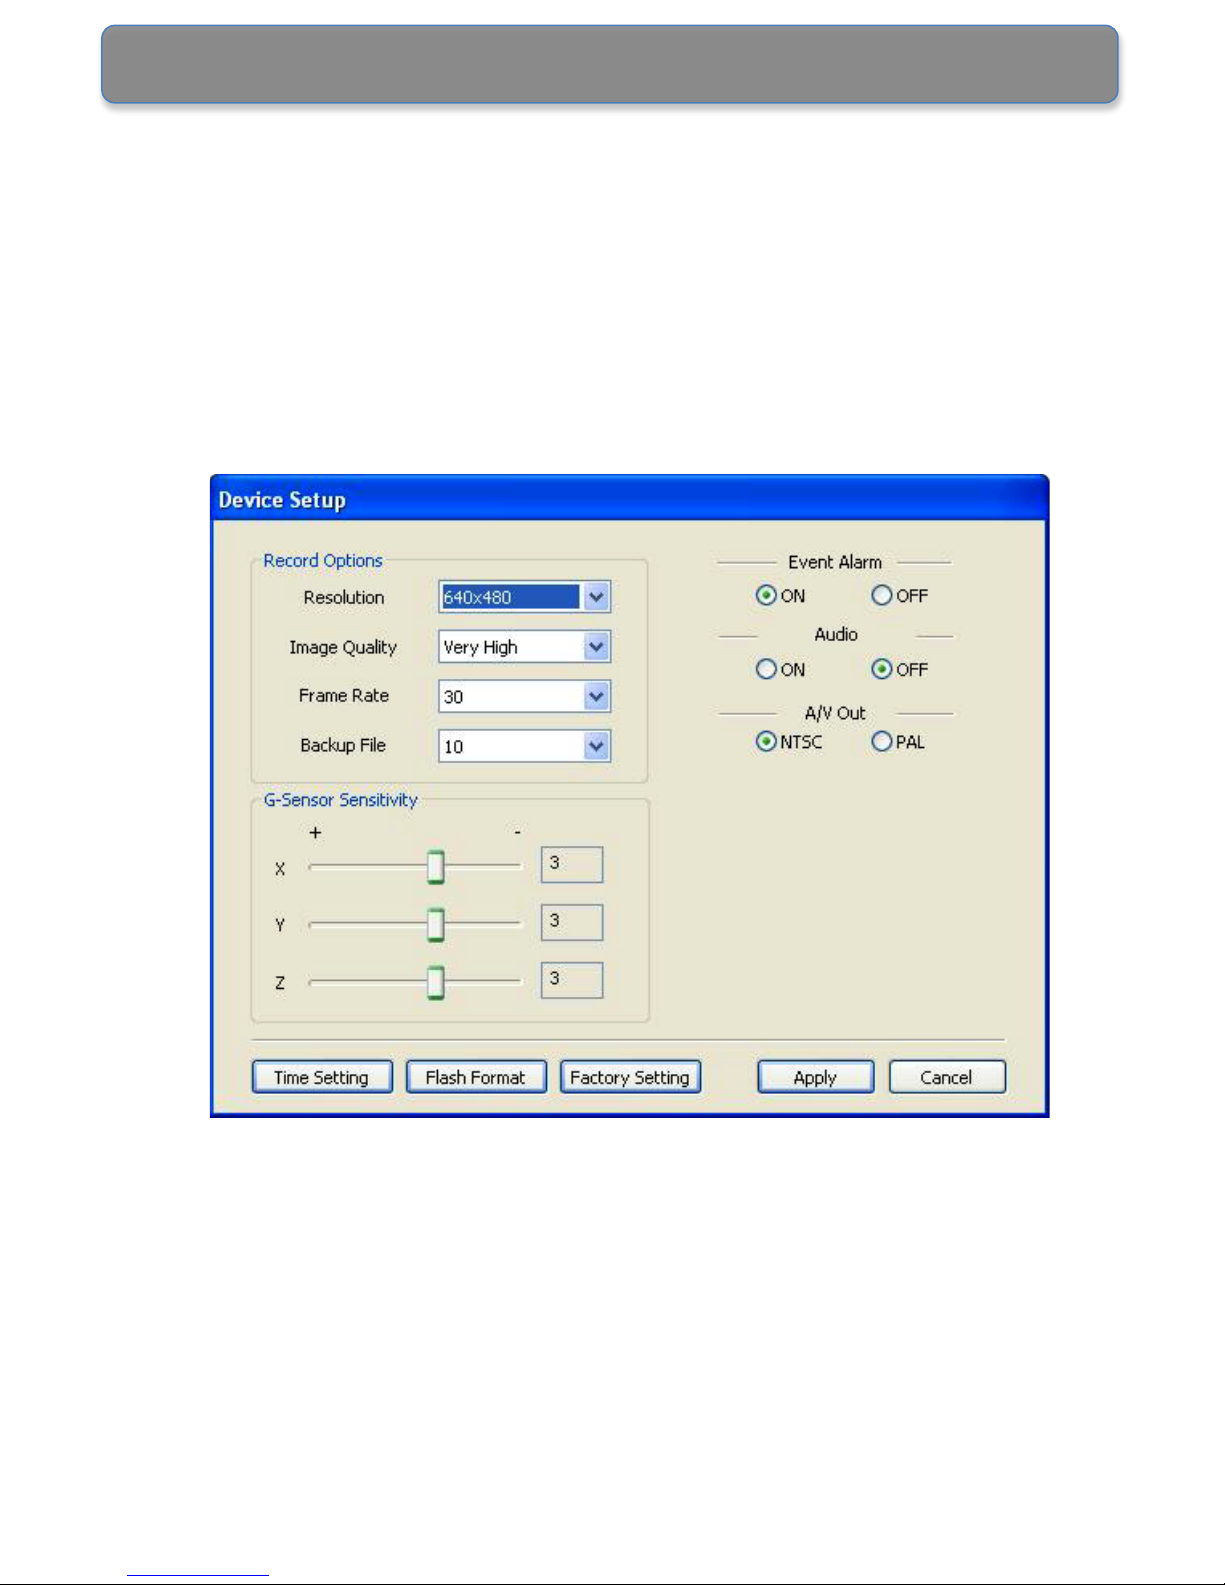
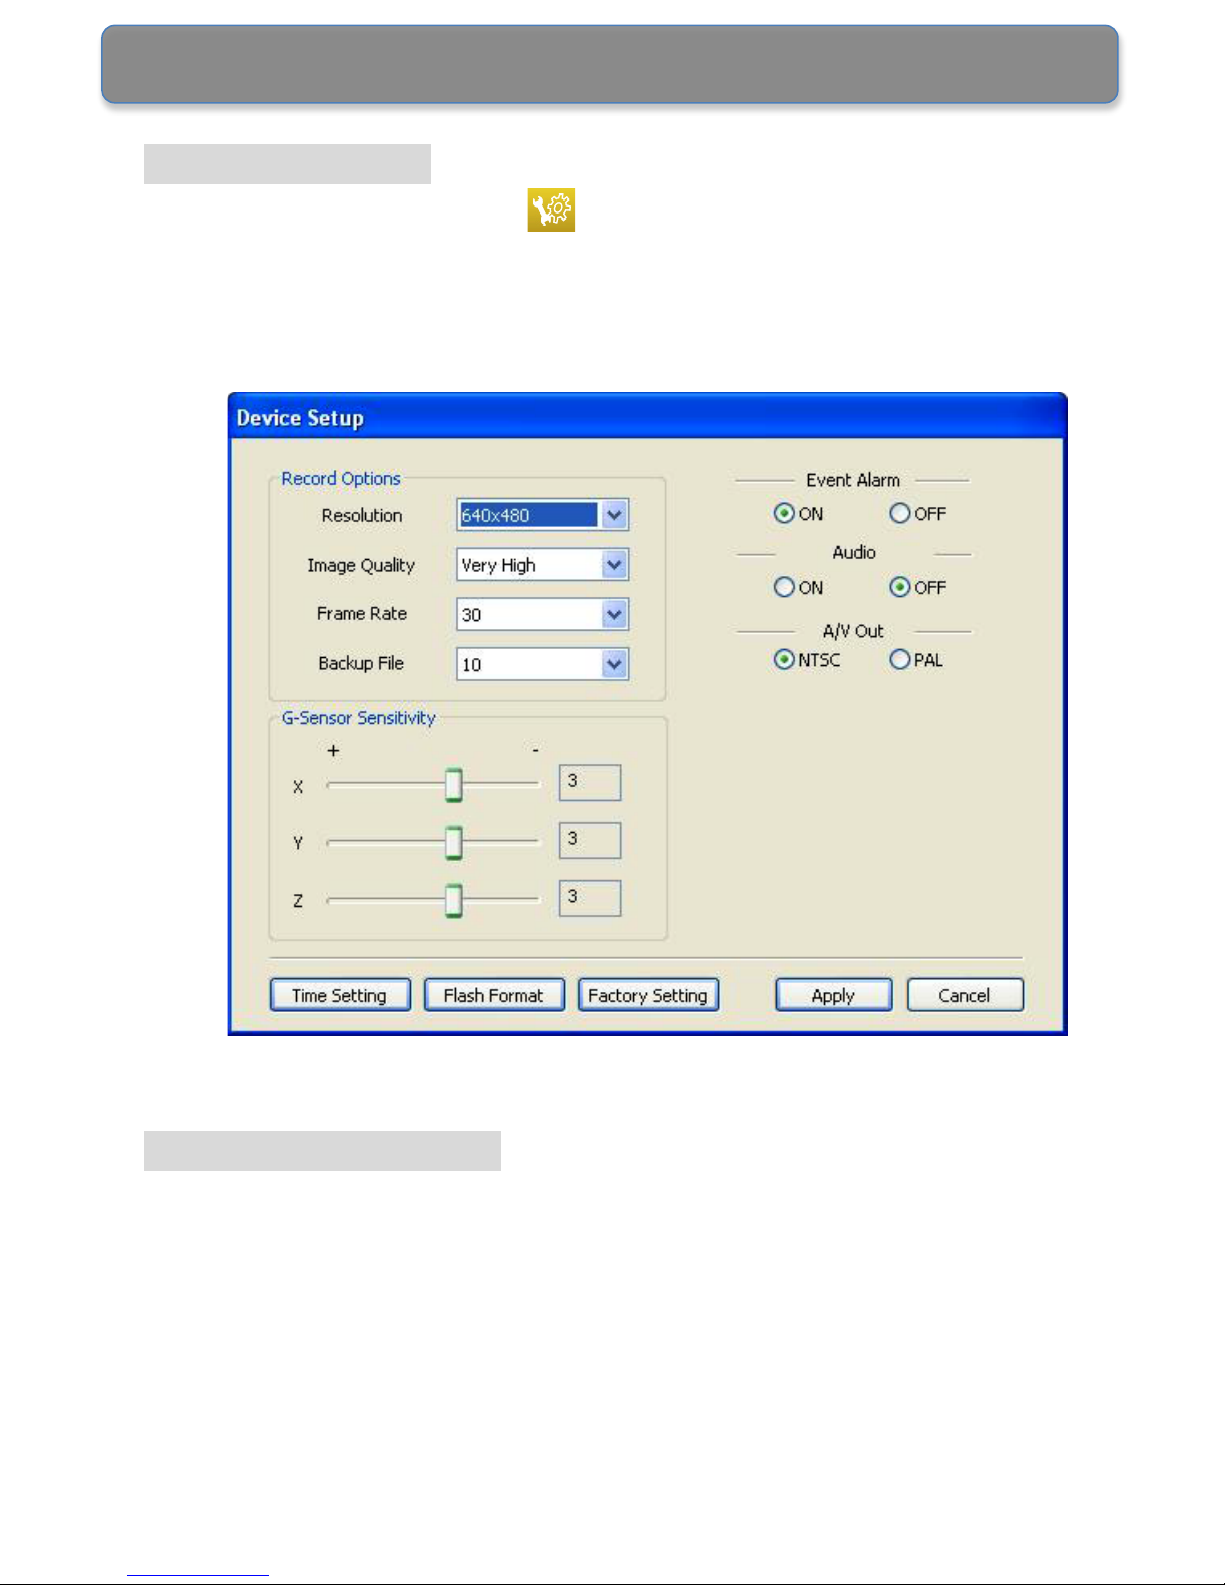
Click the SETUP button to set the Resolution, Image
Quality, Record Frame Rate, Backup Files, G-Sensor
Sensitivity and Event Alarm Sound etc.
Settings Description
1. RESOLUTION: The recorded video resolution can be set as
high as 640 x 480 (lower resolution allows more video/time
to be stored).
2. IMAGE QUALITY: The unit provides the following image
quality options: Very High/High/Normal/Low/Very Low.
Please refer to the following recording time data based on
Page 14

Page 13
30fps (real time) recording:
Very High: Approximately 6hrs continuous recording.
High: Approximately 7hrs continuous recording.
Normal: Approximately 9hrs continuous recording.
Low: Approximately 12hrs continuous recording.
Very Low: Approximately 14hrs continuous recording.
Note: Actual recording time may vary.
3. FRAME RATE: The recording frame rate can be set to
5/10/15/30fps. Note: The higher the fps selected the longer
the recording time. Recommended rate: 15fps or 30fps.
4. BACKUP FILES: To set how many video files are
‘up-loaded’ to a USB Flash Drive. There are selections of 1,
5, 10, 20, 30, 40, and 48 (the larger settings will require a
higher capacity USB Flash Drive/Memory Stick).
5. G-SENSOR SENSITIVITY: The smaller the number, the
higher the sensitivity (more video will be saved).
6. EVENT ALARM: Users can turn OFF the audible alarm
(‘beep’) when the G-Sensor detects an event; the default is
ON.
7. AUDIO: The DVR has a built-in Microphone. Users can turn
off the audio recording by selecting OFF; the default is ON.
8. AV OUT: Users can set up the video output format to match
the video system.
Page 15
Page 14
Proceed to installation after system setup is completed:
1. Turn off the vehicle engine.
2. Clean/dry the windscreen and suction cup (mount) with a
lint-free cloth. Fix the suction cup to the windscreen in a
location that will not block the drivers view (i.e. behind/above
the rear-view mirror).
Clean the camera lens with a
lint-free cloth.
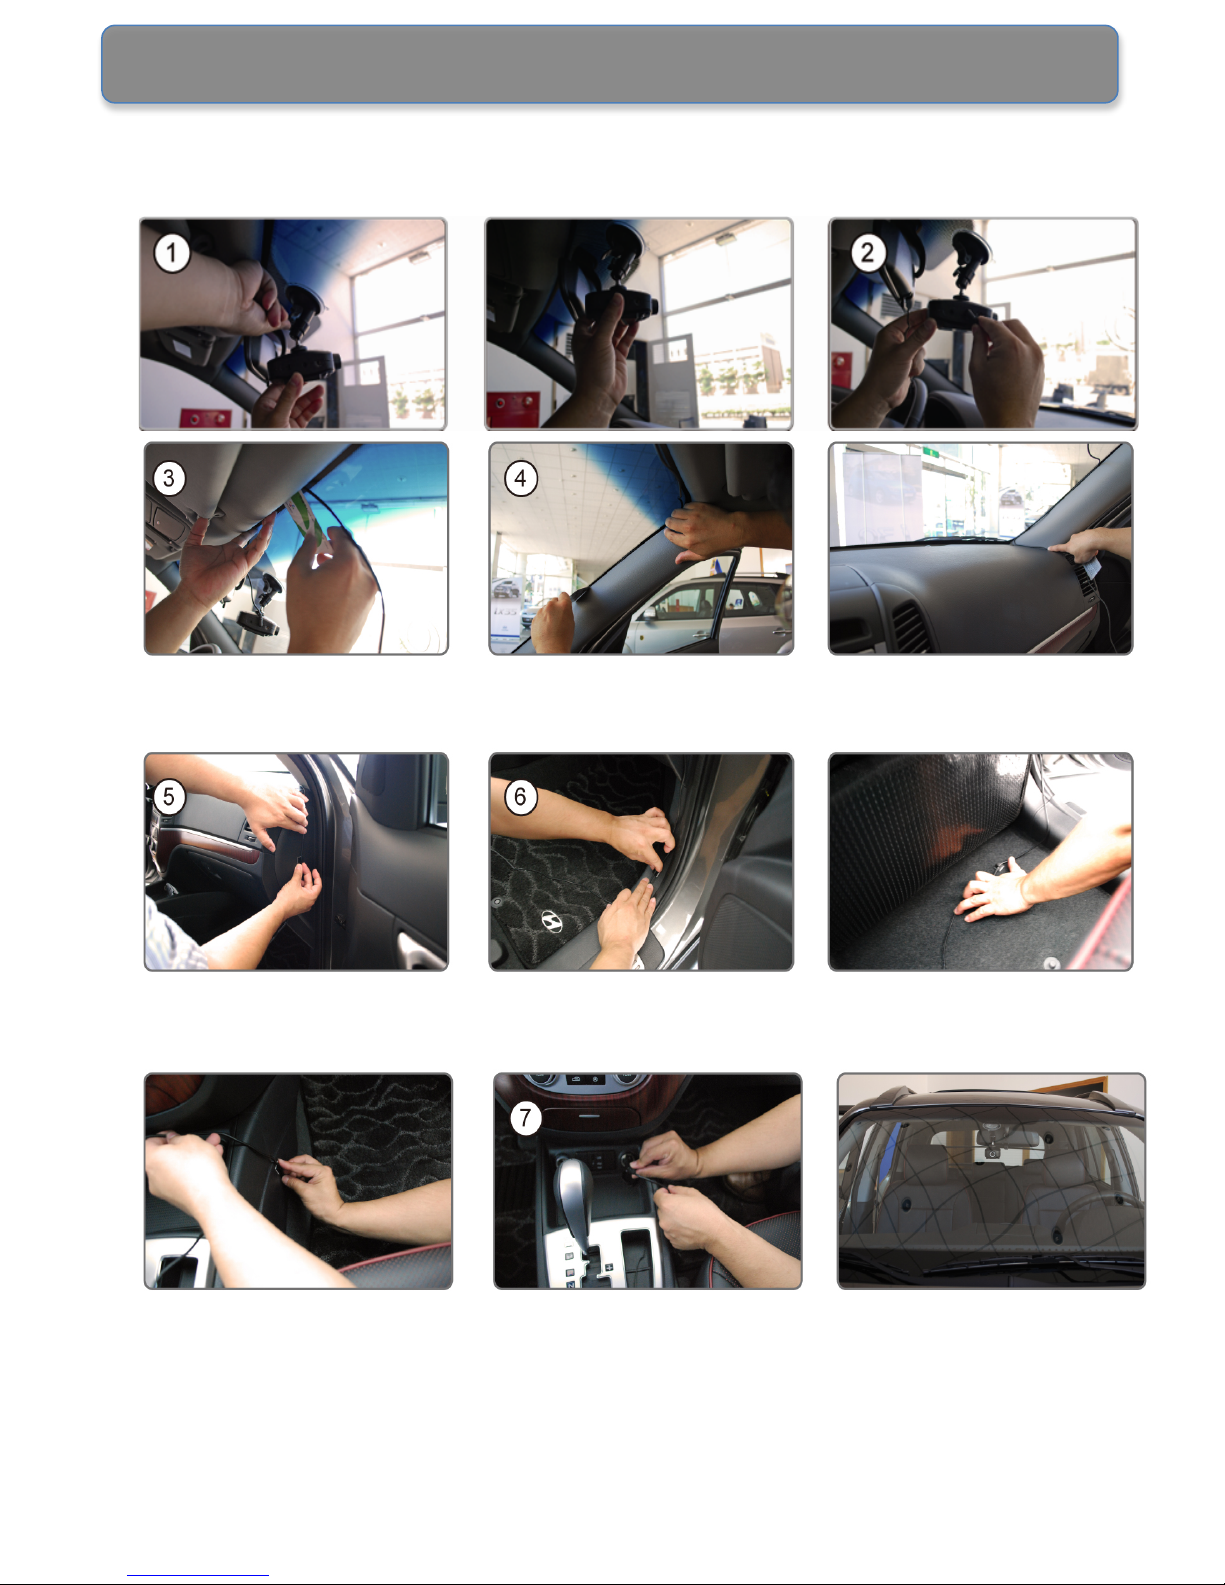
3. Complete the following seven steps to install the cable and
the unit.
Note: Install the unit before applying power.
Page 16
Page 15
Adjust the angle of the unit and plug the power cable in to the
unit.
Use a plastic card, such as a credit card, to press the power
cable firmly into the edges.
Use the provided cable clips to fix the cable at the passenger
side and underneath the floor mat.
Plug the power adapter into a 12-24V socket.
Page 17
Page 16
Operation – Recording
1. After plugging the power adapter into a 12-24V socket, turn
on the ignition/start the engine (to power the socket).
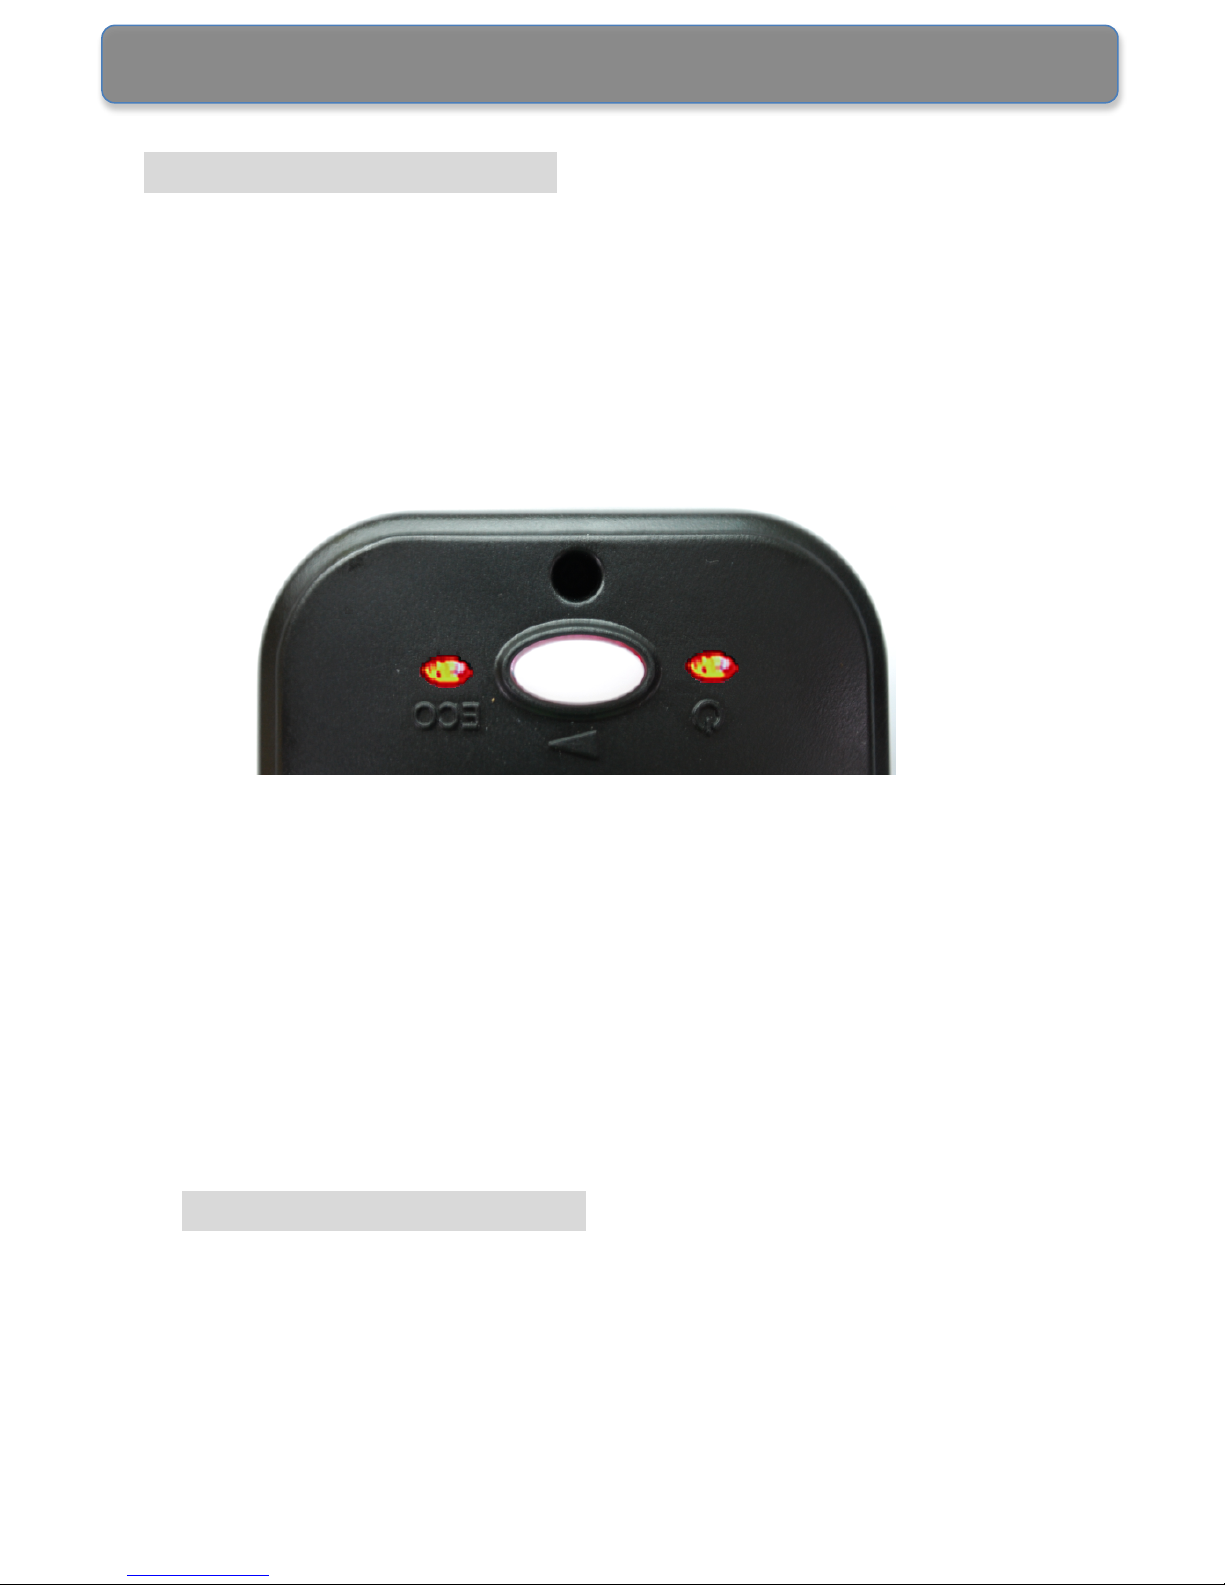
2. When power is on, the unit beeps and all LED lights
illuminate. After a few seconds, the ECO LED light turns off,
and Power LED light illuminates; the unit is ready to use and
starts continuous recording.
3. When the unit is powered, the GPS starts acquiring satellite
signals. Please note that it may take a few minutes to
complete acquiring satellites (therefore it’s possible that
initial recordings won’t include location etc information).
4. Upon impact, sudden acceleration, sharp turn, or collision
etc, the unit beeps and automatically starts Sensor
Recording. Sensor Recording records 10 seconds of pre
event and 20 seconds of post event. Please note that the
alarm beeping sound can be turned off. Please refer to
Program Setup (page 12).
5. To manually record, press the Manual Record Button, which
is located in the centre of the unit. (Each recording includes
10 seconds of video before the button is pressed and 20
seconds afterwards).
Page 18

Page 17
6. USB Backup will backup Manual recording data only. Users
are required to connect the unit to a computer to backup
regular/continuous recording data.
The chart below explains the details of each recording mode:
Continuous
Manual
Sensor
Trigger
Condition
When power is on.
When the
Manual
Record
Button is
pressed.
When the
G-Sensor
detects an
event.
Recording
Duration
Each recording
contains 3 mins of
video. A total of
6-14hrs recorded
data, depending
on image
quality/settings.
Each recording contains 30
seconds of video, 10 seconds
pre event and 20 seconds post
event. The DVR records up to
48 recordings.
Overwriting
The DVR
overwrites from
the oldest
continuous
recording video
clip.
The DVR overwrites from the
oldest event recording.
File Size
Approx. 30MB of
each recording
Approx. 15MB of each
recording
Backup
Connect the unit to
a computer to
download the
file(s).
Connect the unit to a computer
to download the file(s).
Backup to a USB Flash Drive
directly from the unit.
Page 19
Page 18
Connecting the unit to a Monitor
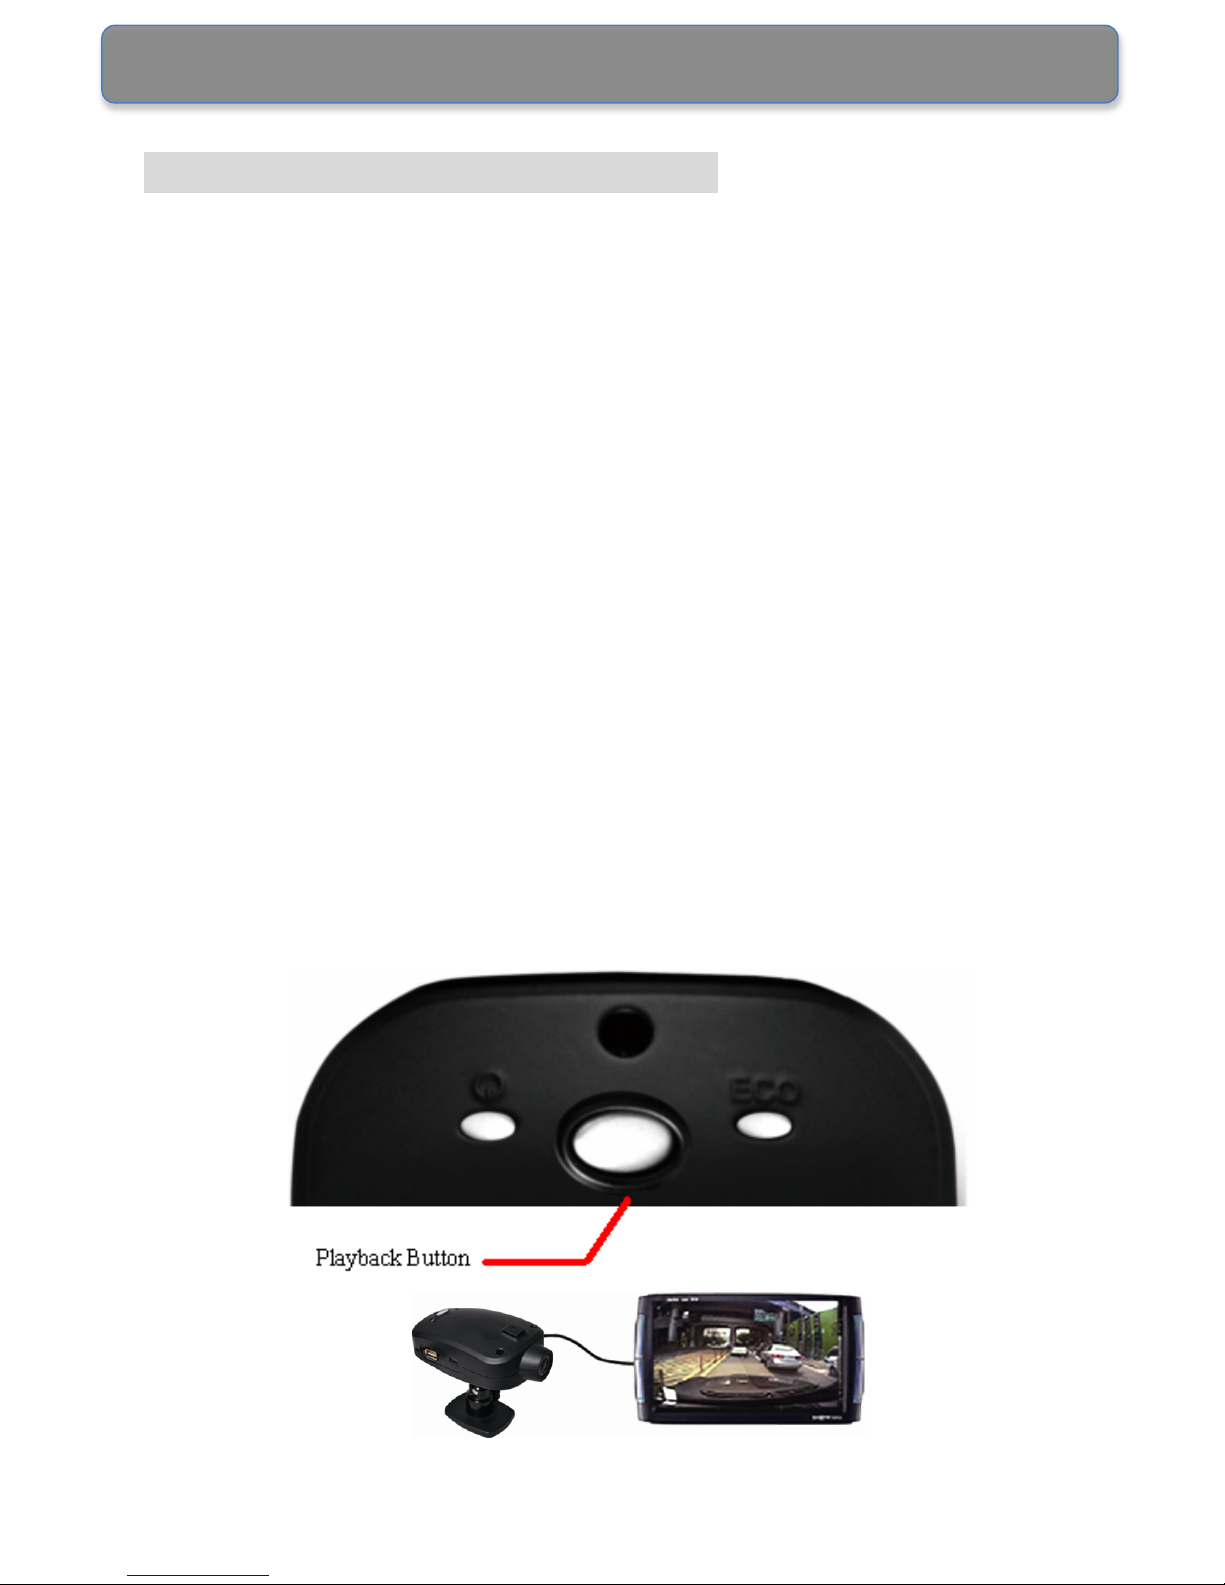
1. To immediately view the recorded video(s) connect the unit
to a monitor.
Note: Do not operate the unit while driving. Operating the
unit can cause distraction and increase the likelihood of an
accident; park the vehicle before viewing the recorded data.
2. Connect the A/V cable to the unit A/V Out Terminal and plug
the other end of the cable into the ‘Video In’ and ‘Audio In’
jacks of the monitor. (Turn the monitor power on, before
connecting the A/V cable).
3. Press the Playback Button to start video playback.
Note: The unit stops recording during playback.
Page 20

Page 19
4. During playback, the ECO LED flashes and the Power LED
is turned off.
5. The playback starts from the oldest archived video clip to the
latest. To skip to the next video clip, press the Playback
Button again.
6. To exit the playback mode, press the Manual Record
Button. The unit beeps and switches to Event Recording
mode. To start Manual Recording when in playback mode,
press the Manual Record Button TWICE.
7. When the unit finishes playing back all the video clips, it
automatically exits the playback mode and switches to the
Event Recording mode.
Page 21
Page 20
Backup the Video Clips to a USB Flash Drive
1. The Sensor (Event) and Manual recording video clips can be
saved to a USB Flash Drive.
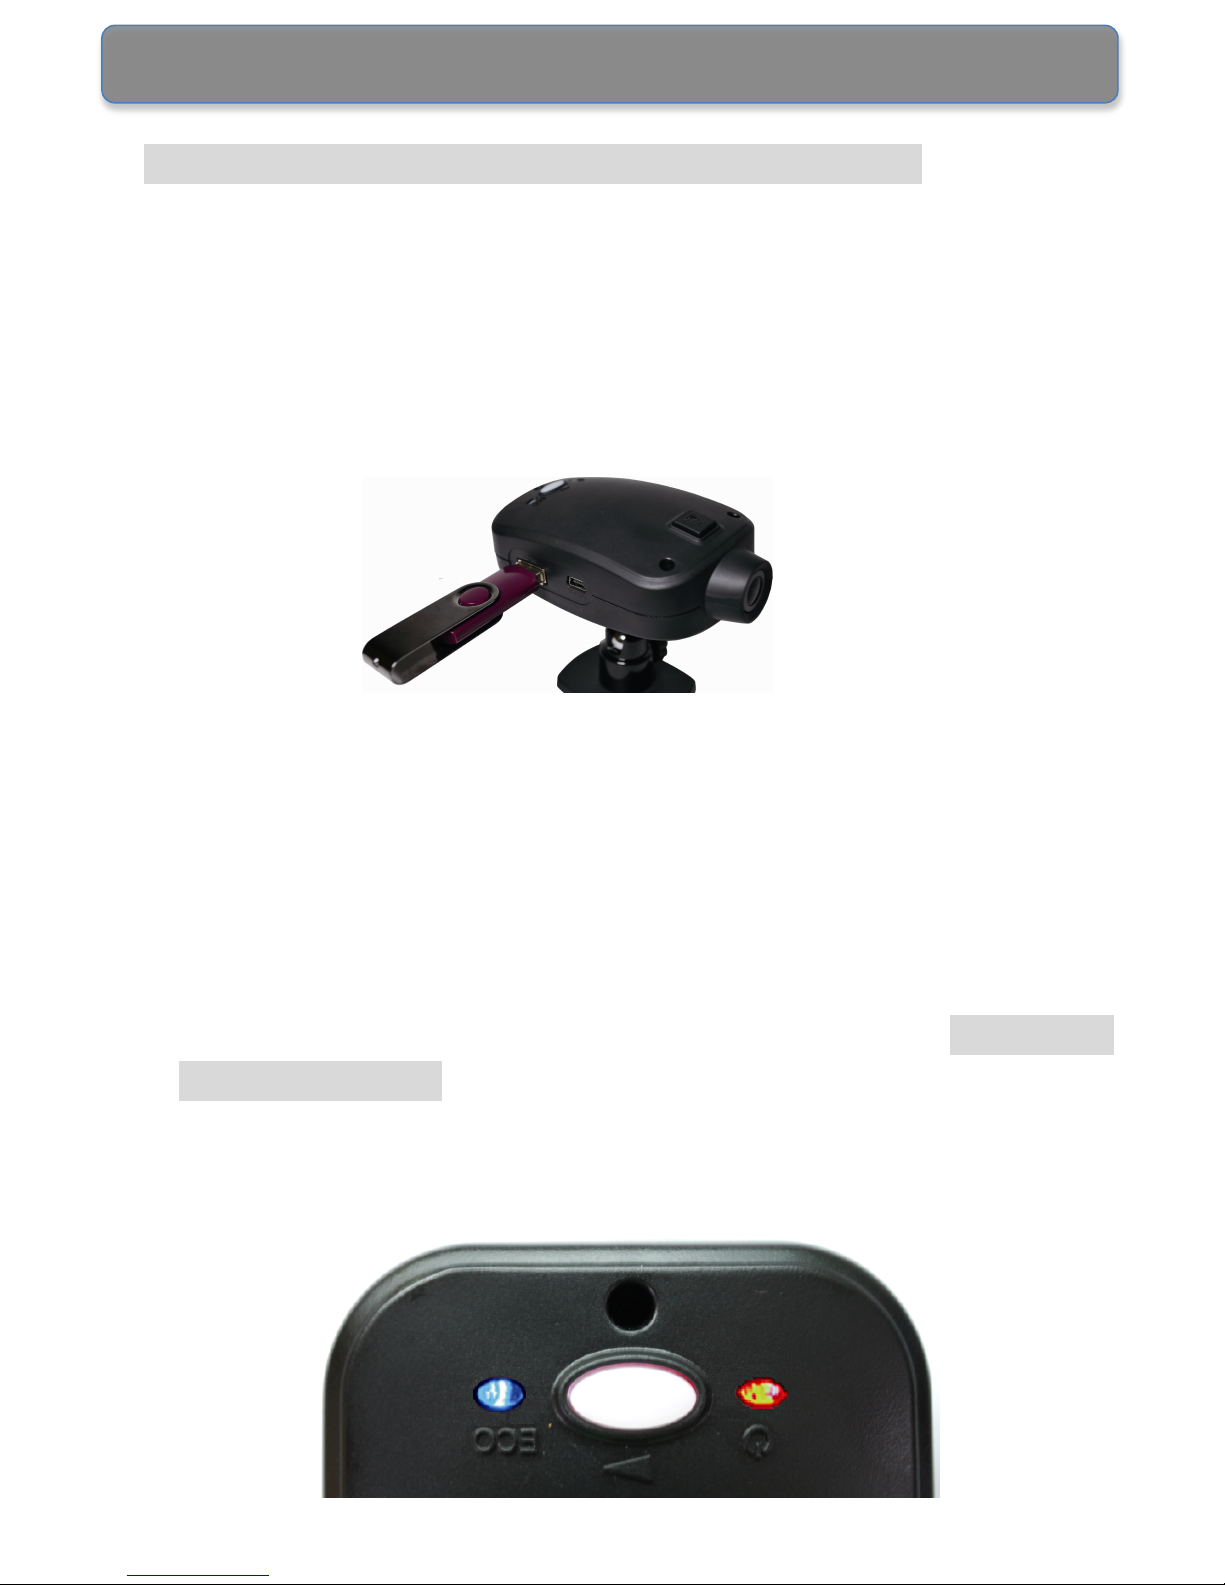
2. Connect a USB Flash Drive to the unit’s USB connection
(see the photo below).
Note: The file system of USB Flash Drive must be
FAT32 or FAT16; the unit does not support NTFS.
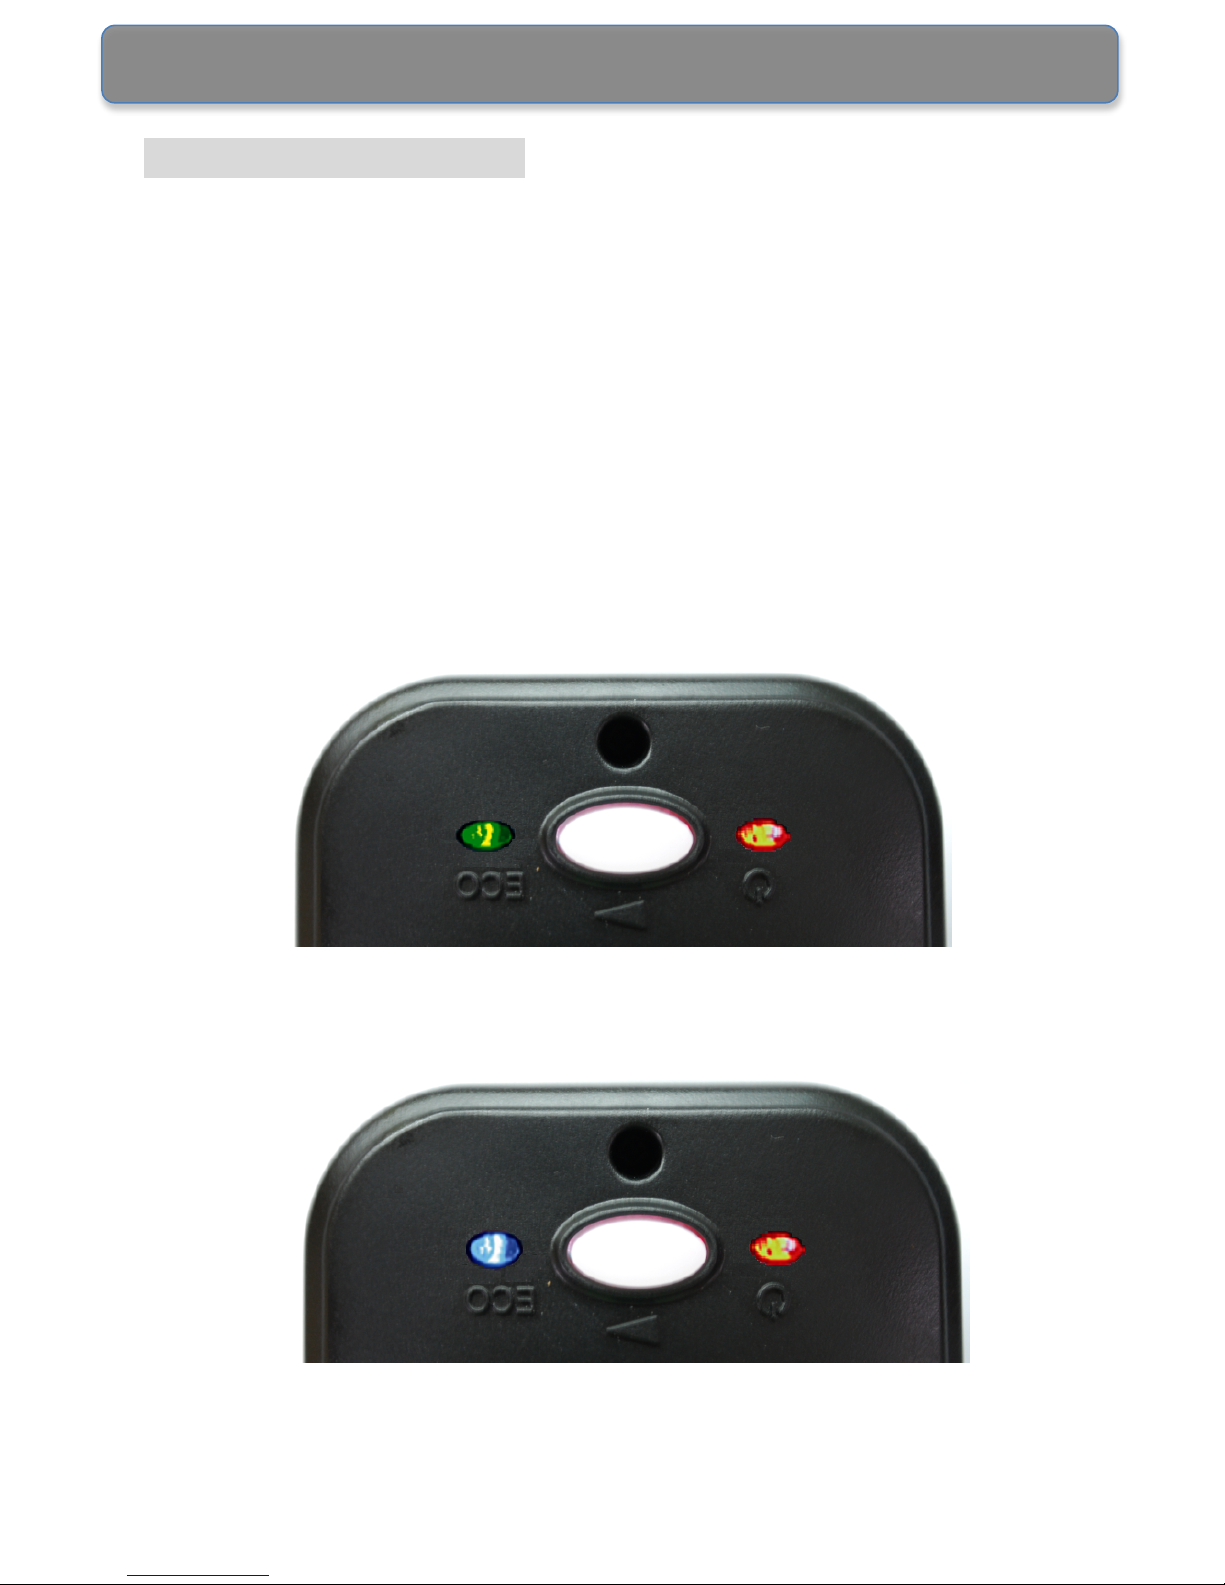
3. When a USB Flash Drive is connected to the DVR, the
Power LED turns off and the ECO LED turns blue.
4. The unit automatically starts transferring the video clips to
the USB Flash Drive and the blue ECO LED flashes. To set
how many video clips are transferred to the USB Flash Drive
utilise the Secure Eye Program. (Please refer to Program
Setup, page 12). To transfer all the video clips, including the
Continuous Recording, please connect the unit to a
computer.
Page 22

Page 21
5. When the backup is complete, the ECO LED turns GREEN.
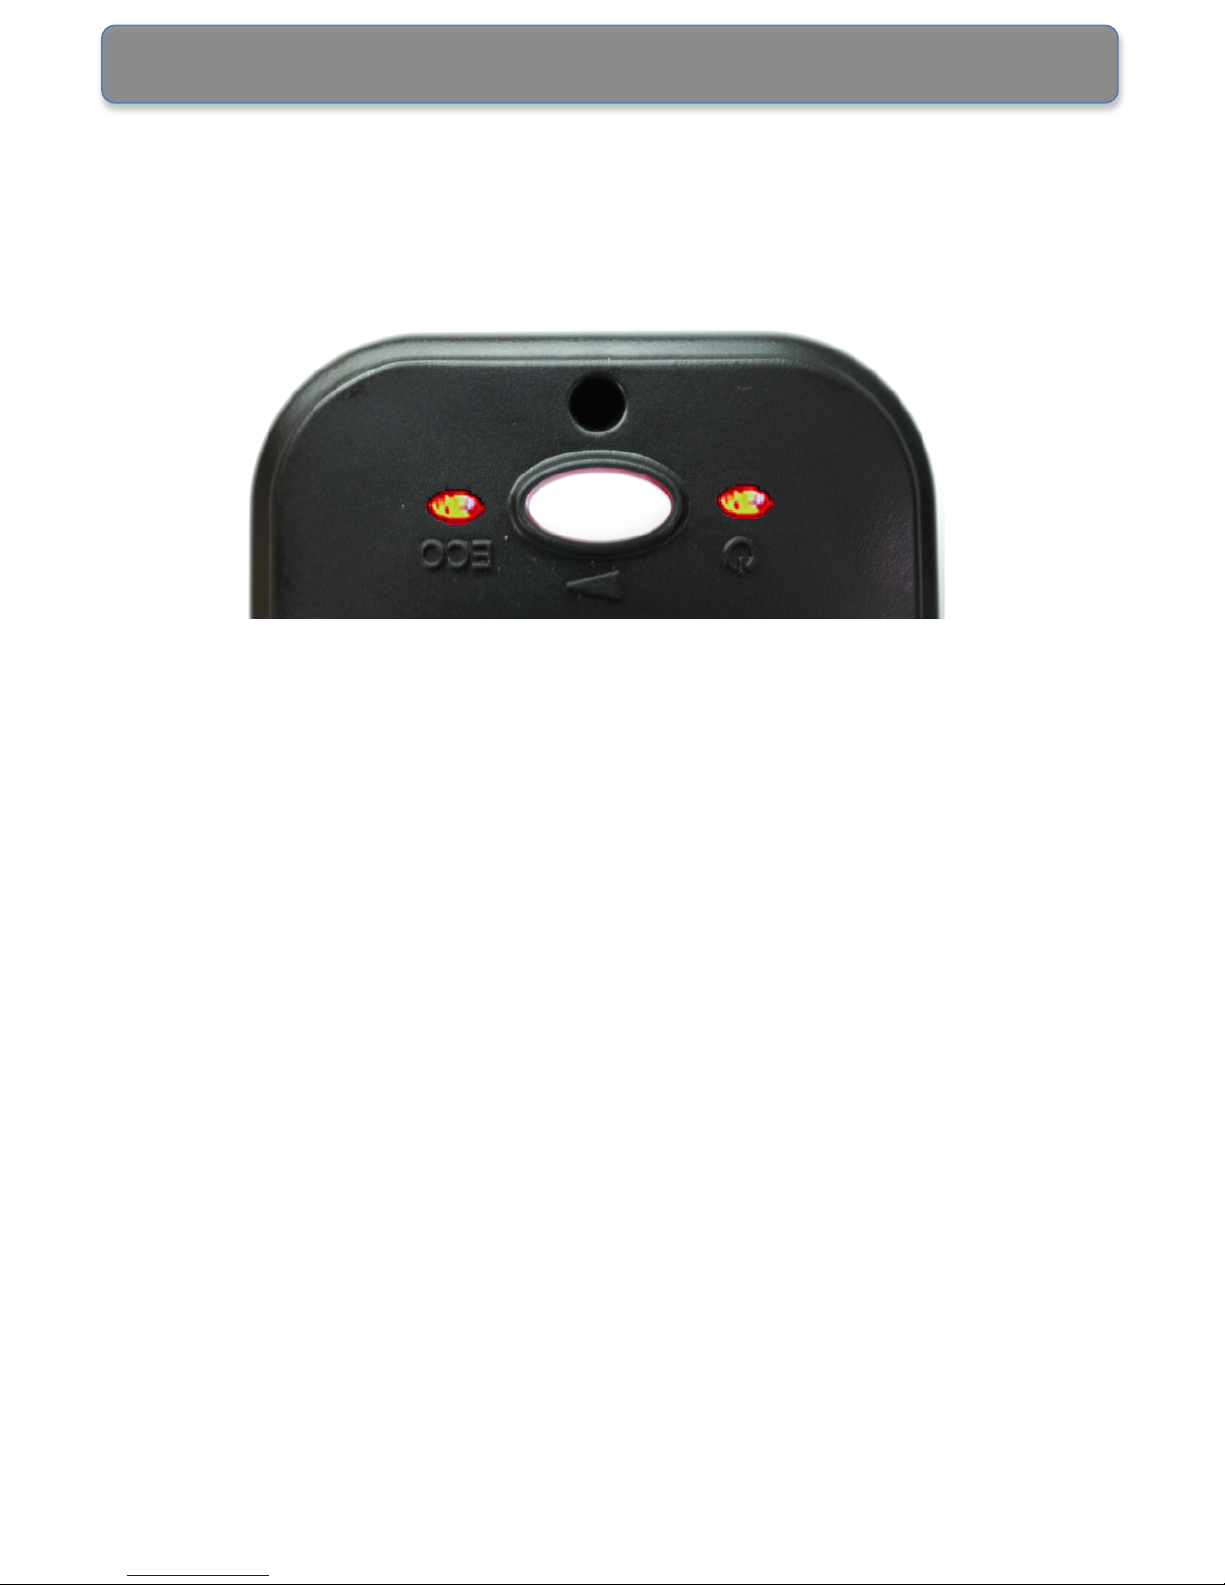
6. If the unit is unable carry out the backup, it will beep, the
Power LED will flash red and the ECO LED turn red. This
may also happen if the USB Flash Drive is not compatible
with the unit. (Please try an alternative USB Flash Drive).
Note: The available memory capacity of the USB Flash Drive
must be larger than 1GB.
8. To exit the backup mode, press the Manual Record
Button. The unit stops backup and switches to the recording
mode. The unit cannot transfer the video to the USB Flash
Drive if the backup is interrupted.
9. When the backup is complete, remove the USB Flash Drive
from the unit and connect it to a computer.
Page 23
Page 22
ECO Driving Indicator
1. The ECO drive indicator provides information to aid more
efficient driving.
2. The internal G-Sensor evaluates the driving over a period of
time and the unit rates it and indicates the score with
different colours.
3. If there is no sharp braking, sudden acceleration, or rapid
cornering etc, the driver will attain a high ECO score and the
ECO LED will turn green.
4. If the ECO LED turns blue, the score is average.
5. If the ECO LED turns red, the score is poor indicating that
Page 24
Page 23
the vehicle has not been driven efficiently.
6. As the score is evaluated over a period of time, the LED
colour may periodically change.
7. To achieve more economical driving, please refer to the
ECO LED colour.
Page 25

Page 24
Turning off
1. When the vehicle/ignition is turned off, the unit will also be
turned off. To avoid losing data, please follow the
instructions below.
2. If the Manual Record button is pressed and the unit is
recording, please wait for 20 seconds before turning the
ignition off.
3. DO NOT turn off the ignition/unit during the backup process;
wait until the (USB) backup is complete and the ECO LED
turns green.
4. Disconnect the power adapter, from the vehicle 12-24V
socket, when the unit is not in use.
Page 26
Page 25
Using the Secure Eye Program
Connect the unit to a computer and open/run
“Secueye_manager.exe”
Page 27
Page 26
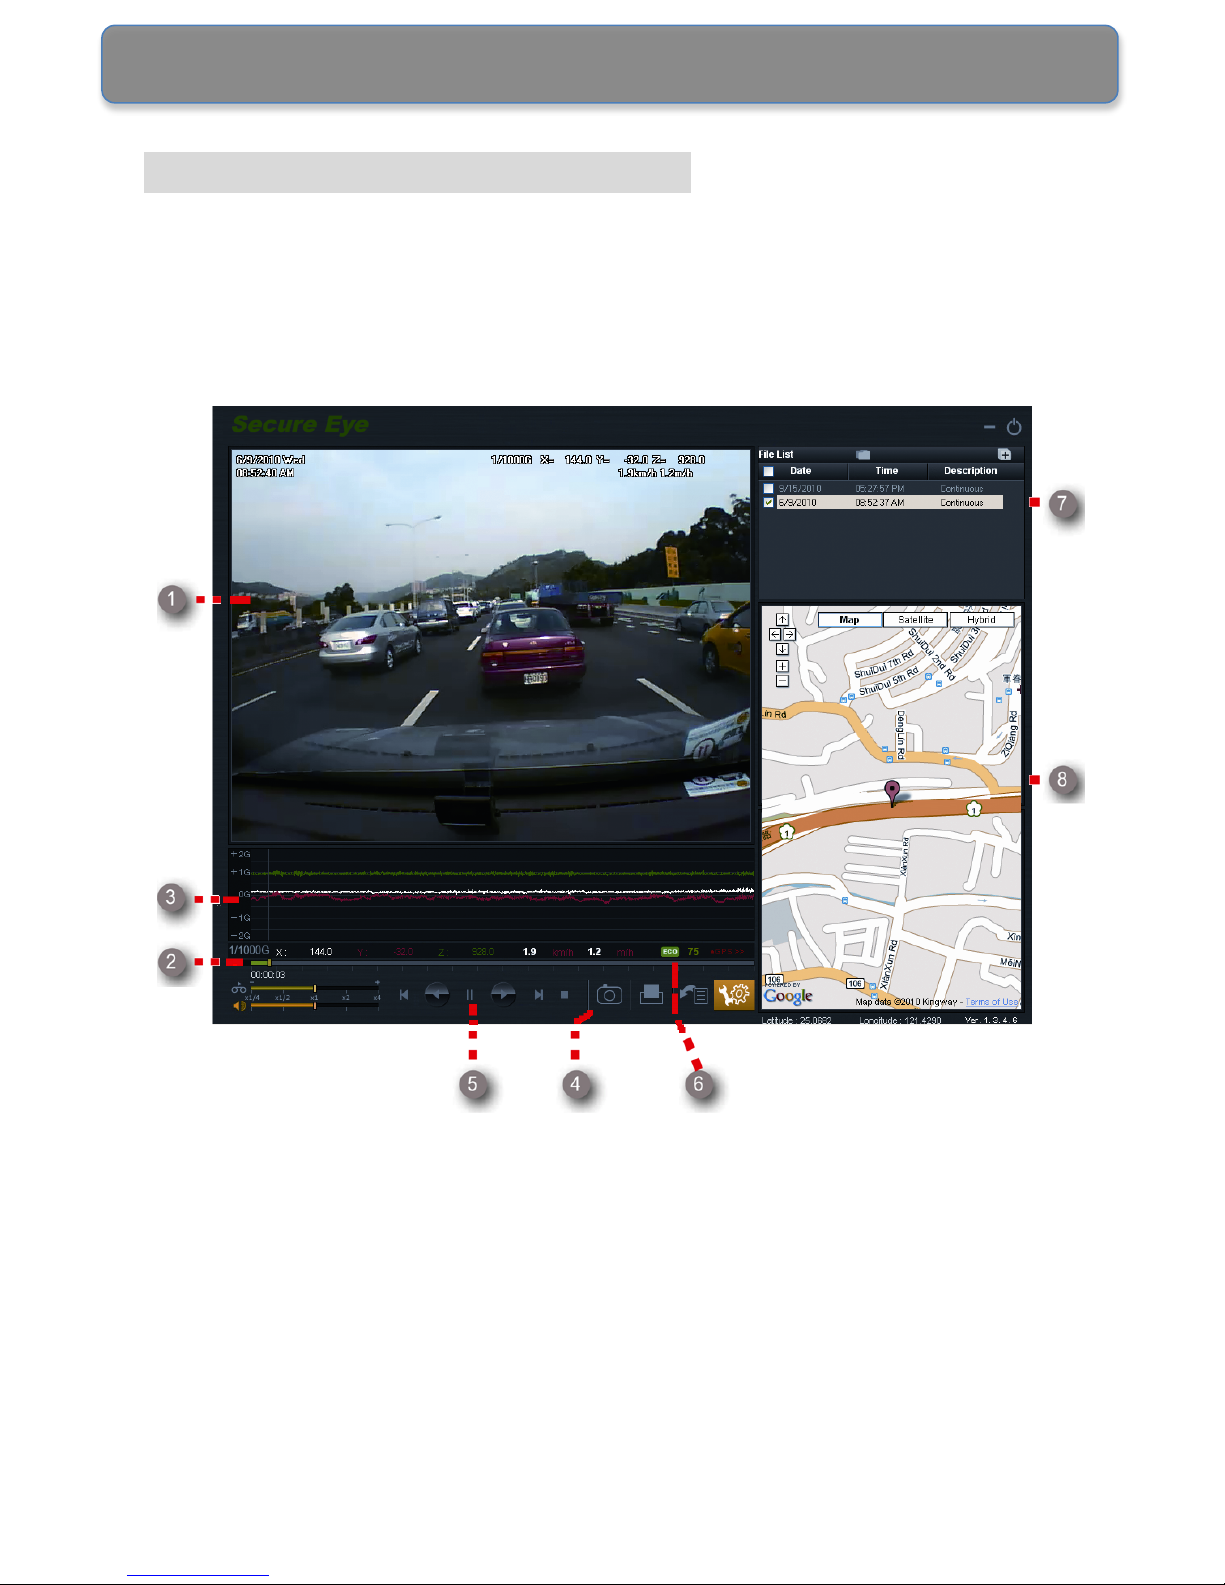
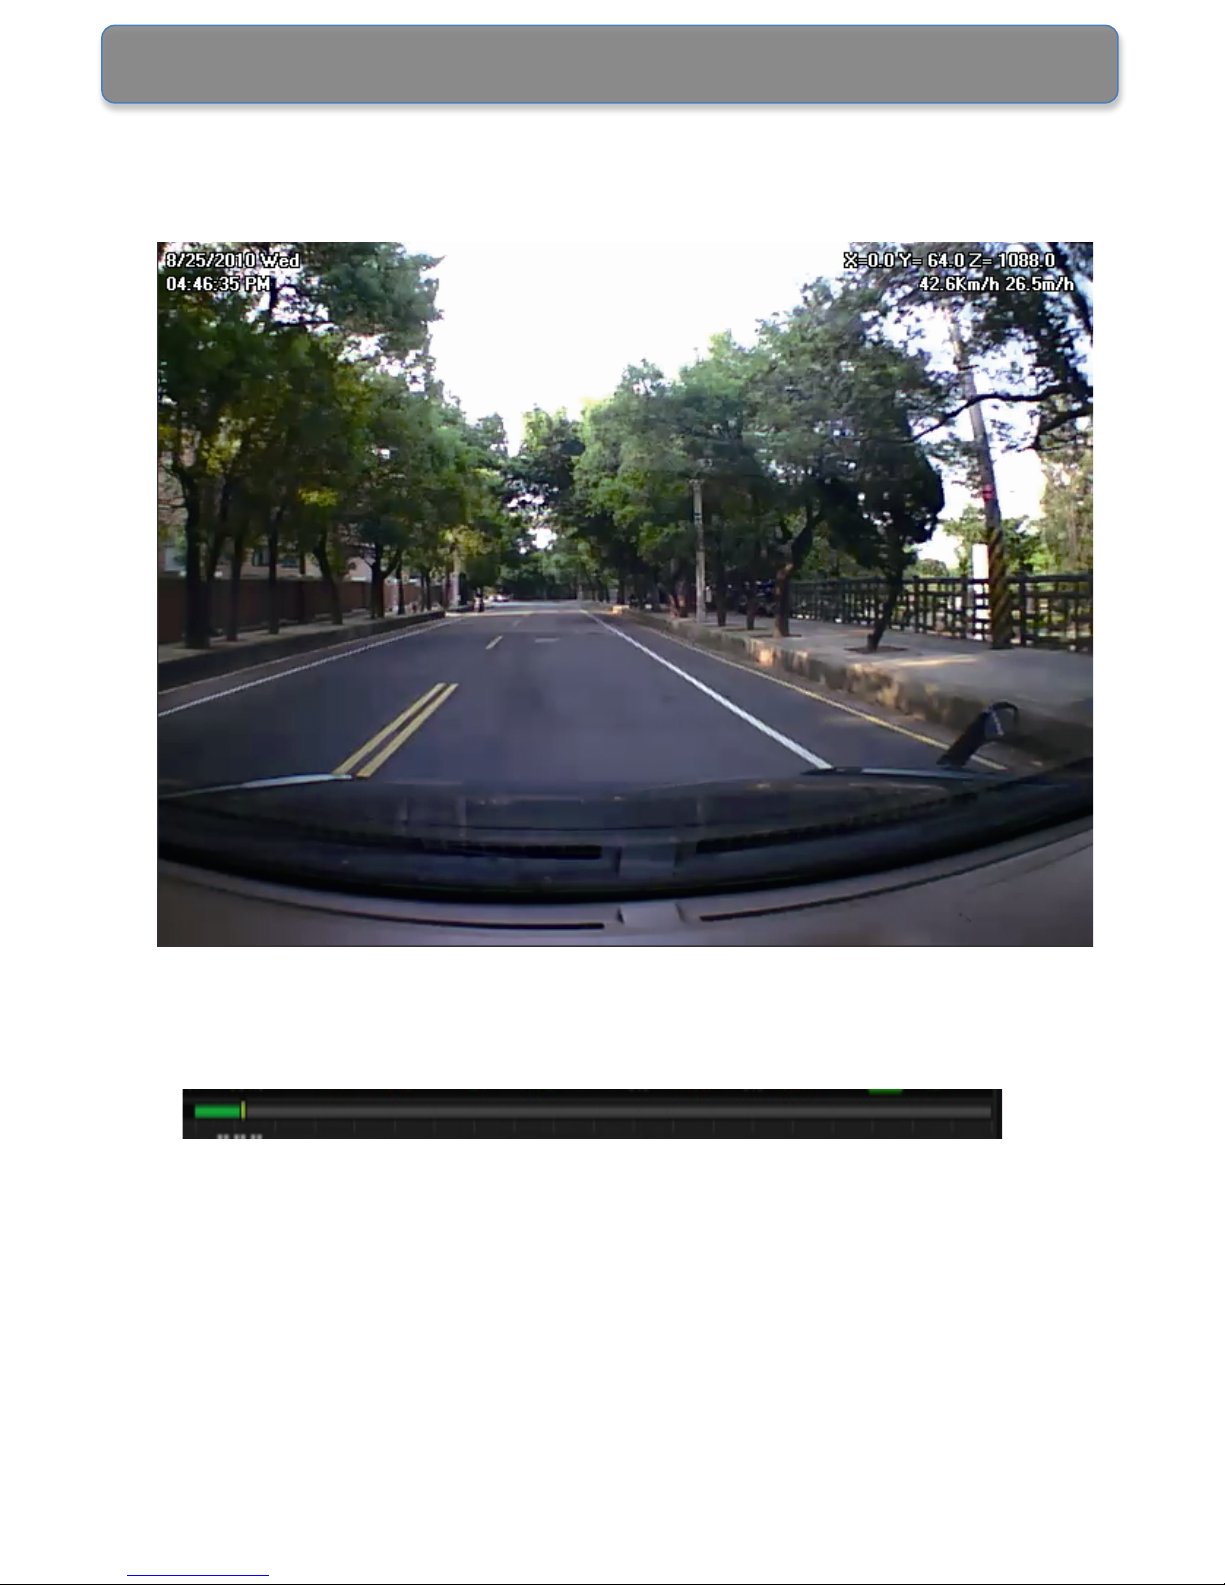
1. Main Screen View: Displays the recorded video clips.
2. Playback Controls: Drag the bar to rewind and forward the
video.
Page 28
Page 27
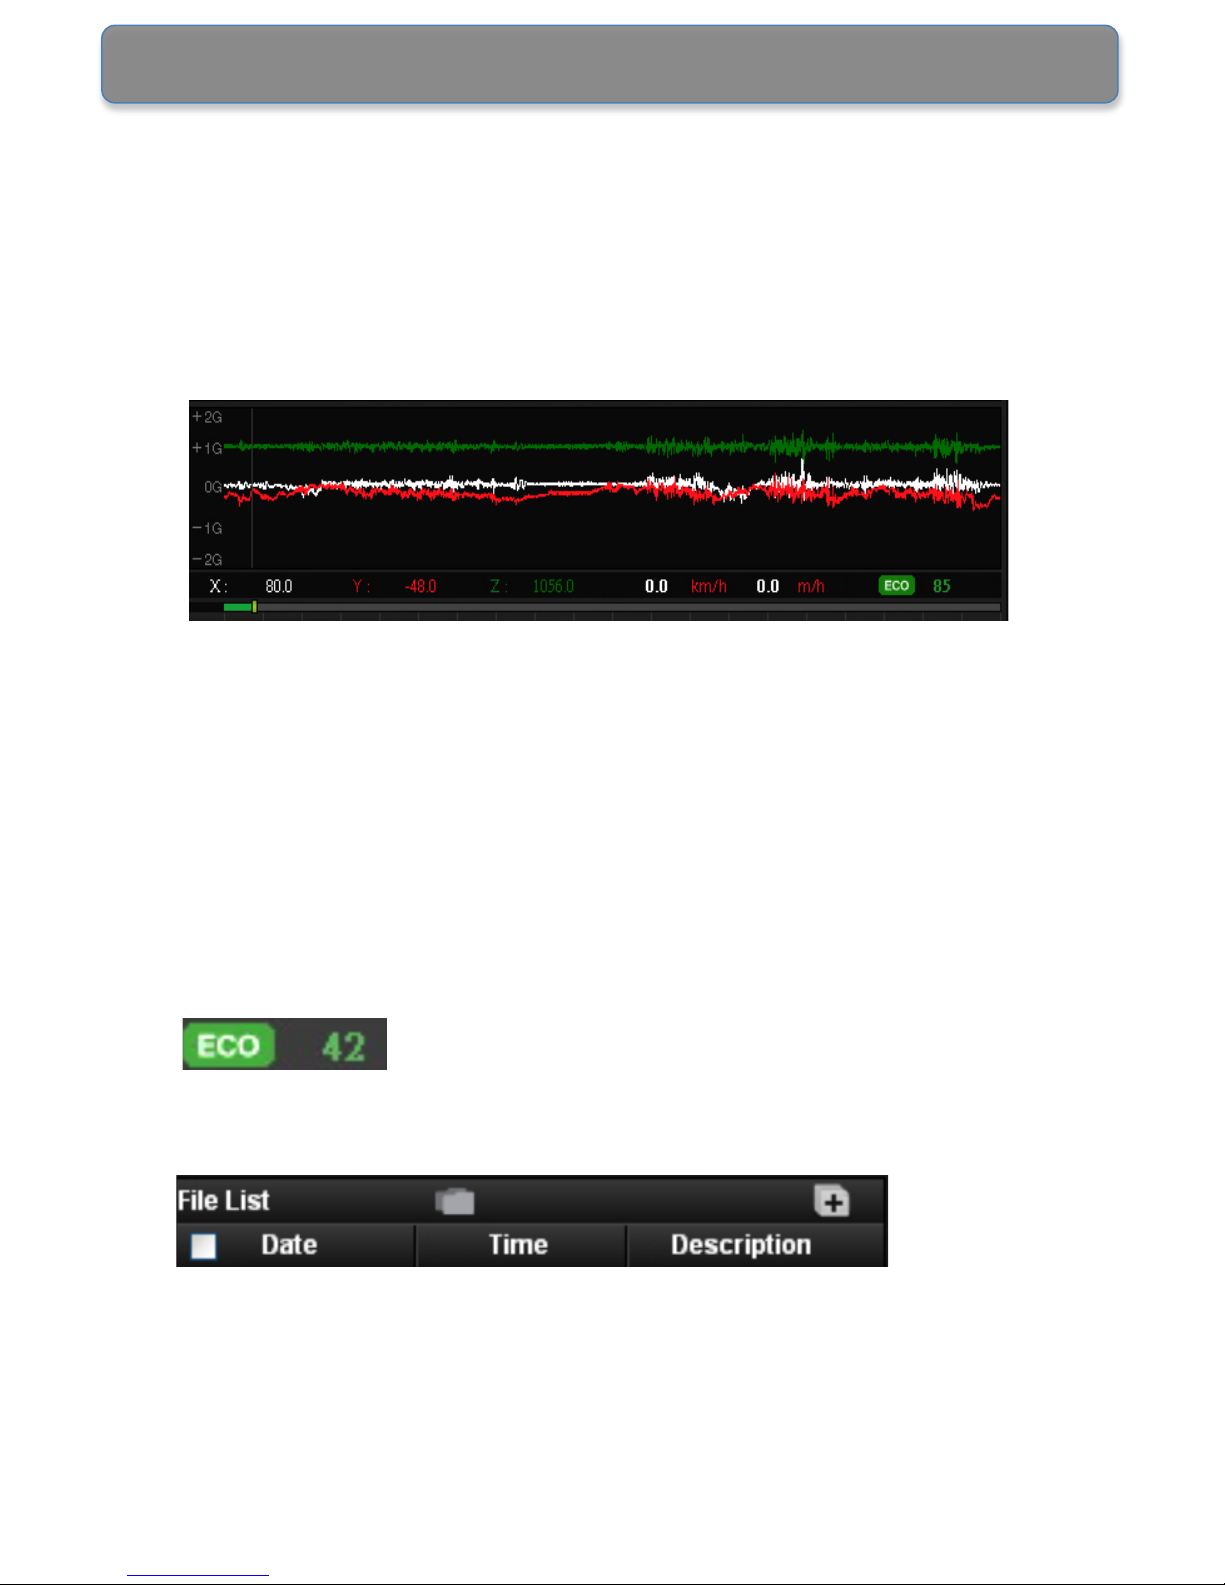
3. G-Sensor Chart: Displays the G-Sensor data in a 3-axis
wave diagram.
• X: Indicates the vehicle direction of forwards and
backwards
• Y: Indicates the vehicle direction of left and right
• Z: Indicates the vehicle direction of up and down
4. Control Buttons: Use the buttons to Capture, Print, Backup,
and Setup the video.
5. Playback Controls: Use the controls to Step Rewind,
Rewind, Pause, Play, Step Forward and Stop the video.
6. ECO Score: Indicates the driving efficiency.
80 and above: Good
60-80: Average
60 and below: Poor
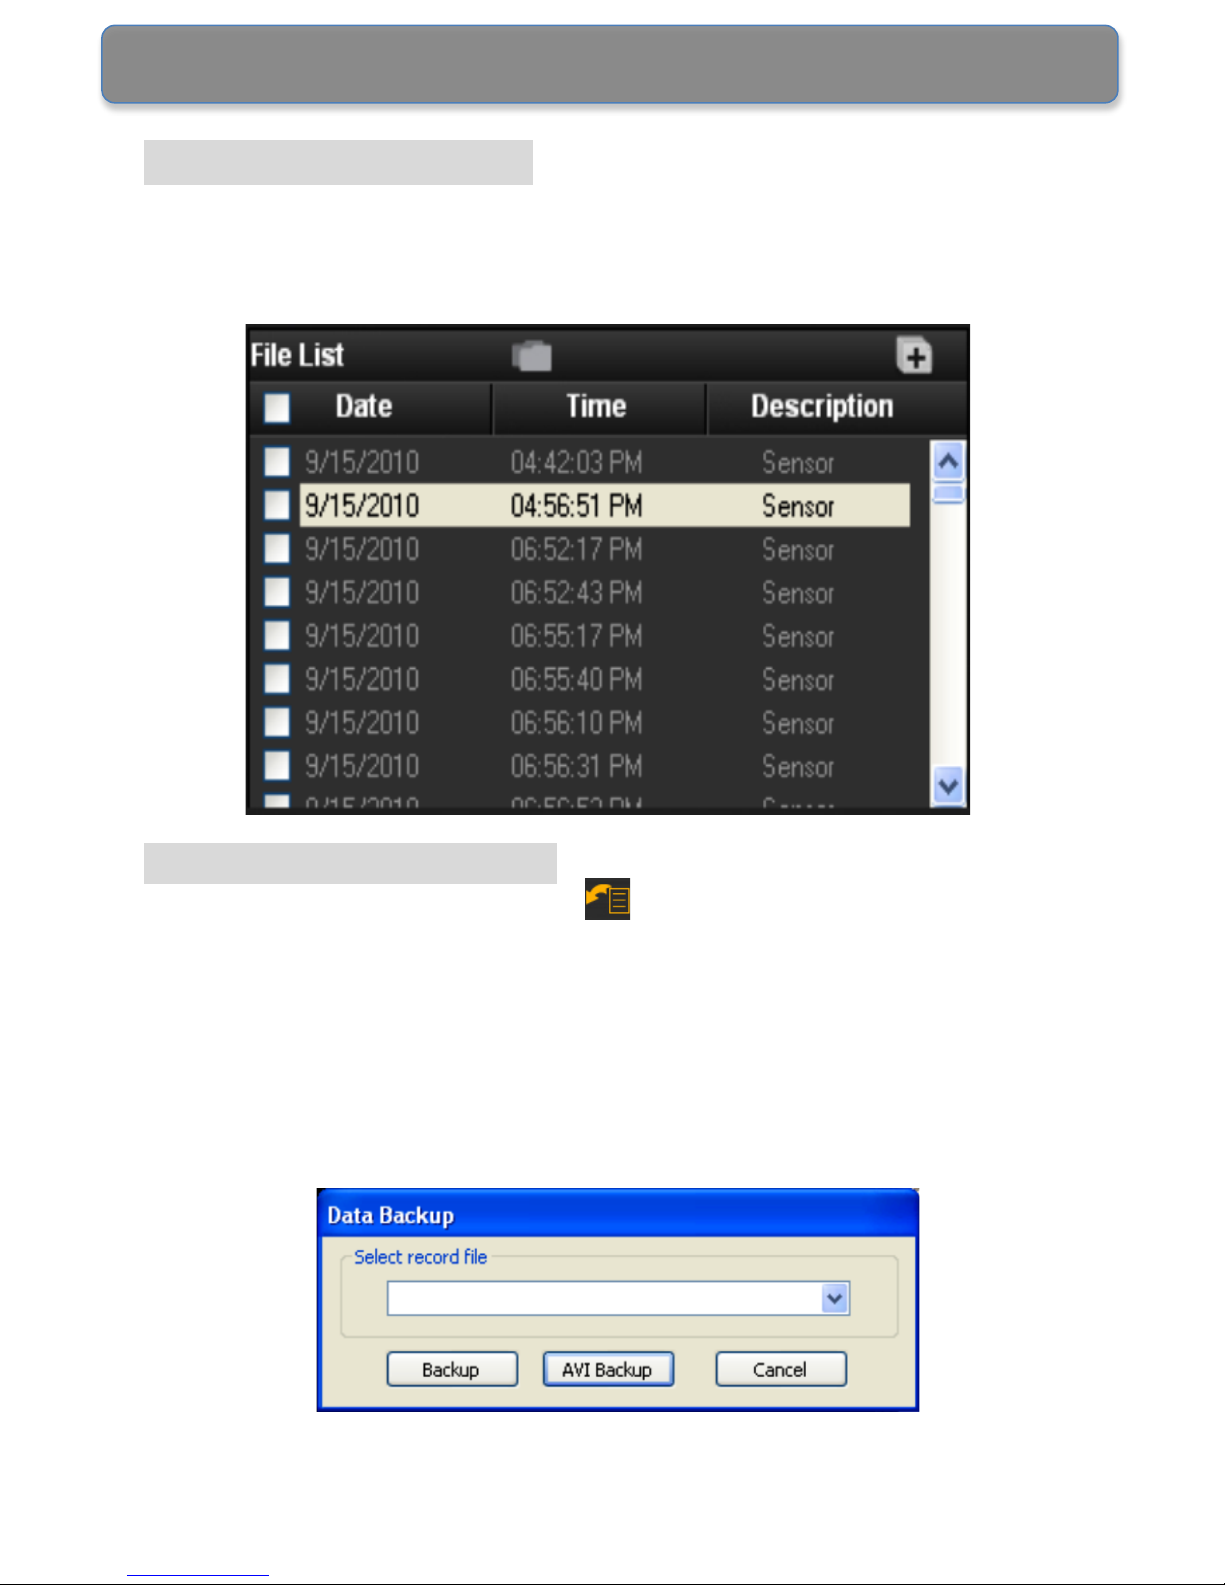
7. File List: Display the recorded video clips.
8. GPS Window: Display the vehicle location and route,
utilising Google Maps.
Page 29
Page 28
Opening the Video
■ Run the Secure Eye Program.
■ Double click the required file, in the File list.
Saving the Video Clips
■ Click the BACKUP button in the Secure Eye Program.
■ Select the file to backup.
■ Select the type of backup, Backup or AVI Backup, to perform.
■ Choose a folder to save the file(s).
■ Click OK to confirm.
Page 30
Page 29
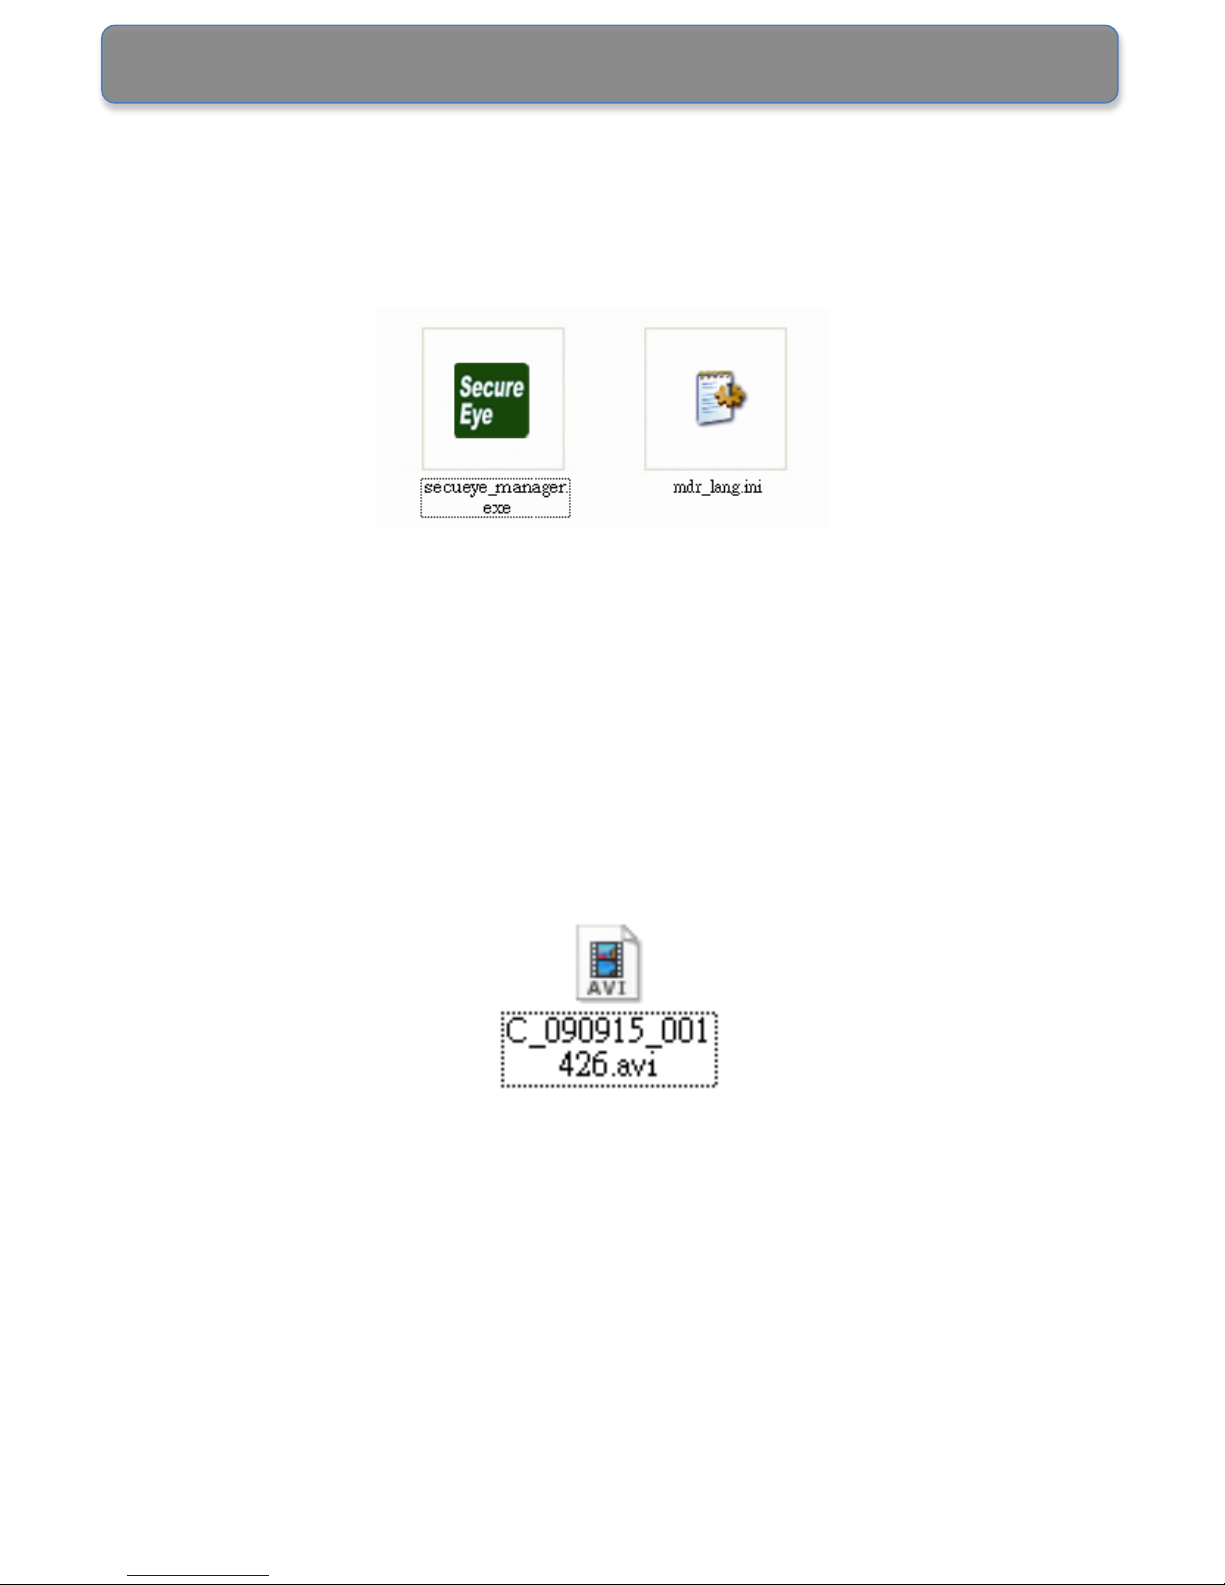
Backup: When ‘Backup’ is selected, the file is saved as *.cpd, as shown
below. CPD files contain GPS and G-Sensor records; utilise the Secure
Eye Program to view the CPD files.
AVI Backup: When ‘AVI Backup’ is selected, the file is saved as a *.avi
file, as shown below. AVI files do not contain GPS and G-Sensor
records, only the video; utilise Window Media Player etc to view the AVI
files.
Page 31
Page 30
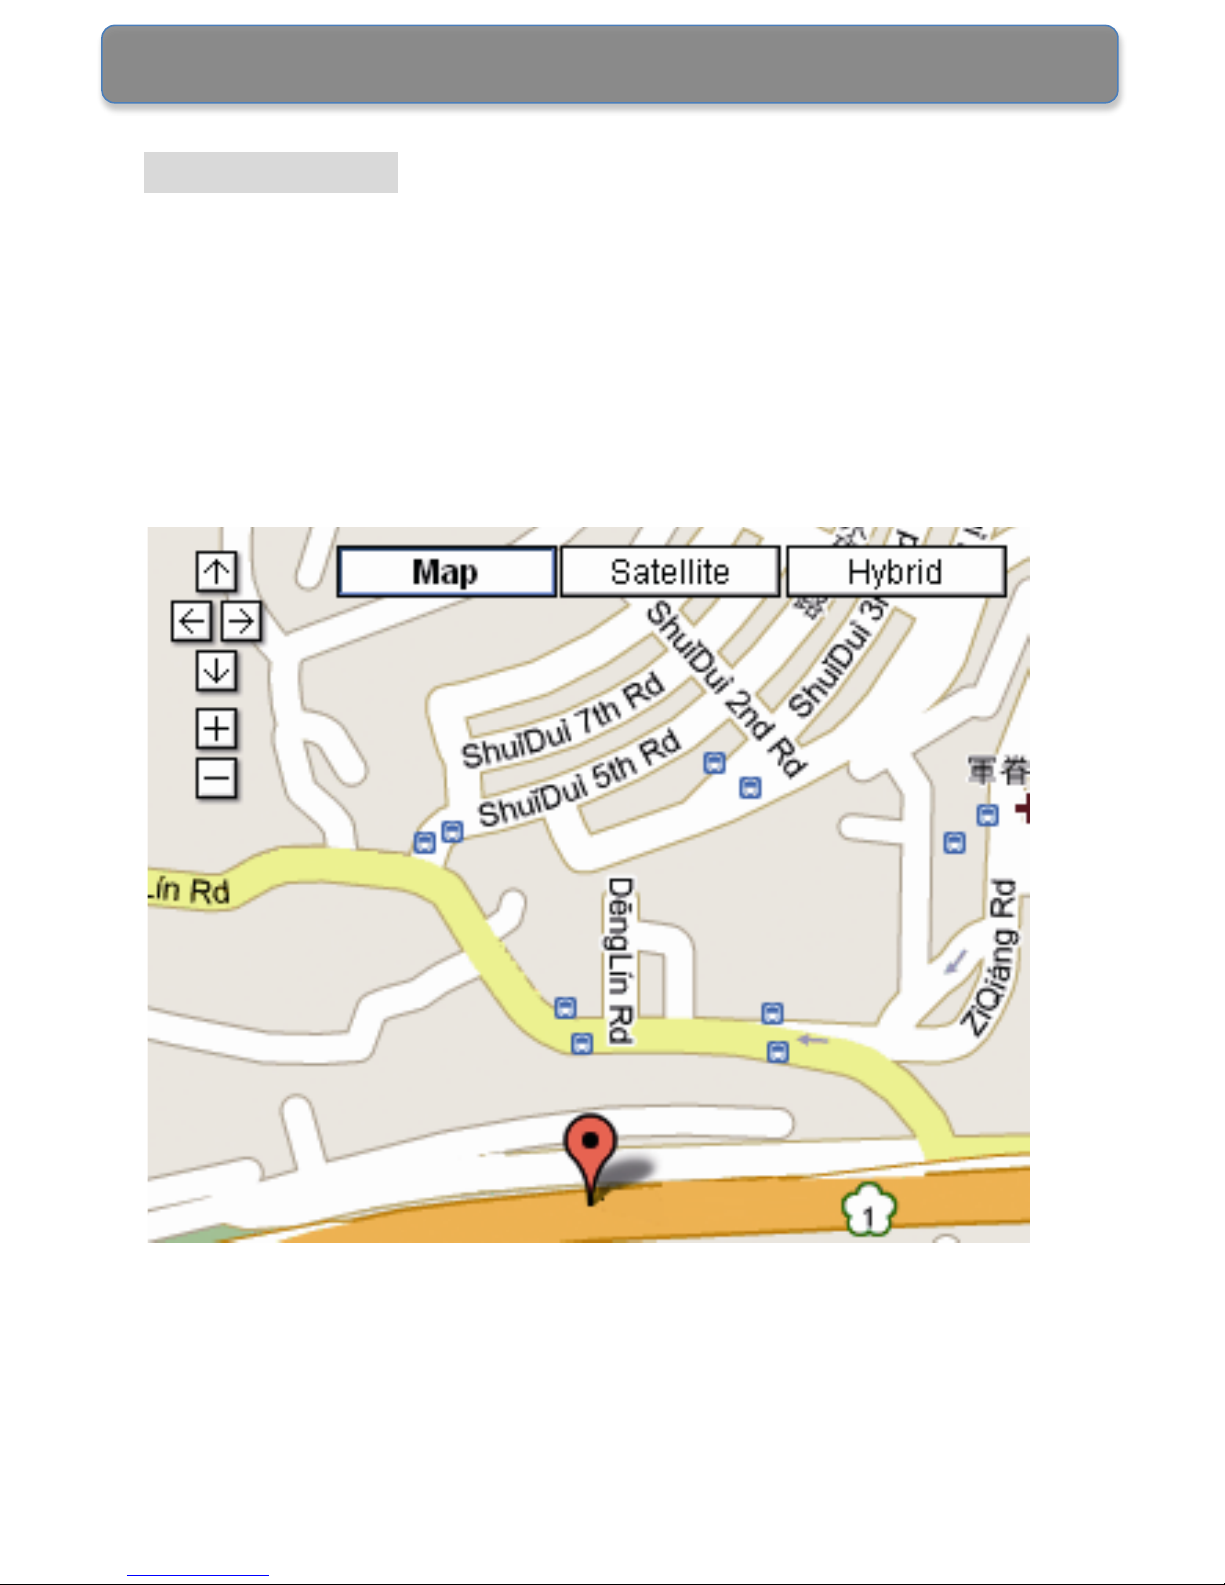
GPS Window
The GPS Window displays the vehicle location and route. Use the Arrow
Keys to move, zoom in and zoom out, the map.
Note: The program may fail to load the map when the computer is not
connected to the internet, or if the unit has not recorded the vehicle
location(s), due to weak etc satellite signals.
Page 32
Page 31
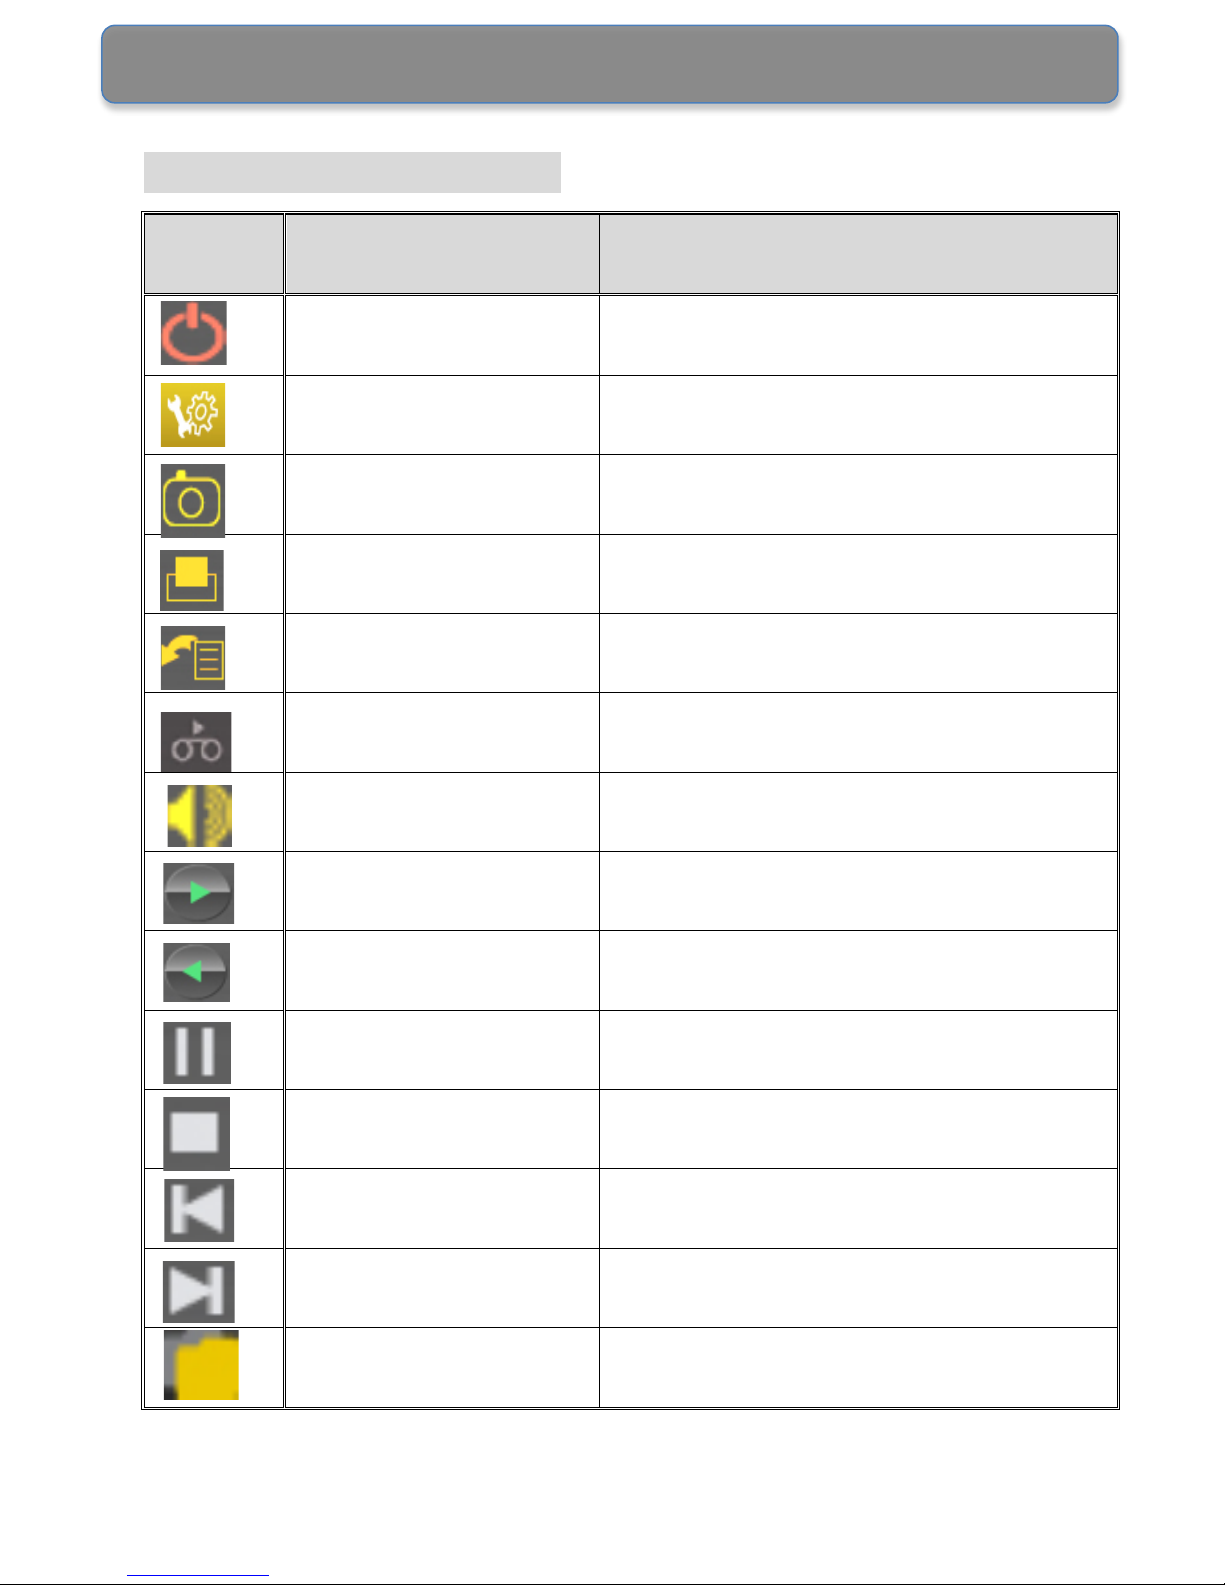
Buttons and Functions
Icon
Name
Function
Exit
Exit the Secure Eye Program
Setup
Program Setup
Capture
Capture a Still Image and Save
as .JPEG
Print
Print the Captured Still Image
Backup
Save the Video Clips as .AVI Files
Speed Control
Control the Playback Speed
Volume
Control the Volume
Play
Play the Video
Rewind
Rewind the Video
Pause
Pause the Video
Stop
Stop the Video
Step
Playback-Rewind
Rewind Picture by Picture
Playback
Step
Playback-Forward
Forward Picture by Picture
Playback
Open
Open the Video Clip
Page 33
Page 32
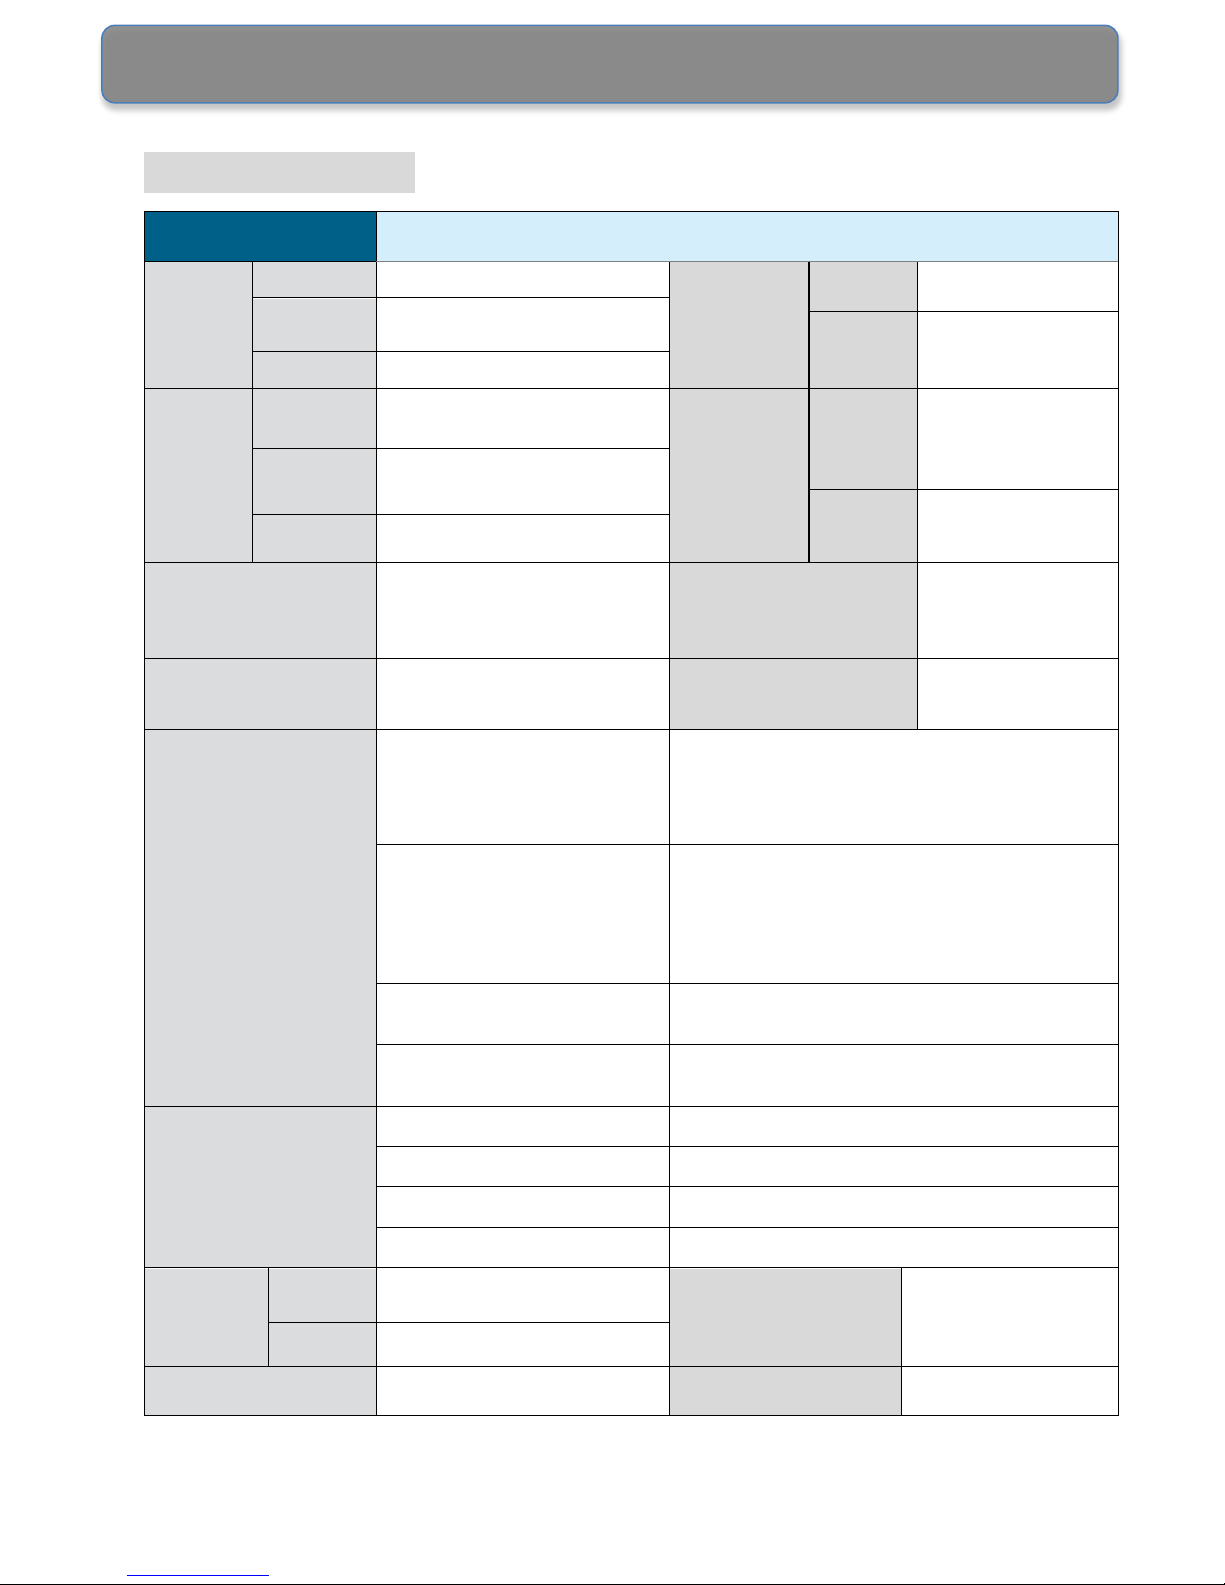
Specifications
MODEL NO.
Camera
Sensor
CMOS
Audio
Speaker
G.711 u-law Date
Angle
64.8 °(V) x 92.8 °(H) x 125.5
°(D)
Privacy
Mode
8bits, 64kbps
Sensitivity
0.8Lux
Recording
Format
H.264(ISO/I.E.C 14496-10)
baseline profile H.264
Microphone
Type
C-Microphone
Resolution
640 x 480
Sensitivity
-38dB
Recording
Speed
30fps
GPS
Non-Directional GPS Signal
Receiver
G-Sensor
3-Axis
(Acceleration/
Breaks/Collisions)
Memory
Built-in Nand Flash memory
8GB
USB Host backup
Optional
1/5/10/20/30/40/48
(File numbers)
Event Recording
Max. Event Qty
Event Video Clip (Overwrite) : Up to 48 events
(G sensor / Manual)
Continuous Video Clip : depends on memory
capacity
Recording Time
One Event Video Clip : Max 30 seconds per file
(10 seconds before event and 20 seconds after
event)
Continuous Video Clip : Max 3 min per file
(About 6 hours I in total)
Sensor sensitivity
User option
LED indication
ECO LED follow ECO score/power Led Flicking /
buzzer
Interface
USB device
USB 2.0 Device (1.1 compatible)
USB host
USB Host 2.0 1 port / Format support: FAT 16/32
AV Out
Resolution 720x480 (NTSC/PAL)
OS
Window98, ME, 2000, XP,Vista ,Win7
Power
Consumption
Rated
Voltage
DC 12V~24V 200mA
Operating Temp
0 °C to 50 °C
Adapter
Cigarette power adapter
Net Weight
120g
Dimension(mm)
101(W)x59(D)X41(H)
Page 34
Page 33
Battery Handling
Please dispose the product properly. Contact your local waste
disposal department for more information.
Distributed By:
 Loading...