

Page 1
Wireless Mouse
for Mac
®
USER GUIDE
AMW43US / 410-1514-001B
©200 8 Manu fact ured o r impo rted b y Targus Group
Inte rnat ional , Inc. ( for U. S. sal es: 12 11 Nort h Mill er Str eet,
Anah eim, CA 9 2806 USA , for Aus trali a sa les: Targu s Aus tral ia
Pty. L td., 1 17-11 9 Bowd en Str eet, M eado wbank , NSW 2 114
Aust rali a). Al l righ ts res erve d. Targ us is e ither a regi ster ed
trad emar k or t radem ark o f Targ us Gr oup In tern atio nal, I nc.
in t he Un ited S tates and/ or ot her c ount ries. Fea tures and
spec ific ation s a re subj ect to chan ge witho ut noti ce. Mac, th e
Mac logo , Ma c OS , Sa fari and iTune s ar e tra dema rks of A pple
Inc. , re giste red i n th e U.S . and othe r cou ntri es. A ll tr adem arks
and reg ister ed trade mark s ar e t he p rope rty of t heir res pect ive
owne rs. Th is pr oduct and it s vari ous fe atur es are p rote cted
unde r pa tent s US 72983 62, T WM249 131, CNZ L0327 5852 .9,
JP31 3210 1, DE20 2007 00561 9.2, CNZL20 0620 1314 43.5,
JP32 3219 4, DE20 2007 00425 6.6, DE2020 0700 6210 .9.
Othe r U nite d S tates an d f oreig n p aten ts pendin g.
ww w.t ar gu s. co m/ us /fo rM ac
ONE Y EAR LIMI TED WARRA NTY
N2953
Page 2
Wireless Mouse
1
Wireless Mouse
2
Hardware
• USB port
Operating System
• Mac OS® X 10.4 or later
Targus Wireless Mouse
Introduction
Congratulations on your purchase of the Targus Wireless Mouse. This wireless
mouse uses 2.4GHz RF technology which provides a seamless connection up
to 33 ft (10 m) away.
System Requirements
Installing the Batteries
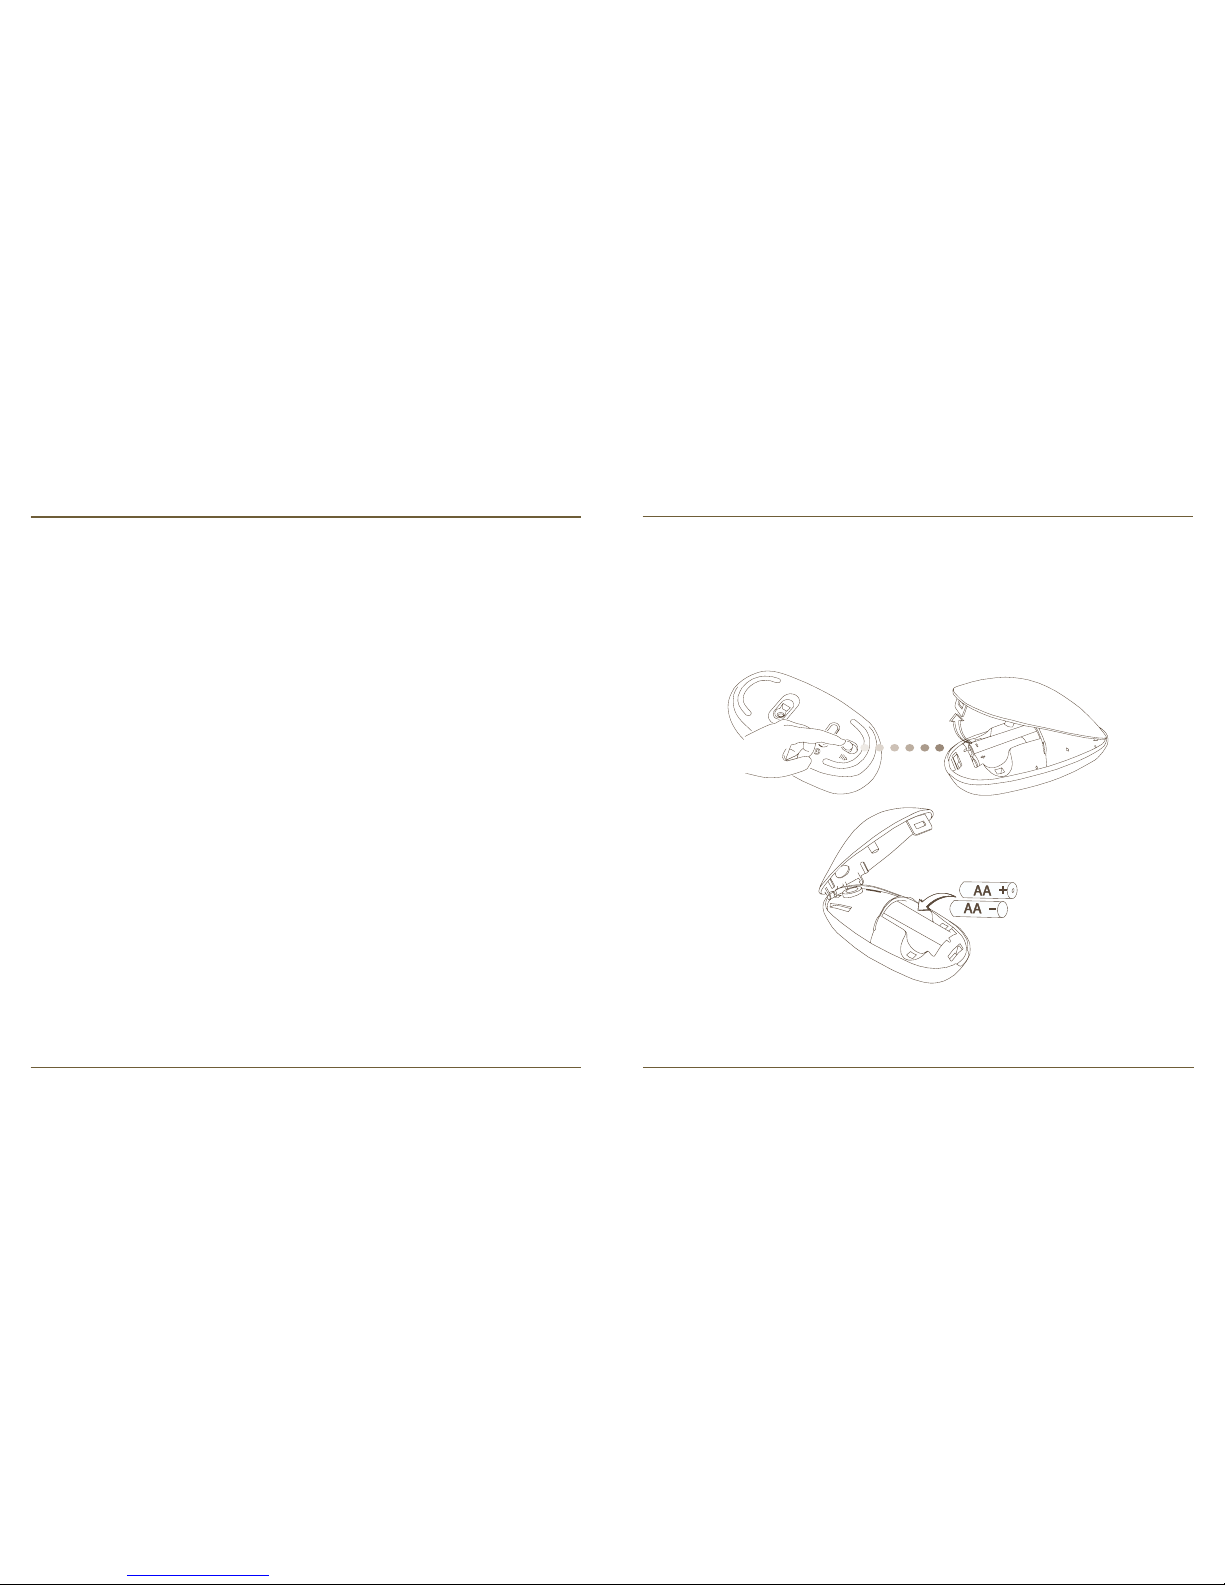
• Please use the two AA batteries that are included.
• Remove the battery cover by sliding the release button on the bottom of the
mouse. Once the battery cover releases, simply lift it up from the back of the
mouse.
• Insert the batteries, making sure that the positive (+) and negative (-) ends of
each battery match the polarity indicators inside the battery compartment.
Page 3
Wireless Mouse
3
Wireless Mouse
4
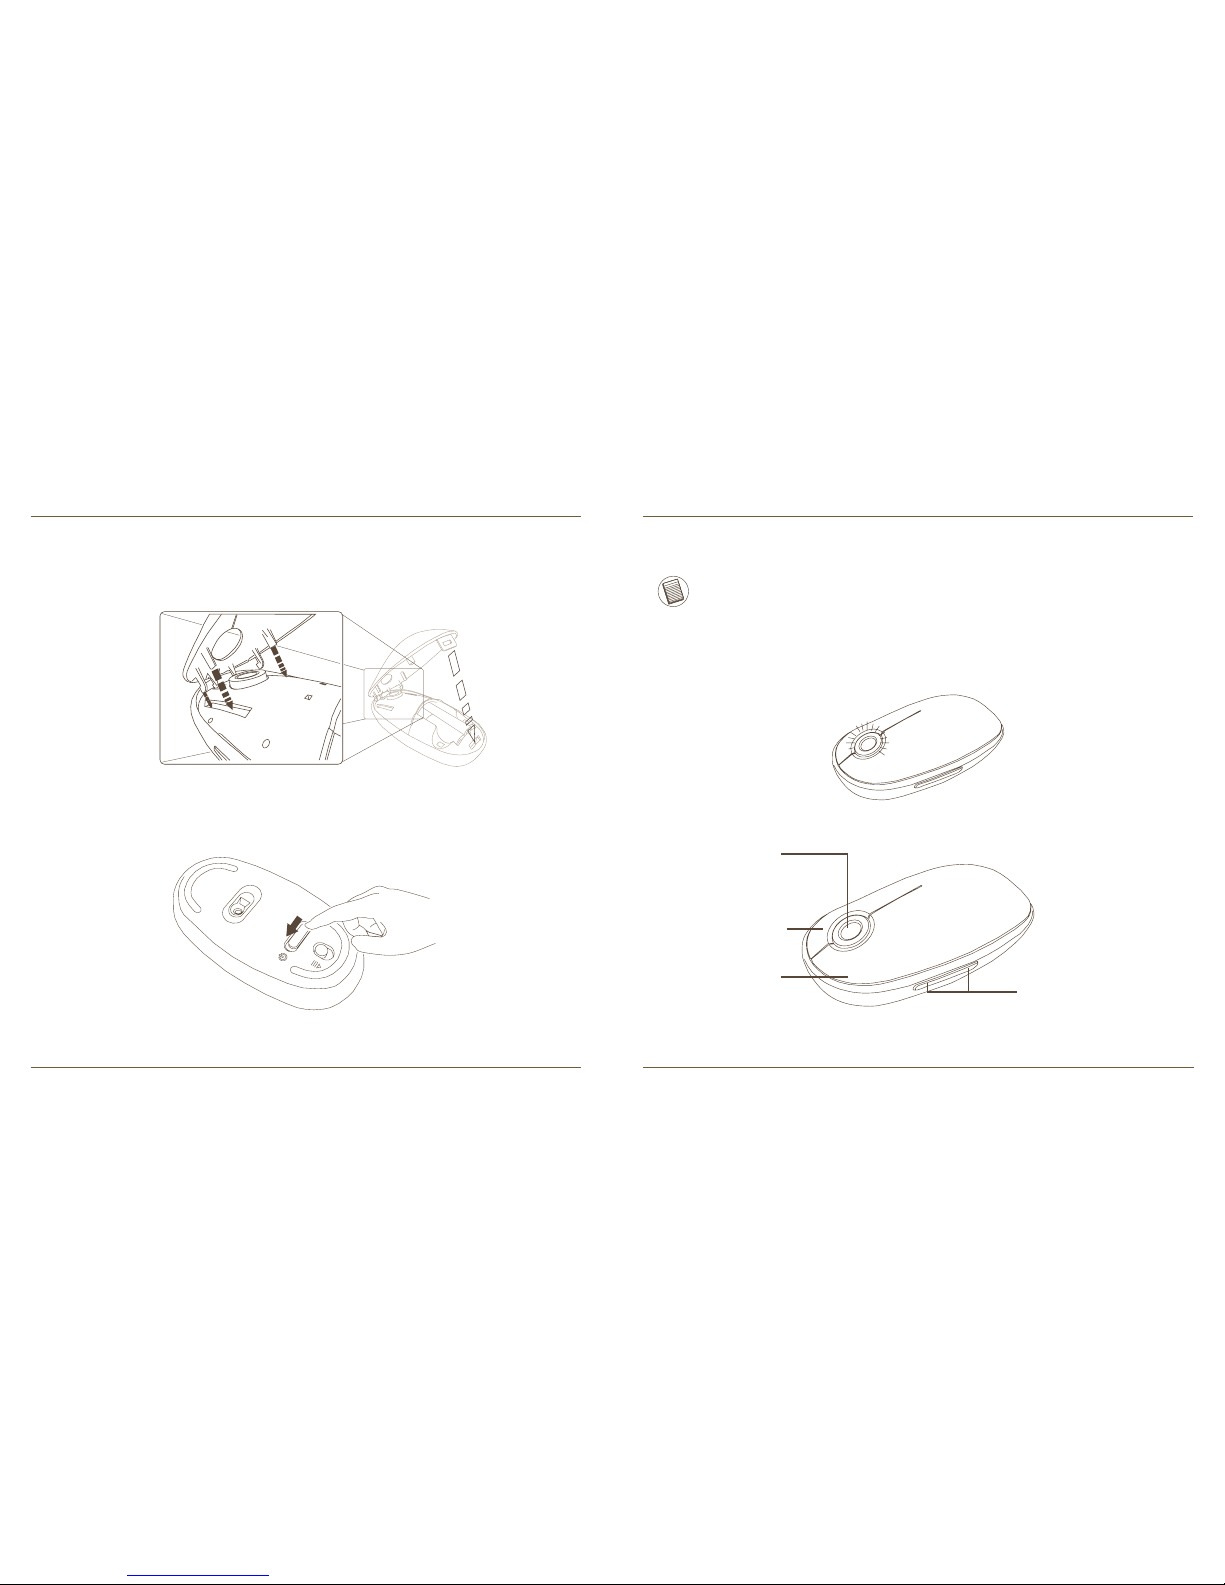
• Once the batteries are installed. Close the battery compartment by first
re-inserting the front of the cover and then pressing down the back until it
locks into position.
• Turn on the mouse by sliding the on/off switch on the bottom to the “on”
position.
Low Battery Power Indicator
NOTE: WHEN THE BATTERY POWER IS LOW, THE TOUCH SCROLL WILL FLASH RED.
PLEASE REPLACE THE BATTERIES.
When 60 minutes of power remains, a red indicator light will glow for 8
seconds.
When only 30 minutes of power remains, the red indicator light will blink
continuously.
Using the Mouse
Touch Scroll
(4-way scrolling)
Left mouse
button
Right mouse
button
Programmable buttons
(requires CD installation)
Page 4
Wireless Mouse
5
Wireless Mouse
6
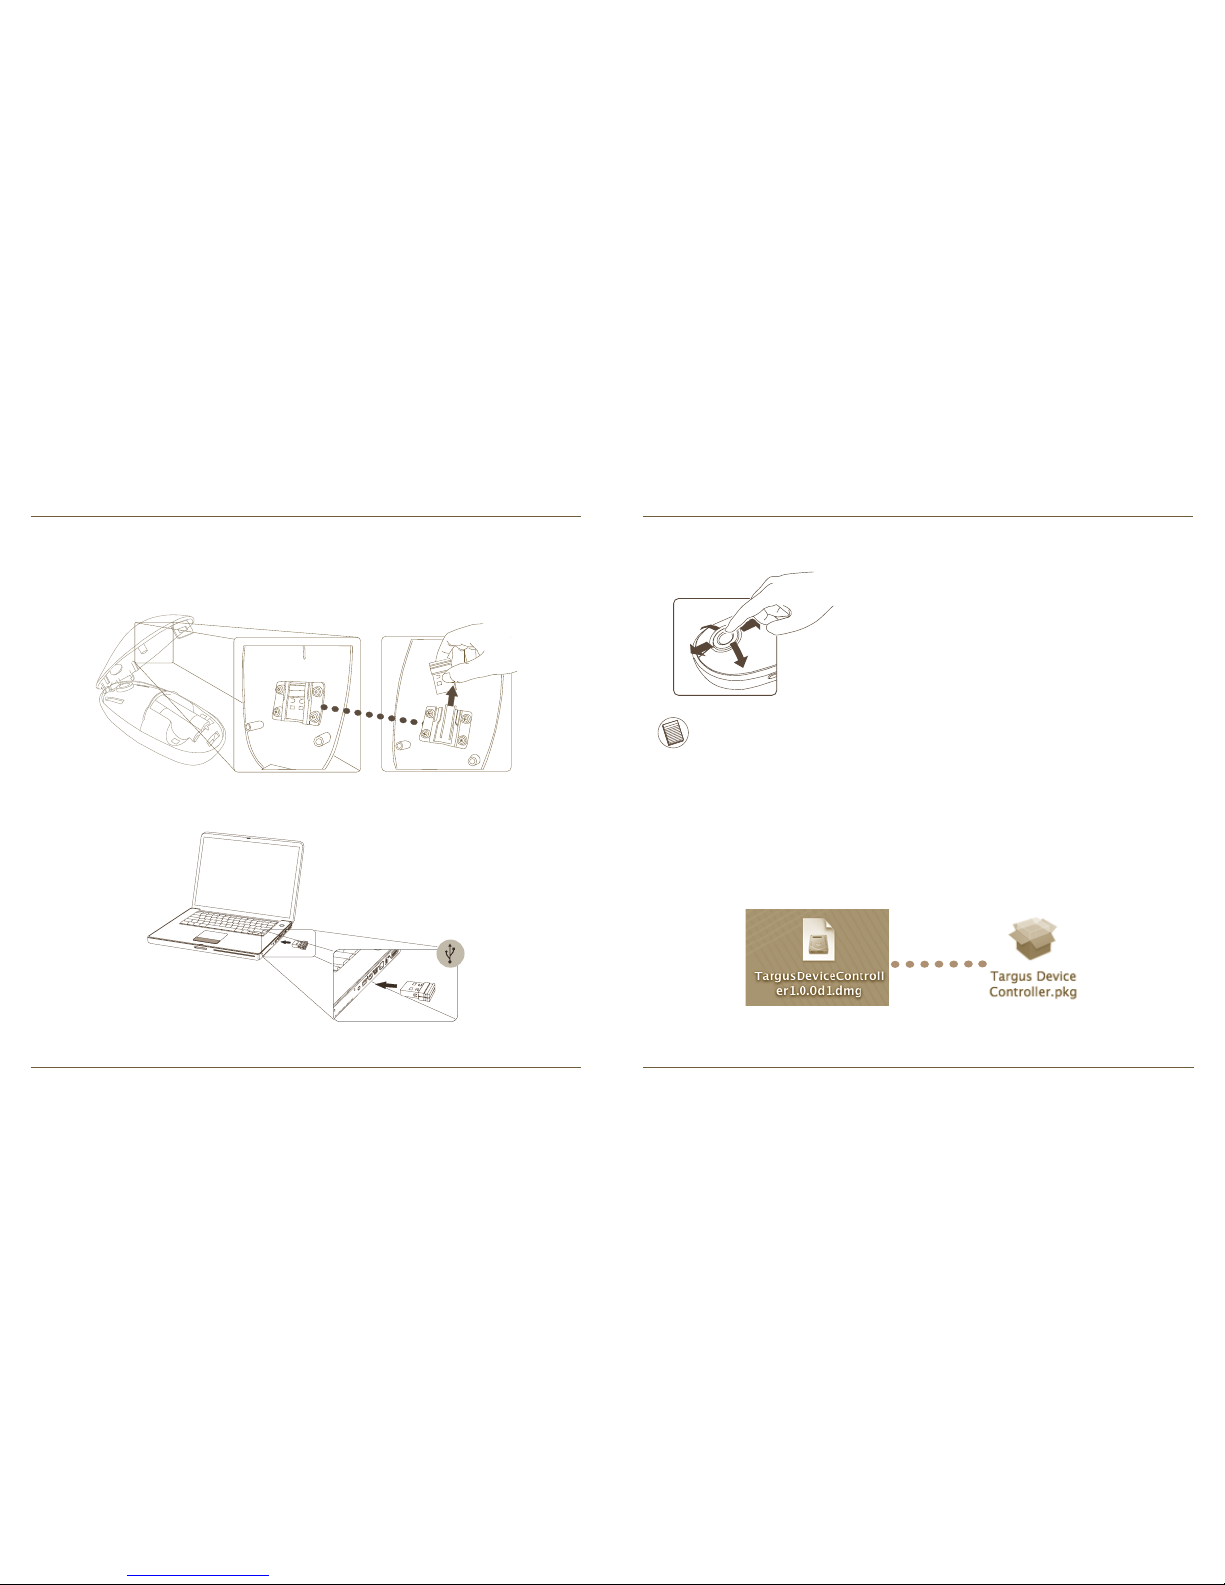
• Remove the mini USB receiver from the bottom of the mouse cover.
• Plug the USB receiver into an available USB port on your computer
• You are ready to use the mouse.
Establishing the Connection
Using the Touch Scroll
• Slide your finger over the Touch Scroll sensing area
to use the 4-way scrolling function.
• Quickly slide your finger (either up or down) over the
Touch Scroll to activate the quick scrolling function.
• Press any button to disable the quick scrolling
function.
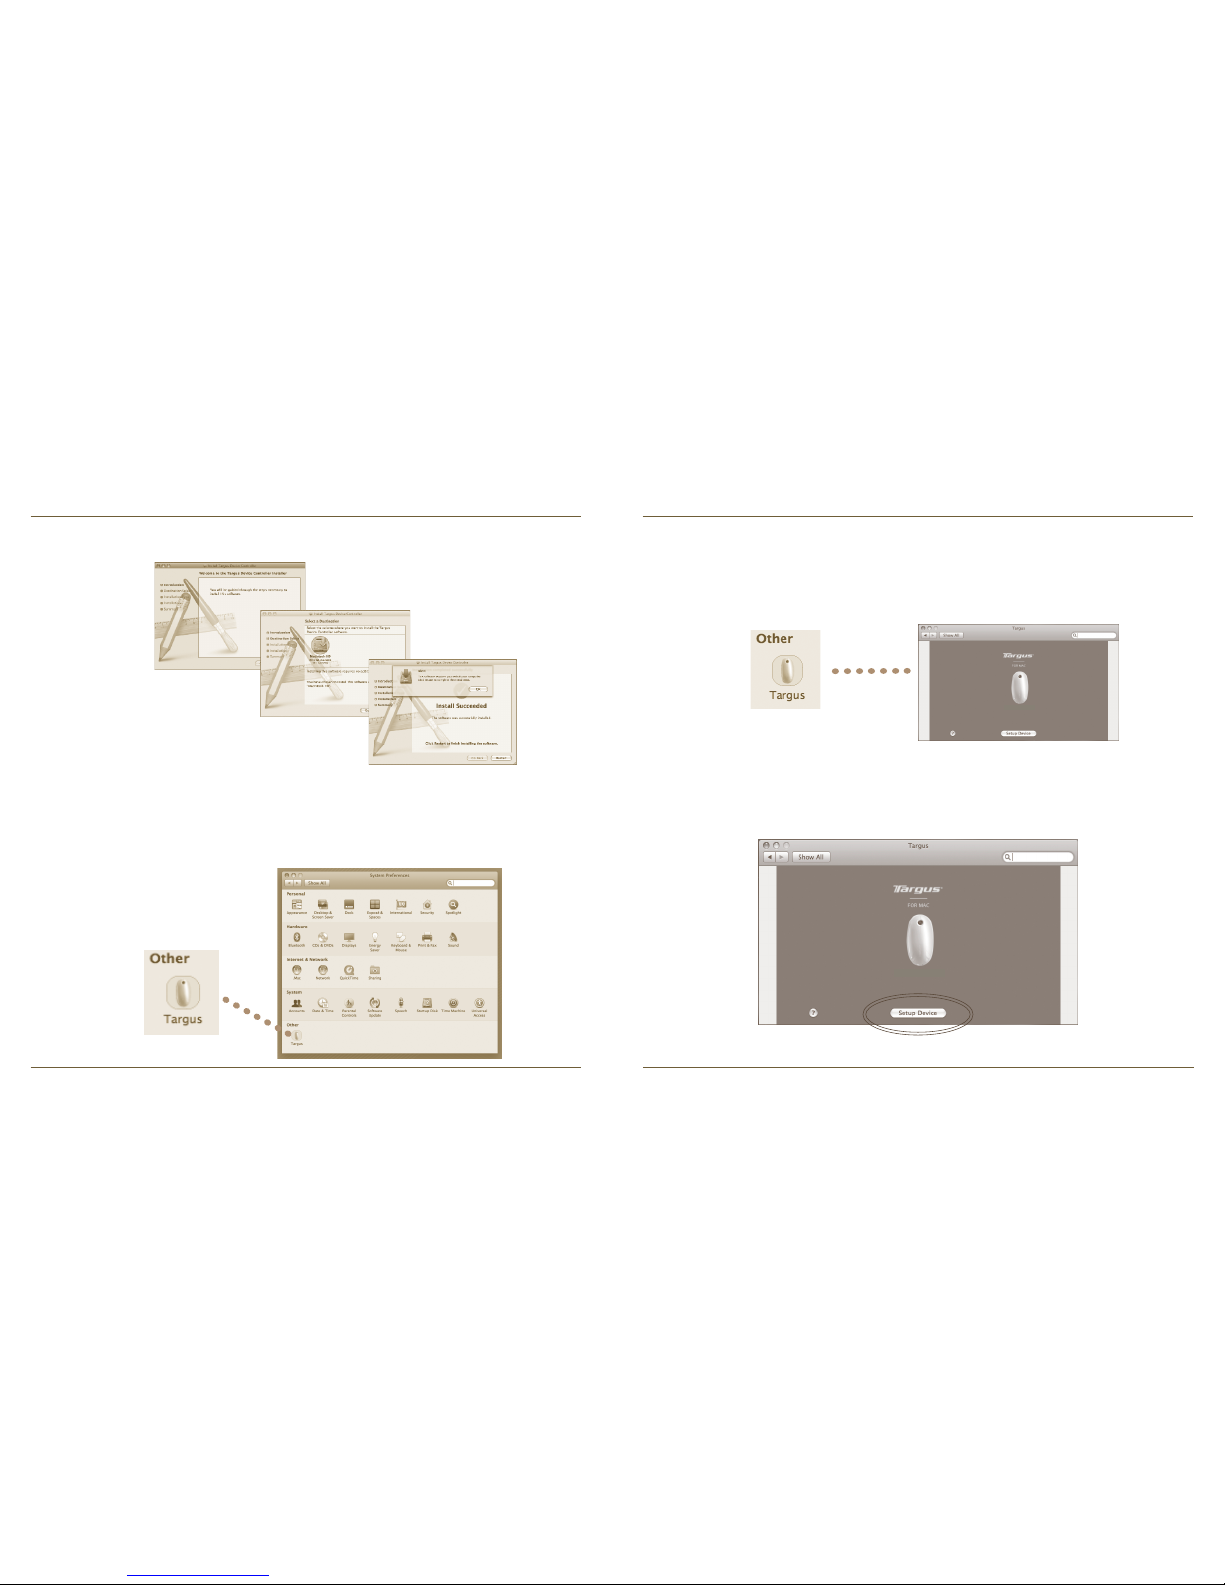
Installing Software for Programmable Buttons
Installing the software enables configuration of the programmable buttons.
The latest software (Model # AMW43) can be downloaded from the official
Targus web site: http://www.targus.com
Double click the setup icon to launch the installation software.
NOTE: PLEASE REMOVE THE PROTECTIVE PLASTIC FILM ON THE TOUCH SCROLL
BEFORE USING THE DEVICE.
Page 5
Wireless Mouse
7
Wireless Mouse
8
Programming the Buttons
Click to highlight the image of the device and then press “Setup Device” to
launch the configuration software.
Click on the Targus logo to launch the device application.
A Targus icon will appear in the System Preferences window.
After the software is successfully installed, restart your computer to finish
installing the software.
Follow the on-screen instructions to complete the installation.
Wireless Mouse
Wireless Mouse
Page 6
Wireless Mouse
9
Wireless Mouse
10
Troubleshooting
The mouse is not working.
• Make sure the batteries are installed correctly. The positive (+) and
negative (-) ends of each battery must match the positive (+) and negative (-)
connections in the battery compartment.
• Make sure the batteries are charged. Replace if necessary.
• Verify that the computer’s USB port is functioning.
• Try plugging the USB receiver into another USB port.
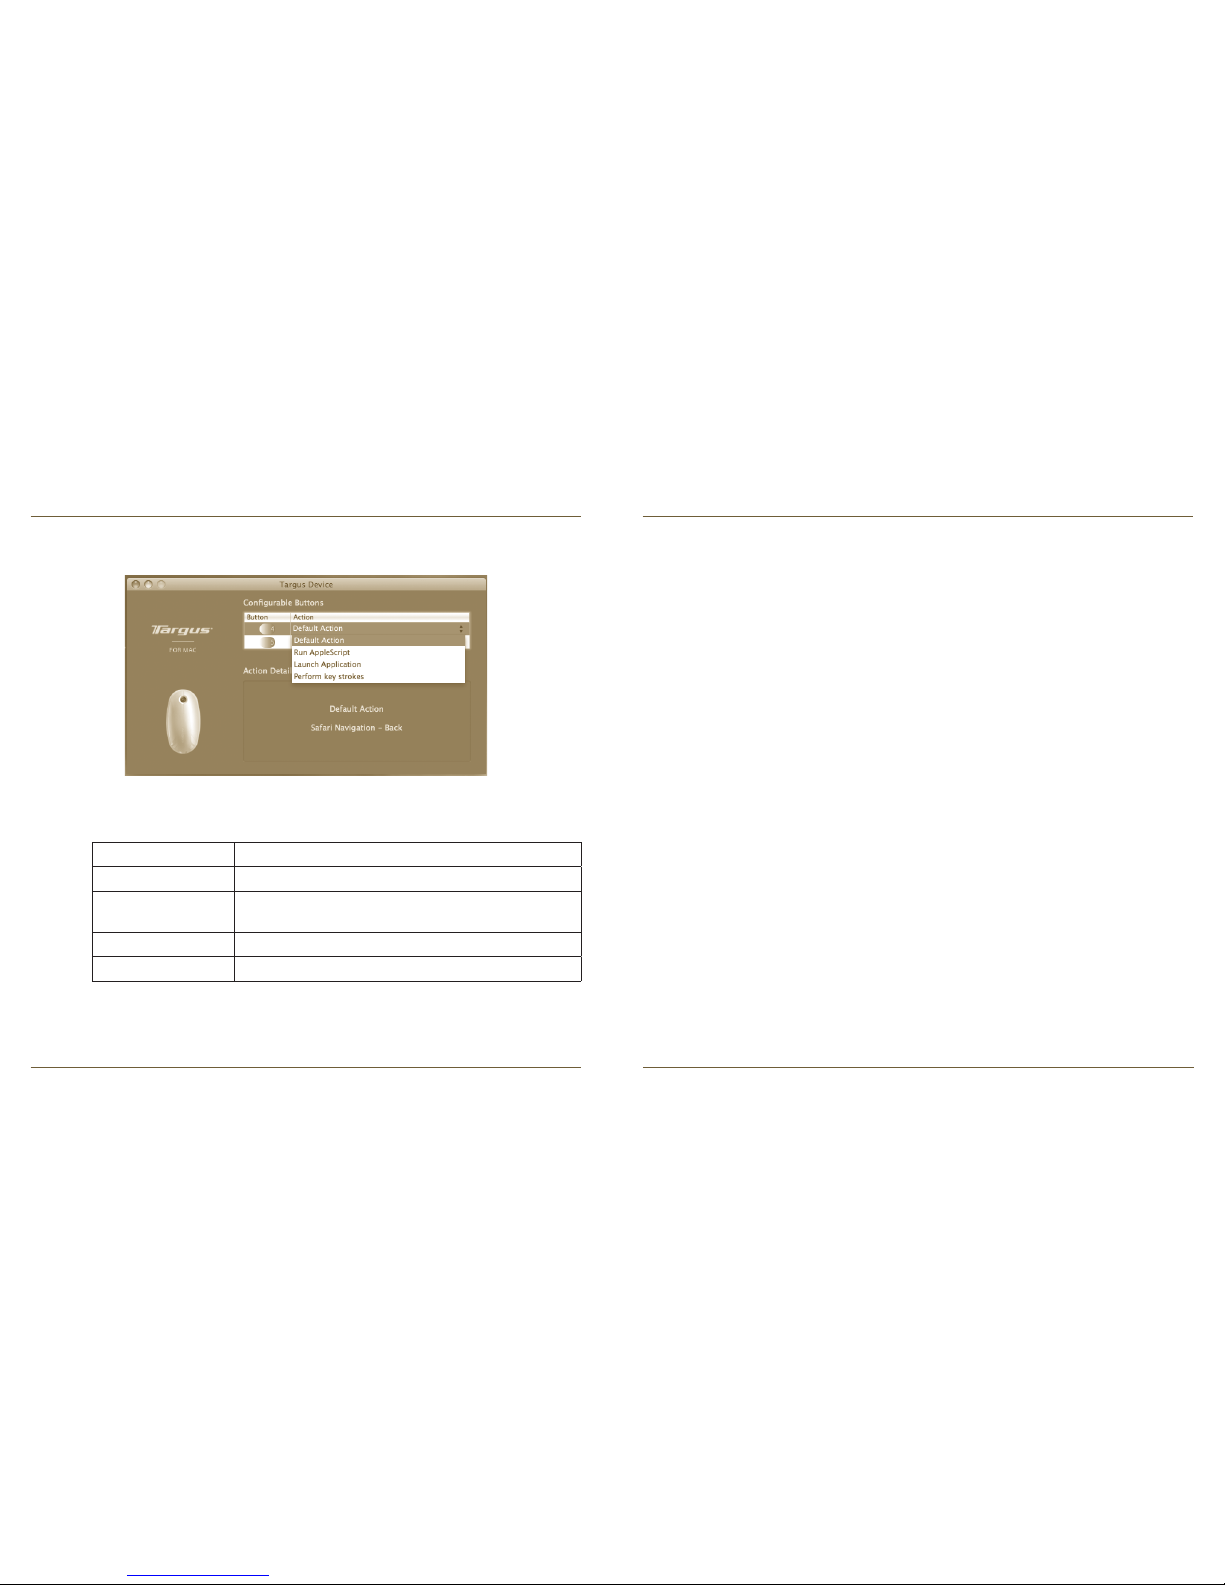
Click the arrows on the right-side of the drop down lists to configure each
button.
Each button can be programmed to any of the following types of functions:
Close the application window to apply the changes.
Default Action Set the buttons to a specific function.
Run AppleScript Set the buttons to load an AppleScript
Launch Application
Set the buttons to launch specific application installed
in the computer.
Perform key strokes Set the button to recall key strokes.
Predefined functions Set the button to map pre-set actions
Page 7

Wireless Mouse
11
Wireless Mouse
12
FCC Statement
Tested to Comply
This equipment has been tested and found to comply with the limits of a Class B
digital device, pursuant to Part 15 of the FCC Rules. These limits are designed to
provide reasonable protection against harmful interference in a residential installation.
This equipment generates, uses, and can radiate radio frequency energy and if not
installed and used in accordance with the instructions, may cause harmful interference
to radio communications. However, there is no guarantee that interference will not
occur in a particular installation. If this equipment does cause harmful interference to
radio or television reception, which can be determined by turning the equipment off
and on, the user is encouraged to try to correct the interference by one or more of the
following measures:
• Reorient or relocate the receiving antenna;
• Increase the separation between the equipment and receiver;
• Connect the equipment into an outlet on a circuit different from that to which the
receiver is connected;
• Consult the dealer or an experienced radio/TV technician for help
Changes or modifications not authorized by the party responsible for compliance could
void the user’s authority to operate this product.
Declaration of Conformity
Hereby, Targus, declares that this device is in compliance with the essential
requirements and other relevant provisions of Directive 1999/5/EC.
Technical Support
For technical questions, please visit:
US Internet: www.targus.com/support.asp
Australia Internet: www.targus.com/au
Product Registration
Targus recommends that you register your Targus accessory shortly after
purchasing it. To register your Targus accessory, go to:
http://www.targus.com/registration.asp
You will need to provide your full name, email address, country of residence and
product information.
Warranty
Targus warrants this product to be free from defects in materials and workmanship
for one year. If your Targus accessory is found to be defective within that time,
we will promptly repair or replace it. This warranty does not cover accidental
damage, wear and tear, or consequential or incidental loss. Under no conditions
is Targus liable for loss of, or damage to, a computer or other device(s); nor loss
of, or damage to, programs, records, or data; nor any consequential or incidental
damages, even if Targus has been informed of their possibility. This warranty does
not affect your statutory rights.
Regulatory Compliance
This device complies with Part 15 of the FCC Rules. Operation is subject to the
following two conditions: (1) This device may not cause harmful interference, and (2)
This device must accept any interference received, including interference that may
cause undesired operation.
Receiver Information:
FCC ID: FSUKM009
IC: 3760A-00016
Rating: 5V 25mA
 Loading...