

Page 1
OWNER’S
MANUAL
A MAJOR CAUSE OF FIRES IS FAILURE TO MAINTAIN REQUIRED
CLEARANCES (AIR SPACES) BETWEEN COMBUSTIBLE MATERIALS.
IT IS OF UTMOST IMPORTANCE THAT THIS PRODUCT BE INSTALLED
ONLY IN ACCORDANCE WITH THESE INSTRUCTIONS.
IMPORTANT: RETAIN FOR FUTURE REFERENCE. READ CAREFULLY.
TFB89BLE/BLEC
TFB65BLE/BLEC
4731 Ironwood_OM_ENv28.indd 1 10/15/18 3:26 PM
Page 2

IMPORTANT SAFETY
READ ALL INSTRUCTIONS BEFORE INSTALLING AND USING
THE APPLIANCE
Please read this entire manual before installation and use of this pellet-burning appliance. Failure to follow these
instructions could result in property damage, bodily injury, or even death. Contact local building or re ofcials
about restrictions and installation inspection requirements in your area.
Cooking with a hardwood re brings years of enjoyment – to you and your lucky friends and family. Your new
Traeger grill is specially designed to make cooking easier while giving you optimal performance with the most
savory-avored food.
As with all grills and cooking appliances, any time you burn a material (whether it be wood, gas, or charcoal),
organic gases are formed during the cooking process. One gas that can be particularly harmful in concentrated
quantities is carbon monoxide. In an outdoor, open-air environment, carbon monoxide should naturally dissipate
and not harm you.
WARNING! Follow these guidelines to prevent this colorless, odorless gas from poisoning you, your family, your
pets, or others:
• Know the symptoms of carbon monoxide poisoning:
headache, dizziness, weakness, nausea, vomiting,
sleepiness, and confusion. Carbon monoxide
reduces the blood’s ability to carry oxygen.
Low blood oxygen levels can result in loss of
consciousness and death.
• See a doctor if you or others develop cold- or
u-like symptoms. Carbon monoxide poisoning,
which can easily be mistaken for a cold or u, is
often detected too late.
• Alcohol consumption and drug use increase the
effects of carbon monoxide poisoning.
IMPORTANT: READ CAREFULLY AND RETAIN FOR FUTURE REFERENCE.
If you are assembling this unit for someone else, provide this manual for the owner to read and save for
future reference.
DANGER!
For North American Consumers:
• Plug into an appropriate 3-prong outlet.
• An electrical supply with GFCI protection is required.
To protect against shock hazard, locate a grounded
3-prong receptacle in reach of the 6' (1.8-m) power
cord. When installing the receptacle, follow the
National Electrical Code and local codes
and ordinances.
For Consumers in the European Union:
• Plug into an appropriate earthed outlet.
• Do not remove earth prong or modify plug in any
way. Do not use an adapter or extension cord.
• Carbon monoxide is especially toxic to mother
and child during pregnancy, infants, the elderly,
smokers, and people with blood or circulatory system
problems, such as anemia or heart disease.
• Only use your Traeger grill outside on a
noncombustible oor and away from combustible
materials.
• Never use gasoline, gasoline-type lantern fuel,
kerosene, charcoal lighter uid, or ammable liquids
to start or “freshen up” a re in this appliance. Keep
all such liquids well away from this appliance when
in use.
DANGER!
• Hazardous voltage is present, which can shock,
burn, or cause death. Disconnect the power cord
before servicing the grill unless otherwise noted
in this Owner’s Manual.
• Never use or store ammable liquids near the grill.
• Never use gasoline or lighter uid to manually
light your grill.
2
4731 Ironwood_OM_ENv28.indd 2 10/15/18 3:26 PM
Page 3

TRAEGERGRILLS.COM
WARNING!
Smoke Hazard
A pellet overow condition can occur during start-up,
resulting in unusually thick, white smoke that lasts a
long time. If this occurs, power down your grill with
the Main Power switch and unplug. If this condition
continues long enough, gases can build up from partial
ignition and fully ignite, causing the lid to “burp.” If
this burp occurs and your grill has not been properly
maintained as described in “Maintaining Your Grill” on
pages 25-26, a grease re could result. To remedy this
condition, let the grill cool down completely, remove all
internal components, and thoroughly clean all ash and
pellets from the grill and repot (see page 26, “Cleaning
the Ash from Inside and Around the Firepot”).
WARNING!
Burn Hazard
Many parts of the grill will become very hot during
operation. Care must be taken to avoid burns, both
during operation and afterwards, while the grill is still hot.
• Never leave the grill unattended when young
children are present.
• Never move the grill when it is operating.
• Let the grill cool thoroughly before moving or
attempting to transport.
WARNING!
Fire Hazard
• When operating this grill, maintain a MINIMUM
distance of 18 inches (45.7 cm) from the grill to
combustibles.
• When operating this grill under overhead
combustibles, a MINIMUM of 40 inches (102 cm)
is required.
WARNING!
Air Contaminant Hazard
• Assemble and operate this grill ONLY per the instructions
in the Assembly Guide and the Owner’s Manual.
• This grill is intended for OUTDOOR USE ONLY.
• Never use heating fuel pellets in the grill, due to
potential hazardous contaminants and additives
that may be present.
CAUTION!
• Always store wood pellets in a dry location, away
from heat-producing appliances and other fuel
containers.
• Keep the grill clean. See the cleaning instructions
in this Owner’s Manual.
• Do not use accessories not specied for use with this grill.
• For best results and avor, use genuine
TRAEGER
®
BRAND HARDWOOD PELLETS.
• Even if there is ample room in the grill, be cautious of
loading excessive amounts of food that can release
large quantities of ammable grease, for example
more than a pound of bacon, especially if the grill
has not been well-maintained. If your previous cooks
have produced large quantities of ammable grease,
it is highly recommended that the grease be cleaned
from the grill before using it again.
For Consumers in the European Union:
• This appliance is not intended for use by persons
(including children) with reduced physical, sensory,
or mental capabilities, or lack of experience and
knowledge, unless they have been given supervision
or instruction concerning use of the appliance by a
person responsible for their safety.
• Children should be supervised to ensure they do not
play with the appliance.
18"
(45.7 cm)
18"
(45.7 cm)
40.00"
40"
(102 cm)
SAVE THESE INSTRUCTIONS
3
4731 Ironwood_OM_ENv28.indd 3 10/15/18 3:26 PM
Page 4
4
4731 Ironwood_OM_ENv28.indd 4 10/15/18 3:26 PM
Page 5
TRAEGERGRILLS.COM
TABLE
OF CONTENTS
2 IMPORTANT SAFETY
6 WHY TRAEGER WOOD PELLETS?
7
8
11 SEASONING YOUR GRILL
13 USING YOUR GRILL
14 CHOOSING A COOK METHOD
21 ADDITIONAL CONTROL FUNCTIONS
22
23 IRONWOOD FEATURES
25 MAINTAINING YOUR GRILL
27 FREQUENTLY ASKED QUESTIONS
29 TROUBLESHOOTING
30 OPERATING TIPS
35 SERVICE AND WARRANTY
MAKE GRILL MAINTENANCE A REAL
BREEZE
GETTING TO KNOW YOUR GRILL
HOPPER CLEAN-OUT
5
4731 Ironwood_OM_ENv28.indd 5 10/15/18 3:26 PM
Page 6
WHY TRAEGER
WOOD PELLETS?
AT TRAEGER, WE’RE BIG ON TASTE.
only the best quality wood is used to flavor your food and burn the most eciently and reliably. We can't guarantee the same
results from other pellet brands, so we always recommend using our pellets for the optimal experience.
That’s why we create our own 100% all-natural hardwood pellets, ensuring
100% ALL-NATURAL
HARDWOOD
No fillers, no unnatural additives—just pure
hardwood for pure flavor.
WOOD-FIRED TASTE
& SMOKE SCIENCE
Just the right moisture ratio results in
highest-quality pure hardwood flavor.
USA
TRAEGER-OWNED MILLS
& PELLET PRODUCTION PROCESS
Afer 30 years in business, we've created
the "gold standard" in pellet production.
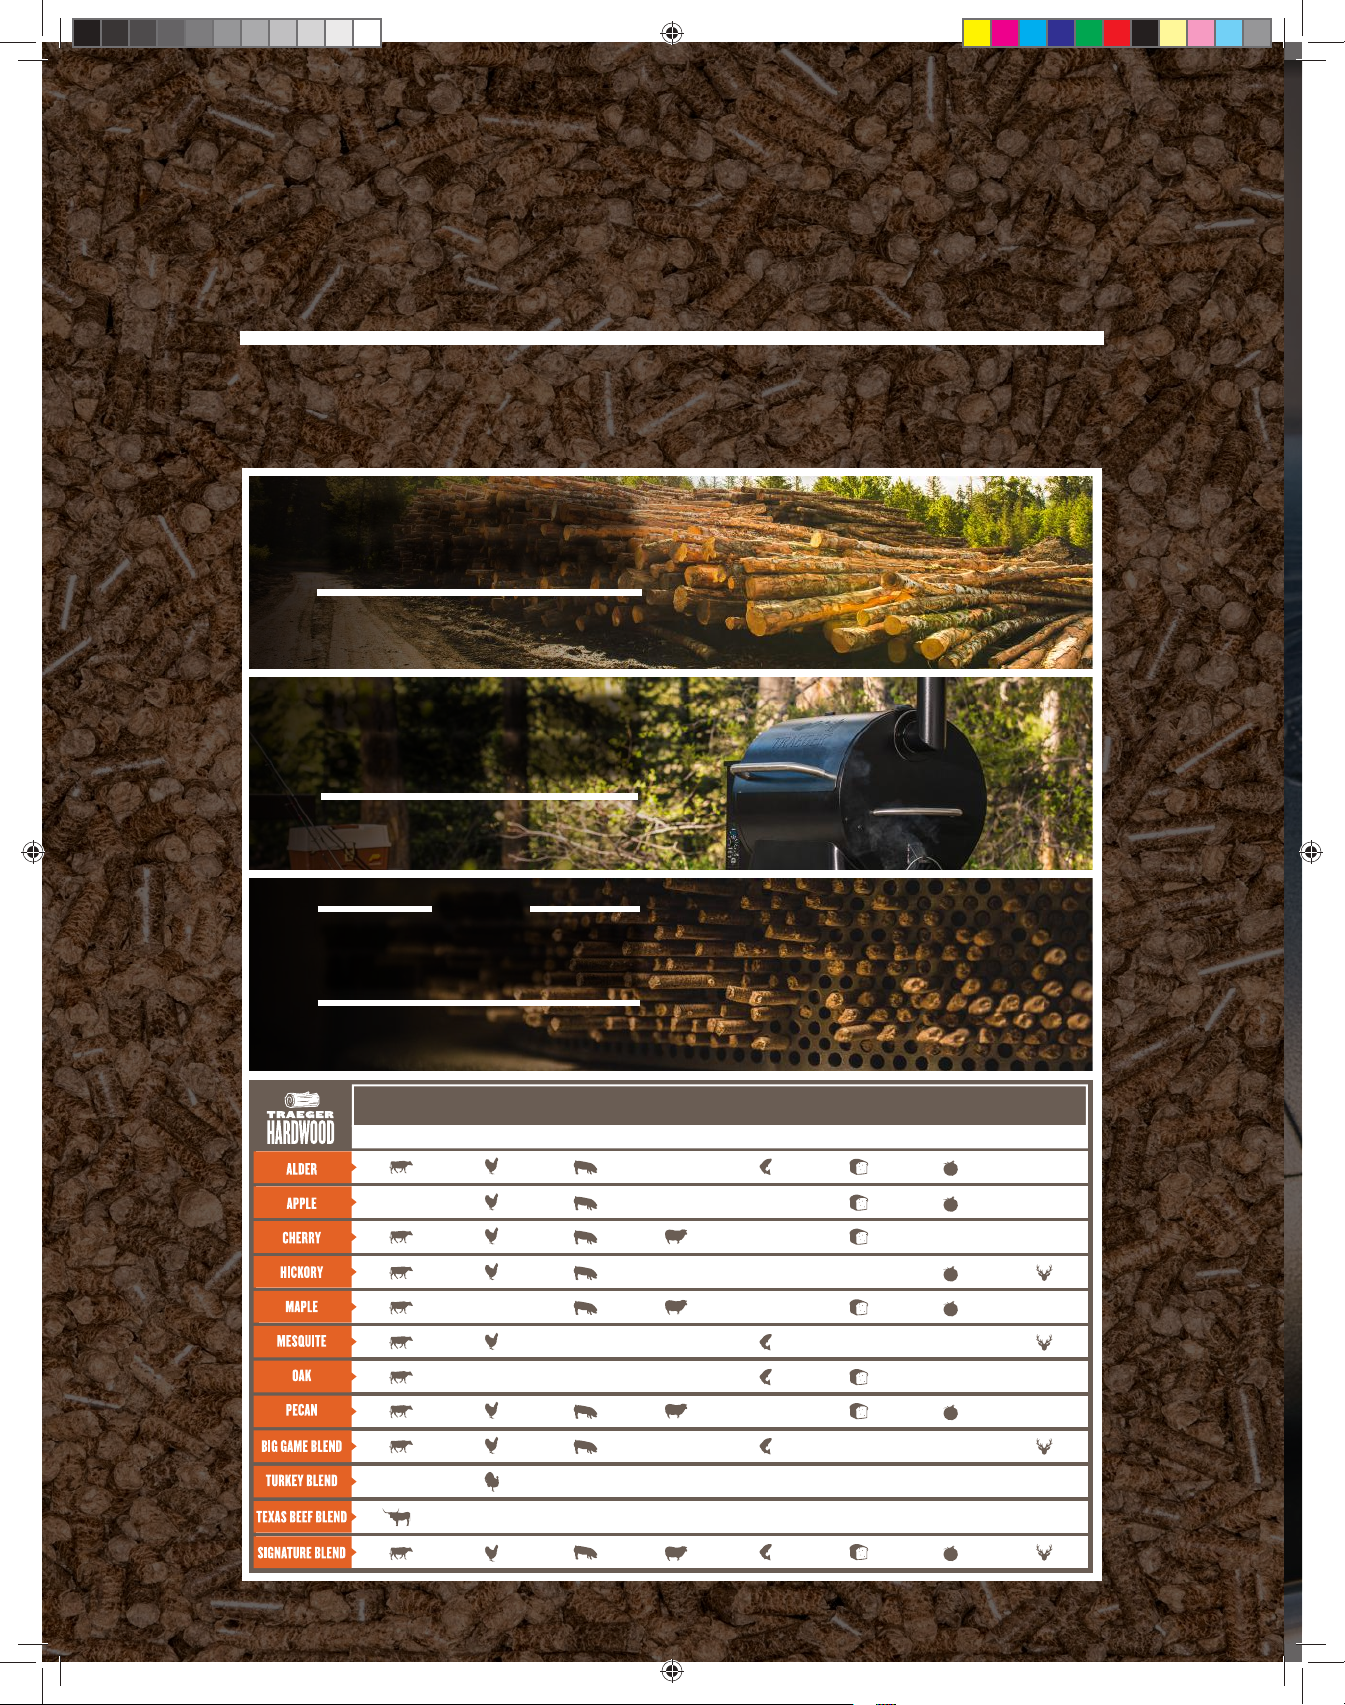
GOOD WITH ANYTHING. GREAT WITH:
BEEF POULTRY PORK LAMB SEAFOOD BAKED VEGGIES WILD GAME
6
4731 Ironwood_OM_ENv28.indd 6 10/15/18 3:27 PM
Page 7
TRAEGERGRILLS.COM
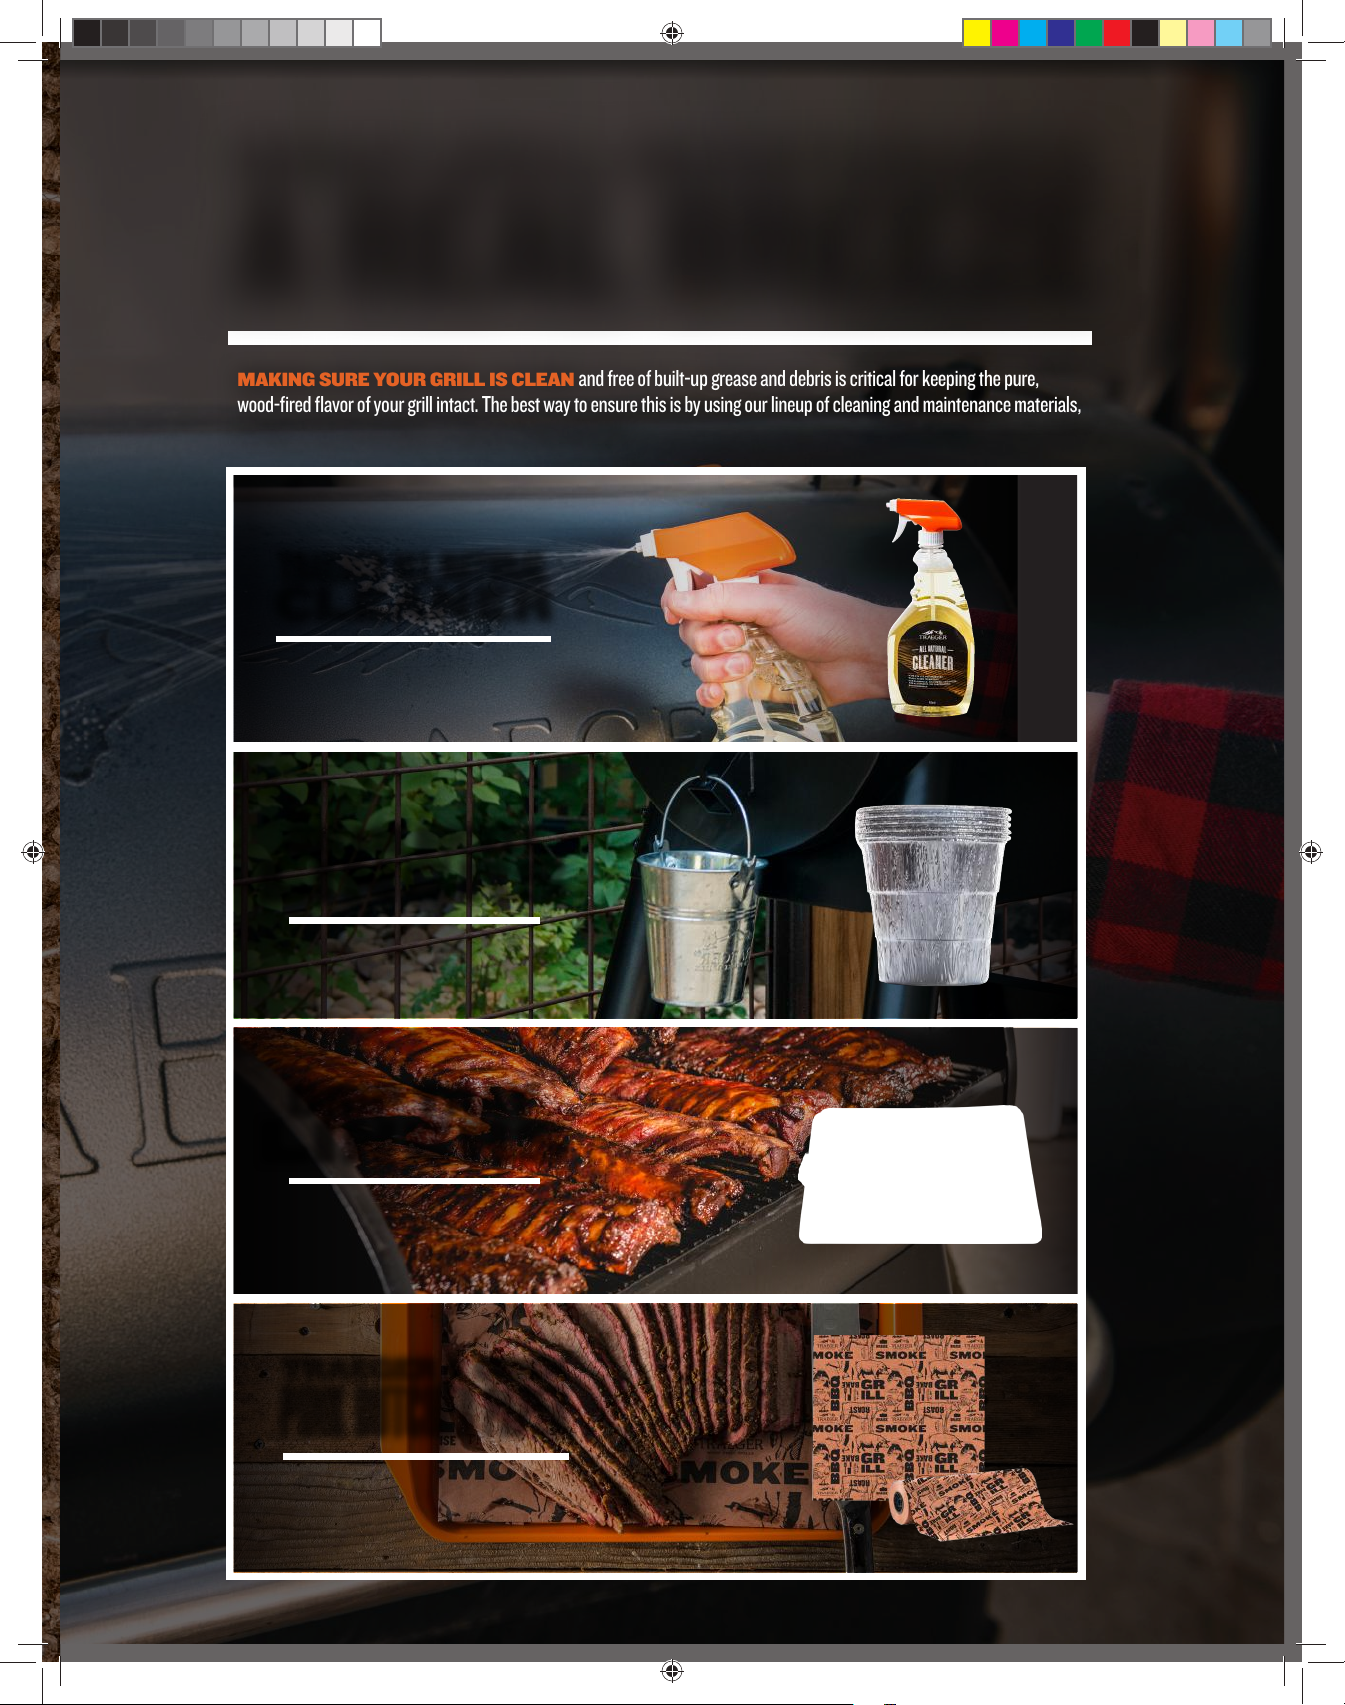
MAKE GRILL MAINTENANCE
A REAL BREEZE
MAKING SURE YOUR GRILL IS CLEAN
wood-fired flavor of your grill intact. The best way to ensure this is by using our lineup of cleaning and maintenance materials,
available at your local dealer or online at traegergrills.com.
950 ML
and free of built-up grease and debris is critical for keeping the pure,
TRAEGER ALL NATURAL
CLEANER
Keep your grill as clean and shiny as
the day you got it with our
All Natural Cleaner.
5-PACK
GREASE BUCKET
LINERS
Get a grip on your drip bucket
maintenance with our
aluminum liners.
5-PACK
DRIP TRAY
LINERS
Made of heatproof aluminum,
they’re lightweight and disposable
so you can clean up quick and
Traeger on.
18" X 150'
TRAEGER X OREN
PINK BUTCHER PAPER
This FDA-approved paper keeps your
meat moist by sealing in the juices, but
is breathable enough to allow additional
smoke flavor in.
7
4731 Ironwood_OM_ENv28.indd 7 10/15/18 3:27 PM
Page 8
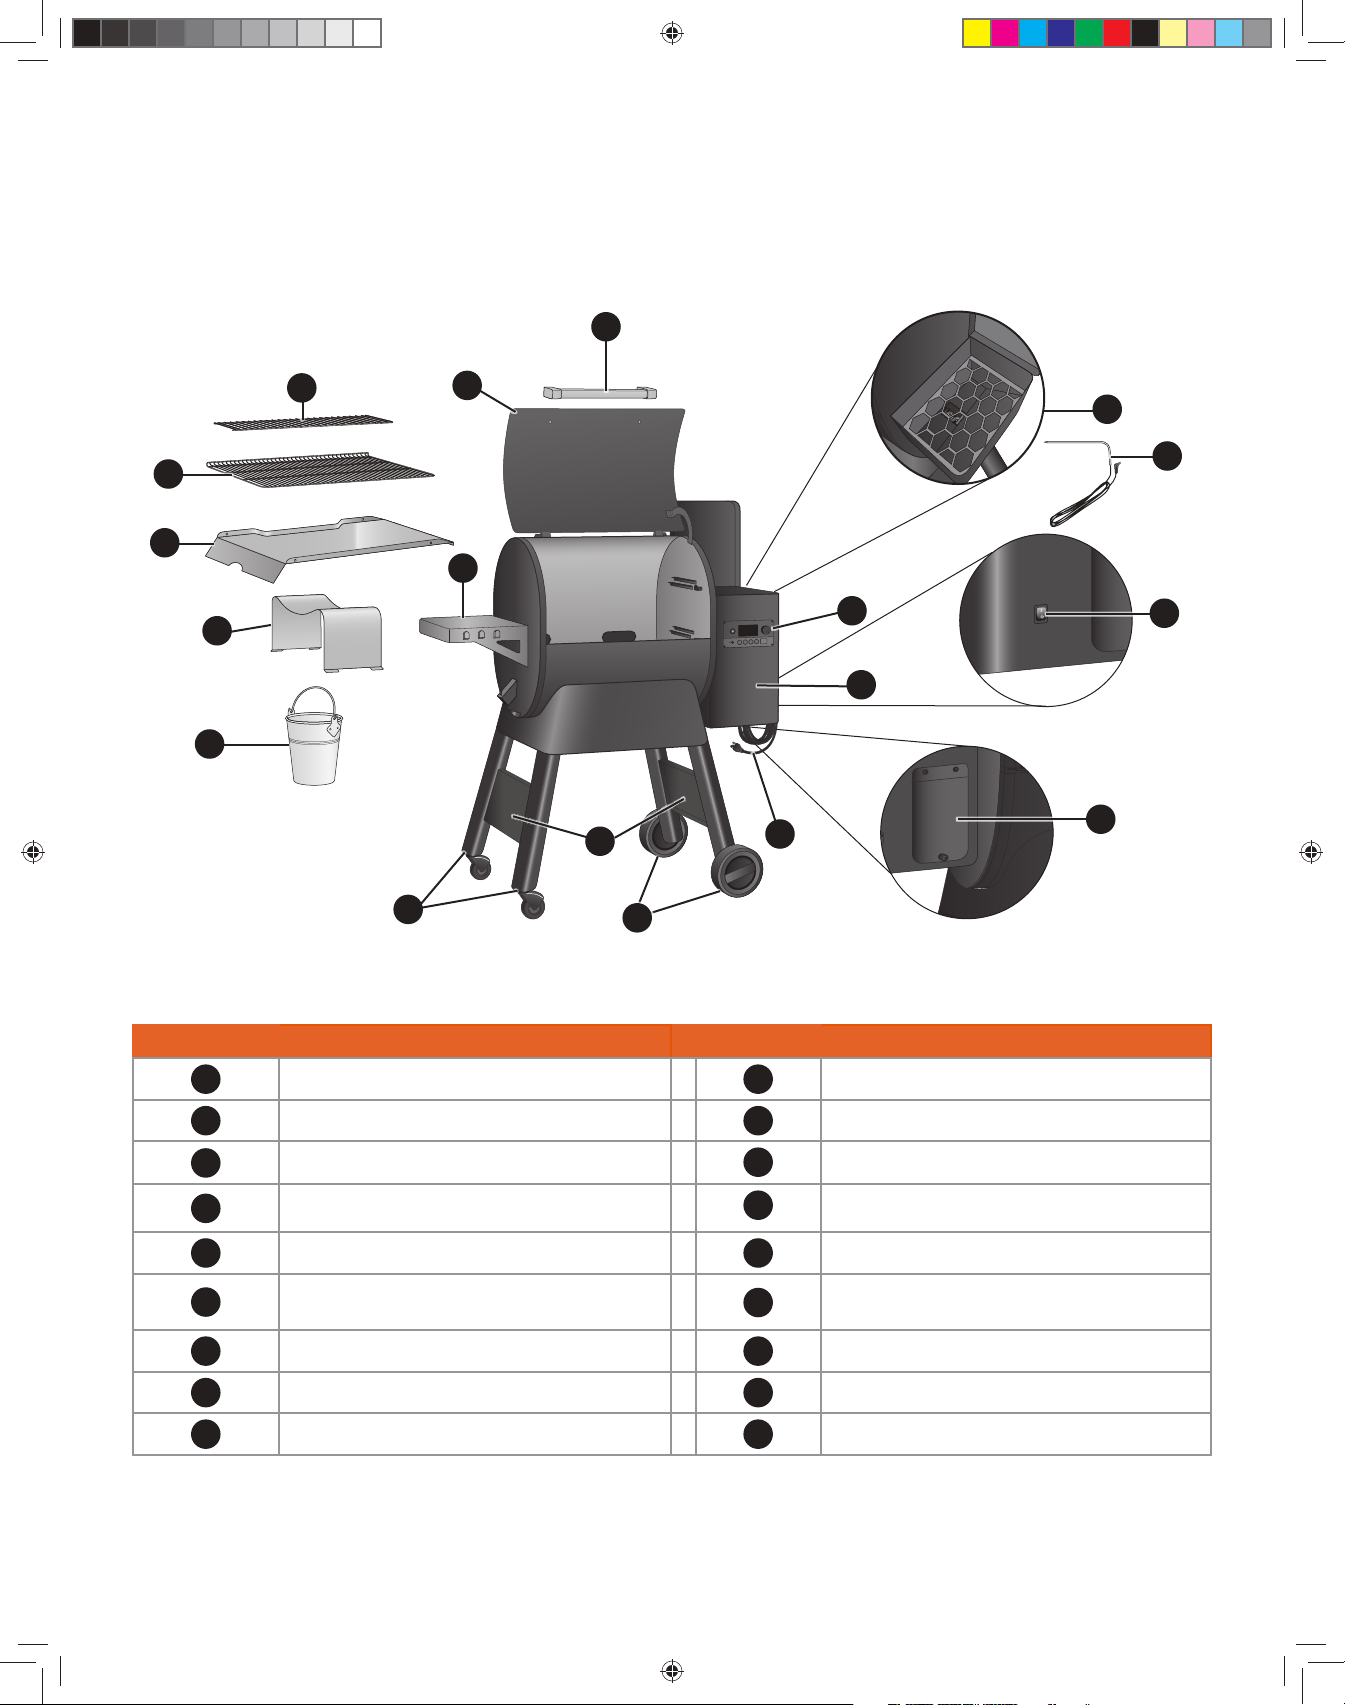
GETTING TO KNOW YOUR GRILL
Refer to the Assembly Guide to assemble and install your Traeger® Ironwood Grill.
GRILL PARTS AND FEATURES
2
3
4
5
6
8
9
1
18
17
7
10
15
14
12
11
13
16
Part Description Part Description
1
2
3
4
5
6
7
8
9
Grill Door
Door Handle
Top Grill Grate
Bottom Grill Grate
Grease Drip Tray
Heat Bae
Side Shelf
Grease Bucket
Locking-Caster Legs
8
10
12
13
14
15
16
17
18
Leg Braces
11
All-Terrain Wheel Legs
Detachable Power Cord
Hopper Clean-Out Door (back of grill)
Pellet Hopper
Traeger Controller with WiFIRE®
Technology
Main Power Switch (back of grill)
Meat Probe
Pellet Hopper Interior with Grate
4731 Ironwood_OM_ENv28.indd 8 10/15/18 3:27 PM
Page 9
TRAEGERGRILLS.COM
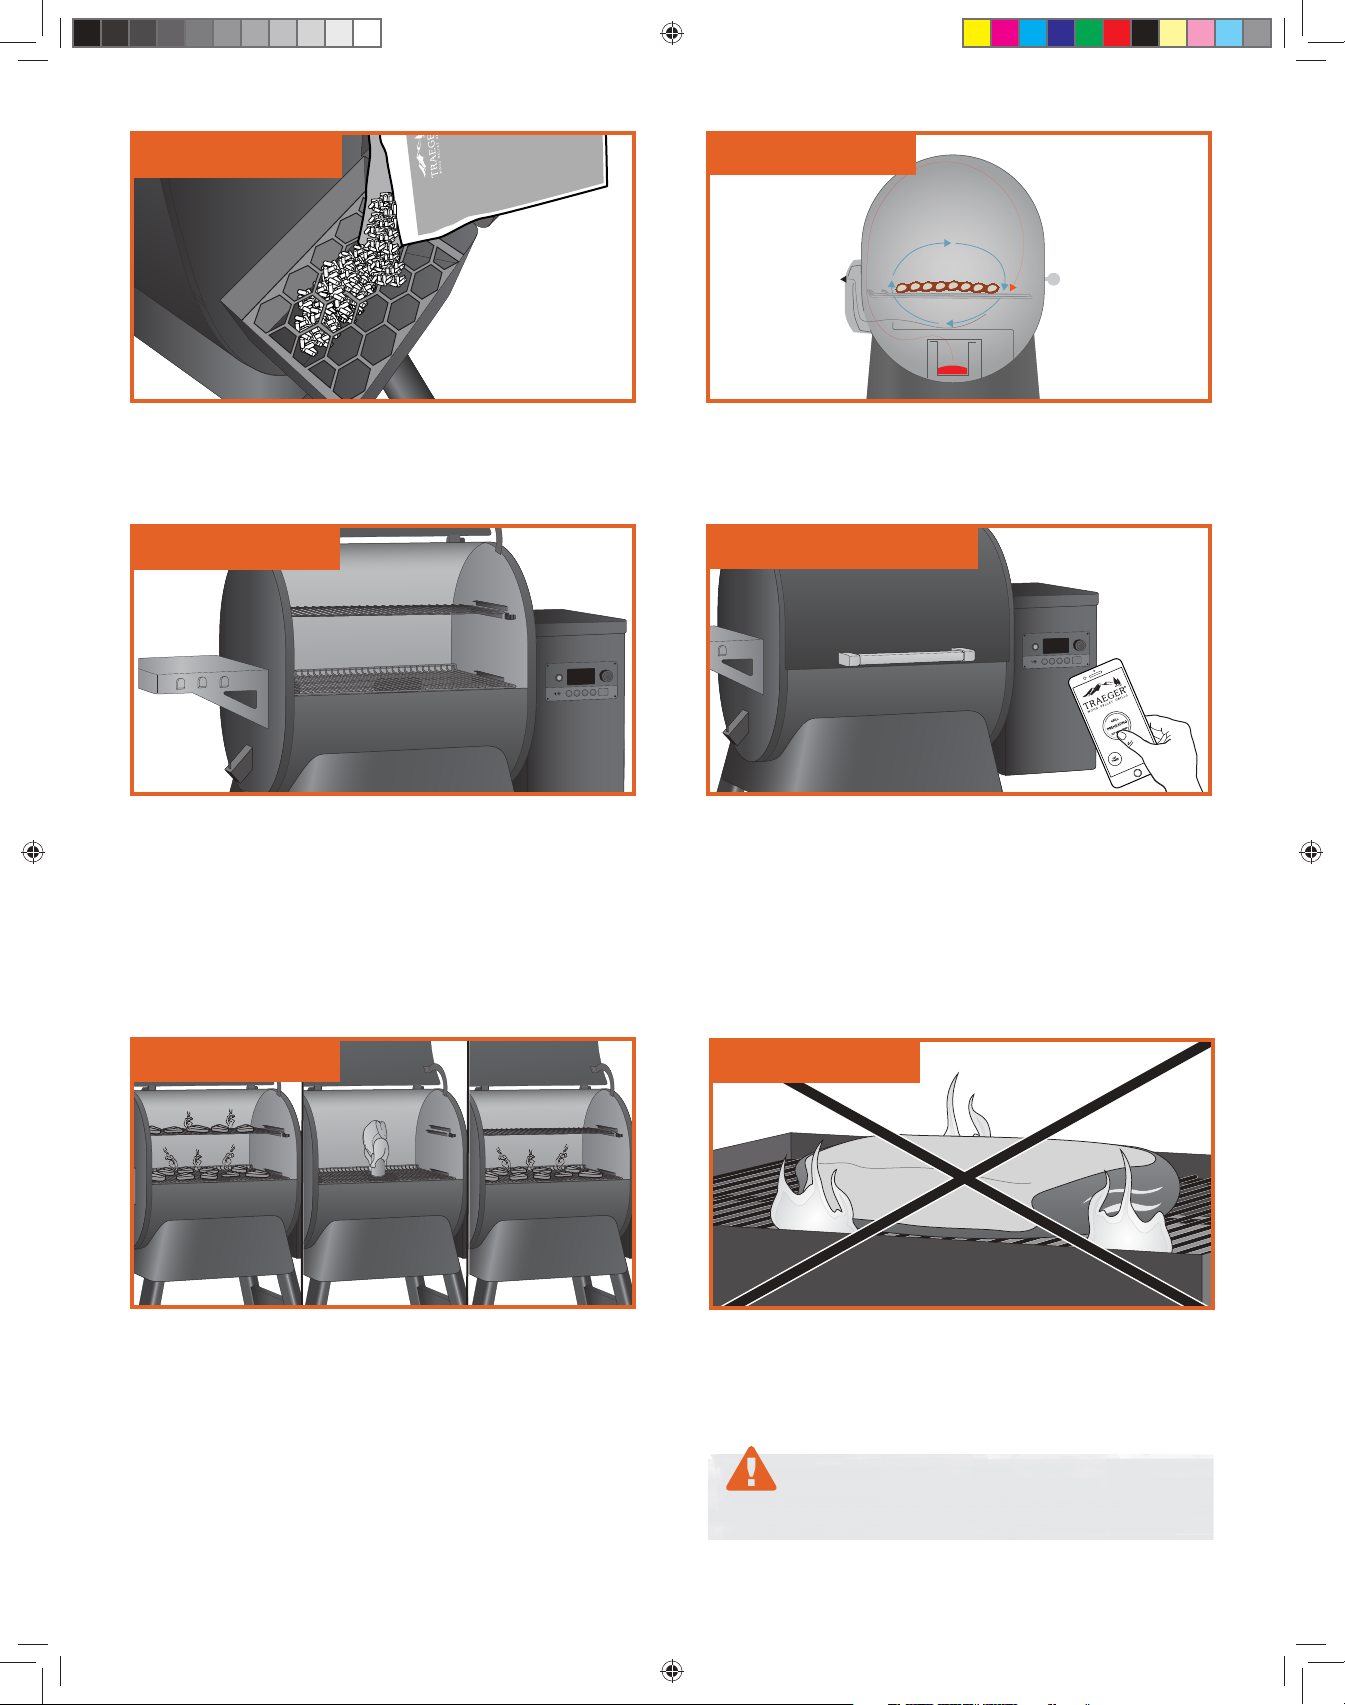
PELLET HOPPER
BARREL SHAPE
A 20-lb. (9.1 kg) capacity pellet hopper will keep you
cooking for hours, getting you away from the grill and
back to the things you want to do.
GRILLING SPACE
With 650-885 in.
Traeger grill has the real estate for party-sized orders of
T-bones or racks of ribs, with enough room lef over to
handle those side dishes, too.
2
(0.42-0.57 m2) of grilling space, your
Traeger’s signature barrel shape creates a vortex
of convection. It circulates hot, smoky air around the
cooking chamber, surrounding your food with wood-fired
heat for even cooking on all sides.
HIGH-TECH CONTROLS
With the Traeger® Ironwood Grill, controlling your grill
is as easy as pulling out your phone. The WiFIRE®
Technology allows you to set and adjust temperatures
automatically with recipes downloaded from our Traeger
App. To download the app for Android, go to the Google
Play Store; for Apple, go to the App Store. For information
on how to use the app, go to traegergrills.com/wifire.
See “Connecting Your Grill” section on next page for
instructions on how to connect to Wi-Fi.
VERSATILITY
An adjustable 2-tier grate system oers options to load
up both grill grates for a true feast; remove the top grate
for taller food like a colossal turkey, or lower the bottom
grate into a sear position for perfect grill marks.
NO FIREFIGHTING
You don’t have to worry about drippings flaring up and
causing nasty fireballs that destroy your meal, because
Traeger Wood Fired Grills cook using indirect heat. All
drippings are safely channeled into an external grease
bucket for easy disposal.
WARNING! Keep your grill clean. See "Operating
Tips" and "Maintaining Your Grill."
9
4731 Ironwood_OM_ENv28.indd 9 10/15/18 3:27 PM
Page 10
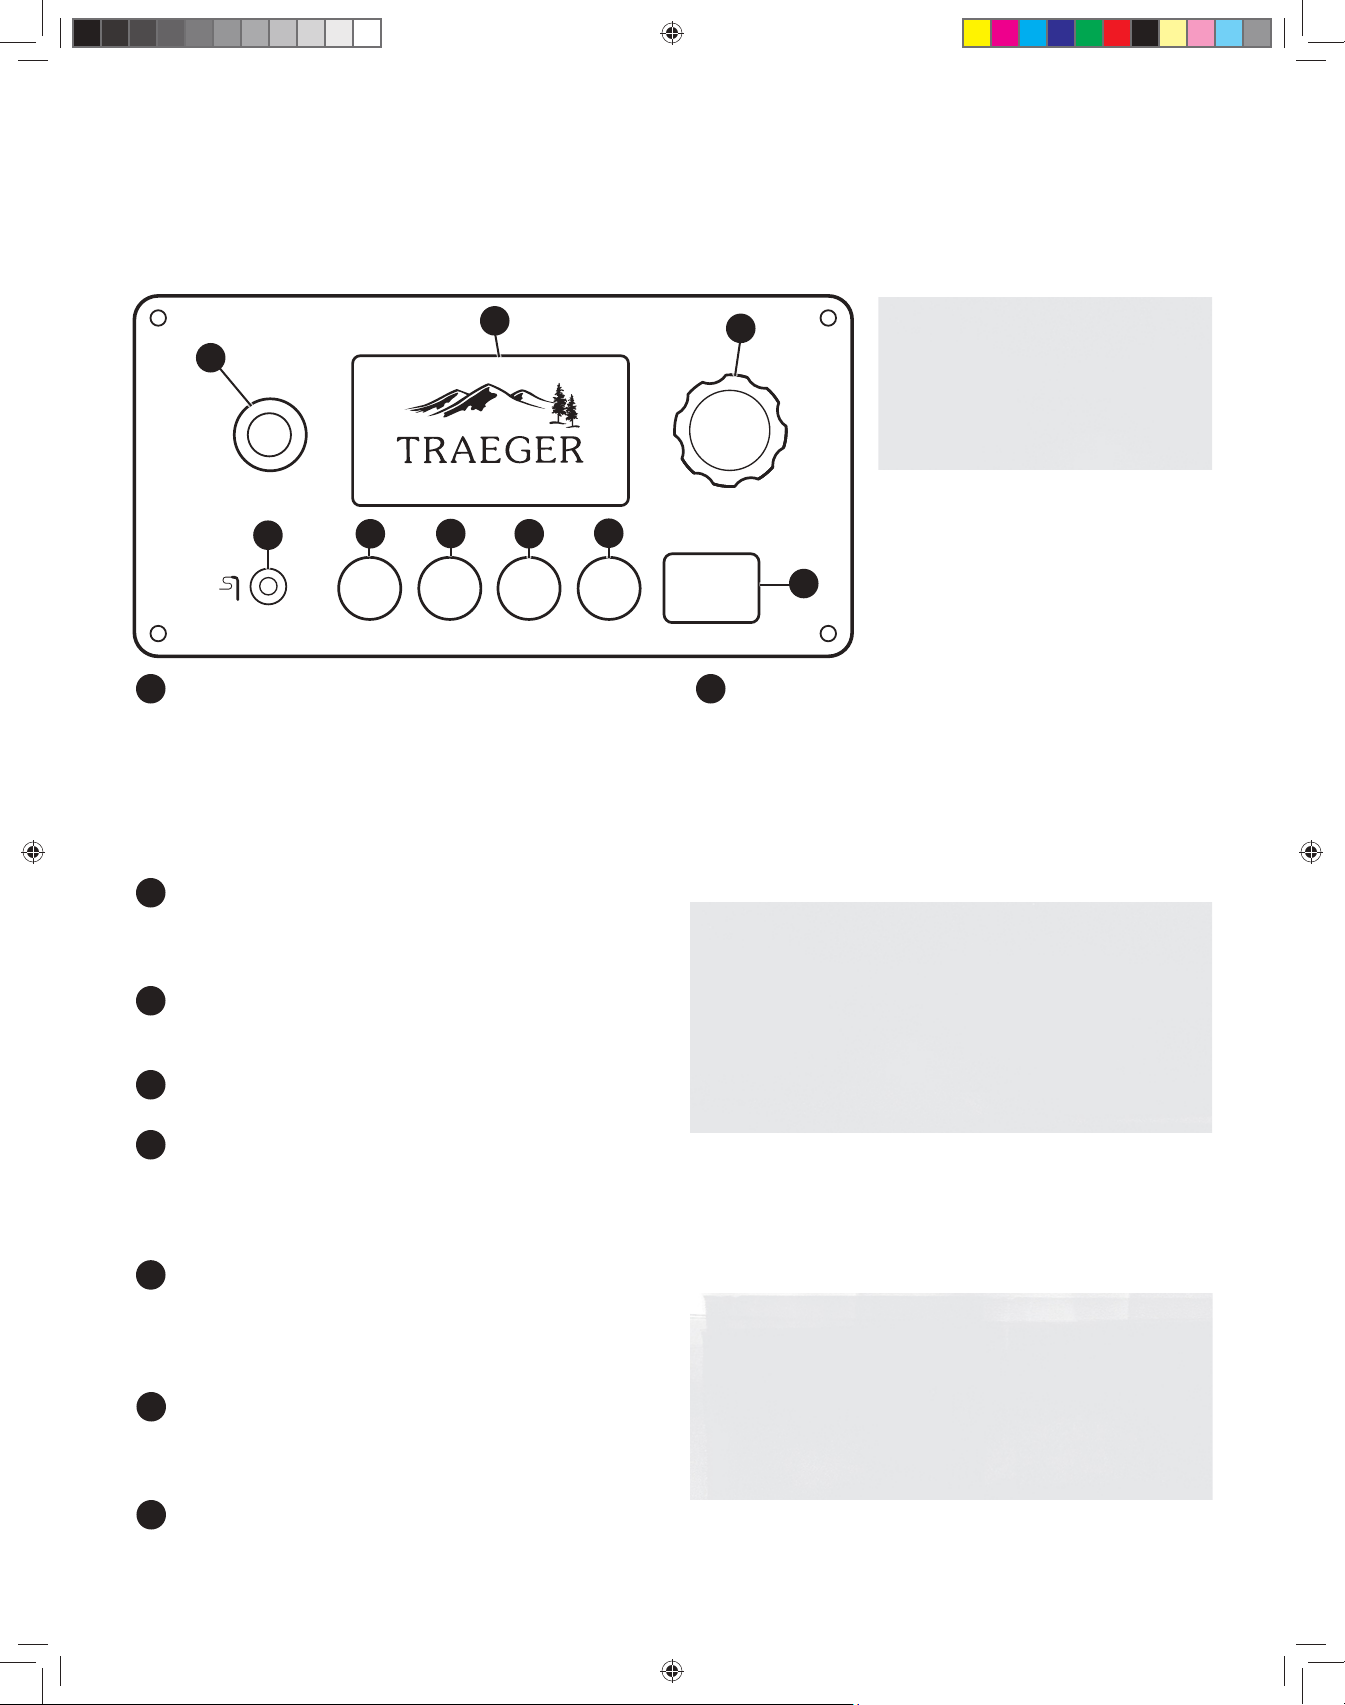
GETTING TO KNOW YOUR GRILL (CONTINUED)
YOUR WiFIRE® ELECTRONIC CONTROLLER The Traeger® Ironwood Grill is equipped with a state-of-the-art
Traeger Controller with WiFIRE® Technology that is Wi-Fi-capable. Before you begin using the grill, it will be helpful to
familiarize yourself with the dierent features of the control panel.
3
1
4
STANDBY BUTTON
1
5
TIMER MENU
6
SUPER
SMOKE
7
KEEP
WARM
Use this button to turn on and o the electronic
controller once the grill’s Main Power switch (located
on the back of the grill) has been turned ON (
and hold for 3 seconds to initiate the shutdown cycle.
Always run your grill through the full shutdown cycle
afer each cooking task. See “Maintaining Your Grill”
for more information.
SELECTION DIAL
2
Rotate dial to move up and down through the
displayed menu. Press the center of the dial to make
a selection.
STATUS DISPLAY
3
Shows current temperature, status of cook program,
cook time remaining, etc.
MEAT PROBE JACK
4
Plug the meat probe into the jack for probe cooking.
TIMER
5
The timer is for your convenience only; it does not
aect grill operation. For example, if you need to
baste your meat in 15 minutes, set the timer for
15 minutes. A tone will sound when the time is up.
SUPER SMOKE
6
Select SUPER SMOKE at any time during grilling
when cook temperature is between 165°–225°F
(74°–107°C) to increase the amount of smoke
released for additional smoky flavor.
KEEP WARM
7
This feature maintains the grill temperature
at 165°F (74°C) to keep food warm without
overcooking it.
8
I). Press
2
NOTE: Temperature fluctuations
are normal for Traeger grills. Any
significant fluctuation could be
the result of wind, air temperature,
improper use, or lack of grill
maintenance.
IGNITE
9
IGNITE
9
Press IGNITE to start the grill.
CONNECTING YOUR GRILL
Follow these instructions to connect your grill to Wi-Fi.
To learn more about WiFIRE®, the Traeger app, and more
ways to connect, go to traegergrills.com/wifire.
NOTES:
• Make sure your smart device is running the latest
operating system.
• To connect your grill to Wi-Fi, your grill must be
powered on. Make sure the Main Power switch is in
the ON (I) position and the grill controller display is
on the home screen.
1. Download the Traeger app at the Google Play store for
Android or the App Store for Apple.
2. Ensure your smart device is connected to the Wi-Fi
network to which you want your grill connected.
3. Open the Traeger app and follow the instructions.
TIPS:
• For best connectivity results, have your grill facing
the direction of your Wi-Fi router. Ensure you have
a strong Wi-Fi signal where you will use your grill.
• A Wi-Fi extender can help improve your Wi-Fi
strength.
MENU
8
From MENU, you can set up the meat probe and sync
your grill with your home’s Internet and settings.
4731 Ironwood_OM_ENv28.indd 10 10/15/18 3:27 PM
10
Page 11
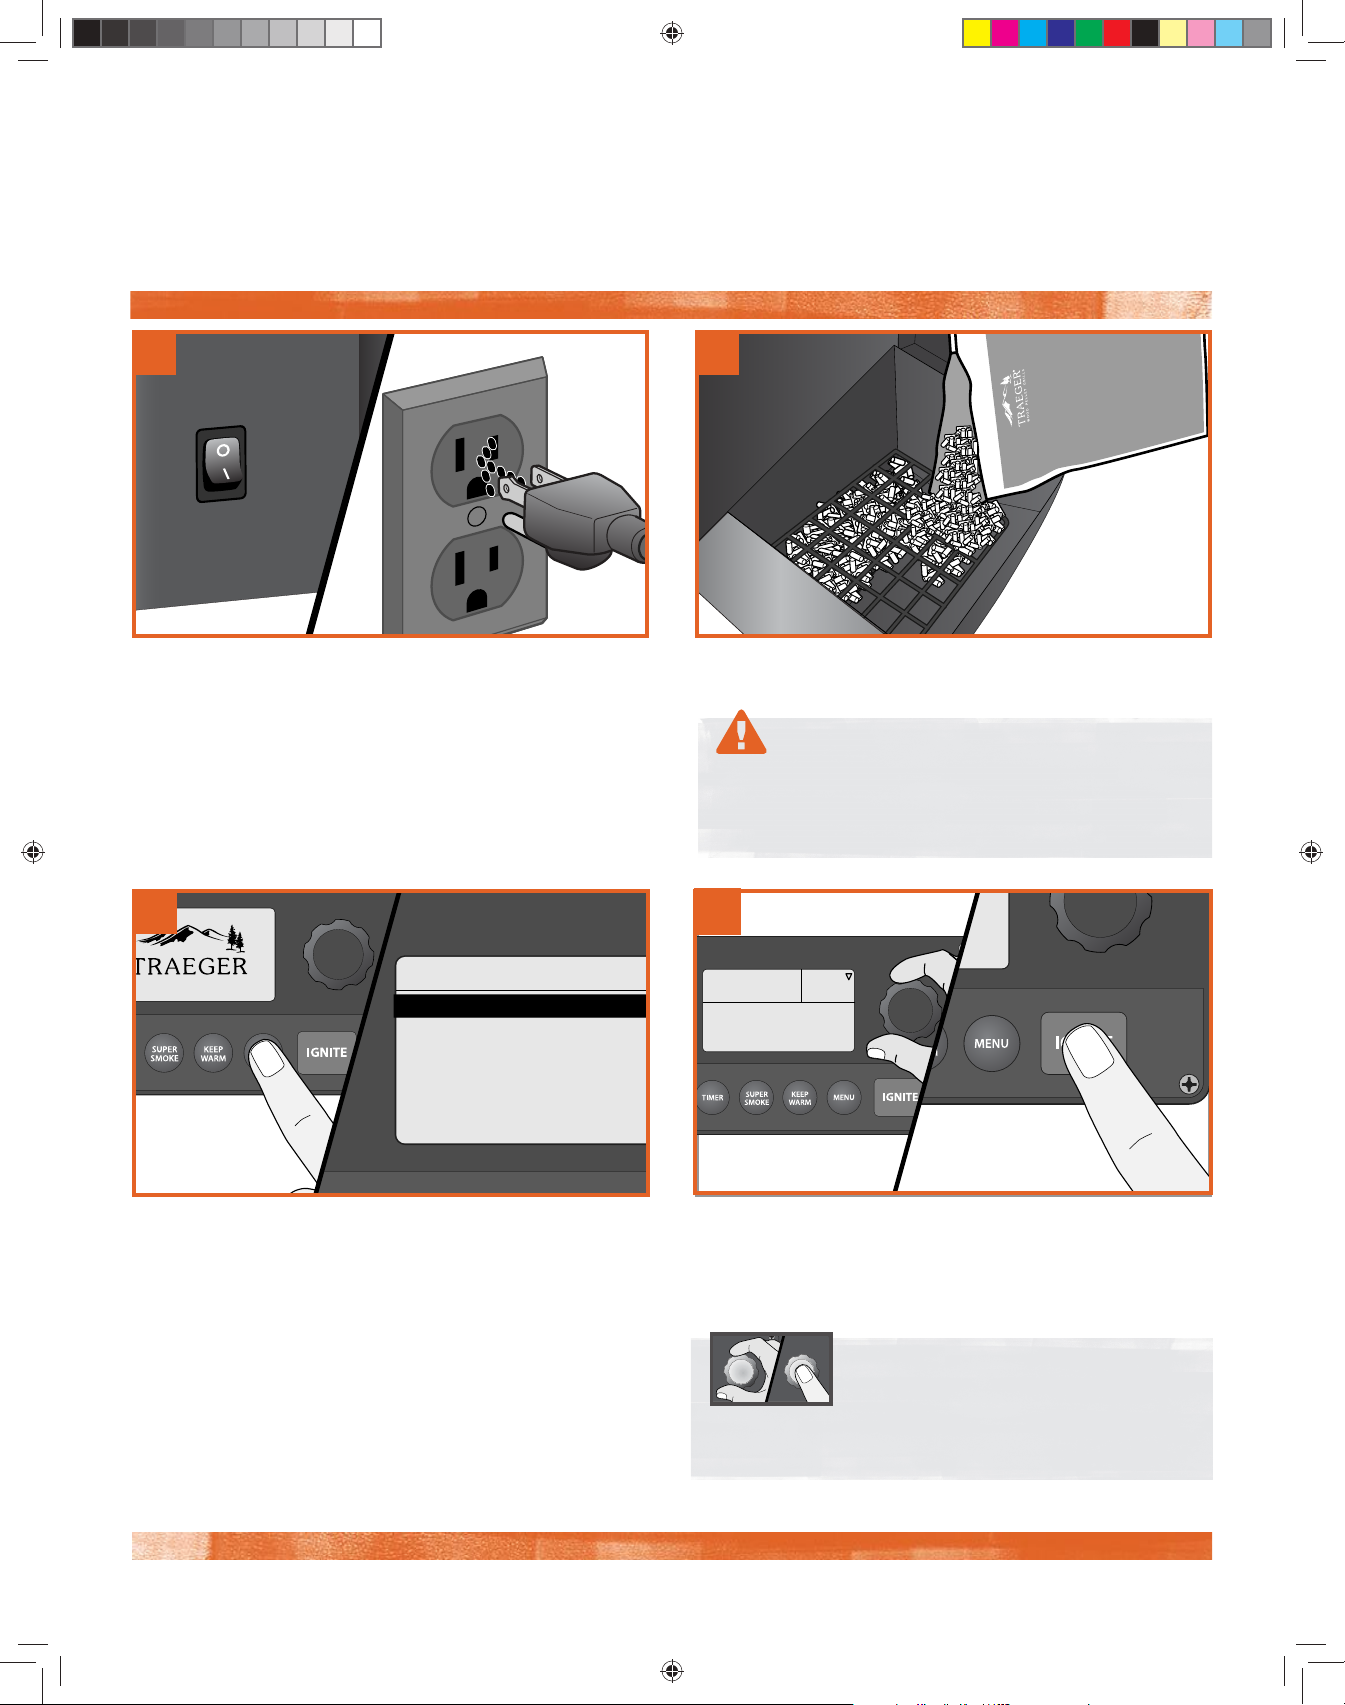
TRAEGERGRILLS.COM
SEASONING YOUR GRILL
AUGER
>Prime Auger
>Clear Auger Jam
>Back
Press dial
to set temp
350
°F
TO BE USED ON INITIAL FIRING ONLY. In order to ensure proper operation of the grill, you must first prime the
auger by allowing the auger tube to be “charged” with pellets.
1 2
PLUG APPEARANCE MAY VARY BY REGION.
With the Main Power switch in the OFF (O) position, plug
the power cord into an appropriate grounded/earthed
electrical outlet.
3
Press MENU to display the main menu. Turn the dial to
select AUGER, then select Prime Auger.
The auger tube should take approximately 2 minutes
to fill with pellets and begin dispensing into the firepot.
Once pellets begin to fall into the firepot, select Back
to turn o the auger. You only need a few pellets in the
firepot to season your grill.
Fill the hopper with TRAEGER® BRAND HARDWOOD
PELLETS.
WARNING! Use ONLY TRAEGER® BRAND
HARDWOOD PELLETS, which are specifically made to
work in our grills. Never use heating fuel pellets in
the grill.
4
The home screen will display “Press dial to set temp.”
Turn the Selection dial clockwise to 350°F (177°C). Press
IGNITE, close grill door, and run grill for 20 minutes once
it has reached the set temperature.
NOTE: Whenever you’re instructed to
select or confirm a menu option, turn
the Selection dial to the desired option and press the
center of the dial to lock in your selection.
11
4731 Ironwood_OM_ENv28.indd 11 10/15/18 3:28 PM
Page 12
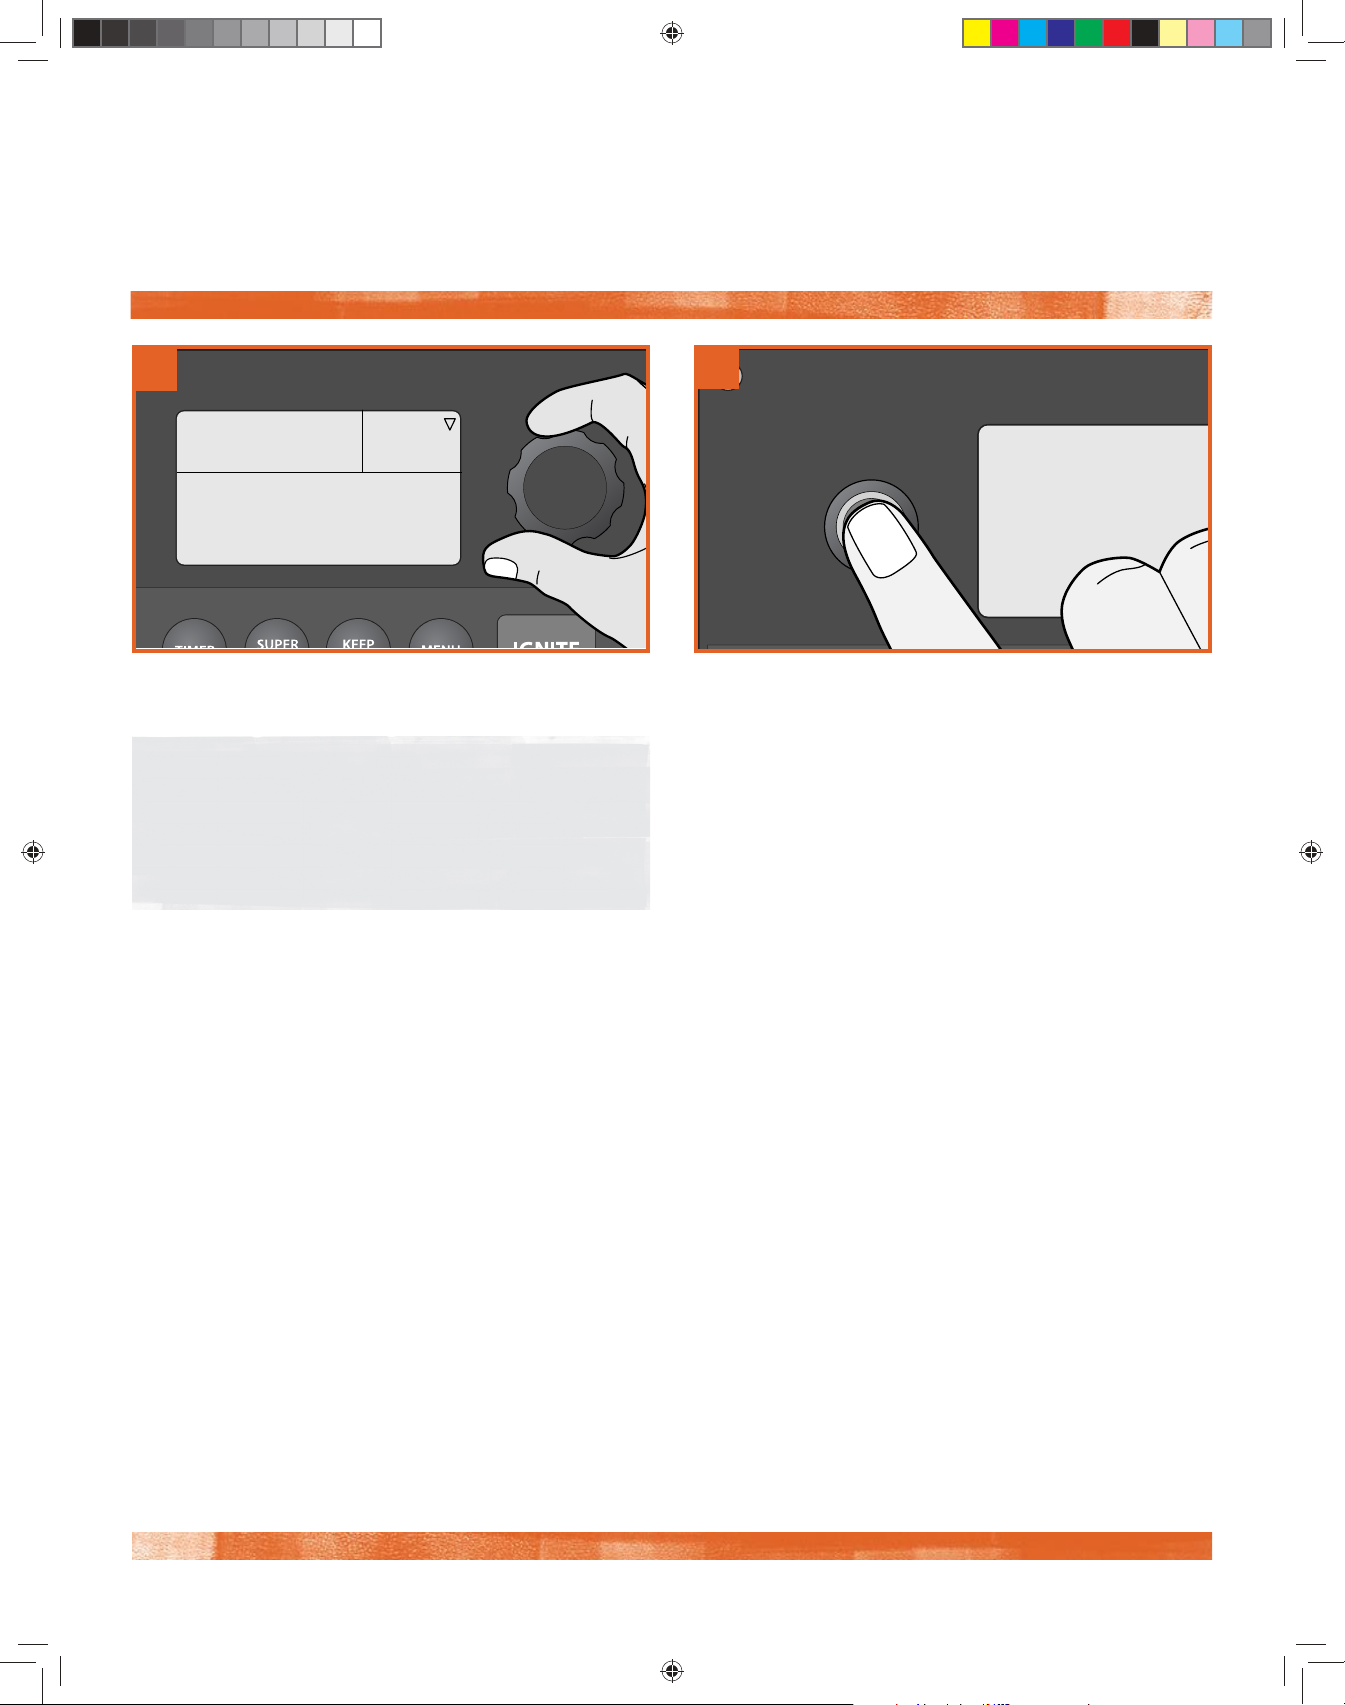
SEASONING YOUR GRILL (CONTINUED)
5
°F
500
Press dial
to set temp
Adjust temperature to 500°F (260°C) and run grill for an
additional 30 minutes.
NOTE: If the auger jams during use, allow grill to cool
completely, then press MENU to display the main
menu. Turn the dial to select AUGER, then select
Clear Auger Jam. The auger will run backwards
for 60 seconds to clear any jammed pellets.
6
Turn o the grill by pressing and holding the Standby
button for 3 seconds, initiating the shutdown cycle. When
the full shutdown cycle finishes, seasoning of your grill is
complete.
12
4731 Ironwood_OM_ENv28.indd 12 10/15/18 3:28 PM
Page 13
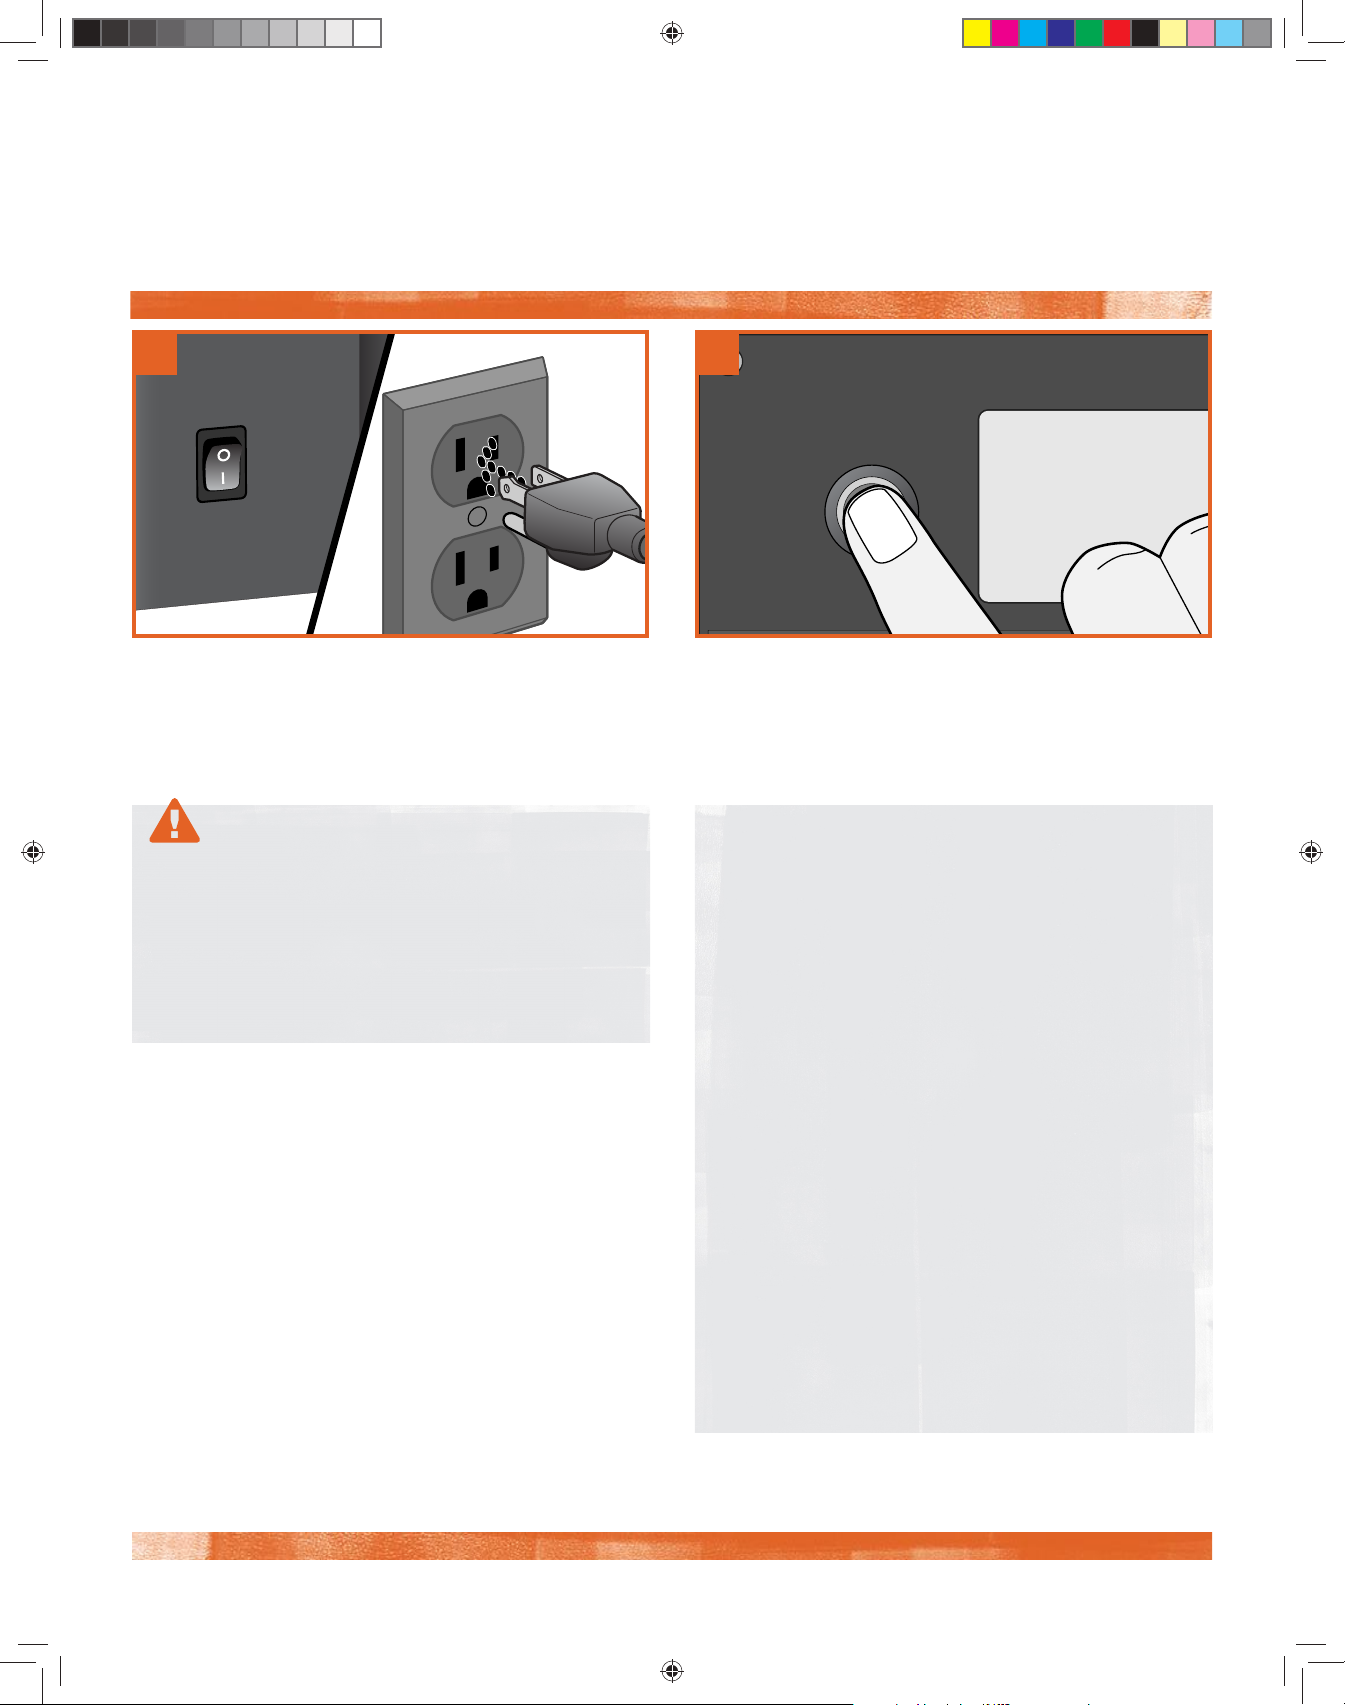
TRAEGERGRILLS.COM
USING YOUR GRILL
YOU WILL NEED TO BEGIN WITH THESE STEPS EVERY TIME YOU USE YOUR GRILL.
1
PLUG APPEARANCE MAY VARY BY REGION.
Plug the power cord into an appropriate grounded/
earthed electrical outlet and flip Main Power switch
to ON (I).
WARNING!
• When operating this grill, maintain a minimum
clearance of 18 inches (45.7 cm) from grill to
combustibles.
• Use ONLY TRAEGER® BRAND HARDWOOD
PELLETS, which are specifically made to work in
our grills. Never use heating fuel pellets in the grill.
2
Press the Standby button to wake the grill.
NOTES:
• The Traeger App for your mobile device makes
operating your WiFIRE® Electronic Controller even
easier. To connect to your grill, download the Traeger
app and follow the instructions. To learn more
about WiFIRE®, the Traeger app, and more ways
to connect, go to traegergrills.com/wifire.
• Whatever cook method you choose, your Traeger®
Ironwood Grill will always begin with an ignition and
preheat cycle once you press IGNITE.
• Afer creating a Custom Cook program, those cycles
will run automatically; you will not have to program
them.
• Always run your grill through the full shut-down
cycle afer each cooking task. Press and hold the
Standby button to initiate the shut-down cycle.
• We recommend you clean the grease drip tray
frequently to reduce the possibility of a grease fire.
Please see "Maintaining Your Grill" on page 25 for
more details.
13
4731 Ironwood_OM_ENv28.indd 13 10/15/18 3:28 PM
Page 14
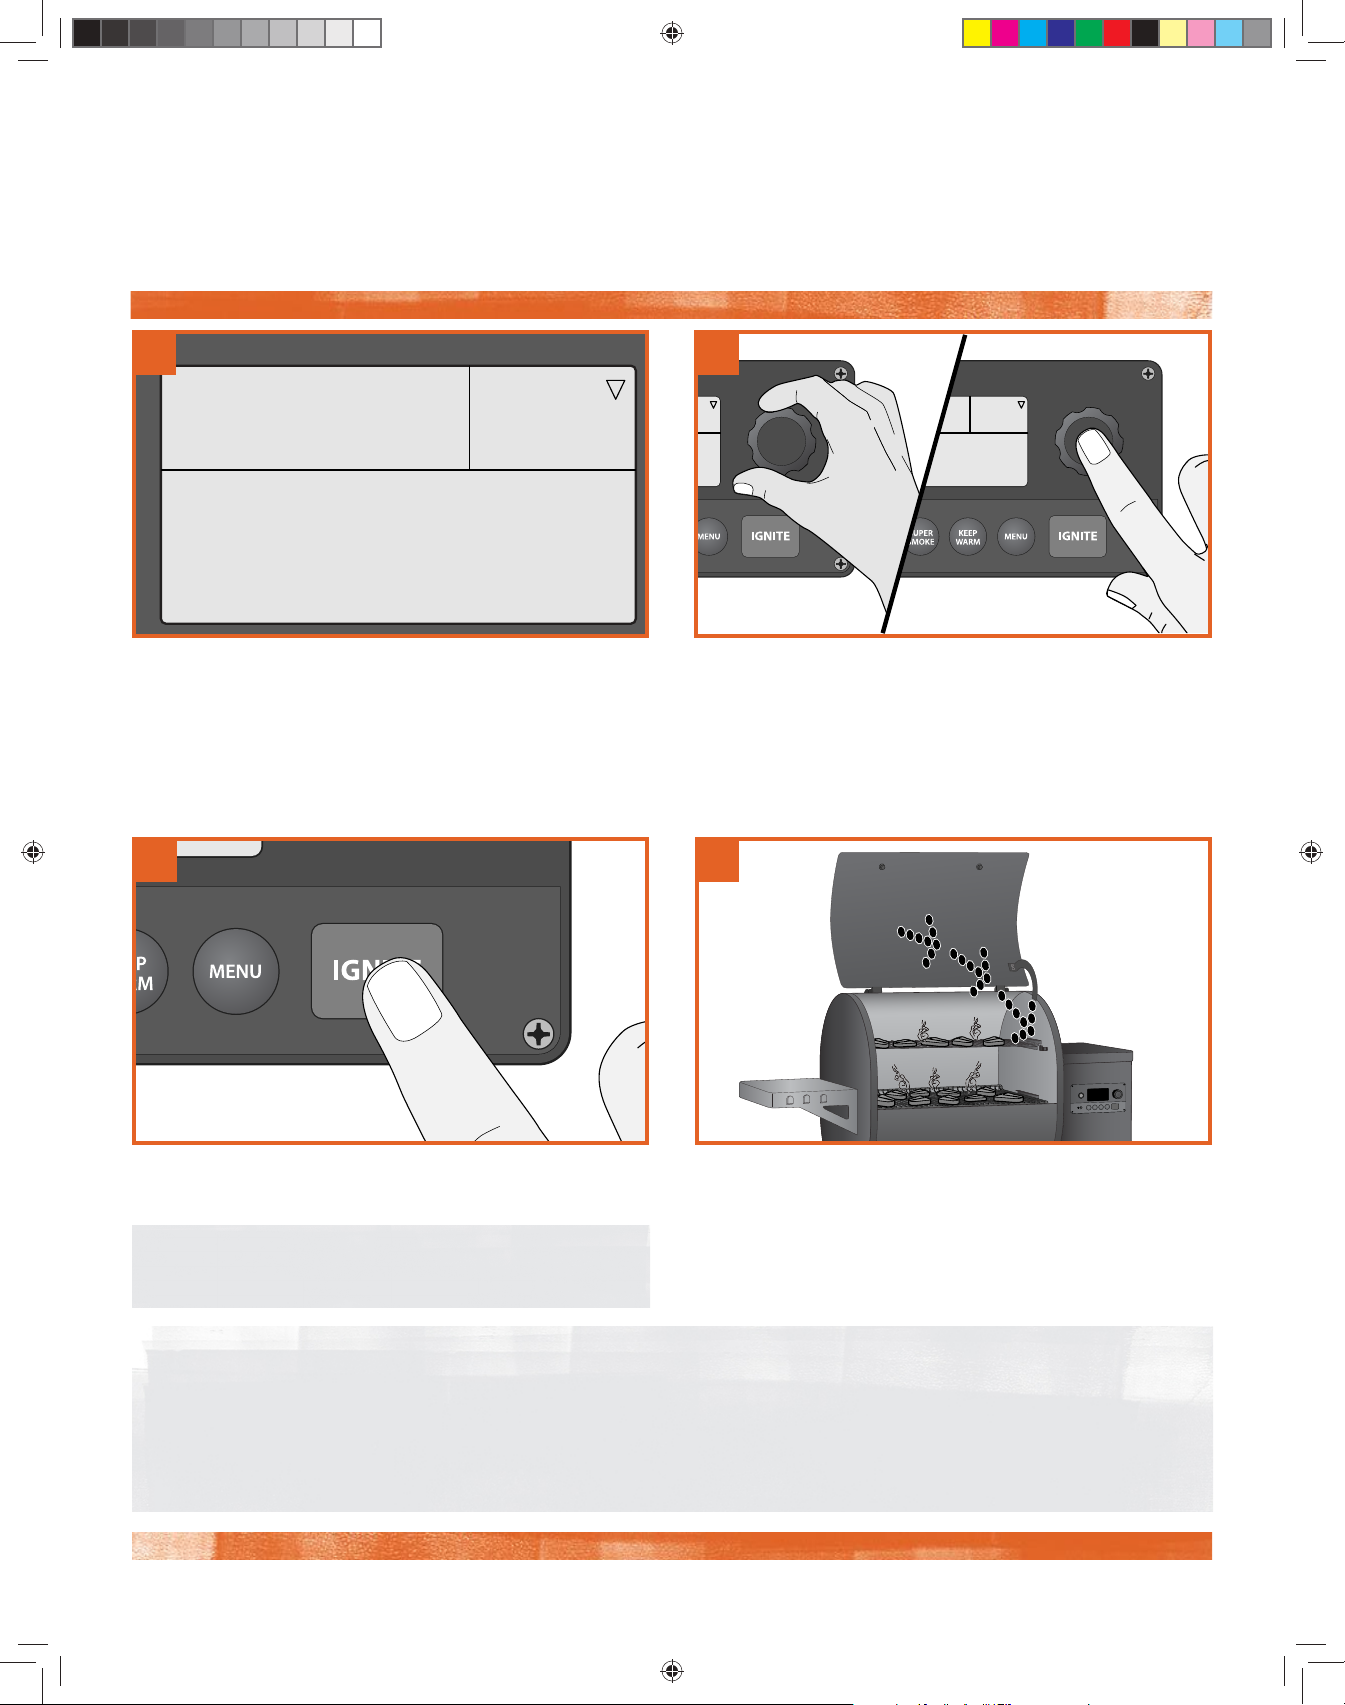
CHOOSING A COOK METHOD
Press Dial To Set Temp
°F
COOKING AT A SINGLE TEMPERATURE Use this method for simple recipes requiring a single cook cycle
at a set temperature.
1
°F
165
Turn Dial
To Select Temp
Afer pressing the Standby button, your grill’s home
screen defaults to the “Turn Dial To Select Temp"
message. Cooking temperature can be set directly
from this screen.
3
2
To select temperature, turn the Selection dial right or
lef; once the desired temperature is displayed, press the
center of the dial to select.
4
4731 Ironwood_OM_ENv28.indd 14 10/15/18 3:28 PM
See this button? Press it! The automatic ignition and
preheat cycle will begin.
NOTE: The grill door should be closed once
preheating begins.
TIPS:
• It is recommended, but not necessary, to wait until the preheat cycle is complete before loading food into the grill.
• It is not necessary to keep the grill door open at start-up; however, the grill door should be closed once the preheat
cycle begins so that the grill can reach the desired set temperature.
• Some temperature fluctuations are normal for Traeger grills.
Once preheating is complete, load food into the grill and
close the grill door.
14
Page 15
TRAEGERGRILLS.COM
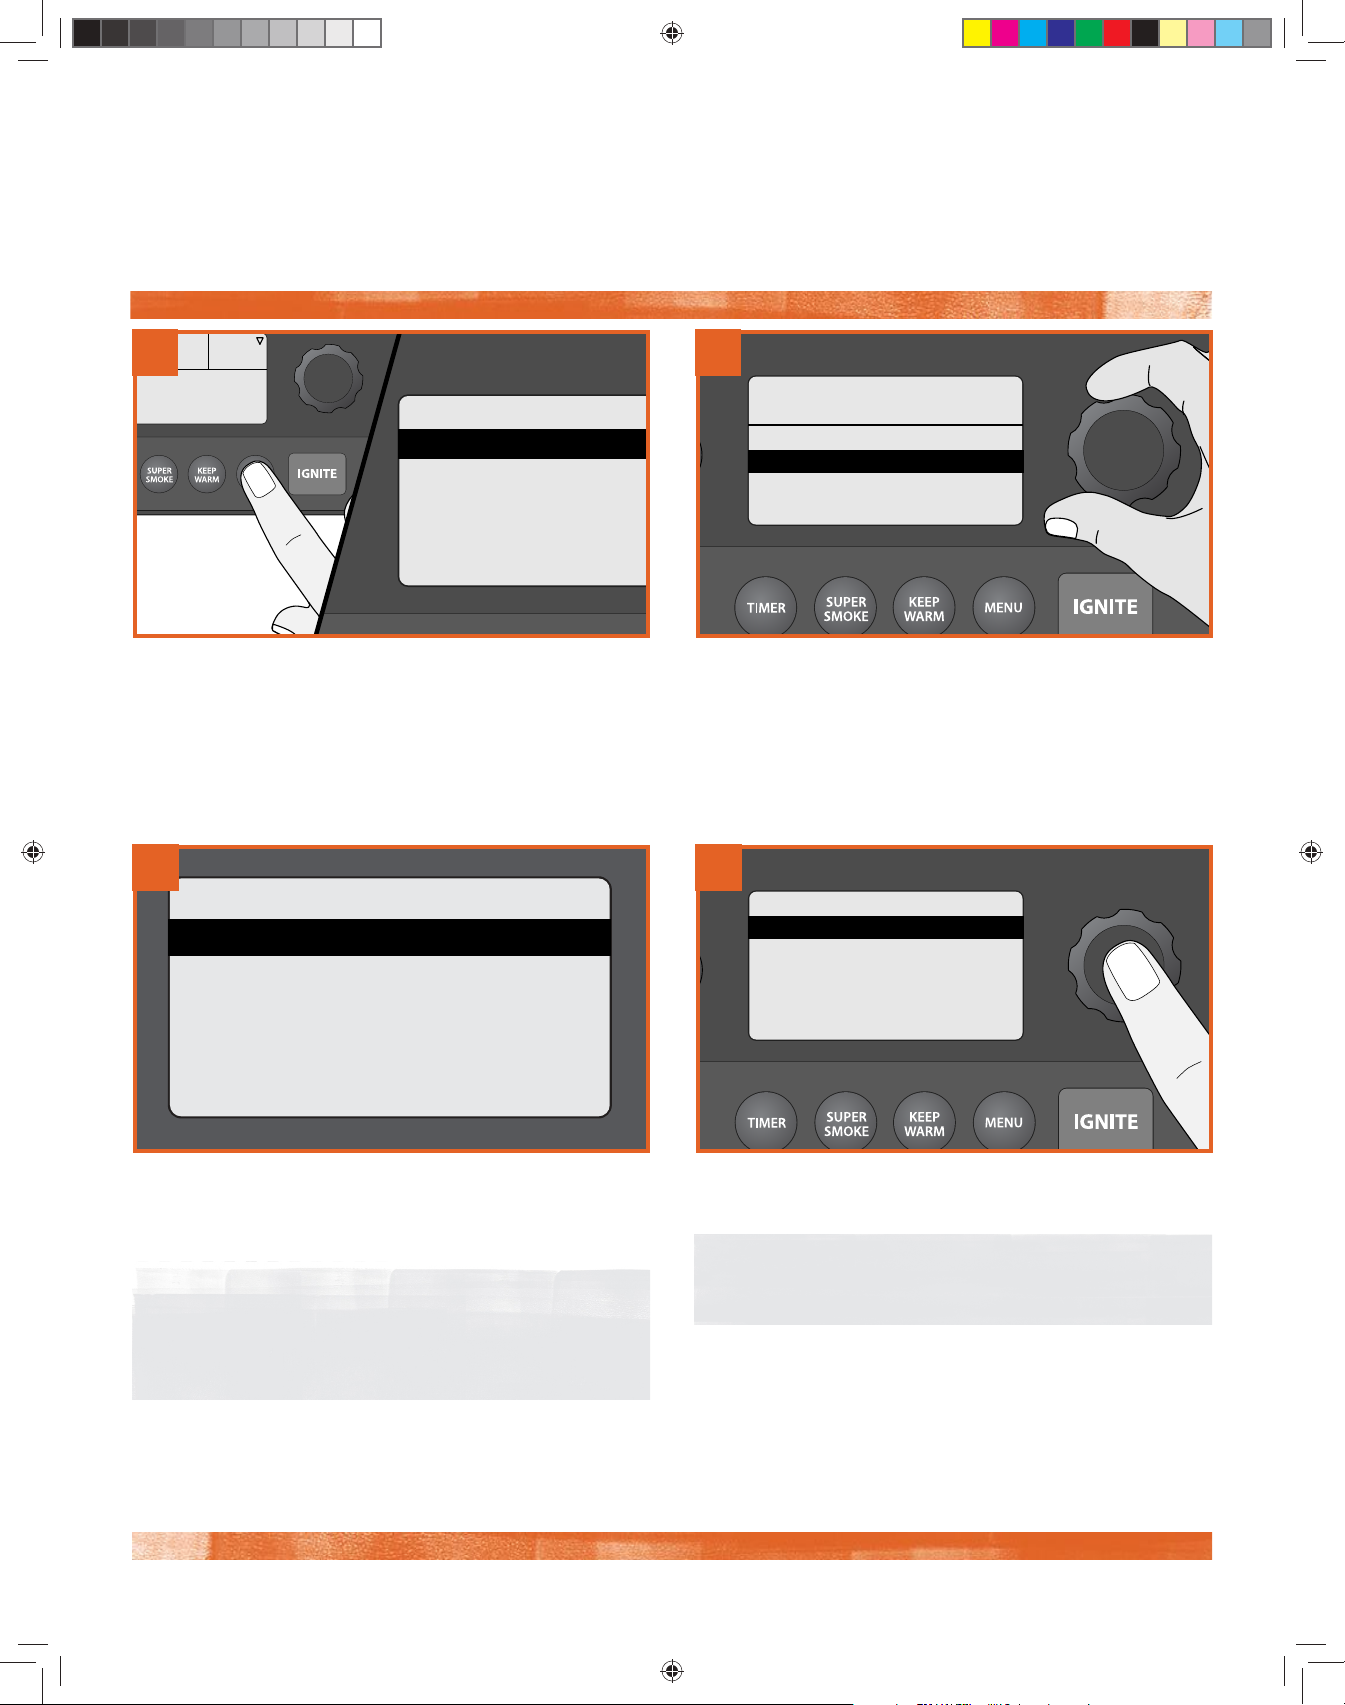
USING A PRESET CUSTOM COOK CYCLE
TRAEGER WiFIRE
>Cook Cycle
>Probe
>Wi-Fi Information
>Settings
>Back
°F
cycles already programmed: Beginner’s Brisket and Chicken Challenge. Use your Traeger App to find thousands of recipes to
download directly to your grill. You must sync your grill to your home's Internet before you can begin downloading recipes.
Your Traeger® Ironwood Grill comes with two of our favorite custom cook
1
Once the home screen is displayed, press MENU. The full
menu will now display several options. Select Cook Cycle.
3
Beginner’s Brisket
STEP 1
165°F | TIME: 03:30
STEP 2
2
VISIT TRAEGER APP
FOR MORE RECIPES
>Chicken Challenge
>Beginner’s Brisket
>NEW
>NEW
From the Cook Cycle screen, use the Selection dial to
choose the recipe you want. Press the center of the dial
to select.
4
Beginner’s Brisket
>RUN NOW
>EDIT
>DELETE
>BACK
225°F | PROBE: 190°F
>RUN NOW
Once a custom cook cycle is selected, the included steps
will display. Then, select one of four options: RUN NOW,
EDIT, DELETE, or BACK to return to the previous menu.
TIP: If you’re in the middle of programming a cook cycle
and change your mind, press MENU like there's no
tomorrow until you return to the main menu, and
start over.
4731 Ironwood_OM_ENv28.indd 15 10/15/18 3:28 PM
If you want to run the custom cook cycle exactly as-is,
select RUN NOW.
NOTE: To edit or add steps, follow the instructions in
"Creating a Custom Cook Program" on page 17.
15
Page 16
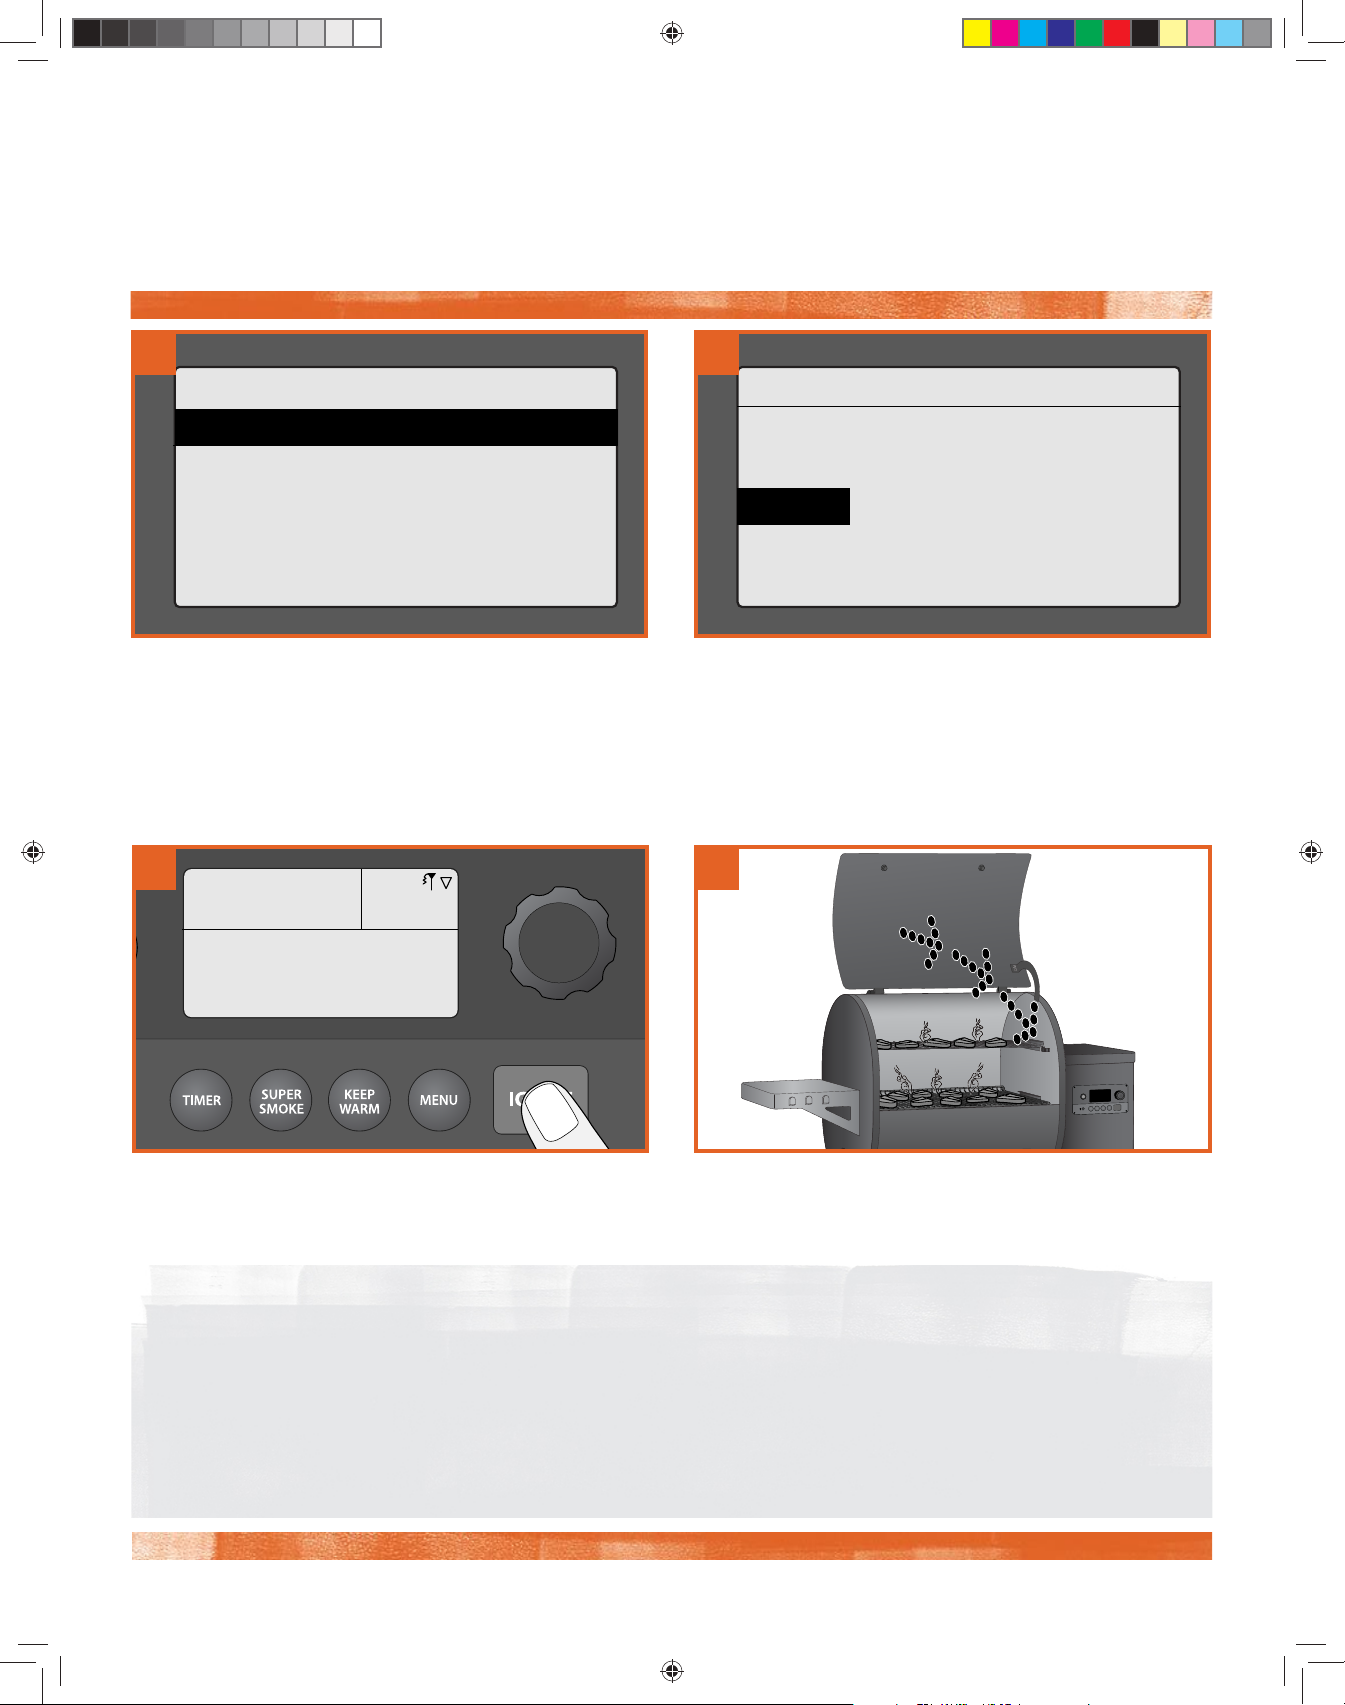
USING A PRESET CUSTOM COOK CYCLE (continued)
5
RUN COOK CYCLE NOW?
>YES
>NO
To RUN COOK CYCLE NOW, select YES at the prompt or
NO to return to the previous screen.
7
077
°F
150
6
BEGINNER’S BRISKET
Probe Required.
Insert Probe in Meat.
>Back
If the probe is required, you’ll be instructed to insert
the probe into your meat. Then, insert the probe plug into
the jack on the controller. A tone will sound once
the probe is recognized. To RUN COOK CYCLE NOW
now, select YES at the prompt.
8
STEP 1: 165°F | TIME: 03:30
PROBE: 072°F
Push Ignite To Start
The display will now show the first step of your cook
program. Press IGNITE to start.
The automatic ignition and preheat cycle will begin. Once
preheating is complete, load food into the grill and close
the grill door. Big time flavor is getting closer.
NOTES:
• If the probe is not plugged in properly, the grill will beep three times. Check to make sure the probe is plugged in
properly.
• It is recommended, but not necessary, to wait until preheat cycle is complete before loading food
into the grill.
• It is not necessary to keep the grill door open at start-up; however, the grill door should be closed once
the preheat cycle begins so that the grill can reach the desired set temperature quickly.
16
4731 Ironwood_OM_ENv28.indd 16 10/15/18 3:28 PM
Page 17
TRAEGERGRILLS.COM
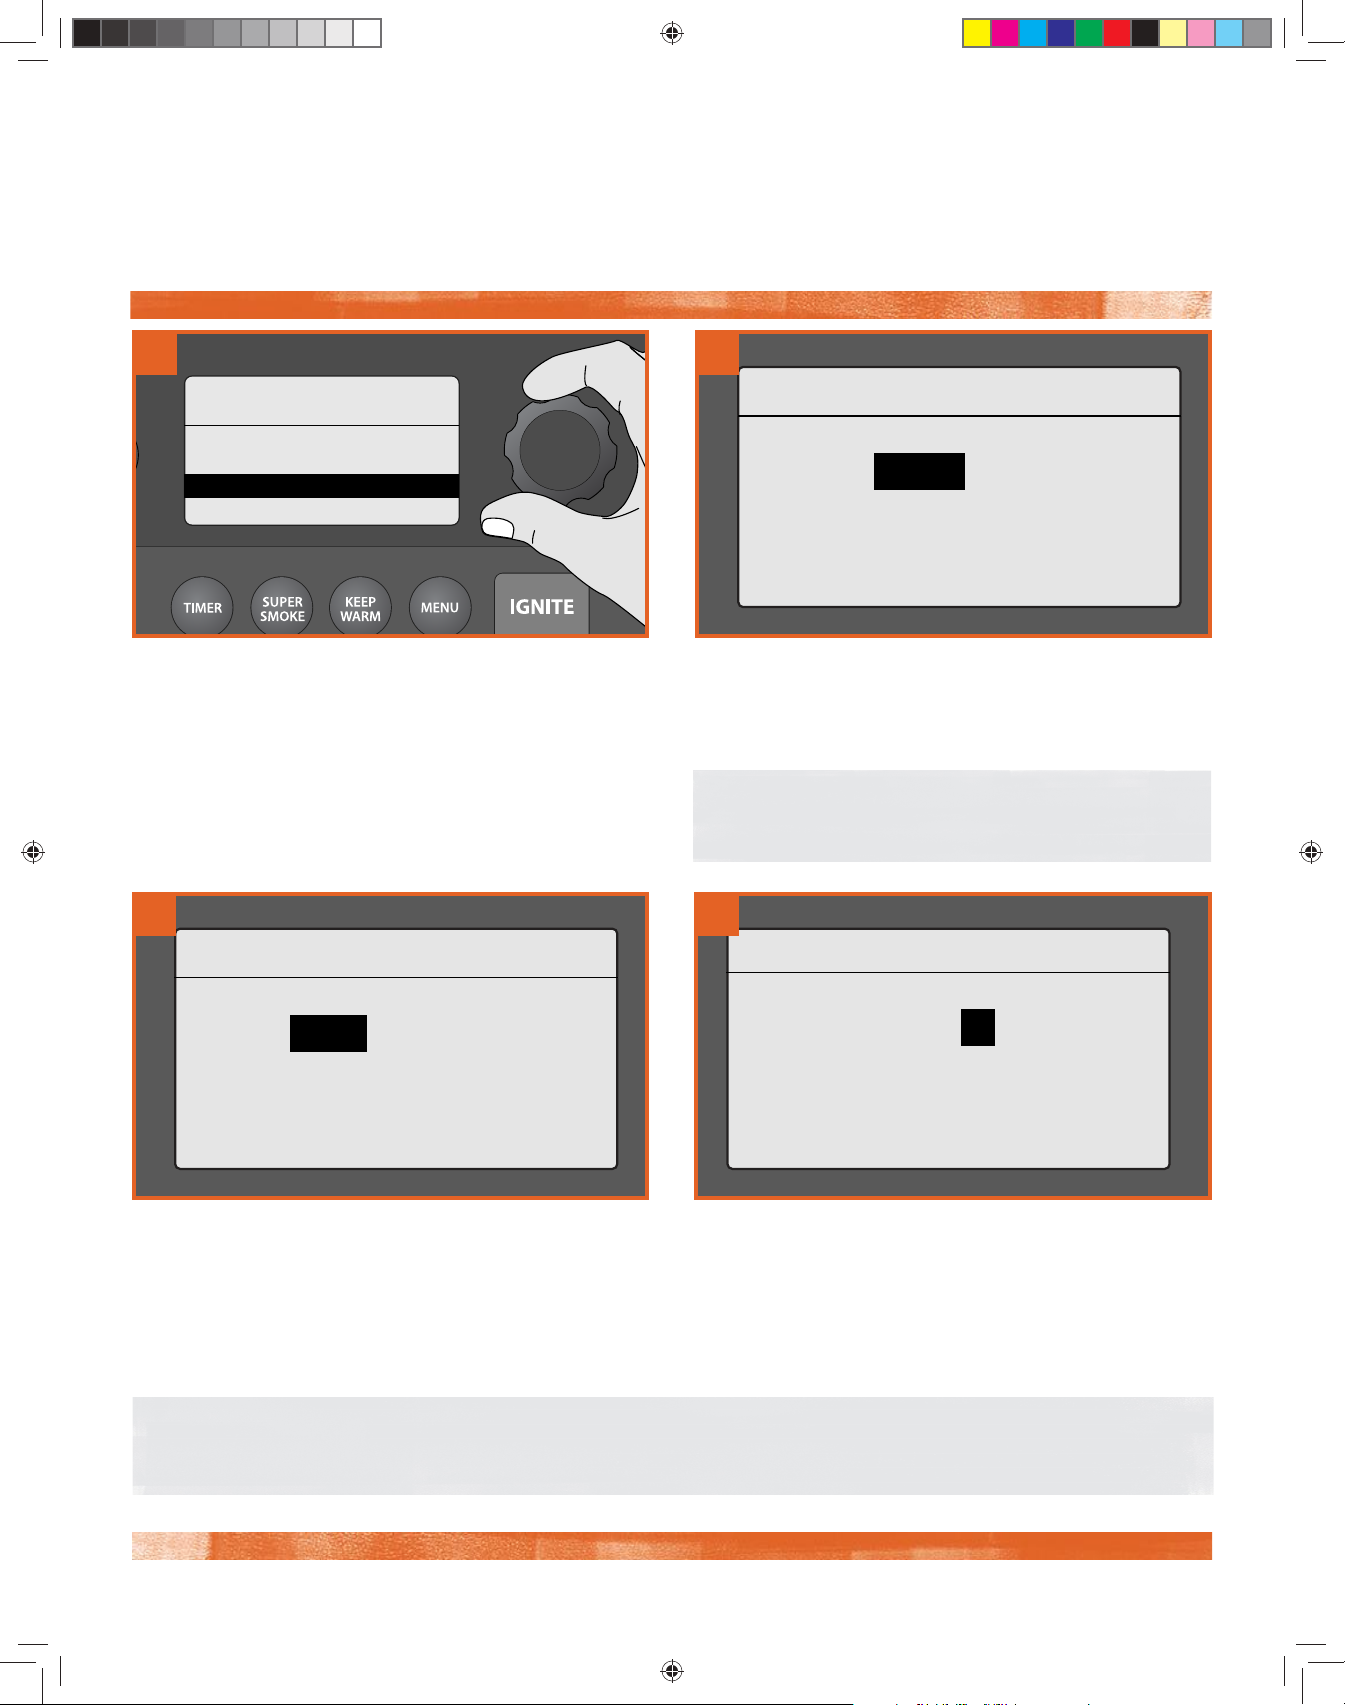
CREATING A CUSTOM COOK CYCLE Use this method to create your own cook program, or to edit
an existing program.
1
VISIT TRAEGER APP
FOR MORE RECIPES
>Chicken Challenge
>Beginner’s Brisket
>NEW
>NEW
At the Cook Cycle menu, select NEW to display the Steps
menu.
3
2
My Cook Cycle 3
STEP 1
> GRILL: 165°F
At Step 1, a prompt will display to select a grill temperature
(default temperature is 165°F [74°C]). Turn the Selection
dial to the desired temperature and press the center of the
dial to select.
NOTE: Custom cook cycles require a minimum of one
step, with a maximum of four.
4
My Cook Cycle 3
STEP 1
170°F> Time OR Probe
My Cook Cycle 3
STEP 1
170°F> | TIME: 00:00
HR: MIN
Once temperature is selected, choose either Time (to cook
for a set time) or Probe (to cook until the internal meat
temperature goal is reached).
REMINDER: When using the Selection dial to choose options, remember to press the center of the dial to lock in your
choice and move to the next menu item.
If the recipe calls for a specific number of hours at a set
temperature, select TIME. To select hours, rotate the dial.
Press to select and move to minutes. Rotate to choose
minutes and press the dial to select and finish.
17
4731 Ironwood_OM_ENv28.indd 17 10/15/18 3:28 PM
Page 18
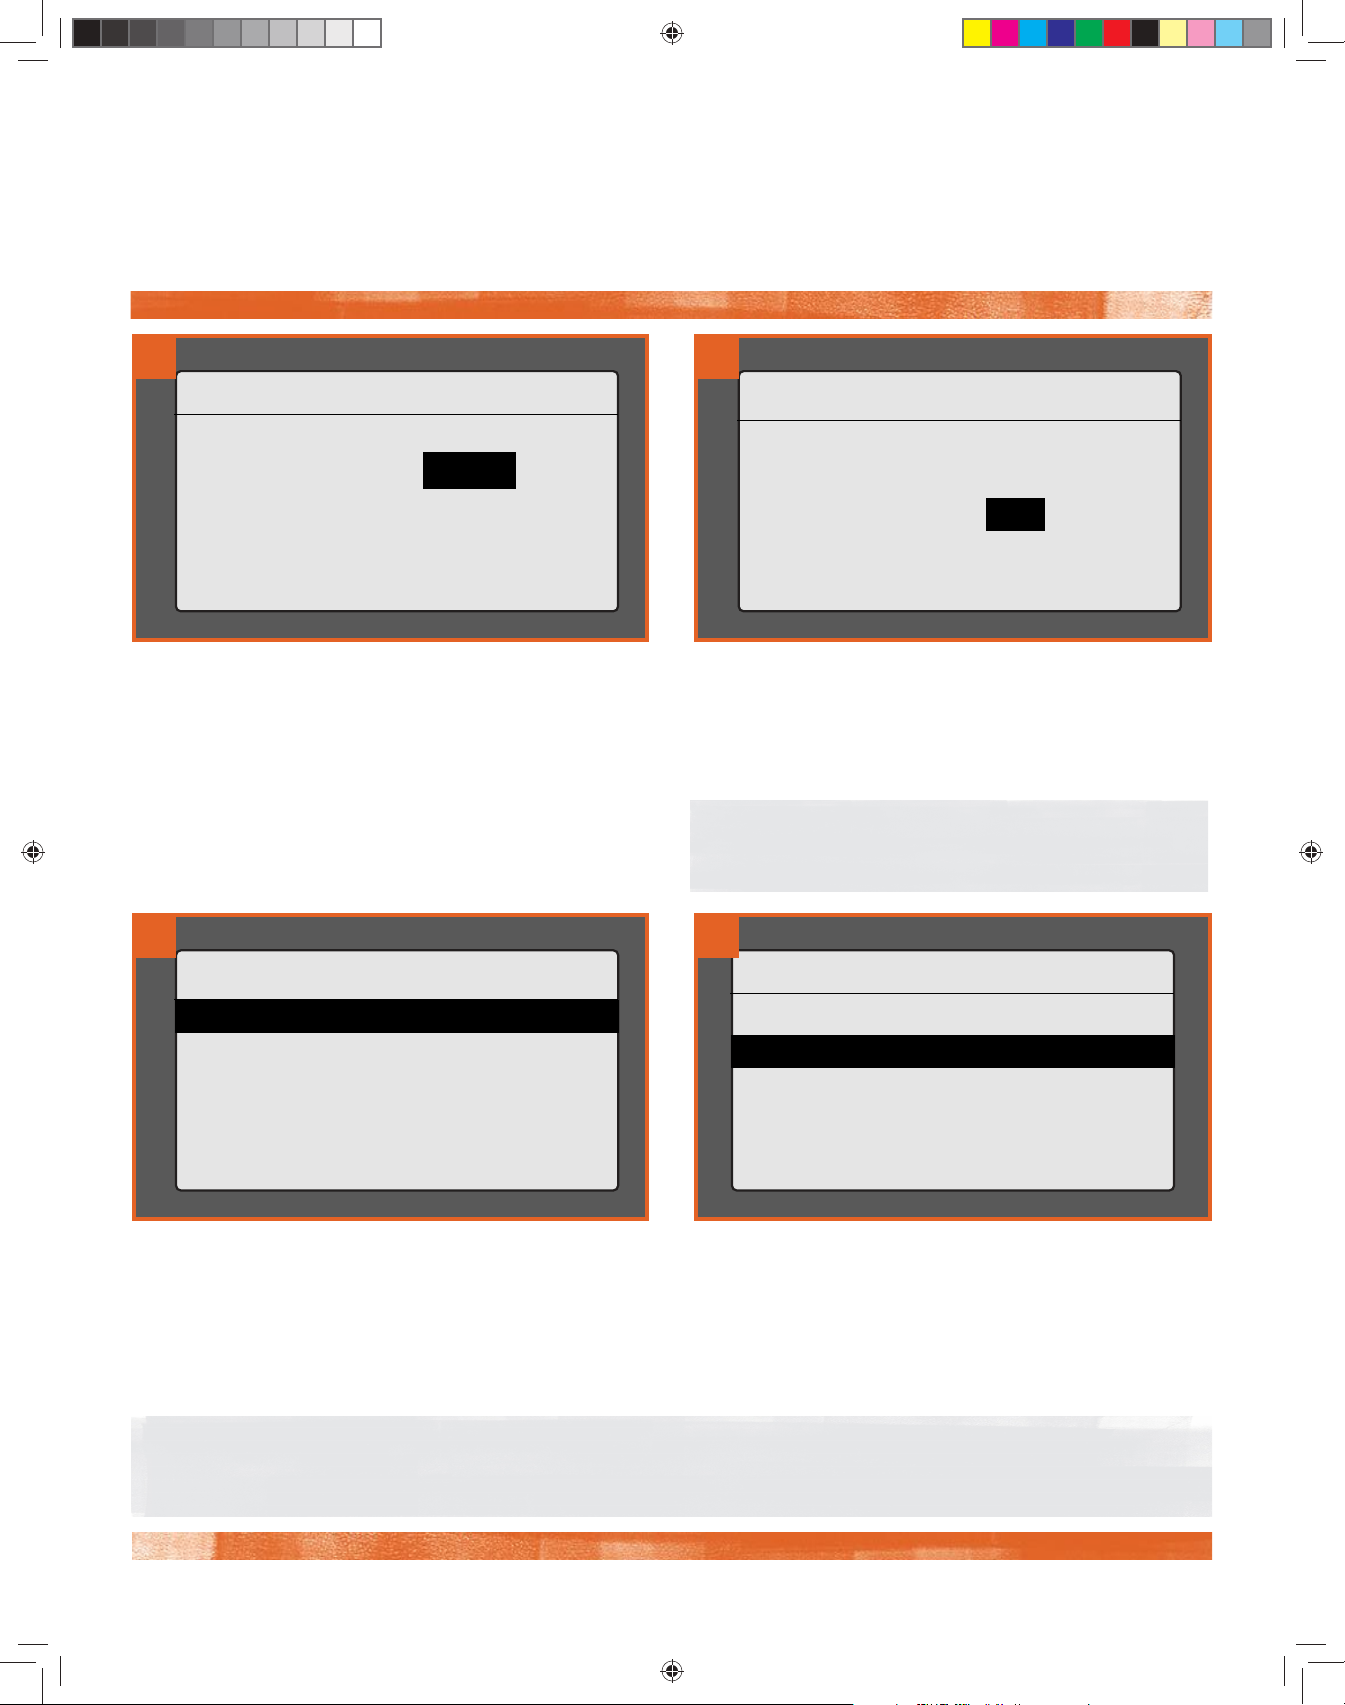
CREATING A CUSTOM COOK CYCLE (continued)
5
My Cook Cycle 3
STEP 1
170°F> Time OR Probe
If the recipe calls for cooking the meat to a specific
internal temperature, choose Probe. Use the Selection dial
to select a goal temperature.
7
6
My Cook Cycle 3
STEP 1
170°F | PROBE: 145°F
>Super Smoke: OFF
The option for adding Super Smoke to the step will
display. To add Super Smoke, first put on your superhero
cape; then use the Selection dial to toggle from OFF
(default) to ON. Otherwise, press the dial center to accept
the default setting.
NOTE: Super Smoke can only be used when the grill
temperature is between 165°–225°F (74°–107°C).
8
My Cook Cycle 3
>STEP 1
170°F | PROBE: 145°F
>ADD STEP
>SAVE
My Cook Cycle 3
>ADD STEP
>SAVE
>DELETE
>BACK
>DELETE
At this point you’ll be returned to the Steps menu for your
custom cook cycle. The step you just created will be saved
automatically. You can add another step, save the cook
program as-is, delete the program, or return to the Cook
Cycle menu.
NOTE: There are a total of four memory slots for recipes on your grill. If you have four recipes already saved and wish
to create a new one, you will need to delete one of the current recipes to make room for the new one.
Once all steps are added, select SAVE. You will then
be asked if you want to RUN COOK CYCLE NOW. If you
select YES, you'll be taken back to the home screen and
instructed to press IGNITE to start. If you select NO, you’ll
return to the Cook Cycle menu.
18
4731 Ironwood_OM_ENv28.indd 18 10/15/18 3:28 PM
Page 19
TRAEGERGRILLS.COM
COOKING WITH THE PROBE
057
°F
355
PROBE : COLD
Igniting . .
PROBE
Set Probe Alarm:
145
PROBE
>Set Alarm
>Back
TRAEGER WiFIRE
>Cook Cycle
>Probe
>Wi- Information
>Settings
>Back
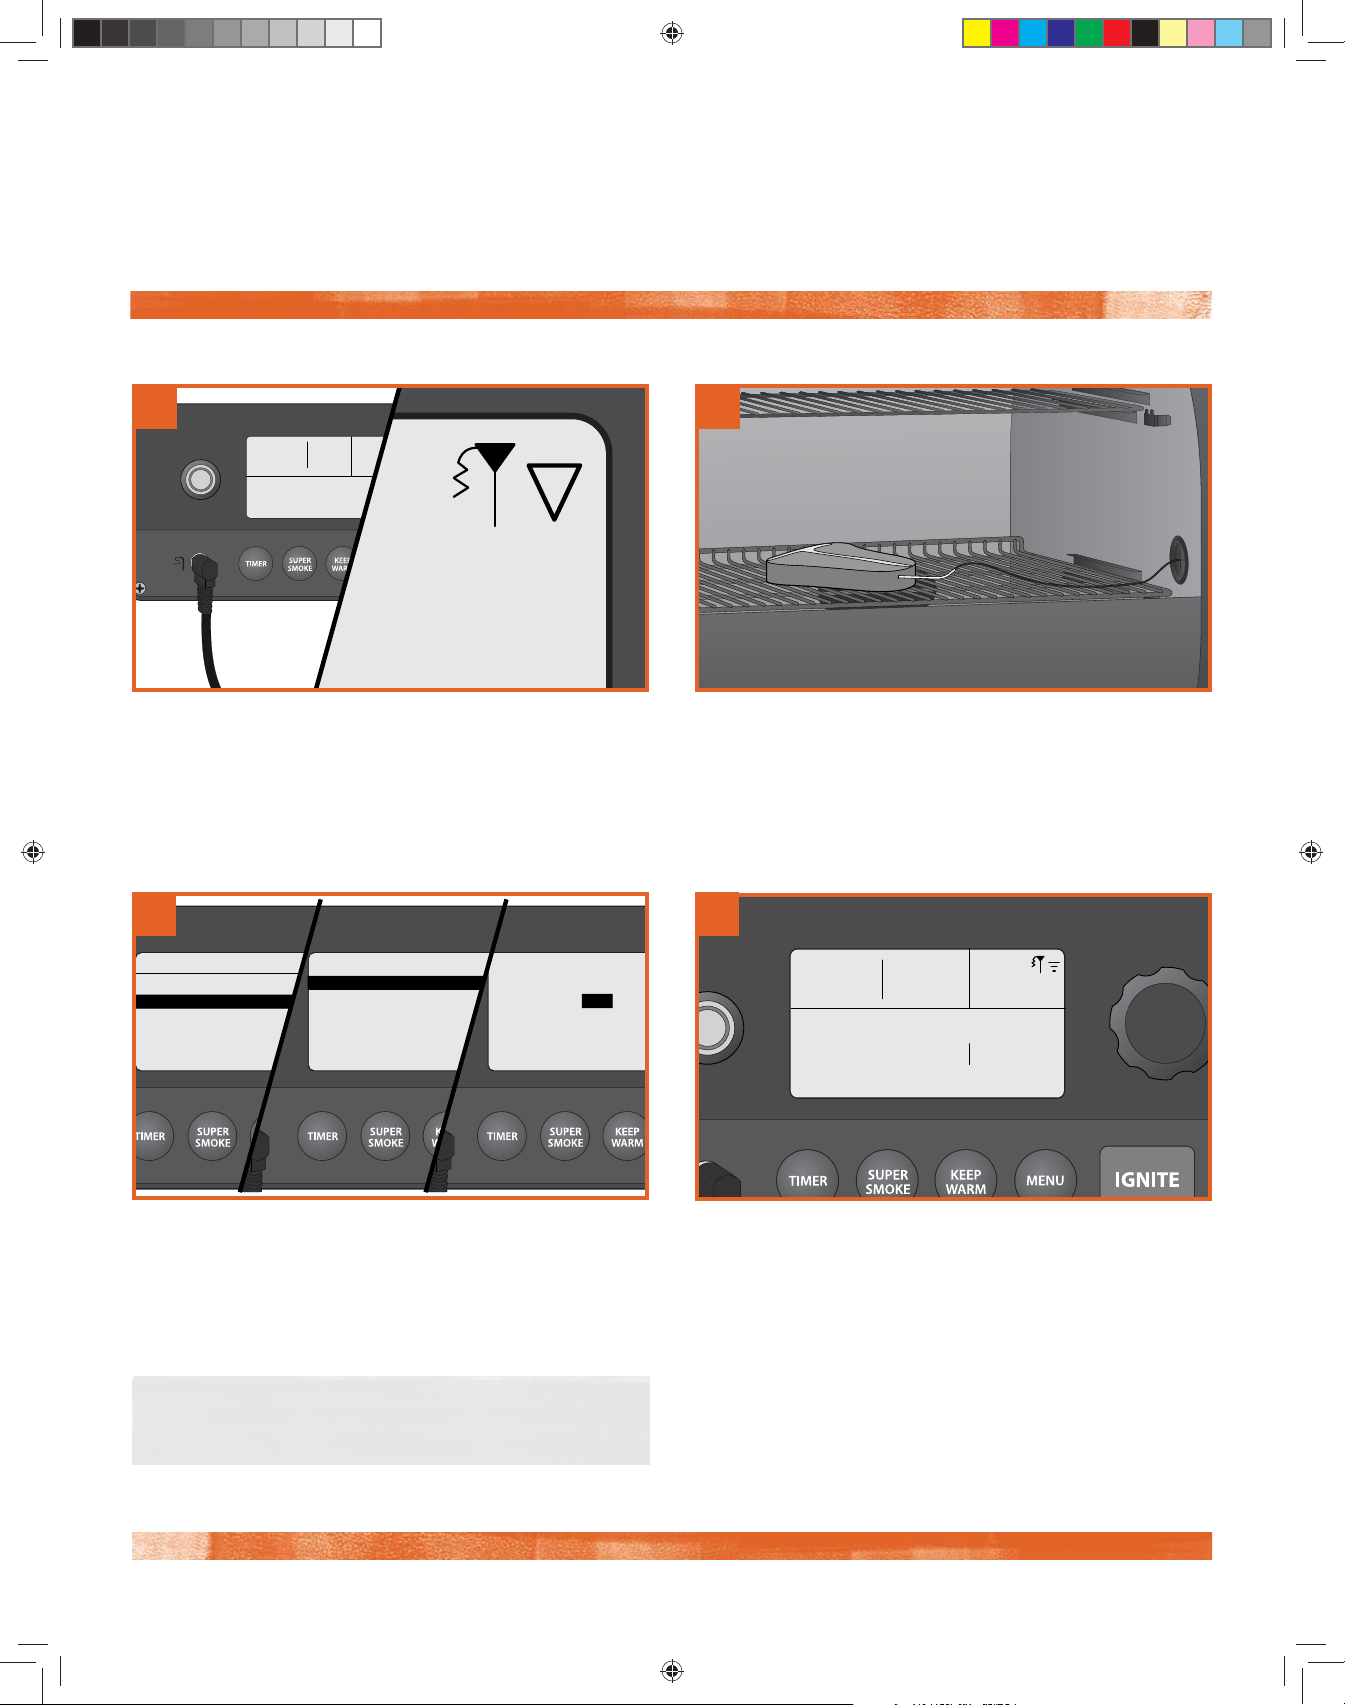
If the grill is turned o:
Use these methods when your recipe specifies an internal goal temperature for your food.
1
Plug the probe into the probe jack located on the WiFIRE®
Controller. See "Using Your Grill" to turn on the grill. Once
the grill is on, the controller will recognize the probe and the
probe icon will light in the controller screen's upper-right
corner.
3
2
Once the grill is preheated to the desired temperature,
load food into the grill. Feed the probe through the
grommet on the side of the grill and insert the probe tip
halfway into the thickest part of the meat—not in the fatty
portion or touching bone.
4
054
°F
350
Press MENU; then scroll and select PROBE. You will
be prompted to set a probe alarm for the internal goal
temperature. Select SET ALARM. Then, at the probe
menu, use the Selection dial to choose the temperature
goal for your meat.
NOTE: To calibrate the probe, see "Additional Control
Functions" on page 21.
Probe: 72˚ F 145˚
Igniting
Once the probe alarm is set, the home screen will display
the grill temperature, goal probe temperature, and grill
status. A tone will sound when your meat reaches the
set alarm temperature. If using the Traeger WiFIRE® app,
you will receive a push notification on your connected
smart device, along with a display of your grill's status
throughout the cooking process.
19
4731 Ironwood_OM_ENv28.indd 19 10/15/18 3:28 PM
Page 20
COOKING WITH THE PROBE (continued)
054
°F
355
Set Probe Alarm?
>YES
>NO
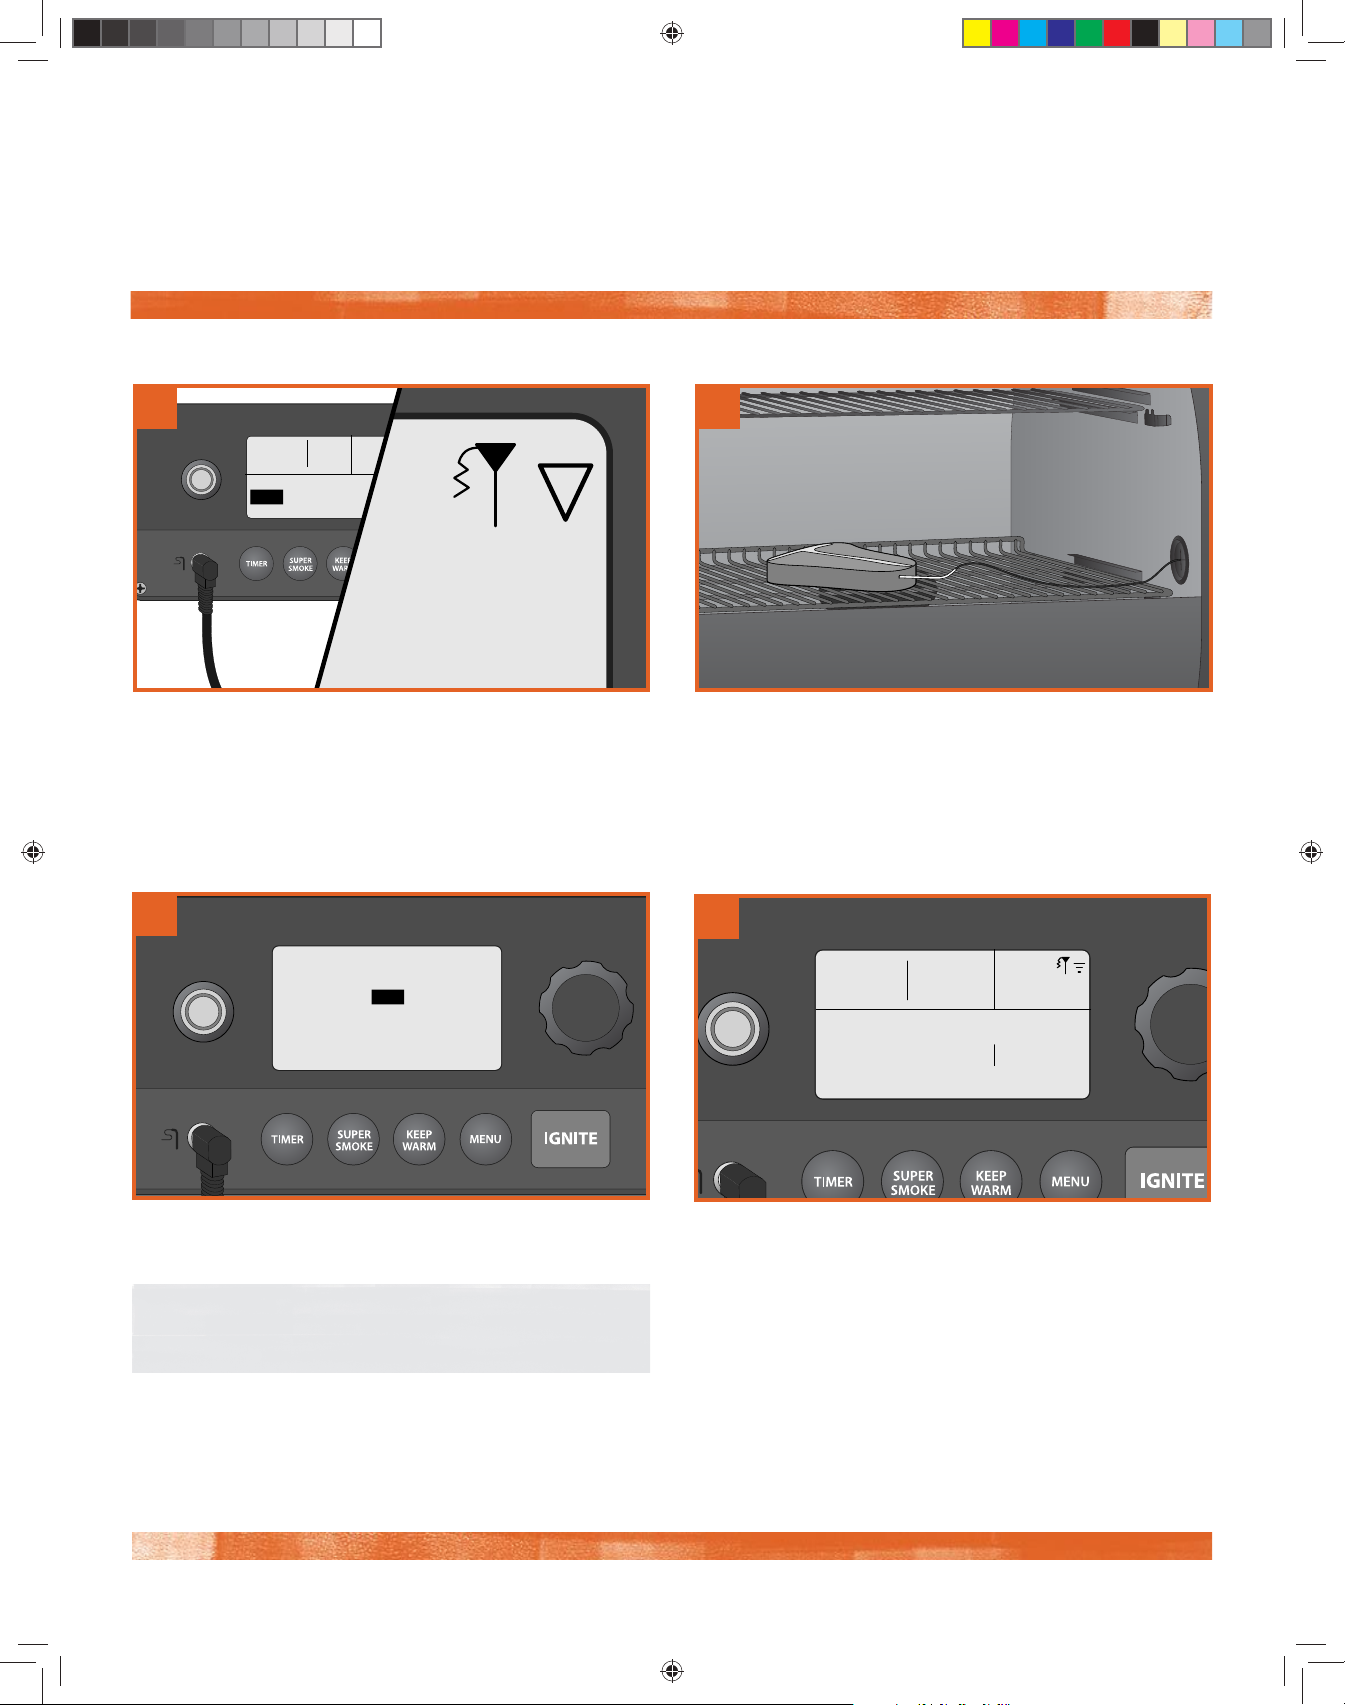
If the grill is turned on:
1
Plug the probe into the probe jack located on the WiFIRE®
Controller. The controller will recognize the probe and the
probe icon will light in the controller screen's upper-right
corner. The display will ask if you want to set an alarm.
Select YES.
3
PROBE
Set Probe Alarm:
145
2
Once the grill is preheated to the desired temperature,
load food into the grill. Feed the probe through the
grommet on the side of the grill and insert the probe tip
halfway into the thickest part of the meat—not in the fatty
portion or touching bone.
4
054
°F
350
Rotate the dial to the desired food temperature. Press the
dial center to select/confirm.
NOTE: To calibrate the probe, see "Additional Control
Functions" on page 21.
Probe: 72˚ F 145˚
Igniting
Once the probe alarm is set, the home screen will display
the grill temperature, goal probe temperature, and grill
status. A tone will sound when your meat reaches the
set alarm temperature. If using the Traeger WiFIRE® app,
you will receive a push notification on your connected
smart device, along with a display of your grill's status
throughout the cooking process.
20
4731 Ironwood_OM_ENv28.indd 20 10/15/18 3:28 PM
Page 21
TRAEGERGRILLS.COM
ADDITIONAL CONTROL FUNCTIONS
TRAEGER WiFIRE
>Cook Cycle
>Probe
>Wi-Fi Information
>Settings
>Back
Press Dial To Set Temp
°F
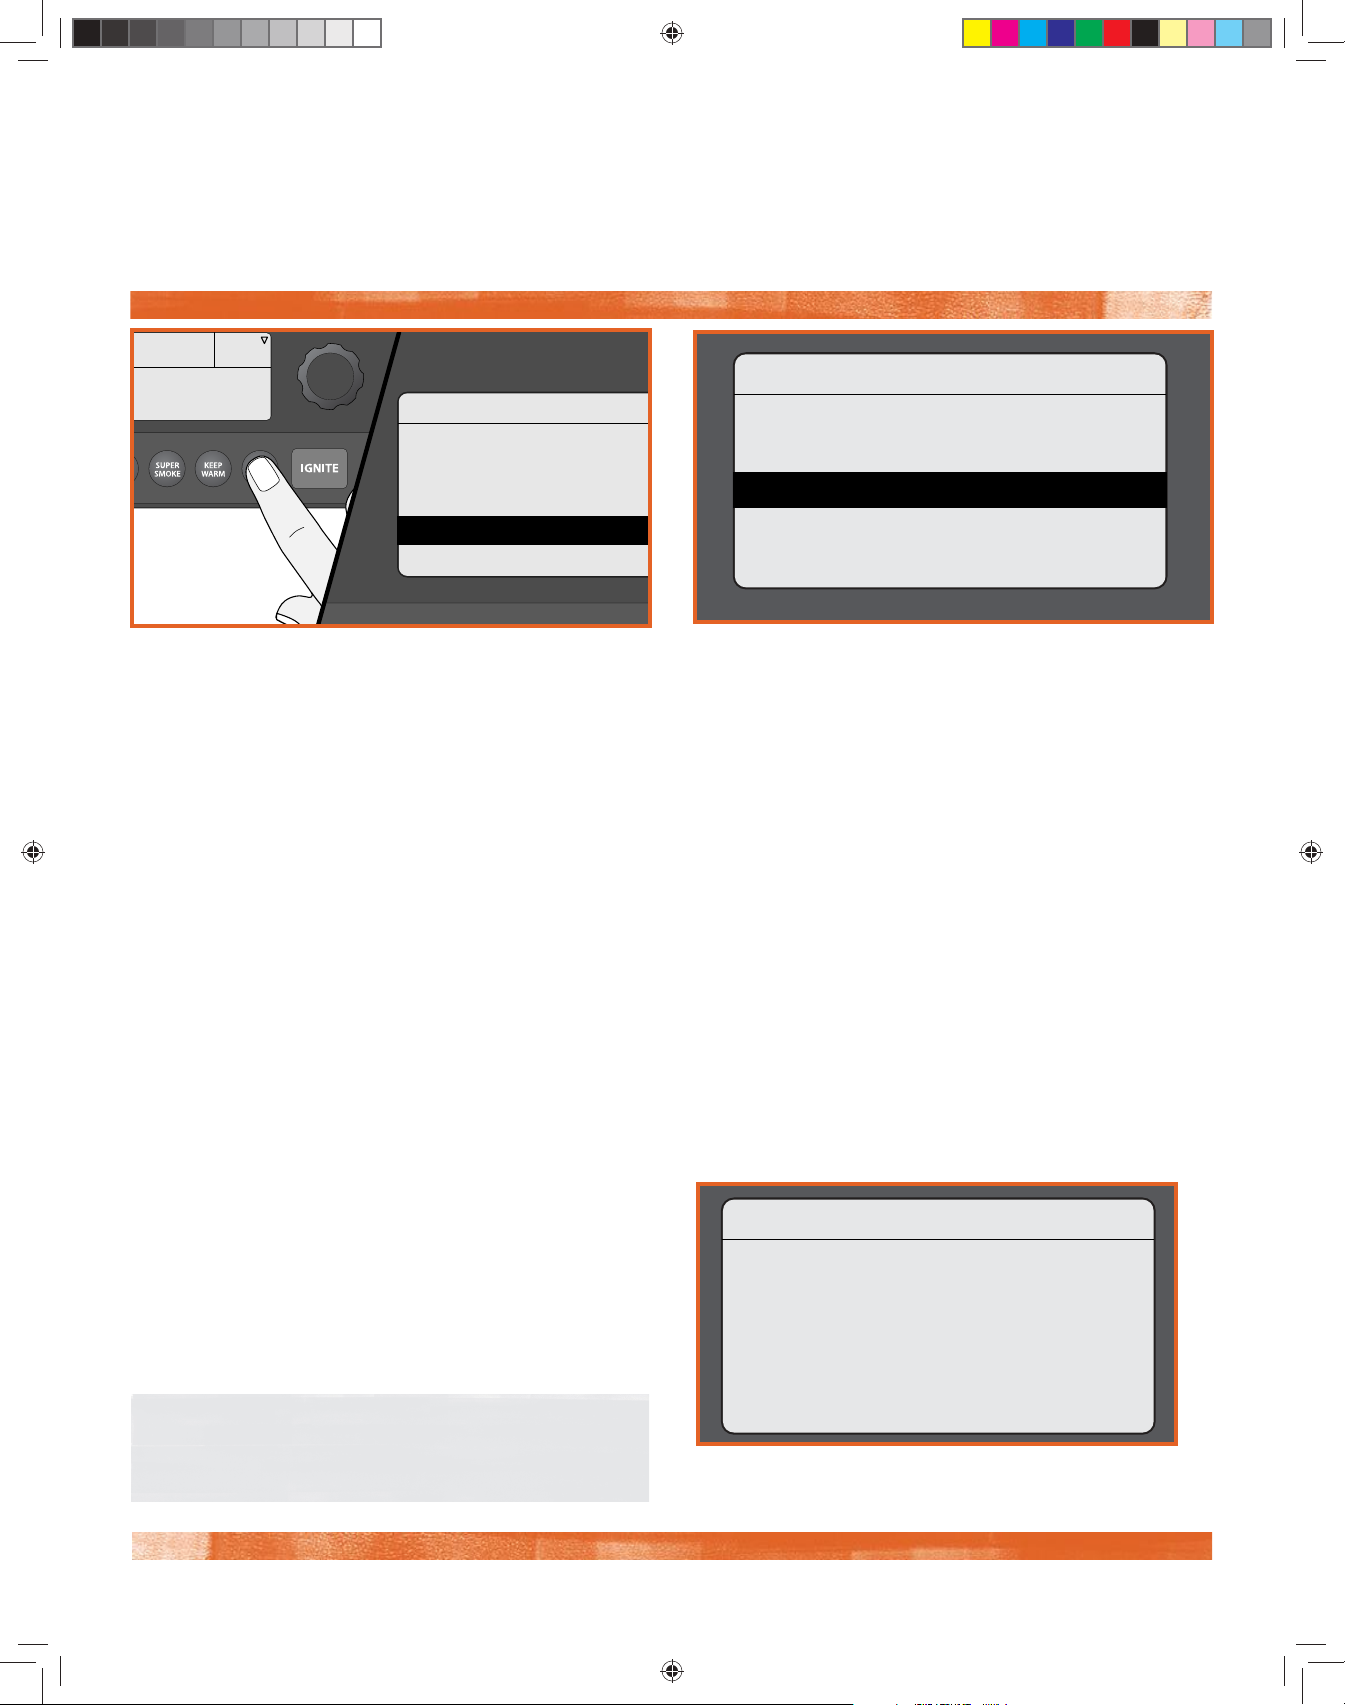
SETTINGS Use the Settings menu to adjust display settings, clear notifications, access important product and contact
information, and more.
SETTINGS
>Speaker
>Contrast
>Probe Calibration
>Clear Notications
>Temperature Units
TO ACCESS THE SETTINGS MENU:
Turn grill on. Once the home screen is displayed, press MENU. The main menu will display several options. Turn the dial
to highlight "Settings". Press the center of the dial to select.
To change a setting, turn the dial to select the desired setting. Press the center of the dial to confirm. Select BACK to
return to the Settings menu.
SPEAKER
Turns the grill control speaker on or o. The selected
setting will be indicated with a *.
CONTRAST
Rotate the dial to adjust the display contrast from
1 (high) to 5 (low). Default setting is 3. Press the center
of the dial to confirm and return to the Settings menu.
PROBE CALIBRATION
There are two options under this setting:
1. Calibrate Probe: Provides instructions on calibrating
using an ice water bath. “Place probe in ice water for
1 minute before calibrating.” is displayed.
2. Probe Oset: Rotate the dial to adjust the probe
temperature oset in 1° increments, from -15°F to
+15°F/-8°C to +8°C. The default setting is 0. Press the
center of the dial to confirm and return to the Settings
menu.
CLEAR NOTIFICATIONS
Use this function to clear error messages and
notifications.
TEMPERATURE UNITS
Turn the dial to choose between degrees Fahrenheit (°F)
and Celsius (°C). Press the center of the dial to confirm.
The selected setting will be indicated with a *.
CUSTOMER SERVICE
Displays the Traeger WiFIRE® dedicated customer service
number.
LEARN MORE
Displays link information for the Traeger App and website.
ABOUT GRILL
Provides important information about your grill, including
model number and sofware version.
ABOUT GRILL
Traeger WiFire Grill
SW VER: 00.01.a2
CONFIG VER: 99.000
UUID: 648CBE
4731 Ironwood_OM_ENv28.indd 21 10/15/18 3:28 PM
NOTE: Since an error will put the grill into Cool Down
mode, the display will still show "Cooling Down" when
you exit the Clear Notifications and Settings menus.
>Back
BACK
Return to the main menu.
21
Page 22
HOPPER CLEAN-OUT
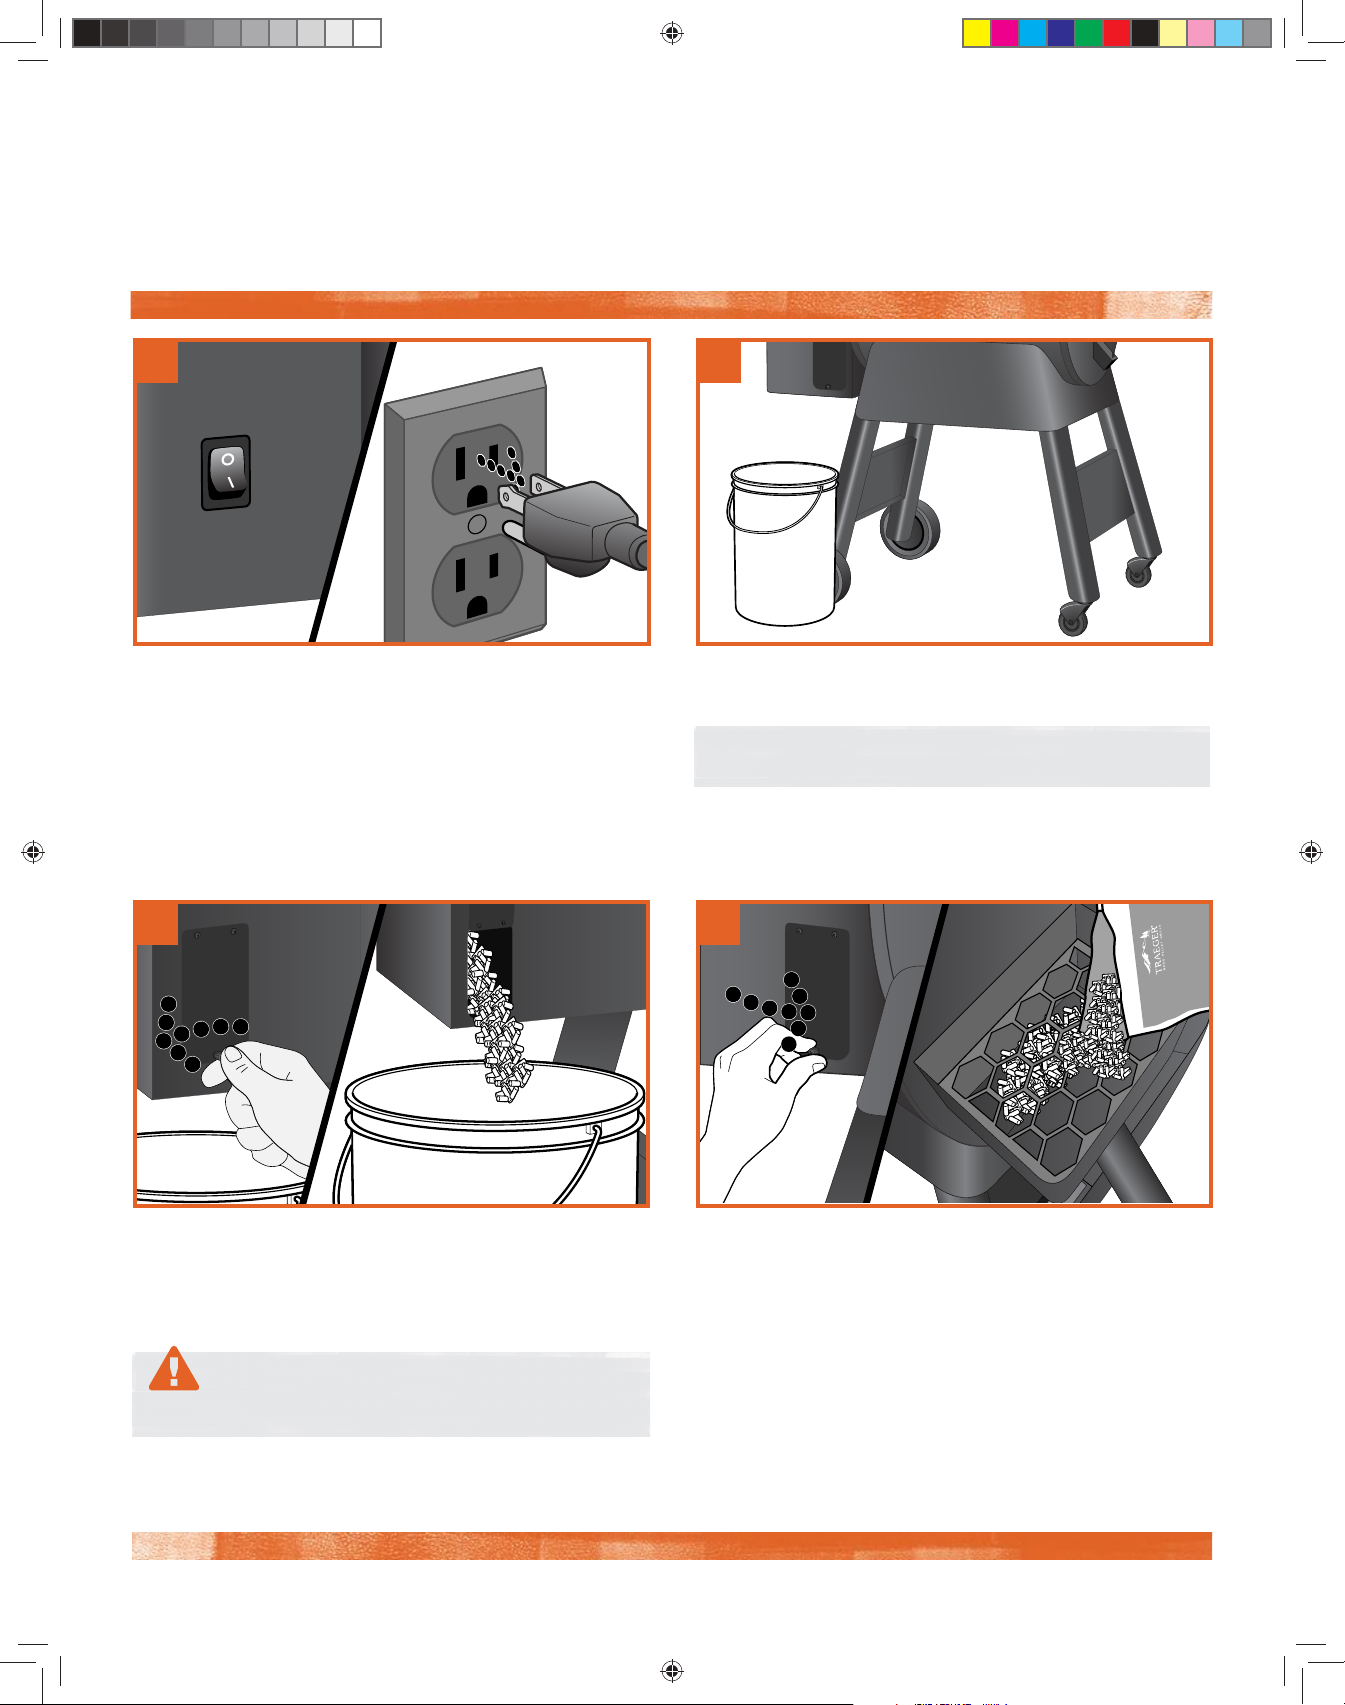
Your Traeger grill has a hopper clean-out system that allows you to quickly change from one pellet flavor
to another without making a mess.
1
PLUG APPEARANCE MAY VARY BY REGION.
Turn the switch to OFF (O) and disconnect the power
cord. If the grill is still hot, allow it to cool completely.
3
2
Place a container large enough to hold the discarded
pellets under the pellet clean-out door.
TIP: A clean 5-gallon bucket works great!
4
Unscrew the clean-out door fastener and open it. Pellets
will empty into the container you've placed below. You
might need a spatula or spoon to push the remaining
pellets out of the hopper.
Once the hopper's empty, close the door, replace the
fastener, and refill the hopper with a dierent flavor of
TRAEGER® BRAND HARDWOOD PELLETS.
WARNING! Carefully empty out hopper soon afer
grill use. Pellets may be very hot.
22
4731 Ironwood_OM_ENv28.indd 22 10/15/18 3:28 PM
Page 23
TRAEGERGRILLS.COM
IRONWOOD FEATURES
Push Ignite To Start
Push Ignite To Start
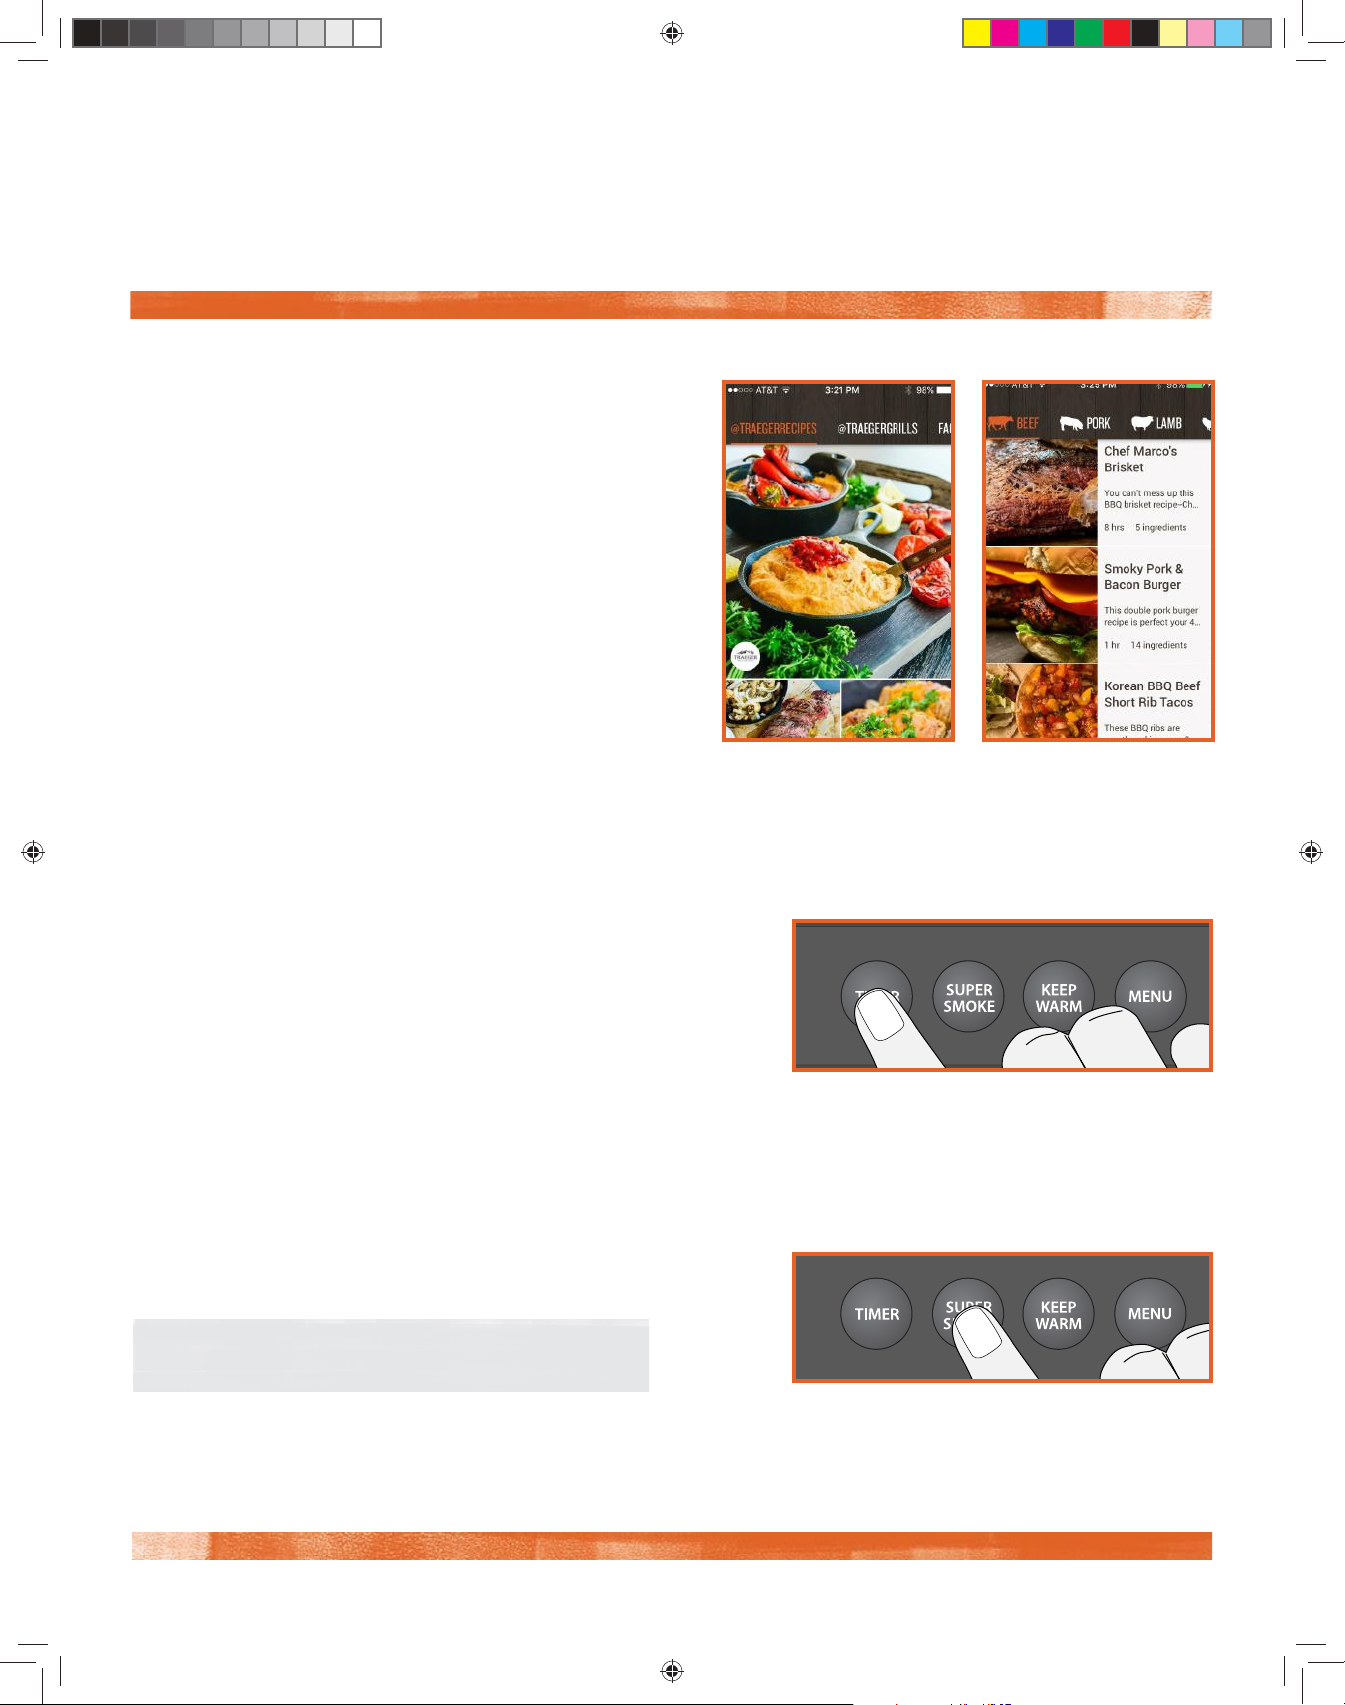
TRAEGER APP
Your Traeger® Ironwood Grill can be controlled remotely using
the Traeger App. To learn more about WiFIRE®, the Traeger app,
and more ways to connect, go to traegergrills.com/wifire.
You will need a home Internet Wi-Fi connection to connect
your Traeger® Ironwood Grill to the Internet. It is required that
your smartphone or tablet is running the latest iOS or Android
operating system. If you leave the range of your home Wi-Fi
network with your device, a data plan is required.
The Traeger App is also an easy way to search, download, and
cook new recipes on your Traeger® Ironwood Grill.
TIMER
Your Traeger® Ironwood Grill comes equipped with a convenient timer. The Timer function does not impact grill operation; you
can use it to notify you of other needed steps during cooking, such as loading vegetables into the grill or basting your food.
To set the Timer:
1. Press and hold TIMER for 3 seconds.
2. Use the Selection dial to toggle between hours and minutes
to set the time.
Once the dial is pressed afer choosing the time, the Timer
is set and you will be returned to the home screen.
To cancel the Timer:
1. Press and hold TIMER for 3 seconds.
2. You will see the options to Edit, Cancel, or go Back to the menu.
SUPER SMOKE OPTION
You can add more smoke flavor to your food by pressing SUPER
SMOKE at any time during grilling. Press it again to cancel.
NOTE: Super Smoke can only be activated when grill
temperature is between 165°–225°F (74°–107°C).
23
4731 Ironwood_OM_ENv28.indd 23 10/15/18 3:28 PM
Page 24
Push Ignite To Start
IRONWOOD FEATURES (CONTINUED)
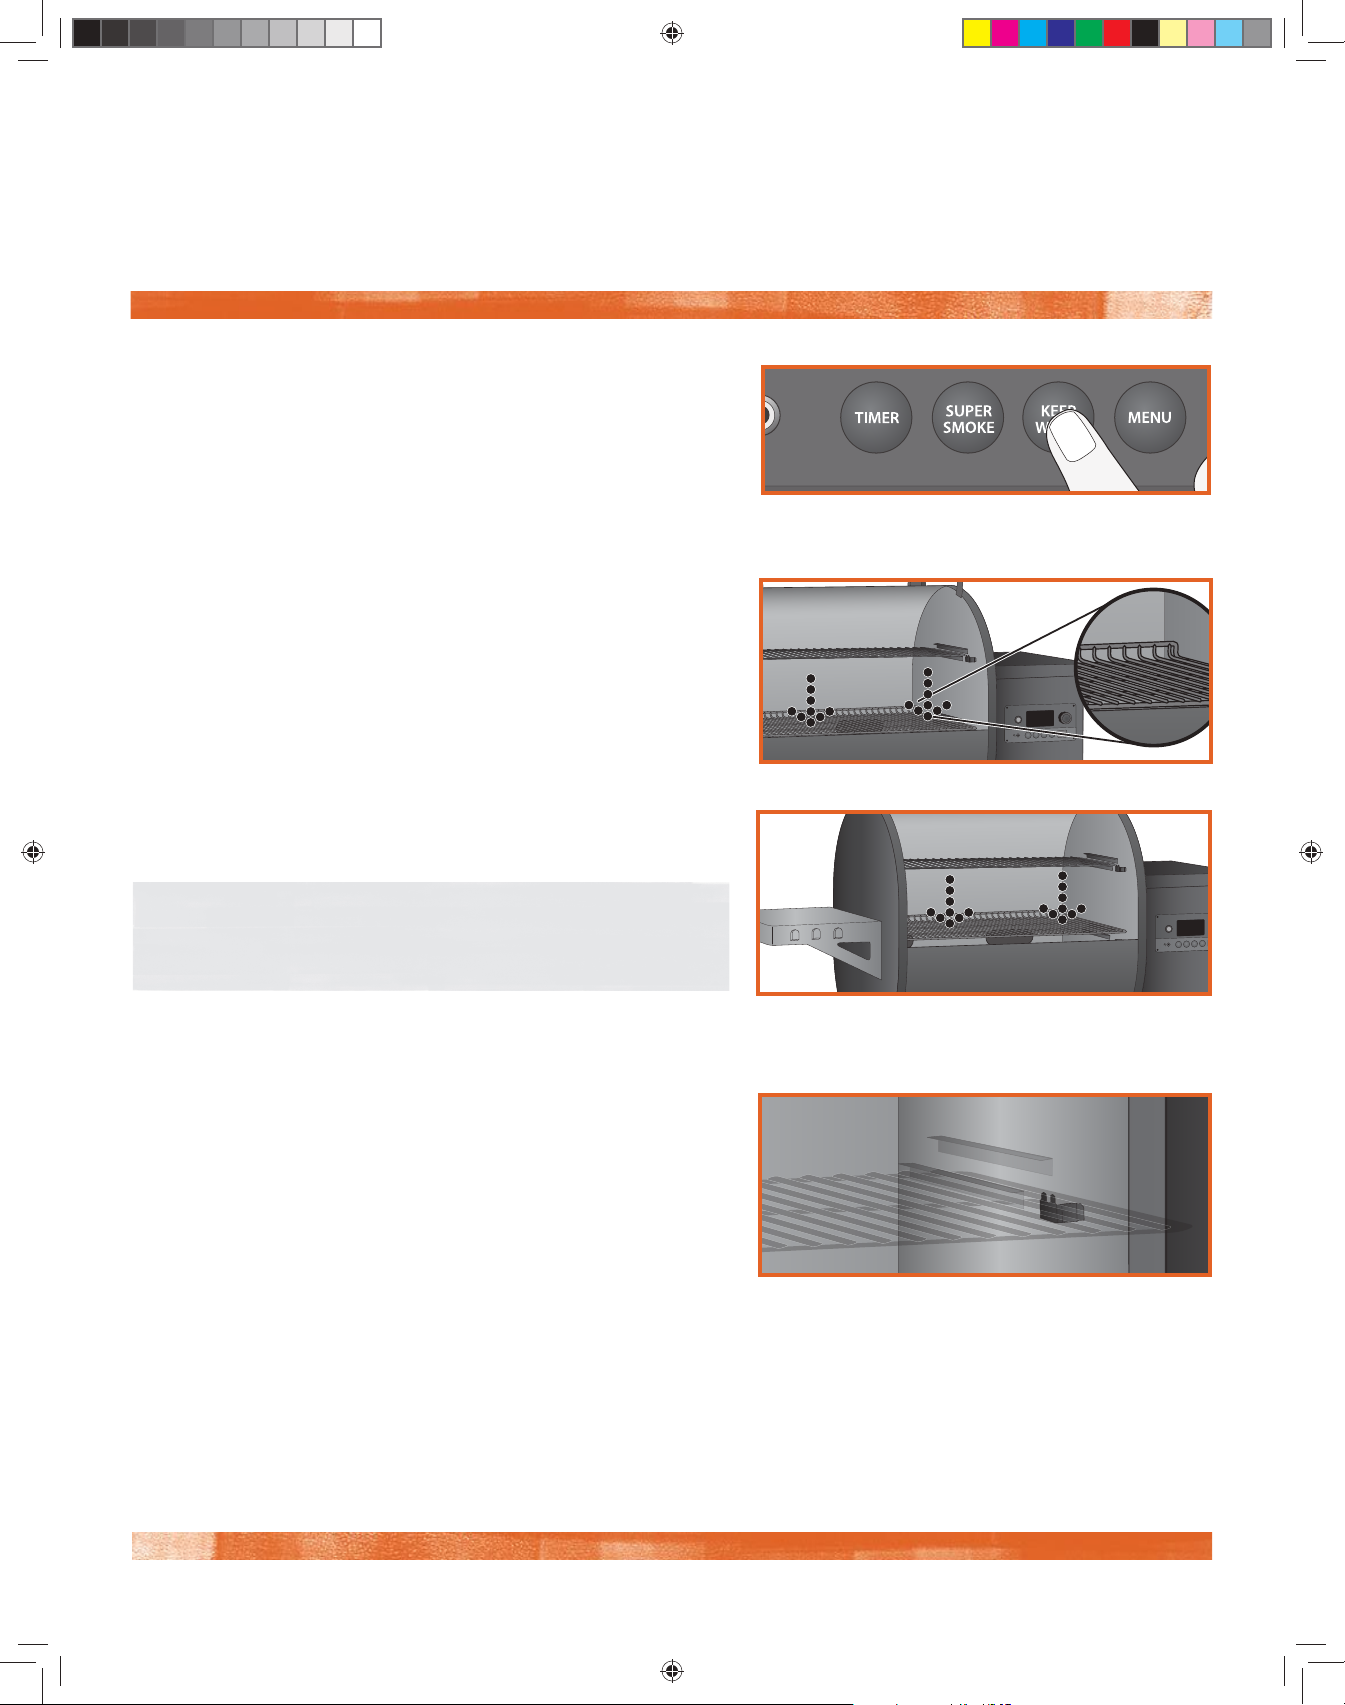
KEEP WARM FUNCTION
Keep Warm can be used to pause the cook cycle at any time
during grilling and maintain the grill temperature at 165°F (74°C).
Press the KEEP WARM button to activate the function. Press
KEEP WARM again to resume cooking.
VERSATILE LOWER GRATE
You can change the placement of the bottom grill grate for two
dierent cooking options: Sear Position and Smoke Position.
In Sear Position, the grill grate should be placed at the lowest point
in the grill body cavity, resting on the lowest back brackets and the
lip at the front. This ensures that the radiant heat from the grease
drip tray is maximized and your food has sear marks.
For Smoke Position, place the grill grate on the higher front
brackets, sliding it into the channel at the back. This will allow
the smoke to fully circulate for convection cooking.
NOTE: The upper grate has two positions, center and back. There
are storage hooks on the rear of the skirt for the upper grate
while not in use.
RACK STOPS
Located at the front of the slider brackets for the bottom grate,
rack stops provide additional stability when accessing food. Simply
slide the grate out until the crossbar catches in the rack stop, and
you’ll be able to flip burgers or baste ribs easily without the rack
tipping.
GRILL COVER
You wouldn't stand out in the rain or snow without protection – well, unless that's your thing. Protect your Traeger®
Ironwood Grill with a premium custom cover, designed to withstand the elements. This durable grill cover is available for
purchase at traegergrills.com.
24
4731 Ironwood_OM_ENv28.indd 24 10/15/18 3:28 PM
Page 25

TRAEGERGRILLS.COM
MAINTAINING YOUR GRILL
1. CREOSOTE AND GREASE FORMATION AND
REMOVAL
When wood pellets are burned slowly, they produce tar
and other organic vapors that combine with expelled
moisture to form creosote. The creosote vapors
condense in the relatively cool exhaust vent of a slowburning fire. As a result, creosote accumulates on the
exhaust vent lining. When ignited, creosote makes
an extremely hot fire. Airborne grease particles will
travel through the cooking chamber, and some of this
airborne grease will accumulate on the exhaust vent
lining, similar to creosote, which could contribute to
a fire.
The Traeger Downdraf Exhaust should be inspected at
least twice a year to determine when a creosote and/or
grease buildup has occurred.
Also, grease drippings from the food will fall onto
the grease drip tray and be channeled into the grease
drain and then out of the grill through the grease drain
tube, to be collected in the grease bucket. These are
the components of the Traeger Grease Management
System (TGMS). Grease will accumulate in all of these
locations.
All components of the TGMS should be inspected
before each use for signs of grease buildup.
When creosote or grease has accumulated, it should
be removed to reduce the risk of fire.
Even if there is ample room in the grill, be cautious of
loading excessive amounts of food that can release
large quantities of flammable grease, for example more
than a pound of bacon, especially if the grill has not
been well-maintained. If your previous cooks have
produced large quantities of flammable grease, it is
highly recommended that the grease be cleaned from
the grill before using it again.
2. CLEANING INSIDE SURFACES:
DANGER! Turn the switch OFF (O) and disconnect the
power cord.
CAUTION! Accumulated grease is easier to clean o
when the grill is still warm—not hot. Be careful not to
burn yourself. Gloves are recommended.
Periodically clean the grease out of the V-shaped
grease drain and grease drain tube. If too much grease
is allowed to build up in the V-shaped grease drain or
is allowed to plug the grease drain tube, a grease fire
could result. We recommend cleaning these locations
regularly.
Remove all grates and the grease drip tray. This will
provide access to the V-shaped grease drain and
grease drain tube opening inside the grill. Scrape the
grease accumulation from inside the V-shaped grease
drain and grease drain tube using a sti, nonmetallic
tool. Much of the loosened grease can be pushed
down through the grease drain tube and will fall into
the grease bucket. Wipe up remaining grease residue
with paper towels or disposable rags. Paper towels or
disposable rags can also be used to wipe some of the
grease o of the interior surfaces of the grill.
3. CLEANING OUTSIDE SURFACES:
DANGER! Turn the Main Power switch OFF (O) and
disconnect the power cord.
Use a disposable rag or cloth dampened with warm,
soapy water to wipe the grease from the outside of the
grill. DO NOT use oven cleaner, abrasive cleansers, or
abrasive cleaning pads on the outside grill surfaces.
4. OUTSIDE STORAGE:
CAUTION! If the grill is stored outside during the rainy
season, care should be taken to ensure that water
does not get into the pellet hopper. Wood pellets
expand greatly when wet and will jam your auger.
Always cover your grill when not in use with the
Traeger grill cover. This custom-fit cover can be
purchased at traegergrills.com.
5. CLEANING THE GRILL GRATES:
CAUTION! Cleaning the grill grates works best while
they are still warm. Be careful not to burn yourself.
We recommend keeping a long-handled cleaning
brush near the grill. Afer removing your food,
give the grill grate a quick brushing. It takes only
a minute and it will be ready the next time you want
to use the grill.
25
4731 Ironwood_OM_ENv28.indd 25 10/15/18 3:28 PM
Page 26

MAINTAINING YOUR GRILL (CONTINUED)
6. CLEANING THE ASH FROM INSIDE AND AROUND
THE FIREPOT (EVERY 20 HOURS OF USE):
DANGER! Turn the Main Power switch OFF (O) and
disconnect the power cord.
WARNING! Make sure that the grill is COLD before
cleaning the ash.
WARNING! Disposal of ashes should be done only
according to the following instructions.
Excess ash in the firepot may cause your fire to go
out. The firepot should be inspected occasionally and
cleaned to remove the ash buildup. Again, cleaning the
ash from in and around the firepot should be done only
when the grill is COLD.
Remove the grill grates, grease drip tray, and heat
bae to provide access to the firepot and the interior
of the grill. Much of the ash outside of the firepot can
be removed from the grill with a small metal fireplace
shovel or other similar tool.
WARNING! A dedicated vacuum cleaner is the best
way to remove ashes from the firepot, but this must be
done with extreme care to avoid the risk of fire. Again,
cleaning the ash from the firepot should be done
only when the grill is COLD.
A utility-type vacuum cleaner having a metal collection
canister without a bag would be best for this task.
However, almost any vacuum cleaner will work safely
if this procedure is properly followed.
Afer ensuring that the ash in the firepot is COLD,
vacuum the ash from the inside of the firepot.
a. If your vacuum cleaner is a bagless model, empty
any previously accumulated debris from the
collection chamber. Then vacuum the ash from the
inside of the firepot. Once the firepot is clean, empty
the collection chamber into the metal container
described below without delay. Make sure that there
is no remaining ash residue lef in the collection
chamber.
b. If your vacuum cleaner is a model that uses a
disposable bag, install an unused bag in the
machine. Then vacuum the ash from the inside of
the firepot. Once the firepot is clean, remove the bag
from the vacuum cleaner and place it in the metal
container described below without delay.
7. DISPOSAL OF ASHES:
WARNING! Ashes should be placed in a metal container
with a tight-fitting lid. The closed container of ashes
should be placed on a noncombustible floor or on
the ground, well away from all combustible materials,
pending final disposal. When the ashes are disposed
of by burial in soil or otherwise locally dispersed, they
should be retained in the closed container until all
cinders have cooled thoroughly.
8. If the supply cord is damaged, It must be replaced by a
special cord assembly available from the manufacturer
or its service agent.
26
4731 Ironwood_OM_ENv28.indd 26 10/15/18 3:28 PM
Page 27
TRAEGERGRILLS.COM
FREQUENTLY ASKED QUESTIONS
Following are frequently asked questions along with their answers:
QUESTION ANSWER
Why won’t
my grill
ignite?
Why are
no pellets
being
delivered
into the
firepot?
Why is the
temperature
of my grill
fluctuating?
Verify power at the electrical outlet. If the power cord is connected to a GFCI (ground fault circuit
interrupter), check and reset if necessary. Initiate start-up. If no ignition, see next answer.
DANGER! Turn the switch OFF (O) and disconnect the power cord. Remove the control and check the fuse
on back. Replace the fuse if blown. Reinstall the control.
Check the draf inducer fan and the auger drive motor for operation. If both are operating, the hot rod needs
to be replaced. If one or both are not operating, contact Traeger's VIP-365 Customer Service (see page 35)
for additional troubleshooting help or to place an order.
Verify that there are pellets in the pellet hopper. If this is the initial firing or the grill has run out of pellets,
allow sucient time for the pellets to travel from the pellet hopper to the firepot (can take up to 7 minutes).
Initiate start-up. See “Using Your Grill” on page 13. If there are still no pellets in the firepot, proceed to next
answer.
If the auger drive motor is operating (check the small fan blade on the back of the motor), the problem
is in the digital control, which will need to be replaced. Contact your Traeger dealer or Traeger's VIP-365
Customer Service (see page 35) to place an order.
If the auger drive motor is not operating but the draf inducer fan is operating, the problem is in the auger
system, which will need to be checked:
With the switch OFF (O), locate the small fan blade on the back of the auger drive motor.
CAUTION! While watching the fan blade, turn the switch ON (I). If the fan blade does not turn, turn the
switch OFF (O). This indicates a defective auger drive motor, and it will need to be replaced. Contact your
Traeger dealer or Traeger's VIP-365 Customer Service (see page 35) to place an order.
If the fan blade turns a bit and then stops, continue watching and turn the switch OFF (O). If the fan blade
unwinds slightly, this indicates a jam in the auger system, which will need to be cleared.
DANGER! Turn the switch OFF (O) and disconnect the power cord. Remove the pellets from the pellet
hopper. Check for foreign objects and wet or decomposed pellets, both of which can cause a jam in the
auger system. The auger will need to be removed to clear a jam in the auger system. See “How do I remove
the auger if it jams?” section on the following page.
Temperature fluctuations are normal for Traeger grills. Any significant fluctuation could be the result of
wind, air temperature, improper use, or lack of grill maintenance
27
4731 Ironwood_OM_ENv28.indd 27 10/15/18 3:28 PM
Page 28
FREQUENTLY ASKED QUESTIONS (CONTINUED)
QUESTION ANSWER
How do I
remove the
auger if it
jams?
How do I
protect my
paint finish?
Where can I
get a new part
for my grill?
DANGER! Turn the switch OFF (O) and disconnect the power cord.
CAUTION! If the grill is still hot, allow it to cool thoroughly.
Remove any covers necessary to access the auger drive motor.
Remove the screw connecting the auger drive motor shaf to the auger shaf and the screw retaining the
auger bushing into the auger tube.
With a small pipe wrench or locking pliers on the auger shaf, turn the auger counterclockwise. It will turn
hard until it breaks free; then the auger will turn freely.
Remove the auger and clean all pellets, ash, or foreign objects from the auger, auger tube, and firepot.
(See instructions for proper handling and disposal of ash on page 26.)
Sand the outside surfaces of the auger with medium grit sandpaper. Check the inside of the auger tube
and sand it if needed. Vacuum the sanding grit out of the auger tube and firepot when finished. Check
that the auger rotates freely.
Reattach the auger shaf to the auger drive motor shaf.
Use a protective cover on the grill to protect your paint finish. A Traeger grill cover is highly recommended.
Covers are available from your Traeger dealer, or log onto our website, traegergrills.com.
Every 90 days, use a high-quality car wax on the outside surfaces of the grill. ONLY APPLY WAX TO A
COLD GRILL.
Check with your Traeger dealer. They may have the part in stock or can order the part for you.
Contact Traeger's VIP-365 Customer Service (see page 35) to place an order.
In either case, please provide your name, phone number, address, model, and serial number of the grill
(located on the label inside the hopper lid), along with the part identification number from the component
diagram or parts list.
28
4731 Ironwood_OM_ENv28.indd 28 10/15/18 3:28 PM
Page 29
TRAEGERGRILLS.COM
TROUBLESHOOTING
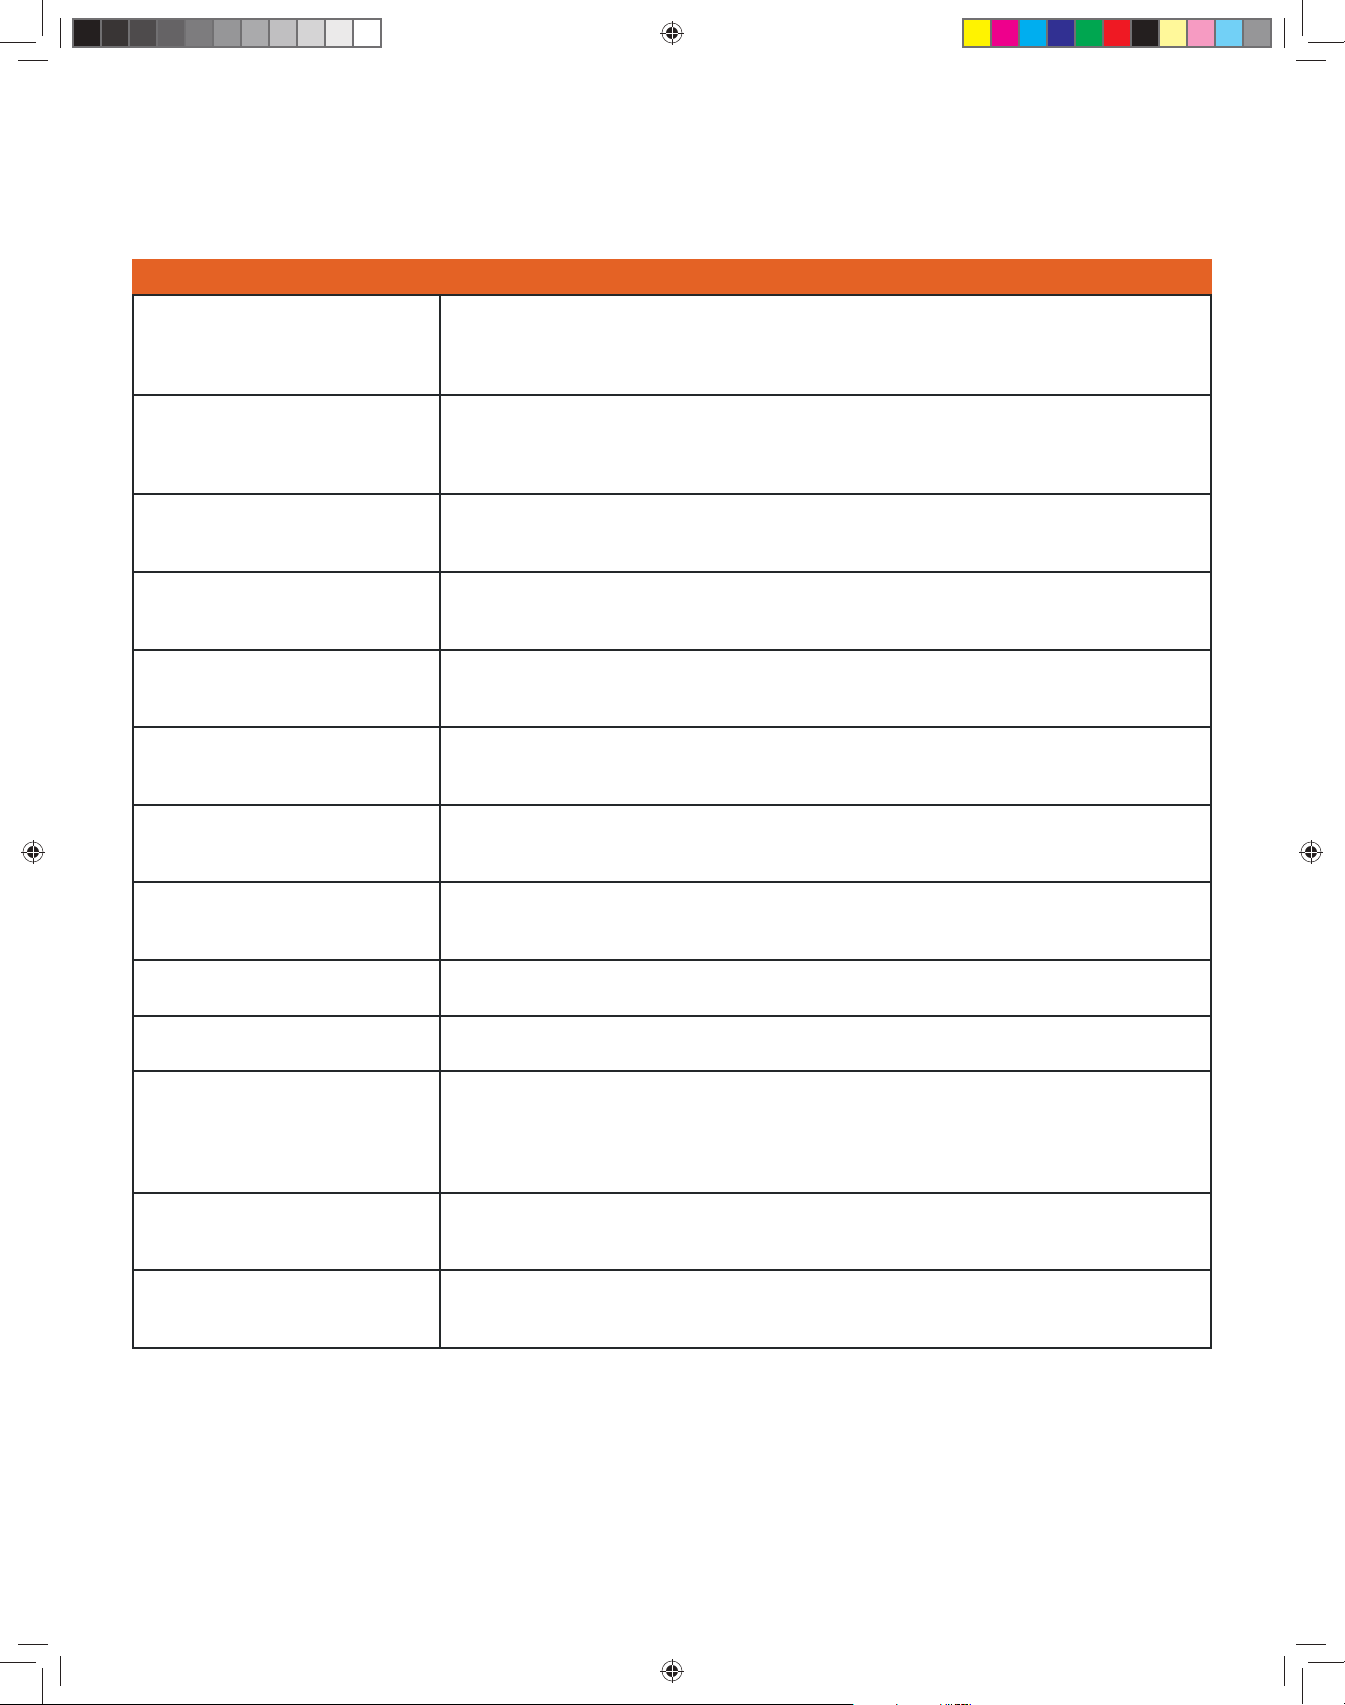
Although rare, you may see an error or warning message display on your control panel. Please refer to the following chart for
potential issues and how to resolve them:
ERROR MESSAGE SOLUTION
High Temp Error
Low Temp Error
Temp Sensor Out
Failed to Ignite
Igniter Disconnect
Fan Disconnected
Auger Disconnected
Auger Overcurrent
Low Temp Warning
Ignition Warning (App
Notification Only)
Low Ambient Temp
Probe Fell Out
Bad Probe
This error will occur when the temperature in the grill reaches temperatures above
550°F (288°C) for more than 45 seconds. Let the grill cool, then turn o the grill. Clear
out any remaining pellets from the firepot and restart your grill. If the problem persists,
call customer service.
This error will occur if the temperature of the grill falls below 120°F (49°C) for
10 minutes, causing the grill to go into shutdown mode. To fix, remove any pellets
from the firepot and add more pellets to the hopper. Turn the controller o and then
on again and restart your grill. If the problem persists, call customer service.
This error will occur if the temperature of the grill is 695°F (368°C) or above for
10 seconds. This could be an adverse event. Allow the grill to cool down and restart the
grill. If the problem persists, call customer service.
This error will occur if the grill is out of pellets or the igniter did not light. Check to see
if there are pellets in the hopper and clean out your firepot. If the problem persists,
replace your igniter or call customer service.
This error occurs when the controller does not detect the igniter. Check to see if the
igniter is connected and restart your grill. If the problem persists, replace your igniter
or call customer service.
This error occurs if the controller does not detect the fan. Make sure the fan is plugged
in and restart your grill. If the problem persists, you may need to replace your fan or
call customer service.
This error occurs when the controller does not detect the auger motor. Check to see
if the motor is plugged in and restart your grill. If the issue persists, replace your auger
motor or call customer service.
This error occurs if the auger motor is damaged or jammed. Use the Clear Auger
feature inside the control menu and restart your grill. If the problem continues, you
may need to replace your auger motor or call customer service.
This warning will occur if the grill has lost its fire and failed to recover. Check the
pellets and restart the grill.
This warning will occur if the grill has not detected a successful ignition in the expected
time. Check the pellets and restart the grill.
This warning will occur when the ambient temperature falls below -20°F (-29°C)
for more than 30 seconds. Although the controller will still work, damage to the
controller’s display may have occurred. If the grill ignites, check to see if the display
operates as expected. If the grill does not ignite, warm the grill and check to see if the
display and controller operate as expected. If not, call customer service.
This warning will occur if the probe is not fully inserted into the food. The message is
triggered when the probe is above 220°F (104°C) while the grill is running. Fully insert
the probe into the food.
This warning will occur if the controller detects a short circuit in the probe for
10 seconds. The probe will need to be replaced. To order a new probe, go to
traegergrills.com.
ERROR CLEARING
Errors are cleared with the Menu - Settings - Clear Notications menu item. Since each error will send the grill into a
cooldown, if an error is cleared while the grill is cooling down, the main screen will display “Cooling Down . . .” until the
cooldown is complete. Note that some errors, like Temp Sensor Out, will trigger again even afer clearing them. This is a
sign that the conditions that caused the error have not changed. Power-cycling the grill will also clear any errors, as many
users are accustomed to.
29
4731 Ironwood_OM_ENv28.indd 29 10/15/18 3:28 PM
Page 30

OPERATING TIPS
1. You can change the temperature at any time during
grilling to increase or decrease cooking temperature.
To change between Fahrenheit and Celsius:
Select Temperature Units from the Settings menu.
Turn the dial to choose between degrees FAHRENHEIT
(°F) and CELSIUS (°C). Press the center of the dial to
confirm. The selected setting will be indicated with a *.
2. You will now see temperatures displayed in the format
you’ve chosen.
3. WARNING! Your Traeger® Ironwood Grill should never
be moved while it is hot. If you are transporting your
grill in a vehicle afer cooking on it, make sure the fire
is completely out and the grill is cold before placing it
in any vehicle. Never put water into the firepot; it will
jam the auger.
4. Your Traeger® Ironwood Grill is designed to operate
with the door closed. Cooking with the door open
greatly lengthens your cooking time.
5. CAUTION! Never add pellets by hand to a hot firepot.
This is dangerous and you may be seriously burned. If
you run out of pellets and lose your fire while cooking,
let the grill cool completely and start again with the
“Hopper Clean-out" instructions on page 22.
6. CAUTION! Make sure the heat bae is properly seated
on its locating brackets. If not seated properly, direct
heat and flame could come up out of the firepot and
cause a grease fire in the grill.
7. Always take into account the type of food you are
cooking.
• Thin foods need high heat and shorter cook
times, while thicker foods need low heat and
longer cook times.
• Vegetables take longer to cook than meats at
the same cooking temperatures.
• Always check that the internal temperature
of the meat that you are cooking reaches safe
temperatures to eat.
• The Keep Warm function is not designed to
properly cook your food.
8. WARNING! If the fire in the firepot goes out while
smoking and there are sucient pellets still in the
pellet hopper, it is important to follow these steps.
Failure to do so may cause a hazardous “overfiring”
of your grill due to an excess of unburned pellets
in the firepot.
• DANGER! Turn the Main Power switch at the back of
the grill to OFF (O) and disconnect the power cord.
Allow the grill to cool thoroughly. Open the door and
remove all food, grill grates, grease drip tray, and heat
bae.
• WARNING! Smoke Hazard
A pellet overflow condition can occur during startup, resulting in unusually thick, white smoke that
lasts a long time. If this occurs, power down your
grill with the Main Power switch and unplug. If this
condition continues long enough, gases can build
up from partial ignition and fully ignite, causing
the lid to “burp.” If this burp occurs and your grill
has not been properly maintained as described in
“Maintaining Your Grill” on pages 25-26, a grease
fire could result. To remedy this condition, let the
grill cool down completely, remove all internal
components, and thoroughly clean all ash and
pellets from the grill and firepot (see page 26,
“Cleaning the Ash from Inside and Around the
Firepot”).
• WARNING! Remove all unburned pellets and ash from
inside and around the firepot. (See instructions for
proper handling and disposal of ash on page 26.)
• Before replacing the heat bae, grease drip tray,
and the grill grates, plug the power cord into an
appropriate grounded/earthed electrical outlet and
turn the switch ON (I). Pellets should fall into the
firepot and the hot rod should begin to heat (it will
start to turn red). CAUTION! Do not touch the hot rod.
• When flames start to come out of the firepot, turn the
switch OFF (O). Let the grill cool down. Now you’re
ready to place the heat bae, grease drip tray, grill
grates, and food back into the grill.
30
4731 Ironwood_OM_ENv28.indd 30 10/15/18 3:28 PM
Page 31

TRAEGERGRILLS.COM
9. CARBON MONOXIDE:
WARNING! Follow these guidelines to prevent this
colorless, odorless gas from poisoning you, your family,
your pets, or others.
Know the symptoms of carbon monoxide poisoning:
headaches, dizziness, weakness, nausea, vomiting,
sleepiness, and confusion. Carbon monoxide reduces
the blood’s ability to carry oxygen. Low blood oxygen
levels can result in loss of consciousness and death.
See a doctor if you or others develop cold- or
flu-like symptoms while cooking or in the vicinity of
this appliance. Carbon monoxide poisoning, which can
easily be mistaken for a cold or flu, is ofen detected
too late.
Alcohol consumption and drug use increase the eects
of carbon monoxide poisoning.
Carbon monoxide is especially toxic to mother and
child during pregnancy, infants, the elderly, smokers,
and people with blood or circulatory system problems,
such as anemia or heart disease.
10. GREASE MANAGEMENT:
CAUTION! Grease fires are caused by improper
maintenance of the grill and failing to clean the Traeger
Grease Management System (TGMS) on a consistent
basis (see “Maintaining Your Grill”). In the unlikely
event of a grease fire while cooking, turn the grill o
and keep the door closed until the fire is completely
out. Never keep the door open during a grease fire.
If the fire does not go out, lightly sprinkle baking soda
on the fire.
CAUTION! Be careful not to burn yourself. If this does
not work, carefully remove the food from the grill and
keep the door closed until the fire is completely out.
Again, be careful not to burn yourself. When the grill is
completely cool, remove all internal components. Clean
any grease accumulation from the TGMS. Replace the
grease drip tray and grill grates, restart the grill, and
resume cooking.
31
4731 Ironwood_OM_ENv28.indd 31 10/15/18 3:28 PM
Page 32

NOTES
32
4731 Ironwood_OM_ENv28.indd 32 10/15/18 3:28 PM
Page 33

TRAEGERGRILLS.COM
NOTES
33
4731 Ironwood_OM_ENv28.indd 33 10/15/18 3:28 PM
Page 34

NOTES
34
4731 Ironwood_OM_ENv28.indd 34 10/15/18 3:28 PM
Page 35

TRAEGERGRILLS.COM
SERVICE AND WARRANTY
TRAEGER’S LEGENDARY CUSTOMER SERVICE is the best out there.
If you have any questions about your Traeger grill or need tips on cooking your first Thanksgiving
turkey, our seasoned experts have your back. We’re here for you 365 days a year, including
holidays, because we’re cooks—not bankers.
For assistance with assembly or installation, parts, or customer service (English only, please), you can phone,
e-mail, or write us at:
TRAEGER'S CUSTOMER SERVICE
Phone: 1-844-9WiFIRE
6:00 a.m. – 8:00 p.m. MT
E-mail: [email protected]
TRAEGER PELLET GRILLS LLC
1215 E. Wilmington Ave.
Salt Lake City, UT 84106
3-YEAR LIMITED WARRANTY (U.S.A. ONLY)
Traeger Pellet Grills LLC warrants this barbecue grill against defects in material and workmanship under
normal use and maintenance for a period of three (3) years from the date of original purchase.
Traeger Pellet Grills LLC will provide a replacement part for any part found to be defective. Original
part(s) approved for return by Traeger’s Parts Department must be returned prepaid.
This warranty does not include labor charges connected with the determination or replacement of defective parts, or
freight charges to ship these parts.
Traeger Pellet Grills LLC shall not be liable under this or any implied warranty for incidental or consequential damages.
This warranty gives the retail customer specific legal rights and the customer may have other rights which vary from state
to state.
This warranty shall be void if the unit is not assembled or operated in accordance with the operation instructions provided
with this unit; the unit is resold or traded to another owner; components, accessories, or fuels not compatible with the
unit have been used; the unit has been used in a commercial or food service application; or the user has abused or
otherwise failed to maintain the unit.
To process a warranty claim, Traeger Pellet Grills LLC may require proof of your date of purchase. You should retain your
sales slip or invoice along with this certificate with your valuable documents.
35
4731 Ironwood_OM_ENv28.indd 35 10/15/18 3:28 PM
Page 36

Traeger Pellet Grills LLC
1215 E. Wilmington Ave
Salt Lake City, UT 84106
traegergrills.com
36
4731 Ironwood_OM_ENv28.indd 36 10/15/18 3:28 PM
 Loading...