

TRADIX 305962 Instruction Manual

NIGB IE
Change of technical specifications:
Battery: BL-5C / ShenZhen Tosun Power Technology co.,Ltd / Li-ion
3.7V / 1050mAh
Amendment to safety instructions regarding batteries:
CAUTION
Danger of explosion if battery is incorrectly replaced.
Replace only with the same or equivalent type.
DK
Skift til tekniske data:
Batteri BL-5C / ShenZhen Tosun Power Technology co.,Ltd / Li-ion
3.7V / 1050mAh
Supplement til sikkerhedsanvisninger vedrørende Batterier:
FORSIGTIG
Eksplosionsfare hvis batteriet ikke er isat korrekt.
Må kun udskiftes med den samme eller lignende type.
FR BE
Changer pour caractéristiques techniques :
Batterie BL-5C / ShenZhen Tosun Power Technology co.,Ltd / Li-ion
3.7V / 1050mAh
Supplément à consignes de sécurité relatives aux Piles :
ATTENTION
Danger d‘explosion si la batterie n‘est pas correctement
remplacée.
Remplacer seulement avec le même type ou un type équivalent.
NL BE
Wijzigen in technische gegevens:
Batterij BL-5C / ShenZhen Tosun Power Technology co.,Ltd / Li-ion
3,7 V / 1050 mAh
Aanvulling op veiligheidsinstructies voor batterijen:
VOORZICHTIG
Gevaar voor explosie wanneer de batterij niet correct
vervangen werd.
Uitsluitend vervangen door hetzelfde of een gelijkwaardig type.
CHDE AT
Änderung zu Technischen Daten:
Batterie BL-5C / ShenZhen Tosun Power Technology co.,Ltd / Li-ion 3.7V /
1050mAh
Ergänzung zu Sicherheitshinweise zu Batterien:
VORSICHT
Explosionsgefahr, wenn Batterie nicht korrekt ersetzt wurde.
Ausschließlich durch denselben oder einen gleichwertigen Typ
ersetzen.
TRADIX GMBH & CO. KG
Schwanheimer Str. 132
DE-64625 Bensheim
GERMANY
Serviceadresse:
TRADIX SERVICE CENTER
Hotline: 00800 30012001
Last update ∙ Oplysningernes status ∙ Version des informations ∙
Stand van de informatie ∙ Stand der Informationen:
06/2018 - Tradix-NR.: PO31000359 / 305962-18-01
DIGITAL DOOR VIEWING PORT
NIGB IE
DIGITAL DOOR VIEWING PORT
INSTRUCTION MANUAL
DK
DIGITAL DØRSPION
BRUGSVEJLEDNING
FR BE
JUDAS NUMÉRIQUE
MODE D’EMPLOI
NL BE
DIGITALE DEURSPION
GEBRUIKSAANWIJZING
CHDE AT
DIGITALER TÜRSPION
BEDIENUNGSANLEITUNG
3
i
NIGB IE
Before reading, please unfold the illustrations page and familiarise
yourself with all device functions. The illustration numbers appear in the
corresponding position within the text.
DK
Klap før læsning siden med illustrationerne og bliv fortrolig med alle
pumpens funktioner. Billednumrene er hver især placeret på det tilsvarende sted i teksten.
FR BE
Avant la lecture, dépliez la page avec les illustrations et familiarisez-vous
ensuite avec toutes les fonctions de l’appareil. Les numéros des illustrations sont indiqués aux endroits appropriés dans le texte.
NL BE
Klap voor het lezen de pagina met de afbeeldingen uit en maak u
vervolgens vertrouwd met alle functies van het apparaat. De nummers
van de afbeeldingen zijn telkens op de overeenstemmende plaats in de
tekst terug te vind.
CHDE AT
Klappen Sie vor dem Lesen die Seite mit den Abbildungen aus und machen
Sie sich anschließend mit allen Funktionen des Produkts vertraut. Die
Bildnummern sind jeweils an der entsprechenden Stelle im Text platziert.
GB/IE/NI Digital door viewing port
Instruction Manual 5
DK Digital dørspion
Brugsvejledning 22
FR/BE Judas numérique
Mode d’emploi 39
NL/BE Digitale deurspion
Gebruiksaanwijzing 59
DE/AT/CH Digitaler Türspion
Bedienungsanleitung 77
IAN 305962IAN 305962
IEGB
NLBENI
DK
1
2
3
35 – 100 mm
7.
10.
8.
2
8
3
5
4
1
1
4
2 3
8 5
7
6
A
1
(2)
(1)
1
3
1
7 6
D1
D2
(a)
E
B1
F
9 10 11 12 13
B2
C1
C2

GB/IE/NI
NIGB IE
DIGITAL DOOR VIEWING PORT
Instruction Manual
1. Introduction ....................................................................5
2. Safety .............................................................................7
3. Scope of delivery ..........................................................8
4. Technical data ...............................................................8
5. Safety instructions ........................................................8
6. Safety instructions regarding batteries ......................10
7. Assembling ..................................................................12
8. Use ...............................................................................14
9. Charging the battery ..................................................15
10. Operating instructions Monitor ..................................15
11. Errors/Actions .............................................................18
12. Cleaning & care instructions ......................................19
13. Conformity declaration ..............................................19
14. Disposal .......................................................................19
15. Warranty ....................................................................20
16. Warranty terms ..........................................................20
17. Distributor ....................................................................21
18. Service address ...........................................................21
1. Introduction
Congratulations!
With your purchase you have chosen a highquality product. Make yourself familiar with the product before starting
to use it. Carefully read the following instruction manual.
Use the product only as described and only for the specified areas of application. Keep this instruction manual for
future reference. When transferring this product to third
parties, also include all documents.
5
GB/IE/NIGB/IE/NI
Explanation of symbols
The following symbols and signal words are used in this
manual, on the digital door viewing port (hereinafter referred to as “door viewing port”) or on the packaging.
WARNING!
!
This signal symbol/word indicates a hazard with a medium level of risk which, if not avoided, may result in death
or serious injury.
CAUTION!
!
This signal symbol/word indicates a hazard with a low
level of risk which, if not avoided, may result in minor or
moderate injury.
NOTE!
This signal word warns of possible property damage.
i
Note about handling these operating instructions
This symbol indicates interior use only.
This symbol indicates potential danger to children.
This symbol indicates potential danger in relation to
electric shocks.
This symbol indicates potential danger in relation to
overheating.
This symbol indicates potential danger from handling
batteries.
This symbol indicates direct current.
IP20
regulations of the European Economic Area.
This symbol indicates protection class.
These symbols inform you about
the disposal of the packaging and
product.
Conformity declaration (see Chapter “13. Conformity declaration”): Products that are marked
with this symbol fulfil all applicable Community
2. Safety
Intended use
WARNING!
!
Risk of injury!
The product may not be used near liquids
or in damp spaces. There is a risk of injury!
The product is exclusively suitable for interior use.
The product is not intended for commercial use. Different
use or a modification to the product are not deemed as
intended use and may lead to risks, such as injuries and
damage. The distributor assumes no liability for damage
that results from improper use.
This symbol indicates potential danger in relation to
explosions.
6
7
GB/IE/NIGB/IE/NI
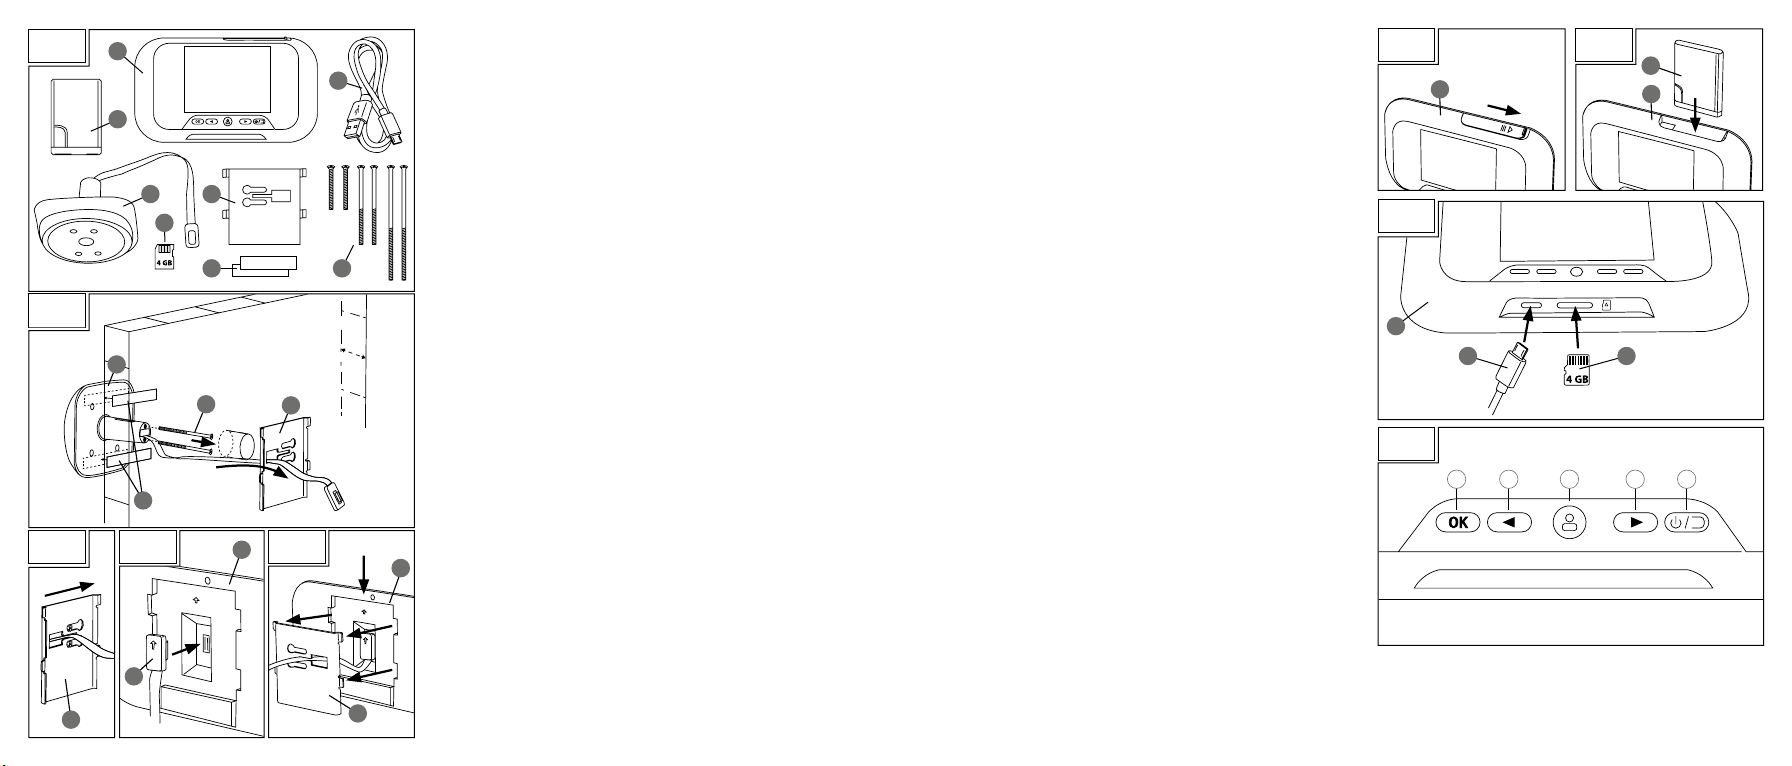
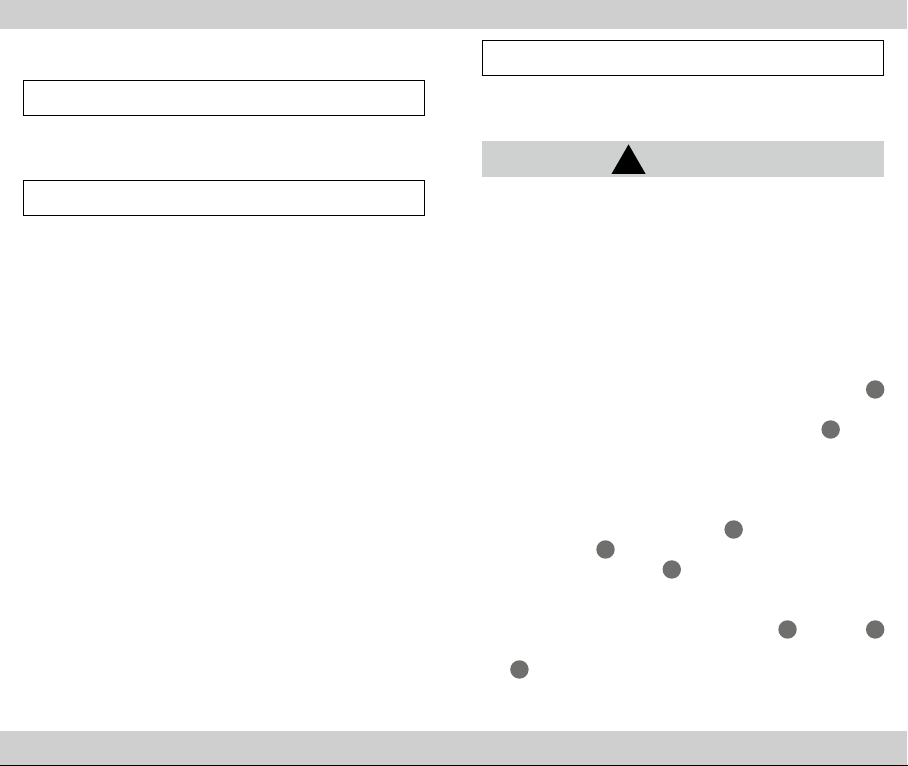
3. Scope of delivery (A)
1 x Monitor
1 x Camera unit incl. connecting cable
1 x Metal holder
1 x 1000mA lithium-ion battery
6 x Fixing screws (different lengths)
1 x 4 GB MicroSD card incl. adapter
1 x USB charging cable
2 x 3M adhesive strips
1 x Operating instructions
1
2
3
7
8
4
5
6
4. Technical specifications
Type: Digital door viewing port with recording function
IAN: 305962
Tradix No.: PO31000359 / 305962-18-01
Camera: 3 megapixel CMOS sensor, 4 infrared LEDs
Monitor: 2.8” TFT, video resolution: 640 x 480 (VGA)
Battery: 3.7 V
Operating voltage: 5 V
, 1 x 1000mA, Li-Ion, model: BL-5C
, 440mA
Protection type: IP20
Dimensions:
Monitor: 130 x 75 x 19 mm (L x W x D)
Camera unit: 65 x 65 x 14 mm (L x W x D)
3M adhesive strips: 40 x 9 mm (L x W)
Production date: 2018
Warranty: 3 Years
5. Safety information
WARNING!
!
Risk of injury!
If children play with the door viewing
port or the packaging, they may injure
themselves or suffocate!
8
- Do not let children play with the door viewing port or the
packaging.
- Supervise children near the door viewing port.
- Keep the door viewing port and packaging out of the
reach of children.
WARNING!
!
Risk of injury!
The door viewing port may not be manipulated! There is a risk of injury!
- The housing may not be opened under any circumstances, and the door viewing port may not be manipulated/modified. Manipulations / modifications may
cause life-threatening injuries due to electric shock. Manipulations / modifications are prohibited for approval
reasons (CE).
WARNING!
!
Risk of injury!
A defective door viewing port may not be
used! There is a risk of injury!
- Do not use the door viewing port in the event of malfunctions, damage or defects. If you find a defect in the door
viewing port, have it checked and repaired if necessary
before putting it back into operation. Failure to do so
may result in electric shock.
WARNING!
!
Risk of injury!
Do not use in an explosive environment!
There is a risk of injury!
- The door viewing port may not be used in potentially
explosive (Ex) environments. The door viewing port is not
approved for an environment in which flammable liquids,
9
GB/IE/NIGB/IE/NI
gases or dusts are present.
WARNING!
!
Risk of injury!
Not suitable for children under the age of
8! There is a risk of injury!
- Children over 8 years of age and persons with
reduced physical, sensory or mental abilities or lack of
experience and knowledge must be supervised and/or
have been instructed in the safe use of the door viewing
port and understand the resulting dangers.
- Children are not allowed to play with the door viewing
port.
- Maintenance and/or cleaning of the door viewing port
may not be carried out by children without supervision.
Observe national regulations!
- Observe applicable national regulations and regulations
when using and disposing of the door viewing port.
Pay attention to ambient conditions!
- The door viewing port may not be used at ambient temperatures above 40 °C or below -10 °C
6. Safety instructions regarding batteries
WARNING!
!
Fatal danger!
Batteries must not be swallowed! There is
a risk of fatal injuries!
- Batteries should not be stored near children. Batteries
may be fatal if swallowed, so this article and its batteries
must be stored out of reach for small children.
- If a battery has been swallowed, please consult a doctor
without delay!
WARNING!
!
Fire and explosion hazard!
- Never recharge non-rechargeable batteries, do
not short-circuit and/or open them. This may result
in overheating, risk of fire or bursting.
- Keep the product away from heat sources and
direct sunlight, the batteries may explode if over-
heated. There is a risk of injury.
WARNING!
!
Risk of injury!
Do not touch leaked batteries with bare
hands! There is a risk of injury!
- Leaked or damaged batteries may cause chemical burns
if they come into contact with skin. Do not touch leaked
batteries with bare hands; therefore ensure that you wear
appropriate protective gloves in this case!
- Only use type 1000mA lithium-ion batteries from the
same manufacturer.
- Insert the batteries into the designated battery compartment with the correct polarity.
- Store batteries in a dry and cool, not damp, place.
- Never throw batteries into fire.
- Do not short-circuit batteries.
- Remove the batteries if the device is not in use.
- Discharged batteries must be immediately removed in
order to avoid battery leakage and thus damage to the
device.
- Empty batteries or used rechargeable batters must be
disposed of properly. .
10
11
GB/IE/NIGB/IE/NI
7. Assembling
Door viewing port installation
NOTE!
The door viewing port is designed for the operation in interior corridors. Moisture and frost will
damage the camera unit.
NOTE!
If you do not feel confident enough to carry
out the assembly or disassembly yourself, then
commission a specialist company.
A: With an existing door viewing port
B: Without an existing door viewing port
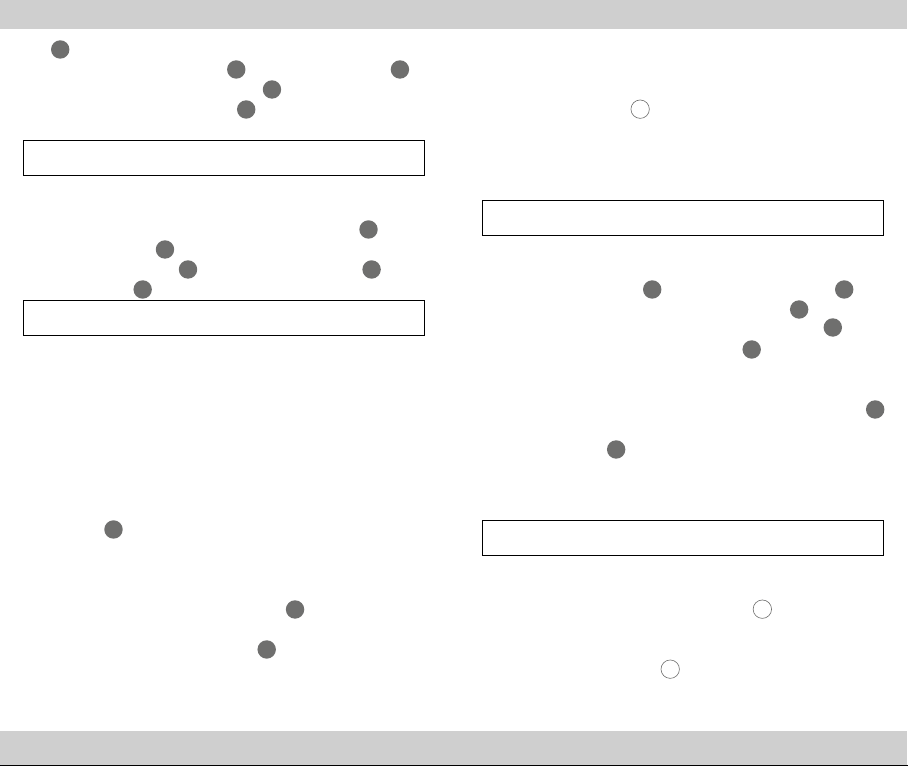
1. Measure the thickness of your door leaf. The door leaf
must have a thickness between 35 - 100 mm.
A: With an existing door viewing port
2. Remove the existing door viewing port. This is usually
done by simply unscrewing the cover on the inside and
pressing out the counterpart.
3. Check the diameter of the hole. It must be at least 15
mm. If the diameter is smaller, drill the hole with a drill
to a diameter of at least 15 - 16 mm (see following
point B).
B: Without an existing door viewing port
2. A suitable hole must be drilled into the door leaf.
You will need a drill, a 16 mm drill (the type of drill
depends on the material of the door leaf) and possibly
a folding rule.
12
NOTE!
Before installing the door viewing port, ask
your house owner in advance whether a hole
may be drilled into the door!
CAUTION!
!
No hole may be drilled in glass doors or doors
with glass inserts. The glass could be damaged!
3. Drill a hole at the height where you want to mount the
door viewing port. The hole should be located horizontally in the middle of the door. The optimal height
is your eye level, or approx. 140 - 160 cm from the
floor. Mark the drill hole beforehand with a ruler and
a pencil.
4. Clean the drill hole, as it must be free of dust and
grease.
5. Use a Phillips screwdriver to screw the fixing screws
into the camera unit with a few turns.
Select two identical fixing screws according
thickness of the door leaf:
- 2.6 x 30 mm for door leaves from 35 - 62 mm
- 2.6 x 55 mm for door leaves from 64 - 85 mm
- 2.6 x 80 mm for door leaves from 85 - 100 mm
6. Stick two 3M adhesive strips
camera unit
2
as shown (see Fig. B1).
8
on the back of the
7. Insert the camera unit 2 from the outside into the hole
in the door leaf as shown. Carefully pass the connecting cable through the hole.
8. Fasten the camera unit to the door leaf
3M adhesive strips. The camera unit must be aligned
2
so that the four infrared LEDs on the front of the
camera unit are level.
9. Pass the connecting cable through the mounting plate
2
using the
5
to the
5
8
13
3
as shown in Fig. B1.
10. Place the mounting plate
11. Slide the mounting plate to the
Fig. B2). Tighten the fixing
3
on the fixing screws
3
correct position (see
5
screws.
5
.
NOTE!
Tighten the screws only by hand. Tightening too
much can damage the camera unit.
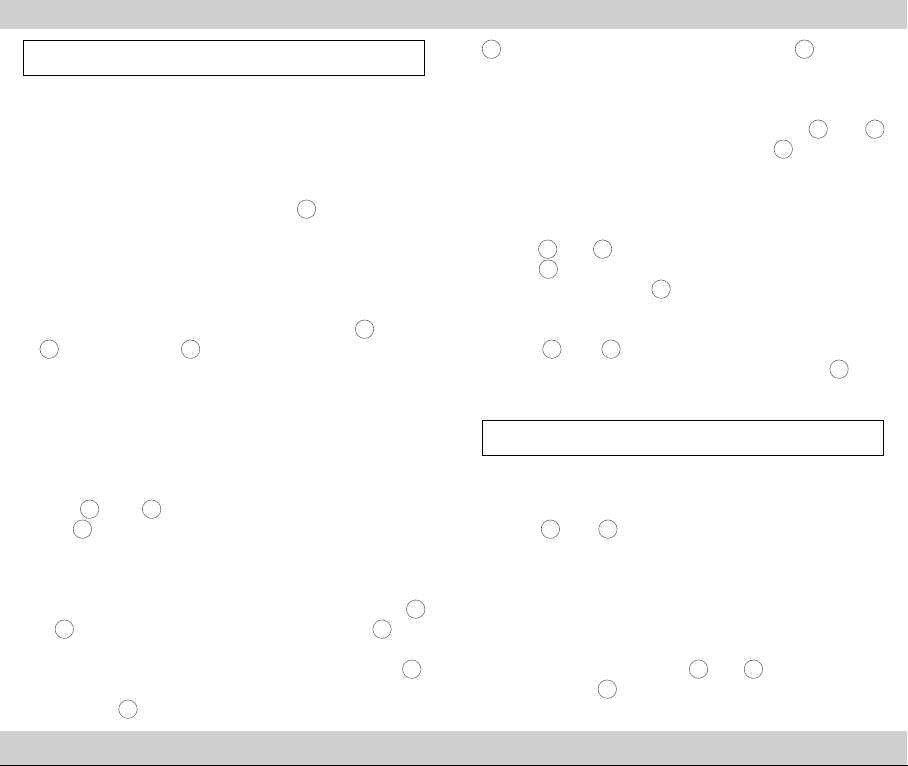
12. Insert the adapter of the camera unit into the
on the monitor
13. Place the monitor
the monitor
1
(see (1) Fig. C1).
1
on the mounting plate
1
down (see (2) Fig. C2).
2
socket
3
. Slide
NOTE!
Take care not to pinch the connecting cable. Otherwise, the cable may be damaged.
If necessary, return it to the cavity behind the mounting
plate.
Your digital door viewing port is now mounted.
8. Use
Using the door viewing port
First insert the supplied 1000mA lithium-ion battery into
the battery
before using the digital door viewing port for the first time.
1. Slide the cover (a) to the right to open the battery com-
partment (see Fig. D1).
2. Insert the battery into the battery
shown (see Fig. D2).
Make sure to insert the battery
rect polarity!
3. Replace the cover (a) and slide it to the left to close the
battery compartment.
14
4
compartment as shown and fully charge it
4
compartment as
4
according to the cor-
GB/IE/NIGB/IE/NI
4. Insert the 4 GB MicroSD card (see Fig. E).
9. Charging the battery
Press the OK button
the bottom right of the monitor display. The battery symbol
indicates the state of charge of the battery.
If the symbol is red and starts flashing, the battery must be
charged.
You may need to remove the monitor from the
adapter plate to charge the battery.
1. Slide the monitor up
2. Disconnect the connection cable from the
3. Plug the supplied USB charging cable with the
plug into the socket on the monitor
4. Plug the USB connector into an appropriate device, e.g.
your computer.
5. When the battery is fully charged, install the monitor
as described in “7. Mounting” described again on the
mounting plate
9
to display the battery symbol at
NOTE!
1
from the mounting plate
1
(see Fig. E).
3
.
1
3
monitor.
7
micro
.
1
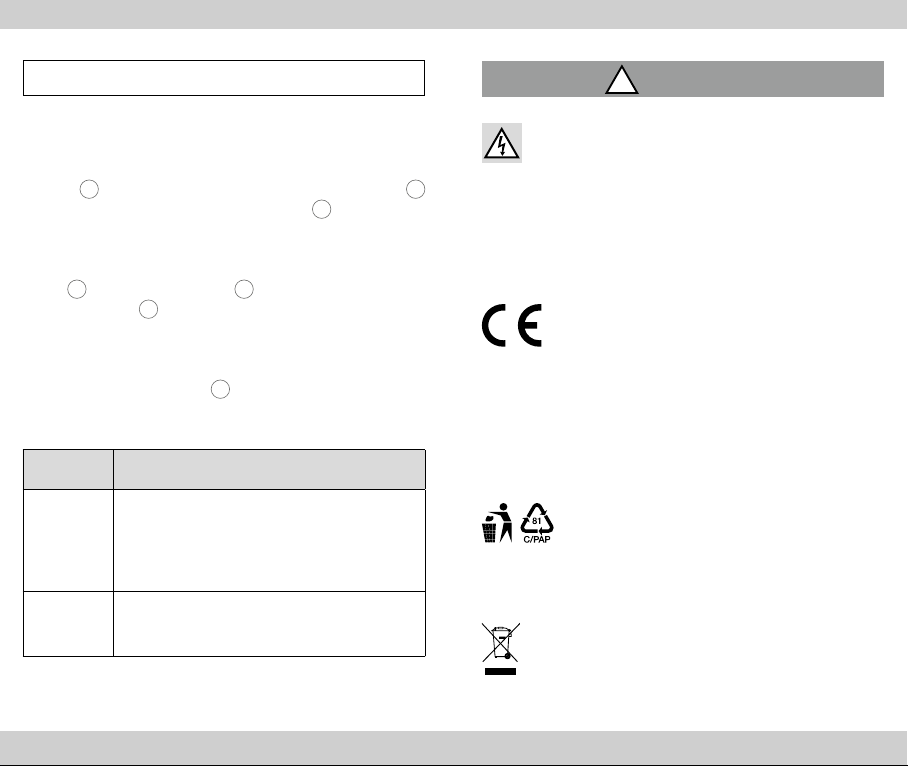
10. Operating instructions monitor (F)
NOTE!
The infrared LEDs switch on automatically in the dark.
1. Turn on the display with the On/Off
2. You can now view the live image of the camera on the
screen.
3. Press the shutter button
11
to take a photo or video.
13
switch.
15
NOTE!
To take and play back a photo or video, you must
- the MicroSD card must be inserted. See 8. Use
- a recording mode must be set. See B) System Set-
tings / recording mode
GB/IE/NIGB/IE/NI
13
button. To exit the menu, press the trigger
11
button.
B) SYSTEM SETTINGS
Here you can make and change settings on the device.
Select the desired option with the and buttons
confirm your selection with the OK button
10
and 12
9
.
Menu
1. With the unit switched on, press the
13
button to open
the display menu.
You are offered 3 menu options:
A) Recordings
B) System settings
C) Version - Info about the device software
Select the desired option with the arrow keys
12
confirm with OK
9
.
10
and
A) RECORDINGS (photos and videos)
Here you can play back or delete the recorded photos
and videos.
Playback
Select the desired photo/video with the left/right arrow
buttons
button
10
9
12
confirm your selection with the OK
and
. The photo/video is displayed directly on the
screen.
Deleting
Select the desired photo/video with the arrow buttons
10
and 12 confirm your selection with the OK button 9. The
photo/video is displayed directly on the screen.
To open the delete option, press the OK button again
9
To confirm the deletion of the photo/video, press the OK
button again
16
9
. To cancel the delete function, press the
Date & Time
Here you can set the date (MM/TT/YYYYY) and time (24
h / 60 min).
10
Use the
OK key
the next value. Press the
12
and
keys to set the desired values. Press the
9
to confirm this value and automatically jump to
13
key to return to the menu.
Language
Use the
10
and 12 keys to select the desired language.
Confirm your language selection with the OK key
Recording mode
NOTE!
Before you can perform an acquisition with the door viewing port, a recording format must first be set.
Use the
10
and 12 buttons to select the desired shooting
mode. You can set images to 960 x 720 pixels and 640 x
480 pixels or videos lasting 3, 5 or 10 seconds.
Automatic switch-off
Here you can set how long the device is to remain switched
on. You can choose between 5, 10, 15 and 20 seconds.
10
Set the desired value with the
.
with the OK key
9
.
and
12
9
.
keys and confirm
17
GB/IE/NIGB/IE/NI
Format SD card
NOTE!
When formatting the SD card, erase all data stored on the
SD card.
To confirm the formatting of the memory card, press the
OK key
9
. To cancel the formatting function, press the
button. To exit the menu, press the trigger
11
button.
13
Factory settings
To reset the unit to the factory settings, press the OK button
9
again
. To cancel, press the
press the trigger
11
button.
13
button. To exit the menu,
C) VERSION
Displays the current version of the firmware used. To exit
the menu, press the trigger
11
button.
11. Errors/Actions
Errors Possible causes/measures
No image - Is the battery dead?
Other
faulty
functions
- Are the camera and monitor unit connected?
- Is the lens taped over, or is the visible
area completely darkened?
- Check the battery charge level.
- Charge the battery with the USB
charging cable on a suitable device.
12. Cleaning and care instructions
WARNING!
!
Risk of injury!
Before cleaning, remove the battery from
the door viewing port. There is a risk of
electric shock!
- only clean with a dry cloth
- do not use any harsh detergents/chemicals
- do not immerse in water
- store in a cool, dry place, protected from UV light
13. Conformity declaration
This device complies with the fundamental requirements and other relevant regulations of the
European Electromagnetic Compatibility Directive 2014/30/EU, as well as the Low-Voltage Directive
2014/35/EU and the RoHs Directive 2011/65/EU. The
complete original conformity declaration is available from
the importer.
14. Disposal
Disposal of the packaging
The packaging and operating instructions are
made of 100 % environmentally friendly mate-
cling centres.
Disposal of the product
town administration.
rials, which you may dispose of at local recy-
The product may not be disposed of with normal
household waste. Please find out about disposal options for the product from your local authority or
18
19
GB/IE/NIGB/IE/NI
Disposal of batteries
Batteries and disposable batteries are not permitted to be disposed of with household waste. They
contain harmful heavy metals. Marking: Pb (=
lead), Hg (= mercury), Cd (= cadmium). You are legally
obligated to return used batteries and rechargeable batteries. After use, you can either return batteries to our point
of sale or in the direct vicinity (e.g. with a retailer or in
municipal collection centres) free of charge. Batteries and
rechargeable batteries are marked with a crossed-out
waste bin.
15. Warranty
Warranty of the Tradix GmbH & Co. KG.
Dear customer, this device comes with a three-year warranty, valid from the date of purchase. In case of defects of this
product, you will have legal rights towards the seller of this
product. These legal rights shall not be limited by our warranty as set out below.
16. Warranty terms
The warranty term starts on the date of purchase. Please
keep the original receipt in a safe place. This document is
required as proof of purchase.
If within a period of three years following the date of purchase, this product displays material or manufacturing defects, we shall - at our discretion - repair or replace the
product free of charge. This warranty assumes that within
a period of three years the defective device and the proof
of purchase (receipt) are submitted and that a brief written description of the defect, including when it occurred,
is provided.
If the defect is covered by our warranty, you shall receive a
repaired or a new product. The repair or exchange of the
20
product does not commence a new warranty term.
17. Distributor
Tradix GmbH & Co. KG
Schwanheimer Str. 132
D-64625 Bensheim
18. Service address
TRADIX SERVICE CENTER
c/o Teknihall Elektronik GmbH
Breitefeld 15, 64839 Münster / Germany
Hotline: 00800 30012001 (free of charge,
mobile networks may vary)
E-Mail: tradix-gb@teknihall.com
E-Mail: tradix-ie@teknihall.com
E-Mail: tradix-ni@teknihall.com
IAN 305962
06/2018
Tradix-NR.: PO31000359 / 305962-18-01
21
DK
DIGITAL DØRSPION
Brugsvejledning
1. Indledning................................................................... 22
2. Sikkerhed .....................................................................24
3. Leveringsomfang ........................................................ 25
4. Tekniske data .............................................................. 25
5. Sikkerhedsanvisninger .............................................. 26
6. Sikkerhedsanvisninger vedrørende batterier ............27
7. Montering ................................................................... 29
8. Anvendelse ..................................................................31
9. Batteriopladning .........................................................31
10. Betjeningshenvisninger displayenhed ...................... 32
11. Fejl/fejlafhjælpning ................................................... 35
12. Rengøring og pleje .................................................... 35
13. Overensstemmelseserklæring ................................... 36
14. Bortskaffelse ............................................................... 36
15. Garanti .........................................................................37
16. Garantibetingelser ......................................................37
17. Distributør ....................................................................37
18. Serviceadresse ........................................................... 38
1. Indledning
Hjerteligt tillykke
Med dette køb har du besluttet dig for et kvalitetsprodukt.
Forud for den første ibrugtagning skal man blive fortrolig
med produktet. Læs derfor den efterfølgende betjeningsvejledning opmærksomt igennem. Brug kun produktet
sådan som det er beskrevet og til de specificerede anvendelsesområder. Opbevar denne vejledning godt. Hvis
produktet gives videre til tredjepart, så giv også alle bilag
med.
22
DKDK
Symbolforklaring
Følgende symboler og signalord anvendes i denne betjeningsvejledning, på selve den digitale dørspion (nedenstående kaldt »dørspion«) eller på emballagen.
ADVARSEL!
!
Dette signalsymbol/-ord betegner en fare med en mellemstor risiko, der, hvis den ikke undgås, kan medføre livsfare
eller alvorlige kvæstelser.
FORSIGTIG!
!
Dette symbol betegner en fare med en lav risiko, der, hvis
den ikke undgås, kan medføre lettere eller mellemstore
kvæstelser.
VEJLEDNING!
Dette symbol advarer mod mulige materielle skader.
i
Vejledning håndtering af denne betjeningsvejledning
Dette symbol angiver, at produktet kun er egnet til
indendørs brug.
Dette symbol angiver mulige farer i forhold til børn.
Dette symbol angiver mulige farer i form af elektriske stød.
Dette symbol angiver mulige farer i forbindelse
med overophedning.
23

DKDK
Dette symbol angiver mulige farer i form af eksplosioner.
Dette symbol angiver mulige farer i omgangen
med batterier.
Dette tegn angiver jævnstrøm.
IP20
Dette tegn angiver beskyttelsesklasse.
Dette tegn informerer om, hvordan emballage og produkt skal
bortskaffes.
Overensstemmelseserklæring (se kapitel ”13.
Overensstemmelseserklæring”): Produkter, der
er markeret med dette symbol, opfylder alle relevante harmoniserede forskrifter i det Europæiske Økonomiske Område.
2. Sikkerhed
Tilsigtet brug
ADVARSEL!
!
Fare for personskader!
Produktet må ikke komme i nærheden af
væsker eller bruges i fugtige rum. Der er
fare for personskader!
Produktet er udelukkende beregnet til
indendørs brug.
Produktet er ikke beregnet til erhvervsbrug. Enhver anden
brug af eller ændringer på produktet gælder som ikke-formålsmæssig og kan medføre risici for person- og materiel-
24
le skader. Distributøren hæfter ikke for skader, som opstår
som følge af ikke-formålsmæssig brug.
3. Leveringsomfang (A)
1 x displayenhed
1 x kameraenhed inkl. forbindelseskabel
1 x metalholder
1 x 1000mA litium-ion-batteri
6 x monteringsskruer (forskellige længder)
1 x 4 GB MicroSD-kort inkl. adapter
1 x USB-ladekabel
2 x 3M-tape
1 x brugsanvisning
1
3
7
8
4
6
4. Tekniske data
Type: Digital dørspion med optagelsesfunktion
IAN: 305962
Tradix-nr: PO31000359 / 305962-18-01
Kamera: 3 megapixel CMOS sensor, 4 infrarød LED
Monitor: 2,8“ TFT, videoopløsning 640 x 480 (VGA)
Batteri: 3,7 V
Driftsspænding: 5 V
Kapslingsklasse: IP20
Mål:
Monitor: 130 x 75 x19 mm (L x B x T)
Kameraenhed: 65 x 65 x 14 mm (L x B x T)
3M-tape 40 x 9 mm (L x B)
Produktionsdato: 2018
Garanti: 3 år
, 1 x 1000mA, Li-ion, model: BL-5C
, 440mA
2
5
25

DKDK
5. Sikkerhedsanvisninger
! ADVARSEL!
Fare for personskader!
Børn kan kvæles eller komme til skade,
hvis de leger med dørspionen eller embal-
lagen!
- Lad ikke børn lege med dørspionen eller emballagen!
- Hold øje med børn, hvis de er i nærheden af dørspionen
- Dørspion og emballage skal opbevares utilgængeligt for
børn.
ADVARSEL!
!
Fare for personskader!
Dørspionen må ikke manipuleres! Der er
fare for personskader!
- Huset må under ingen omstændigheder åbnes,
og dørspionen må ikke manipuleres/ændres. Manipulationer/ændringer kan medføre livsfare i form af elektriske
stød. Manipulationer/ændringer er forbudt iht. godkendelsesårsager (CE).
ADVARSEL!
!
Fare for personskader!
En defekt dørspion må ikke benyttes! Der
er fare for personskader!
- Brug ikke dørspionen i tilfælde af funktionsfejl, beskadigelse eller defekter. Hvis du opdager en defekt på dørspionen, skal du få dørspionen kontrolleret eller repareret, før du bruger den igen. Hvis dette ignoreres, er der
risiko for et strømstød.
ADVARSEL!
!
Fare for personskader!
26
Brug ikke produktet i eksplosionsfarlige
omgivelser! Der er fare for personskader!
- Dørspionen må ikke anvendes i eksplosionsfarlige omgivelser. Dørspionen må ikke bruges i omgivelser med
brændbare væsker, gasser eller støv.
ADVARSEL!
!
Fare for personskader!
Ikke egnet til børn under 8 år! Der er fare
for personskader!
–Børn på 8 år og derover samt personer med nedsat fysiske, sensoriske eller mentale evner eller manglende erfaring og viden skal overvåges og/eller instrueres i
en sikker brug af dørspionen og de deraf følgende farer
ved brug af dørspionen.
Børn må ikke lege med dørspionen.
- Vedligeholdelse og/eller rengøring af dørspionen må
ikke udføres af børn, som ikke er under opsyn.
Overhold nationale forskrifter!
- Overhold de gældende nationale regler og forskrifter
ved brugen og under bortskaffelsen af dørspionen.
Vær opmærksom på miljøforhold!
- Dørspionen må ikke bruges, hvis den omgivende temperatur er over 40 °C eller under -10 °C.
6. Sikkerhedsanvisninger vedrørende
batterier
ADVARSEL!
!
Livsfare!
Batterier må ikke sluges! Livsfare!
- Batterier skal opbevares utilgængeligt for børn.
Batterier kan være livsfarlige, hvis de sluges, og derfor
skal dette produkt og de tilhørende batterier opbevares
27
DKDK
utilgængeligt for små børn.
- Søg omgående lægehjælp, hvis der er slugt et batteri.
ADVARSEL!
!
Brand- og eksplosionsfare!
– Ikke-genopladelige batterier må aldrig oplades,
kortsluttes eller åbnes. Overophedning, brandfare
eller eksplosion kan være følgen.
Hold produktet på afstand fra varmekilder og direkte solstråling, da batterierne kan eksplodere ved
overopvarmning. Der er fare for personskader!
ADVARSEL!
!
Fare for personskader!
Udløbne batterier må ikke berøres med
bare hænder! Der er fare for personskader!
- Udløbne eller beskadige batterier kan ætse huden ved
berøring. Udløbne batterier må ikke berøres med bare
hænder; brug derfor altid egnede sikkerhedshandsker!
- Anvend kun batterier af type 1000mA litium-ion fra samme producent.
- Læg batterierne i henhold til deres polaritet ind i den dertil beregnede batteriskakt.
- Batterier skal opbevares tørt og køligt, aldrig fugtigt.
- Batterier må aldrig kastes ind i ild.
- Batterier må ikke kortsluttes.
- Fjern batterierne, når produktet ikke anvendes.
- Afladede batterier skal fjernes omgående for at undgå,
at batteriet løber ud og dermed forårsager skader på
produktet.
- Tomme batterier og brugte genopladelige batterier skal
bortskaffes korrekt.
- Opbevar engangsbatterier adskilt fra afladede genbrugsbatterier for ikke at forbytte dem.
28
7. Montering
Dørspionens montering
Dørspionen er beregnet til drift i indendørs gange. Fugtighed og frost ville beskadige kameraenheden.
Hvis du ikke selv vil montere eller afmontere enheden, bør du kontakte en fagmand.
A: Med eksisterende dørspion
B: Uden eksisterende dørspion
1. Mål dørpanelets tykkelse Dørpanelet skal have en tykkelse mellem 35 – 100 mm.
A: Med eksisterende dørspion
2. Fjern den eksisterende dørspion Dette sker som regel
ved at skrue afdækningen på indersiden af og trykke
modstykket ud.
3. Mål hullets diameter. Den skal være mindst 15 mm Er
diameteren mindre, bores hullet med en boremaskine
op til en diameter på mindst 15 – 16 mm (se hertil følgende punkt B).
B: Uden eksisterende dørspion
2. Der skal bores et passende hul i dørpanelet.
Der kræves en boremaskine, et 16 mm bor (borets be-
skaffenhed afhænger af dørpanelets materiale) og evt.
en tommestok.
VEJLEDNING!
VEJLEDNING!
29
 Loading...