

Page 1

P. O . Box 776
Old Saybrook, CT 06475-0776
Place
Postage Here.
Or for additional
security enclose
in a envelope.
Page 2
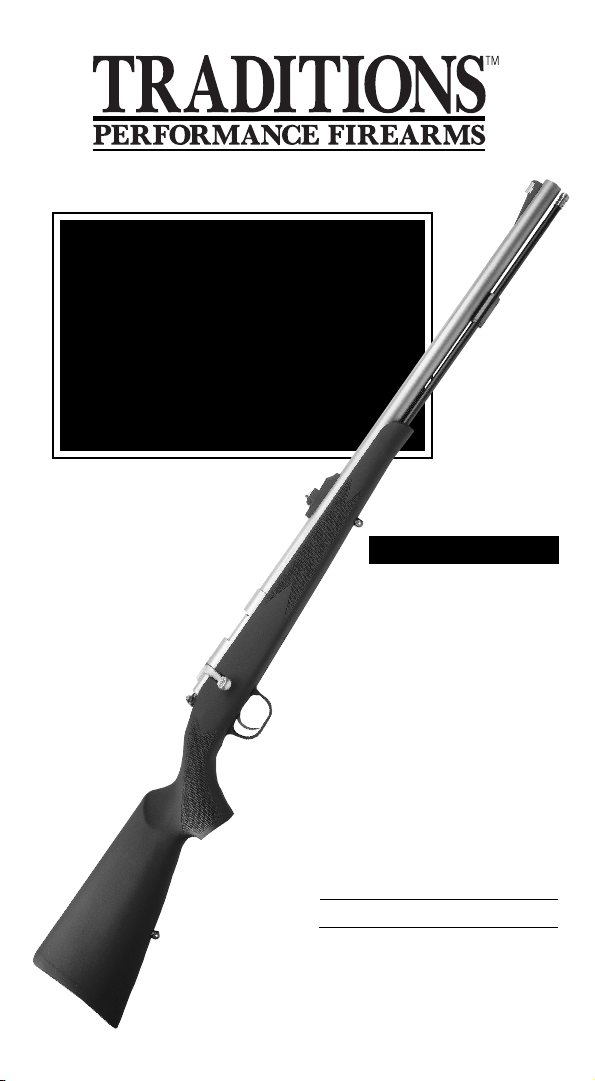
EVOLUTION
THUNDERBOLT
TRACKER
IMPORTANT!
Thoroughly read and
understand all of the
instructions and warnings
in this manual before using
your Traditions firearm.
In-Line Muzzleloader Owner’s Manual
Traditions Performance Firearms
1375 Boston Post Road
P. O. Box 776
Old Saybrook, CT 06475
www.traditionsfirearms.com
email: [email protected]
Fit 18 – 03/03
Jb2
Page 3

TRADITIONS’ WARRANTY PROTECTION
INCLUDED WITH YOUR NEW GUN
Quality, pride and old world craftsmanship has gone into your new
Traditions muzzleloader. We work hard to provide the best value and
performance possible, we back it up with a limited lifetime
mechanical warranty. Should you ever experience mechanical
difficulty with your new Traditions firearm, be assured that we are
staffed and equipped to correct it quickly. Your satisfaction with your
firearm is very important to us.
PLEASE HELP US SERVE YOU BETTER
In the unlikely event you need warranty service on your new
firearm, we need your help to get the work done right and without
delay. It’s as easy as dropping us a note or picking up the telephone.
Traditions conveniently embosses the caliber, twist configuration,
and model name on each barrel. Take note of this information and be
prepared to state it when contacting the Traditions Customer Service
Department with your questions.
Help is just a phone call away should you ever experience a
problem. Simply follow these four simple steps and we’ll get your
firearm back in perfect working order in the shortest possible time.
1. Do not return your firearm to the dealer. You can save
time by following the steps outlined below.
2. Do call us and describe the problem. Chances are we can either
guide you to a solution right over the phone or when possible send
you the parts you need to correct the problem.
3. Should your gun need factory service, we will give you instructions
as to where to ship it.
4. We will inspect your firearm and make necessary repairs that are
covered under warranty.
Often we can help you by phone, Call before you return your
Traditions firearm for service. Good Shooting!
Important: All firearms must have a factory issued return
authorization number (RA#) before returning to traditions
for warranty service.
Contact Traditions at 1-860-388-4656, tell us what problem you
are experiencing and we’ll get busy to remedy your situation.
1
-860-388-4656
Page 4

LIMITED LIFETIME MECHANICAL WARRANTY
Firearms packaged and shipped improperly are not covered under
warranty if damage occurs.
This warranty shall remain in force unless any of the following are
determined by the Traditions Customer Service Department:
1. Use of any propellant other than black powder, Pyrodex or Triple 7.
2. Use of any powder charges in excess of those recommended in
this booklet.
3. Use of any plastic patching material with round balls.
4. Modification of internal parts as they were shipped from the factory.
5. A lack of proper maintenance and thorough cleaning is evident such
as rust.
6. Wooden stocks and ramrods are warrantied to the extent that the
defect is a result of the manufacturer and not as a consequence of
normal wear and tear.
your service representative when obtaining your RA#
Traditions will warrant this muzzleloading firearm (or parts in a
kit to be built) to be free of mechanical defects in materials or
craftmanship for the life of the firearm, while in the possession of the
original owner except wooden stocks. Traditions will repair or
replace, at its own option, product or parts which are returned at
owner’s expense to the Traditions Customer Service Department. A
full explanation of the specific problem must accompany
the returned item. Call 1-860-388-4656 to obtain a factory issued
return authorization number.
Shipping Address:
Traditions Performance Firearms
1375 Boston Post Rd. • P.O. Box 776
Old Saybrook, CT 06475-0776
Tel. 1-860-388-4656
Fax. 1-860-388-4657
Website: www.traditionsfirearms.com
E-mail: [email protected]
Business hours: M-Th. 7:45-4:30 EST
Fri.-7:45-3:15 EST
If you are unsure how to package your firearm for return, ask
Page 5

TABLE OF CONTENTS
YOUR NEW TRADITIONS MUZZLELOADER . . . . . . . . . . . . . 1
TODAY’S MUZZLELOADING SPORT . . . . . . . . . . . . . . . . . . . . . . . 2
MUZZLELOADING ‘MUSTS’
FOR MUZZLELOADING SUCCESS . . . . . . . . . . . . . . . . . . . . . . . . 3
BEFORE YOU USE YOUR MUZZLELOADER . . . . . . . . . . . . . . . . 5
THUMB SAFETY . . . . . . . . . . . . . . . . . . . . . . . . . . . . . . . . . . . . . . . . . . 5
DISASSEMBLY FOR IN-LINE MUZZLELOADERS. . . . . . . . . . . . 7
DISASSEMBLY FOR BOLT-ACTION MUZZLELOADERS . . . . . 8
IGNITION (includes nipples and breech plugs) . . . . . . . . . . . . . . 10
ADJUSTABLE TRIGGER. . . . . . . . . . . . . . . . . . . . . . . . . . . . . . . . . . . 12
LOADING . . . . . . . . . . . . . . . . . . . . . . . . . . . . . . . . . . . . . . . . . . . . . . . 12
RECOMMENDED PROPELLANTS. . . . . . . . . . . . . . . . . . . . . . . . . 13
LOADING THE POWDER. . . . . . . . . . . . . . . . . . . . . . . . . . . . . . . . . 14
LOADING THE PROJECTILE . . . . . . . . . . . . . . . . . . . . . . . . . . . . . . 16
CAPPING YOUR MUZZLELOADER . . . . . . . . . . . . . . . . . . . . . . . 18
IF THE GUN FAILS TO FIRE. . . . . . . . . . . . . . . . . . . . . . . . . . . . . . . 19
REMOVING THE PROJECTILE AND THE CHARGE . . . . . . . . 20
SIGHTING IN . . . . . . . . . . . . . . . . . . . . . . . . . . . . . . . . . . . . . . . . . . . . 21
RECOMMENDED LOADS . . . . . . . . . . . . . . . . . . . . . . . . . . . . . . . . 22
CLEANING . . . . . . . . . . . . . . . . . . . . . . . . . . . . . . . . . . . . . . . . . . . . . . 24
HELPFUL MUZZLELOADING ACCESSORIES. . . . . . . . . . . . . . 26
PREFERRED CUSTOMER WARRANTY . . . . . . . . . . . . . . . . . . . . 28
Page 6
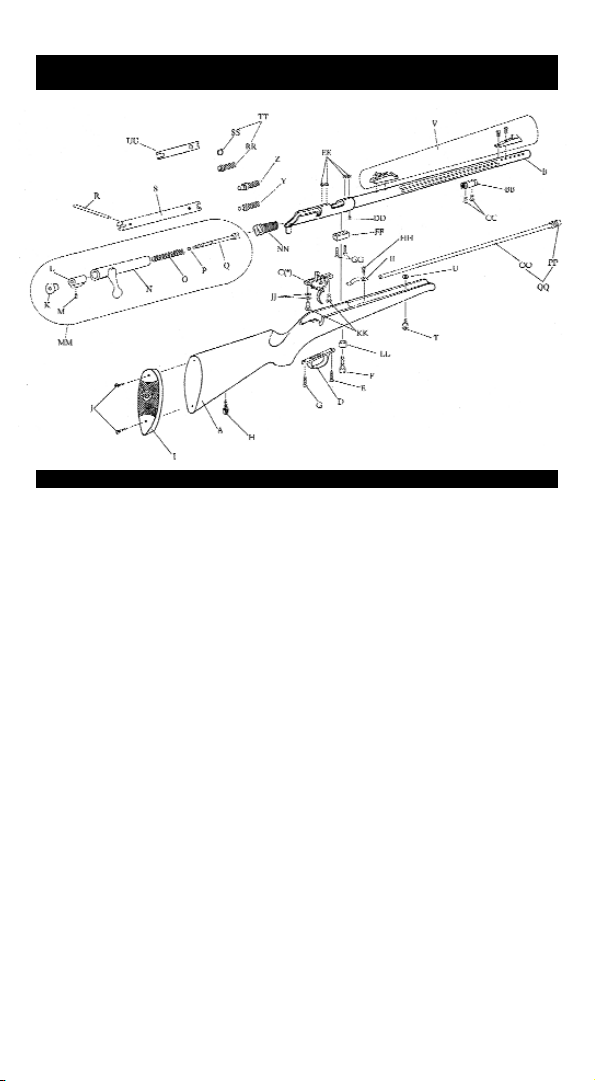
Evolution
™
Premier Rifle
DESCRIPTION
Description
A Stock
B Barrel Assembly (Length 26”)
.50 cal. Perc. (twist 1-28”)
CTrigger Assembly (Adjustable)
DTrigger Guard (Blackened)
ETrigger Guard Screw
F Action Mounting Screw (Allen Head)
G Action Mounting Screw
H Sling Swivel Stud-Rear
I Buttpad
J Buttpad Mounting Screw (2)
K Cap
L Bolt Head
M Locking Screw
N Bolt
O Mainspring
PRed Ring
Q Striker
RWrench Handle
SWrench
T Sling Swivel Stud-Front
U Sling Swivel Stud-Front Nut
V Right Sight Assembly
Description
Y Percussion Nipple
Z Musket Cap Nipple
BB Ramrod Thimble
CC Ramrod Thimble Screw (2)
DD Barrel Locking Screw
EE Plug Screw
FF Bedding Block
GG Bedding Block Screw (Allen Head) (2)
HH Ramrod Retaining Spring Screw
II Ramrod Retaining Spring
JJ Lock Washers (2)
KK Trigger Assembly Mount Screw (2)
LL Stock Bushing
MM Bolt Assembly
NN Breech Plug
OO Ramrod (Aluminum)
PP Ramrod Tip Cal .50
QQ Ramrod Assembly
RR 209 Cap Nipple
SS 209 Cap Nipple Spring
TT 209 Cap Nipple Assembly
UU Decapping Tool
Page 7
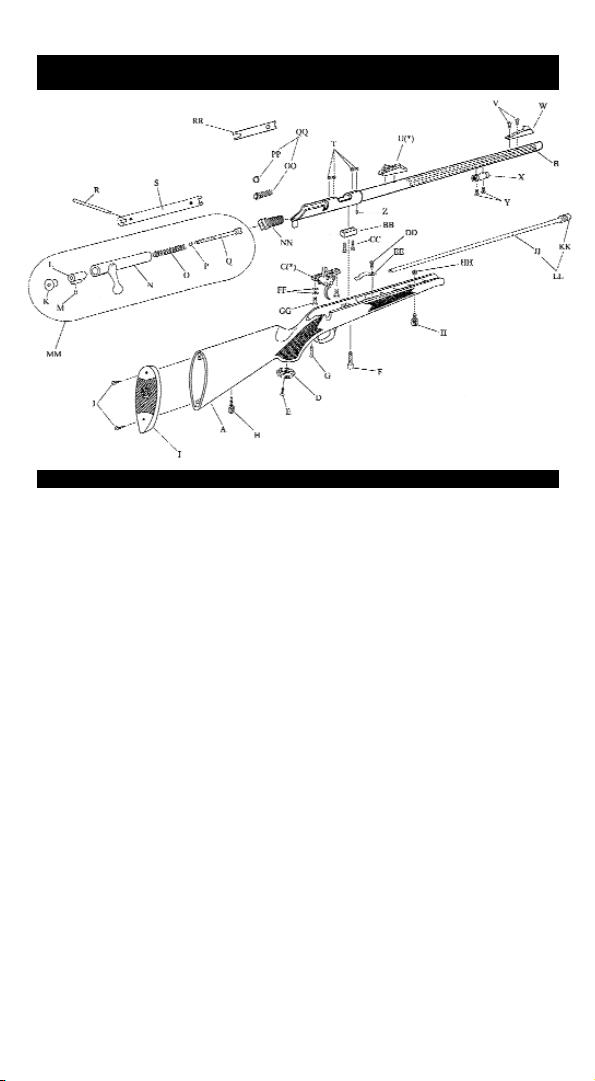
Evolution
™
LD Rifle
DESCRIPTION
Description
A Stock
B Barrel Assembly (Length 26”)
.50 cal. Perc. (twist 1-28”)
CTrigger Assembly (Adjustable)
D Pistol Grip Cap
E Pistol Grip Cap Screw
F Action Mounting Screw (Allen Head)
G Action Mounting Screw
H Sling Swivel Stud-Rear
I Buttpad
J Buttpad Mounting Screw (2)
K Cap
L Bolt Head
M Locking Screw
N Bolt
O Mainspring
PRed Ring
Q Striker
RWrench Handle
SWrench
T Plug Screw (4)
U Fiber Optic Rear Sight
Description
V Front Sight Mounting Screw (2)
W Fiber Optic Front Sight
X Ramrod Thimble
Y Ramrod Thimble Screw (2)
Z Barrel Locking Screw
BB Bedding Block
CC Bedding Block Screw (Allen Head) (2)
DD Ramrod Retaining Spring Screw
EE Ramrod Retaining Spring
FF Lock Washers (2)
GG Trigger Assembly Mount Screw (2)
HH Sling Swivel Stud-Front Nut
II Sling Swivel Stud-Front
JJ Ramrod (Aluminum)
KK Ramrod Tip Cal .50
LL Ramrod Assembly
MM Bolt Assembly
NN Breech Plug
OO 209 Cap Nipple
PP 209 Cap Nipple Spring
QQ 209 Cap Nipple Assembly
RR Decapping Tool
Page 8
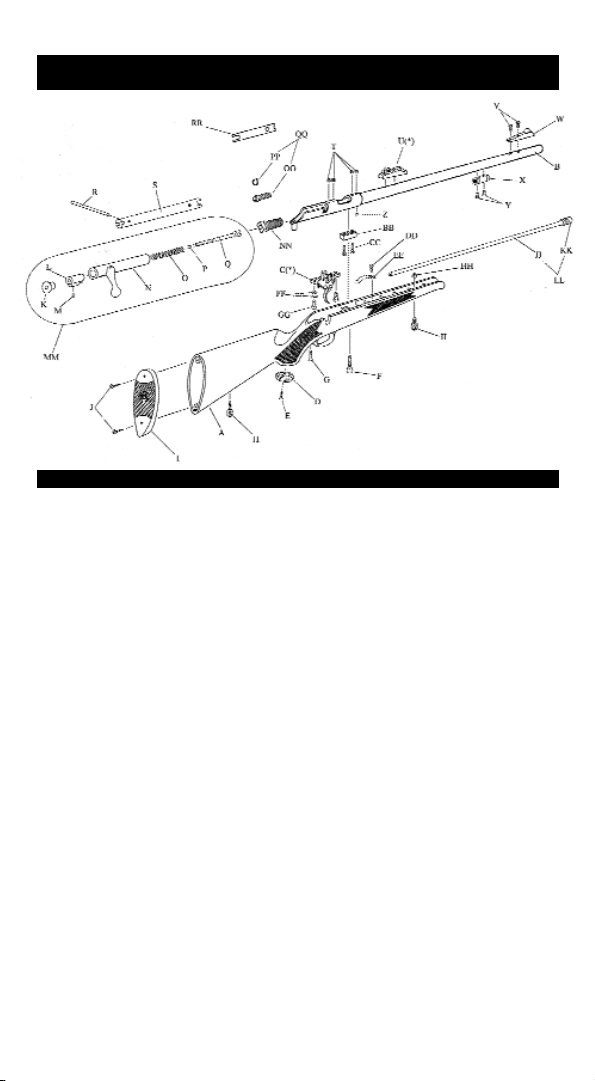
Evolution
™
Rifle
DESCRIPTION
Description
A Stock
B Barrel Assembly (Length 24”)
.50 cal. Perc. (twist 1-28”)
CTrigger Assembly (Adjustable)
D Pistol Grip Cap
E Pistol Grip Cap Screw
F Action Mounting Screw (Allen Head)
G Action Mounting Screw
H Sling Swivel Stud-Rear
I Buttpad
J Buttpad Mounting Screw (2)
K Cap
L Bolt Head
M Locking Screw
N Bolt
O Mainspring
PRed Ring
Q Striker
RWrench Handle
SWrench
T Plug Screw (4)
U Fiber Optic Rear Sight
Description
V Front Sight Mounting Screw(2)
W Fiber Optic Front Sight
X Ramrod Thimble
Y Ramrod Thimble Screw (2)
Z Barrel Locking Screw
BB Bedding Block
CC Bedding Block Screw (Allen head)(2)
DD Ramrod Retaining Spring Screw
EE Ramrod Retaining Spring
FF Lock Washers (2)
GG Trigger Assembly Mount Screw (2)
HH Sling Swivel Stud-Front Nut
II Sling Swivel Stud-Front
JJ Ramrod (Aluminum)
KK Ramrod Tip Cal.
LL Ramrod Assembly
MM Bolt Assembly
NN Breech Plug
OO 209 Cap Nipple
PP 209 Cap Nipple Spring
QQ 209 Cap Nipple Assembly
RR Decapping Tool
Page 9
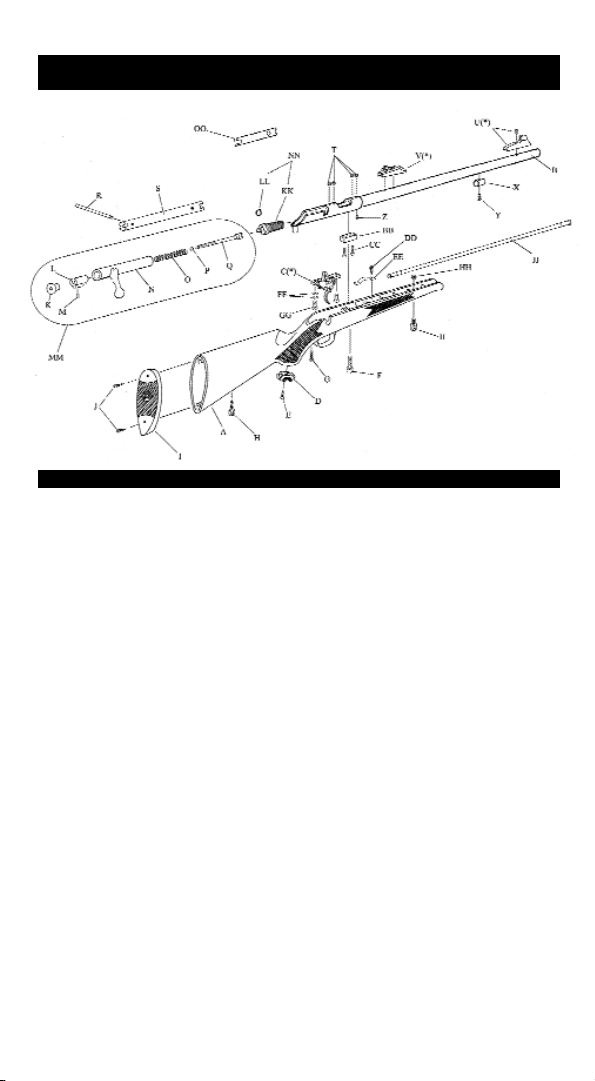
Thunderbolt
™
Rifle
DESCRIPTION
Description
A Stock (Finished)
B Barrel Assembly (Length 24”)
.50 cal. Perc. (twist 1-28”)
CTrigger Assembly (Adjustable)
D Pistol Grip Cap
E Pistol Grip Cap Screw
F Action Mounting Screw (Allen Head)
G Action Mounting Screw
H Sling Swivel Stud-Rear
I Buttpad
J Buttpad Mounting Screw (2)
K Cap
L Bolt Head
M Locking Screw
N Bolt
O Mainspring
PRed Ring
Q Striker
SWrench
Description
T Plug Screw (4)
U New Luminous Front Sight
V New Luminous Rear Sight
X Ramrod Thimble
Y Ramrod Thimble Screw
Z Barrel Locking Screw
BB Bedding Block
CC Bedding Block Screw (Allen head) (2)
DD Ramrod Retaining Spring Screw
EE Ramrod Retaining Spring
FF Lock Washers (2)
GG Trigger Assembly Mount Screw (2)
HH Sling Swivel Stud-Front Nut
II Sling Swivel Stud-Front
JJ Ramrod Assembly
KK 209 Breech Plug-Nipple
LL 209 Cap Breech Plug-Nipple
MM Bolt Assembly
NN 209 Breech Plug-Nipple Assembly
OO Decapping Tool
Page 10
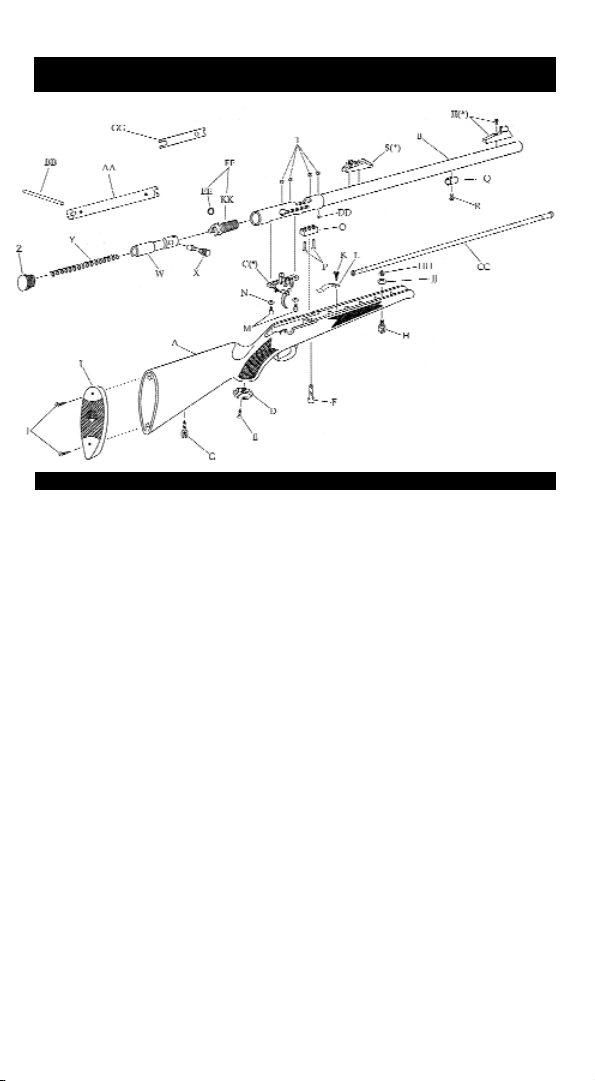
Tracker 209 In-Line Rifle
DESCRIPTION
Description
A Stock
B Barrel Assembly (Length 24”)
. 50 cal. Perc. (twist 1-28”)
CTrigger Assembly
D Pistol Grip Cap
E Pistol Grip Cap Screw
F Action Mounting Screw (Allen Head)
G Sling Swivel Stud-Rear
H Sling Swivel Stud-Front
I Buttpad
J Buttpad Mounting Screw (2)
K Ramrod Retaining Spring Screw
L Ramrod Retaining Spring
MTrigger Assembly Mount Screw (2)
N Lock Washers (2)
O Bedding Block
P Bedding Block Screw (Allen head) (2)
Q Ramrod Thimble
Description
R Ramrod Thimble Screw
S New Luminous Rear Sight
T Plug Screw (4)
W Bolt
X Bolt Handle
Y Mainspring
Z Receiver Cap (Blued)
AA Wrench
BB Wrench Handle
CC Ramrod Assembly
DD Barrel Locking Screw
EE 209 Cap Nipple Spring
FF 209 Breech Plug-Nipple Assembly
GG Decapping Tool
HH Sling Swivel Stud-Front Nut
II New Luminous Front Sight
JJ Sling Swivel Stud-Front Washer
KK 209 Breech Plug-Nipple
Page 11

1
YOUR MUZZLELOADING RIFLE
Congratulations on your purchase of a Traditions muzzleloader.
You have selected a muzzleloading firearm designed and engineered
to give today’s shooters the highest performance and optimum
accuracy. When given the respect and care that any firearm demands,
you can expect many years of reliable service and enjoyable hunting
from your new Traditions muzzleloader.
A person using any firearm has elected to take on an enormous
responsibility. This manual contains instructions, cautions and
dangers for the safe enjoyable use of your Traditions muzzleloader.
Shooting a firearm is a serious endeavor. These instructions and
precautions should always be followed during each shooting session.
Safe firearm handling, loading and shooting are your responsibility
and requires that you understand and respect the design and function
of your firearm. All firearms can be very dangerous if misused,
handled improperly or not properly maintained.
Like all firearms, muzzleloaders can be dangerous. Your purchase
of this firearm implies that you accept all the responsibilities
associated with its proper handling, use and care. Also, if in the hands
of another, realize that you have the duty to insure that that person
handles your firearm in the correct and proper manner.
CAUTION: If you sell, trade or give this rifle to another
person, be sure to give the new owner a copy of this
manual. Copies of this manual are available free of
charge from Traditions Performance Firearms.
Tradition's markets a "How to" Muzzleloading video called The
Basics of Muzzleloading. This video is very helpful in understanding
the bas ic steps and procedures involved in loading, shooting, cleaning
and maintaining your muzzleloader. This video can be purchased
from your local sporting goods dealer or direct from
Traditions Firearms by calling 1-860-388-4656.
Page 12

2
THE SPORT OF MUZZLELOADING
More and more sportsmen have discovered the challenges and
enjoyment of muzzleloading in recent years. For both hunting and
target shooting, muzzleloading guns have helped a modern
generation recapture and enjoy an important aspect of our nation’s
sporting past.
Tr aditions In-Line Muzzleloaders are firearms which represent the
latest developments in this unique part of the shooting sports. They are
manufactured to modern standards for safe and enjoyable shooting.
This booklet is intended as a basic guide for the proper
maintenance, loading and shooting of Traditions muzzleloaders, and
to offer important rules and precautions for safe handling and
shooting of this type of firearm. In addition to this booklet, it is
recommended that the novice obtain further information and
instruction before firing a muzzleloader. Sources for this help include:
1. National Muzzle Loading Rifle Association
P.O. Box 67, Friendship, Indiana, 47021, 1-800-745-1493 or visit
them on the web @ HYPERLINK http://www.nmlra.org or
www.nmlra.org
The following are available from the
National Muzzle Loading Association:
“The Muzzleloading Rifle Handbook”
“The Muzzleloading Pistol Handbook”
2. National Rifle Association has over 41,500 certified instructors in
the United States, and offers courses on safe and correct operation
of muzzleloading rifles. To find a local instructor, contact NRA’s
Training Division at 1-703-267-1430, or visit them online at
www.nra.org.
3. Your town clerk, local sporting good dealer, state DEP or conservation
department can provide information on hunter safety courses offered
in your area. Many such courses include muzzleloader training and
are excellent for the beginner shooter.
4. Contact your local muzzleloader or hunting club. Club members
should be pleased to help introduce you to enjoyable shooting.
Page 13

3
MUZZLELOADING ‘MUSTS’
FOR MUZZLELOADING SUCCESS
1. Read completely, fully understand and be willing to follow all
instructions and warranty limitations outlined in this booklet before
loading or attempting to shoot your new Traditions muzzleloader.
2. Always treat any firearm as if it is loaded.
3. Always wear proper eye and ear protection when loading or
firing any firearm.
4. Don’t shoot until you are absolutely sure of your target and what
is beyond it. Do not point your firearm at anything you do not intend
to shoot. Be sure that all bystanders are safely positioned behind you
and that they are aware that you are about to shoot. Be mindful that
this firearm has a range in excess of a half a mile.
5. Use only the proper grade of black powder, Pyrodex®powder,
Pyrodex Pellets
®
or Triple 7 powder in properly measured amounts. Be
sure to reference the chart in this booklet for recommended loads. Reduce
charges of Triple 7 by 15%, whether measuring by weight or volume.
6. Never use any amount of smokeless gun powder in your
muzzleloader. Although also black in color, smokeless powder is a
very different chemical composition and it will produce dangerous
pressures resulting in serious injury to yourself, bystanders and it will
damage your firearm.
7. Never smoke or permit others to smoke in the presence of black
powder or Pyrodex®. Take care to guard against all potential
ignition sources.
8. Never take drugs and/or drink alcoholic beverages before and
during shooting.
9. Be certain that the powder, patches and projectiles are properly
sized and measured and are loaded in their proper sequence and that
the projectile is firmly seated on top of the propellant.
10. Use only cotton or linen shooting patches when loading round
lead balls. Do not use any type of plastic patches.
11. Never load powder into a gun directly from a can, powder horn
or flask. Always use a separate calibrated powder measuring device.
Aremaining spark or ember in the barrel may cause an ignition of the
powder and cause harm to you, bystanders and the firearm.
13. No projectiles other than those specifically recommended in this
manual should be used in your muzzleloader.
Page 14

4
14. Always be mindful of where the safety lever is set and routinely
verify its setting. Never solely rely on any rifle’s safety. It is prudent
to always treat every gun as if it were loaded and ready to fire. A
firearm’s safety is a mechanical device which can fail.
15. Always disable your muzzleloader by carefully removing the
percussion cap or primer and unloading the barrel when immediate
shooting is not planned.
16. Never install a percussion cap or primer on the nipple before the
gun is loaded. When loaded, a bump or unintentional pressure could
result in the discharge of the firearm resulting in a serious accident.
17. Never leave a loaded firearm unattended.
18. Never climb, jump or move abruptly while carrying any
loaded firearm.
19. Never transport a loaded firearm nor shoot one from within a
vehicle.
20. Always store the powder, gun and percussion caps or primers
in separate locked places. Always keep all firearms and ammunition
components secured and separate away from children. Never store a
loaded gun.
21. In the event of a misfire, assume the gun could fire at any
moment. Keep gun pointed down range with the bolt closed. Wait at
least one minute before recapping, repriming, or removing the load
from the barrel.
22. Never load a muzzleloading firearm indoors. Only load your
firearm in a location where it is safe to shoot.
23. Be certain that anyone firing this muzzleloader understands and
is willing to follow the instructions and precautions in this manual
and the fundamentals of safe firearm handling.
24. Always make certain that the safety is fully set in the most
rearward “Safe” (S) position when installing percussion caps or
primers.
25. Never shoot at a hard, flat surface or the surface of water.
26. Make sure you have a safe and secure backstop of proper
thickness and density necessary to capture the projectiles.
Take time now to acquaint yourself with your new Traditions
Muzzleloader. If you have any questions regarding your muzzleloader
after reviewing this information, please contact theTraditions Customer
Service Department for assistance. 1-860-388-4656.
Page 15

5
MAKE SURE THAT THE MUZZLELOADER IS
UNLOADED BEFORE PROCEEDING.
To check if the muzzleloader is unloaded, remove the ramrod and
place it down the barrel. The ramrod should be flush with the
muzzle. If it is not, you will need to disassemble the muzzleloader
and remove the obstruction before proceeding. Refer to the
disassemble section.
BEFORE YOU USE YOUR MUZZLELOADER,
CLEAN & LUBRICATE IT!
These are brief instructions on what to do before you use your
muzzleloader for the first time. Please review the Disassembly
instructions inside for a complete set of instructions. When you first
take the muzzleloader new, out of the box there will be some
manufacturing oils and grease for shipping purposes. These residues
need to be removed so that the muzzleloader will function properly.
1. Remove the bolt or plunger (depending on the model you have),
nipple & breech plug from your muzzleloader.
2. Remove the barrel action from the stock and clean the barrel with
hot, soapy water. This will remove any manufacturing residue that
may be on the inside or outside of the barrel.
3. Dry all of the parts completely.
4. Apply a light coat of Tradition’s Wonderlube 1000 Plus lubricant
to a dry patch (or use Tradition’s pre-lubes patches) and run up &
down the bore before loading. This will allow for easier loading and
cleaning throughout your shooting sessions.
5. Lubricate the threads of the breech plug and nipple with
Tradition’s Wonderlube 1000 Plus or Tradition’s Breech plug grease.
THUMB SAFETY
Your Traditions ThunderBolt or Evolution rifle is equipped with a
trigger blocking thumb safety. (Standard Buckhunter Models do not
come with this feature.) When this safety is set on “Safe”(S) or pulled
to the rear, it will restrict movement of the trigger. When the safety
is set on “Fire” (F) or pushed to the front, the hammer will be released
and will fire when the trigger is pulled.
CAUTION: With the safety set in the “Fire” (F) position, the
gun is now ready to fire. Never rely totally on your rifle’s
mechanical “safety” device. The word “Safety” describes a
5
Page 16
6
gun’s trigger block mechanism. This mechanical device is
designed to place your gun in a safer status. No guarantee
can be made that the gun absolutely will not fire even if the
safety is set on the “Safe” (S) position. Like any mechanical
device, a “Safety” can sometimes fail. It can be jarred or
inadvertently manipulated into an unsafe condition. Never
test the safety while your rifle is loaded or at any time while
it is pointed in an unsafe position.
A Note About Maintenance Procedures:
Proper maintenance and cleaning of your new muzzleloader will
require you to remove the barreled action from the stock. You must
clean the muzzleloader each time it is used. Please see the
Disassembly and Cleaning sections for more information. Take time
before such cleaning to study the Disassembly/Assembly procedures
and the accompanying photographs to thoroughly acquaint yourself
with your rifle’s subassemblies.
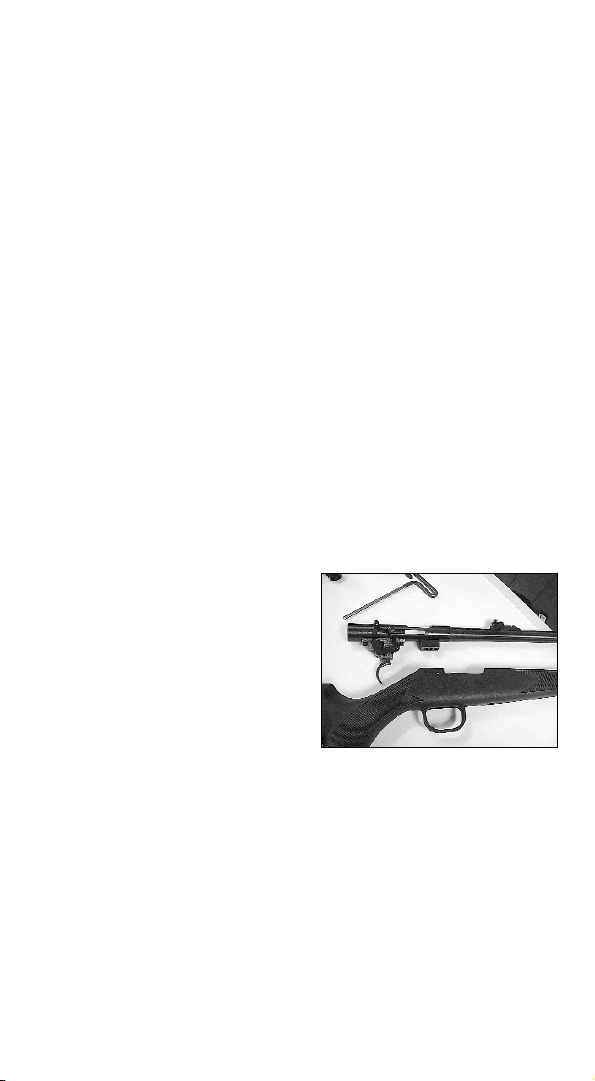
Removal of Barrel from the Stock
(All model In-Line Muzzleloaders)
1. Make sure the muzzleloader is UNLOADED & UNCAPPED.
2. Remove the ramrod. Using a 5mm
hex wrench, loosen and remove
the hex bolt in front of trigger
guard.
3. ThunderBolt and Evolution rifles
a. Loosen and remove the flat
head screw behind the trigger
guard.
Buckhunter models
c. Loosen forearm swivel stud by gently turning in a counter-
clockwise direction.
Note: The swivel stud on the forend of the Buckhunter Series
muzzleloaders needs to be replaced or re-tightened. Also, if the
forearm swivel stud is over-tightened, the ramrod may not slide
back into the stock. You will need to loosen it up a little.
4. Lift barrel up and away from the stock. The trigger assembly
should come out with the barrel. See fig. 1
Fig. 1
Tracker 209 model shown here.
6
Page 17
7
DISASSEMBLY FOR IN-LINE MUZZLELOADERS:
(Tracker 209 , Buckhunter’s & other variations)
Before proceeding with disassembly and maintenance of your rifle,
make certain the gun is unloaded and that the cap, or primer has
been removed from the nipple.
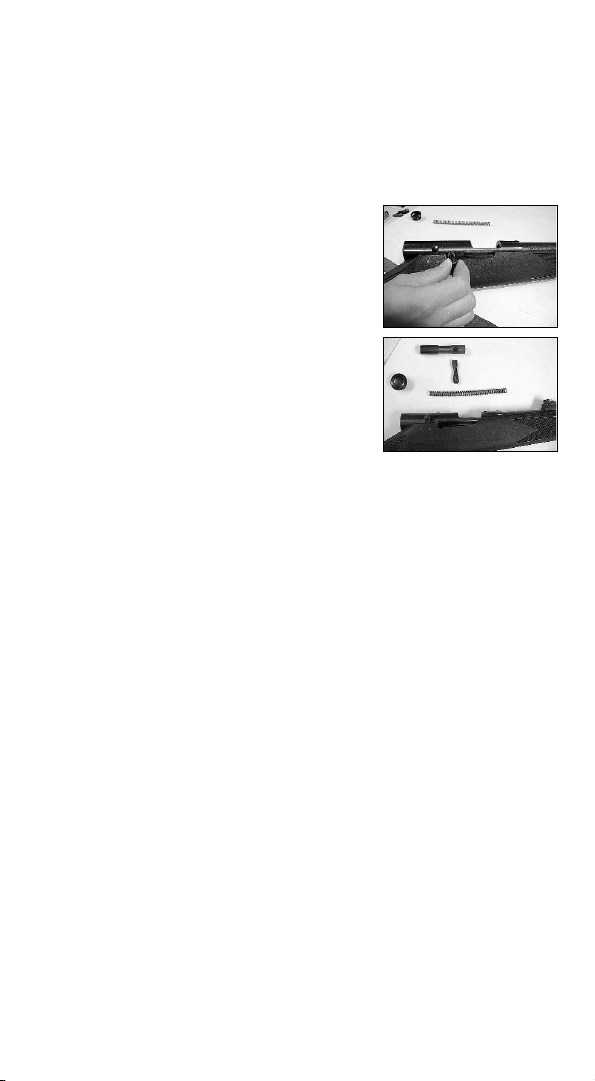
1. Remove ramrod and make sure the
muzzleloader is unloaded.
2. With safety in “fire” or “off” position,
hold trigger in and push bolt handle and
bolt to the forward position. Place bolt in
full forward position by holding
moderate pressure on the bolt handle,
then pulling the trigger and gently sliding
the bolt to its full forward position. A
new muzzleloader will come with the
bolt already in the forward position.
3. Unscrew the knurled cap at back end of
receiver, maintaining a constant pressure on the cap to prevent an
accidental release of the bolt spring.
CAUTION: The bolt is under compression even with bolt in full
forward position and can cause serious injury if released
unexpectedly. Exercise caution whenever removing or replacing
knurled cap and spring.
4. Remove bolt spring.
5. Squeeze trigger and slide bolt handle back to the rearmost position
in the receiver. see fig. 2
6. Remove bolt handle by pulling straight out from side of the
receiver. You may have to jiggle the handle a bit while pulling.
7. Squeeze the trigger and push the bolt out through the rear of
receiver. By pulling trigger, it allows the sear to drop down and
allow the bolt to be removed. You should have 4 parts on the table.
See fig.3. (Buckhunter models will have a spring follower.)
Fig. 2
Fig. 3
7
Page 18

8
DISASSEMBLY FOR BOLT ACTION
MUZZLELOADERS:
(ThunderBolt and Evolution Rifles)
Removal of Bolt from the Receiver
Before proceeding with disassembly and maintenance of
your rifle, make certain the gun is unloaded and that the
percussion cap or primer has been removed from the
nipple.
a. New, out of the box, the muzzleloader comes without the bolt in the
receiver.
b. If the bolt is installed already in the rifle, follow these instructions:
Note: The Evolution and ThunderBolt rifles are equipped with the
Ultra Glide Bolt, which cocks the internal striker when the bolt handle
is lifted. There will be slight resistance when lifting the uncocked bolt
from the closed position, as this lifting motion cocks the striker.
1. Move the safety to the forward “Fire” (F) position.
2. Lift up on the bolt handle to release out of stock groove.
3. Pull the trigger and hold.
4. Lift the bolt handle up and over the safety lever while still
holding the trigger in.
Disassembly of the Bolt
Note: During the course of a shooting session, if at any time the bolt
should not function correctly, please remove from receiver and
inspect. Traditions recommends that you disassemble the bolt as
described below.
Note: Due to larger amounts of powder being used the powder residue
may build up inside the bolt assembly when shooting. Spray some Easy
Clean solvent into the face of the bolt so that it penetrates the inside area
of the bolt body. This will loosen the powder residue that has built up
inside the body and should allow the striker to function properly. If the
bolt is still not functioning correctly, please follow these instructions.
Please refer to the diagram of the Bolt Action Muzzleloader and
familiarize yourself with the bolt and its’ parts before attempting to
disassemble it.
8
Page 19
9
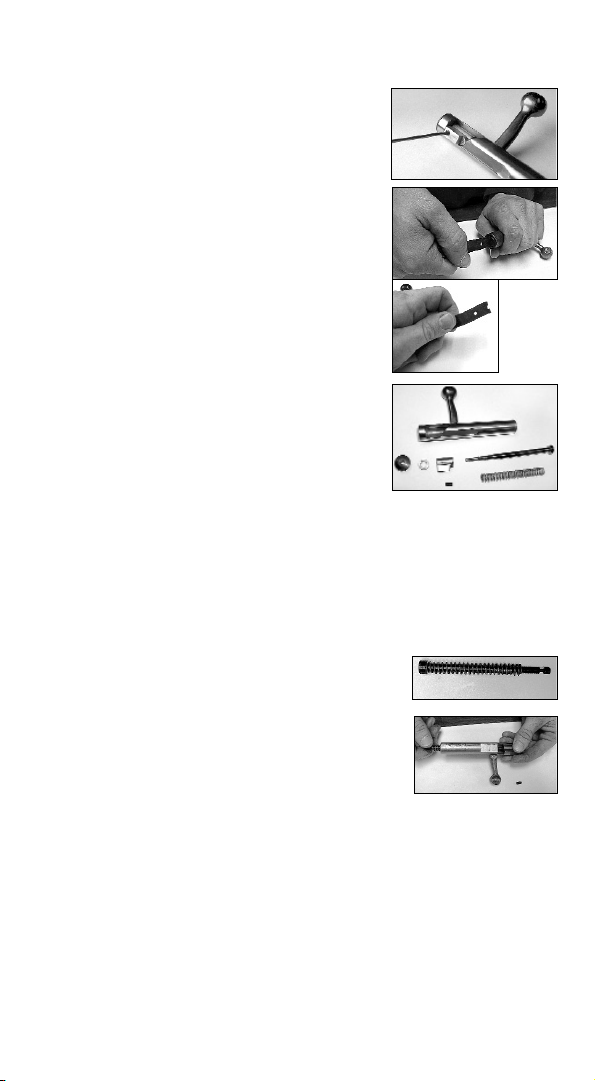
1. Using a 2mm (metric) hex wrench, loosen and halfway unscrew the
small set-screw located in the bolt head. It is
located underneath and at the rear of the
bolt.
2. Using the 209 Depriming tool or a wide
blade flat-headed screwdriver, unscrew the
striker counterclockwise, located at the front
of the bolt and remove it from the bolt body.
Helpful Hint: Secure the 209 Depriming tool
in a pair of vice grips and use the vice grips
for more leverage when unscrewing the striker
from the bolt body.
3. Separate the striker, spring and bolt head.
4. Clean bolt parts with hot, soapy water using
a nylon brush to remove residue.
5. Lightly lubricate all parts using light gun
oil.
Note: Do not use grease or heavy lubrication
on these parts. In cold weather they become thicker and can affect the
function of the bolt possibly resulting in a misfire or unintentional
firing.
Assembly of Bolt
1. Insert the striker through the middle of the spring.
2. Insert spring & striker into the bolt body with
striker head facing opposite of body cutout.
3. Screw the striker into the bolt head. You should
be able to see the threads sticking out of the bolt
body. Note: The striker head should be approx.
1/16” below the face of the bolt body.
Note: The correct distance will be determined
when you complete assembly of the muzzleloader and test to make
sure the primer or percussion cap is being fully struck by the striker.
If the striker does not hit cap or primer, unscrew striker 1/4 turn out.
4. Reset (2mm) set screw in the bolt head.
Fig. 7
Fig. 8
9
Fig. 4
Fig. 5A
Fig. 5B
Fig. 6
Page 20

10
Installing the Bolt Into the Receiver
Note: Before installing the bolt into the receiver, you must first install
the breech plug and the nipple. See Installation instructions for both
items.
1. Inspect breech area for obstructions or debris. Clean out if necessary.
2. Move safety in “Fire” (F) position.
3. Pull trigger to rear and hold.
4. While holding in trigger, slide the bolt into the rear of the receiver.
IMPORTANT: Rotate & align the bolt head with
the milled cutout slot in the base of the receiver.
See fig. 9
Helpful Hint: Use your thumb to guide the bolt
head into the groove in receiver.
5. Push the bolt handle up and over the thumb safety lever and into
position.
6. Release trigger.
Helpful hint: The striker must be cocked to allow the bolt to be
installed in the receiver. The bolt head must be in its rearmost position.
If the striker has become uncocked during assembly or disassembly,
insert the bolt into the receiver backwards, with the corners of the bolt
head aligned with the receiver groove. Press upward on the bolt
handle until the bolt turns clockwise. This will cock the striker.
Remove the bolt and reverse it, reinstalling it in the receiver as normal.
7. IMPORTANT: To make sure the striker has been correctly installed:
a. Make sure muzzleloader is unloaded!
b. Place a cap or primer on nipple.
c. Do not put any powder in muzzleloader! Close bolt.
d. Point the muzzleloader in a safe direction.
e. Fire muzzleloader to make sure cap or primer goes off.
f. If the striker is not hitting the cap or primer, you need to unscrew
the striker 1/4 turn counterclockwise to move striker head out.
IGNITION
Note: Breech plugs and nipples will wear out over time and should
be replaced periodically. We recommend that you purchase at least
one extra nipple and breech plug for emergencies in the field or at the
range. Thread size of standard Traditions nipples is M6x1
Thread size of Magnum Traditions nipple is M8x1
Fig. 9
10
Page 21
11
Removal of the Nipple:
1. Make sure that the nipple is not capped or primed.
2. Remove the bolt assembly from the receiver.
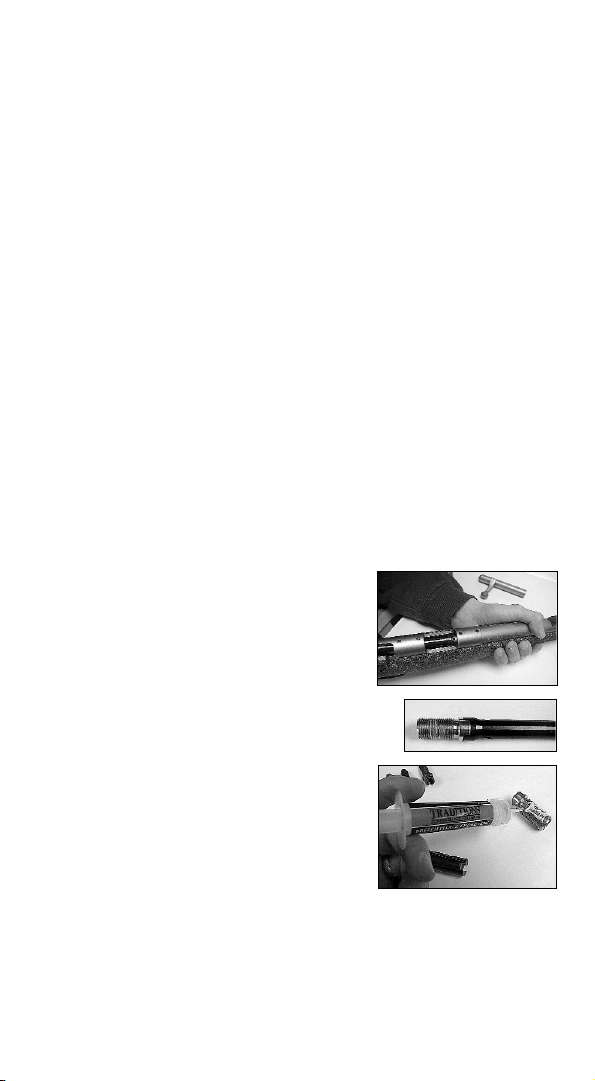
3. Insert the breech plug wrench supplied with your muzzleloader
through the rear of the receiver (while squeezing the trigger) and
position the correct side of it over the nipple.
4. Insert the handle into the wrench and unscrew the nipple counter-
clockwise.
Note: The breech plug and 209 adapter on the ThunderBolt rifle are
one unit. Do not attempt to separate the ThunderBolt’s 209 adapter
from its breech plug, or breakage may result.
Removal of the Breech Plug:
1. Insert the larger end of the wrench into the receiver (while
squeezing the trigger) and position it onto the breech plug.
2. Insert the rod handle into the wrench.
3. Turn the wrench counter-clockwise and unscrew the breech plug
and withdraw the wrench and plug from the receiver. It may
require some extra force to free up the breech plug after shooting.
Tips for stuck Breech Plugs:
Always make sure to lubricate the breech plug threads liberally
before using your muzzleloader.
a. With the breech plug wrench fitted over
the breech plug, actually try to tighten
the plug and then rock it back and forth
to loosen up the fouling.
b. Remove the barrel from the stock and
then remove the trigger assembly from
the barrel. Soak the barrel in very hot,
soapy water for about 1/2 hour. Secure
the barrel in a padded vice. Position the
wrench onto the breech plug and
remove.
c. If you still cannot remove plug, contact
Traditions Customer Service Department.
Installation of the Breech Plug:
1. Spray the breech plug inside and out with Traditions Easy Clean
solvent to loosen the residue on the plug. Use a stiff brush to clean
the outside threads and inner area of the breech plug. A pipe
cleaner can be used to get the smaller areas clean and dry.
Fig. 11
Fig. 12
Fig. 10
11
Page 22

12
2. Wipe with a clean cotton cloth. Repeat until all residue is off.
3. Apply some Tradition’s Breech Plug grease onto the threads of the
breech plug.
4. Place the breech plug in the receiver.
5. Slide the wrench onto the threads and screw it in clockwise.
6. Securely tighten the breech plug into the breech area.
Installation of the Nipple:
1. Before installing a nipple, be sure to clean and lubricate the threads
with Traditions Breech Plug/Nipple Grease or Wonderlube 1000
Plus. When lubricating, take care to not get any grease in flash hole
of nipple. Pipe cleaners or a nipple pick are excellent to clean out the
flash hole in nipples.
2. Place the nipple on the end of the wrench and insert it through the
receiver (while squeezing the trigger) to thread it into the breech plug.
3. Snug the nipple into the breech plug. Take care not to overtighten.
ADJUSTABLE TRIGGER
Your rifle has an adjustable trigger that has been preset at the factory
for optimum hunting performance. The adjustment screws have been
fixed at the factory with a thread locking sealant.
WARNING: No adjustments to the trigger or sear can be
made except by the factory or a certified gunsmith only.
Trigger pull should never be set to less than three pounds.
LOADING
For reasons of safety and proper performance, these loading
instructions for your Traditions Muzzleloader must be followed
closely. While some of the procedures may seem cumbersome, with
practice they will soon become second nature and will make for safe,
dependable and accurate shooting. (It is very helpful to have an
experienced black powder shooter with you the first few times you
load and shoot your muzzleloader.) If, after reading these
instructions you still have questions concerning the safe use of your
Muzzleloader, contact Traditions Customer Service Department.
Follow these instructions in their sequence:
12
Page 23

13
PROPELLANTS:
If you have any questions regarding powder velocities and
pressures please contact the manufacturer of the propellant.
1. Black powder, Pyrodex, Pyrodex pellets or Triple 7 powder are the
only safe propellants to use in this muzzleloading rifle. Maximum
charges of Triple 7 should be reduced by 15%, whether measured
by weight or volume.
2. The term “black powder” does not refer to any powder black in
color, since modern smokeless powders are also black in color.
3. Be certain that the propellant you select is commercially
manufactured black powder, Pyrodex or Triple 7 for use in
muzzleloaders.
DANGER: The use of SMOKELESS POWDER in any
TRADITIONS muzzleloaders will result in excessively high
pressures and can cause serious damage to the rifle and
possible injury or death to the shooter and bystanders.
4. Pyrodex is intended to be used on a volume-to-volume basis. It
burns cleaner and produces less fouling build up than black powder.
PROPELLANT RECOMMENDATIONS
• Cannons or very large-caliber rifles:
1f/fg (coarsest granulation) black powder or Pyrodex CTG (not
commonly found today). Not recommended for use in Traditions
Bolt Action & In-Line Muzzleloading Rifles.
• .45 to .58 caliber rifles:
2f/ffg (course granulation) black powder, Pyrodex RS, Select,
Pellets or Triple 7 is recommended for use in Traditions Bolt
Action & In-Line Muzzleloading Rifles.
• Revolvers, pistols and .38 caliber (and under) rifles:
3f/fffg (standard granulation) black powder, Pyrodex P, .44/.45
Pellets or Triple 7. Not recommended for Traditions Bolt Action &
In-Line Muzzleloading Rifles.
• Flintlock primer:
4f/ffffg (finest granulation) black powder. Not recommended for
Traditions Bolt Action & In-Line Muzzleloading Rifles.
•
Store all propellants according to the manufacturer’s instructions
listed on each container. Local fire regulations should also be
followed.
13
Page 24
14
CAUTION: Never smoke while loading, shooting or
handling propellants. Always follow the manufacturer’s
safety precautions as listed on the propellant container.
PREPARING TO LOAD THE PROPELLANT:
1. Wear eye and ear protection.
2. Check to make sure nipple is securely tightened into breech plug. If
necessary, tighten with correct size nipple wrench.
3. Make certain the gun is unloaded.
a. Move the safety into the “on” or “safe” position.
b. Insert the ramrod into the barrel, when it is touching the top of
the breech plug it should be approximately flush with the barrel.
Note: The ramrod could be slightly higher or lower. You should hear
a metallic sound as the brass loading or cleaning jag makes contact
with the breech plug.
c. Remove the ramrod and lay it along the outside of the barrel,
aligning the reference mark with the muzzle. If the gun is
unloaded, the loading end of the ramrod should be within
1
1/2
” of the nipple.
d. If the distance between the loading end of the ramrod and the
nipple is greater than 1
1/2
”, the barrel may be either
obstructed or loaded. To remove the obstruction, remove the
nipple and the breech plug. Do not attempt to clear the barrel
by firing. Before loading anything into the barrel, clean all oil
and grease from inside the barrel. We suggest a thorough
cleaning like mentioned in the beginning of this manual. We
recommend using Traditions cleaning products to enhance
your accuracy and ease of shooting & cleaning.
5. Point the rifle down towards a safe area on the ground and load
a percussion cap or primer into nipple. Fire one
or two caps or primers to blow out any oil or
residue from the fire channel. Point the muzzle
at a leaf or blade of grass to see if it moves. If it
moves, you have a clear channel. If not, fire off a
couple more caps.
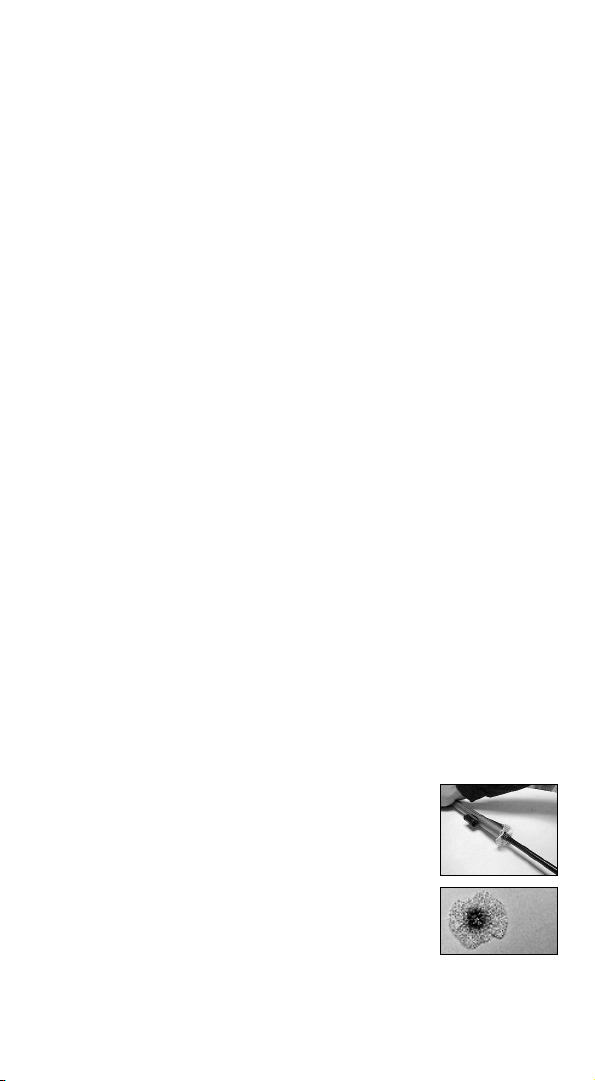
6. Another way to see if you have a clear fire
channel is to screw on a loading/cleaning jag on
your ramrod and place a dry patch on the muzzle of your rifle.
Push the patch down to the breech plug face and leave ramrod &
Fig. 14
Fig. 15
14
Page 25
15
patch in bore. Point rifle in safe direction, place cap or primer on
nipple & fire two caps or primers. Remove ramrod from bore and
inspect patch. Patch should have a complete circular burn in
middle. This tells you that you have a clear fire channel.
7. Stand the butt of the rifle on the ground so that the muzzle is
pointed up and away from you and others. Never work with your
face or any part of your body over the muzzle, even when the gun
is unloaded.
8. Your rifle is now ready to be loaded.
LOADING THE POWDER.
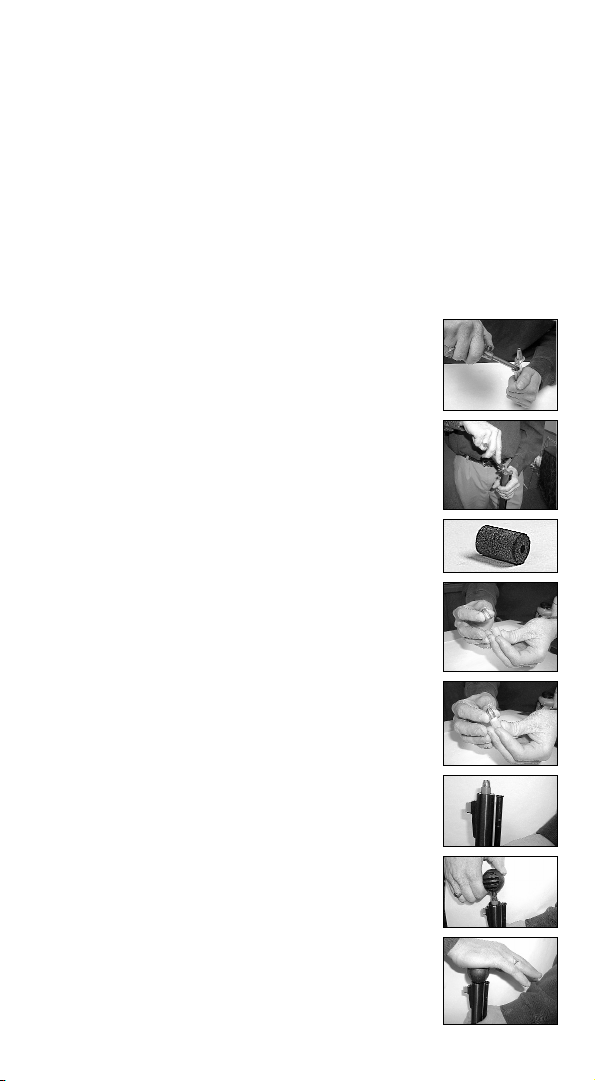
Use only Black Powder or Pyrodex loose or
pelletized powder or Triple 7. Follow the Powder
Manufacturer’s Instructions when handling any
type of powder.
When loading loose powder:
a. Adjust your Traditions powder measure to
the desired charge.
b. Pour powder from your Traditions flask into
the measure until full. Pour powder down
the barrel.
Warning:
Never load powder into a gun directly
from a can, powder horn or flask. Always use a
separate calibrated powder measuring device. A
remaining spark or ember in the barrel may cause an
ignition of the powder and cause harm to you,
bystanders and the firearm.
c. Tap the side of the barrel to settle the powder
into the breech area.
When loading pelletized powder
(Pellets):
a. Drop the desired amount of pellets into the
barrel with the igniter side down. Using a
pipe cleaner to handle the pellets makes it
easier to load and keeps oil from your hands
off the pellet.
IMPORTANT: Do not break or crush the pellets
when loading or seating the projectile on top of the
pellets. This could cause inconsistent groups.
Fig. 16
Fig. 17
Fig. 18
Fig. 19
Fig. 20
Fig. 21
Fig. 22
15
Page 26

16
LOADING THE PROJECTILE:
Note: The Evolution rifle is equipped with the Projectile Alignment
System (PAS), which helps ensure correct placement of the bullet in
the muzzle. See Fig. 20.
Saboted Bullets: The plastic material used in our Traditions sabots is
self-lubricating, therefore you need not pre-lube your bullets.
1. Insert the base of the bullet into the sabot, making certain the bullet
is firmly & fully seated against the bottom of the sabot.
2. Place the assembled projectile into the muzzle.
3. Start the projectile with your thumb.
4. Using a ball starter, place the short shaft on top of the bullet and drive
it downward until the starter hits the top of the muzzle.
5. Push the projectile deeper into the bore using the longer shaft of the
ball starter until it hits the muzzle.
6. Use a loading jag on your ramrod and position it on top of the bullet
inside the bore.
7. Holding the ramrod no further up than 6” over the bore apply firm
pressure downward until the bullet is on top of the powder.
(Holding the ramrod any higher will increase your chances of
breaking your ramrod.)
Note: If you are using pelletized powder do not crush them
when loading the bullet. Testing has shown that crushed or
broken pellets can cause bullet-grouping problems.
IMPORTANT: ALWAYS SEAT THE BULLET FIRMLY
ON TOP OF THE POWDER CHARGE. FAILURE TO
DO THIS MAY RESULT IN INJURY OR DEATH TO YOU
&/OR BYSTANDERS.
Note: When using conical bullets or patched round balls, it
is recommended to use loose powder only.
CONICAL BULLETS:
1. Lubricate the projectile with Wonderlube 1000 Plus.
2. Place the projectile into the barrel, using the ball starter and ramrod
follow the same procedures as shown with the saboted bullet
loading.
Note: Patches are not to be used with conical bullets, these bullets are made to
full bore size.
It is critical that the conical bullet is the correct size to your bore. It
must fit fairly tight and require moderate pressure to seat on top of
the powder. A loose fit could cause the projectile to separate from the
16
Page 27
17
powder, particularly if the gun is subjected to jarring or sharp
movement before ignition.
PATCHED ROUND BALLS:
1. Lubricate a dry cloth shooting patch with Traditions Wonderlube
1000 Plus or use a pre-lubed shooting patch.
2. Center the patch over the muzzle.
Caution: Never use any type of plastic patch or sabot with a round ball.
3. Place the lead ball on top of the patch. If the lead ball has a flat
section or ìsprueî, place it upward.
4. Using a ball starter, place the short shaft on top of the ball and drive
the ball downward until the starter hits the top of the muzzle. If
there is excess patch material after you seat the ball with the short
shaft you can cut it away with a sharp knife. This will be
unnecessary if you used a pre-cut patch.
5. Push the ball deeper into the barrel using the longer shaft of the ball
starter.
6. Screw the loading jag on the ramrod and grasp the rod no more than
6” above the muzzle. (Holding the ramrod any higher will increase
your chances of breaking your ramrod.)
7. Apply moderate pressure and push the ball firmly down on top of
the powder.
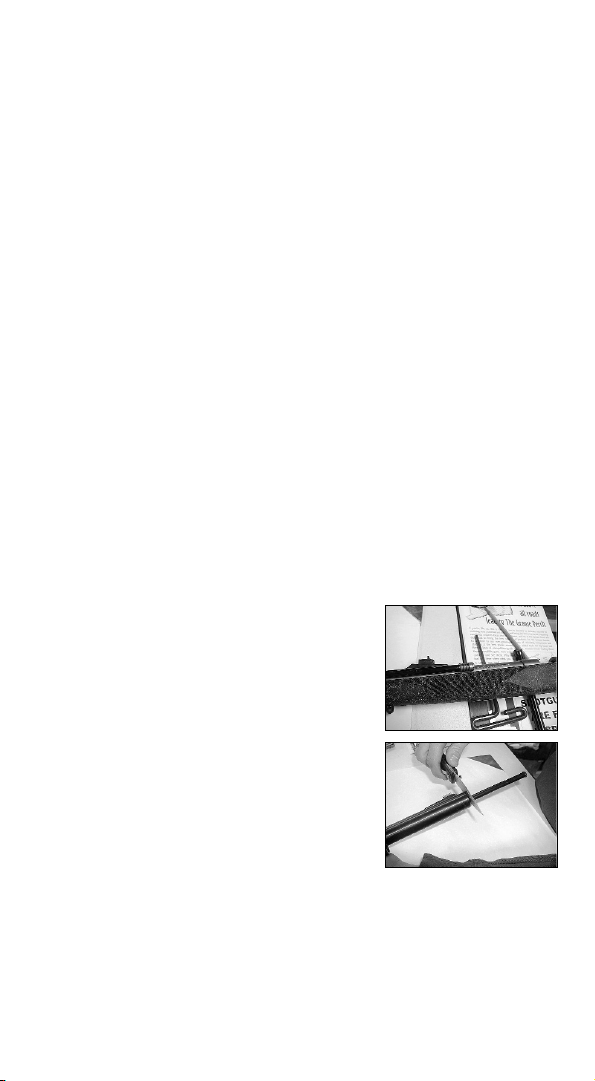
HOW TO CHECK IF THE
BULLET IS FULLY SEATED ON
TOP OF THE POWDER.
1. Drop ramrod down the barrel until it
taps the projectile.
2. Mark the ramrod where it sticks out of
the end of the barrel.
3. Lay the ramrod along side of the outside
of the barrel lining up the marked spot at
the end of the barrel.
4. The jag should end at the top of your
measured charge. (Note: if you change
bullet weights or powder charges your
jag will line up differently each time.) If the jag lines up anywhere
but the top of your charge, you must pull the charge or extract the
bolt and breech plug and then inspect and fix the problem.
Note: Be sure to seat the patched ball directly on top of the powder
charge, any gap between the powder and ball can result in excessive
pressure upon firing and injury to the rifle, shooter and bystanders.
Fig. 23
Fig. 24
17
Page 28
18
CAPPING YOUR MUZZLELOADER:
There are four major ignition types in black powder shooting at this
time. They are the flint, the #11 percussion cap, the musket cap and
the 209 shotgun primer. The flint is used in flintlock sidelock
muzzleloaders only. The #11 percussion cap has been and is still used
today with many sidelock and in-line muzzleloaders. The musket cap
was mainly used in sidelock muzzleloaders and became popular with
in-line muzzleloaders in the 1990’s because of its’ hotter ignition. The
209 shotgun primer is very popular because of its’ features and
benefits for superior ignition. The 209 shotgun primer is exactly as it
is named, a shotgun primer, the same primer used in a shotgun shell.
The 209 primer has three main benefits over the #11 cap and the
musket cap. First, the 209 primer is water-resistant which keeps water
and moisture out of the powder for a sure-fire ignition when
conditions are damp or rainy. Second, the 209 primer is larger than
the caps and can be handled easier with gloves on when in hunting
situations. Thirdly, they are 10 times hotter than a #11 percussion cap
which gives a more reliable ignition.
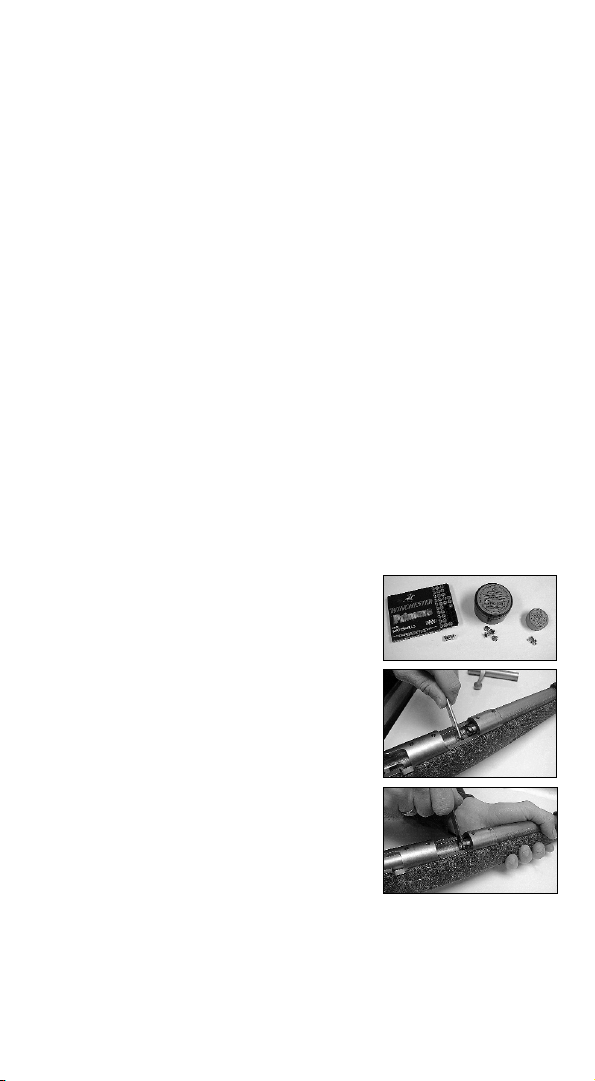
When Capping your Muzzleloader please follow
these instructions:
1. Make sure that your muzzleloader is in
the “safe” & “on” position.
2. Point the muzzle in a safe direction.
3. Choose the correct percussion cap or
primer for your ignition system. Keeping
the muzzle pointed in a safe direction,
open the bolt to expose the nipple. Using
a capper or your fingers, press the
cap/primer over or into the nipple. When
using the Evolution or ThunderBolt rifles,
close the bolt and press the bolt handle
firmly down into the receiver/stock
notch. When using the Tracker or similar
models, the bolt remains in the fully
cocked position. When you are ready to shoot, push the thumb safety
lever forward into the “Fire” position.
4. Your muzzleloader is now ready to fire.
Fig. 25
Fig. 26
Fig. 27
18
Page 29

1919
DECAPPING YOUR MUZZLELOADER:
1. Use a De-capping tool to remove a primer or a percussion cap from
the nipple.
2. Slide the tool alongside the inner part of the cap or primer closest
to the nipple and push the cap or primer off the nipple.
3. A depriming tool is provided with your rifle. This is a flat piece of
case-hardened metal approximately 2 1/2” long and 1/2” wide,
with a forked arrangement at one end. Use the forked end of this
tool to remove spent 209 primers from your rifle. See Fig. 27.
IF YOUR GUN FAILS TO FIRE:
Anyone involved with muzzleloading firearms will experience a
hangfire or misfire. The following are a few simple procedures that
will help you to effectively manage such occurrences.
Hangfire
A hangfire is a delayed ignition. The percussion cap fires when the
trigger is pulled and the main charge fires a brief moment later. There
are many reasons that hangfires occur. If you are experiencing a
substantial number of hangfires, there are a few possible causes that
you need to evaluate. Verify the following:
1. Check that the load is packed tightly. Review loading procedures.
2. Verify that the percussion cap is the correct size and properly fitted
onto the nipple.
3. Inspect that the ignition channel is clear of obstruction.
4. Check the condition of the percussion nipple. Verify that it has not
mushroomed on the end and that it is securely screwed into the
breech plug.
5. Verify that the proper propellant is being used and that it is the
proper granulation and free from moisture, contamination and oils.
6. Check the condition of the percussion caps and propellant powder.
For hunting situations, it is a wise practice to use fresh caps and
powder. Use a fresh load for each day’s hunting.
7. Make sure to prep your firearm by running a cleaning patch to
clear the bore of oils, moisture and contamination. Fire two or three
caps before loading to insure that the ignition channel is clear. See
#7 in earlier section headed Preparation.
Page 30

2020
Misfire
Amisfire is a failure of either the cap or the main charge to ignite. This
could be a very hazardous situation. Extreme caution should be
exercised when dealing with a misfire.
Rarely is a misfire the fault of the rifle. Generally, it can be attributed
to a problem with the propellant or cap.
Should your gun fail to fire for any reason, keep the muzzle pointed
at your target for at least one minute with the bolt closed. By doing so,
you make sure you are prepared for the chance of a delayed ignition.
If the the percussion cap did not fire:
1. Check to make certain that a cap was installed and is still securely
positioned on the nipple.
2. Verify that the bolt striker cup face is free of debris.
3. Try a new cap.
If the percussion cap fires but the main charge does not:
1. Using a cleaning pick, verify that the hole in the nipple is clear of
any obstruction.
2. Tap the butt pad of the rifle with your hand to direct powder into
the ignition channel. Recap, verify your target, and fire again.
3. Verify that propellant was loaded under your ball or bullet by
running the ramrod down the muzzle and observing the measure
marks on your ramrod. Use extreme caution to always keep the
muzzle pointed in a safe direction.
4. Check for any mechanical defects to the nipple, breech plug, bolt
and striker assembly or trigger.
If, after several attempts, your gun has repeatedly failed to fire, you
will need to unload the rifle. At this point a beginning shooter should
seek assistance from an experienced shooter. Never leave an unfired
charge in the barrel.
REMOVING THE PROJECTILE
AND THE CHARGE:
Method 1
1. Open the bolt or plunger and carefully remove the percussion cap
from the nipple.
2. Remove the bolt or plunger from the receiver.
3. Using the Breech Plug/Nipple Wrench, supplied with the rifle, remove
the nipple and breech plug assembly from the rear of the barrel.
Page 31

21
4. Insert a ramrod into the muzzle and push the load out of the rear of
the barrel. Take care not to get water or powder into the trigger
mechanism.
5. Clean and wipe all surfaces of loose material.
6. Remember, when the powder dries, it will again be volatile.
Dispose of properly.
NOTE: It is also possible to drive the projectile out the muzzle. However,
an extra long bench rod or a standard ramrod with an extension will be
needed to accommodate the added length of the receiver.
Method 2
1. Open the bolt or plunger and carefully remove the percussion cap
from the nipple.
2. Using a range/bench ramrod, with a ball puller screw in one end,
insert the screw end into the muzzle until the screw makes contact
with the projectile.
3. Apply pressure to the end of the ramrod while at the same time
turning it, allowing the ball puller screw to bite into the projectile.
4. Continue turning the ramrod until you can determine that the ball
puller screw is well anchored into the projectile.
5. Firmly grasp the exposed end of the ramrod with projectile
attached, pull it through the barrel and out the muzzle. One
continuous non stop pull is generally best.
NOTE:When extracting patched round balls it is helpful to pour
warm soapy water down the barrel to aid in the removal of fouling
from within the bore.This also lubricates the rifling to make the
process easier.
NOTE: When extracting saboted bullets the first few inches of the pull
will separate the projectile from the plastic sabot. At that point the
bullet will be free from the sabot and will come out easily. It will then
be necessary to reinsert the ball puller screw back down the barrel and
screw it into the plastic sabot and also pull it out.
6. Remove powder, if any.
7. Clean and dry the bore of the barrel making sure the breech area is
dry before reloading fresh powder.
8. Dispose of the old powder safely.
SIGHTING IN:
Start your sighting in at approximately 25 yards with a large target.
You want to achieve a grouping of shots no matter where on the target
Page 32
22
first. After you are able to shoot at least 3 shots in the same 2” area,
then adjust your sight to the center bullseye.
T
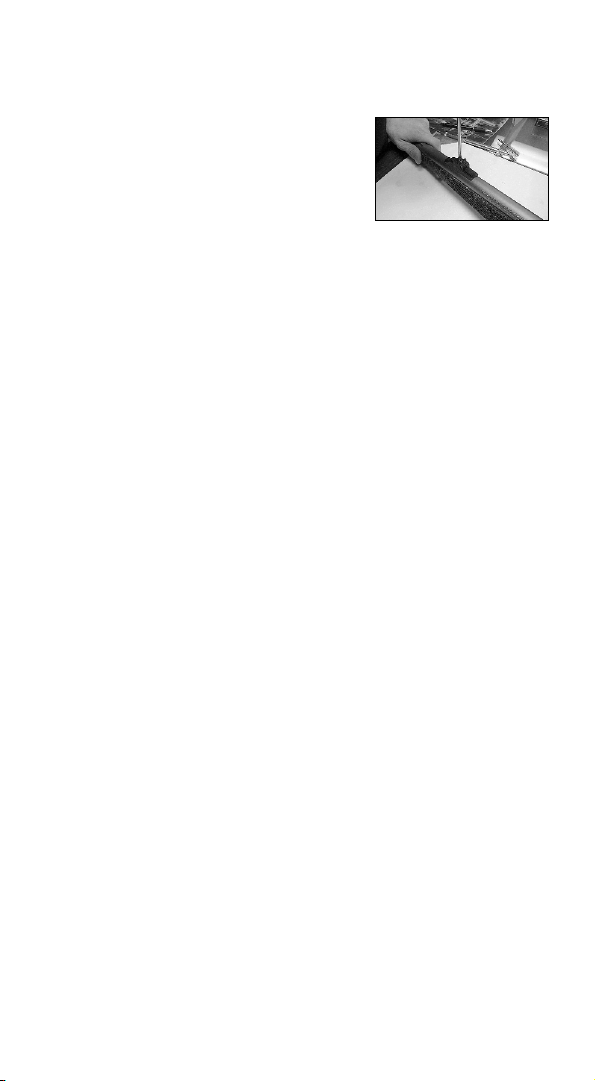
o adjust: Move the rear sight in the
direction you want the bullet to go.
Note: Traditions recommends while
sighting in your muzzleloader that you
clean the bore between each of your shots.
By doing this you are starting out with a fresh, seasoned bore that will
help prevent some shooting errors such as powder build up that
could cause inaccuracies.
SCOPE MOUNTING:
All Traditions In-Line muzzleloaders are drilled & tapped for
mounting a scope. To sight in your scope, please follow the scope
manufacturer’s directions.
RECOMMENDED LOADS:
Traditions recommends that your begin your shooting with a charge
between 80-90 grains of Black powder, Triple 7, Pyrodex loose or
Pelletized Powder to lessen the recoil & let yourself get acquainted
with your muzzleloader. (ex. Pyrodex Pellets). The bullet that you
need is dependent upon the game that you are hunting. Tradition’s
recommends using a powder charge of 80-150 grains depending on
what you are hunting or shooting with your muzzleloader.
CLEANING & MAINTENANCE:
A systematic routine of cleaning while shooting is strongly advised to
aid in avoiding problems while loading and to optimize accuracy.
1. When cleaning the bore, use cleaning patches rather than shooting
patches. Shooting patches are too small for cleaning and can
dislodge in the bore.
2. If a patch becomes lost in the bore, use Traditions Patch Puller
Worm attached to a ramrod for retrieval, or if necessary, remove the
breech plug and push the patch out through the breech area. Never
load a charge over a lost patch.
3. If unusual resistance is felt while loading a projectile, place a
cleaning patch treated with Traditions Wonder Lube 1000 Plus on
the cleaning jag affixed to the end of a ramrod and run it the full
length of the barrel several times with your objective being to
remove as much of the fouling build up as possible and at the same
time lubricating the rifling.
Fig. 28
Page 33

23
NOTE: It should never be necessary to hammer or excessively force a
projectile down the bore. Projectiles should load firmly against the
powder charge with a series of short push strokes. If the projectile is the
proper size, unusual resistance usually indicates the need to swab the
bore with a treated cleaning patch. Use bore cleaner solution if heavily
contaminated. An occasional cleaning of the bore with a brass Traditions
Bore Brush is advisable to remove excessive fouling build-up.
NOTE: For barrels coated with Ultra-CoatTM with Teflon®, a nylon
bristle bore brush should be used.
4. When target shooting or sighting in,
develop a habit of consistently wiping the
bore with Traditions Wonder Lube 1000
after each shot. Depending upon the
specific load, temperature, and
humidity, a short series of shots with black powder or Pyrodex can
be fired before it becomes necessary to wipe the bore with
Traditions Easy Clean or Traditions Wonder Lube in order to
remove fouling build-up. When shooting saboted bullets, make
certain to run a lubricated cleaning patch through the bore between
every shot. This will aid in removing fouling within the barrel and
lubricate the bore to facilitate the loading of the non lubricated
saboted bullets.
If this procedure is not followed, each successive loading will require
additional force to drive the saboted bullet down the barrel while at
the same time increasing the risk of not fully seating the projectile
firmly atop the powder charge is greater. With an excessively fouled
barrel, it is possible for a saboted projectile to get stuck part way down
the bore.
If for any reason the projectile will not go all the way down to the
powder charge, it will be necessary to extract the projectile from the
barrel either with a bullet puller attachment on a ramrod or the breech
plug can be removed, the charge removed and the projectile forced
out the end of the barrel with a long bench/range rod or an extended
ramrod.
NOTE: Adirty fouled barrel will directly effect your ability to group
shots. However, in a hunting situation, only a few shots will likely be
taken. If the barrel is prepped and lubed at the onset, it is not
necessary to clean and lube the interior of the barrel between shots
when hunting.
Fig. 30
23
Page 34

24
CLEANING AFTER SHOOTING
CAUTION: Before cleaning, make absolutely certain the gun is
unloaded and uncapped. Use the ramrod measuring method as
described earlier.
Clean your gun as soon as possible after your shooting session. To
leave a gun uncleaned, even overnight, can result in serious and
damaging corrosion.
ADVICE: Take care when cleaning not to get water or solvent into the
trigger assembly. If the trigger assembly is affected, it will be
necessary to remove the barreled-action, dry the trigger assembly and
treat it with gun oil.
NOTE: Regardless of the cleaning method, you must remove and
thoroughly clean the percussion nipple, the breech plug and the
threads and breech area of the receiver during each cleaning. Be
certain to lightly lubricate the threads of the nipple and breech plug
with Traditions Wonder Lube 1000 before reinstalling. When
reinstalling these parts, take care not to overtighten them.
ADVICE: Nipples are a relatively inexpensive yet a very critical
component of muzzleloading shooting. Periodically changing to a
new nipple is highly advised.
Cleaning Method
A thorough cleaning requires the complete disassembly of the firearm.
1. Make sure the firearm is unprimed.
2. Remove the bolt or plunger assembly from the reciever. Refer to
disassembly section if unsure how to do.
3. Using Breech Plug/Nipple wrench, remove the nipple and breech
plug from breech.
4. Remove stock from barrel. refer to Disassembly section if unsure
how to do.
5. Remove Trigger assembly by unscrewing allen screws (2) from
barrel with a 3mm allen wrench.
6. Pour 8-10 inches of hot, soapy water into a secured pail.
7. Immerse the receiver end of the barrel into the cleaning solution so
that the water is above the breech opening.
8. Using a cleaning patch or brush affixed to a cleaning jag, pump the
soapy water repetitvely through the barrel by raising and lowering
the ramrod until bore is clean.
9. When the bore is clean, remove barrel from liquid. Run cleaning
patches up and down bore to dry inside. Wipe outside of barrel
with dry cloth. Dry receiver and breech area dry.
24
Page 35

25
10. Lightly coat outside and inside of barrel and all other metal parts
with Wonderlube 1000 plus
11. Clean all residue off inside and outside of the stock.
12. Disassemble the bolt if you have a bolt action muzzleloader. See
Disassembly section.
13. Clean and then lightly oil all bolt parts or plunger parts and
reassemble.
14. Reassemble the entire muzzleloader.
NOTE: An extra long bench/range ramrod is necessary for this
cleaning method given that it must be as long as the barrel and
receiver. Visit your Traditions retailer for this type of rod.
NOTE: Store your rifle in a cool, dry, secured area. Storage in a gun
case is discouraged, as it may hasten condensation and corrosion.
During long periods of storage, periodically check for signs of pitting
or rusting on the surface and in the barrel bore.
NOTE: The myth that stainless steel & nickel doesn’t have to be
cleaned as much as blued steel is false. You need to clean and
lubricate your stainless barrel just as you would a blued steel barrel.
The stainless and nickel barrels are more rust resistant than blued
steel, but over time can rust.
SUPERIOR ACCURACY
Your new Traditions firearm has been engineered and
manufactured to precise tolerances on modern computerized
machinery. With proper care and cleaning, your new Traditions
firearm will retain its superior appearance and accuracy for many
years to come.
There are many environmental factors that influence accuracy such
as humidity, temperature etc. Also, variations in measurements of the
loads, the manufacture of the propellant charge and projectiles from
lot to lot and between different manufacturers have an influence.
Shooting the same load, propellant and projectile, in the same
volume and bullet weight is critical to achieve consistency.
Black powder and Pyrodex are hydroscopic and the amount of
moisture content from one shooting session to another can contribute
to variation in performance.
Accuracy can be affected by the simple take-down and reassembly
of the rifle components. Although the sights or scope may not have
moved, various forces such as tightness of the underside hex bolt,
pressure from the way the stock touches the barrel (more common
25
Page 36

26
with wood stocks that can be effected by moisture in the
environment), the torque applied to the breech plug from installation
to installation, etc. can all change the point of impact.
A clean barrel bore is definitely more accurate than one with
accumulated fouling. Cleaning the bore of the barrel with one or two
lubricated cleaning patches, attached to the cleaning jag end of a
ramrod, between shots is the single most effective thing you can do to
optimize accuracy between shots. This not only cleans away the bulk
of the fouling, but at the same time lubricates the rifling for ease of
loading and reduces the friction of the sabot as it exits the barrel.
HELPFUL MUZZLELOADING ACCESSORIES
In order to participate fully in the sport, you will probably want to
consider the purchase of the various Traditions accessories mentioned
in this manual. Your firearms retailer should stock a complete line of
accessories from Traditions. If not, ask him to order them for you. Visit
him soon to discover all the ways to make your muzzleloading
experience even more enjoyable and convenient.
Write to Traditions for a current catalog showing a complete line of
firearms, ammunition, and accessories or view it on our web site
www.traditionsfirearms.com. Your local retailer can special order any
Traditions products you want.
26
Page 37

HUNTING LOAD RECOMMENDATIONS:
Caliber Bullet Charge Muzzle Velocity
.45 180 gr. saboted bullet (2) 50 gr. pellets 1950 fps
(3) 50 gr. pellets 2400 fps
100 gr. Pyrodex RS 1900 fps
150 gr. Pyrodex RS 2350 fps
100 gr. Triple 7 2100 fps
.45 200 gr. saboted bullet (2) 50 gr. pellets 1900 fps
(3) 50 gr. pellets 2400 fps
100 gr. Pyrodex RS 1850 fps
150 gr. Pyrodex RS 2350 fps
100 gr. Triple 7 2000 fps
.50 240/250 gr. saboted bullet (2) 50 gr. pellets 1700 fps
(3) 50 gr. pellets 2100 fps
100 gr. Pyrodex RS 1700 fps
150 gr. Pyrodex RS 2100 fps
100 gr. Triple 7 1900 fps
.50 300 gr. saboted bullet (2) 50 gr. pellets 1600 fps
(3) 50 gr. pellets 1900 fps
100 gr. Pyrodex RS 1550 fps
100 gr. Triple 7 1700 fps
.54 250 gr. saboted bullet 100 gr. Pyrodex RS 1700 fps
275 gr. saboted bullet 100 gr. Pyrodex RS 1600 fps
425 gr. conical bullet 100 gr. Pyrodex RS 1500 fps
* Velocities are approximate, depending on barrel length and interior
barrel dimensions of individual rifles.
27
Page 38
✃
Cut Along Dotted Line
FIT-18-03/03-JB2
PREFERRED CUSTOMER WARRANTY REGISTRATION CARD
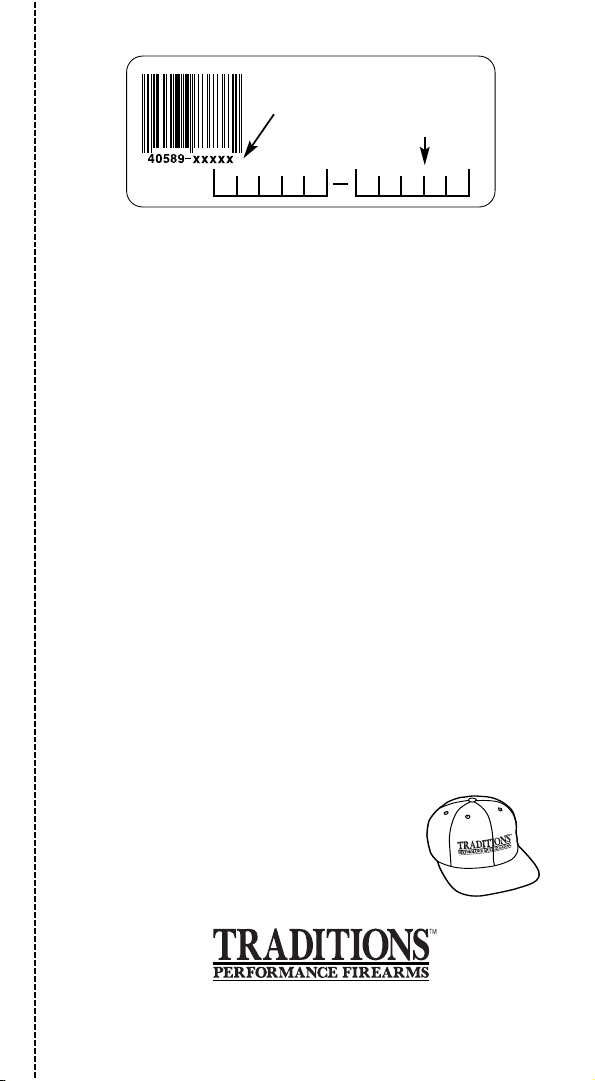
Referencing the label on the end of the
carton, please write in the last 5 digits
located on the right half of the UPC
code into the boxes below.
40589
UPC #
Model #_______________________________________________________
Serial # (from barrel)______________________________________________________________
Name_________________________________________________________________Age __________
Street________________________________________________________________________________
City __________________________________________ State __________ Zip ___________________
Day Time Phone #_________________________ Date of Purchase ___________________________
Purchase Price ________________________ Store Name ___________________________________
1. What is your age? ❑
1
Under 18 ❑218-24
❑325-34 ❑435-44 ❑545-54 ❑655-64 ❑7over 65
2. Reason for your purchase ❑
1
Hunting ❑2Tar get Shooting ❑3Personal use ❑4Gift
❑
5
Raffle Prize ❑6Other
3. Do you own? ❑
1
Other muzzleloaders ❑2Over/Under Shotgun ❑3Side by Side Shotgun
❑
4
Semi-Auto Shotgun ❑5Pump Shotgun ❑6Cartridge Rifle ❑7Handgun ❑8Bow
4. Where purchased? ❑
1
Gun Shop ❑2General Sporting Goods Store ❑3Hardware Store
❑4Chain Store ❑5Mail Order Catalog ❑6Internet Store
5. Is this your first muzzleloader? ❑
1
Yes ❑2No
6. Which factors influenced your purchase? ❑
1
Previously owned a Traditions product
❑
2
Magazine Ad/Article ❑3Internet/Website ❑4Traditions Catalog ❑5Recommendation of
Salesperson ❑
6
Recommendation of a Friend ❑7Price ❑8Features ❑9Other
7. What type of game do you hunt? ❑
1
Whitetail Deer ❑2Mule Deer ❑3Elk ❑4Bear
❑5Antelope ❑6Turkey ❑7Small Game ❑8Other
8. What do you think is the best way to get information about Hunting & Hunting products?
❑
1
Magazine Ads ❑2Internet/Website ❑3Television Programs ❑4Radio
9a. Which magazine do you read?________________________________________________________
b. Which TV hunting show do you watch?_______________________________________________
❑ Check here to receive a free Traditions catalog showing muzzleloadings’ largest selection of firearms
and accessories or visit our website at www.traditionsfirearms.com
❑ To receive a Traditions Firearms Logo cap and catalog, send $11.95
along with your warranty registration card.
NOTE: Return this card within 15 days of
purchase in order to validate your limited lifetime warranty.
P.O. Box 776 • Old Saybrook, CT 06475-0776
www.traditionsfirearms.com
Please complete all information above and mail to:
28
 Loading...