

Page 1
INSTALLATION INSTRUCTIONS &
USE & CARE GUIDE
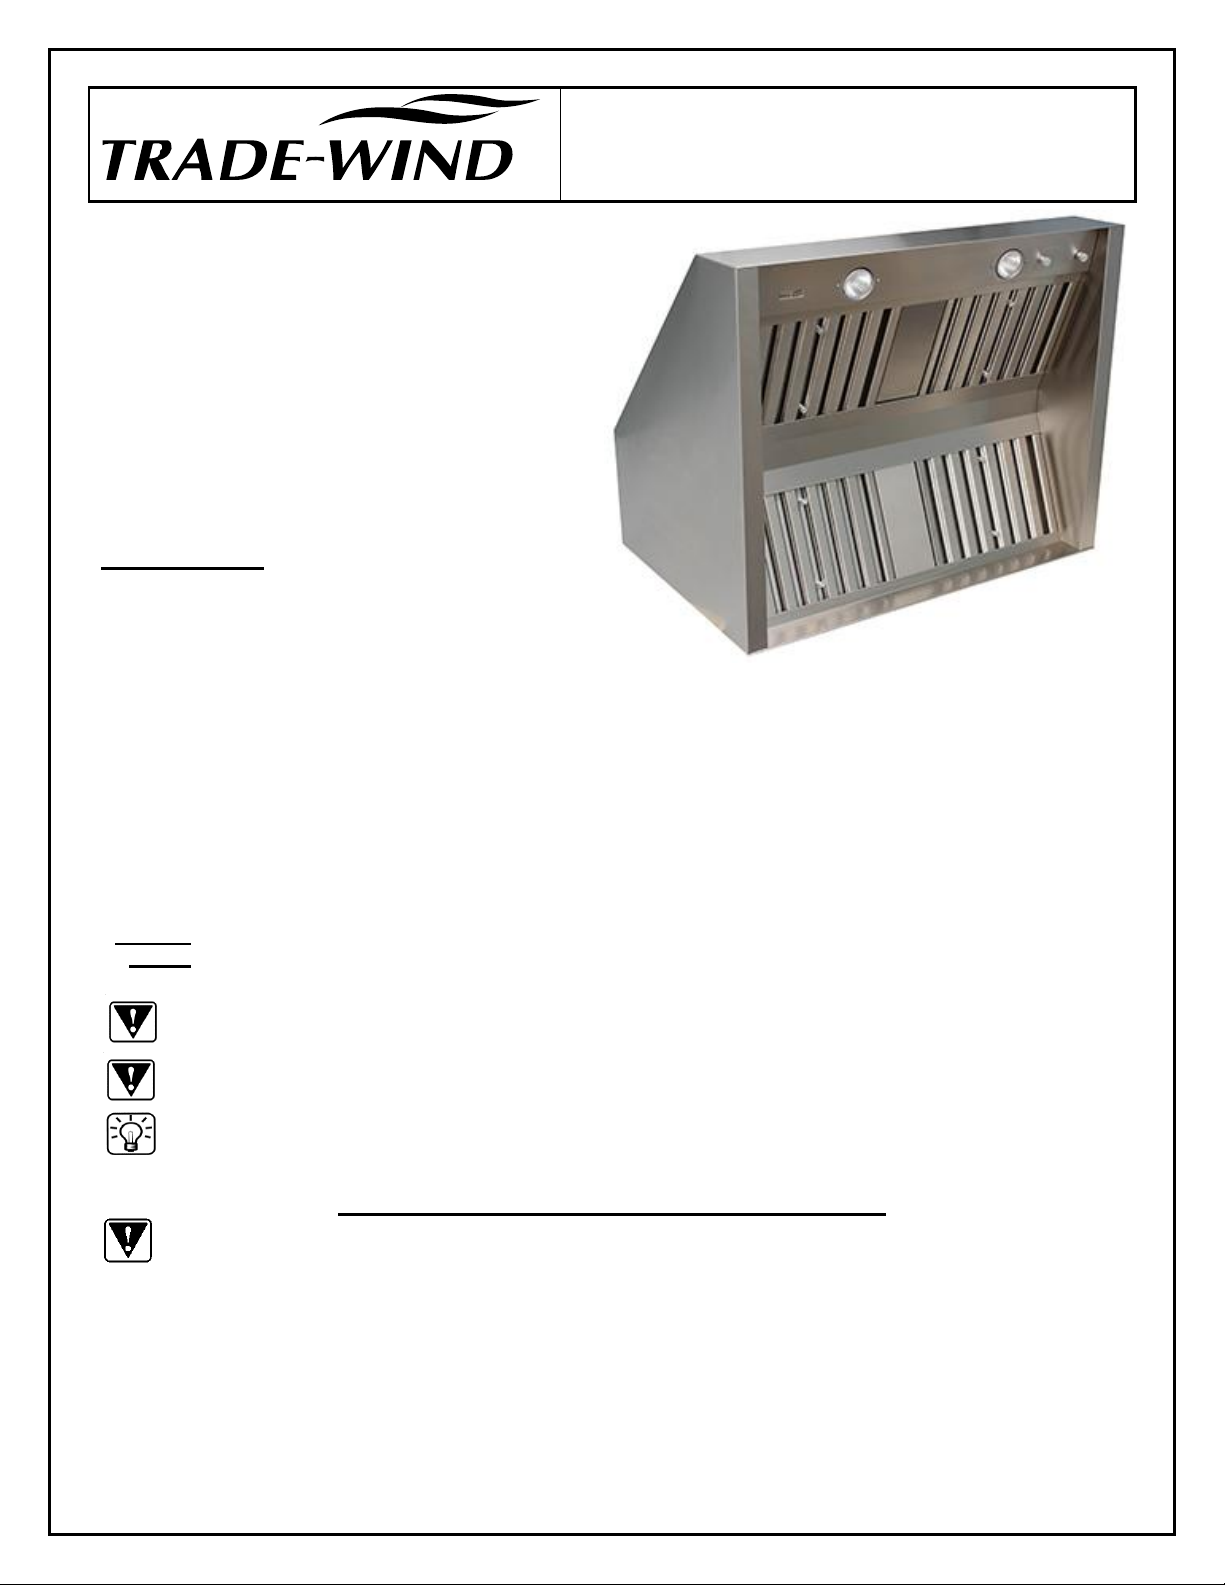
Trade-Wind®7200 Series BBQ Hood
7200 Series Models:
No Blower 1200 CFM 2300CFM
7236 7236-12 N/A
7242 7242-12 N/A
7248 7248-12 N/A
7254 N/A 7254-23
7260 N/A 7260-23
7266 N/A 7266-23
7272 N/A 7272-23
CONTENTS:
Part 1 - Planning The Installation
Part 2 - Electrical Connection
Part 3 - Direction of Vent and Securing The Hood
Part 4 - Use & Care
Installer:
Please leave Installation Instructions with the BBQ hood owner.
Owner:
Please keep Installation Instructions for local electrical inspector’s use and for future reference.
WARNINGS: Must be followed carefully to avoid personal injury.
IMPORTANT: Must be followed carefully to avoid damage or incorrect installation.
TIPS: Contain helpful information to facilitate installation.
Before beginning installation, please thoroughly read and become familiar with these instructions. Installation and
service must be completed by a qualified installer. Failure to properly install this product may void the warranty.
Please be advised that the Trade-Wind® 7200 Series BBQ Hood MAY NOT be installed on a Patio or Lanai area
that does not have a roof over the BBQ Hood to protect it from direct rain or potential water ingress. This Hood
should be installed with a MINIMUM of three (3) feet of weather proof roof coverage on all sides that are not
protected from direct rain by an adjacent wall.
It is required that all duct work and roof openings be thoroughly sealed with the applicable tape and/or roof sealant
to prevent ingress of water.
WARNING! TO REDUCE THE RISK OF FIRE, ELECTRICAL SHOCK, OR INJURY TO
PERSONS OBSERVE THE FOLLOWING:
a) Use this unit only in the manner intended by the manufacturer. If you have any questions, please contact the
manufacturer at the address or telephone number listed in the warranty.
b) Before servicing or cleaning unit, switch power off at service panel and lock service panel and lock the service
disconnection means to prevent power from being switch on accidentally. When the service disconnecting means
cannot be locked, securely fasten a prominent warning device, such as a tag to the service panel.
Revised 6/11/18 Copyright © 2018 Trade-Wind Manufacturing, LLC Proverbs 22:29 Page 1
READ AND SAVE THESE INSTRUCTIONS
Page 2
CAUTION -- For general ventilating use only. Do not use to exhaust hazardous or explosive materials
and vapors.
WARNING – TO REDUCE THE RISK OF A BBQ TOP GREASE FIRE:
a) Never leave surface units unattended at high settings. Boilovers cause smoking and greasy spillovers that may
ignite. Heat oils slowly on low or medium settings.
b) Always turn hood ON when cooking at high heat or when flambeing food (i.e. Crepes Suzette, Cherries Jubilee,
Peppercorn Beef Flambe’).
c) Clean ventilating fans frequently. Grease should not be allowed to accumulate on fan or filter.
d) Use proper pan size. Always use cookware appropriate for the size of the surface element.
WARNING! TO REDUCE THE RISK OF INJURY TO PERSONS IN THE EVENT OF A
BBQ TOP GREASE FIRE, OBSERVE THE FOLLOWING:
a) SMOTHER FLAMES with a close-fitting lid, cookie sheet, or metal tray, then turn off the burner. BE CAREFUL
TO PREVENT BURNS. If the flames do not go out immediately, EVACUATE AND CALL THE FIRE
DEPARTMENT.
b) NEVER PICK UP A FLAMING PAN—YOU MAY BE BURNED.
c) DO NOT USE WATER, including wet dishclothes or towels - aviolent steam explosion will result.
d) Use an extinguisher ONLY if:
1. You know you have a Class ABC extinguisher and you already know how to operate it.
2. The fire is small and contained in the area where it started.
3. The fire department is being called.
4. You can fight the fire with your back to an exit.
e) Follow the barbeque grill manufacturer’s instruction when using gas grills, cookers, or any propane appliances.
f) BE CAREFUL TO PREVENT BURNS. If the flames do not go out immediately, EVACUATE AND CALL THE
FIREDEPARTMENT.
Recommendations:
1. Consult a licensed ventilation contractor or qualified technician for proper installation of exhaust ducting.
Locate the cooking area for minimum cross drafts-away from doors and windows, when possible.
2. Ducts must be of adequate size and duct runs should be as short as possible. Where turns are necessary,
keep turning radius as large and as smooth as possible.
3. The ducting must be air tight. Use a minimum of 2 sheet metal screws at every duct joint. Then, seal the duct
joints with high quality duct tape.
4. Do not use this unit with any solid-state speed control device.
5. This unit must be grounded.
Revised 6/11/18 Copyright © 2018 Trade-Wind Manufacturing, LLC Proverbs 22:29 Page 2
Page 3
INSTALLATION INSTRUCTIONS
WARNING – TO REDUCE THE RISK OF FIRE, ELECTRIC SHOCK, OR INJURY TO
PERSONS, OBSERVE THE FOLLOWING:
a) Installation work and electrical wiring must be done by qualified person(s) in accordance with all applicable
codes and standards, including fire-rated construction codes and standards.
b) Sufficient air is needed for proper combustion and exhausting of gasses through the flue (chimney) of fuel
burning equipment to prevent back drafting. Follow the heating equipment manufacturer's guidelines and safety
standards such as those published by the National Fire Protection Association (NFPA) and the American Society
for Heating, Refrigeration and Air Conditioning Engineers (ASHRAE) and the local code authorities.
c) When cutting or drilling into wall or ceiling, do not damage electrical wiring and other hidden utilities.
d) Ducted fans must always be vented to the outdoors.
e) For safe and secure wall mounting, the TRADE-WIND®BBQ Hood should be mounted to a solid vertical surface
of sufficient width to allow for mounting of the Hood. The horizontal surface should extend from a vertical plane to
the point directly in front of the exhaust roof cap (or wall cap).
f) The Hood should be installed with a MINIMUM of three (3) feet of weather proof roof coverage on all sides that
are not protected from direct rain by an adjacent wall.
g) It is also required that all duct work and roof openings be thoroughly sealed with the applicable tape and/or roof
sealant to prevent ingress of water.
WARNING -- TO REDUCE THE RISK OF FIRE, USE ONLY METAL DUCTWORK.
CAUTION –To reduce the risk of fire and to properly exhaust air, be sure to duct air outside – Do not
Vent exhaust air into spaces with in walls or ceilings or into attics, crawl spaces, or garages.
PART 1 Planning the Installation
CAUTION:
1. For general ventilating use only. Do not use to exhaust hazardous or explosive materials and vapors.
2. To reduce the risk of fire and to properly exhaust air, the hood must be exhausted to outside air. Never
exhaust into a wall, an attic or a concealed area in the building. This can create a potential hazard.
3. Consult a licensed ventilation contractor or qualified technician for proper installation of exhaust ducting.
4. Locate the cooking area for minimum cross drafts—away from doors and windows, when possible.
5. Ducts must be of adequate size and duct runs should be as short as possible. Where turns are necessary,
keep turning radius as large and as smooth as possible.
6. The ducting must be air tight. Use a minimum of 2 sheet metal screws at every duct joint. Then, seal the duct
joints with high quality duct tape.
7. Only use ductwork constructed of materials deemed acceptable by state, municipal and local codes.
8. Plan the installation so that all minimum clearances are met or exceeded. Dimensions shown provide minimum
clearances, unless otherwise specified.
Revised 6/11/18 Copyright © 2018 Trade-Wind Manufacturing, LLC Proverbs 22:29 Page 3
Page 4
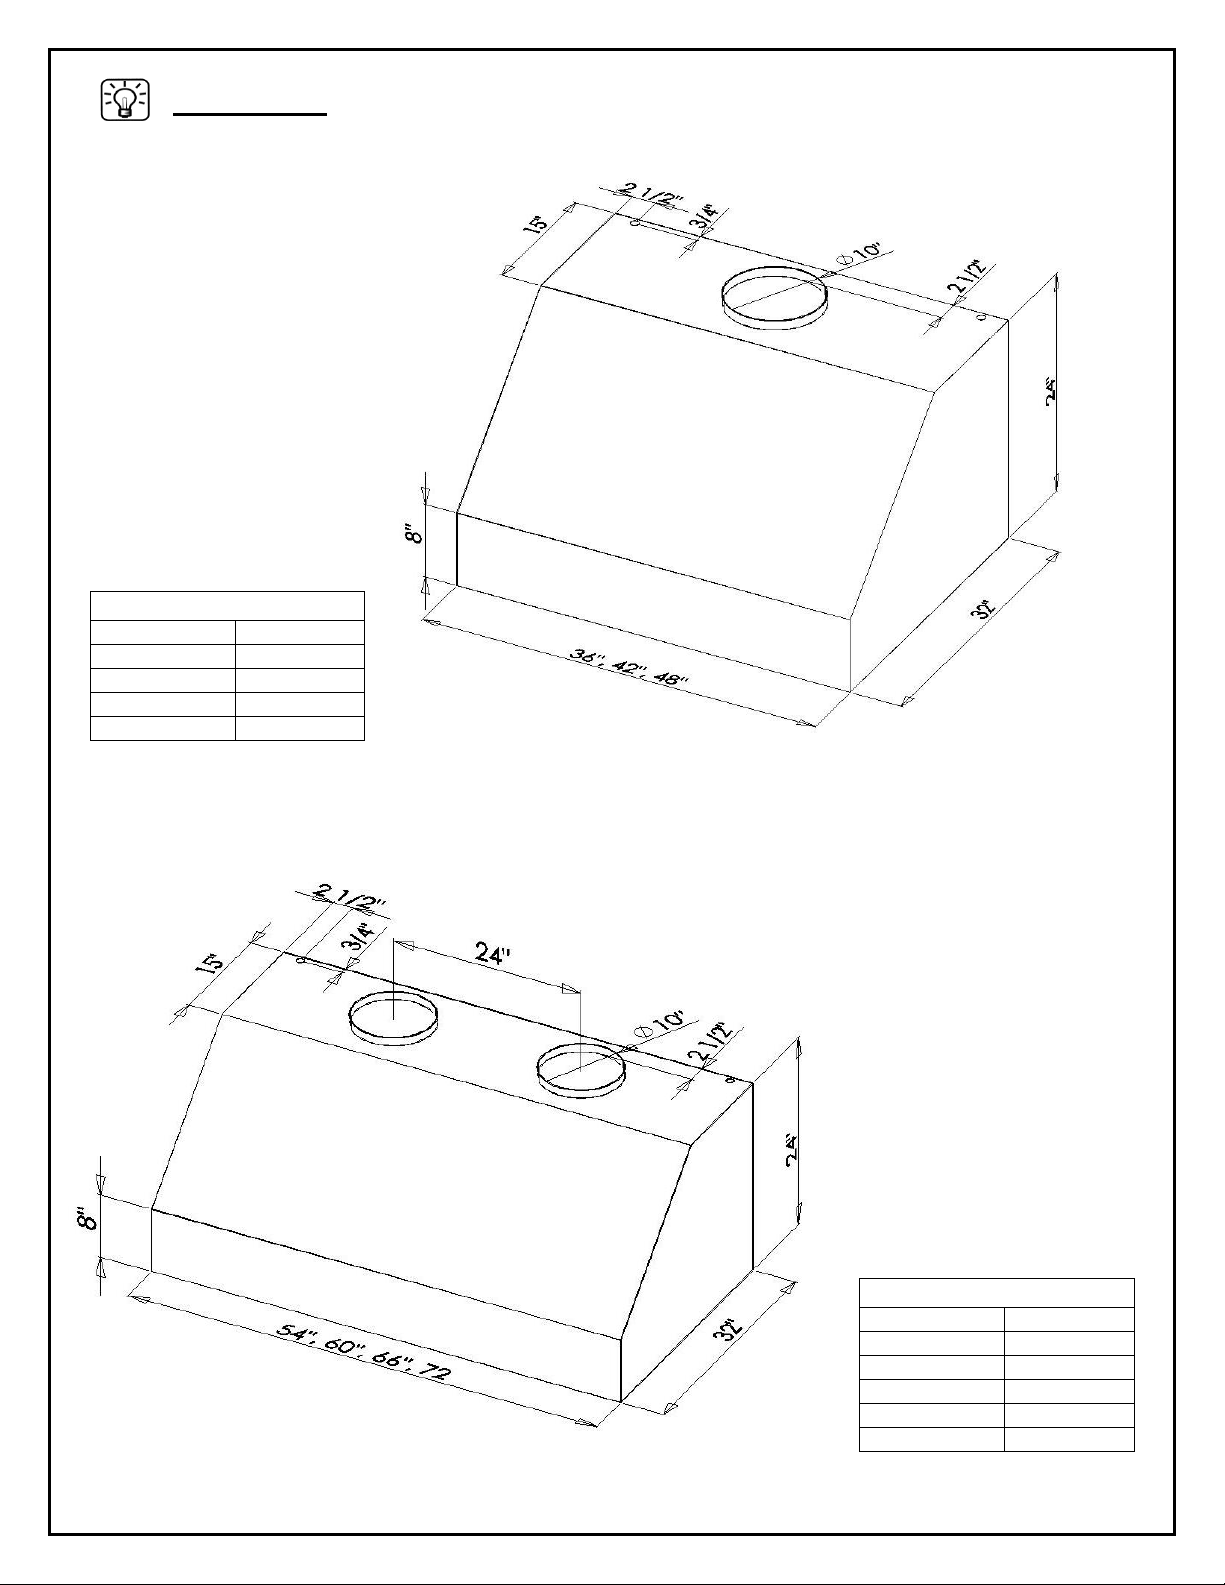
Model #
(No Blower)
(1200 CFM)
7236
7236-12
7242
7242-12
7248
7248-12
Model #
(No Blower)
(2300 CFM)
7254
7254-23
7260
7260-23
7266
7266-23
7272
7272-23
IMPORTANT: All dimensions are nominal +/- 1/8”.
FRONTVIEW
FRONTVIEW
Revised 6/11/18 Copyright © 2018 Trade-Wind Manufacturing, LLC Proverbs 22:29 Page 4
Page 5
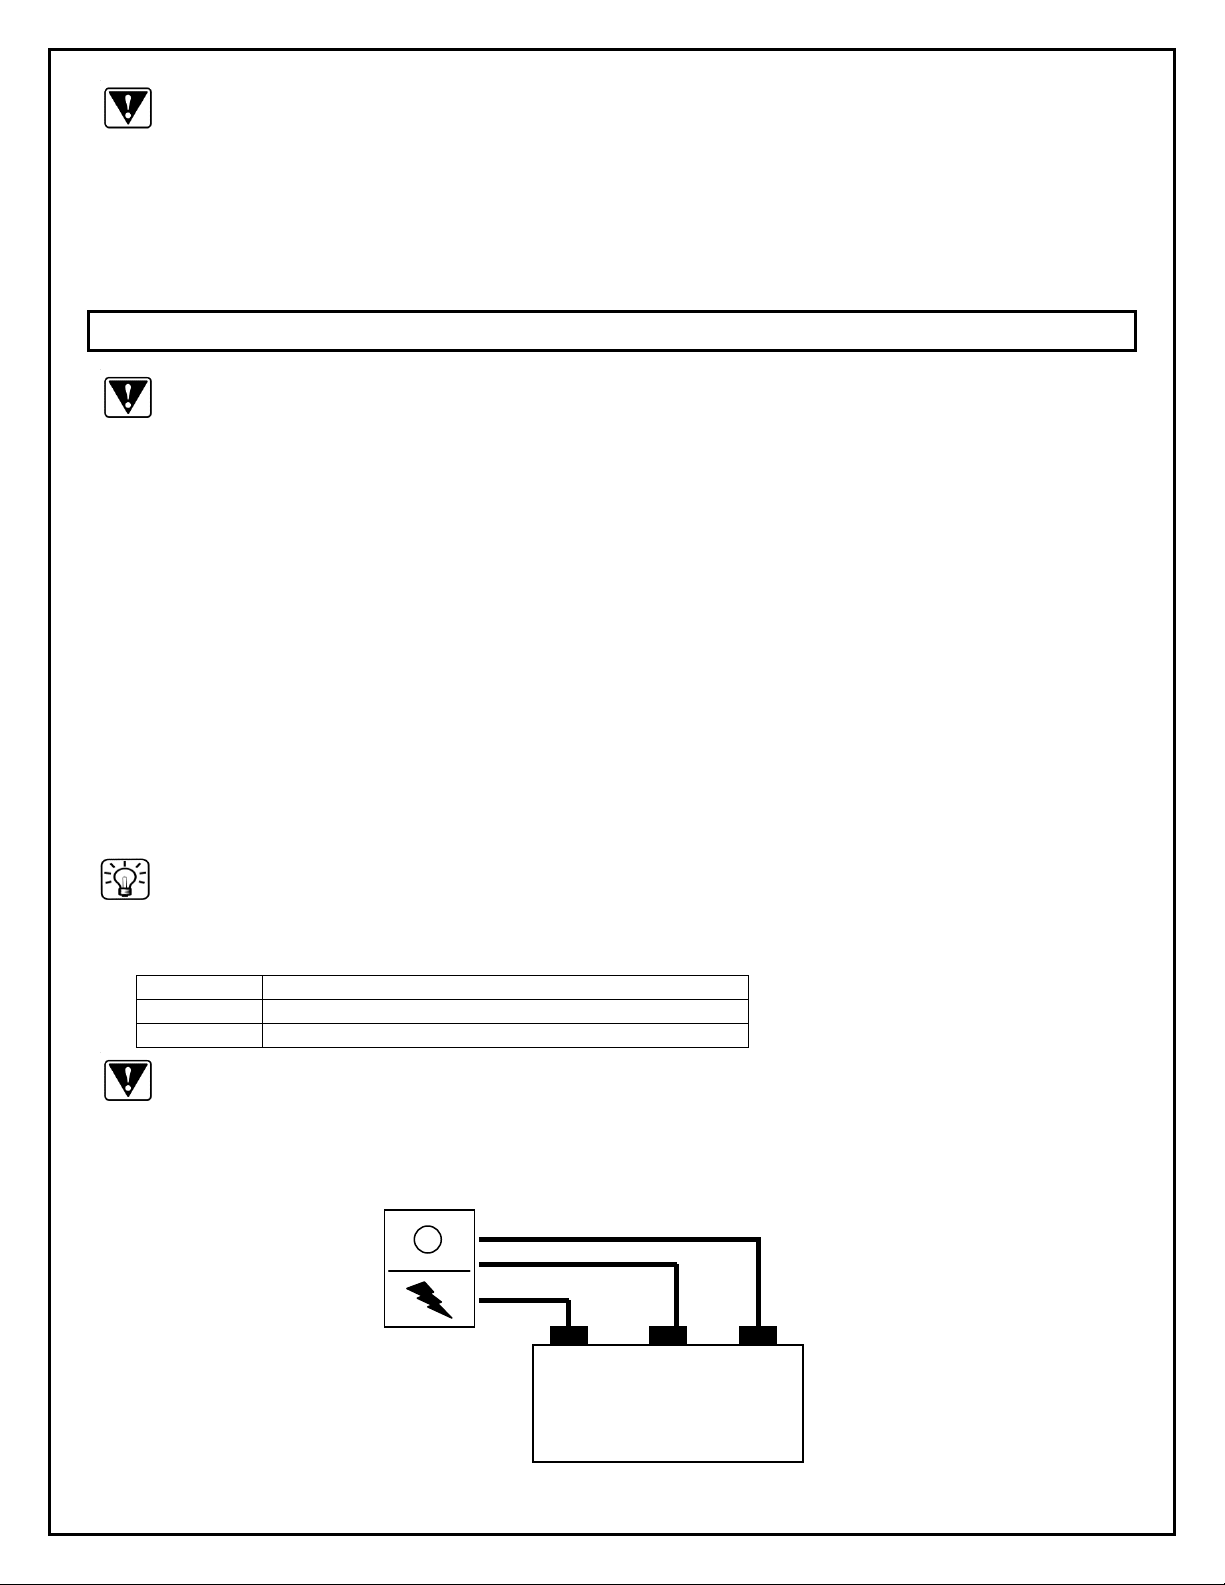
BLACK
120 VAC from electrical panel (usually black)
WHITE
Neutral from electrical panel (white)
GREEN
Ground from electrical panel (usually green)
Hood
House Electrical
Panel
Green or bare wire
White
120V Black (L)
WARNING! Following are Manufacturer’s Suggestions.
Hoods installed in custom canopies constructed of combustible materials should be installed with the combustible
material structure a minimum of 36” above the cooking surface. Hoods installed in custom canopies constructed of
non-combustible materials, should be installed with the non-combustible material structure a minimum of 30” above
the cooking surface. Follow all instructions regarding minimum safe clearances and installation location. Failure to
do so may result in a safety hazard or fire. To reduce the risk of fire use only metal ductwork.
Always Observe Local Building Codes.
PART 2 Electrical Connection
WARNING!
Ensure that the power supply is disconnected before proceeding. Verify that the power supply matches the ratings
found on the appliance data label before proceeding. The complete appliance must be properly grounded at all
times when electrical power is applied. Do not ground the appliance with the neutral (white) house supply wire. A
separate ground wire must be utilized. Failure to complete electrical connections properly may result in damaged
or non-functional systems. Follow instructions carefully to ensure proper installation.
It is the owner’s responsibility to ensure that a qualified person performs the electrical connection of this
appliance. The electrical installation, including minimum supply wire size, must comply with the National
Electric Code ANSI/NFPA 70-1990 (or latest revision) and local codes and ordinances.A copy of this
standard may be obtained from:
National Fire Protection Association, 1 Batterymarch Park, Quincy, Massachusetts 02169-7471
Important Electrical Requirements:Observe all National and local governing codes and ordinances. Have all
electrical installation done by a qualified electrical installer. This Hood requires a 120 Volt, 60 Hertz electrical
supply of an individual properly grounded branch circuit protected by a 15 or 20 Amp circuit breaker.
The TRADE-WIND®7200 Series BBQ Hood is suppliedwith a 6.0 Amp three speed fan control.
For safety precautions, each Ventilation Hood should be installed in a GFCI protected branch circuit.
Wire connections: (See Diagram Below)
There are 3 wires on the front panel that require connection.
INSTRUCTIONS:
CAUTION:
The neutral wire (white) must only be connected to the white neutral wire coming in from the electrical panel.
Revised 6/11/18 Copyright © 2018 Trade-Wind Manufacturing, LLC Proverbs 22:29 Page 5
Page 6
PART 3 Direction of Vent and Securing the Hood
MOUNTING HOLES:
Because the TRADE-WIND®7200 Series BBQ Hood was designed for all applications, no mounting holes have
been pre-drilled. This allows for custom applications for mounting. The hood should be attached to the framing
through the top and back, whenever possible. Remove the filters. Mark and drill screw holes through the hood as
required. Secure the hood by driving screws (provided by others) through the screw holes.
**NOTE: DRILLING THROUGH STAINLESS STEEL REQUIRES TITANIUM DRILL BITS. BE CAREFUL NOT TO
DRILL THROUGH THE UL LABEL OR INTO THE HOOD’S ELECTRICAL COMPONENTS
PART 4 Use and Care
OPERATING CONTROLS:
Always activate the ventilator when using cooking appliances. Activate the ventilator a few minutes before starting
to cook to establish an airflow pattern within the room. Adjust the fan speed as needed. Adjust the dimmable
halogen lights as desired.
WARNING!
Do NOT operate the blower / ventilator system without the filters in place, or with dirty, grease laden filters.
ENERGY SAVING TIPS:
Do not operate the blower at a speed higher than necessary to remove the cooking exhaust. Turn off the unit once
the smoke and cooking odors have been eliminated. Clean filters and grease laden surfaces often to improve
efficiency.
Proper cleaning is necessary to maintain performance and appearance, while also ensuring safe operation.
The frequency of cleaning should be adjusted according to the type and amount of cooking. Best results will be
achieved by cleaning soiled components as soon as possible. Filters must be cleaned regularly. Using the
aluminum knobs, lightly pull the filter toward the front of the liner while pulling the backside downwards. Replacing
the filter is just as easy as taking it out. For visual instructions on how to remove the filters visit our YouTube page
(https://www.youtube.com/channel/UCwVIbi_9hbuIATTYvz43oBA).
The filters may be cleaned by hand washing in hot water using a mild detergent solution, or by placing them in a
dishwasher. Locate holes on the sides of the filter. Put filter in dishwasher with holes facing up so detergent can
enter filters. Dry the filters completely before using again. Rinse and dry with a soft lint-free cloth. Always wipe
stainless steel surfaces with the grain. Never wipe across the grain. After cleaning, reinstall the filters carefully.
>>Most common scrubber type pads will scratch the hood.
If a commercially available stainless steel cleaner is used, it is important to read the labels for chlorine compounds.
Chlorine is a corrosive substance, DO NOT USE. Follow polish manufacturer’s instructions.
Hoods are designed for halogen light bulbs. They can be purchased at most home and/or grocery stores.
We endeavor to incorporate the best technology provided to our industry, in manufacturing the
TRADE-WIND
and specification without prior notice.
CARE & CLEANING:
CAUTION:
HALOGEN LIGHT BULBS:
®
products, therefore, we reserve the right to change models, mode of operation,
Revised 6/11/18 Copyright © 2018 Trade-Wind Manufacturing, LLC Proverbs 22:29 Page 6
Page 7
W A R R A N T Y
B Outdoor BBQ Ventilation Products
What IS Covered:
Trade-Wind Manufacturing, LLC® warrants its Trade-Wind® Outdoor BBQ Ventilation Products to the original
user, to be free of defects in materials and workmanship for three (3) years from the date of purchase.
Trade-Wind Manufacturing, LLC® at its option, will repair or replace the complete unit or any defective
component without charge. This warranty may be voided if any unauthorized service, alterations, or repairs are
made to the product.
What is NOT Covered:
Normal maintenance and service of any product that has been subject to misuse, negligence,
accident, or installation inconsistent with the recommended Trade-Wind® Installation Instructions
and Trade-Wind® Best Practices Guidelines.
Product used other than for normal in-home use or products used outside of the United States and Canada.
Damage to the product caused by accident, fire, flood, or other acts of God.
Service calls to educate the customer in the proper use and care of the product, change fuses, or to
reset the circuit breakers.
Service calls to correct faulty installation, such as, performance issues relating to improperly sized
ducting or restrictive roof caps is not covered and will by default be charged back to the Homeowner.
Light bulbs are not covered under warranty.
Trade-Wind Manufacturing, LLC® disclaims and excludes any liability for implied warranties or for incidental or
consequential damages wherever permitted by law. There are no implied warranties of merchantability or fitness
for a particular use or purpose. This warranty gives you specific legal rights and you may also have other rights,
which vary from state to state.
For Service: If you need service on your Trade-Wind
®
Outdoor BBQ Ventilation Product, visit our website at:
www.t-wusa.com and click on the warranty tab. Fill out the simple form providing the model number, serial
number, date of purchase, and brief description of the problem. Proof of purchase will also be required.
Warranty Revised 6/11/18
800 West Grant Street, Phoenix, AZ 85007
1-800-955-5737
602-900-8500
t-wusa.com
MADE IN PHOENIX, AZ USA
Trade-Wind Manufacturing, LLC® has a policy of continuous improvements and reserves the right to modify (at any time and
without notice) any or all of its products, features, designs, components and specifications. For exact dimensions, see the
Installation Instructions included with each product. Some features may be slightly different than shown on product literature.
For more information, please contact your Trade-Wind® Representative
Revised 6/11/18 Copyright © 2018 Trade-Wind Manufacturing, LLC Proverbs 22:29 Page 7
Page 8
Best Practices
Venting Installation Instructions
Addendum to Installation
Instructions
Model: 7200 Series
IMPORTANT: Problems caused by improper installations are not covered by the manufacturer’s warranty.
IMPORTANT: Undersized and improperly installed duct pipe and/or other ventilation components will cause excessive static
pressure (air resistance), that may result in rattling, vibration and air buffeting noises, as well as inadequate ventilation .
1. Building Codes
BBQ Hood Ventilators should be installed by qualified technicians familiar with state and local building codes.
2. Duct Pipe and Fittings (Elbows, Transitions, Roof & Wall Caps)
a. Use round or rectangular rigid metal duct only. Where possible, use round duct as it creates the least amount of
static pressure. DO NOT use flex duct.
b. All duct sections and fittings (EXCEPT DAMPERS, per Section 4), should overlap and be connected with at least 3 – 4
equally spaced screws and wrapped tightly with 2 – 3 layers of Aluminum Foil Metal Duct Tape. This type of duct
tape is more durable than traditional cloth duct tape. DO NOT use butt joints.
c. For best air flow, elbows and pipe size transition fittings should not be directly connected to one another. Where
possible, always include at least 15 inches of straight pipe between fittings.
3. Duct Pipe and Fitting Sizes
IMPORTANT: No portion of any length of duct pipe or fitting should be smaller than the discharge port of the ventilator.
This is very important because any type of restriction anywhere in the ventilation system will cause increased static
pressure (air resistance), that may result in rattling, vibration and air buffeting noises, as well as inadequate ventilation.
See Duct Sizing Chart and Area Calculations section for more detail.
Duct Runs – Length
a. Configure the ventilation duct run to be as short and as direct to the outside as possible. Minimize the number of
elbows and transition fittings used. Complex or long runs should be reviewed by a qualified installer.
b. No portion of the ducting should be run so that the exhaust air flows downward. Since exhaust heat rises, forcing
the air to flow downward will cause increased static pressure. As previously mentioned, improperly installed duct
pipe will cause excessive static pressure (air resistance), that may result in rattling, vibration and air buffeting noises,
as well as inadequate ventilation.
c. Duct runs for 1200CFM ventilator models should not exceed 35 linear feet with two 90-degree elbows and two 45-
degree elbows, a damper and a roof or wall cap. Longer runs or additional elbows will result in decreased
ventilation performance. Each 90-degree elbow is the equivalent of 6 linear feet of duct pipe; each 45-degree elbow
is equivalent to 3 linear feet of duct pipe.
d. Always run ventilator ducts to the outdoors. DO NOT terminate a duct into an attic, basement, garage, crawl space
under a house, a chimney, other ducting or an enclosed room.
4. Dampers
IMPORTANT: DO NOT USE ANY TYPE OF DAMPER IN A BBQ HOOD APPLICATION.
In ventilation systems utilizing a roof cap or wall cap with a built-in damper, remove it. Dampers are unnecessary and will
cause increased static pressure (air resistance), that may result in rattling, vibration and air buffeting noises, as well as
inadequate ventilation.
Revised 6/11/18 Copyright © 2018 Trade-Wind Manufacturing, LLC Proverbs 22:29 Page 8
Page 9
Ventilator Discharge Port
Types & Sizes
Duct Type Required
Duct Size
(in Square Inches)
Minimum Discharge Size
of Roofcap or Wallcap
Outside Opening
6” Diameter, Round
28.3”
6” Round Metal Duct
28.3”
28.3”
7” Diameter, Round
38.5”
7” Round Metal Duct
38.5”
38.5”
8” Diameter, Round
50.25”
8” Round Metal Duct or
6” x 9” Rectangular Metal Duct
50.25”
54”
50.25”
54”
10” Diameter, Round
78.5”
10” Round Metal Duct
78.5”
78.5”
3.25” x 10” Rectangular
32.5”
3.25” x 10” Rectangular Metal Duct
32.5”
32.5”
ROUND DUCT
RECTANGULAR DUCT
Radius
x
Radius
x
3.1416 = Area (Sq.
Inches)
Width
x
Depth
=
Area (Sq. Inches)
x x =
x =
The “radius” is one-half the diameter of a round duct, e.g.,
½ of a 10” round duct is 5”. 3.1416 is “Pi”, the “constant”
used when calculating the area of a circle.
Please see next
page for
drawing of
optimum
performance
roof cap.
5. Roof Caps and Wall Caps
The roof cap or wall cap is the termination point of the venting system that allows the exhaust air to exit to the outdoors.
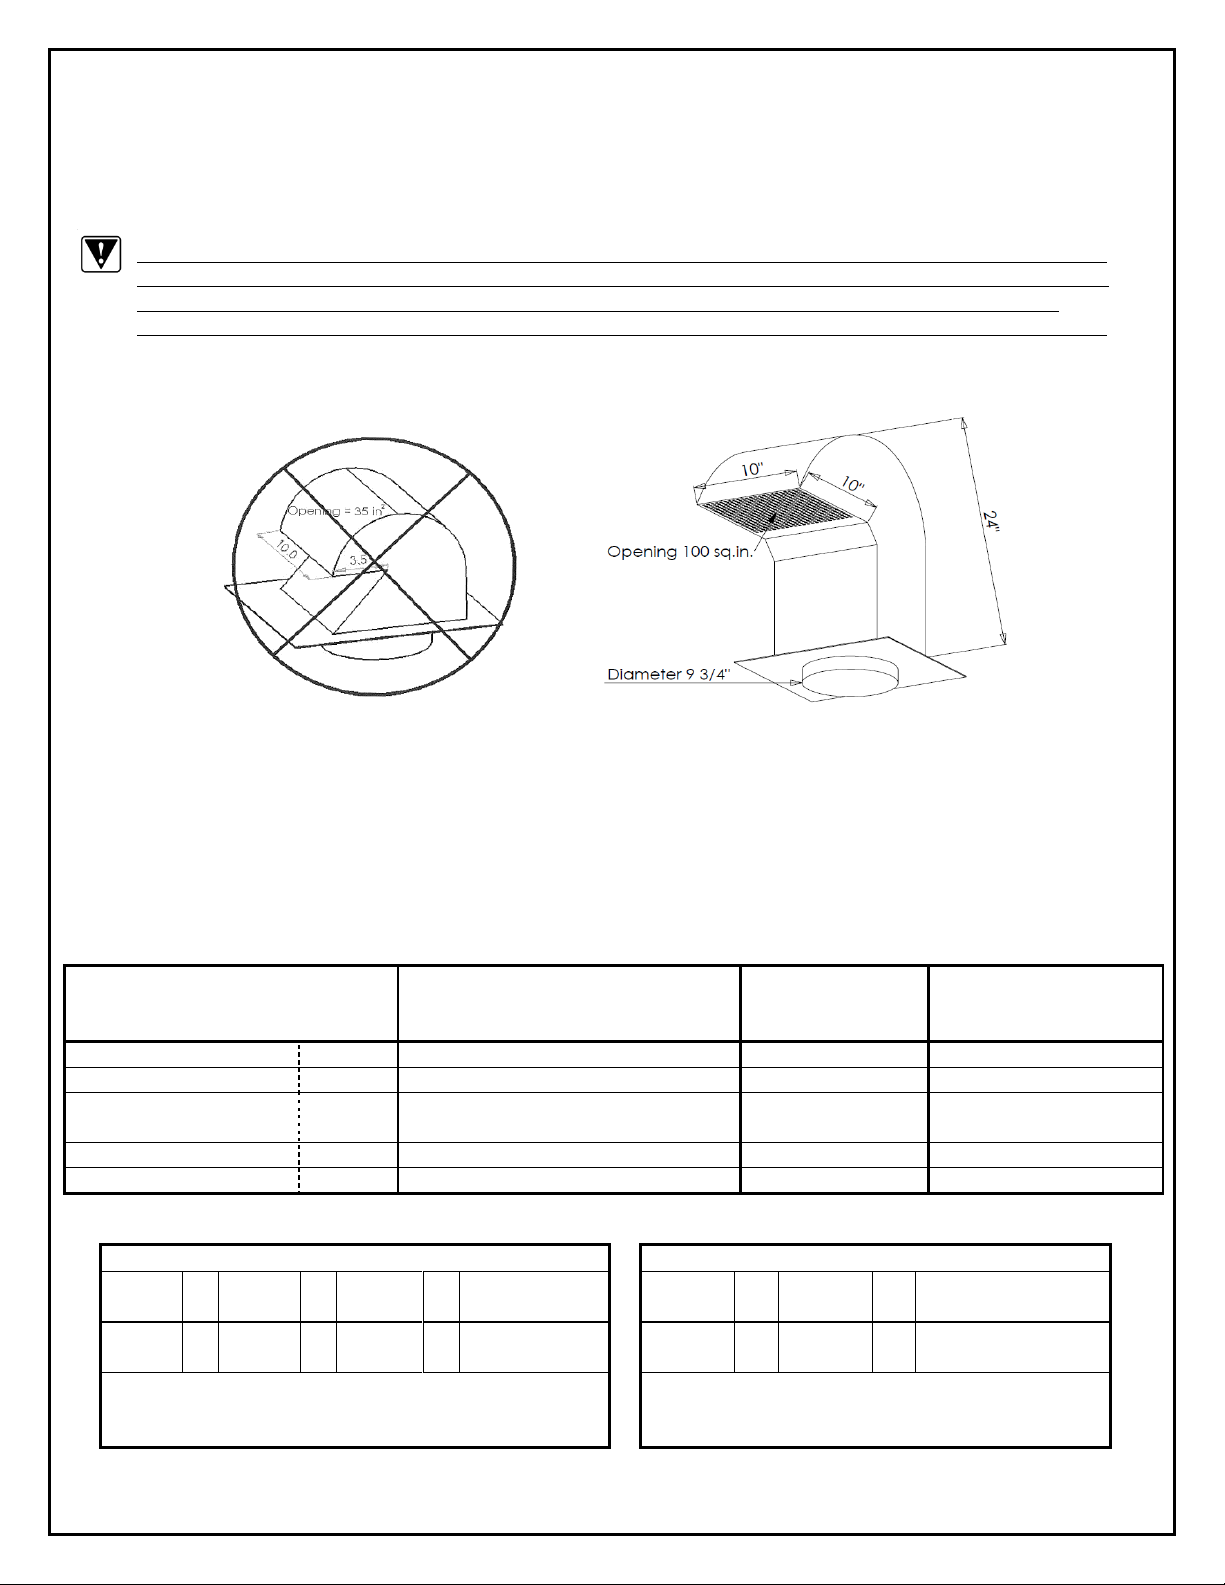
All sections of this fitting must have an equal or greater air path area than the ventilator’s discharge port. If any section
of the roof cap or wall cap is smaller than the ventilator’s discharge port, the entire ventilation system will lose efficiency
and the restriction will cause increased static pressure and decrease performance.
IMPORTANT: Even though the intake side of the roof cap or wall cap may be properly sized, roof caps or wall caps with
built-in dampers must be made so that when the damper is fully open, the actual open area of the final air path is equal
to or greater than the discharge port of the ventilator. Any undersized portion of a roof cap or wall cap will cause
excessive static pressure that may result in rattling, vibration and air buffeting noises, as well as inadequate ventilation.
Do Not use “goose-neck style” caps as they significantly restrict natural, heated air-flow. Do Not use caps with dampers
for BBQ Hoods.
Fig. 1 Fig. 2
The air exit opening on the roof cap used needs to be at or above 78.5 square inches. See illustrations above. Never use a
roof cap like the one shown in Figure 1. Instead use a style similar to the one shown in Figure 2.
6. Attaching Duct to House Framework
The ventilation system should be attached to the framework in such a manner that the weight of the duct and fittings is
supported with no stress on the duct joints, fittings or on the ventilator. All ducting should be attached so as to avoid
any possible duct vibration from being transferred to the house’s framework.
7. Duct Sizing Chart and Area Calculations
Formulas for Calculating Square Inches of Various Duct Sizes & Types
Revised 6/11/18 Copyright © 2018 Trade-Wind Manufacturing, LLC Proverbs 22:29 Page 9
Page 10
A
B
30" - 44"
30" - 44"
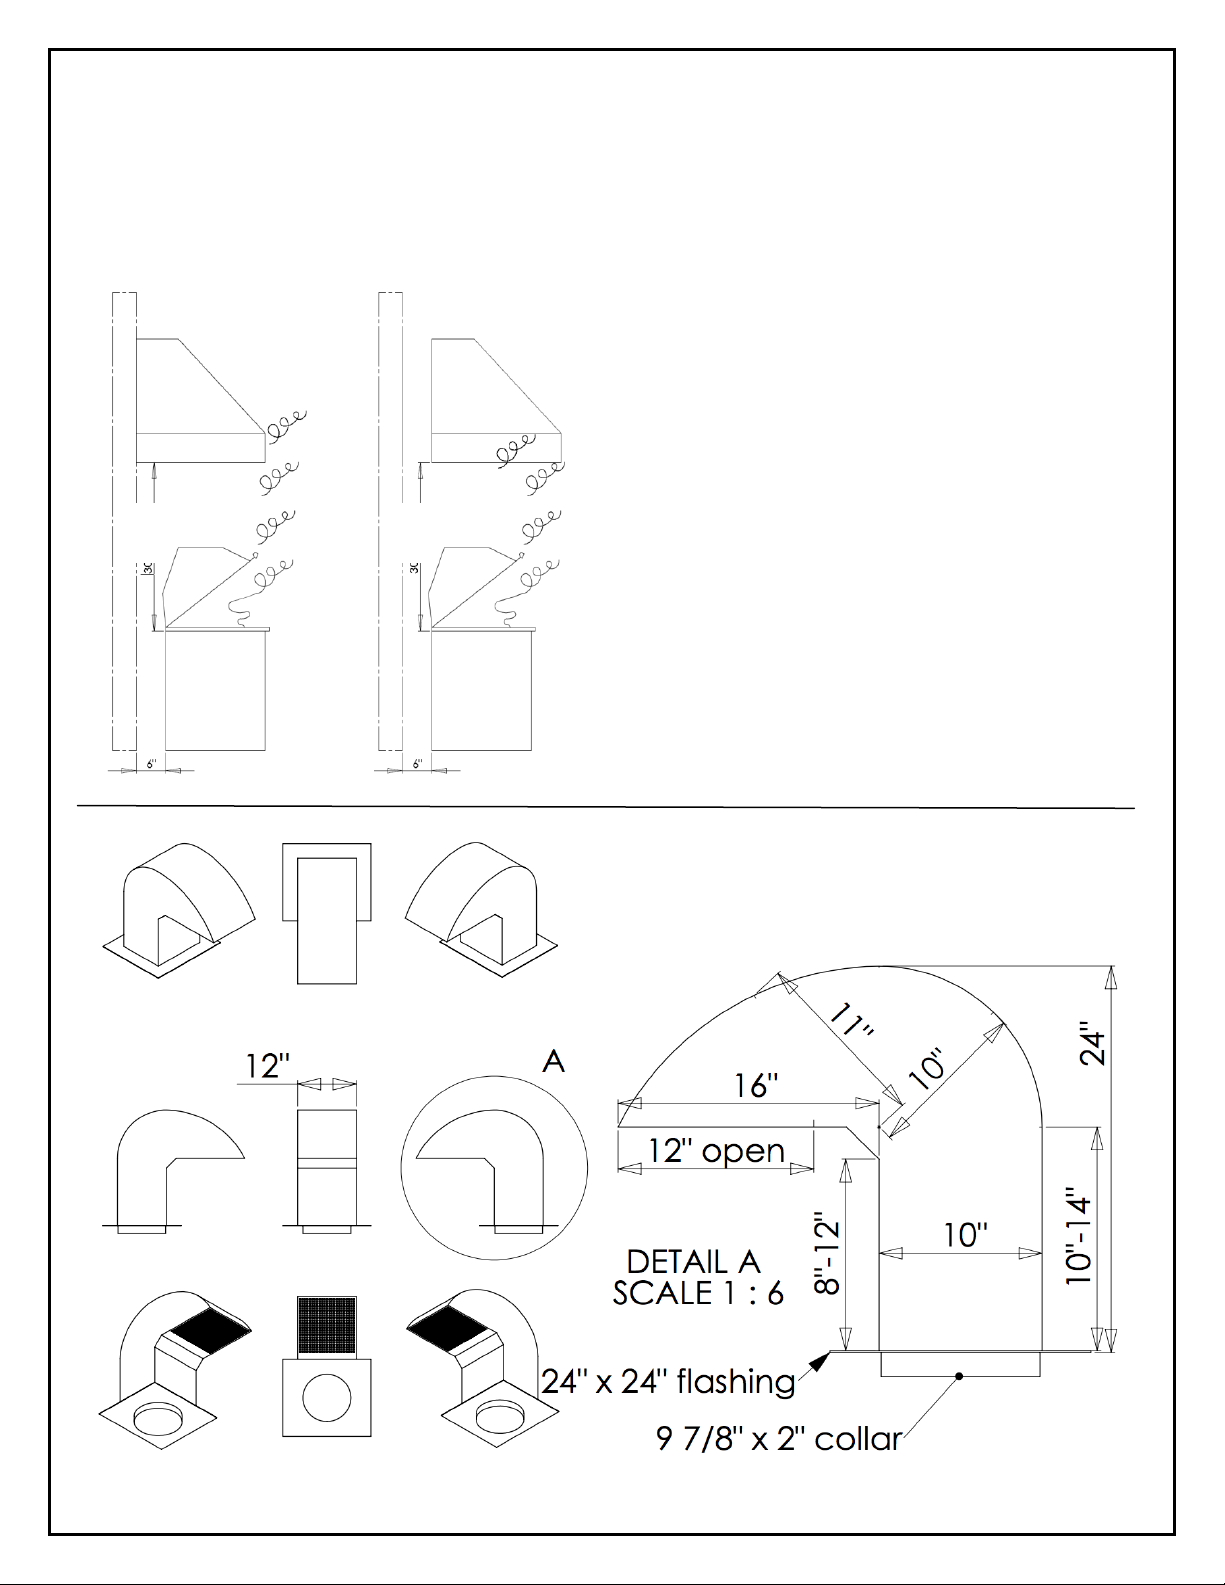
Roof Cap Drawing
*Required dimensions for roof cap - Minimizes static
pressure and maximizes air flow to ensure optimum
performance of your Trade-Wind product.
8. Best Smoke Capture Recommendations
Smoke and hot air from an Outdoor BBQ Grill rises quickly, especially as the BBQ lid is opened. Not only does the smoke rise
fast, but it is usually deflected forward (toward the cook) beyond the BBQ hood’s capture area by the shape and position of
the BBQ lid itself. Heavy, fast rising smoke is a challenge even for high-performance BBQ hoods, but there are some things
you can do to enhance your outdoor BBQ hood’s performance.
a. Install the hood at least 30”, but no more than 44” above
the cooking surface. If the hood is installed more than 44” above
the cooking surface, its’ smoke capture ability declines rapidly.
See Drawing A.
b. Since smoke also expands as it rises, the hood’s sides and
front edge should extend 3” – 6” beyond the front and sides of
the cooking surface—see Drawing B. In this example, the hood is
attached to a built-out section of the wall or to a chase.
It is unlikely that smoke rising past the bottom of the BBQ hood
will be captured by the hood. Smoke escaping the hood’s capture
area will typically remain against the ceiling until it is blown out
by natural air currents or until it dissipates.
c. Turn the hood on high 2 -3 minutes prior to placing food
on the grill. If there is no wind or wind drafts, an upward flowing
air “curtain” will be created by the hood’s suction that moves air
up the sides and front of the cooking surface. This upward
moving air curtain will help capture much of the smoke.
d. Wind and wind drafts will also negatively affect the
capture ability of high-performance outdoor BBQ hoods. If the
BBQ grill is located in a consistently windy area, e.g., near oceans,
large lakes or on hillside properties, for best BBQ hood
performance, a wind-break may be required.
Revised 6/11/18 Copyright © 2018 Trade-Wind Manufacturing, LLC Proverbs 22:29 Page 10
 Loading...