

TradeVision CK390 User Manual
B
Blluueettooootthh
H
Haannddssffrreeee
C
Caarr
K
Kiitt
w
wiitthh LL
C
C
D
D
USER’S MANUAL
Model: CK390
www.tradevision.nl

Contents
1. Introduction·································································· 1
n Identifying Components ·············································· 1
Core Components ······························································ 1
Optional Components ·························································· 2
Optional Accessories ··························································· 2
2. Installation ··································································· 3
n Installing the Junction Box ·········································· 3
o Connecting the Power Supply······································ 4
p Connecting Accessories ············································· 5
q Preparing the Control Module ······································ 6
Installing the battery ···························································· 6
Attaching the control module ················································· 7
r Installing the Caller ID Display ····································· 9
s Installing the Microphone ············································ 10
Installing the Microphone ····················································· 10
3. Operation ···································································· 11
n How to Operate the Car Kit ········································· 11
Understanding the icons on your screen ·································· 11
o Basic operation ························································· 12
Connecting to the Mobile Phone for the First Time ····················· 12
p Dialing the First Call ·················································· 13
Receiving and Ending a Phone Call ········································ 13
Adjusting the Conversation Volume ········································ 13
Phonebook Functions 1 – Updating Phonebook ························ 13
Phonebook Functions 2 – Search for a Name to Call ················· 16
Accessing Received, Dialed, and Missed Calls ························· 17
Dialing a Number································································ 17
Initiating Private Calls ·························································· 17
r Connection Settings ·················································· 18
Pairing Setup ····································································· 18
Disconnecting From the Current Phone ··································· 18
Viewing, Connecting, and Deleting (Previously Paired Phones) ···· 18
s Language Settings ···················································· 19
Language Settings ······························································ 19
www.tradevision.nl

t Sound Settings ························································· 20
Adjusting the Speaker Volume ·············································· 20
Disabling and Enabling the Keytone ······································· 20
u Display Settings ························································ 20
Adjusting Display Contrast ···················································· 20
Adjusting Display Brightness ················································· 22
Changing the Backlight Color ················································ 22
Enabling Screen Auto Off ····················································· 23
v Other Settings ·························································· 23
Enabling and Disabling Automatic Phonebook Synchronization ···· 23
Finding Out About the Device ················································ 23
w FM Transmission & A2DP for Stereo MP3 Playback ········ 24
Setting up FM Transmission ················································· 24
Using A2DP Media Player ···················································· 25
Factory Settings Reset ··············································· 26
Bluetooth Software Upgradeability ································ 26
www.tradevision.nl
1
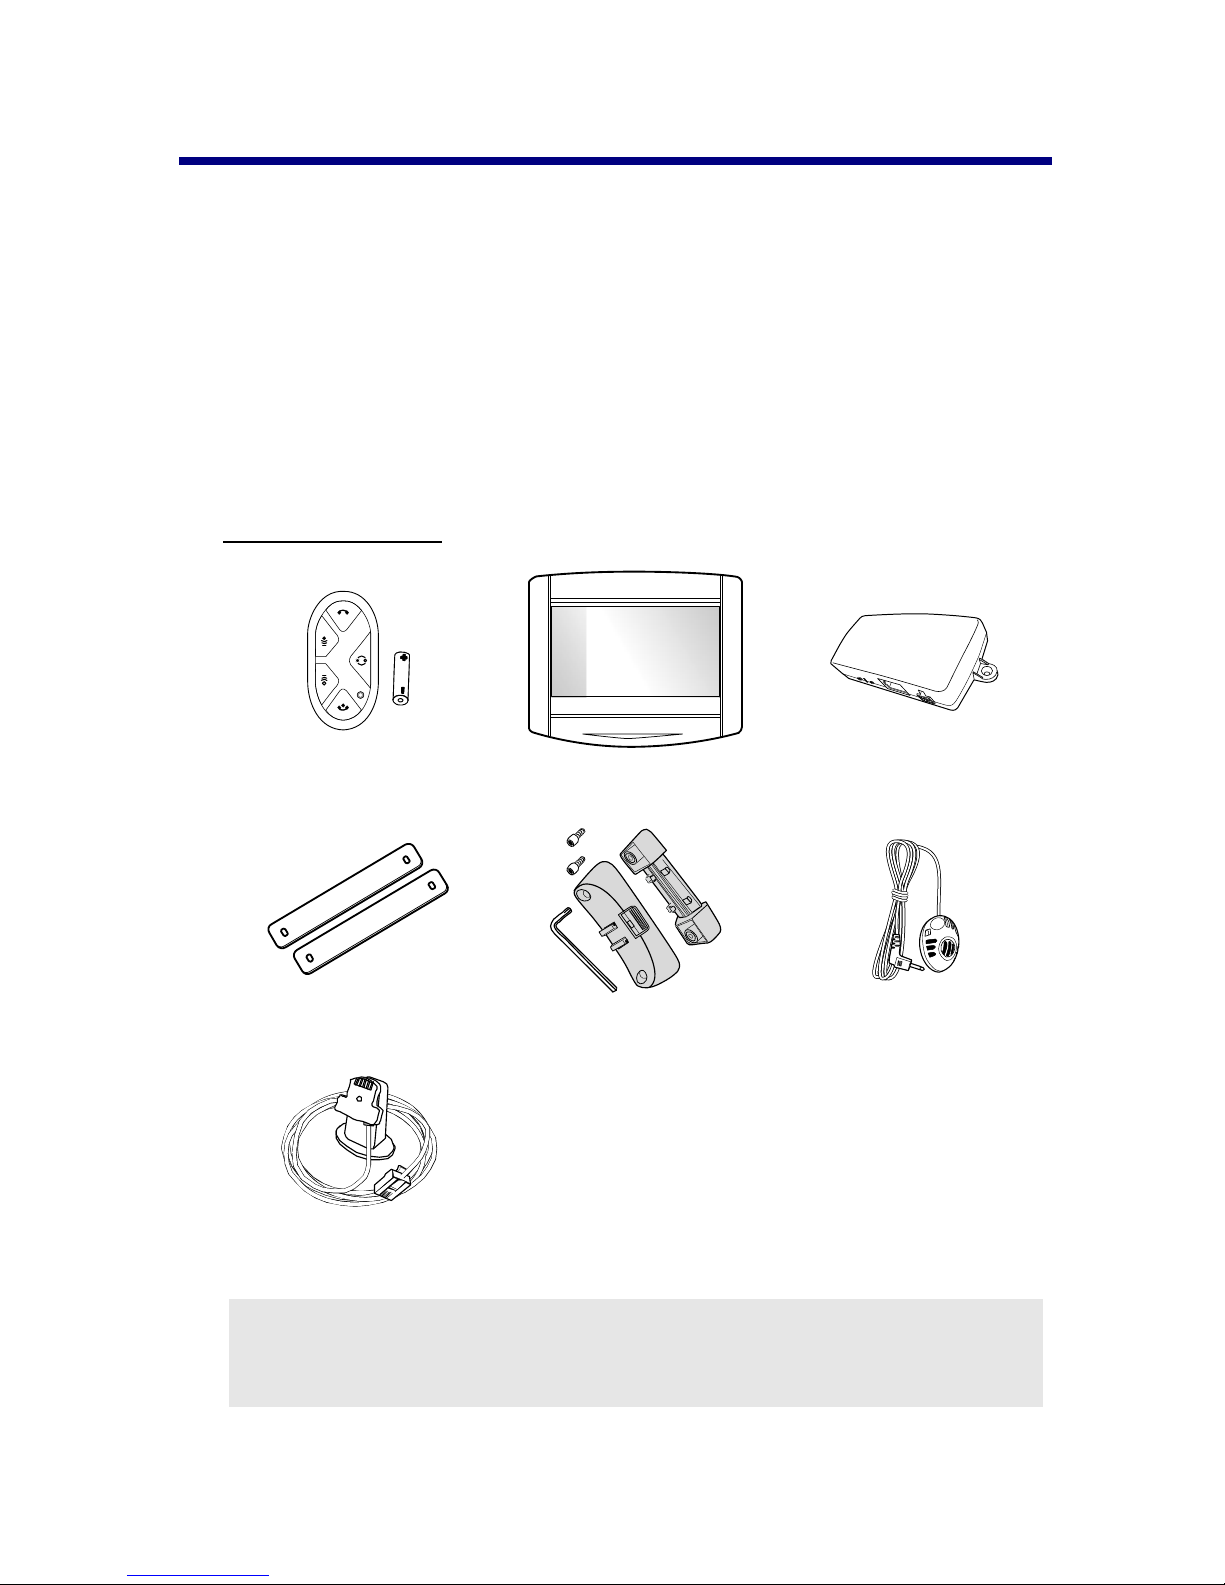
Carefully unpack the CK390 Bluetooth Handsfree Car Kit
and check that the following items are included:
n Identifying Components
Unpack the Car Kit package and ensure the following items
are included.
Core Components
Control module
(one 23A battery)
CK390 LCD
Caller ID
Junction Box
Rubber Clasp
Control bracket
(hex bolt x 2 and key x 1)
Microphone
1. Introduction
Stand
Note:
If any item is missing or damaged, please contact your
dealer.
www.tradevision.nl

1. Introduction
Optional Components
Standard Option 1 Option 2
ISO 2 ISO 1 External Speaker
Power Cable Power Cable
Fuse set Fuse set
Optional Accessories
Suction Cup LCD attachment/ suction cup
Note:
Please contact your dealer for availability.
2
www.tradevision.nl

3
2. Installation
This section demonstrates how to set up and install the
CK390 into a vehicle.
n Installing the Junction Box
The Car Kit is designed to work with the 12/ 24-volt power
supply of the vehicle. Refer to the following to install the
junction box in a vehicle.
1. Locate a suitable place inside the car to mount the
junction box. Select a dry place that avoids excessive
heat and mechanical vibration. Ideally, the junction box
should be hidden from view, but still easily accessible.
Note:
Make sure that the cables are long enough to support
the location of the junction box. If the cables are not long
enough, do not lengthen the cables. Instead, relocate the
junction box.
2. Use two screws (not included) to fasten the junction box
in place.
www.tradevision.nl
2. Installation
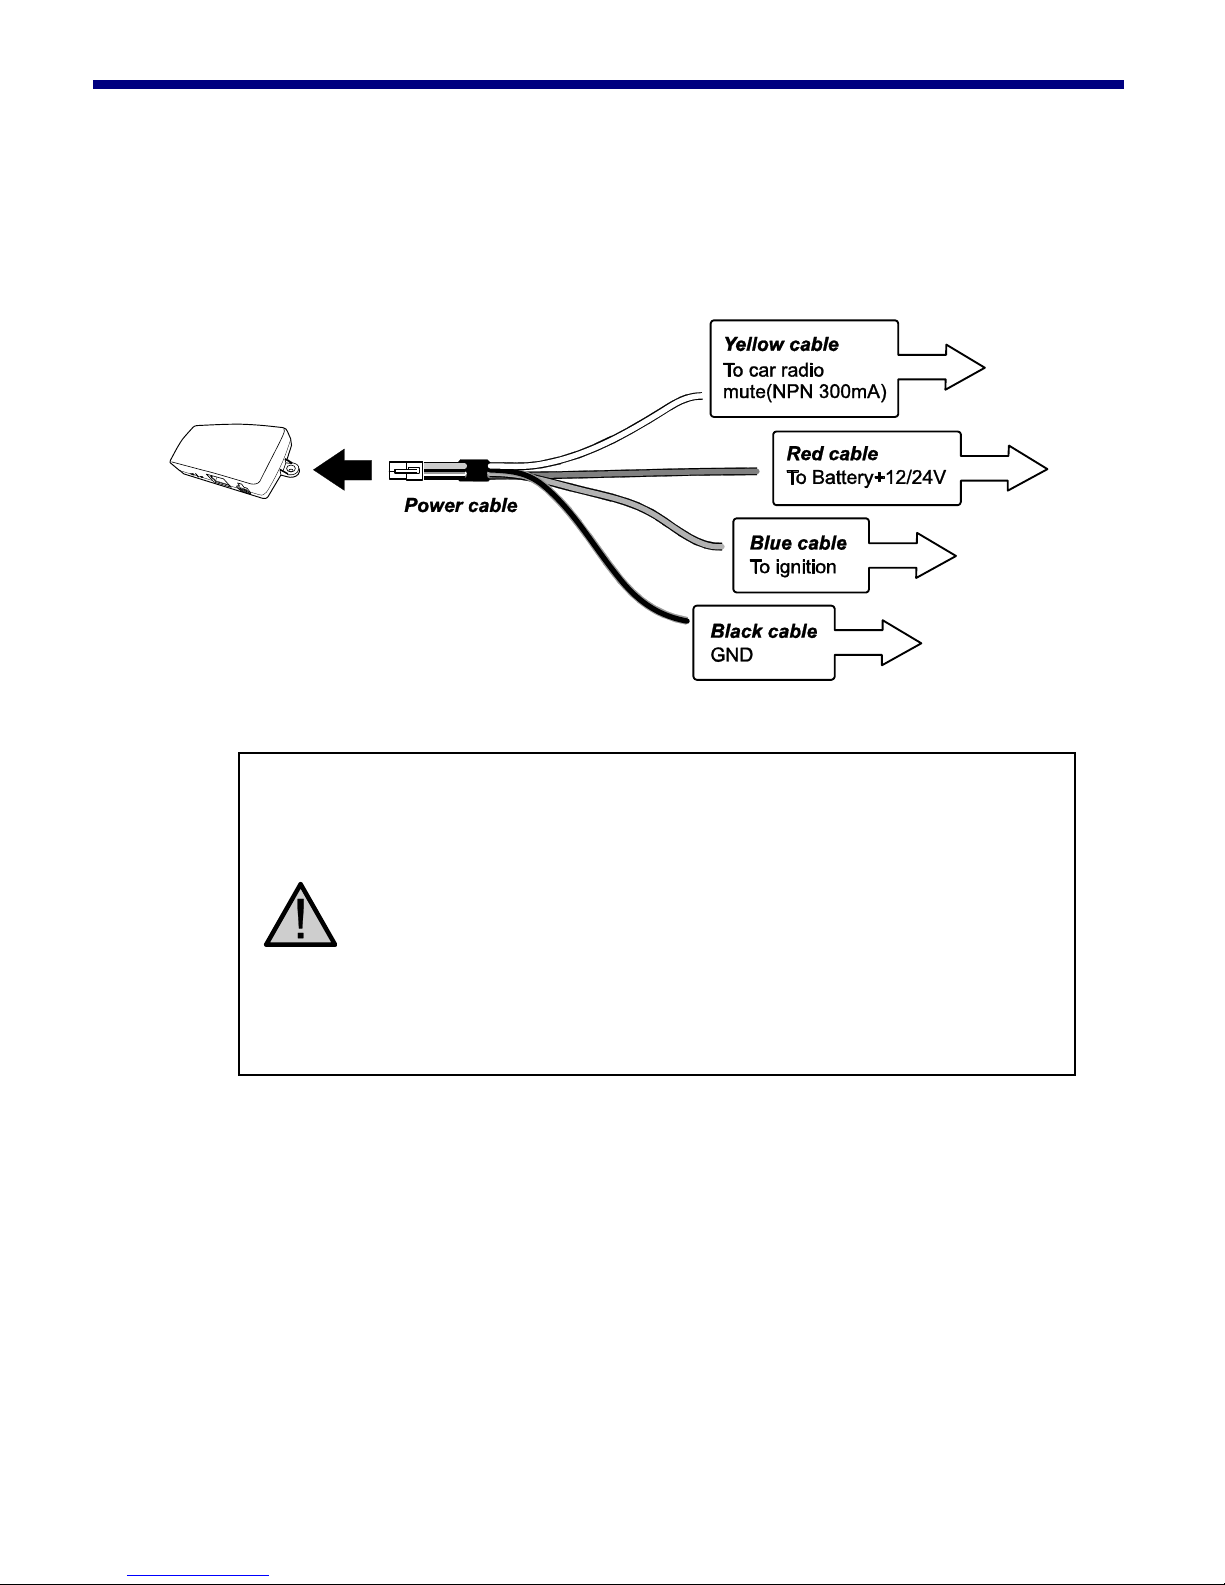
o Connecting the Power Supply (For Options 1 and 2 only)
The following illustration demonstrates how to connect the
Car Kit’s power cables to the vehicle’s electrical system.
Important:
The blue cable must be connected to the 12/ 24V
switched to enable the Car Kit to go into standby
mode.
Do not connect the blue cable to the +12/ 24V
permanent. Doing so may discharge the battery of
the vehicle and prevent the Car Kit from being
reset.
4
www.tradevision.nl
2. Installation
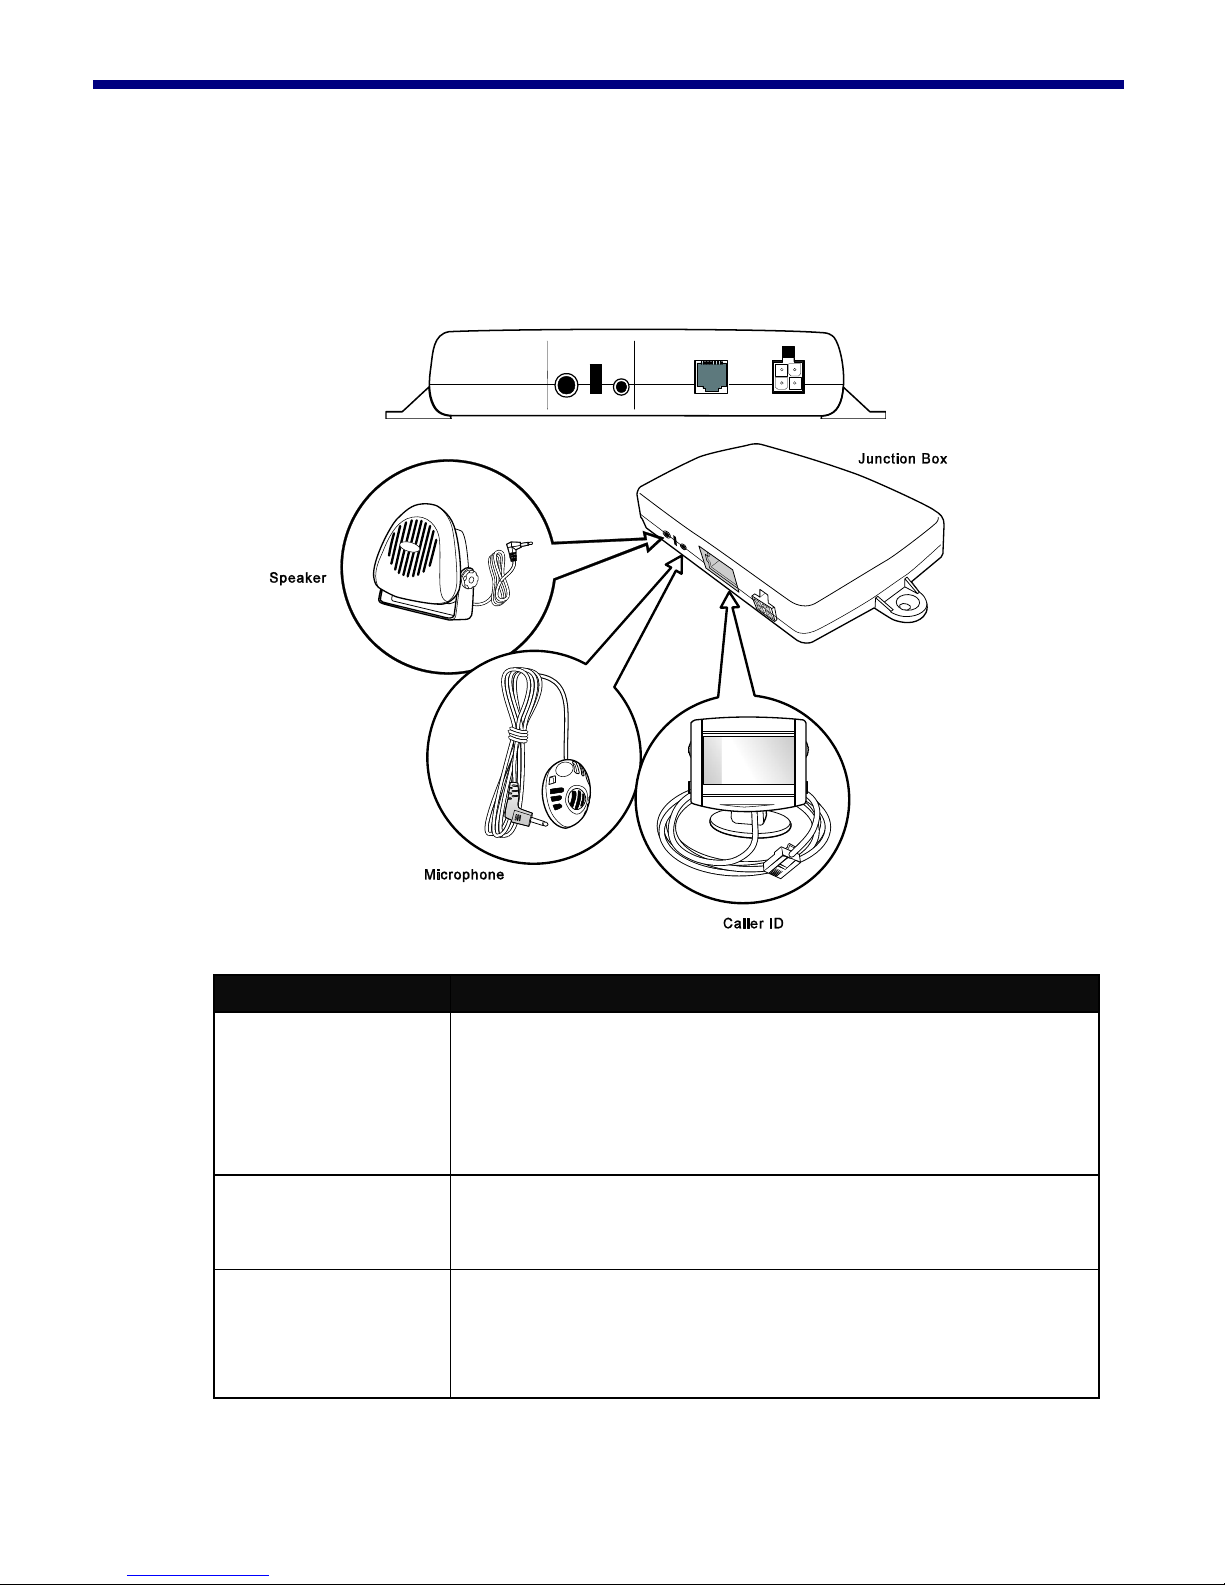
p Connecting Accessories
The following illustration shows where to connect accessory
devices.
5
Item Description
Caller ID
The caller ID should be placed on the dash
within view of the driver and passenger.
(See Installing the Caller ID Display on
page 9.)
Microphone
Ideally, the microphone should be located in
front of the user and above waist height.
Speaker
For best reception, the speaker should be
mounted at least 80cm (30 inches) from the
Car Kit’s microphone.
www.tradevision.nl
2. Installation
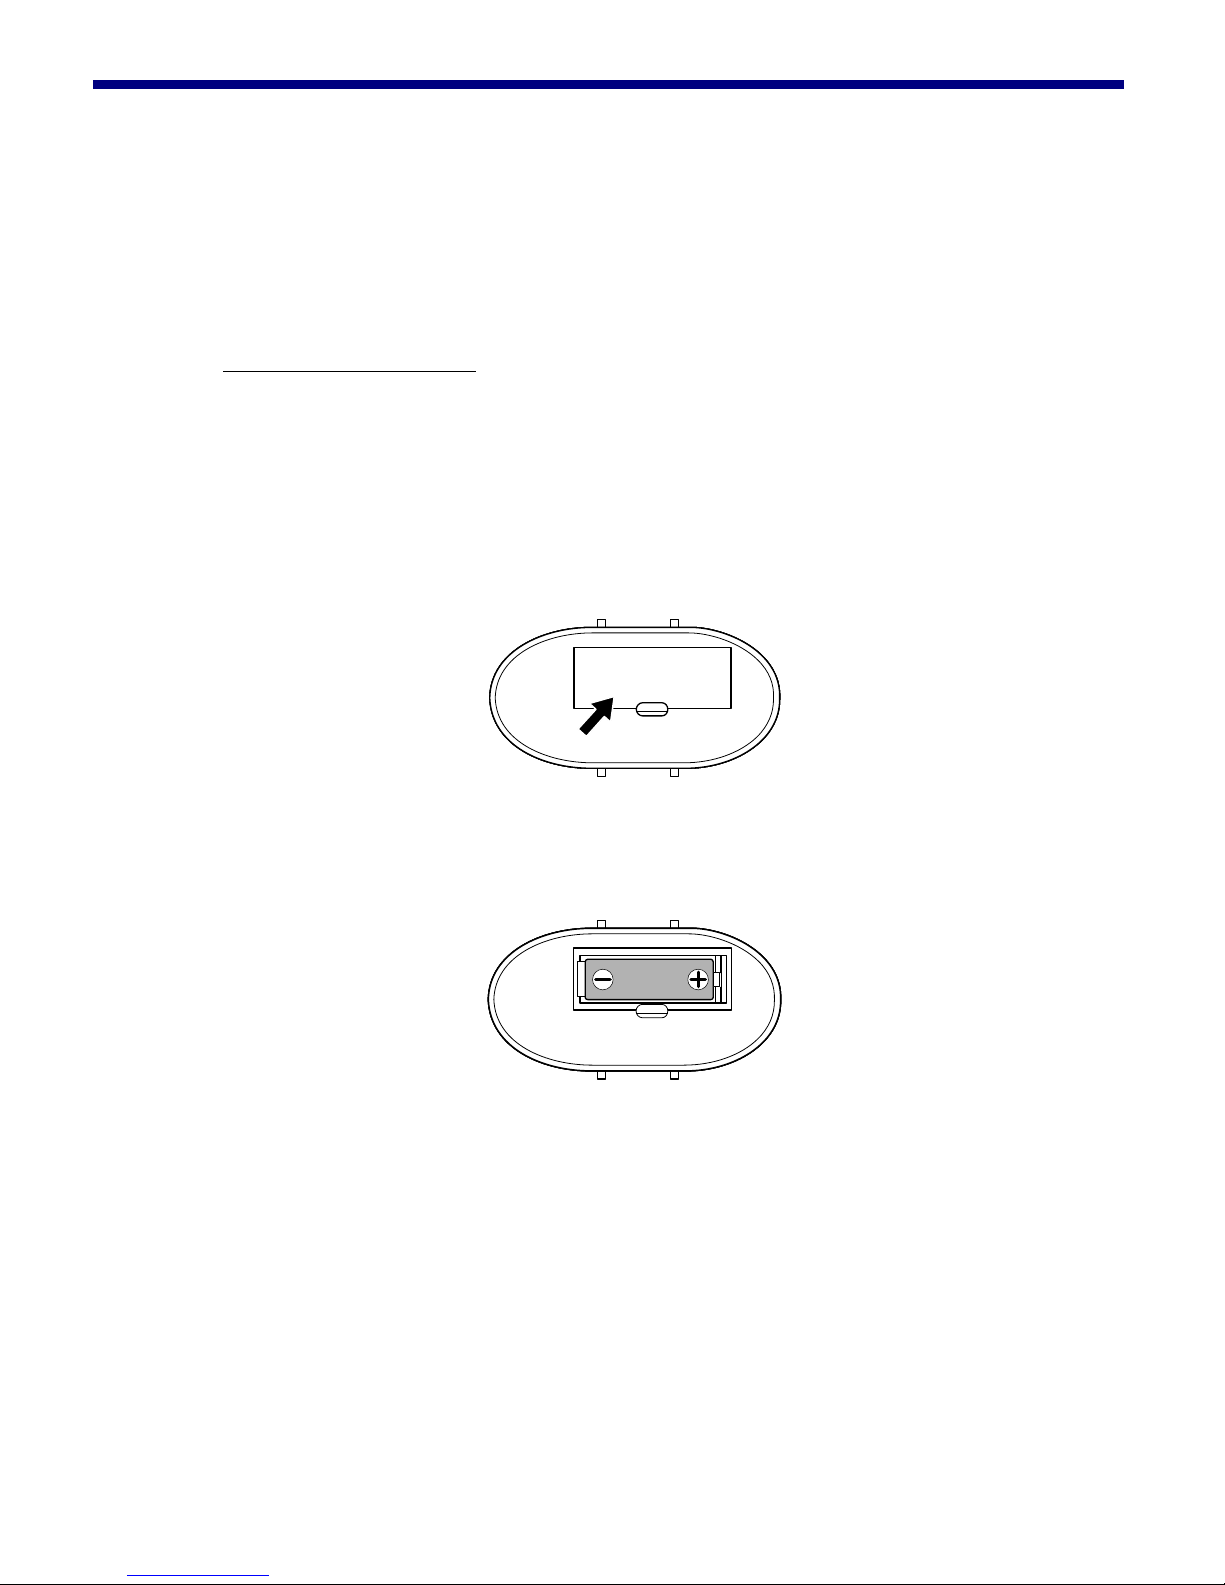
q Preparing the Control Module
The control module is designed to attach to the inside of the
steering wheel on the left or right side.
Installing the battery
Before attaching the control module, install the supplied
battery.
1. Remove the battery cover from the rear of the control
module and remove the old battery (if any).
2. Insert the new battery with the correct polarity as shown
below.
3. Put the battery cover back on.
6
www.tradevision.nl
 Loading...