

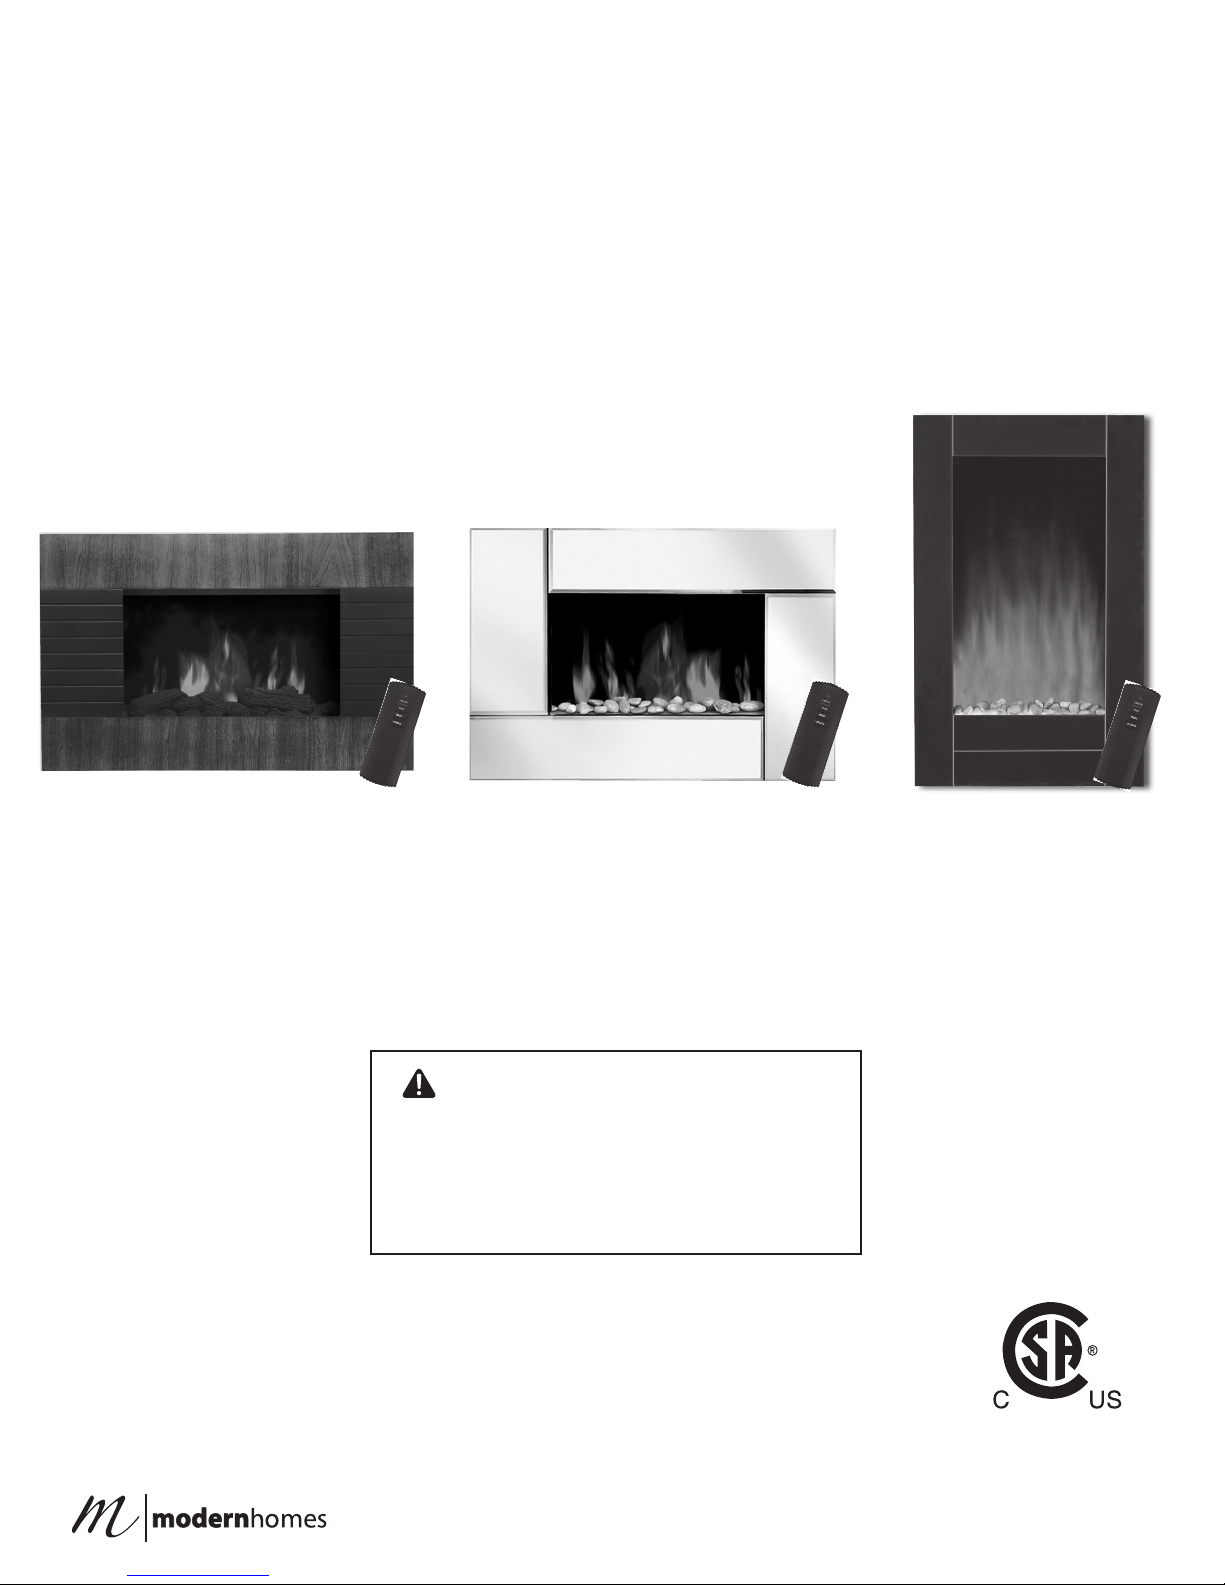
Trademark 67500 Mahogany Effect, 67502 Black Bevel EdgeGlass Front, 67501, 67502 Installation And User Instruction Manual
INSTALLATION AND USER INSTRUCTION GUIDE
Wall Mount Electric Fire Place
with Remote Control
Model: 67500 Mahogany Eect Model: 67501 Beveled Mirror
READ AND SAVE THESE INSTRUCTIONS
Carefully read and review before
assembling, installing, operating or
maintaining this product. Observe all
safety instructions and information.
Failure to follow warnings and operational
instructions contained in this manual can
result in property damage or personal injury.
Model: 67502 Black Bevel Edge
Glass Front
1
IMPORTANT: THESE INSTRUCTIONS SHOULD BE READ
CAREFULLY AND RETAINED FOR FUTURE REFERENCE
CAUTION
Read all instructions and
warnings carefully before
starting installation. Failure to
follow these instructions may
result in a possible electric
shock or re hazard.
RISK OF
ELECTRIC SHOCK
DO NOT OPEN.
NO USER-SERVICEABLE PARTS INSIDE.
SAVE THESE INSTRUCTIONS.
CAUTION
Due to many dierent materials
used on dierent walls, it is
highly recommended that you
consult your local hardware
store to determine what type
of mounting screws are needed
before you install this replace
onto the wall.
2

IMPORTANT: THESE INSTRUCTIONS SHOULD BE READ
CAREFULLY AND RETAINED FOR FUTURE REFERENCE
Important Safety Instructions
When using this electrical appliance, basic precautions should be followed to reduce the risk of re,
electric shock and injury to person, including the following:
This heater must be used on an AC supply only and the voltage marked on the heater’s rating label must
correspond to the supply voltage.
Do not switch the appliance on until it is properly installed as described in this manual.
The heater must not be located immediately below a socket outlet.
Keep furniture, curtains and other ammable material at least 1 metre away from the appliance.
Do not leave the appliance unattended during use.
This appliance is intended for household use and should not be used for industrial purposes.
From time to time, check the cord for damage. Never use the appliance if the cord or any part of the
appliance shows signs of damage. A damaged cord must only be replaced by a qualied person.
Do not operate this appliance with a damaged plug or cord, after a malfunction or after being dropped or
damaged in any way.
Repairs to electrical appliances should only be performed by a qualied electrician. Improper repairs may
place the user at serious risk.
Do not run the mains cable under carpets, rugs etc.
Do not cover or obstruct the heater in any way. Overheating will result if it is accidentally covered.
Never immerse the product in water or any other liquids.
Do not use this heater where it may come into contact with water e.g. in bathrooms, a shower rooms etc.
Do not use the appliance outdoors.
Before cleaning the appliance, ensure it is unplugged from the power and that it is completely cool.
Do not clean the appliance with abrasive chemicals.
Never use accessories that are not recommended or supplied by the manufacturer. It could cause danger
to the user or damage to the appliance.
The only user replacement parts are the bulbs. There are no other user replacement parts. All other
servicing should be referred to a qualied engineer.
This appliance is not intended for use by persons (including children) with reduced physical, sensory
or mental capabilities or lack of experience and knowledge unless they have been given supervision or
instruction concerning use of the appliance by a person responsible for their safety.
Children should be supervised to ensure that they do not play with the appliance.
Do not lift the appliance by the front panel.
CAUTION! In order to avoid a hazard due to inadvertent resetting of the thermal cut out, this
appliance must not be supplied through an external switching device such as a timer or connected to a
circuit that is regularly switched on and o by the utility.
Do not insert or allow foreign objects to enter the inlet or outlet vents as this may result in electric shock,
3

IMPORTANT: THESE INSTRUCTIONS SHOULD BE READ
CAREFULLY AND RETAINED FOR FUTURE REFERENCE
Important Safety Instructions
re or damage to the appliance.
Do not install the re using an extension cord.
Unplug from the mains supply if the appliance is not to be used for long periods.
WARNING! This heater is not equipped with a device to control the room temperature. Do not use this
heater in small rooms when they are occupied by persons not capable of leaving the room on their own,
unless constant supervision is provided.
Getting Started
Remove the appliance from the box.
Remove any packaging from the product.
Place the packaging inside the box and either store or dispose of safely.
Contents of Carton
Heater
Wall xing bracket
Fixing screws and wall plugs
Remote control
1 Instruction Manual
Helpful Advice Before Fitting
Please retain all packaging until you have checked and counted all the parts and the contents of the
xing pack against the parts list.
The xing pack contains small items which should be kept away from young children.
We suggest that you open the xing pack and place all the contents into a container, therefore reducing
the risk of losing any small pieces.
Installation
Do not connect the appliance to the power supply until properly xed to the wall and the instructions
read fully
The minimum distances must be observed.
For installation of the appliance, care must be taken not to damage concealed cables.
Please be careful while drilling the holes.
This appliance is designed to be permanently xed to a wall. Ensure the wall is suciently strong enough
to hold the weight of the re. Brick or breeze block walls are ideal. If positioning on plasterboard wall,
it must be xed to timber batons. If you are not sure that the area is structurally stable then consult it
qualied builder. The wall bracket must be xed horizontally and the cable routed to the bottom right of
4

IMPORTANT: THESE INSTRUCTIONS SHOULD BE READ
CAREFULLY AND RETAINED FOR FUTURE REFERENCE
Important Safety Instructions
the heater. The appliance is not designed to be installed in a recess.
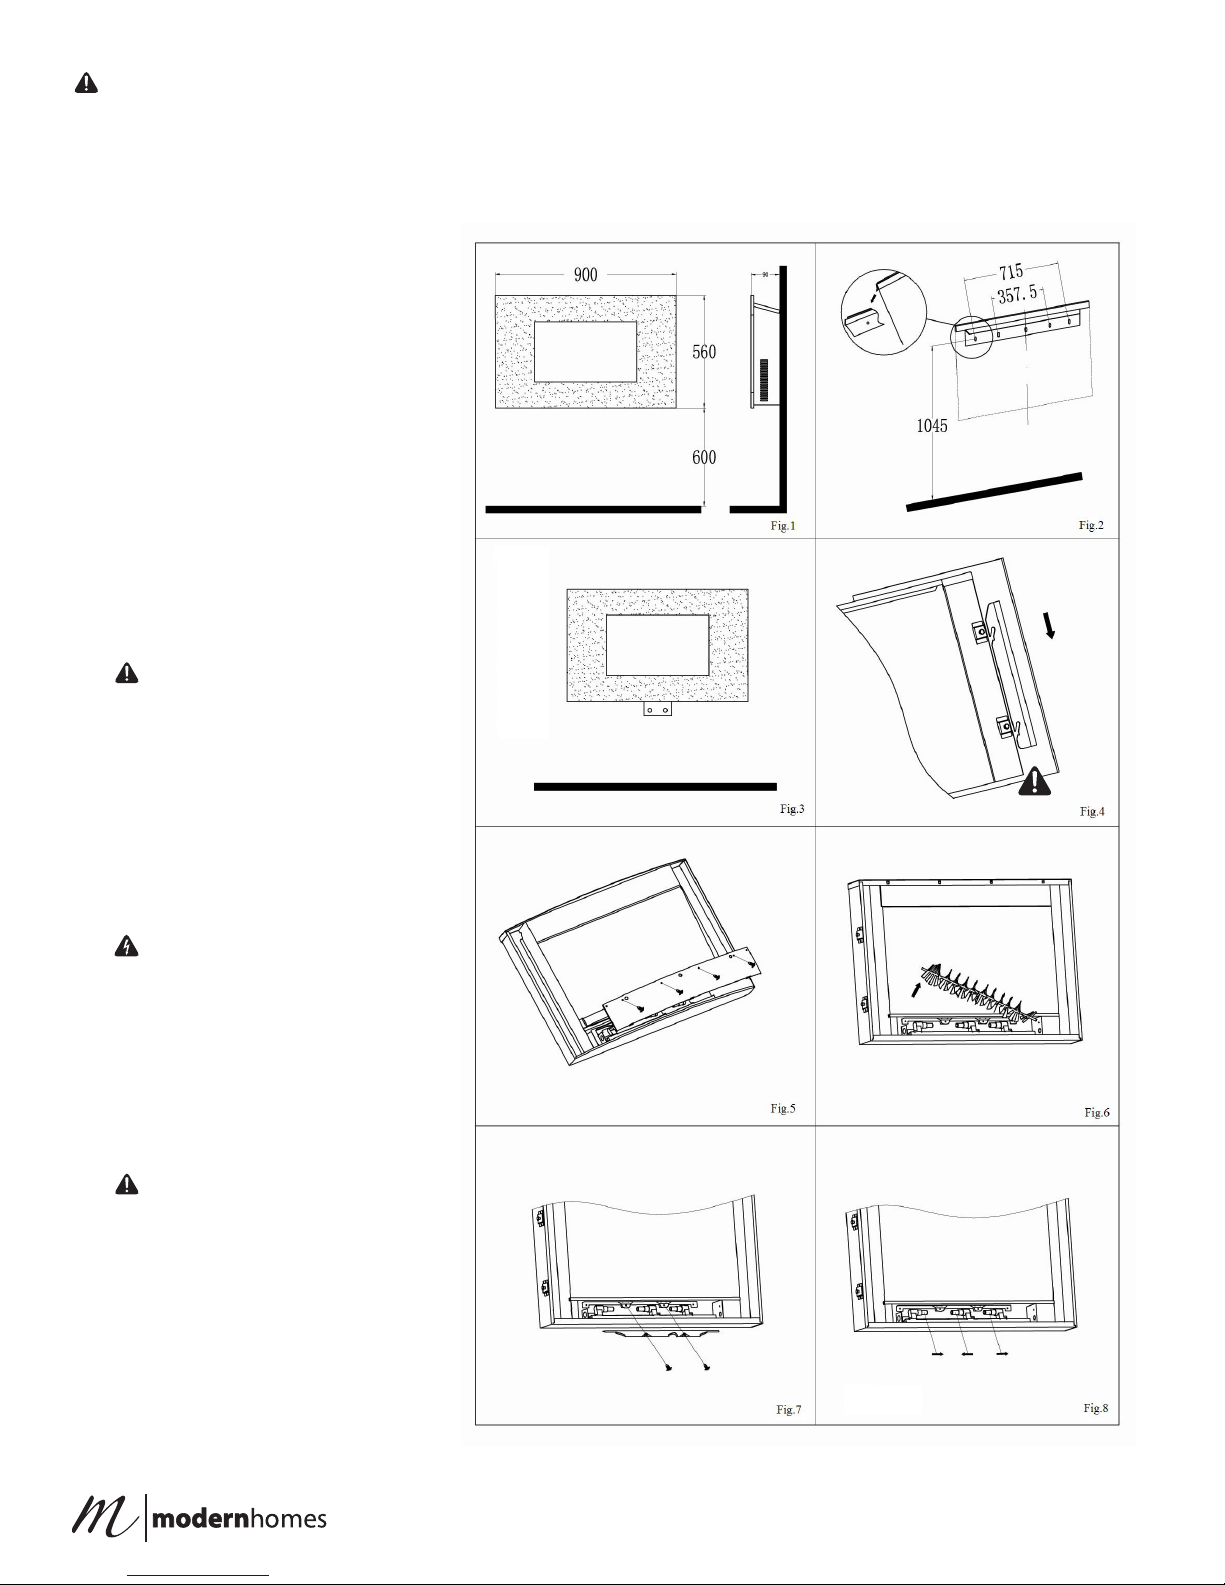
A height of 600mm from bottom of heater to oor is recommended for optimum viewing of fuel
bed — see Fig.2 for recommends xing dimensions.
Keep top of heater at least 1000mm away from ceiling or other objects for optimum heat ventilation.
For optimum viewing, mark the top four screws xing positions on wall in accordance with the
recommend xing dimensions — see Fig.2. Drill holes with a six drill bit.
WARNING! Never place this replace where it may fall into a bathtub or other water container.
WARNING! Ensure the power cord is not installed so that it is pinched against a sharp edge.
CAUTION! The replace must be mounted at two (2) pints, one of which must be a wall stud.
CAUTION! Ensure method of installation does not obscure the air intake slots of the unit.
Fix the wall bracket using that the plug and screws provided .
Carefully lift the heater up ensuring that the top rear ledge of heater engages the wall bracket (see Fig.2
in circle) and is sitting centrally.
Gently bring the heater level with the wall.
Mark the bottom holes position — see Fig.3, remove the heater ensuring that the bottom xing bracket
is rotated up.
Drill and t wall plug.
Ret the heater to the wall xing bracket and rotate the bottom xing bracket down again and use the
screw provided to permanently x the heater in place.
Unpack the pebbles from the bag and place them along the light unit in the desired position.
Place the front glass surround over the front of the re aligning the slots in the brackets at each side of
the glass panel with the lugs on the sides of the re — see Fig.4. Again two people will be required for
this operation.
Instructions for Use
The appliance can be operated either by the switches located on the top right hand side of the re or by
supplied remote control.
Manual Operation
The switches located at the top right hand side of the re .The standby switch must be rst switch on.
Press the O/I button once to turn on the appliance and re eect. A red indicator light will appear to
indicate that the function is ON. Press the O/I button for 3 seconds this will operate the dimmer mode.
Press the 750W button once for the low heat settings; press twice to switch o the heat setting.
Press the 1500W button once for the high heat settings; press twice to switch o the heat setting.
5
 Loading...