


Model 560
Model 580
Operating and
Assembly
5225 Serum Plant Road
Manual
Palmor Products Inc.
Thorntown, IN 46071
2/21/2006
8
7
11
9
2
3
6
4
5
1
12
13
10
9
14
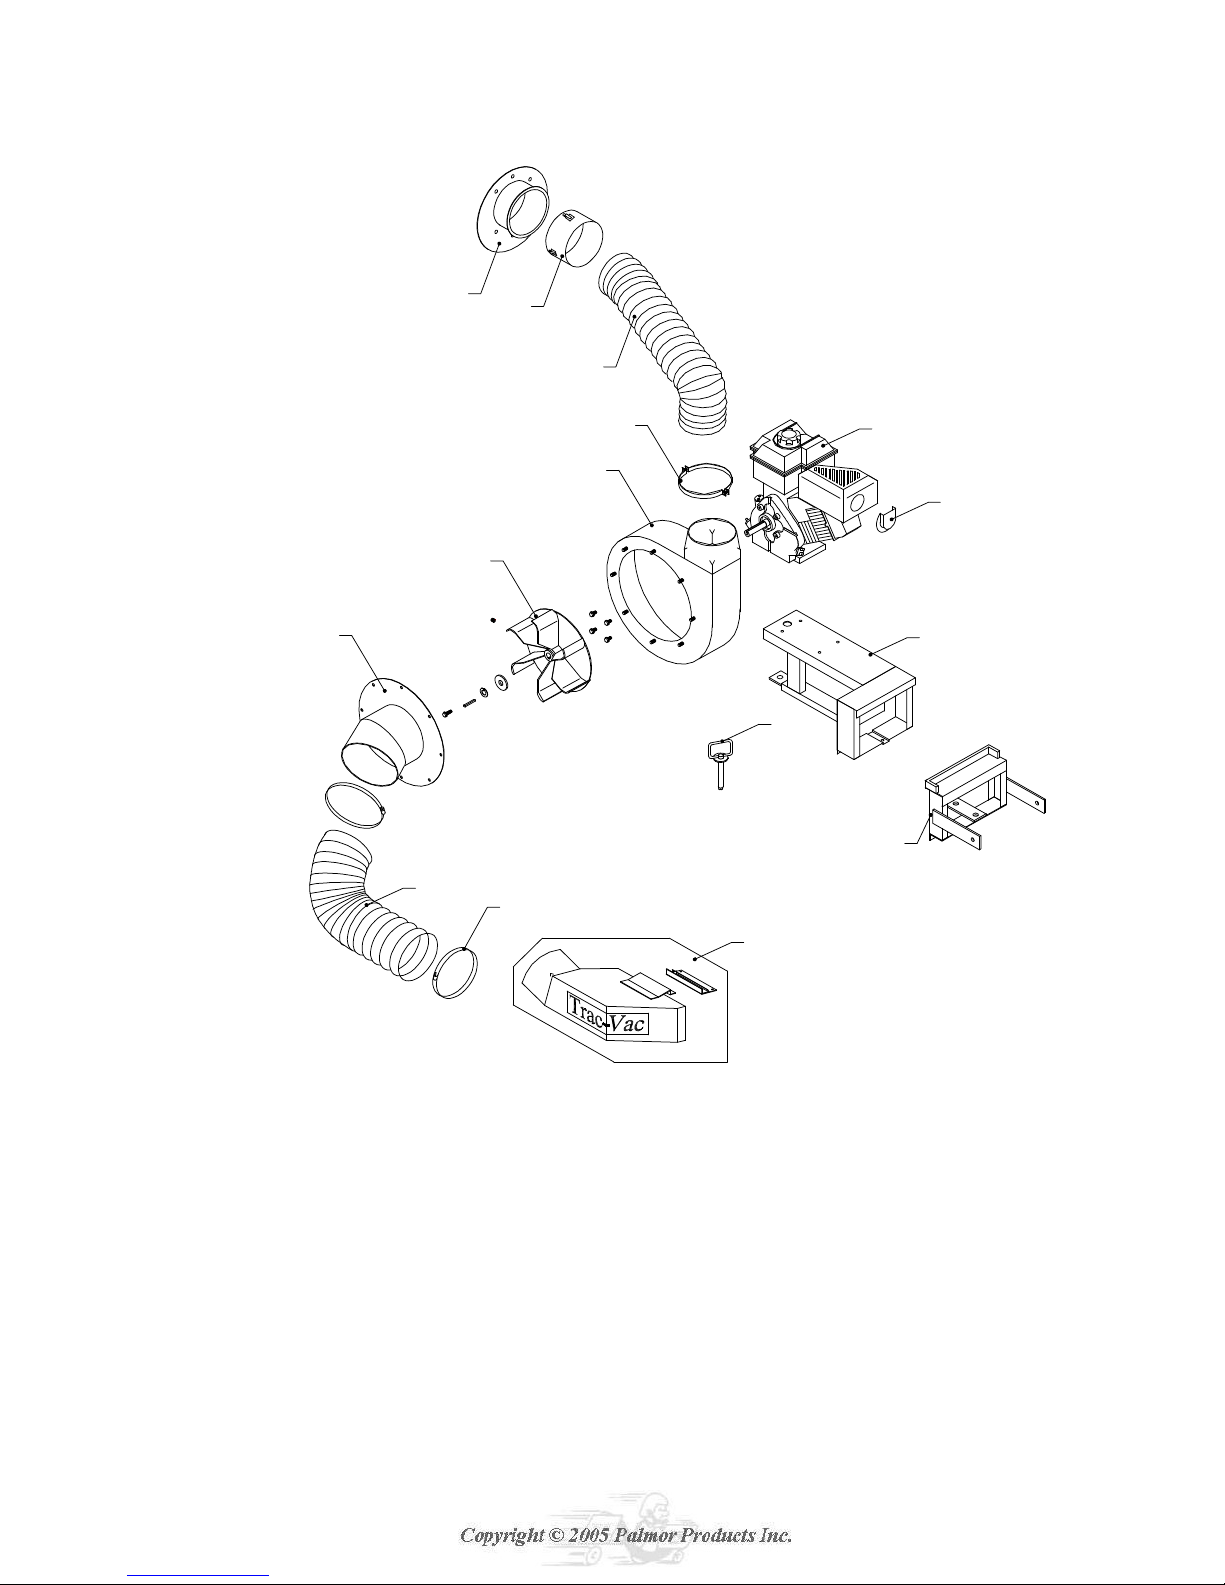
KEY PART # DESCRIPTION
1 56010
56011
56012
2
3 56030
4
5 58050
6 86115 Muffler Deflector
56021
56022
56018
46242
56040
46253
Frame, RH
Frame, LH
Frame, Elec.
Engine, 5.5 HP INTEK
Engine, 5.5 Honda
Engine, 6.5 Intek Pro
Turbine Housing
Turbine Housing, 560 Pro
Turbine
Turbine , 1" Bore
Inlet, 580
MODEL 560 TRAC VAC
KEY PART # DESCRIPTION
7
8
9
10
11
12
14 *****
56060
56070
56102
45102
56103
58104
******13
58104
56029
Hose Connector, 6"
Cart Connector, 6"
Band Clamp, 6"
Intake Hose, 6" x 60"
Exhaust Hose, 6" x 48"
Hitch Pin
Hitch (tractor specific)
Chute, (tractor spec ific)
Key Switch (elec. only)
Turbine Spaccer (Honda & el ec.)
7-16-05

MODEL 580 Trac-Vac Parts List
Key Part # Description
1 58047 Main Frame
58045 Main Frame, elec.
2 58048 Sub Frame
58046 Sub Frame, 1” axle
3 56021 Engine, 5.5 HP Intek
56022 Engine, 5.5 HP Honda
56018 Engine, 6.5 HP Intek
4 56030 Turbine Housing, 6”
46242 Turbine Housing
5 46253 Turbine, 1” Bore
56040 Turbine, 5 HP
6 58050 Inlet, 6” small back
58036 Inlet, 6” big back
7 58061 Latch
8 58062 Latch Spring
9 58040 Exhaust Hose (Metal)
10 45101 Metal Hose Clamp
11 56070 Cart Connector, 6”
12 58023 Support Arm, 580
13 58022 Support Arm Extension, 15”
14 58072 Hose Support Strap
15 58071 Stand
16 32108 Stand Spring
17 58063 Drawbar
18 58104 Hitch Pin
19 56102 Band Clamp
20 58101 Intake Hose, 6” x 90”
21 560221 Muffler Deflector
22 ***-6 Chute Assembly (Deck Specific)
45131 Decal, 2 x 8 Trac-Vac White
45133 Decal, Warning Stop Engine
58095 Decal, 580 Serial #
86027 Spacer, (580 elec.)
56029 Turbine Spacer, (Honda & elec.)
18110 Key Switch (elec. only)

MODEL 580 TRAC VAC
7-20-05

Model 348/368 Cart Covers
12
3
11 8
6
10
1
4
2
7
9
1
5
Model 280/348 Cart Cover
Key Part No. Description
1
2
3
4
5
6
7
8
9
10
11
12
28047
28030
28236
28232
28230
28231
28200
28201
28102
28103
28105
28104
Side Panel
Front Panel
Tailgate
Deflector
Front Screen
Rear Screen
Rear Angle RH
Rear Angle LH
Latch Ass'y RH
Latch Ass'y LH
Top Latch
Handle
12-1-04
Model 280/368 Cart Cover
DescriptionPart No.Key
1
2
3
4
5
6
7
8
9
10
11
12
28059
28035
28238
28235
28234
28233
28100
28101
28102
28103
28105
28104
Side Panel
Front Panel
Tailgate
Deflector
Front Screen
Rear Screen
Rear Angle RH
Rear Angle LH
Latch Ass'y RH
Latch Ass'y LH
Top Latch
Handle

Model 280 Cart Cover Assembly Instructions
NOTE: Do not tighten any bolts until the end of construction.
Place side panels on end with decal
outward and about a foot apart at
top. Place screen with latch, ( rear
screen), on end between sides with
latch outward and to the floor.
Attach to sides with 1/4 x 1/2 bolts.
Place connector, (packed in with vac),
on outside of front with the lip to the
outside. Attach with 1/4 x 1/2 bolts.
Place screen without latch, (front
screen), on top of rear screen and
between sides. Secure to rear
screen with 1/4 x 1/2 bolts. Slip
deflector between sides and front
screen with tapered end up.
Secure with 1/4 x 1/2 bolts.
Place cover flat on floor and attach angles
to side panels at rear of cover with angles
on the outside of cover. Secure with 1/4 x
1/2 bolts. Start at the top and second hole
from the bottom, (latch uses bottom hole),
then work towards the center of the panels.
Bolts truss, (round), head should be to the
inside of cart.
Place front on sides with flanges on
outside . Start corner bolts in sides
and screen before tightening. Start
bolts at top & bottom of side panels
and work your way toward center,
with truss head, round, to the outside.
Attach handle to tailgate on smooth
side. Place cover on cart. Make sure
the two lower black angle brackets
have been installed on the lower rear
of the cart. Fit tailgate to the cover
using the top latch and lower brackets
only.
Gently move cover to the rear to insure
contact between the tailgate and cover,
(along entire contacting surface). Center
front on cart. Mark hole locations, and
drill 9/32" holes. Attach cover with
1/4 x 1/2 bolts.
Place latch on each side of cart with
tongue of latch to rear. Attach to
side panel and cart with 1/4 x 1/2 bolts.
Tighten all hardware.
1-13-99

Operation
1. Follow engine manufacturer’s instructons in preparing engine for operation.
2. Inspect area to be vacuumed and pick up all harmful objects and litters.
3. For best vacuuming results, operate tractor at manufacturer’s recommended speed for
best cutting. If grass is high, mow and vacuum the second time.
4. When mowing, keep discharge chute to the outside of the cutting area for better cut of
grass and efficient pickup of grass clippings and leaves.
5. Your vacuum engine is preset to run approximately 3800 RPM no- load. Do not slow
engine down. Optimum vacuum is at 3600 RPM.
6. Do not overload cart. When cart is filled, shut off vacuum engine and disconnect hose at
snap disconnect, remove tailgate and dump.
7. When operating tractor on slope or grade, exercise much caution. Do not cut across
grade or slopes. Mow directly up or down hill.
8. Periodically check all hardware for tightness.
9. Listen for unusual vibration of engine or air turbine. If excessive vibration is present,
STOP engine and check for damaged blade.
10. When removing clogs, SHUT OFF tractor engine.
11. Always shut off tractor engine and vacuum engine before servicing,
12. Replace deflector shield when discharge chute is removed.
TRAC VAC WARRANTY POLICY
Palmor Products, Inc. will repair or replace, free of charge, any part, or parts that are defective
in material or workmanship or both for a period of one year residential use, and 90 day’s for
commercial and rental use. The purchaser will pay transportation charges on parts submitted for
replacement under warranty. For warranty service, contact your local dealer from whom the unit
was purchased. There are no other express or implied warranties. Some states do not allow
limitations on how long an implied warranty lasts, and some states do not allow the exclusion or
limitation of incidental or consequential damages, so the above limitation and exclusion may not
apply to you. This warranty gives you specific legal rights and you may also have other rights,
which vary from state to state.
PALMOR PRODUCTS, INC.
5225 Serum Plant Rd.
Thorntown, IN 46071
Phone: 1-800-Trac-Vac
Web Page: www.trac-vac.com E-Mail: palmor@trac-vac.com
 Loading...