


11-11-11
Model 470-/H/PRO/IC
Operating and Assembly
Manual
Midwest Equipment Manufacturing, Inc.
5225 Serum Plant Road
Thorntown, IN 46071

1
SAFETY RULES
Remember, any power equipment can cause injury if operated improperly or if the user does not understand
how to operate the equipment. Exercise caution at all times when using power equipment.
This symbol means Attention!!!!! It is used to point out safety precautions.
▪ Read and follow all instructions in this manual before assembly or operation of this equipment. Failure
to comply with these instructions may result in personal injury. Keep this manual for
future reference and for ordering replacement parts.
▪ Read this instruction manual carefully. Become familiar with the controls and proper use of this
equipment.
▪ Read the engine owners manual and safe operation rules before using this equipment.
▪ Never allow children less than 16 years of age to operate the Trac-Vac. Children 16 years and older
should operate only under close parental supervision.
▪ Do not allow anyone to operate this equipment without proper instruction.
▪ Do not allow passengers to ride on the Trac-Vac or on the towing vehicle.
▪ Keep children and pets out of area of operation.
▪ Check fuel before starting engine. Do Not fill fuel tank indoors, or while engine is running or hot. Wipe
off any spilled fuel before starting engine.
▪ Engine and muffler get HOT! Do Not touch! Keep debris from accumulating on or around engine and
muffler to avoid fire hazard.
▪ Allow engine to cool before storing in any enclosed area. Never store Trac-Vac with fuel in tank.
▪ Do not operate engine if air cleaner or cover is removed, except for adjustments. Removal of the part could
create a fire hazard.
▪ Keep hands, feet, face, long hair and clothing out of inlet and discharge areas. There are ROTATING
BLADES inside these openings.
▪ Make certain that all moving parts come to a complete stop before cleaning, repairing or inspection.
Disconnect spark plug wire and keep away from plug to prevent accidental starting.
▪ If Trac-Vac should become clogged with debris, SHUT OFF ALL ENGINES and wait until impeller
comes to a complete stop before attempting to remove obstruction. Disconnect spark plug wire to prevent
accidental starting.
▪ If excessive vibration occurs while operating your Trac-Vac, stop the engine immediately, disconnect the
spark plug wire and allow all moving parts to stop completely before taking the following steps.
A. Inspect for damage.
B. Repair or replace any damaged parts.
C. Check for loose parts and tighten to assure continued safe operation.
▪ Check all hardware periodically to insure safe operation.
▪ Check cart cover periodically for wear and replace if worn or damaged.
▪ Never operate Trac-Vac without intake hose and exhaust hose attached in proper place.
▪ Do Not remove exhaust hose or attempt to empty contents of container while engine in running.
▪ Keep all shields and guards in place and securely attached.
▪ Always wear eye protection (safety glasses or goggles) when operating this equipment.
▪ Do Not stand behind unit in exhaust discharge area while engine is running.
▪ Do Not operate this equipment while intoxicated or while taking medications that could impair
reactions or senses.
▪ Operate this equipment at reduced ground speed on rough terrain, along creeks and ditches and on slopes to
prevent tipping or loss of control.
▪ Vehicle stability and braking are affected by the addition of this unit. Do not fill the Trac-Vac to its full
capacity without checking the capability of the towing vehicle to safely pull and stop with the unit attached.
▪ Do Not operate on slopes in excess of 10 degrees. STAY OFF OF STEEP SLOPES!
▪ Follow the maintenance instructions outlined in this manual.
2
Trac-Vac Model 470-/H/PRO/K/IC
6-04-12
1
2
3
4
5
6
7
8
9
10
11
12
13
14
15
16
17
18
19
20
21
22
23
24
25
26
27
28
29
30
31
32
33
34
8
21
23
35
36
38
37

3
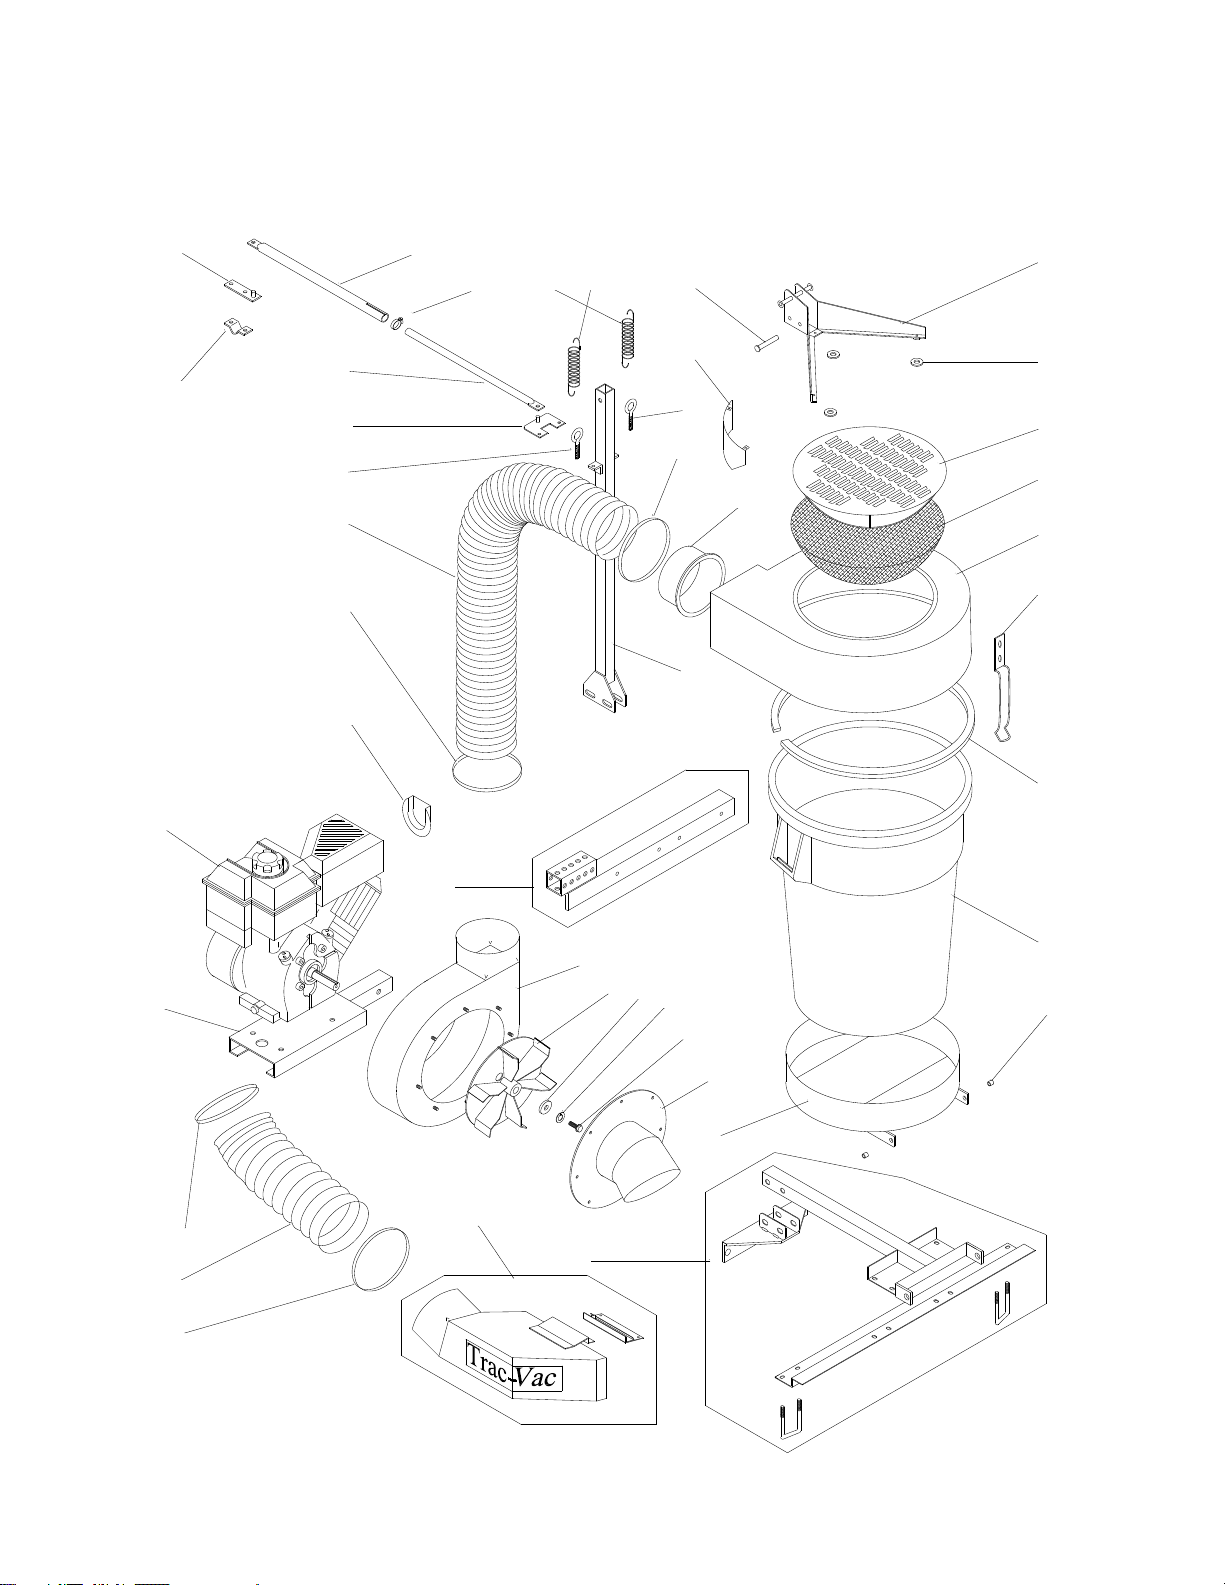
Model 470 Parts List
Key Part No. Qty. Description
1 47010 1 Frame, Engine Assembly
2 56022 1 Engine (5.5 HP Honda)
56021 Engine (5.5 HP Intek)
56018 Engine (6.5 HP Briggs Intek)
3 56030 1 Turbine Housing (5.5 Honda, 5.5 Briggs)
46242 Turbine Housing (6.5 Briggs Intek)
4 56040 1 Turbine (5.5 HP Honda, 5.5 HP Briggs)
46253 Turbine (6.5 HP Briggs Intek)
5 56107 1 Turbine Spacer , 5.5HP Briggs
56029 Turbine Spacer, Honda
6 88040 1 Inlet (5.5 HP Honda, 5.5 Briggs)
47050 Inlet 6.5 HP Briggs Intek)
7 47020 1 Vertical Upright
8 3120518 2 Eyebolt
9 48038 2 Springs
10 46248 1 Filter Shield
11 46218 1 Clevis Pin, Vertical Support
12 46217 1 Top Support, 462
13 56115 3 Nylon Spacer
14 46233 1 Filter Support Assembly
15 46228 1 Filter, Open Mesh for 46227
16 47222 1 Molded Top, 470
17 46235 1 Container Latch
18 46219 1 Seal, Molded Top
19 46210 1 Container, 44 Gallon
20 48040 1 Intake Nozzle
21 56102 2 Band Clamp, 6”
22 45102 1 Hose, 6” X 60”
23 18119 2 Band Clamp, 8”
24 47035 1 Hose, 8” X 24”
25 47040 1 Eyebolt Bracket
26 20037 1 Hose Support Extension, 2000
27 20039 1 Hose Clamp, Support Arm
28 20036 1 Hose Support, 2000
29 47041 1 Handle Bracket
30 47042 1 Handle Strap
31 86115 1 Muffler Deflector, (5.5 HP, 6.5 HP Briggs Intek)
56022 Muffler Deflector, (6 HP Honda)
32 ***** 1 Hitch, (Tractor Specific)
33 474** 1 Container Frame Mount Kit, (Tractor Specific)
34 ***-6 1 Chute, (Tractor Specific)
35 47018 1 Container Holder, 470
36 47019 2 Bushing, 471, Container Holder
37 3130112 1 Turbine Bolt
38 3120801 1 Split Lock Washer

4
MOUNTING INSTRUCTIONS, MODEL 470
1. Locate hitch (32) across rear of mowing machine. Most mowers have holes that match holes
in hitch; however, it is advisable to drill on far right of some models. (Fig. 1.) Secure with a
minimum of three (3) bolts provided.
2. Slide tube end of engine assembly frame (1) into tube on hitch. (Fig. 2) Align holes and
secure with clevis pin (11) and #3 hairpin clip.
3. Slide vertical upright (7) over frame (33). (NOTE: eyebolt brackets on upright should be
located toward front of frame assembly.) Align slots on upright with holes on frame and
mounting brackets from kit (if required). (Fig.3) Join frame and upright (and bracket if
required) with 3/8” x 2 ½” HHC, flat washers and 3/8” whizlock nuts. Do not tighten.
4. Spin 5/16” whizlock with flange, down onto eyebolt (8). Position eyebolt bracket as shown
in Fig 4. Align slots with holes. Slip eyebolts thru brackets. Secure with 5/16” free nut.
Tighten whizlock nuts.
5. Align brackets on container holder (35) to brackets on front of frame. (Fig. 5) Slip spacers
(36) from bolt bag thru each hole and secure with 5/16” flange nut per side. Fit container
(19) into holder. Adjust bolt tension so that holder can support container in tilted position.
6. Slide intake nozzle (20) thru intake opening with lip on the inside. (Fig. 6) Slip one end of
6” x 60” hose (22) over nozzle and secure with 6” band clamp (21).
7. Fit filter (15) over lip on filter support (14). (Fig. 7) Apply seal as shown in (Fig. 8).
8. Align slots on container latch (17) to holes in molded top (16). Secure with ¼” x ½” truss
screws and whizlocks. (Fig. 9)
9. Place molded top on top of container. (Fig. 10) Align pivot hole on top support to pivot hole
on vertical upright. Secure with ½” x 1 2/4” HHC and ½” nylon locknut. Tighten until a
slight drag is felt when pivoting top assembly. Pivot top upwards until springs (9) can be
attached to spring retainer on top support and to eyebolts. Lower top assembly and slip 3/8”
x 2 1/8’ clevis pin thru locking pin hole. Secure with 1/8” x 1” cotter key.
10. Slip free end of 6” x 60” hose over neck on turbine housing and secure with 6” band clamp.
(Fig. 11)
11. Latch molded top over container handle. If necessary, adjust tension by loosening ¼” truss
screws and sliding latch to proper tension. See that container is vertical in container holder.
If necessary, shift vertical upright and tighten bolts at base of vertical support.
12. Attach chute to mower deck with pins or bolts provided. If necessary, trim off excess hose.
Tighten clamps. (Fig. 12)
13. Slip 8” band clamp (23) over each end of the 8” x 24” hose (24). Slip one end of hose over
inlet (6) and the other end over neck on chute (34). (Fig. 13)
14. The stabilizer assembly ties to the vertical upright and mounts to the mower (may be attached
to side of handlebar if crossbar is not accessible). (Fig. 14) With handle bracket (29) and
handle clamp (30) in position as shown, strap handlebar cross brace between clamp
assembly. Secure with 5/16” x 1” HHC and 5/16” whizlock nuts. Slide hose clamp (27)
over support arm (28) and support arm extension (26). Slip hole on extension over pin on
eyebolt bracket and secure with #3 hairpin clip. Slide hose clamp to slotted end of support
and tighten.
15. Read engine operating instructions and service engine before starting.

5
Fig. 8
Fig. 5
Fig. 7
Fig. 6
1/4" x 1/2" Truss Head (2x)
1/4" Whizlock Nut (2x)
(
Not Pictured
Seal, Sticky
Side Up.
Note: Bunch a few
hose clamp to
achieve a good
tight seal to top.
ribs of the hose
up behind the
5/16" Freenut (2x)
5/16" Whizlock Nut (2x)
Eyebolt (2x)
Fig. 4
Eyebolt Bracket
Fig. 3
Fig. 9
Fig. 1
Fig. 2

6
1/2" Nylon Locknut
1/8" Cotter Pin
1/2" x 2 1/2" Hexbolt
3/8" x 2 1/8" Clevis Pin
Fig. 12
Fig. 11
Fig. 10
Fig. 13
Fig. 14

7
TROUBLESHOOTING
PROBLEM POSSIBLE CAUSE CORRECTIVE ACTION
Engine fails to start
1. Spark plug wire disconnected
2. Fuel tank empty
3. Faulty spark plug
1. Connect wire to spark plug
2. Fill tank with clean fuel
3. Clean, adjust gap or replace
Loss of power or
erratic operation
1. Spark plug wire loose
2. Blocked fuel line
3. Water or dirt in fuel system
4. Dirty air cleaner
5. Unit running on choke
1. Connect & tighten spark plug wire
2. Clean fuel line
3. Disconnect fuel line at carburetor
drain fuel tank. Refill with fresh
fuel
4. Service air cleaner (refer to engine
manual)
5. Move choke lever to OFF position
Engine overheats
1. Engine oil level low
2. Operating below full RPM
1. Fill crankcase with proper oil
2. Run throttle full open.
Excessive vibration
1. Damaged turbine or loose
parts
1. Stop engine immediately and
disconnect spark plug wire. Tighten
all bolts & nuts. Make necessary
repairs. If vibration continues, have
unit serviced by an authorized dealer.
Unit won't pick up.
1. Discharge chute clogged
2. Foreign object lodged in
turbine.
3. Container full
1. Stop engine & disconnect spark plug
wire. Clean inside of discharge
chute.
2. Stop engine and disconnect spark
plug wire. Remove lodged object
in turbine.
3. Stop engine and empty container.
NOTE: Please contact the nearest authorized service dealer for repairs beyond the minor adjustments above.

8
CAUTION!!!!
SPINNING BLADE
OPERATING PROCEDURE
BEFORE STARTING, Follow the engine manufacturer’s instructions in preparing engine for
operation. Never fill fuel tank indoors, with engine running or while engine is hot.
Do not smoke while filling tank!
1. Inspect area to be vacuumed and pickup all harmful objects and litter. Rocks and other
harmful debris can do serious damage to vacuum assembly and cause bodily injury.
2. For best vacuuming results operate tractor at manufacturer's recommended speed for best
cutting. If grass is high, mow first and vacuum on the second pass.
3. Your vacuum is preset to run at approximately 3800-RPM (385), at no load. Do not slow
down engine.
4. SHUT OFF ENGINE TO UNLOAD.
5. When operating tractor on slope or grade, exercise EXTREME CAUTION. Do not cut across
grade or slope. Mow directly up and down hills.
6. Periodically check all fasteners for tightness.
7. Listen for unusual vibration of engine or air turbine. If excessive vibration is present, STOP
engine and check for damage to turbine fan.
8. Always shut off tractor engine and vacuum engine before servicing.
9. Replace deflector shield when discharge chute is removed.
10. When removing clogs, SHUT OFF ALL ENGINES and wait for all moving parts to
come to a complete stop! Failure to do so can cause serious bodily injury!
11. Do not tow unit on public roads
12. Do not carry passengers on unit
13. Avoid sudden turns or maneuvers.
EXTENDED STORAGE PROCEDURES
1. Wash and clean vacuum, and lubricate any lubrication points.
2. Drain fuel from the tank and run vacuum until fuel is exhausted in carburetor.
3. Drain and change the engine oil.
4. Clean tires and check pressure. Raising and supporting unit with weight off tires is
recommended.
5. When storing a unit with Rubbermaid containers, leave containers latched to top.
6. Store inside a clean dry area, when not in use.
TRAC VAC WARRANTY POLICY
Midwest Equipment Manufacturing, Inc. will repair or replace, free of charge, any part,
or parts that are defective in material or workmanship or both for a period of one year
residential use, and 90 day’s for commercial and rental use. The purchaser will pay
transportation charges on parts submitted for replacement under warranty. For warranty
service, contact your local dealer from whom the unit was purchased. There are no other
express or implied warranties. Some states do not allow limitations on how long an
implied warranty lasts, and some states do not allow the exclusion or limitation of
incidental or consequential damages, so the above limitation and exclusion may not apply
to you. This warranty gives you specific legal rights and you may also have other rights,
which vary from state to state.
MIDWEST EQUIPMENT MANUFACTURING, INC.-5225 Serum Plant
Rd.-Thorntown, IN 46071
Phone: 1-800-Trac-Vac
Web Page: www.trac-vac.com E-Mail: sales@midmfg.com
 Loading...