


Model 1060
Operating and Assembly
Manual
Palmor Products Inc.
5225 Serum Plant Road
Thorntown, IN 46071
3/31/2015

SAFETY RULES
Remember, any power equipment can cause injury if operated improperly or if the user does not understand
how to operate the equipment. Exercise caution at all times when using power equipment.
This symbol means Attention!!!!! It is used to point out safety precautions.
▪ Read and follow all instructions in this manual before assembly or operation of this equipment.
Failure to comply with these instructions may result in personal injury. Keep this manual for future
reference and for ordering replacement parts.
▪ Read this instruction manual carefully. Become familiar with the controls and proper use of this
equipment.
▪ Read the engine owners manual and safe operation rules before using this equipment.
▪ Never allow children less than 16 years of age to operate the Trac-Vac. Children 16 years
and older should operate only under close parental supervision.
▪ Do not allow anyone to operate this equipment without proper instruction.
▪ Do not allow passengers to ride on the Trac-Vac or on the towing vehicle.
▪ Keep children and pets out of area of operation.
▪ Check fuel before starting engine. Do Not fill fuel tank indoors, or while engine is running or hot.
Wipe off any spilled fuel before starting engine.
▪ Engine and muffler get HOT! Do Not touch! Keep debris from accumulating on or around engine
and muffler to avoid fire hazard.
▪ Allow engine to cool before storing in any enclosed area. Never store Trac-Vac with fuel in tank.
▪ Do not operate engine if air cleaner or cover is removed, except for adjustments. Removal of the
part could create a fire hazard.
▪ Keep hands, feet, face, long hair and clothing out of inlet and discharge areas. There are
ROTATING BLADES inside these openings.
▪ Make certain that all moving parts come to a complete stop before cleaning, repairing or inspection.
Disconnect spark plug wire and keep away from plug to prevent accidental starting.
▪ If Trac-Vac should become clogged with debris, SHUT OFF ALL ENGINES and wait until
comes to a complete stop before attempting to remove obstruction. Disconnect spark plug wire to
prevent accidental starting.
▪ If excessive vibration occurs while operating your Trac-Vac, stop the engine immediately,
disconnect the spark plug wire and allow all moving parts to stop completely before taking the
following steps.
A. Inspect for damage.
B. Repair or replace any damaged parts.
C. Check for loose parts and tighten to assure continued safe operation.
▪ Check all hardware periodically to insure safe operation.
▪ Check cart cover periodically for wear and replace if worn or damaged.
▪ Never operate Trac-Vac without intake hose and exhaust hose attached in proper place.
▪ Do Not remove exhaust hose or attempt to empty contents of container while engine in running.
▪ Keep all shields and guards in place and securely attached.
▪ Always wear eye protection (safety glasses or goggles) when operating this equipment.
▪ Do Not stand behind unit in exhaust discharge area while engine is running.
▪ Do Not operate this equipment while intoxicated or while taking medications that could impair
reactions or senses.
▪ Operate this equipment at reduced ground speed on rough terrain, along creeks and ditches and on
slopes to prevent tipping or loss of control.
▪ Vehicle stability and braking are affected by the addition of this unit. Do not fill the Trac-Vac to its
full capacity without checking the capability of the towing vehicle to safely pull and stop with the
unit attached.
▪ Do Not operate on slopes in excess of 10 degrees. STAY OFF OF STEEP SLOPES!
▪ Follow the maintenance instructions outlined in this manual.
1
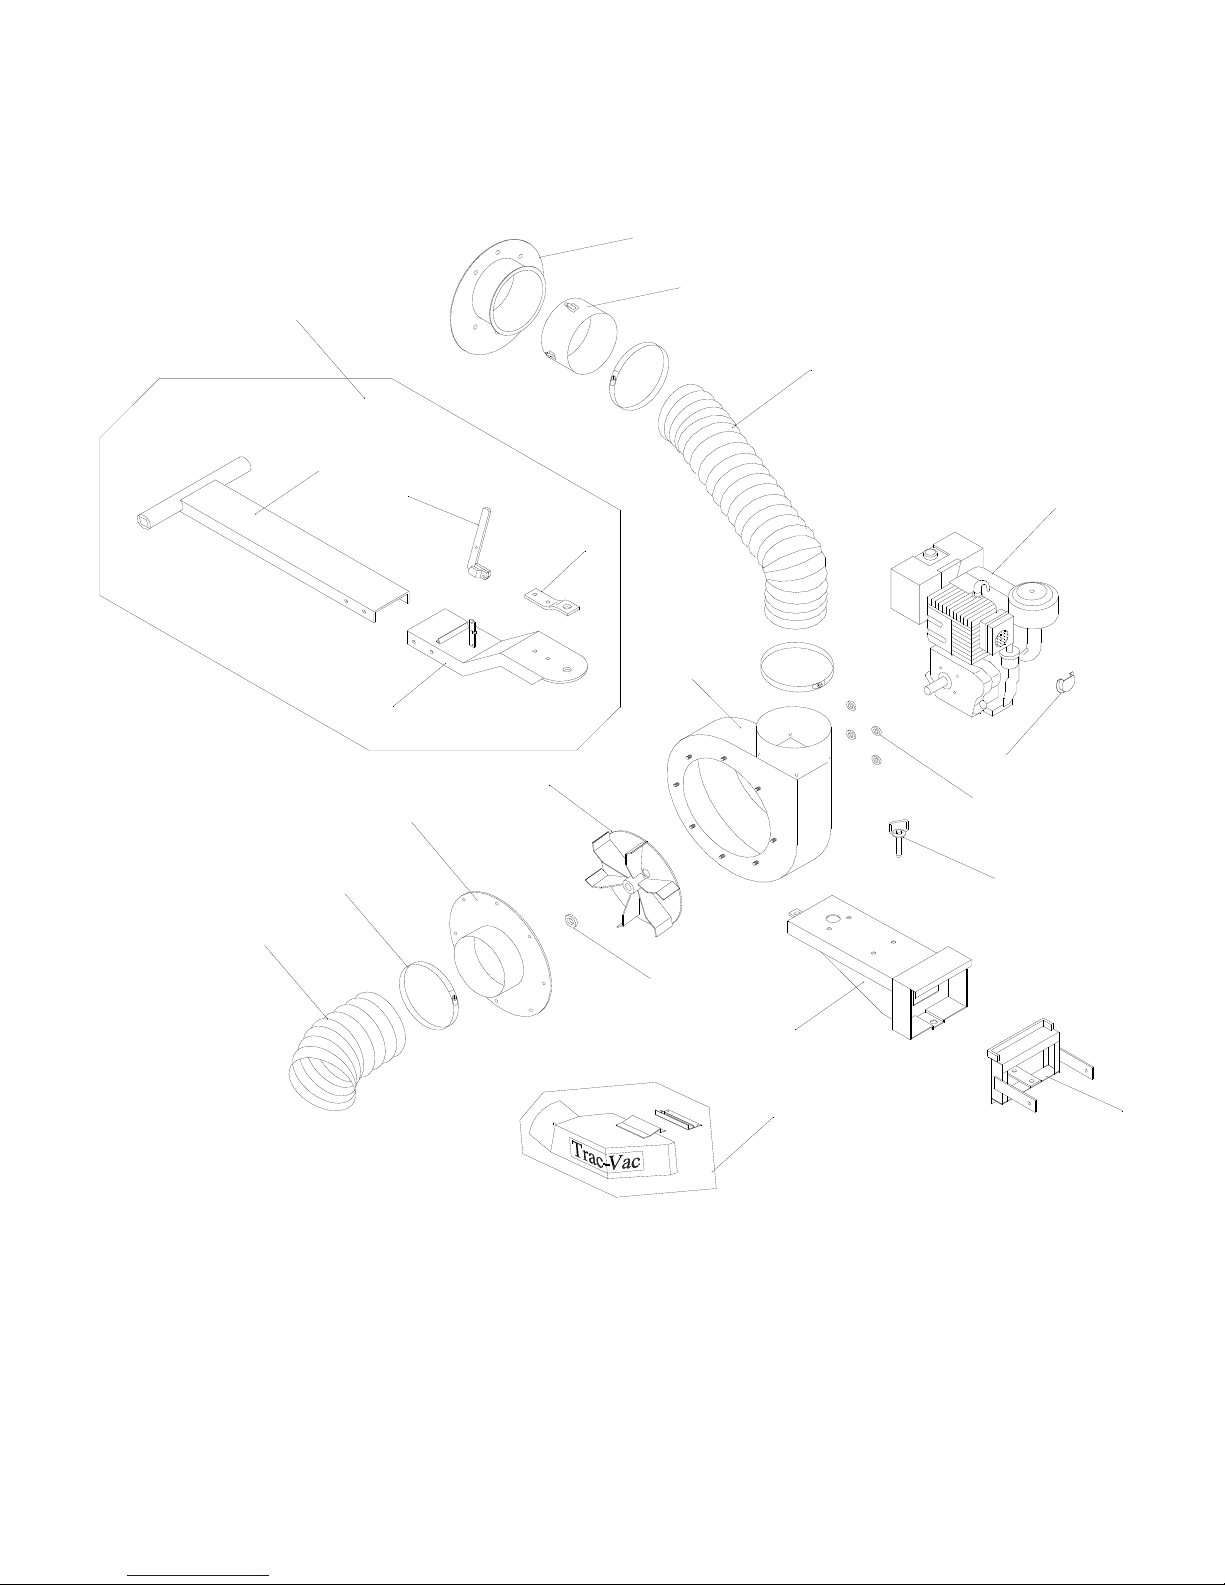
Trac-Vac Model 1060
13
Drawbar Kit
Part No. 10620
14
15
3
5
6
4
8
2
7
9
18
10
11
16
12
17
1
20
6-8-05
19
2

Key Part No. Description
1 10602 Frame, RH
2 10605 Extension, Drawbar
3 10606 Drawbar
4 58067 Hitch Plate (comes w/ cart)
5 58061 Cart Latch, 580
6 20122 Engine, 11 HP B&S Pull Start
18113 Engine, 11 HP Electric Start
52026 Engine, 12 HP LCT (414 CC)
7 86513 Muffler Deflector
52047 Muffler Deflector (12 HP LCT only)
8 10601 Turbine Housing
9 20050 Turbine, 14”
10 66010 Inlet, 8” Straight
11 18119 Band Clamp, 8”
12 88101 Intake Hose, 8” x 7 ½’
13 18070 Cart Connector, 8”
14 86060 Hose Connector, 8’
15 86101 Exhaust Hose, 8” x 5’
16 58104 Hitch Pin
17 86107 Turbine Washer
18 86027 Spacer, Housing
19 46*** Hitch (tractor specific)
20 ***** Chute (tractor specific)
45131 Decal, Trac-Vac
45133 Decal, Warning
3

Model 348/368L Cart Covers
12
3
11
6
13
8
10
1
4
2
14
7
9
1
5
Model 280/348L Cart Cover
Key Part No. Description
1
2
3
4
5
6
7
8
9
10
11
12
13
14
28047
28030
28236
28232
28242
28243
28200
28201
28102
28103
28105
28104
28156
28157
Side Panel
Front Panel
Tailgate
Deflector
Front Screen
Rear Screen
Rear Angle RH
Rear Angle LH
Latch Ass'y RH
Latch Ass'y LH
Top Latch
Handle
Latch Ass'y LH
Latch Ass'y RH
Model 280/368L Cart Cover
1
2
3
4
5
6
7
8
9
10
11
12
13
14
28059
28035
28238
28235
28240
28241
28100
28101
28102
28103
28105
28104
28156
28157
DescriptionPart No.Key
Side Panel
Front Panel
Tailgate
Deflector
Front Screen
Rear Screen
Rear Angle RH
Rear Angle LH
Latch Ass'y RH
Latch Ass'y LH
Top Latch
Handle
Latch Ass'y LH
Latch Ass'y RH
4

Model 280 Cart Cover Assembly Instructions
NOTE: Do not tighten any bolts until the end of construction.
Place side panels on end with decal
outward and about a foot apart at
top. Place screen with latch, ( rear
screen), on end between sides with
latch outward and to the floor.
Attach to sides with 1/4 x 1/2 bolts.
Place connector, (packed in with vac),
on outside of front with the lip to the
outside. Attach with 1/4 x 1/2 bolts.
Gently move cover to the rear to insure
contact between the tailgate and cover,
(along entire contacting surface). Center
front on cart. Mark hole locations, and
drill 9/32" holes. Attach cover with
1/4 x 1/2 bolts.
Place screen without latch, (front
screen), on top of rear screen and
between sides. Secure to rear
screen with 1/4 x 1/2 bolts. Slip
deflector between sides and front
screen with tapered end up.
Secure with 1/4 x 1/2 bolts.
Place front on sides with flanges on
outside . Start corner bolts in sides
and screen before tightening. Start
bolts at top & bottom of side panels
and work your way toward center,
with truss head, round, to the outside.
Place cover flat on floor and attach angles
to side panels at rear of cover with angles
on the outside of cover. Secure with 1/4 x
1/2 bolts. Start at the top and second hole
from the bottom, (latch uses bottom hole),
then work towards the center of the panels.
Bolts truss, (round), head should be to the
inside of cart.
Attach handle to tailgate on smooth
side. Place cover on cart. Make sure
the two lower black angle brackets
have been installed on the lower rear
of the cart. Fit tailgate to the cover
using the top latch and lower brackets
only.
Place latch on each side of cart with
tongue of latch to rear. Attach to
side panel and cart with 1/4 x 1/2 bolts.
Tighten all hardware.
5

280/368L Latch Bracket Installation
1. Remove whizlock nut shown in illustration (Fig. 1)
2. Place latch bracket over bolt and replace whizlock
nut.
3. Mark and drill Ø9/32" hole for the opposite end of
latch bracket. (Fig. 2)
4. Attach latch bracket with 1/4-20 trusshead bolt & whizlock
nut provided. (Fig. 3)
5. Repeat steps 1 thru 4 on opposite side of cart. (Fig. 4)
Remove this nut
with Ø9/32"drill bit.
(Remove bracket before drilling)
Mark and drill here
Fig. 1 Fig. 2
Fig. 3
Fig. 4
6

MAINTENANCE
DANGER: The Trac-Vac was built to be operated according to the rules for safe operation in this manual.
Carelessness or error on the part of the operator can result in serious injury.
This unit is capable of amputating fingers or hands and throwing objects. Failure to comply with
the safety instructions could result in serious injury or death.
CAUTION!!!!
SPINNING BLADE
MAINTENANCE SCHEDULE
Check engine oil level
Check tire pressure
Check all hardware for tightness
Lubricate
Clean
Maintain engine per engine manual
Before each use
X
X
X
After each use
Every season
XXX
Before Stoarage
Service Dates
BEFORE EACH USE
CHECK FOR LOOSE HARDWARE
▪ Make a thorough visual check of the unit for any bolts and nuts which may have become loose.
Retighten any loose nuts and bolts
CHECK TIRE PRESSURE
▪ Check tire pressure regularly. The recommended tire pressure is printed on the tire.
CHECK ENGINE OIL LEVEL
▪ Check oil level before each use. Maintain engine oil as instructed in engine manual.
LUBRICATION
▪ Use a light machine oil to lubricate the axle where the hitch tongue pivots and the latch and pivot
bolt at the beginning of each season.
▪ Grease or oil wheel bearings, using automotive wheel bearing grease at least once every season.
WARNING: Always stop engine and disconnect spark plug wire before
lubricating, cleaning or before maintenance or repairs.
ENGINE MAINTENANCE
▪ Check oil level before each use, maintain engine oil according to the engine manual
▪
Service air cleaner after every 25 hours of normal conditions. Under extremely dusty
conditions, clean every few hours. Poor engine performance usually indicates that the air
cleaner needs to be serviced.
▪ Clean spark plug and reset gap once every season. It is recommended that the spark plug be
replaced at the start of each season. Check the engine manual for the correct spark plug and gap
specifications.
CLEANING
▪ Clean the unit after each use. Grass clippings and leaves can mildew and cause damage if
not properly cleaned.
▪ Clean the engine regularly with a cloth or brush. Remove all dirt and debris from muffler area.
7

Exhaust Hose Installation
90°
or under
For proper hose attachment, try to keep the hose level or below where it connects to the cart. Trim the
hose if necessary.
CORRECT
INCORRECT
NOTES
8

OPERATING PROCEDURE
BEFORE STARTING, Follow the engine manufacturer’s instructions in preparing
engine for operation. Never fill fuel tank indoors, with engine running or while
engine is hot. Do not smoke while filling tank.
1. Inspect area to be vacuumed and pickup all harmful objects and litter. Rocks and other harmful debris can do
serious damage to vacuum assembly and cause bodily injury.
2. For best vacuuming results operate tractor at manufacturer's recommended speed for best cutting. If grass is high,
mow first and vacuum on the second pass.
3. Your vacuum is preset to run at approximately 3800-RPM (385), at no load. Do not slow down engine.
4. SHUT OFF ENGINE TO UNLOAD.
5. When operating tractor on slope or grade, exercise extreme caution. Do not cut across grade or slope. Mow
directly up and down hills.
6. Periodically check all fasteners for tightness.
7. Listen for unusual vibration of engine or air turbine. If excessive vibration is present, STOP engine and check for
damage to turbine fan.
8. Always shut off tractor engine and vacuum engine before servicing.
9. Replace deflector shield when discharge chute is removed.
10. When removing clogs, SHUT OFF ALL ENGINES and wait for all moving parts to come to a complete
stop! Failure to do so can cause serious bodily injury!
11. Do not tow unit on public roads
12. Do not carry passengers on unit.
13. Avoid sudden turns or maneuvers.
CAUTION!!!!
SPINNING BLADE
EXTENDED STORAGE PROCEDURES
1. Wash and clean vacuum, and lubricate any lubrication points.
2. Drain fuel from the tank and run vacuum until fuel is exhausted in carburetor.
3. Drain and change the engine oil.
4. Clean tires and check pressure. Raising and supporting unit with weight off tires is recommended.
5. When storing a unit with Rubbermaid® containers, remove containers, remove clevis pin from top support, and
rotate top around to completely open.
TRAC VAC WARRANTY POLICY
Palmor Products, Inc. will repair or replace, free of charge, any part, or parts that are defective in
material or workmanship or both for a period of one year residential use, and 90 day’s for
commercial and rental use. The purchaser will pay transportation charges on parts submitted for
replacement under warranty. For warranty service, contact your local dealer from whom the unit
was purchased. There are no other express or implied warranties. Some states do not allow
limitations on how long an implied warranty lasts, and some states do not allow the exclusion or
limitation of incidental or consequential damages, so the above limitation and exclusion may not
apply to you. This warranty gives you specific legal rights and you may also have other rights,
which vary from state to state.
PALMOR PRODUCTS, INC.-5225 Serum Plant Rd.-Thorntown, IN 46071
Web Page: www.trac-vac.com
Phone: 1-800-Trac-Vac
E-Mail: palmor@trac-vac.com
9
 Loading...