

Page 1

Installation Instructions:
41000 - Toolbox Mount Kit For TracONE•
34000 - Tacoma Mount Kit•
41500 - Tacoma Mount Kit with Toolbox Mount•
TracRac Inc. 994 Jefferson St. Fall River, MA 02721 l 800-501-1578
TracRac
994 Jefferson St.
Fall River MA
800-501-1587
www.tracrac.com
Instruction Manual
Page 2
Remove the front 2 clamps from either side of the 1.
front rack and replace with TB Front Clamps (Figure
1)
Take one of the TB Rear Mounts and thread a 3/8”-16 2.
HHCS in through the bottom of the clamp.
Take the C-Channel Clamp Foot and place it on top of 3.
the 3/8” HHCS (Figure 2)
Repeat Steps 2 & 3 for the opposite TB Rear Mount.4.
Place the Rounded Shims on the sidewall of your 5.
truck, approximately 2” to 3” behind the upright
bases as illustrated (Figure 1) This distance will vary
depending on the size of the toolbox
Mount the assembled clamps (Step 1-3) onto the 6.
rounded shims and torque down the HHCS to 14 lb-ft
using a 9/16” socket and torque wrench. Re-torque
the TB Front Clamps to 14 lb-ft.
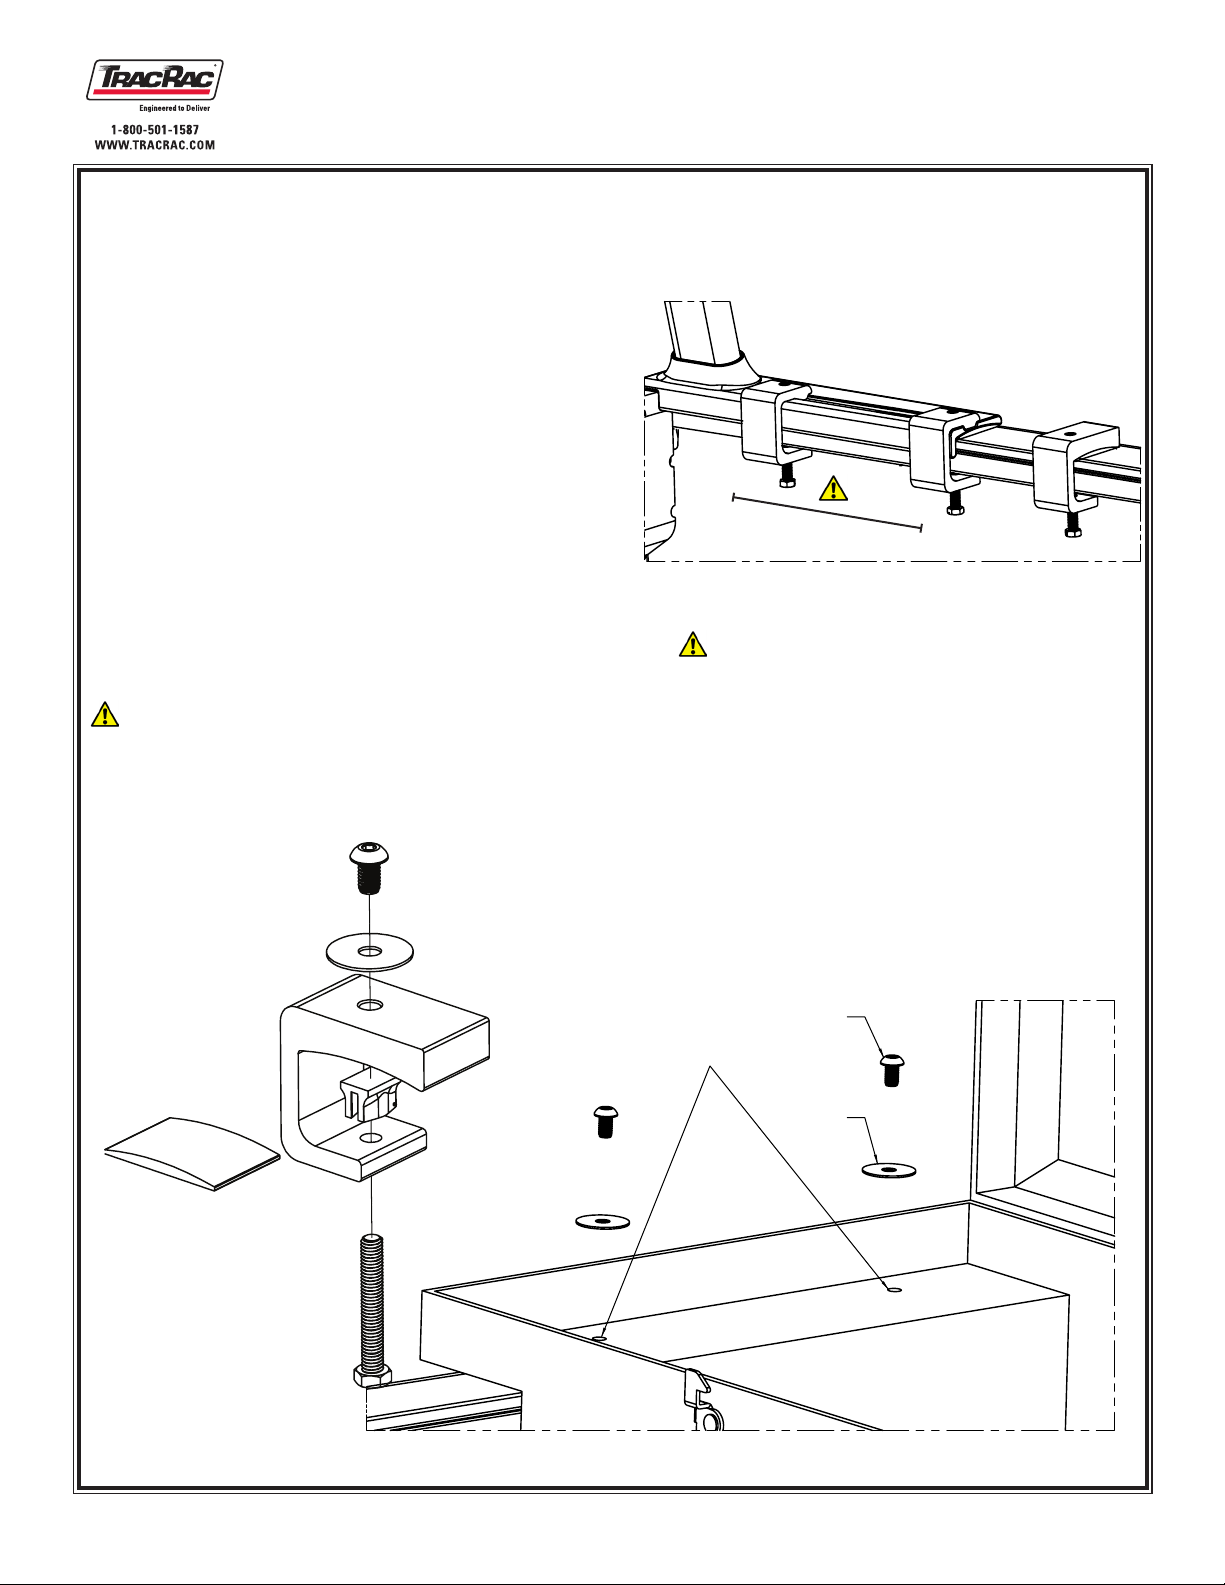
Place your toolbox on top of the clamps and secure 7.
it by using the 3/8” washer and the 3/8”-16 BHCS.
Torque the BHCS to 27 ft-lbs. (Figure 3)
Note: When positioning the toolbox, please note that
there is sufficient clearance for the lid to open so that it
does not scratch the uprights.
Toolbox Installation - 41000
No t e : Be s u r e t o k e e p t h e r u B B e r s h i m
u N d e r t h e B a s e w h e N t i g h t e N i N g t h e
c l a m p s
max distance possible
Figure .1
IMPORTANT: If your toolbox does not come
with pre-drilled holes/slots that line up with
the threaded clamps, you will need to position
you toolbox in the desired location, mark the
necessary hole locations, remove the toolbox
and then drill either a 13/32” or 7/16” clearance
hole. After the holes are drilled you will be able
to mount your toolbox.
Figure 2
Instruction Manual
Button Head
Cap Screw
Customer Drilled
Holes
3/8 Washer
Figure 3
TracRac Inc. 994 Jefferson St. Fall River, MA 02721 l 800-501-1578
Page 3

Toyota Tacoma Mount Installation - 34000
Tacoma Installation (Clamp Set)
Remove the plastic end-caps from the factory 1.
installed rails, front and back.
Take the Tacoma mount clamp and partially 2.
thread a 3/8”-16 hex head cap screw through
the tapped hole located on the bottom of the
clamp.
Slide two clamps into each factory installed 3.
rail from the back end of the truck and replace
the rear end-caps.
Slide two clamps into each factory installed 4.
rail from the front end of the truck and replace
the front end-caps. If installing a toolbox, slide
three clamps into the front of the factory rail.
With the clamps retained in the track now 5.
slide 2 of them on each upright base, the
clamps should be spaced as far a part as
possible.
Reference the placement of the uprights from 6.
the TracONE installation book. With the base
in the desired location place a 3” U channel
on top of the hex head caps screws.
Torque the hex head cap screws down to 14 7.
lb-ft using a 9/16” open end wrench.
Base Unit
Factory
Installed
Bed Rail
System
Rubber Shim
Tacoma Clamp
U-Channel
Hex Head Bolt
Note: The 3” U Channel and 3/8”-16 Hex Head •
Cap Screw are included with the original rack
hardware.
TracRac Inc. 994 Jefferson St. Fall River, MA 02721 l 800-501-1578
Instruction Manual
Page 4

Toyota Tacoma Toolbox Installation - 41500
Remove the plastic end-caps from the factory installed rails, front and back.1.
Take the Tacoma Tool Box Mount Clamp and partially thread a 3/8”-16 hex head cap screw through 2.
the tapped hole located on the bottom of the clamp.
Slide two clamps into each factory installed rail from the back end of the truck and replace the rear 3.
end-caps.
Slide three clamps into each factory installed rail from the front end of the truck and replace the 4.
front end-caps.
With the clamps retained in the track now slide 2 of them on each upright base, with the base 5.
in the desired location place a 3” U channel on top of the hex head caps screws. Reference the
placement of the uprights from the included installation book.
Place a rubber shim and tool box shim under the two remaining clamps in the front along with a 6.
7/8” U channel on top of the hex head caps screws.
Torque the hex head cap screws down to 14 lb-ft using a 9/16” open end wrench.7.
Follow the remaining steps in Toolbox Installation directions on page 1. - 41000. 8.
The 3” U Channel and 3/8”-16 Hex Head Cap Screw are included with the original rack hardware.•
Tacoma
Clamp
Button Head
Cap Screw
3/8 Washer
Aluminum
Shim
Plastic Shim
When Complete
U-Channel
Instruction Manual
Hex Head
Cap Screw
TracRac Inc. 994 Jefferson St. Fall River, MA 02721 l 800-501-1578
 Loading...