

Page 1
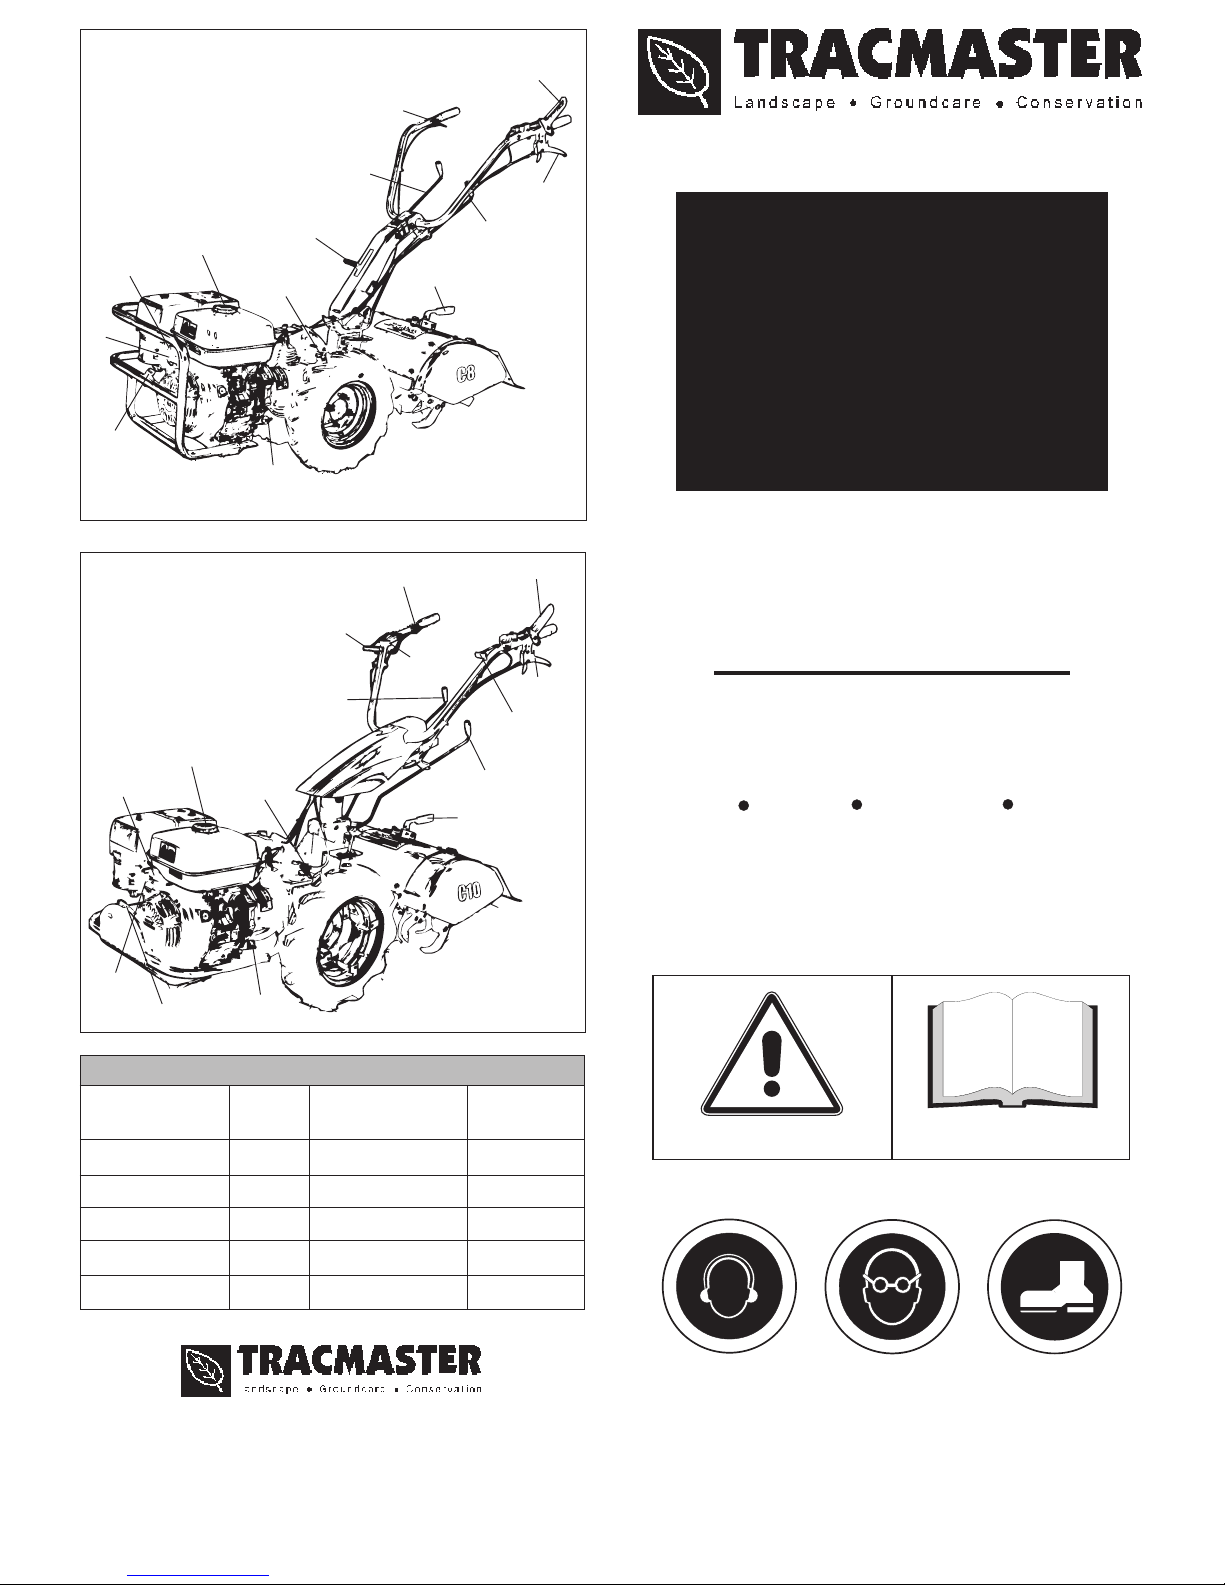
C10 & C12
Red cut out lever
Throttle lever
Wheel speed
lever
Handlebar adjuster
Gearbox
oil level
Petrol cap
Recoil
starter
Fuel tap
Engine
oil level
Choke lever
Depth adjuster
Clutch lever
Clutch lever
VIBRATION & SOUND LEVELS
2
Machine RPM Vibration m/sec Sound Level
3 Axis dB(A)
C6 Rotavator 3100 2.9 85.0
C8 Rotavator 3400 4.9 88.0
C10P Rotavator 3000 4.4 85.0
C10D Rotavator 3600 7.3 97.0
C12 Rotavator 3600 5.8 85.0
Tracmaster Ltd, Teknol House, Victoria Road, Burgess Hill RH15 9LH
Tel: 01444 247689 Fax: 01444 871612
Website: www.tracmaster.co.uk E-mail: [email protected]
© Tracmaster Ltd 2007.
Specifications are subject to change without prior notice.
OP/ROT/1207
CAMON
No liability will be accepted for any damage
caused to persons or property through failure
to observe the operating and safety instructions.
ROTAVATORS
C6 C8 C10 C12
OPERATING
INSTRUCTIONS
&
SAFETY NOTES
WEAR EAR
PROTECTION
WEAR SAFETY
FOOTWEAR
WEAR EYE
PROTECTION
READ CAREFULLY
IMPORTANT
C6 & C8
Throttle lever
Red cut out lever
Wheel speed lever
Depth adjuster
Petrol cap
Digging knives
engagement
lever
Digging knives
engagement
lever
Engine
oil level
Recoil starter
Handlebar
adjuster
Gearbox
oil level
Choke lever
Fuel tap
Fwd/rev
lever
Diff lock
lever
Page 2

S A F E T Y
TO START PETROL ENGINE
TO START DIESEL ENGINE
ALWAYS start the engine in the open air
DO NOT smoke when refuelling
DO NOT mix OIL with the fuel
ALWAYS stop the engine before making any adjustments, refuelling,
moving or cleaning, or when the unit is unattended
USE ONLY fuel from containers designed for this purpose - refuel
outdoors only and replace the tank cap securely
IN CASE of petrol spillage move the machine away from the area of
spillage and allow the petrol vapours to dissipate before
starting the engine
DO NOT remove any safety guards that are fitted
DO NOT touch any moving parts or attempt any maintenance whilst
the machine is running - KEEP HANDS AND FEET AWAY
BEFORE starting work clear the work area of any objects that could
damage the machine
DO NOT allow children or anyone uninstructed to operate the
machine - KEEP ANIMALS AWAY
o
DO NOT use on slopes or banks of more than 20
ALWAYS wear suitable clothing to give personal protection
including footwear that offers a good grip
AVOID wearing loose garments that may catch in moving parts
KNOW how to stop the machine in an emergency
NEVER interfere with any control settings on the engine
NEVER select reverse gear with your back to a wall or other
immovable object
IF A FAULT develops DO NOT attempt any repair - immediately
contact the supplier from whom the machine was obtained
VISUALLY INSPECT the machine before use - ensure all tines, nuts
and bolts are tight and not worn or damaged and replace tines if
necessary
KEEP IN MIND the operator is responsible for accidents or hazards
occurring to people or property
Using the dipstick provided, check the engine oil level. Top up with
10w/40 oil if necessary (if the dipstick is clear of oil).
Check fuel level. Only use unleaded petrol from a clean container.
Never re-fuel when the engine is hot or running. Leave 1” air space in
the fuel tank.
Depress the engine stop lever (the red lever on the left handlebar) then
pull up the clutch lever and secure with locking clip.
Ensure the wheel speed lever is in neutral ‘O’ position.
Apply half throttle (the lever on the right handlebar).
Turn the fuel tap to ‘ON’ position, if the engine is cold set the choke lever
to ‘ON’ position.
Pull the recoil start handle gently until it engages then give it a good
strong pull to start the engine.
When the engine has started, release the choke lever after a few
seconds and return the throttle lever to idle position.
Never re-fuel
when the engine is hot or running.
Depress the engine stop lever (the red lever on the handlebar) then pull
in the clutch lever and secure with locking clip.
Ensure the wheel speed lever is in neutral ‘O’ position.
Apply half throttle (the lever on the right handlebar).
Press and hold the decompression lever on top of the engine.
(C10D only)
Check fuel level. Only use diesel from a clean container.
Pull recoil start handle gently until it engages then slowly pull the engine
over 2-3 times to prime the engine.
Release the decompression lever and gently pull over the engine until
compression is felt.
Press, but do not hold, the decompression lever and give the starter
handle a good strong pull to start the engine.
Once the engine has started return the throttle to idle position.
OPERATION
TO STOP ENGINE
OPERATING HINTS
MAINTENANCE GUIDE
Use handlebar adjuster to set handlebar height.
Pull up clutch lever (located on left handlebar). This will automatically
release stop lever locking clip.
Ensure forward/reverse lever is in forward position.
Select working speed one. NEVER select a higher wheel speed for work.
Engage drive to the digging knives by pushing the lever forward.
Release clutch lever slowly and fully, keeping the red engine stop lever
depressed as engine will stop if released.
Commence work.
Close the throttle.
Engage clutch lever.
Locate gear lever in neutral position.
Disengage drive to the digging knives.
Release clutch lever.
Release engine stop lever completely.
WARNING: THE EXHAUST COVER MAY BE HOT - DO NOT
TOUCH
LET THE MACHINE DO THE WORK.
Excessive downward pressure on the handlebars may cause the
machine to jump. Apply gentle pressure and the machine will find its
own digging depth according to the type of ground. If the ground is
hard, position the depth adjuster centre knife on the top hole and make
several passes until the desired depth is achieved.
If the speed or digging knives lever does not engage immediately,
release clutch lever slightly and 'feel in' with the engine on tick-over. DO
NOT ‘RIDE’ THE CLUTCH.
C10 and C12 only - if one wheel begins to lose traction engage the
differential lock by pulling the black lever on top of the right hand
handlebar towards you to engage drive to both wheels.
Always pull in the clutch lever before engaging any gear, digging unit or
changing forward/reverse.
The clutch lever must be fully released when working. Do not operate
the machine with the clutch lever partially engaged as serious damage
may occur.
DO NOT WORK ON SLOPES MORE THAN 20°
If working on a slope, work across the slope pointing the machine
slightly uphill.
DO NOT ATTEMPT CULTIVATION ON:
(i) Frozen or waterlogged ground as this will destroy the soil structure
resulting in poor future drainage.
(ii) Ground that is covered with thick foliage or high grass. Remove it
by burning or cutting down.
After every hour of operation stop the engine and remove the spark
plug cap. Check engine oil level (recommended oil SAE 10w/40).
Remove all foreign matter from the digging knives assembly e.g.
wire, string, grass etc.
Replace the spark plug cap.
Do not turn the machine on its side for cleaning.
When the machine is not in use always leave the clutch lever pulled in
and secured with locking clip.
For engine maintenance please refer to engine manufacturers manual.
Before checking the oil level ensure the machine is level.
Remove the digging unit oil level plug and ensure the oil level is within
1½” of the hole. Remove the gearbox unit dipstick and ensure the oil
reaches the top level mark. If necessary both units can be topped up
with EP90 gear oil.
 Loading...