

Page 1

Operating Instructions
Before commissioning the machine, read operating instructions
and observe warning and safety instructions.
PLEASE ALSO READ ORIGINAL
BCS INSTRUCTION MANUAL
BCS Rotary Mower (100cm)
Manufactured by BCS S.p.A.
to t
BCS Power Units
Page 2
BCS 100cm Rotary Mower Attachment
Page 2 TWT/100RM/0617
No liability will be accepted for any damage caused to persons or property
through failure to observe the operating and safety instructions.
!
IMPORTANT READ CAREFULLY
Contents
Page 4 Assembly
Page 5 Operation
Page 9 Maintenance Guide
Page 10 Vibration & Sound Levels
Page 11 Manufacturer Information
Page 3

BCS 100cm Rotary Mower Attachment
TWT/100RM/0617 Page 3
!
IMPORTANT
PLEASE READ THE OWNER’S MANUAL
FOR THE POWER UNIT FIRST.
For any further information
or assistance please contact
Tracmaster on 01444 247689 or
visit www.tracmaster.co.uk
Page 4
BCS 100cm Rotary Mower Attachment
Page 4 TWT/100RM/0617
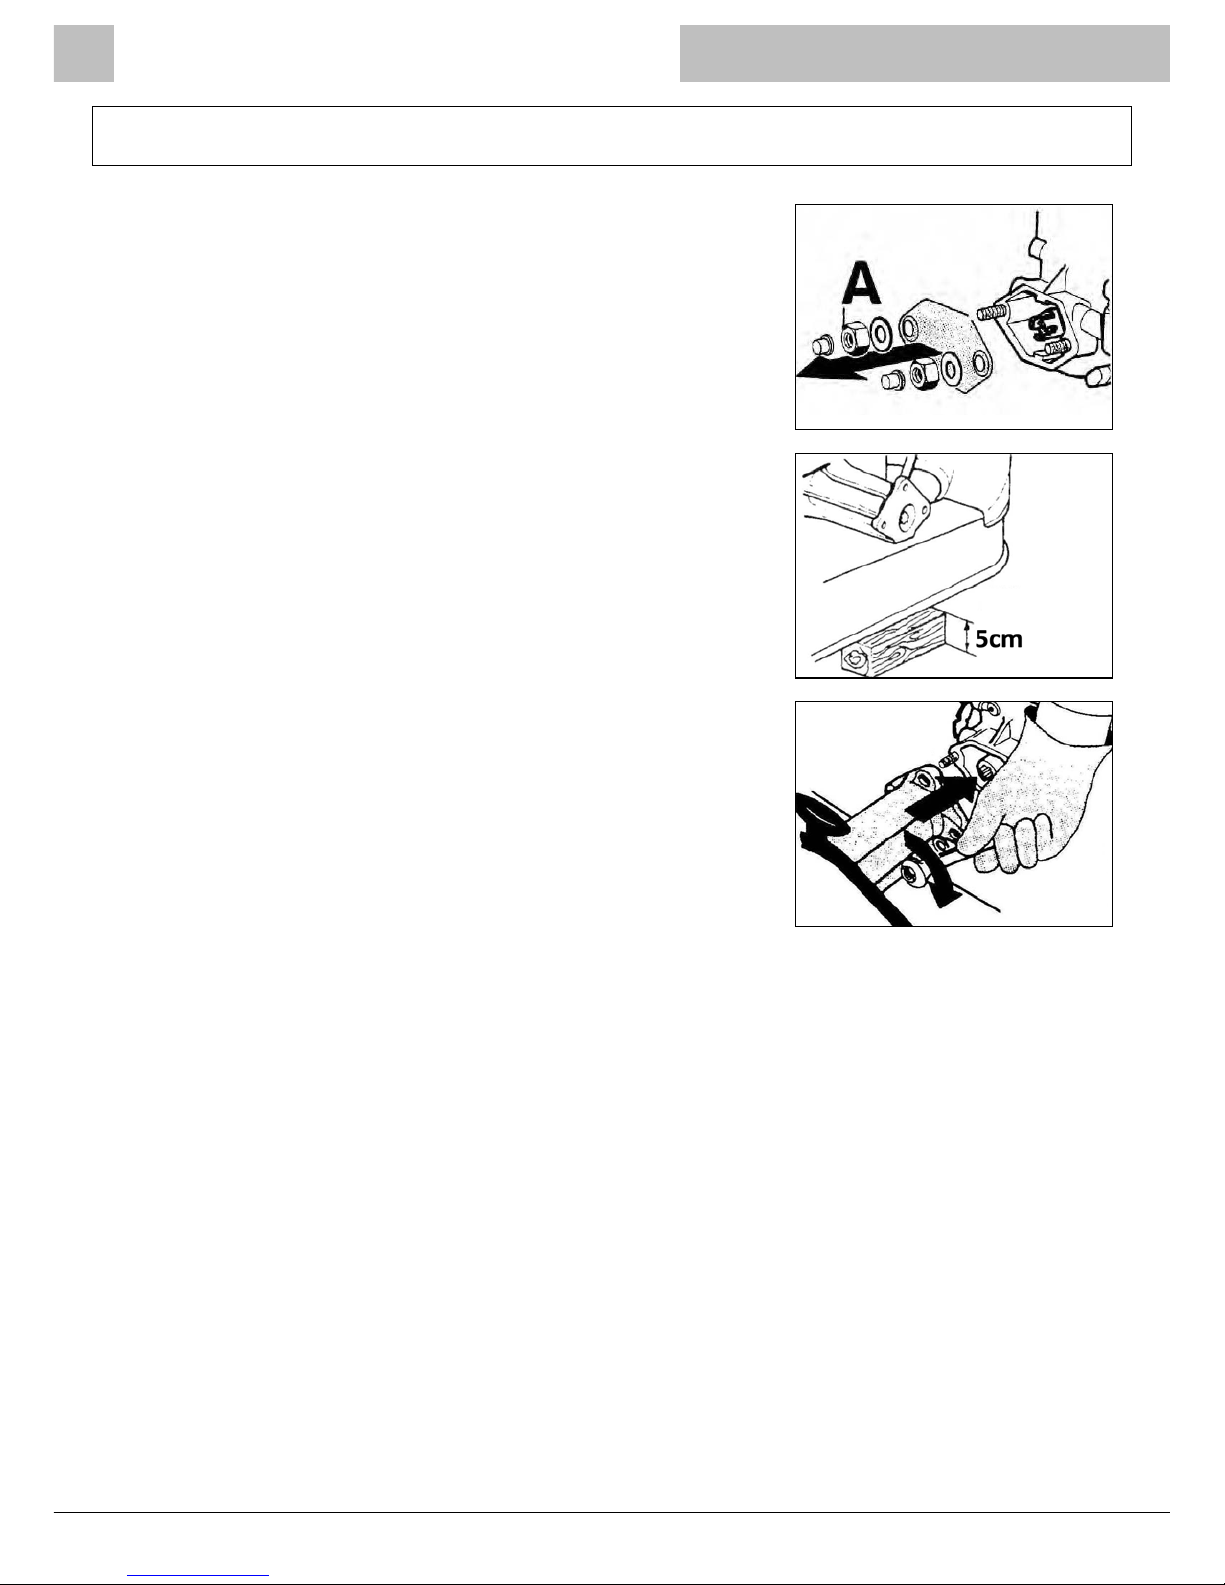
Unscrew nuts [A] and remove the washers and the protection
cover for the power take-off (PTO) (g.4/1).
Keep the lawn mower raised approximately 5cm (2”) off the
ground using a shim (g.4/2).
Fit the mower onto the ange of the machine using the
washers and nuts [A] previously removed. Tighten the nuts
securely (g.4/3).
The machine is now ready to run without the grass bag.
Assembly
Fig 4/1
Fig 4/2
Fig 4/3
Page 5

BCS 100cm Rotary Mower Attachment
TWT/100RM/0617 Page 5
Check that the gearbox oil level is correct.
Always wear heavy gloves to protect your hands whilst working on the equipment.
Do not use the machine near children or animals.
Before starting work, observe the following:
1. Study, understand, and follow the safety procedures;
2. Undertake periodic and appropriate machine maintenance and lubrication;
3. Read ALL operating manuals on the machine’s use and maintenance carefully;
4. Read and observe all warning labels on the machine and implement;
5. Ensure regular inspections of the blades, replacing them as required if they are damaged
or worn out;
6. Check that the cutting edges of the blades are mounted in the proper rotation direction;
7. Regularly remove any foreign objects, such as wires, grass, debris or any other material
which has remained stuck to the blades and blade holding rotors;
8. Ensure that the protection and safety devices are in place and properly mounted;
9. Wear appropriate clothing; always use safety goggles and gloves. Never operate the
lawnmower barefoot or wearing sandals - always wear safety footwear;
10. The surface to be cut must be free of stones, branches or foreign objects which can be
potentially dangerous if hurled at a distance by mowing deck;
11. Work alone in full daylight, avoiding dawn, dusk, and articial light.
The machine operator is responsible for any damage to persons or property.
Always walk with the machine - DO NOT RUN.
NEVER work on slopes of more than 20
o
and always work across the face of a slope (side to
side), NEVER up and down. NEVER use the machine on a bank where there is a possibility of
the machine sliding down the slope.
Operation
Page 6
BCS 100cm Rotary Mower Attachment
Page 6 TWT/100RM/0617
Operation
Always disengage the power take-off (PTO) when changing direction or location of operation.
Do not replace the blades or attempt to undertake any maintenance of the mower while the
machine is running.
Only qualied persons should operate the machine.
If any abnormal vibrations occur STOP the engine immediately and visually inspect the machine
and implement for any signs of damage.
IMPORTANT: Read all machine and implement manuals thoroughly before using the rotary
mower.
Commencing work
Use the handlebar height adjuster to set handlebar height before
commencing work.
NOTE: Disengage the drive to the mower before selecting reverse
gear.
Raise the throttle to speed, release the clutch lever gently and fully,
keeping the red machine stop lever (OPC) depressed as engine will
stop if released.
Increase throttle speed.
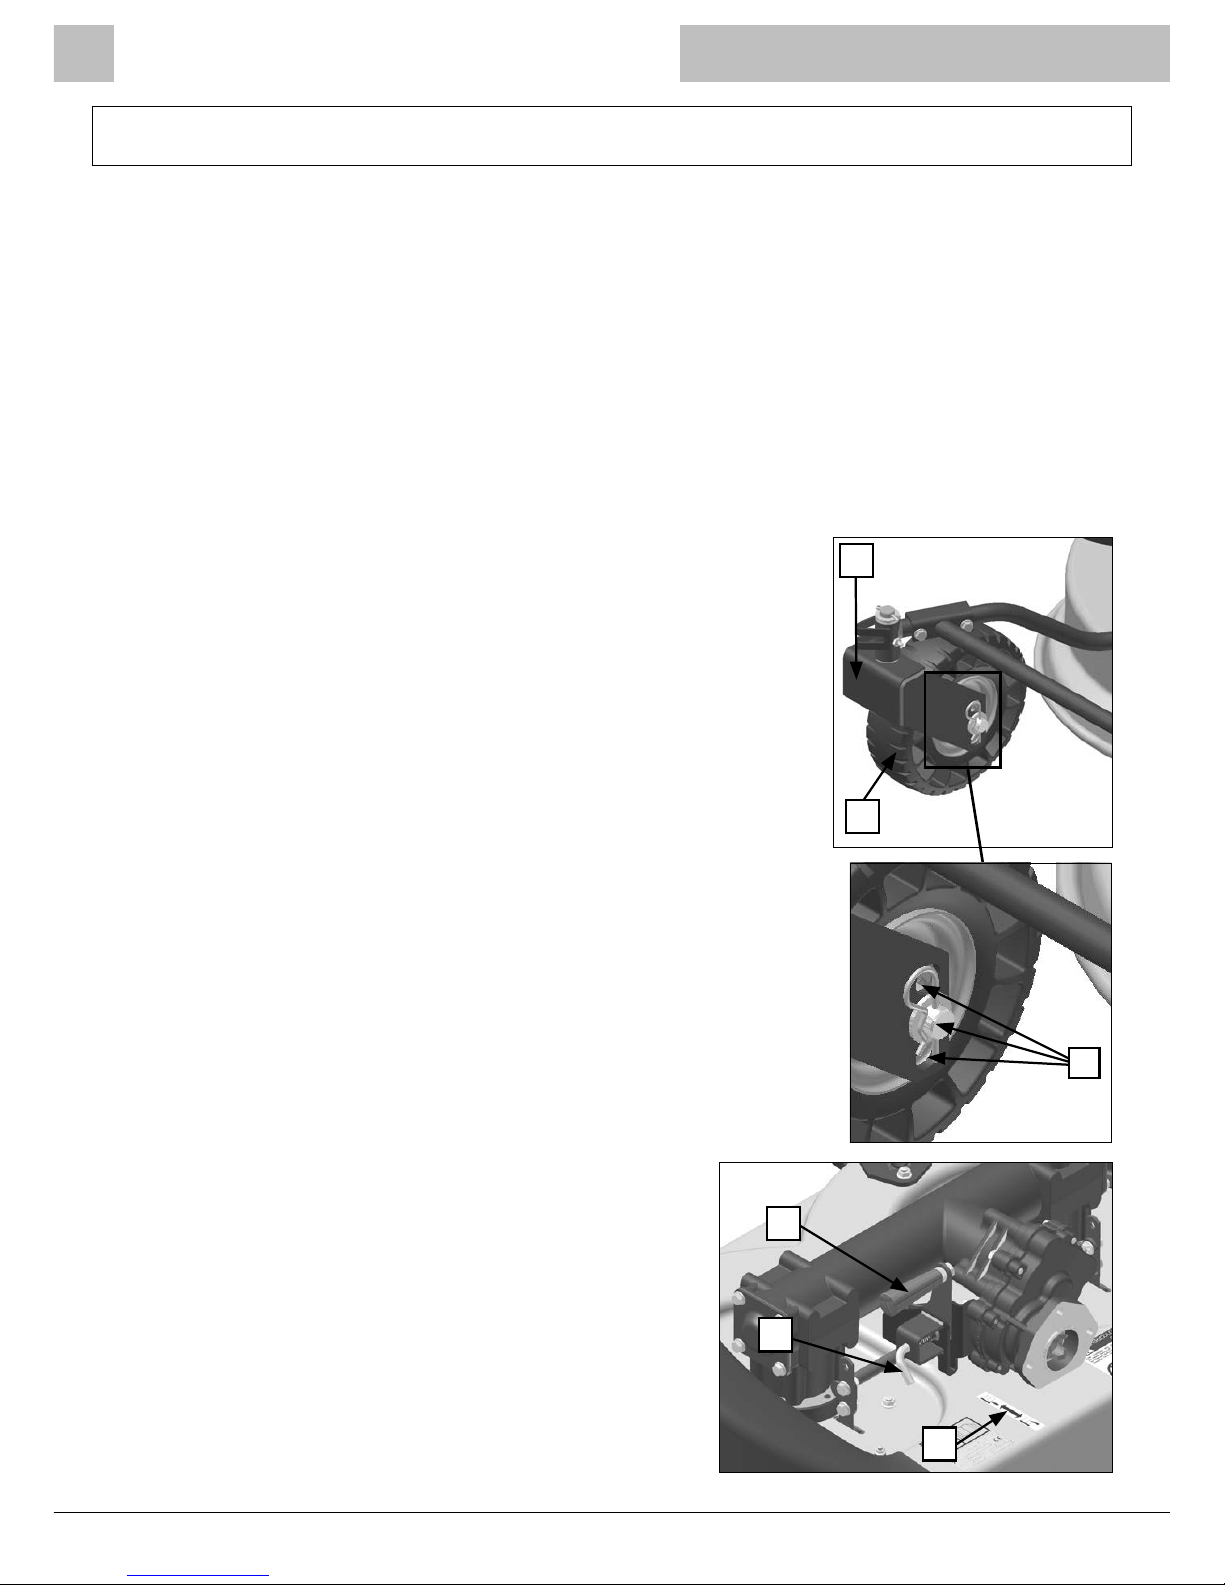
The mower deck should be level for an even mowing height.
If adjustment is required, remove the wheel and remount it into a
higher or lower position as required (g.4/4).
The cutting height ranges from 2” to 5”. It is
recommended that a maximum of 2” be removed at
each mowing, then reduce it to a desired height with a
second mowing.
To adjust the cutting height unhook the split pin [D] and
use the adjustment lever [E] as shown on the sticker
[F] (g.4/5).
Fig 4/4
C
A
B
F
D
Fig 4/5
E
Page 7
BCS 100cm Rotary Mower Attachment
TWT/100RM/0617 Page 7
Operation
The adjustment described and the position of the front wheels [A] on the forks [C] (g.4/4) allow
the following cutting heights to be obtained:
• From 5cm to 8cm
• From 7.5cm to 10.5cm
• From 10cm to 13cm
Mowing wet grass is not recommended as it may clog the
discharge chute and make collection difcult.
Best results are obtained with the engine at a high throttle
setting.
Forward motion speed should be selected according to the grass
conditions.
Use speed two for light conditions and speed one for difcult
conditions.
Never allow the engine to labour.
The mower has a built-in blade brake which stops the blade if
the drive is disconnected.
NEVER ENGAGE THE MOWER IN LONG, UNCUT GRASS.
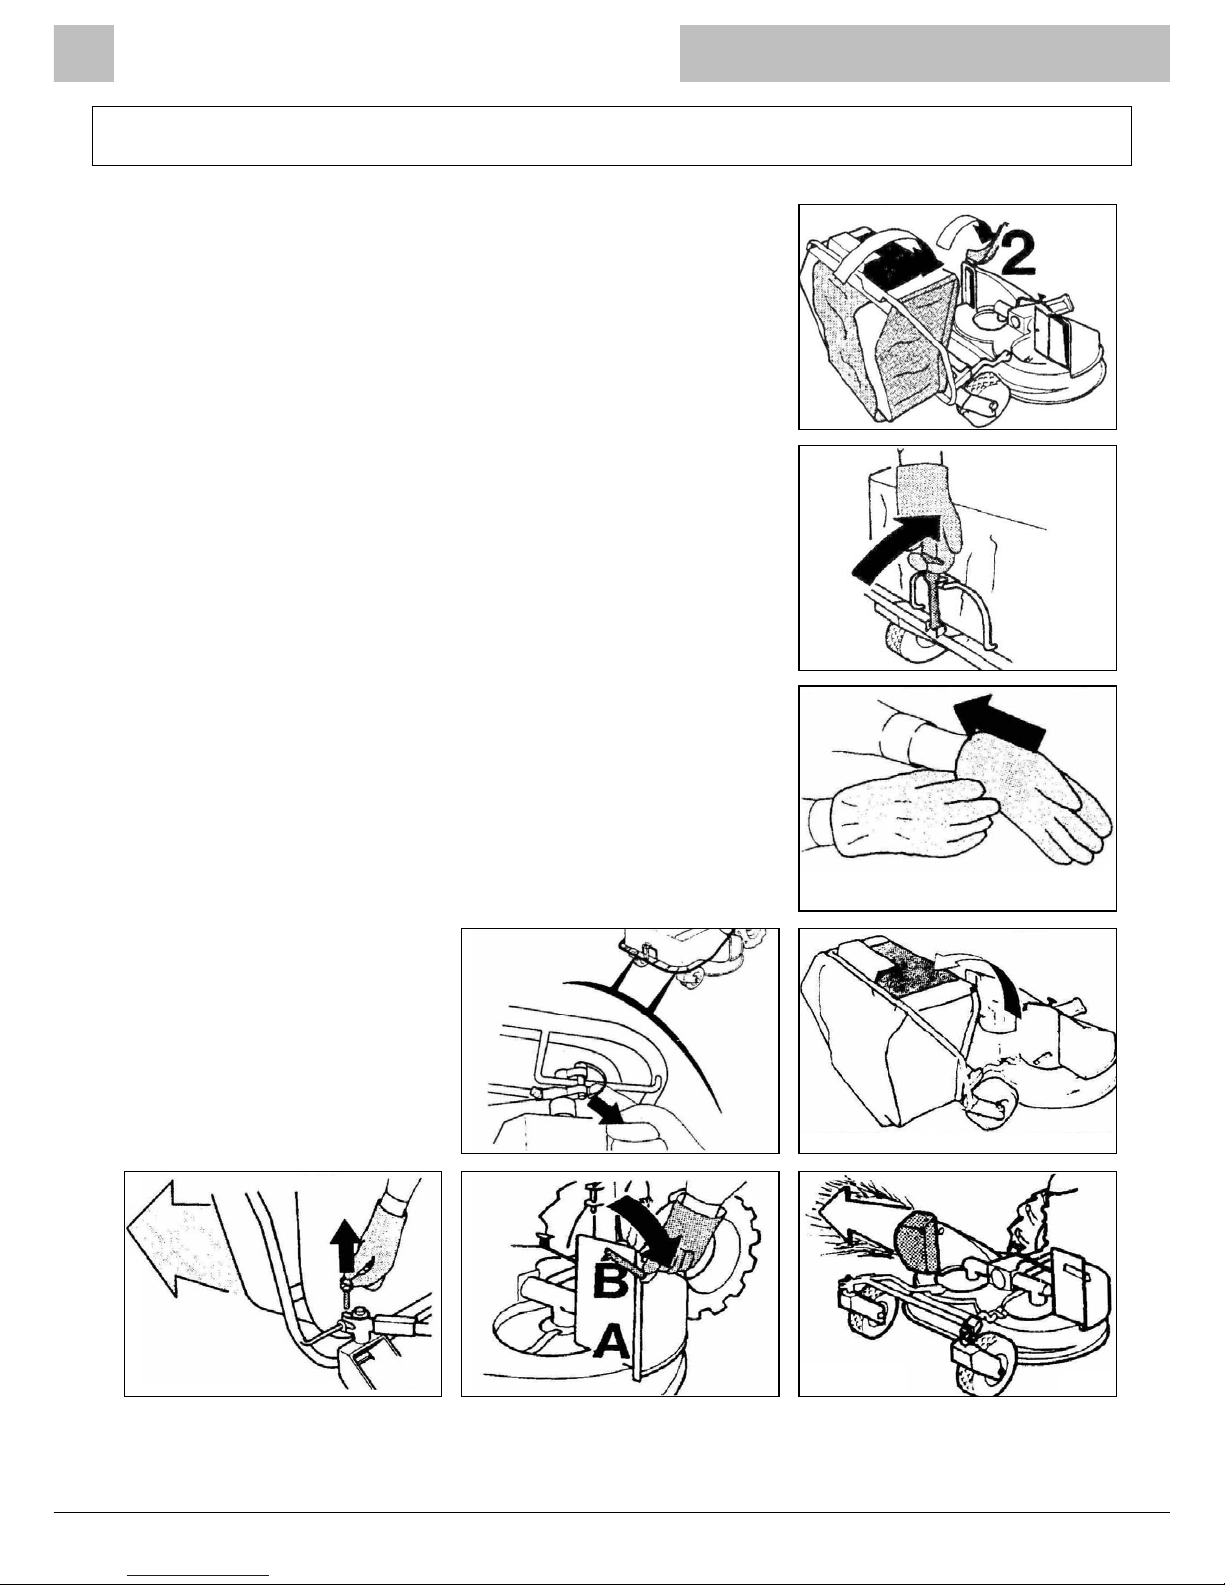
Using the mower with the collection bag
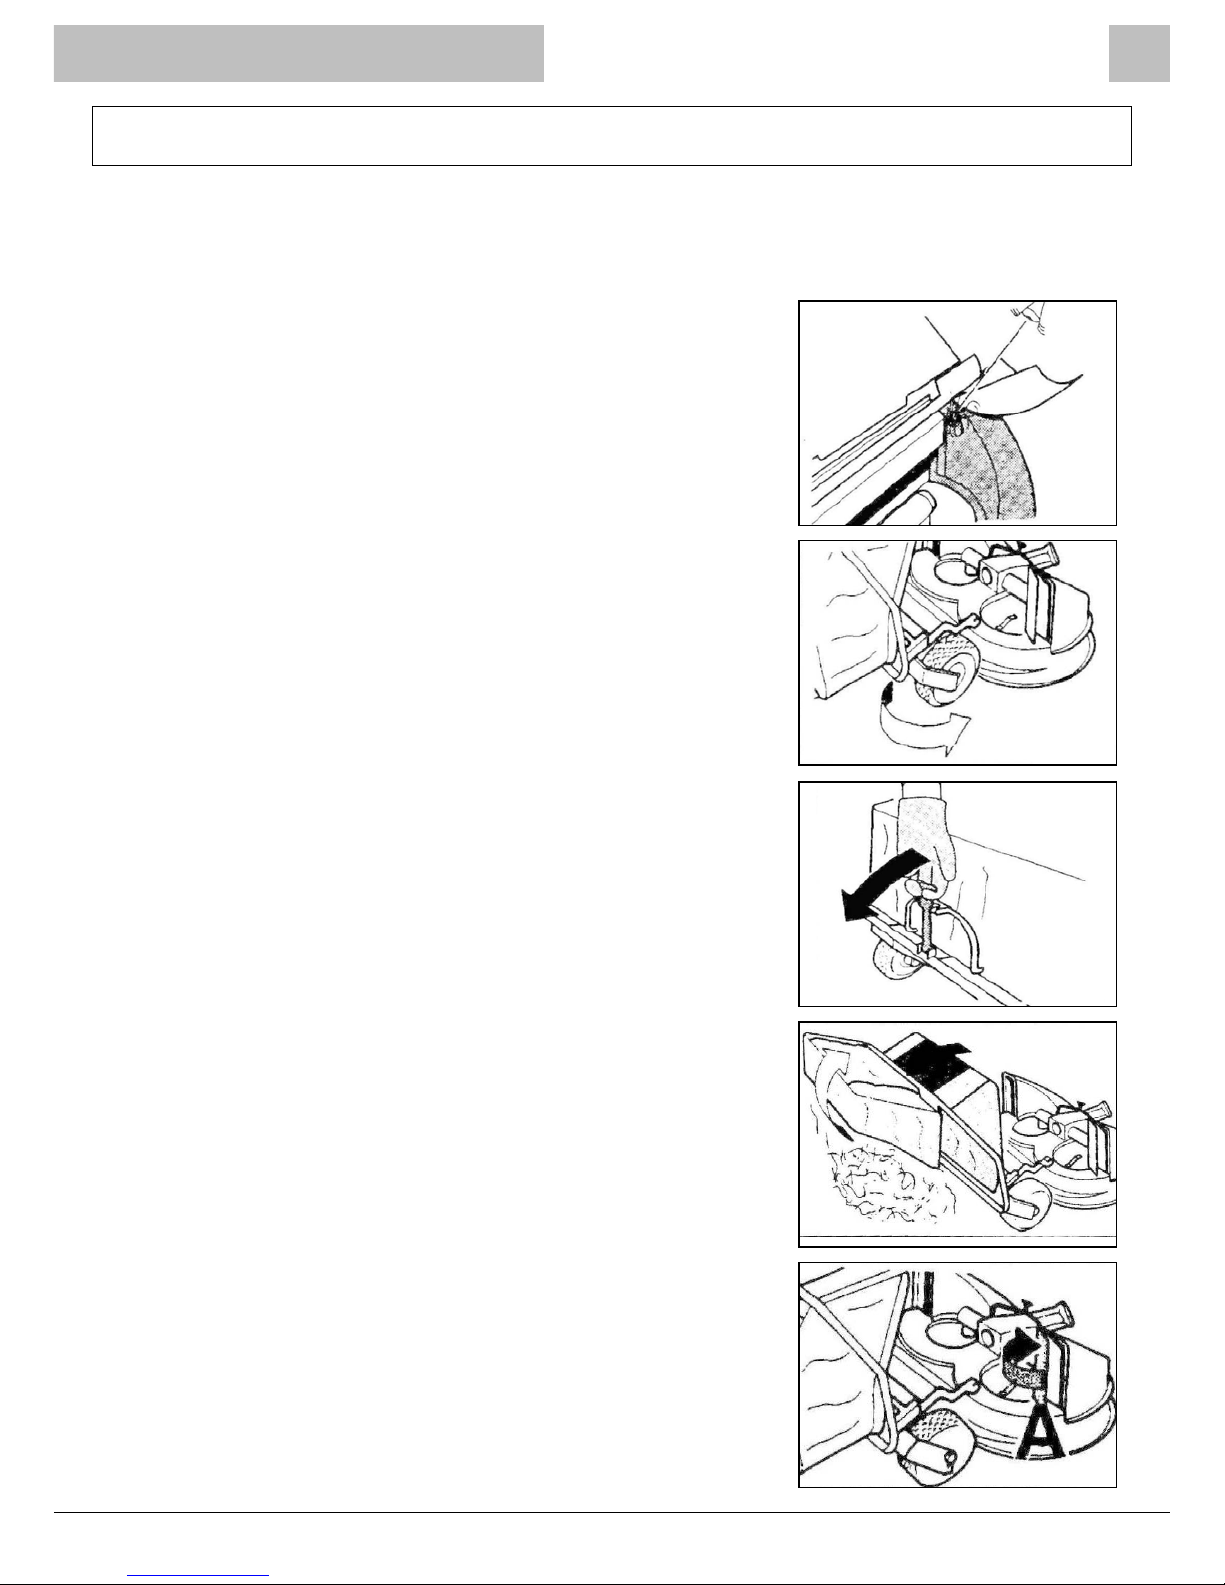
When using the mower deck with the collection bag, the bag is
full when the grass exits from the right conveyor hole (g.4/6).
To empty the bag, it is necessary to point the wheels to the
inside (g.4/7).
Unhook the elastic handle (g.4/8).
Tip the bag up and open it (g.4/9).
To return to work, open the door [A] with the aim of hooking
on (g.4/10).
Fig 4/6
Fig 4/7
Fig 4/8
Fig 4/9
Fig 4/10
Page 8
BCS 100cm Rotary Mower Attachment
Page 8 TWT/100RM/0617
Operation
Raise the deector [2] while re-lowering the basket (g.4/11).
Hook the elastic handle on again (g.4/12).
Using the mower without the collection bag
Should you wish to use the mower without the grass bag, it is
necessary to detach the bag.
This operation should be carried out using work gloves (g.4/13)
and with the engine switched off.
Unhook the two plugs (g.4/14).
Raise the bag (g.4/15).
Remove the plugs and take the bag away (g.4/16); lower the
stopping hook [B] from the left door [A] (g.4/17).
The grass will be ejected at the right-hand side (g.4/18).
Fig 4/11
Fig 4/12
Fig 4/13
Fig 4/15
Fig 4/18
Fig 4/14
Fig 4/17Fig 4/16
Page 9
BCS 100cm Rotary Mower Attachment
TWT/100RM/0617 Page 9
Maintenance
Maintenance of the mower deck
Every hour, or if an obstacle has been struck during operation, do the following:
1. Stop the engine and remove the spark plug cap. Check engine oil level (recommended
oil SAE 10w/40).
2. Check the blades, making sure they show no signs of cracking, wear, and are properly
sharpened. Do not continue operation if the blades are not sharp.
3. Replace damaged or worn blades.
4. Remove foreign objects such as wires, grass, paper, etc. from the blades and blade
holding rotors.
5. Replace the spark plug cap.
Every 8 work hours:
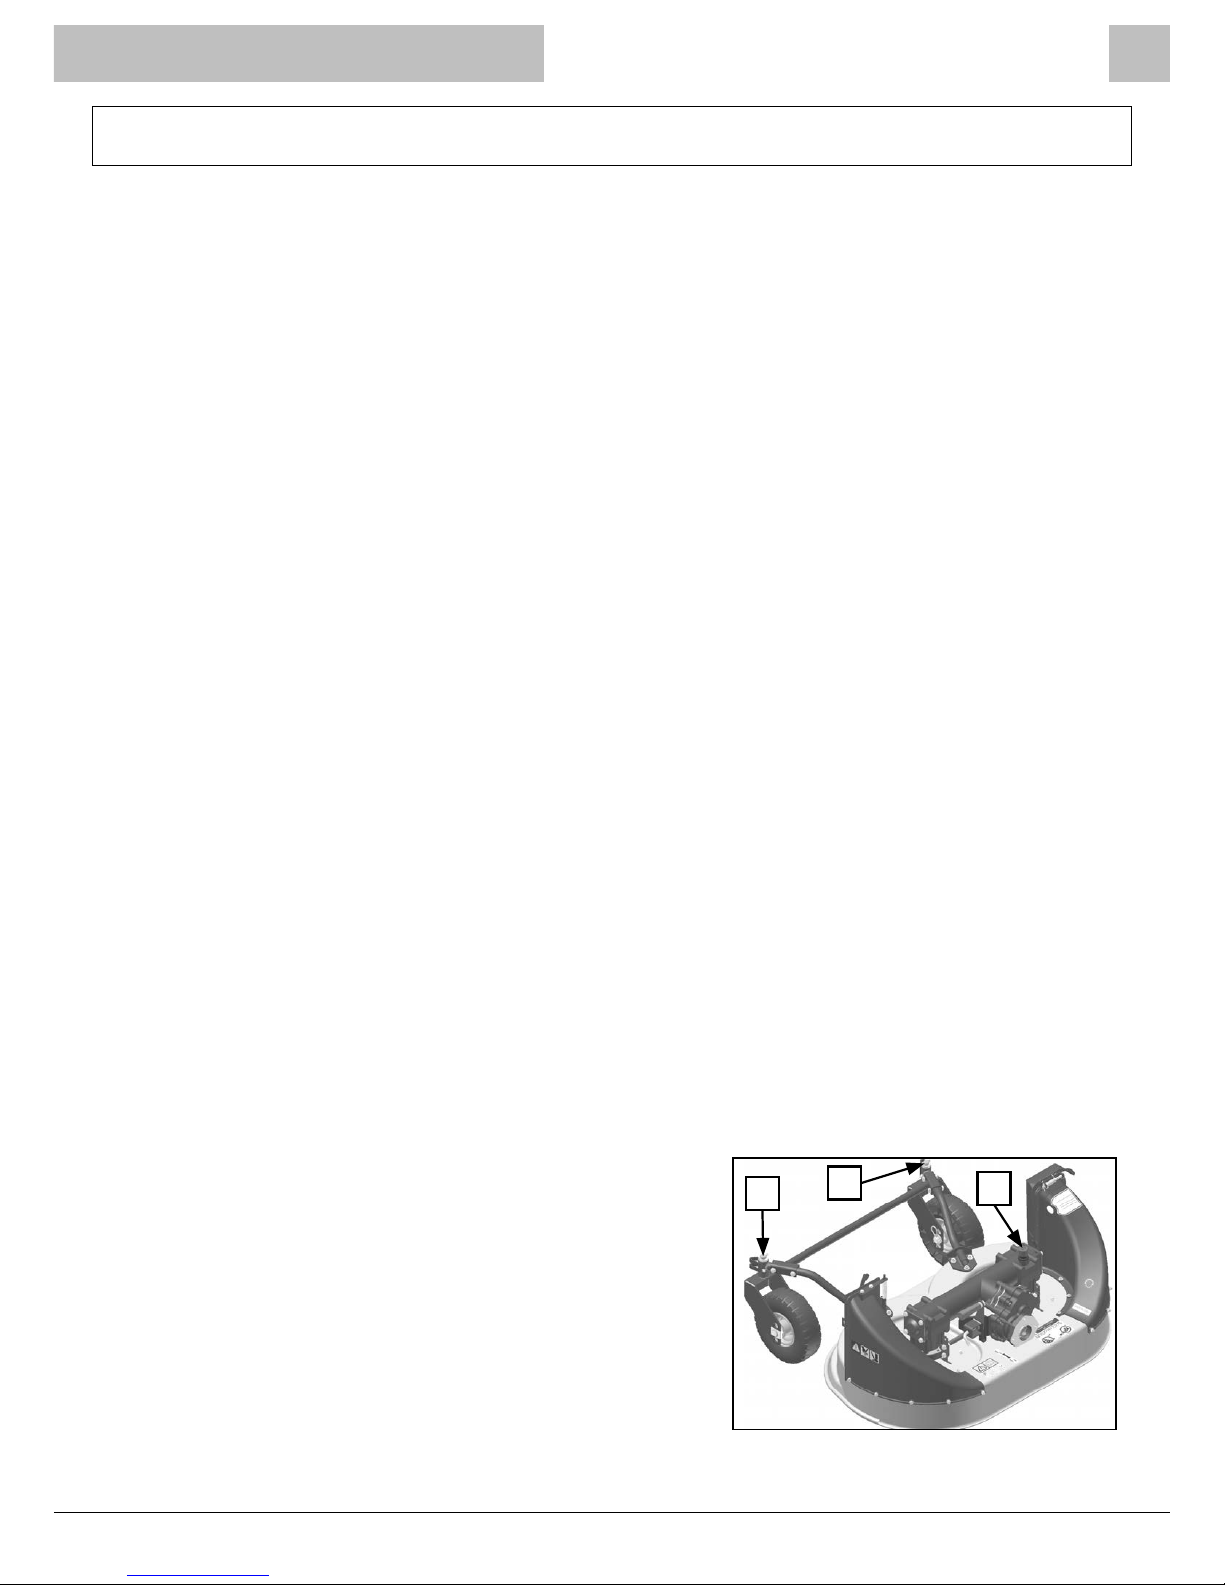
1. Lubricate the wheel forks [A] (g.5/1).
2. Check the gearbox oil level, lling if necessary with BCS PowerLube W7 SAE 80W/90
(API GL-5) by the plug [M] (g.5/1).
Every 25 work hours:
1. Check that all bolts are properly tightened.
2. During operation, vibrations can cause loosening of the bolts. Periodically check that
they are properly tightened, using the correct torque wrench.
First 250 work hours:
Change the oil in the gearbox; to drain the oil turn the mowing deck upside down and allow
the oil to drain from the level cap [M] (g.5/1). The capacity of oil is 1,2 kg.
Every 1,000 work hours:
1. Change the oil in the gearbox.
Maintenance of the blades
WARNING: handling of the blades is dangerous;
use safety gloves and proceed with caution when
disassembly or assembly of the blades is required.
If it becomes necessary to sharpen or replace the blades
pay attention when re-assembling as there are blades
which are right and left; the cutting edge must always
face the ground and check manually that they rotate in
the right direction.
Fig 5/1
A
A
M
Page 10
BCS 100cm Rotary Mower Attachment
Page 10 TWT/100RM/0617
Maintenance Guide
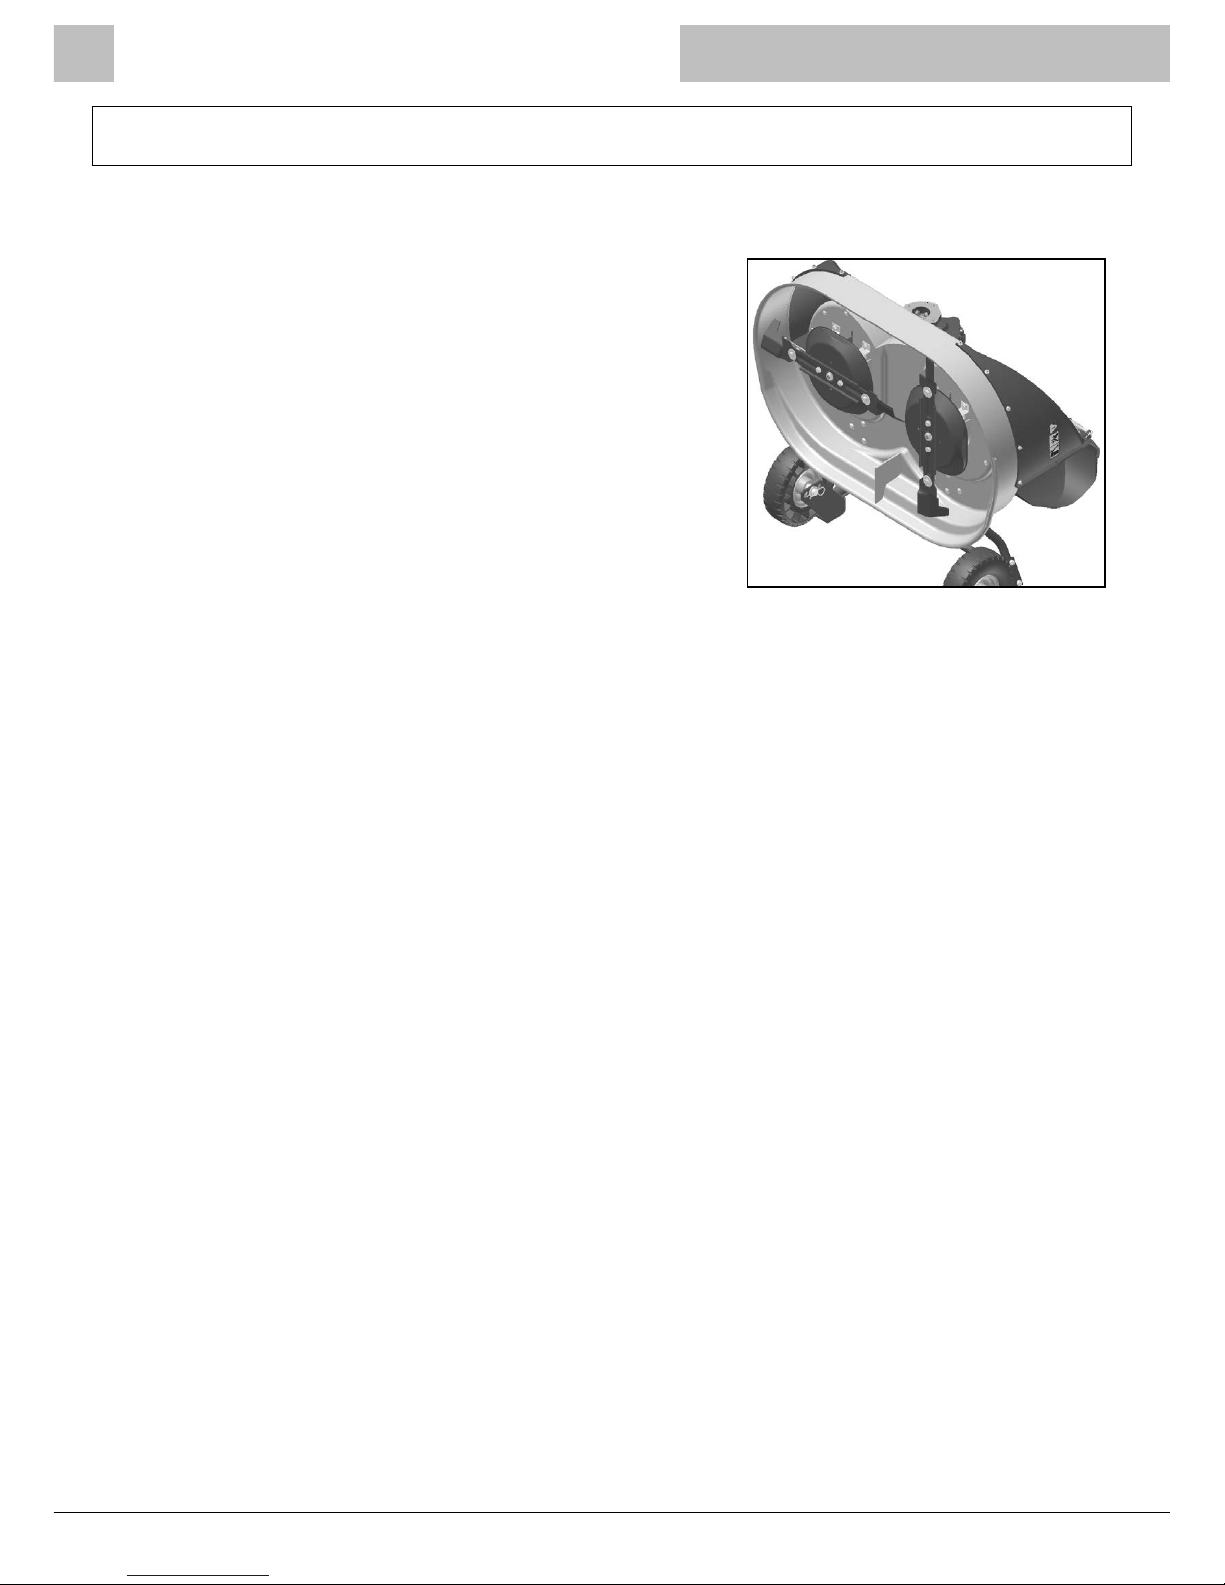
Cutter block discs
The cutter block discs are designed to reduce damage
to a minimum, in the case of light contact, thanks to
the disappearing blades. In case of contact, check for
deformations on the discs, make sure the blade housings
are in good condition. Replace any of these parts if
necessary.
When reassembling the disks, ensure that the blades on
one disk are displaced 90° compared to the blades on the
other disk.
Always check the self-locking nut M10 and replace it,
tightening properly.
For engine maintenance please refer to engine manufacturers manual.
Like all cutting machines, the mower must be kept in good condition in order to perform to its
best ability.
NOTE: Always remove the mower attachment from the main power unit before working on the
deck.
Never try to straighten a bent blade - always replace it.
Clean the underside of the deck periodically to prevent a build-up of dirt and grass on the
surfaces.
Lubricate the wheels and swivel brackets periodically.
Do not turn the machine on its side for cleaning.
Fig 5/2
Page 11

BCS 100cm Rotary Mower Attachment
TWT/100RM/0617 Page 11
Manufacturer Information
This machine is manufactured in Italy by BCS S.p.A.
Tracmaster Ltd is the UK distributor for this model, the BCS 100cm Rotary Mower.
BCS S.p.A. has been at the forefront of developing cutting edge agricultural machinery since its
formation in 1943, when their founder developed a self-propelled motor mower. Tracmaster Ltd
has been the UK distributor for BCS pedestrian equipment since 1984.
Please ensure you read the original manufacturer’s manual before operating this machine.
BCS S.p.A.
V.le Mazzini, 161
20081 Abbiategrasso (MI)
Italy
Tel: +39 02 9482 1
Fax: +39 02 9496 0800
Email: [email protected]
Website: www.bcsagri.it
Page 12

© Tracmaster Ltd 2017.
Specications are subject to change without prior notice.
Tracmaster Ltd, Sovereign Centre, Victoria Road, Burgess Hill RH15 9LR
T: +44 (0) 1444 247689 F: +44 (0) 1444 871612
W: www.tracmaster.co.uk E: [email protected]
TWT/100RM/0617
 Loading...