

Trackito Technology Trackito User Manual

User manual
Ʒ&31")0(Ư*+2û)
+2)!"202/&,
+2")!҂21&)&01&,+
Ξϻϰ϶Ϧ϶ϨϹϺϦ϶
Ϸ϶ϳЄϭ϶ϦϤϺϩϳЇ
"+217"/%+!2 %
smart
alarm&
gp
s
tracker

2
Technical Specifi cations
Package contents:
• Trackito device
• MicroUSB cable (1 m)
• Manual
• Safety information
• Card with pairing code (Trackito ID)
• Activation card (Activation Code)
• Tool for pushing the button
Applied Technologies
The Trackito contains a global data SIM card, a motion
sensor, a GPS sensor, a Li-Ion power pack with a capacity
of 2200 mAh and nominal voltage of 3.7 V.
Charging and Permanent Power Supply
The device charges using a microUSB cable (included)
that can be connected to a computer or a 5 V mains
charger.
Once the device starts charging, the LED indicator glows
red. When the battery is fully charged, the LED indicator
turns green. Information on the battery charge level is
available in the mobile application.
Trackito can be permanently connected to a 6–30 V
power supply using the terminal board in the face

3
side of the unit. Use a maximum 3-meter cable to
connect it. The screws of the terminal board are located
underneath the lid next to the plastic Trackito logo in
the top cover. Remove the lid to access the screws. Only
qualifi ed personnel should connect the external power
supply.
Supported Platforms
The device can be controlled by its smartphone application or via the web interface at www.trackito.com. List of
supported systems:
• Android 4.0.4 or higher
• iOS 7 or higher
• Internet browser (Firefox, Chrome, Opera, Safari,
IE, Edge)
All devices require access to the Internet.
Operating Conditions
The device is designed for operation in temperatures
ranging from -10 to 60 °C. The temperature range for
charging the battery is 0 to 40 °C. If the current temperature is outside this range, the Trackito disconnects from
charging to prevent battery damage.
Note: Extreme temperatures reduce the battery
capacity.
Trackito must be within the reach of a GSM network; it
must not be blocked from the GPS signal to obtain good
positional reading.
EN
4
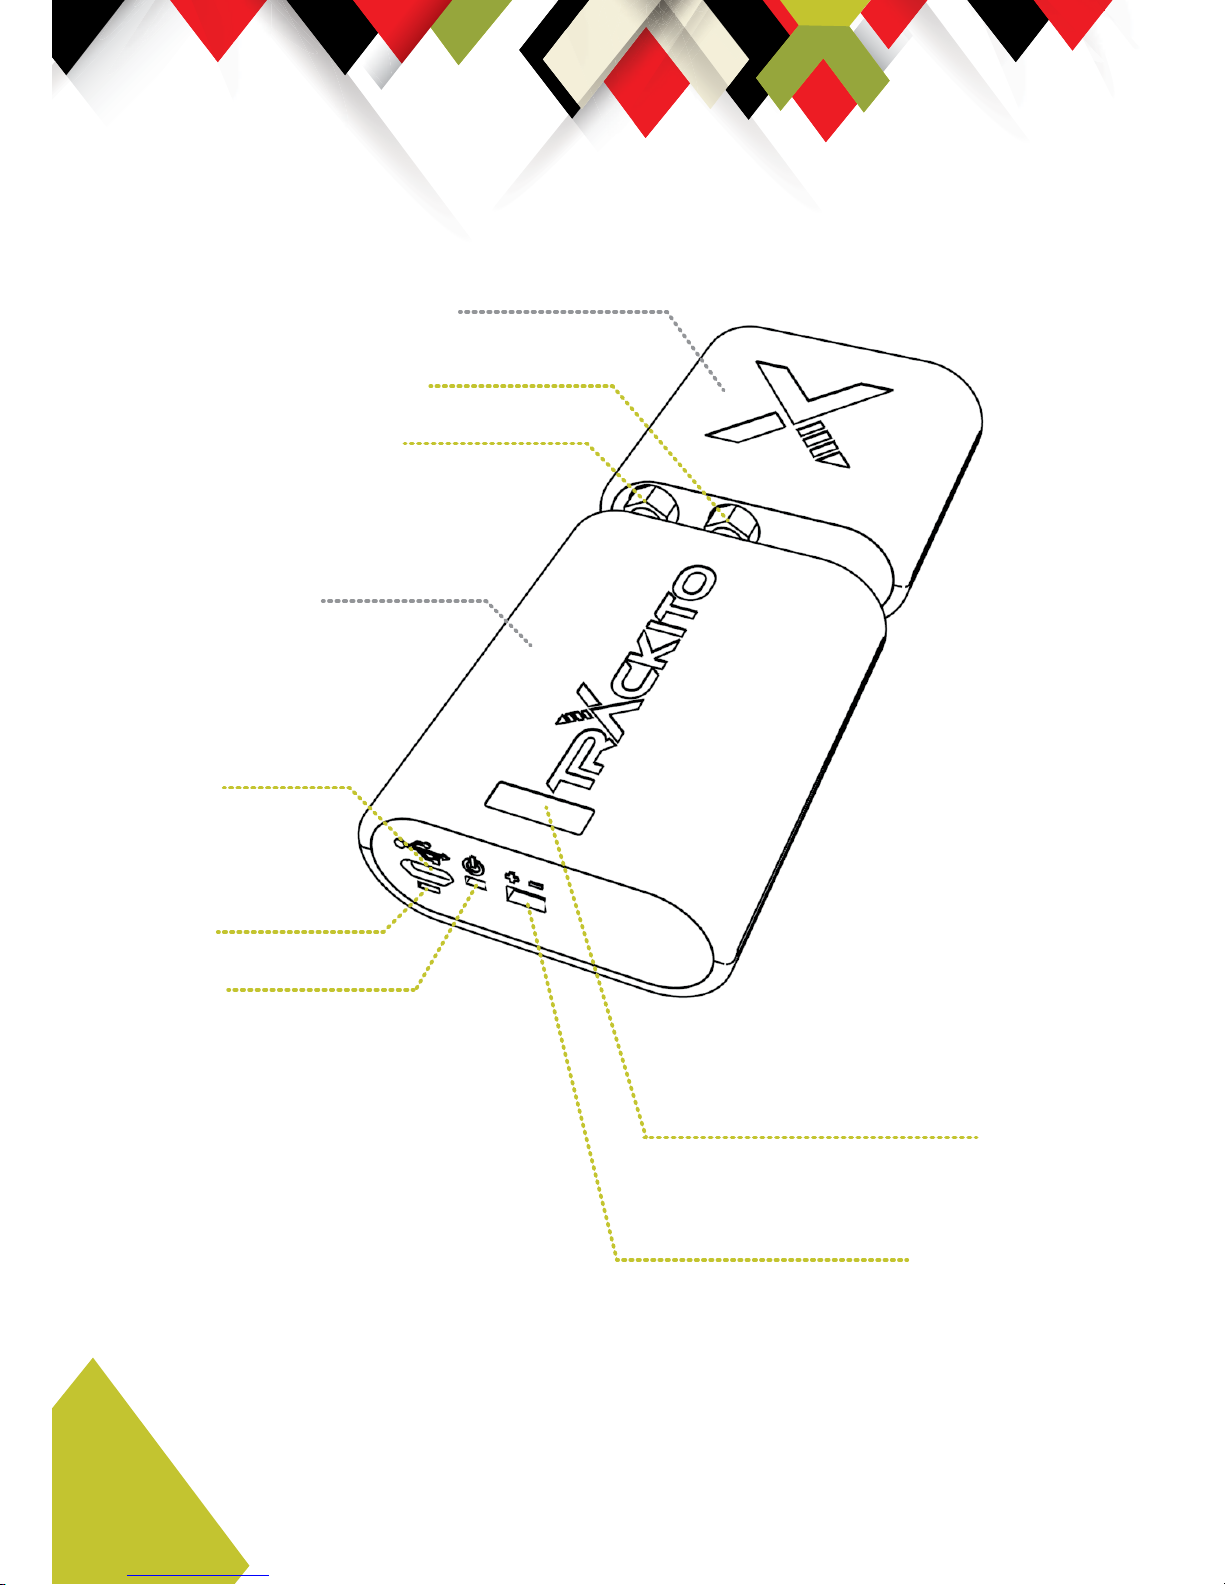
Dimensions and description of each item
Antenna module
GPS connector
GSM connector
Main module
MicroUSB
charging
connector
LED indicator
Control button
Terminal board for
external power supply
Openings for access
to the terminal board
screws for external power
If necessary, the antenna module can be removed and
installed elsewhere or replaced by other antennas (GSM
and GPS).

5
Getting Started with Trackito
The Trackito battery might not be fully charged when
unboxed. It is recommended that you charge the
battery immediately. When connected to the charger,
the Trackito powers on automatically.
Downloading the application
It is recommended that the device be controlled
via the application which you need to install in your
phone. There are several methods for installing the
application:
1. Open the App Store / Google Play application in
your phone and fi nd “Trackito”.
2. Scan the QR code on the Trackito box or visit
the www.trackito.com/app website. Choose your
phone’s operating system (if you are accessing
the website from your phone, the system will be
detected automatically). You will be forwarded
to the detail site of the Trackito application at
Google Play / App Store where you can install
the app.
Registration and Pairing
Run the Trackito application in your phone (or use
www.trackito.com/register), create an account and
complete the registration procedure. Then choose Add
Module and follow the instructions of the wizard.
EN

6
Recommended Position
The GPS antenna in the antenna module is directional,
oriented towards the upper cover with the pressed
logo. For good reception of the GPS signal, please
make sure there are no metal objects over the upper
cover which could block the signal. Position the
Trackito so that the upper cover is pointed upwards,
if possible.
Place the unit in a hidden, dry and clean place.
How Trackito Works
Trackito operates as a silent alarm with a GPS sensor.
Should an object protected with Trackito be stolen, you
will be notifi ed and you can track its current position.
You can lock and unlock the device in the application.
If the Trackito is locked and senses movement, the
application in your phone signals an alarm. It is in that
moment the Trackito starts sending information about
its position. Now you can start the Tracking mode,
which allows you to see the current position of the
Trackito. Information on the Trackito position is stored
from the initial moment of the alarm being raised; the
data can be displayed at any time thereafter. However,
switching the alarm off without starting the Tracking
mode deletes the recorded positions. The Alarm and
Tracking modes permanently enable the GPS: this
leads to much shorter battery life and higher data
traffi c. Therefore, do not allow the Trackito to function
in the alarm mode for too long if you know it is a false

7
alarm. The battery life in the Tracking or Alarm mode
amounts to several days provided the battery is fully
charged.
Trackito is designed for maximum battery saving
during real operation. If you test Trackito outside real
operation, it may happen that it will not behave exactly
as you wish. Should this be the case, please wait
before another action (i.e. moving the device) for 15
seconds at least.
Power On/O•
Power the device on by pressing and holding the
control button for no less than 5 seconds. The green
LED indicator • ashes when the device has powered on.
Power the device o• by pressing and holding the
control button for no less than 5 seconds. The device
must be unlocked. The red LED indicator • ashes when
the device has powered o• .
The process of powering on or o• continues for
approximately 30 seconds after the LED indicator
has • ashed. Therefore, wait for at least 30 seconds
between powering on and o• .
EN
8
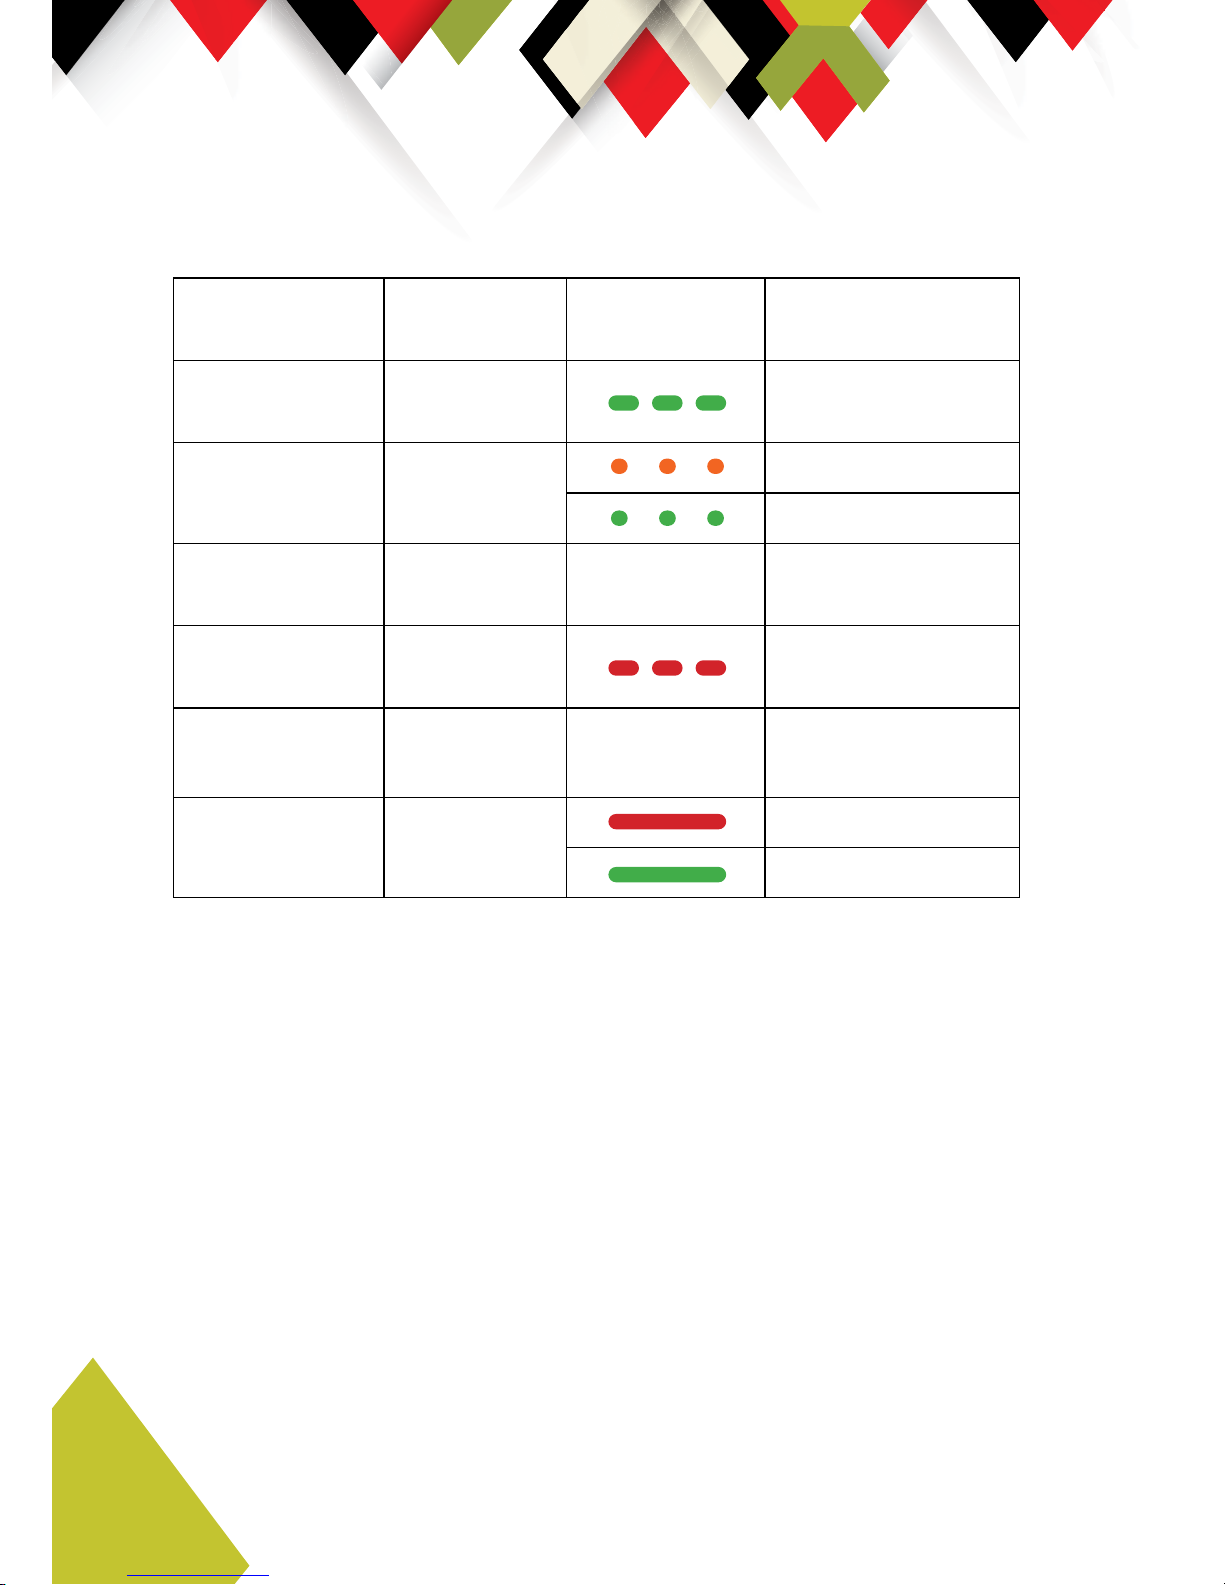
Button Functions and LED Indicator
Action
Press the
button for
LED status Note
Switching the
Trackito on
5-20 s
Turning on the
service mode
1 s
Connecting ...
Service mode active
Turning off the
service mode
1 s
Switching
Trackito off
5-20 s
Device must be
unlocked
Reset >90 s
Only in case of
device failure
Charging
Charging
Charged
Connections and Charges
Trackito can be used in all EU countries, Switzerland,
Norway, the USA and Russia. The device contains a builtin data SIM card. Proper operation of Trackito requires
an active data plan. The Basic Operation plan is included
in the price of the product. The plan includes Internet
connection of the Trackito to the Internet, operation of
our servers and communication with your Trackito application. Data plans for further periods can be purchased
via the Internet interface (www.trackito.com).

9
Základní parametry
Obsah balení:
• Za!ízení Trackito
• MicroUSB kabel (1m)
• Manuál
• Bezpe"nostní informace
• Karta s párovacím kódem (Trackito ID)
• Aktiva"ní karta (Activation Code)
• Pom#cka pro sepnutí tla"ítka
Použité technologie
Trackito obsahuje globální datovou SIM kartu, pohybový
senzor, GPS senzor, Li-Ion baterii o kapacit$ 2200 mAh
o nominálním nap$tí 3,7 V.
Nabíjení a trvalé napájení
Za!ízení se nabíjí pomocí p!iloženého microUSB kabelu,
který lze p!ipojit do PC nebo sí%ového adaptéru o nap$tí
5 V.
Nabíjení je signalizováno svícením "ervené LED diody na
za!ízení. Jakmile je baterie nabitá, LED dioda se rozsvítí
zelen$. Informace o úrovni nabití baterie je dostupná
v mobilní aplikaci.
Trackito je možné trvale p!ipojit k externímu zdroji o nap$tí 6–30 V p!es svorkovnici vyvedenou na "elní stranu
Trackita. K p!ipojení použijte kabel o délce maximáln$
CZ

10
3 m. Utahovací šrouby svorkovnice jsou umíst•ny pod
štítkem, který se nachází vedle prolisovaného loga
Trackito v horním krytu. Pro p•ístup k nim je t•eba tento
štítek odstranit. Montáž externího napájení m•že provád•t pouze kvali• kovaná osoba.
Podporované platformy
Za•ízení lze ovládat pomocí aplikace pro chytré mobilní
telefony nebo pomocí webového rozhraní na adrese
www.trackito.com. Seznam podporovaných systém•:
• Android verze 4.0.4 a vyšší
• iOS verze 7 a vyšší
• Internetový prohlíže! (Firefox, Chrome, Opera,
Safari, IE, Edge)
U všech za•ízení je vyžadováno p•ipojení k Internetu
Provozní podmínky
Za•ízení je zkonstruované k provozu v rozsahu teplot
-10 až 60 °C. Teplota pro nabíjení baterie je 0 až 40 °C.
Pokud není teplota v tomto rozsahu, Trackito nabíjení
odpojí, aby zabránilo poškození baterie.
Upozorn•ní: p•i extrémních teplotách dochází ke snižování kapacity baterie.
Trackito musí být v dosahu sít• GSM a pro správné ur!ení polohy nesmí být odstín•né od signálu GPS.
11
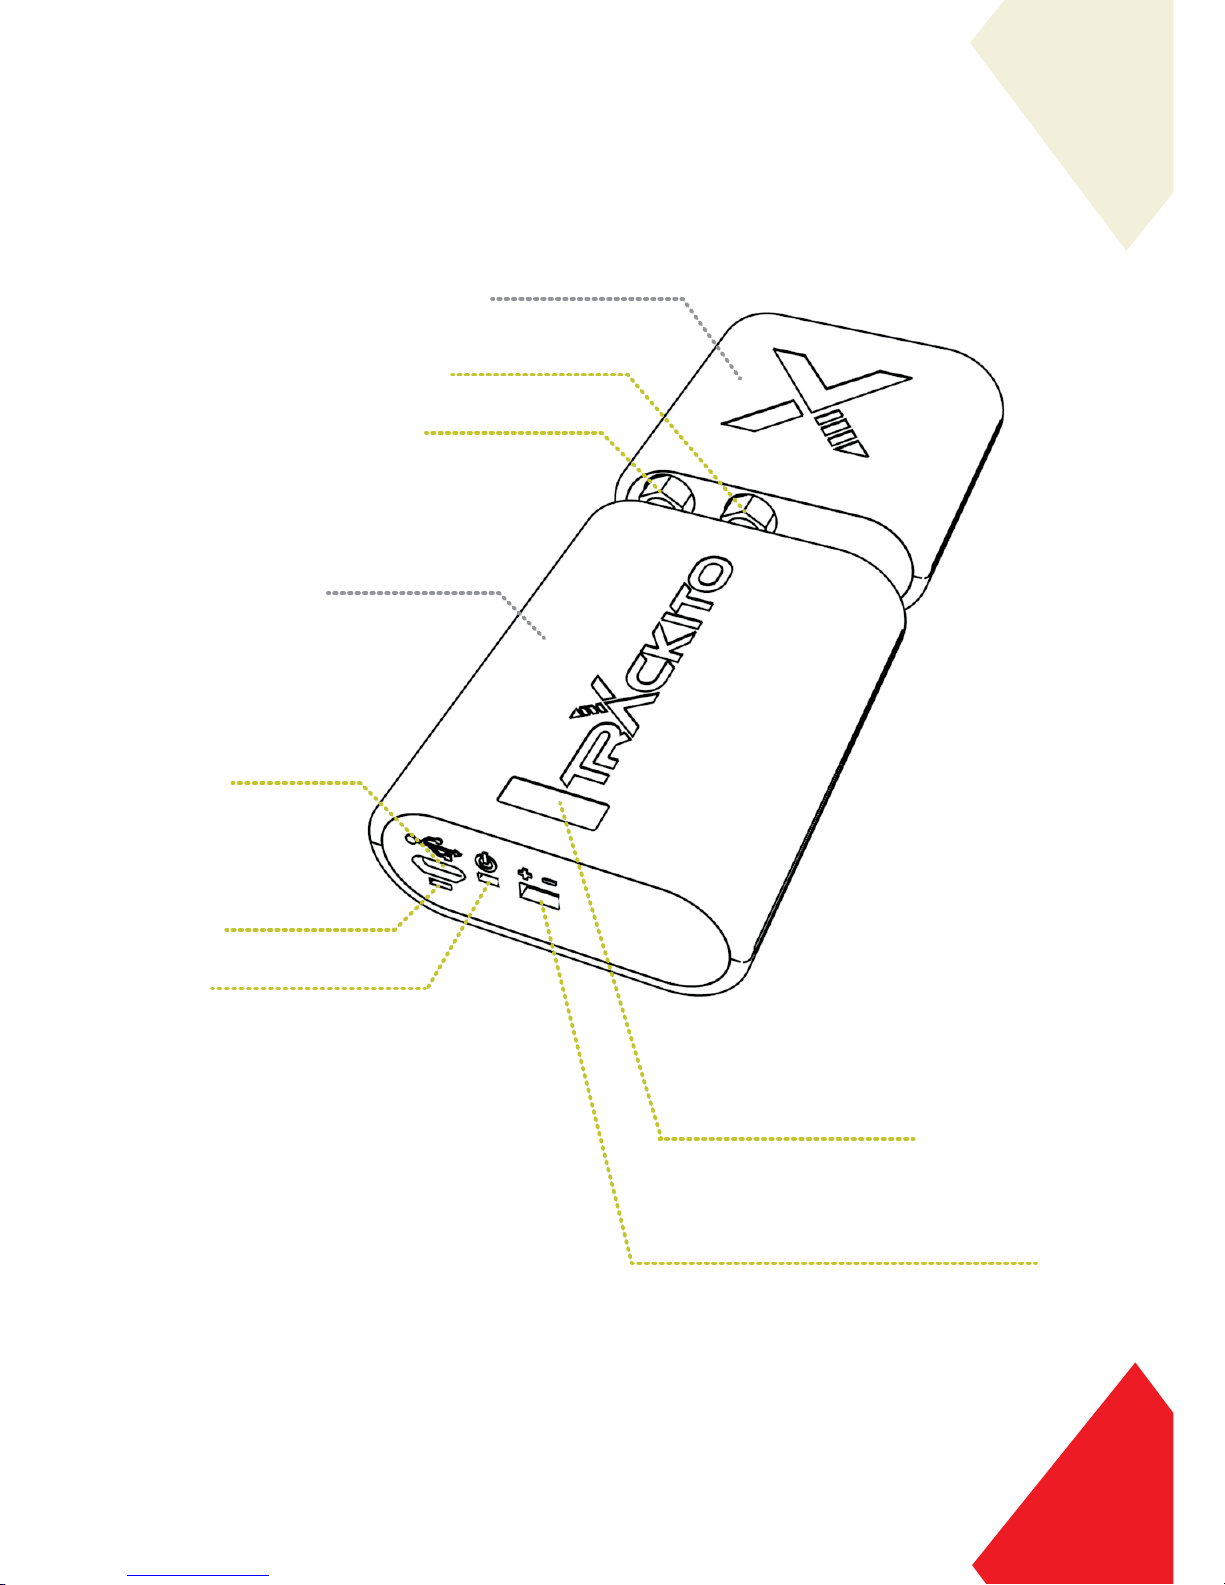
Rozm•ry a popis prvk•
Anténní modul
GPS konektor
GSM konektor
Hlavní modul
Napájecí
konektor
microUSB
+!&(Ę+ľ
LED dioda
3)û! ľ1)Ęľ1(,
Svorkovnice externího napájení
/,)&06-/,-ſľ012-
("Ɔ/,2ƚ*03,/(,3+& "
externího napájení
V p!ípad• pot!eby lze anténní modul odd•lit a vyvést na
jiné místo, p!ípadn• nahradit vlastními anténami (GSM
a GPS).
CZ

12
Začínáme používat Trackito
Baterie Trackita nemusí být po vybalení z krabi•ky pln•
nabitá. Proto doporu•ujeme, abyste si Trackito ihned
dobili. P•i p•ipojení do nabíje•ky se Trackito samo zapne.
Stažení aplikace
Za•ízení doporu•ujeme ovládat pomocí aplikace Trackito, kterou je nutné nainstalovat do vašeho mobilního
telefonu. Aplikaci lze nainstalovat n•kolika zp•soby:
1. V mobilním telefonu spus•te aplikaci App Store /
Google Play a vyhledejte “trackito”
2. Na•t•te QR kód, který se nachází na obalu Trackita, nebo navštivte stránku www.trackito.com/app.
Zvolte opera•ní systém vašeho telefonu (pokud
na stránku p•istupujete z mobilního telefonu, opera•ní systém bude zvolen automaticky). Následn•
budete p•esm•rováni na detail aplikace Trackito
v Google Play / AppStore, odkud je aplikaci možné
nainstalovat
Registrace a spárování
V mobilním telefonu spus•te aplikaci Trackito (nebo
využijte stránku www.trackito.com/register), vytvo•te si
ú•et a dokon•ete registraci. Poté zvolte p•idat modul
a postupujte podle pr•vodce.

13
Doporu•ené umíst•ní
GPS anténa v anténním modulu je sm•rová, orientovaná
sm•rem k hornímu krytu, na kterém je prolisované logo.
Pro dobrý p•íjem GPS signálu dbejte, aby nad horním
krytem bylo co nejmén• kovových p•ekážek, které by
mohly signál stínit. Trackito umis•ujte tak, aby horní kryt
pokud možno mí•il vzh•ru.
Trackito umíst•te na skryté, suché a •isté místo.
Jak Trackito funguje
Trackito funguje jako tichý alarm s GPS senzorem. Pokud
je vám p•edm•t chrán•ný Trackitem odcizen, budete na
to upozorn•ni a m•žete sledovat jeho aktuální polohu.
V aplikaci je možné za•ízení zamykat a odemykat. Pokud
je Trackito zamknuté a dojde k jeho pohybu, aplikace
ve vašem mobilním telefonu vyvolá alarm. V tomto
okamžiku Trackito za•ne zasílat informace o své poloze.
V tuto chvíli m•žete zapnout Sledování, p•i kterém vidíte
aktuální polohu Trackita. Informace o polohách Trackita
se ukládají, a to již od prvního okamžiku, kdy byl vyvolán
alarm a lze je tak pozd•ji kdykoliv zobrazit. Pokud však
alarm deaktivujete, aniž byste zapnuli Sledování, zjišt•né
polohy se vymažou. P•i Alarmu a p•i Sledování je trvale
zapnutá GPS - výdrž baterie rapidn• klesá a nar•stá
datová spot•eba. Nenechávejte proto Trackito v alarmu
p•íliš dlouho, pokud víte, že se jedná o planý poplach.
Vydrž baterie p•i Sledování •i p•i alarmu se p•i pln•
nabité baterii pohybuje v •ádu dní.
Trackito je navrženo pro maximální úsporu baterie p•i
reálném použití. Pokud budete Trackito testovat mimo
reálný provoz, m•že se tak stát, že se nebude chovat
p•esn• podle Vašich p•edstav. Pokud se tak stane,
vy•kejte mezi jednotlivými úkony (nap•. zm•na pohybu
za•ízení) alespo• 15 s.
CZ
14
Zapnutí / Vypnutí
Zapnutí za•ízení provedete stiskem ovládacího tla•ítka
po dobu minimáln• 5 s. Zapnutí je signalizováno blikáním zelené LED diody.
Vypnutí za•ízení provedete stiskem ovládacího tla•ítka
po dobu minimáln• 5 s. Za•ízení musí být odemknuto.
Vypnutí je signalizováno blikáním •ervené LED diody.
Proces zapnutí nebo vypnutí za•ízení probíhá ješt•
zhruba 30 s po sv•telné signalizaci. Mezi zapnutím
a vypnutím tedy vy•kejte alespo• 30 s.
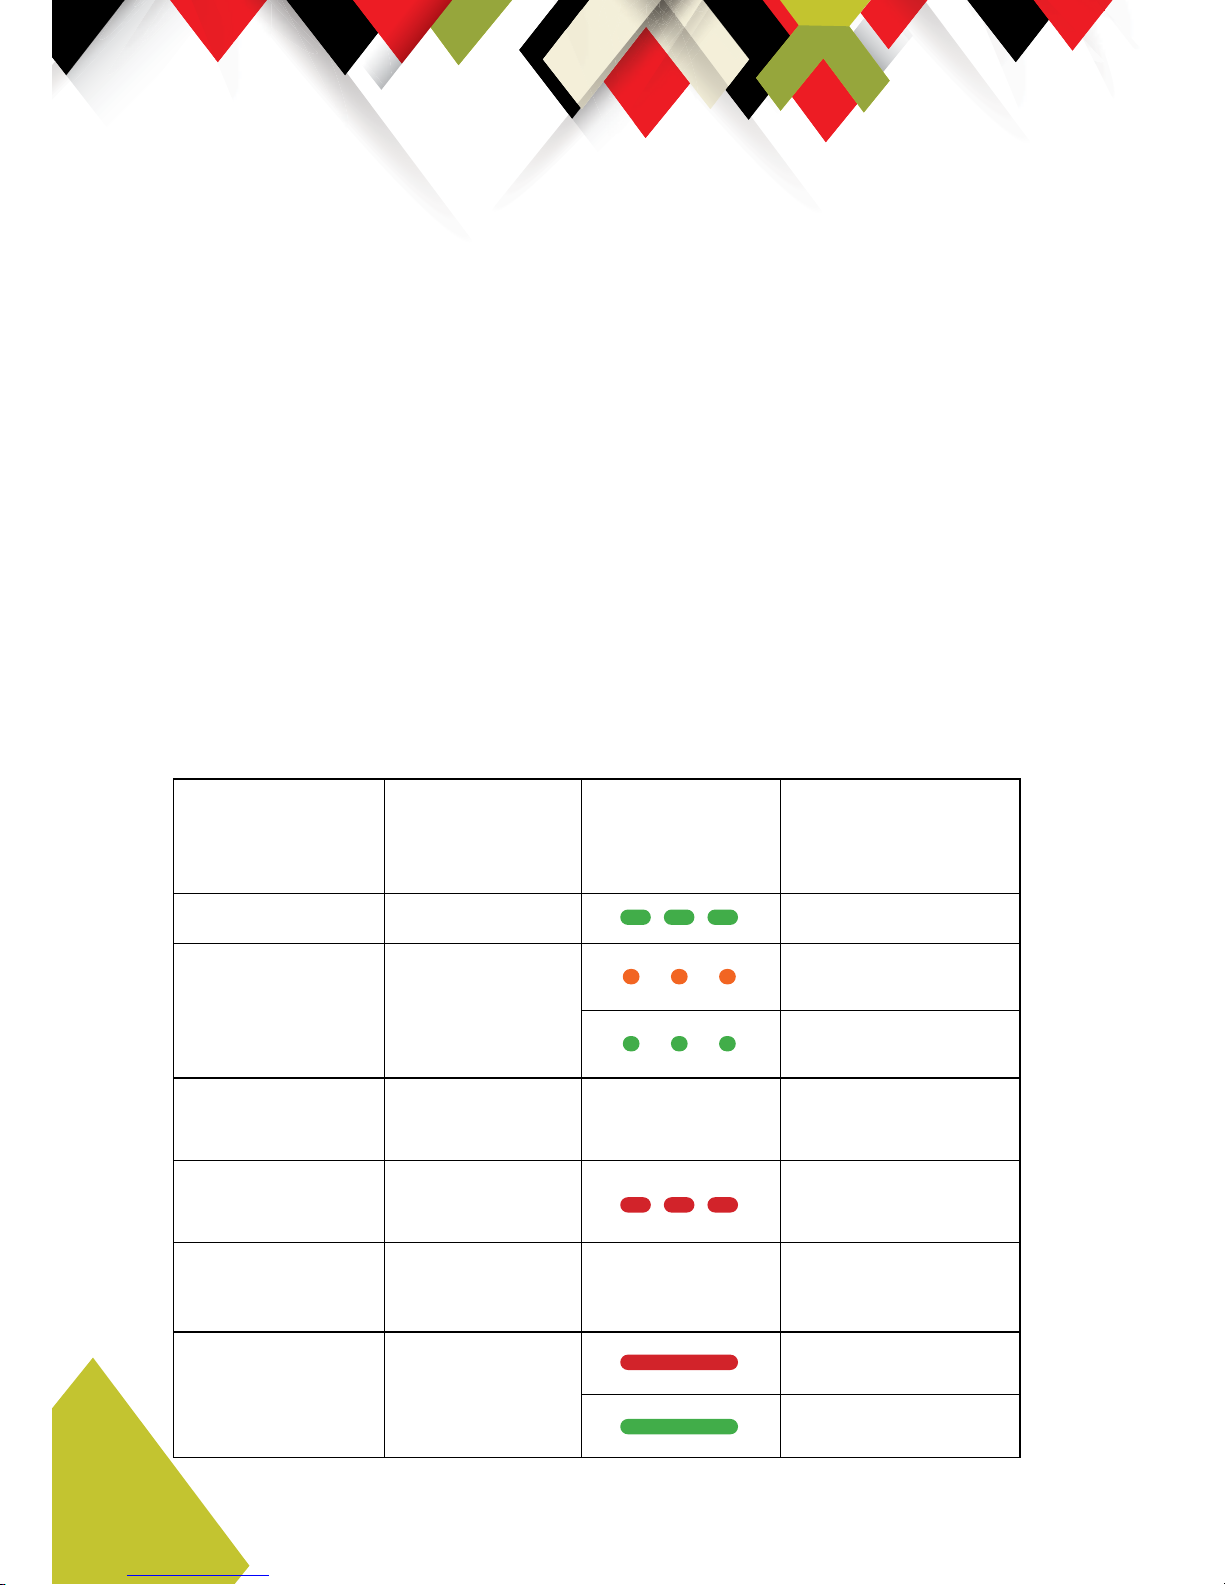
Funkce tla•ítka a indika•ní LED dioda
Akce
Stisknout
tlačítko na
dobu
Stav LED Poznámka
Zapnutí 5-20 s
Zapnutí servisního režimu
1 s
Připojování ...
Režim aktivní
Vypnutí servisního režimu
1 s
Vypnutí 5-20 s
Musí být odemknuto
Reset >90 s
Pouze v případě
poruchy zařízení
Nabíjení
Nabíjí se
Nabito
 Loading...