

Page 1
June 2015
TRACKIMO
UNIVERSAL TRACKER USER GUIDE
Page 2

User Guide v7
Table of Contents
1. GETTING STARTED ..................................................................................................... 2
1.1. UNPACKING YOUR DEVICE .................................................................................................... 2
1.2. CHARGING YOUR DEVICE FOR THE FIRST TIME ....................................................................... 3
1.3. SIGN UP & LOG IN ............................................................................................................... 4
1.4. ACTIVATING YOUR DEVICE .................................................................................................... 5
1.5. RESETTING YOUR PASSWORD ............................................................................................ 10
1.6. YOUR DEVICE LIGHTS AND SOUNDS ................................................................................... 11
2. TRACKIMO DASHBOARD ......................................................................................... 13
2.1. DASHBOARD OVERVIEW ..................................................................................................... 13
2.2. DEVICE LOCATION INFORMATION ........................................................................................ 16
2.3. UPDATE DEVICE LOCATION ................................................................................................ 18
2.4. DEVICE LOCATION FREQUENCY .......................................................................................... 19
2.5. DEVICE HISTORY ............................................................................................................... 20
2.6. DEVICE ALARMS AND SETTINGS ......................................................................................... 22
2.7. MANAGE SUBSCRIPTIONS ................................................................................................... 25
2.8. GEO FENCES ..................................................................................................................... 27
1
Page 3

User Guide v7
1. Getting Started
1.1. Unpacking your device
Carefully unpack your Trackimo device, your packaging should include:
• Battery
• Locking belt clip
• Adhesive Velcro
• Adhesive Magnet
• Water Resistant Sleeve
• USB Cable
• Screw Driver
• Keychain and Lanyard
The Quick-Start Guide and a Safety & Warranty booklet are also included.
• Use only approved accessories.
• Accessories may vary by country or region.
2
Page 4
User Guide v7
1.2. Charging your device for the first time
Your battery will not be installed or charged when you first unpack your device.
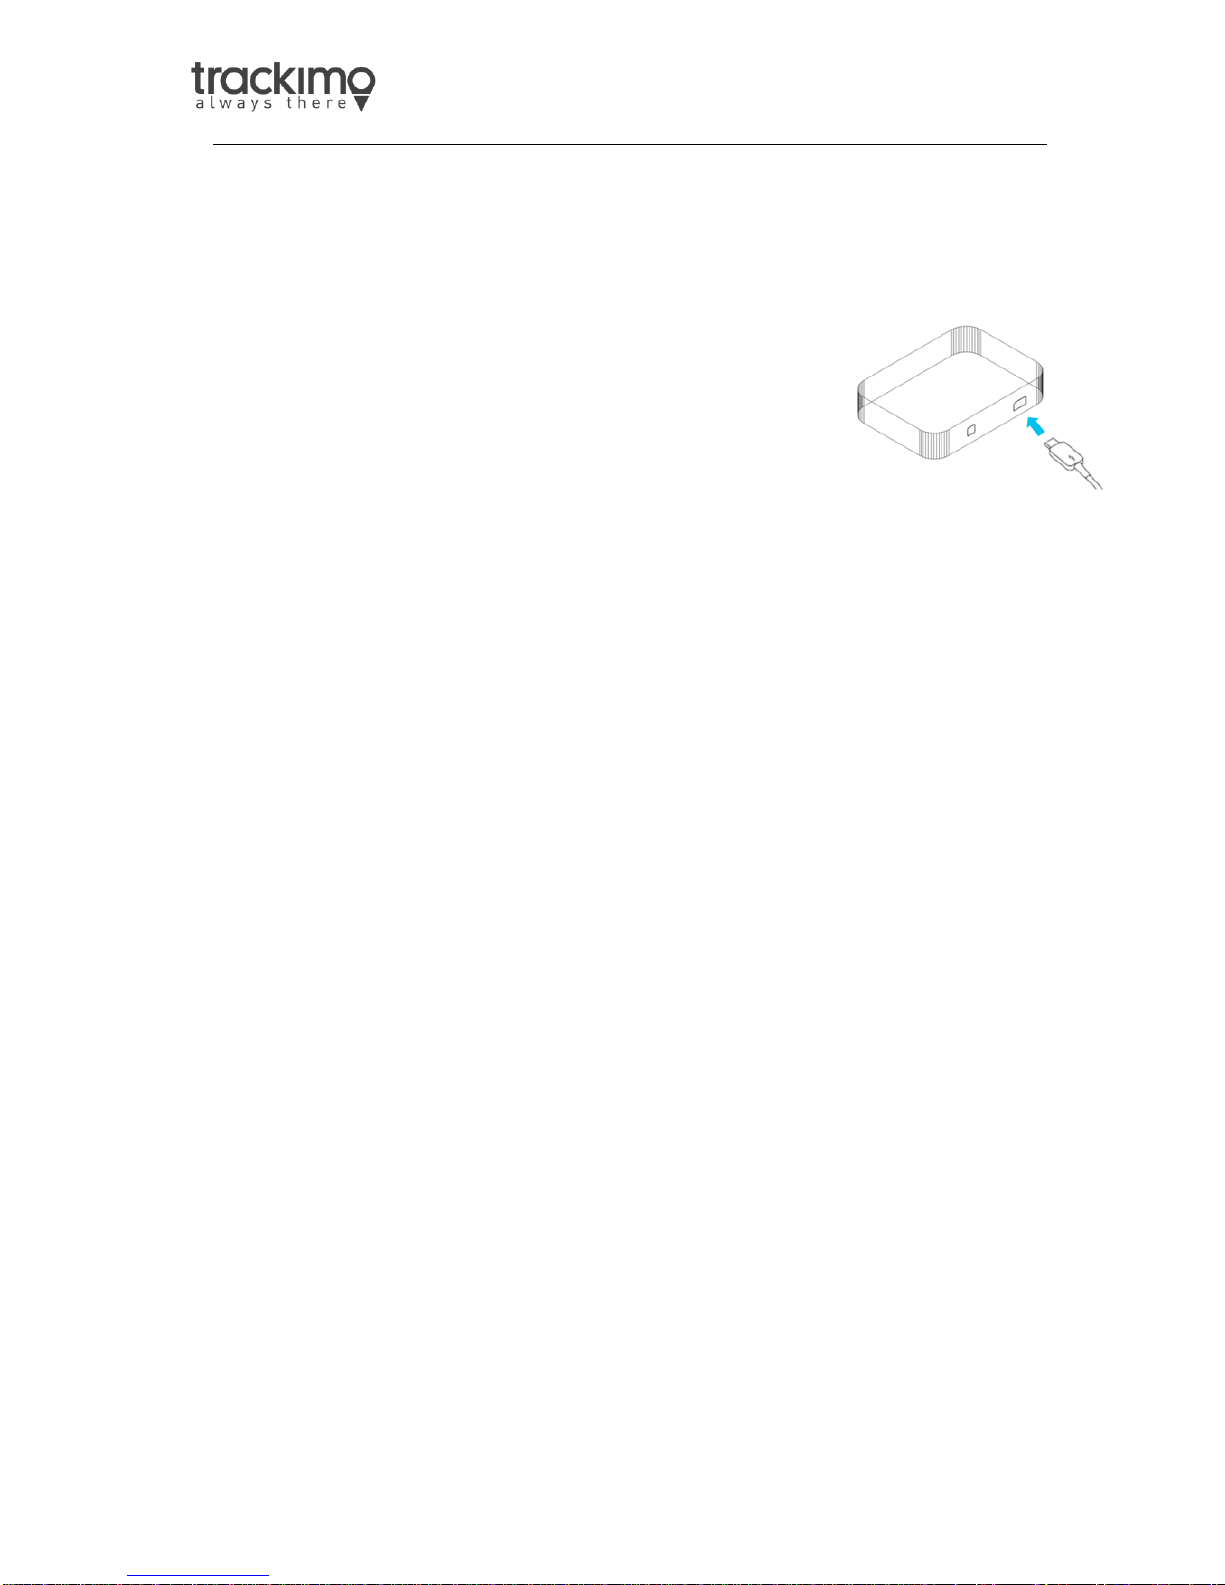
Install the battery by taking off the back cover and insert the battery.
To take off the back cover, slightly push it in the middle
and slide it out.
To charge, connect one end of the data cable to the
charger port at the bottom of the device, and the other
end to a power USB adaptor.
Then connect the USB adapter to a power outlet. Charge the device for 12 hours.
3
Page 5
User Guide v7
1.3. Sign Up & Log In
Before activating your device, you must sign up to the Trackimo website via your
computer or laptop, and create a Trackimo account. You will be asked to enter
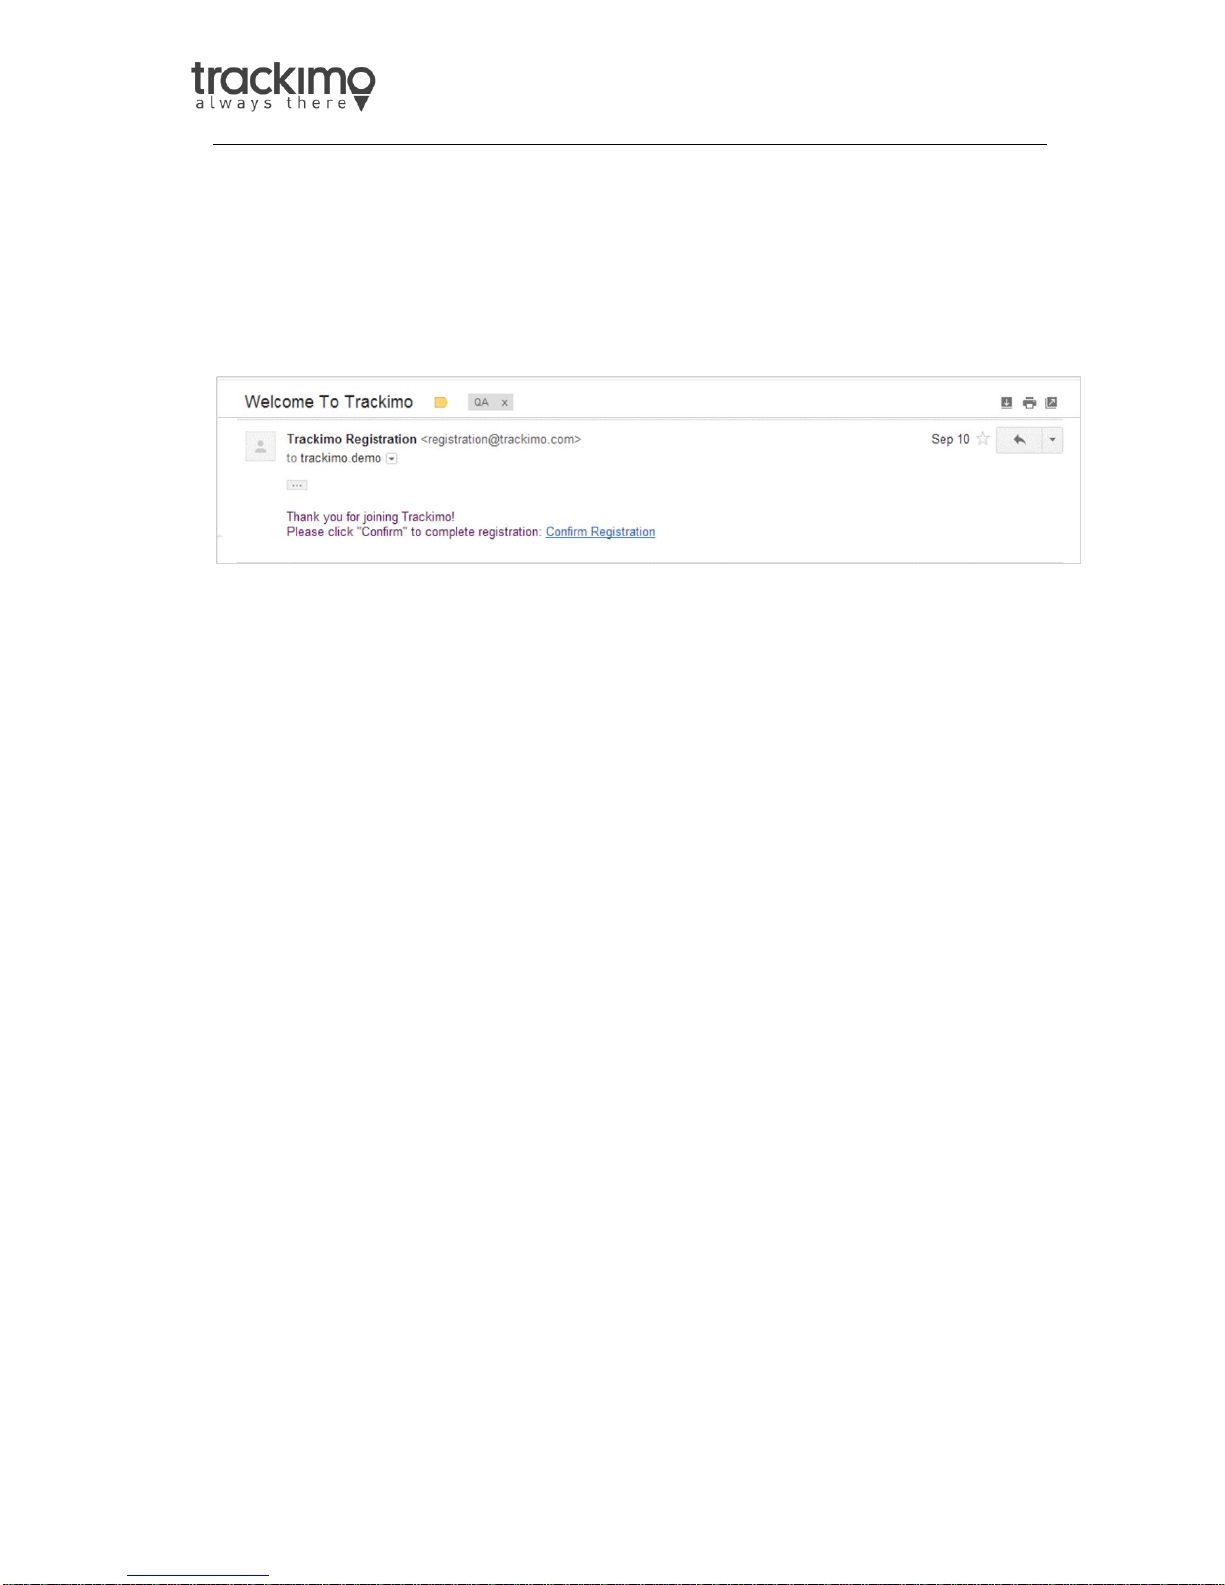
your email and choose a password. After registration is completed you will
receive a confirmation email where you will need to confirm the validity of your
email address.
From this point on you can login through the Trackimo and Activate your device.
IMPORTANT: Make sure you find this email and click the confirmation link. If you
don’t see it in your Inbox after 2-3 minutes from signing up, search your SPAM
filer, it may have been moved there.
4
Page 6
User Guide v7
1.4. Activating your device
First, charge your device until it is fully charged (once the device is fully charged
the red light will be steady – this typically takes at least 8 hours). After that, turn
the device on – press the small red button at the top for at least 5 seconds.
Prior to activating the device, it is recommended to confirm the device receives a
GPS signal – this will allow the first location finding faster once you activate. All
you need to do for that is keep the device turned on, and put it outside in clear
view of the sky for 15 minutes.
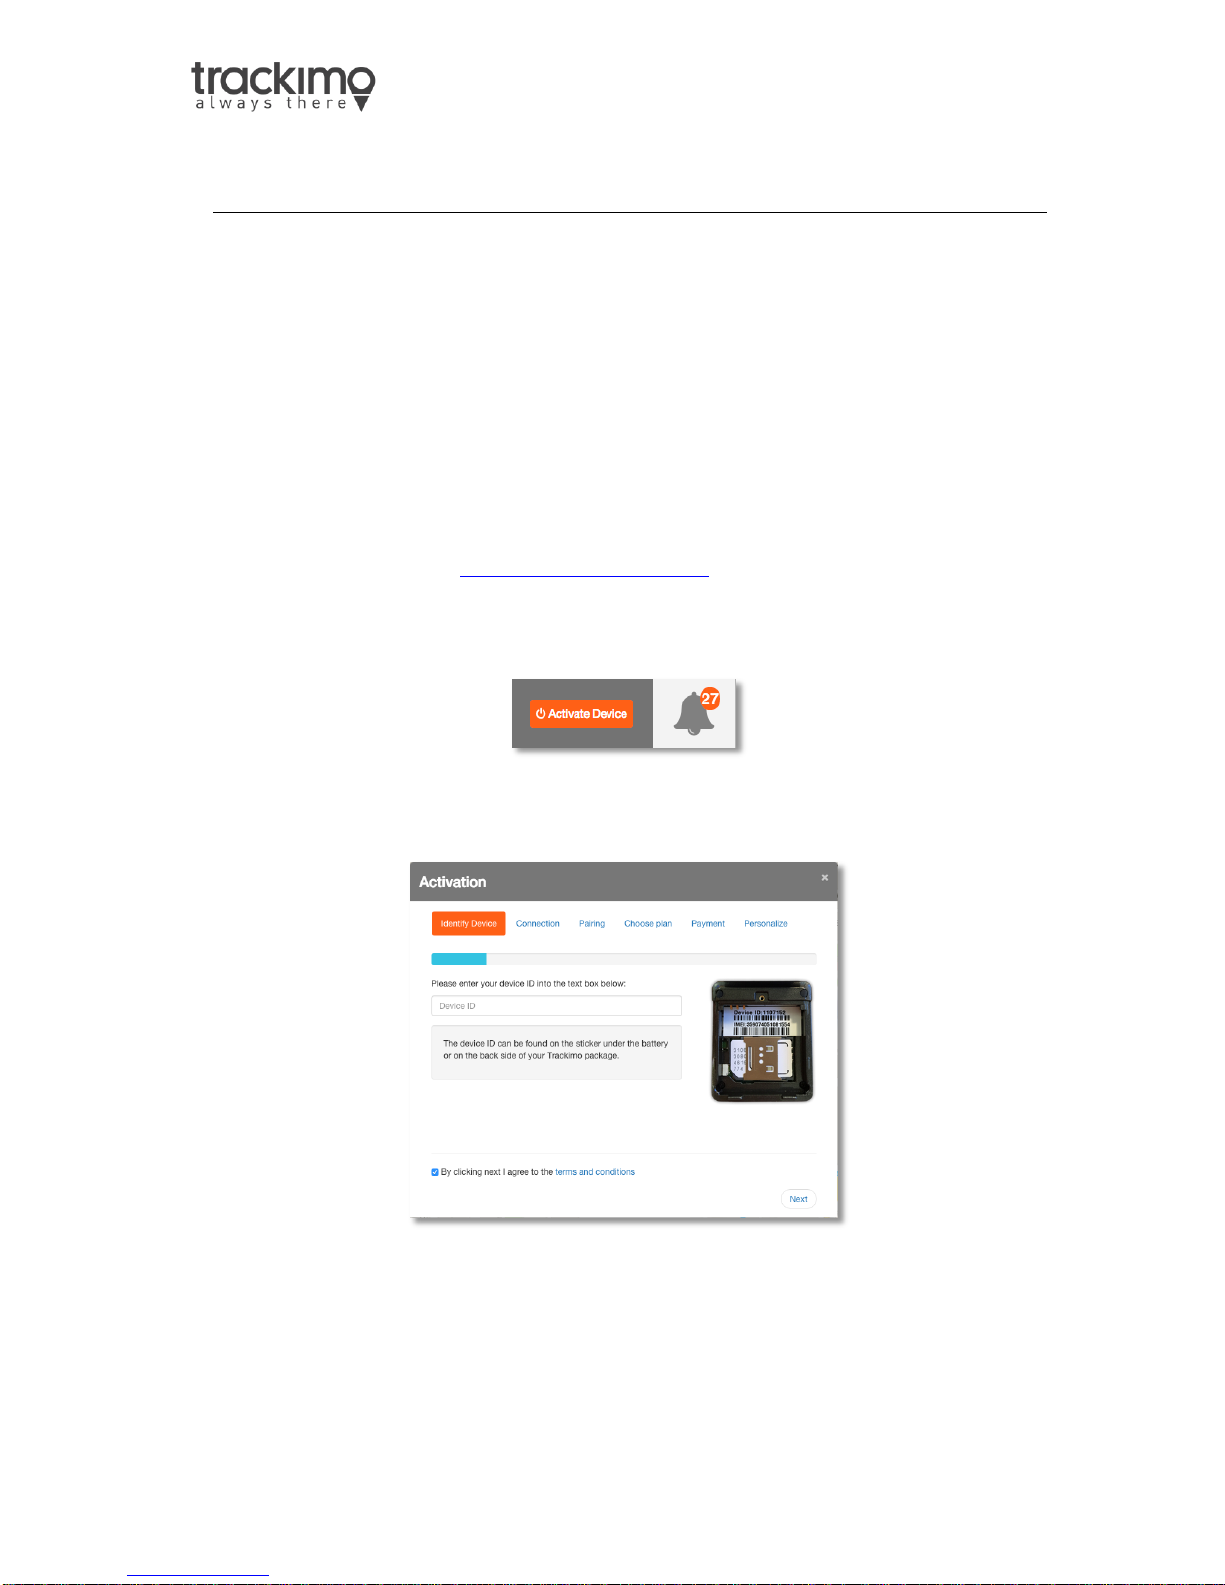
Then go to the website http://app.trackimo.com on your computer or laptop, log
in, and press the “Activate Device” button on the Trackimo website to begin the
activation process.
The activation wizard will appear and you should follow the instructions.
Enter the “Device ID” of your Trackimo – this is a 7-digit number, located
on the inside of your Trackimo under the battery, and printed on the
package.
5
Page 7
User Guide v7
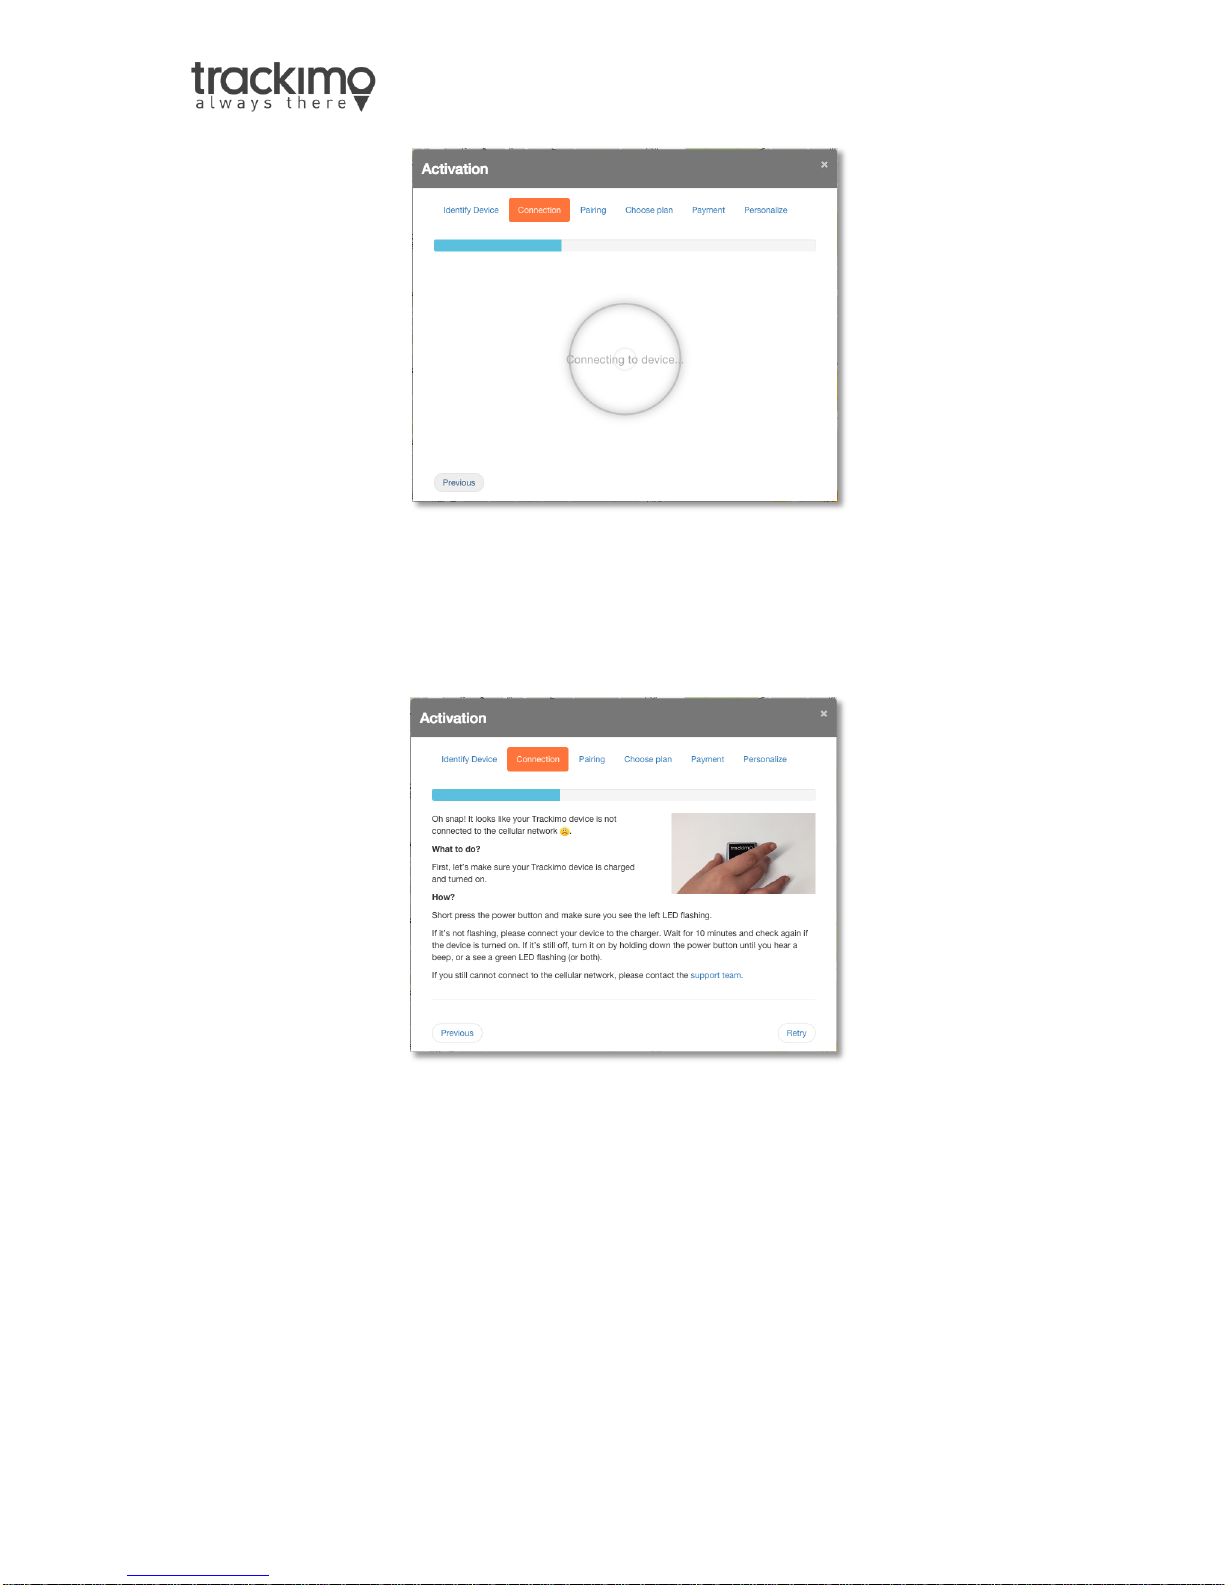
After you enter the device ID, the system will check the connectivity of the your
Trackimo to GSM network. This may take a couple of minutes.
If your Trackimo is not connected to a GSM network, you will see this:
In case the device is not connected to GSM network, you will be asked to perform
the following steps and retry the connection step
6
Page 8
User Guide v7
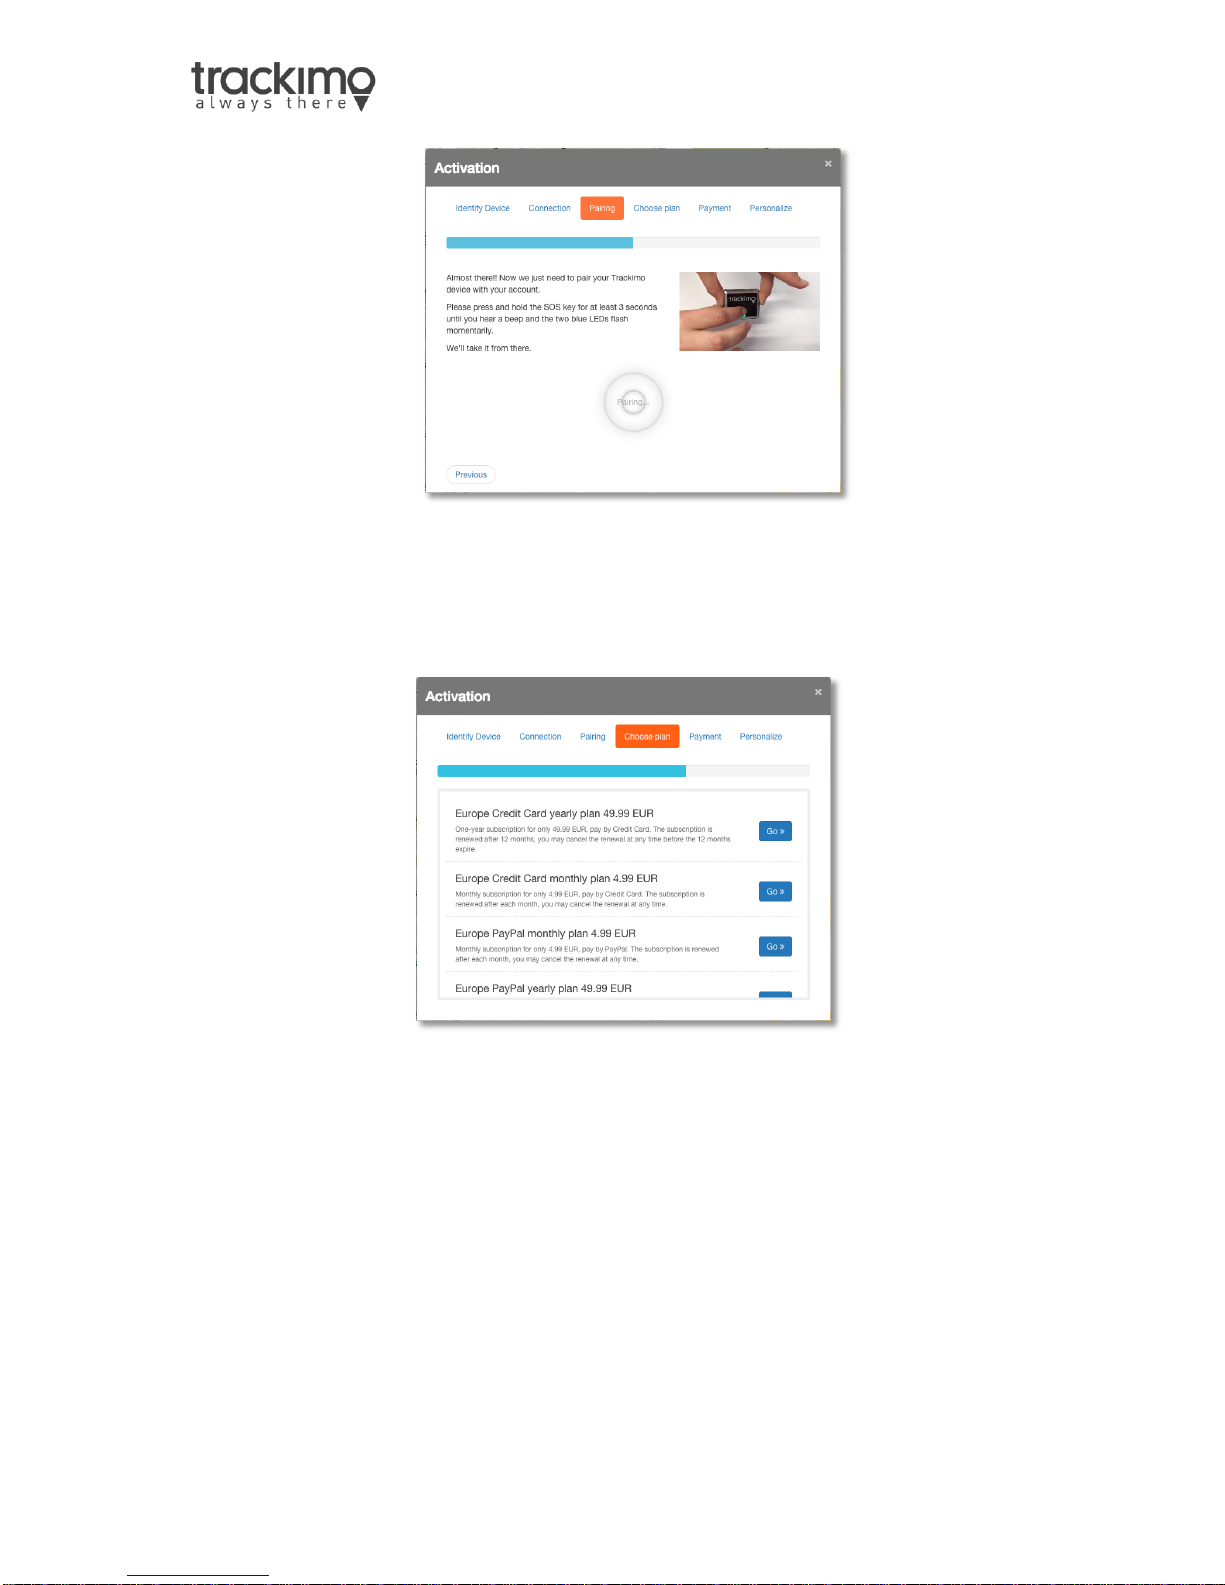
The system needs to verify that your device is actually in your possession. This is
done by physically associating your device to your account. Follow the instructions
and click on the SOS button to associate the device to your account.
Then, you will have to choose your preferred billing plan and payment method (if you
bought a Trackimo device that requires a subscription payment, and not a prepaid
7
device)
Page 9
User Guide v7
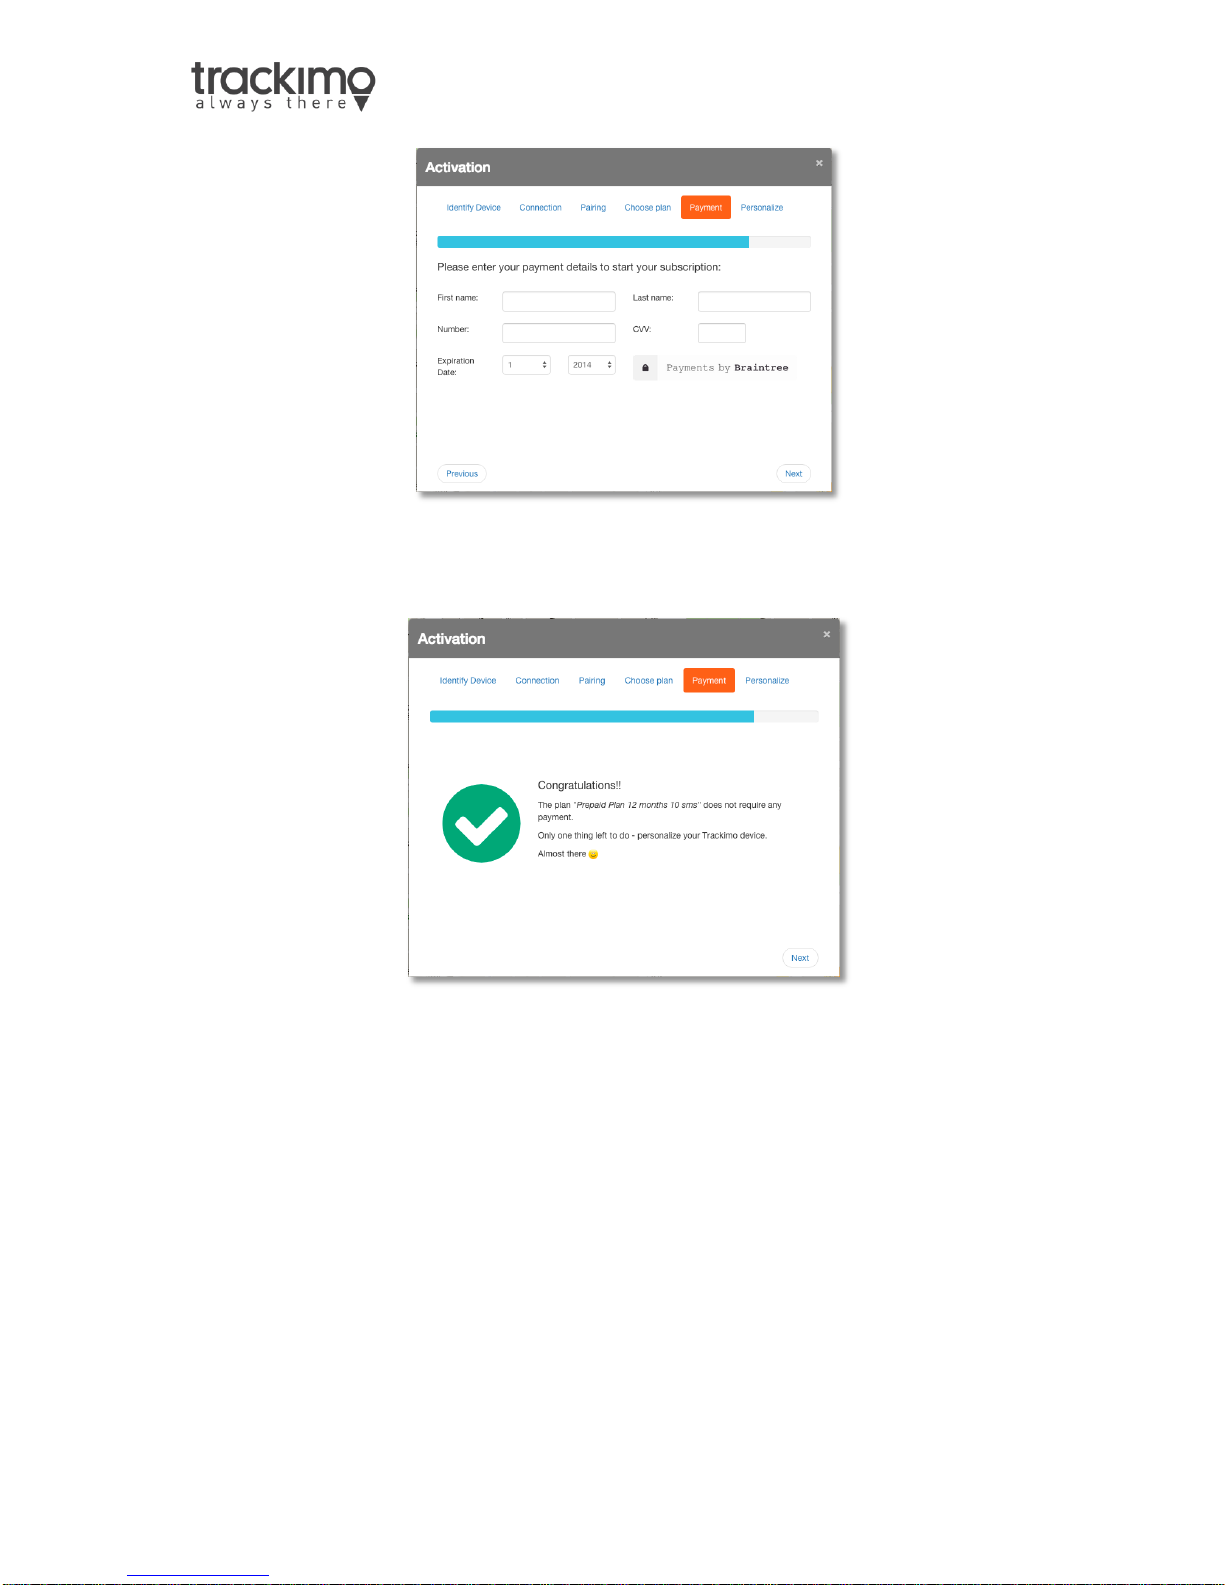
If your device does not have a prepaid subscription, you then have to enter your
Credit Card or PayPal details
Congratulations, you device was successfully activated! The Only one thing left to
8
do is personalize your Trackimo device
Page 10
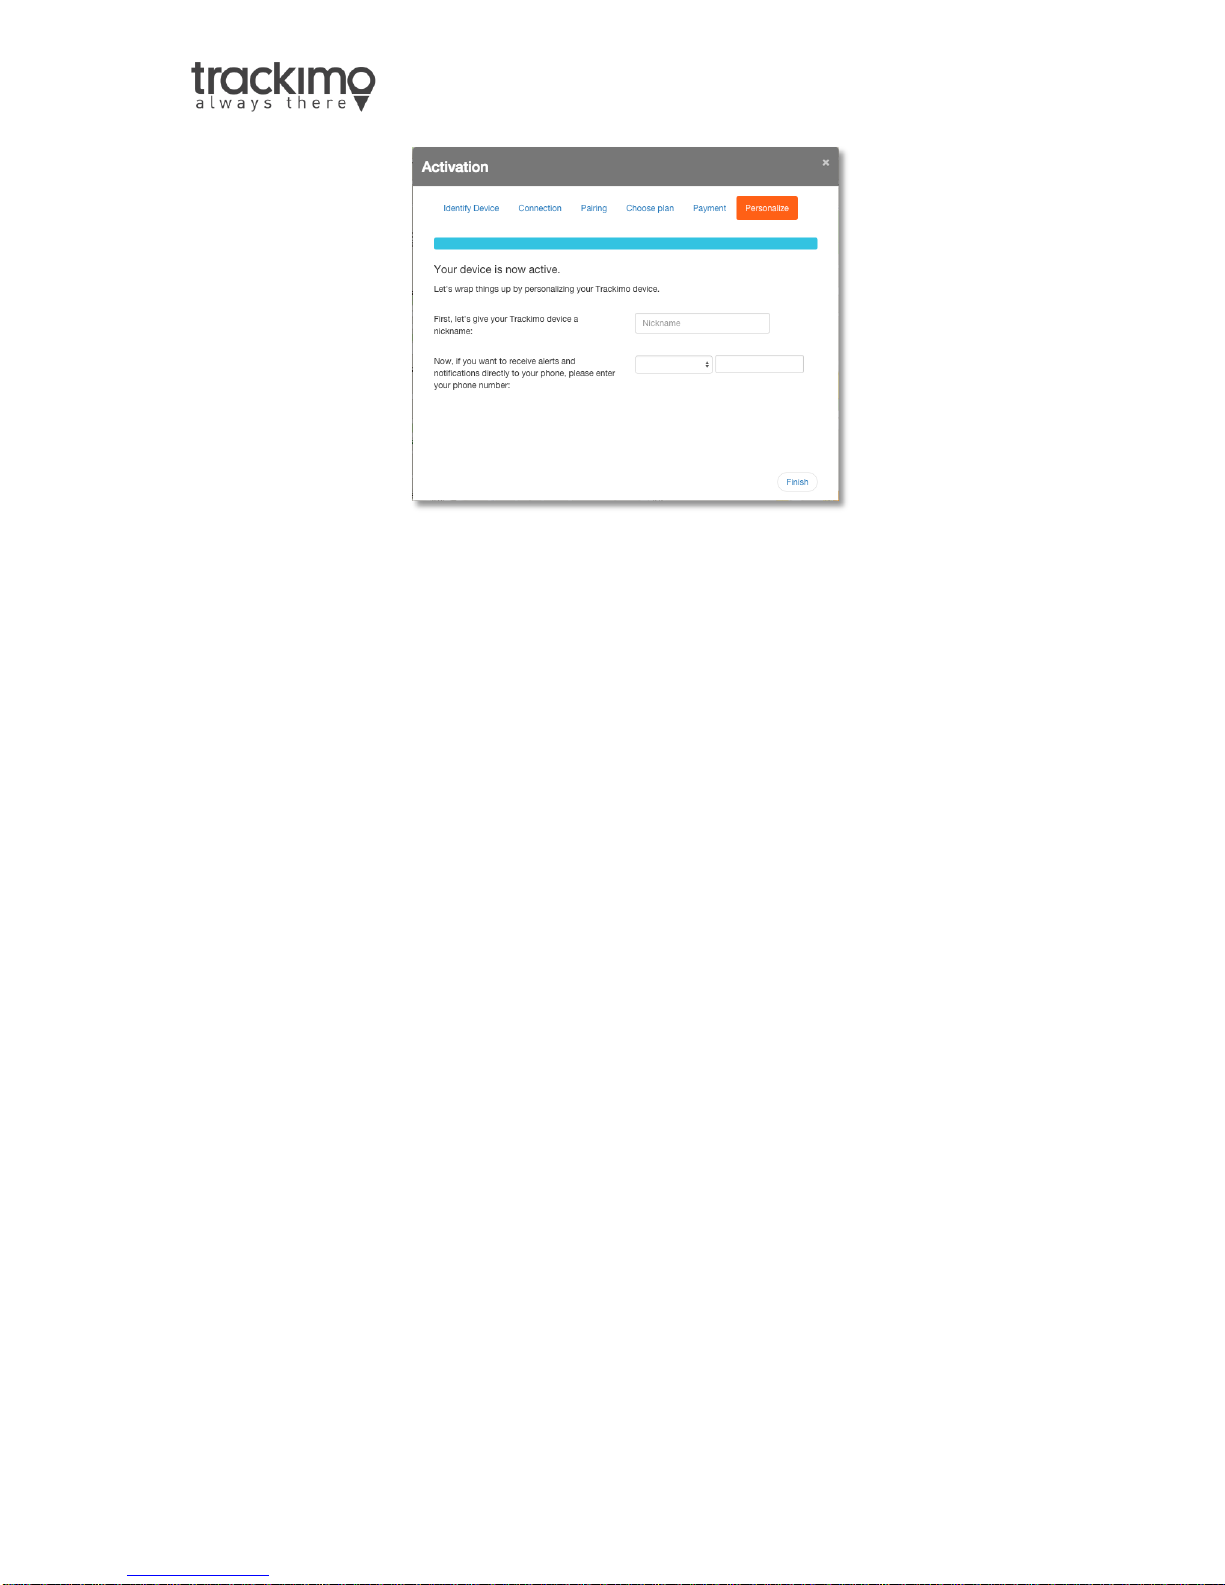
User Guide v7
Enter a nickname for your Trackimo device and (optionally) the phone number to
receive alerts and notifications directly to your phone. Now you are ready to go.
A couple of notes to remember:
1. The device has to be fully charged before the first activation.
9
Page 11
User Guide v7
Remember: If you are a new Trackimo user, you will need to verify your
email address before you can use the Trackimo service with your
device.
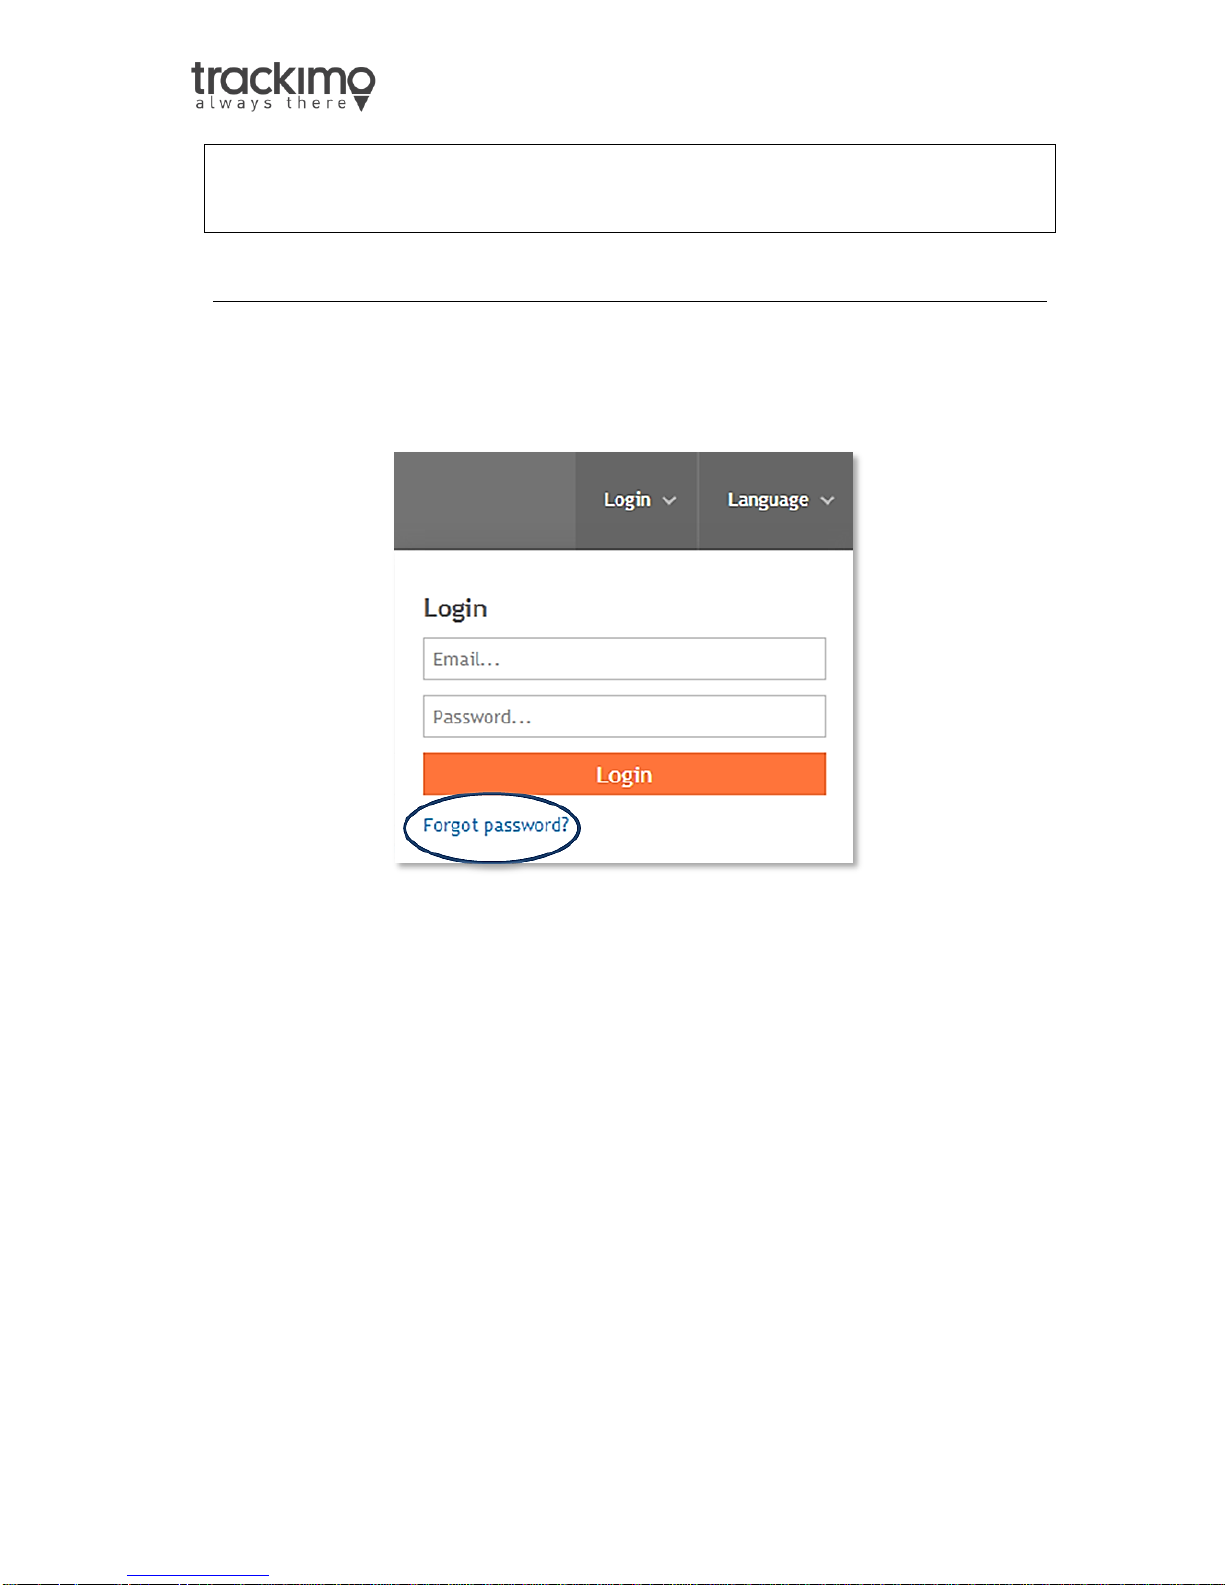
1.5. Resetting your Password
In case you may have forgotten your password, you can click on the forgotten
password link in the login dialog.
An email will be sent to you to reset your password, clicking on the link within the
email will open a browser window that will allow you to set a new password.
10
Page 12
User Guide v7
Action
Lights
Sounds
Power on the device
Green light will
flash 3 times
2 short beeps
Power off the device
Red light will flash
twice
Long beep
Connected to Mobile network
Left blue light on
for 4 seconds
Long Beep
Any key is pressed
Green light on for
3 seconds
SOS key pressed for 2 seconds
Both blue lights
flash twice
Long Beep
Left or Right key pressed for 2
seconds
Corresponding
blue led flashes
twice
Long Beep
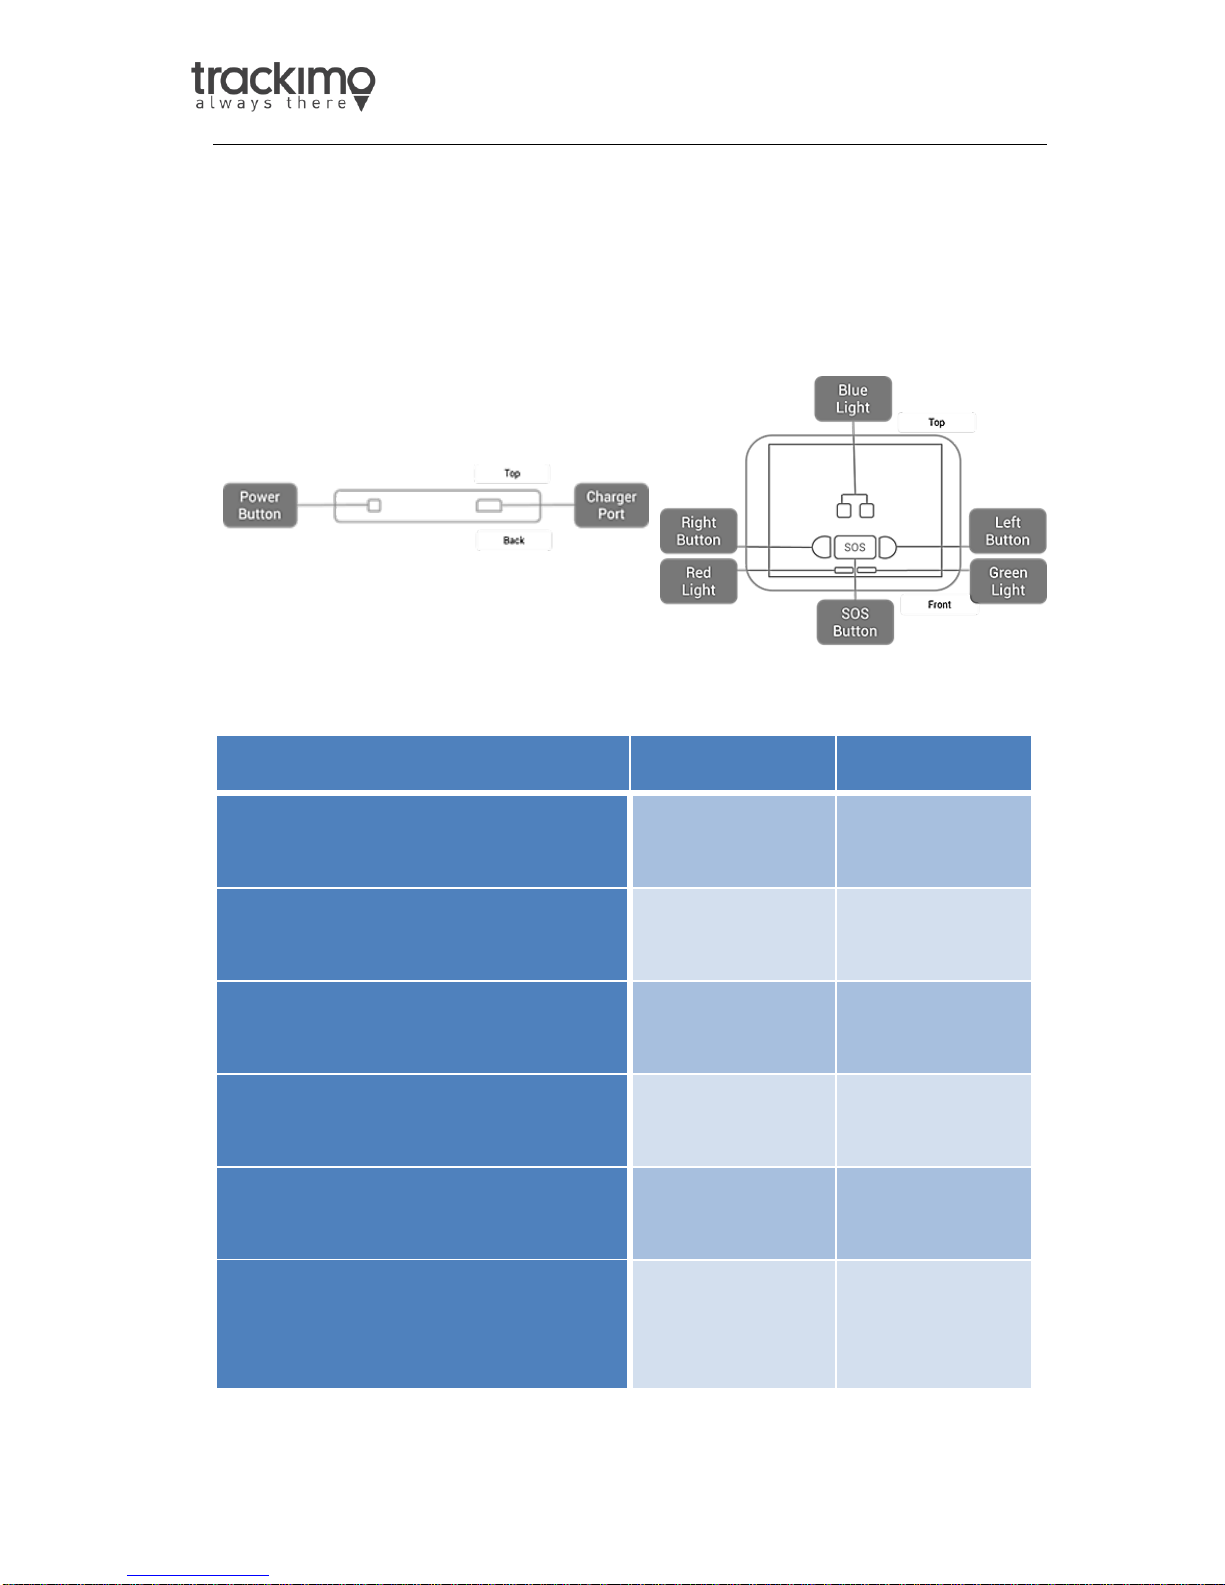
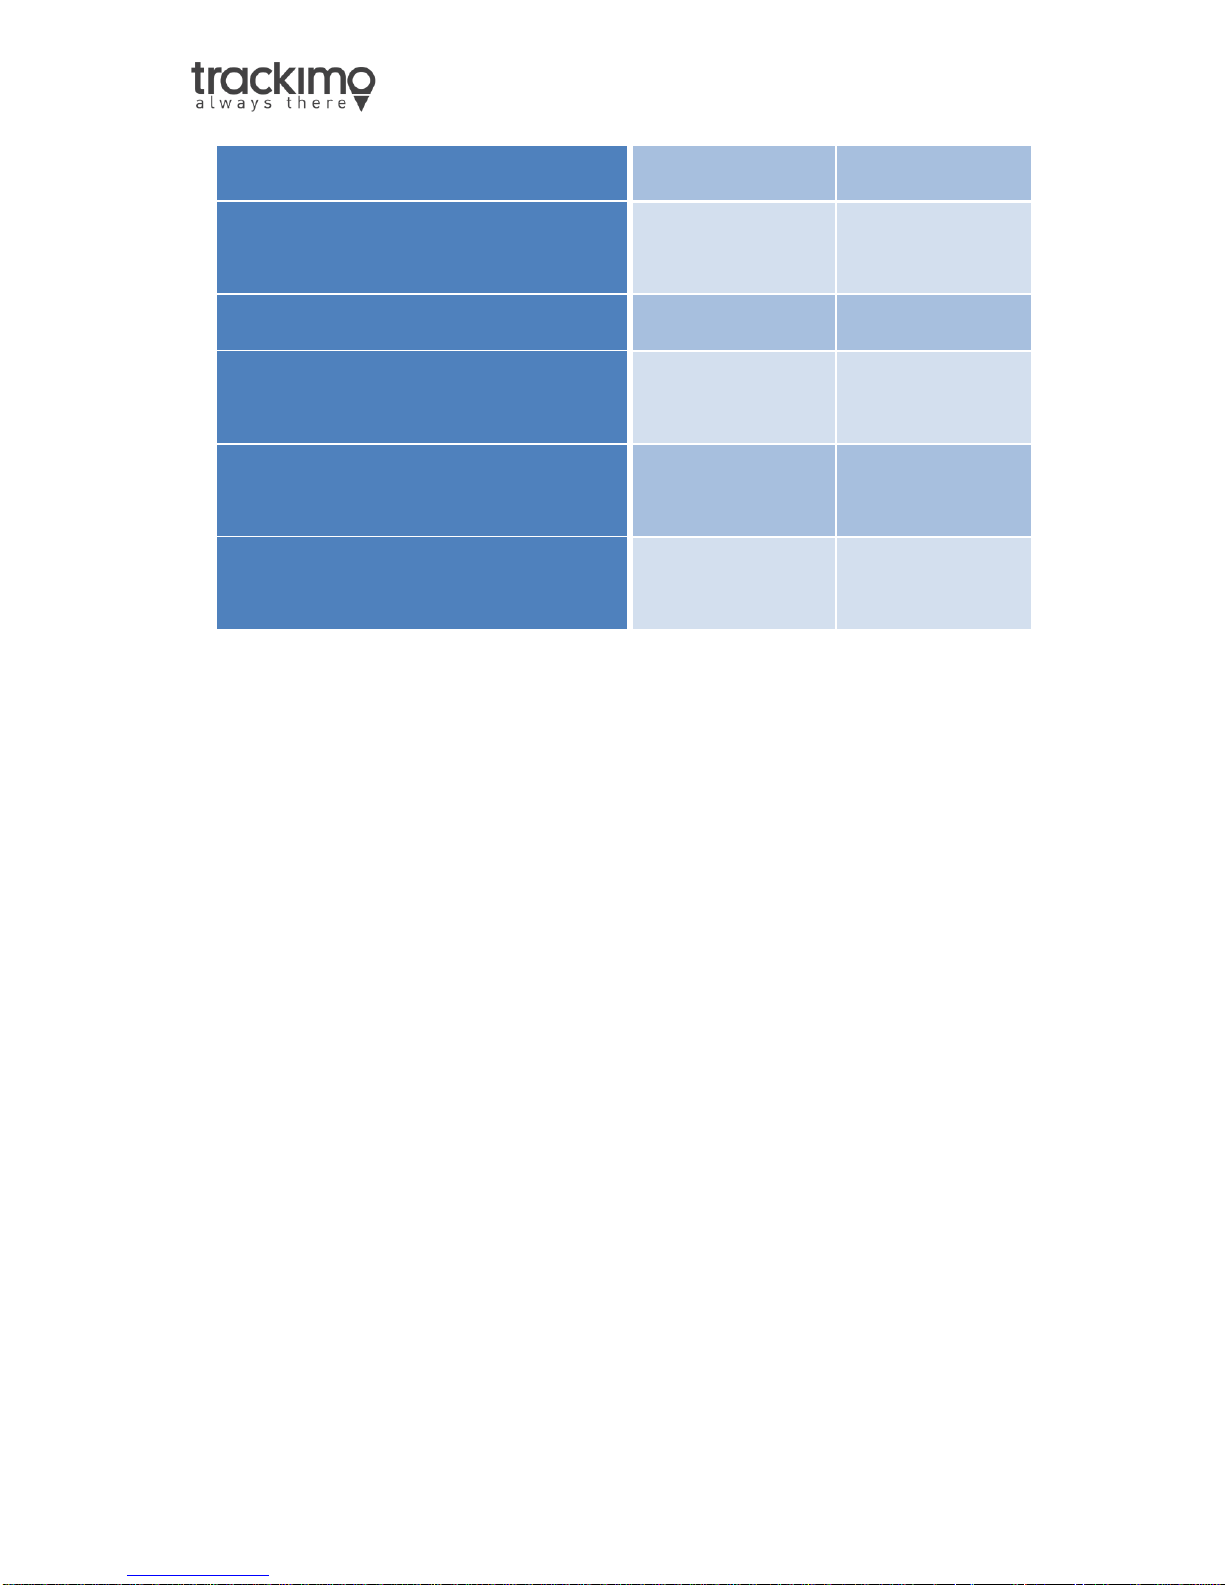
1.6. Your Device Lights and Sounds
Your device will make sounds and lights will be displayed to provide you with
better visual and sound information, for a richer experience. The picture below
shows where all the buttons and lights are located on the device, the table below
will show what causes lights to turn on and the device to make sounds.
11
Page 13
User Guide v7
Low Battery
Red light flashing
Charging
Slow flashing red
light
Plugged in and fully charged
Red light
Cellular network and GPS not
connected
Left and right blue
lights flash slow
Short beep
No cellular network connection,
GPS connected
Right blue light on
for 4 seconds
Short beep
Cellular network and GPS
connected
Left blue light on
for 4 seconds
Short beep
12
Page 14
User Guide v7
A
Device Marker
Icon
This is the icon that is associated with a device, this
will be the icon representing the device on the map.
(You can change your icon in the setting menu)
B
Device Nickname
The nickname chosen for your device, this nickname
will appear in emails and notifications.
(You can change your device’s nickname by clicking
the edit icon next to it. Select a new nickname and
save.)
C
Device Info Pop
Provides location and speed information about the
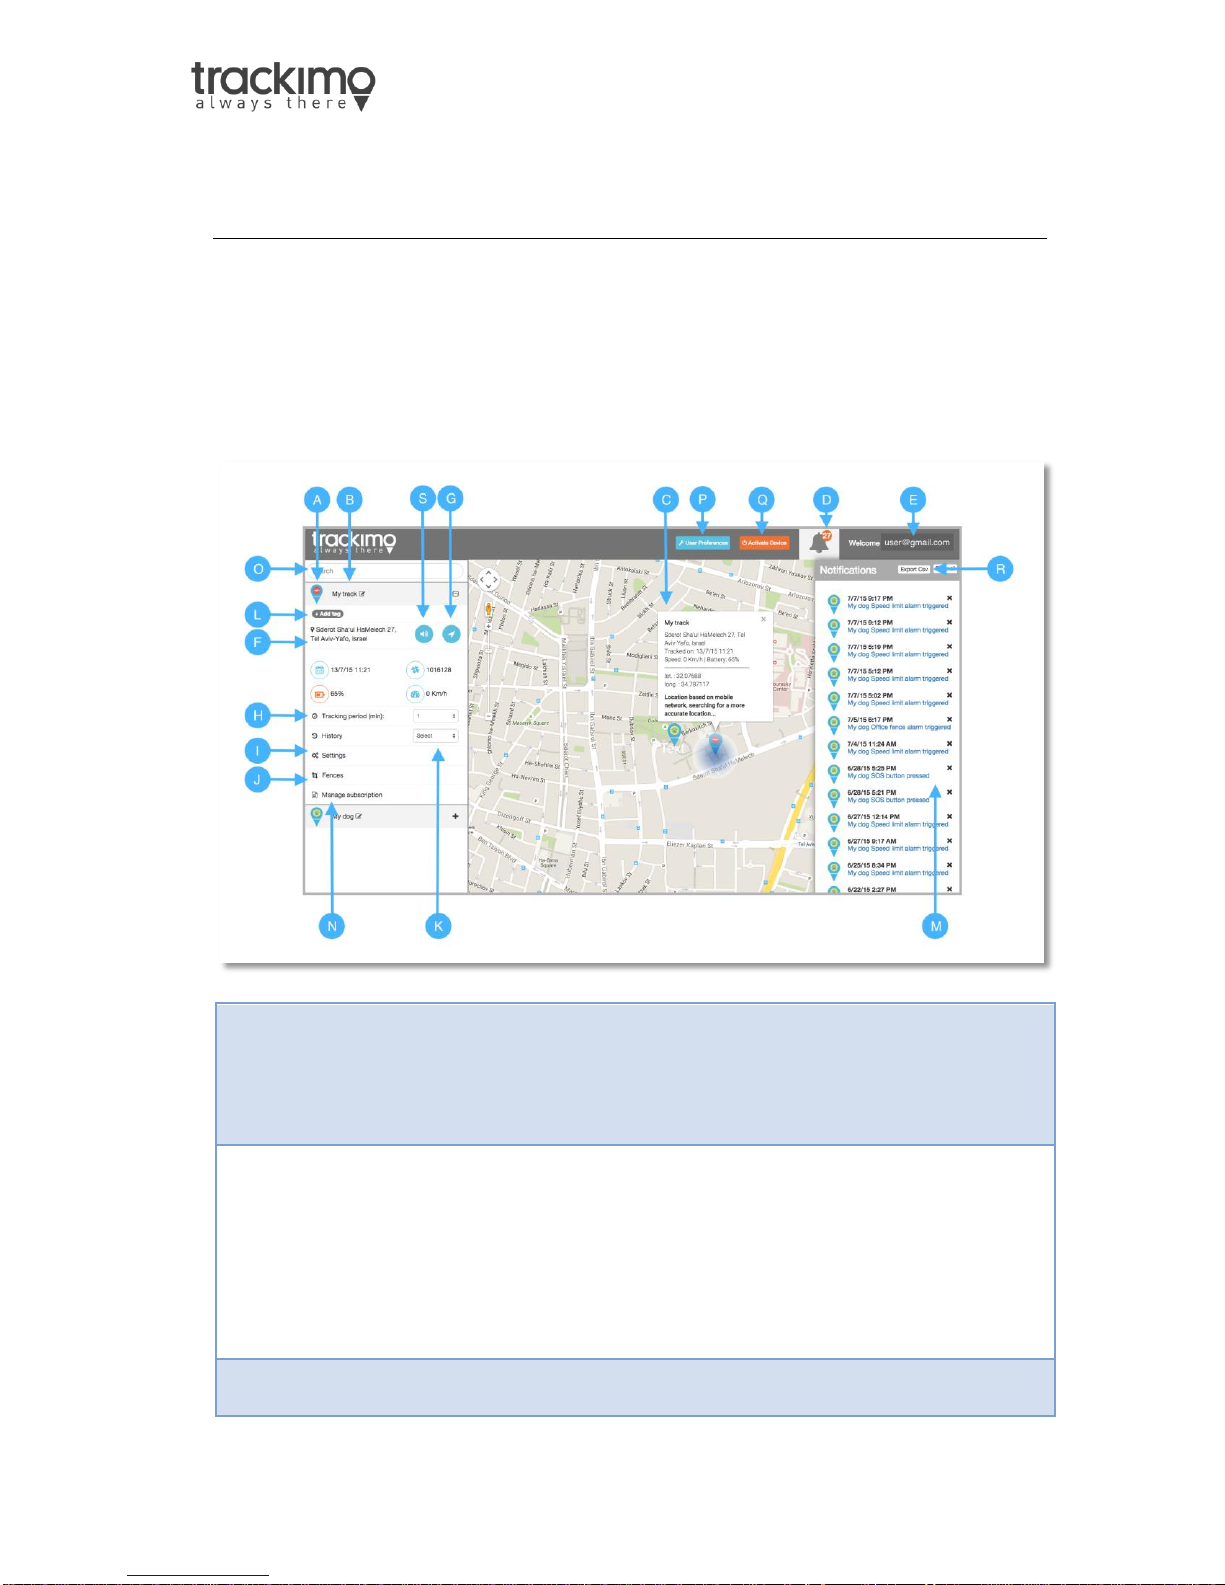
2. Trackimo Dashboard
2.1. Dashboard Overview
After logging in to the Trackimo website with your username and password, you
will reach the Trackimo dashboard. The image below provides the Trackimo
dashboard with a short explanation in the table below about the key items within
the dashboard.
13
Page 15
User Guide v7
Up
device, and is located right above the device marker
on the map.
D
Notification Menu
Alerts the user to the number of unread device
notifications, and upon clicking the menu shows all
device notifications.
E
User Menu
Upon clicking provides user specific options such as
logging out or activating another device.
F
Device Location
Information
Provides location, battery status and speed
information about the device.
G
Update Location
Button
Updates the device location.
H
Tracking
Frequency Selector
Provides the option to select how frequently the
device updates its location, please note, the more
frequently that the device updates its location, the
shorter battery life it will have.
I
Settings Menu
Button
Upon clicking the button, the alarm menu will open
allowing setting alarms and notifications.
J
Fences Menu
Upon clicking the button, existing fences appear, and
the fences menu becomes available.
K
View History
Selector
Selects the device history and shows it on the map.
L
Tags
Allows entering a multiple tags for device.
M
Device
Notifications
The device notifications, upon clicking them, they will
be cleared from the list.
N
Manage
Subscription
This section shows subscription information regarding
the device and allows renewing the current
subscription and increase monthly text alert limit.
O
Device Filter
This filter allows filter device by device nickname,
14
Page 16
User Guide v7
device id, tags and fences
P
User Preferences
Allows to change measurement units, SOS alarm
sound and date format
Q
Activate device
Allows to add devices to account
R
Export History
Allows to download device history in CSV format
S
Send “beep” to
device
This button sends beep command to device. When
the device receives the command a beep signal will
be heard
15
Page 17
User Guide v7
2.2. Device Location Information
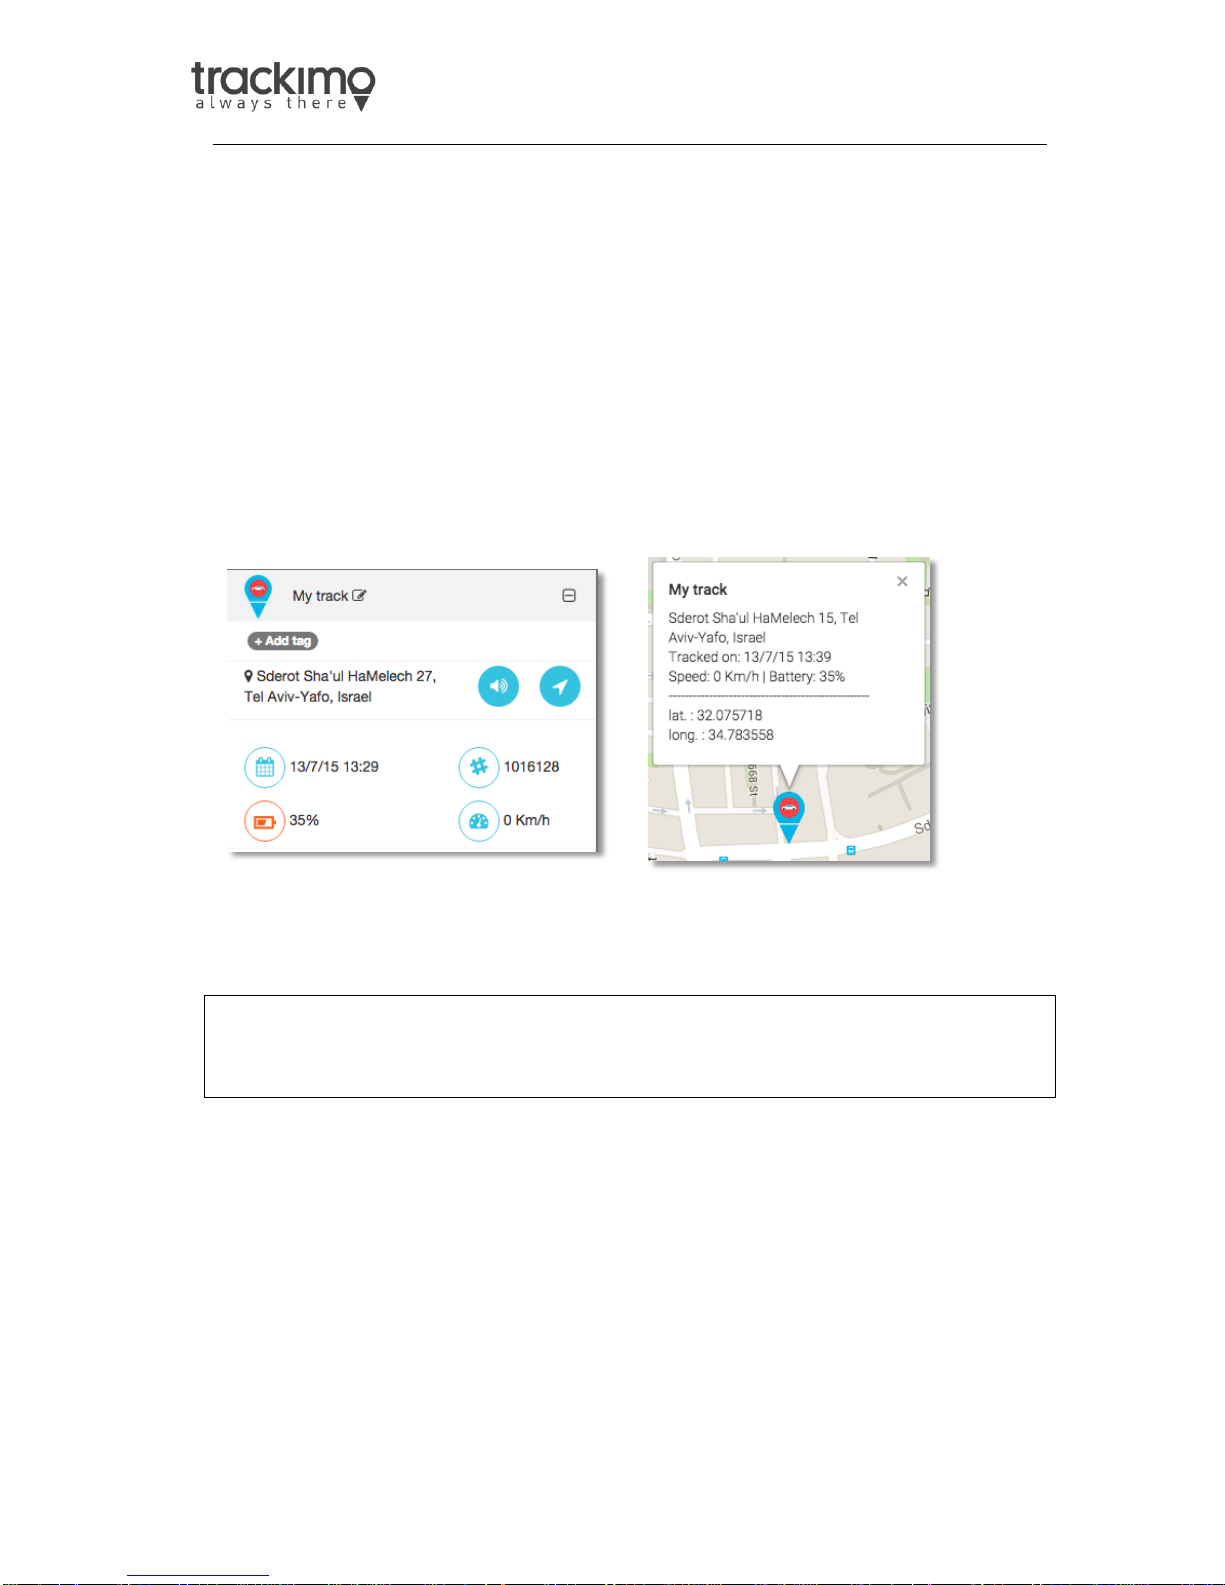
The device information can be found in two places:
1. When clicking on the device marker icon on the map, the location information
will be available inside the information pop up right above the device marker
icon.
2. When clicking on the device on the left sidebar of the dashboard the location
information will be right below the device name.
The location information available is the device address, time tracked, speed,
battery percentage left, and the longitude and latitude location of the device.
Note: The device location may be based on the cellular network signal
(GSM location), in cases where the device cannot receive proper GPS
signals from the GPS satellites, for example indoors. This location is not
accurate, but rather an approximation of the device location.
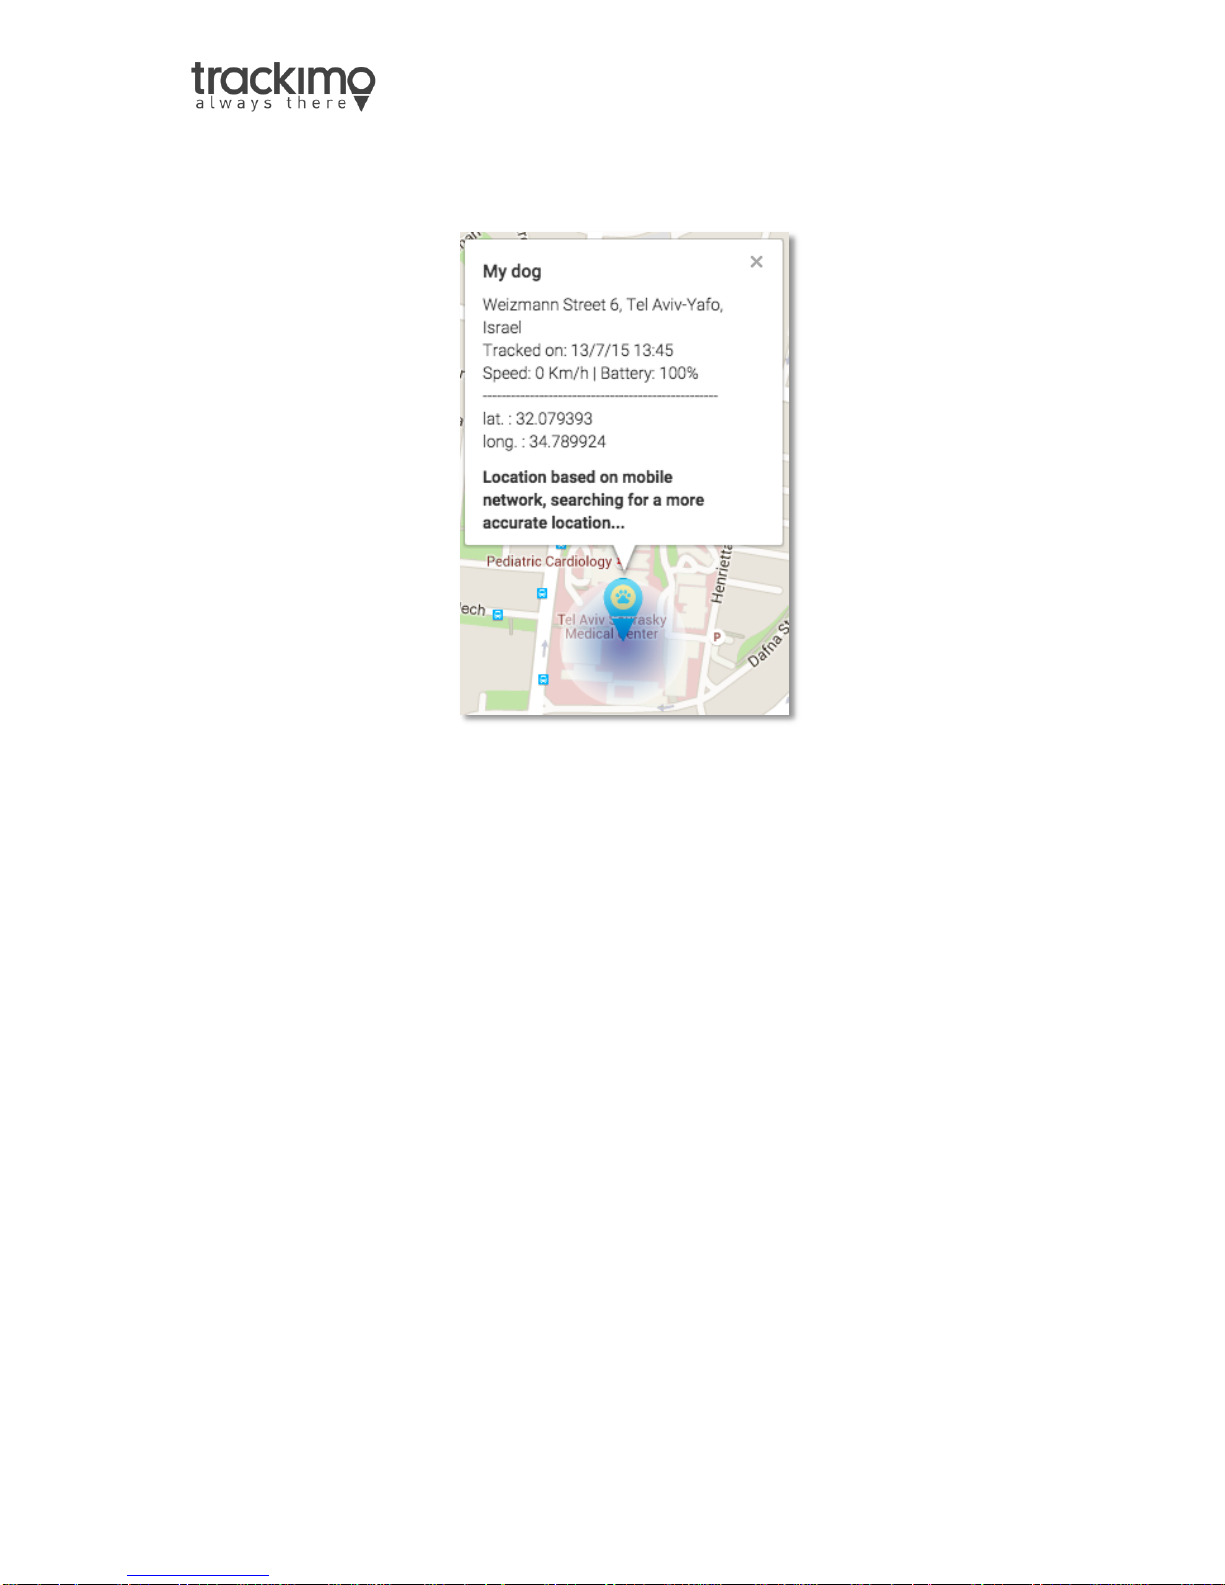
If GPS location is not available, the location will be based on computing an
approximate position according to the signals from nearby cellular towers. In that
case, the location and text will appear in the device location information area
16
Page 18
User Guide v7
notifying that the location is based on the cellular network. A blue halo will also
surround the tracking marker notifying you that the location is approximate, as
shown in the image below.
17
Page 19
User Guide v7
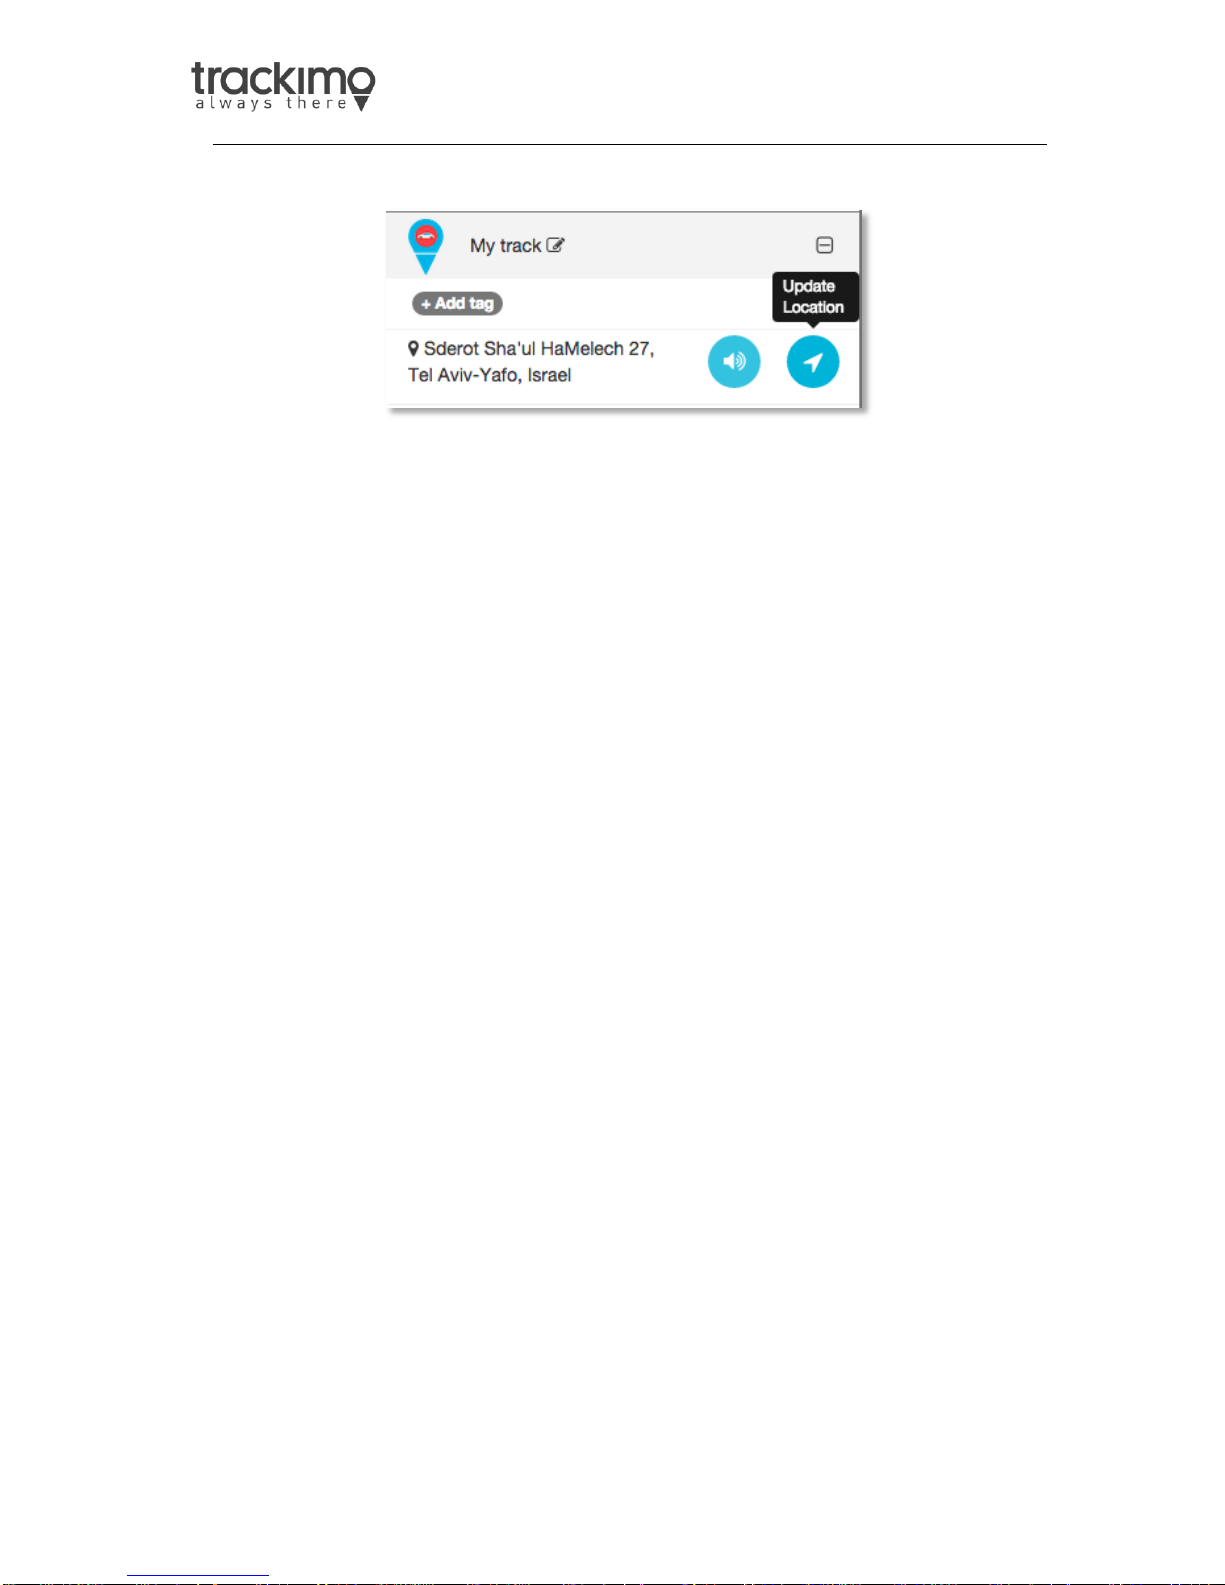
2.3. Update Device Location
Upon clicking on the update location button, available for each device, Trackimo
will attempt to contact the device through the cellular network and retrieve the
devices exact location.
Trackimo will retrieve an exact GPS based location, but if GPS is unavailable at
the device location, Trackimo will attempt to approximate the location using the
mobile network signals to the device.
If the device is unreachable within 60 seconds from the Trackimo system, the
system will notify the user with an information notification. Reasons that the
device may be unreachable may include; the device being turned off, the device
is out of battery, and the device is in an area which does not have cell phone
reception.
18
Page 20
User Guide v7
Manual
The device location will only update when the user clicks the
update location button; this ensures the longest battery life
to the device.
1 Minute
The device will update its location every 1 minute; this mode
will cause the device to have the shortest battery life.
5 Minutes
The device will update its location every 5 minutes; this mode
will cause the device to have a short battery life.
30 Minutes
The device will update its location every 30 minutes; this
mode will cause the device to have a moderate battery life.
120
Minutes
The device will update its location every 120 minutes; this
mode will cause the device to have a long battery life.
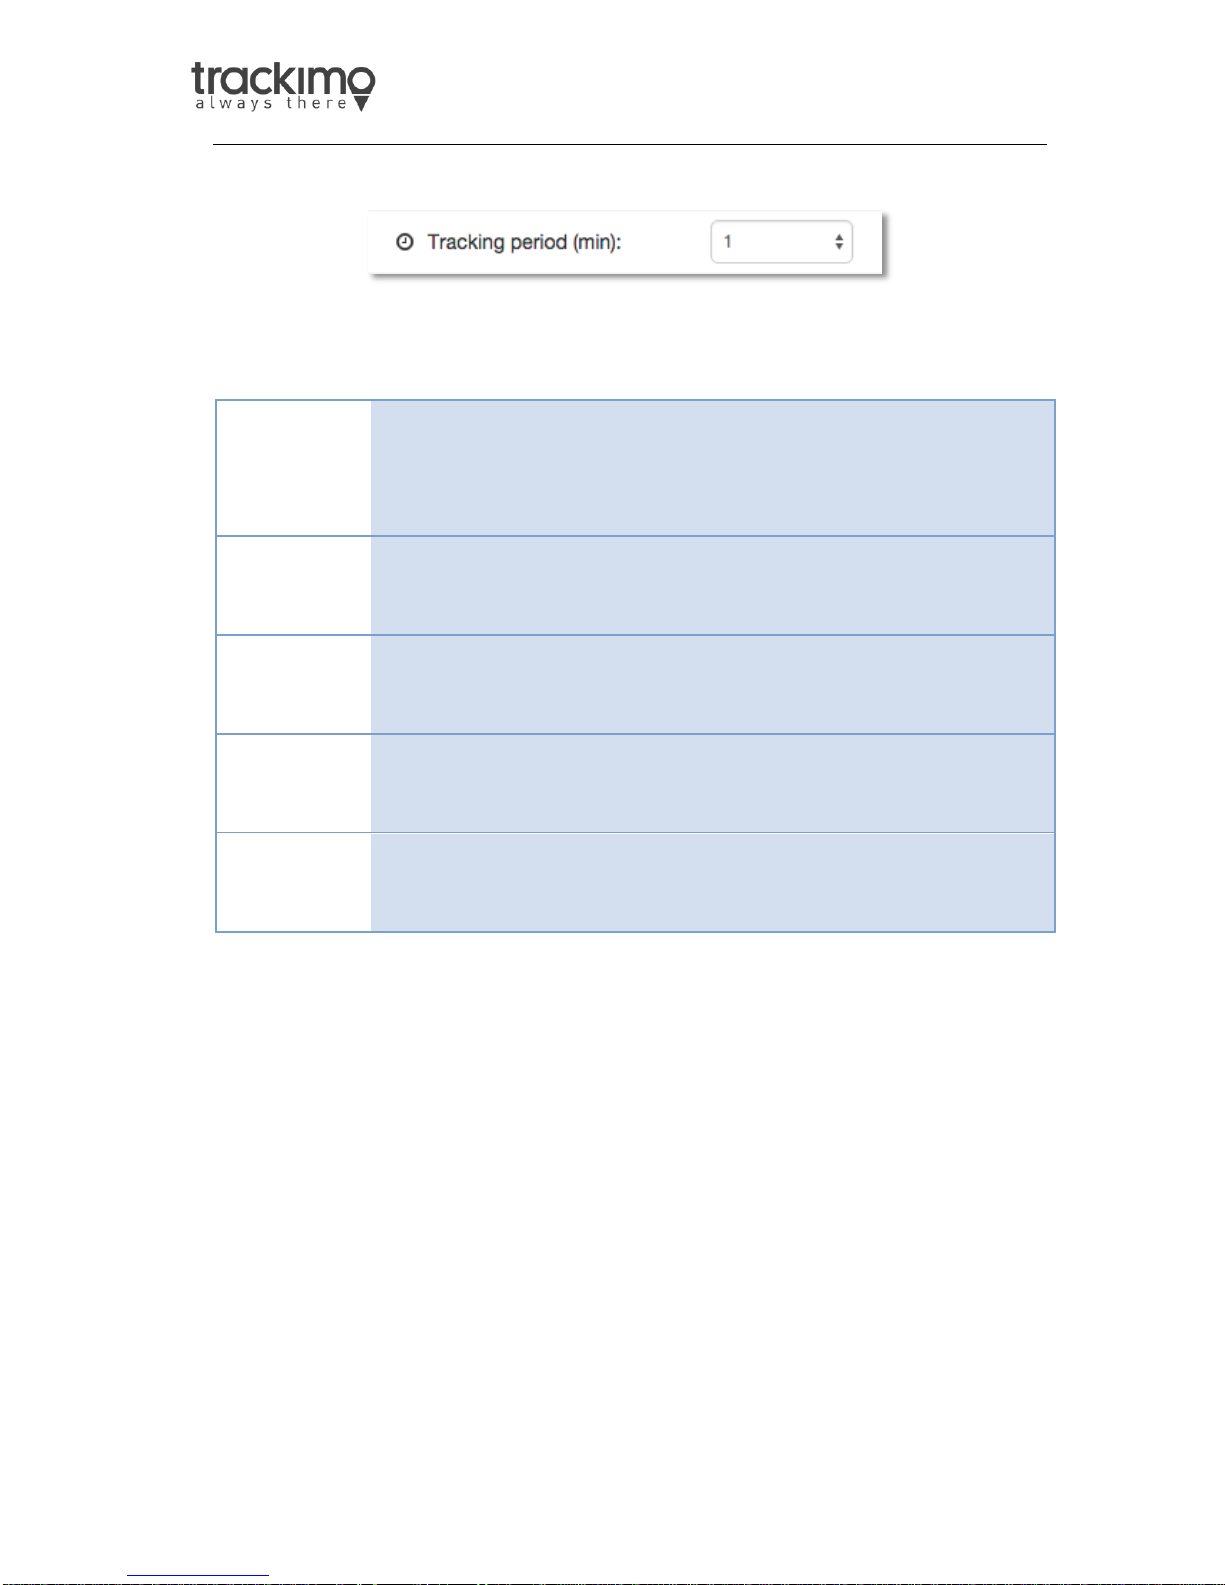
2.4. Device Location Frequency
The user can set the device location frequency. This setting determines how
often the device reports its location to you through the Trackimo system.
19
Page 21
User Guide v7
2.5. Device History
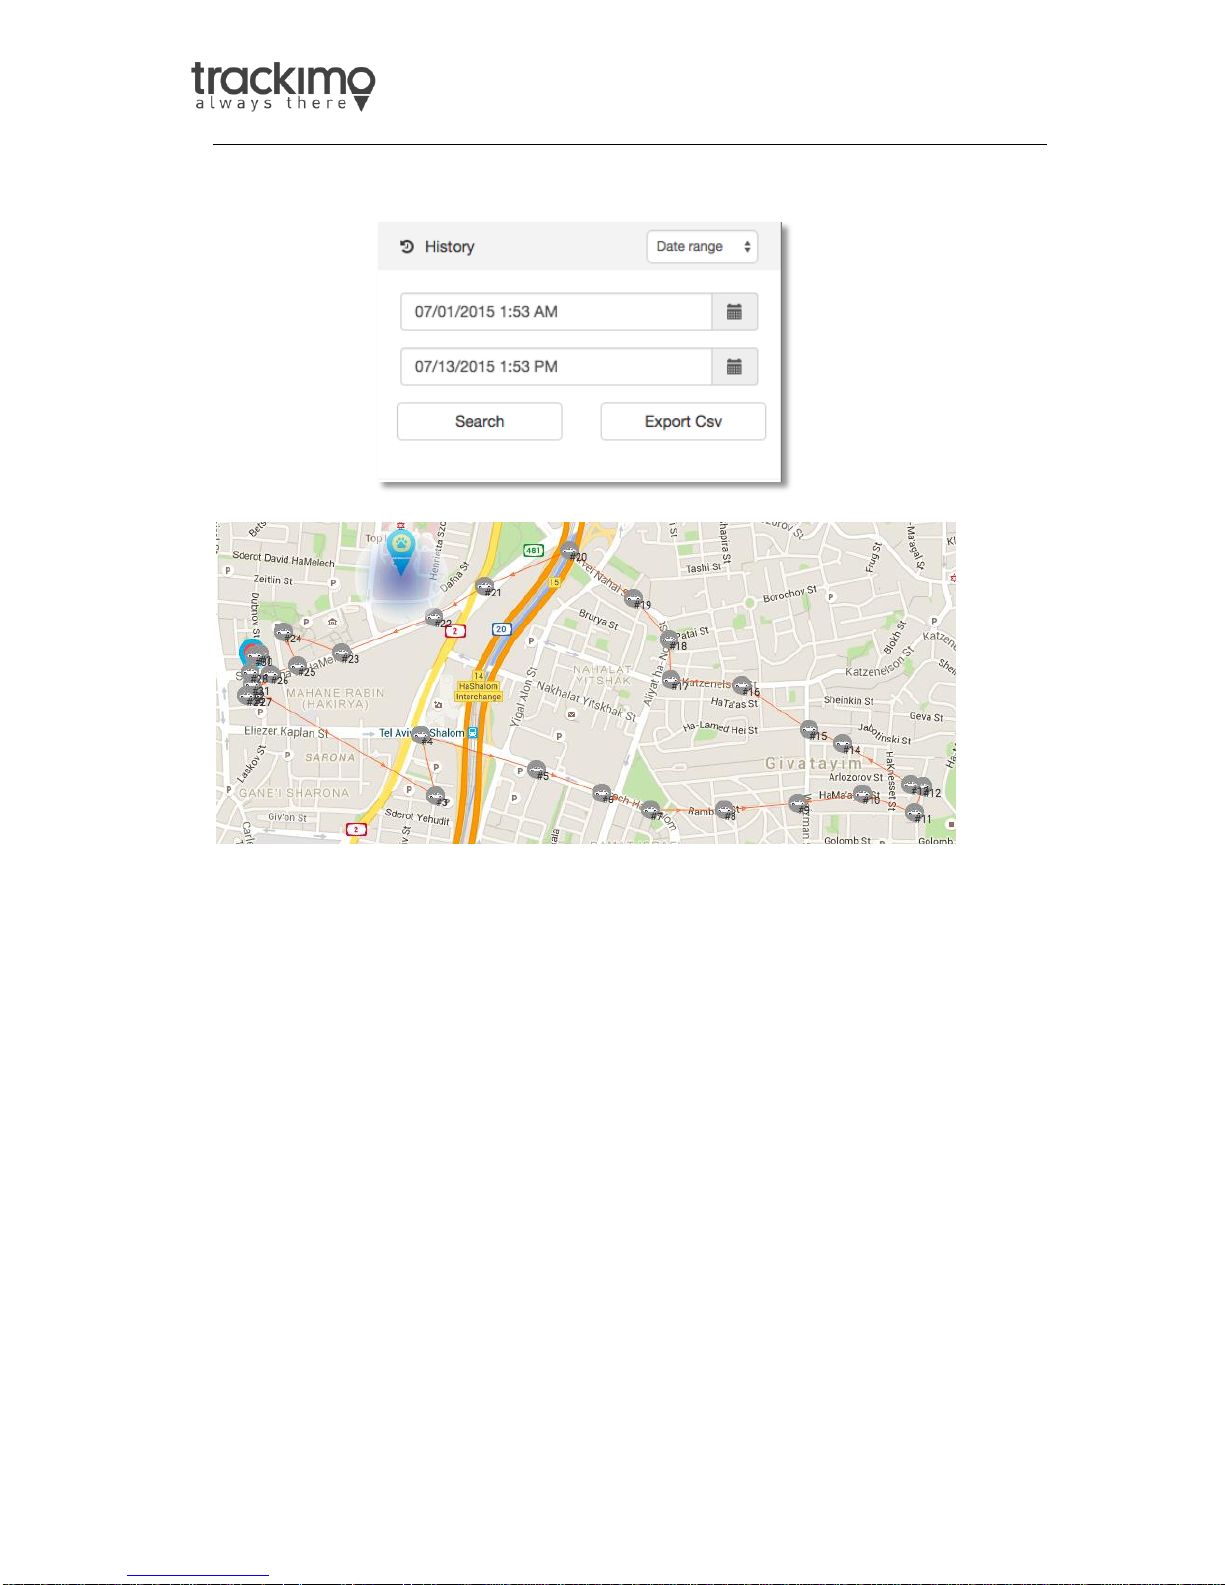
The device history can be displayed on the map by selecting the device history
from the history dropdown.
The map will display history marker icons in grey on the map, will connect the
markers to indicate the device tracking path, and will number the device marker
icons to form a device history timeline.
The device history can be shown from the last hour, today (24 hours), the last
week, and by specifying a specific date and time range (start and end). Also, the
device history can be downloaded in CSV format file.
Clicking on any device marker info from the history will show the time of the
history, the location and the speed.
The map will automatically also zoom to show all the history of the device in a
single view for you. You can also zoom in and out to better view the device
history.
20
Page 22

User Guide v7
21
Page 23
User Guide v7
Speed Limit
A notification is sent when the speed limit is
crossed.
Low Battery
A notification is sent when the battery level
reaches 10%.
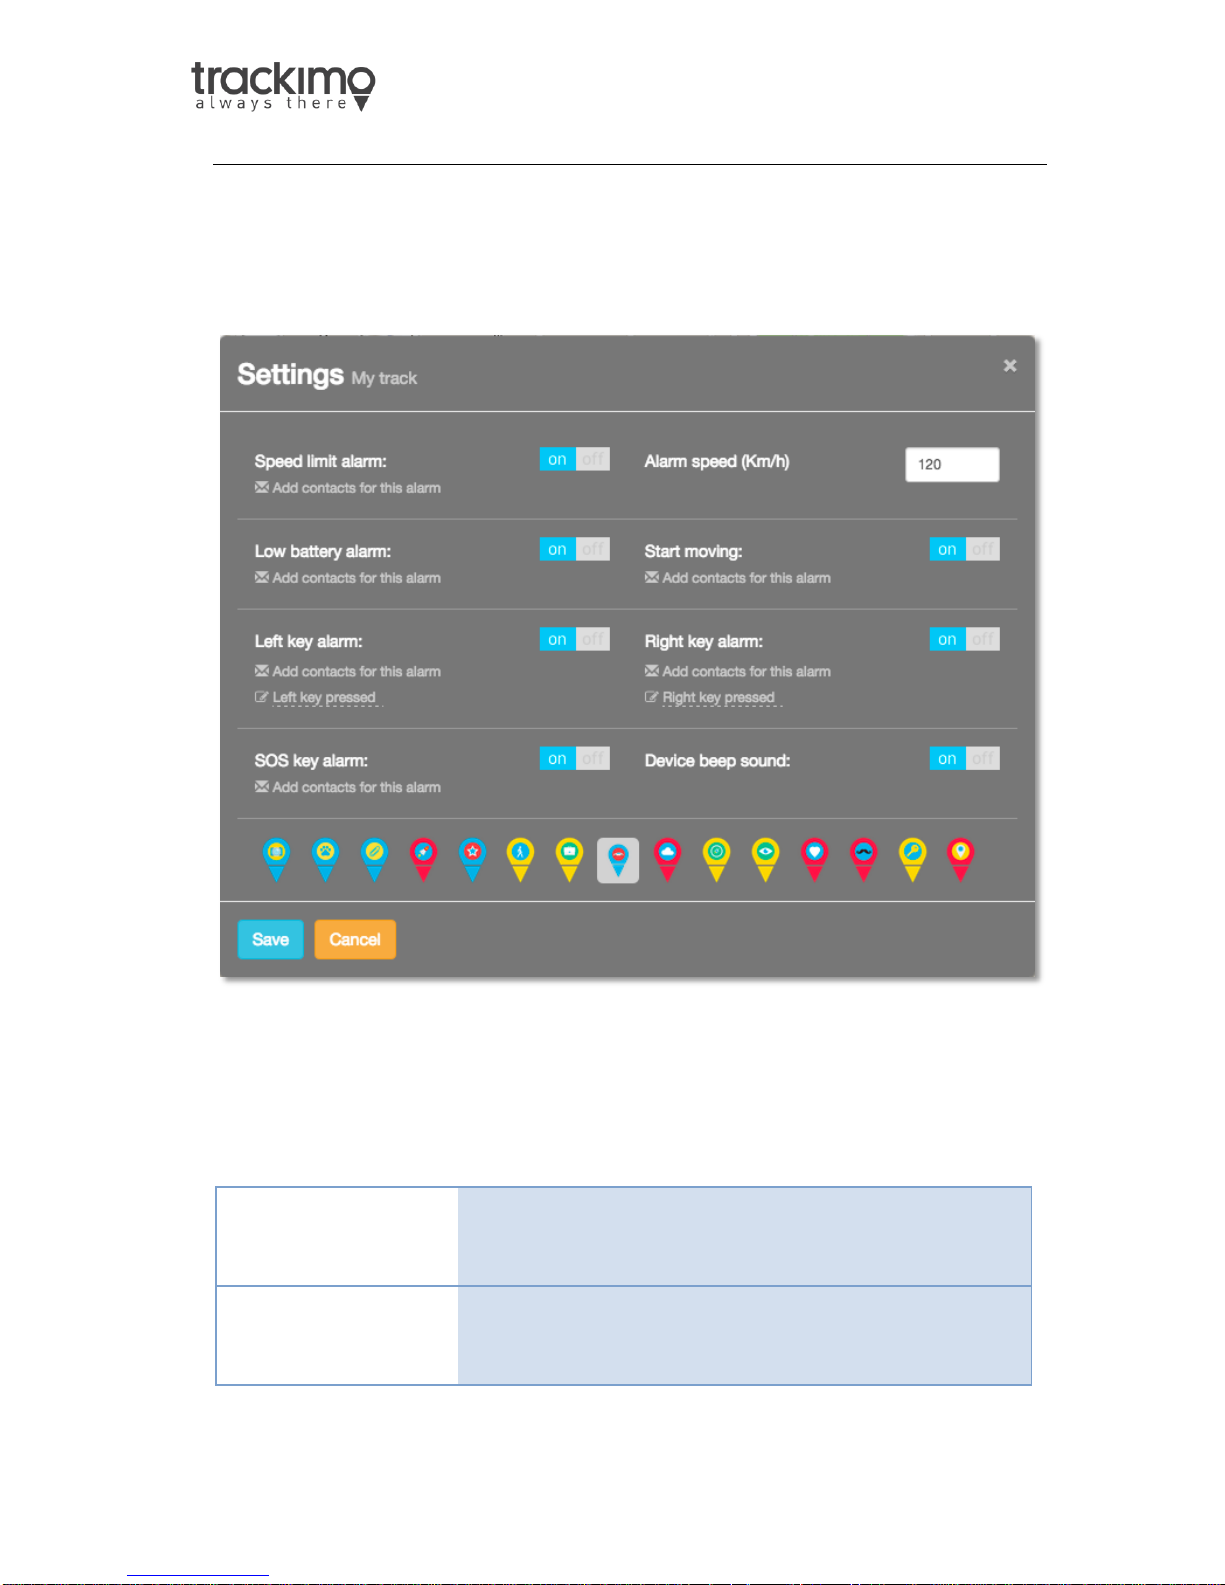
2.6. Device Alarms and Settings
Clicking on the settings section will open the following. This will allow you to set
the device specific settings and alarm notifications.
Alarms are sent to your configured email and to the Trackimo dashboard, the
notification alarms will include the device location and speed at the time the
alarm is triggered.
The following alarms are available:
22
Page 24
User Guide v7
Moving Start
A notification is sent when the device starts to
move.
Right Key
Pressed
A notification is sent when the right key is pressed
on the device. Also, user can insert a custom text
to this alert.
Left Key
Pressed
A notification is sent when the Left key is pressed
on the device. Also, user can insert a custom text
to this alert.
SOS Key
Pressed
A notification is sent when the SOS key is pressed
on the device.
Device Beep
Sound
This turns the beeping options of the device on or
off. When “off” the device will operate in “silent
mode” and no beeps will be heard upon turning
on, pressing the OS and left/right button etc.
Device Marker
Icons
Selects the icon for the device marker
The following settings are available:
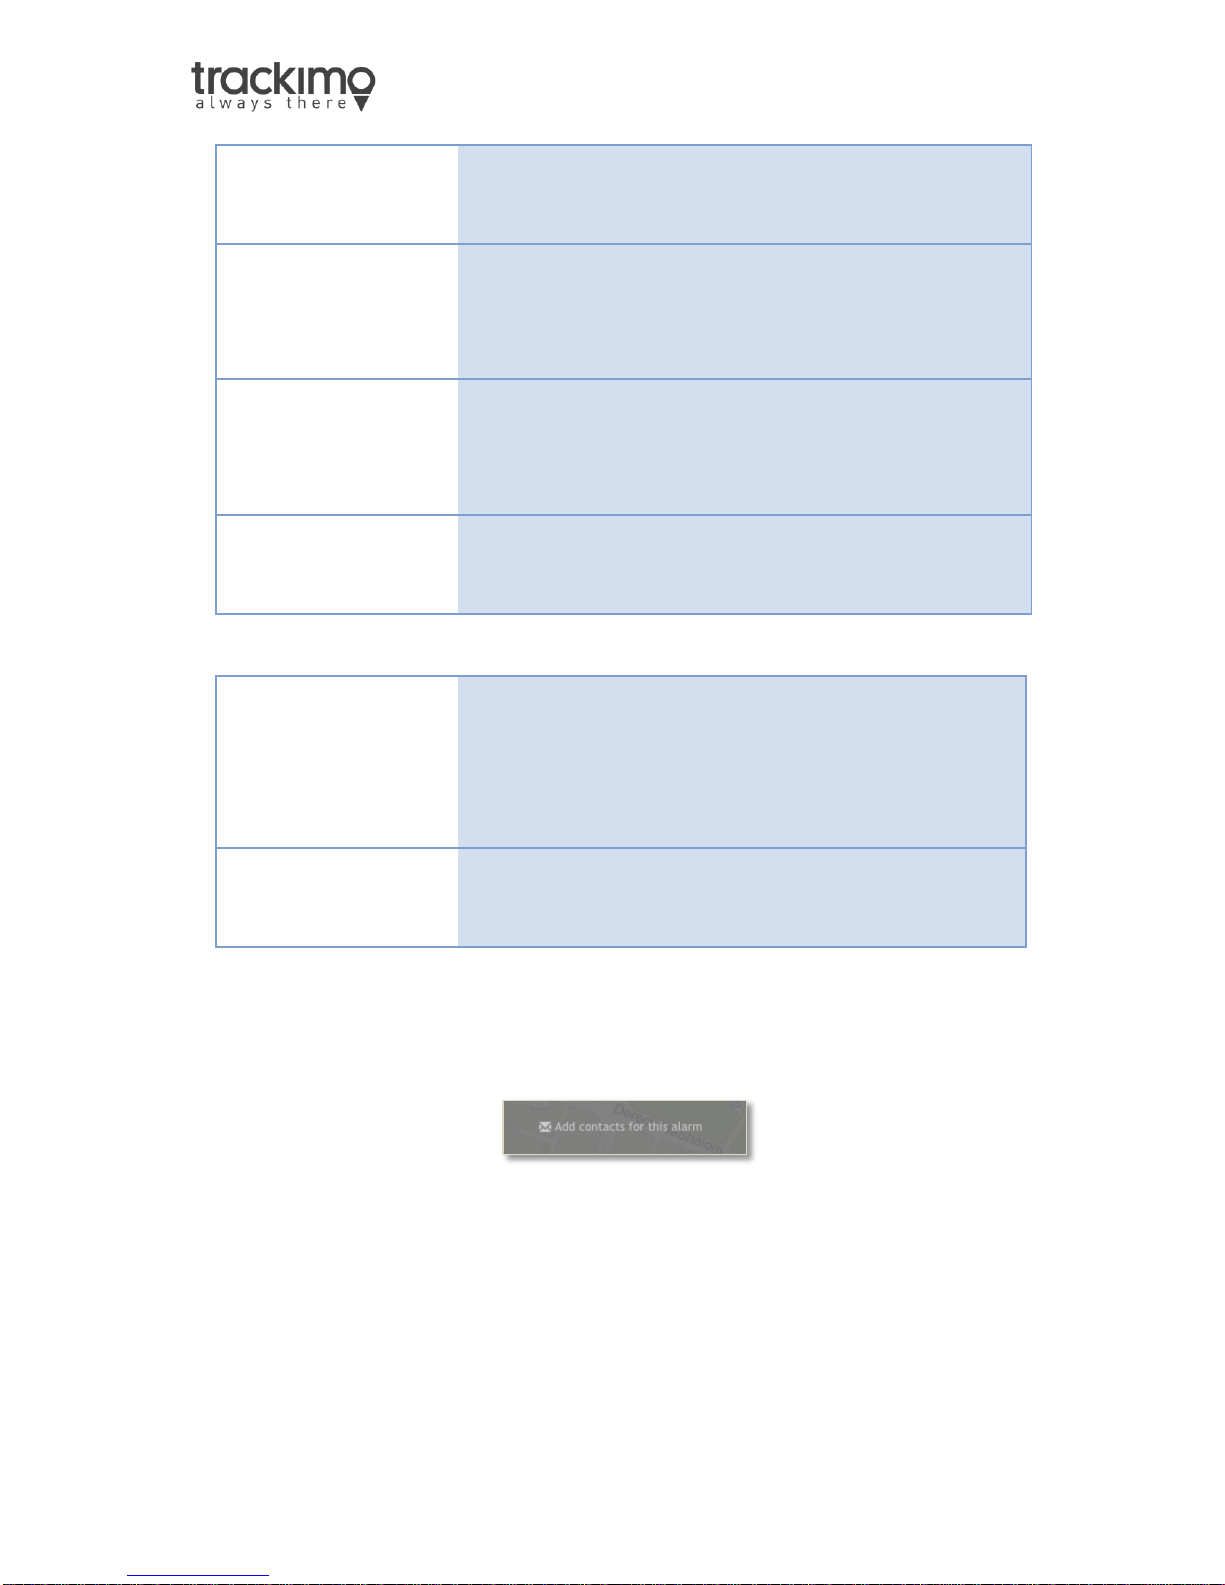
Sending Alarms to contacts
The Trackimo service allows you to send alarms to other contacts by entering
their email address or phone number for SMS alarm to their cell phone.
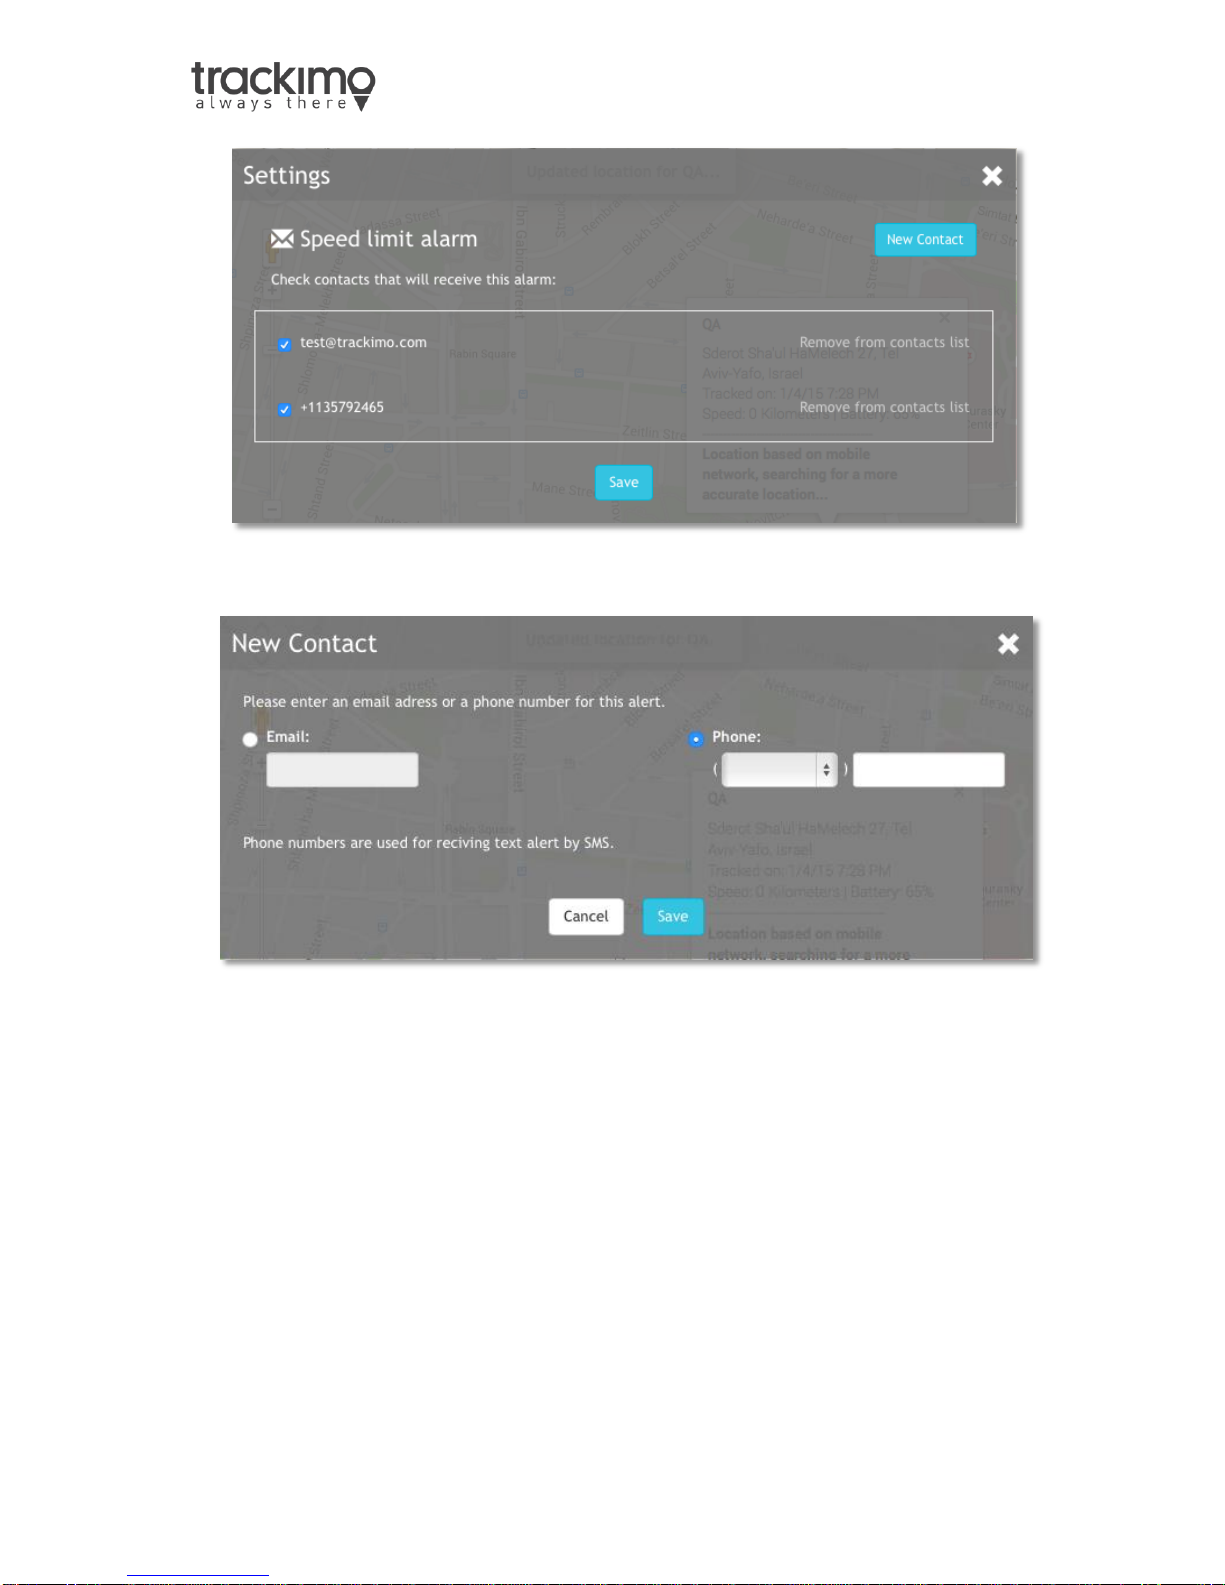
Clicking on the “Add contacts for this alarm” link below each alarm, can do this.
When this is done a dialog will appear as shown in the image below. Contacts
that are checked on the right side will receive the alarm. You may remove a
contact by clicking on the “Remove from contacts list” link per contact.
23
Page 25
User Guide v7
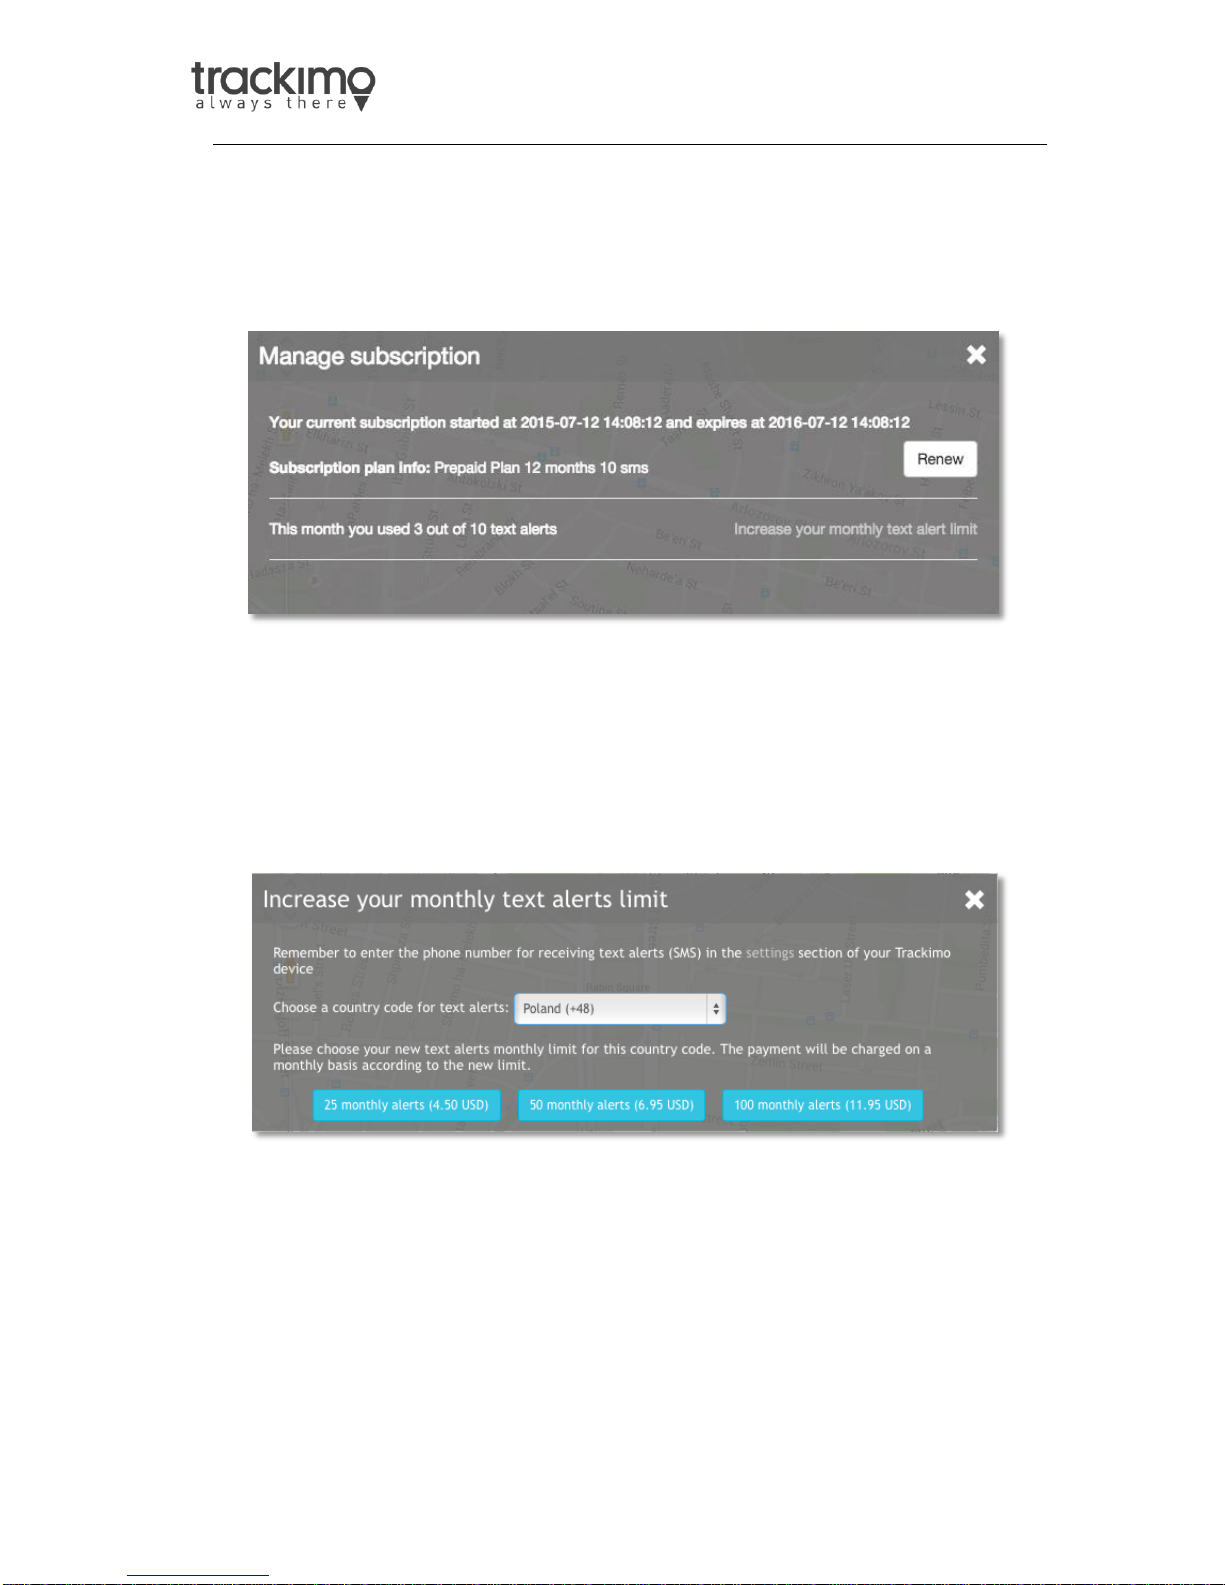
To create a new contact click on the “New Contact” button. This will open a dialog
as shown below. You can either add an email or a phone number as a contact.
24
Page 26
User Guide v7
2.7. Manage subscriptions
Clicking on the Manage Subscription will open a following popup on top of the
screen. This will allow you to see subscription information and increase your
monthly text alerts limit.
Subscription information included:
Dates of start and end of your current subscription per device
Current subscription plan
And SMS usage for this specific device
Increase your monthly text alerts limit
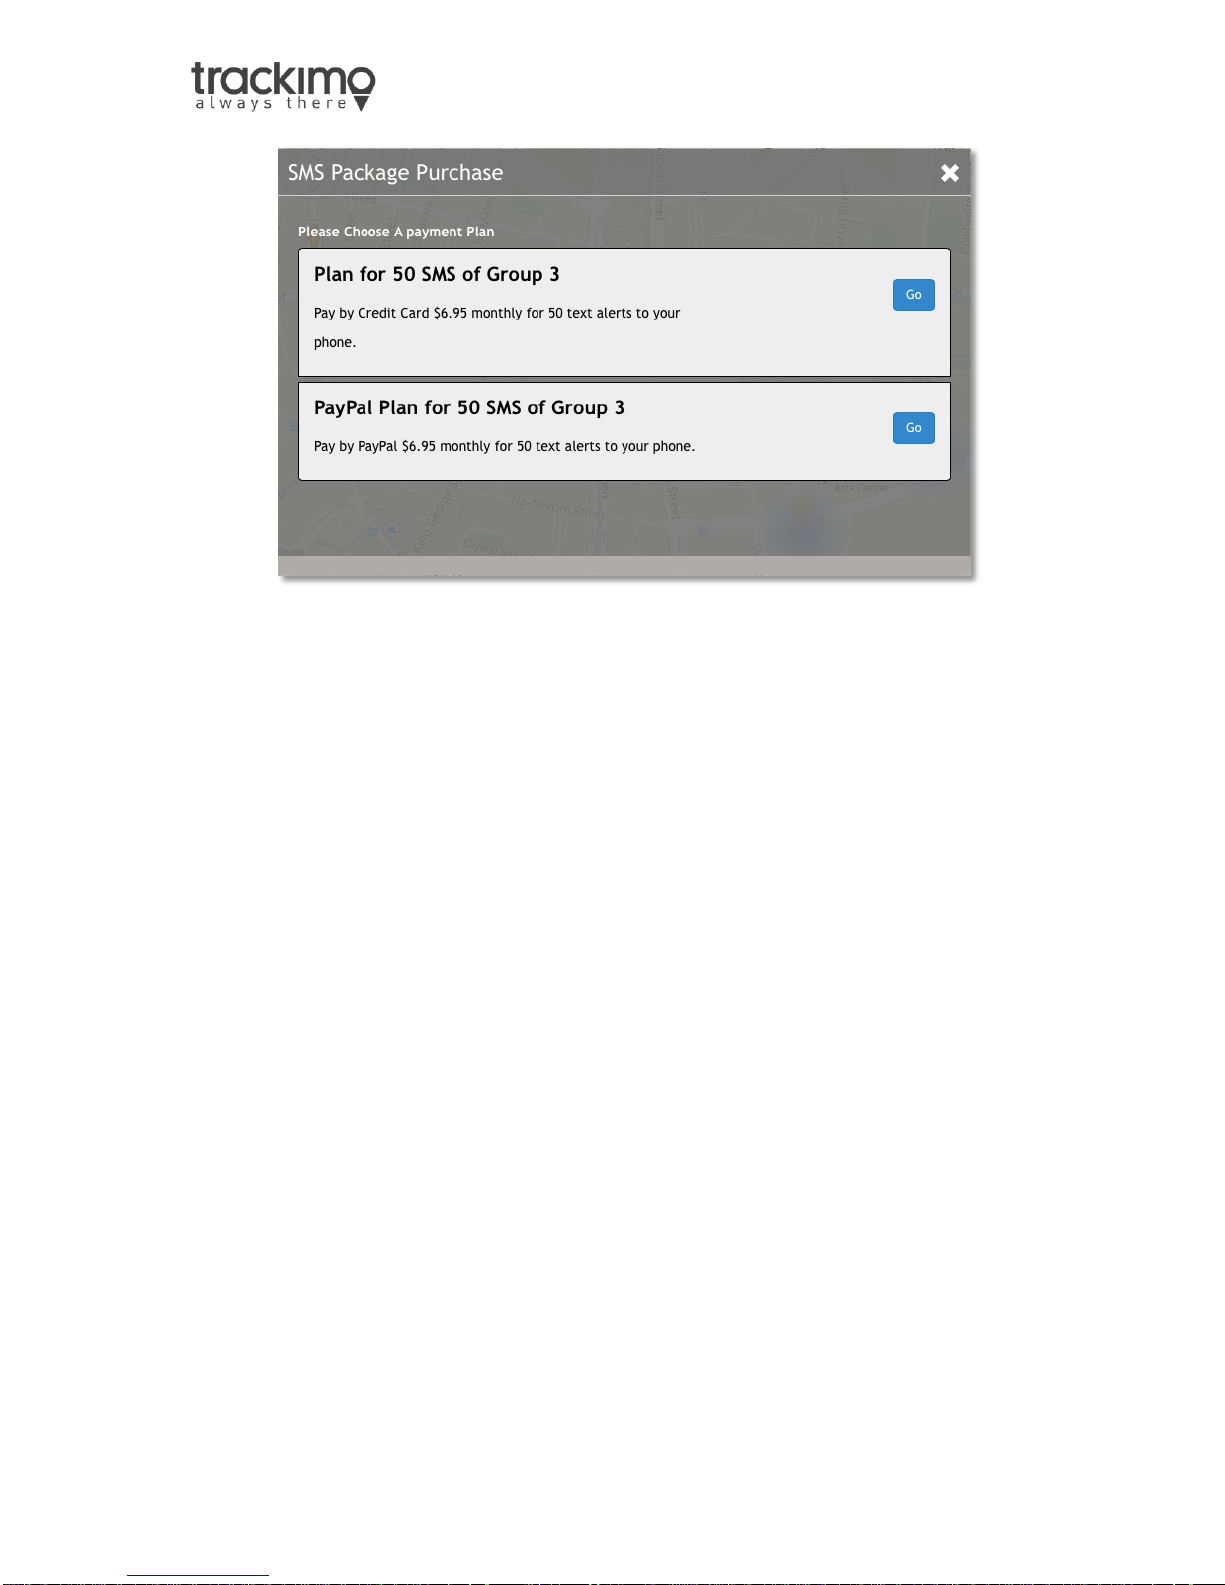
User can choose the country code for text alerts usage and increase monthly limit
of text alerts to 25, 50 & 100 alerts per month. This package requires additional
monthly subscription according to the desired limit. After choosing the monthly
limit, user choose subscription plan and pay by credit card or PayPal.
25
Page 27
User Guide v7
26
Page 28
User Guide v7
2.8. Geo Fences
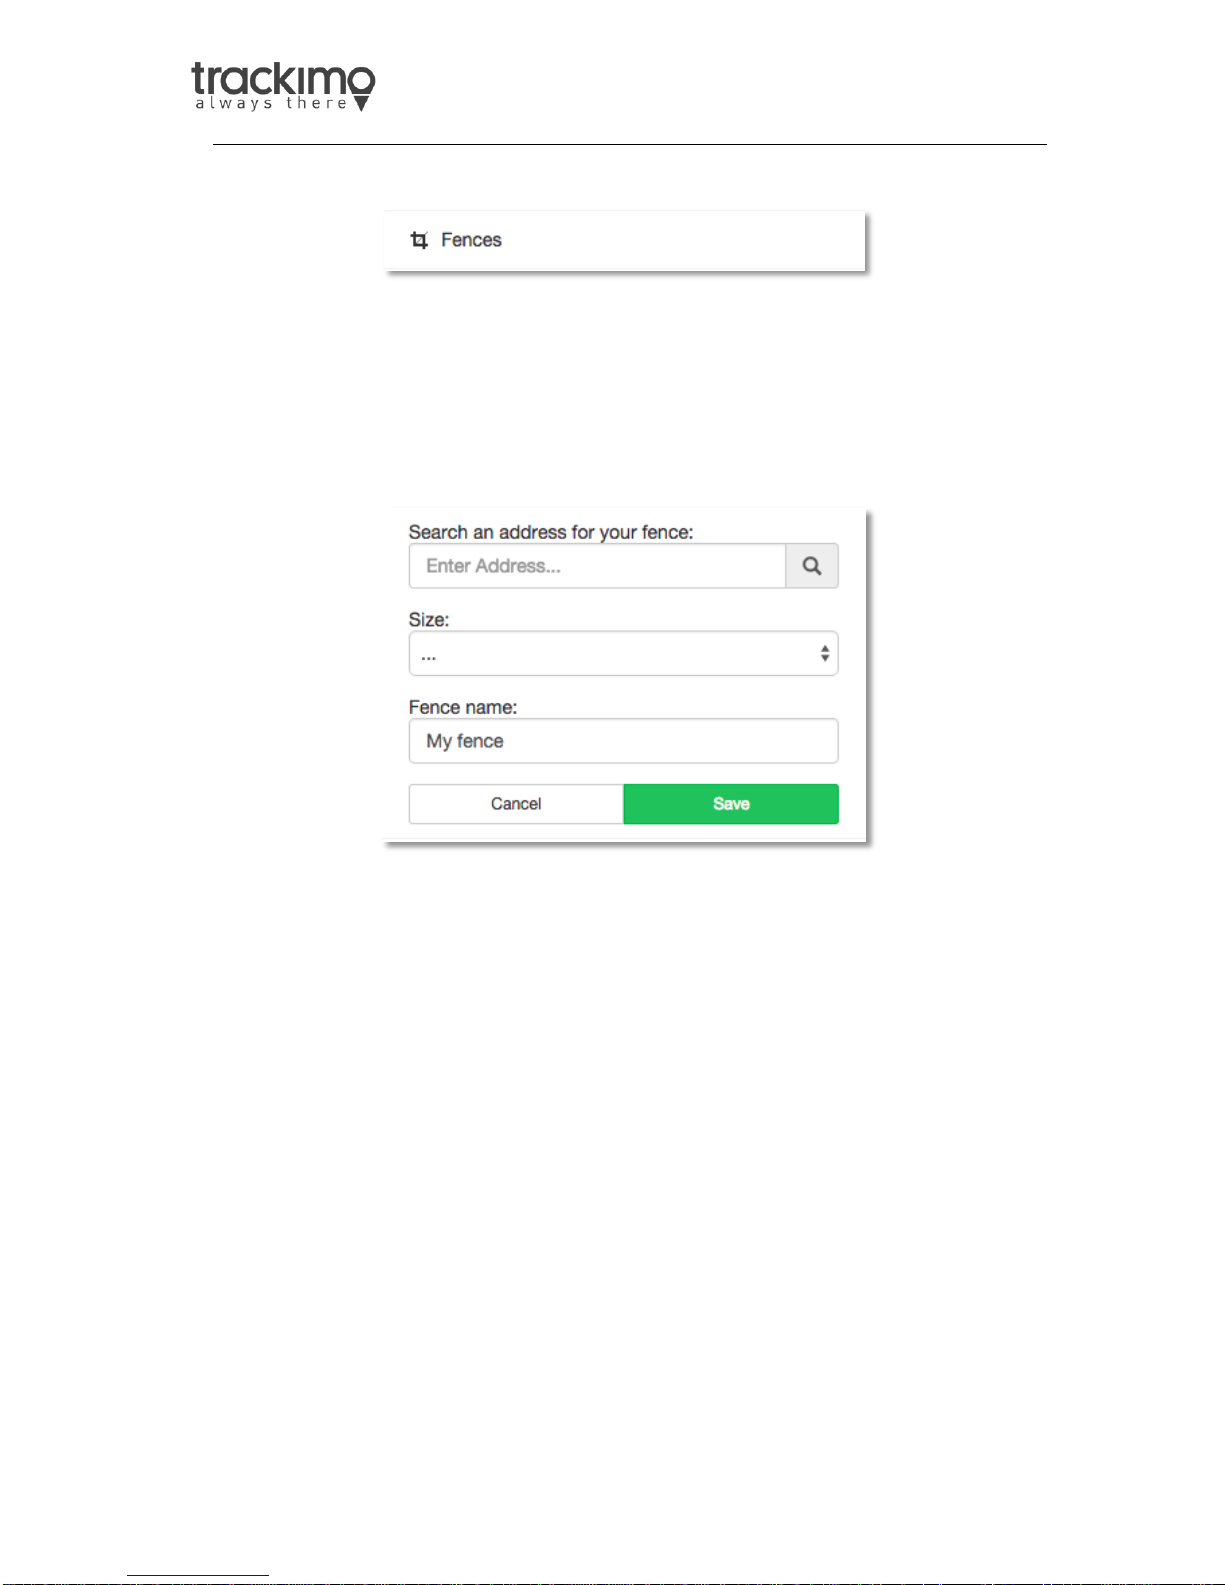
A GeoFence is a virtual fence (a rectangle around a certain location) that you can
set using the Trackimo dashboard. When the device crosses the virtual fence, you
will receive an email alarm message with information of when the device has
crossed the virtual fence.
Creating a GeoFence
To setup a GeoFence:
1. Click on the Fence button in the device menu
2. Click on the "Create a new fence" button, this will open the new fence options
below the button.
3. You will then have the option to search for an address for your fence and set
a perimeter. A red rectangle will appear on the map representing your
GeoFence. You can then move or resize your GeoFence directly on the map.
4. When done, give your fence a name in the new fence options and click on
save to save your GeoFence.
Your fence can not be smaller than 200 meters (218 Yards).
Modifying a GeoFence
To modify a GeoFence:
1. Click on the Fence button in the device menu
27
Page 29

User Guide v7
2. Click on the fence name you would like to modify.
3. The map will center on the fence and the fence will be displayed as a red
rectangle on the map.
4. Click on the Edit button
5. You will then have the option to search for an address for your fence and set
a perimeter. A red rectangle will appear on the map representing your
GeoFence. You can then move or resize your GeoFence directly on the map.
6. When done click Save.
Deleting a GeoFence
To delete a GeoFence:
1. Click on the Fence button in the device menu
2. Click on the fence name you would like to modify.
3. The map will center on the fence and the fence will be displayed as a red
rectangle on the map.
4. Click on the Delete Button.
5. Your fence will be deleted
28
 Loading...