

Page 1
User´s guide
EN
Tracker R50 - Tracker T60
Page 2
!
1 2 3 4
5 6
8
7
9 10
12
11
N
F
2
3 31
Page 3

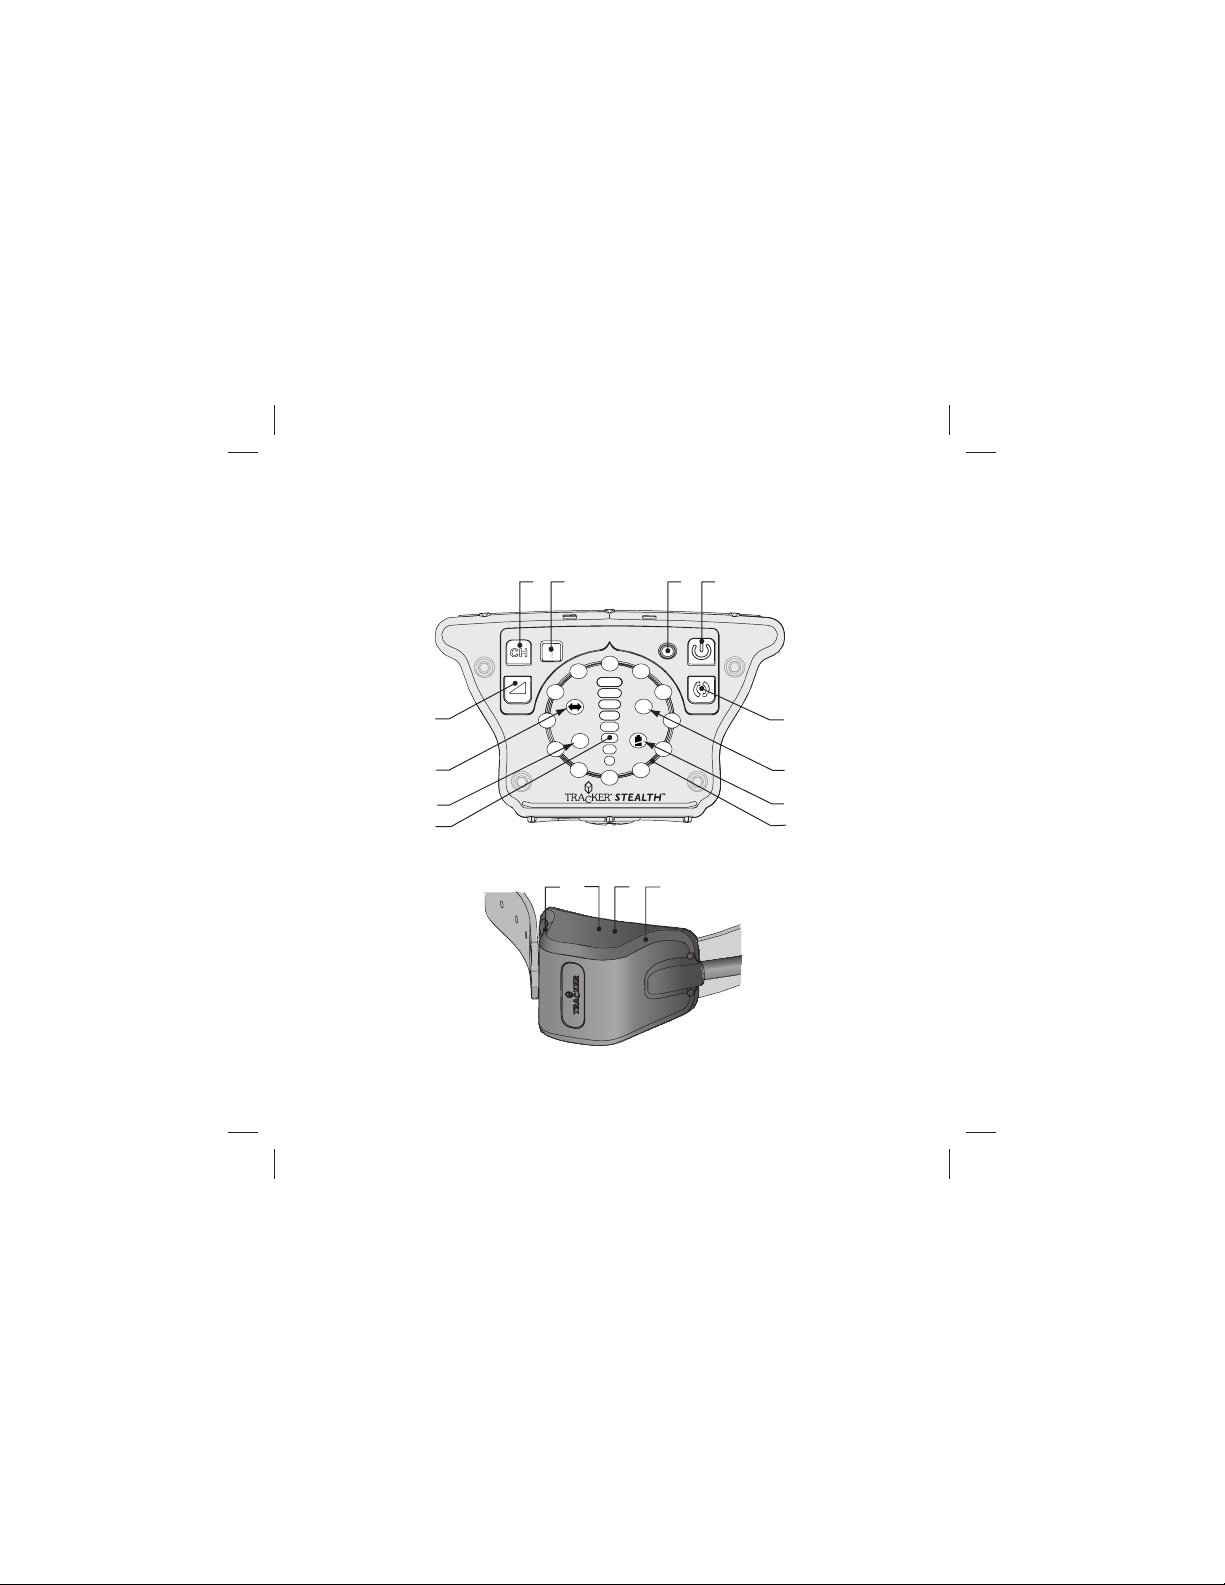
Controls on the receiver
1. Transmitter change button
2. Transmitter number display
3. Power/Standby indicator light
4. On/Off button
5. Volume button
6. Copy button
7. Pointing indicator light
8. Treeing indicator light
9. Barking indicator light
10. Transmitter low battery indicator light
11. Bearing signal strenght bar
12. Tracking signal display
1. Green LED
2. Red LED
3. Blue LED
LEDs on the Transmitter
Page 4

EN
Tracker Stealth .........................................................................5
Warnings and cautions .............................................................6
Installing and replacing the batteries ........................................7
Holding the receiver ...............................................................10
Changing volume settings ......................................................10
Alarms and indicator lights on the receiver ............................ 11
Alarms and indicators on the transmitter ................................13
Switching on the devices for the 1st time ................................ 15
Calibrating the receiver’s internal compass ............................ 17
Pairing the transmitter with the receiver .................................18
Copying a transmitter to other receivers ................................19
Tracking .................................................................................. 20
Practicing tracking .......................................................................... 20
Putting on the collar ........................................................................ 21
Locating the bearing ....................................................................... 22
Reading the direction...................................................................... 24
Reading the distance ...................................................................... 24
Using the standby mode ......................................................... 25
Switching off the devices ........................................................26
Erasing the transmitter from the receiver ............................... 27
Maintenance ...........................................................................28
Troubleshooting ...................................................................... 30
Technical specifications ..........................................................34
Warranty and Service .............................................................36
Additional safety information ..................................................38
Quick Guide ............................................................................ 42
Contents
Page 5
EN
Tracker Stealth
Congratulations for purchasing Tracker Stealth dog tracking system!
This user manual includes information on the proper use and maintenance
of the product. For more information on the Tracker products, visit www.
trackerradio.com or www.tracker.fi.
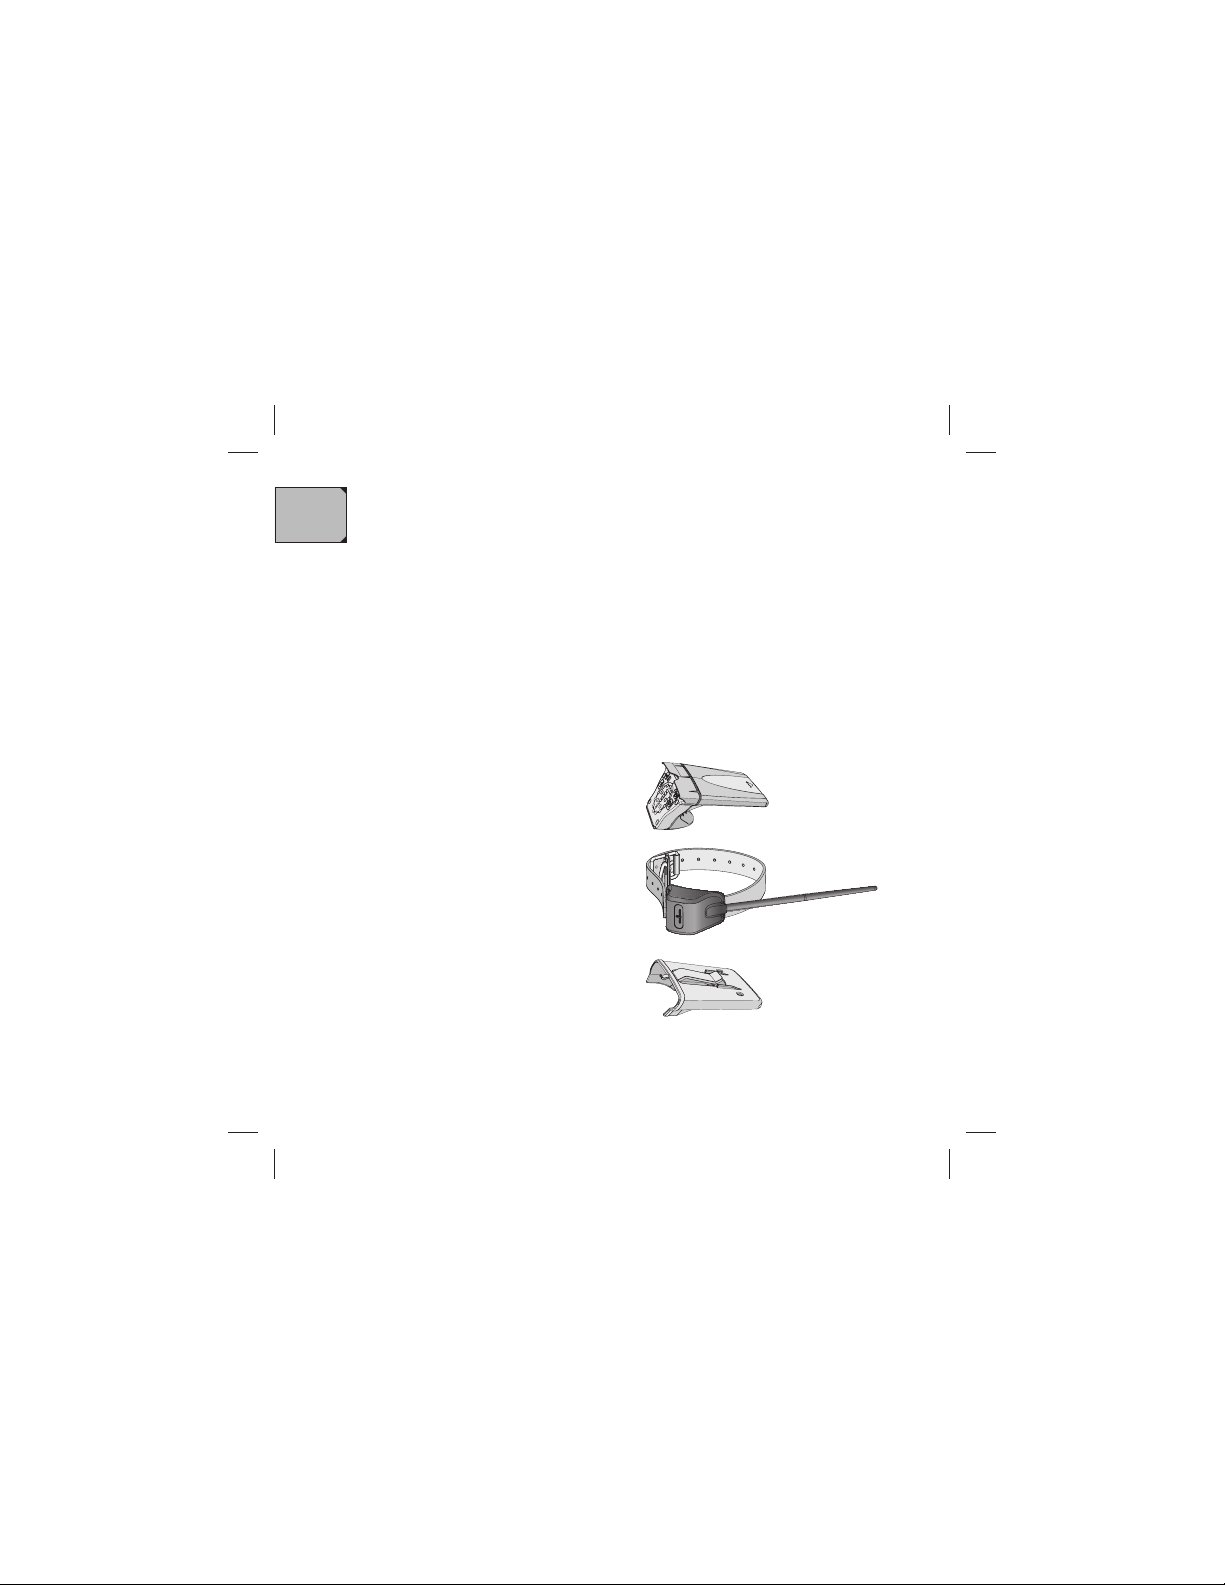
Contents of the storage case:
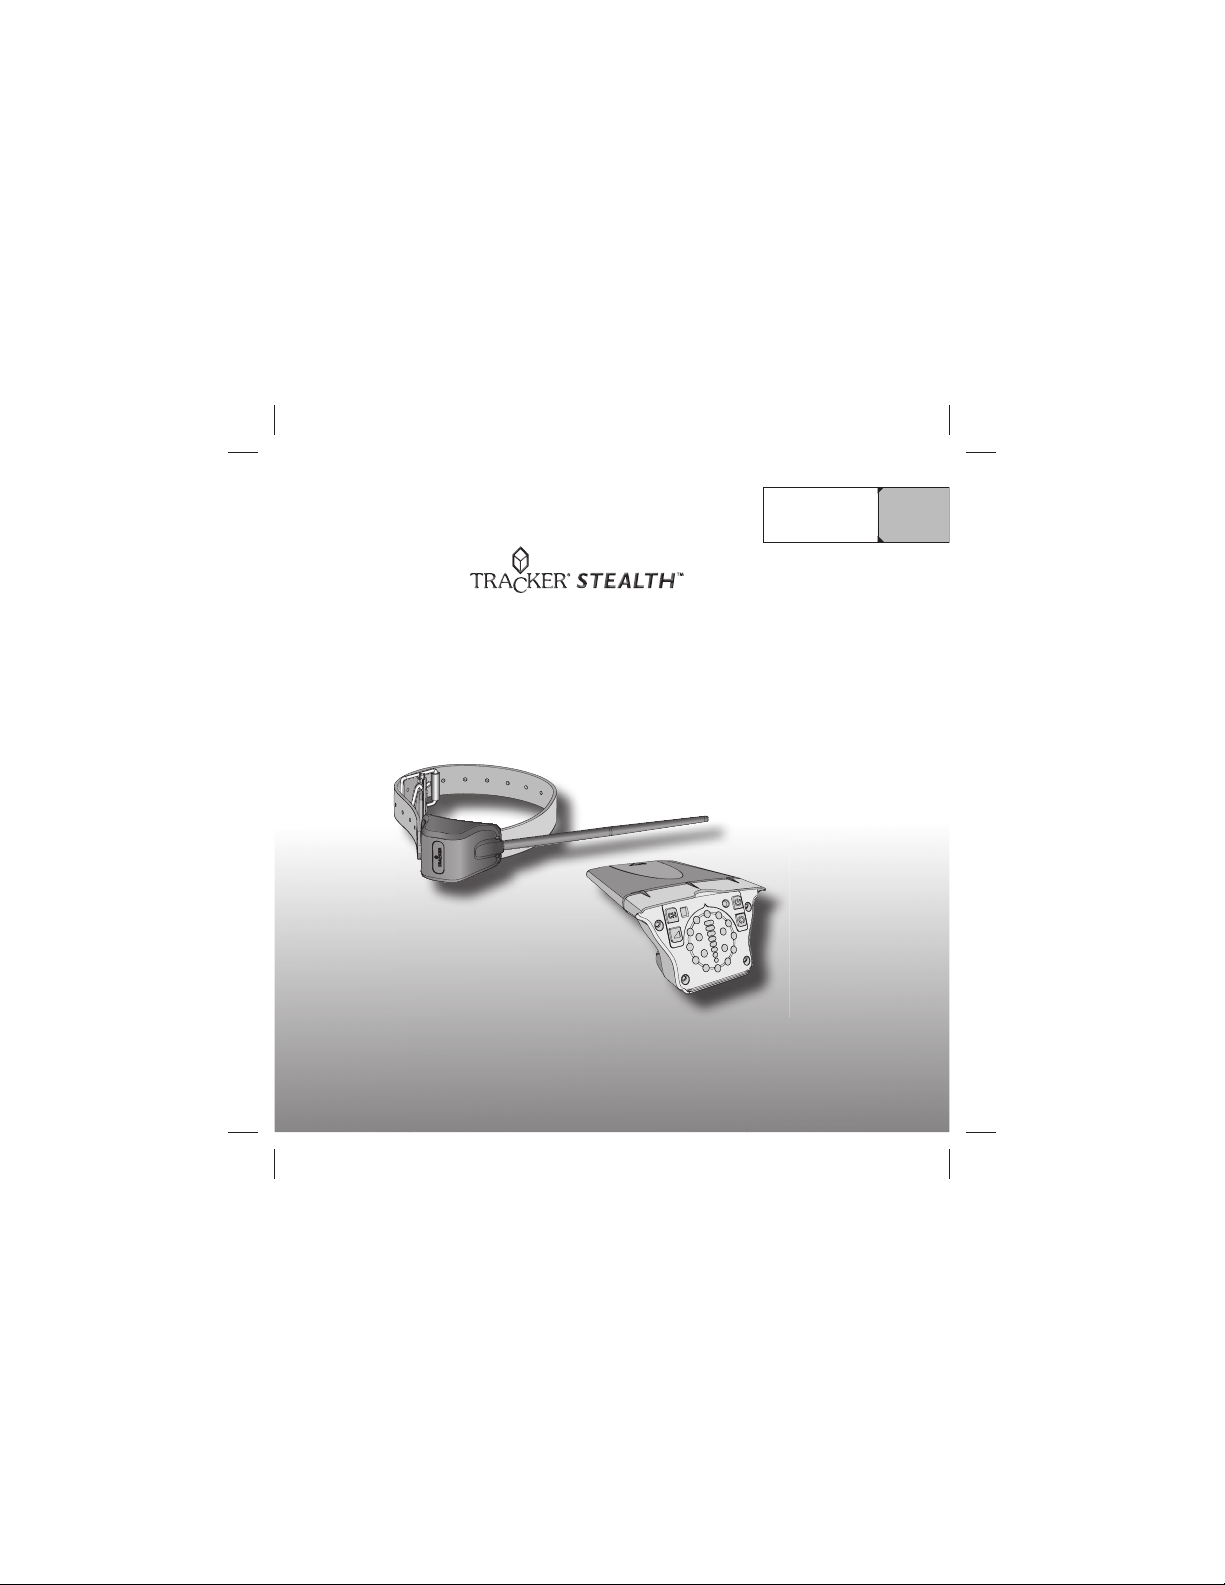
• Tracker R50 Receiver
• Tracker T60 Transmitter collar
• Receiver belt holster
• Batteries
• User Manual
5
Page 6

EN
Warnings and cautions
Tracker Stealth tracking device is intended to be an aid for tracking
you dog while hunting. Do not rely solely on the device for locating
your dog in any circumstances.
If you are using the devices for the first time, it is recommended
that you practice tracking without the dog before going into field
tracking.
The warranty becomes void if any changes or modifications are
done to the devices unauthorized by Tracker.
The radiated output power of the T60 complies with the FCC RF
exposure limits. To avoid the possibility of exceeding the FCC
radio frequency exposure limits, a distance of at least 20 cm
should be kept with the user and the device while operating.
CE 0598
Hereby, Tracker Inc., declares that Tracker R50 and T60 are in compliance
with the essential requirements and other relevant provisions of Directive
1999/5/EC. (Sub-class 30 “Non-Specific Short Range Devices“) The CE
compliance statement is available at www.tracker.fi.
FCC statements:
This device complies with Part 15 of the FCC Rules. Operation is
subject to the following two conditions: (1) this device may not cause
harmful interference, and (2) this device must accept any interference
received, including interference that may cause undesired operation.
Information to user.
Any changes or modifications not expressly approved by Tracker could void
the user’s authority to operate this equipment.
6
Page 7
EN
Installing and replacing the batteries
Use only batteries from manufacturers approved by Tracker. See
www.trackerradio.com or www.tracker.fi for the latest information.
Do not use rechargeable batteries.
Always use new batteries and change them all at once. Do not mix
new and used batteries.
Recycle or dispose of the used batteries according to the local
regulations.
Risk of explosion and serious injury. Never throw batteries to
open fire.
The battery type to be used for the both devices is disposable CR123.
7
All the repairs and modifications equipments and accessories are allowed
only at authorized after sales service stores.
IC statements:
Operation is subject to the following two conditions: (1) this device may
not cause interference, and (2) this device must accept any interference,
including interference that may cause undesired operation of the device.
Any changes or modifications not expressly approved by Tracker could
void the user’s authority to operate this equipment.
Please deliver the device into a specific recycling point after use. This
request concerns this device and other labeled extra devices. Please do
not recycle these in the normal waste. In the lack of a specific recycling
point, please return the device to the seller or manufacturer after use.
All the repairs and modifications to equipments and accessories are
Page 8
EN
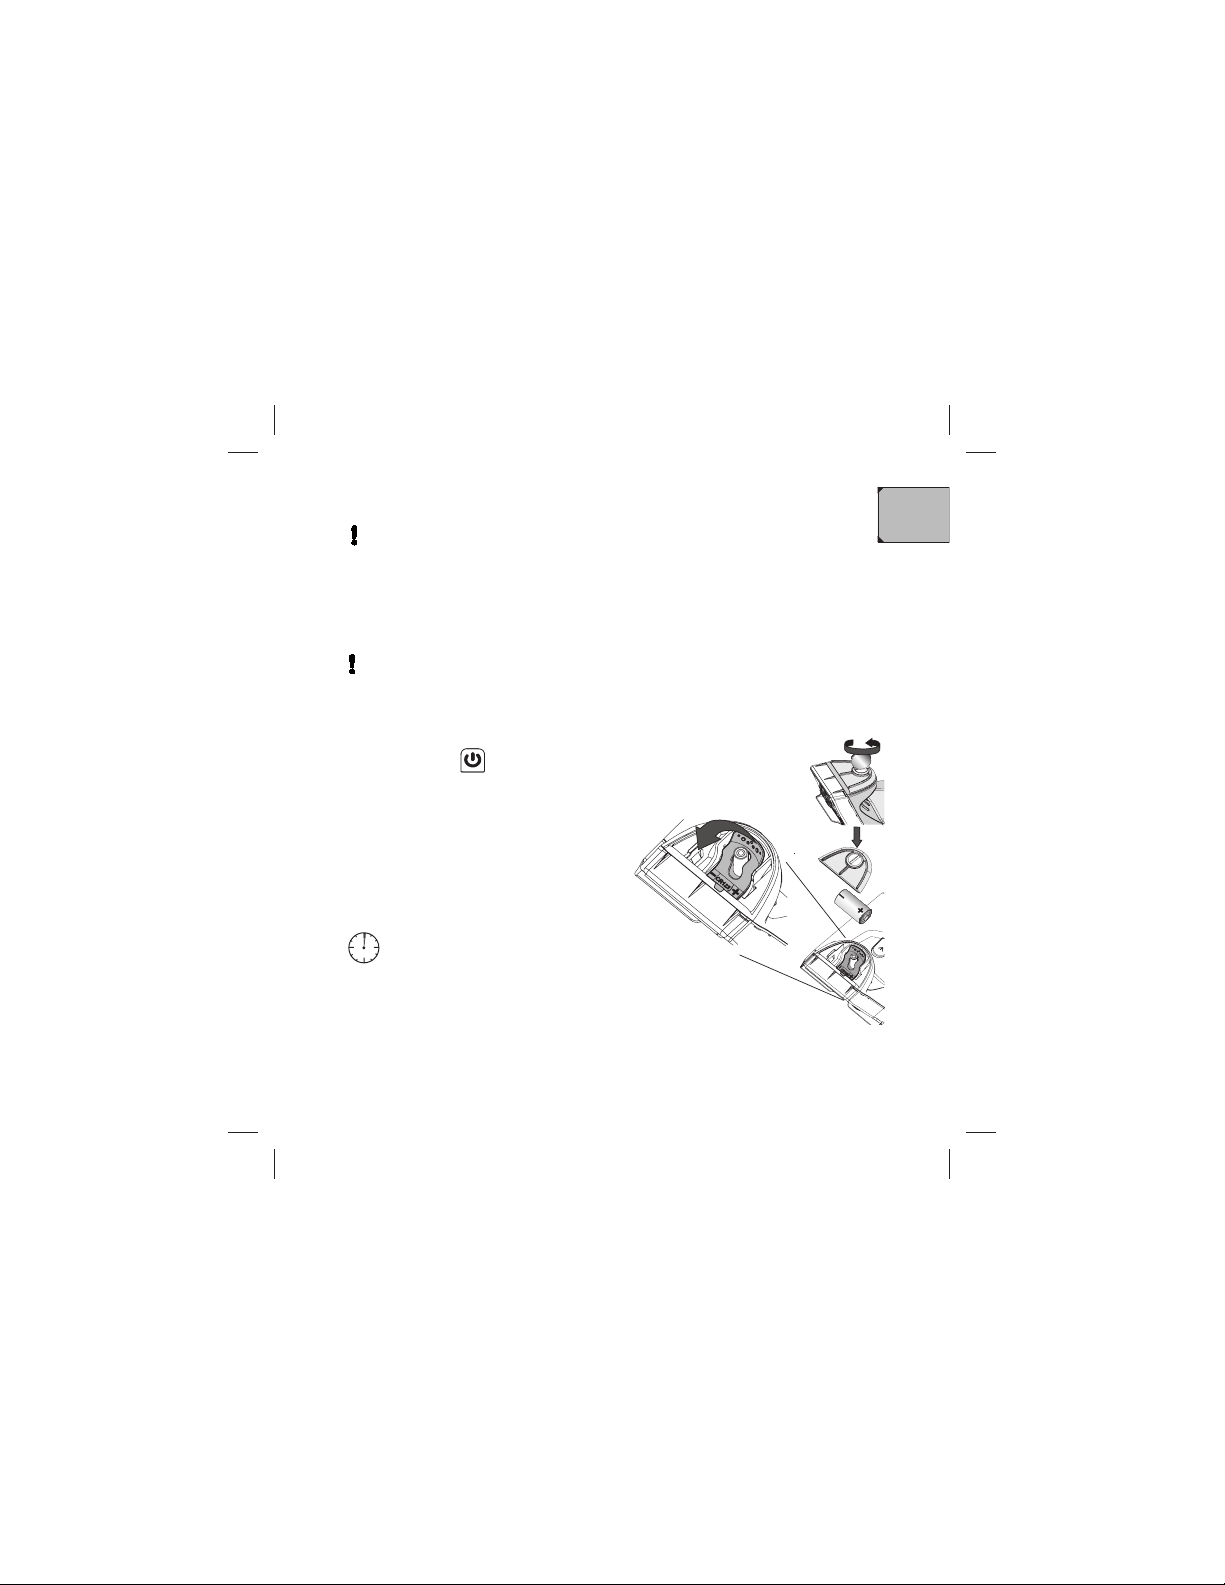
You need one CR123 battery for the receiver.
If the transmitter is in use, you have one minute to change the
receiver’s battery without breaking up the pairing between the
devices. Make sure you have a new fresh battery at hand removed
from the package.
Receiver
1. If the receiver is in use, switch it off by
pressing the button until you hear
three falling beeps and the lights go
out.
2. Clean the battery housing and cover
from any dirt or moisture.
3. Open the battery cover by turning the
screw counter clockwise with a coin.
4. Remove the old battery by pulling up
the rubber flap.
If you are changing the battery on
the move, you have one minute to
complete the steps 4 and 5.
5. Place the new battery in its slot,
aligned with the negative and positive
pole markings.
8
Use a coin or similar to open the battery cover. Be careful with a
screwdriver, as excessive force may damage the threads.
Page 9
EN
6. Carefully fit the cover in place and tighten the screw by turning it
clockwise with the coin.
7. Switch on the receiver by pressing the button until the Power/
Standby indicator light starts blinking.
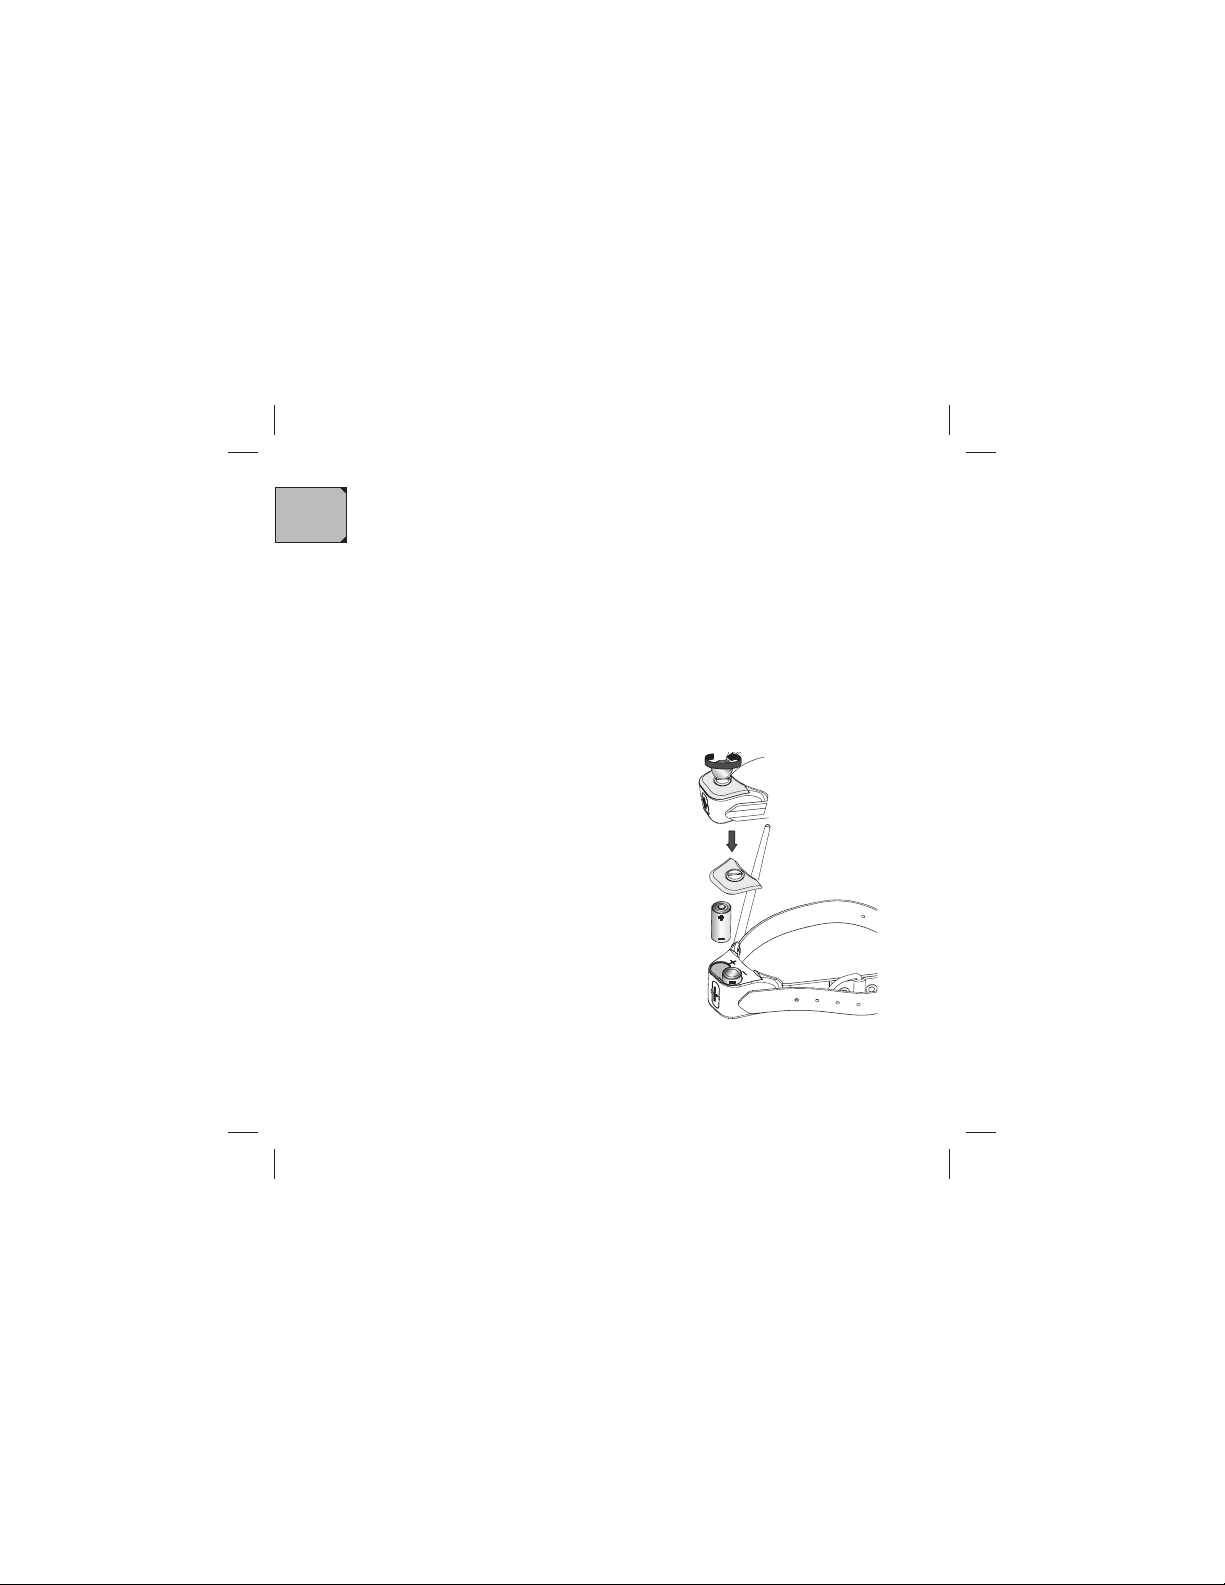
1. If the transmitter is in use, remove the
collar from the dog.
2. Clean the transmitter from any dirt or
moisture.
3. Open the battery cover by turning the screw
counter clockwise with a coin.
4. Remove the old batteries.
5. Place the new batteries in the battery slots,
aligned with the negative and positive pole
markings.
6. Check that the battery housing is clean and
the seals are undamaged.
7. Carefully fit the cover in place and tighten the
screw by turning it clockwise with the coin.
8. The transmitter goes to standby mode as soon
as the batteries and the cover are in place;
For the LED indications, see Alarms and
indicators in the transmitter.
Transmitter
You need two CR123 batteries for the transmitter.
9
Page 10
EN
Holding the receiver
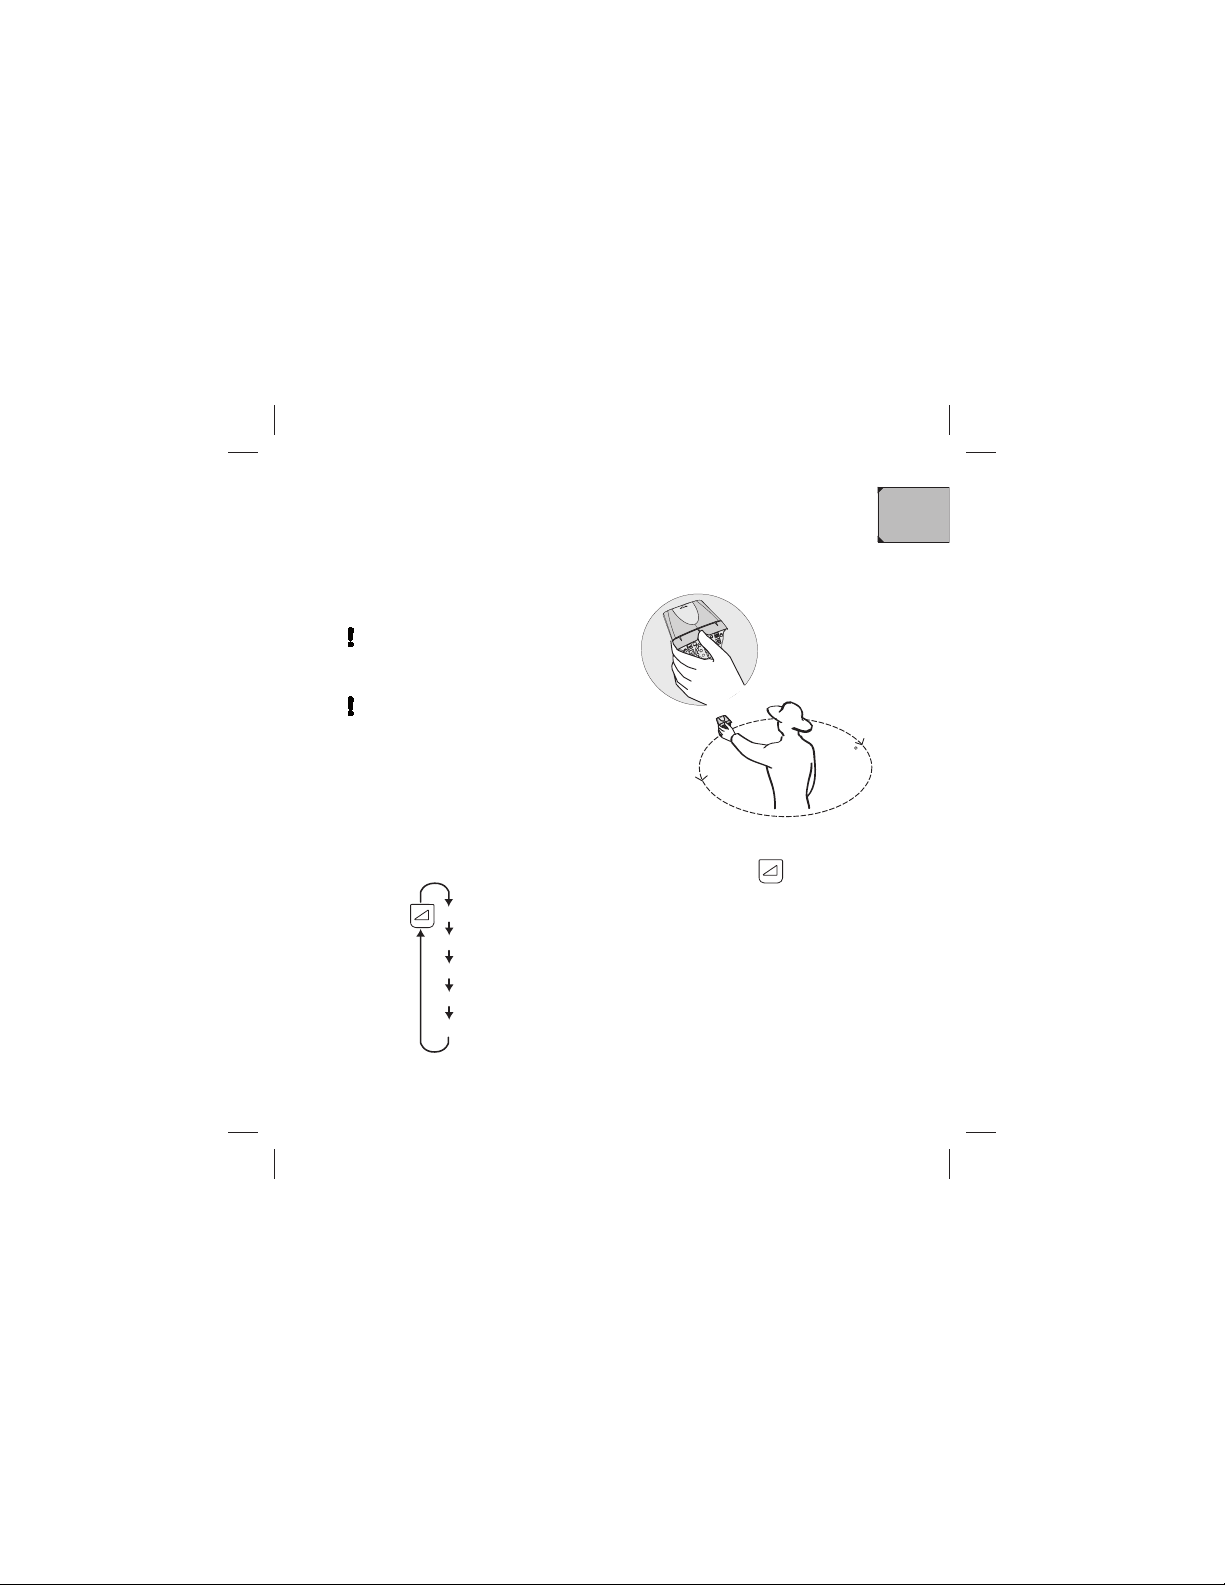
Hold the receiver with one hand at eye level
in front of you.
There is a slot for the thumb on the
receiver’s visor. A misplaced finger
may distort the signal to the antenna.
Keep the receiver in continuous left
- right sweeping motion (min. 180°) to
maintain the bearing fresh. Check the
bearing from different directions
every once in a while. Check that the
direction is correct by turning a full
circle of 360° every once in a while.
360
Changing volume settings
To change between the volume settings, shortly press the button.
Normal volume with vibration
Mute, lights only/silent
Low volume
Normal volume
Vibration only
10
Page 11

EN
The alarms do not function at the limits of the transmission range
between the receiver and the transmitter.
The alarms go off and the indicators light up to indicate the following
functions:
Pointing
• The dog remains steady on point.
• When the dog starts moving again, the light goes out.
Barking
• The dog is barking at a certain interval and volume.
• When the barking stops, the light goes out.
Transmitter low battery
• Change the transmitter’s batteries as soon as possible.
Treeing
• The dog remains treeing.
• When the dog returns to four legs, the light goes out.
Alarms and indicator lights on the receiver
!
11
Page 12

EN
Tracking mode
• The Power/Standby indicator light blinks in green at short interval when
the receiver is paired with the transmitter and held in horizontal
position.
Standby mode
• When you turn the receiver down to vertical position, the receiver goes
to Standby and the Power/Standby indicator light starts to blink at long
interval. This is the battery saving mode.
Receiver low battery
• The Power/Standby indicator light turns red.
• Change the receiver’s battery as soon as possible.
If the transmitter is in use, you have one minute to change the
receiver’s battery without breaking up the pairing.
See Installing and replacing the batteries for detailed instructions.
12
Page 13

EN
Alarms and indicators on the transmitter
The LEDs in the transmitter indicate the following alarms and functions:
Green LED
• Green LED blinks 5 times when the batteries have been installed or
changed and the cover closed to indicate the transmitter is in the
standby mode.
• Green LED lights up for 2 seconds when the transmitter is paired
succesfully with the receiver.
• During tracking, the green LED blinks when the transmitter gives
transmission pulses and functions normally.
• If the green LED does not blink or light up, change the batteries.
See
Installing and replacing the batteries for detailed instructions.
• If the green LED still does not blink or light up, take the transmitter to
Tracker or an authorized service for checking.
13
Page 14

EN
14
Red LED
• Red LED blinks 10 times when the batteries have been installed or
changed and the cover closed; low battery or malfunction.
• During tracking, the red LED blinks when the transmitter battery is low.
The low battery indicator lights up in the receiver, as well.
• Change the batteries; see Installing and replacing the batteries for
detailed instructions.
• If the red LED is still blinking, take the transmitter to
Tracker after-service for checking.
Blue LED
• During tracking, the two optional blue LEDs blink at a few seconds
interval to get better visibility to the dog when dusk or dark.
Page 15
EN
Switching on the devices for the 1
st
time
The transmitter power is on after you have installed the batteries. When
you switch on the receiver for the first time, the transmitter is paired with
the receiver. If the transmitter is already paired with the receiver, you can
move on to Tracking.
The initial pairing needs to be done only during the first start-up.
Before you start:
• Make sure that the batteries have
been installed.
• For use in normal hunting situations,
hold the receiver in horizontal position
during switch-on.
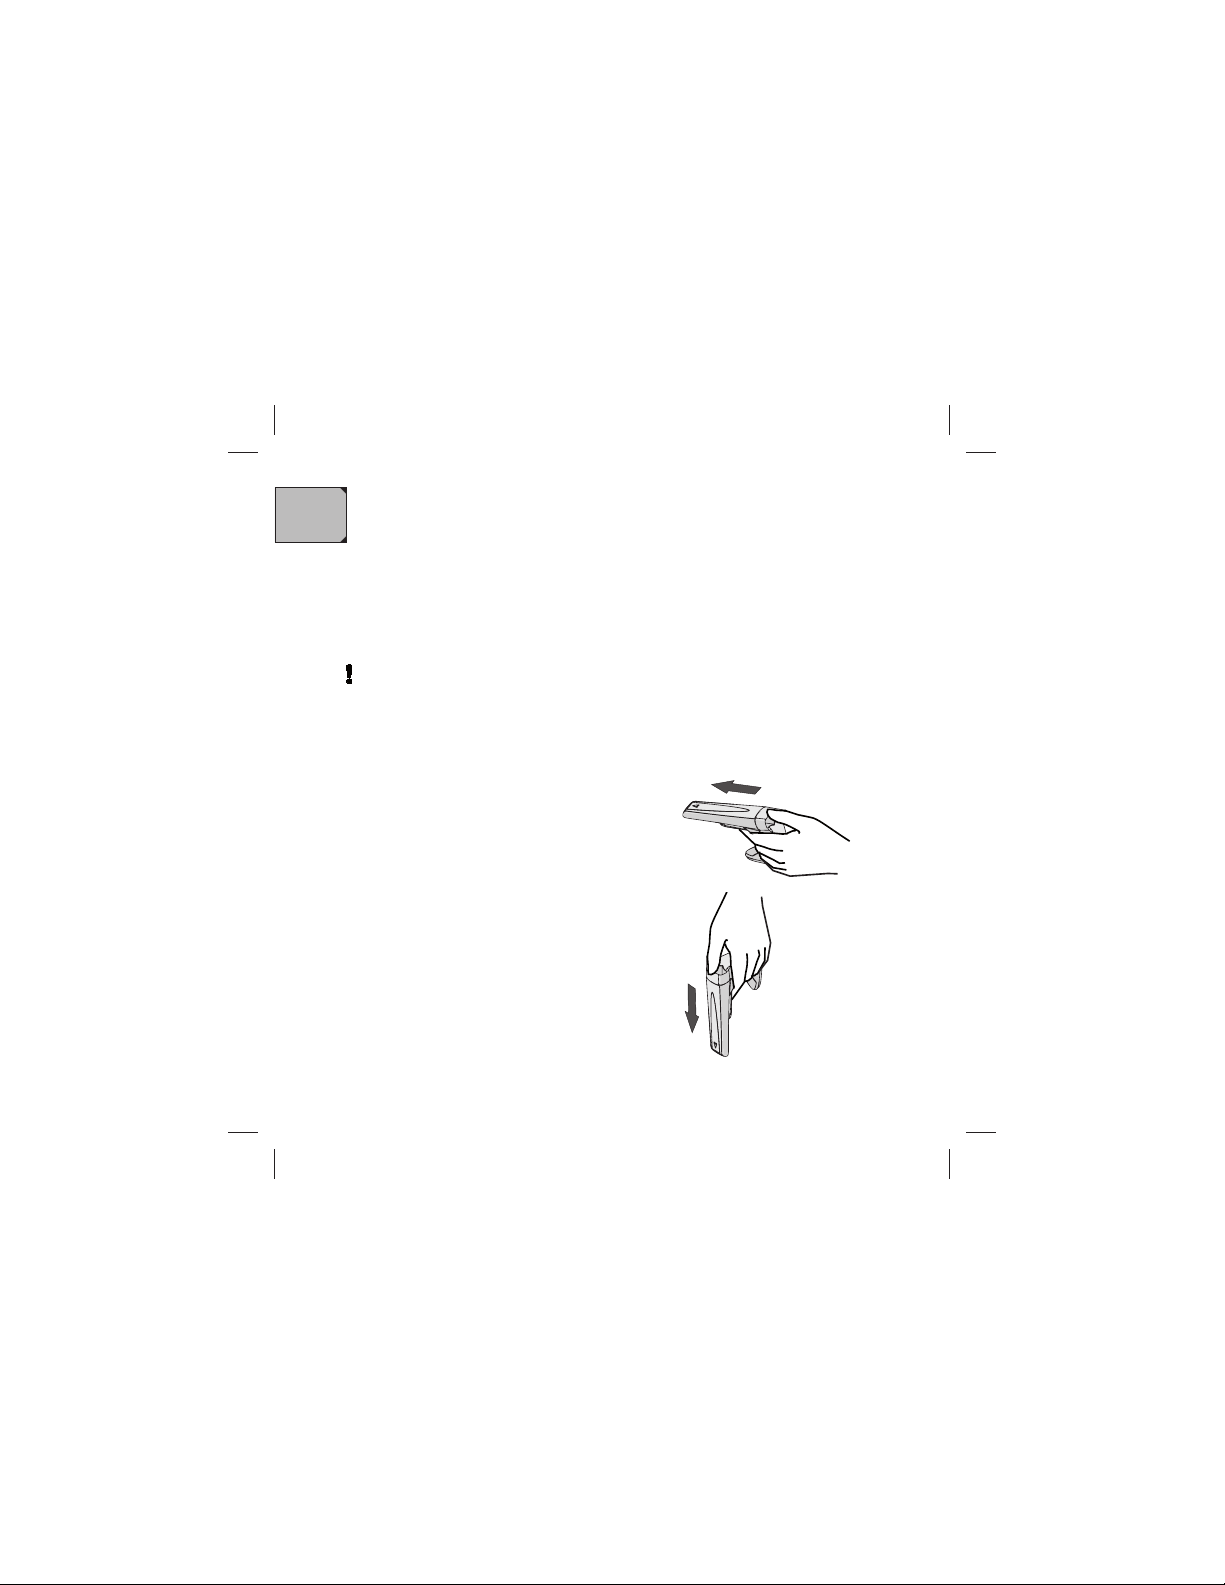
• For exceptional use, such as for
keeping receiver always in receiving
mode, hold the receiver downwards in
vertical position during switch-on.
15
Page 16

EN
The battery saving standby mode is not functional when used in
vertical tracking mode.
The transmitter has to be within one meter (one yard) of the
receiver. There must not be other transmitters within a range of five
meters (six yards).
1. Switch on the receiver by pressing the button continuously.
→ You hear two rising beeps and the Power/Standby indicator light
starts blinking.
→ The transmitter number 1 blinks on the display for 10 seconds to
indicate that it is ready for pairing.
2. Press the button continuously until you hear three rising beeps.
→ The Tracking signal display lights up, and the receiver beeps at
approximately one second interval.
→ The lights of the transmitter start blinking to indicate that the
transmitter is on and paired with the receiver.
RSS 210 Warning Statement: When tracking, keep the T60
transmitter at a minimum of 20 cm (8 “) distance from yourself or
other people.
16
Page 17
EN
17
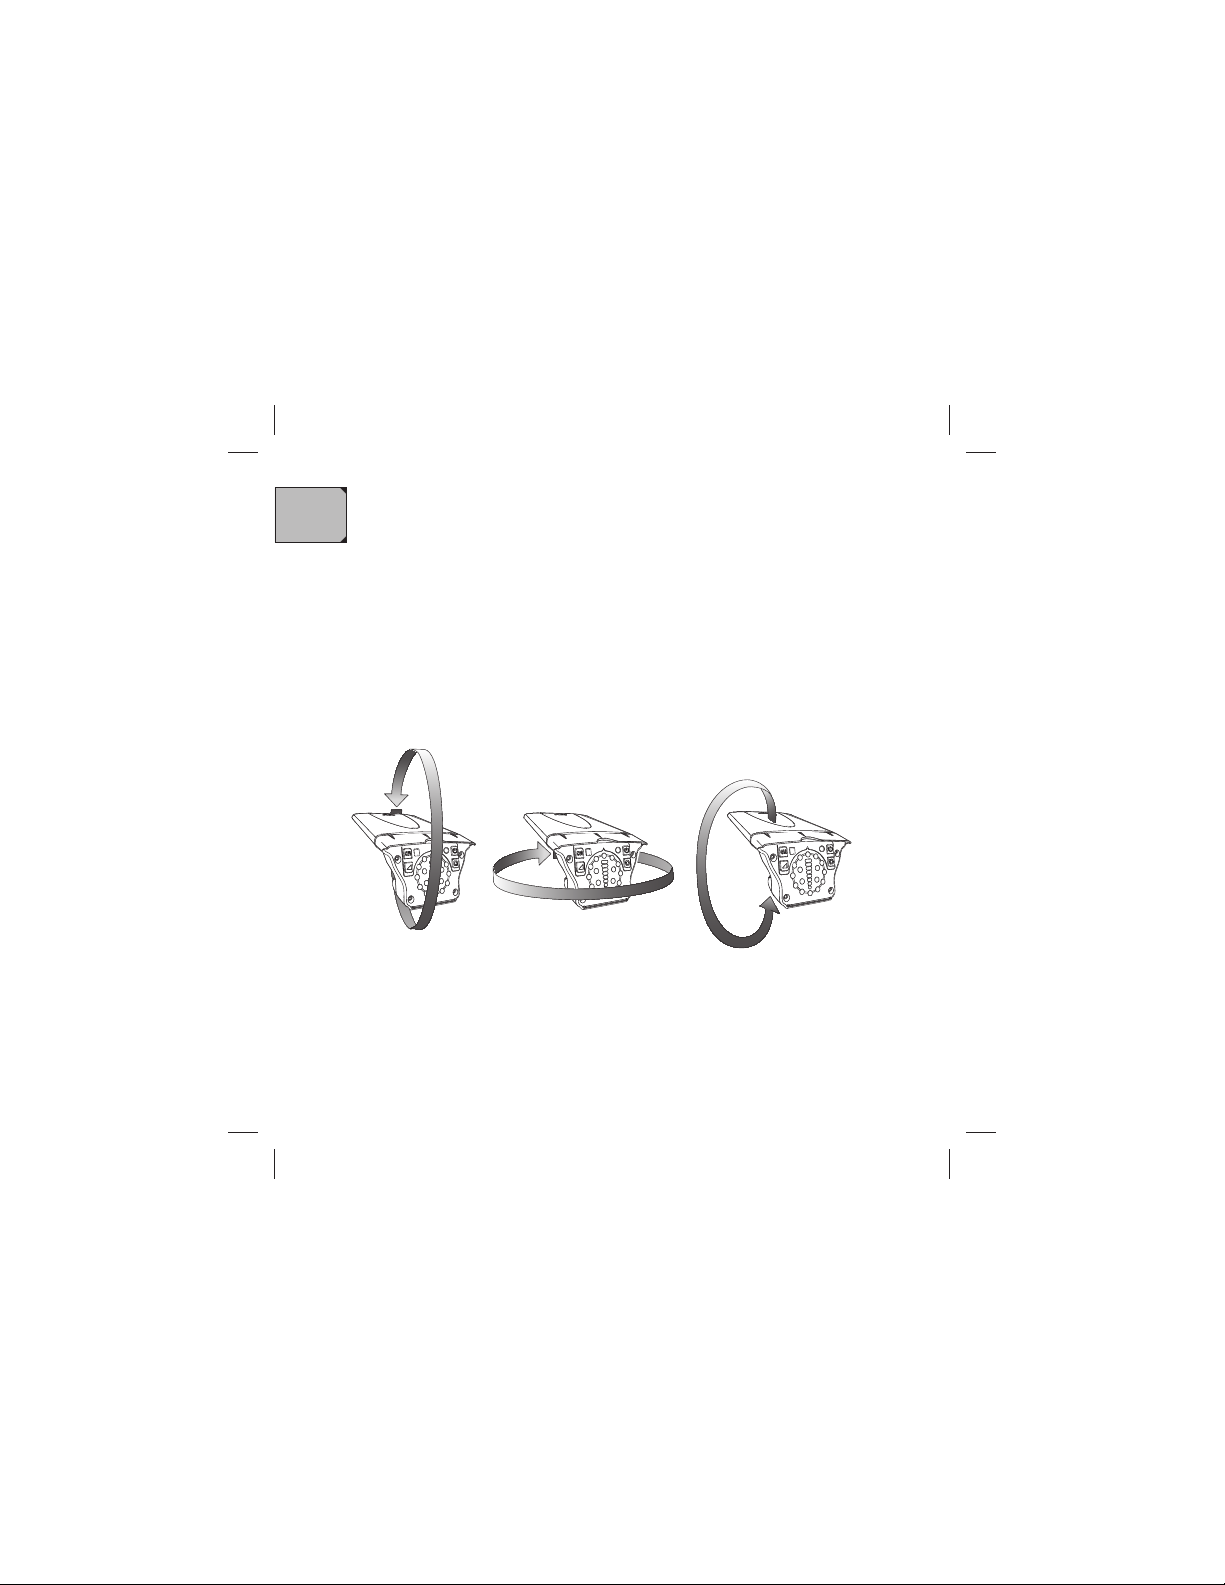
Calibrating the receiver’s internal compass
To ensure successful tracking, you need to calibrate the internal compass
of the receiver after the first switch-on.
1. Switch on the receiver outdoors as instructed in Switching on the
devices for the 1
st
time.
2. Rotate the receiver in three directions as shown in the pictures until you
hear a short double-beep.
3. Repeat the calibration several times when switching on the receiver for
the first time.
Page 18

EN
Pairing the transmitter with the receiver
You can pair up to nine transmitters with one receiver.
The transmitter has to be within one meter (one yard) of the
receiver. There must not be other transmitters within a range of five
meters (six yards).
When pairing several transmitters with one receiver, mark down the
transmitter numbers of each transmitter. Do not write on the collars
but use removable tags instead.
1. Press the button shortly until an available transmitter number blinks
on the display.
2. Press the button continuously until you hear three rising beeps.
→ The Tracking signal display lights up, and the receiver beeps at
approximately one second interval.
→ The lights of the transmitter start blinking to indicate that the
transmitter is on and paired with the receiver.
3. Repeat the pairing for each transmitter separately.
18
Page 19
EN
Copying a transmitter to other receivers
!
N
F
!
N
F
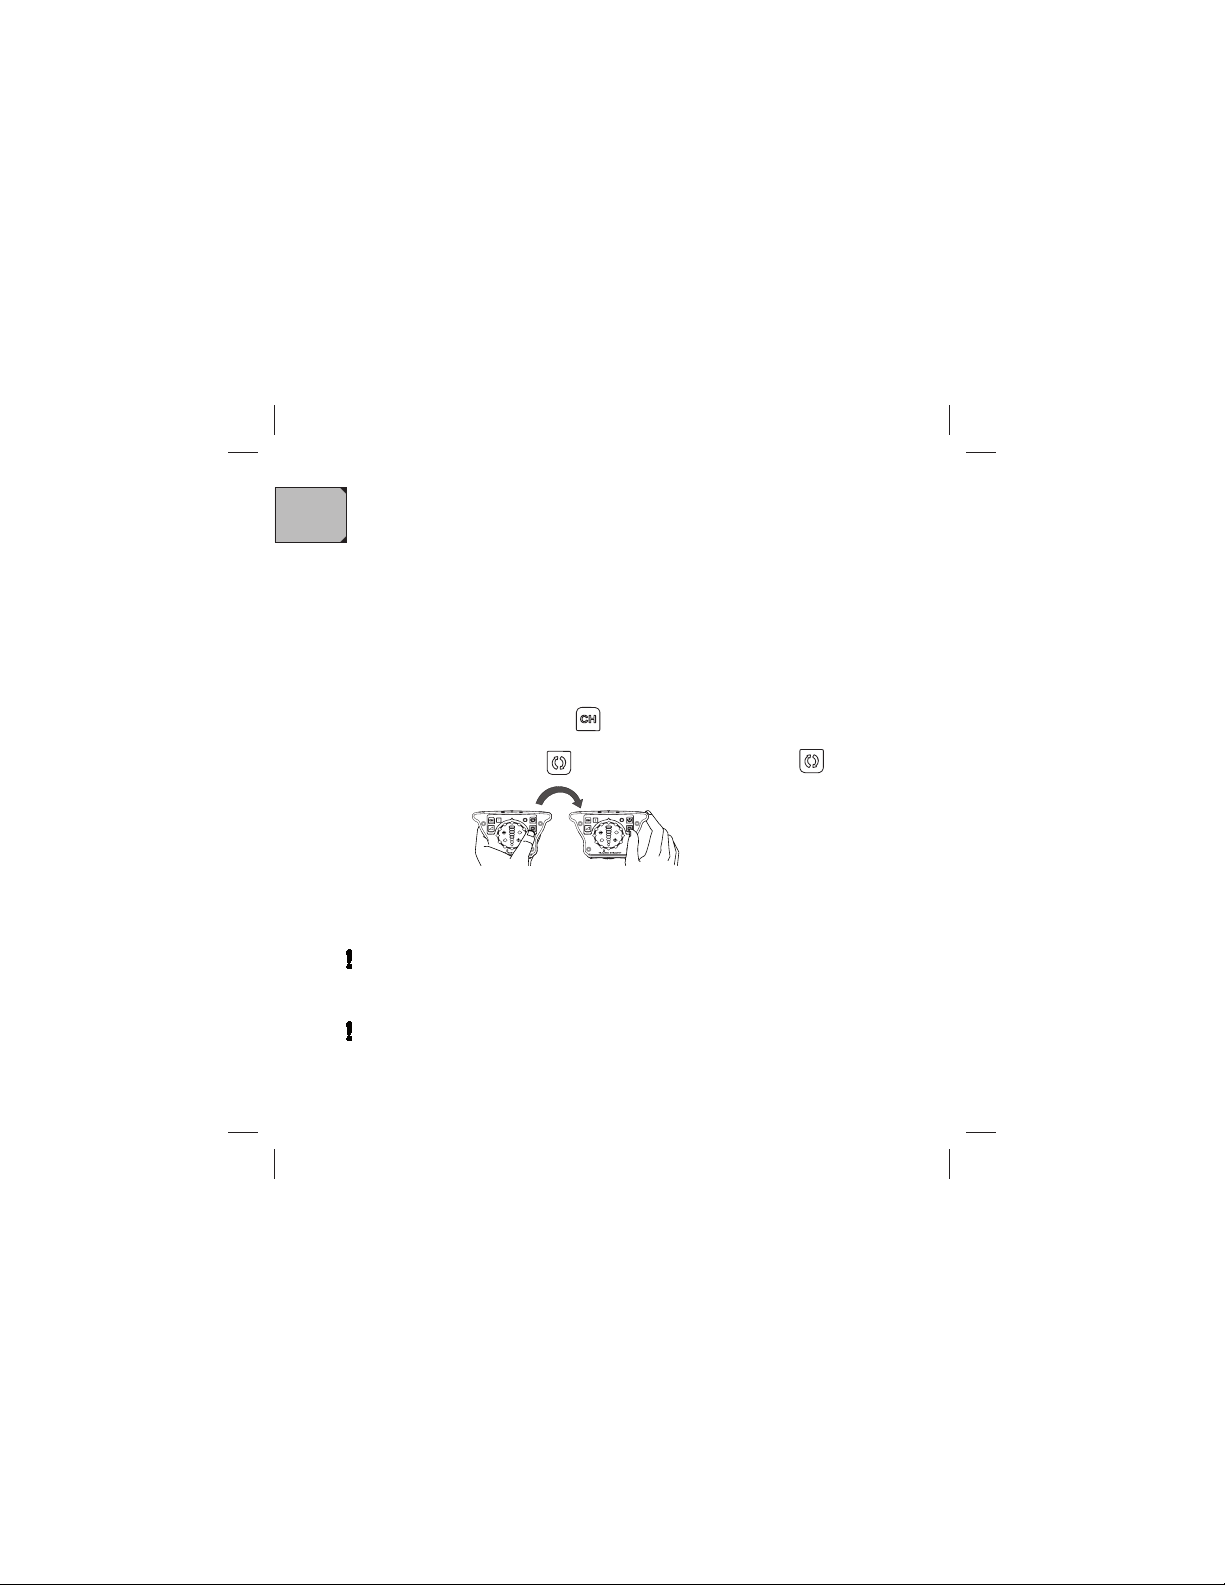
You can track a transmitter with several receivers.
1. Pair the transmitter with the receiver 1 as instructed in Pairing the
transmitter with the receiver.
2. Hold the receivers in your left and right hands, max. one meter (one
yard) apart.
3. Select an available transmitter number from the receiver 2 that you want
to add by shortly pressing the button until an available transmitter
number blinks on the display.
4. Simultaneously press the button of the receiver 1 and the button
in the receiver 2 until the receiver 2 starts beeping at one second
interval.
→ The number of the transmitter shows on the display of the receiver
2 for 10 seconds. The transmitter pairing has been copied from the
first receiver to the second.
5. Repeat the copying for all the additional receivers.
When the transmitter is switched off by the receiver 1, the
pairing information must be erased from the additional receivers.
See Erasing the transmitter from the receiver.
Transmitter can be switched off by receiver 1. Other receivers can
be used only for tracking. See Switching off the devices.
19
Page 20

EN
Tracking
You can track several transmitters with one receiver.
You can also use several receivers to track one transmitter.
Before you start:
• Pair the devices as instructed in Pairing the transmitter with the
receiver.
• If the devices have already been paired, switch on the receiver by
pressing the button continuously. Then switch on the
transmitter on the same transmitter number that was used previously.
Practicing tracking
If you are using the devices for the first time, it is very important
that you practice tracking without the dog.
1. To practice, hang the transmitter on a tree in a clear area, away from
cars and buildings.
2. Move for about 50 meters (45 yards) off the transmitter.
3. Follow the steps in Locating the bearing.
20
Page 21
EN
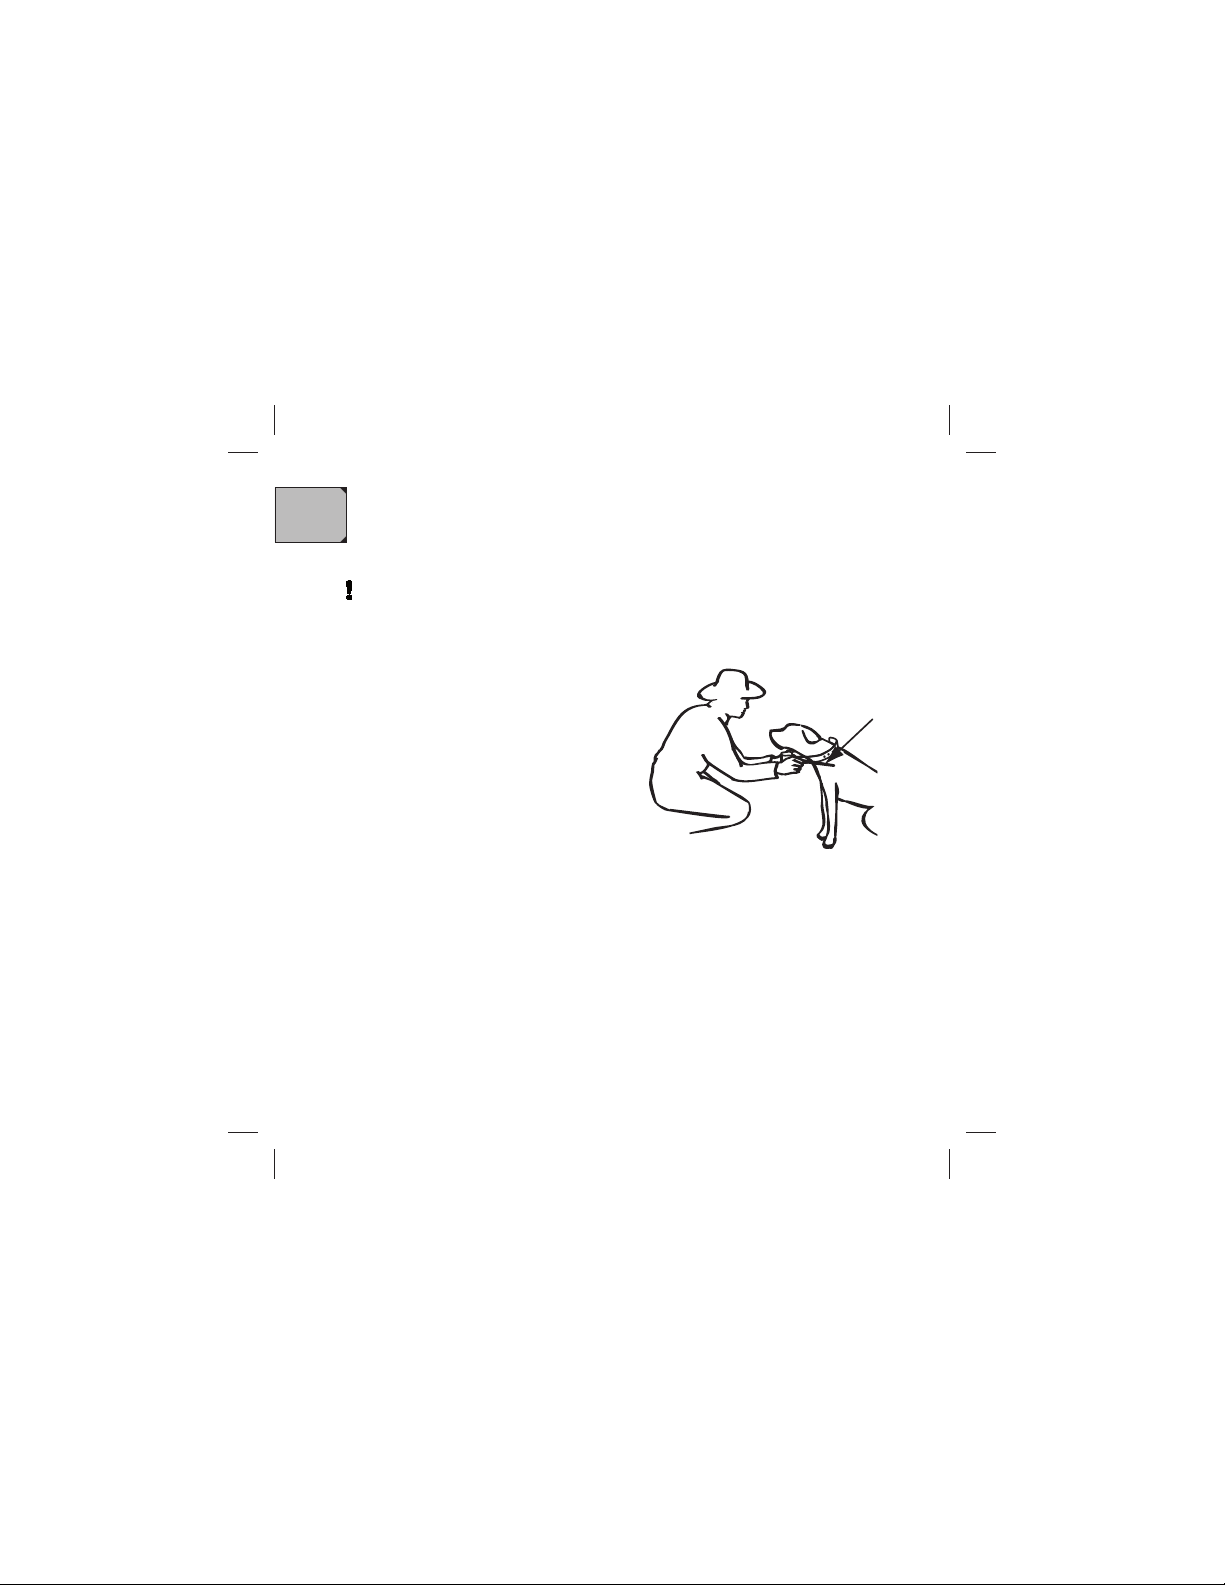
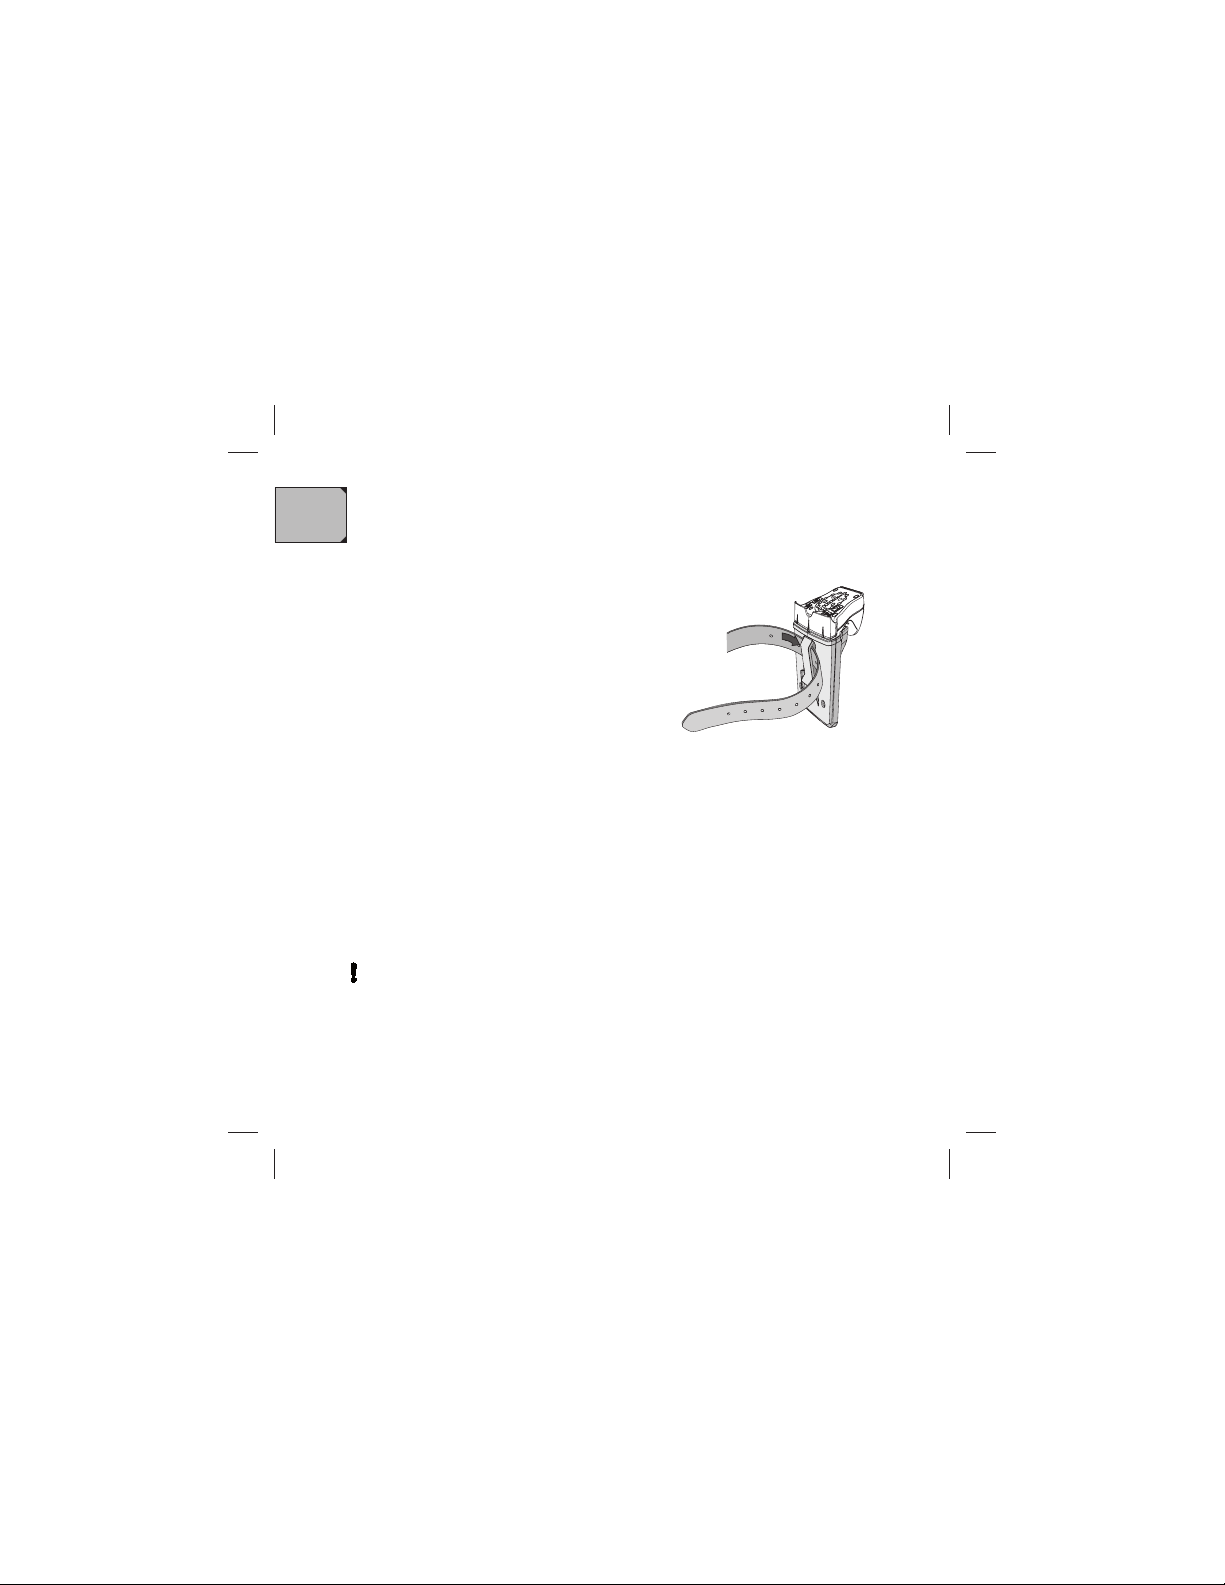
Putting on the collar
Check that:
• the transmitter is under the dog’s
neck, with the transmitting led facing
forwards
• the antenna is on the left.
Always make sure that the transmitter is on and paired with the
receiver before you put the collar on the dog.
21
Page 22
EN
!
N
F
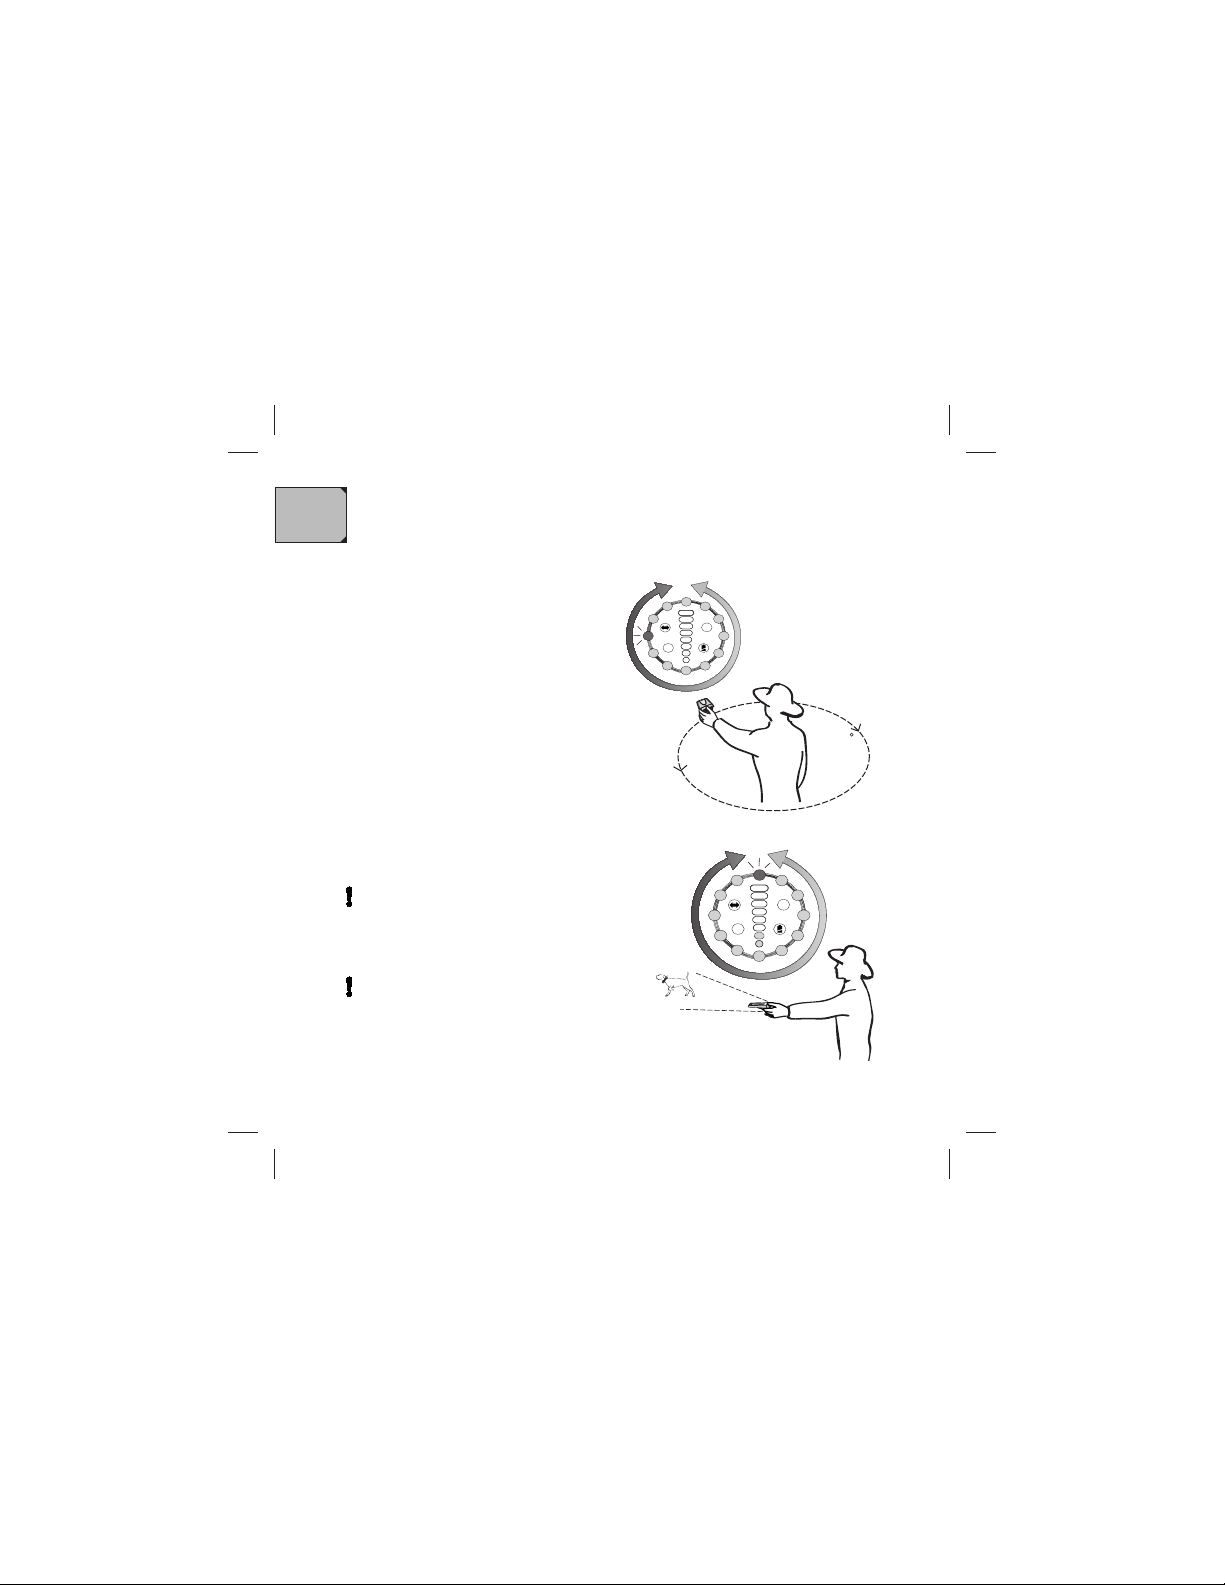
Locating the bearing
Large obstacles, such as hills or rocks, may distort the signal. If
you have trouble in locating the bearing, find an open place
elevated from the surroundings.
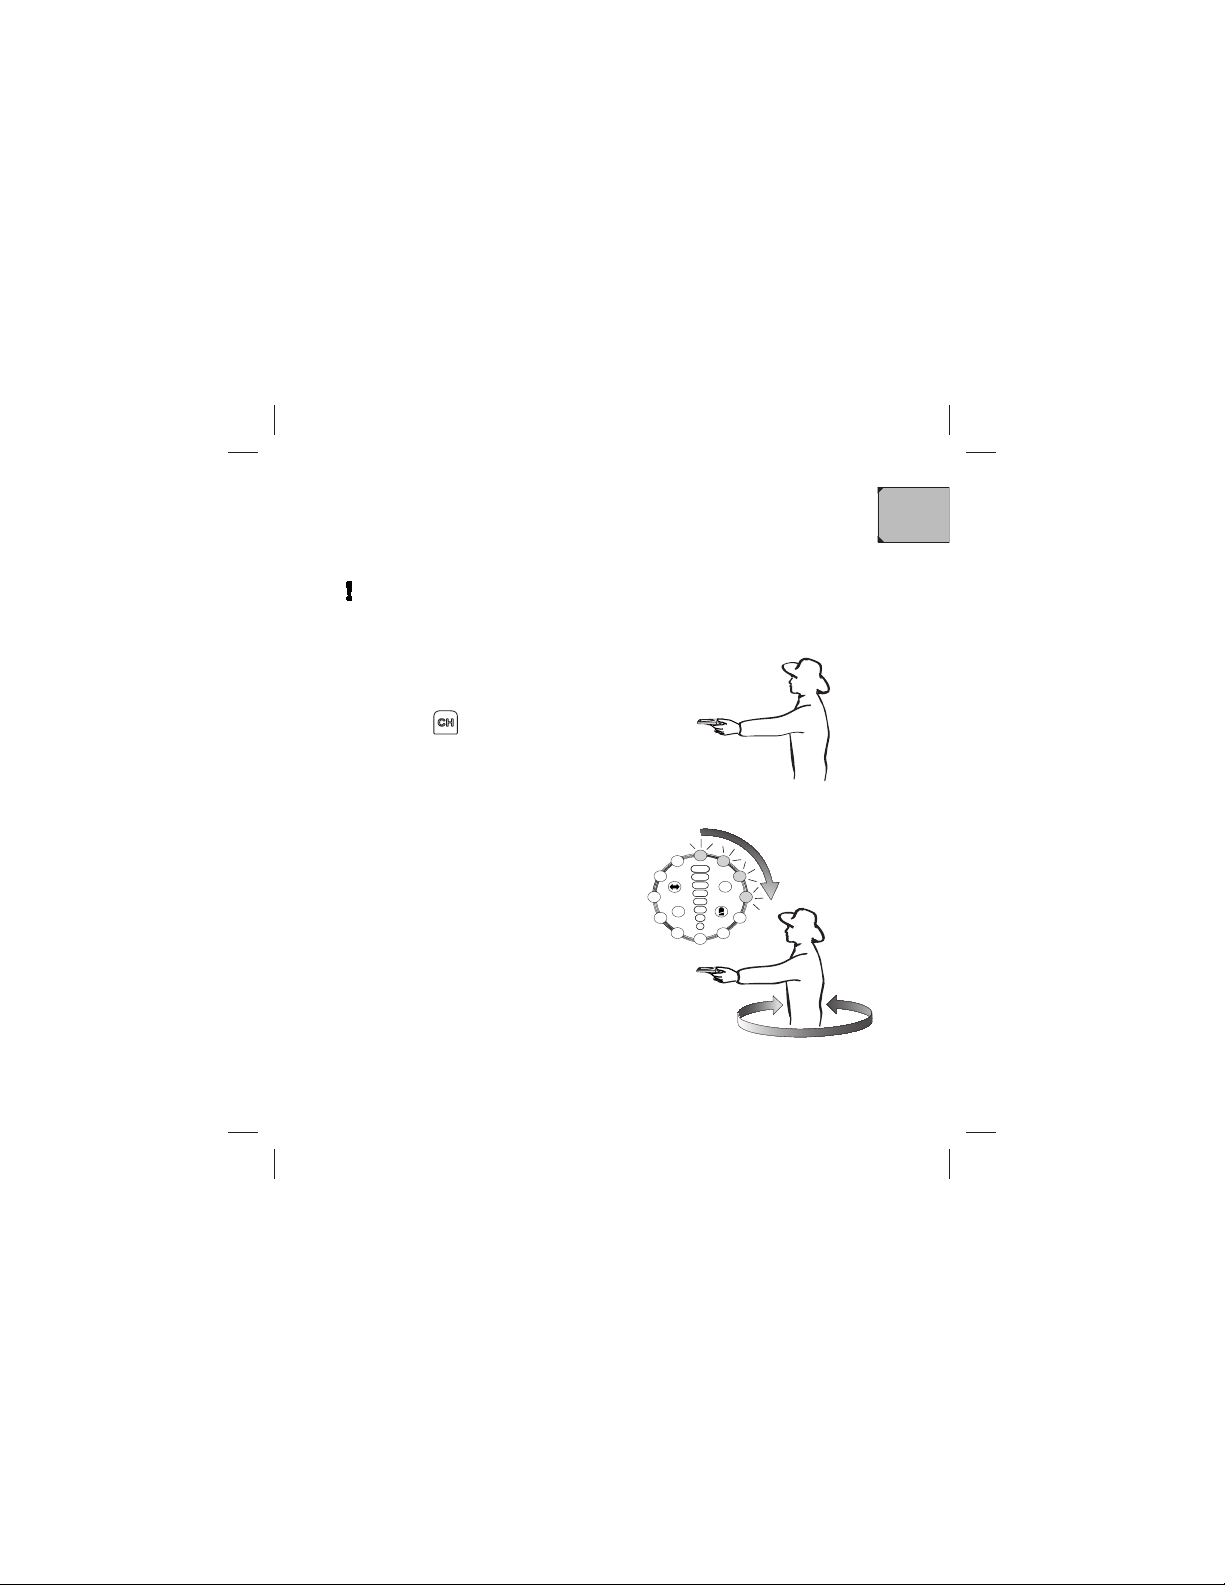
1. Hold the receiver in horizontal position
in front of you.
2. When tracking several transmitters,
press the button shortly to display
the number of the transmitter you
want to locate.
3. Start turning around slowly but
constantly.
→ The lights of the Tracking signal
display light up in green one by
one, and the receiver beeps at one
second interval.
• If you turn around too fast, some
lights may remain unlit. Turn back
to light them up before you continue.
• If you turn around too slowly, the first
lights may go out before you are
finished. Start over again, and keep
practicing until you catch the right pace.
22
Page 23
EN
→ When the receiver has tracked the
transmitter, the regular beeping
goes off and one of the Tracking
signal display lights turns red to
indicate the direction of the dog.
4. Point the receiver to the direction
of the dog, and keep the receiver in
continuous left-right sweeping motion
(min. 180°) to maintain the bearing
fresh.
5. Check that the direction is correct by
turning a full circle of 360° every
once in a while.
Move a few steps and repeat the
procedure of locating the bearing
every once in a while to check and
refresh the bearing.
If you point the receiver down even
momentarily during tracking, the
receiver goes to Standby mode and
the bearing resets.
N
F
!
360
N
F
!
23
Page 24
EN
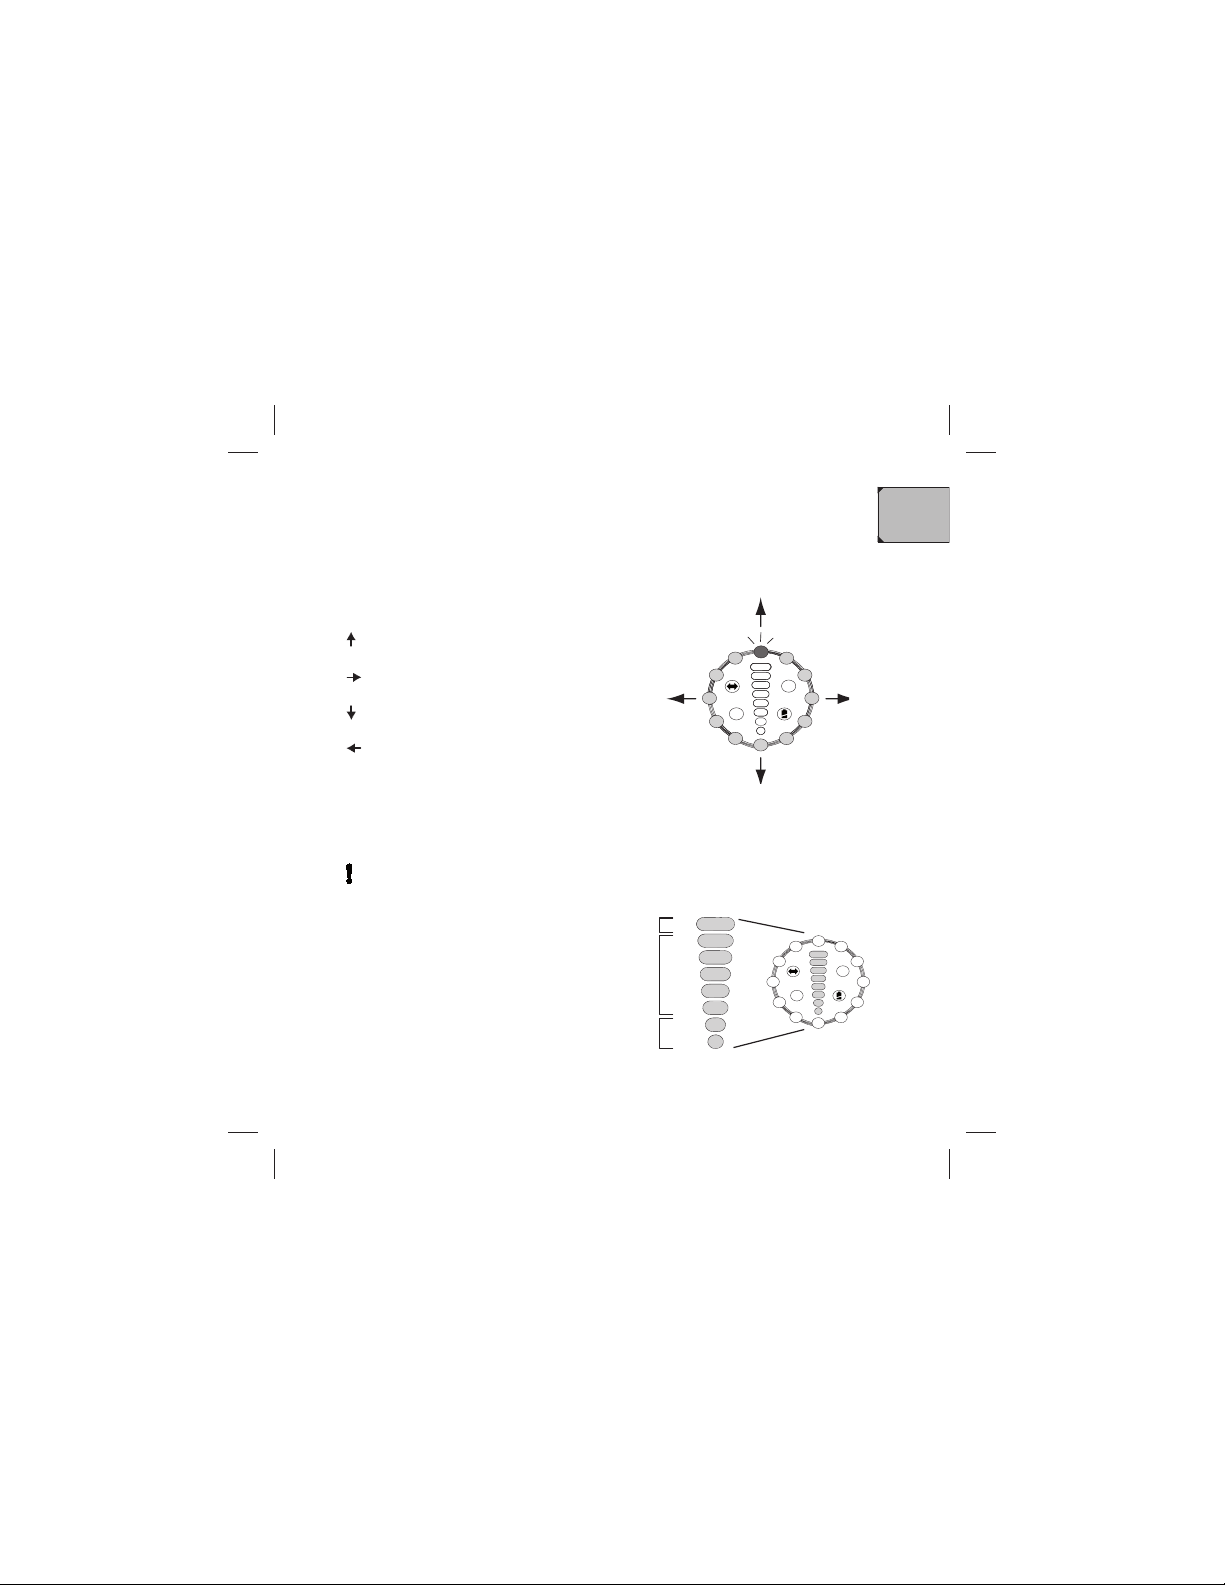
Reading the distance
The level of the bearing signal strength bar indicates the estimated distance
to the transmitter.
The geographic and environmental features may affect the accuracy
of the indicated distance.
1. Near (N) = The transmitter is less
than 100 m (110 yards) away.
2. Middle = The transmitter is approx.
3 km (2 miles) away.
3. Far (F) = The transmitter approx.
10 km (6 miles) away
1
2
3
N
F
!
Reading the direction
The red light on the tracking signal display indicates the direction of the
transmitter.
Up = in front of you
Right = on your right
Down = behind you
Left = on your left
N
F
!
24
Page 25
EN
You do not have to switch off the receiver during
the day. The receiver goes to the battery saving
Standby mode when you point it down towards
the ground.
When not in active use, you can keep the
receiver in the belt holster or in your pocket.
Using the standby mode
In the standby mode:
• the Power/Standby indicator light
blinks at long interval.
• all the sounds and the vibration function
according to your settings.
• the alarms and indicator lights
function.
• the bearing from the transmitter resets.
If you point the receiver down even momentarily during tracking,
the receiver goes to standby mode and the bearing resets.
To return to active tracking mode, lift the receiver to horizontal position and
locate the bearing again as instructed in Tracking.
25
Page 26

EN
Switching off the devices
Do not switch off the receiver before you have removed the trans
mitter from the dog. If you need to change the battery on the move,
follow the instructions in Installing and replacing the batteries.
1. Switch off the transmitter:
a. Remove the transmitter collar from the dog.
b. Hold the receiver in horizontal position.
The transmitter has to be within one meter (one yard) of the
receiver.
c. Shortly press the button to select the transmitter to be
switched off on the channel display.
d. Press the button continuously until you hear three falling
beeps.
→ The transmitter’s lights go out.
e. If you have several transmitters paired with the receiver, repeat the
above steps for each transmitter before you switch off the receiver.
2. Switch off the receiver by pressing the button continuously until you
hear two falling beeps.
→ The receiver’s lights go out.
26
Page 27

EN
Remove the transmitter from the dog before erasing it from the
receiver.
Erasing the transmitter erases all the pairing information. The
transmitter cannot be tracked before it is paired again with a
receiver.
To completely remove the pairing information of a transmitter from the
receiver:
1. Press the button shortly to select the channel of the transmitter you
want to erase from the receiver.
2. Press the button continuously until you hear a series of random
beeps aand the bearing signal strength bar rises slowly to the top.
→ The number of the erased transmitter channel starts blinking to
indicate that the channel is available for pairing again.
3. To reset the transmitter, remove and install the batteries.
Erasing the transmitter from the receiver
27
Page 28

EN
• Switch off the devices after use.
• Always check the condition of the devices after use. If you detect broken
parts, contact Tracker support.
• Clean the devices carefully from any dirt or moisture.
• You can rinse the transmitter lightly with water provided that the battery
cover is closed properly.
Do not use pressurized water, solvents, oils or detergents.
• Wipe the receiver clean with a dry cloth.
The receiver tolerates rain but has no guarantee for water
resistance.
• Remove the batteries from the devices after use, especially if they will not
be used for a few days or a longer period of time.
Condensed moisture inside the battery housing damages the
devices.
Do not remove the battery from the receiver if the dog is in the field
with the transmitter.
• Check the condition of the battery cover seals and make sure that the
cover closes tightly. Replace any damaged seals immediately.
Maintenance
28
Page 29

EN
Do not open the devices in any other way than instructed in this
manual.
• Do not drop the devices.
• Do not paint the devices.
Use only accessories and add-on antennas that are approved by
Tracker. Do not make your own modifications to the devices.
• Keep the lid of the external antenna connector plug-in closed at all times.
• Store the devices in their storage case, in a dry space in room
temperature.
29
Page 30
EN
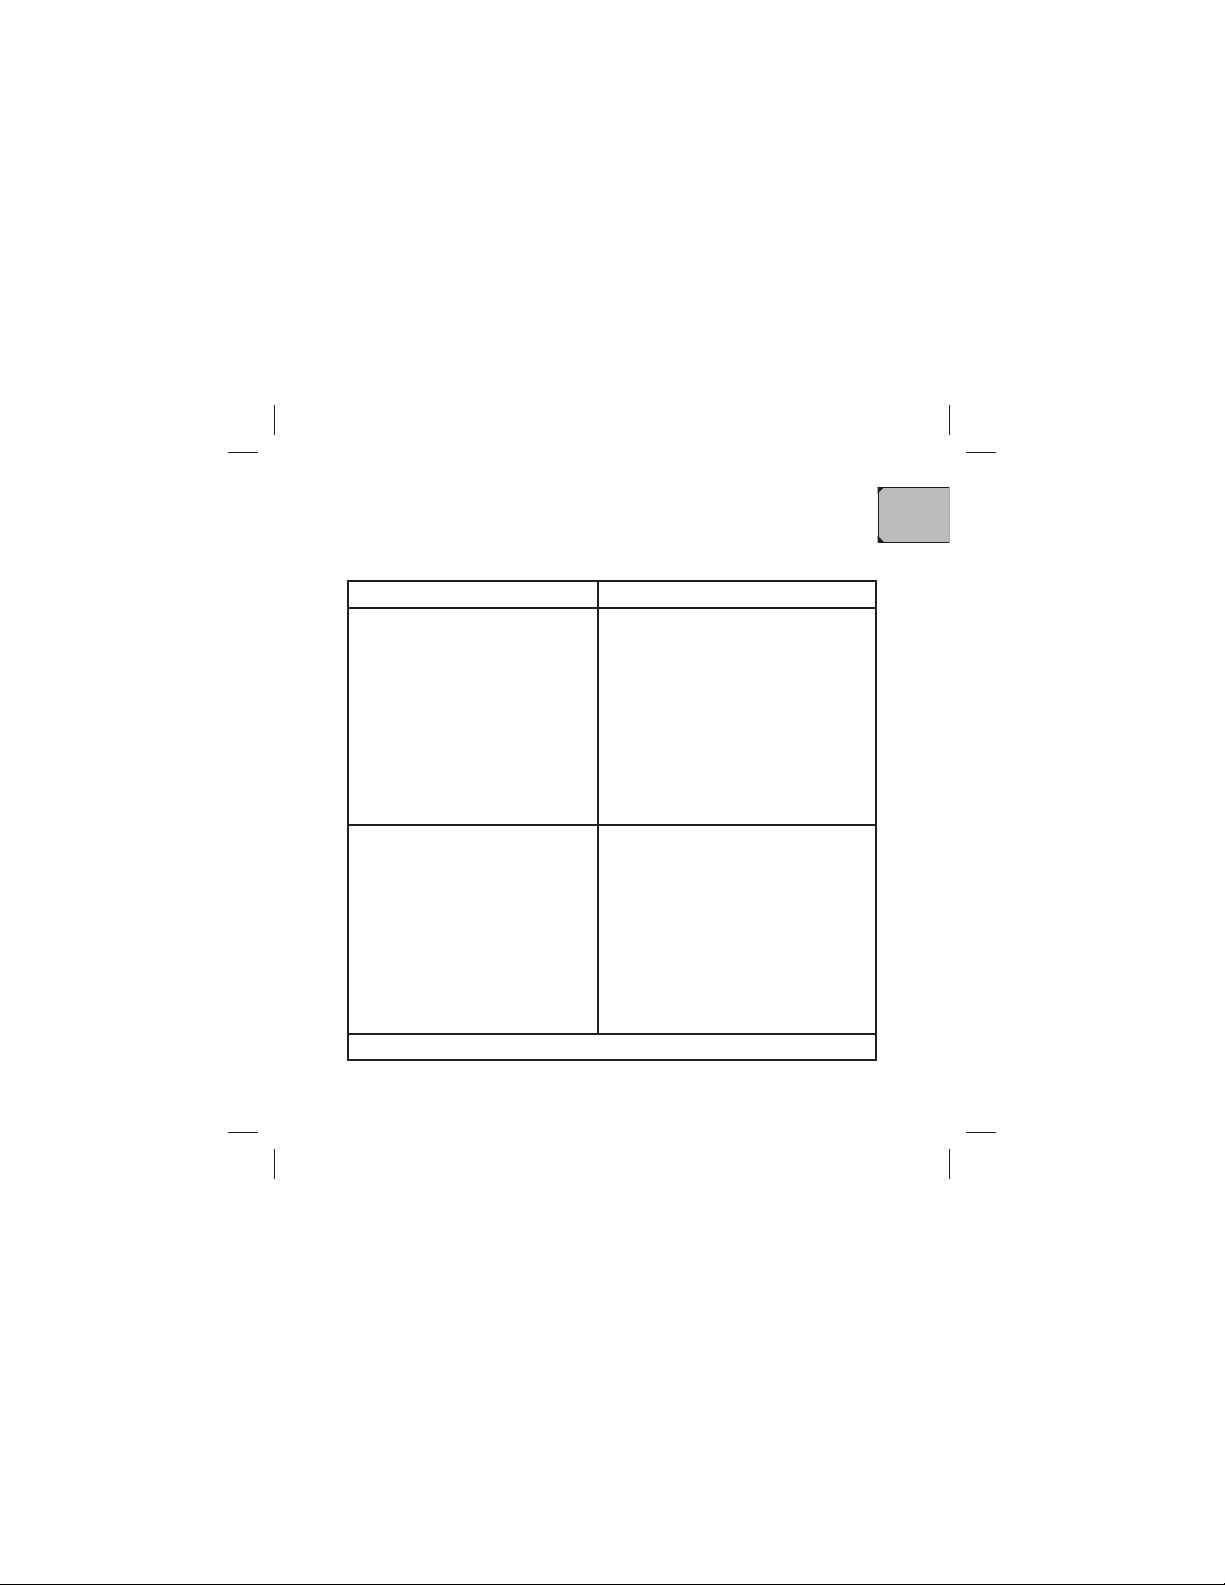
Troubleshooting
Problem Solution
The receiver does not switch on. • Check that:
the battery is not depleted.•
the battery is of the correct type.•
the battery is installed correctly.•
the battery cover is properly closed •
and there is no dirt in the seals.
• Remove the battery for five minutes.
Then put it back and try to switch on
the device again.
The receiver is on but there are no
sounds or sounds are weak.
• Check that the volume is not set to
Mute.
• In extremely rough conditions with
high noise level even the maximum
volume setting may not be enough.
Try using the vibration mode.•
Move to a different place.•
Table continued on next page
30
Page 31
EN
Problem Solution
The transmitter does not switch on. • Check that:
the batteries are not depleted.•
the batteries are of the correct type.•
the batteries are installed correctly.•
the battery cover is properly closed •
and there is no dirt in the seals.
Erase the transmitter’s pairing from •
the receiver, and pair the devices
again.
• If there is a powerful radio transmitter
nearby, the transmitter may not switch
on.
• Move away from the radio transmitter.
The transmitter is on and the indicator
lights indicate that it functions, but the
receiver does not track it.
• Check that the receiver is on the
right channel. Change the channel by
shortly pressing the button.
• Check that the transmitter is properly
paired with the receiver in question.
• If the pairing was copied from another
receiver, check that the copying was
successful.
• If possible, try switching off the
transmitter and switching it on again.
Table continued on next page
31
Page 32
EN
Problem Solution
Unable to locate the bearing to the
transmitter.
The receivers tracking signal display
does not update while turning.
• Check that you hold the receiver
properly.
• Large obstacles may distort the signal.
Try to find an open place elevated from
the surroundings, and try again.
• The internal electric compass may be
disturbed by electromagnetic fields of
strong magnets, power lines, railroads
and such. Move away from disturbing
factors and try again.
• Electric compasses require calibration
from time to time. Recalibrate the
receiver by rotating it around its axis in
both vertical and horizontal directions.
The receiver does not go to
standby mode even though pointed
downwards.
• The automatic standby mode is
disabled. Switch off the receiver, and
switch it on again while holding the
receiver in horizontal position.
The receiver goes to standby mode
when pointed downwards. I am on
a high hill / helicopter and the dog is
somewhere below me.
• The automatic standby mode is enabled.
To disable the automatic standby
mode, switch off the receiver, and
switch it on again while pointing the
receiver downwards.
Table continued on next page
32
Page 33
EN
Problem Solution
Barking alarm and indicator do not
function even though the dog is
barking.
• The barking indicator requires that the
dog is barking at certain interval and
volume typical of hunting situations.
• Check that there is no dirt between the
collar and the microphone gasket.
The receiver has dropped into water.
Do not try to switch the receiver on.
Dry the receiver with a cloth from •
the outside.
Open the battery cover and •
remove the battery.
Dry the battery housing and cover •
from the inside.
Send the receiver to Tracker or •
an authorized service as soon as
possible.
I have tried everything but with no luck.
What next?
• Switch off the devices, remove the
batteries and wait for five minutes.
Replace the batteries with new ones.
• Read the instructions carefully, and try
again. Be careful to follow every step
exactly.
• Take the devices to Tracker or an
authorized service for checking.
33
Page 34
EN
Technical specifications
Tracker R50 Receiver
Weight incl. battery 160 g (5.64 oz)
Dimensions (W x L x H) 103 x 135 x 63 mm (4.06 x 5.31 x 2.48 in)
Operating voltage 2.7–3.1 V
Operating frequency area CE 869.37 - 869.65 MHz
FCC 902.00 - 916.00 MHz
Battery type Disposable CR123, 1 pc
Power consumption 100 mA / 10 mA
Operating temperature -25°C to +55°C (-13°F to +131°F)
Storage temperature 10-38°C (50-100°F)
Available number of transmitters 9
Channel frequency Random jumping frequency,
CE 10 different frequencies,
FCC 50 different frequencies
34
Page 35
EN
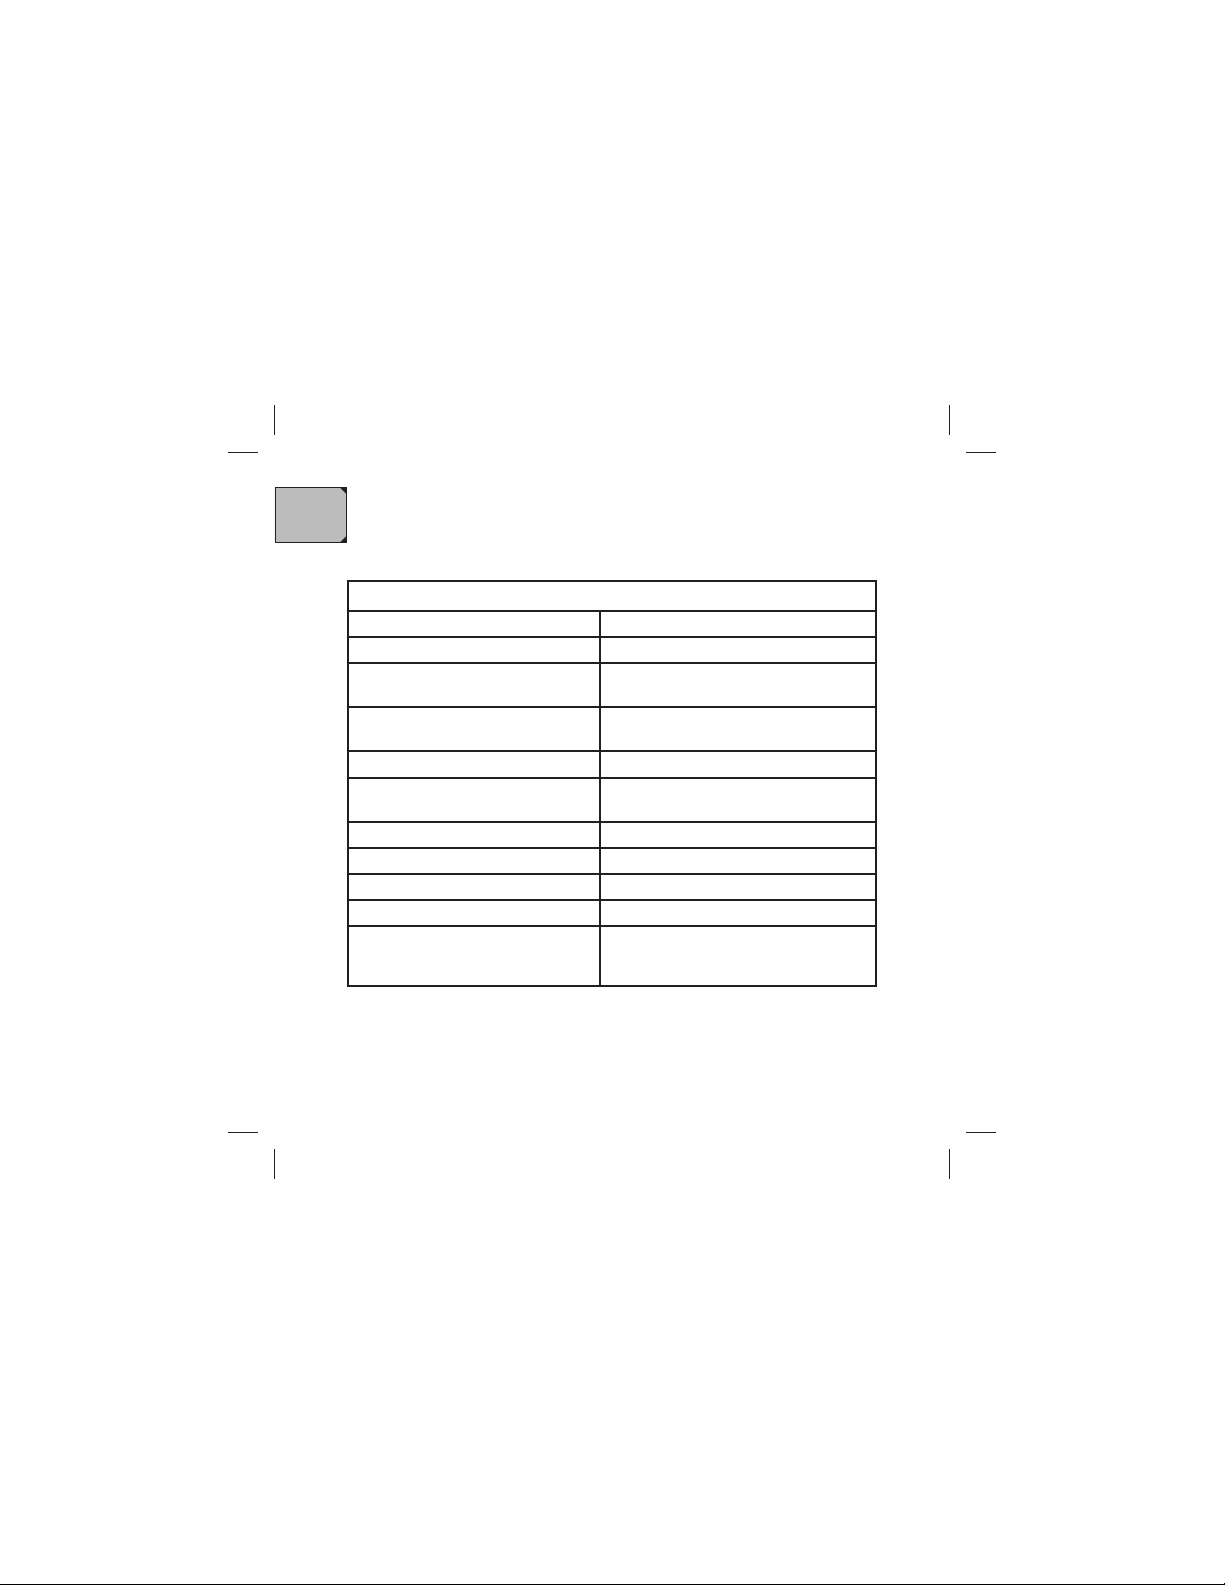
Tracker T60 Transmitter
Weight incl. batteries and collar 170 g (6.00 oz)
Weight incl. batteries, without collar 95 g (3.35 oz)
Dimensions (W x L x H) without
antenna and collar
76 x 49 x 48 mm (2.99 x 1.92 x 1.89 in)
Dimensions (W x L x H) with antenna,
without collar
175 x 202 x 48 mm (6.89 x 7.95 x 1.89 in)
Operating voltage 4.0-6.0 V
Operating frequency area CE 869.37 - 869.65 MHz
FCC 902.00 - 916.00 MHz
Battery type Disposable CR123, 2 pcs
Average power consumption ≤35 mA
Operating temperature -25°C to +55°C (-13°F to +131°F)
Storage temperature 10-38°C (50-100°F)
Channel frequency Random jumping frequency,
CE 10 different frequency,
FCC 50 different frequency
35
Page 36

EN
Warranty and Service
During the warranty period Tracker or its authorized maintenance company will within
a reasonable period of time either repair the product due to faulty materials, design or
quality or, if so desired, replace the product with a new one in accordance with these
warranty terms. This limited warranty is valid only in the country where the product
was purchased, unless otherwise agreed.
The warranty period starts when the product is sold for the first time to an end user.
The warranty periods are: twenty-four (24) months for a positioning device and six (6)
months for its accessories.
Any resale, repair or replacement of the product do not extend, renew or change
the warranty period of the product in any way. However, the parts repaired and the
product replaced during the warranty period remain under the warranty until the end
of the original warranty period, yet always at least for sixty (60) days from the repair
date or the delivery of the replacement product.
When you wish to make a claim under the warranty, return the product to Tracker or
to an authorized service company.
In order to claim under the warranty, you must inform Tracker or an authorized
service company of the fault you have detected within a reasonable period of time
after discovering the fault, and in any event, before the end of the warranty period.
When claiming under the warranty, you must be able to present : a) the product (or
its faulty part), b) an original certificate of purchase stating the name and address of
dealer, time and place of purchase and the serial number of the product.
This warranty does not cover the user’s manual of the product, Tracker does not
guarantee that any software of the product (i) will fulfill all your demands, (ii) will work
or be compatible with any third party device or software, (iii) will work uninterrupted or
error-free.
This warranty does not cover a) normal wear and tear b) any defects caused by the
handling of the product c) defects or damages caused by misuse of the product or d)
defects or damages caused by other acts beyond the reasonable control of Tracker.
36
Page 37

EN
This warranty does not cover defects or alleged defects caused by the fact the
product was used with, or connected to, a product, accessories, software and/or
service not manufactured or supplied by Tracker, or was used otherwise than for its
intended use.
You cannot make a claim under this warranty, if the product has been altered or it has
been opened or repaired by someone else other than the authorized maintenance
company, if it has been repaired using other than official spare parts, or if the serial
number of the product, the date of the accessory or the serial number have been
removed, rubbed off, altered or is according to Tracker’s view otherwise unclear.
A third party, independent from Tracker, provides the batteries on which the product
operates. Therefore, Tracker will not accept responsibility under this warranty for their
operation, desecration or availability.
This warranty becomes void, if the product has been exposed to extreme thermal
or environmental conditions or to rapid changes in such conditions, or to chemical
products.
When Tracker replaces any parts of the product or other devices, the original parts
or devices become the property of Tracker. If it turns out that the product returned
to Tracker or Tracker’s authorized service company is not covered by this warranty,
Tracker reserves the right, on behalf of itself and its authorized service companies,
to charge a handling fee for the returned product. When repairing or replacing the
product, Tracker may use new, equivalent to new or repaired products or parts.
This limited warranty is your sole and exclusive remedy against Tracker and Tracker’s
sole and exclusive liability in respect of defects in your product. Tracker does not
assume any liability for indirect damage and Tracker’s liability shall be limited to the
purchase value of the product.
37
Page 38

EN
Small children
Your device and its accessories may contain small parts.
Keep them out of the reach of children.
Pets and domestic animals
Your device and its accessories may contain small parts and hazardous materials to
animals when broken.
Keep device out of the reach of pets, dogs or domestic animals when they are without
supervising.
Pets, dogs, domestic animals and wild animals can make serious injury by biting,
scratching, kicking, pulling or another conflict with other animals. At the same time
devices can be broken and add to quantum of damages.
Also pets, dogs and domestic animals can crash to the vehicle, object, fool down
or sink under water making damage himself and tracking devices. Broken tracking
device can add to quantum of damages. Therefore do not release your pets, dogs or
domestic animals to areas where is a risk for accidents.
Operating environment
To receiving data messages, this device requires a quality connection to the
transmitter. In some cases, transmission of messages may cancel until such a
connection is available. Therefore tracking devices do not guarantee founding of the
objects in any conditions. Therefore be sure that you know your objects positions also
by visual methods as well.
Additional safety information
38
Page 39

EN
Parts of the device are magnetic. Metallic materials may be attracted to the device.
Do not place credit cards or other magnetic storage media near the device, because
information stored on them may be erased.
Vehicles
RF signals may affect improperly installed or inadequately shielded electronic
systems in motor vehicles such as electronic fuel injection systems, electronic
antiskid (antilock) braking systems, electronic speed control systems, and air bag
systems. For more information, check with the manufacturer, or its representative, of
your vehicle or any equipment that has been added.
Only qualified personnel should service the device or install the device in a vehicle.
Faulty installation or service may be dangerous and may invalidate any warranty that
may apply to the device.
Do not use tracking device inside of a car or any vehicle. It can be dangerous
and may be illegal. Do not store or carry flammable liquids or materials, gases, or
explosive materials in the same compartment as the device, its parts, batteries, or
accessories. For vehicles equipped with an air bag, remember that air bags inflate
with great force. Do not place objects, including tracking equipment in the area over
the air bag or in the air bag deployment area. If in-vehicle tracking equipment is
improperly installed and the air bag inflates, serious injury could result.
Using your tracking device while flying in aircraft is prohibited. Switch off your
device before boarding an aircraft. The use of tracking devices in an aircraft may be
dangerous to the operation of the aircraft, and may be illegal.
39
Page 40

EN
Medical devices
Operation of any radio transmitting equipment, including tracking devices, may
interfere with the functionality of inadequately protected medical devices. Consult
a physician or the manufacturer of the medical device to determine if they are
adequately shielded from external RF energy or if you have any questions. Switch
off your device in health care facilities when any regulations posted in these areas
instruct you to do so. Hospitals or health care facilities may be using equipment that
could be sensitive to external RF energy.
Implanted medical devices
Manufacturers of medical devices recommend that a minimum separation of 25
centimeters (10 inches) should be maintained between a tracking device and
an implanted medical device, such as a pacemaker or implanted cardioverter
defibrillator, to avoid potential interference with the medical device.
Persons who have such devices should:
always keep the wireless device more than 25 centimeters (10 inches) from the •
medical device when the tracking device is turned on.
not carry the radio device in a breast pocket.•
hold the tracking device to the ear opposite the medical device to minimize the •
potential for interference.
turn the tracking device off immediately if there is any reason to suspect that •
interference is taking place.
read and follow the directions from the manufacturer of their implanted medical •
device.
If you have any questions about using your tracking device with an implanted medical
device, consult your health care provider.
40
Page 41

EN
Potentially explosive and fire environments
Switch off and remove batteries from your tracking devices when in any area with
a potentially explosive or fire atmosphere, and obey all signs and instructions.
Therefore do not release or keep your pets, dogs or domestic animals to areas
where is a risk for fire or explosive accidents. Potentially explosive atmospheres
include areas where you would normally be advised to turn off your vehicle engine.
Even normal conditions after using of tracking device, remove batteries from the
devices and storage batteries separately one by one without any risk of short circuits
of batteries. Handle always batteries one by one for risk of sparks or explosion of
battery. Do not place batteries (even empty) in your pockets. Do not throw away
batteries into open fire. There is a danger of serious bodily injury or even death.
Sparks in such areas could cause an explosion or fire resulting in bodily injury or
even death. Switch off the tracking device at refueling points such as near gas pumps
at service stations. Observe restrictions on the use of radio equipment in fuel depots,
storage, and distribution areas; chemical plants; or where blasting operations are in
progress. Areas with a potentially explosive atmosphere are often, but not always,
clearly marked. They include below deck on boats, chemical transfer or storage
facilities and areas where the air contains chemicals or particles such as grain,
dust, or metal powders. You should check with the manufacturers of vehicles using
liquefied petroleum gas (such as propane or butane) to determine if this device can
be safely used in their vicinity.
41
Page 42

EN
Quick Guide
1. Switch on the receiver by pressing the button continuously.
2. Calibrate the receiver’s internal compass by rotating the receiver in
three directions until you hear a short double-beep.
3. Pair the transmitter with the receiver:
a. Press the button shortly to select a free channel for the transmitter.
b. Press the button continuously until you hear three rising beeps.
4. Put the transmitter collar on the dog.
5. Hold the receiver in horizontal position in front of you.
6. Press the button shortly until the number of the transmitter you want
to locate is displayed.
7. Locate the bearing by turning around slowly but constantly.
→ The lights of the Tracking signal display light up in green one by one,
and the receiver beeps at one second interval.
→ When the receiver has tracked the transmitter, the regular beeping
goes off and one of the Tracking signal display lights turns red to
indicate the direction of the dog.
8. Point the receiver to the direction of the dog, and keep the receiver in
continuous left - right sweeping motion (min. 180°) to maintain the
bearing fresh.
42
Page 43

Tracker Oy
Kauppiaantie 30
Fin-90460 Oulunsalo
Finland
Tel: +358 8 521 9000 Fax: +358 8521 9100
www.tracker.fi
sales@tracker.fi
All right reserved © Tracker Oy
 Loading...