

Page 1

HUB User’s Manual
TRACKER ™ HUB by Output Technology, Inc. EMAIL: [email protected]
www.TrackMyOps.com TEL: (763) 546-9078
HUB Components Received .......................................................................................................................................................... 2
Wired TR Configuration .................................................................................................................................................................. 2
Wireless TR Configuration ............................................................................................................................................................. 2
Optional HUB Components ............................................................................................................................................................ 3
Establishing a Wireless Network ................................................................................................................................................... 4
Establishing a Wired TR Network .................................................................................................................................................. 4
HUB Overview ................................................................................................................................................................................. 5
HUB Input/Output Panels .......................................................................................................................................................... 5
Powering Up Your HUB ................................................................................................................................................................. 5
Powering Up Your TRs .................................................................................................................................................................. 5
Getting Started ................................................................................................................................................................................ 6
Tools Menu ................................................................................................................................................................................. 7
Display Items. .......................................................................................................................................................................... 7
Linear Display.......................................................................................................................................................................... 7
Trackers .................................................................................................................................................................................. 7
Tracker Settings ...................................................................................................................................................................... 8
HUB Options ........................................................................................................................................................................... 8
Systems Menu ............................................................................................................................................................................ 9
Color Types ............................................................................................................................................................................. 9
Languages............................................................................................................................................................................. 10
Status Types ......................................................................................................................................................................... 12
Status Languages ................................................................................................................................................................. 13
Tracker Menu. ........................................................................................................................................................................... 14
Color ...................................................................................................................................................................................... 14
Language .............................................................................................................................................................................. 14
Status. ................................................................................................................................................................................... 15
Visibility ................................................................................................................................................................................. 15
Page 2

HUB User’s Manual
TRACKER™ HUB
HUB
Power Cable
Wireless USB Keyboard/Mouse
KYBD/MOUSE wireless
Ethernet Router
HUBRwired
Ethernet Switch
HUBS
Two (2) 3-ft Cat5 Cables
Cat003
Wireless Router
HUBRwireless
One (1) 3-ft Cat5 Cable
Cat003
Wireless Client
WIFI
One (1) 3-ft Cat5 Cable
Cat003
HUB Components Received
Wired TRACKER Configuration
Wireless TRACKER Configuration
Wireless TR Kit: Required for Each Wireless TR
Power Requirements: 120/220V, 50/60Hz, Grounded Plug.
See training videos at TrackMyOps.com Page 2
©Output Technology, Inc. Jan15.—All rights reserved. Specifications subject to change. TRACKER™ Real-Time, Real Results
Page 3
HUB User’s Manual
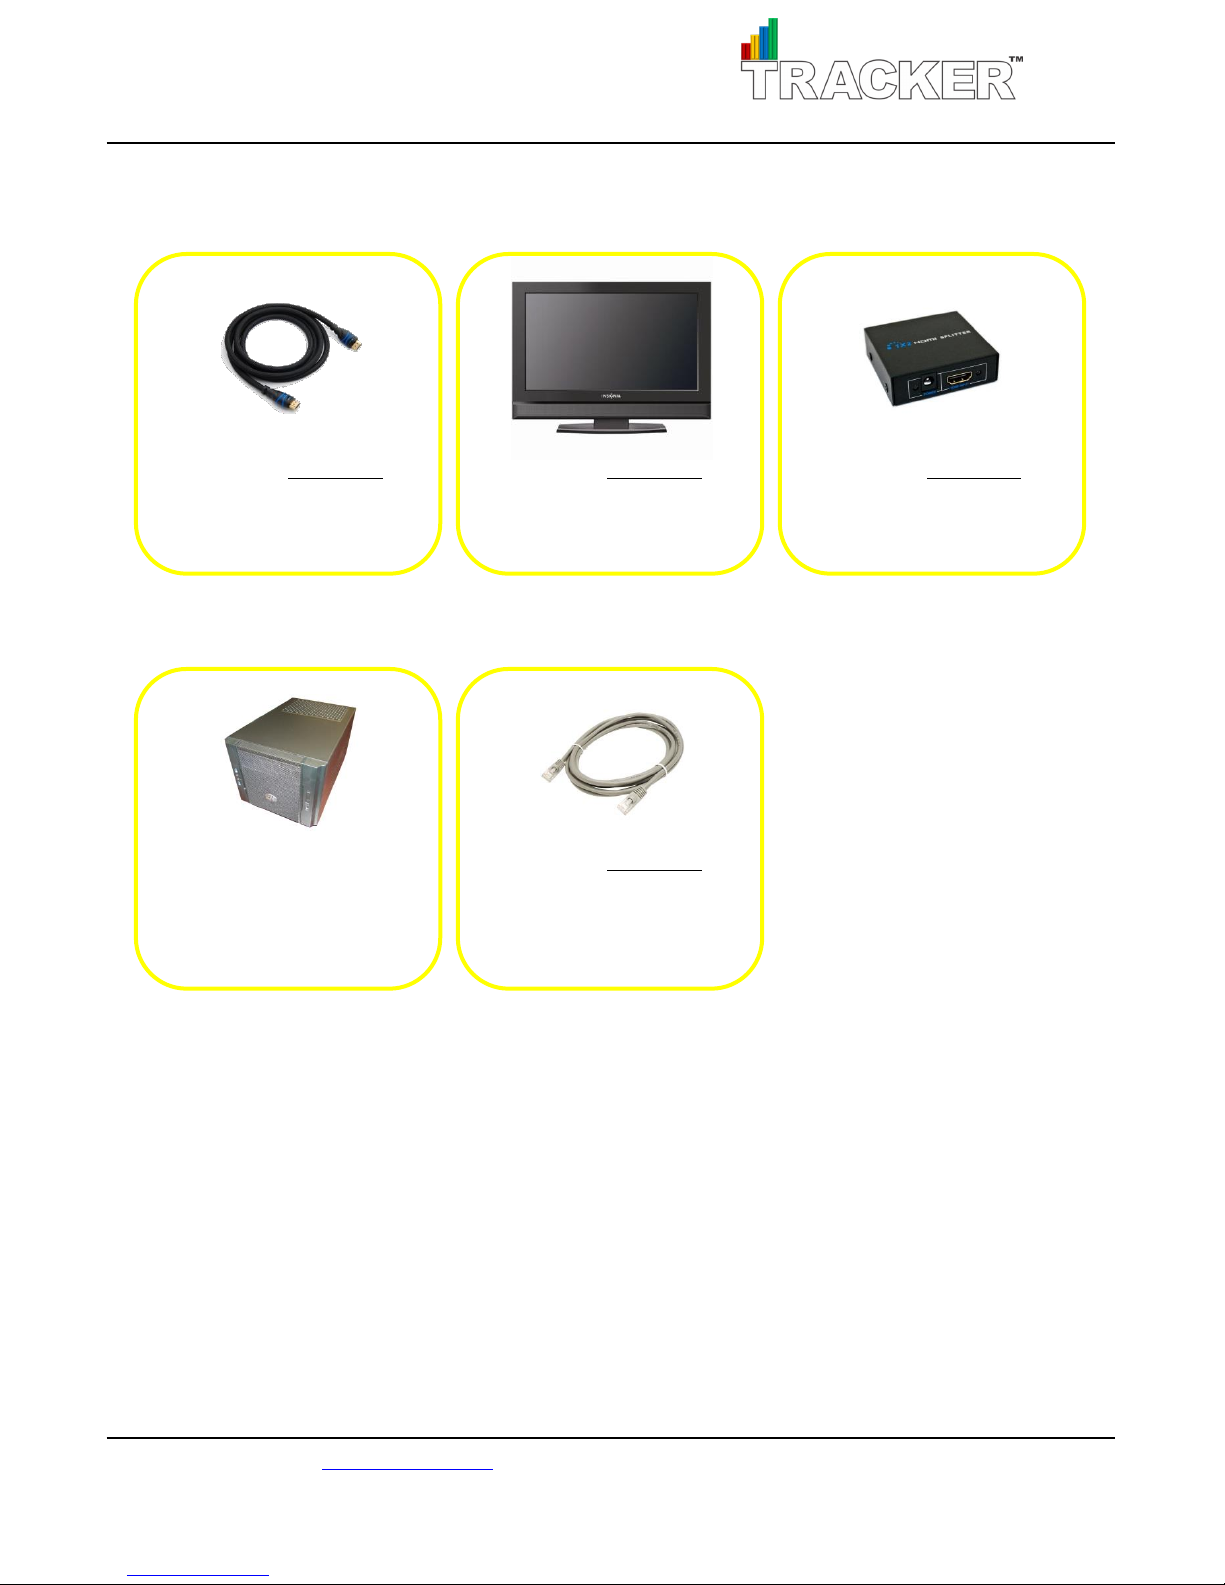
HDMI Cables Part Number
6-ft HDMI6
10-ft HDMI10
25-ft HDMI25
HDTVs Part Number
24-in TV24
32-in TV32
HDMI Splitter Part Number
1x2 HDMIS
Remote HUB
HUBremote
Includes: wireless antenna, power cord,
and wireless USB keyboard and mouse.
Cat5 Cable Part Number
10-ft Cat010
50-ft Cat050
100-ft Cat100
250-ft Cat250
Optional HUB Components
All optional components are available for purchase at
TrackMyOps.com
See training videos at TrackMyOps.com Page 3
©Output Technology, Inc. Jan15.—All rights reserved. Specifications subject to change. TRACKER™ Real-Time, Real Results
Page 4
HUB User’s Manual
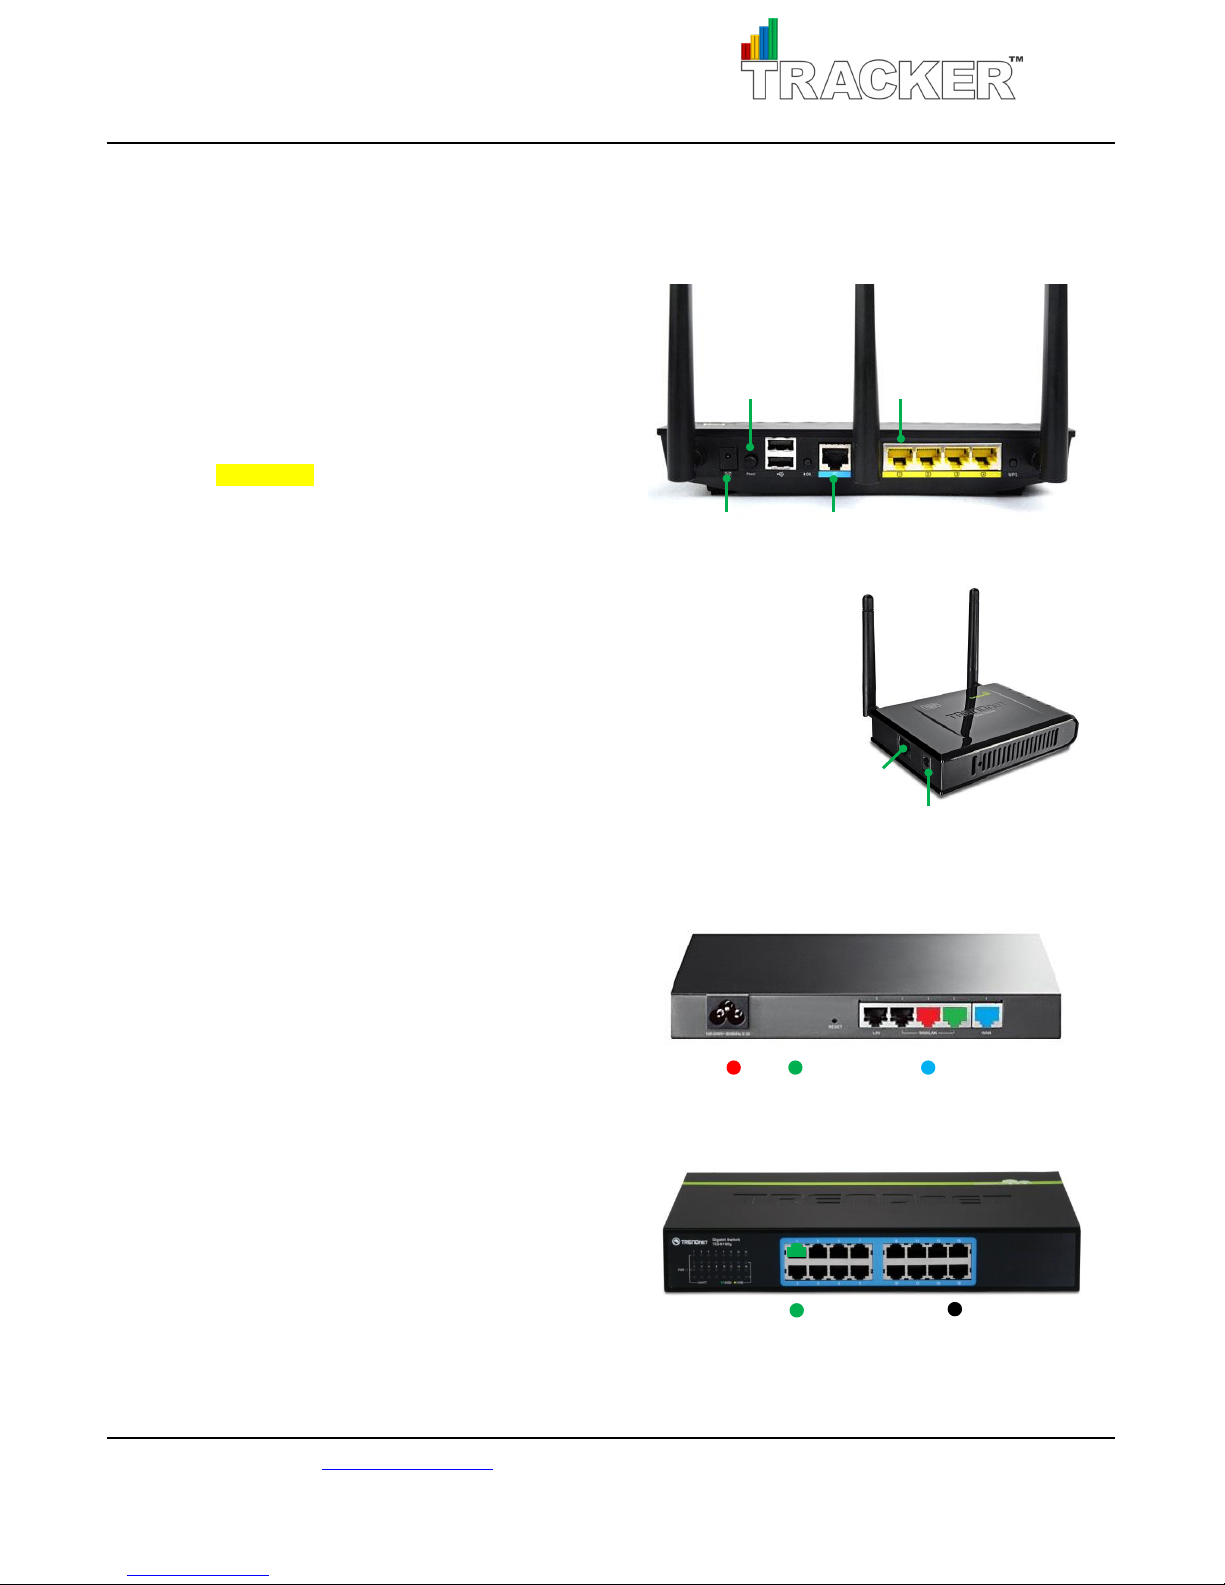
Power Switch
WAN (internet)
HUB
Power Supply
Power Supply
TR
Port 1: Wireless Router
Ports 2-16: TRs
HUB
Ethernet Switch
WAN (internet)
Establishing a Wireless Network
Powering Up Your Wireless Router
1. Plug in power supply.
2. Connect WAN (internet) into blue Ethernet port.
3. Connect Ethernet cable from yellow Ethernet port 1
to left Ethernet port in the HUB.
Please note: only use the left port of the HUB.
4. Turn on power switch.
Powering Up Your Access Points
1. Plug in power supply.
2. Connect Ethernet cable from TR Ethernet port to Access Point.
3. Repeat for every TR.
Establishing a Wired TR Network
Powering Up Your Ethernet Router
1. Plug in power supply.
2. Connect WAN (internet)
3. Connect HUB.
4. Connect Switch
5. Turn on.
Powering Up Your Ethernet Switch
1. Plug in power supply.
2. Connect cable from HUB left Ethernet port
to Ethernet switch Port 1.
3. Connect Ethernet cable from TR Ethernet port
to Ethernet switch Ports 2-16
See training videos at TrackMyOps.com Page 4
©Output Technology, Inc. Jan15.—All rights reserved. Specifications subject to change. TRACKER™ Real-Time, Real Results
Page 5
HUB User’s Manual
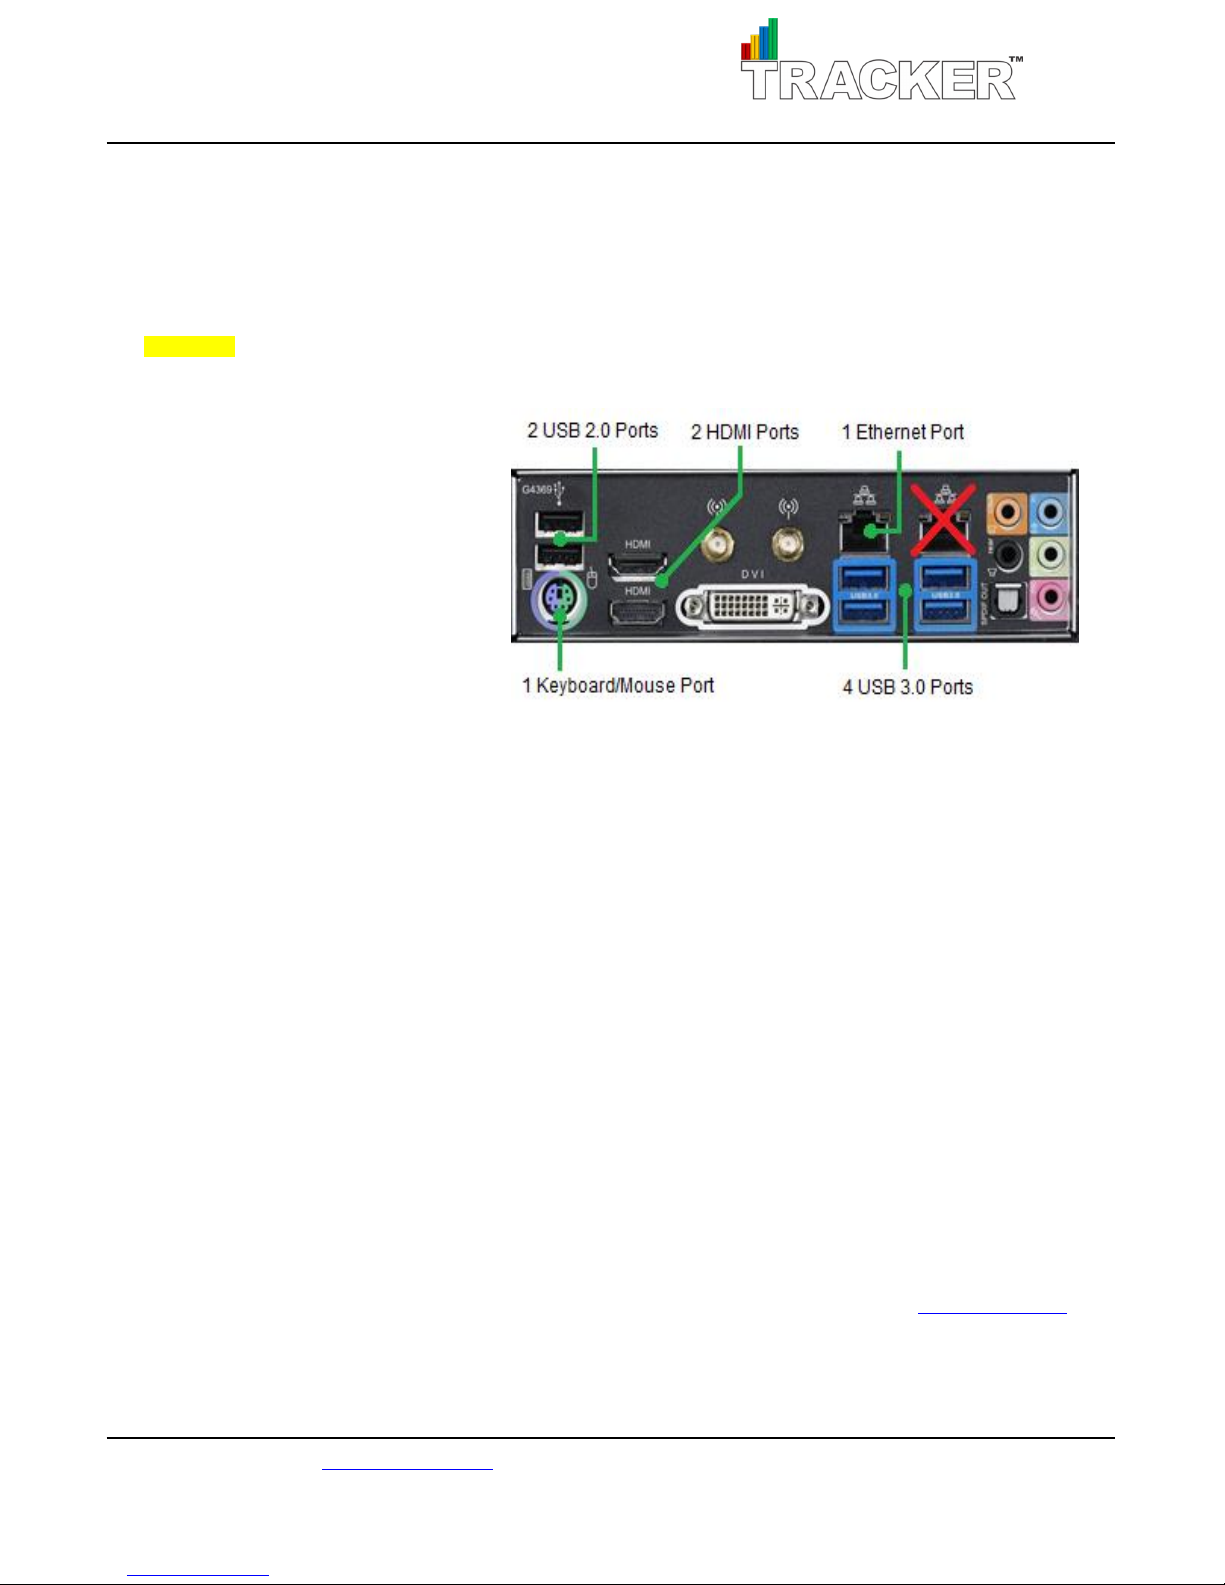
Fig. 1: Rear Input/Output
HUB Overview
HUB Input/Output Panels
Please note: additional in/out ports not listed are not used for HUB operation.
Front Panel
2 Female USB 3.0 Ports
1 Female USB 2.0 Port
Power ON/RESTART Button
Power (Rear)
Power Supply
Power ON/OFF Switch
Rear Panel
See figure 1.
Powering Up Your HUB
1. Plug in
2. Plug in keyboard and mouse.
3. Plug in HDMI Cable to the lower
4. Plug in HDMI Cable to TV HDMI port. Note which HDMI input number.
5. Turn ON TV and set to correct HDMI input number.
6. Switch the power switch ON in rear power supply, then press the POWER ON button in front.
7. You will be asked to enter a password.
8. HUB program will load automatically.
power cord from HUB power supply to standard 115V/230V wall outlet.
HDMI port of your HUB.
a. Default password: Tracker2014
a. The OTI-HUB program shortcut is located on the Desktop.
Powering Up Your TRs
For power-up and complete operating instructions, see TRACKER™ TR User’s Manual at TrackMyOps.com
See training videos at TrackMyOps.com Page 5
©Output Technology, Inc. Jan15.—All rights reserved. Specifications subject to change. TRACKER™ Real-Time, Real Results
Page 6
HUB User’s Manual
Getting Started
At this point you should have your HUB powered on, TRs powered on, your TR network powered on.
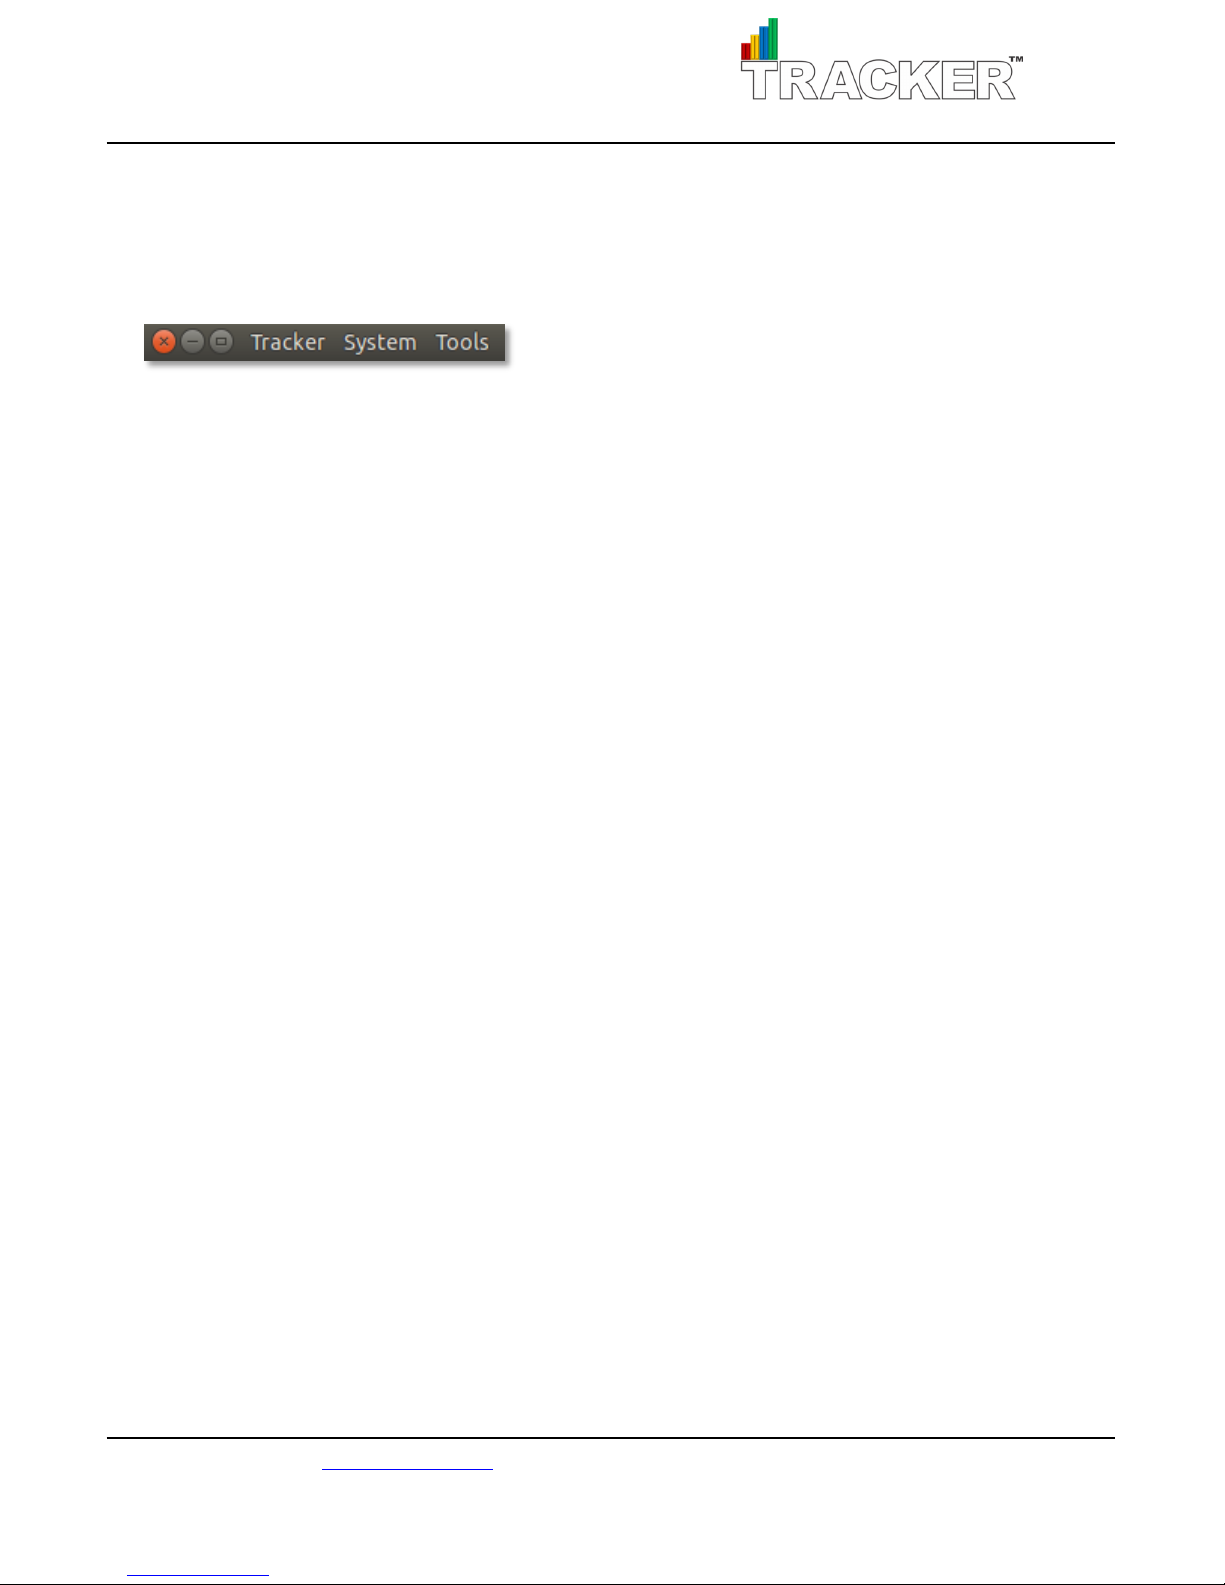
Move curser to the top left of the window in the OTI-HUB program and three menus will appear:
Tools Menu
Display Items
Linear Display
Trackers
Tracker Settings
HUB Options
System Menu
Color Types
Languages
Status Types
Status Languages
Tracker Menu
Color
Language
Status
Visibility
See training videos at TrackMyOps.com Page 6
©Output Technology, Inc. Jan15.—All rights reserved. Specifications subject to change. TRACKER™ Real-Time, Real Results
Page 7
HUB User’s Manual
Linear Display
Grid Display
1
1 2 3
4
2 3 4 5
5 6 7
8
6 7 8
Tools Menu
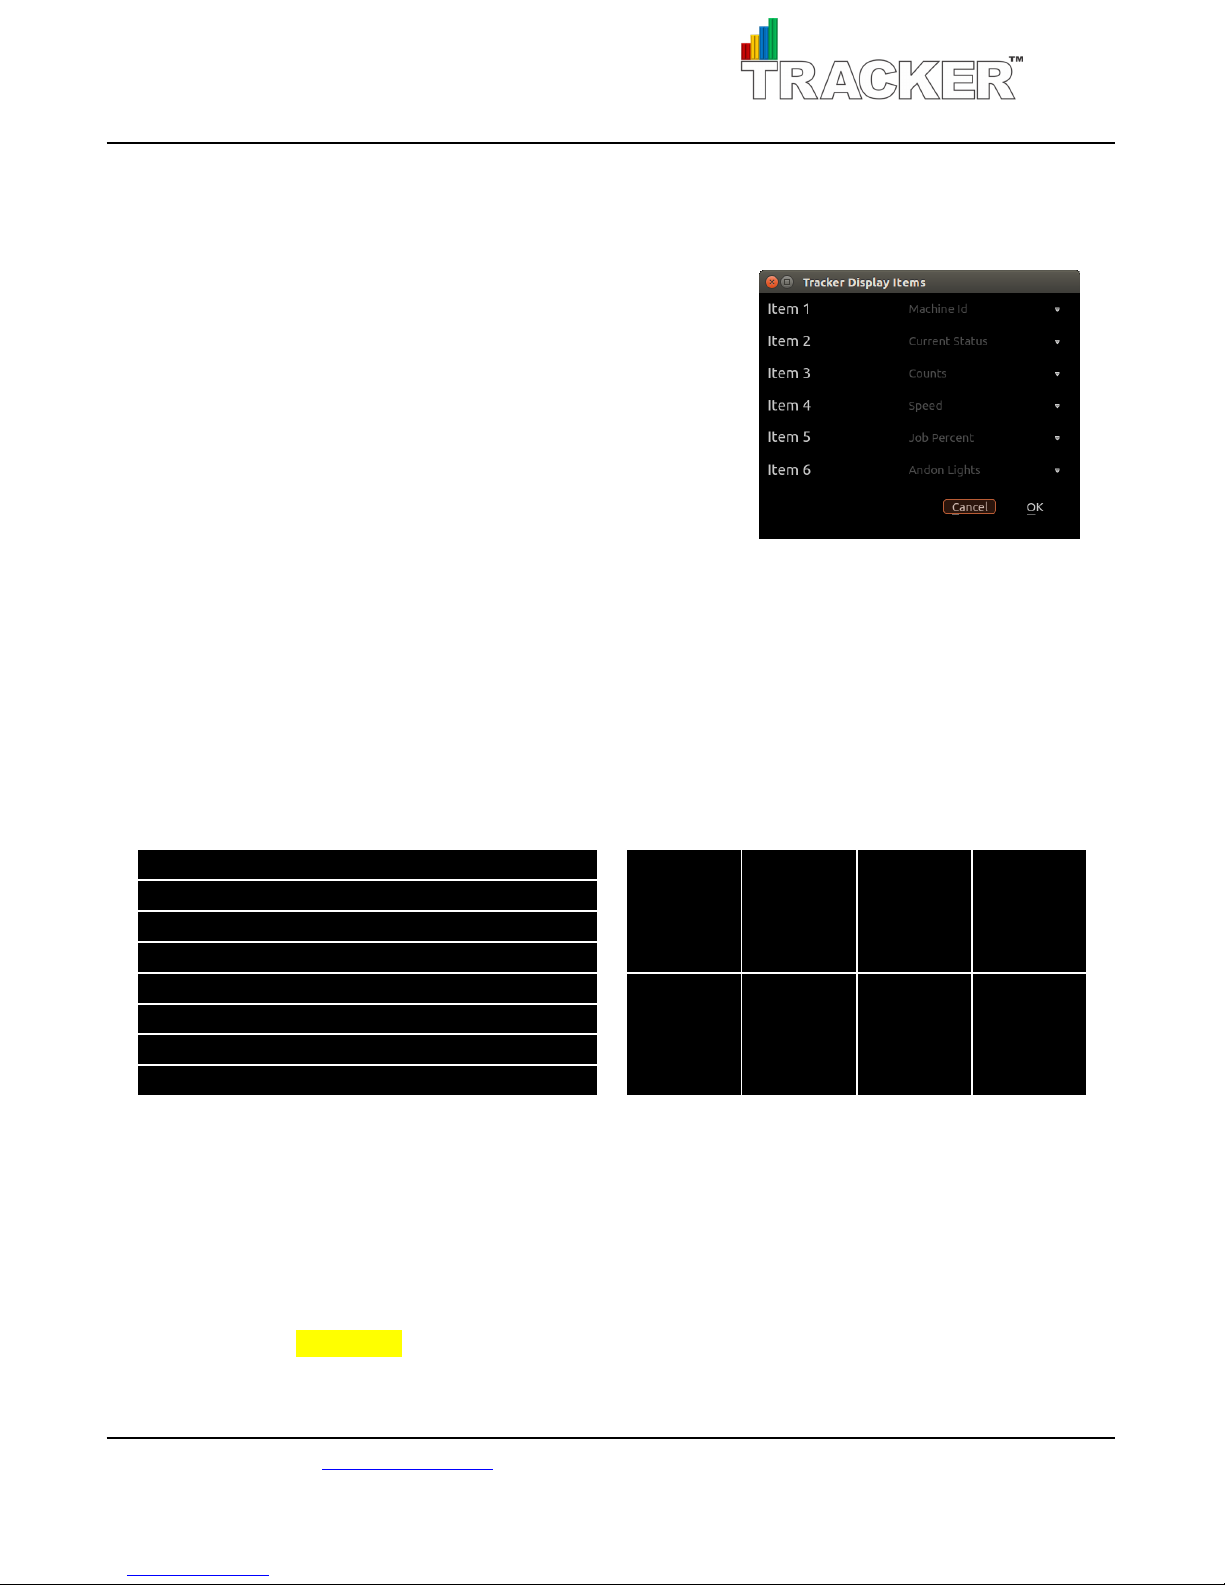
Display Items: select the information to display.
There are six total fields to display for TR units on the HUB. Go to
each line item and select from the drop-down list which field to
display. These settings will apply to all of the TR units onscreen
and can be changed at any time. Click OK to save changes and
close menu. Click Cancel to discard changes.
Linear Display: toggle between linear and grid displays.
16 TR units can be connected to a HUB. The first 8 selected TRs will appear on Screen #1, and 9-16 on
Screen #2. In Linear Display, the first selected TR unit will display at the top of screen then fill down the
screen from 1-8 in rows. In Grid Display, the first selected TR unit will appear in upper left, then 2-4 will
fill in from left to right across top row, and 5-8 across bottom. Pattern repeats for 9-16 on screen #2.
Trackers: select which connected TR units to display on the HUB.
When TR units are powered on, you will see a list of TR units the HUB has communicated with. Click the
checkbox of the TR units to display on the HUB screen. The order of the TR units is the order in which
they will display on the HUB Screen. To change the order in which the TRs appear, click on the intended
TR and click Move Up or Move Down to change its position. Click Close to save when done.
Please note: TRs removed from the network will still display as offline.
See training videos at TrackMyOps.com Page 7
©Output Technology, Inc. Jan15.—All rights reserved. Specifications subject to change. TRACKER™ Real-Time, Real Results
Page 8
HUB User’s Manual
Tracker Settings: change Job Information and Tracker Setting from the HUB.
The top line item, “Tracker” contains a drop-down list of currently connected TRs. The TRs name is the
“Machine Id” entered in the TR’s “Tracker Settings” screen. Select which TR unit to which changes will
be made. Select the fields you would like to make changes to and enter the new values. See TR user’s
manual for a complete description of each field at TrackMyOps.com.
Please note: Do NOT change the “HUB IP Address” field.
When done with making changes, click on Apply to save, and then click Close to exit the dialog box.
Changes will not update on the TR unit until End Job has been clicked from the TR unit. The system
waits for END JOB mode so the changes do not interrupt any data collection or reporting while
operating. If the TR unit is already in END JOB mode, click the End Job button again to update changes.
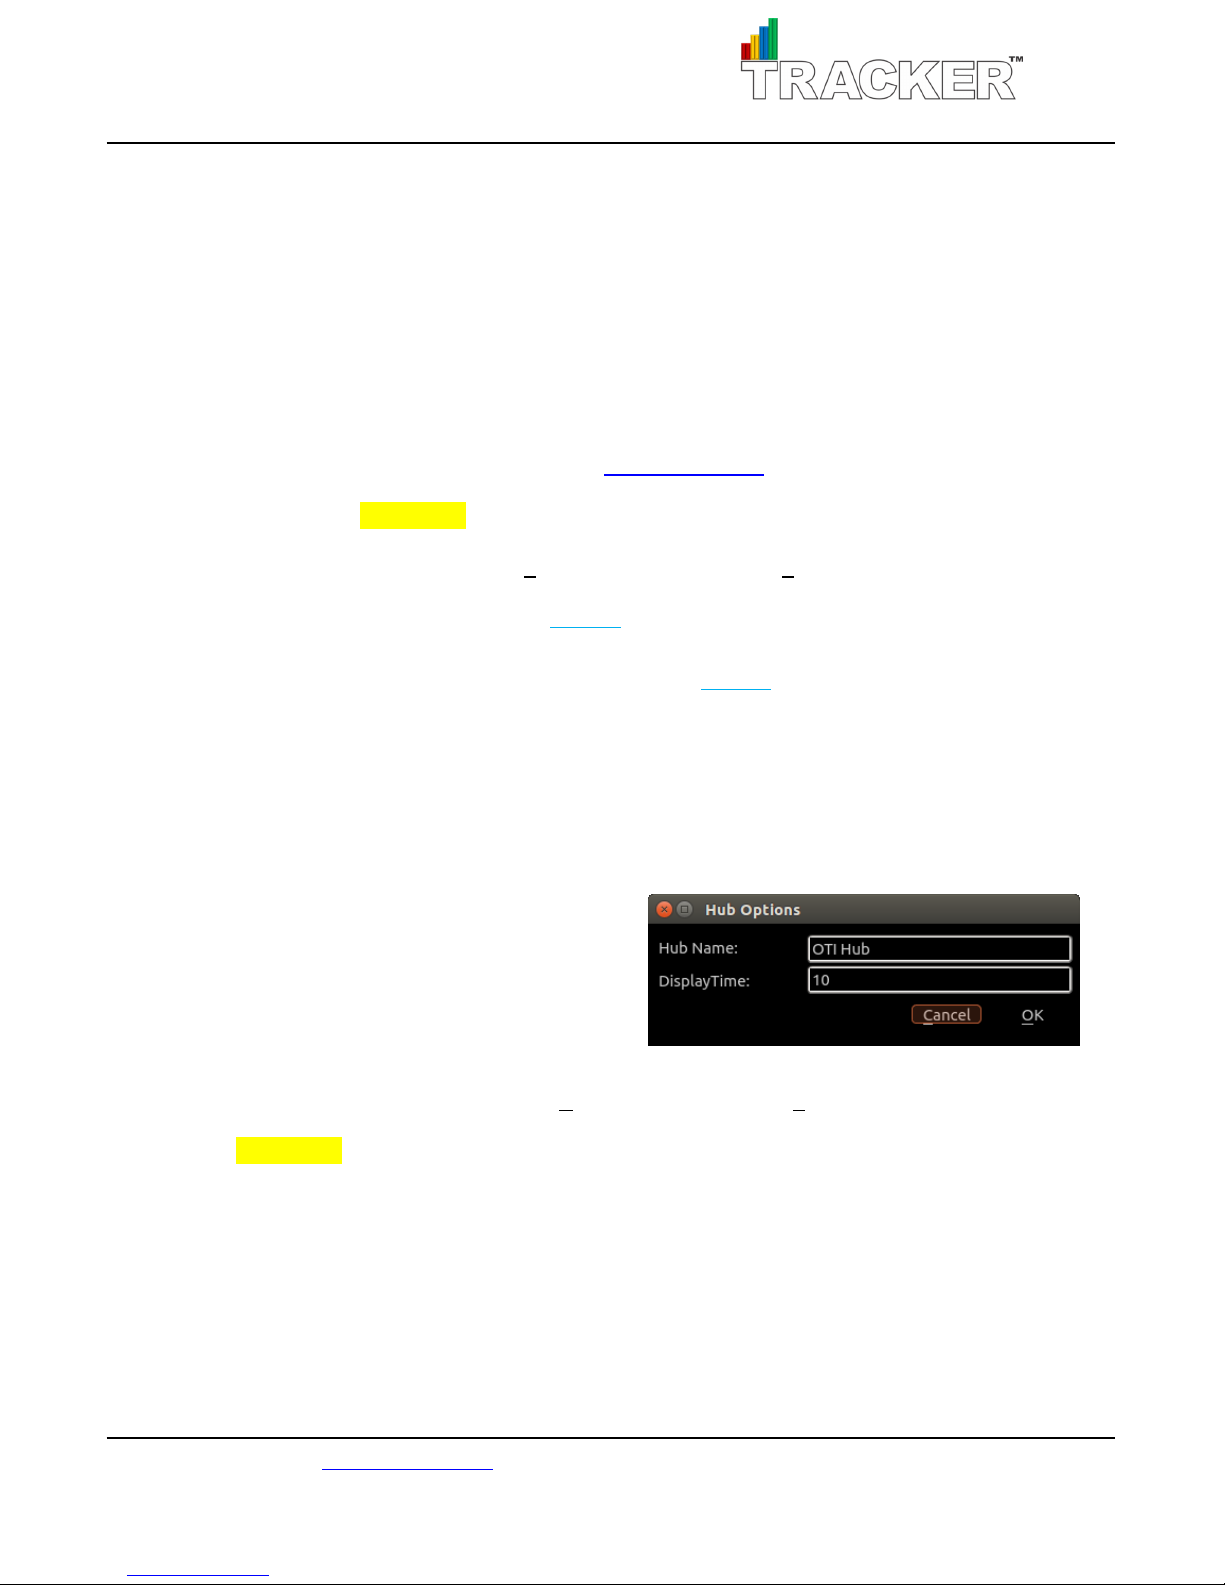
HUB Options: change HUB Name and Display Time.
The HUB Name can be any combination of alphanumeric characters. The HUB Name will change
automatically on the Tracker WEB Server.
Display Time is the number of seconds that the HUB
will display each screen, Screen #1 with TRs 1-8, and
Screen #2 with TRs 9-16. To display each screen for a longer time, increase the value; to display each
screen for less time, decrease the value. Click OK to save changes. Click Cancel to discard changes.
Please note: If there are not at least nine TR units active, only Screen #1 will display.
See training videos at TrackMyOps.com Page 8
©Output Technology, Inc. Jan15.—All rights reserved. Specifications subject to change. TRACKER™ Real-Time, Real Results
Page 9
HUB User’s Manual
System Menu
Changes made in the Systems menu are saved as templates; update TR units in the Tracker menu.
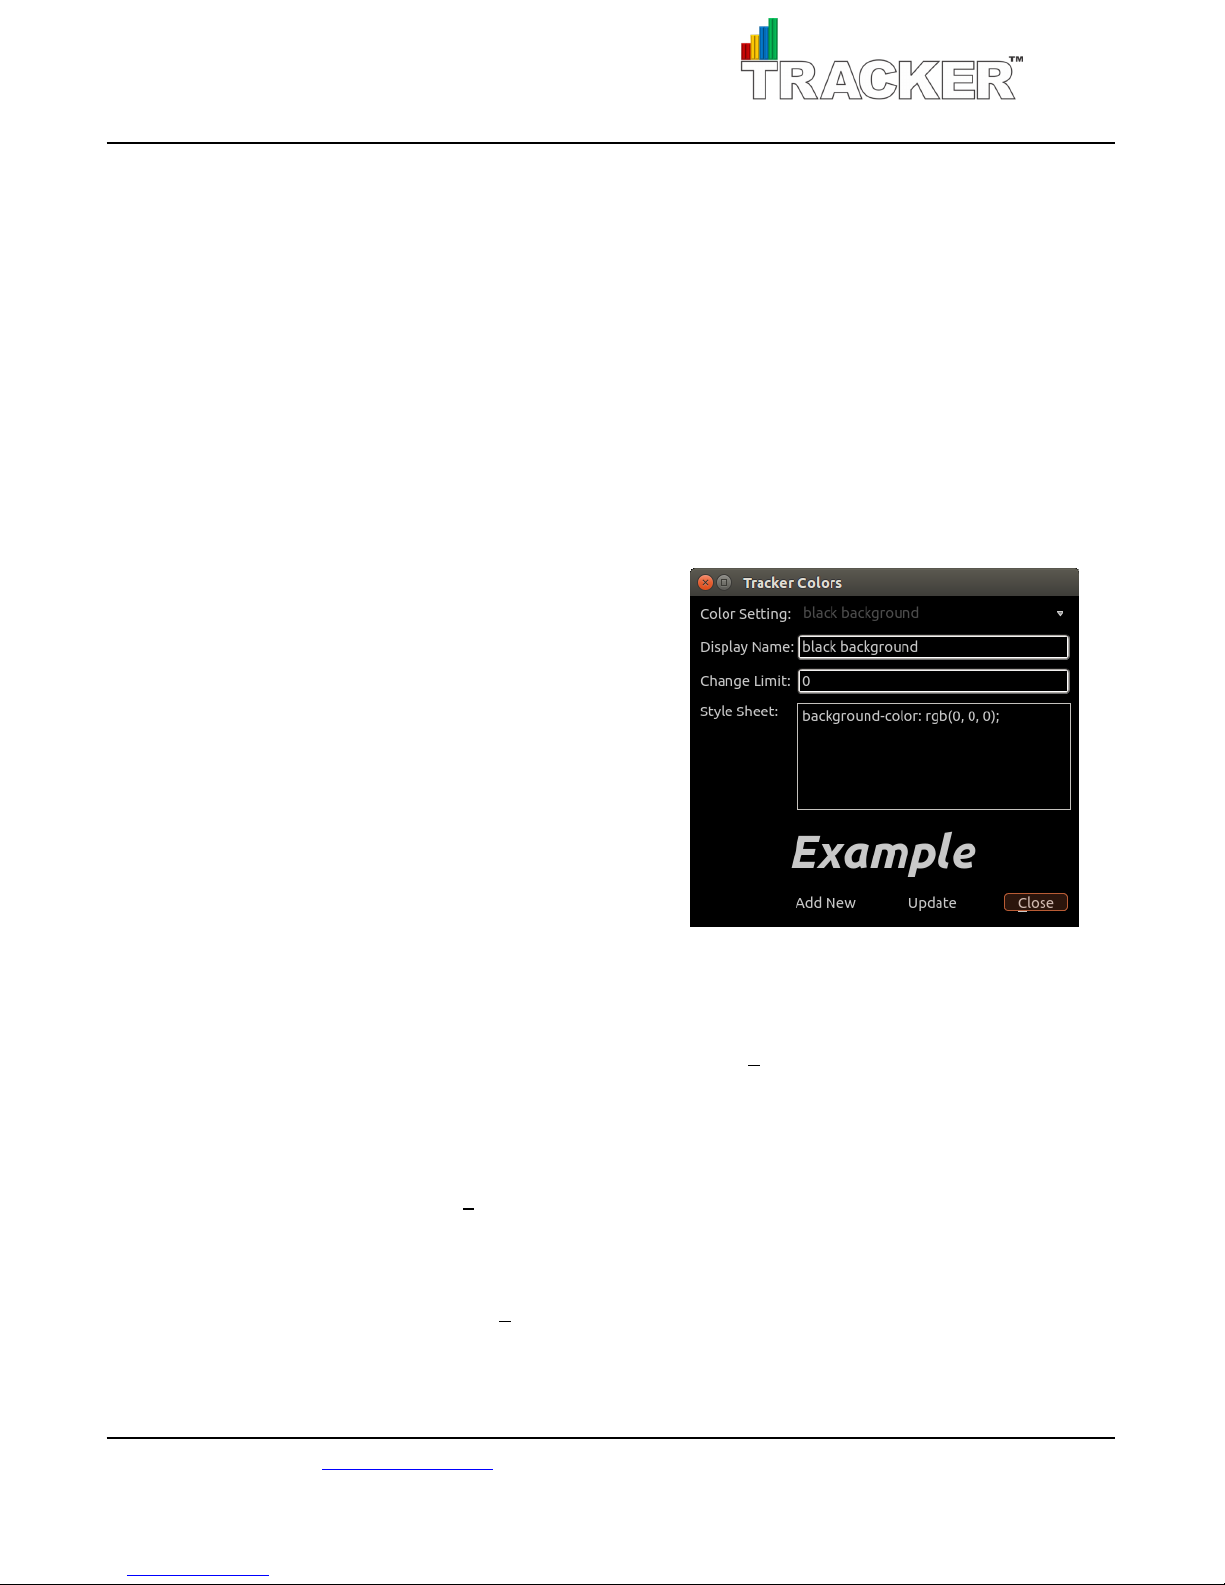
Color Types: change the colors and appearance of the TR units.
Colors are configured with the RGB color model. Use any web browser to look up an RGB table for
reference. Use the three values provided (red, blue, green) in the style sheet.
Color Setting: currently selected color template.
Display Name: title of the template.
Change Limit: set the values when the background color
changes in the percentage fields. This field only applies
to the count, speed, and job percentage display items.
Style Sheet: change text color [color: rgb(0,0,0)],
background color [background-color: rgb(0,0,0)],
border width [border 0px solid color: rgb(0,0,0)]
suggested range of 1-10px, and border radius
[border-radius: 0px], suggested range of 0-30px.
EXAMPLE: preview changes made to the stylesheet.
Make changes to a color type.
Select the color template from the drop-down list you intend to change. Do not change the display
name. Make the changes to the style sheet and click Update. Click Close to exit the dialog box.
Make changes to a color type, but keep the original.
Select the color type from the drop-down list you intend to change and change the display name to
something different than the current name and click Add New. Make the changes to the template and
click Update to save changes. Click Close to exit the dialog box.
Add a new color type.
Enter a title for the new color type template in the display name and click Add New. Make the changes
to the template and click Update. Click Close to exit the dialog box.
See training videos at TrackMyOps.com Page 9
©Output Technology, Inc. Jan15.—All rights reserved. Specifications subject to change. TRACKER™ Real-Time, Real Results
Page 10

HUB User’s Manual
Examples of Modifying and Adding Color Type Templates
Modifying Templates with a Change Limit
The default color type template for the display item “speed target high” when the speed percentage
on target is high has a change limit of 95%. To set the “speed target high” change limit to 90%, but
save the original template to keep “counts target high” at 95%, then change the title to “green
background 90” and click add new. This saves a new template which looks identical but with a
different change limit value while preserving the original. Click Close to exit the dialog box.
Changing Colors in a Template
The default color type template for the display item “id labels” is “red no border.” To change the text
color from red to green select the current template and change the display name to “green no
border,” leave the change limit at 0, and then change the style sheet to read:
color rgb(0, 255, 0); color background rgb(0, 0, 0);
This template will have green text on a black background without a border. Click Update to overwrite
the “red no border” template, or click Add New to save a new template and preserve the original.
Click Close to exit the dialog box.
Creating a Template
Below is a template for a color type with a red border, white text, and a rounded blue background:
display name: white on rounded blue red border
change limit: 0
style sheet: color: rgb(255, 255, 255); background-color: rgb(0, 0, 255);
border: 5px solid rgb(255,0,0);border-radius: 30px;
Click Add New to save this template. Click Close to exit the dialog box.
To use the above template for a percentage display item, insert a value in the change limit field (and
include that value in display name for reference). Click Update to overwrite the previous template, or
click Add New to save a new template and preserve the original. Click Close to exit the dialog box.
See training videos at TrackMyOps.com Page 10
©Output Technology, Inc. Jan15.—All rights reserved. Specifications subject to change. TRACKER™ Real-Time, Real Results
Page 11

HUB User’s Manual
Languages: edit or add new languages for TR units.
In this dialog box, the left column is for reference of a current language in the HUB, and the right column
is to modify each label used in TR operations for a selected language. The default operating language
for TR units and the HUB is English (US).
Make changes to a language.
Select the language from the drop-down list in the left column that you intend to change. Leave the
first field unchanged, this is the language name. Change each text string/label in the right column to
read as you prefer for this language. Click Update to save changes. Click Close to exit the dialog box.
For example, if you are using “English (US)” but want change the default label from “Job Size” to “Shift
Size” then leave the first field as English (US), double click “Job Size” in the right column, type “Shift
Size,” and then click update.
Make changes to a language, but keep the original.
Select the language from the drop-down list in the left column that you intend to change and change
the language name in the first field to something different than the current language name and click
Add New. Change each text string/label in the right column to read as you prefer for this language.
Click Update to save changes. Click Close to exit the dialog box.
Add a new language.
In the right column, replace the current language name label in the first field to the name of the new
language and click Add New. Change each text string/label in the right column to read as you prefer
for this language. Click Update to save changes. Click Close to exit the dialog box.
Please note: Changes made in Systems > Languages does not include JOB STATUS labels.
Those changes are made in Systems > Status Languages.
See training videos at TrackMyOps.com Page 11
©Output Technology, Inc. Jan15.—All rights reserved. Specifications subject to change. TRACKER™ Real-Time, Real Results
Page 12
HUB User’s Manual
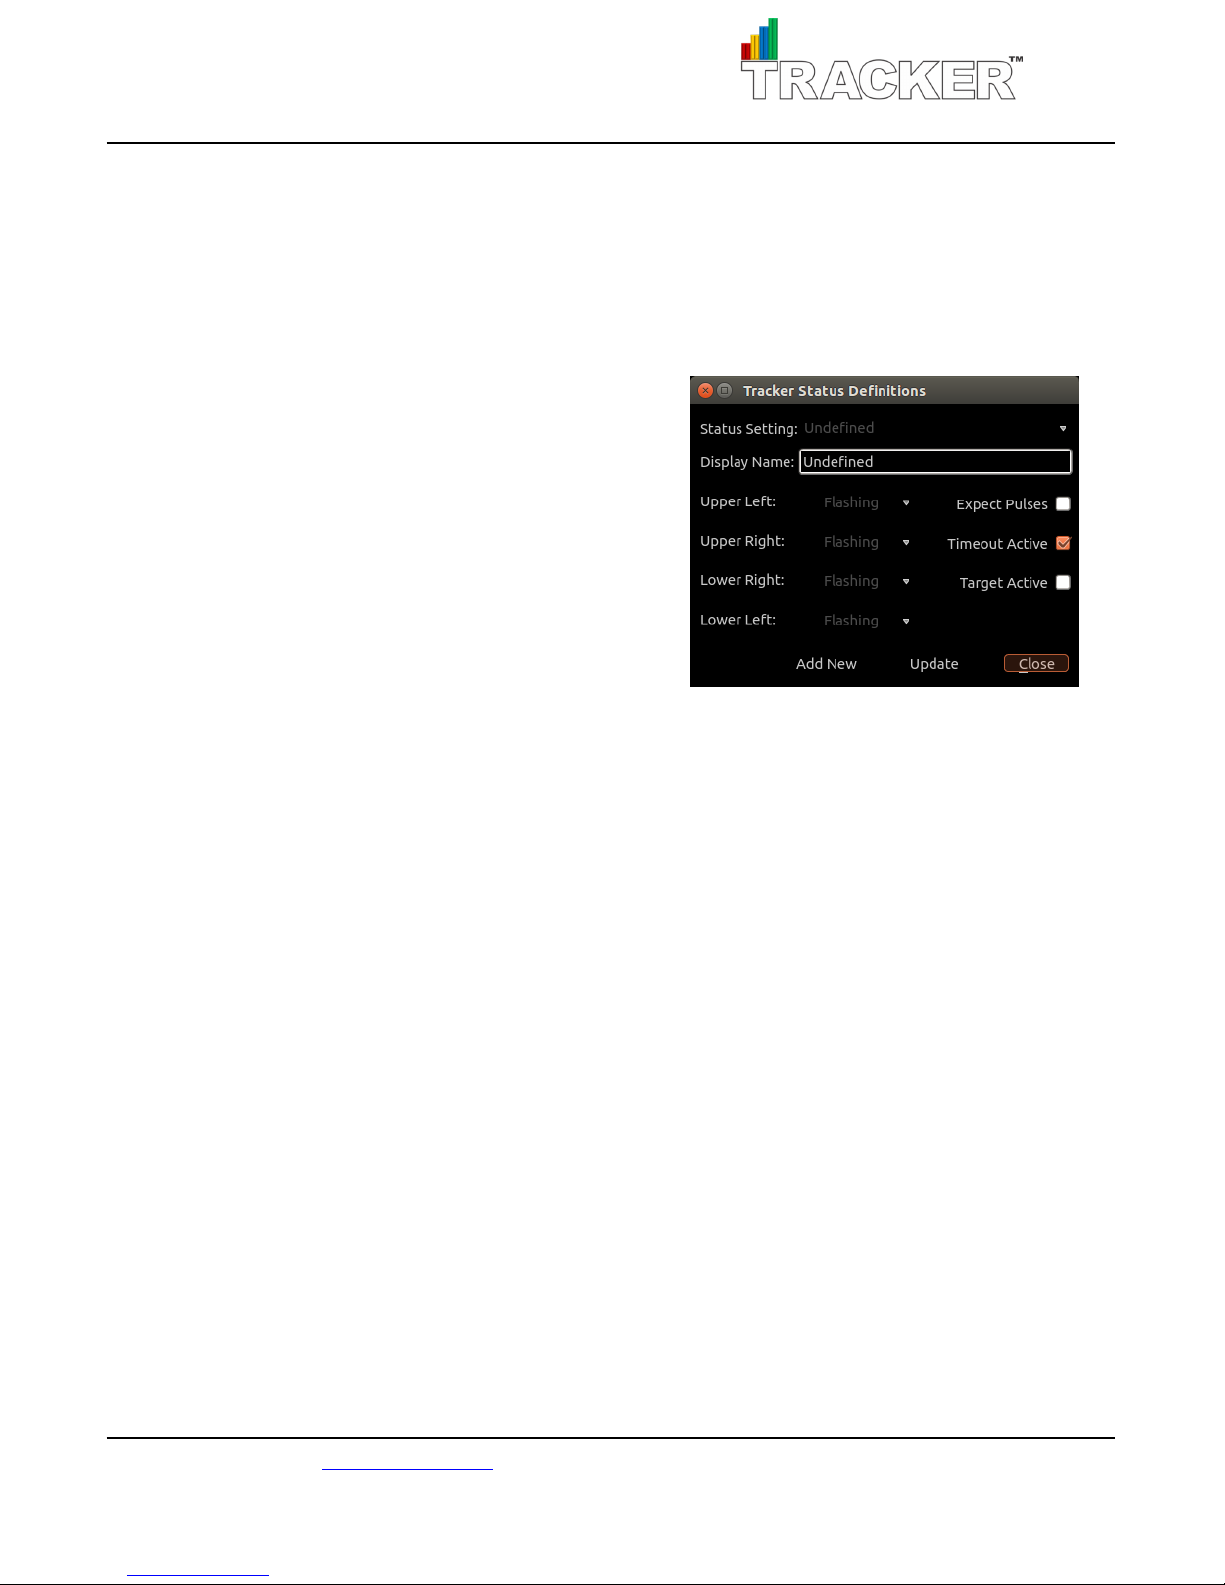
Status Types: add, edit, or remove Event Status Types.
Go to this Line item to make changes to the default Status
Types or to add new Status Types. The TR units can
display up to 32 Status Types.
Status Setting: currently selected status template.
Display Name: title of the template.
Upper/Lower Left/Right: colored Andon light display,
settable to on, off, or flashing.
Expect Pulses: this box is checked if the sensor will be receiving input pulses from a moving line.
For example, the status of “Running” will expect pulses because the line is in operation, but “Down for
Service” will not expect pulses because the line has stopped. The default setting for “Job Setup” is
expecting pulses, but if in your operations there will be no movement on the line during setup you would
uncheck the expect pulses box.
Timeout Active: this box is checked if after a set amount of time (Pulse Timeout field in the “Update
Tracker Settings” screen on the TR unit) the TR will go into an “Undefined” status if the opposite of the
Expect Pulses setting is happening.
For example, if a TR is in the status “Running” and there are no pulse inputs, the TR will go into an
“Undefined” status, prompting the operator to set the TR to the correct status. Alternatively, if a TR is in
the status “Down for Service” and there are pulses incoming, the “Undefined” status is entered.
Target Active: this box is checked if the target/takt fields should increase during an event status.
For example, if a TR is in the status “Running” the takt will increase because the line is in normal
operation. If a TR is in the status “Job Set Up” the takt will not increase because the any incoming pulses
are considered a part of the setup process and not normal operation. Whereas the status “Out of
Product” will increase the takt because the line should procedurally not run out of products while
normally operating.
See training videos at TrackMyOps.com Page 12
©Output Technology, Inc. Jan15.—All rights reserved. Specifications subject to change. TRACKER™ Real-Time, Real Results
Page 13

HUB User’s Manual
Making Changes to an Existing Status Template
Select the status from the drop-down list that you intend to change. Do not modify the Display Name.
Make any changes to the colored Andon lights, pulses, timeout, and target settings.
Click Update to save changes. Click Close to exit the dialog box.
Adding a New Status Template
Type in a title for your new Status in the Display Name field. Configure the desired colored Andon
lights, pulses, timeout, and target settings.
Click Add New to save this template. Click Close to exit the dialog box.
Please note: When adding a new status template, add translations for any
additional languages in the Status Languages submenu.
Status Languages: edit languages for Job/Event Statuses.
Select the language from the drop-down list that you intend to change. The language in the left column
is English (US) and the language in the right column is the selected language. Change each text
string/label in the right column to read as you prefer for this language.
Click Update to save changes. Click Close to exit the dialog box.
See training videos at TrackMyOps.com Page 13
©Output Technology, Inc. Jan15.—All rights reserved. Specifications subject to change. TRACKER™ Real-Time, Real Results
Page 14
HUB User’s Manual
Tracker Menu
Use this menu to update the TR units with changes you modified or created in the System Settings menu.
Please note: Changes will not update on TR units until End Job has been clicked from the TR unit. The
system waits for END JOB mode so the changes do not interrupt any data collection or reporting while
operating. If the TR unit is already in END JOB mode, click the End Job button again to update changes.
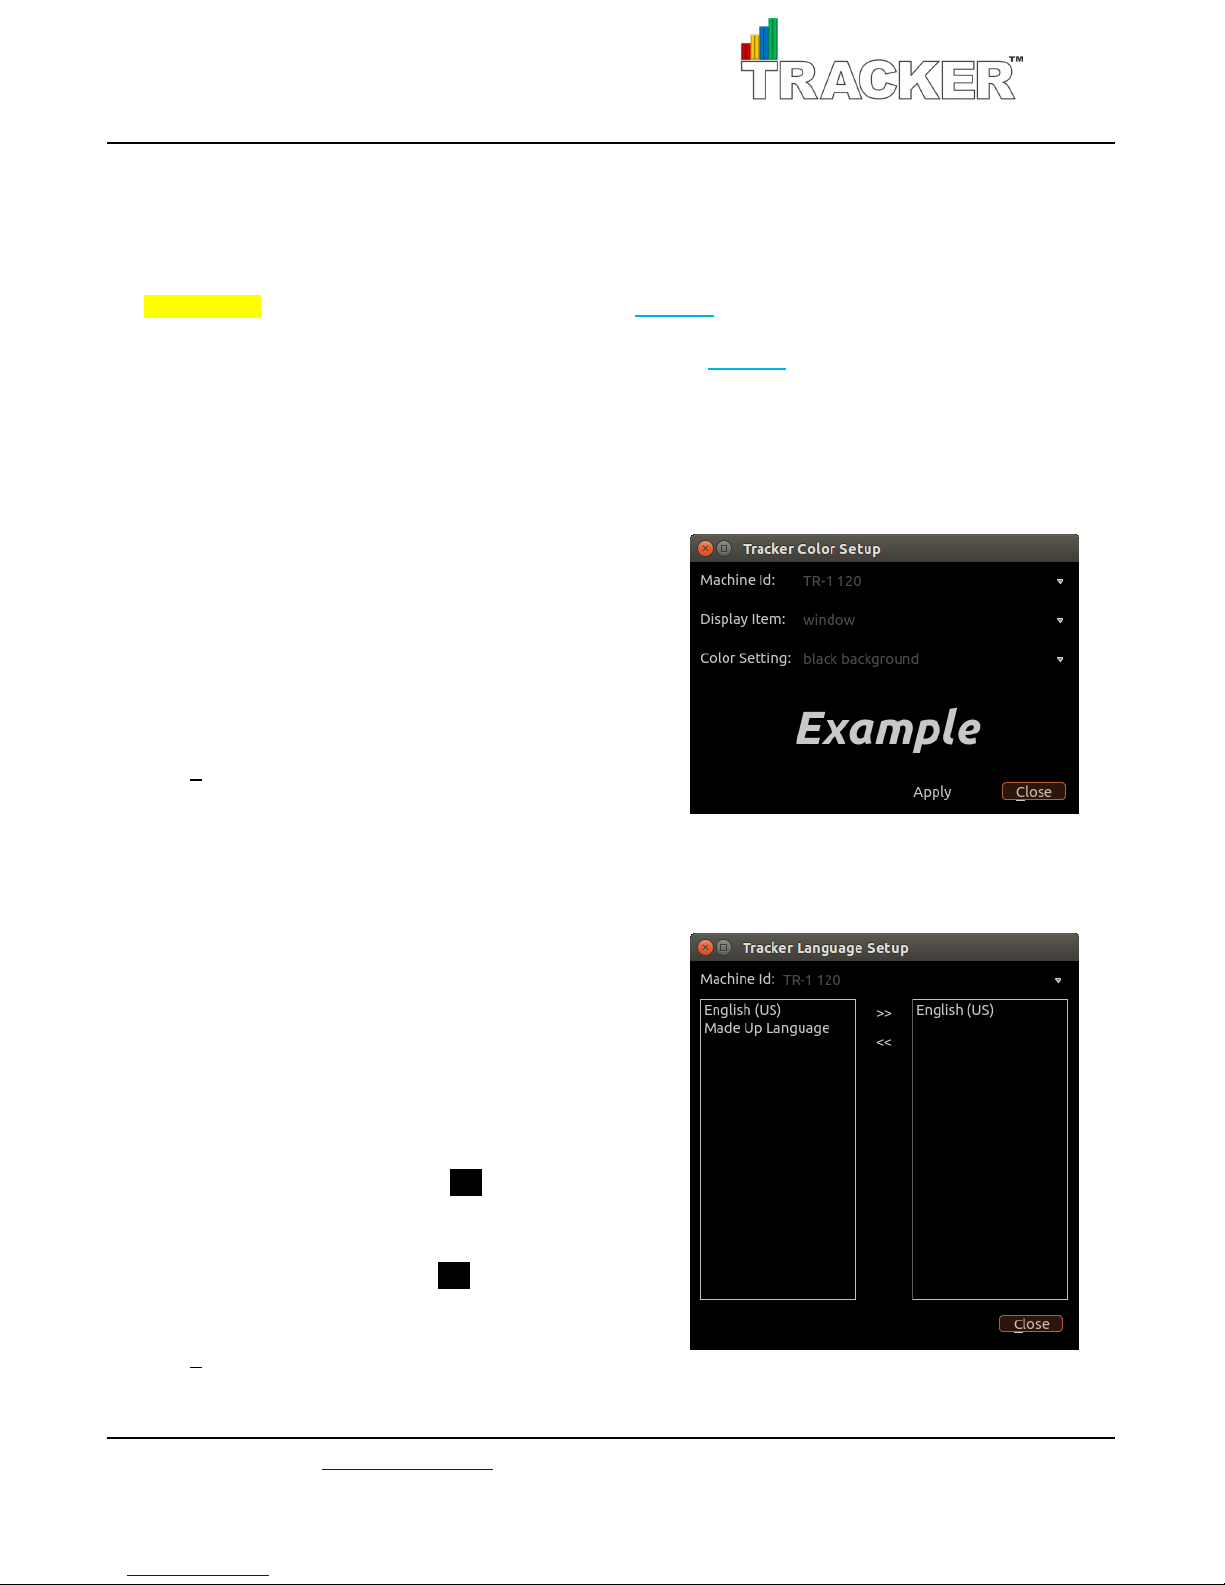
Color: change the look of a TR’s Display Items.
Choose the “Machine ID” of the TR unit you would like to
make changes to, and then select the “Display Item” you
would like to change. You can pick one of the default
Color Settings or one of the templates you created in the
Systems > Color Types submenu. The new color setting
will preview in the Example section.
Click Apply after each change to save changes.
Click Close to exit the dialog box.
Language: add/remove languages from a TR.
Select the Machine ID of the TR unit you would like to
modify from the drop-down list. The left column displays
all available languages on the HUB, including the default
English (US) language and any other languages created in
the Systems > Languages submenu. The right column
displays the languages on the selected TR.
To add a language highlight a language in the left column
and click on the move right arrow >> . The selected
language will now display in the right column. To remove
a language highlight a language in the right column box
and click on the move left arrow << . The selected
language will be removed from the right column.
Click Close to exit the dialog box.
See training videos at TrackMyOps.com Page 14
©Output Technology, Inc. Jan15.—All rights reserved. Specifications subject to change. TRACKER™ Real-Time, Real Results
Page 15
HUB User’s Manual
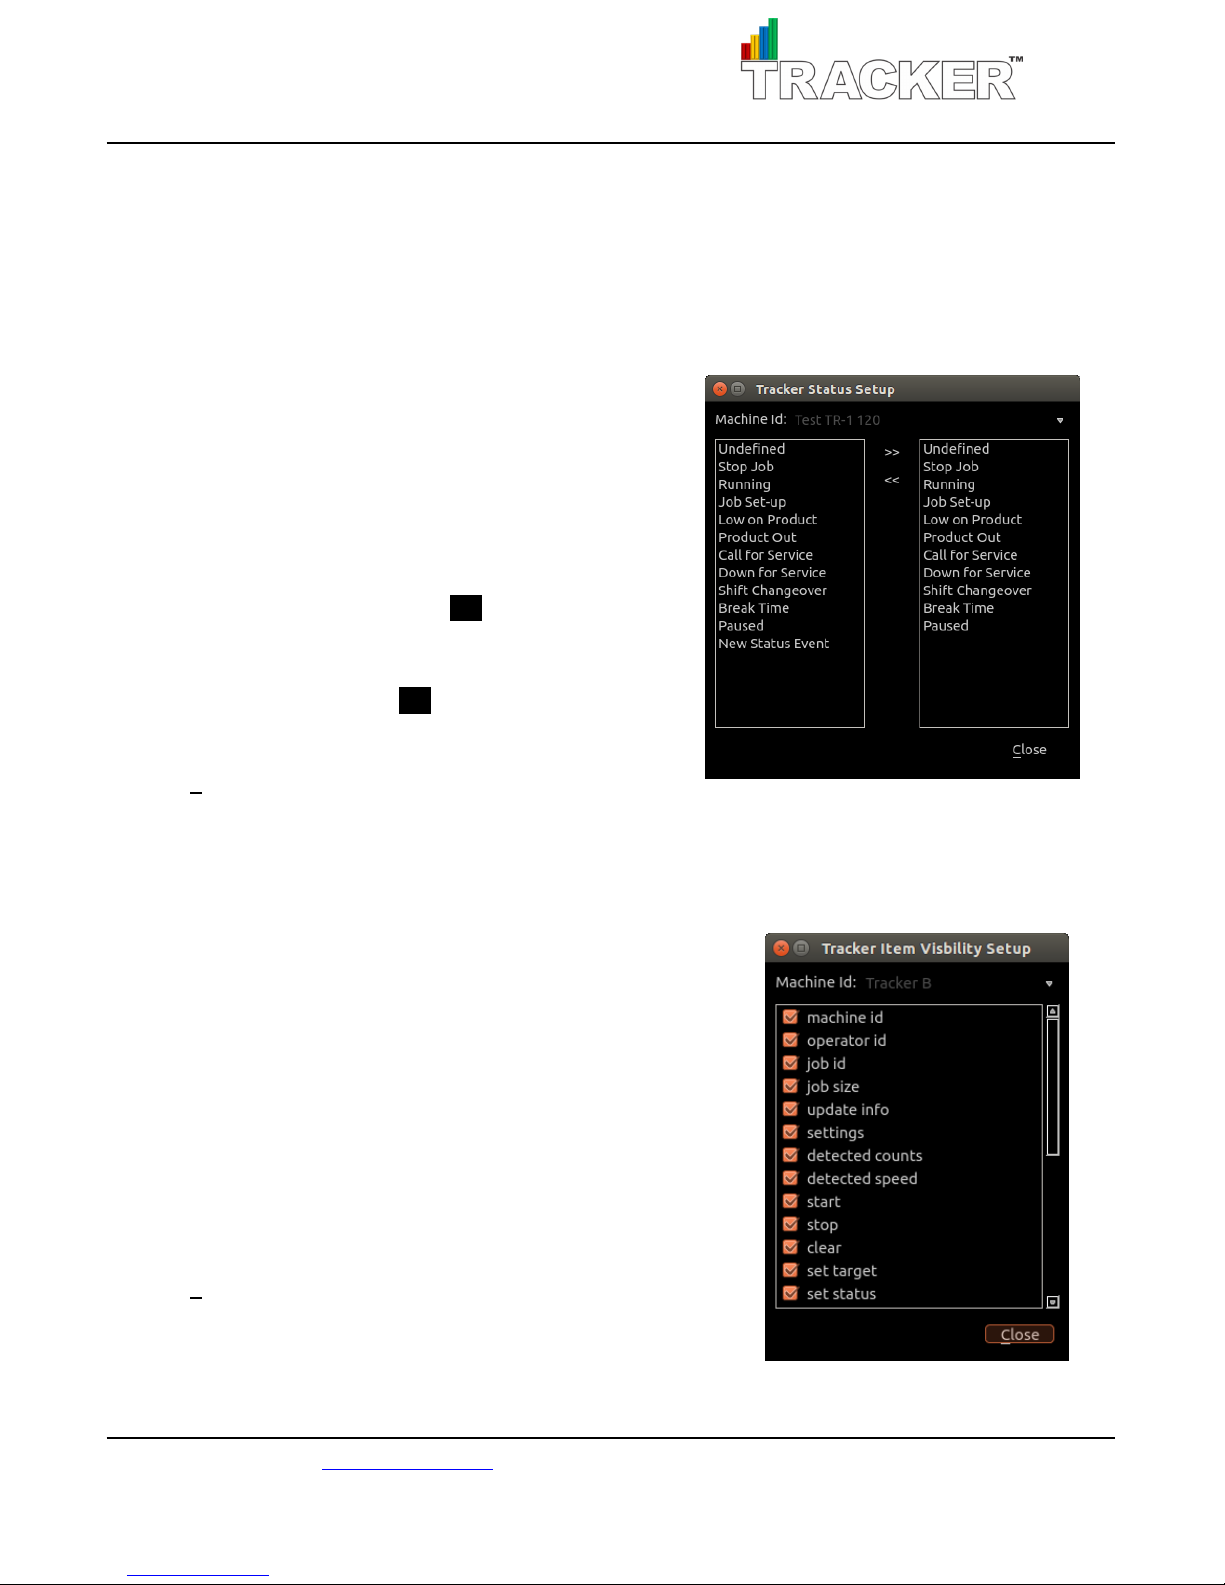
Status: add or remove a Job/Event Status from a TR unit.
Select the Machine ID of the TR unit you would like to
modify from the drop-down list. The left column displays all
Status Types available on the HUB, including the default
Status Types and any other created in the Systems > Status
Types submenu. The right column displays the Status Types
on the selected TR.
To add a Status Type highlight a Status in the left column
and click on the move right arrow >> . The selected
language will now display in the right column. To remove a
language highlight a language in the right column box and
click on the move left arrow << . The selected language will
be removed from the right column.
Click Close to exit the dialog box.
Visibility: turn Display Items ON or OFF on a TR unit.
Select the Machine ID of the TR unit you would like to modify from
the drop-down list. To add or remove items:
Uncheck the box to make a Display Item not visible.
Check the box to make a Display Item visible.
For example, if you want to change Job Information and Tracker
Settings for a TR unit only from the HUB in Tools > Tracker
Settings, and remove the buttons on the TR, uncheck the “update
info” and “settings” boxes so they will not appear on the TRs
screen.
Click Close to exit the dialog box.
See training videos at TrackMyOps.com Page 15
©Output Technology, Inc. Jan15.—All rights reserved. Specifications subject to change. TRACKER™ Real-Time, Real Results
 Loading...