

TM
TRACERCO
PERSONAL
ELECTRONIC DOSIMETER (PED)
USER MANUAL

CONTENTS
1. ABOUT YOUR TRACERCO PED . . . . . . . . . . . . . . . . . . . . . . . . . . . . . . . . . . . . . . . . . . . . . . . . . . . . . . . . . . . .3
2. TRACERCOTMPED OPERATION . . . . . . . . . . . . . . . . . . . . . . . . . . . . . . . . . . . . . . . . . . . . . . . . . . . . . . . . . . . .4
2.1 Physical Description . . . . . . . . . . . . . . . . . . . . . . . . . . . . . . . . . . . . . . . . . . . . . . . . . . . . . . . . . . . . . . . . . . . . . . . . . . .4
2.2 Wearing the TRACERCO PED . . . . . . . . . . . . . . . . . . . . . . . . . . . . . . . . . . . . . . . . . . . . . . . . . . . . . . . . . . . . . . . . . . .5
2.3 Start up and shut down . . . . . . . . . . . . . . . . . . . . . . . . . . . . . . . . . . . . . . . . . . . . . . . . . . . . . . . . . . . . . . . . . . . . . . . .5
2.4 Readings screen . . . . . . . . . . . . . . . . . . . . . . . . . . . . . . . . . . . . . . . . . . . . . . . . . . . . . . . . . . . . . . . . . . . . . . . . . . . . .6
2.5 TRACERCO PED navigation schematic . . . . . . . . . . . . . . . . . . . . . . . . . . . . . . . . . . . . . . . . . . . . . . . . . . . . . . . . . . .7
2.6 TRACERCO PED functions . . . . . . . . . . . . . . . . . . . . . . . . . . . . . . . . . . . . . . . . . . . . . . . . . . . . . . . . . . . . . . . . . . . . .8
2.6.1 Alarms . . . . . . . . . . . . . . . . . . . . . . . . . . . . . . . . . . . . . . . . . . . . . . . . . . . . . . . . . . . . . . . . . . . . . . . . . . . . . . . . .8
2.6.2 Tasks . . . . . . . . . . . . . . . . . . . . . . . . . . . . . . . . . . . . . . . . . . . . . . . . . . . . . . . . . . . . . . . . . . . . . . . . . . . . . . . . . .8
2.6.3 Flip screen function . . . . . . . . . . . . . . . . . . . . . . . . . . . . . . . . . . . . . . . . . . . . . . . . . . . . . . . . . . . . . . . . . . . . . . .9
2.6.4 Screensaver . . . . . . . . . . . . . . . . . . . . . . . . . . . . . . . . . . . . . . . . . . . . . . . . . . . . . . . . . . . . . . . . . . . . . . . . . . . .9
2.6.5 Power status . . . . . . . . . . . . . . . . . . . . . . . . . . . . . . . . . . . . . . . . . . . . . . . . . . . . . . . . . . . . . . . . . . . . . . . . . . .10
2.6.6 Monitor details . . . . . . . . . . . . . . . . . . . . . . . . . . . . . . . . . . . . . . . . . . . . . . . . . . . . . . . . . . . . . . . . . . . . . . . . . .10
2.6.7 Time zone . . . . . . . . . . . . . . . . . . . . . . . . . . . . . . . . . . . . . . . . . . . . . . . . . . . . . . . . . . . . . . . . . . . . . . . . . . . . .11
2.6.8 Language selection . . . . . . . . . . . . . . . . . . . . . . . . . . . . . . . . . . . . . . . . . . . . . . . . . . . . . . . . . . . . . . . . . . . . . .11
2.6.9 Activity Sounder . . . . . . . . . . . . . . . . . . . . . . . . . . . . . . . . . . . . . . . . . . . . . . . . . . . . . . . . . . . . . . . . . . . . . . . .11
2.7 TRACERCO PED errors and recovery actions . . . . . . . . . . . . . . . . . . . . . . . . . . . . . . . . . . . . . . . . . . . . . . . . . . . . . .12
2.7.1 Status warning messages . . . . . . . . . . . . . . . . . . . . . . . . . . . . . . . . . . . . . . . . . . . . . . . . . . . . . . . . . . . . . . . . .12
2.7.2 Critical malfunction warnings . . . . . . . . . . . . . . . . . . . . . . . . . . . . . . . . . . . . . . . . . . . . . . . . . . . . . . . . . . . . . .13
2.7.3 Response to dose rate overload . . . . . . . . . . . . . . . . . . . . . . . . . . . . . . . . . . . . . . . . . . . . . . . . . . . . . . . . . . . .14
3. DOSEVISION
TM
SOFTWARE . . . . . . . . . . . . . . . . . . . . . . . . . . . . . . . . . . . . . . . . . . . . . . . . . . . . . . . . . . . . . .15
3.1 Recommended host PC requirements . . . . . . . . . . . . . . . . . . . . . . . . . . . . . . . . . . . . . . . . . . . . . . . . . . . . . . . . . . .15
3.2 Software installation . . . . . . . . . . . . . . . . . . . . . . . . . . . . . . . . . . . . . . . . . . . . . . . . . . . . . . . . . . . . . . . . . . . . . . . . . .15
3.3 TRACERCO PED connection to PC . . . . . . . . . . . . . . . . . . . . . . . . . . . . . . . . . . . . . . . . . . . . . . . . . . . . . . . . . . . . . .15
3.4 Transferring data from the TRACERCO PED . . . . . . . . . . . . . . . . . . . . . . . . . . . . . . . . . . . . . . . . . . . . . . . . . . . . . . .16
3.5 Viewing data . . . . . . . . . . . . . . . . . . . . . . . . . . . . . . . . . . . . . . . . . . . . . . . . . . . . . . . . . . . . . . . . . . . . . . . . . . . . . . . .16
3.5.1 Date range selection and navigation . . . . . . . . . . . . . . . . . . . . . . . . . . . . . . . . . . . . . . . . . . . . . . . . . . . . . . . .17
3.5.2 Data display options . . . . . . . . . . . . . . . . . . . . . . . . . . . . . . . . . . . . . . . . . . . . . . . . . . . . . . . . . . . . . . . . . . . . .17
3.5.3 Exporting data . . . . . . . . . . . . . . . . . . . . . . . . . . . . . . . . . . . . . . . . . . . . . . . . . . . . . . . . . . . . . . . . . . . . . . . . .18
3.6 Changing TRACERCO PED settings with DoseVision . . . . . . . . . . . . . . . . . . . . . . . . . . . . . . . . . . . . . . . . . . . . . . . .19
3.6.1 Alarm settings . . . . . . . . . . . . . . . . . . . . . . . . . . . . . . . . . . . . . . . . . . . . . . . . . . . . . . . . . . . . . . . . . . . . . . . . . .19
3.6.2 Time settings . . . . . . . . . . . . . . . . . . . . . . . . . . . . . . . . . . . . . . . . . . . . . . . . . . . . . . . . . . . . . . . . . . . . . . . . . . .19
3.6.3 Data logging mode . . . . . . . . . . . . . . . . . . . . . . . . . . . . . . . . . . . . . . . . . . . . . . . . . . . . . . . . . . . . . . . . . . . . . .20
3.6.4 Changing TRACERCO PED units . . . . . . . . . . . . . . . . . . . . . . . . . . . . . . . . . . . . . . . . . . . . . . . . . . . . . . . . . . .20
3.6.5 Assigning TRACERCO PED users . . . . . . . . . . . . . . . . . . . . . . . . . . . . . . . . . . . . . . . . . . . . . . . . . . . . . . . . . .20
3.6.6 Setting the folder for data storage . . . . . . . . . . . . . . . . . . . . . . . . . . . . . . . . . . . . . . . . . . . . . . . . . . . . . . . . . .21
3.7 TRACERCO PED firmware upgrades . . . . . . . . . . . . . . . . . . . . . . . . . . . . . . . . . . . . . . . . . . . . . . . . . . . . . . . . . . . .21
3.8 DoseVision upgrades . . . . . . . . . . . . . . . . . . . . . . . . . . . . . . . . . . . . . . . . . . . . . . . . . . . . . . . . . . . . . . . . . . . . . . . . .21
3.9 Access security . . . . . . . . . . . . . . . . . . . . . . . . . . . . . . . . . . . . . . . . . . . . . . . . . . . . . . . . . . . . . . . . . . . . . . . . . . . . .22
4. MAINTENANCE AND CALIBRATION . . . . . . . . . . . . . . . . . . . . . . . . . . . . . . . . . . . . . . . . . . . . . . . . . . . . . . .23
4.1 Charging the TRACERCO PED . . . . . . . . . . . . . . . . . . . . . . . . . . . . . . . . . . . . . . . . . . . . . . . . . . . . . . . . . . . . . . . . .23
4.2 Cleaning . . . . . . . . . . . . . . . . . . . . . . . . . . . . . . . . . . . . . . . . . . . . . . . . . . . . . . . . . . . . . . . . . . . . . . . . . . . . . . . . . . .23
4.3 Handling . . . . . . . . . . . . . . . . . . . . . . . . . . . . . . . . . . . . . . . . . . . . . . . . . . . . . . . . . . . . . . . . . . . . . . . . . . . . . . . . . . .23
4.4 Screen protection . . . . . . . . . . . . . . . . . . . . . . . . . . . . . . . . . . . . . . . . . . . . . . . . . . . . . . . . . . . . . . . . . . . . . . . . . . . .24
4.5 Calibration . . . . . . . . . . . . . . . . . . . . . . . . . . . . . . . . . . . . . . . . . . . . . . . . . . . . . . . . . . . . . . . . . . . . . . . . . . . . . . . . .24
4.6 TRACERCO PED software and firmware upgrades . . . . . . . . . . . . . . . . . . . . . . . . . . . . . . . . . . . . . . . . . . . . . . . . .24
4.7 Essential safety information . . . . . . . . . . . . . . . . . . . . . . . . . . . . . . . . . . . . . . . . . . . . . . . . . . . . . . . . . . . . . . . . . . .25
4.7.1 Hazardous area approval . . . . . . . . . . . . . . . . . . . . . . . . . . . . . . . . . . . . . . . . . . . . . . . . . . . . . . . . . . . . . . . . .25
4.7.2 Approval standards . . . . . . . . . . . . . . . . . . . . . . . . . . . . . . . . . . . . . . . . . . . . . . . . . . . . . . . . . . . . . . . . . . . . . .25
4.7.3 Repair and maintenance of the TRACERCO PED . . . . . . . . . . . . . . . . . . . . . . . . . . . . . . . . . . . . . . . . . . . . . .25
4.7.4 Use of the TRACERCO PED docks . . . . . . . . . . . . . . . . . . . . . . . . . . . . . . . . . . . . . . . . . . . . . . . . . . . . . . . . .26
4.7.5 Electromagnetic interference . . . . . . . . . . . . . . . . . . . . . . . . . . . . . . . . . . . . . . . . . . . . . . . . . . . . . . . . . . . . . .26
4.7.6 Device heating . . . . . . . . . . . . . . . . . . . . . . . . . . . . . . . . . . . . . . . . . . . . . . . . . . . . . . . . . . . . . . . . . . . . . . . . .26
2
CONTENTS (continued)
5. TECHNICAL SPECIFICATIONS . . . . . . . . . . . . . . . . . . . . . . . . . . . . . . . . . . . . . . . . . . . . . . . . . . . . . . . . . . . .27
5.1 Radiological performance . . . . . . . . . . . . . . . . . . . . . . . . . . . . . . . . . . . . . . . . . . . . . . . . . . . . . . . . . . . . . . . . . . . . .27
5.2 Hazardous area approval . . . . . . . . . . . . . . . . . . . . . . . . . . . . . . . . . . . . . . . . . . . . . . . . . . . . . . . . . . . . . . . . . . . . .30
5.3 EMC . . . . . . . . . . . . . . . . . . . . . . . . . . . . . . . . . . . . . . . . . . . . . . . . . . . . . . . . . . . . . . . . . . . . . . . . . . . . . . . . . . . . . .30
5.4 Battery . . . . . . . . . . . . . . . . . . . . . . . . . . . . . . . . . . . . . . . . . . . . . . . . . . . . . . . . . . . . . . . . . . . . . . . . . . . . . . . . . . . .30
5.5 Mechanical . . . . . . . . . . . . . . . . . . . . . . . . . . . . . . . . . . . . . . . . . . . . . . . . . . . . . . . . . . . . . . . . . . . . . . . . . . . . . . . . .30
5.6 Environmental . . . . . . . . . . . . . . . . . . . . . . . . . . . . . . . . . . . . . . . . . . . . . . . . . . . . . . . . . . . . . . . . . . . . . . . . . . . . . .31
5.7 Data logging . . . . . . . . . . . . . . . . . . . . . . . . . . . . . . . . . . . . . . . . . . . . . . . . . . . . . . . . . . . . . . . . . . . . . . . . . . . . . . . .31
6. ACCESSORIES FOR THE TRACERCO PED . . . . . . . . . . . . . . . . . . . . . . . . . . . . . . . . . . . . . . . . . . . . . . . . .32
7. MONITORS PRODUCT RANGE . . . . . . . . . . . . . . . . . . . . . . . . . . . . . . . . . . . . . . . . . . . . . . . . . . . . . . . . . . .33
APPENDIX A - Type Test Report Summary . . . . . . . . . . . . . . . . . . . . . . . . . . . . . . . . . . . . . . . . . . . . . . . . . . . . .34
1. ABOUT YOUR TRACERCO PED
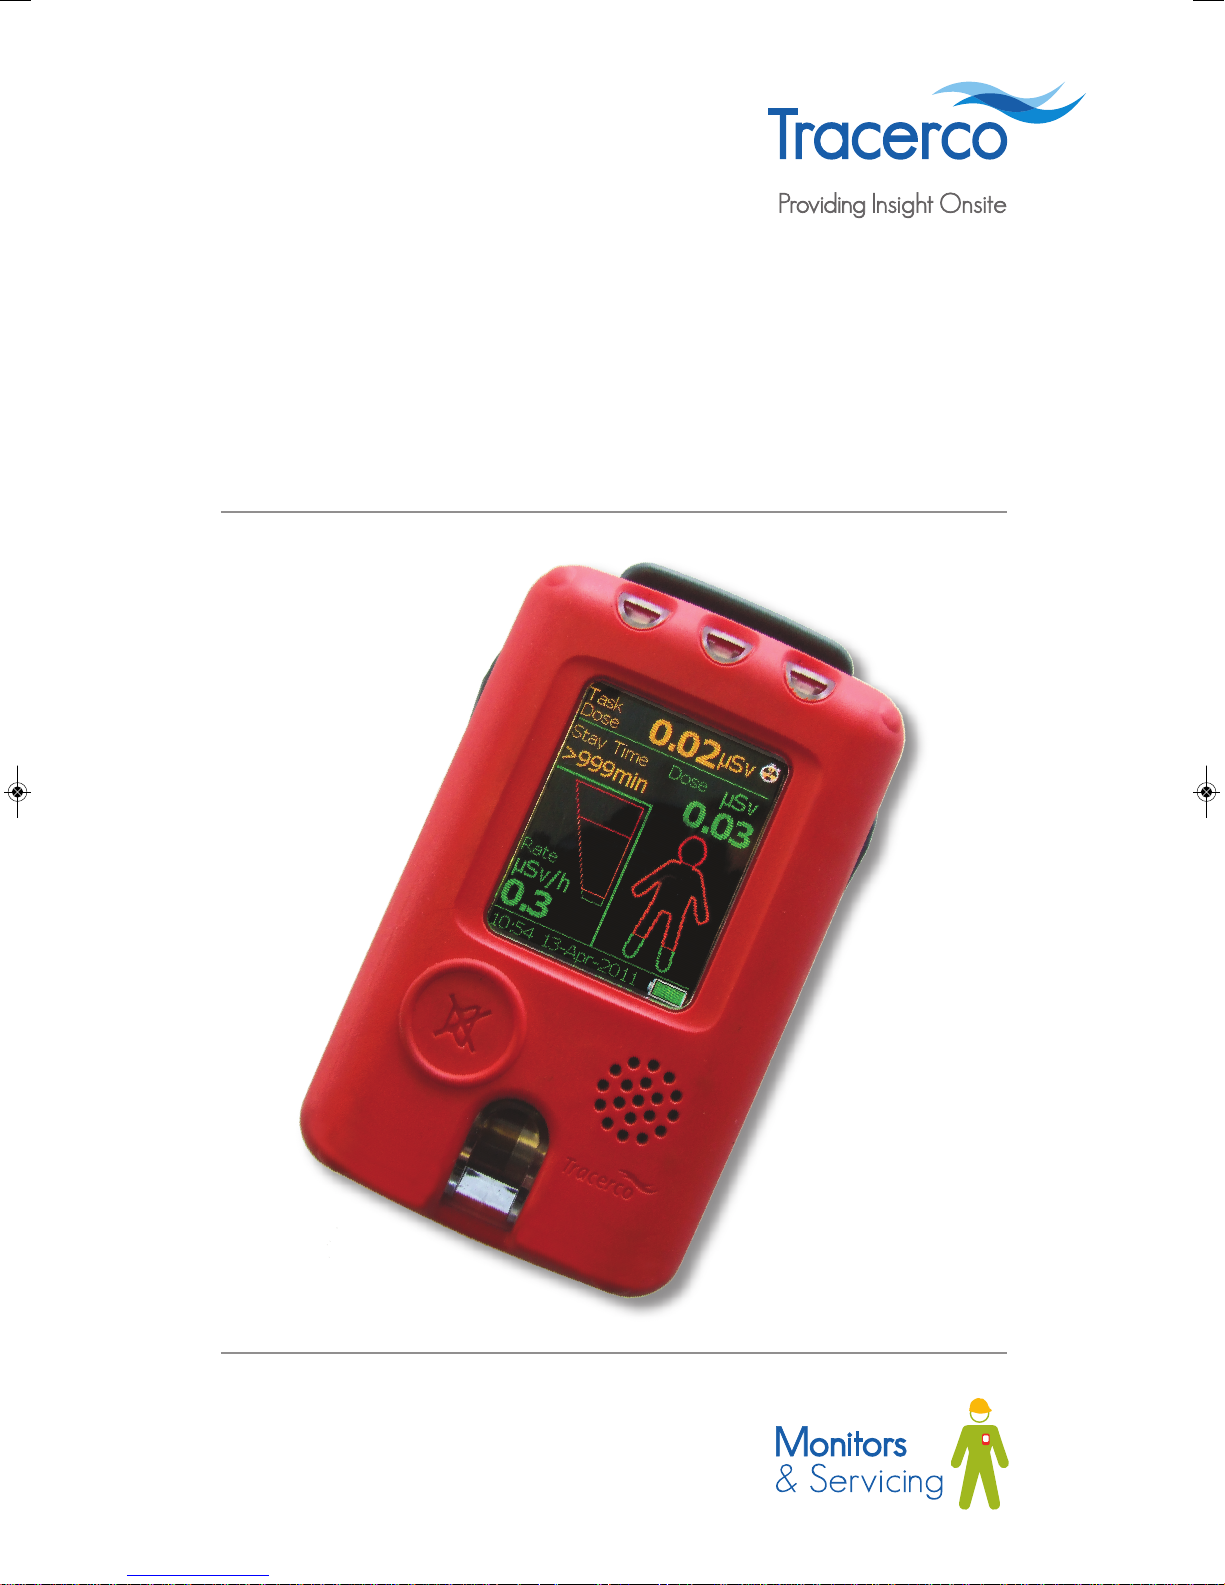
The TRACERCO PED is a personal electronic
dosimeter that has been approved for use in
explosive atmospheres. The TRACERCO PED
measures radiation equivalent dose, Hp(10),
accumulated in X and gamma radiation fields in
the energy range of 33keV to 1.25MeV and in
dose rates between 0.1 µSv/h and 100 mSv/h.
The TRACERCO PED reflects TRACERCO’S 50
years of experience in industrial and environmental
radiation measurement by combining new design
features with major advances in display technology
to increase ease of operation in the field.
The Geiger Müller tube is used for radiation
detection and the device has been specially
designed to be lightweight but robust. The soft
polymer case is resistant to chemicals and
offers a high level of protection for use in all
environments.
3
2. TRACERCO PED OPERATION
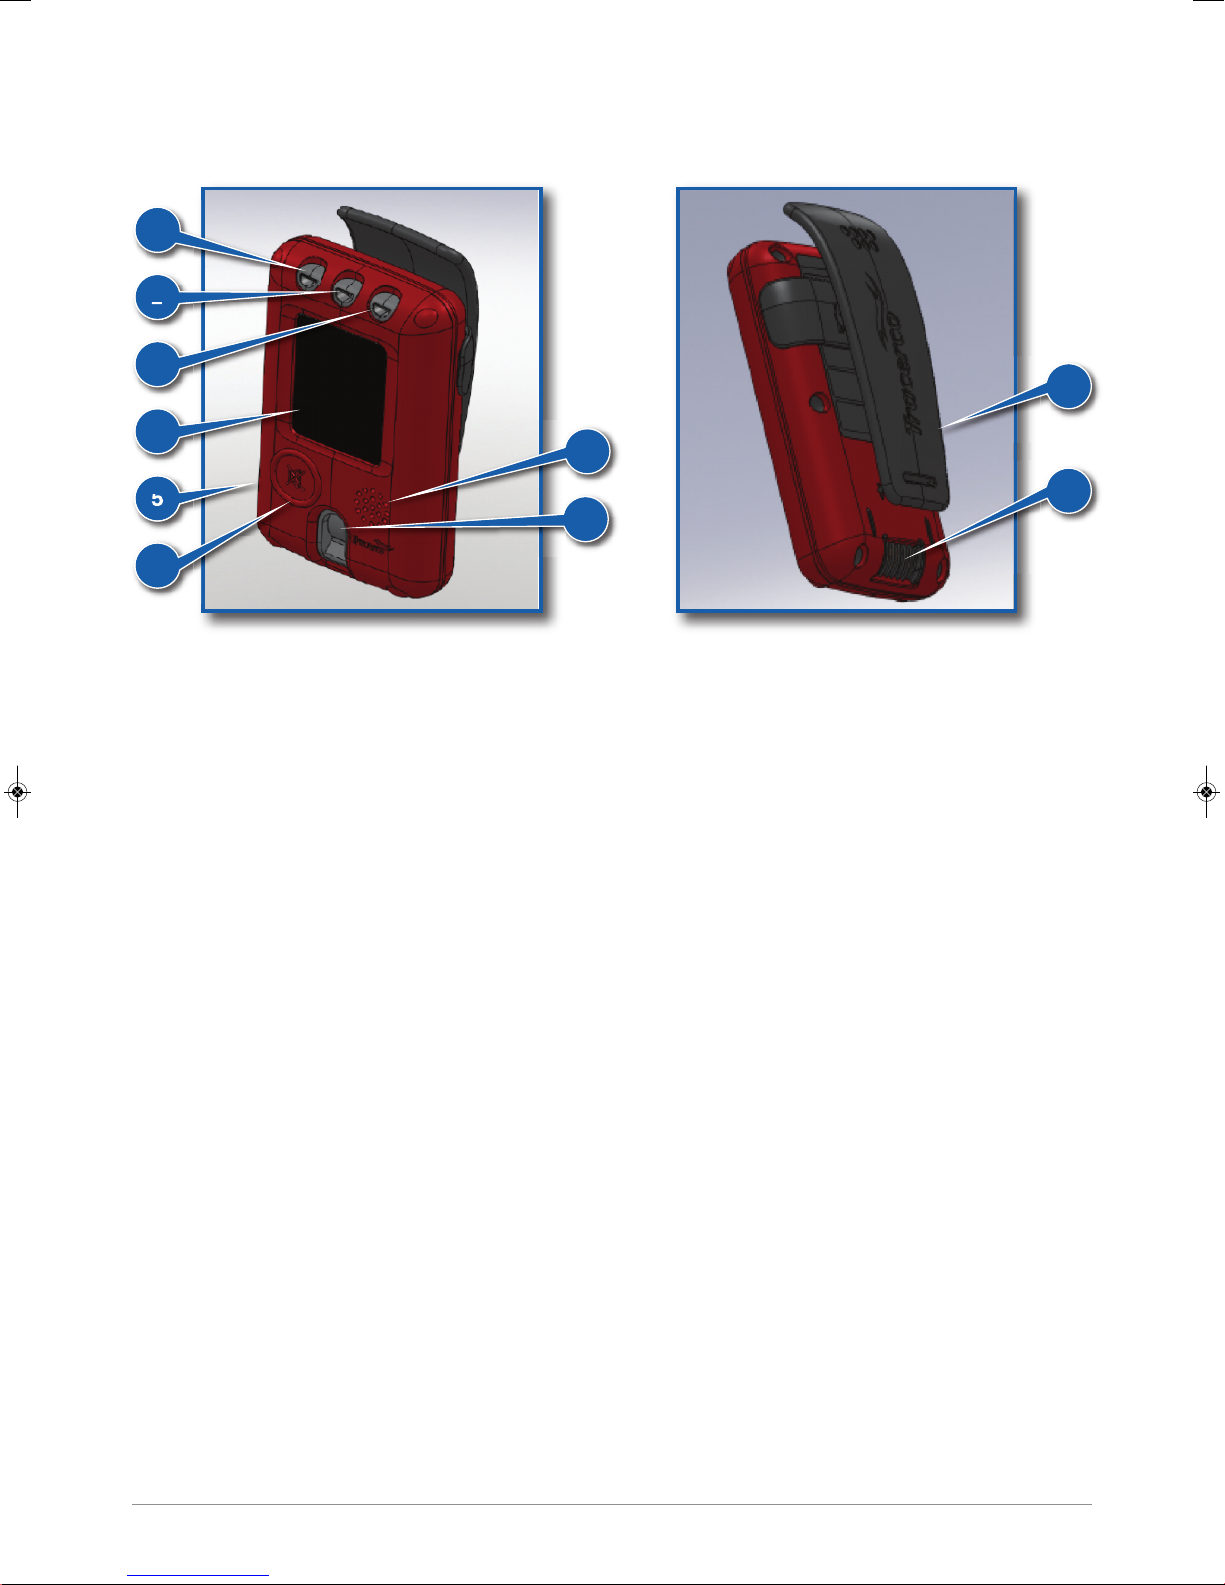
2.1 PHYSICAL DESCRIPTION
1
2
3
9
4
7
5
10
8
6
(1) System check light
LED will periodically flash green while the TRACERCO PED is functioning correctly. The LED will flash red if
the instrument is in a critical status (see section 2.7 for possible critical status messages).
(2) Dose rate alarm light
Flashes amber while the amber dose rate alarm is exceeded. Flashes red while the red dose rate alarm is
exceeded.
(3) Dose alarm light
Flashes amber when the amber dose alarm has been passed. Flashes red when the red dose alarm has been
passed. Will continue to flash until the data has been transferred to a PC, using DoseVision.
(4) Screen
An AMOLED screen is used to display readings and menus. The screen can be programmed to display the
information you want using DoseVision. The screen is coated with an antistatic material. See section 4 for
maintenance tips.
(5) Case
The TRACERCO PED case is constructed from a robust, durable polymer that has inherent antistatic
properties. See section 4 for maintenance tips.
(6) Button
The TRACERCO PED utilises a single button for selection and navigation. A long press is used to turn on the
TRACERCO PED, open the menu system and to make a selection. A short press is used to scroll. This button
is also used to silence alarms.
(7) Speaker
The speaker is used for audible alarms.
(8) Geiger Müller tube window
The Geiger Müller tube has a small window to allow increased low energy response.
(9) Clip
The clip is used for fixing the TRACERCO PED to the users clothing.
(10) Contacts
When placed in the TRACERCO PED dock the contacts are used to transfer data and charge in the
instrument.
4

2.2 WEARING THE TRACERCO PED
The TRACERCO PED is worn on the users upperbody.
Note that the calibration will be invalid if the TRACERCO PED is not worn
!
on the upper body. The TRACERCO PED must not be used as a handheld
radiation monitor.
The clip may be used to fix the TRACERCO PED to the users belt or some other
area of work clothes. The TRACERCO PED must be worn with the screen facing
outwards. It is best to wear the TRACERCO PED on the outer layer of clothing for
easy readings and to make sure alarm lights are visible.
The clip may be removed
by simply pulling one side
of the clip saddle away from
the TRACERCO PED. The
clip is reinstalled by pushing
the clip saddle fixing points
into the small cavities on
either side of the rear of
the TRACERCO PED.
To offer additional security a lanyard may be fixed to the clip hinge section.
2.3 START UP AND SHUT DOWN
To turn the TRACERCO PED on, press & hold the button for a few seconds until the status bar says
100%. During start up a screen showing the assigned user is displayed, assuming there are no alarms
or warnings present. This screen is followed by a button operation message. The alarms are tested
when the TRACERCO PED is starting up, so the device should flash and make a load beep sound.
The readings screen is automatically displayed after start up.
If the dose stored on the TRACERCO PED is higher than the dose alarm level the TRACERCO PED will
bypass the start up screens to go straight to the readings screen and sound the alarm and beep.
The TRACERCO PED is turned off by entering the main menu and selecting the “switch off” option.
See section 2.5 for menu navigation.
5
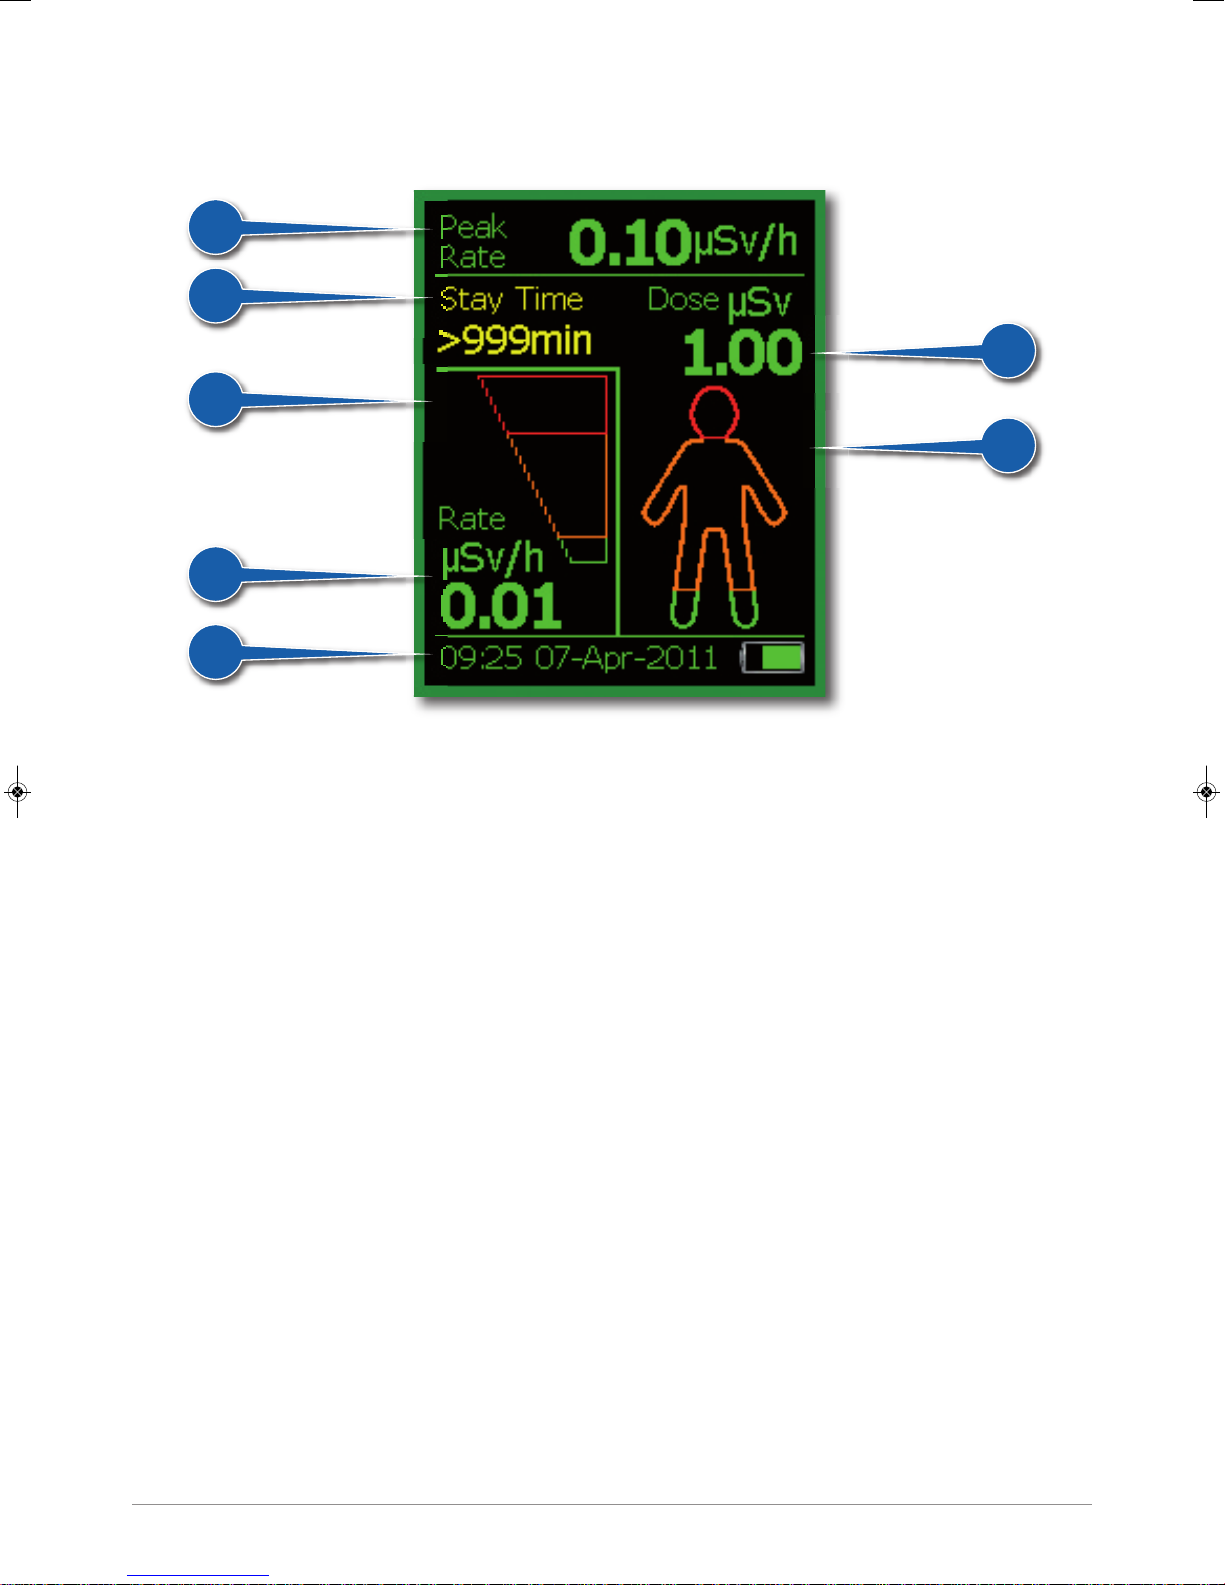
2.4 READINGS SCREEN
The readings screen is the main data display screen.
1
2
5
6
7
3
4
(1) Peak reading
This is the highest rate of dose detected since the last time the readings were transferred
onto DoseVision. Displayed in either µSv/h or mRem/h. See section 3.6.4 for units selection.
This section of the screen changes to a task dose display whilst tasks are running.
(2) Stay time
This is an estimate of the time you have left at current dose rate, until you reach the red dose alarm.
It is displayed in minutes with a range of 0 to 999 minutes.
(3) Dose
This is the total dose of radiation a person has received since the last readings were added
onto DoseVision. Displayed in either µSv or mRem. See section 3.6.4 for units selection.
(4) Dose Man display
Graphical display of accumulated dose level. The Dose Man will fill from the bottom as dose
is accumulated. Orange and red dose alarm thresholds are displayed on the Dose Man.
See section 3.6.1 for alarm threshold selection.
(5) Dose rate bar graph
Graphical display of current dose rate (linear scale). Orange and red dose rate alarm
thresholds are displayed on the bar graph. See section 3.6.1 for alarm threshold selection.
(6) Rate
Current dose rate. Displayed in either µSv/h or mRem/h. See section 3.6.4 for units selection.
(7) Status bar
Displays time, date and battery capacity. This display alternates with instrument status notices
if any are current.
6
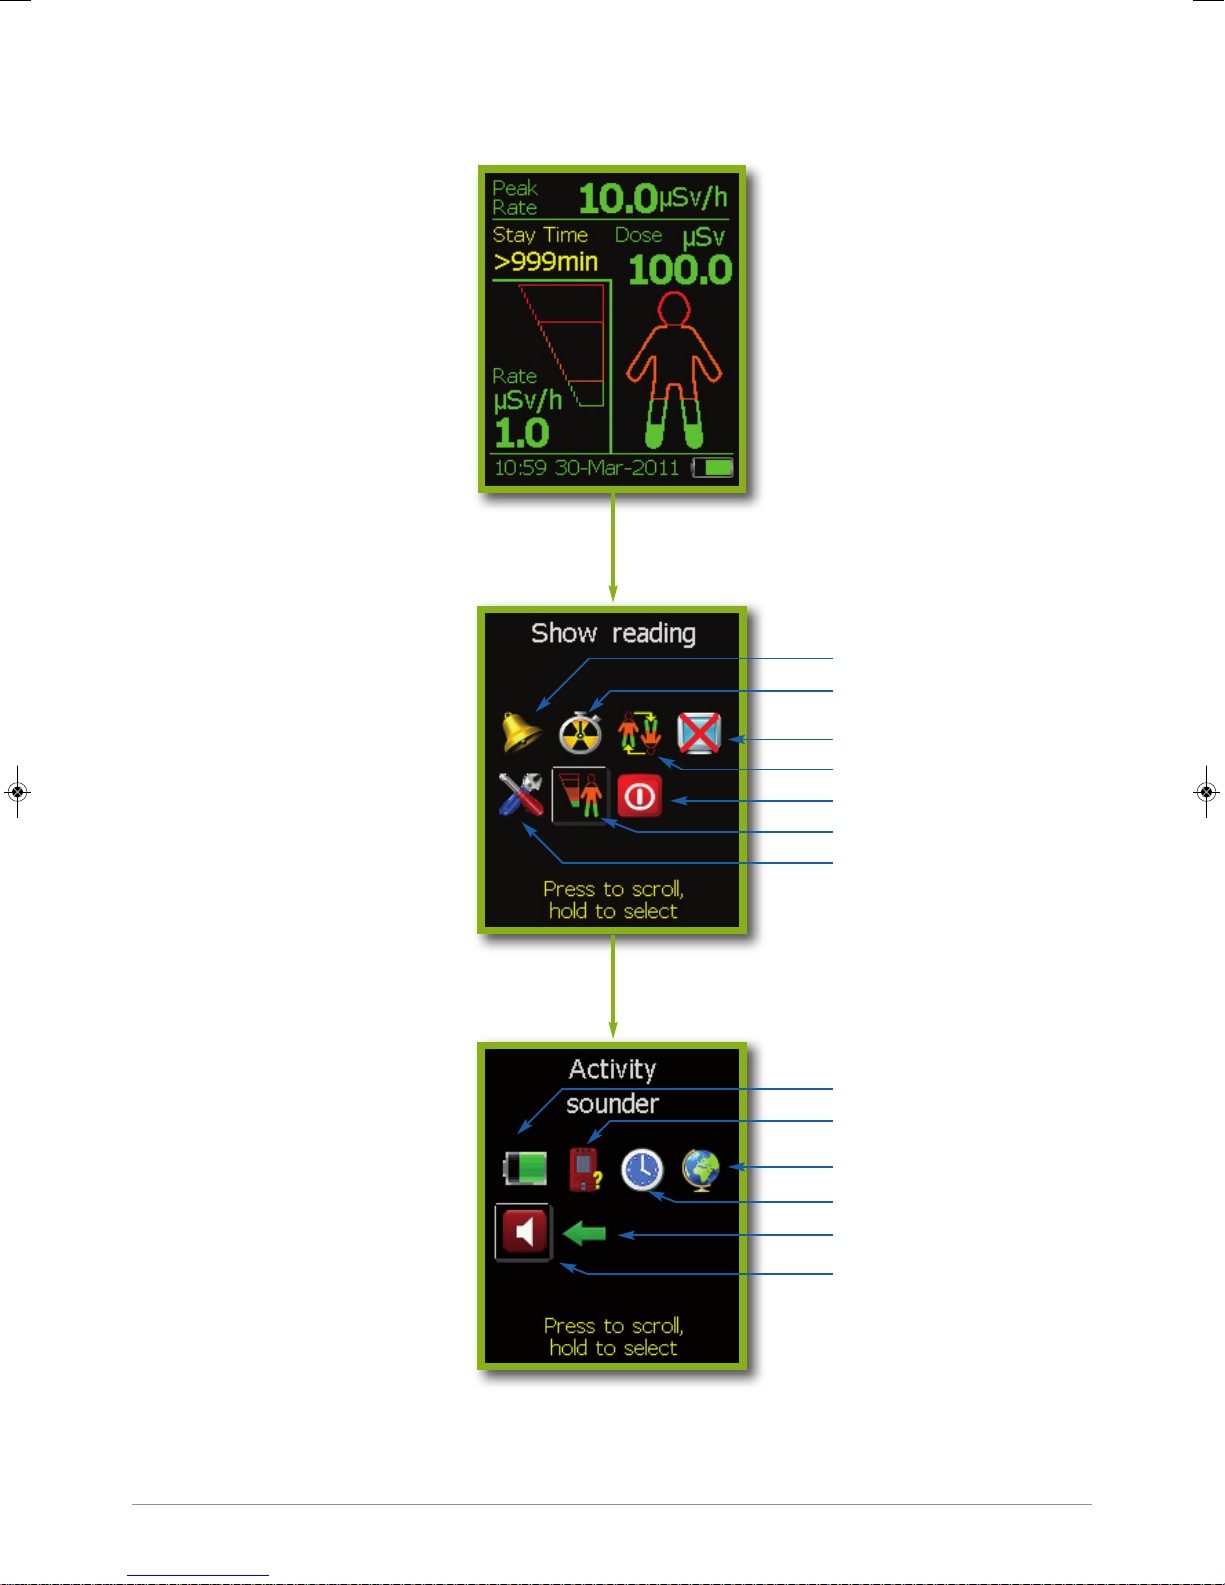
2.5 TRACERCO PED NAVIGATION SCREENS
Readings screen
Hold button to enter main menu
Main menu
Press button to scroll then
hold to select
Alarm levels
Task menu
Settings / status menu
Press to scroll then
hold to select
Screen saver
Flip screen
Switch off
Show reading screen
Settings / status
Power status
Monitor details
Language
Time zone
Back
Activity Sounder
See section 2.6 for further explanation of these screens and functions.
7
2.6 TRACERCO PED FUNCTIONS
2.6.1 Alarms
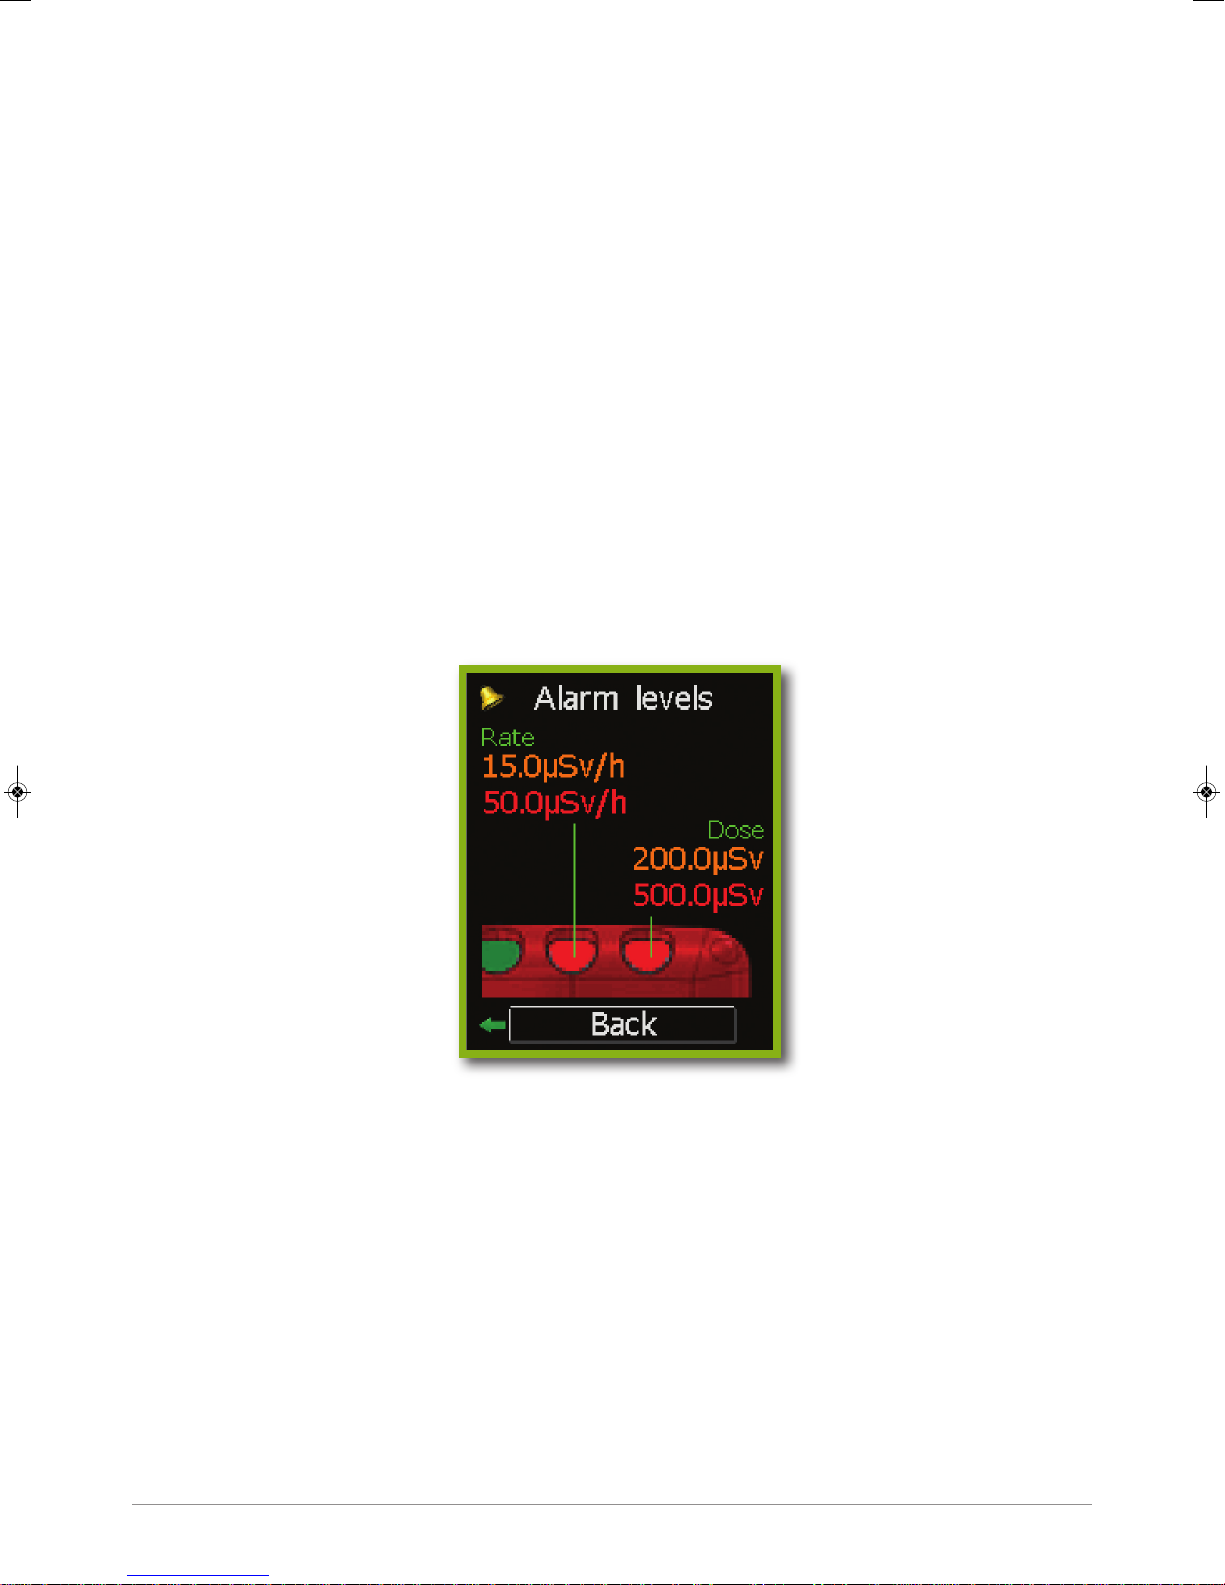
The TRACERCO PED has two adjustable alarm levels for both dose and dose rate.
The alarm levels can be set using the DoseVision software.
The LEDs for dose and dose rate alarms will flash amber when the first alarm is reached and red
for the second alarm. See section 2.1 for how the dose and dose rate alarm LEDs are positioned.
The TRACERCO PED will make a loud beeping noise for the audio alarm.
The dose rate alarms will continue until the dose rate drops below the alarm level. The dose
alarm will continue until the total dose history has been transferred to the PC using DoseVision.
If the TRACERCO PED button is pressed during an alarm the audio alert will be silenced
and the vibrate alert will stop. The relevant LED will continue to flash.
Dose and dose rate alarm levels are checked every second.
The TRACERCO PED alarm settings may be viewed in the alarm levels screen. See section 2.5 for
navigation to this screen. The alarm settings may only be changed via the DoseVision software.
2.6.2 Tasks
A special function of the TRACERCO PED is the capability to allow users to monitor dose and peak
dose rate over particular time periods or tasks. Tasks are started from the Task Menu screen. See
section 2.5 for navigation to this screen. Tasks will continue to record, until stopped by the user.
8
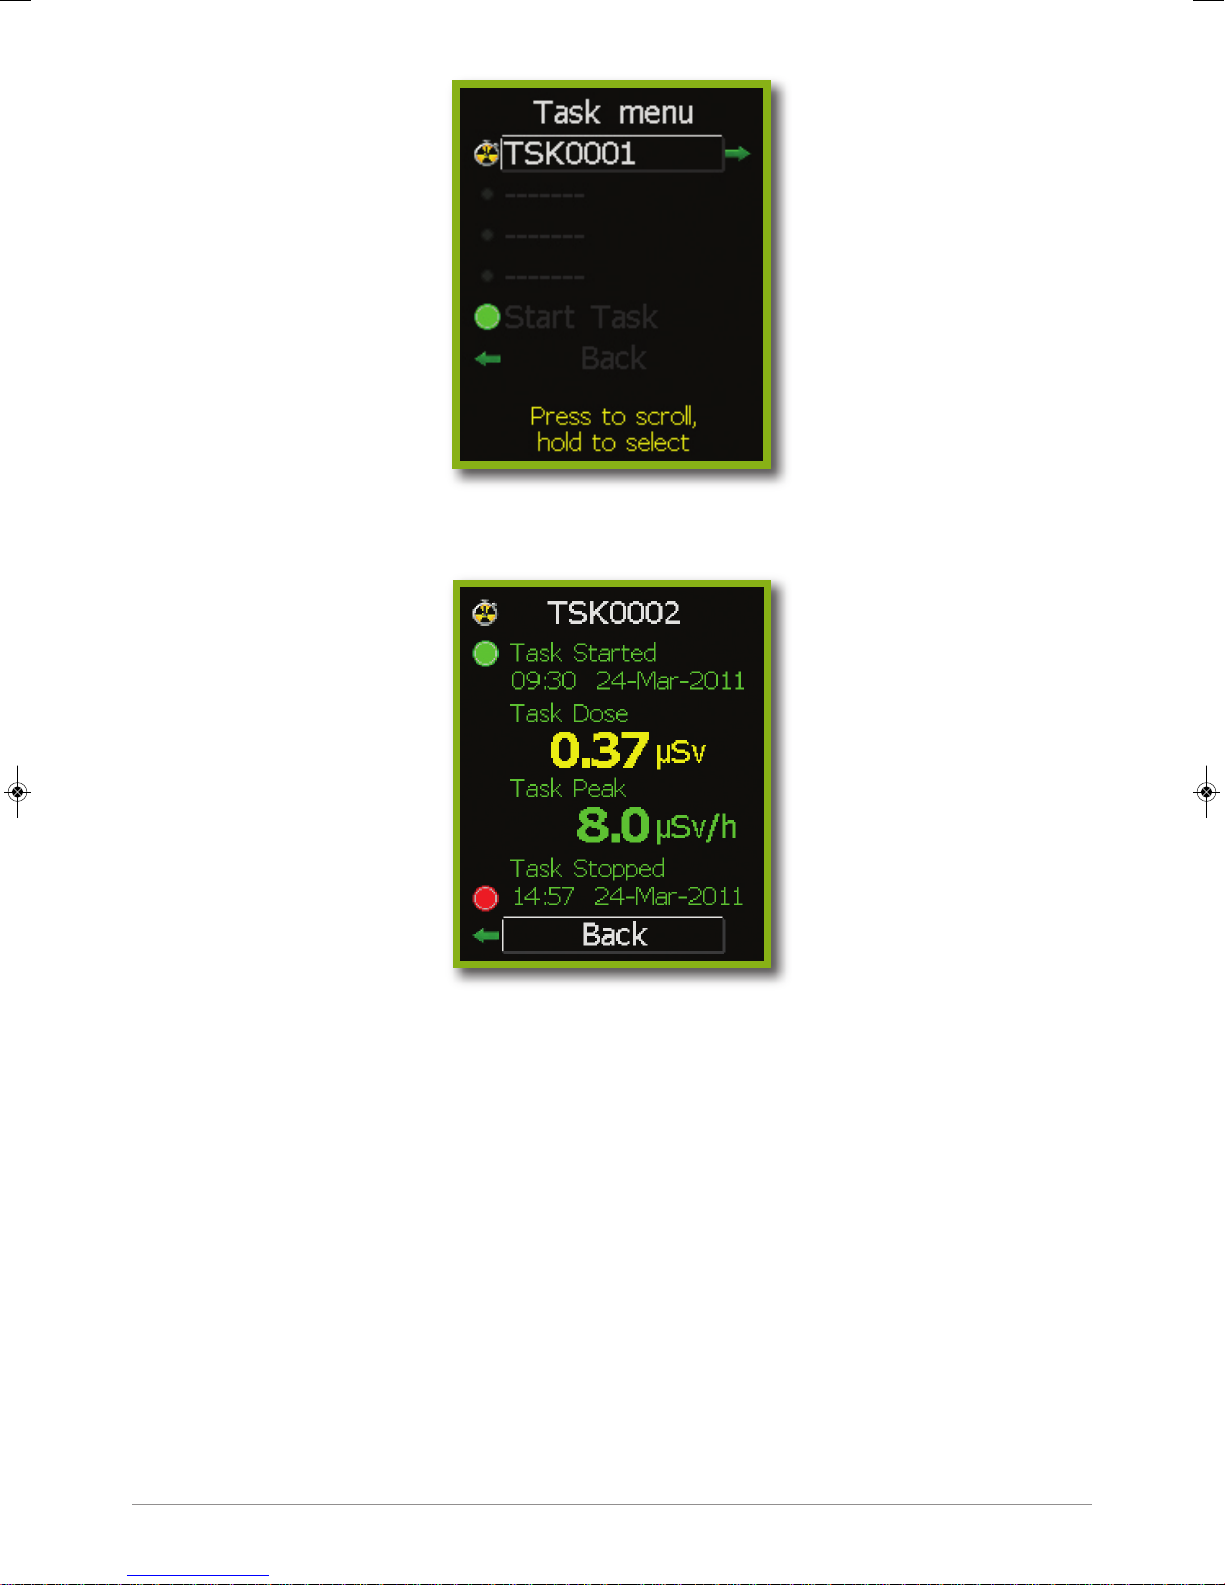
Current tasks are highlighted by a green light. A trefoil/stop watch icon shows completed tasks.
Current and completed task details may be viewed by selecting that task.
It is possible to record up to 9999 tasks on the TRACERCO PED. The four most recent tasks may
be reviewed through the task details screen. Note;all task data logging periods may be displayed
when data is viewed in DoseVision.
Task details may be cleared from the TRACERCO PED after data has been transferred to the
PC using the DoseVision software.
2.6.3 Flip screen function
To aid the user in viewing readings during operations the TRACERCO PED has the special
capability to flip the orientation of the screen. See section 2.5 for navigation to this function.
2.6.4 Screensaver
The TRACERCO PED screensaver is a blank screen. The screensaver can be switched off
by pressing the TRACERCO PED button. The user may select the time period before
screensaver activation. See section 2.5 for navigation to this screen.
9
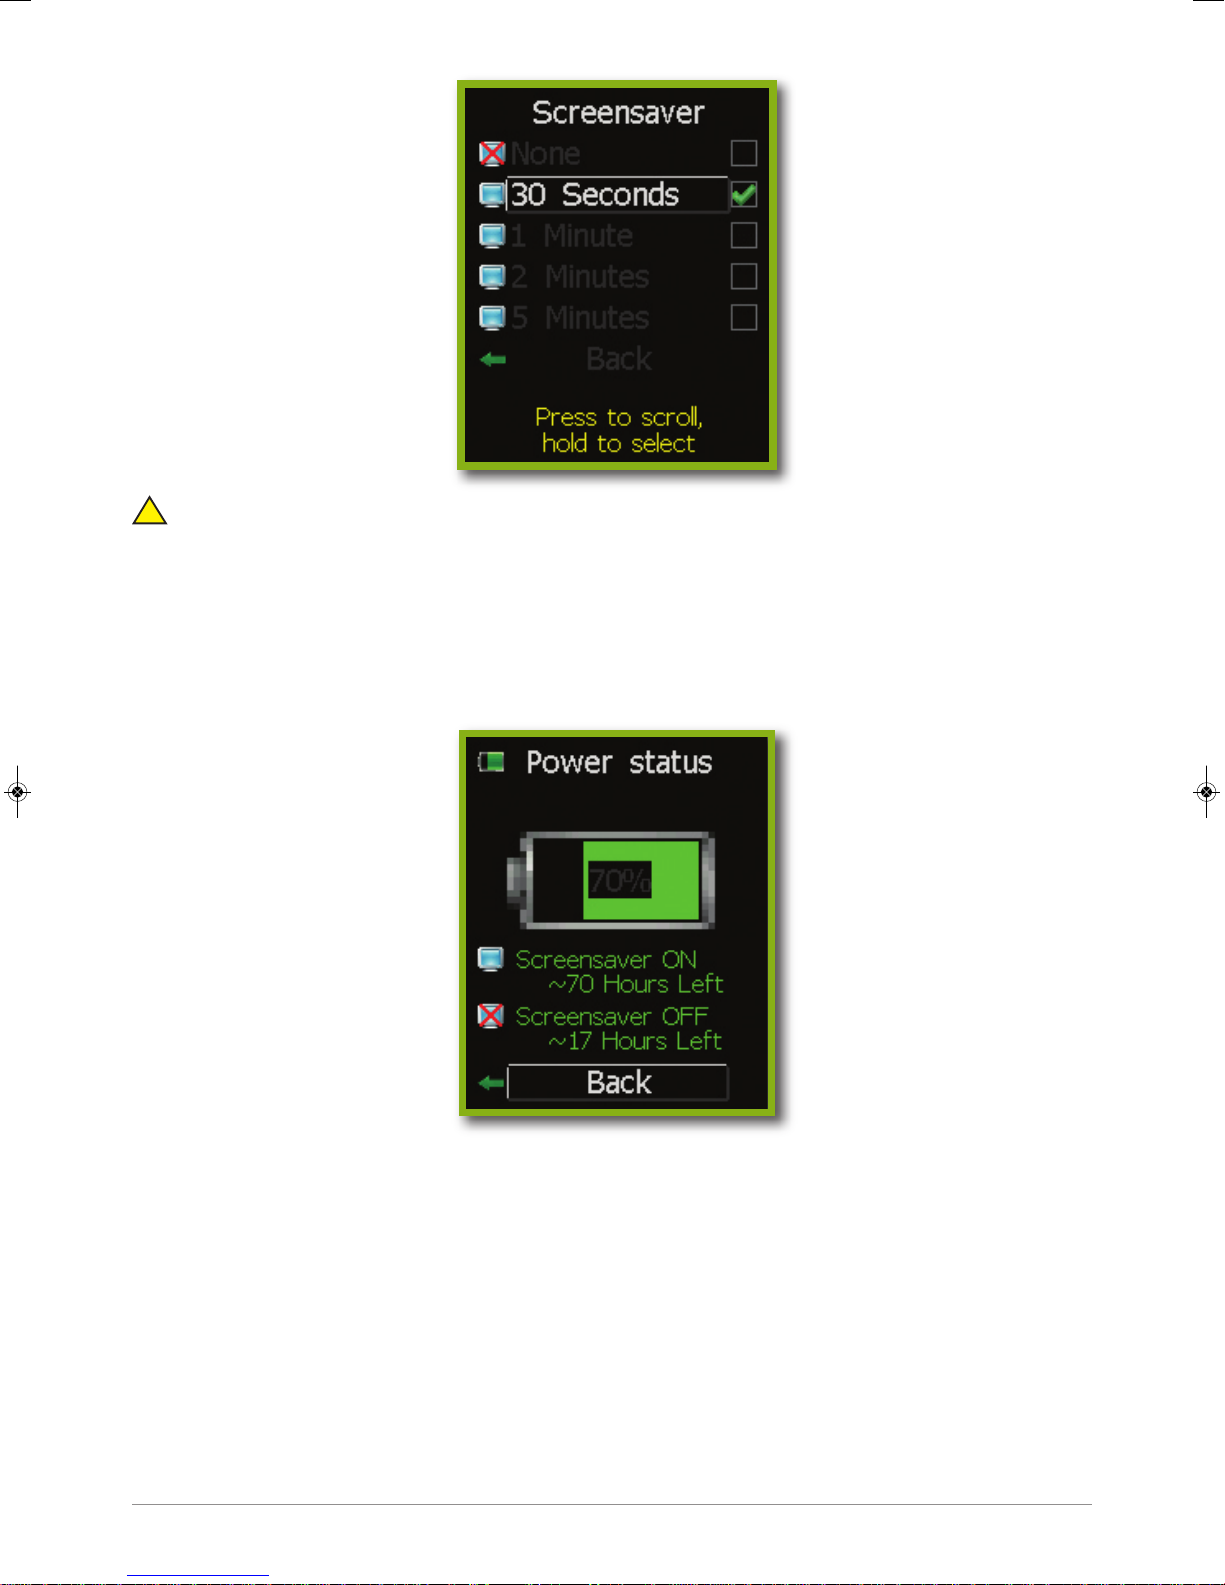
TRACERCO recommend that the time period before screensaver activation should be kept
!
as low as practical. Long periods of screen activity will reduce the lifetime of the PED screen
and deplete the battery more quickly.
2.6.5 Power status
The remaining battery capacity may be viewed in the power status screen. This screen also
provides the user with an estimate of the run time left, both with the screensaver on or off.
See section 2.5 for navigation to this screen.
The estimates run time are based on a battery monitoring algorithm and are therefore only
approximate. The accuracy of the estimated run time also depends on the ambient temperature.
2.6.6 Monitor details
The monitor details screen shows various useful pieces of information about the TRACERCO PED
and its status. Calibration contact details can also be found here. See section 2.5 for navigation to
these screens.
10
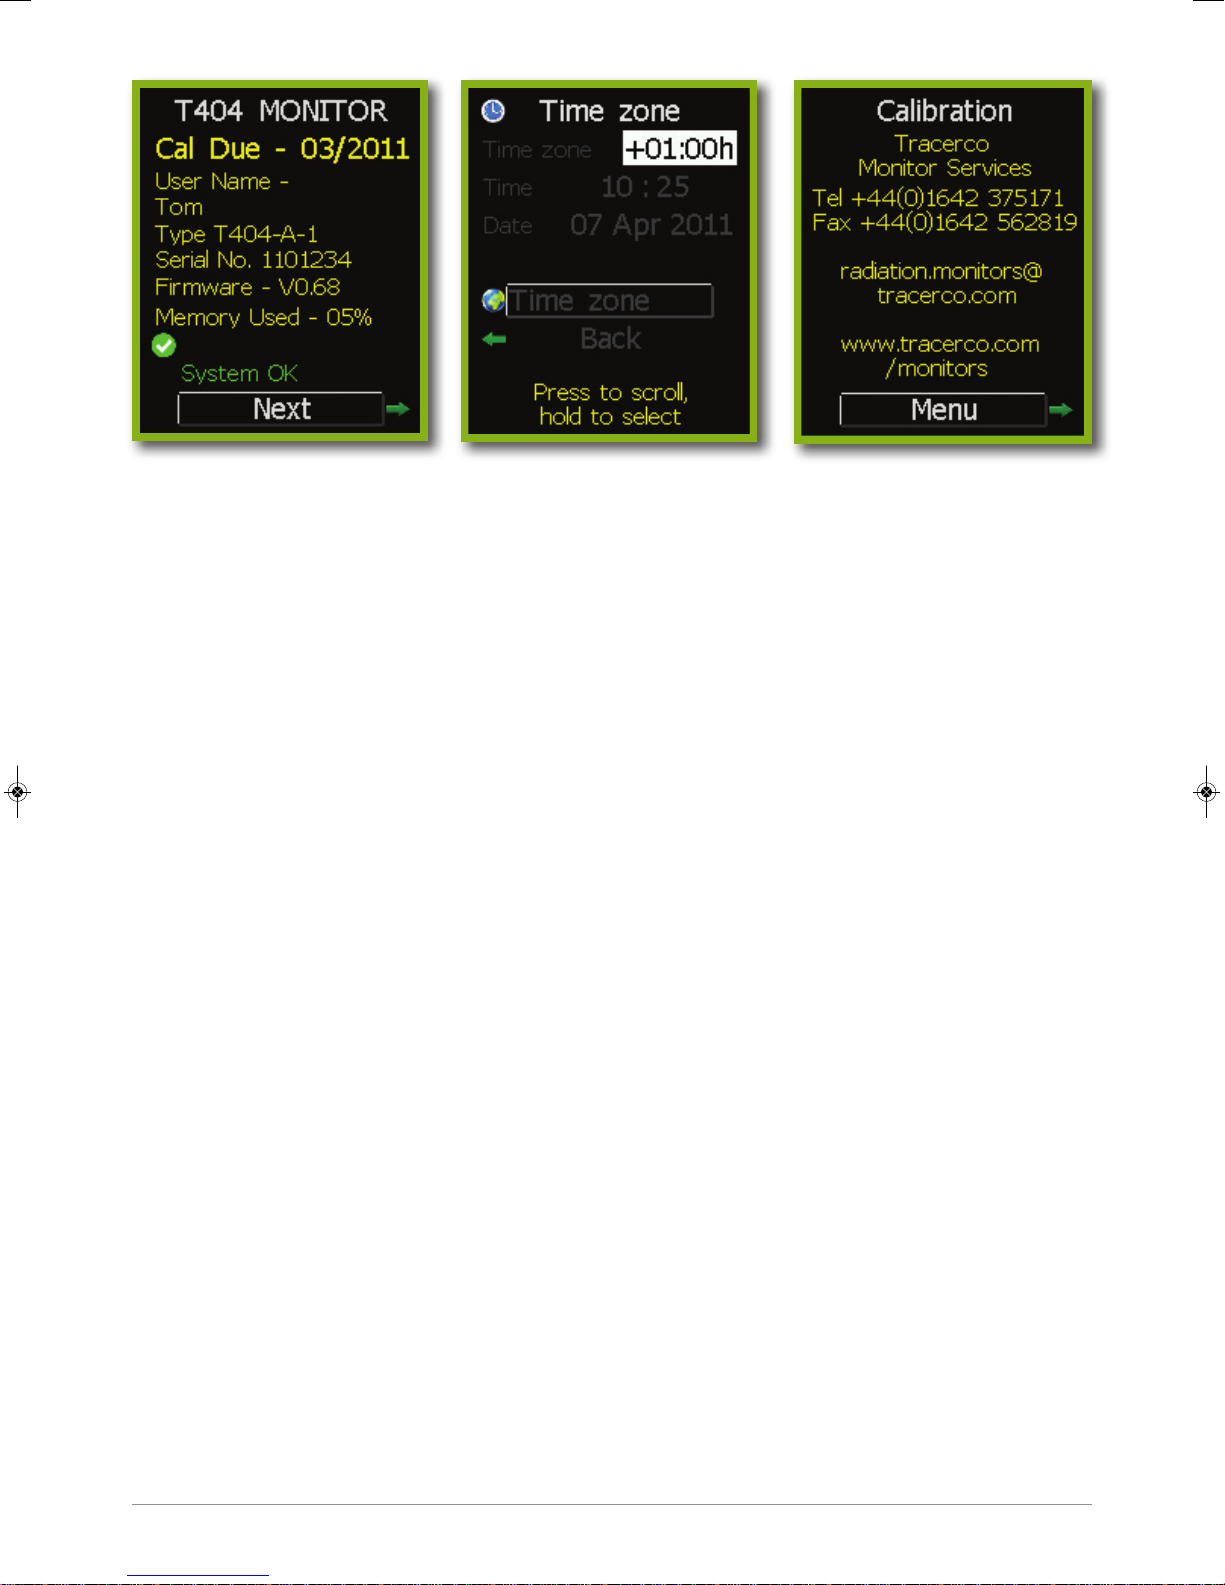
2.6.7 Time zone
To make sure the dose history data is secure, it is not possible for the user to change the time
and date stored on the TRACERCO PED. However, it is possible to change the displayed time
to current local time through the time zone selection in the time zone screen.
The time zone screen displays the current time, date and time zone. See section 2.5 for navigation
to this screen.
Note that the time and date stored on the TRACERCO PED can be set via the DoseVision software
to the time (GMT) stored on the PC DoseVision is installed on.
2.6.8 Language selection
A unique feature of the TRACERCO PED is the capability to change the displayed text language.
See section 2.5 for navigation to this function.
2.6.9 Activity Sounder
An activity sounder can be activated in this screen. Typical background radiation will produce
approximately 12 counts per minute. The divide options allow the user to manage the ‘click’ event
interval.
Selecting ÷ 1 means that a ‘click’ is generated every time a radioactive particle is detected.
Selecting ÷ 30 will give a ‘click’ interval of about 2.5 minutes.
11

2.7 TRACERCO PED ERRORS AND RECOVERY ACTIONS
The TRACERCO PED has been designed to communicate to the user, through easy-to-understand
messages, when the instrument has an error.
The system check light on the top of the TRACERCO PED will flash green when the device is
operating normally and red if the device has an error.
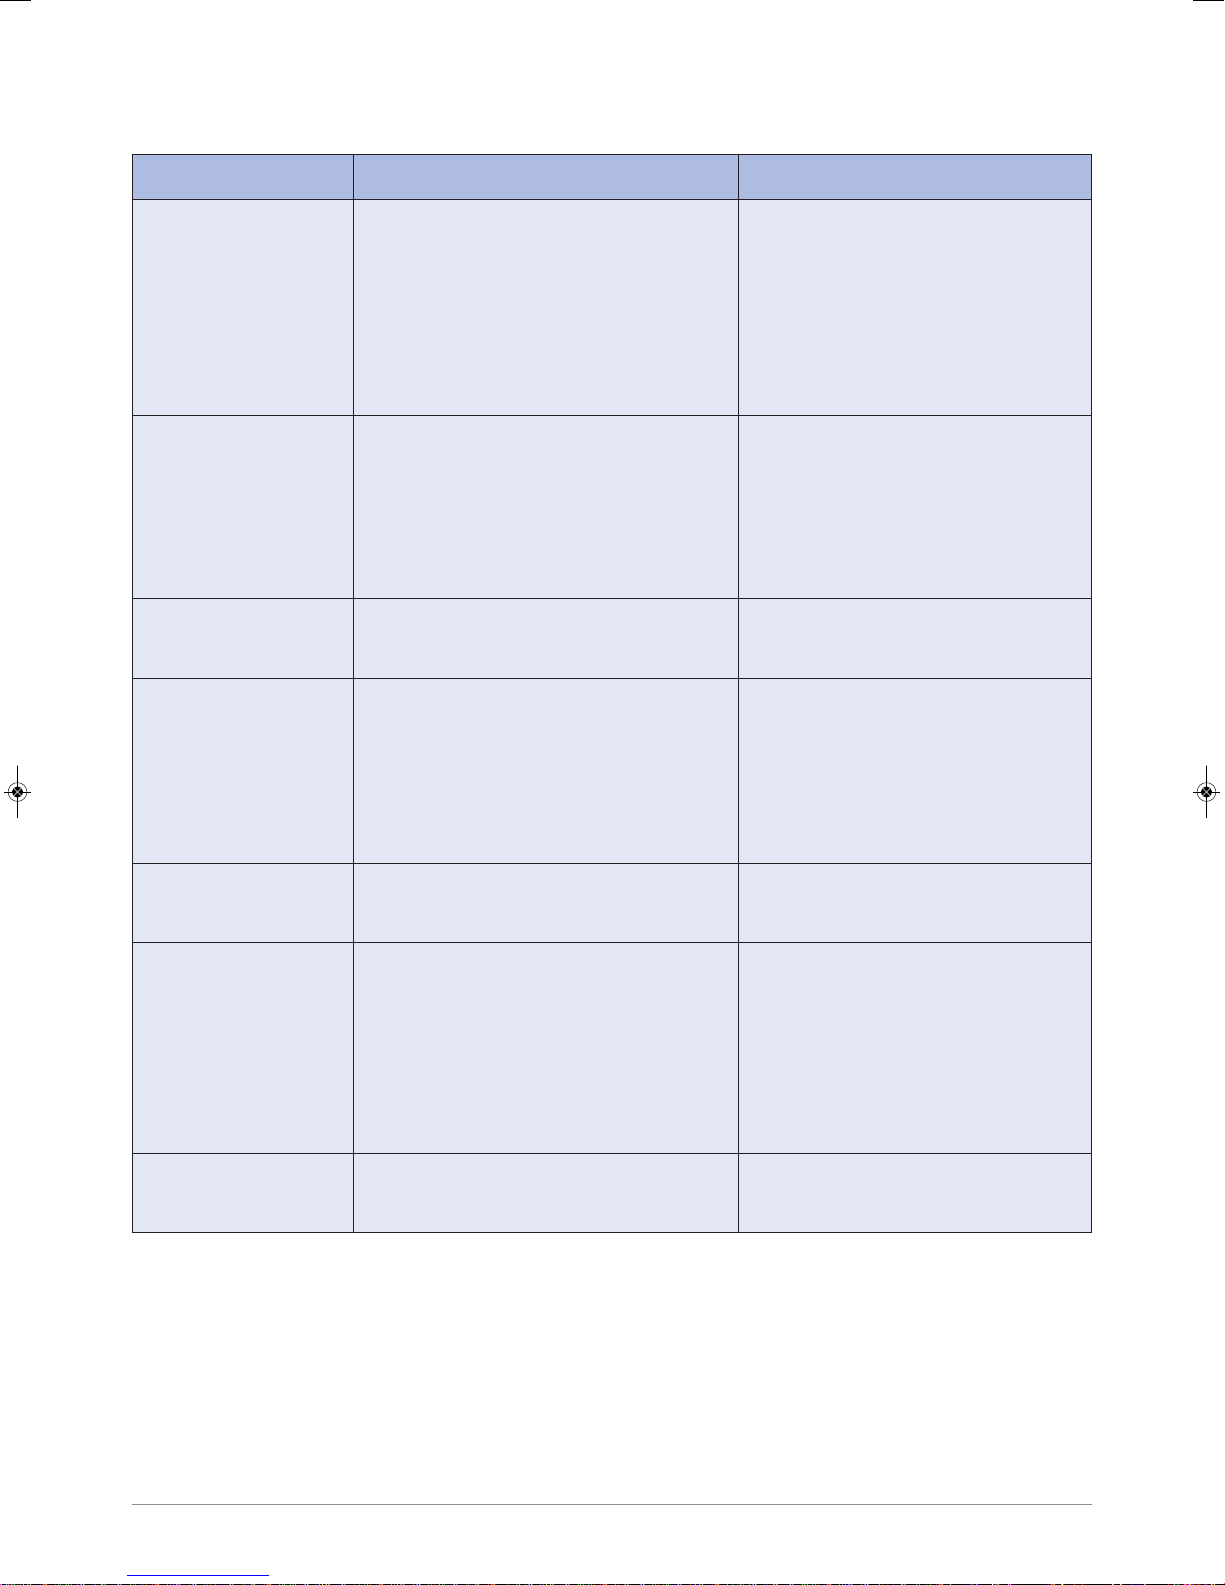
2.7.1 Status warning messages
Status warnings are given when the TRACERCO PED is in a condition that requires action,
but will still operate correctly.
Status warning messages are displayed on the readings screen status bar.
The possible status warning messages and appropriate actions are described in the table below.
Warning message Comments Action
Battery Low Remaining battery capacity is The device should
approximately 8 hours at be recharged.
background radiation levels.
Memory Low Memory low warning displayed Data should be transferred
when memory is more than 70% full. to PC using DoseVision.
Calibration Due Indicates that more than one year TRACERCO PED should be
has elapsed since previous calibration. returned to TRACERCO for
Annual calibration is recommended. re-calibration.
Default Cal Data Default (factory set) calibration TRACERCO PED should be
values are set. returned to TRACERCO for
calibration.
Warning An undefined warning has Return to TRACERCO for full
occurred. diagnosis.
12

2.7.2 Critical malfunction warnings
A critical malfunction is a device error that will prevent accurate TRACERCO PED operation.
If the TRACERCO PED is on when a malfunction occurs an alarm will sound to make the user
aware. The malfunction alarm sound is shorter and less frequent beep than the radiation alarm
beeps.
The dose rate area of the readings screen will be replaced by a white cross on a red square
background and the error will be stated. The Stay Time will be removed and a message saying
“Last Reading” will be shown to indicate the last dose reading before the critical malfunction
occurred.
If a critical malfunction has occurred and the TRACERCO PED is turned off it is not possible
to perform a full restart. Pressing the button will cause the relevant malfunction message to
be displayed at the opening screen. When the button is released (or after 1 second for a
dead battery) the TRACERCO PED screen will switch off.
13
The possible critical malfunction messages and appropriate actions are described in the table
below.
Warning message Comments Action
Battery critical
Detector failure
Calibration
Clock Failure
This indicates that the battery
charge is approaching a level where
radiological performance cannot be
guaranteed. The TRACERCO PED
will shut down after 10 seconds.
Further restarts should be avoided
to preserve the internal clock.
In order to recognise a GM tube
malfunction in areas of extremely
low background radioactivity, the
TRACERCO PED will assume
detector failure if no counts are
recorded over a period of 2 minutes.
Calibration factors are out of the
recommended range of values.
Real time clock failure. This may
occur if the battery becomes fully
drained.
The device must be
recharged.
If the user is confident the
TRACERCO PED is in an area
where normal levels of background
radiation could be expected the
device should be returned to
TRACERCO for full diagnosis.
TRACERCO PED should be returned
to TRACERCO for re-calibration.
The user will be prompted to
reset the TRACERCO PED clock.
Care must be taken to ensure
that the reset time corresponds
to the time on the PC used for
data transfer using DoseVision.
System Failure
Memory Full
The device is experiencing a
malfunction that may affect accuracy.
Warning displayed when memory
Return to TRACERCO for full
diagnosis.
Data must be transferred to PC.
is 95% full. When memory is
completely full the TRACERCO
PED will continue to measure and
display the true current accumulated
dose, but new date/time information
will not be recorded.
Error
An undefined error has occurred.
Return to TRACERCO for full
diagnosis.
2.7.3 Response to dose rate overload
The
TRACERCO
PED will operate accurately in dose rates up to 100 mSv/h (10 Rem/h).
The accuracy of measured dose rates cannot be guaranteed above 100 mSv/h and
consequently there is potential for inaccuracies in subsequent accumulated dose values
from the time of overload until the data has been cleared and a new accumulation started.
14

During exposure above 100 mSv/h the top of the readings screen will show “Overload” and dose
rate will be displayed as “>100mSv/h” (note that the actual measured dose rate values will still
be recorded and readable when transferred to a PC using DoseVision). Dose values will still be
displayed, but will flash to indicate possible inaccuracies. The status bar will show a warning
symbol and “Dose Error?” message. An alarm will sound continuously until the button is pressed.
After exposure above 100mSv/h the top of the screen will return to standard conditions. The dose
rate display will return to live values. Total dose values will continue to flash (this will only be cleared
once the data has been transferred to the PC using the DoseVision software). The status bar
will continue to show a warning symbol and “Dose Error?” message. This message will only be
cleared once the data has been transferred to the PC using DoseVision. The alarm will continue
to sound until the button has been pressed.
3. DOSEVISIONTMSOFTWARE
The DoseVision software is used to transfer dose history data from the
TRACERCO
PED to a PC
and to view the data in graph form. DoseVision also allows you to adjust your settings such as
changing alarm settings and assigning the TRACERCO PED to a user.
3.1 RECOMMENDED HOST PC REQUIREMENTS
Operating systems Windows XP (32 –bit), Windows Vista (32-bit)
and Windows 7 (32bit and 64-bit)
Recommended screen resolution 1280 x 768
Minimum memory required 500 MB
Minimum spare disk space 5GB
3.2 SOFTWARE INSTALLATION
The
TRACERCO
PED comes with the DoseVision software. The installation programme will auto
run when the CD with DoseVision is inserted in the PC. If auto run does not happen the installation
programme may be started from Windows Explorer. The installation programme provides step-bystep instructions during the installation process.
The latest DoseVision software may also be downloaded from the
(www.tracerco.com/monitors). The dock should not be plugged in during installation.
Once installation is finished DoseVision may be
opened by double clicking on the desktop icon.
3.3 TRACERCO PED CONNECTION TO PC
The
TRACERCO
USB cable. The
DoseVision has detected the
PED is loaded into a
TRACERCO
PED should be pushed into the dock so that it clicks into place. Once
TRACERCO
displaying the last measured values on the
TRACERCO
TRACERCO
PED dock, which is connected to the PC via a
web site
PED the Home tab will change from searching mode to
TRACERCO
PED readings screen.
15

Home tab in searching mode Home tab with PED connected
Note that whilst in the dock the
!
TRACERCO
3.4 TRANSFERRING DATA FROM THE
Data can be transferred from the
TRACERCO
TRACERCO
PED does not measure or record dose data.
PED
PED by clicking the Get Dose Data from PED button
on the home page. The transferred data will then be saved in the data folder (see section 3.6.6) and
will also be displayed in the Data tab.
Data can be cleared from the
TRACERCO
This command requires administrator access to the
is cleared all unsaved data on the
and all logs and tasks on the
TRACERCO
TRACERCO
PED by clicking the Clear Dose Data in PED button.
TRACERCO
PED (see section 3.9). If the data
PED is saved, the accumulated dose is set to zero
PED are cleared.
3.5 VIEWING DATA
Data is viewed in the Data tab.
16

All of the transferred data stored on the PC for the current user may be viewed by clicking the All
Data button. If the data for an alternative user is required the Select User button may be clicked
and a user selected from the list.
3.5.1 Date range selection and navigation
The start and end dates for the viewed data may be selected in the calendars at the bottom of the
screen.
The viewing window may be scrolled backwards and forwards in time in large or small steps with
the scroll buttons above the data chart. The zoom buttons (magnifying glass icons) above the data
chart may be used to increase or decrease the time period. The Back button will return the data
chart to the previous view.
3.5.2 Data display options
The data type displayed on the chart may be selected from the tick boxes on the right hand side of the chart.
These options are: Dose, Dose Rate and Accumulated Dose.
Dose in μSv (or Dose in mRem) displays the dose received in a bar-chart form.
Ave. Dose Rate in μSv/hr displays the average dose rate
received in each time period in a bar-chart form.
Accumulated Dose in μSv displays the accumulated dose
over the selected period as a red trace.
If Show Dose Rate Peaks is selected, peak dose rate information
is displayed as yellow bars. The peak dose rate is the highest value
recorded by the
TRACERCO
PED since the previous data transfer. The
scale for the dose rate peaks is found on the right hand side of the plot.
If Show Tasks is selected, the period that corresponds to each task is
displayed as a dark magenta bar at the top of the plot. For each period
there is also a blue triangle that represents the time when the task peak
dose rate occurred.
Hint: Hovering the cursor over a data bar will open a window with information on date
and dose/dose rate. This also applies to dose rate peaks, tasks and task peaks.
Clicking on a data bar will zoom the data chart into the time period of the data bar so that
radiation events may be seen in more detail.
The date/time axis may be changed to correspond to either Greenwich Mean Time (GMT),
the date/time on the PC or the date/time displayed on the
TRACERCO
PED data is recorded relative to GMT as this is the internationally accepted
TRACERCO
PED. Note that all
protocol for factory time settings on PCs.
The dose/dose rate units on the data chart may be changed by clicking the “Set plot units to…”
button.
17

3.5.3 Exporting data
Data may be exported from the data tab as a Comma Separated Values (CSV) file, which may be
opened directly into an Excel spreadsheet. When opened in Excel the Date/Time column must be
highlighted and the cells formatted into the desired date and time display.
18

3.6 CHANGING TRACERCO PED SETTINGS WITH DOSEVISION
Settings on the
TRACERCO
PED may be changed through the DoseVision software.
Note that access to some of these functions is restricted to administrator level access
(see section 3.9 for details).
TRACERCO
PED settings are changed in the Settings tab.
3.6.1 Alarm settings
The dose and dose rate alarm levels can be set in the Settings tab. After entering the new alarm
level value into the blue box the green Apply button must be clicked. The user is not allowed to set
the amber alarm setting to a higher value than the red alarm value.
Hint: If only a red alarm is required the amber and red alarms should be set to the same value.
3.6.2 Time settings
The internal clock on the
TRACERCO
stored on the PC. Time setting changes are made by clicking the Set Internal Clock (GMT)
button.
The time displayed on the
TRACERCO
is working. This change may be made by clicking the Set Time Zone button. Note that dose data
will still be recorded relative to GMT.
PED may be changed to match the time and date (in GMT)
PED may be adjusted to suit the local time in which the user
19

3.6.3 Data logging mode
It is possible to change the
Data is recorded by the
TRACERCO
TRACERCO
PED in either Periodic Logging or Intelligent Logging mode.
PED data-logging mode in the Settings tab.
In Periodic Logging mode the
TRACERCO
PED will record the accumulated dose every minute.
Periodic Logging is not preferred when deployed in low dose rate areas as many data points
will show zero changes and will unnecessarily use
Hint: Select Periodic Logging only if the
TRACERCO
TRACERCO
PED is to be deployed in areas where the
PED memory.
dose rate will be consistently above background, and/or rapid dose rate fluctuations are
not anticipated.
Whilst in intelligent logging mode the
TRACERCO
change in dose. In normal circumstances the
employing intelligent logging. Intelligent logging is the default mode on the
PED will log the accumulated dose for every 0.01 μSv
TRACERCO
PED memory is used most efficiently by
TRACERCO
PED.
The logging mode is selected by clicking the Apply button next to the desired mode in the settings tab.
3.6.4 Changing TRACERCO PED units
The units in which the TRACERCO PED displays dose and dose rate data can be changed between
μSv (and μSv/h) and mRem (and mRem/h). This change is made by clicking the Set PED Units to …
button at the bottom of the Settings tab.
3.6.5 Assigning TRACERCO PED users
It is possible to assign the TRACERCO PED to another user by clicking the Assign PED to User button
in the Users tab and selecting a name from the list. After changing the assigned user the new name is
stated on the
TRACERCO
PED charge screen.
20

Users may be created and deleted by clicking the Add and Delete Users button, then selecting
the appropriate action in the dialog box that appears.
Note that changing the assigned user and editing the user name list are functions that require
TRACERCO
PED password access (see section 3.9).
3.6.6 Setting the folder for data storage
The folder used for storing dose history data is selected when DoseVision is installed for the first time.
It is possible to change the data storage folder or create a new folder by clicking on the Set Data
Folder button on the Advanced tab.
3.7
TRACERCO
The latest version of the
PED FIRMWARE UPGRADES
TRACERCO
(www.tracerco.com/monitors). Once the latest firmware has been saved DoseVision may be used for
installing it onto the
TRACERCO
Firmware button in the Advanced tab and selecting the relevant Hex file from the explorer window.
TRACERCO
The
PED must be docked for this operation.
Note that upgrading the firmware requires administrator access (see section 3.9).
3.8 DOSEVISION UPGRADES
The latest version of DoseVision may be downloaded from the
(www.tracerco.com/monitors). Instructions for DoseVision upgrades are provided on the web site.
PED firmware may be downloaded from the
TRACERCO
website
PED. The firmware upgrade is performed by clicking the Upgrade
TRACERCO
website
21

3.9 ACCESS SECURITY
Upon receipt of a
TRACERCO
PED the DoseVision software should be installed on a nominated
“Administrator” PC.
TRACERCO
The
When a
TRACERCO
in the
TRACERCO
PED is supplied without password protection.
PED that is not password protected is in the dock, a password may be set
PED using the Set Admin Password button. There is an option in the Set
Administrator Password dialog to select previously used passwords from a drop-down list.
This allows a quick set up process when several
TRACERCO
User names are not associated with the password. The password is held in the
and applies whichever PC the
TRACERCO
PED is connected to.
PEDs are in operation.
TRACERCO
PED
Subsequent connection of password protected TRACERCO PEDs to the Administrator PC will not
require password entry as the password will be cached on the PC. Access security for
TRACERCO
PEDs on the Administrators PC is effectively provided by the PC Windows login.
Hint: The dose history data is normally downloaded to a folder in application data, which is visible
only to the user who first runs DoseVision on the PC. If wider access is required for the dose
history data the administrator can choose to change the data folder to a more public one,
e.g. a folder within shared docs. See section 3.6.6 for changing the data storage folder.
If a
TRACERCO
PED that has had a password applied is connected to a different PC
(with DoseVision installed) the password will be required to gain access to administrator
level functions. User level functions can still be freely accessed. Users level access is
restricted to the following functions:
• Transferring and viewing current data
• Viewing old data for the assigned user that is stored on the PC
• Changing the data storage folder
• Exporting data
• Changing the data logging mode
• Setting the time zone
• Changing the
TRACERCO
PED measurement units
Administrator level access to a
Administrator Access button and giving the password. Once the password has been given for a
particular
TRACERCO
PED, it is not necessary to re-enter it in the future as the password is cached
on the PC.
It is possible to view the password on a docked
Password” button on the advanced tab. This requires administrator level access and may be used
when the user of a different PC requires administrator access and the password has been
forgotten.
In the unlikely circumstances of the administrator PC losing the cached password, Tracerco can
provide a pass code that will allow the administrator to read the
on the Get Forgotten Password button and follow the instructions.
22
TRACERCO
PED can be acquired on any PC by clicking the Get
TRACERCO
PED by clicking the “Show Admin
TRACERCO
PED password. Click

4. MAINTENANCE AND CALIBRATION
The
TRACERCO
environments and should provide many years of effective service provided attention is paid to
basic operational maintenance.
4.1 CHARGING THE TRACERCO PED
The
TRACERCO
dock has a micro USB connection that will allow charging via a mains supply, 12v
car supply or connection to a PC USB port.
Note that only charger accessories supplied by TRACERCO are
!
recommended. See section 6 for further information on
accessories.
During charging an estimation of battery capacity and a lightning flash icon is
displayed. When the estimated battery charge is greater than 95% the display
will show full charge. Active warning messages are also displayed during charge.
PED has been designed for reliable operation in heavily industrialised
PED is charged by inserting it into a charger dock. The charger
TRACERCO
PED
A fully charged
conditions before recharge is required. A low battery warning will be provided when only 8 hours
remaining capacity is estimated. When the battery charge reaches a critically low level the
PED will close down to preserve stored data. Further drain on the battery may result in loss of the
TRACERCO
The user must not attempt to change
!
the
TRACERCO
PED real time clock.
TRACERCO
Note that during charging the
PED can be expected to last for greater than 300 hours in normal operating
TRACERCO
PED battery.
TRACERCO
PED does not record data.
4.2 CLEANING
The
TRACERCO
PED features a soft polymer over mould that has been manufactured from materials
with excellent chemical resistance and inherent antistatic properties. The over mould may be cleaned
by wiping with a slightly moistened cloth. A mild detergent may be used if required.
TRACERCO
The
PED screen is manufactured from a tough polymer with antistatic coating. Care
must be taken when cleaning that the antistatic coating is not removed. The screen may be cleaned
by gently wiping with a slightly moistened soft cloth. A mild detergent may be used if required.
4.3 HANDLING
Maintenance of the mechanical integrity and antistatic properties of the
are critical for use in explosive atmospheres. While the
unnecessary impacts, abrasions or contact with harmful chemicals should be avoided.
recommend that the
TRACERCO
See section 6 for further information on
The user must not attempt to open the
!
TRACERCO for repair.
TRACERCO
TRACERCO
PED has a tough design,
PED housing
PED is transported in an approved case and pouch.
TRACERCO
TRACERCO
PED accessories.
PED The TRACERCO PED must be returned to
TRACERCO
23

4.4 SCREEN PROTECTION
The
TRACERCO
power consumption. However,
PED screen graphics have been designed to maximise screen life and minimise
TRACERCO
recommend that the time period before screensaver
activation should be kept as low as practical. Long periods of screen activity will reduce the lifetime
of the
TRACERCO
PED screen.
4.5 CALIBRATION
Ionising radiation legislation recommends that all operational radiation measurement devices are
subjected to regular inspection and testing. This recommendation includes performance checks
and where appropriate, recalibration of the monitor.
TRACERCO
The
PED should be calibrated with the display screen facing the radiation beam.
The position of the GM detector is clearly marked by the detector window near the bottom of the
front face. An ISO phantom or suitable correction factor should be employed during calibration.
Note that the calibration will be invalid if the
!
during operations. The
A special feature of the
TRACERCO
TRACERCO
PED is the provision of a warning message to notify the user
PED must not be used as a handheld device.
TRACERCO
PED is not worn on the torso
when calibration is due. The next calibration due date may be found in the monitor details screen.
Calibration contact details are also contained here. See section 2.5 for navigation to this screen.
TRACERCO
All
Following this initial procedure (or the regular inspection and calibration check)
PEDs are checked and calibrated immediately prior to despatch to the customer.
TRACERCO
operatives will re-set the next calibration check due date within the software of the PED.
To assist in providing customers with a more efficient and comprehensive service,
TRACERCO
has developed a proprietary database, which holds records of all monitors supplied to customers,
including details of inspections, repairs, replacements and calibrations. This database provides
a cradle-to-grave history for the tracking of radiation monitors.
TRACERCO
has several calibration and repair facilities throughout the world. Contact
TRACERCO
customer services to find your nearest facility.
Tracerco Customer Services
UK (Global Headquarters) USA
Te l: +44 (0)1642 375171 Te l: +1 281 291 7769
Email: radiation.monitors@tracerco.com Toll Free: 1 800 288 8970
Web: www.tracerco.com/monitors Email: tracerco.@tracerco.com
Malaysia Australia
Te l: +603 7803 4622 (GL) Te l : +61 (0)8 9209 3905
Email: robert.yong@tracerco.com Email: colin.foley@tracerco.com
Brazil
Te l: +55 21 3535-7600
Email: tracerco.brasil@tracerco.com
Web: http://www.tracerco.com.br
24

4.6 PED SOFTWARE AND FIRMWARE UPGRADES
A special feature of the
software and firmware. This allows users to benefit from the latest
The latest version of the
TRACERCO
website (www.tracerco.com/monitors). Once the latest firmware has been saved
DoseVision may be used for installing onto the
TRACERCO
TRACERCO
PED and DoseVision is the ability to upgrade to the latest
TRACERCO
PED improvements.
PED firmware and DoseVision may be downloaded from the
TRACERCO
PED.
4.7 ESSENTIAL SAFETY INFORMATION
4.7.1 Hazardous area Approval dependant on version ordered and described on
equipment label
The TRACERCO PED model T404-A-1 is suitable for operation in hazardous areas, zones 0, 1 & 2.
ATEX Certificate: Baseefa11ATEX0045
IECEx Certificate IECEx BAS11.0027;
FM Approval: 3041519
ATEX/IECEx Mark:
ATEX: II 1G
Electrical code: Ex ia IIC T4 Ga (-20°C ≤ Ta ≤ +50°C)
USA Mark:
IS Class I, Div1, Groups ABCD, T4 (-20°C ≤ Ta ≤ +50°C)
Class I, Zone 0, AEx ia IIC T4 Ga (-20°C ≤ Ta ≤ +50°C)
Canadian Mark:
Class I, Zone 0, Ex ia IIC T4 Ga (-20°C ≤ Ta ≤ +50°C)
The ATEX coding declares the equipment is for non-mining use (II) with very high protection (1) for
gas (G) atmospheres. The electrical coding is for intrinsically safe equipment (ia) and may be used
in flammable gas groups IIA, IIB and IIC and with a temperature class of T1, T2, T3, and T4. The
equipment is only certified for use in ambient temperatures –20°C to +50°C inclusive.
4.7.2 Approval standards ATEX/IECEx/FM/CSA
BS EN 60079-0:2006 & 2009
BS EN 60079-11:2007
FM Class 3600 / 3610 / 3810
CSA-C22.2 60079-0 / E60079-11 / 1010.1
4.7.3 Repair and maintenance of the TRACERCO PED
Repair of the equipment shall be carried out by suitably trained personnel in accordance with the
applicable code of practice e.g. IEC/EN 60079-19
All parts used in the repair of the TRACERCO PED must be supplied by TRACERCO.
The screen of the TRACERCO PED has a conductive coating to prevent the build up of a static
charge. The screen and the body of the equipment may be cleaned using water and a mild
detergent. There will normally be no danger of ingress as the body is sealed to IP67 meaning it is
submersible in water up to 1 metre deep. Do not use anything abrasive.
The following materials are used in the construction of the TRACERCO PED:
• Clip and bracket (Static dissipative Polycarbonate/ABS alloy)
• Rear case (Static dissipative Polycarbonate/ABS alloy with a static dissipative TPE overmould)
• Front case (polycarbonate with a static dissipative TPE overmould)
• Screen coated with Indium Tin Oxide (ITO)
25

Note - If the equipment is likely to come into contact with aggressive substances, it is the
responsibility of the user to take suitable precautions to ensure the type of protection provided by
the equipment is not compromised.
4.7.4 Use of the TRACERCO PED docks
The T409 and T410 docks are used for charging and communicating with the TRACERCO PED
These docks are the only equipment which may be used to communicate with the TRACERCO
PED. The docks must not be used in a hazardous location.
U
m =
253V
AC.
This is the maximum voltage which may be applied to the docks without invalidating the type of
protection. This is not the dock supply voltage. The nominal supply for the docks is +5V +/- 5%.
Repair of the docks shall be carried out by suitably trained personnel in accordance with the
applicable code of practice e.g. IEC/EN 60079-19
All parts used in the repair of the TRACERCO PED docks must be supplied by TRACERCO.
The dock cases are ABS and may be cleaned with a damp cloth.
4.7.5 Electromagnetic interference
Whilst the TRACERCO PED has undergone rigorous EMC testing it is advisable that care
is taken when used in close proximity to medical devices such as pacemakers.
4.7.6 Device heating
The TRACERCO PED may become warm during charging and normal use.
For technical support contact:-
Tracerco Customer Services
UK (Global Headquarters) USA
Te l: +44 (0)1642 375171 Te l: +1 281 291 7769
Email: radiation.monitors@tracerco.com Toll Free: 1 800 288 8970
Web: www.tracerco.com/monitors Email: tracerco@tracerco.com
Malaysia Australia
Te l: +603 7803 4622 (GL) Te l : +61 (0)8 9209 3905
Email: robert.yong@tracerco.com Email: colin.foley@tracerco.com
Brazil United Arab Emirates
Te l: +55 21 3535-7600 Te l : +9712 554 1672
Email: tracerco.brasil@tracerco.com Email: tracerco@tracerco.com
26

5. TECHNICAL SPECIFICATIONS
The
TRACERCO
Instrumentation – Measurement of personal dose equivalents Hp(10) and Hp(0.07) for X, gamma,
neutron and beta radiations – Direct reading personal dose equivalent meters and monitors).
Further details of type tests may be found in Appendix A.
5.1 RADIOLOGICAL PERFORMANCE
Radiation detected X-rays and gamma rays in range 33 keV to 1.25 MeV.
Sensor Single, energy compensated geiger müller tube.
Units Sieverts or Rem
Radiation dose rate Bargraph display 0 to 100 mSv/h or 0-10 Rem/h
Accumulated dose Dose “man” display 0 to 10 Sv or 0-1000 Rem
PED has been tested in accordance with EN 61526:2007 (Radiation Protection
(may be selected in DoseVision software)
Digital numeric 0 to 100 mSv/h or 0-1000 Rem
Digital numeric 0 to 10 Sv or 0-1000 Rem
Peak radiation dose rate Digital numeric 0 to 100 mSv/h or 0-10 Rem/h
Alarms Two alarm levels for both dose and dose rate.
Alarm levels set via DoseVision software.
Dedicated LEDs for dose and dose rate will flash
amber for first alarm level and red for second
alarm level. Loud beep and powerful vibrate alerts
occur during alarm.
Overload Response PED gives clear indication of overload
when above 100mSv/h.
A special feature of the Tracerco PED is continued
indication of possible accumulated dose
inaccuracy due to overload. This indication is
provided on both the PED and in the data in
DoseVision.
Variation with Temperature Less than ± 10% over temperature
range -20°C to +50°C.
Dose rate linearity ± 16% over the range 2 μSv/h to 100 mSv/h
27

TRACERCO PED energy response
TRACERCO
PED energy response results from tests performed by the UK Health Protection
Agency. Responses are normalised to Cs-137.
TRACERCO PED angular response
TRACERCO
PED angular response results from tests performed by the UK Health Protection
Agency. Responses are normalised to Cs-137.
28

TRACERCO PED dose rate response
TRACERCO
PED dose rate response results from tests performed by the UK Health Protection Agency.
29

5.2 HAZARDOUS AREA APPROVAL
ATEX/IECEx APPROVAL DEPENDANT ON VERSION ORDERED AND DESCRIBED ON EQUIPMENT LABEL
Certification numbers ATEX certificate number: Baseefa11ATEX0045
IECEx certificate number: IECEX BAS11.0027
ATEX coding II 1G
Electrical coding Ex ia IIC T4 Ga (-20°C ≤ Ta ≤ + 50°C)
USA/CANADA APPROVAL DEPENDANT ON VERSION ORDERED AND DESCRIBED ON EQUIPMENT LABEL
FM Approval Certificate Number 3041519
USA Mark IS Class I, Div 1, Groups ABCD, T4 (-20°C ≤ Ta ≤ + 50°C)
Class I, Zone 0, AEx ia IIC T4 Ga (-20°C ≤ Ta ≤ + 50°C)
Canadian Mark Class I, Zone 0, Ex ia IIC T4 Ga (-20°C ≤ Ta ≤ + 50°C)
5.3 EMC
EMC compliance 2004/108/EC Electromagnetic Compatibility
Directive (including amendments).
Tested and passed according to EN61526.
5.4 BATTERY
Battery Rechargeable lithium ion
Battery life Greater than 300 hours typical battery charge with
(with screen saver on) background radiation and room temperature.
Tested and passed according to EN61526.
Low battery indication Approximately 8 hours available life left with
background radiation.
Tested and passed according to EN61526.
Time to Recharge 2 hours from flat
5.5 MECHANICAL
Case material Tough polymers with antistatic
surface properties.
Size 10 x 6 x 2 cm
Weight 160g approx
30

5.6 ENVIRONMENTAL
Operating temperature range -20 to 50oC
Temperature stability tested and passed
according to EN61526.
Temperature shock tested and passed
according to EN61526.
Humidity range Up to 95%
Tested and passed according to EN61526.
-2
Vibration 20 ms
for 15 mins in each of 3 orthogonal
directions in the range 10 to 33Hz.
Tested and passed according to EN61526.
Shock 6 x 1m drops onto concrete,
1 drop on each face of
TRACERCO
PED.
Tested and passed according to EN61526.
Microphonics 60 x 10cm drops onto hard steel surface,
10 shocks on each of the main 6 faces.
Tested and passed according to EN61526.
Ingress protection rating IP67
5.7 DATA LOGGING
Memory 125,000 data point capacity.
Includes dose measurements
and alarms/fault events.
Memory retention Serial non-volatile memory. 10 year data retention.
Dose data log interval Intelligent mode: log every 0.01 µSv
Periodic mode: log every 1 minute
Logging mode selected in DoseVision.
31

6. ACCESSORIES FOR THE TRACERCO PED
There are several accessories available for use with the
Portable dock: for charging
and transferring data.
Desktop dock: for charging
and transferring data.
TRACERCO
PED.
In car charger
Multi-region mains adapter.
32
Lanyard
Tough Transit CasePouch

7. TRACERCO MONITORS PRODUCT RANGE
We offer a number of monitors for sale and hire including a range of intrinsically safe
monitors, which are suitable for use in a potentially explosive environment:
• TRACERCO Intrinsically Safe range
T201 Radiation Contamination Monitor
T202 Radiation Dose Rate Monitor
T404 TRACERCO PED.
• TRACERCO range
T401 Contamination Monitor
T402 Dose Rate Monitor
T403 Contamination Monitor
T406 X-Ray Monitor.
We also offer for sale a Mud Monitor for detecting
dislodged sources during drilling operations.
33

APPENDIX A - Type test report summary
Test Acceptance criteria Result
Dose response EN 61526:2007 Within +/- 7%
Relative intrinsic error was determined using
137
Cs gamma requires:
radiation at approximately 20%, 40% and 80% of each +/- 15%
order of magnitude. A single measurement was performed
at each point.
Dose rate response EN 61526:2007 Within +/- 16%
Dose rate response was determined using
137
Cs at requires:
approximately 20%, 40% and 80% of each order of +/- 20%
magnitude over the full working range of the TRACERCO
PED. A single measurement was performed at each point
Variation of response with Photon Radiation Energy EN 61526:2007 -14% to +31%
Determined over the energy range 33 keV to 1.25 MeV. requires:
An x-ray source (ISO) was used to generate energies up to -29% to +67%
241
248 keV . Gamma radiation emitted from
60
Co sources provided the response to energies 60 keV,
Am,
137
Cs and
662 keV and 1.25 MeV respectively.
Variation of response with angle of incidence EN 61526:2007 -26% to +18%
Angular dependence determined using
241
Am and 33 keV x radiation. The measurements -29% to +67% limited to +/-450)
were performed at angles of incidence up to ±60
137
Cs, 60Co, requires: (33keV response
o
Dose rate overload TRACERCO
TRACERCO PED exposed to 500 mSvh
-1
EN 61526:2007 PED displayed >100
for a period of five minutes. requires: mSv h-1for entire
indication of overload duration of the overload
Response time EN 61526:2007 <8s increasing
Time to increase from background to more than 80% requires: <5s decreasing
of the true dose rate. <10 s response time
Time to decrease to less than 20% of the true dose rate.
Beta and neutron radiation response EN 61526:2007 Beta response is 4%
Dose rate response to beta radiation determined requires: of actual dose.
90
using
Sr/90Y (15000 µSv/h) response to be stated Neutron response is
Dose rate response to neutron radiation determined by the manufacturer 4% of actual dose.
using and
241
Am/Be (122.39 µSv/h)
Full type test details are available upon request.
34

35

For further details please contact:
Tracerco
Unit 2/3 Belasis Court,
Belasis Hall Business Park,
Billingham,
Cleveland, TS23 4AZ, UK
Tel: +44 (0)1642 375171
Fax: +44 (0)1642 562819
Email: radiation.monitors@tracerco.com
Web: www.tracerco.com/monitors
@TracercoMonitor
MN1010 Rev A
 Loading...