

Page 1
USER MANUAL OUTBOARD MOTOR BRACKETS
Aluminum Outboard Motor Brackets - Installation and Operating Instructions
Models T10050, T10051, T10052 and Quick Connect/Adaptor Plate T10053
CAUTION
Do not exceed the bracket’s HP or weight limits. Read instructions completely before starting assembly.
Motor bracket must remain in the “UP” position throughout installation. DO NOT operate motor
bracket unless motor is installed on bracket. This bracket is under spring tension. Exercise caution
when installing and operating.
INSTALLATION INSTRUCTIONS
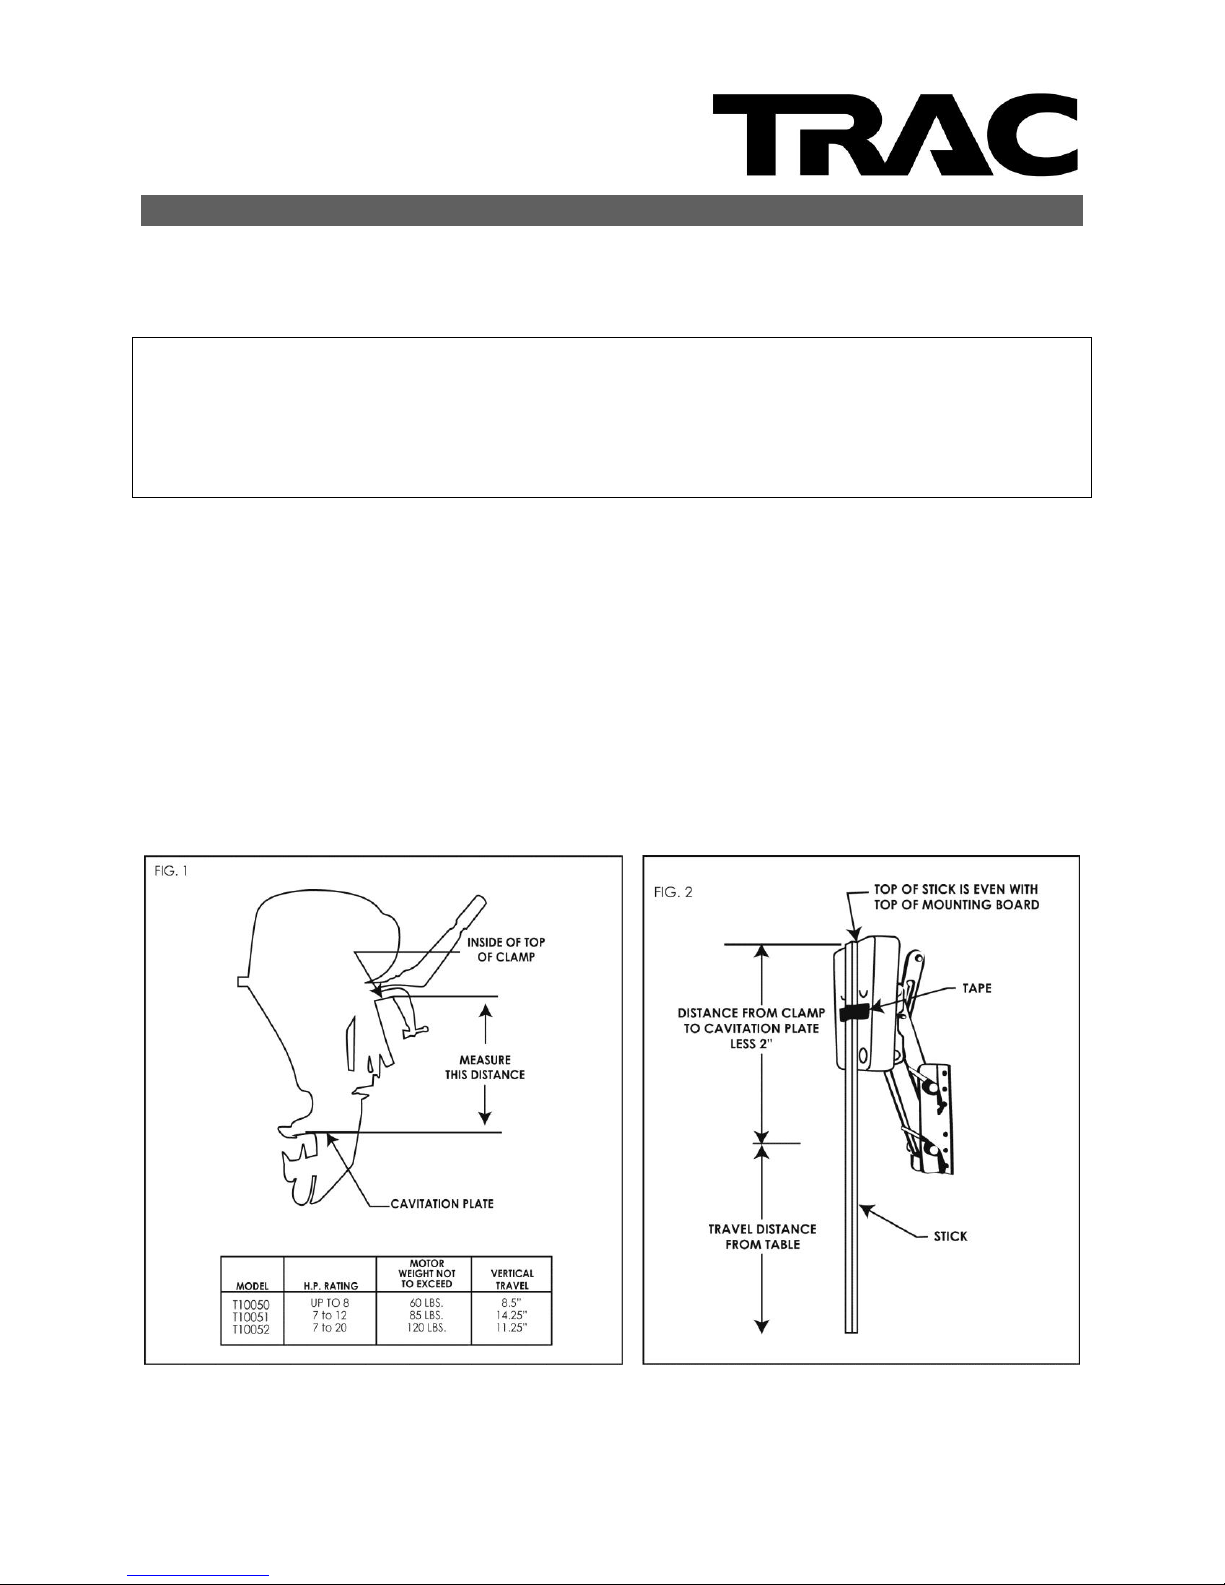
Refer to Figures 1 and 2
Measure the distance on your outboard motor between the cavitation plate and the upper inside edge
of the transom clamp. Add the total travel distance of your model bracket from the table in figure 1.
Then subtract 2 inches.
(Measure clamp to cavitation plate) add (bracket’s vertical travel) subtract 2” = _________
Cut a stick to this length and tape it to the center of the bracket board so that the stick and board are
flush at the top edge of the board as shown in figure 2.
Page 2
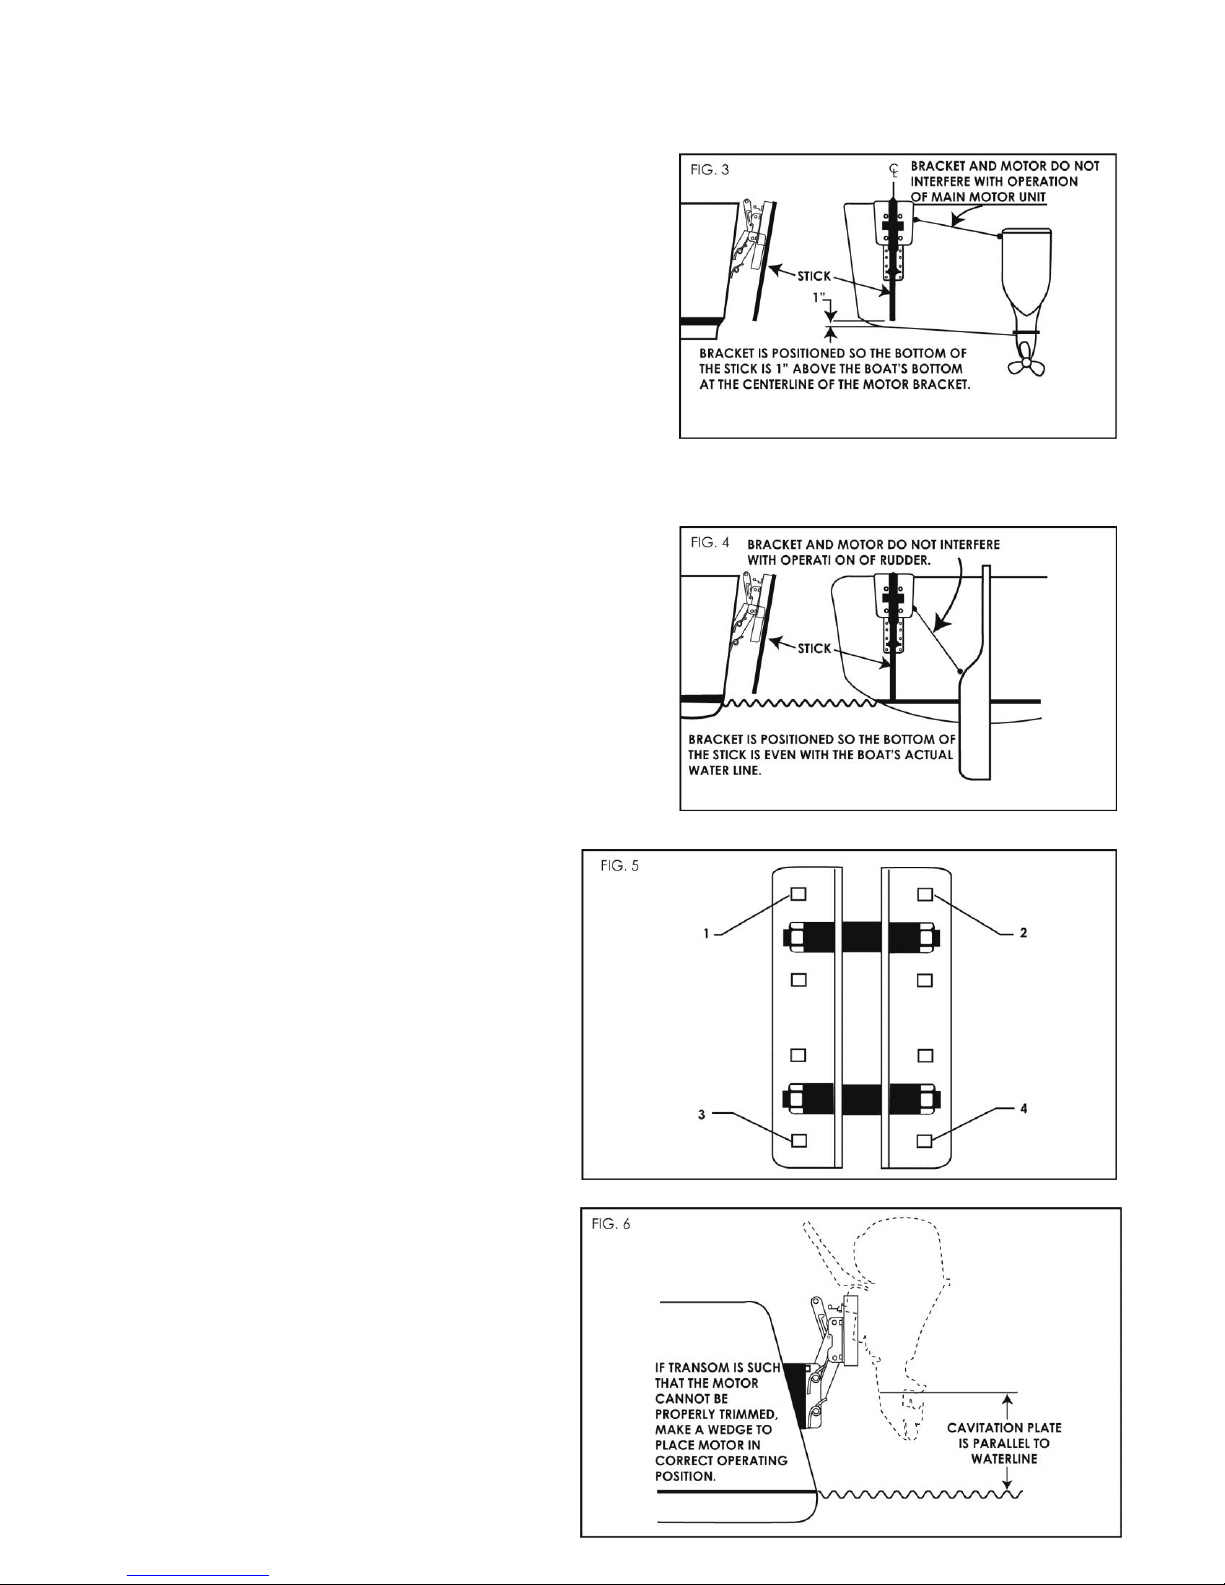
Refer to Figure 3
Choose the most appropriate side of your transom for
installing the bracket. Position your bracket so it won’t
interfere with the turning operation of your primary
motor, rudder, or anything else installed on your boat’s
transom.
Power Boats – Position the outboard motor bracket on
the transom with the mounting flanges flat against the
transom. Position the bracket so the bottom of the stick
is one inch above the boat’s bottom.
Refer to Figure 4
Sailboats - Position the outboard motor bracket on the
transom with the mounting flanges flat against the
transom. Position the bracket so the bottom of the stick
is even with the boat’s waterline.
Refer to Figure 5
Alter the bracket has been properly
positioned, mark the upper and lower bolthole locations using the bracket as a template
on your transom. Drill the four marked holes
with a 3/8" drill bit, making sure to hold the
drill at right angles to the transom.
Refer to Figure 6
Check the angle of the transom on your boat
and determine it the motor to be used can be
trimmed so the cavitation plate is parallel to
the waterline. lf not make a wedge shaped
spacer out of suitable material.
Page 3

Refer to Figure 7
If the transom is less than 2" thick, a backing
plate should be installed on the inside of the
transom for greater needed rigidity. Attach
your motor bracket to the transom by coating
the flat surfaces of the mounting flanges, the
backing plate, and both sides of the drilled
holes with a marine adhesive/sealant. Secure
the bracket to the transom with the supplied hardware as illustrated. The bracket is now ready to
receive the outboard motor.
OPERATING INSTRUCTIONS
To lower the bracket bear down on motor and release locking lever by pushing the handle towards the
mounting board, allowing the guide pin to slide in its safety groove. The handle will snap locked when
fully extended in the "up" or "down” position. The bracket springs counter balance most of the motor
weight; however, a slight push or lift is necessary to raise or lower the motor.
ALWAYS LOWER MOTOR SLOWLY. All four arms on the bracket should be tight, but not too much to
prevent smooth up and down action.
CAUTION! IMPORTANT GUIDELINES:
1. Install motor bracket in “up” position.
2. Always remove your motor from the bracket when trailering. Failure to do so could result in
damage to boat, motor and bracket.
3. Do not exceed the stated motor HP rating or weight.
4. Always use a safety cable to connect the motor to boat.
5. Operate motor at low speed.
6. Avoid turning motor at full throttle, refrain from sharp turns.
7. Operate motor in lowest position possible for best performance.
8. Never raise or tilt motor when in use.
9. Keep pivoting bolts greased to insure smooth operation.
IMPORTANT RECOMMENDATIONS
A lubricant coating on all bolts and nuts will increase corrosion resistance. Keep pivot points lubricated.
Remove your motor from the bracket when trailering your boat. Use a safety cable when operating
your motor. If a spacer is used, keep it sealed to increase longevity.
Page 4

MODEL T10053 ADAPTER PLATE INSTALLATION INSTRUCTIONS
(sold separately)
Prior to installation, be certain to read instructions completely. This quick
connect / adaptor plate works only with T10050, T10051 and T10052
aluminum motor brackets.
Slide motor bracket into adapter plate as shown in Figure 8 and secure it in
position by turning locking handle as indicated in Figure 8. Follow bracket
installation instructions to correctly position the bracket and adaptor plate
as a unit. Use the adaptor plate holes as a template to mark bolt-holes.
ADAPTOR PLATE INSTALLATION INSTRUCTIONS
FOR A MOTOR BRACKET WHICH IS ALREADY INSTALLED
If the adaptor plate is to be installed where an outboard motor bracket is already installed, remove the
bracket from the boat and seal the existing holes with plugs and a marine adhesive/sealant. Position the
plate on the transom so the bracket will be in the same position as before. Follow installation instruction
above.
LIMITED WARRANTY
This limited warranty is provided by TRAC Outdoor Products Co (TRAC) to the original consumer purchaser (purchaser) of the
new (not refurbished) TRAC Outboard Motor Bracket. This limited warranty is not transferable to any other party. TRAC will at
it option repair or replace any part of the TRAC Outboard Motor Bracket which may be found by TRAC to be defective within
two (2) years of original purchase. TRAC does not pay for the shipping cost from original purchaser to TRAC. You will have to
ship the items to us for repair or replacement. For warranty repair or replacement, the purchaser will provide dated proof of
purchase (sales receipt) and promptly notify TRAC of the request for warranty action. The purchaser will notify TRAC by email
at info@TRAC-Outdoor.com or by calling 615-641-2542 for warranty action. Purchasers will be provided a Return Goods
Authorization (RGA) to include with return for warranty work which will be shipped at the purchaser’s expense to the address
provided. The purchaser must use reasonable care in maintenance and operation of the product in accordance with this
manual. Failure to follow the instructions in the manual will void the warranty. This warranty covers defects in material or
workmanship of the TRAC Outboard Motor Bracket only. This warranty does not cover failure that results from misuse,
improper installation, accident, abuse, neglect, modification, or improper maintenance. There are no other express or implied
warranties. Any damage to watercraft or trailer resulting from proper or improper use of this TRAC Outboard Motor Bracket is
not covered under this warranty. Costs of installation or repair by service centers or marine repair facilities are not covered by
this warranty. This is the exclusive remedy and any liability for any and all incidental or consequential damages or expenses
whatsoever is excluded. Some states do not allow limitations on how long an implied warranty lasts, or do not allow exclusion
or limitation of incidental or consequential damages, the above limitations may not apply to you. This limited warranty gives
you specific legal rights, and you may also have other rights which vary from state to state.
TRAC Outdoor Products Co
6039 Dana Way
Antioch, TN 37013
www.trac-outdoor.com
info@trac-outdoor.com
(615) 641-2542
 Loading...