

INSTRUCTION MANUAL
EUROMEX
STEREO MICROSCOPES
EDUBLUE SERIES
MANUEL D’UTILISATION
EUROMEX
DES STEREO MICROSCOPES
SÉRIE EDUBLUE
BEDIENUNGSANLEITUNG FÜR
EUROMEX
STEREOMIKROSKOPE
DER EDUBLUE REIHE
MANUAL USUARIO
SERIE EduBlue
.
2
INSTRUCTION MANUAL
EUROMEX
STEREO MICROSCOPES
EDUBLUE SERIES

1.0 Introduction
With your purchase of a EUROMEX EduBlue range stereo microscope you have chosen for a
quality product. The EUROMEX EduBlue range microscopes are developed for use at schools
and laboratories.
The stereo microscope consists of two separate microscope tubes which are combined as a unit,
in order to focus them simultaneously on the object. Each tube has prisms, achromatic objectives
and a widefield eyepiece in order to obtain a large, flat field of view. Both eyes are looking at the
object under a different angle to reach a deep stereoscopic image.
The maintenance requirement is limited when using the microscope in a decent manner.
This manual describes the construction of the microscope, how to use the microscope and
maintenance of the microscope.
2.0 Index
1.0 Introduction
2.0 Index
3.0 Construction of the stereo head
4.0 Functions of the stereo microscope
5.0 Preparing the stereo microscope for use
6.0 Working with the stereo microscope
7.0 Maintenance and cleaning
8.0 Optional accessories
3.0 Construction of the stereo microscope
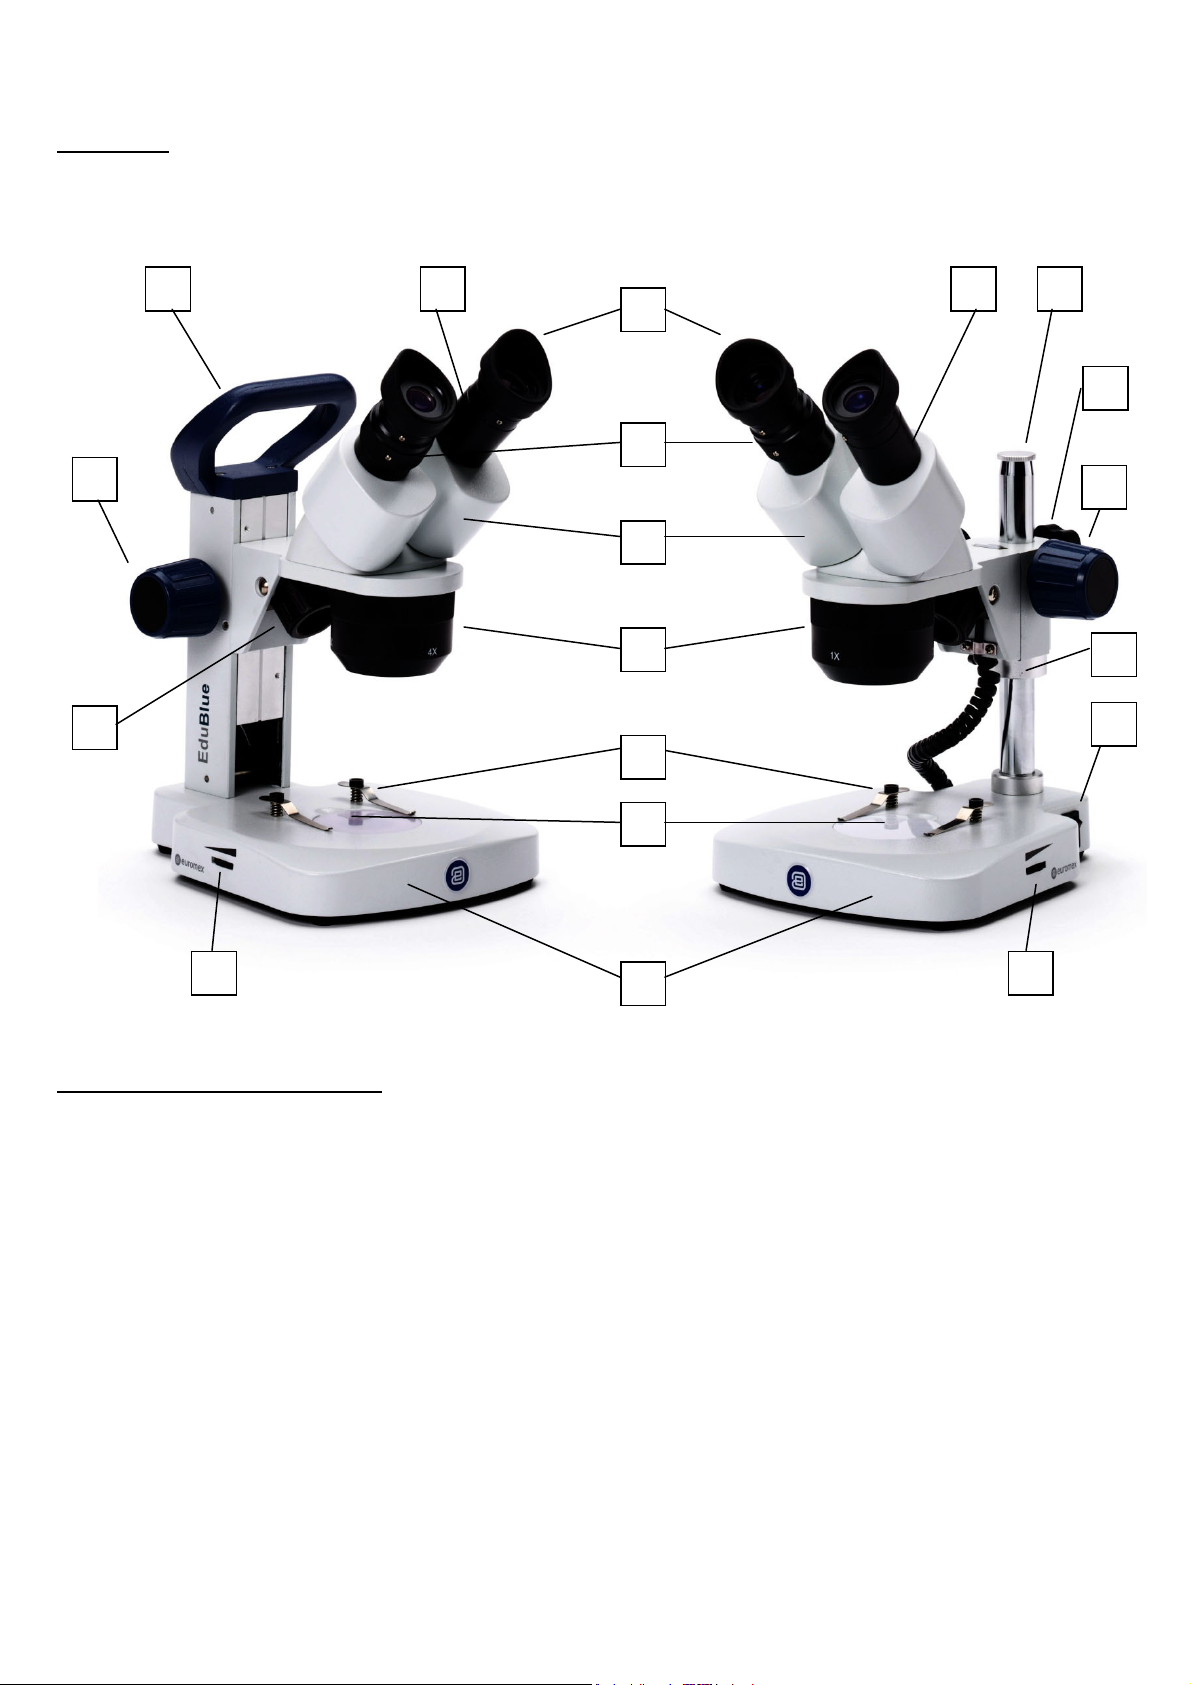
The names of the several parts are listed below and are indicated in the picture:
A) Eyeshade I) On/off switch
B) Diopter adjustment J) Incident illumination
C) Revolver (objective changer) K) Focusing knob
D) Illumination adjustment L) Handle
E) Object clip M) Prism housing
F) Stage plate N) Widefield eyepiece
G) Stand foot with built-in illumination O) Safety device
H) Pillar P) Fixing screw
4.0 Functions of the stereo microscope
The stereo microscope consists of a stand (G) with object stage, a vertical pillar (ED.xxxx-P
models) or rack and pinion stand (ED.xxxx-S models) and a head with focusing system.
3

4.1 Tubes
The EduBlue models are equipped with a 45° inclined tubes
K
J
4.2 Optical specifications
The ED.1302-P and ED.1302-S models are equipped with paired widefield 10x eyepieces (N) and
a pair of achromatic 1x/3x objectives mounted in one revolving nosepiece.
The ED.1402-P, ED.1402-S and ED.1405-S models are equipped with paired widefield 10x
eyepieces (N) and a pair of achromatic 2x/4x objectives mounted in one revolving nosepiece.
The ED.1502-S model is equipped with paired widefield 10x eyepieces (N) and three achromatic
1x/2x/3x objectives mounted in one revolving nosepiece.
The ED.1802-S and ED.1805-S models are equipped with paired widefield 10x eyepieces (N) and
three achromatic 1x/2x/4x objectives mounted in one revolving nosepiece.
Total magnification is calculated by multiplying the magnification of the eyepieces with the
magnification of the objectives. The eyepieces are locked in the tubes by means of a small screw.
D
N
4
HL N
A
P
B
K
M
C
E
F
G
D
O
I

4.3 Object stage
The EduBlue stereomicroscopes are equipped with an transparent object stage and 2 object clips.
All models have a transmitted and a incident LED illumination.
4.4 Safety device
The fixing screw (P) locks the stand arm into its position. When loosening the fixing screw, one can
adjust the holder in height depending of the volume/height of the object. After adjustment the fixing
screw (P) should be tightened again and the safety device (O) repositioned and secured in order to
avoid that the arm stand can fall down unexpectedly !
4.5 Focusing
With the focusing knobs (K) the object can be sharply focussed.
The working distance (distance between front of objectives to top of object) is about 60 mm.
4.6a Revolver of Dual Magnification models
The ED.1302-P / ED.1302-S / ED.1402-P / ED.1403-S and ED.1405-S are equipped with 2 pairs
of achromatic objectives mounted in one revolver (objective changer). By turning this nosepiece
another magnification is set. Turn the nosepiece untill it clearly “clicks” into position.
4.6b Revolver of Triple Magnification models
The ED.1502-S / ED.1802-S and ED.1805-S are equipped with 3 pairs of achromatic objectives
mounted in one revolver (objective changer). By turning this nosepiece another magnification is
set. Turn the nosepiece untill it clearly “clicks” into position.
4.7 Illumination
All models have a transmitted (diascopic) and incident LED illumination
With use of the potentiometer switch (D) the illuminators can be adjusted in intensity and both
illuminations can be used simultaneously.
With the switch (I) the illuminations can be switch IN and OUT
4.8 Tension adjustment
When the system lowers itself by its own weight, the tension of the focusing knob (K) should be
adjusted. This is done by turning the two focusing knobs in opposite (clockwise or
counterclockwise) directions
5.0 Preparing the stereo microscope for use
Take the stereo microscope out of its packing and put it on a firm stable table
Insert the plug of the power supply adapter into the mains supply and switch on the illumination
with the On/off switch (I) and place the eyeshades onto the eyepieces. Sit comfortably down
behind the microscope and take a relaxed position while viewing through the eyepiece (N).
5

6.0 Working with the stereo microscope
• Place an object onto the object plate and adjust the height of the holder randomly with the
screw (P) at the backside of the stand.
• Adjust the interpupillary distance by moving both prism housings (M) towards each other
until one round image is seen with both eyes.
• Focus the specimen by means of the focusing knobs (K) on both sides of the holder.
• For normal observation both tubes should have the same length, but to adjust any
difference between the two eyes, proceed as follows: focus sharply on a flat specimen, only
using the right eye, looking through the right eyepiece. Now look through the left eyepiece,
only with the left eye and focus the specimen with the diopter adjustment ring on the left
tube.
7.0 Maintenance and cleaning
Always place the dustcover over the microscope after use. Keep the eyepieces always mounted in
the tubes to avoid dust entering the instrument.
7.1 Cleaning the optics
When the eyepiece lens is dirty it can be cleaned by wiping a piece of lens paper over the surface
(circular movements). When this does not help put a drop of xylol or alcohol on the lens paper.
Never put xylol or alcohol directly on the lens!
When dirt is clearly visible in the field of view it resides on the lowest lens of the eyepiece. By
using the Allen-key the eyepiece can be removed from the tube. Clean the outside of the lens.
In case there is still dust visible please check if the dust is in the eyepiece by turning it. If this is the
case remove the lowest lens carefully from the eyepiece and clean it.
Caution
• Cleaning cloths containing plastic fibres can damage the coating of the lenses!
7.2 Maintenance of the stand
Dust can be removed with a brush. In case the stand or stage plate is really dirty the surface can
be cleaned with a non-aggressive cleaning product.
6

7.3 Charging the batteries
At first use, the batteries should be charged. Connect the cable of the charger to the inlet at the
back side of the microscope base, and connect the charger to the mains supply. The first charging
will take about 20 hours to reach full capacity.
7.4 Exchanging the batteries
Caution: Always remove the power adapter from the mains supply
before changing the bulb!
• Remove the battery compartment cover from the bottom plate.
• Replace the 3 batteries (AA type) in the correct order and place the battery cover back again.
8.0 Optional accessories
7
ED.6005 Pair HWF 5x/22 mm eyepieces
ED.6010 Pair HWF 10x/20 mm eyepieces
ED.6015 Pair HWF 15x/12 mm eyepieces
ED.6020 Pair HWF 20x/10 mm eyepieces
ED.6110 HWF 10x/20 mm eyepiece with micrometer reticle
ED.6099 Pair eyeshades
ED.9570 Pair object clamp for stage
ED.9950 Stage plate frosted glass, opaque, Ø 60 mm
ED.9956 Stage plate black/white, Ø 60 mm
AE.1112 Object micrometer 50 mm divided in 500 parts on glass slide 76 x 26 mm
8
MANUEL D’UTILISATION
EUROMEX
DES STEREO MICROSCOPES
SÉRIE EDUBLUE

1.0 Introduction
Avec l'achat d'un stéréomicroscope de la série EUROMEX EduBlue vous avez choisi pour un
produit de qualité. La série de stereomicroscopes EUROMEX EduBlue a été développé pour
l'utilisation dans l'enseignement, l'industrie et les amateurs avertis.
Le microscope stéréoscopique consiste de deux systèmes optiques parallèles, montés et alignés
sous un angle légerement différent. Chaque tube est doté de prismes, d'un objectif achromatiques
et d'un oculaire à grand champ. Chaque œil observe l'objet sous un ange légèrement différent de
telle façon qu'on obtient une vue en profondeur stéréoscopique.
L'entretien est - lors d'une utilisation sous des conditions normales - limité au stricte minimum
2.0 Sommaire
1.0 Introduction
2.0 Sommaire
3.0 Composants du microscope stéréoscopique
4.0 Fonctions du microscope stéréoscopique
5.0 Mise en service du microscope
6.0 Utilisation du microscopique
7.0 Entretien et nettoyage
8.0 Accessoires
3.0 Composants du stéréomicroscope
Vour retrouvez les composants cidessous sur la photo sur la page suivante
A) Oeilleton I) Interrupteur Marche/Arrêt
B) Réglage dioptrique J) Eclairage incident
C) Toutelle à objectifs K) Bouton de mise au point
Potentiomètre L) Poignée
E) Valet de fixation M) Logement des prismes
F) Porte-objet N) Oculaire grand champ
G) Socle avec illumination intégrée O) Dispositif de sécurité
H) Colonne P) Vis de fixation
4.0 Fonctions du stéréomicroscope
Le stéréomicroscope est dote d’un statif (G) avec un porte objet, d’une colonne vertical (modèles
ED.xxxx-P) ou bien d’une crémaillère (modèles ED.xxxx-S) et d’une tête avec un système de mise
au point.
9

4.1 Têtes
Les modèles EduBlue sont équipés de tubes inclines à 45º
K
J
4.2 Caractéristiques optiques
Les modèles ED.1302-P et ED.1302-S sont équipés d’une paire d’oculaires WF10x (N) et d’une
paire d’objectifs achromatiques 1x/3x montés sur une tourelle rotative.
Les modèles ED.1402-P, ED.1402-S et ED.1405-S sont équipés d’une paire d’oculaires WF10x
(N) et d’une paire d’objectifs 2x/3x montés sur une tourelle rotative.
Le modèle ED.1502-S est équipé d’une paire d’oculaires WF10x (N) et de trois objectifs
achromatiques 1x/2x/3x montés sur une tourelle rotative.
Les modèles ED.1802-S et ED.1805-S sont équipés d’une paire d’oculaires WF10x (N) et de trois
objectifs achromatiques 1x/2x/4x montés sur une tourelle rotative
Le grossissement total s’obtient en multipliant le grossissement de l’oculaire par celui de l’objectif.
Les oculaires sont sécurisés par une vis de fixation.
.
D
N
10
A
B
M
C
E
F
G
HL N
P
K
D
O
I

4.3 Le porte-objet
Les stereomicroscopes EduBlue sont équipés d’un porte-objet transparent et de deux valets de
fixation. Tous les modèles ont un éclairage LED incident et transmis.
4.4 Dispositifs de sécurité
La vis de fixation (P) maintient le bras du statif dans sa position. En desserrant la vis de fixation on
peut ajuster la hauteur du support de tête par rapport à la hauteur de l’objet à observer. Après le
réglage de la vis de fixation (P) le dispositif de sécurité (O) doit être replace sous le support de tête
afin d’éviter que celui-ci ne tombe !
4.5 Mise au point
Utilisez le bouton de réglage (K) pour faire la mise au point de l'objet.
La distance de travail est d'environ de 60 mm.
4.6a Tourelle à deux objectifs
Les modèles ED.1302-P / ED.1302-S / ED.1402-P / ED.1403-S et ED.1405-S sont équipés de
deux objectifs achromatique montés sur une tourelle. En tournant la tourelle un autre
grossissement est possible. Tournez la tourelle jusqu’à entendre clairement le « click » de
position.
4.6b Tourelle à trois objectifs
Les modèles ED.1502-S / ED.1802-S sont équipés de trois objectifs achromatiques montés sur
une tourelle. En tournant la tourelle un autre grossissement est possible. Tournez la tourelle
jusqu’à entendre clairement le « click » de position.
4.7 Eclairage
Tous les modèles ont un éclairage incident et transmis à LED
En utilisant le potentiomètre (D) l’intensité lumineuse des éclairages peut être réglée et chacun
peut être utilisé simultanément.
Les éclairages peuvent être allumés ou éteins grâce à l’interrupteur correspondant (I)
4.8 Réglage de la friction de la mise au point
Si la mise au point est trop raide ou trop souple, le bouton de contrôle de la friction (K) peut être
réglé à l'aide d'une clé fournie avec le stéréomicroscope. Ce réglage s’obtient en tournant chaque
bouton dans le sens contraire l’un et l’autre .
5.0 Mise en service du stéréomicroscope
Sortez le stereomicroscope de son emballage et posez le sur une table plate et stable.
Branchez la prise de l'adaptateur d'alimentation dans la prise secteur et allumez l'éclairage grâce
à l'interrupteur marche / arrêt (I), puis montez les oeilletons sur les oculaires. Assayez vous
11
confortablement face au stéréomicroscope et prenez une position détendue tout en regardant
dans les oculaires (N).

6.0 Utilisation du stéréomicroscope
• Positionnez l'objet sur le porte-objet et régler l'hauteur de la tête avec la vis de fixation (P)
situé à l’arrière du statif.
• Réglez la distance interpupillaire en déplaçant les deux tubes porte oculaire (M) jusqu'à
obtenir une seule image.
• Ajustez la mise au point avec les boutons de mise au point (K).
• Pour l'observation normale, les deux tubes doivent avoir la même longueur, mais pour
régler la différence entre les deux yeux, procédez de la manière suivante: Faites la mise au
point de l’objet avec l’oeil droit à travers l’oculaire droit. Puis regardez avec l’oeil gauche
dans l’oculaire de gauche et faites la mise au point de l’échantillon en utilisant la bague de
réglage dioptrique du tube porte oculaire gauche.
7.0 Entretien et nettoyage
Remettez la housse de protection après chaque utilisation du microscope
Laissez les oculaires toujours en place, ceci évite que la poussière rentre dans le
stéréomicroscope.
7.1 Nettoyer l'optique du microscope
Dans le cas que la lentille frontale d'un oculaire est souillé, celui-ci peut être nettoyé avec du
papier spéciale pour lentilles.
Dans le cas d'une souillure importante, mettez une goutte de xylol ou d'alcool sur du papier pour
lentilles et nettoyez dans un mouvement circulaire la lentille.
Dans le cas il y aura de la poussière dans le champ de vision, celui-ci se trouve sur la dernière
lentille de l'oculaire.
Avertissement
L'usage de chiffons fabriqués en matières synthétiques, peuvent
endommager les lentilles !
7.2 Entretien du statif
La poussière peut être enlevée avec un simple pinceau. La surface peut être nettoyée avec un
produit de nettoyage non agressif.
12

7.3 Recharge des batteries
Pour la première utilisation, les batteries devraient être charges. Branchez le câble du chargeur
sur la partie arrière de la base de l’appareil, puis branchez le à la prise de courant. La première
recharge doit durer environ 20 heures afin d’atteindre sa capacité maximale.
7.4 Changer les batteries
Avertissement: Débranchez toujours la prise de courant de avant de manipuler les
batteries ou le LED.
• Enlevez le couvercle des batteries situé sous l’appareil
• Remplacez les 3 batteries (type AA ) dans l’ordre correct puis remettez et fermez le couvercle
8.0 Accessoires en option
13
ED.6005 Paire d’oculaires HWF 5x/22 mm
ED.6010 Paire d’oculaires HWF 10x/20 mm
ED.6015 Paire d’oculaires HWF 15x/12 mm
ED.6020 Paire d’oculaires HWF 20x/10 mm
ED.6110 Oculaire micrométrique HWF 10x/20 mm
ED.6099 Paire d’oeilletons
ED.9570 Paire de valets de fixation
ED.9950 Disque en verre dépoli opaque, Ø 60 mm
ED.9956 Disque noir / blanc, Ø 60 mm
AE.1112 Micromètre objet de 50mm, divisé en 500 parties sur une préparation en verre
de 76 x 26 mm

14
BEDIENUNGSANLEITUNG FÜR
EUROMEX
STEREOMIKROSKOPE
DER EDUBLUE REIHE

1.0 Einleitung
Mit dem Kauf eines Stereomikroskops der EUROMEX EduBlue Reihe haben Sie sich für ein
Qualitätsprodukt entschieden. Die Mikroskope der EUROMEX EduBlue Reihe wurden zur
Verwendung an Schulen und in Labors konzipiert.
Das Stereomikroskop besteht aus zwei separaten Mikroskoptuben, die zu einer Einheit kombiniert
werden, um schließlich gleichzeitig auf das Objekt fokussiert werden zu können. Jeder Tubus
verfügt über jeweils ein Prisma, ein achromatisches Objektiv sowie ein Weitfeldokular. Hierdurch
wird ein großes, ebenes Sehfeld erzielt. Beide Augen betrachten das Objekt jeweils unter einem
geringfügig anderen Winkel, so dass ein stereoskopischer Effekt entsteht.
Bei normaler Verwendung reduziert sich der Wartungsbedarf auf ein Minimum!
Diese Bedienungsanleitung gibt Informationen zu Aufbau, Handhabung und Wartung des
Mikroskops.
2.0 Inhalt
1.0 Einleitung
2.0 Inhalt
3.0 Aufbau des Stereomikroskops
4.0 Funktionsweise der einzelnen Bauteile
5.0 Vorbereiten des Stereomikroskops zur Nutzung
6.0 Arbeiten mit dem Stereomikroskop
7.0 Wartung und Reinigung
8.0 Optionales Zubehör
3.0 Aufbau des Stereomikroskops
Im Folgenden finden Sie die Bezeichnung der einzelnen Bauteile, die auch auf der Abbildung
dargestellt sind:
A) Augenmuschel I) Ein-/Aus-Schalter
B) Dioptrien-Einstellung J) Auflichtbeleuchtung
C) Objektivrevolver K) Fokussierung
D) Beleuchtung Einstellung L) Handgriff
E) Präparatklemmen M) Prismengehäuse
F) Objektscheibe N) Weitfeld- Okular
G) Stativfuß mit integrierter Beleuchtung O) Sicherheitseinrichtung
H) Stativ P) Befestigungsschraube
4.0 Funktionsweise der einzelnen Bauteile
Das Stereomikroskop besteht aus einem Stativfuß (G), mit einer vertikale Säule (ED.xxxx-PModelle) oder Zahnstangen Ständer (ED.xxxx-S-Modelle) sowie einem Kopf mit
Fokussiereinrichtung.
15
4.1 Tubus
Die EduBlue Modelle sind mit einem 45° Schrägtuben ausgestattet
K
J
4.2 Optische Spezifikationen
Die ED.1302-P und ED.1302-S-Modelle sind mit 10x Weitfeld-Okulare (N) und ein Paar von
achromatischen 1x/3x Objektive in einem Revolver montiert ausgestattet
Die ED.1402-P,-S und ED.1402 ED.1405-S-Modelle sind mit 10x Weitfeld-Okulare (N) und ein
Paar von achromatischen 2x/4x Objektive in einem Revolver montiert ausgestattet.
Die ED.1502-S-Modell ist mit 10x Weitfeld-Okulare (N) und drei achromatischen 1x/2x/3x
Objektive in einem Revolver montiert ausgestattet.
Die ED.1802-S und ED.1805-S-Modelle sind mit 10x Weitfeld-Okulare (N) und drei
achromatischen 1x/2x/4x Objektive in einem Revolver montiert ausgestattet.
Die Gesamtvergrößerung des Mikroskops wird durch Multiplikation der Vergrößerung der Okulare
mit der Vergrößerung der Objektive berechnet. Die Okulare sind jeweils mit einer kleinen
Schraube im Tubus fixiert.
D
N
16
A
B
M
C
E
F
G
HL N
P
K
O
I
D

4.3 Objekttisch
Die EduBlue Stereomikroskope sind mit einem transparenten Objekttisch und 2 Objekt Clips
ausgestattet. Alle Modelle verfügen über eine Auf- und durchlicht LED-Beleuchtung.
4.4 Feststellknopf
Die Befestigungsschraube (P) verriegelt den Stativarm in seiner Position. Beim Lösen der
Befestigungsschraube kann man den Halter in der Höhe justieren, abhängig von dem Volumen /
Höhe des Objekts. Nach der Einstellung der Befestigungsschraube (P) sollte diese wieder
angezogen werden und die Sicherheitseinrichtung (O) positioniert und befestigt, um zu verhindern,
dass der Stativarm herunterfallt unerwartet!
4.5 Fokussieren
Mit den Fokussierknöpfen (K) kann das Bild des Objekts scharf eingestellt werden. Der
Arbeitsabstand (Abstand zwischen Unterseite des Objektivs und Oberseite des Objekts) beträgt
ca. 60mm.
4.6a Revolver
ED.1302-P / ED.1302-S / ED.1402-P / ED.1403-S und ED.1405-S verfügen jeweils über zwei Paar
achromatische Objektive in einem drehbaren Revolver. Durch Drehung des Revolvers wird eine
andere Vergrößerung eingestellt. Drehen Sie den Revolver bis Sie ein Klicken hören.
4.6b Revolver mit Drei Vergrößerungen
Die ED.1502-S / ED.1802-S und ED.1805-S sind mit 3 Paaren von Achromaten in einem Revolver
(objektiven-Wechsler) montiert sind. Durch Drehen dieses Objektivrevolver eine andere
Vergrößerung eingestellt ist. Schalten Sie den Objektivrevolver bis es eindeutig "Klicks"
4.7 Beleuchtung
Alle Modelle verfügen über ein Durchlicht und Auflicht LED-Beleuchtung
Mit Verwendung der Potentiometer-Schalter (D) können die Beleuchtungen in der Intensität
angepasst werden und beide Beleuchtungen können gleichzeitig verwendet werden.
Mit dem Schalter (I) können die Beleuchtungen IN und OUT werden gewechselt.
4.8 Einstellen der Gängigkeit
Falls sich der Mikroskopkopf durch sein eigenes Gewicht senkt, sollte die Gängigkeit der
Fokussierung (K) eingestellt werden. Dies wird durch Drehen der beiden Fokussierknöpfe in
entgegengesetzter Richtung gemacht. (im Uhrzeigersinn oder gegen den Uhrzeigersinn)
5.0 Vorbereiten des Stereomikroskops zur Nutzung
Nehmen Sie das Mikroskop aus der Verpackung und stellen Sie es auf einen stabilen Tisch.
Stecken Sie den Netzstecker in eine Steckdose und schalten Sie die Beleuchtung mit dem Ein/Aus-Schalter (I) an. Schieben Sie danach die Augenmuscheln über die Okulare. Setzen Sie sich
nun bequem vor das Mikroskop und schauen Sie durch die Okulare (N).
17

6.0 Arbeiten mit dem Stereomikroskop
• Legen Sie ein Objekt auf die Objektplatte und verstellen Sie die Höhe des Stereokopfs, bis
Sie ein einigermaßen scharfes Bild sehen (Feststellknopf P).
• Stellen Sie den Pupillenabstand ein, indem Sie die Prismengehäuse (M) aufeinender zu
oder voneinander weg bewegen, bis Sie mit beiden Augen nur ein rundes Bild sehen.
• Stellen Sie das Bild mit der Fokussierung (K) scharf ein.
• Im Normalfall sollten beide Okulartuben dieselbe Länge haben. Um einen etwaigen
Unterschied zwischen den beiden Augen auszugleichen, verfahren Sie bitte wie folgt:
Nehmen Sie ein flaches Objekt und schauen Sie nur mit dem rechten Auge in das rechte
Okular. Stellen Sie nun das Bild mit der Fokussierung (K) scharf ein. Schauen Sie nun nur
mit dem linken Auge durch das linke Okular und benutzen Sie die Dioptrieneinstellung auf
dem linken Tubus, um ein scharfes Bild zu erhalten.
• Die Modelle mit Beleuchtung haben außerdem eine schwarz-weiße Objektplatte, die
einfach ausgetauscht werden kann. Lösen Sie dazu einfach die kleine Inbusschraube (H).
Die schwarze Seite kann zur Beobachtung von Objekten genutzt werden, die sich besser
vor einem dunklen Hintergrund darstellen lassen.
Achtung
Bei Nutzung der schwarz-weißen Objektscheibe muss die Durchlichtbeleuchtung
abgeschaltet sein!
7.0 Wartung und Reinigung
Decken Sie das Mikroskop nach Nutzung immer mit der Staubschutzhülle ab. Lassen Sie die
Okulare immer im Mikroskoptubus montiert, damit kein Staub ins Gerät eindringen kann.
7.1 Reinigung der Optik
Falls die Linsen des Okulars verschmutzt sind, können sie mit einem Stück Linsenpapier
abgewischt werden (kreisförmige Bewegungen). Wenn dies keine Verbesserung bringt, feuchten
Sie das Linsenpapier mit einem Tropfen Xylol oder Alkohol an. Geben Sie niemals Xylol oder
Alkohol direkt auf die Linsen!
Falls Schmutz deutlich im Sichtfeld zu erkennen ist, befindet er sich auf der untersten Linse des
Okulars. Mit Hilfe des Inbusschlüssels können die Okulare aus dem Tubus genommen werden.
Säubern Sie nun die Außenseite der Linse. Sollte immer noch Staub sichtbar sein, vergewissern
Sie sich durch Drehung des Okulars, dass der Staub wirklich im Okular ist. Sollte dies tatsächlich
der Fall sein, drehen Sie vorsichtig die unterste Linse aus dem Gehäuse und reinigen sie.
Warnung
Tücher mit Kunststoff-Fasern können die Beschichtung der Linsen beschädigen!
18

7.2 Reinigung des Stativs
Staub kann mit einem Pinsel entfernt werden. Falls das Stativ stark verschmutzt ist, kann die
Oberfläche mit einem nicht-aggressiven Reinigungsmittel gesäubert werden.
7.3 Aufladen der Batterien
Vor der ersten Nutzung müssen die Batterien geladen werden. Verbinden Sie das Kabel des
Ladegerätes mit dem Anschluss an der Rückseite des Stativfußes und verbinden Sie das
Ladegerät mit einer Netzsteckdose. Die Erstladung dauert ungefähr 20 Stunden.
7.4 Austausch der Batterien
Warnung: Vor dem Austauschen der Batterien immer den Netzstecker ziehen!
• Entfernen Sie die Abdeckung des Batteriefachs von der Grundplatte des Stativs.
• Entnehmen Sie die alten Batterien, setzen Sie die neuen Batterien (Typ AA) in der richtigen
Richtung ein und setzen Sie die Abdeckung wieder auf.
8.0 Optionales Zubehör
19
ED.6005 Paar Okulare HWF 5x/22 mm
ED.6010 Paar Okulare HWF 10x/20 mm
ED.6015 Paar Okulare HWF 15x/12 mm
ED.6020 Paar Okulare HWF 20x/10 mm
ED.6110 Mikrometerokular HWF 10x/20 mm
ED.6099 Paar Augenmuscheln
ED.9570 Paar objektklemmen
ED.9950 Objektscheibe aus Milchglass, Opak, Ø 60 mm
ED.9956 Schwarz-Weisse Objektscheibe, Ø 60 mm
AE.1112 Objektmikrometer 50 mm geteilt in 500 Teile auf ein Glass Objektträger 76 x 26 mm
20
MANUAL USUARIO
SERIE EduBlue

1.0 Introducción
Con la compra de su microscopio estereoscópico de la gama EduBlue de EUROMEX, usted ha
elegido un producto de calidad. La gama de microscopios estereoscópicos EduBlue se ha
desarrollado para su uso en la educación, coleccionistas de minerals, sellos, monedas, insectos,
etc.
El microscopio estéreo se compone de dos tubos de microscopio separados que se combinan
como una unidad, con el fin de centrarse de forma simultánea en el objeto. Cada tubo tiene
prismas, objetivos acromáticos y un ocular de campo amplio con el fin de obtener un gran campo
plano de visión. Ambos ojos están mirando el objeto bajo un ángulo diferente para llegar a una
imagen estereoscópica de calidad.
El requisito de mantenimiento se limita a usar el microscopio de una manera adecuada.
Este manual describe la construcción del microscopio, la forma de utilizar el microscopio y el
mantenimiento del microscopio.
2.0 Índice
1.0 Introducción
2.0 Índice
3.0 Componentes del microscopio estereoscópico
4.0 Detalle de los componentes del microscopio estereoscópico
5.0 Instalación del microscopio estereoscópico
6.0 Trabajando con el microscopio estereoscópico
7.0 Mantenimiento y limpieza
8.0 Accesorios opcionales
3.0 Componentes del microscopio estereoscópico
Los nombres de las distintas partes se enumeran a continuación y se indican en imagen (pág.3):
A) Asa de transporte G) Alojamiento de los prismas
B) Enfoque macrométrico H) Alojamiento objetivos
C) Control intensidad iluminación incidente I) Iluminador incidente
D) Base plana con iluminación transmitida J) Control intensidad iluminación transmitida
E) Oculares K) Pinzas sujeta muestras
F) Ajuste de dioptrías L) Iluminador transmitido
21

22
EduBlue ED.1402-S
4.0 Detalle de los componentes del microscopio estereoscópico
El microscopio estéreo se compone de una base plana, un brazo vertical con el sistema de
enfoque macrométrico y un soporte en el que coloca el cabezal del microscopio estereoscópico
zoom que se puede bloquear con un tornillo de fijación.

4.1 Cabezal
Los microscopios estereoscópicos de la gama EduBlue están equipados con un cabezal con
inclinación de 45º. El porta-ocular izquierdo dispone de un ajuste de dioptrías.
4.2 Especificaciones ópticas
Los microscopios estereoscópicos de la gama EduBlue están equipados con un par de objetivos
acromáticos (con doble o triple factor de aumento) y una pareja de oculares WF10x de gran
campo. En la siguiente tabla se enumeran todos los modelos disponibles.
Modelo Oculares Objetivo Aumentos Estativo
ED.1302-P WF10x 1x / 3x 10x / 30x Columna
ED.1302-S WF10x 1x / 3x 10x / 30x Brazo fijo
ED.1402-P WF10x 2x / 4x 20x / 40x Columna
ED.1402-S WF10x 2x / 4x 20x / 40x Brazo fijo
ED.1405-S
DIGITAL
ED.1502-S WF10x 1x / 2x / 3x 10x / 20x / 30x Brazo fijo
ED.1802-S WF10x 1x / 2x / 4x 10x / 20x / 40x Brazo fijo
4.3 Base
La base (D) esta equipada con una platina semitransparente, el iluminador transmitido (L) y una
pareja de pinzas sujeta-muestras (K).
4.4 Enfoque
Utilizando los mandos de enfoque macrométrico (B) se consigue un enfoque preciso de la
muestra. Se recomienda enfocar la muestra utilizando ambos mandos de manera simultánea.
4.5 Ajuste de los aumentos en los modelos con doble/triple factor de aumento
Las versiones estéreo con doble/triple factor de aumento (1/3x, 2/4x, 1x/2x/3x y 1x/2x/4x) están
equipadas con 2/3 pares de objetivos acromáticos en un revólver (H). Girando este revólver (H)
usted puede seleccionar el aumento deseado. Gire el revólver (H) hasta que claramente haga
"clic" en su posición.
4.6 Iluminación
Los microscopios estereoscópico de la gama EduBlue están equipados con iluminación
transmitida (diascópica) LED1W e incidente (episcópica) LED 1W. Los iluminadores pueden ser
utilizados simultáneamente. En la parte posterior de la base se encuentran los reguladores de
intensidad (en la derecha para la luz transmitida (J) y en la izquierda para la luz incidente (C).
5.0 Instalación del microscopio estereoscópico
Extraiga el microscopio estereoscópico de su embalaje y póngalo sobre una mesa firme y estable.
Conectar el transformador a la red de alimentación y conector del transformador a la base del
microscopio esteroscópico (D). Ponga en marcha la iluminación del microscopio y regule la
intensidad de la luz. Coloque los oculares (E) en los porta-oculares. Sientese cómodamente y
tome una posición relajada mientras observa a través de los oculares (E).
WF10x 2x / 4x 20x / 40x Brazo fijo
23

24
6.0 Trabajando con el microscopio estereoscópico
• Coloque la muestra bajo el cabezal del microscopio y ajuste la altura del cabezal mediante
el mando de enfoque macrométrico (B).
• Ajuste la distancia interpupilar moviendo (juntando o separando) ambos alojamientos de
prisma (G) hasta que vea una sola imagen.
• Ponga en posición “O” (girando a derecha o izquierda) el ajuste de dioptrías (F).
• Enfoque el objeto por medio del mando de enfoque macrométrico (B).
• Mire primero solo con el ojo derecho y enfoque la muestra con el enfoque macrométrico
(B). Ahora cierre el ojo derecho y mire solo con el ocular izquierdo. Si no ve perfectamente
enfocada la imagen gire el corrector de dioptrías hasta conseguir enfocar la imagen.
7.0 Mantenimiento y limpieza
Siempre coloque el protector de polvo sobre el microscopio después de su uso. Mantenga los
oculares montados siempre en los tubos para evitar que entre polvo en el instrumento.
7.1 Limpieza de los components ópticos
• Cuando las lentes de los oculares estén súcias, se pueden limpiar frotando con
movimientos circulares la superficie con papel de limpieza de lentes.
• Cuando esto no sea suficiente, ponga una gota de xilol o de alcohol en el papel de limpieza
de lentes. Nunca coloque xilol o alcohol directamente en la lente!
• Cuando la suciedad es claramente visible en el campo de vision, es posible que la
suciedad se encuentre en el interior del ocular. Mediante el uso de la llave Allen, el ocular
puede ser retirado del tubo. Limpiar el interior del ocular a ser posible con aire comprimido
(filtrado de aceite).
• En caso de que aún quede polvo visible, comprobar si el polvo está en el ocular girándolo.
Si este es el caso, ha de quitar la lente más baja del ocular con mucho cuidado y limpiarla a
ser posible con aire comprimido (filtrado de aceite).
CUIDADO
Algunos paños de limpieza pueden contener fibras de plástico que pueden dañar el
tratamiento multi-capas de las lentes!
7.2 Mantenimiento del estativo
El polvo puede ser eliminado con un cepillo. En caso de que la base u otros componentes
metálicos estén muy sucios se pueden limpiar mediante productos de limpieza no agresivos.
8.0 Accesorios opcionales
ED.6005 Pareja de oculares HWF5x/16mm. ED.9570 Pinzas sujeta muestras
ED.6015 Pareja de oculares HWF15x/12mm. ED.9950 Platina de vidrio 60mm. diámetro
ED.6020 Pareja de oculares HWF20x/10mm. ED.9956 Platina blanca/negra 60mm. diámetro
ED.6110 Ocular micrométrico HWF10x/20mm. AE.1112 Micrómetro objetivo 50mm/500 partes
ED.6099 Protectores de goma para oculares
<
 Loading...