

TQC Scrub Abrasion and
Washability Tester
(AB6000, AB6010)
Operating Instructions (V1.1 0118)
IMPORTANT! Before taking this instrument
in use we strongly advise you to read this
manual carefully.


3 |
TQC will grant a warranty for a period of 12 months for the TQC Scrub
Abrasion and Washability Tester and 12 months for all related equipment
from the date of delivery in respect of any evidence of faulty workmanship
and materials.
Should a delivered consignment prove to be contrary to contract upon
inspection, the customer shall grant TQC the opportunity hereunder of
removing the fault, or else the customer may demand replacement. Because
of size and weight of the instrument TQC will strive to give remote support.
Should the supply or delivery of any improvement or replacement not prove
possible, the customer may choose between having the purchase price
reduced or in demanding the contract of sale to be rescinded (conversion).
Damage resulting from natural wear and tear, mechanical or chemical
damage, an act of God or non compliance with the operating instructions
shall be excluded from the warranty as well as mechanical interference by
the customer or by third parties with TQC Scrub Abrasion and Washability
Tester and related equipment without TQC’s written permission. No liability
will be accepted for defects, damage or injury caused due to use not carried
out in accordance with the manufacturer’s user instructions.
To claim warranty, the rejected product has to be sent to TQC together with
the original invoice, any exchange before the product has been returned
to TQC is not possible. TQC reserve the right to repair, exchange or supply
an equivalent substitute. TQC is not liable for handling or transport costs.
Warranty on the purchase price is limited, all liability for consequential
damages or changes in technology is expelled.
This product complies to
- Machinery Directive 2006/42 / EC
- Low Voltage Directive 2006/95 / EC
- EMC Directive 2004/108 / EC
This product is RoHS 2 compliant (2011/65/EU)
WARRANTY


5 |
1 General
1.1 Importance of operating manual
1.2 User-responsibility
1.3 Responsibility of personnel
1.4 Dangers
1.5 Designated purpose
1.6 Copyright
1.7 Manufacturer’s/Supplier’s address
2 Safety Instructions
2.1 Meaning of Symbols
2.2 Availability of Safety Information
2.3 Dangers from Electrical Energy
2.4 Modifications to the Equipment
3 Transport and Storage
3.1 Packing
3.2 User: Check on Receipt
3.3 Reporting Transport Damage and
Documentation
3.4 Storage and Protective
Measures when not in use
4 Instrument Data
4.1 Name / Article
4.2 Scope of Supply
4.3 Technical Data
4.4 Dimensions and Weight
4.5 Basic Unit
5 Instrument Controls and Functions
5.1 Instrument Layout
5.2 Connecting a Mouse and Keyboard
6 Instrument Preperations
6.1 Installation
6.2 Tool Holders and Tools
6.3 Fluid Tubes
7 Navigation
7.1 Menu
7.2 Number Input
7.3 Text Input
8 Operation
8.1 Starting the Instrument
8.2 Run
8.2.1 Run
8.2.2 Manual Movement
8.3 Run Setup
8.3.1 Manual
8.3.2 Alarms
8.3.3 Pumps
8.3.4 Custom Presets
8.3.5 New Custom Preset
8.3.6 Standard Presets
8.3.7 Select Length
8.3.8 Test Positioning
8.3.9 Flush System (AB6000 only)
9 Instrument Setup
9.1 Instrument Setup Menu
9.2 Units
9.3 Alarms
9.4 Display Brightness
9.5 System Information
9.6 Reset
10 Mechanical
10.1 Test Beds
10.2 Sample Clamp Frames
10.3 Tool Holders
10.4 Tools
10.4.1 Small Sponge (AB5012)
10.4.2 Wild Boar Brush (AB5010)
10.4.3 Nylon Brush (AB5011)
10.4.4 Abrasive Pad Tool (AB5013)
10.4.5 Universal Material Clamp (AB5020)
10.4.6 MEK / Crockmeter Tool (AB5060)
10.4.7 Large Sponge Tool (AB5050)
10.4.8 TQC Cloth Holder (AB5055)
10.4.9 Metal Shim (AB5025)
10.4.10 Glass Bed (AB5180)
10.4.11 Heavy Weight Support Tool (AB5032)
10.4.12 Tubing (AB5115 and AB5113)
11 Care and Maintenance
11.1 Disposal of Materials
11.2 Customer Service
12 Disclaimer
Annex A Standards Conguration Table
Annex B Chemical Resistance
Annex C Operator Qualication List
Annex D Maintenance List
6 21/22
23/27
28
29
30/31
32/43
45
47
7
8
9
10/11
12
13
14/20
INDEX

| 6
1.1 Importance of operating manual
This manual is written in order to become familiar with all the functions and
possible applications of the instrument. It contains important instructions
about how to use the instrument safely and economically; according to
the purpose designated. Following these instructions is not only essential
to avoid risks. It also reduces repair costs and down-time and increases the
products reliability and service-life.
Anyone who works with the instrument shall follow the instructions in this
manual, particularly the safety related instructions. Additionally local rules
and regulations relating to environmental safety and accident prevention
should be observed. It is mandatory that users have read and understand
this manual prior to first operation of the TQC Scrub Abrasion and
Washability Tester.
1.2 User-responsibility
The user should
a) Only allow persons to work with the instrument who are
familiar with the general instructions on how to work safely and
to prevent accidents. The use of the instrument should have been
instructed duly.
b) Regularly check the safety-awareness of personnel at work.
1.3 Responsibility of personnel
Before commencing work anyone appointed to work with the instrument
should pay attention to the general regulations relating to working safety
and accident prevention. The safety chapter and the warnings in this manual
should have been read and understood
; acknowledged as evidenced by
their signature as can be placed in the Operator Qualification list Annex C.
1.4 Dangers
This instrument has been designed and constructed in accordance with
state-of-the-art technology and the acknowledged safety regulations.
Nevertheless, working with the instrument could cause danger to the
life and health of the operator or to others, or damage to the instrument
or other property. Therefore the instrument should only be used for its
designated purpose, and in a perfect technical condition. Any defect that
could have a negative effect on safety should be repaired and recorded.
1.5 Designated purpose
TQC Scrub Abrasion and Washability Tester is exclusively designed to
perform washability tests of painted and coated test panels as described
within the specifications. TQC will not be held liable for damage resulting
from improper use.
Designated purpose also includes properly observing all instructions in the
operation manual, and adherence to inspection and maintenance
schedules. TQC is entitled to request these form when warranty claims are
made and during inspections to ensure safe operation and evaluate correct
usage.
1.6 Copyright
The copyright of this operating manual remains with TQC. This operating
manual is intended solely for the user and his personnel. Its instructions
and guidelines may not be duplicated, circulated or otherwise passed on to
others, neither fully, nor partly. Infringement of these restrictions may lead
to legal action may be taken if this restrictions are infringed upon.
1.7 Manufacturer’s/Supplier’s address
TQC – Molenbaan 19
2908 LL Capelle aan den IJssel
The Netherlands
T +31(0)10 7900 100
F +31 (0)10 7900 129
1 GENERAL

7 |
2.1 Meaning of Symbols
The following symbols for dangers are used in this instruction manual.
2.2 Availability of Safety Information
The instruction manual should be kept in proximity to where the instrument
operates and should be visible and accessible at any time of operation.
In addition to the information contained in the instruction manual, general
and local regulations for accident prevention and environmental protection
shall be kept available and observed. Always ensure all guidelines in respect
of safety and dangers on the instrument are in readable condition.
In case of danger the instrument has to be switched off by means of the on /
off switch at the left back side of the instrument or by unplugging the mains
power, then the danger should be eliminated.
2.3 Dangers from Electrical Energy
• Work on the electrical supply may only be done by a qualified electrician.
• The electrical equipment of the instrument must be checked regularly.
Loose connections and cables damaged by heat must be corrected
immediately.
• Always make sure the instrument’s power is turned off while adjusting any
electrical component.
Make sure that no paint or other liquids are spilled on the
electronics
2.4 Modications to the Equipment
• Any modifications or additions or alterations to the instrument may solely
be made with permission from the manufacturer otherwise the warranty
will be void.
• Instruments which are not in fault-free condition must immediately be
switched off
• Only use replacement parts from the original supplier. Parts used from
other sources aren’t guaranteed to take the loading and meet the safety
requirements.
Possible immediate
danger to the life or
health of personnel.
If this guideline is not noted
it can lead to severe danger
to health, up to fatal injury.
A dangerous situation
could be caused.
Non observance of this
guideline can lead to injury
or to damage to equipment.
Special tips and
particular information.
Guidelines to make optimal
use of the instrument.
2 SAFETY INSTRUCTIONS

| 8
3.1 Packing
• Please take note of pictorial symbols on the packing.
• Check for transport damages. If the packaging is damaged only accept it
with a written approval of the transporter that the package was damaged.
3.2 User: Check on Receipt
• Check packing for damage
• After unpacking check complete supply.
3.3 Reporting Transport Damage and Documentation
• Any damage should be documented as accurately as possible (possibly
photographed) and reported to the relevant insurers or, in the case of sales
“delivered to customers works”, to the supplier.
3.4 Storage and Protective Measures when not in use
• The instrument must be stored in a dry place at a temperature
between 10 - 40˚C / 50 - 104˚F.
• If packing is damaged upon receipt immediately inform the forwarder and
make a note on the packing list and have it signed by the forwarder. Ideally
make some pictures of the damage as well.
• Store instrument in the original packing if possible.
3 TRANSPORT AND STORAGE
9 |
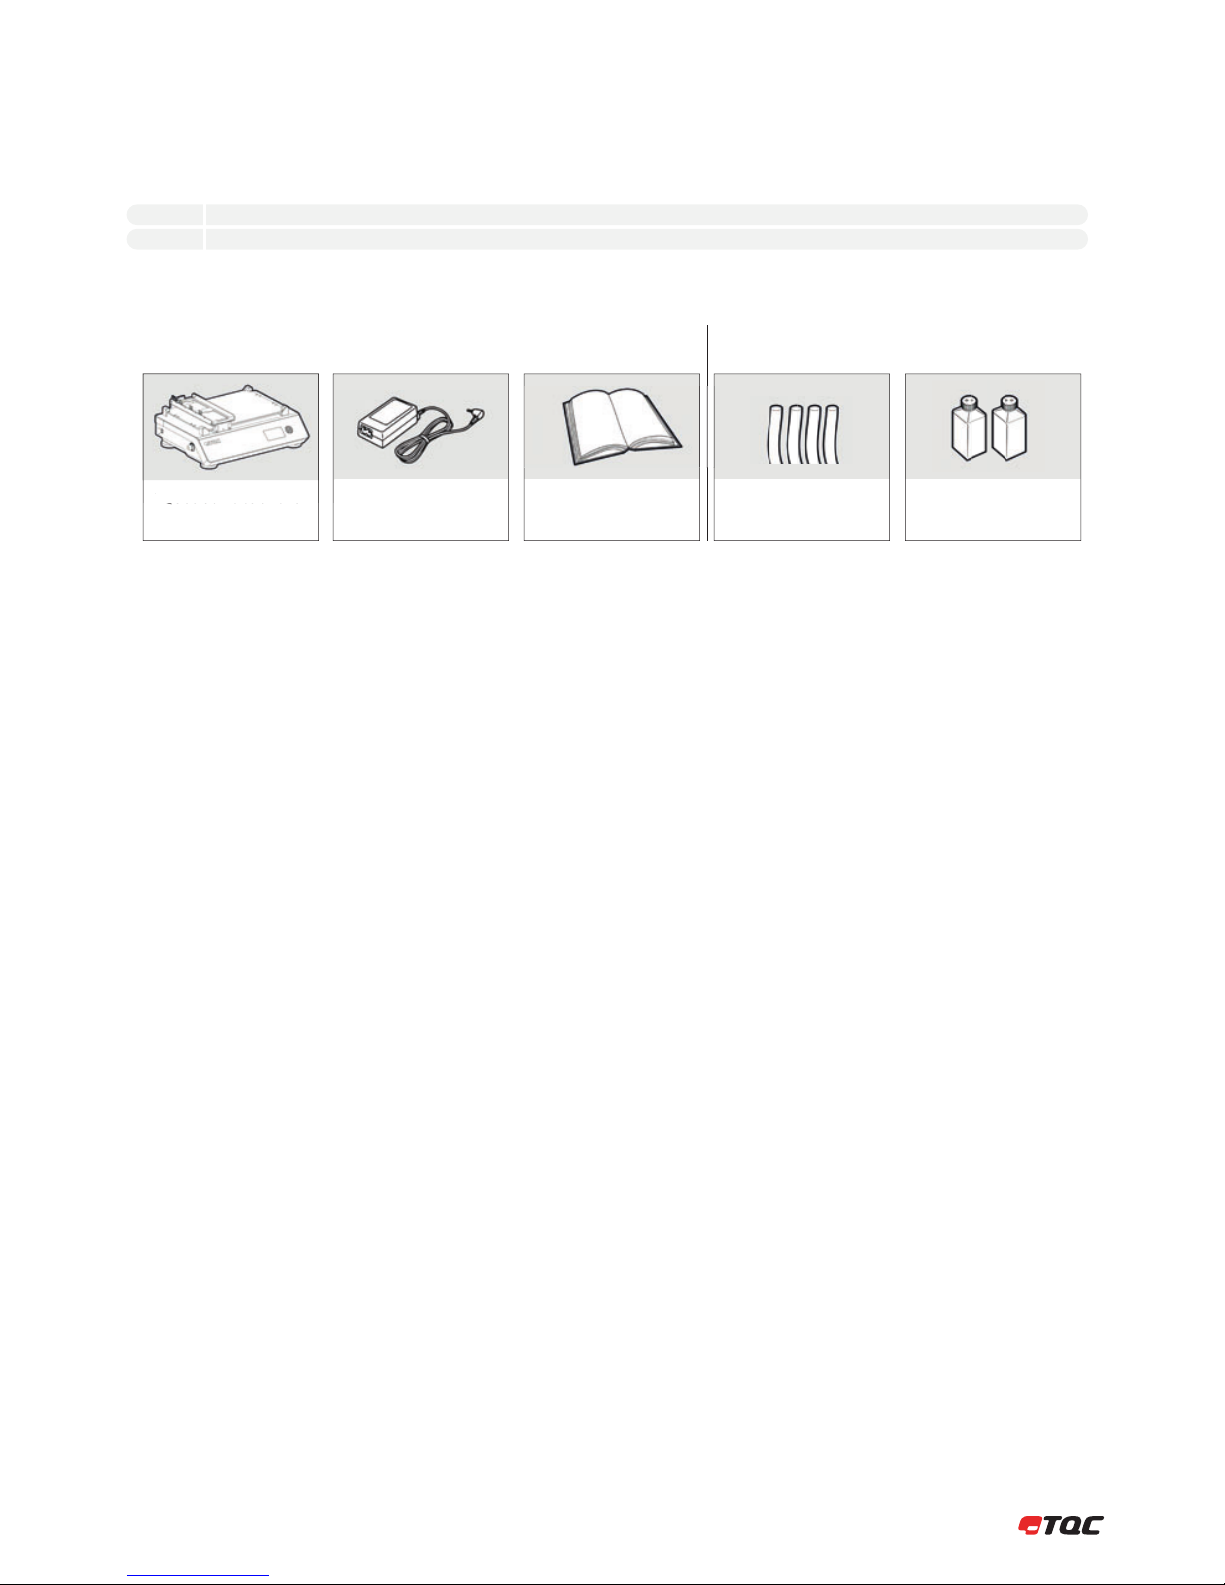
4 INSTRUMENT DATA
TQC Scrub Abrasion and
Washability Tester
24 V Adapter +
Power Cable
Manual Tubing
Fluid Containers
Standard supplied Only supplied with AB6000
4.3 Technical Data
Traverse speed: 1 - 60 cycles per minute
Traverse speed accuracy: + / - 1% of set speed
Stroke length: 20 - 300 mm / 0.39 - 11.81 in
Stroke length accuracy: + / - 0.01 mm
Pump flow rate: 0.0 - 3.0 ml per minute / 0.0 - 0.79 GPH
Max. panel width: 70 mm
Max. panel length: 350 mm
Max. panel height: 35 mm
4.4 Dimensions and Weight
Depth: 490 mm / 19.3 in
Depth with pumps: 530 mm / 20.87 in
Width: 640 mm / 25.2 in
Height: 235 mm / 9.24 in
Weight: 30 - 35 kg / 66.14 - 77.16 lbs (depending on model)
4.5 Basic Unit
Power Supply: 24 VDC / 100 - 240 V / 50 - 60 Hz
Power consumption: max. 90 Watt
Display: 480 x 272 pixel TFT display
Control: 5-key navigation switch
(Mouse Keyboard optional)
Menu languages: English, Spanish, Chinese, Polish, German, French,
Italian, Japanese, Russian, Turkish
4.1 Name / Article
AB6000 TQC Scrub Abrasion and Washability Tester
AB6010 TQC Scrub Abrasion and Washability Tester Basic
4.2 Scope of Supply
| 10
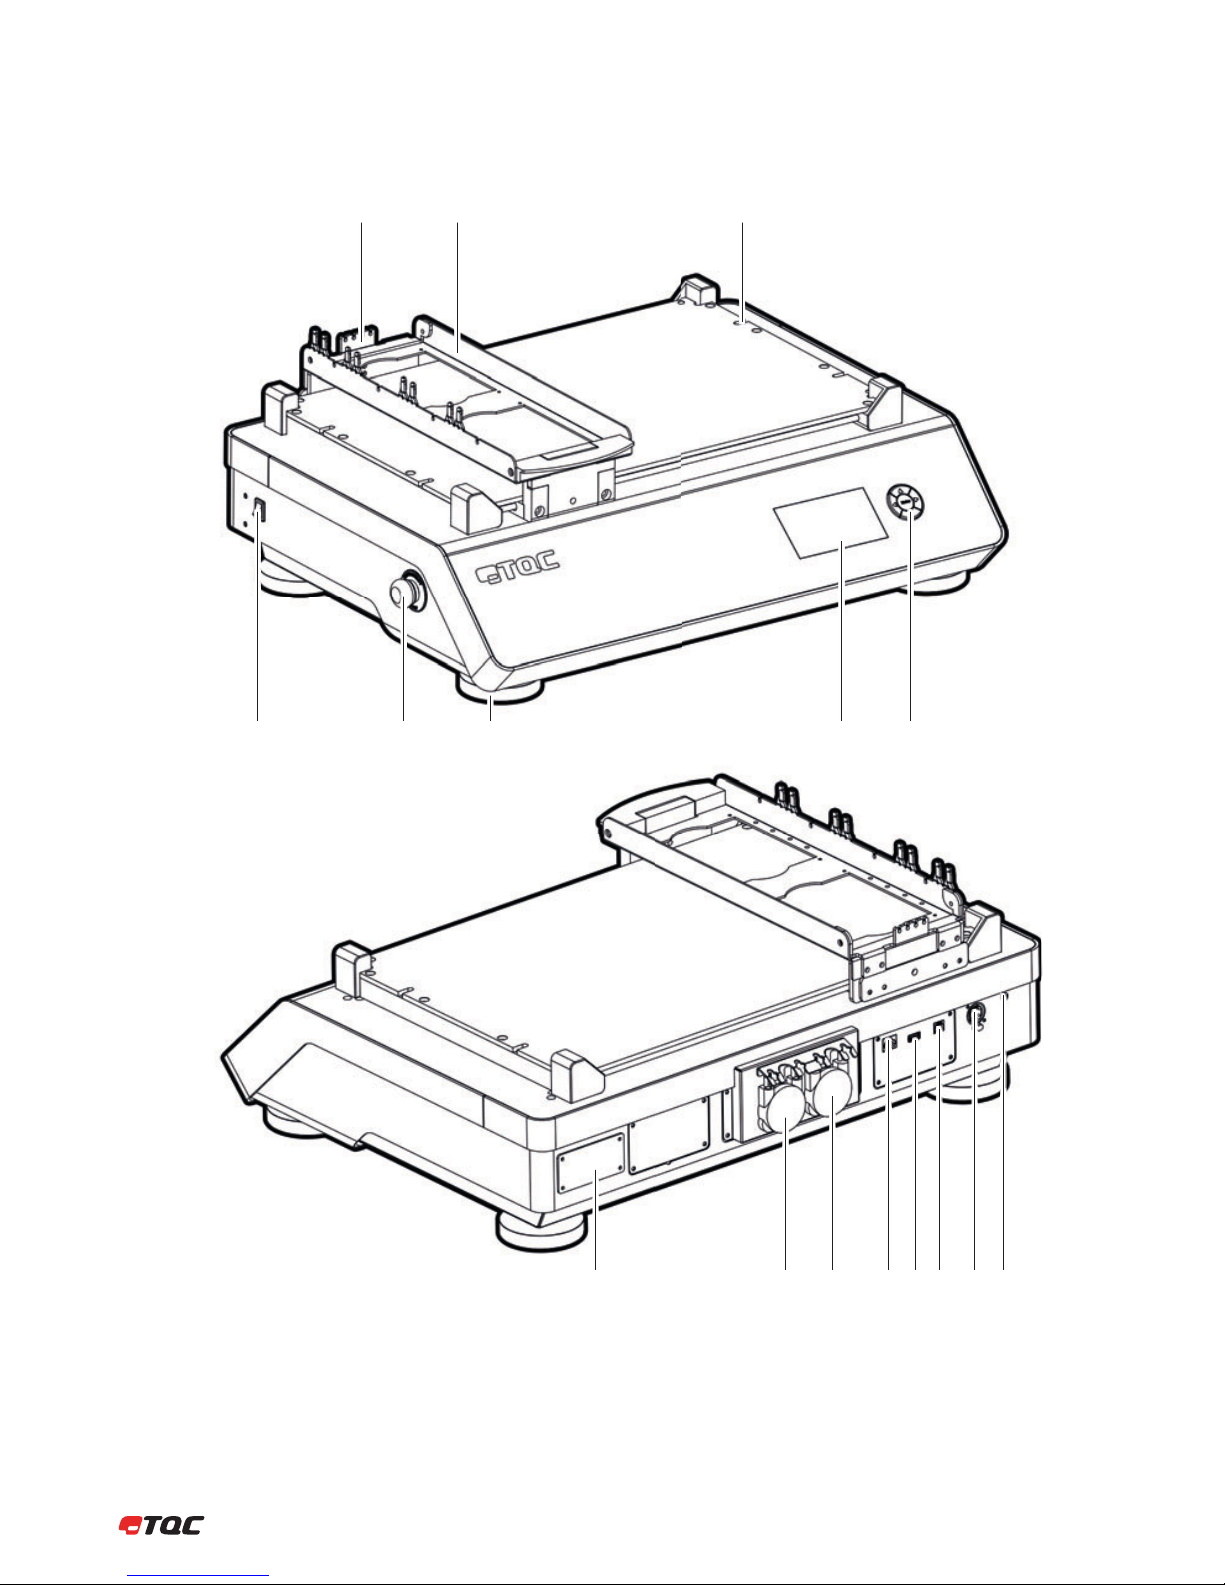
5 INSTRUMENT LAYOUT AND FUNCTIONS
Tube Holder
Tool Carrier
Fixture Screws
Power Switch
Emergency Button
Adjustable Feet
Full Color Display
5-key Navigation Switch
5
6
7
8
9
10
11
12
13
14
15
16
1
2
3
4
Machine ID-Tag
Pump AB
Pump CD
Ethernet
USB-A
USB-B
TQC Bus
Power Entry
45
910111213141516
678
12 3
5.1 Instrument Layout
11 |
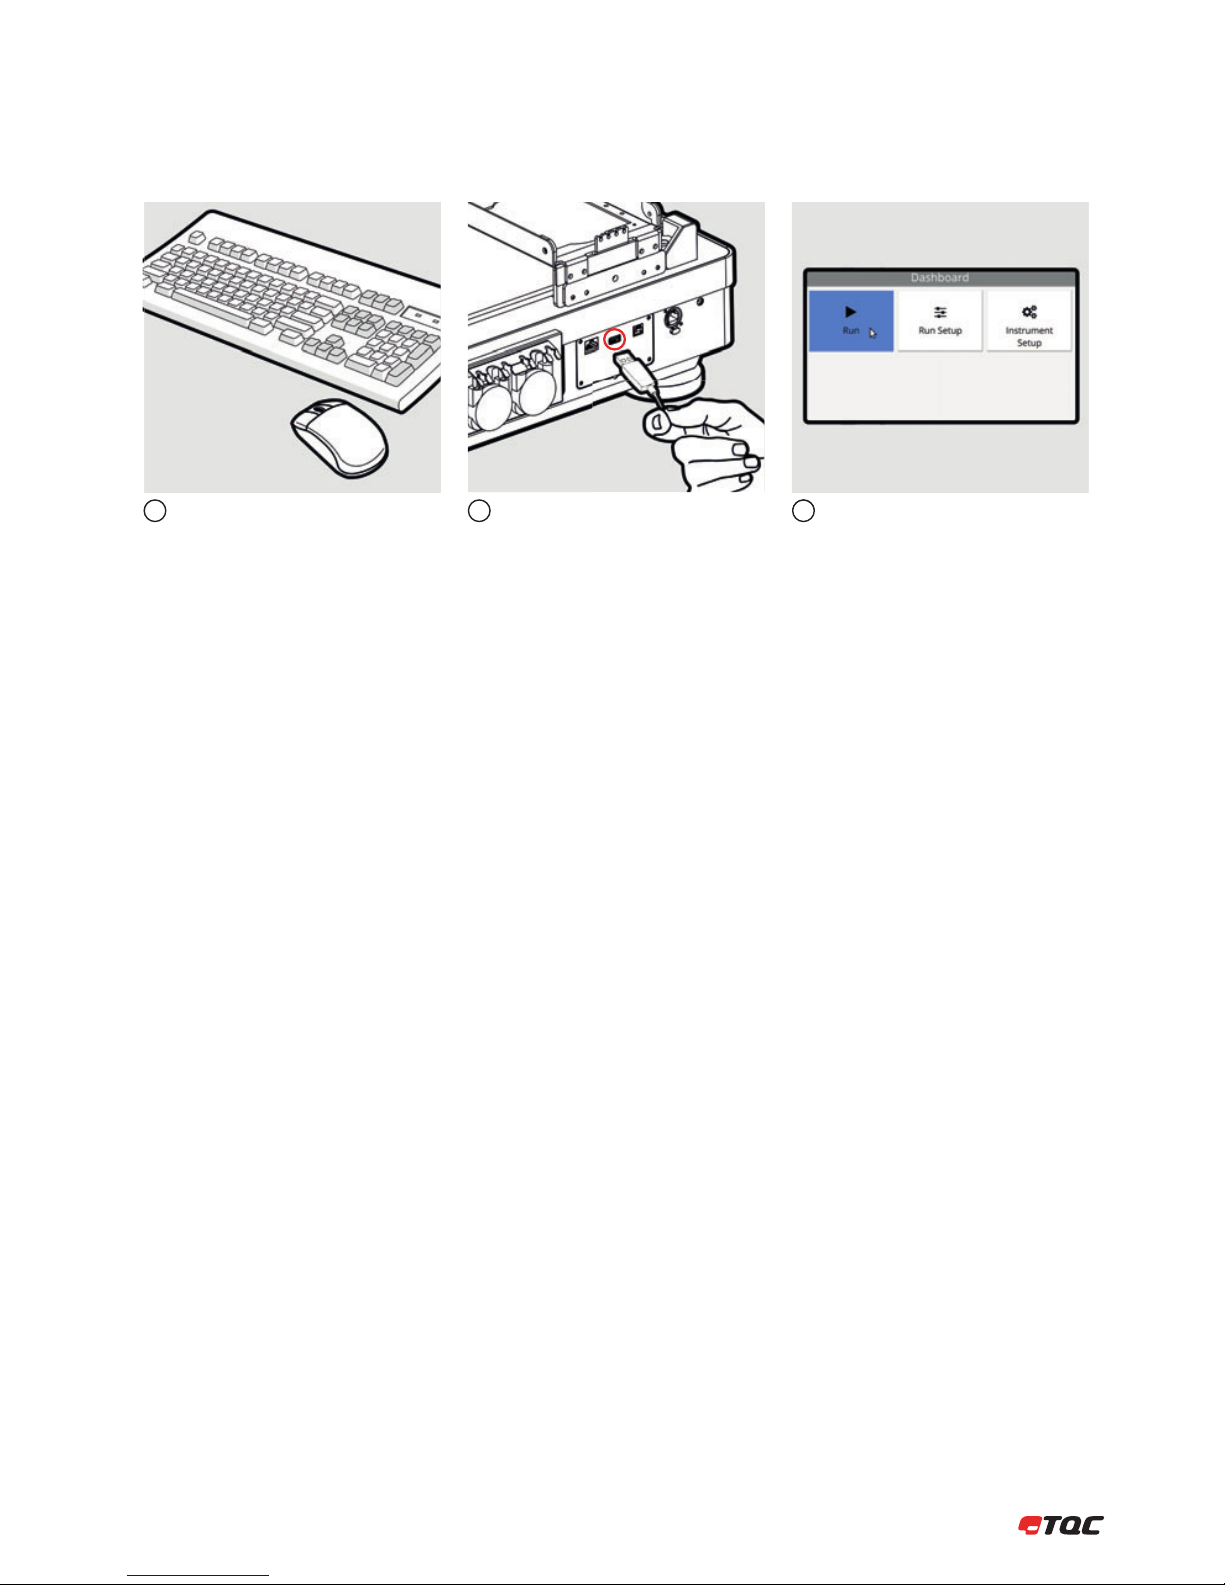
5.2 Connecting a Mouse and Keyboard
The instrument can also be controlled by a
mouse and/or keyboard.
Connect the mouse and/or keyboard to the
USB-A port at the back of the instrument.
Clicking the left mouse button behaves the
same as the OK button. (Not all input fields
can be controlled by a mouse.)
123
| 12
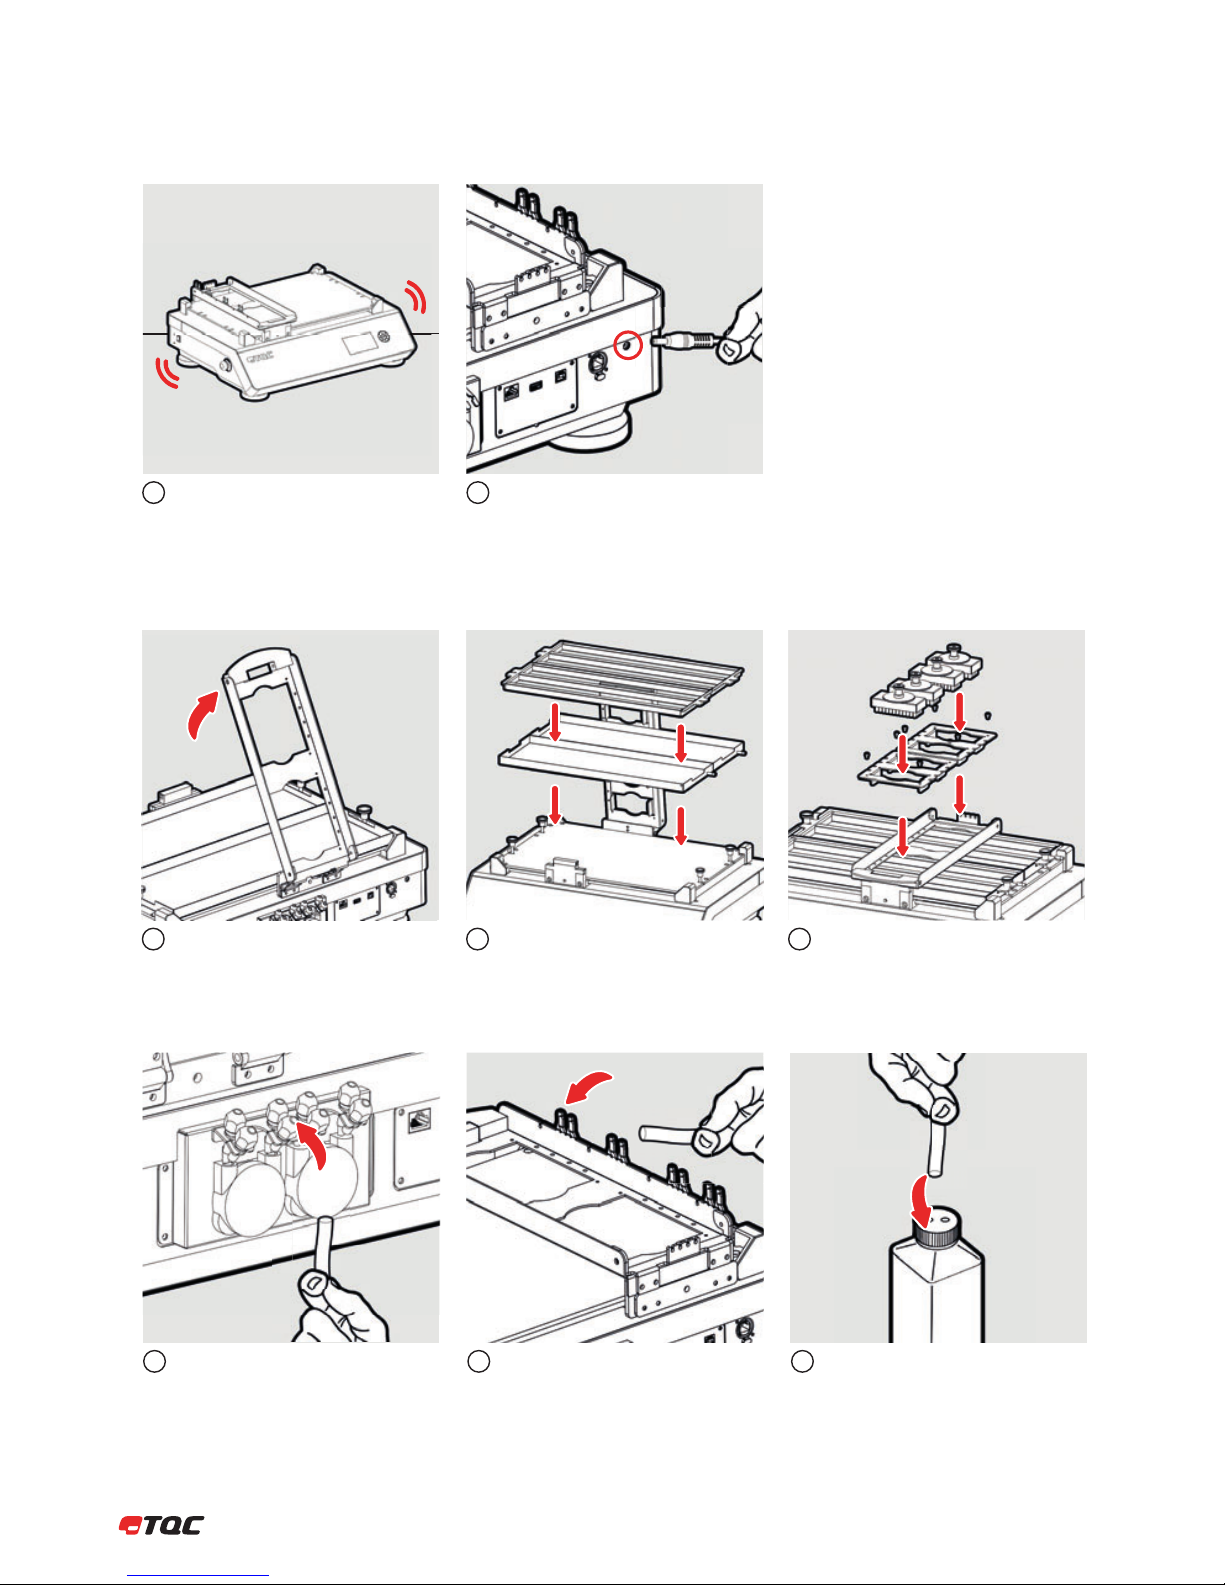
6 INSTRUMENT PREPARATIONS
The instrument has to be installed on a
sturdy table or work area.
Lift the Tool Carrier.
Connect the power cable to the machine
and a wall socket.
Place the Test Beds and the Sample Clamp
Frames. Then close the Tool Carrier.
Place the Tool Holders first, then place the
Tools.
1
1
2
23
6.1 Installation
6.2 Tool Holders and Tools
6.3 Fluid Tubes
Mount the tubes in the bracket on the Tool
Carrier and place the correct tube at each
channel.
Connect the IN tubes from the pumps to
the fluid containers.
23
Connect the tubes to the fluid pumps. The
channels are marked on bracket.
1
13 |
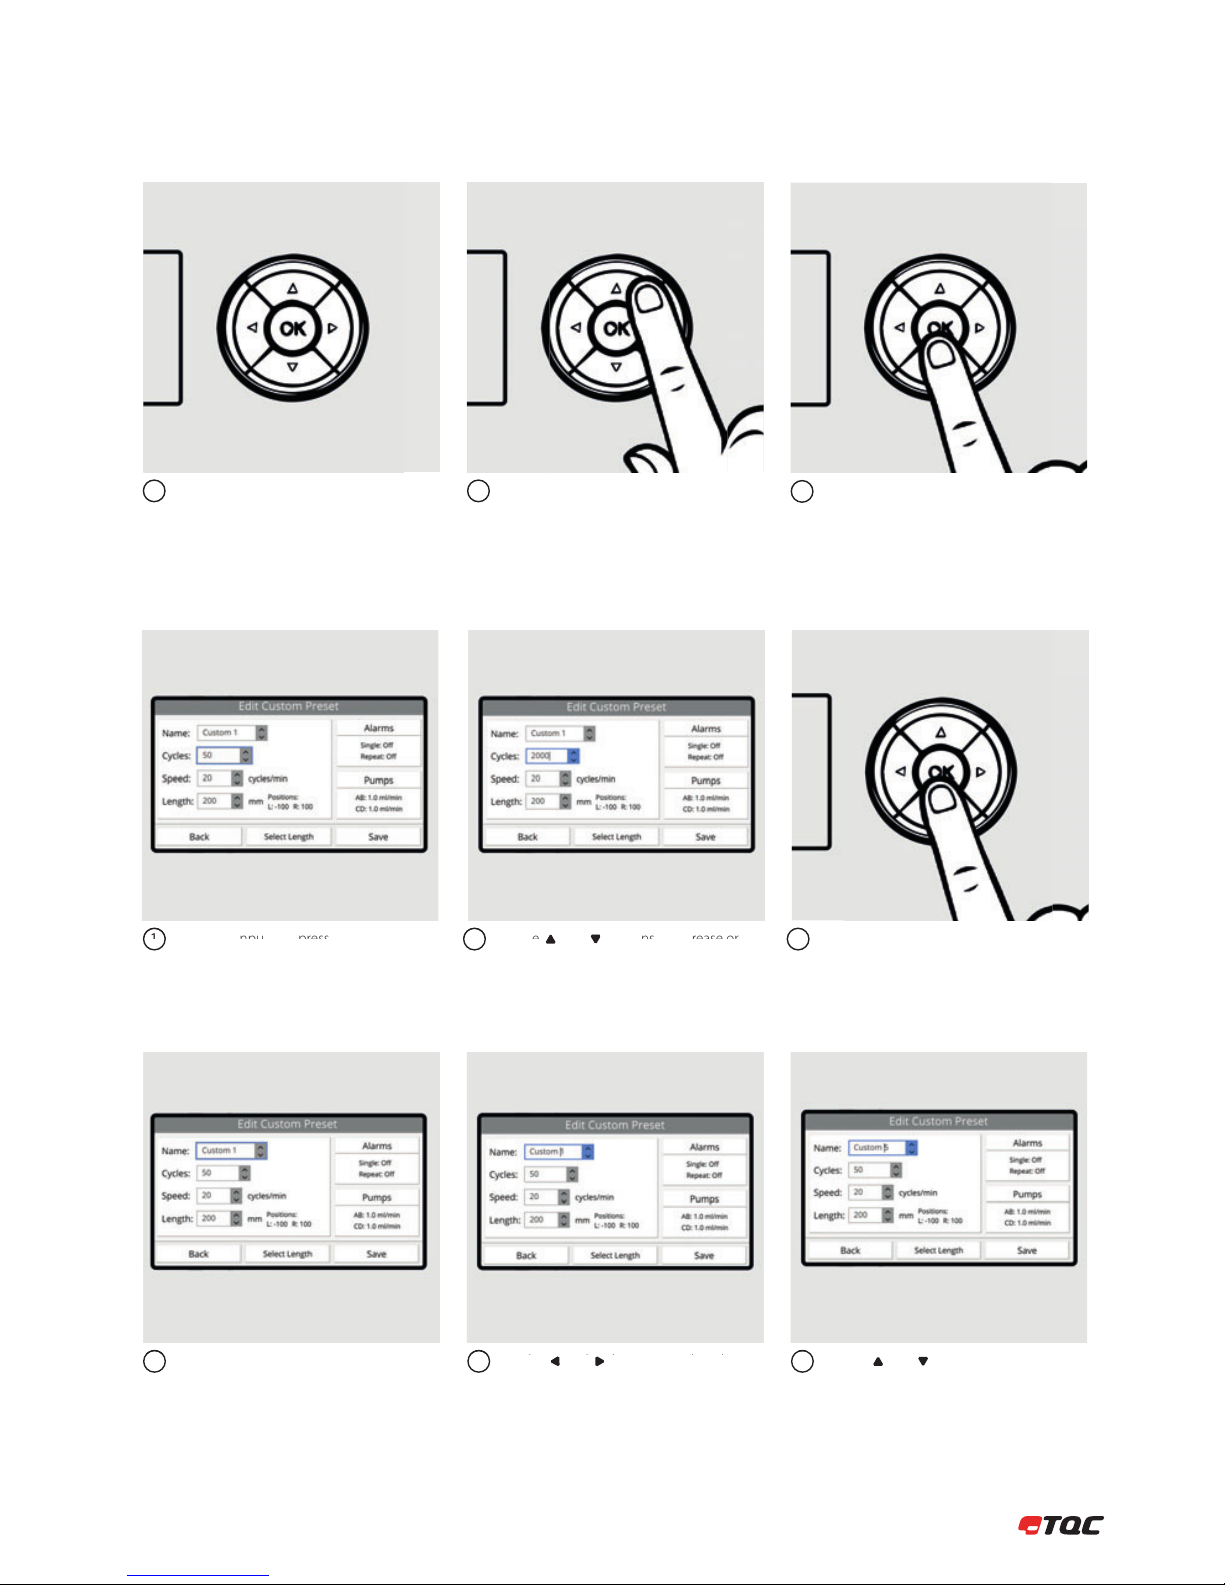
7 NAVIGATION
Use the 5-key button to navigate through
the interface. Red lights in the 5-key button
indicate possible actions for the selected
button.
You can change the selected button by
pressing the arrows on the 5-key button.
12
To confirm the selected button, press OK on
the 5-key button.
3
Select the input and press OK to edit the
value.
Use the and buttons to increase or
decrease the value. Hold the button to
increase or decrease in bigger steps.
Use the and buttons to select the
character.
Use the and buttons to change the
character.
Press OK to stop editing.
12
23
3
Select the input and press OK to edit the
value.
1
7.2 Number Input
7.1 Menu
7.3 Text Input
| 14
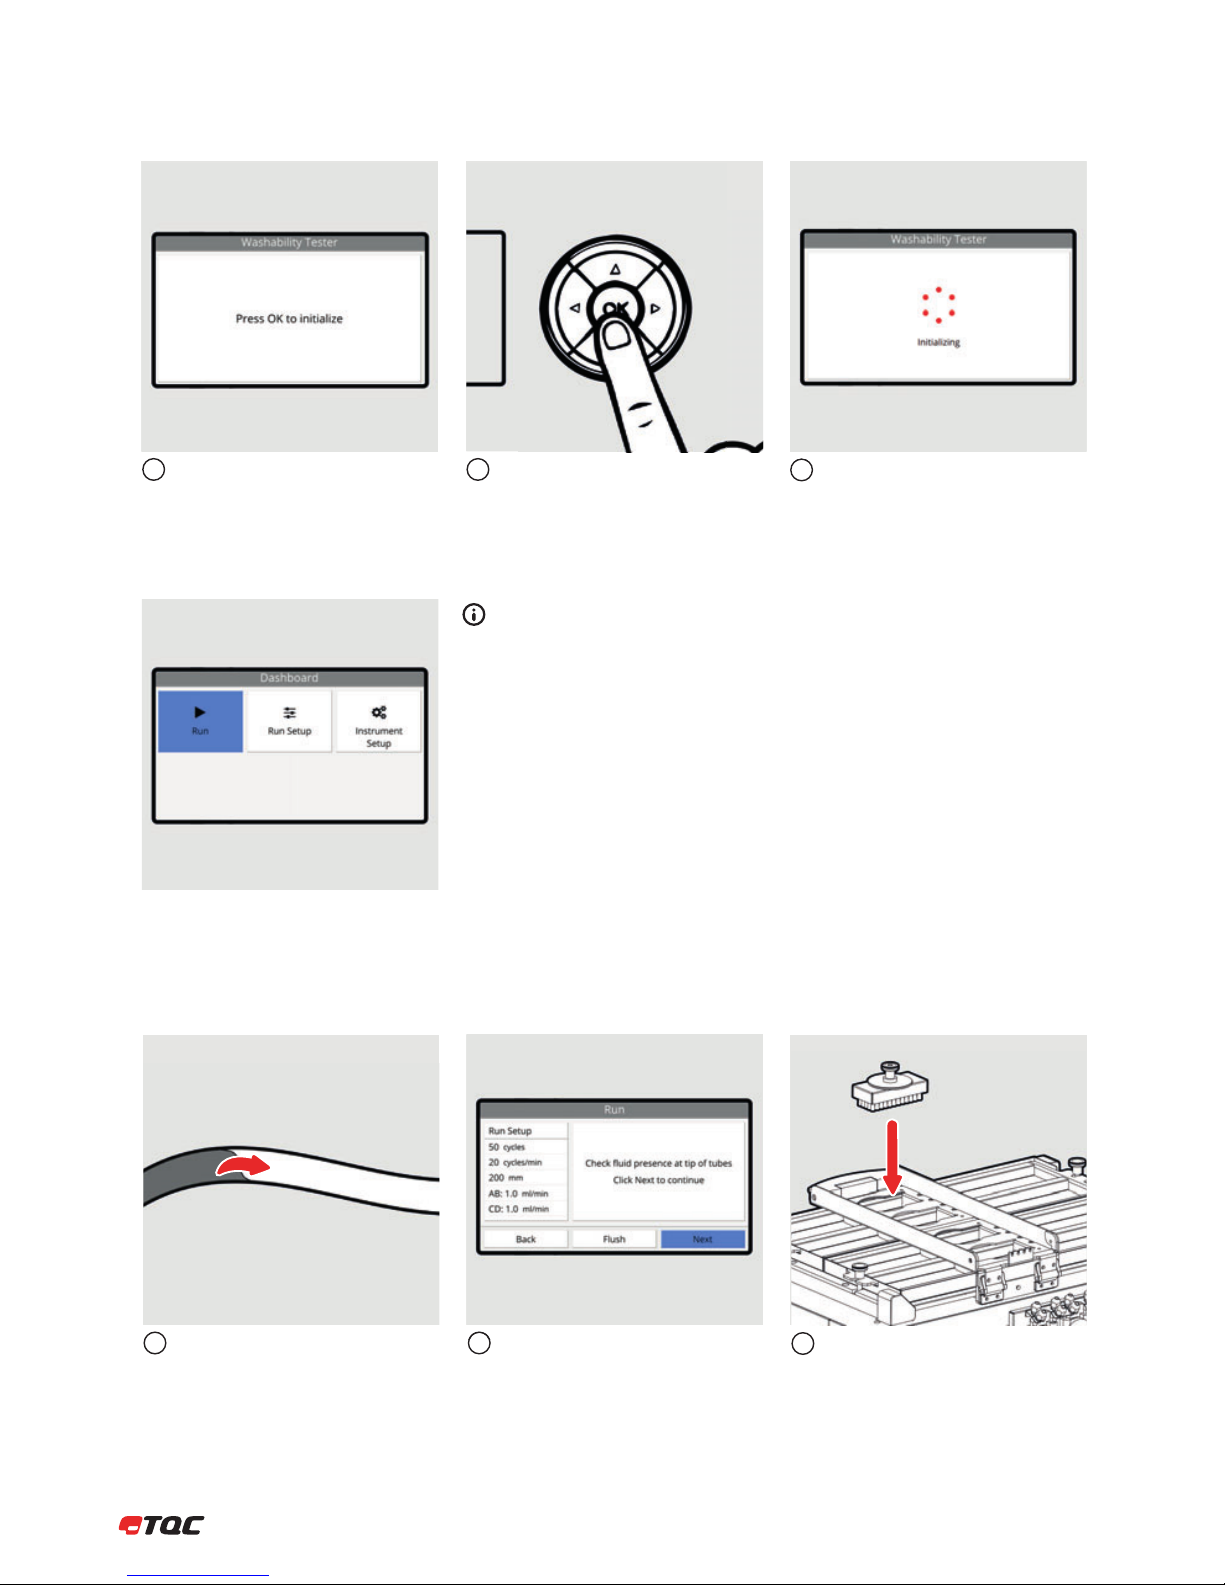
8.1 Starting the Instrument
8 OPERATION
Press OK to initialize the instrument.This screen will be displayed after turning
on the instrument.
The instrument will check the system
for any errors and the Tool Carrier will be
calibrated.
12
Run
Click to start a new run.
Run Setup
Run related settings.
Instrument Setup
All instrument related settings.
3
Check fluids presence at tip of tubes.
(AB6000 only)
Follow the instructions on the display.
12
Place and secure tools.3
8.2 Run
8.2.1 Run
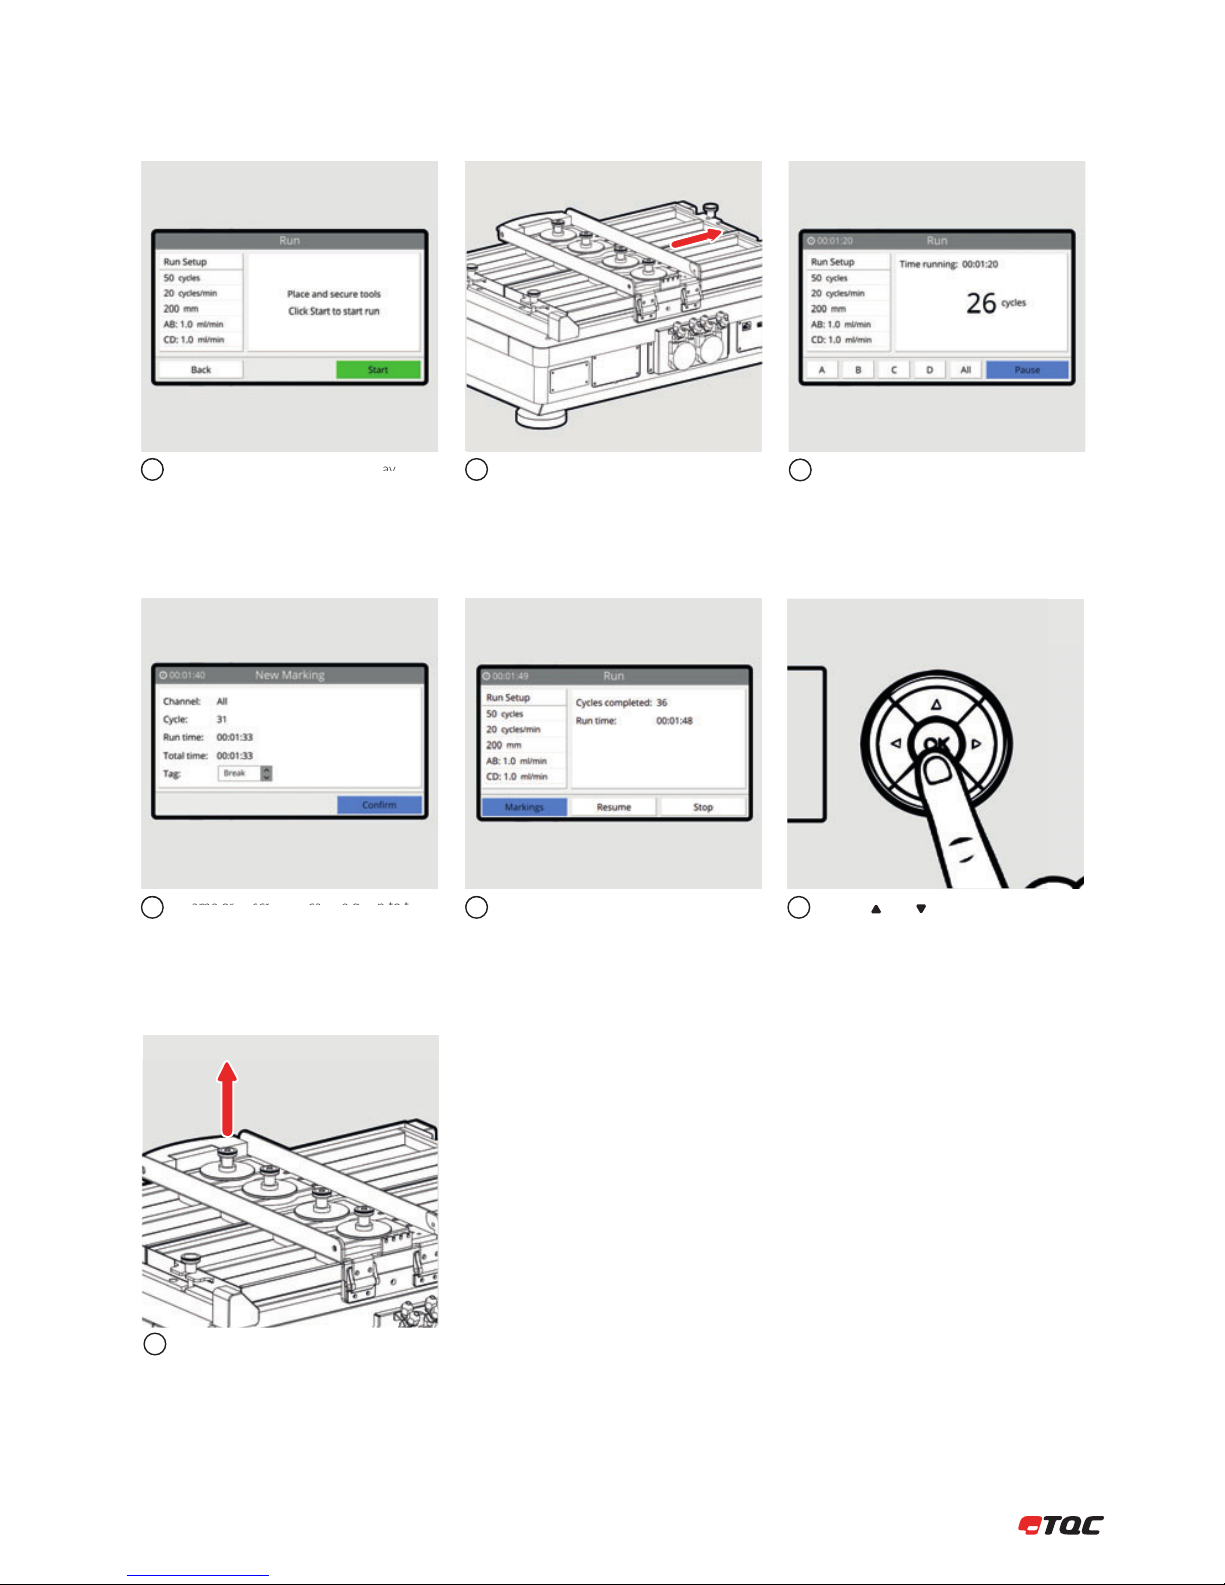
15 |
Follow the instructions on the display.
A name or description can be given to the
marking. Click Conrm to save the marking.
The Tool Carrier will now move. Stay clear
from moving parts!
4
7
5
89
Click A, B, C, or D to mark a single channel
at current cycles/time. Click All to mark all
channels at current cycles/time. Click Pause
to temporarily stop the test.
Click Markings to view all markings of the
current run. Click Resume to continue the
run. Click Stop to stop the run.
Use the and buttons to scroll through
the list of markings. Click Clear to erase all
current markings.
6
Tools may be removed when the Tool
Carrier has stopped moving.
10

| 16
8.2.2 Manual Movement
See steps 1 – 4 from chapter 8.2.1.
8.2.1.
Click Move Stroke to move the Tool Carrier
a single stroke. (from Left to Right or Right
to Left, depending on set Start Position)
12
Click Move Cycle to move the Tool Carrier a
single cycle.
3
Click Stop to stop the run.
4
Tools may be removed when the Tool
Carrier has stopped moving.
5
Run settings are set in Manual, Custom or
Standard. The red checkmark indicates the
active setup.
Click to set the movement start position to
Left or Right.
12
8.3 Run Setup
Run Setup
St
op
to sto
he run
.
4

17 |
Set the speed and length.
Click Alarms to configure the alarms
settings. Click Pumps to configure the
pumps settings. (AB6000 only)
If uncertain about the left and right
position, use Select Length to determine
the positions. See 8.3.7.
123
8.3.1 Manual
Click Select to use the manual setup.
Enable Manual Movement for manual
control of the Tool Carrier in a run.
45
Manual
Manual Movement
Instead of automatic movement, the user
can move the Tool Carrier a single stroke or
cycle by the click of a button. See 8.2.2 for
more information.
Single alarm will make a sound once at set
number of cycles. Enable Stop at alarm
to stop the Tool Carrier when an alarm is
triggered.
Repeat alarm will make a sound at set
interval.
Click Back to save the alarm settings.
123
8.3.2 Alarms
Ala

| 18
Enable or disable a pump.
Set the flow rate speed. Click Back to save the pumps settings.
123
8.3.3 Pumps
Click New to create a new custom preset.
Click to edit the selected preset.
Click to delete the selected preset.
The selected preset’s settings are listed on
the right.
12
Click Select to use the selected custom
preset.
3
8.3.4 Custom Presets
Similar to Manual, set the A, B, C, and D.
A name can be given to the custom preset.
Click Alarms to configure the alarms
settings. Click Pumps to configure the
pumps settings. (AB6000 only)
12
Click Save to save the new custom preset.
The new preset will be listed in the Custom
Presets menu.
3
8.3.5 New Custom Preset

19 |
Predefined presets according several
standards.
Click Select to use the selected standard
preset.
Click to edit the number of cycles.
123
8.3.6 Standard Presets
Move the tool carrier by using
the and buttons. Make sure the Tool
Carrier can move freely.
Click Set Left Position to set the current
position as left position.
12
Click Set Right Position to set the current
position as right position.
3
8.3.7 Select Length
Use the and buttons to move the
Tool Carrier. Left and Right position for
irregular test objects can be determined.
1
8.3.8 Test Positioning
Standard Preset
s

| 20
Click Flush Both to start both fluid pumps.
Click Flush Pump AB or Flush Pump CD to
start one of the pumps.
12
Click Back to return to the Run Setup menu.
Active pumps will be stopped.
3
8.3.9 Flush System (AB6000 only)
yy

21 |
This menu contains all instrument related
settings and information about the system.
Select the desired language and click Back
to change the systems language.
12
Click Length to set the length unit. Options
are: Millimeter, Centimeter or Inch.
Click Flow to set the flow unit. Options are:
Millimeter per second or Gallons per Hour.
(AB6000 only)
12
9.2 Units
9.1 Instrument Setup Menu
9 INSTRUMENT SETUP
9.3 Alarms
O
Alarms will make no sound.
Single
Alarms will make a sound once.
Repeat
Alarms will repeat a sound, until turned off.
p
9.3 Alarm
s

| 22
Use the and buttons to change the
brightness level of the display.
Click Back to save the brightness level.
12
Information about the instrument is listed
here. When requesting support, always
provide the serial number and the versions.
(Versions may be different than listed here.)
Information about updating the system will
be given when an update is released.
Click Reset to reset presets.
123
9.5 System Information
9.4 Display Brightness
Click Reset Custom Presets to remove all
custom presets.
Click Reset Standard Presets to set the
standard presets to their default values.
Warning: this action cannot be reversed.
Saved presets will be lost.
12
9.6 Reset
y

23 |
The TQC Scrub, Abrasion and Washability Tester can be supplied with
2 types of test beds. Either one AB5176 covering the full width of the
machine or one or two AB5196, covering either half the width or the full
width.
Placement
Dependent on the model either two narrow or one wide test bed is placed
flat on the top plate of the Washability tester.
AB6000 and AB6010 can be used without the test beds when used for dry
abrasion testing. Following rules have to be applied:
- The sample shall not protrude from the test bed.
- The sample shall be positioned such that it will not move.
- The sample shall not block any of the movement of the TQC Scrub
Abrasion and Washability Tester.
In order to hold samples down the TQC scrub, abrasion and washability
tester shall be equipped with one of the following sample clamp frames.
These can be used on both test bed models AB5196 and AB5176. The total
machine can contain two frames at a time.
Placement
The sample frames are with the indentation on each side up such that
they can be fixed using the fixture screws of the TQC Scrub Abrasion
and Washability Tester. The Rubber seals beneath the clamping frames
are made out of Viton rubber. The chemical resistance of this rubber is
expressed in annex B.
The TQC Scrub, Abrasion and Washability Test is equipped with a universal
traverse as of 01-04-2016. Earlier models have a standard configurated
traverse containing tool holders equal in function to AB5041. Models
after 01-04-2016 have a configurable traverse allowing for a flexible
arrangement of the tools. The tool holders are linked to the tools in use
and the frames that are used. Please use the online Ordering Matrix to
select the proper tool holder in correlation to the clamping frame and tool
in use. The shown models are available and all have the same installation.
Placement
Place the tool holder in the designated part of the traverse and secure
it with the 4 screws supplied with each tool holder. Always make sure
the tool holder is properly secured with the guides for the tools facing
downward.beneath the clamping frames are made out of Viton rubber.
The chemical resistance of this rubber is expressed in annex B.
AB5196
Dimensions: 480x165x18 mm
ABAB5045
AB5041
AB5043
AB5176
Dimensions: 480x330x18 mm
AB5197
AB5042
AB5044
10.1 Test Beds
10.2 Sample Clamp Frames
10.3 Tool Holders
10 MECHANICAL
pp
T
T
AB519
7

| 24
The TQC Scrub, Abrasion and Washability Tester can be supplied with a wide range of tools. These tools are all selected and produced with the greatest care.
Please see the Ordering Matrix to select the correct tool for the appropriate standard. You can download the Ordering Matrix at
www.tqc.eu/en/product/tqc-scrub-abrasion-and-washability-tester/ under the tab documents.
10.4 Tools
The small sponge holder is supplied ready for use.
The sponge is a gentle tool to test the washability
of the coating. Often used for cleanability tests of
for example wall paints.
Placement
The AB5012 sponge tool is placed in the AB5042
or AB5041 holder and needs to fit comfortably in
the holder. The tool must be able to move freely
without friction in the holder. Always position
the tool facing the same way, to create the best
homogeneity in results. For replacement intervals
check the appropriate standard.
Scope of supply:
• Sponge
• Sponge Holder
• Weight 60 g / 0.13 oz
• Weight 100 g / 0.22 oz
• Fixation Screw
Specications Sponge Tool Complete
Mass: 508 g / 17.92 oz
Standards: ASTM D4213-92, ASTM D4828
Specications Sponge Tool Holder
Material: Stainless steel
Inner dImensions: 92x41 mm
Outer dimensions 94x43 mm
Scope of supply
• Wild boar brush
• Brush holder
• Weight
Specications Wild Boar Brush Tool Complete
Mass: 250g/8.82oz
Standards: DIN 53778
Specications Brush Holder
Inner dimensions: 92x41 mm
Outer dimensions: 94x43 mm
Material: Stainless steel
Specications Wild Boar Brush
Material: Wild boar hair
Mass: 60 g / 0.13 oz
Scope of supply
• Nylon brush
• Brush holder
• Weight 60 g / 0.13 oz
• Weight 100 g / 0.22 oz
• Fixation screw
Specications Nylon Brush Tool Complete
Mass: 454 g / 16.01 oz
Standards: ASTM D2486
Specications Brush Holder
Material: Stainless steel
Inner dimensions: 92x41 mm
Outer dimensions: 94x43 mm
The wild boar brush holder is supplied ready for
use. The brush is used to test scrub resistance of
coatings. The brushes are not worn in. This needs
to be done on the machine of the user.
Placement
The AB5010 Wild boar hair tool is placed in
the AB5042 or AB5041 holder and needs to fit
comfortably in the holder. The tool must be able
to move freely without friction in the holder.
Always position the tool facing the same way,
to create the best homogeneity in results. For
replacement intervals check the appropriate
standard.
The nylon brush brush holder is supplied ready
for use. The brush is used to test scrub resistance
of coatings. The brushes are not worn in. This
needs to be done on the machine of the user.
Placement
The AB5011 nylon brush tool is placed in the
AB5042 or AB5041 holder and needs to fit
comfortably in the holder. The tool must be able
to move freely without friction in the holder.
Always position the tool facing the same way,
to create the best homogeneity in results. For
replacement intervals check the appropriate
standard.
10.4.1 Small Sponge (AB5012)
10.4.2 Wild Boar Brush (AB5010)
10.4.3 Nylon Brush (AB5011)

25 |
The Abrasive Pad Holder is supplied ready for
use. The pad is used to test scrub resistance of
coatings. The pads cause an aggressive wear of
the coating.
Placement
The AB5013 Abrasive Pad Tool is placed in the
AB5042 or AB5041 holder and needs to fit
comfortably in the holder. The tool must be able
to move freely without friction in the holder.
Always position the tool facing the same way,
to create the best homogeneity in results. For
replacement intervals and maximum life please
check the appropriate standard.
Scope of supply
• Abrasive pad
• Pad holder
• Fixation screw
Specications Abrasive Tool Complete
Mass: 135 g / 4.76 oz
Specications Aluminium Pad Holder
Material: Aluminium
Inner dimensions: 92x41 mm
Outer dimensions: 94x43 mm
Scope of supply
• Clamp tool upper part with fixation screw
• Clamp tool lower part with rubber lining on the
bottom and a separate rubber lining for both
short sides
Specications
Universal Material Clamp Tool. Assembly of two black
anodised aluminum blocks with rubber lining into which
user-selected abrasive material can be clamped.
Dimensions: 75x40x80 mm
(without rubber lining on
the short sides)
Scope of supply
• TQC MEK / Crockmeter tool
• Weight
• Set of felts and Viton O-rings
Specications
Required Mass: 454 g
Standard Delivery: 200g
Order extra (not included): + 1x AB5065 (54 g)
+ 2x AB5015 (100g)
Required Mass: 900g
Standard Delivery: 200g
Order extra (not included): + 1x AB5015 (100g)
+ 3x AB5066 (200g)
The Universal Material Clamp Tool is designed to
hold abrasive media as sandpaper, cloth, towel
material, etc. The rubber lining on the bottom
create a uniform pressure on the bottom. The
rubber pads on each side allow for the size
adjustment to any thickness of cloth.
Placement
The AB5020 Universal Material Clamp Tool is
placed in the AB5042 or AB5041 holder and
needs to fit comfortably in the holder. The tool
must be able to move freely without friction in
the holder. Always position the tool facing the
same way, to create the best homogeneity in
results. For replacement intervals and maximum
life please check the appropriate standard.
The AB5060 MEK / Crockmeter is designed to
perform several types of MEK / Crockmeter tests,
depending on the configuration used. A full set
weighs 200g. The hollow fixation screw allows for
easy filling of the liquid reservoir in the stamp.
Placement
The AB5060 MEK / Crockmeter tool is placed in
the AB5042 or AB5041 holder and needs to fit
comfortably in the holder. The tool must be able
to move freely without friction in the holder.
Always position the tool facing the same way,
to create the best homogeneity in results. For
replacement intervals and maximum life please
check the appropriate standard.
10.4.4 Abrasive Pad Tool (AB5013)
10.4.5 Universal Material Clamp (AB5020)
10.4.6 MEK / Crockmeter Tool (AB5060)

| 26
Scope of supply
• Sponge
• Sponge holder
• Weight 500 g
• Fixation screw
Specications Sponge Tool Holder
Material: Stainless steel
Inner dimensions: 90x75 mm
Outer dimensions 102x78mm
The Large Sponge Tool is supplied ready for use.
The sponge is a gentle tool to test the washability
of the coating. Often used for cleanability tests on
for example wall paints.
Placement
The AB5050 Sponge Tool is placed in the AB5043
holder and needs to fit comfortably in the
holder. The tool must be able to move freely
without friction in the holder. Always position
the tool facing the same way, to create the best
homogeneity in results. For replacement intervals
check the appropriate standard.
10.4.7 Large Sponge Tool (AB5050)
Scope of supply
• Cloth holder body
• Cloth holder frame
SpecicationsC Cloth Holder Body
Material: POM
Dimensions: 90x54*x30 mm
* Width of the block is 40 mm
Specications Cloth Holder Frame
Material: Anodised aluminium
Inner dimensions: 91x41x12 mm
Outer dimensions: 110x51x12 mm
The TQC Cloth Holder is supplied ready for use.
The tool is suitable for clamping flexible test
media around the test body. Allowing for a
smooth testing.
Placement
The AB5055 Cloth Holder can only be placed
in the AB5044 tool holder and needs to fit
comfortably in the holder. The tool must be able
to move freely without friction in the holder.
10.4.8 TQC Cloth Holder (AB5055)
Scope of Supply
• 4 metal shims with rounded corners
Specications
Material: Stainless steel
Dimensions: 0.25x12x158 mm
Please verify proper use of the shims by appropriate standard
and or specification.
Scope of Supply
• 2 glass plates with champhered edges
Specications
Material: Glass
Dimensions : 470x163x6 mm
The metal shim is usually placed in the middle
and underneath of the test sample. The small
elevation will increase abrasion at that point
hence test results are obtained more
quickly.
Some standards require all tests to be performed
on a glass test bed. This to ensure the flattest
and smoothest substrate for the test. Often the
glass bed is used together with the metal shims
for many ASTM standards.
10.4.9 Metal Shim (AB5025)
10.4.10 Glass Bed (AB5180)

27 |
Scope of supply
• 1 heavy weight support tool
• 1 fixture screw
Specications
Material: Stainless steel and plastic
Dimensions : 94x50x50 mm
(adjustable hight: 50 - 75 mm)
Mass: 14 g
When using top heavy tools the risk exists for a
tool to tip over due to the load, or the used
speed. Instable tools cause irregular wear and will
lead to non-reproducible results. A tipped over
tool can significantly scratch the sample and
damage it beyond use. The heavy weight support
tools are used to stabilize the tools by creating a
fixture point on the vertical axis of the tool. Per
tool 1 heavy weight support tool is required.
When a lighter weight is used, mount the
supplied spacers between the weight and the
tool.
10.4.11 Heavy Weight Support Tool (AB5032)
Scope of Supply
• AB5115 General tubing set
• 1 set of tubes suitable for installation between container
and pump and from the pump to the test area’s
• AB5113 Pump tubing kit
• 4 tubes for installation in the pumps
Specications
Pump tubing: BPT Pharmamed tube
Tubing to pump
and from pump : Tygon (at delivery PVC tube to the
pump)
Additional information
Waste / drainage
tube : Silicon tube
The TQC Scrub, Abrasion and Washability Tester
AB5000 and AB5005 are equipped with pumps
for the application of test liquids to the samples.
These tubes do require maintenance and timely
replacement depending on the liquids that are
pumped. The chemical resistance of the tubes is
covered in the chemical resistance table. The wear
of the tubes depends both on the abrasiveness
and aggressiveness of the media used. It is not
possible to predict the life expectancy of a
tube.
10.4.12 Tubing (AB5115 and AB5113)

| 28
• Though robust in design, this instrument is precision-machined.
Never drop it or knock it over.
• Always clean the instrument after use.
• Clean the instrument using a soft dry cloth. Never clean the instrument
by any mechanical means such as a wire brush or abrasive paper. This may
cause, just like the use of aggressive cleaning agents, permanent damage.
• Do not use compressed air to clean the instrument.
• Never bend or exert extreme forces on the tool carrier
• Generally the TQC Scrub Abrasion and Washability Tester does not require
any maintenance.
Make sure that no paint or other liquids are spilled on the
electronics or left in the tubing.
11.1 Disposal of Materials
Disposal of materials used in the operation of the instrument or for auxiliary
functions and exchanged items should be dealt with safety and in a manner
that will not harm the environment. Follow the local regulations.
11.2 Customer Service
Customer service is provided on request by
TQC – Molenbaan 19 , 2908LL Capelle aan den IJssel - The Netherlands,
T +31(0)10 7900100, F +31 (0)10 7900129 or by local representatives.
11 CARE AND MAINTENANCE

29 |
The right of technical modifications is reserved.
The information given in this manual is not intended to be exhaustive and
any person using the product for any purpose other than that specifically
recommended in this manual without first obtaining written confirmation
from us as to the suitability of the product for the intended purpose does
so at his own risk. Whilst we endeavor to ensure that all advice we give
about the product (whether in this manual or otherwise) is correct we have
no control over either the quality or condition of the product or the many
factors affecting the use and application of the product. Therefore, unless
we specifically agree in writing to do so, we do not accept any liability
whatsoever or howsoever arising for the performance of the product or for
any loss or damage (other than death or personal injury resulting from our
negligence) arising out of the use of the product. The information contained
in this manual is liable to modification from time to time in the light of
experience and our policy of continuous product development.
12 DISCLAIMER

| 30
ANNEX A | STANDARDS CONFIGURATION TABLE
Art. No. Description
MEK test / DIN 55654 / ISO 105-X12§4.2.1
ASTM D4828
ASTM D3450
ASTM D2486
ASTM D4213 (from 1996)
ASTM D4213-92
ISO 11998 / EN13300
DIN 53778
x
x
x
o
x
o
x
o
x
o
x
x
x
x
x
x
o
x
o
x
o
x
x
x
o
x
x
x
x
x
x
o
x
x
x
o
x
x
x
x
x
x
o
x
x
x
o
x
x
x
x
o
x
o
x
o
x
o
x
x
x
x
x
o
x
x
x
o
o
x
x
x
x
x
x
x
o
x
x
x
o
x
x
x
x
x
x
o
x
o
x
o
x
AB5000
AB5005
AB5210
AB5215
AB5196
AB5176
AB5045
AB5197
AB5041
AB5042
AB5043
AB5044
AB5010
AB5011
AB5012
AB5013
AB5020
AB5050
AB5055
AB5060
AB5014
AB5015
AB5030
AB5040
AB5032
AB5025
AB5027
AB5180
Scrub Test Basic Device
TQC Scrub, Abrasion and Washability Test 230 V
TQC Scrub, Abrasion and Washability Test 100 V
TQC Scrub, Abrasion and Washability Test Basic 230 V
TQC Scrub, Abrasion and Washability Test Basic 100 V
Test beds
Reservoir low, half
Reservoir low, full
Clamping frames
Wide channel single frame for low reservoir
Double narrow channel frame for low reservoir
Tool adapter (WARNING: The adapter must be compatible with the clamping frame)
Tool adapter “Double” for tools AB5012/5010/5011/5013/5020
Tool adapter “Single” for tools AB5012/5010/5011/5013/5020
Tool adapter “Single” for tool AB5050
Tool adapter “Double” for tool AB5055
Tools
Wild Boar Brush (250g/8.82oz) DIN 53778
Nylon Brush (454g/16.01oz) ASTM D2486
Sponge (232g/8.12oz)
Abrasive pad (232g/8.12oz) ISO 11998
Universal holder
Sponge tool, large, conform ASTM D4828 / D3450 (500g)(excl weights)
Cloth holder tool for detergents test
MEK Test / Crock meter
Accessories
Weight for Washability test 60g
Weight for Washability test 100g
Weight for Washability test 1000g
Weight for Washability test 500gr
Tool stabilization kit for heavy weights
Metal shims for ASTM D2486, for reservoir half (set of 4)
Metal shims for ASTM D2486, for reservoir full (set of 4)
Glass base conform ASTM D2486 (set of 2)
x = mandatory
o = optional

31 |
Art. No. Description
MEK test / DIN 55654 / ISO 105-X12§4.2.1
ASTM D4828
ASTM D3450
ASTM D2486
ASTM D4213 (from 1996)
ASTM D4213-92
ISO 11998 / EN13300
DIN 53778
x
o
x
x
xx
oxo
xxx
o
AB5016
AB5016
AB5017
AB5018
AB5018
AB5019
VF2316
VF2316
AB5140
AB5142
AB5141
AB5113
AB5113
Consumables
Abrasive pads for tool AB5013, set 5 pcs (Weight each appr. 3 g.)
Abrasive pads for tool AB5050, set 5 pcs
Wild boar brush for tool AB5010
Nylon brush for tool AB5011
Sponge pads for tool AB5050, set 5 pcs
Sponge pads for tool AB5012, set 5 pcs
TQC opacity scrub charts, black and white, 100 pieces
TQC opacity scrub charts black, 100 pieces.
Spare parts
Glass container 500ml
Glass container cap yellow
Glass container cap green
Pump tubes set of 4
Full tubing kit

| 32
Chemical
BPT Pharmed tube
PVC
Tygon
Silicone
Viton
Acetaldehyde D D D A D
Acetamide D N/A D B B
Acetate Solvent D N/A D C D
Acetic Acid D N/A D C B
Acetic Acid 20% D A D B B
Acetic Acid 80% C N/A D B B
Acetic Acid, Glacial D N/A D B D
Acetic Anhydride D A D C D
Acetone D D D D D
Acetone, 50% water D N/A N/A A2 D
Acetyl Bromide D C D N/A N/A
Acetyl Chloride (dry) C C D C A
Acetylene A1 N/A A1 B A
Acrylonitrile B1 N/A D D D
Adipic Acid A2 N/A D N/A A2
Alcohols: Amyl A2 N/A D D A
Alcohols: Benzyl D N/A D N/A A
Alcohols: Butyl A2 N/A A2 B A
Alcohols: Diacetone B1 N/A B1 D D
Alcohols: Ethyl C N/A C B A
Alcohols: Hexyl A2 N/A A2 B C
Alcohols: Isobutyl A1 N/A A1 A A
Alcohols: Isopropyl A1 N/A D A A
Alcohols: Methyl A1 N/A A1 A C
Alcohols: Propyl A1 N/A A1 A A
Allyl Chloride D N/A N/A N/A A3
Aluminum Acetate (saturated) A A N/A D A
Aluminum Chloride A2 A A2 B A
Aluminum Chloride 20% A1 A A1 B A
Aluminum Fluoride A2 N/A A2 B A
Aluminum Hydroxide A2 A A2 N/A A
Aluminum Nitrate B2 A B2 B1 A2
Aluminum Potassium Sulfate 10% A2 A A2 A A
Aluminum Potassium Sulfate 100% A2 A A2 A A
Aluminum Sulfate A2 A A2 A A
Amines D N/A D B D
Ammonia 10% B1 a B1 N/A D
Ammonia Nitrate B a B N/A D
Ammonia, anhydrous A2 a B C D
Ammonia, liquid A1 a A2 N/A D
Ammonium Acetate A a A N/A A
Ammonium Bifluoride A N/A A2 N/A A
Ammonium Carbonate A2 a A2 C A
Ammonium Chloride A2 a A2 C A
Ammonium Fluoride 25% A N/A N/A N/A A
Ammonium Hydroxide A a A A B
Ammonium Nitrate A2 a A2 C A
ANNEX B | CHEMICAL RESISTANCE

|
Page 33
Chemical
BPT Pharmed tube
PVC
Tygon
Silicone
Viton
Ammonium Oxalate A N/A A N/A N/A
Ammonium Persulfate A2 N/A A2 D A
Ammonium Phosphate, Dibasic A2 A A2 A A
Ammonium Phosphate, Monobasic A A A A A
Ammonium Phosphate, Tribasic A A A A A
Ammonium Sulfate A2 A A2 A A
Ammonium Sulfite A2 N/A A2 N/A D
Amyl Acetate D B D D D
Amyl Alcohol A2 D D D A
Amyl Chloride D C D D B1
Aniline C1-Fair C D B A
Aniline Hydrochloride B2 C D D A
Antifreeze (glycol–based) B N/A B B A
Antimony Trichloride A2 N/A N/A N/A A2
Aqua Regia (80% HCl, 20% HNO3) C1-Fair D D D B
Aromatic Hydrocarbons D D N/A D A
Arsenic Acid A1 N/A B A A2
Arsenic Salts A A A N/A A
Asphalt A2 N/A N/A D A
Barium Carbonate A2 A N/A N/A A
Barium Chloride A1 A B A A
Barium Cyanide D A N/A N/A A
Barium Hydroxide A2 A N/A A A
Barium Nitrate A A N/A B A
Barium Sulfate B1 A N/A A A
Barium Sulfide A2 A N/A A A
Beer A2 N/A A A A
Beet Sugar Liquids A2 N/A N/A A A
Benzaldehyde D D D D D
Benzene C1-Fair N/A D D A
Benzene Sulfonic Acid A D D D A
Benzoic Acid A N/A D B A
Bleach A N/A B N/A A
Bleaching Liquors A1 A N/A B A
Borax (Sodium Borate) A1 N/A N/A B A
Boric Acid A2 A A A A
Bromine C1-Fair D D D A
Butadiene C1-Fair N/A A D B
Butane C1-Fair A A D A
Butanol (Butyl Alcohol) C1-Fair D D B A
Buttermilk A1 N/A B A A
Butyl Amine D N/A D B1 D
Butyl Ether A2 N/A A2 D D
Butylacetate D B D D D
Butylene A1 N/A N/A D A
Butyric Acid B1 B D D B1
Calcium Bisulfide A2 A N/A C A

|
Page 34
Chemical
BPT Pharmed tube
PVC
Tygon
Silicone
Viton
Calcium Bisulfite B A N/A A A
Calcium Carbonate A2 A N/A A A
Calcium Chlorate B2 A N/A N/A A
Calcium Chloride (30% in water) C A A A A
Calcium Chloride (saturated) A A N/A A A
Calcium Hydroxide B A B2 A A
Calcium Hydroxide (saturated) A A N/A A A
Calcium Hypochlorite B1 A A B A
Calcium Hypochlorite (saturated) A A N/A N/A A
Calcium Hypochlorite 30% A A N/A N/A A
Calcium Nitrate A2 A A2 B1 A2
Calcium Oxide B A C A B
Calcium Sulfate B2 A N/A N/A A
Calcium Sulfide A A N/A N/A A
Cane Juice A1 N/A A A A
Carbolic Acid (Phenol) D N/A B D A
Carbon Bisulfide D D D N/A A
Carbon Dioxide (dry) A2 A A B B
Carbon Dioxide (wet) A1 A A B B
Carbon Disulfide D N/A D N/A A1
Carbon Monoxide A2 N/A A A2 A
Carbon Tetrachloride D D D D A
Carbonated Water A N/A N/A N/A A
Carbonic Acid A2 N/A A A A
Catsup A N/A N/A N/A A
Cellulose Acetate D N/A N/A N/A D
Chloral Hydrate A N/A N/A N/A D
Chloric Acid A2 N/A N/A N/A N/A
Chlorine (dry) D C A D A
Chlorine Water A2 D N/A D A
Chlorine, Anhydrous Liquid D D B D A
Chloroacetic Acid B1 B A D D
Chlorobenzene (Mono) D D D D A
Chlorobromomethane D B N/A D A
Chloroform D C D D A
Chlorosulfonic Acid D D D D D
Chromic Acid 10% A2 A C C B
Chromic Acid 30% A1 A B C A
Chromic Acid 5% A2 A B C A
Chromic Acid 50% D A B C A
Chromium Salts A A A N/A N/A
Cider A N/A N/A B1 A
Citric Acid B2 N/A N/A A A
Copper Chloride A1 A A A1 A
Copper Cyanide A2 A N/A A A
Copper Fluoborate A A A N/A A
Copper Nitrate A2 A B N/A A

|
Page 35
Chemical
BPT Pharmed tube
PVC
Tygon
Silicone
Viton
Copper Sulfate >5% A2 A N/A A A
Copper Sulfate 5% A2 A A A A
Creosote A N/A N/A D A
Cresols D D D D A
Cresylic Acid D N/A N/A D A
Cupric Acid A2 N/A A2 A1 A2
Cyclohexane D D D D A
Cyclohexanone D D D D D
Detergents A N/A A A A
Dextrin A N/A N/A N/A D
Dextrose A N/A N/A A A
Diacetone Alcohol D A N/A D D
Dichlorobenzene D N/A N/A D C
Dichloroethane D N/A D N/A C
Diesel Fuel A1 N/A D D A
Diethyl Ether D N/A N/A D D
Diethylamine D N/A A B A
Diethylene Glycol C1-Fair N/A C1-Fair B1 A2
Dimethyl Aniline D N/A D D D
Dimethyl Formamide D N/A D C C
Diphenyl Oxide D N/A D C A
Disodium Phosphate A N/A N/A N/A A
Dyes B N/A C N/A A
Epsom Salts (Magnesium Sulfate) A1 N/A B A A
Ethane A1 N/A A D A
Ethanol C C C B A
Ethanolamine D N/A N/A B D
Ether D C D D C
Ethyl Acetate D B D B D
Ethyl Benzoate D N/A D D A1
Ethyl Chloride D C D D A
Ethyl Ether D N/A D D D
Ethylene Bromide D N/A D D A
Ethylene Chloride D N/A N/A D B
Ethylene Chlorohydrin D A D C A
Ethylene Diamine D N/A N/A A B
Ethylene Dichloride D C D D A
Ethylene Glycol A A A A A
Ethylene Oxide D A A D D
Fatty Acids A C D C A
Ferric Chloride A A N/A B A
Ferric Nitrate A A N/A C A
Ferric Sulfate A A N/A B A
Ferrous Chloride A A N/A N/A A
Ferrous Sulfate A A N/A N/A B
Fluoboric Acid A D N/A N/A B
Fluorine D N/A D D C

|
Page 36
Chemical
BPT Pharmed tube
PVC
Tygon
Silicone
Viton
Fluosilicic Acid D C A N/A B1
Formaldehyde 100% A D D B D
Formaldehyde 40% A D D N/A A
Formic Acid A1 A A B C
Freon® 11 A2 D A D B
Freon® 113 B D N/A D B
Freon® 12 A2 D A D B
Freon® 22 A D A D D
Freon® TF B D N/A D B
Fruit Juice A N/A A N/A A
Fuel Oils A2 N/A D D A
Furan Resin A N/A A D D
Furfural D N/A D D D
Gallic Acid B N/A D D A
Gasoline (high–aromatic) A D N/A D A
Gasoline, leaded, ref. B D D D A1
Gasoline, unleaded C2-Fair D D D A1
Gelatin B N/A A A A
Glucose A2 A A A A
Glue, P.V.A. C A C A B
Glycerin A A A A A
Glycolic Acid B N/A A A A
Grape Juice A N/A B A A
Grease A N/A A D A
Heptane C1-Fair N/A D D A
Hexane B1 N/A D D A
Honey A N/A A A A
Hydraulic Oil (Petro) A N/A A B A
Hydraulic Oil (Synthetic) A N/A A B A
Hydrobromic Acid 100% A1 D A D A
Hydrobromic Acid 20% B2 D A D A
Hydrochloric Acid 100% D A A1 D A
Hydrochloric Acid 20% A2 A A1 D A
Hydrochloric Acid 37% B B A1 B A
Hydrochloric Acid, Dry Gas A2 A N/A N/A N/A
Hydrocyanic Acid B N/A A C A
Hydrocyanic Acid (Gas 10%) A N/A A D A
Hydrofluoric Acid 100% C N/A D D B
Hydrofluoric Acid 20% B N/A A D A
Hydrofluoric Acid 50% B1 D C D B
Hydrofluoric Acid 75% C N/A C D B
Hydrofluosilicic Acid 100% B1 N/A D D A
Hydrofluosilicic Acid 20% A2 N/A A D A
Hydrogen Gas A2 N/A A C A
Hydrogen Peroxide 10% A1 A B A A
Hydrogen Peroxide 100% A B B B A
Hydrogen Peroxide 30% A1 A B B A

|
Page 37
Chemical
BPT Pharmed tube
PVC
Tygon
Silicone
Viton
Hydrogen Peroxide 50% A1 A B B A
Hydrogen Sulfide (aqua) B1 N/A A C D
Hydrogen Sulfide (dry) A2 N/A A C D
Hydroquinone B N/A N/A N/A B
Hydroxyacetic Acid 70% D N/A N/A N/A A
Ink C N/A C N/A A
Iodine A A A N/A A
Iodine (in alcohol) A A N/A N/A N/A
Iodoform A N/A C N/A N/A
Isooctane A1 N/A D D A1
Isopropyl Acetate D N/A D D D
Isopropyl Ether B N/A D D D
Isotane A N/A N/A N/A A
Jet Fuel (JP3, JP4, JP5, JP8) C N/A D D A
Kerosene A2 D D D A
Ketones D D D N/A D
Lacquer Thinners D B D D D
Lacquers D N/A A D D
Lactic Acid B1 A A A A
Lard A1 N/A D B A
Lead Acetate B A B A D
Lead Nitrate A2 N/A A2 B1 A2
Lead Sulfamate B N/A N/A B A
Lime B N/A A N/A A
Linoleic Acid A2 N/A A2 B1 B1
Lithium Chloride D N/A A2 A1 A1
Lubricants B2 N/A B D A
Lye: Ca(OH)2 Calcium Hydroxide B2 N/A B2 A B1
Lye: KOH Potassium Hydroxide B N/A B C B
Lye: NaOH Sodium Hydroxide A N/A B A1 B1
Magnesium Bisulfate A2 N/A A2 N/A N/A
Magnesium Carbonate B N/A N/A N/A A
Magnesium Chloride B A N/A A A2
Magnesium Hydroxide A2 N/A A A A
Magnesium Nitrate A2 N/A A N/A A
Magnesium Sulfate (Epsom Salts) A1 A A A A
Maleic Acid A2 N/A D N/A A
Malic Acid A2 A A B A
Manganese Sulfate C A A1 A1 A2
Mayonnaise D N/A D N/A A
Melamine D N/A D C A
Mercuric Chloride (dilute) A A D N/A A
Mercuric Cyanide A A N/A A A1
Mercurous Nitrate A A A2 N/A A1
Mercury A A A N/A A
Methane B A A D A
Methanol (Methyl Alcohol) A1 A D A C

|
Page 38
Chemical
BPT Pharmed tube
PVC
Tygon
Silicone
Viton
Methyl Acetate D N/A D D D
Methyl Acetone D N/A A N/A D
Methyl Alcohol 10% A1 N/A A1 A C
Methyl Bromide D N/A D N/A A
Methyl Butyl Ketone A N/A N/A D D
Methyl Cellosolve D N/A C D D
Methyl Chloride D C D D A1
Methyl Dichloride A N/A N/A N/A A1
Methyl Ethyl Ketone D D D D D
Methyl Isobutyl Ketone D N/A D D D
Methyl Isopropyl Ketone D N/A N/A C D
Methyl Methacrylate A N/A N/A C D
Methylamine D N/A D N/A D
Methylene Chloride D N/A D N/A B
Milk A2 N/A A A A
Mineral Spirits A N/A D D A
Molasses A N/A A N/A A
Monoethanolamine D N/A D B D
Motor Oil B N/A D N/A N/A
Mustard B N/A B N/A D
Naphtha A1 D D D A
Naphthalene D N/A D D A
Natural Gas A N/A A A A
Nickel Chloride A A B A A
Nickel Nitrate A A A2 N/A A2
Nickel Sulfate A A A A A
Nitrating Acid (<1% Acid) D N/A D N/A N/A
Nitrating Acid (<15% H2SO4) D N/A D N/A N/A
Nitrating Acid (<15% HNO3) D N/A D N/A N/A
Nitrating Acid (>15% H2SO4) D N/A D N/A N/A
Nitric Acid (20%) A1 A D D A
Nitric Acid (5 to10%) A1 A D C A
Nitric Acid (50%) B1 A D D A
Nitric Acid (Concentrated) B1 D D D A
Nitrobenzene D D D D B
Nitromethane B2 N/A D D D
Nitrous Acid A A A N/A B
Nitrous Oxide A N/A A N/A B
Oils: Aniline D C D D C
Oils: Castor A N/A A A A
Oils: Cinnamon D N/A N/A N/A A
Oils: Citric B N/A D N/A A
Oils: Coconut A1 N/A A A A
Oils: Cod Liver A1 N/A N/A B A
Oils: Corn B N/A B A B
Oils: Cottonseed B2 N/A B A A
Oils: Creosote C N/A N/A D A

|
Page 39
Chemical
BPT Pharmed tube
PVC
Tygon
Silicone
Viton
Oils: Crude Oil A N/A N/A N/A A
Oils: Diesel Fuel (20, 30, 40, 50) B N/A A D A
Oils: Fuel (1, 2, 3, 5A, 5B, 6) A2 N/A A C B
Oils: Hydraulic Oil (Petro) A N/A A B A
Oils: Hydraulic Oil (Synthetic) A N/A A B A
Oils: Linseed A2 C A A A
Oils: Mineral B D B C A
Oils: Olive C C B D A
Oils: Orange C1-Fair C N/A D A
Oils: Palm A C N/A N/A A
Oils: Peanut A1 C A A A
Oils: Pine D C D D A
Oils: Rosin C1-Fair C N/A N/A A
Oils: Sesame Seed A C A N/A A
Oils: Silicone A C A C A
Oils: Soybean A1 N/A B A A
Oils: Transformer B N/A N/A B A
Oils: Turbine A1 N/A A D A
Oleic Acid C2-Fair C D D B
Oleum 100% D N/A C D A
Oleum 25% D N/A A D A
Oxalic Acid (cold) B B B B A
Ozone B B A A A
Palmitic Acid B1 C D D A1
Paraffin B N/A D N/A B
Pentane A N/A A D A
Perchloric Acid C A N/A D A
Perchloroethylene C1-Fair C D D A
Petrolatum B N/A B D A
Phenol (10%) C1-Fair A B D A
Phenol (Carbolic Acid) D A B D A
Phosphoric Acid (<40%) B A A C A
Phosphoric Acid (>40%) B A A D A
Phosphoric Acid (crude) B2 N/A D D A
Phosphoric Acid (molten) D N/A D N/A N/A
Phosphorus A1 N/A B1 N/A N/A
Phosphorus Trichloride D N/A A N/A A1
Photographic Developer A N/A A B A
Photographic Solutions A N/A A2 A B1
Phthalic Anhydride D N/A D N/A A
Picric Acid D A A D A
Plating Solutions: Antimony Plating 130°F A A N/A N/A A
Plating Solutions: Arsenic Plating 110°F A A N/A N/A A
Plating Solutions: Brass: High-Speed Brass Bath 110°F A A N/A N/A A
Plating Solutions: Brass: Regular Brass Bath 100°F A A N/A N/A A
Plating Solutions: Bronze: Cu-Cd Bronze Bath R.T. A A N/A N/A A
Plating Solutions: Bronze: Cu-Sn Bronze Bath 160°F D A N/A N/A A

|
Page 40
Chemical
BPT Pharmed tube
PVC
Tygon
Silicone
Viton
Plating Solutions: Bronze: Cu-Zn Bronze Bath 100°F A A N/A N/A A
Plating Solutions: Cadmium: Cyanide Bath 90°F A A N/A N/A A
Plating Solutions: Cadmium: Fluoborate Bath 100°F A A N/A N/A A
Plating Solutions: Chromium: Barrel Chrome Bath 95°F A A N/A N/A C
Plating Solutions: Chromium: Black Chrome Bath 115°F A A N/A N/A C
Plating Solutions: Chromium: Chromic-Sulfuric Bath 130°F A A N/A N/A C
Plating Solutions: Chromium: Fluoride Bath 130°F A A N/A N/A C
Plating Solutions: Chromium: Fluosilicate Bath 95°F A A N/A N/A C
Plating Solutions: Copper (Acid): Copper Fluoborate Bath 120°F A A N/A N/A A
Plating Solutions: Copper (Acid): Copper Sulfate Bath R.T. A A N/A N/A A
Plating Solutions: Copper (Cyanide): Copper Strike Bath 120°F A A N/A N/A A
Plating Solutions: Copper (Cyanide): High-Speed Bath 180°F D A N/A N/A A
Plating Solutions: Copper (Cyanide): Rochelle Salt Bath 150°F D A N/A N/A A
Plating Solutions: Copper (Misc): Copper (Electroless) A A D N/A A
Plating Solutions: Copper (Misc): Copper Pyrophosphate A A N/A N/A A
Plating Solutions: Gold: Acid 75°F A A N/A N/A A
Plating Solutions: Gold: Cyanide 150°F D A N/A N/A A
Plating Solutions: Gold: Indium Sulfamate Plating R.T. A A N/A N/A A
Plating Solutions: Gold: Neutral 75°F A A N/A N/A A
Plating Solutions: Iron: Ferrous Am Sulfate Bath 150°F D A N/A N/A A
Plating Solutions: Iron: Ferrous Chloride Bath 190°F D A N/A N/A A
Plating Solutions: Iron: Ferrous Sulfate Bath 150°F D A N/A N/A A
Plating Solutions: Iron: Fluoborate Bath 145°F D A N/A N/A A
Plating Solutions: Iron: Sulfamate 140°F A A N/A N/A A
Plating Solutions: Iron: Sulfate-Chloride Bath 160°F D A N/A N/A A
Plating Solutions: Lead Fluoborate Plating A A N/A N/A A
Plating Solutions: Nickel: Electroless 200°F D A N/A N/A A
Plating Solutions: Nickel: Fluoborate 100-170°F A A N/A N/A A
Plating Solutions: Nickel: High-Chloride 130-160°F D A N/A N/A A
Plating Solutions: Nickel: Sulfamate 100-140°F A A N/A N/A A
Plating Solutions: Nickel: Watts Type 115-160°F D A N/A N/A A
Plating Solutions: Rhodium Plating 120°F A A N/A N/A A
Plating Solutions: Silver Plating 80-120°F A A N/A N/A A
Plating Solutions: Tin-Fluoborate Plating 100°F A A N/A N/A A
Plating Solutions: Tin-Lead Plating 100°F A A N/A N/A A
Plating Solutions: Zinc: Acid Chloride 140°F A A N/A N/A A
Plating Solutions: Zinc: Acid Fluoborate Bath R.T. A A N/A N/A A
Plating Solutions: Zinc: Acid Sulfate Bath 150°F D A N/A N/A A
Plating Solutions: Zinc: Alkaline Cyanide Bath R.T. A A N/A N/A A
Potash (Potassium Carbonate) A A A N/A A
Potassium Bicarbonate A A A A1 A
Potassium Bromide A N/A B A1 A
Potassium Chlorate A N/A B B A
Potassium Chloride A N/A A A A
Potassium Chromate A N/A B N/A A
Potassium Cyanide Solutions A N/A A A A
Potassium Dichromate A N/A N/A A A

|
Page 41
Chemical
BPT Pharmed tube
PVC
Tygon
Silicone
Viton
Potassium Ferricyanide A N/A B N/A A
Potassium Ferrocyanide A N/A B N/A A
Potassium Hydroxide (Caustic Potash) A1 A B C B
Potassium Hypochlorite B1 N/A B1 N/A N/A
Potassium Iodide A2 A B N/A A
Potassium Nitrate A N/A A A A
Potassium Permanganate A1 N/A B N/A A
Potassium Sulfate A2 N/A A A A2
Potassium Sulfide A2 N/A N/A A A
Propane (liquefied) A1 N/A N/A D A
Propylene B1 N/A A D A1
Propylene Glycol C1-Fair N/A A A A
Pyridine D C D D D
Pyrogallic Acid A N/A N/A N/A A
Resorcinal C N/A C N/A A1
Rosins C1-Fair N/A N/A A A
Rum A N/A N/A A A
Salicylic Acid B1 N/A B1 N/A A1
Salt Brine (NaCl saturated) A N/A N/A A1 A2
Sea Water A2 N/A N/A A1 A
Silicone A A N/A C A
Silver Nitrate A1 A B A A
Soap Solutions A B A A A
Soda Ash (see Sodium Carbonate) A A N/A A A
Sodium Acetate B1 N/A A D D
Sodium Benzoate B1 N/A B1 N/A A1
Sodium Bicarbonate A2 N/A B A A
Sodium Bisulfate A2 A B A A
Sodium Bisulfite A2 A B A A
Sodium Borate (Borax) A2 N/A N/A A A
Sodium Bromide B2 N/A B2 N/A A1
Sodium Carbonate A2 A B A A
Sodium Chlorate A1 B B C A
Sodium Chloride A2 N/A B A A
Sodium Cyanide A2 N/A A A A2
Sodium Ferrocyanide A A A N/A A
Sodium Fluoride A2 N/A D N/A A
Sodium Hydrosulfite C B A C A
Sodium Hydroxide (20%) A A A1 A2 C
Sodium Hydroxide (50%) A N/A C A1 D
Sodium Hydroxide (80%) A N/A C A1 D
Sodium Hypochlorite (<20%) A N/A C B A1
Sodium Hypochlorite (100%) B N/A N/A B A1
Sodium Iodide A N/A N/A N/A C
Sodium Metaphosphate A N/A N/A A A
Sodium Metasilicate A N/A N/A N/A A
Sodium Nitrate A2 A B D A

|
Page 42
Chemical
BPT Pharmed tube
PVC
Tygon
Silicone
Viton
Sodium Perborate A2 N/A N/A B A
Sodium Peroxide B2 N/A N/A D A
Sodium Polyphosphate A1 N/A N/A D A
Sodium Silicate A2 A B A A
Sodium Sulfate A2 A A A A
Sodium Sulfide A2 A B A A2
Sodium Sulfite A2 A A A A2
Sodium Tetraborate A2 N/A N/A A A
Sodium Thiosulfate (hypo) A2 N/A N/A A A
Stannic Chloride A2 N/A N/A B A
Stannous Chloride A1 N/A A B A
Starch A N/A N/A N/A A
Stearic Acid B2 C D B A1
Stoddard Solvent C1-Fair N/A C D A
Styrene D D N/A D B
Sulfate (Liquors) B N/A N/A B A1
Sulfur Chloride C1-Fair N/A D C A
Sulfur Dioxide A1 N/A A B A
Sulfur Dioxide (dry) A2 N/A A B A
Sulfur Hexafluoride B N/A N/A B N/A
Sulfur Trioxide A N/A A B A
Sulfur Trioxide (dry) A1 N/A B B A
Sulfuric Acid (<10%) A1 A A C A
Sulfuric Acid (10-75%) A1 A C D A2
Sulfuric Acid (75-100%) D D D D A1
Sulfuric Acid (cold concentrated) D D D D B
Sulfuric Acid (hot concentrated) D D D D A2
Sulfurous Acid A2 A B D A
Tannic Acid A1 B B B A
Tanning Liquors A1 A B B A
Tartaric Acid A1 A B A A
Tetrachloroethane C N/A N/A D A
Tetrachloroethylene D N/A N/A D A
Tetrahydrofuran D N/A N/A D D
Tin Salts A A A B A
Toluene (Toluol) D D D D A
Tomato Juice A N/A N/A N/A A
Trichloroacetic Acid B B A D C
Trichloroethane C N/A D D A
Trichloroethylene D D D D A
Tricresylphosphate D N/A D C A2
Triethylamine B N/A A N/A D
Trisodium Phosphate A N/A A A A
Turpentine D D D D A
Urea D A B B A
Uric Acid A A A N/A N/A
Urine A N/A N/A N/A A1

|
Page 43
Explanation of Footnotes
1. Satisfactory to 72ºF (22ºC)
2. Satisfactory to 120ºF (48ºC)
Ratings - Chemical Eect
A = Excellent.
B = Good -- Minor Effect, slight corrosion or discoloration.
C = Fair -- Moderate Effect, not recommended for continuous use. Softening, loss of strength, swelling may occur.
D = Severe Effect, not recommended for ANY use.
N/A = Information not available.
Chemical
BPT Pharmed tube
PVC
Tygon
Silicone
Viton
Varnish D N/A D D A
Vinegar B N/A A1 A A
Vinyl Acetate D N/A D D A1
Vinyl Chloride D N/A D N/A A1
Water, Acid, Mine B N/A N/A B A
Water, Deionized A2 A A2 N/A A1
Water, Distilled A2 A B C A
Water, Fresh B A B B A
Water, Salt B A B B A
Whiskey and Wines A2 N/A C A A
White Liquor (Pulp Mill) A2 N/A N/A A A
White Water (Paper Mill) A N/A N/A N/A A
Xylene D D D D B
Zinc Chloride B D A B A
Zinc Sulfate A2 N/A A A A


45 |
ANNEX C | OPERATOR QUALIFICATION LIST
Date Name Signature SignatureInstructed by
Supervisor list (allowed to perform lamp replacement and such).
Date Name Signature SignatureInstructed by
Operator list.


47 |
ANNEX D | MAINTENANCE LIST
Date Action Name Signature
Installed at test location.
First run performed.

TQC Korea
Bldg Star Plaza, #805
Kimpo-Hangang-8-Ro 410
10071 Kimpo-Si, Gyeonggi-Do
South-Korea
+82 (0) 31 982 7074
+82 (0) 31 997 0827
jongsun@tqc.kr
www.tqc.eu
TQC UK
Po Box 977A
Surbiton, KT1 9XL
England
+44 208 255 0143
-
janet@tqc.eu
www.tqc.eu
TQC B.V.
Molenbaan 19
2908 LL, Capelle aan den IJssel
The Netherlands
+31 (0) 10 – 7900 100
+31 (0) 10 – 7900 129
info@tqc.eu
www.tqc.eu
TQC GmbH
Nikolaus-Otto-Strasse 2
Hilden, D-40721
Germany
+49 (0)2103-25326-0
+49 (0)2103-25326-29
info.de@tqc.eu
www.tqc.eu
TQC-USA Inc.
4053 S. Lapeer Road / Suite H
P.O. Box 108 Metamora, Michigan 48455
USA
+1 810-678-2400
+1 810-678-2422
joel@tqc-usa.com
www.tqc-usa.com
TQC ITALIA s.r.l.
Via Cesare Cantu’ ,26
SEREGNO, (MB) 20831
Italy
+39 0362-1822230
+39 0362-1822234
info@tqcitaly.it
www.tqc.eu
TQC Norge AS
Øvre Langgt. 26
Tønsberg, 3110
Norway
+47 333 10220
+47 333 10221
info@tqc.no
www.tqc.no
 Loading...