

SDN-P Series Waterpro of Solar Charge Controller
Instruction M anual
Applicable Model: SDN-P-10A SDN-P-20A

- 2 -
Preface
Respected users:
Thank you for using our products, we will wholeheartedly provide you with the
best quality service. This product specification provides some important information
and instructions related to installation, use, troubleshooting, etc. Before using this
product, please read carefully, and special attention shall be paid to the safety
suggestions in the instr uction manual.
This instruction manual shall be subject to updates without prior notice, which
shall be included in the n e w version of the instruction manual. Please take g oo d care of
this instruction for your reference.

- 3 -
Contents
==================================
1. An introduction to the product ................................................................................. 4
1.1 Product description ........................................................................................... 4
1.2 Main features..................................................................................................... 4
1.3 Technical parameters ........................................................................................ 5
1.4 Sizing specificationsInstallation method ........................................................... 6
2. Installation method ................................................................................................... 7
2.1 An introduction to the panel .............................................................................. 7
2.2 LED indica tor lamp .............................................................................................. 8
2.3 Installation of the controller ............................................................................... 9
2.4 Mode of connection ........................................................................................... 9
2.5 Wiring procedures ............................................................................................ 10
3. Operational instructions .......................................................................................... 11
3.1 Instructions for charging ................................................................................. 11
3.2 Instructions for discharging ............................................................................ 13
4. Handling of common faults ...................................................................................14
5. Protction funct ions .................................................................................................. 15
6. Quality guarantee ................................................................................................... 16

- 4 -
An introduction to the product
1.1 Product description
SDN-P series waterproof controller products include SDN-P10A, SDN-P20A
two specifications, w hich ar e intende d mainly for use in sma ll solar inde pende nt pow er
generation system s.
With this equipment, it is possible for the solar cell panel to perform the charge
management on the battery as well as for the battery to carry out load discharge on the
battery. This equipment has perfect protection functions. There are various control
modes and manual switching on/off is available. It can be widely used in solar power
small power station system. In addition, it also can be used in the solar energy street
lamp system together with the LED constant current source.
1.2 Main features
For the full range -35~55°C, it can perfor m long-term full load operation, with an
high efficiency and a low power consumption
It is compatible with the lead-acid type battery, the colloid type battery, the lithium
type battery and ot her ty pes of bat ter y
It has six period l oad control a nd the length of e a ch pe r iod is adju stable separately.
It is of a compact design, with a small size and high perf or m anc e - price ratio; it can
be installed in a narrow space and is of a f ully waterpr oof design IP 67
It has comprehens ive pr ot ect i on fu nct i o ns; the controller itself and the external
equipment will not be damaged in case of various abnormal conditions such as short
circuit, open circuit, super power and so on
The pure aluminum shell design facilitates the heat dissipation
It has the ex pandable Intelligent Human Induction Function
- 5 -
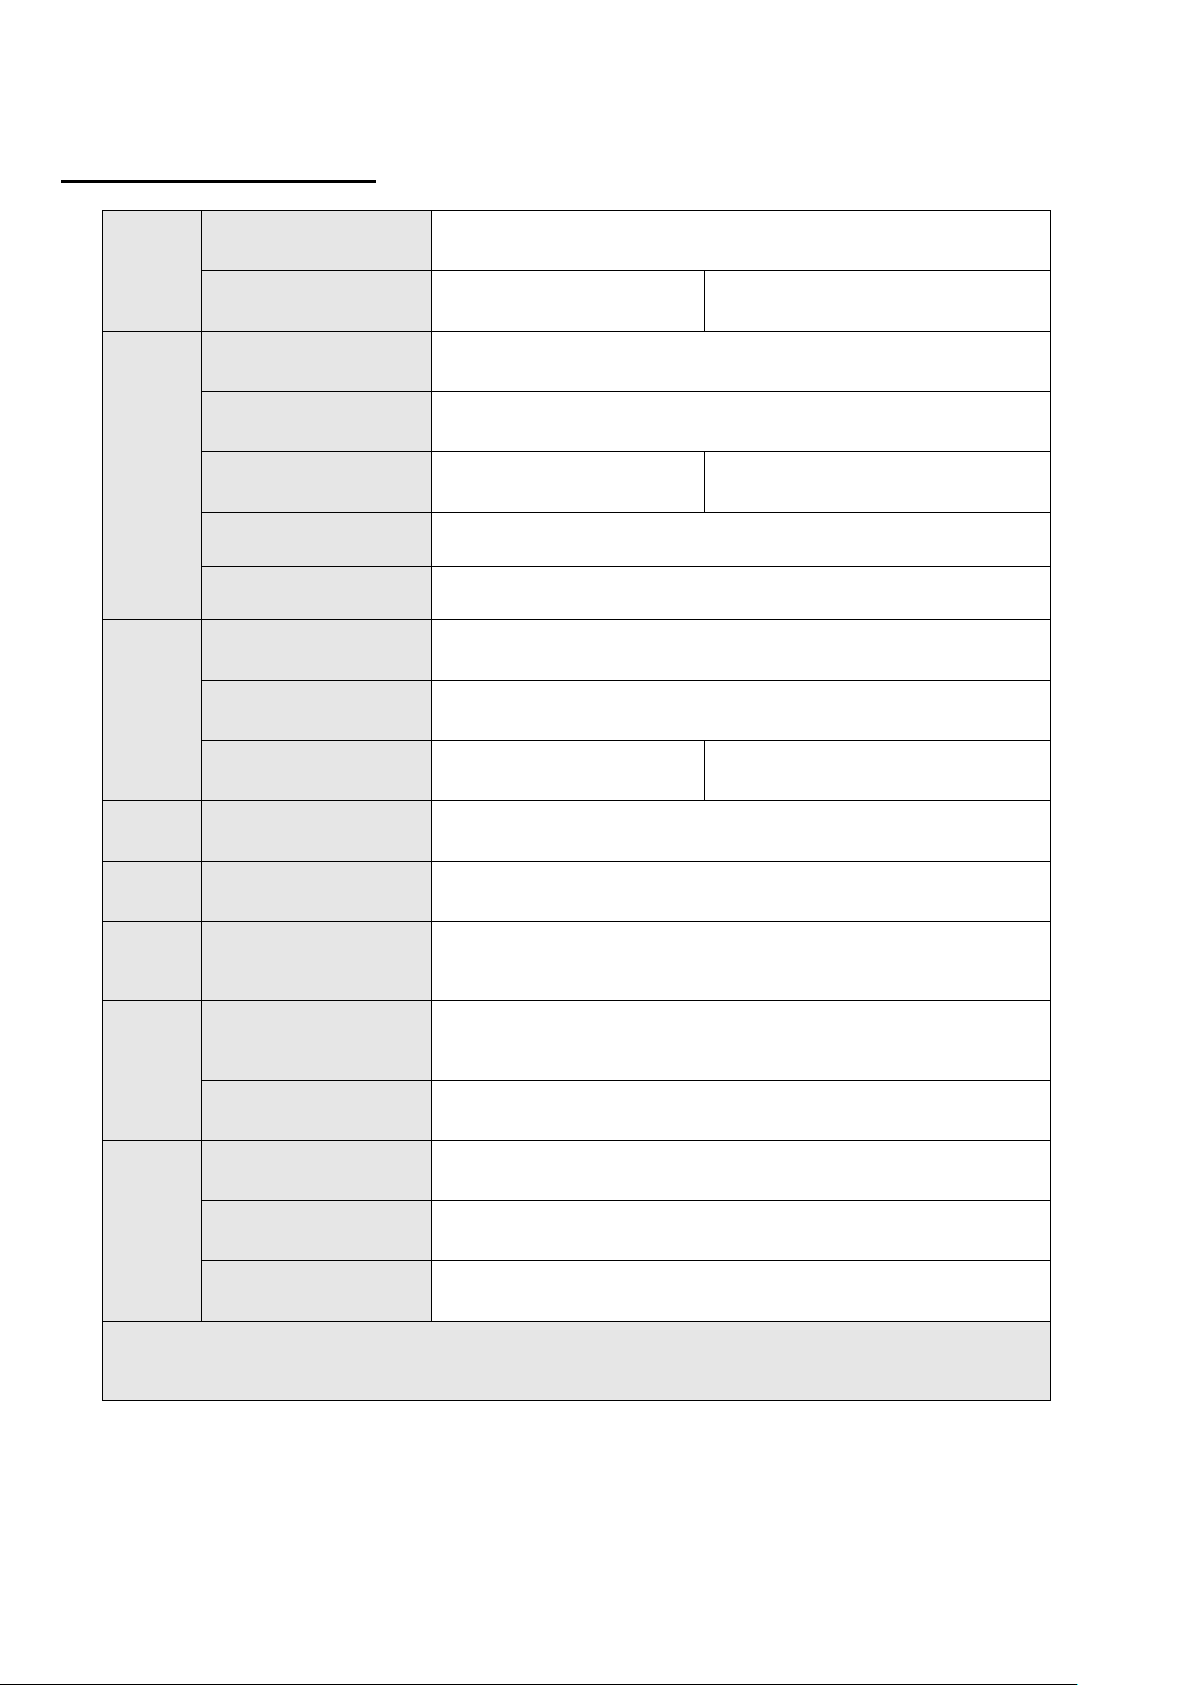
1.3 Technical parameters
Maximum charge current
Maximum output current
voltage
· · Product name · Waterproof solar charge controller
· Model · SDN-P10A · SDN-P20A
·
·
· Charging mode · PWM pulse width modulation
· Type of batteries · Lead acid / colloid / lithium electricity / to be de fined by customer
· Charging
·
· 10A · 20A
· System voltage · 12V/24V (Automatic Identification)
· Battery overvoltage · Default value 17.0V*
·
· Dischargi
ng
· Operating mode · Optical control / automatic / man ual / commissioning
· System voltage · 12/24v Automatic identification
·
· 10A · 20A
· · Battery undervoltage · Default value: 12.0V*
· · Battery overvoltage · Default value: 11.1V*
· · Returned over discharge
· · Operating temperature
range
· Default value: 12.6V*
· -40~55 ℃
· Self damage · ≤14mA
·
· Dimensio
ns
· Shell size · 88×62×20.7mm
· Waterproofing grade · IP67
· Net weight · 300g
· Note: * For setting of 12V system and 24V system x2, the system voltage can be set in the same as 12V
system.

- 6 -
1.4 Sizing specification
Figure 1.4: The appearance and dimensions of the prod uct

- 7 -
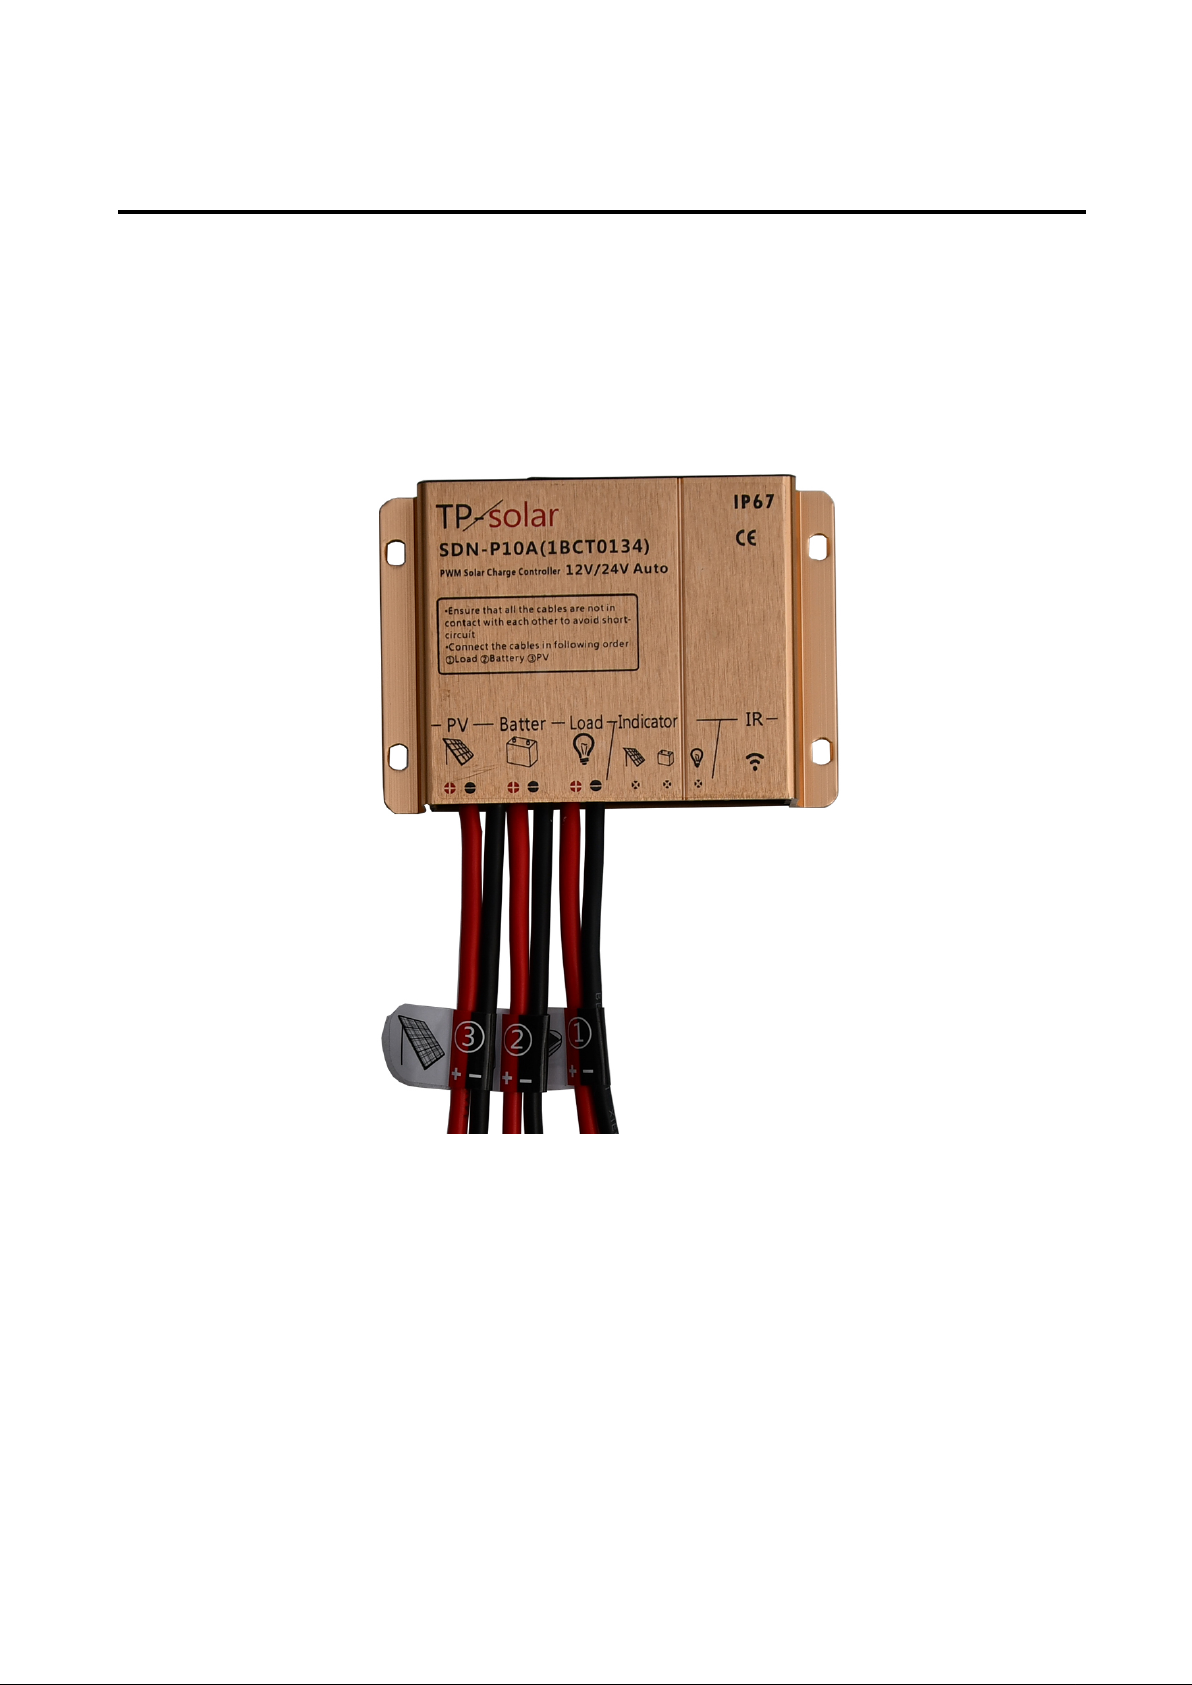
Installation instructions
Figure 2.1 A diagram of the panel
① Battery Indicator (Green) ② Battery Indicator (Red and
Green dual color)
③ Load indicator (yellow) ④ Infrare d communication
connector
⑤ Photocel l te rminal ⑥ Battery terminal
⑦ Load terminal ⑧ Mounting hole

- 8 -
2.2 Status indicator lamp(LED)
Normally On
Normally On
Normally On
down)
Normally
Color Status Instructions notes
Photocell
panels
status
LED
Battery
status LED
Green
Green
Quick
flashing
Panels are in normal charging
Overvoltage of battery (see
Troubleshooting)
------ Not On Panel voltage is low
Green
Battery in normal condition
Green Flashing Battery is full
Red /
Undervoltage of battery
Green
Red Normally
On
Yellow
Battery is over discharging
(The load output has been shut
Load On
On
Load
------ Not On Load Off
status
LED
Yellow Quick
Yellow
flashing
Slow
flashing
Load is short circuited
Overload

- 9 -
2.3 Installation
Fix the controller in a position where direct sunlight and h igh temper ature can be avoid and
there is no risk of being socked. Attention should be given to the radiators which play the r ole of
reducing the temperature of the equipment during the full power operation of the equipment..
Obstruction should be avoided so as to ensure the heat dissipation by me ans of natural
convection. When the device is installed in a narrow plaice such a s the lamp po le and so on, it is
preferred to install the heat dissipation bars in the direction of the air flow.
2.4 Mode of connect ion
The following recommendation is a common wiring method for electricians.
Please conne ct each wire of the contro ller according to the standard method.
● Before bein g dispatched f rom the fact ory, each wire of the co ntr o ller is a cut to
reserved a n opening on it. This will help to make easie r to push aside the wire at the
time making the connections and avoid short circuit between the wires at the same time.
Therefore, during the insta l la ti on, ple ase carry out the following steps one by one. In
avoid short circuit, do not remove the insulation of all the six wi res at one time.
● Overlap the coppe r wire in the lead of the controller and that in the lead of the
load each other, th en twine each them to the back half of the other lead and tighten hard,
respectively. In this connection mode, there is a larger contact area and a stronger
connection force, which can ensure reliable connection fo r a long period of time. Make
ensure that each of the connection heads is tightene d. It i s pref er red to fasten the wire with
a strap so as to avoid a loose connection head caused by shaking of the wire in the case
that the contr oller is u sed whi le it is in m ovem ent.

- 10 -
● Wrap the bare part of the wire with the waterproof insulating tape. To ensure its
reliability, first wrap the inner layer with a length of high-pressure rubber self-adhesive
tape and then wrap the outer layer with a length of electrical t ape. It should avoid to let
the contro ll er t o be i n a humid and h ot environme n t for an extended period of time, where
aging of the electric al tape m ay occur and consequently result in a short circui t accide nt.
Figure 2.4.3 Wiring step 3- Wrapping of the insulation layer
The wiring operation which conform to t he r eq uire m ents is the guarantee for the longterm reliable operation of the system. If the connections of the wire are not reliable enough,
this may cause the co ntac t re sis tanc e t o be too l ar ge an d cause the connection area to be too
hot. The o per ati on f or a n ex tend ed pe ri od o f tim e m ay resu lt i n early aging of the
insulation layer of the lead, and t hen give rise to short circ uit, op en circu it and other faults.
2.5 Wiring procedures
For the purpose of installation safety, please f ollow the sequence of
wiring of ① l oad ② battery ③ photocell while carrying out the installation.
● Connecting of the load: The controller has not started to work at this ti me, and the
controller does not make responses after the connection is completed
● Connecting of the battery: Before connecting the battery, make sure that the
battery voltage is high er than 9V in o rder to start the controller . If it is a system of 24V,
make sure that the accumulator voltage is not less than 18V. When the connection of
battery is completed, the controller will start working,
● Connecting of the solar battery: The controller is applicable to the solar
modules of standard specifications 12V or 24V; it can also be used with a solar cell
module with an open circuit voltage not exceeding the specified maximum input
voltage. At the maximu m powe r point , the voltage of the solar cell module should not
be less than the battery voltage.

- 11 -
Operational instructions
3. 1 Instructions for charging
SDN-P series products can manage battery charging according to specific charging
curves of the different battery types and their setting items. Based on the charging
characteristics, the batteries can be divided into two categories: the lead acid colloidal
battery and the lithium battery , and it w ill be possible to customize the parameters.
3.1.1 Colloid battery / lead acid battery
●
The preliminary trickle charging stage: At the beginning of charging, if the
voltage of the battery is too low, the controller will cha rge at a very small current for the
purpose of protecting the battery and preventing the impact of excessive current from
causing damages to the internal structure of the battery. When the battery voltage has
increased to certain level , it will enter the quick charging stage.
● The quick charging stage: When the battery voltage has not r eached the set value,
the controller will provide the maximum battery panel power for charging of the battery.
In the quick charging stage, the p hotovoltaic cell and the battery are directly connected,
and the photovoltaic cell voltage is restrained at the batter y vo lta ge point.
● The balanced charging stage: When the solar battery enters the balanced charging
stage, the pulse width modulation (PWM) will be activated, and as the battery voltage
has reached the preset value, the controller will keep adjusting the battery voltage in
order to keep it at the set value so that overcharging the battery can be avoided. This
stage will be maintained for 2 hours and then the solar battery enters the floating
charging stage.
● The floating charging s tage: The battery no longer needs more electricity at this
time. However the controller will still maintain a very weak charge, for the purpose of
reducing the electricity co nsumption in supplying power to small loads and replenish ing
the power consumption of the battery itself. In this way, it will be possible to keep the
battery in the saturation state all the time, while prolong the service life of the battery.

- 12 -
3.1.2 Lithium battery
In case that the lithium ba ttery type is chosen, the controller should be adjusted to a charging
curve which is suitable for the characteristics of the lithium battery.
●
The preliminary trickle current charging stage: At the beginning of charging, if
the voltage of the battery is too low, the controller will charge at a very small cur rent for
the purpose of protecting the battery and preventing the impact of excessive current from
causing damages to the internal structure of the battery. When the battery voltage has
increased to certain level , it will enter the quick charging stage.
● The quick charging stage: When the battery voltage has no t reach ed the set value,
the controller will provide the maximum battery panel power for charging of the battery. In
the quick charging stage, the phot ovoltaic cell and the battery are directly connected, and
the photovoltaic ce ll volta ge is restrained at the battery voltage point.
● The constant voltage cha rging stage: When the battery voltage has increased to
the set voltag e for charging, the constant current charging will come to an end and the
constant voltage charging stage will start. The current slowly decreases for its maximum
value as the charging p rocess c ontinue to perform the charging according to th e ext ent of
saturation of the solar battery. Normally the set voltage for charging is 4.2V for a single
- junction solar cell depending on the parameters provided by the battery manufacturer.
● The charging termination stage: Monitorin g of the charging current
in the constant voltage charging stage is carried out.

- 13 -
The photovoltaic indicator lamp is
The load indicator lamp is on only
Check to see whether the wiring of the
Disconnect the connection of the solar
Check to see if the load connection has
Disconnect the load and make the connection
The period when LED lamp is on
There is a lack of voltage
The lead has been broken
Handling of common faults
Failure phenomenon Analysis of causes Solution
·
not on during the day
· The load indicator lamp is on
during the day
·
for one night
·
· The load indicator lamp flashes
· The LED lamp is not on
The loa d indicator lamp flashes
slowly
· There are errors
with the battery panel or
with the wiring
· The load
connection is short
circuited
· The lamp holder is
damaged
The output powe r
exceeds the rated power
·
solar panel has been correct in a proper
manner
·
panel and make the connection once again
·
been made in a correct way
·
once again
Remove pa rt of the load and make the
connection once again.
The battery indicator lamp is in
red
is not sufficient
with the battery
and the battery has been
damaged
Check to see if the charging is normal and if
the solar panel has been equipped with a
shield and so on
Check to see if the battery connection has
bee n disconnected or has been connected in a
loose manner
There is any quality problem with the battery
or its service life has been expired.

- 14 -
the controller
to turn
seconds at 1.5-fold overcurrent.
power supply.
Protection functions
Load fault protection:
If there is a short circuit with the controller load, the controller will automatica lly
carry out protection, the load indicator lamp will flashes quickly, and
will a utomatically detect at a certain interval to see if the fault at the load end has
been eliminated. If the failure lasts for more than 7 minutes, the controller will no
longer try to turn on the load until the next day when the controller attempts
on once again or the operator carries out the troubleshooting and manually
eliminates the fault.
Overcurrent protection:
The controller will keep the normal operation under 1.1-fold
overcurrent, carry out protection after a time delay of 1 minute at 1.25fold time delay, and carry out protection after a time delay of 20
Overcharge protection:
When the charging voltage is too high, the controller will automatically
cut off the charging circuit. Avoid damaging the battery.
Over discharging protection:
When the battery has been up to the over-discharge protection voltage,
the controller enters the over-discharge protection state and closes the
load output so as to protect the battery from being damaged. When the
battery charge is higher than the returned over-discharge voltage, the
controller will exit the over-discharge protection and restore the load
The reversed polarity connection protection for the photovoltaic cell:
The controller will not be damaged in case that the polarity of the
photovoltaic cell has been reverse connected, and it will continue to
carry out the normal operation after the wiring error has been corrected.
The reversed polarity connection protection for the battery:
The controller will not be damaged in case that the polarity of the
battery has been reverse connected, and it will continue to carry out the
normal operation after the wiring error has been corrected.
The temperature sensor damage fault protection:
In case that the temperature sensor is short-circuited or damaged, the
controller will work at 25 ℃ by default to avoid the damage caused to
the battery by the wrong temperature compensation.
 Loading...