

Page 1

TP TUBE
DSP
DESIGN
WAF
500W
SoundDeny
160W
300W
CLASS-D
Chrome
DMOS
WAF
DSP
DESIGN
CLASS D
160W
Chrome
Ampliere
Active loudspeakers by TP RADIO
SoundDeny
Ampliere
CLASS D
300W
DMOS
Active speakers by TP RADIO
SoundDeny
160W
300W
CLASS D
It’s almost unnatural that these “sticks” can
give the impression of being huge speakers.
It’s so unrealistic that you won´t believe it
until you have experienced it.
Johnny Sørensen
HI-FI
HI-FI
User Guide
Page 2

UserGuide March 2013
For TP160 / TP300 / TP500
Health and safety
Always use an original TP Tube stand if the speaker is to be free-standing.
Otherwise, the speaker may fall over and cause injury.
The sound pressure generated from TP TUBE loudspeakers can cause
hearing damage if the ear is too close to the speaker.
Never play with a high sound pressure when a person’s head is less than
1m from a speaker.
Note: TP TUBE speaker is so heavy that it is able to
cause damage to the feet and other body parts if it is dropped.
When you have to deal with heavy objects such as TP TUBE
loudspeakers, make sure to always use proper lifting techniques, bend
your knees and hold back upright and arms as close to your body as
possible.
NOTE: This is a Beta version 1.2-2013 of the userguide and we keep the
rights to change it at any time.
Page 3

INDHOLD
• Quick Guide 4
• Introduction 6
• Functions 7
• Place the Speaker 11
• Connections 14
• Connect the speaker 16
• The Front indicator 20
• Customize setting with TPlay 22
• Documentation 30
• Interface / Pin-out 33
• Your own setup 34
Page 4

Quick Guide
Here’s a quick guide to setting up and using TP Tube Series
Your TP Tube, is supplied with an auto function to make
installation easy.
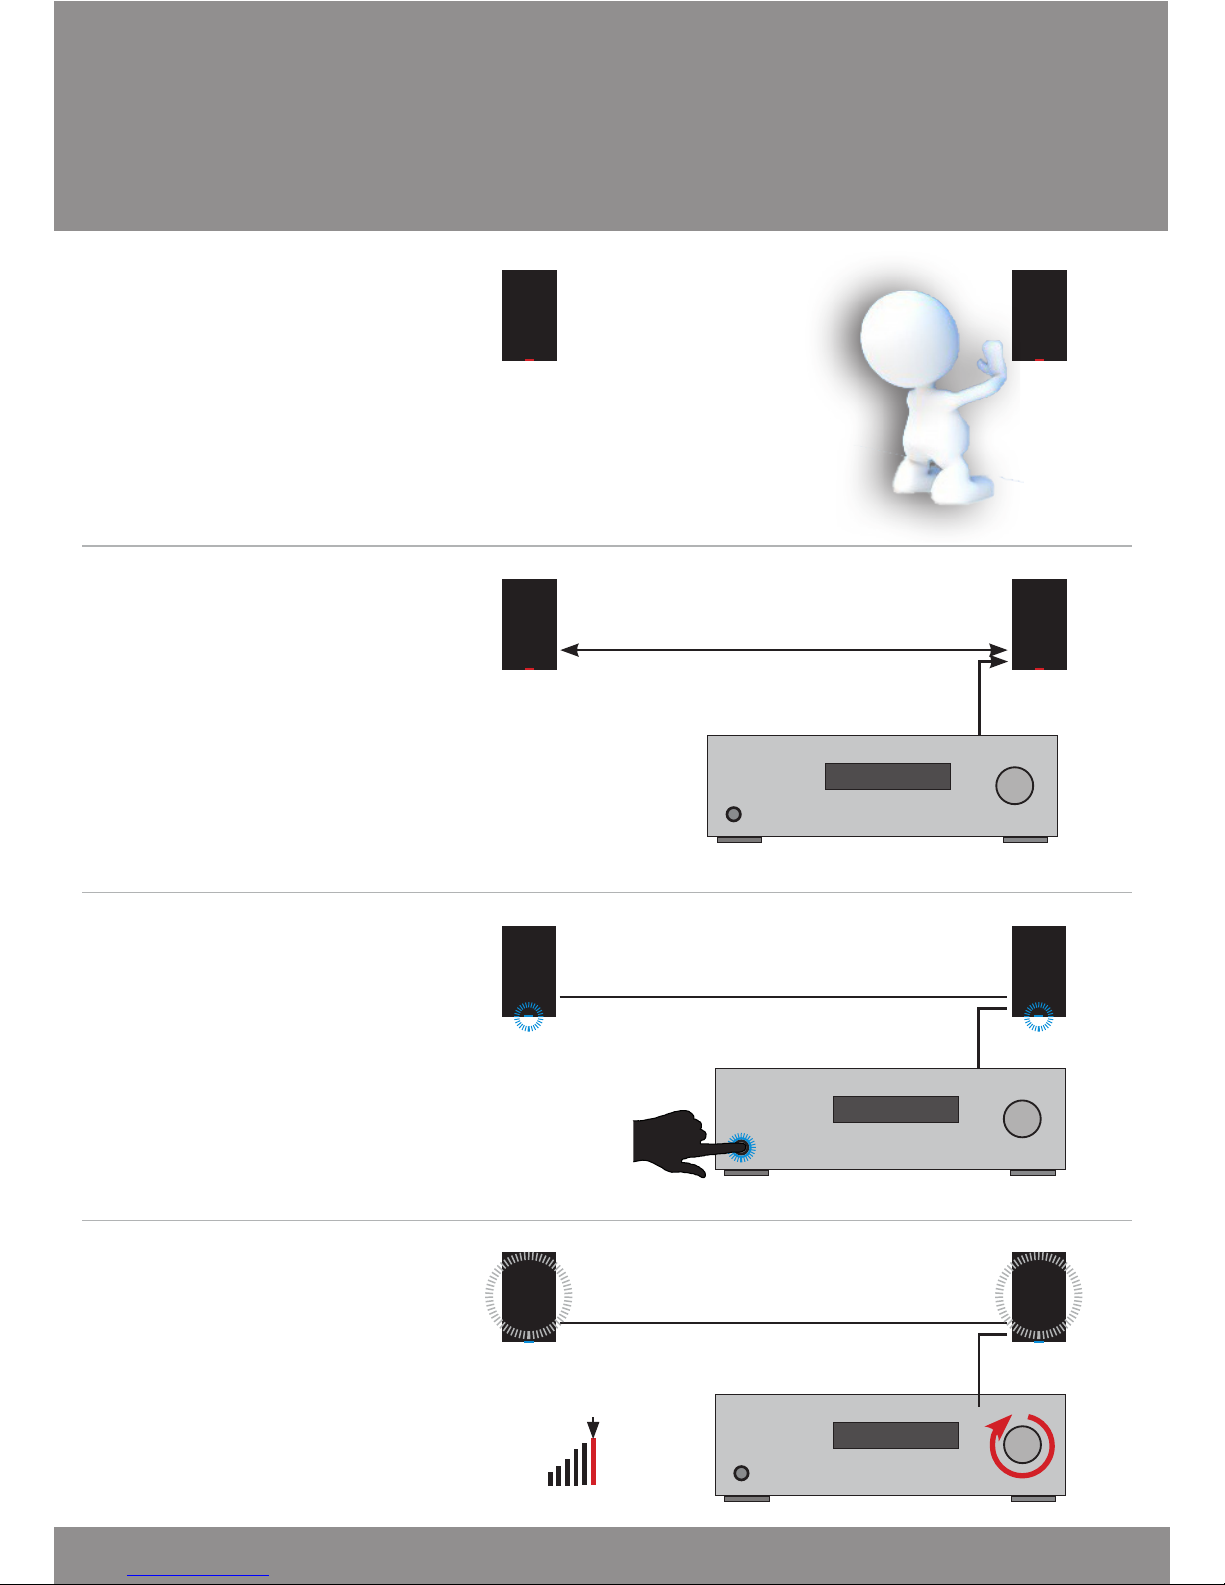
1. Place your speakers as described in the user manual.
2. Connect with 230V power cord and audio source with link cables and
adapters. Set left and right speakers @ INPUT switch (see page 15)
3. Turn on your audio device. Play music / sound and register that the speakers also powers on. (Blue LED on)
4. Crank up your audio for about 6 seconds. (Be aware that there may be
damage to your hearing. Use if necessary earplugs.) Then turn down the
listening level again..
Your speakers have now adapted to the source they are connected to, and is
now ready for use.
It is recommended to read the user manual carefully and adjust the speaker
following its instruction.
4
Page 5
5
TP Tube Stereo
TP Tube Stereo
TP Tube Stereo
♪♫♪
♪♫♪
• 1.
• 2.
• 3.
• 4.
Quick Guide
6 sek
Page 6

Introduction
Congratulations on your new TP TUBE active speakers.
You have with TP TUBE series acquired an Danish designed- and produced
quality product that we hope you will enjoy for many years.
When you unpack your speakers. You must ensure that there are the following
contents in each package and that it is not damaged:
• 1 Speaker
• 1 SK-655 Power cord (2 m)
• 1 Key Package / TPlay CD + USB
• 1 User manual
Signal cables, signal adapter, speaker stand is an accessory and must be
ordered separately.
Cleaning
If it is necessary to clean the speaker cabinet, use a soft lint-free cloth that has
been soaked in water with a bit of normal detergent.
Be careful not to let water into the speaker.
Avoid using a wet cloth on the back panel connectors.
Never use cleansers that contain abrasives, solvents or other chemical detergents.
daily use
Once you have set up and adjusted the speakers as described in the instructions on the following pages. Connected to the power source and is ready for
use.
TP TUBE enters standby mode automatically when not in use and this is shown in the
indicator, with a red light
g. 1
6
Page 7

Functions
• Active speakers
TP TUBE loudspeakers are active speakers, which means that the ampliers
to equip the speaker units are located inside the cabinet.
In addition to the usual input signal active speakers requires an external power
source.
• Auto power on / off
TP TUBE loudspeakers are supplied with a built-in “Auto Power On / Off” function. In standby mode, it means that as soon as it detects a signal on the input,
the speaker automatically turns On.
This is indicated with blue light in the indicator (Fig. 1).
“Power On” level can be adjusted.
(read more in the section “Customize settings with TPlay”)
If there is not detected a signal at the input for more than ve minutes, the
speakers turns off (go into stand-by mode) automatically.
This is shown with red light in the indicator .. (Fig. 1)
If the speakers are used with B & O “Powerlink” controlled equipment, the
TP Tube speakers automatically turns on / off at the same time as the B & O
equipment.
•
7
Page 8

Functions
• Active Loudness
The “active loudness technology” (physiological volume control) used in TP
TUBE loudspeakers are unique to these products.
In TP TUBE loudspeakers there are used a very subtle, acoustic natural
process that dynamically regulates the amount of “boost” depending on the
frequency and level, after the so called Fletcher-Munson curves.
“Active loudness” level can be changed with the included TPlay - CD / USB.
The function can, if desired, be turned off by a switch on the panel on the
cabinet rear. (Cable Connections page 13 / g.2)
• Auto-leveling input
TP TUBE loudspeakers can be used with any audio source
(standard line-level professional line level, power amplier output level.)
With rst time use or after “reset”, the unique “auto-leveling input” function
adjusts the input gain to suit most ampliers (from 5W and up)
If it is necessary to connect the speakers to a line-level output, the start level
is set using the CD / USB.
(read more in the section “Customize settings with TPlay”)
• Limiters
TP TUBE loudspeakers are protected by a digital limiter, which provides
protection of the speaker units from being destroyed by limiting the output
level.
This means that it is impossible to destroy the devices, playing too high.
8
Page 9

Functions
• DSP
Crossover Frequency, physiological volume control, equalizer and limiting
features are implemented in a 24-bit Digital Signal Processor.
DSP completes the use of the high efciency ampliers used in TP TUBE
active speakers.
• Class D (digital ampliers)
Each of the four woofers in TP 500 is powered by its own 100W PWM power
amplier. Class D is a digital amplier with efciency up to 90%
In TP 160, the same type of Class D power amplier is used for both woofer
and tweeter unit (an amplier for each unit). Max. output is set to 80W.
• DMOS
A separate 100W DMOS power amplier drives the tweeter in the TP 500 and
TP300.
9
Page 10

Functions
• SoundDeny antitheft system
“SoundDeny” system is a very effective anti-theft system.
The patent-pending technology ensures that TP TUBE loudspeakers can not
be used if stolen.
The system works as follows:
If the power at any time is removed from the TP TUBE loudspeakers for more
than 6 hours, the digital electronic locks the speakers and prevent use until a
unique Audio key is supplied to the speakers.
The benecial owner of the speakers can simply play the unique audio tracks
from TPlay - CD or the USB from a completely common source and unlock the
speakers. (See “Customize settings with TPlay”)
If TPlay - CD / USB is kept in a safe place, the speaker can not be used if it is
stolen.
If the benecial owner loses or destroys TPlay CD / USB, then TP Radio
provide a copy, under the circumstances that a correct serial number and the
purchase can be documented.
• SOUND
This switch determines the frequency curve that best ts the location of the
speaker in the listening room:
1- Freestanding - used when the speaker is placed 50 cm or
more from a wall and it is not in a corner.
2- Near the wall - used when the speaker is located less than 50
cm from a wall and it is not in a corner.
3- Corner used when the speaker is placed in a corner.
10
Page 11
Place the speaker
• Installation of TP TUBE
TP 500, TP 300 is cleared for use in freestanding mode when the original
TP TUBE stand is mounted. For stability reasons, this stand should always be
used when the loudspeaker is to be detached.
TP 160 has not a requirement for installation of a stand.
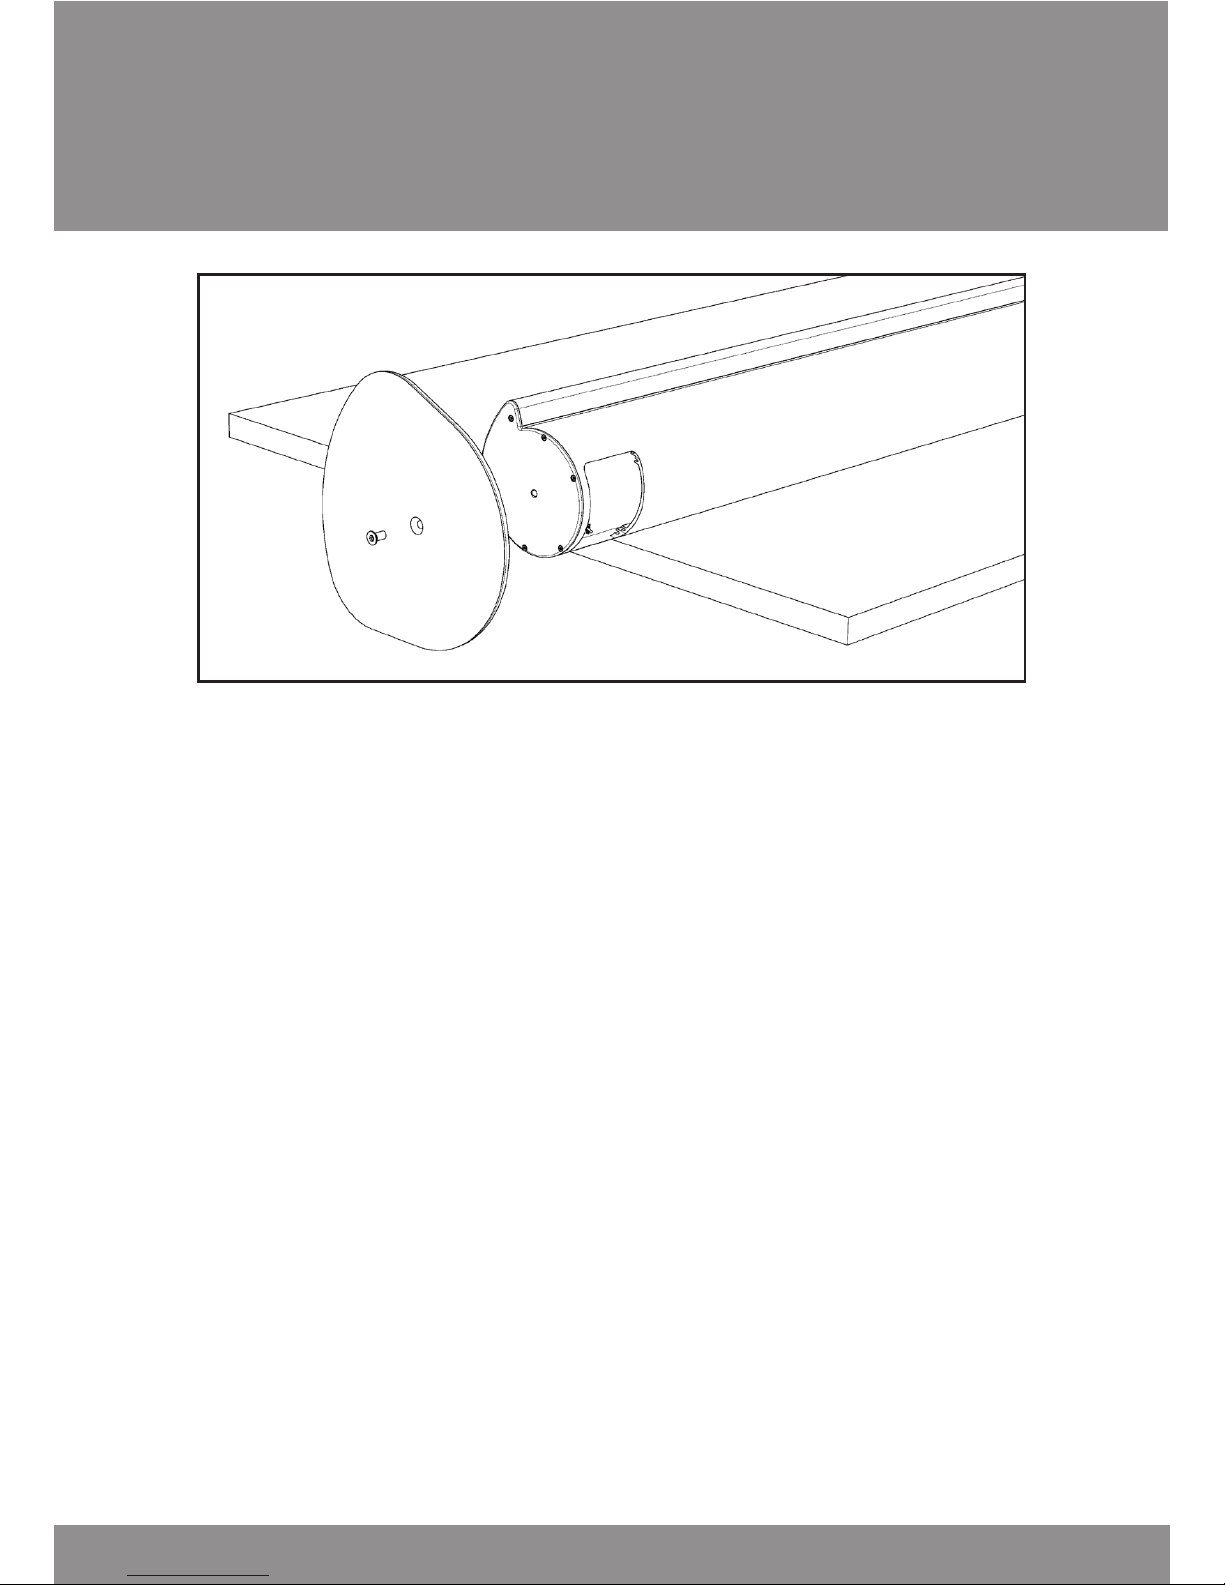
1- Unpac TP TUBE speaker.
2- A piece of soft protective materials, such as. a small
blanket or foam material on a solid table that is large
enough for the speaker to be there.
3- Lay the speaker on the side of the protective material in such a way
that the bottom of the loudspeaker protrudes beyond the edge of the
table. (See Figure 3)
4- Keep stand (optional - not supplied with the speaker) up towards the
bottom of the speaker and secure it with the supplied allen screw.
g. 3
11
fortsættes...
Page 12

Place the speaker
5- Tighten the screw with the supplied Allen-key.
6- Lift the speaker with both hands and place it
gently on the oor in an upright position.
Note: Never lie or support the speaker on the front
(Metal grill with black fabric). Use a soft surface if the speaker is on its side - the
painted surface can be scratched by direct contact with a hard surface.
12
Page 13

Place the speaker
ou are now ready to place your speakers.
TP TUBE loudspeakers can be placed in an upright position anywhere in the
listening room, if you just make sure to place them on a stable and solid
material. (TP160 / TP300 can be placed in the vertical, as a center speaker)
However, there are other things to be taken into consideration:
• Acoustic - if the speakers are placed in a corner or close up against
a wall, you can compensate for this by choosing the right setting with
“sound” switch.
It would be ideal to place TP TUBE loudspeakers free
standing with at least 50 cm away from the nearest wall.
• Aesthetic - nd out what location that makes it easier to hide the
wires.
• The distance to the nearest power outlet. every speaker must be
connected to power source.
With each speaker delivered a 2m long power cord.
If the distance to the nearest outlet is larger, an extension cord
should be used.
• The distance to the sound source
(Radio + amp / CD player etc.).
• The distance between the speakers
We are always ready to assist with advice and guidance about
placement and adjustment
13
Page 14

Connections
• Signal cables / Link Cables / Adaptors
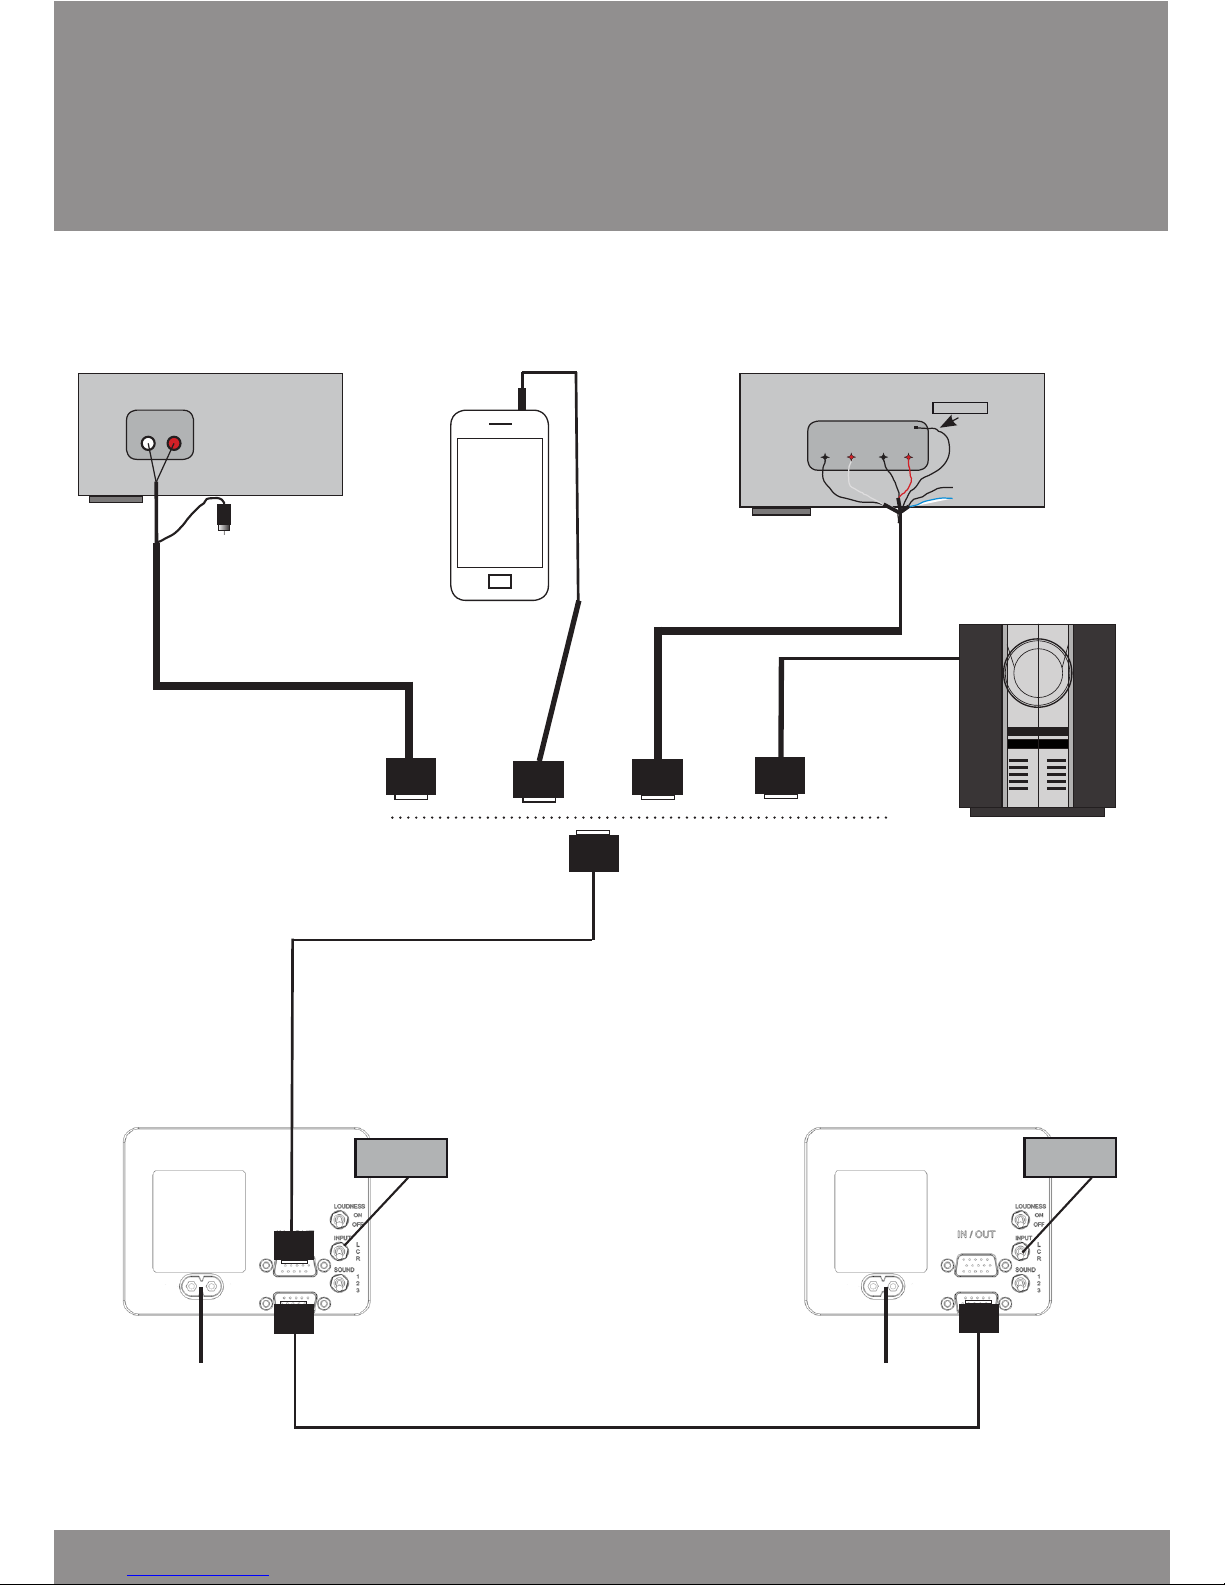
You can control up to three TP TUBE loudspeakers with the same signal
cable. (See: Installing page 14)
This is possible because the signal cable has three paired signal lines, and the
two inputs / output connectors makes it possible to connect speakers in series.
This solution can simplify cable connections from source to the speakers.
The following cables are available:
• SK652 Line adapter - Line level input, 30 cm long,
phono plug to the sound source, D-15 female connector at the
other end.
• SK688 Line adapter - Line level input, 30 cm long,
3.5 Jack at the sound source, D-15 female connector at the
other end.
• SK653 speaker adapter – Speaker level input, 30 cm long,
Stripped and tinned wire to the sound source, D-15 socket on
other end.
• SK654 ”Power link” adapter - (only for B&O systems)
Speaker Level input, 30 cm long, DIN plug to the sound
source, D-15 female connector at the other end.
• SK651/1 Extension Cable 1.0m, D-15 male to D-15 female.
• SK651/35 Extension Cable 3.5m, D-15 male to D-15 female.
• Sk651/10 Extension Cable 10m, D-15 male to D-15 female.
For accessories and prices, please call or go to www.tptube.dk
14
Page 15
Installation 4
Connections
3
4
5
6
1
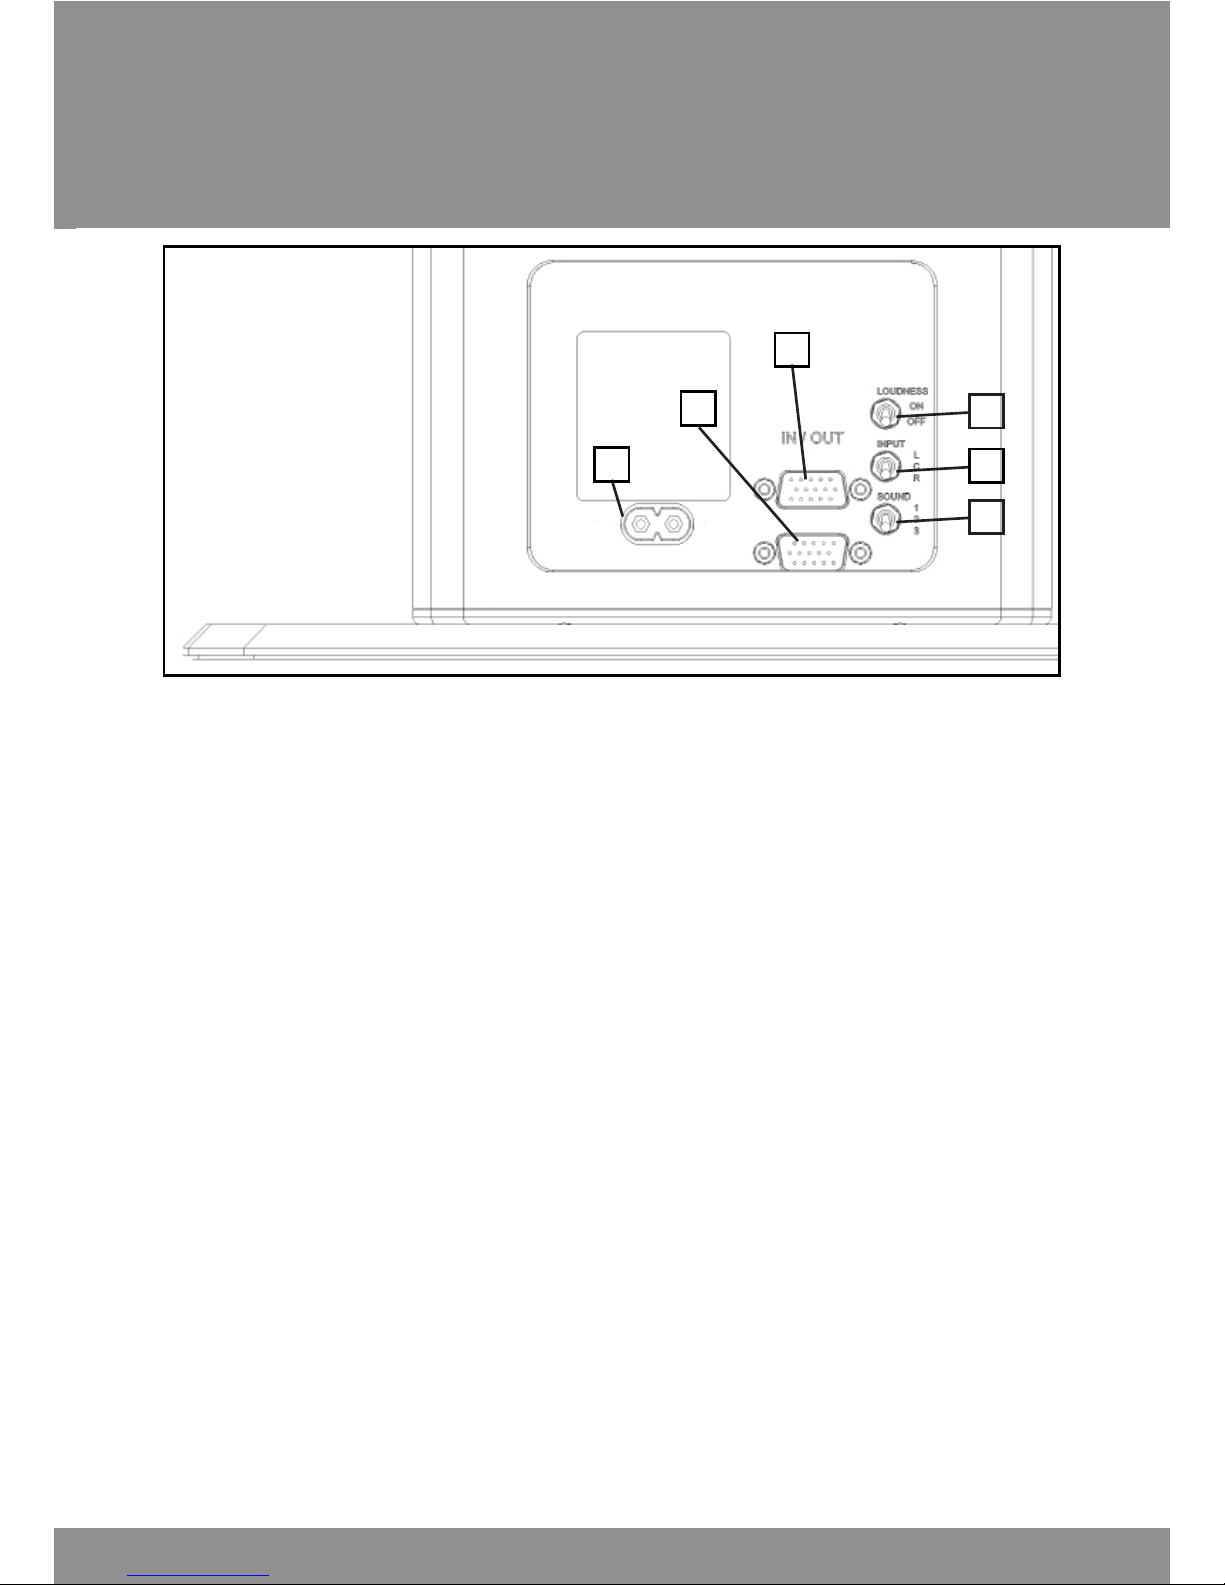
The power cord (SK654) is inserted here.
Here you connect the audio source.
Or link cable from the second TP TUBE speaker.
Here you can connect the link cabel to the next TP TUBE
speaker.
This switch turns the “active loudness”
function, On or Off
Sets the speaker to: left, right or center.
You can with this switch determine location of the
speaker in the listening room.
1. 230V
2 IN
3 OUT
4. LOUDNESS
5. INPUT
6. SOUND
2
g. 2
15
Page 16
Connect the speaker
Of course it is also possible to connect cables to each speaker individually
16
SK652
SK653
SK651/35
SK651/10
230 VAC
230 VAC
input set to
L (left)
input set to
R (right)
SK688
Example of Adapter use i a stereo setup
SK654
Center
L R
Front
Stereo Forstærker
Volume controled
line-output
L
højttaler udgang
R
C
Stelledning
Forstærker
Speaker output
Page 17
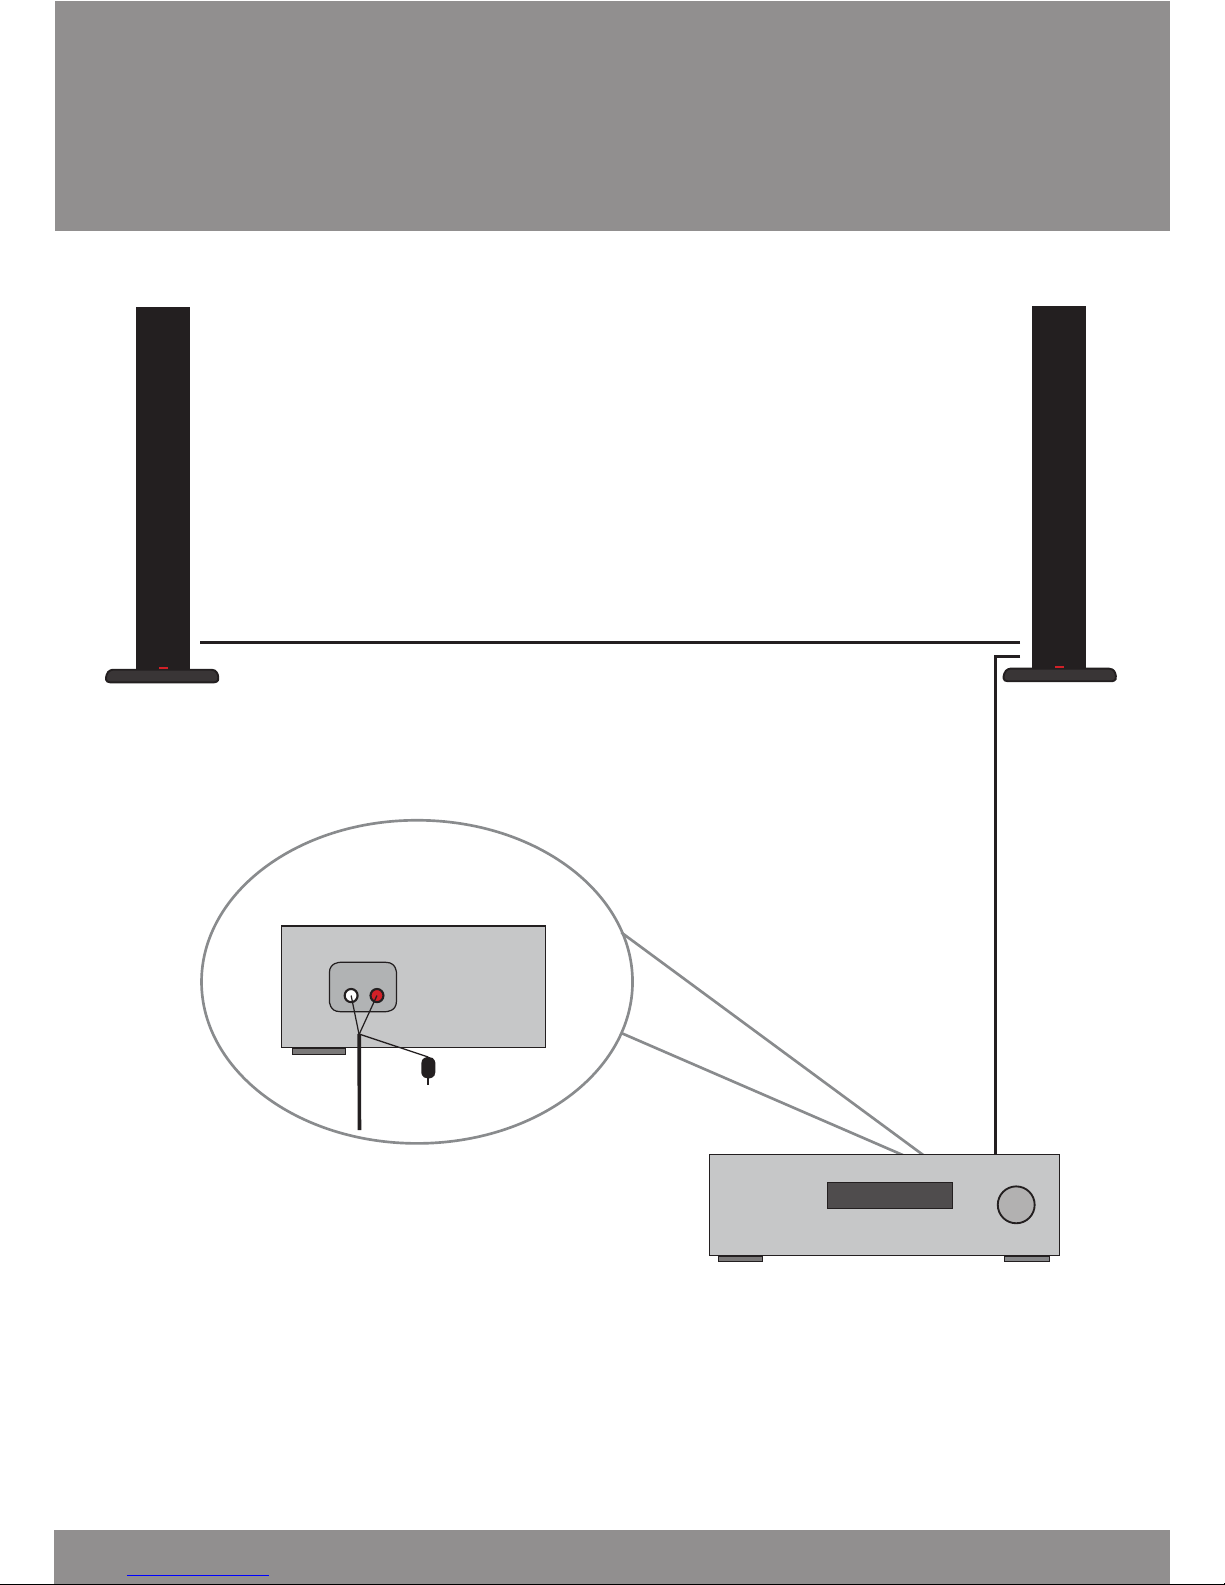
Connect the speaker
Example of installation with Amplier using the Pre-Out
Of course it is also possible to connect cables to each speaker individually
17
Center
L R
Front
Stereo Forstærker
Volume controled
line-output
TP Tube Stereo
Page 18
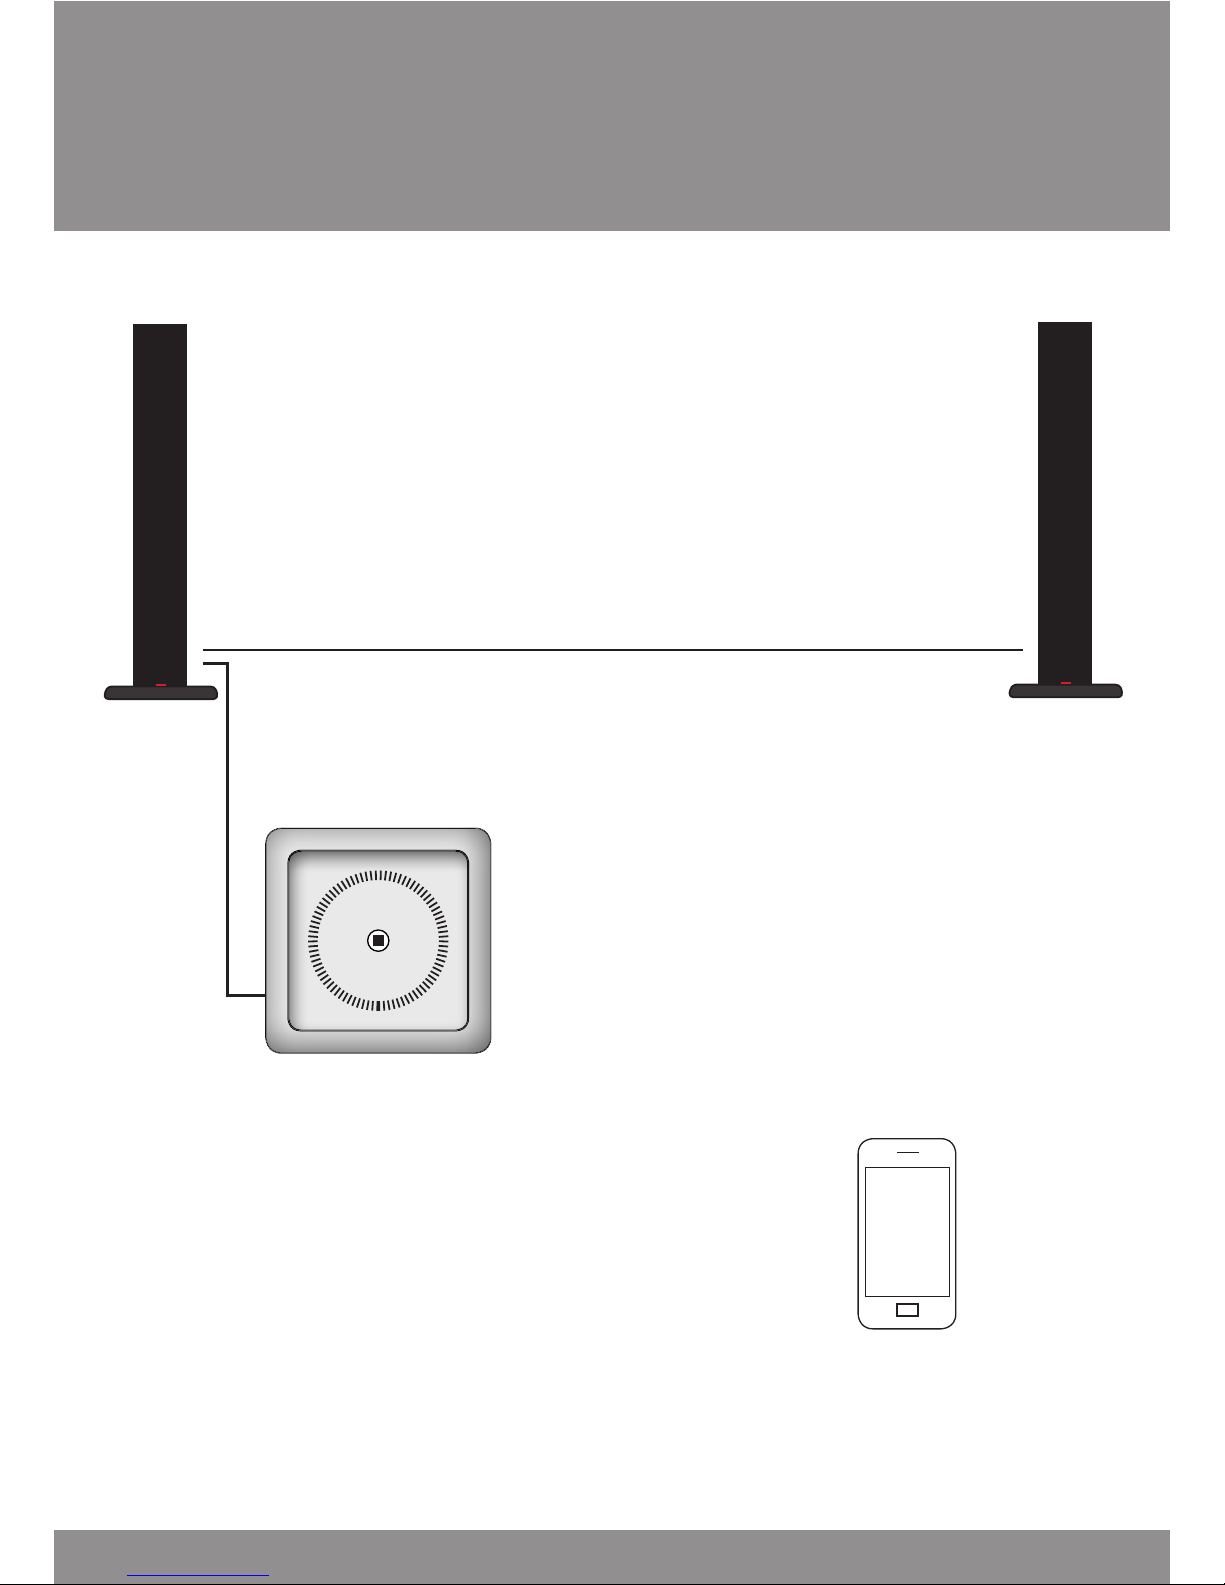
Connect the speaker
If you have questions about the installation? -Please refer to FAQ on www.tptube.dk or call 43 90 60 48
18
Example of Stereo installation with AirPlay & DLNA
BANG & OLUFSEN
(
(
(
(
(
(
Page 19
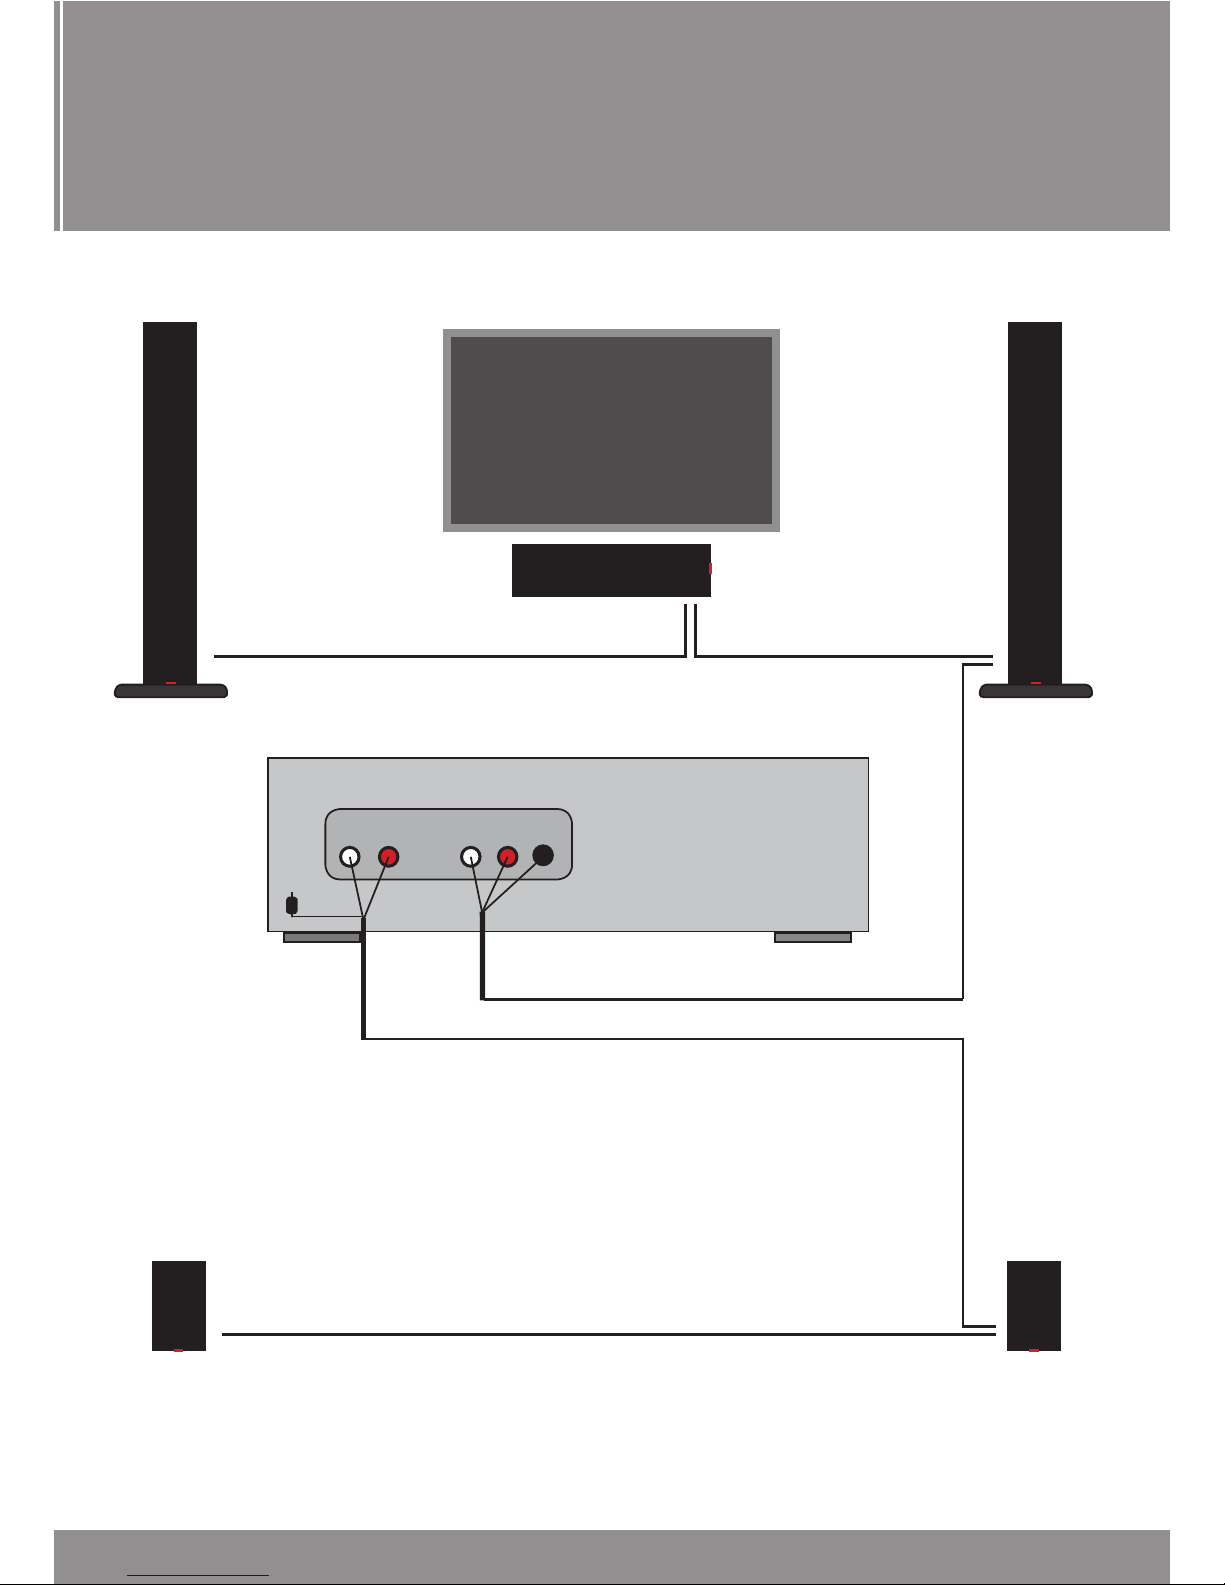
Connect the speaker
Eksempel of Surround installation
Remember to choose what speaker to play as: L - C - R
19
Center
L R
L R
C
Back Front
Sorround Reciever
Page 20

The Front indicator
• ndicator / LED
On the speaker front bottom center is located a two-color LED indicator.
LED turns red when the loudspeaker is connected to the mains.
LED can be lit or ashing, with the colors red, purple and blue.
When the speaker is used usually led shows the following:
• Constant blue light: The speaker is on
• Steady red: The speaker is in standby.
• Slowly ashing red light: the protective device (Sound Deny) entered
ifunktion, and the speaker works only again when protective device is
activated or deactivated with TPlay - CD / USB.
When the speaker plays very loud, the LED briey or
longer intervals change from blue to purple or red.
• If the LED briey ashes red intermittently, it means that the built-in
protection circuit is activated briey. This does not hurt the speaker.
If the LED lights up red more persistent you need to turne down the
volume.
• If the LED briey ashes purple, it means that the signal from the
sound source is too strong.
Read the description under “Customize settings with TPlay”
Using TPlay - CD / USB light blinks, see description under
“Customize settings with TPlay”
20
Page 21
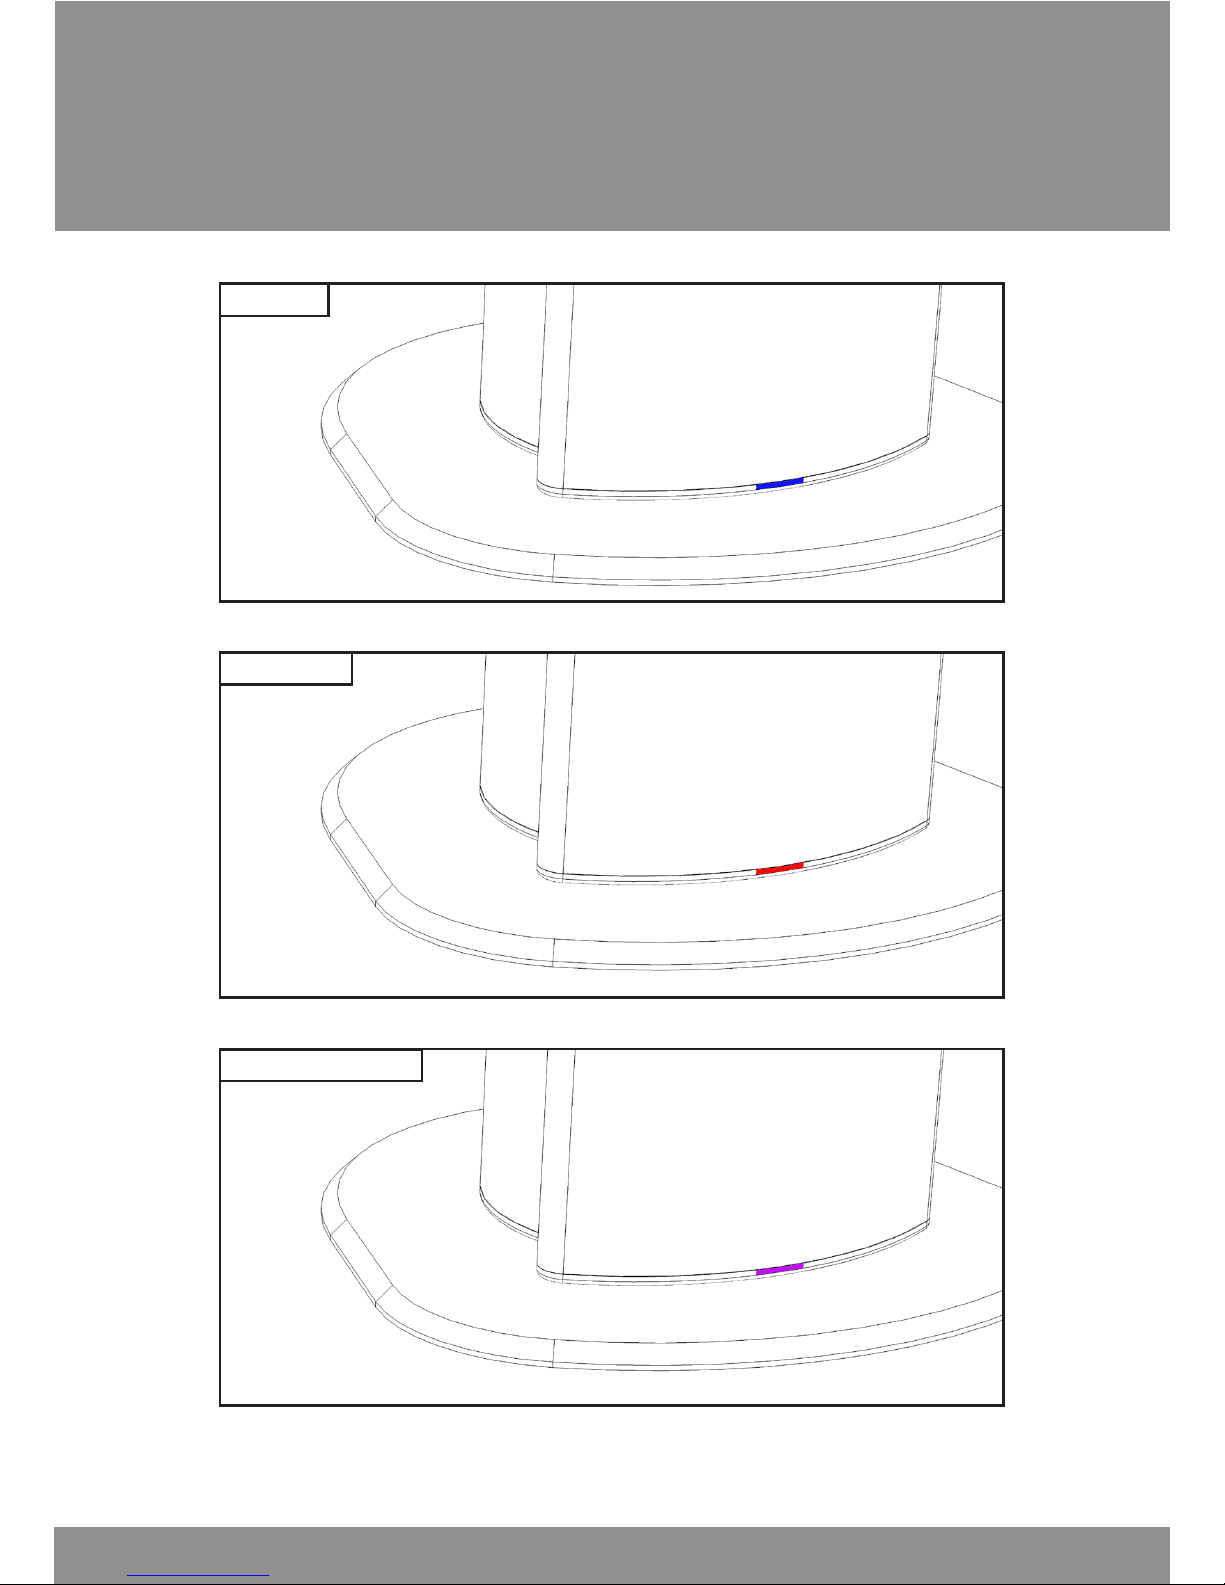
The Front indicator
On
Standby
Safety/Teach
21
Page 22

Customize settings with TPlay
Before taking your speakers in use for the rst time
• Decide whether to use “Active Loudness” function and set the
“loudness” switch then.
• Determine where the speaker is to be placed and set the switch.
“Sound”
• Determine whether the speaker is a left, right or center
speaker and set “input” switch then.
• You can with TPlay set input level depending on your amp.
• Determine whether you want to use“SoundDeny anti-theft”
function
22
Page 23

Customize settings with TPlay
• Info
The accompanying TPlay - CD / USB contains soundtrack to adjust the
speaker properties beyond what is possible with the switches at the rear of the
speaker.
The soundtrack is divided such that all even numbers have a “function”, while
the odd numbers are “empty numbers” that separates the individual functions,
so that you can manage to stop playing before the next function starts.
To enable a function to a value simply play the number that gives the desired
value. Hi- system must be set to normal listening level, and must not be
adjusted while the track is playing. Hi- system sound setting should be set to
neutral.
If the SoundDeny is “activatet”, the notes could not be heard, but the function
will nevertheless be executed.
The rst number (1), is a test tone that can be used to adjust sound level.
All even numbers starting with 2 tones of 6 sec. duration. At the end of the
second tone, the LED on the front start ashing purple, indicating that the
sound level is in order.
Then there will be rapid succession a series of tones that make up the function
itself. If the light at the end of these notes is red for 2 seconds. it meant that
there was an error.
In case of failure, you can try increasing or decreasing the
volume level a bit and try again.
Note: when adjusting the surround system, it may be necessary to play the “4-stereo”
or put the rear speakers as front speakers temporarily, to get sound level enough to get
adjustment to work.
23
Page 24
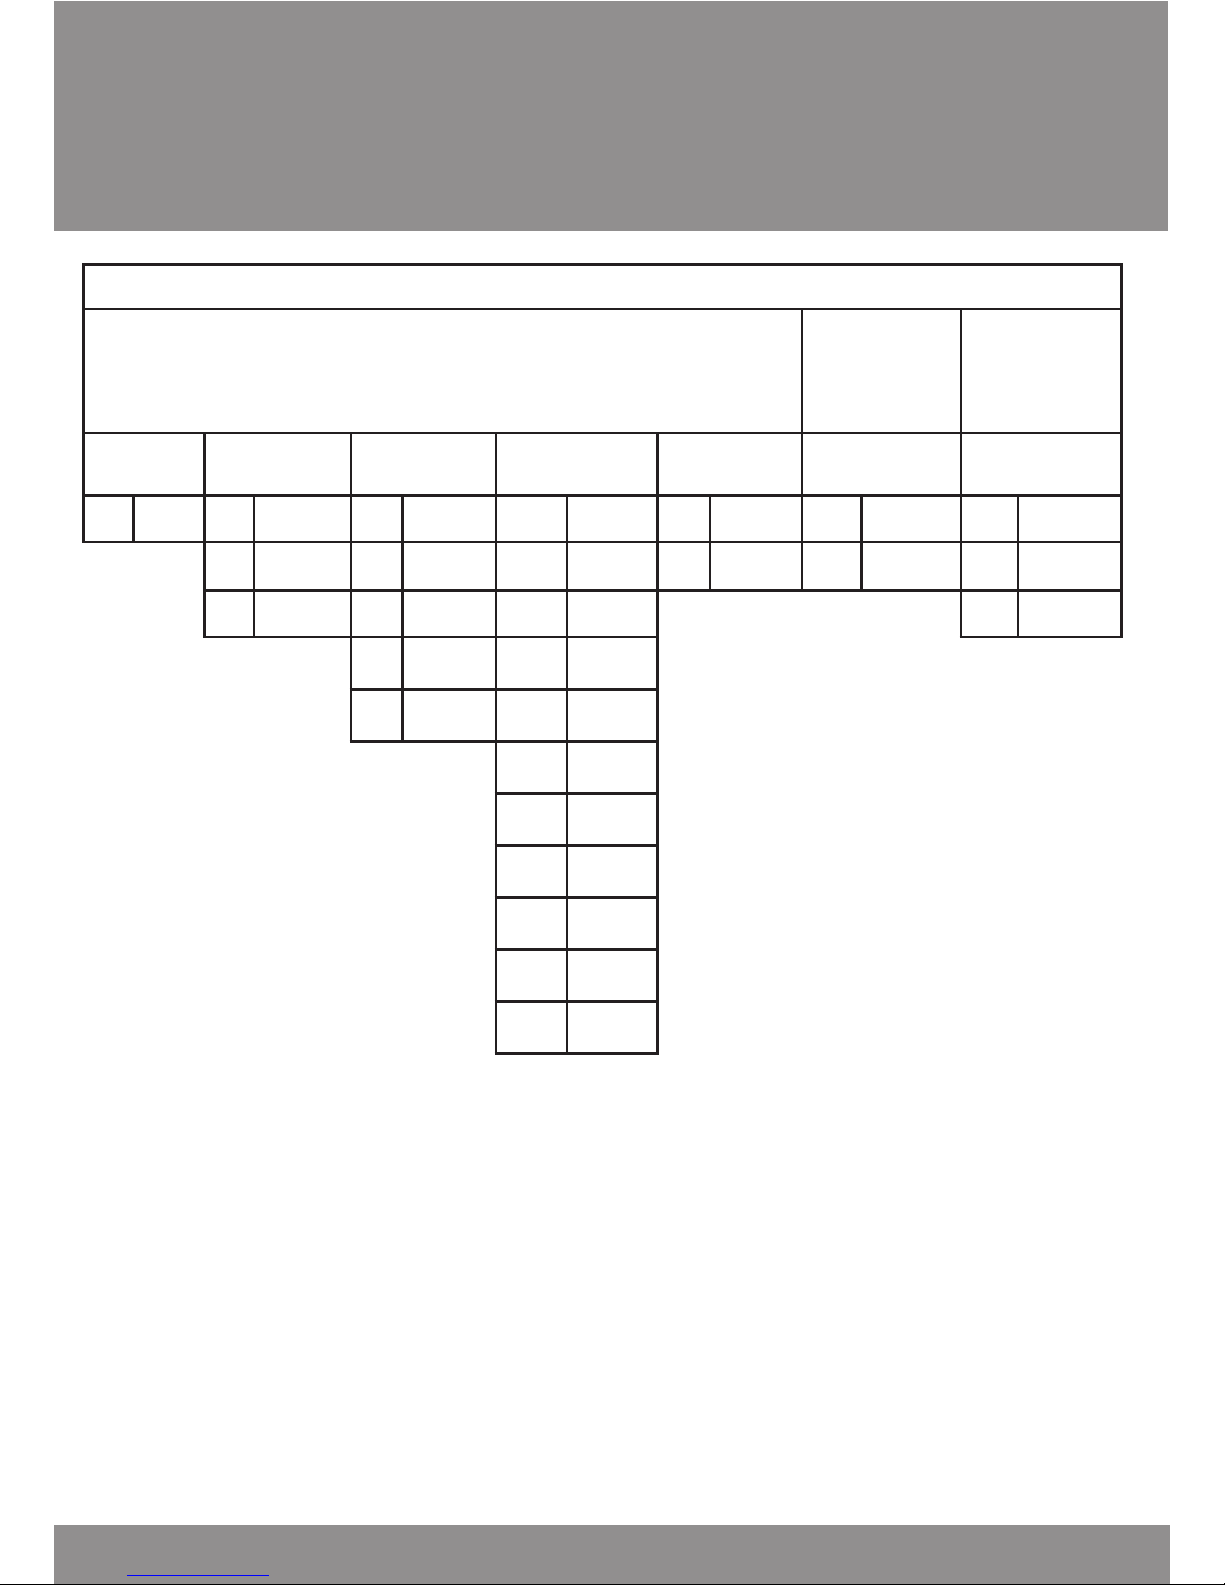
Customize settings with TPlay
The function of the audio tracks
These numbers works on all speakers regardless of serial
number
These numbers
only works on
speaker
with the right
Serial No.
These numbers
works on all
speakers
regardless of
Serial No.
Reset Auto power
on level
Output level Input level BassCut SoundDeny
Anti theft
Loudness
level
2 on 4 low 10 -20dB 20 Auto 42 normal 46 ON 50 high
6 normal 12 -10dB 22 0dBm 44 high 48 OFF 52 normal
8 high 14 0dB 24 6dBm 54 low
16 +10db 26
12dBm
1 Watt
18 +20dB 28
15dBm
2 Watt
30
18dBm
5 Watt
32
21dBm
10 Watt
34
25dBm
25 Watt
36
28dBm
50 Watt
38
31dBm
100 Watt
40
34 dBm
200 Watt
• The numbers on the left side of a column is the track number.
• Values highlighted in bold / red are initial values after reset.
• All odd-numbered tracks are empty.
24
Page 25

Customize settings with TPlay
The following functions can be changed with TPlay:
• The speakers can be reset to default values.
• The speakers automatic On / Off circuits can be adjusted
• The speakers volume level can be adjusted
• The speakers input sensitivity can be adjusted.
• The speakers bassCut can be adjusted.
• The speakers SoundDeny can be activated and deactivated.
• The speakers loudnes level can be adjusted
Description of track / features:
1 - Test Tone to adjust the volume.
2 - Reset speaker to the factory settings. (see table)
Auto power
When the speaker is made to work with many different hi- systems, it may happen
that speaker either will not turn off automatically or off by playing very low.
Therefore, the sensitivity of the circuit can be changed:
4 - On-circuit can be set to a lower level, if the speaker turns off at
low sound levels.
6 - On-circuit can be set to normal level.
(factory setting)
8 - On-circuit can be set to a higher level if the speaker does not
turn off.
25
Page 26

Customize settings with TPlay
Output level
The speaker output volume level can be adjusted depending on the needs.
10 - The output level can be set to never be higher than
“room level” (-20db).
Suitable for “children home alone security”
12 - The output level can be set to never being more than
“strong room level” (-10db).
Suitable for “children home alone security.”
14 - The output level can be set to maximum unregulated level
(0dB)
Suitable for general use.
16 - The output level can be set to “power” (+10 db)
Provides higher average level as the speaker Adjust the
sound dynamic when played loud.
(factory setting)
18 - The output level can be set to “extra power” (+20 db)
For even higher average level, as the speaker Adjust the
sound even more dynamic when played loud.
This option is suitable for large rooms. Or “party”
26
Page 27

Customize settings with TPlay
Input level
The speaker is set at the factory to self-adapt to the hi- system it is
connected. But it may be an advantage to preset speaker’s sensitivity, to
match the hi- system it is connected.
Especially with surround systems it would be good to preset the input
sensitivity of the individual speakers.
Although sensitivity is set in advance, the speaker will always regulate down if
the level is higher than it has been set.
Normally, all speakers should be set to the same sensitivity, and then netuning of the individual channels is made on the sound system.
The speaker must always be set to the nearest greater value than the output
that the sound system is provided for.
An example:
If a surround sytem data is provided to 5 * 35W, all speakers should be set to
50W. The speaker can also be connected to ampliers with line output level,
again, select the next larger level.
Note: If the LED occasionally ashes purple, this indicates that
speaker is set at too low a level.
When this is the case, there will be distortion in the entrance, in the worst cases it can
destroy the speaker, if you play very loud.
27
Page 28

Customize settings with TPlay
20 - input level Auto (factory setting)
22 - input level 0dBm (0,7V rms)
24 - input level +6 dBm (1,5V rms)
26 - input level +12 dBm ( 3V rms) 1 W sinus rms
28 - input level +15 dBm (4,5V rms) 2 W sinus rms
30 - input level +18 dBm ( 6V rms) 5 W sinus rms
32 - input level +21 dBm ( 9V rms) 10 W sinus rms
34 - input level +25 dBm ( 14V rms) 25 W sinus rms
36 - input level +28 dBm ( 20V rms) 50 W sinus rms
38 - input level +31 dBm ( 28V rms) 100 W sinus rms
40 - input level +34 dBm ( 40V rms) 200 W sinus rms
BassCut
The loudspeaker can be adjusted to work with a subwoofer.
In this setting, the deepest bass tones are removed which instead comes out
of the subwoofer.
42 - BassCut is set to normal (40 Hz) (factory setting)
44 - BassCut set to high (150 Hz)
(when there is a subwoofer connected)
28
Page 29

Customize settings with TPlay
SoundDeny
This feature only works on the speaker when CD / USB has the same serial
number.
Whether the speaker is activated or deactivated, the device is always being
unlocked when played.
46 - The speaker theft activated
48 - The speaker theft deactivated (factory setting)
Loudness
The speaker is factory set to “normal” loudness function.
Meaning that it provides a mild regulating of the bass and treble.
This position ts the space between 20m2 and 30m2.
If the regulation seems to be too strong, it can be set to low, and vice versa if
the regulation seems too weak, it can be set to high.
50 - Loudness level is set to high
52 - Loudness level set to normal (factory setting)
54 - Loudness level is set to low
29
Page 30

Documentation
TP TUBE 500
Dimensions:
Weight:
Cabinet type:
Cabinet nish:
Standby consumption:
Supply voltage:
Power amplier modules:
Amplier types:
Maximum output power:
Effective frequency range:
Input sensitivity:
Woofer size:
Tweeter size:
Net volume:
Auto power-off time:
16.6 x 15.6 x 121 cm
18 kg
Bass reex
Painted Aluminium
<2W
200-260 VAC, 50 Hz*
5
Digital ampliers for woofers
DMOS amplier for tweeter
500W total
50 - 20,000 Hz
700mV to 30V auto-levelling
4 x 5½ inches
1 x 1 inch
15 litres
5 minutes
TP TUBE 300
Dimensions:
Weight:
Cabinet type:
Cabinet nish:
Standby consumption:
Supply voltage:
Power amplier modules:
Amplier types:
Maximum output power:
Effective frequency range:
Input sensitivity:
Woofer size:
Tweeter size:
Net volume:
Auto power-off time:
16.6 x 15.6 x 51 cm
11 kg
Bass reex
Painted Aluminium
<2W
200-260 VAC, 50 Hz*
2
Digital amplier for woofer
DMOS amplier for tweeter
300W total
50 - 20,000 Hz
700mV to 30V auto-levelling
2 x 4 inches
1 x 1 inch
5.0 litres
5 minutes
30
Page 31

Documentation
TP TUBE 160
Dimensions:
Weight:
Cabinet type:
Cabinet nish:
Standby consumption:
Supply voltage:
Power amplier modules:
Amplier types:
Maximum output power:
Effective frequency range:
Input sensitivity:
Woofer size:
Tweeter size:
Net volume:
Auto power-off time:
16.6 x 15.6 x 31 cm
8 kg
Bass reex
Painted Aluminium
<2W
200-260 VAC, 50 Hz*
2
Digital amplier for woofer
Digital amplier for tweeter
160W total
55 - 20,000 Hz
700mV to 30V auto-levelling
1 x 5½inches
1 x 1 inch
2.5 litres
5 minutes
31
Technical specications, features and the use thereof are subject to change without notice.
Page 32

Dokumentation
Declaration of Conformity
Manufacturers Name: TP Radio
Manufacturers Address: Agenavej 37, 2670 Greve Denmark
Declares under our sole responsibility that the Product:
Product description: Loudspeaker with built-in amplier
and power supply
Type- or Model Names: TP- Tube 500
Product variants: TP- Tube 160/300
Is in conformity to the Directives and Standards listed below:
89/336/EEC Electromagnetic Compatibility Directive. (EMC)
73/23/EEC Low Voltage Directive. (LVD)
Standards used in the assessment:
• EN61000-3-2:2001,
• EN55013:2001
• EN55020: 2002
• EN60065: 2001
Name: Jørgen Sindt
Position held: Technical Manager
Location: Greve, Denmark
Issue Date: 10 Feb. 2004
Signed:
TP Radio / Agenavej 35-37 / 2670 Greve Denmark.
www.tpradio.dk / +45 4390 6048
32
Page 33

Interface / stikforbindelser
The following information is for users who want to interface directly to
TP TUBE speaker control system.
Input connector provides a serial connection used for factory setup /
programming.
In addition to the balanced left, right and center signals, the input terminal
connected to the following:
• On (used for Powerlink control)
• On_n (inverted level on / off control)
• Control (bring same gain to all connected speakers)
• RX (serial data programming)
• TX (serial data programming)
• PWR (+5 V output, only factory use)
• FACT (special function pin, only factory use)
Pin connections are as follows:
1. Centre in +
2. Centre in –
3. ON_N input
4. RX
5. GND
6. Left in +
7. Left in –
8. GND
9. Control
10. TX
11. Right in +
12. Right in –
13. ON
14. PWR
15. Only factory use, warranty lapse if
the pin is connected.
33
Page 34
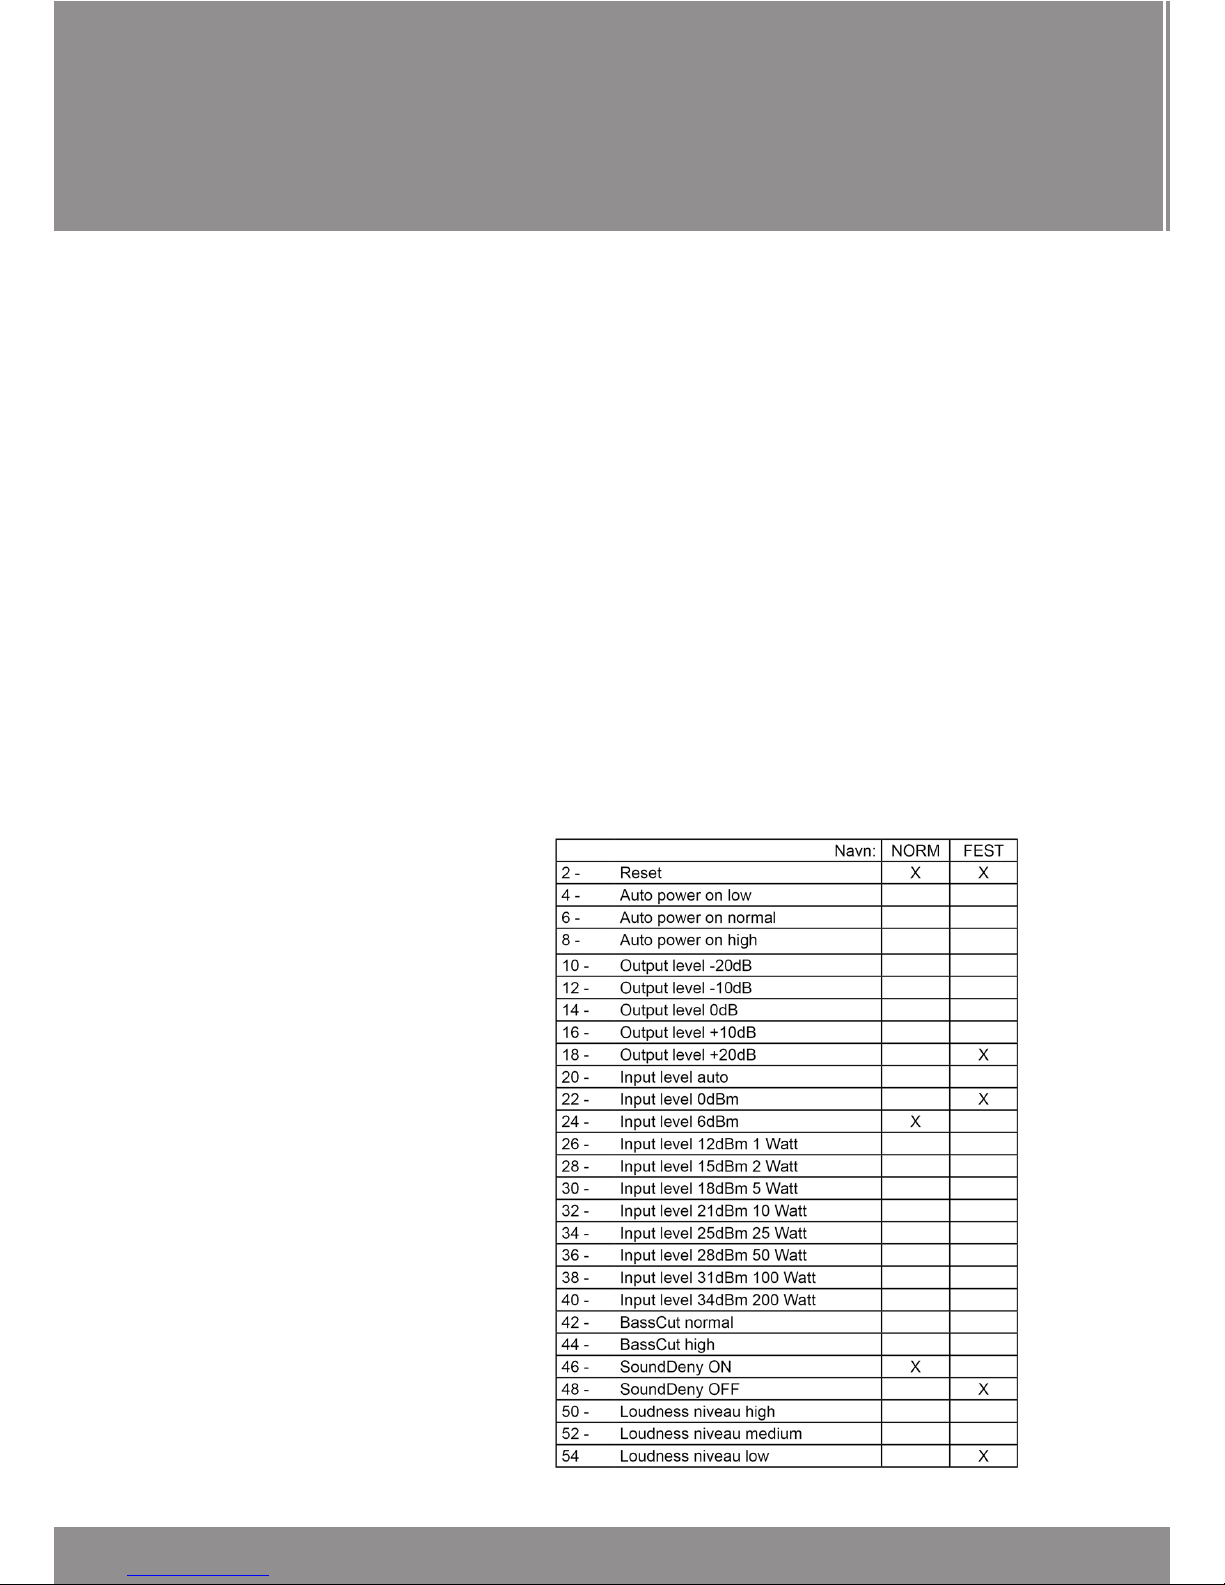
Your own setup
34
Remember your adjustment
Once you’ve tagged your speakers to the desired adjustment, it can be difcult
to remember which tracks you have used.
With the form to the right, you can check which tracks you have used and
even create multiple lists.
Example, you can create a “normal” list which is your best setup.
And maybe a “party-list” where you raise the output level of +20 dB and
change the loudness.
Or a “Children home alone” list, where output level-20dB is used.
The possibilities are many.
This is only an example
Page 35
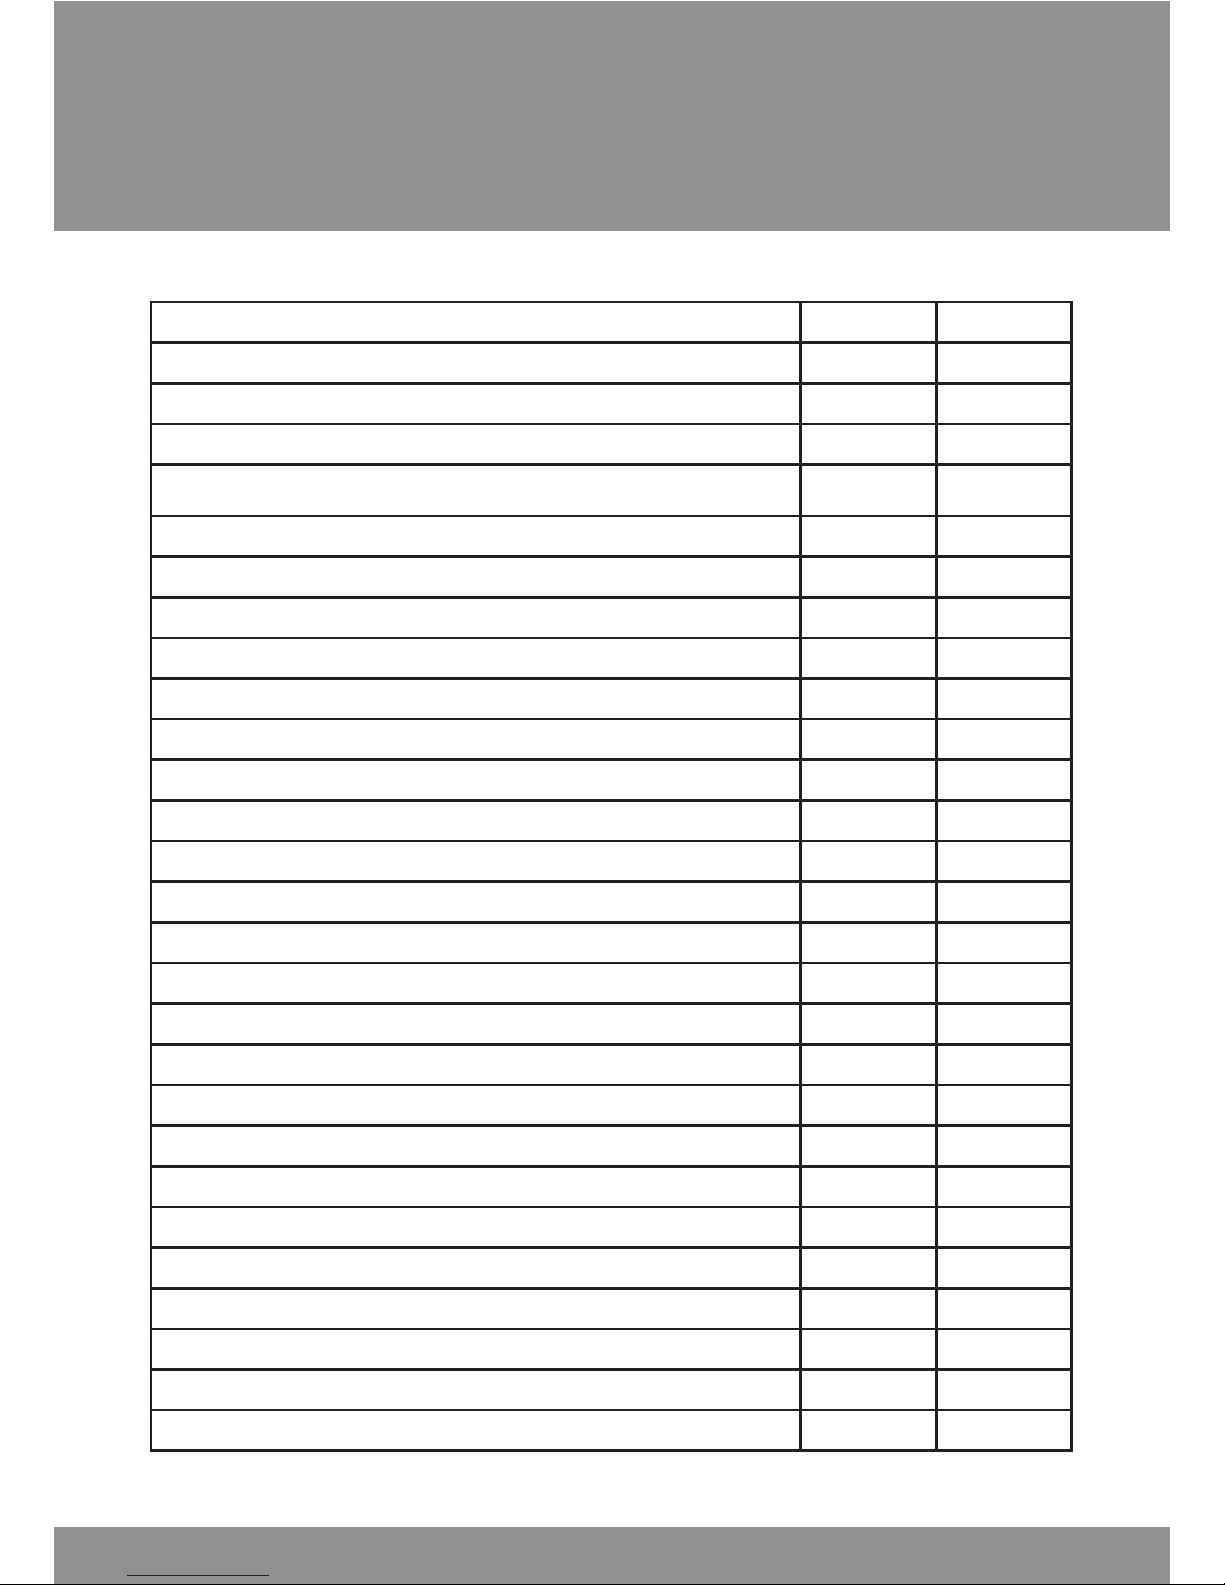
Your own setup
35
Name:
2 - Reset
4 - Auto power on low
6 - Auto power on normal
8 - Auto power on high
10 - Output level -20dB
12 - Output level -10dB
14 - Output level 0dB
16 - Output level +10dB
18 - Output level +20dB
20 - Input level auto
22 - Input level 0dBm
24 - Input level 6dBm
26 - Input level 12dBm 1 Watt
28 - Input level 15dBm 2 Watt
30 - Input level 18dBm 5 Watt
32 - Input level 21dBm 10 Watt
34 - Input level 25dBm 25 Watt
36 - Input level 28dBm 50 Watt
38 - Input level 31dBm 100 Watt
40 - Input level 34dBm 200 Watt
42 - BassCut normal
44 - BassCut high
46 - SoundDeny ON
48 - SoundDeny OFF
50 - Loudness niveau high
52 - Loudness niveau medium
54 Loudness niveau low
Page 36

TP RADIO - Agenavej 35-37 - 2670 Greve - Danmark,
Phone: +45 43 90 60 48
E-Mail [email protected]
www.tptube.dk
TP TUBE
 Loading...