

Page 1

TL-WPS510U
Pocket-Sized Wireless N Print Server
REV4.0.0
1910010986
Page 2

COPYRIGHT & TRADEMARKS
Specifications are subject to change without notice. is a registered trademark of
TP-LINK TECHNOLOGIES CO., LTD. Other brands and product names are trademarks or
registered trademarks of their respective holders.
No part of the specifications may be reproduced in any form or by any means or used to make any
derivative such as translation, transformation, or adaptation without permission from TP-LINK
TECHNOLOGIES CO., LTD. Copyright © 2014 TP-LINK TECHNOLOGIES CO., LTD. All rights
reserved.
http://www.tp-link.com
I
Page 3

FCC STATEMENT
This equipment has been tested and found to comply with the limits for a Class B digital device,
pursuant to part 15 of the FCC Rules. These limits are designed to provide reasonable protection
against harmful interference in a residential installation. This equipment generates, uses and can
radiate radio frequency energy and, if not installed and used in accordance with the instructions,
may cause harmful interference to radio communications. However, there is no guarantee that
interference will not occur in a particular installation. If this equipment does cause harmful
interference to radio or television reception, which can be determined by turning the equipment off
and on, the user is encouraged to try to correct the interference by one or more of the following
measures:
Reorient or relocate the receiving antenna.
Increase the separation between the equipment and receiver.
Connect the equipment into an outlet on a circuit different from that to which the receiver
is connected.
Consult the dealer or an experienced radio/ TV technician for help.
This device complies with part 15 of the FCC Rules. Operation is subject to the following two
conditions:
1) This device may not cause harmful interference.
2) This device must accept any interference received, including interference that may cause
undesired operation.
Any changes or modifications not expressly approved by the party responsible for compliance
could void the user’s authority to operate the equipment.
Note: The manufacturer is not responsible for any radio or TV interference caused by
unauthorized modifications to this equipment. Such modifications could void the user’s authority to
operate the equipment.
FCC RF Radiation Exposure Statement
This equipment complies with FCC RF radiation exposure limits set forth for an uncontrolled
environment. This device and its antenna must not be co-located or operating in conjunction with
any other antenna or transmitter.
“To comply with FCC RF exposure compliance requirements, this grant is applicable to only
Mobile Configurations. The antennas used for this transmitter must be installed to provide a
separation distance of at least 20 cm from all persons and must not be co-located or operating in
conjunction with any other antenna or transmitter.”
Page 4

CE Mark Warning
This is a class B product. In a domestic environment, this product may cause radio interference, in
which case the user may be required to take adequate measures.
Canadian Compliance Statement
This device complies with Industry Canada license-exempt RSS standard(s). Operation is subject
to the following two conditions:
(1) This device may not cause interference, and
(2)This device must accept any interference, including interference that may cause undesired
operation of the device.
Cet appareil est conforme aux norms CNR exemptes de licence d’Industrie Canada. Le
fonctionnement est soumis aux deux conditions suivantes:
(1) cet appareil ne doit pas provoquer d’interférences et
(2) cet appareil doit accepter toute interférence, y compris celles susceptibles de provoquer un
fonctionnement non souhaité de l’appareil.
This device has been designed to operate with the antennas listed below, and having a maximum
gain of 3 dBi. Antennas not included in this list or having a gain greater than 3 dBi are strictly
prohibited for use with this device. The required antenna impedance is 50 ohms.
Industry Canada Statement
Complies with the Canadian ICES-003 Class B specifications.
Cet appareil numérique de la classe B est conforme à la norme NMB-003 du Canada.
This device complies with RSS 210 of Industry Canada. This Class B device meets all the
requirements of the Canadian interference-causing equipment regulations.
Cet appareil numérique de la Classe B respecte toutes les exigences du Règlement sur le
matériel brouilleur du Canada.
Korea Warning Statements
당해 무선설비는 운용중 전파혼신 가능성이 있음.
Page 5

NCC Notice & BSMI Notice
注意!
依據 低功率電波輻射性電機管理辦法
第十二條 經型式認證合格之低功率射頻電機,非經許可,公司、商號或使用者均不得擅自變更頻率、
加大功率或變更原設計之特性或功能。
第十四條 低功率射頻電機之使用不得影響飛航安全及干擾合法通行;經發現有干擾現象時,應立即
停用,並改善至無干擾時方得繼續使用。前項合法通信,指依電信規定作業之無線電信。低功率射
頻電機需忍受合法通信或工業、科學以及醫療用電波輻射性電機設備之干擾。
減少電磁波影響,請妥適使用。
Продукт сертифіковано згідно с правилами системи УкрСЕПРО на відповідність вимогам
нормативних документів та вимогам, що передбачені чинними законодавчими актами
України.
Safety Information
When product has power button, the power button is one of the way to shut off the product;
when there is no power button, the only way to completely shut off power is to disconnect the
product or the power adapter from the power source.
Don’t disassemble the product, or make repairs yourself. You run the risk of electric shock
and voiding the limited warranty. If you need service, please contact us.
Avoid water and wet locations.
This product can be used in the following countries:
AT BG BY CA CZ DE DK EE
ES FI FR GB GR HU IE IT
LT LV MT NL NO PL PT RO
RU SE SK TR UA
Page 6

TP-LINK TECHNOLOGIES CO., LTD
DECLARATION OF CONFORMITY
For the following equipment:
Product Description: Pocket-Sized Wireless N Print Server
Model No.: TL-WPS510U
Trademark: TP-LINK
We declare under our own responsibility that the above products satisfy all the technical
regulations applicable to the product within the scope of Council Directives:
Directives 1999/5/EC, Directives 2004/108/EC, Directives 2006/95/EC, Directives 1999/519/EC,
Directives 2011/65/EU
The above product is in conformity with the following standards or other normative documents
EN 300 328 V1.7.1: 2006
EN 301 489-1 V1.9.2:2011& EN 301 489-17 V2.2.1:2012
EN 55022:2010
EN 55024:2010
EN 61000-3-2:2006+A1:2009+A2:2009
EN 61000-3-3:2008
EN 60950-1:2006+A11:2009+A1:2010+A12:2011
EN 62311:2008
The product carries the CE Mark:
Person is responsible for making this declaration:
Yang Hongliang
Product Manager of International Business
Date of issue: 2014
TP-LINK TECHNOLOGIES CO., LTD.
Building 24 (floors 1, 3, 4, 5), and 28 (floors 1-4) Central Science and Technology Park,
Shennan Rd, Nanshan, Shenzhen, China
Page 7

CONTENTS
Package Contents ....................................................................................................1
Chapter 1. Introduction......................................................................................... 2
1.1 Product Overview ...................................................................................................... 2
1.2 Features .................................................................................................................... 2
1.3 LED Indicator............................................................................................................. 2
1.4 Factory Default Settings ............................................................................................ 3
Chapter 2. Hardware Installation .........................................................................4
2.1 Preparation................................................................................................................ 4
2.2 Typology.................................................................................................................... 4
2.3 Connection ................................................................................................................ 4
Chapter 3. How to Configure the Print Server ....................................................6
3.1 Using Utility in Windows XP/Vista/7/8 ....................................................................... 6
3.1.1 Setting up a Print Server Network...............................................................................6
3.1.2 Joining the Print Server Network.............................................................................. 12
3.2 Using Web Management Page in Windows XP/Vista/7/8 .......................................16
3.2.1 Setting up a Print Server Network............................................................................ 16
3.2.2 Joining the Print Server Network.............................................................................. 26
3.3 Using Web Management Page in MAC OS............................................................. 27
3.3.1 Setting up a Print Server Network............................................................................ 27
3.3.2 Printer Installation in MAC OS ................................................................................. 35
3.3.3 Joining the Print Server Network.............................................................................. 38
Chapter 4. More Configuration for the Print Server .........................................39
4.1 Login........................................................................................................................ 39
4.2 Status ...................................................................................................................... 41
4.2.1 System ..................................................................................................................... 41
4.2.2 Printer ....................................................................................................................... 42
4.2.3 Wireless.................................................................................................................... 43
4.2.4 TCP/IP ...................................................................................................................... 43
4.3 Setup ....................................................................................................................... 44
4.3.1 System Setup ........................................................................................................... 44
4.3.2 Wireless Setup ......................................................................................................... 46
4.3.3 TCP/IP Setup ........................................................................................................... 47
4.4 Misc ......................................................................................................................... 48
I
Page 8

4.4.1 Factory Default ......................................................................................................... 48
4.4.2 Firmware Upgrade.................................................................................................... 49
4.5 Restart..................................................................................................................... 50
Appendix A: How to Reset the Print Server .........................................................51
Appendix B: Frequently Asked Questions ...........................................................52
Appendix C: Printer Installation in Windows OS .................................................54
C-1 If You Have Installed a Printer Before........................................................................ 54
C-2 If You Never Install a Printer Before ..........................................................................59
Appendix D: Additional Installation Instructions.................................................65
Page 9

TL-WPS510U Pocket-Sized Wireless N Print Server
Package Contents
One TL-WPS510U Pocket-Sized Wireless N Print Server
One external AC power adapter
One USB cable
One Quick Installation Guide
One Resource CD containing Utility and User Guide
1
Page 10

TL-WPS510U Pocket-Sized Wireless N Print Server
Chapter 1. Introduction
1.1 Product Overview
The external print servers enhance capability by letting you place your printers at convenient
locations directly on the Ethernet network, and by increasing network printer performance and
management. Please note that the print server does not support printing with host-based printers,
e.g. CAPT, GDI, and PPA.
1.2 Features
Travel size design, small enough to take on the road
Compatible with IEEE 802.11n/g/b
Wireless N speed up to 150Mbps
One USB 2.0 High Speed port(PID1)
One Built-in Reset Button
1.3 LED Indicator
Power LED
WLAN LED
LED Status Indication
On (Red)
Power
Off
Blinking (Green) The Print Server is transmitting data via wireless connectivity.
WLAN
Off
The Print Server’s power is on.
The Print Server’s power is off.
The Print Server is not connected to any router/access point, or there
is no data transmitted via wireless connectivity.
2
Page 11

TL-WPS510U Pocket-Sized Wireless N Print Server
1.4 Factory Default Settings
Username: admin
Password: admin
Wireless Mode: Ad-Hoc (Peer-to-Peer)
Channel: 1
SSID: WLAN-PS
Encryption: None
IP Address: 192.168.0.10
Subnet Mask: 255.255.255.0
DHCP Client: off
3
Page 12

TL-WPS510U Pocket-Sized Wireless N Print Server
Chapter 2. Hardware Installation
2.1 Preparation
Before you start, you should prepare the following items:
One USB Printer (non-GDI/CAPT)
One 802.11n Access Point/Router
One Computer with Wireless Adapter installed
Note:
Please make sure the computer has been successfully installed the printer driver, i.e., when
correctly connected to the printer, the computer can print without other configurations.
2.2 Typolog y
In this topology, the wireless router is the center of the wireless network. Every host and
TL-WPS510U will communicate with the wireless router. The hosts communicate with
TL-WPS510U via the wireless router.
Figure 2-1 Topology
2.3 Connection
Follow the instructions below to install the print server.
1. Power off the printer.
2. Connect the print server to your printer with the provided USB cable.
3. Power on the printer.
4
Page 13

Power on the print server.
4.
5. Wait 40 seconds for the print server’s Power On Self Test (POST).
TL-WPS510U Pocket-Sized Wireless N Print Server
5
Page 14

TL-WPS510U Pocket-Sized Wireless N Print Server
Chapter 3. How to Configure the Print Server
3.1 Using Utility in Windows XP/Vista/7/8
3.1.1 Setting up a Print Server Network
To connect to the print server using PSWizard, the configurations for Windows XP, Windows Vista,
Windows 7 and Windows 8 are similar. Here we take Windows 7 for example.
1. Insert the setup CD into your CD-drive. The autorun program will be started as shown in
Figure 3-1. Select the model (TL-WPS510U) of you
Figure 3-1
Note:
r print sever.
If you don’t have a CD-ROM, you can log onto our website http://www.tp-link.com/en/support/download
to download the setup wizard PrintServer_Setup_Wizard.
6
Page 15

TL-WPS510U Pocket-Sized Wireless N Print Server
2. Choose Easy
Setup Wizard.
Figure 3-
2
3. Then a prompt will appear as shown in Figure 3-3. Make sure you have installed the printer
drive
r, and click Continue.
Figure 3-
3
7
Page 16

Then the Wireless Print Server Setup Wizard will appear as shown in Figure 3-4. Select the
4.
TL-WPS510U Pocket-Sized Wireless N Print Server
wireless router to connect to the print serve
r and click “Next”.
Figure 3-
Note:
Please make sure your router’s DHCP feature is enabled.
5. If your wireless router is secured, the Input Key window will prompt. Enter and confirm the
network key. Click “Connect”.
Figure 3-
4
5
8
Page 17

TL-WPS510U Pocket-Sized Wireless N Print Server
6. On
the Select a Print Server screen as shown in Figure 3-6, select the print server and click
“Nex
t”.
Figure 3-
Note:
If you can’t find the print server in the list, please check whether its power LED is on (red). If the
power LED is on and the print server still doesn’t appear, please reset it. For the reset method,
please refer to Appendix A: How to Reset the Print Server
6
.
9
Page 18
TL-WPS510U Pocket-Sized Wireless N Print Server
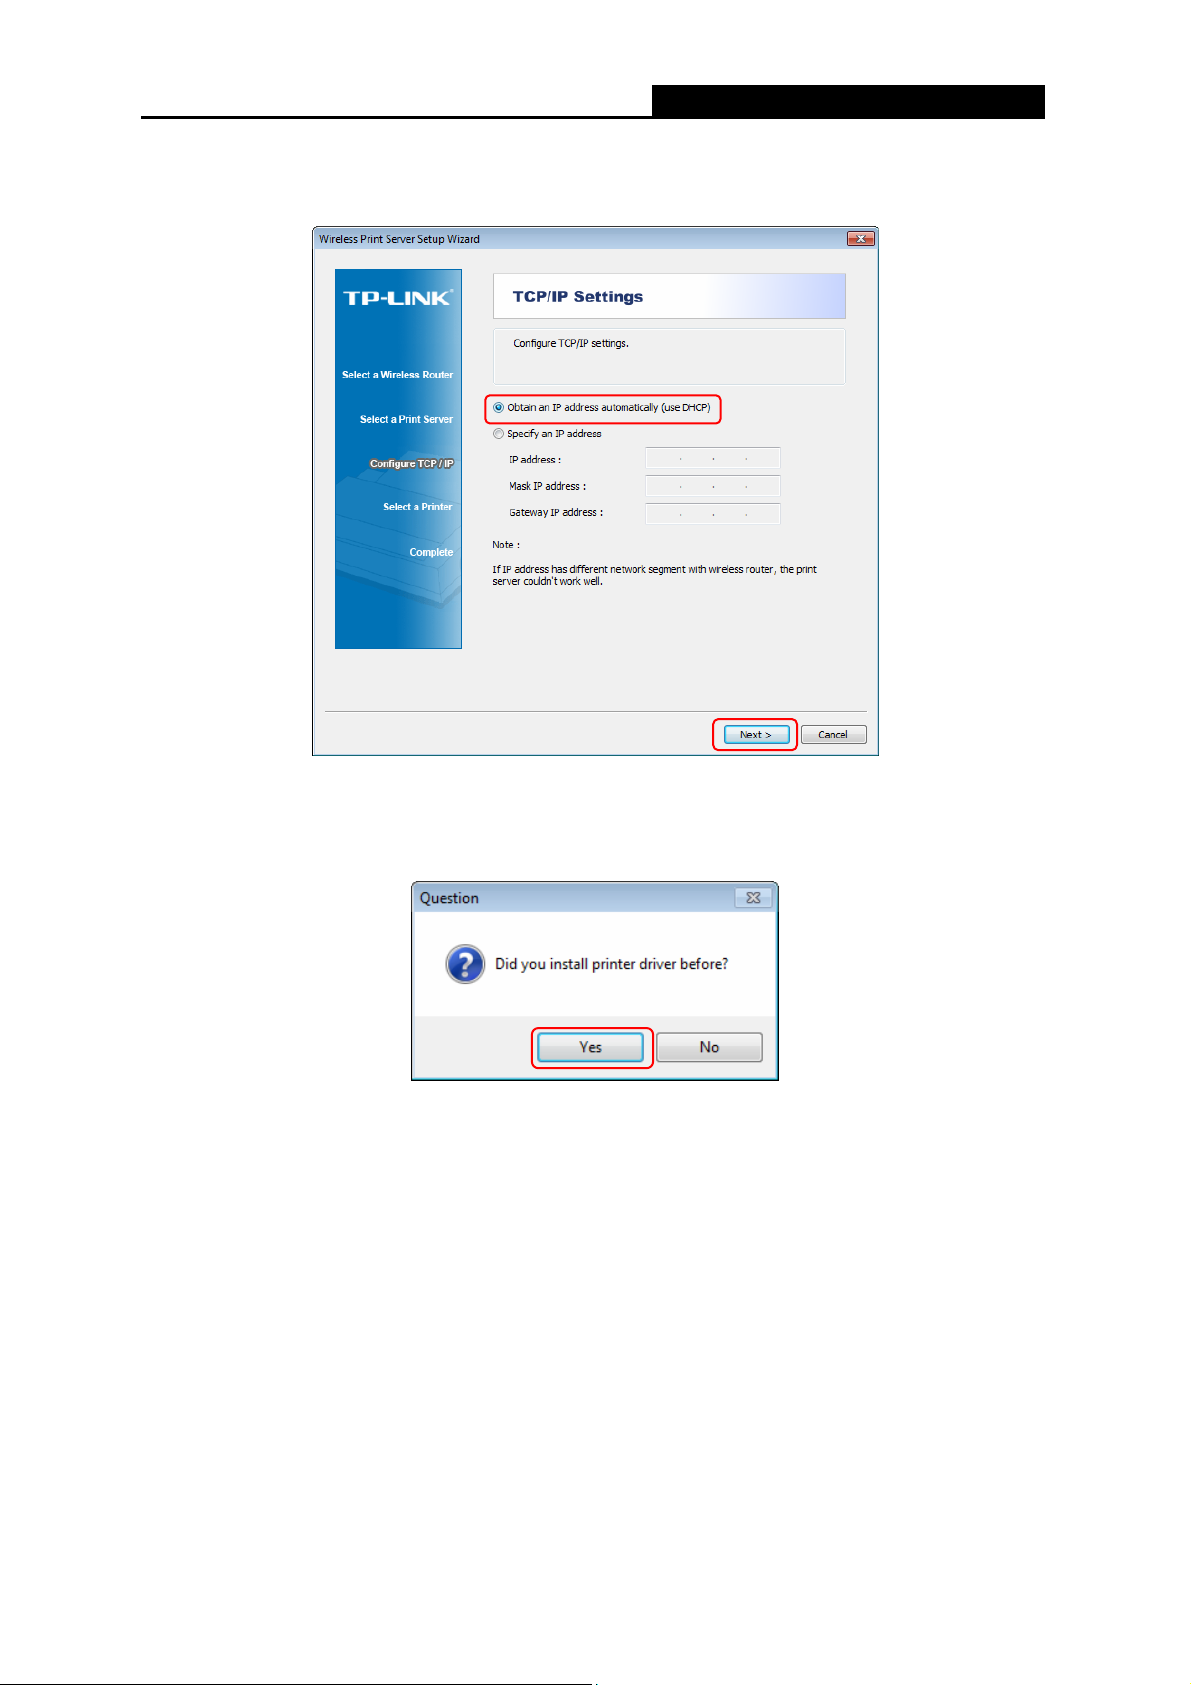
On the TCP/IP Settings page as shown in Figure 3-7, select “Obtain an IP address
7.
automatically (use DHCP)” and then click “Next”.
Figure 3-
8. Then a prompt will appear to ask whether you have installed printer driver before. Click “YES”.
Figure 3-
7
8
10
Page 19
TL-WPS510U Pocket-Sized Wireless N Print Server
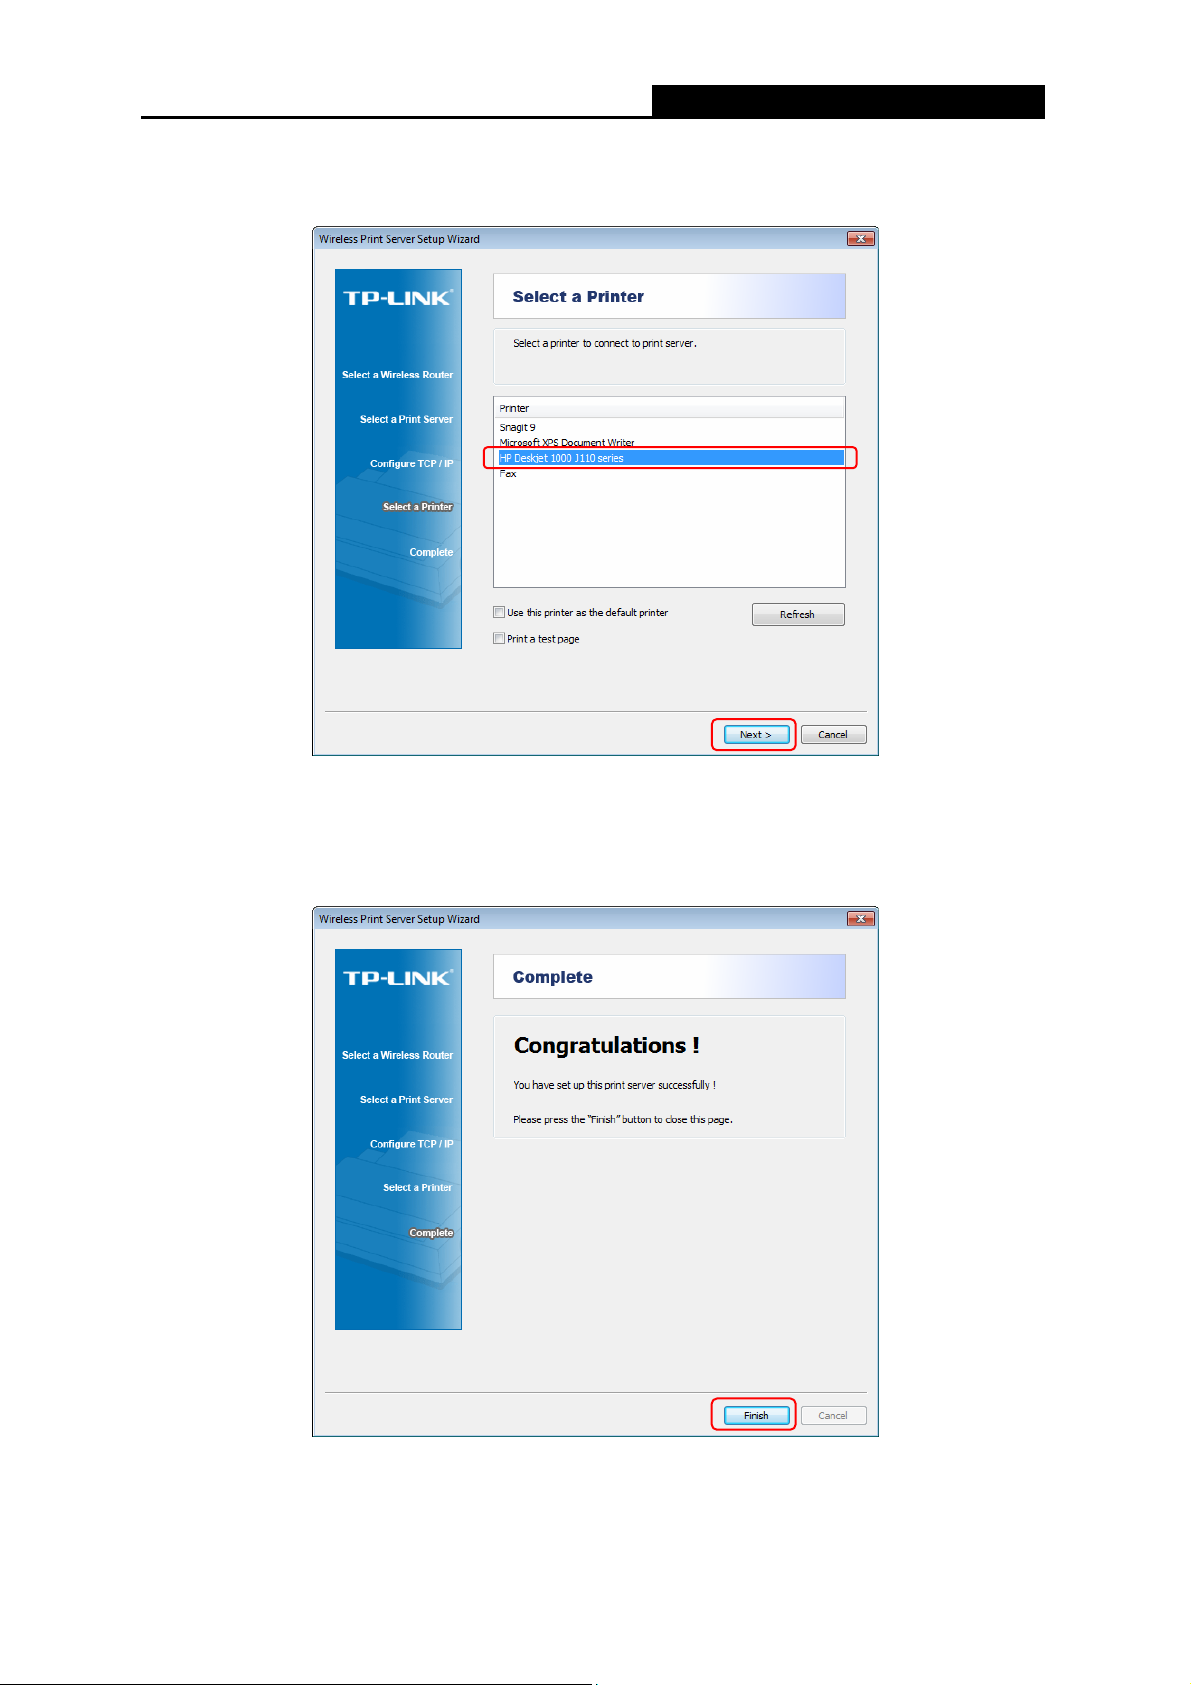
9. Then
the Select a Printer page will appear. Select the printer you’ve installed the printer
driver, and click “Next”.
Figure 3-
10. Click “Finish” to complete the configuration. Now the computer can use the printer via the
print server.
9
Figure 3-
11
10
Page 20

TL-WPS510U Pocket-Sized Wireless N Print Server
3.1.2 Joining the Print Server Network
If another computer wants to join the print server network to share the printer, please follow the
steps bellow.
Note:
Please make sure the computer has been successfully installed the printer driver, i.e., when
correctly connected to the printer, the computer can print without other configurations.
1. Connect the computer to your router or access point. For details, please refer to your router’s
installation guide.
2. Insert the setup CD into your CD-drive. The autorun program will be started as shown in
Figure 3-11. Select the model (TL-WP
Note:
S510U) of your print sever.
Figure 3-11
If you don’t have a CD-ROM, you can log onto our website http://www.tp-link.com/en/support/download
to download the setup wizard PrintServer_Setup_Wizard.
12
Page 21

3. Choose Setup Wizard.
TL-WPS510U Pocket-Sized Wireless N Print Server
Figure 3-
4. The Welcome page will appear. Click “Next”.
12
Figure 3-
13
13
Page 22

TL-WPS510U Pocket-Sized Wireless N Print Server
5. On
the Select A Print server page, select your print server and click “Next”.
Figure 3-
6. On the Change Settings page, select “No, I don’t want to change settings. (O)” and click
“Next”.
14
Figure 3-
14
15
Page 23

TL-WPS510U Pocket-Sized Wireless N Print Server
7. On
the Summery page, click “Next”.
Figure 3-
8. Click “Finish” on the Installation Complete page.
16
Figure 3-
Now, the computer has successfully joined the infrastructure network, and it can also use the
printer via the print server.
17
15
Page 24

TL-WPS510U Pocket-Sized Wireless N Print Server
3.2 Using Web Management Page in Windows XP/Vista/7/8
3.2.1 Setting up a Print Server Network
To connect to the print server using the web management page, the configurations for Windows
XP, Windows Vista, Windows 7 and Windows 8 are similar. Here we take Windows 7 for example.
1. On the Windows taskbar, click the Start->Control Panel.
2. Click View network status and tasks.
Figure 3-
Figure 3-
18
19
16
Page 25

lick Change adapter settings.
3. C
TL-WPS510U Pocket-Sized Wireless N Print Server
Figure 3-20
4. Right click Wireless Network Connection, and select Properties.
Figure 3-
21
17
Page 26

TL-WPS510U Pocket-Sized Wireless N Print Server
5. Doubl
e click Internet Protocol Version 4 (TCP/IPv4), or select it and then click Properties.
Figure 3-
6. Select “Use the following IP address” and input a static IP address 192.168.0.X (1<X<10 or
10<X<255, for 192.168.0.10 is the default IP address of the print server), Subnet mask
255.255.255.0. Click OK.
22
Note:
The IP address must be within the same subnet as your wireless print server. For example, if the
IP address of your print server has been changed to 192.168.1.10, then the IP address should be
configured as 192.168.1.X (1<X<10 or 10<X<255).
18
Page 27

TL-WPS510U Pocket-Sized Wireless N Print Server
Figure 3-23
7. Left-click the
appear. Select the SSID WLAN-PS of wireless print server and then click Connect. (Here we
use Windows Zero Configuration as an example. You can also use vendor utility of wireless
adapter. )
icon at the right bottom on your desktop and the wireless network list wil
Figure 3-
19
24
Page 28

Once the connection is successful, you will see the following screen shown in Figure 3-25.
8.
TL-WPS510U Pocket-Sized Wireless N Print Server
Figure 3-25
9. Open a web-browser and type in the IP address of the print server (the default is 192.168.0.10)
in the address field of the browser to login to the web management of the print server.
Figure 3-26
10. After a moment, a login window will appear, similar to the Figure 3-27. Enter admin in
case letters for the User Name and admin for the Password. Then click the OK button or
press the Enter key.
lower
Figure 3-27
11. Then the print server web management page will appear, with which you can configure all
print server settings.
20
Page 29

TL-WPS510U Pocket-Sized Wireless N Print Server
Figure 3-28
12. Click “Setup” and then choose “TCP/IP”. Check “Use the following TCP/IP Settings” radio
button and then fill in the following parameters.
IP Address: Specify an IP address for your print server. The IP address must be within
the same subnet as your wireless router or access point. For example, if the LAN IP
address of your wireless router or access point is 192.168.1.1, the IP address should be
set to 192.168.1.X (1<X<255). 192.168.1.10 is suggested.
Subnet Mask: Enter the subnet mask of your network.
Default Router: Enter the LAN IP address of your wireless router or access point. Here
takes 192.168.1.1 for example.
21
Page 30

TL-WPS510U Pocket-Sized Wireless N Print Server
Figure 3-
13. Click Save & Restart and then wait the print server to save the changes and restart.
29
Figure 3-30
22
Page 31

Enter the “Internet Protocol (TCP/IP) Properties” page as shown in Figure 3-31. Fill in the
14.
following par
IP Address: Specify an IP address for your adapter. The IP address must be within the
same subnet as your wireless router or access point. For example, if the LAN IP address
of your wireless router or access point is 192.168.1.1, the IP address should be set to
192.168.1.X (1<X<10 or 10<X255, for 192.168.1.10 has been specified for your print
server). Here we take 192.168.1.101 for example.
Subnet Mask: Enter the subnet mask of your network.
Default Gateway: Enter the LAN IP address of your wireless router or access point. Here
takes 192.168.1.1 for example.
ameters.
TL-WPS510U Pocket-Sized Wireless N Print Server
Figure 3-31
15. Login to the web management page of the print server again. Select “Setup”, and then
choose “Wireless”. Configure the following wireless parameters.
Network Type/ SSID /Channel: select the network (Take TP-LINK_A4161E for example)
from the “Site Survey” list and then these three fields will be automatically filled.
Transmission Rate: Keep the default value.
Wireless Mode: Keep the default value.
Security Type: Select the security type of your wireless router (TP-LINK_A4161E) and
then enter the key. Here we take WPA-PAK security type with 1234567890 as the key for
example.
23
Page 32

TL-WPS510U Pocket-Sized Wireless N Print Server
Figure 3-
24
32
Page 33

TL-WPS510U Pocket-Sized Wireless N Print Server
16. Click Save & Restar
t button and then wait the print server to restart.
Figure 3-33
17. Connect your computer to the wireless router. We take TP-LINK_A4161E for example. The
password is 0123456789.
Figure 3-
25
34
Page 34

TL-WPS510U Pocket-Sized Wireless N Print Server
Figure 3-
35
18. Install a printer.
If you’ve already installed the printer on your computer, please refer to C-1 If You Have
Installed a Printer Before to add a Standard TCP/IP port for it.
If you never install a printer on your computer, please refer to C-2 If You Never Install a
Printer Before
to install a printer and add a Standard TCP/IP port for it.
3.2.2 Joining the Print Server Network
If another computer wants to join the print server network to share the printer, please follow the
steps bellow.
1. Connect the computer to your router or access point. For details, please refer to your router’s
installation guide.
2. Install a printer.
If you’ve already installed the printer on your computer, please refer to C-1 If You Have
Installed a Printer Before to add a Standard TCP/IP port for it.
If you never install a printer on your computer, please refer to C-2 If You Never Install a
Printer Before to install a printer and add a Standard TCP/IP port for it.
26
Page 35

TL-WPS510U Pocket-Sized Wireless N Print Server
3.3 Using Web Management Page in MAC OS
3.3.1 Setting up a Print Server Network
1. Click the Apple Icon on the left side of the top-bar, and then choose System Preferences….
Figure 3-36
2. On the new window, please choose Network.
Figure 3-
27
37
Page 36

Follow the steps as shown in Figure 3-38 and Figure 3-39 to set the IP address.
3.
TL-WPS510U Pocket-Sized Wireless N Print Server
1
3
Figure 3-
2
38
4
5
Figure 3-
28
39
Page 37

Connect your MAC computer to the TL-WPS510U. In default, the print server will work on
4.
Ad-Hoc mode with the SSID WLAN-PS, so please select the wireless network WLAN-PS to
connect. If you need to reset the TL-WPS510U but don’t know how to do, please refer to the
TL-WPS510U Pocket-Sized Wireless N Print Server
Appendix A: How to Reset the Print Server
.
Figure 3-
40
29
Page 38

Open the Safari and login to the TL-WPS510U (default Name: admin, default Password:
5.
admin). Go to “Setup -> TCP/IP”, and then select “Use the following TCP/IP settings”.
Change its IP Address and Subnet Mask to 192.168.1.10 and 255.255.255.0; enter your
router’s IP address in the Default Router blank (e.g. 192.168.1.1). After the configuration, click
Save & Restart.
1
TL-WPS510U Pocket-Sized Wireless N Print Server
2
3
4
Figure 3-
41
Figure 3-42
30
Page 39

Change the MAC computer’s IP Address, Subnet Mask to 192.168.1.101 and 255.255.255.0;
6.
TL-WPS510U Pocket-Sized Wireless N Print Server
enter your router’s IP address in the Router blank (e.g. 192.168.1.1). Click “OK” and the MAC
computer will be automatically connected to the network WLAN-PS again.
Figure 3-
43
7. Login to the TL-WPS510U and go to “Setup -> Wireless”. Configure the wireless parameters
according to your wireless router. After the configuration, click Save & Restart.
Network Type/ SSID /Channel: select the network (Take TP-LINK_A4161E for example)
from the “Site Survey” list and then these three fields will be automatically filled.
Transmission Rate: Keep the default value.
Wireless Mode: Keep the default value.
Security Type: Select the security type of your wireless router (TP-LINK_A4161E) and
then enter the key. Here we take WPA-PAK security type with 1234567890 as the key for
example.
In this example as shown in Figure 3-44, the router’s SSID is TP-LINK_61
type is WPA-PSK, and its password is 0123456789. You can also select a wireless network
type is WPA-PSK, and its password is 0123456789. You can also select a wireless network
from the network list as shown in Figure 3-45, and then the SSID will be automatically filled in
from the network list as shown in Figure 3-45, and then the SSID will be automatically filled in
the correspo
the correspo
nding field.
nding field.
gure 3-44, the router’s SSID is TP-LINK_61
BB7A, its security
BB7A, its security
31
Page 40

TL-WPS510U Pocket-Sized Wireless N Print Server
Figure 3-
Figure 3-
44
45
32
Page 41

Connect your MAC computer to the wireless router. We take TP-LINK_61BB7A for example.
8.
The password is 0123456789.
TL-WPS510U Pocket-Sized Wireless N Print Server
Figure 3-
Figure 3-47
46
33
Page 42

Try to access the TL-WPS510U and you can see Wireless status. The TL-WPS510U is
9.
working on Infrastructure mode and can communicate with the wireless router and your MAC
computer.
TL-WPS510U Pocket-Sized Wireless N Print Server
Figure 3-48
34
Page 43

TL-WPS510U Pocket-Sized Wireless N Print Server
3.3.2 Printer Installation in MAC OS
1. Click the Apple icon -> System Performances -> Print & Scan to add a Standard TCP/IP
port for the printer.
Figure 3-
49
35
Page 44

TL-WPS510U Pocket-Sized Wireless N Print Server
2. C
lick
.
Figure 3-
3. Select “IP”, and then configure the following parameters as shown in Figure 3-51 and Figure
3-52. Select “Line Print
192.168.1.10 for Address and lp1 for Queue. Give a name to your printer. For Print Using, go
to “Select Printer Software…” and select your printer model from the list. Here takes HP
Deskjet 1000 J110 series for example. And then click Add.
You can login to the print server, and go to Status -> TCP/IP to find the IP address of print
server. Here we take 192.168.1.10 for example.
er Daemon - LPD” for Protocol and enter the print server’s IP
50
36
Page 45

1
TL-WPS510U Pocket-Sized Wireless N Print Server
2
3
4
5
6
Figure 3-
51
7
8
Figure 3-52
37
9
Page 46

Till now you've successfully installed the print server and can print via the TL-WPS510U.
4.
TL-WPS510U Pocket-Sized Wireless N Print Server
Figure 3-
53
3.3.3 Joining the Print Server Network
If another computer wants to join the print server network to share the printer, please follow the
steps bellow.
1. Connect the computer to your router or access point. For details, please refer to your router’s
installation guide.
2. Install a printer. For details, please refer to 3.3.2 Printer Installation in MAC OS
.
38
Page 47

TL-WPS510U Pocket-Sized Wireless N Print Server
Chapter 4. More Configuration for the Print Server
The Print Server contains an embedded web server that can be accessed through a supported
web browser on a WLAN, for example, IE6, Firefox or above is recommended. The embedded
web server provides access to configuration and management pages for the print server and the
connected peripheral device.
To use the embedded web server, you should first connect your adapter to the print server.
4.1 Login
Open a web-browser and type in the IP address of the print server (the default is 192.168.0.10) in
the address field of the browser to login to the web management of the print server.
Figure 4-1
After a moment, a login window will appear, similar to the Figure 4-2. Enter admin in
letters for the User Name and admin for the Password. Then click the OK button or press the
Enter key.
Figure 4-2
Then the print server web management page will appear, with which you can configure all print
server settings.
lower case
39
Page 48

TL-WPS510U Pocket-Sized Wireless N Print Server
Figure 4-3
40
Page 49

TL-WPS510U Pocket-Sized Wireless N Print Server
4.2 Status
The Status page shows the current information about the print server as shown in Figure 4-3. By
clicking the corresponding tab, you can view the following information, including System, Printer,
Wireless, and TCP/IP.
4.2.1 System
Figure 4-4
Print Server Name: This option allows you to view device name of the print server. To correct
the print server’s device name.
System Up Time: This option allows you to view uptime of the print server. When you start
the print server, it will compute the print server from start time to power off time.
Firmware Version: This option allows you to view firmware version of the print server. To
verify the print server’s firmware version is newer in this time.
MAC Address: This option allows you to view Node ID of the print server. The Node ID is
unique from any print server.
41
Page 50

4.2.2 Printer
TL-WPS510U Pocket-Sized Wireless N Print Server
Figure 4-5
Manufacturer: This option allows you to view manufacturer of the printer. When the printer
connected with the print server, it will be show in the manufacture box.
Model Number: This option allows you to view model of the printer. When the printer
connected with the print server, it will be show in the model box.
Printing Language Supported: This option allows you to view command to set the printer.
When the printer connected with the print server, it will be show in the command box.
Current Status: This option allows you to view status of the printer. When the printer
connected with the print server, it will be show in the status box. For Example: Waiting for job.
It is means the printer already to printing.
42
Page 51

TL-WPS510U Pocket-Sized Wireless N Print Server
4.2.3 Wireless
The Wireless Status page shows the current wireless information of the print server.
Figure 4-6
4.2.4 TCP/IP
The TCP/IP Status page shows the current TCP/IP settings of the print server.
Figure 4-7
43
Page 52

TL-WPS510U Pocket-Sized Wireless N Print Server
Use D
DHCP/BOOTP server on your network, this option allows the print server to obtain IP-related
settings automatically from your DHCP server.
IP Address: This option allows you to view IP address from the print server. The IP address
must meet the IP addressing requirements of the network segment. (default: 192.168.0.10)
Subnet Mask: This option allows you to view subnet mask from the print server.
Gateway: This option allows you to view gateway from the print server.
HCP/BOOTP: This option allows you to view DHCP/ BOOTP status. If there is a
4.3 Setup
The Setup page allows you to configure general system settings of he print server. By clicking the
corresponding tab, you can configure the following items, including System, Wireless, and
TCP/IP.
4.3.1 System Setup
Click System, the following screen will appear.
Figure 4-8
44
Page 53

TL-WPS510U Pocket-Sized Wireless N Print Server
E-mail Alert
SMTP Server IP Address: Enter the IP Address of the SMTP Server.
Administrator E-mail Address: Enter the e-mail address used to receive alert.
Print Server Name: This option allows you to input device name of the print server. To
correct the print server’s device name.
Password: This option allows you to change password of the print server. Factory default is
admin. (default user name is admin, it’s not available to change)
: This option allows you to receive alert of the device.
45
Page 54

TL-WPS510U Pocket-Sized Wireless N Print Server
4.3.2 Wireless Setup
Click Wireless, the following screen will appear.
Figure 4-9
46
Page 55

TL-WPS510U Pocket-Sized Wireless N Print Server
Basic Settin
Network Type: To change the WLAN type to Ad-Hoc (default) or Infrastructure.
SSID: To change the SSID to connect an existing wireless network.(default: WLAN-PS)
Channel: Indicates the channel setting for this print server.
Transmission Rate: Select the basic transfer rates based on the speed of wireless network.
Wireless Mode: Select the WLAN mode based on the existing wireless network
Advanced Settings:
Security Type: To change the wireless security settings based on the existing wireless
network. Default setting is Disable.
Site Survey:
The following site survey table will provide a list of existing wireless network. You can choose one
to join in.
gs:
4.3.3 TCP/IP Setup
Click TCP/IP, the following screen will appear.
Figure 4-10
Use DHCP/BOOTP: This option allows you to select DHCP/ BOOTP option. If there is a
DHCP/BOOTP server on your network. This option allows the print server to obtain IP-related
settings automatically from your DHCP server.
47
Page 56

TL-WPS510U Pocket-Sized Wireless N Print Server
IP Address: This option allows you to input IP address
must meet the IP addressing requirements of the network segment.
from the print server. The IP address
Note:
On the TCP/IP Setup screen, specify a fixed IP address is highly recommended.
Subnet Mask: This option allows you to input subnet mask from the print server. The IP
address must meet the IP addressing requirements of the network segment.
Default Router: This option allows you to input gateway from the print server. This IP address
of gateway must meet the router or gateway to go across of the network segment.
4.4 Misc
4.4.1 Factory Default
Click OK to restore the print server to its Factory Default settings.
Figure 4-11
48
Page 57

TL-WPS510U Pocket-Sized Wireless N Print Server
4.4.2 Firmware Upgrade
Click Browse… to select the firmware file and then click Firmware Upgrade to upgrade the
firmware of the print server.
Figure 4-12
49
Page 58

4.5 Restart
Click OK to reboot the print server.
TL-WPS510U Pocket-Sized Wireless N Print Server
Figure 4-13
50
Page 59

TL-WPS510U Pocket-Sized Wireless N Print Server
Appendix A: How to Reset the Print Server
If you lose the connection with TL-WPS510U because of wrong configuration, you need to reset it
to factory default settings and configure it again.
Follow the steps below to reset TL-WPS510U:
1. Unplug the power adapter of TL-WPS510U;
2. Press and hold the Reset button on TL-WPS510U;
3. Plug in the power adapter of TL-WPS510U and continue pressing the Reset button for about
10 seconds.
4. Release the Reset button and wait for the WLAN LED (green) to flash.
5. When the WLAN LED light flashes regularly, the resetting is completed and you can see the
WLAN-PS Ad-Hoc network in your wireless network list.
51
Page 60

TL-WPS510U Pocket-Sized Wireless N Print Server
Appendix B: Frequently Asked Questions
1. Print jobs are sent to the print queue successfully, but fail to be sent to the printer.
1) Check all the information of the print server by running PSAdmin.
2) Check to see that if the power adapters are properly connected.
3) Recheck the print server connection by running the PSAdmin.
4) Check all the information in print port setting.
2. Print jobs start printing, but print very slowly or print unknown characters.
A printer driver is missing or is incompatible with that printer. Using a print driver that is not
specific for the printer can cause printing errors. Install the proper printer driver. If these
printer drivers are not available to you, please contact your printer manufacturer.
3. The upgrading process indication bar stops and does not seem to proceed again while
upgrading the print server.
1) Check the wireless network connection, especially from the workstation running the
PSAdmin to the print server unit.
2) Upgrade the print server again by PSAdmin or WEB browser.
4. The Setup Wizard can’t find print server.
Please disable the Personal Firewall temporarily or adjust the security level to lower.
5. Power Related Problems
The print server requires an external AC power adapter in order for it to function. If you have a
power problem, check to see whether the power cord or its connectors are damaged. More
importantly, check to see that the AC power adapter included with the print server matches
the AC voltage in your country or area. Using an incorrect AC adapter will damage your print
server.
6. Print Port Related Problems
Printing data failure may be caused by a loose connection of the print server to the USB port
of the printer. Check to see if any of the pins on the USB port connector are damaged. In
addition, check the cable connection. If the pins are damaged, contact your dealer for a
replacement connector.
52
Page 61

TL-WPS510U Pocket-Sized Wireless N Print Server
7. TCP/IP
A. The print server's Node ID you specified in the "arp" command is not correct.
If this is the case, please ensure the Node ID field in the corresponding entry of the print
server's IP address in NT's ARP cache table is correct by typing the following command at
NT's DOS prompt. "arp -a"
If the Node ID shown on the screen doesn't match the print server's Node ID, please follow
the instructions below to reset the entry.
1) At NT's DOS prompt, type "arp -d <print server's IP address>" to delete the current entry.
2) Type "arp -s <print server's IP> <print server's Node ID>" to specify a new ARP entry.
B. The print server's IP address is duplicated or is as same as another computer's IP
If this is the case, please consult your network administrator to obtain an unused IP address
for your print server.
Problems
address on the network.
53
Page 62

TL-WPS510U Pocket-Sized Wireless N Print Server
Appendix C: Printer Installation in Windows OS
Other computers in the same local network that need to share the printing should add the
Standard TCP/IP port on their system. There’re two conditions. Please choose one according to
your system.
C-1
is on the precondition that you have ever installed a printer driver and now you want to use a
print server to share the printer through your network. You need to change the printer port to
Standard TCP/IP port.
C-2
is on the precondition that you never use the printer on your computer before but also want to
share printing. You just need to add a printer, follow the steps to create a Standard TCP/IP port,
and then install the printer driver.
C-1 If You Have Installed a Printer Before
1. Click Start > Control Panel > Classic View > Printers.
Figure C-1
54
Page 63

Find your installed printer icon, right-click on it, and select Properties.
2.
TL-WPS510U Pocket-Sized Wireless N Print Server
Figure C-2
3. Click Ports > Add Port > Standard TCP/IP Port > New Port > Next.
Figure C-3
55
Page 64

Input the exact IP address of print server. Click Next. (You can login to the print server, and
4.
go to Status -> TCP/IP to find the IP address of print server. Here we take 192.168.1.10 for
example.)
TL-WPS510U Pocket-Sized Wireless N Print Server
5. Select Custom, and click Settings.
Figure C-4
Figure C-5
56
Page 65

TL-WPS510U Pocket-Sized Wireless N Print Server
6. Choose LPR, and input the queu
e name as lp1. Click OK.
Figure C-6
7. Click Next and then Finish, to complete the wizard.
Figure C-7
57
Page 66

TL-WPS510U Pocket-Sized Wireless N Print Server
Figure C-8
8. Click Close and Apply.
Figure C-9
58
Page 67

TL-WPS510U Pocket-Sized Wireless N Print Server
Figure C-10
9. Now, the printer port has been created.
C-2 If You Never Install a Printer Before
1. Click Star > Control Panel, and select Devices and Printers.
Figure C-11
59
Page 68

lick Add a printer.
2. C
3. Select Add a local printer.
TL-WPS510U Pocket-Sized Wireless N Print Server
Figure C-12
Figure C-13
60
Page 69

TL-WPS510U Pocket-Sized Wireless N Print Server
4. Select
“Create a new port”, and the type of port is “Standard TCP/IP Port”.
Figure C-14
5. Input the IP address of the print server and click Next. (You can login to the print server, and
go to Status -> TCP/IP to find the IP address of print server. Here we take 192.168.1.10 for
example.) The windows will detect the TCP/IP Port. Please wait for the next page.
Figure C-15
61
Page 70

TL-WPS510U Pocket-Sized Wireless N Print Server
Figure C-16
6. On the following page, select Custom and click Settings. And then on the next page, please
select LPR as the Protocol and the Queue Name is lp1.
Figure C-17
62
Page 71

The windows will ask you to install the driver of the printer. You can select one in the list or
7.
click Have Disk to install other drivers. Please follow the steps to finish the installation.
TL-WPS510U Pocket-Sized Wireless N Print Server
Figure C-18
Figure C-19
63
Page 72

8. After that, the new printer is in the list. And you can enjoy the sharing.
TL-WPS510U Pocket-Sized Wireless N Print Server
Figure C-20
Figure C-21
64
Page 73

TL-WPS510U Pocket-Sized Wireless N Print Server
Appendix D: Additional Installation Instructions
Panasonic KX-P6100/6300/6500
If you are using a Panasonic KX-P6100/6300/6500 laser printer with the print server through the
Network Print Port under Windows 95/98, please redirect the printer named “Panasonic
KX-P6100 PCL” or “Panasonic KX-P6300 PCL”, or “Panasonic KX-P6500 PCL” to the print
server through the Network Print Port.
DO NOT redirect the printer named “Panasonic KX-P6100 GDI”, “Panasonic KX-P6300 GDI”, or
“Panasonic KX-P6500 GDI” to the print server.
Please note that the print server doesn’t support printing with host-based printers, e.g.
CAPT, GDI, and PPA printers. Furthermore, the print server doesn’t support any
non-printing functions of MFP (Multiple Function Printer).
In case of static electricity or noise of power cable issue causes print server to disconnect, please
re-plug the USB cable or re-start power to connect again.
65
 Loading...