

Page 1
TL-WPS510U
Wireless Print Server
Rev: 1.1.0
1910010195
Page 2

COPYRIGHT & TRADEMARKS
Specifications are subject to change without notice. is a registered trademark of TP-LINK
TECHNOLOGIES CO., LTD. Other brands and product names are trademarks or registered trademarks of their
respective holders.
No part of the specifications may be reproduced in any form or by any means or used to make any derivative
such as translation, transformation, or adaptation without permission from TP-LINK TECHNOLOGIES CO., LTD.
Copyright © 2008 TP-LINK TECHNOLOGIES CO., LTD. All rights reserved.
http://www.tp-link.com
FCC STATEMENT
This equipment has been tested and found to comply with the limits for a Class B digital device, pursuant to part
15 of the FCC Rules. These limits are designed to provide reasonable protection against harmful interference in
a residential installation. This equipment generates, uses and can radiate radio frequency energy and, if not
installed and used in accordance with the instructions, may cause harmful interference to radio communications.
However, there is no guarantee that interference will not occur in a particular installation. If this equipment does
cause harmful interference to radio or television reception, which can be determined by turning the equipment
off and on, the user is encouraged to try to correct the interference by one or more of the following measures:
• Reorient or relocate the receiving antenna.
• Increase the separation between the equipment and receiver.
• Connect
• Consult the dealer or an experienced radio/ TV technician for help.
This device complies with part 15 of the FCC Rules. Operation is subject to the following two conditions:
1) This device may not cause harmful interference.
2) This device must accept any interference received, including interference that may cause undesired
operation.
Any changes or modifications not expressly approved by the party responsible for compliance could void the
user’s authority to operate the equipment.
the equipment into an outlet on a circuit different from that to which the receiver is connected.
I
Page 3

Trademarks
NetWare is a registered trademark of Novell Inc and Windows 95/98/Me and Windows NT/2000/XP /2003/Vista
are registered trademarks of Microsoft Corp. All other brands and product names are trademarks or registered
trademarks of their respective owners.
Copyright
No part of this publication may be reproduced in any form or by any means or used to make any derivative (such
as translation, transformation or adaptation) without the express written consent of the manufacturer as
stipulated by the United States Copyright Act of 1976.
FCC Radiation Exposure Statement
This equipment complies with FCC radiation exposure limits set forth for an uncontrolled environment. In order
to avoid the possibility of exceeding the FCC radio frequency exposure limits, human proximity to the antenna
shall not be less than 20 cm (8 inches) during normal operation.
This transmitter must not be co-located or operating in conjunction with any other antenna or transmitter.
FCC Caution: Any changes or modifications not expressly approved by the party responsible for compliance
could void the user’s authority to operate this equipment.”
CE Mark Warning
This is a class B product. In a domestic environment, this product may cause radio interference, in which case
the user may be required to take adequate measures.
National Restrictions
2400.0-2483.5 MHz
Country Restriction Reason/remark
Bulgaria
France
Italy
Luxembourg None
Norway Implemented
Russian Federation Only for indoor applications
Outdoor use limited to 10
mW e.i.r.p. within the band
2454-2483.5 MHz
General authorization required for outdoor use
and public service
Military Radiolocation use. Refarming of the 2.4 GHz
band has been ongoing in recent years to allow
current relaxed regulation. Full implementation
planned 2012
If used outside of own premises, general authorization
is required
General authorization required for network and service
supply(not for spectrum)
This subsection does not apply for the geographical
area within a radius of 20 km from the centre of
Ny-Ålesund
Note:It not used outdoors in France.
All contents and specifications are subject to change without notice.
II
Page 4

TP-LINK TECHNOLOGIES CO., LTD
DECLARATION OF CONFORMITY
For the following equipment:
Product Description: Wireless Print Server
Model No.: TL-WPS510U
Trademark: TP-LINK
We declare under our own responsibility that the above products satisfy all the technical
regulations applicable to the product within the scope of Council Directives:
Directives 1995 / 5 / EC, Directives 2004 /108 / EC, Directives 2006/95/EC
The above product is in conformity with the following standards or other normative document s
Radio ETSI EN 300 328 V1.7.1:2006
EMC ETSI EN 301 489-1 V1.6.1:2005
ETSI EN 301 489-17 V1.2.1:2002
Health & Safety EN 60950-1:2006
The product carries the CE Mark
This device is intended for home and office use in all EU countries (and other countries
following the EU directive 1999/5/EC)
Signature:
Zhao Jianjun
Director of International Business Date of Issue: 2008-04-30
TP-LINK TECHNOLOGIES CO., LTD.
South Building, No.5 Keyuan Road, Central Zone, Science & Technology Park,Nanshan,
Shenzhen, P. R. China
Page 5

CONTENTS
CHAPTER 1. INTRODUCTION............................................................................1
1.1 Product Overview.............................................................................................................1
1.2 Network configuration ......................................................................................................1
1.3 Components and Features...............................................................................................1
1.4 LED Indicators..................................................................................................................1
CHAPTER 2. INSTALLATION.............................................................................2
2.1 Hardware Installation .......................................................................................................2
2.2 Wireless Network with Print Server:.................................................................................2
CHAPTER 3. PRINT SERVER INSTALLATION .................................................3
3.1 Preparation ......................................................................................................................3
3.2 Configuration Solution Table............................................................................................3
3.3 Self-test Page ..................................................................................................................3
CHAPTER 4. SOFTWARE INSTALLATION .......................................................4
4.1 Prepare Your Computer...................................................................................................4
4.2 Installing the PSAdmin and Setup Wizard......................................................................10
4.3 How to create print server port manually?......................................................................20
4.4 How to know the current settings of print server? ..........................................................20
4.5 Using PSAdmin..............................................................................................................20
4.6 Wizard............................................................................................................................21
4.7 Manual Setup.................................................................................................................22
4.7.1 General:...................................................................................................................................... 22
4.7.2 Wireless:
4.7.3 TCP/IP:
..................................................................................................................................... 23
....................................................................................................................................... 24
III
Page 6

4.8 Upgrade.........................................................................................................................24
4.9 Reset..............................................................................................................................25
4.10 Refresh ..........................................................................................................................25
CHAPTER 5. CONFIGURATION FROM EMBEDDED WEB SERVER.............23
5.1 Overview........................................................................................................................23
5.2 Using Embedded Web Server........................................................................................23
5.3 Status Menu
5.3.1 System Status............................................................................................................................. 24
5.3.2 Wireless Sta
5.3.3 Printer Status
5.3.4 TCP/IP Statu
...................................................................................................................24
tus........................................................................................................................... 25
.............................................................................................................................. 26
s............................................................................................................................. 27
5.4 Setup Menu....................................................................................................................27
5.4.1 System Setup ............................................................................................................................. 28
5.4.2 Wireless Set
5.4.3 TCP/IP Setup:
up:........................................................................................................................... 28
............................................................................................................................. 29
5.5 Misc................................................................................................................................30
5.6 Restart ...........................................................................................................................31
CHAPTER 6. TCP/IP LPR PORT PRINTING INSTALLATION.........................33
6.1 Windows 2000/XP/2003/Vista Standard TCP/IP Port Printing Installation.....................33
6.2 Mac OS 10.4 and Linux LPR/LPD Installation................................................................35
6.3 Redhat Linux 9/Fedora Core..........................................................................................36
CHAPTER 7. UPGRADING PRINT SERVER.................................................... 39
7.1 Overview........................................................................................................................39
7.2 Upgrading the print server from PSAdmin......................................................................39
7.3 Upgrading the print server from c
7.4 Upgrading the print se
rver from Browser .......................................................................39
ommand prompt.........................................................39
IV
Page 7

CHAPTER 8. TROUBLESHOOTING.................................................................40
APPENDIX A: RESET BUTTON........................................................................41
APPENDIX B: FREQUENTLY ASKED QUESTIONS
.......................................42
APPENDIX C: ADDITIONAL INSTALLATION INSTRUCTIONS
......................43
V
Page 8
Chapter 1. Introduction
1.1 Product Overview
The external print servers enhance capability by letting you place your printers at convenient locations directly
on the Ethernet network, and by increasing network printer performance and management. Please note that the
print server does not support printing with host-based printers, e.g. CAPT, GDI, PPA.
1.2 Network configuration
The print servers provide an embedded web server that can be accessed via a proper web browser. We also
subsidiary Windows-based PSAdmin utility which help administrator to setup print server environment.
1.3 Components and Features
Dongle-sized Wireless Print Server
¾ 1-USB2.0 High Speed port(PID1)
¾ 1 Setup CD contains driver and manual for Windows system
¾ One external AC power adapter
¾ One Quick Installation Guide
¾ Built-in Reset Button
1.4 LED Indicators
LED Status Indication
On (Red) The Print Server’s power is on.
Power
Off The Print Server’s power is off.
WLAN Blinking (Green)
Indicating the linkage and data transmission via wireless
connectivity.
1
Page 9

Chapter 2. Installation
Before you start, you should prepare the following items:
¾ One Windows-based computer with print server setup CD
¾ One printer
¾ One printer cable
¾ One 802.11b/g Access Point (optional)
2.1 Hardware Installation
To install the print servers, you need to complete these steps:
1) Confirm that your printer parallel port or USB Port works well.
2) Connect the print server to the network and printer, and plug in the print server.
Follow these instructions to install the print servers, please refer to any peripheral you are connecting
to the print server:
1) Turn off the printer’s power.
2) Connect the print server to your printer with the supplied printer cable.
3) Turn the printer’s power on.
4) Plug the AC power adapter into the power connector on the print server.
5) Wait 40 seconds as part of the print server’s Power On Self Test (POST).
2.2 Wireless Network with Print Server:
z Username: admin
z Password: 0000
z Wireless Mode: Ad-Hoc (Peer-to-Peer)
z Channel: 1
z SSID: WLAN-PS
z IP Address: 192.168.0.10
z Subnet Mask: 255.255.255.0
2
Page 10
Chapter 3. Print Server Installation
3.1 Preparation
The print server supports Standard TCP/IP Port printing protocol – LPR/LPD. This means that the print server
supports the most popular network operating systems today, including Windows 2000/XP/2003/Vista, Linux
and Mac OS 10.2 or above.
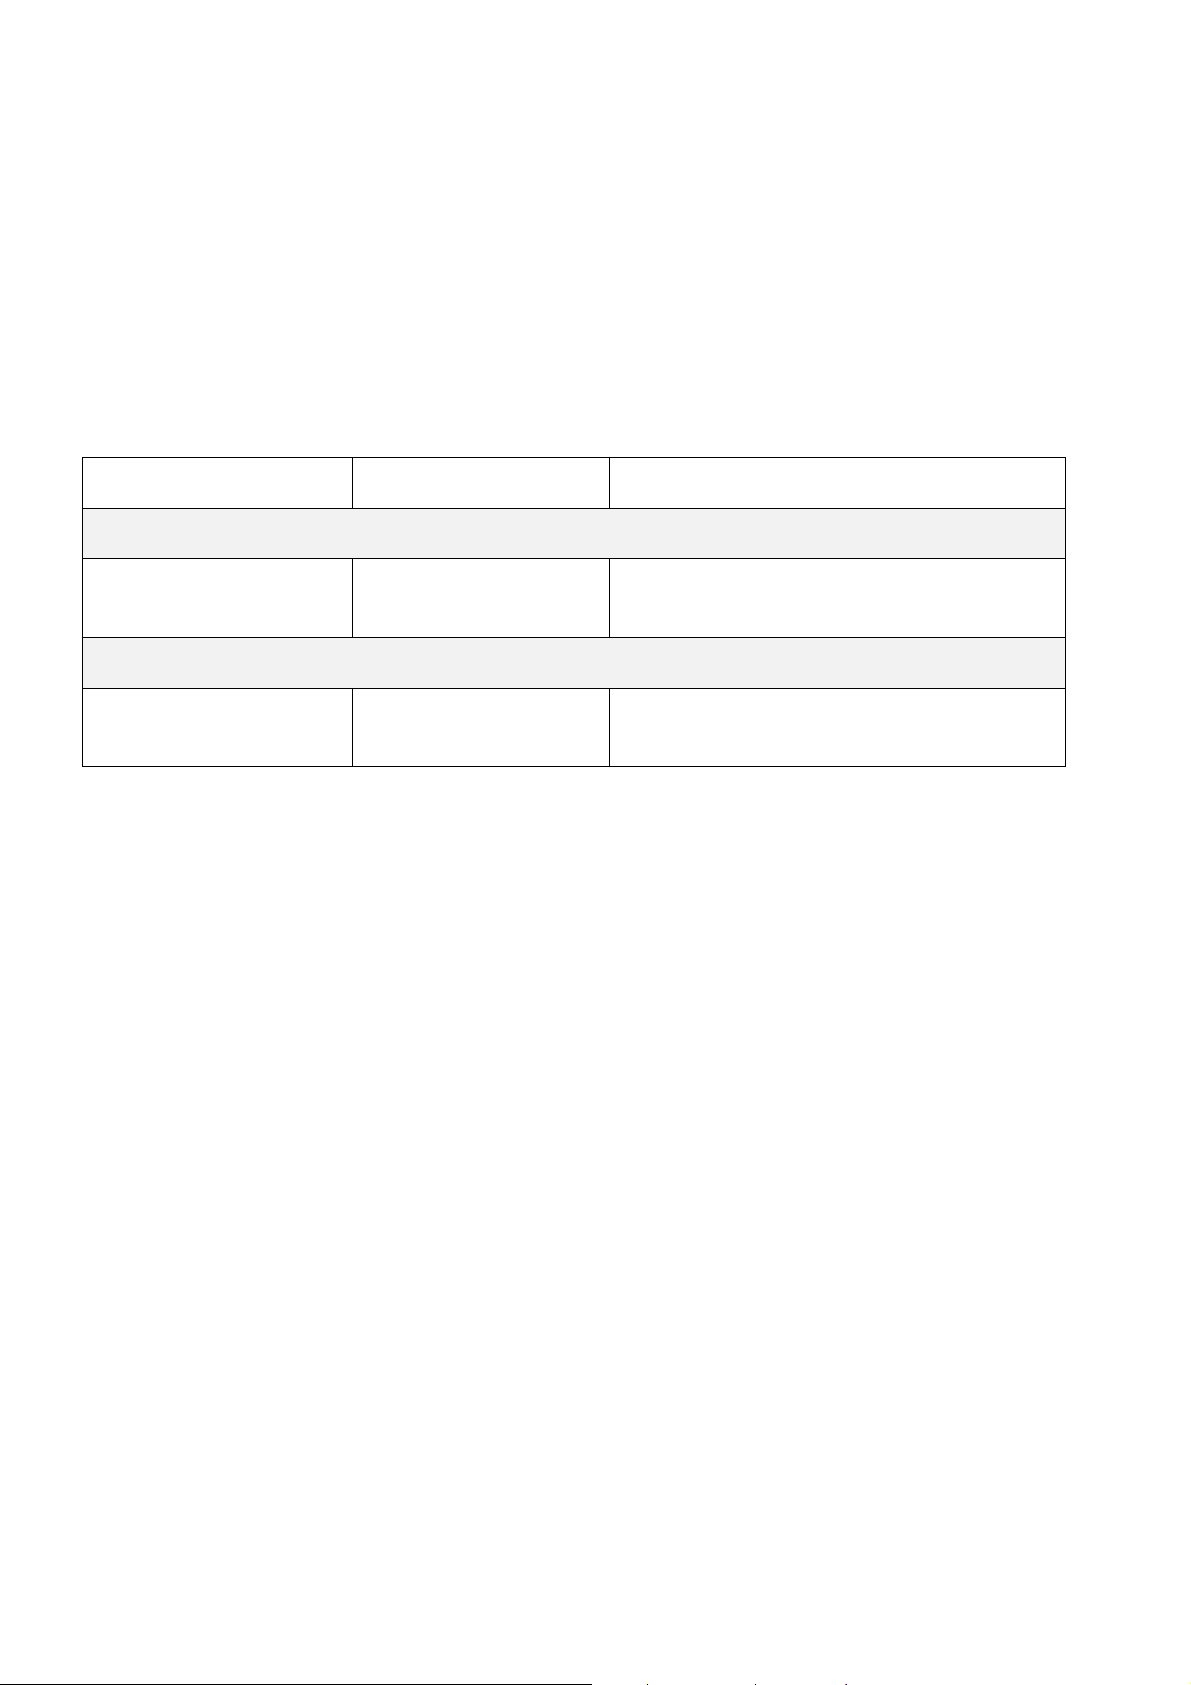
3.2 Configuration Solution Table
Setup Operating System Function Remarks
PSAdmin utility / Setup Wizard
Windows 2000/XP/2003,
Vista
Embedded Web server
Windows-based system,
Mac OS, Linux…
Install a single network on
a peer-to-peer network
Remote setup print server
from private network
Easy printer installation runs from print server
setup CD
Follow standard browser, e.g. IE or Firefox
3.3 Self-test Page
To know the current settings of print server, please follow these instructions to print the self-test page of print
server.
1) Turn off the printer’s power.
2) Connect the print server to your printer with the supplied printer cable.
3) Turn the printer’s power on.
4) Plug the AC power adapter into the power connector on the print server.
5) Wait 40 seconds as part of the print server’s Power On Self Test (POST).
6) Press the reset button for 8 seconds, and then release it.
7) Then, the test page includes the current settings of print server will be printed out.
3
Page 11
Chapter 4. Software Installation
The PSAdmin is a proprietary Windows-based management program that can assist you in configuring and
managing your print server. The program can be installed from the setup CD of print server.
4.1 Prepare Your Computer
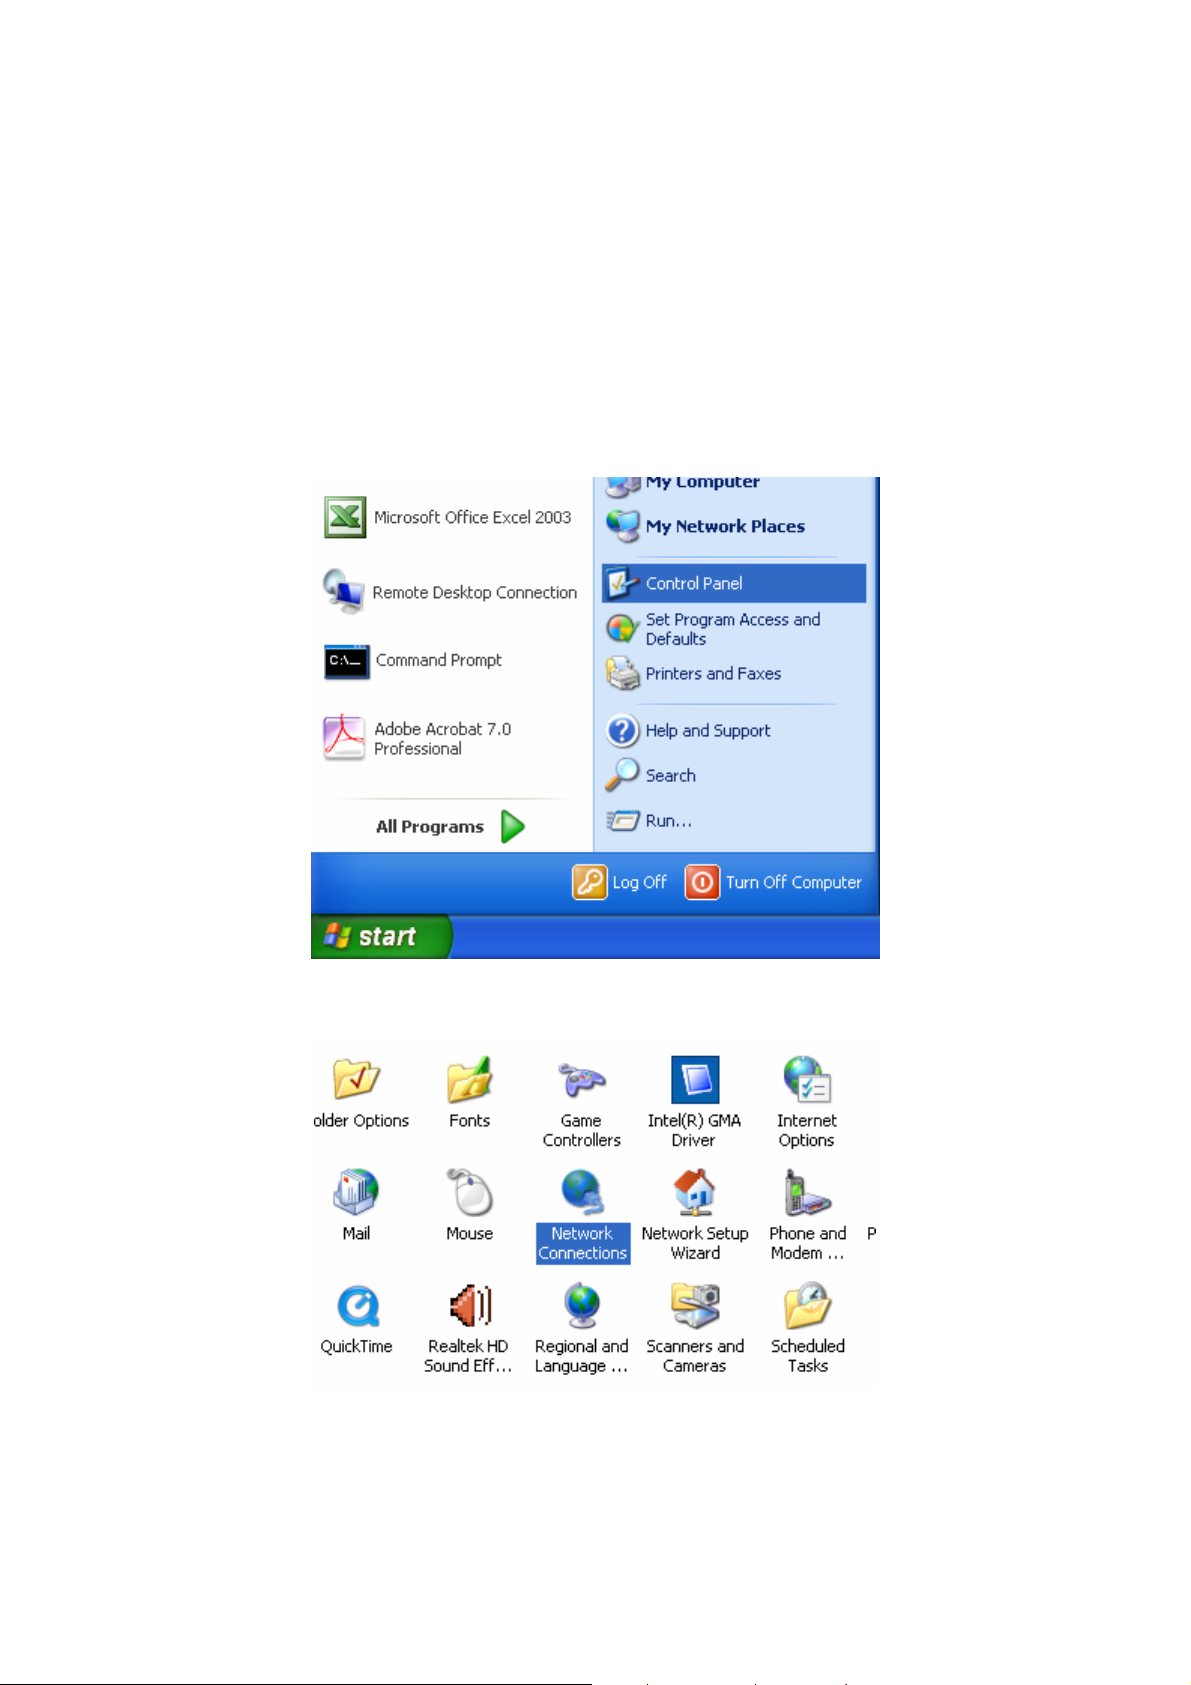
For Windows XP:
Step 1 On the Windows taskbar, click the Start->Control Panel
Step 2 select and double-click Networking Connections.
Step 3 Right Click Wireless Connection, select and click Properties.
4
Page 12
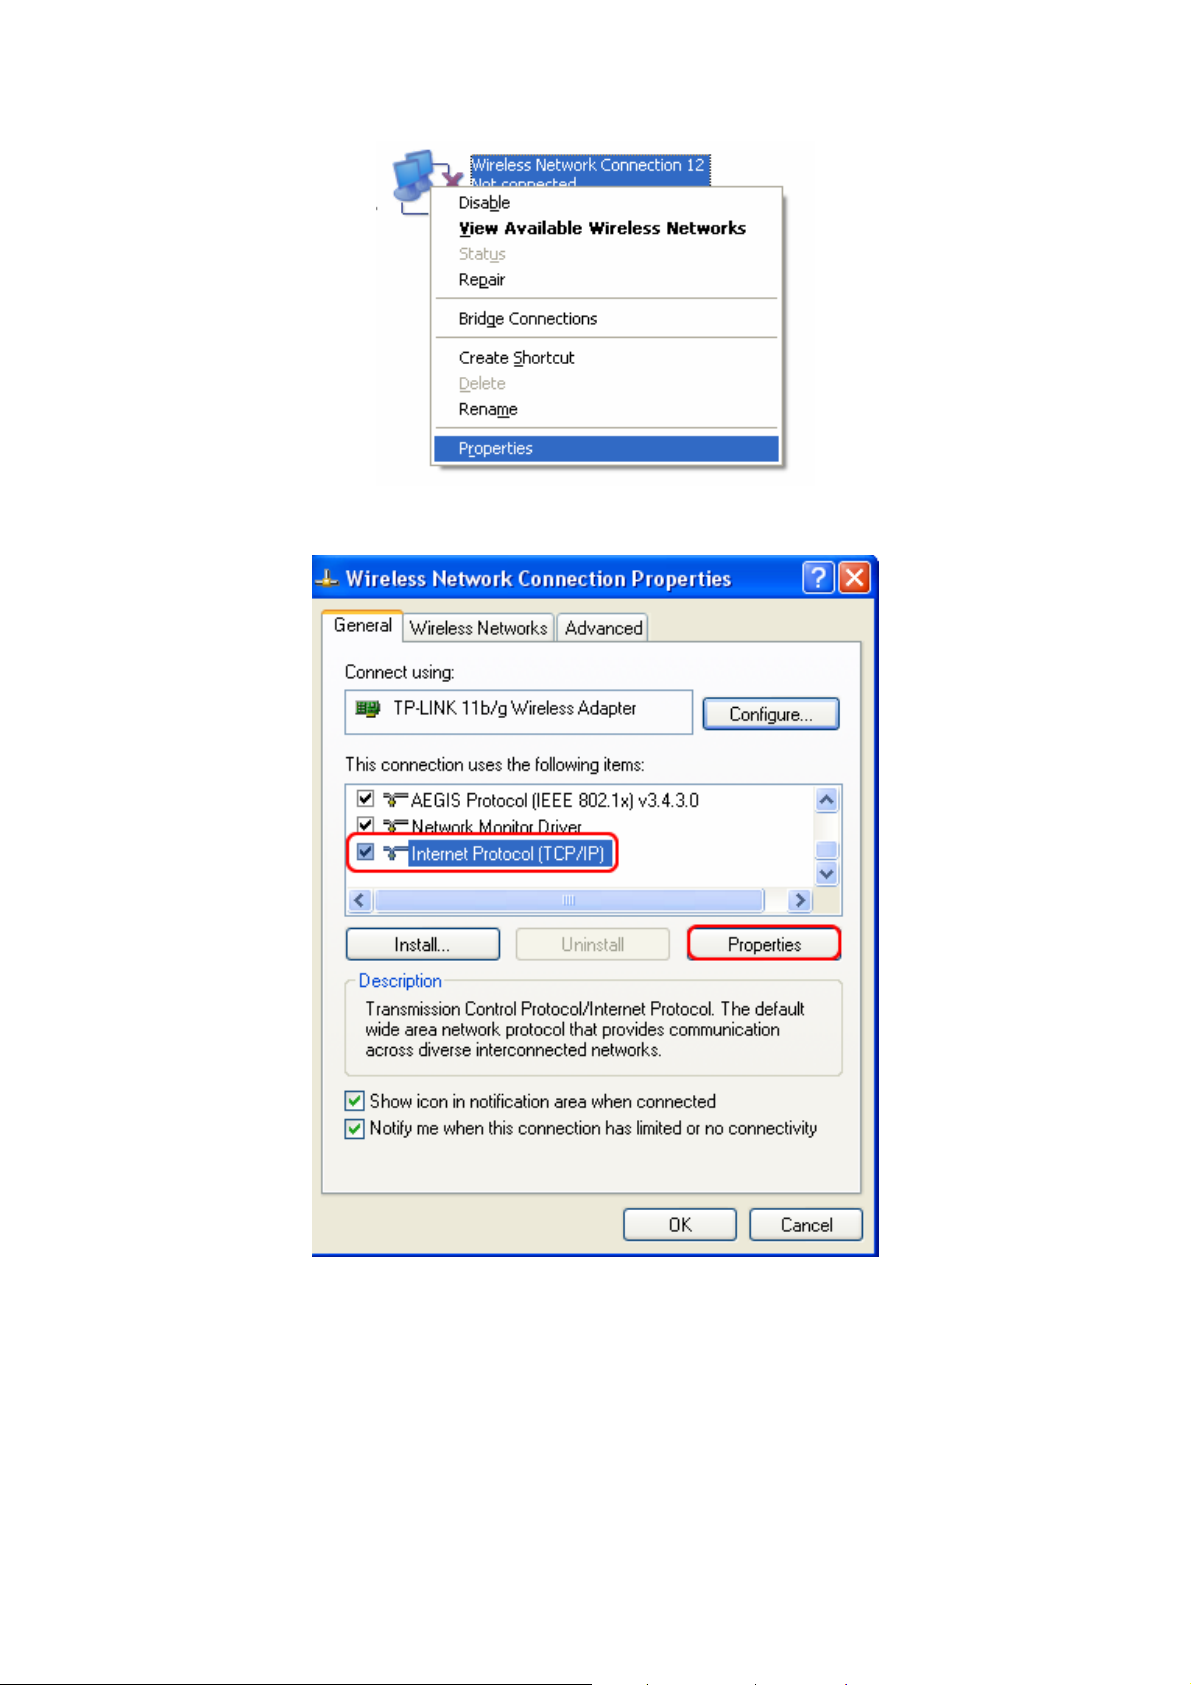
Step 4 Select Internet Protocol (TCP/IP), then double click it or click Properties.
Step 5.Select “Use the following IP address” and input the static IP address, e.g.192.168.0.101,Subnet mask:
255.255.255.0;
5
Page 13
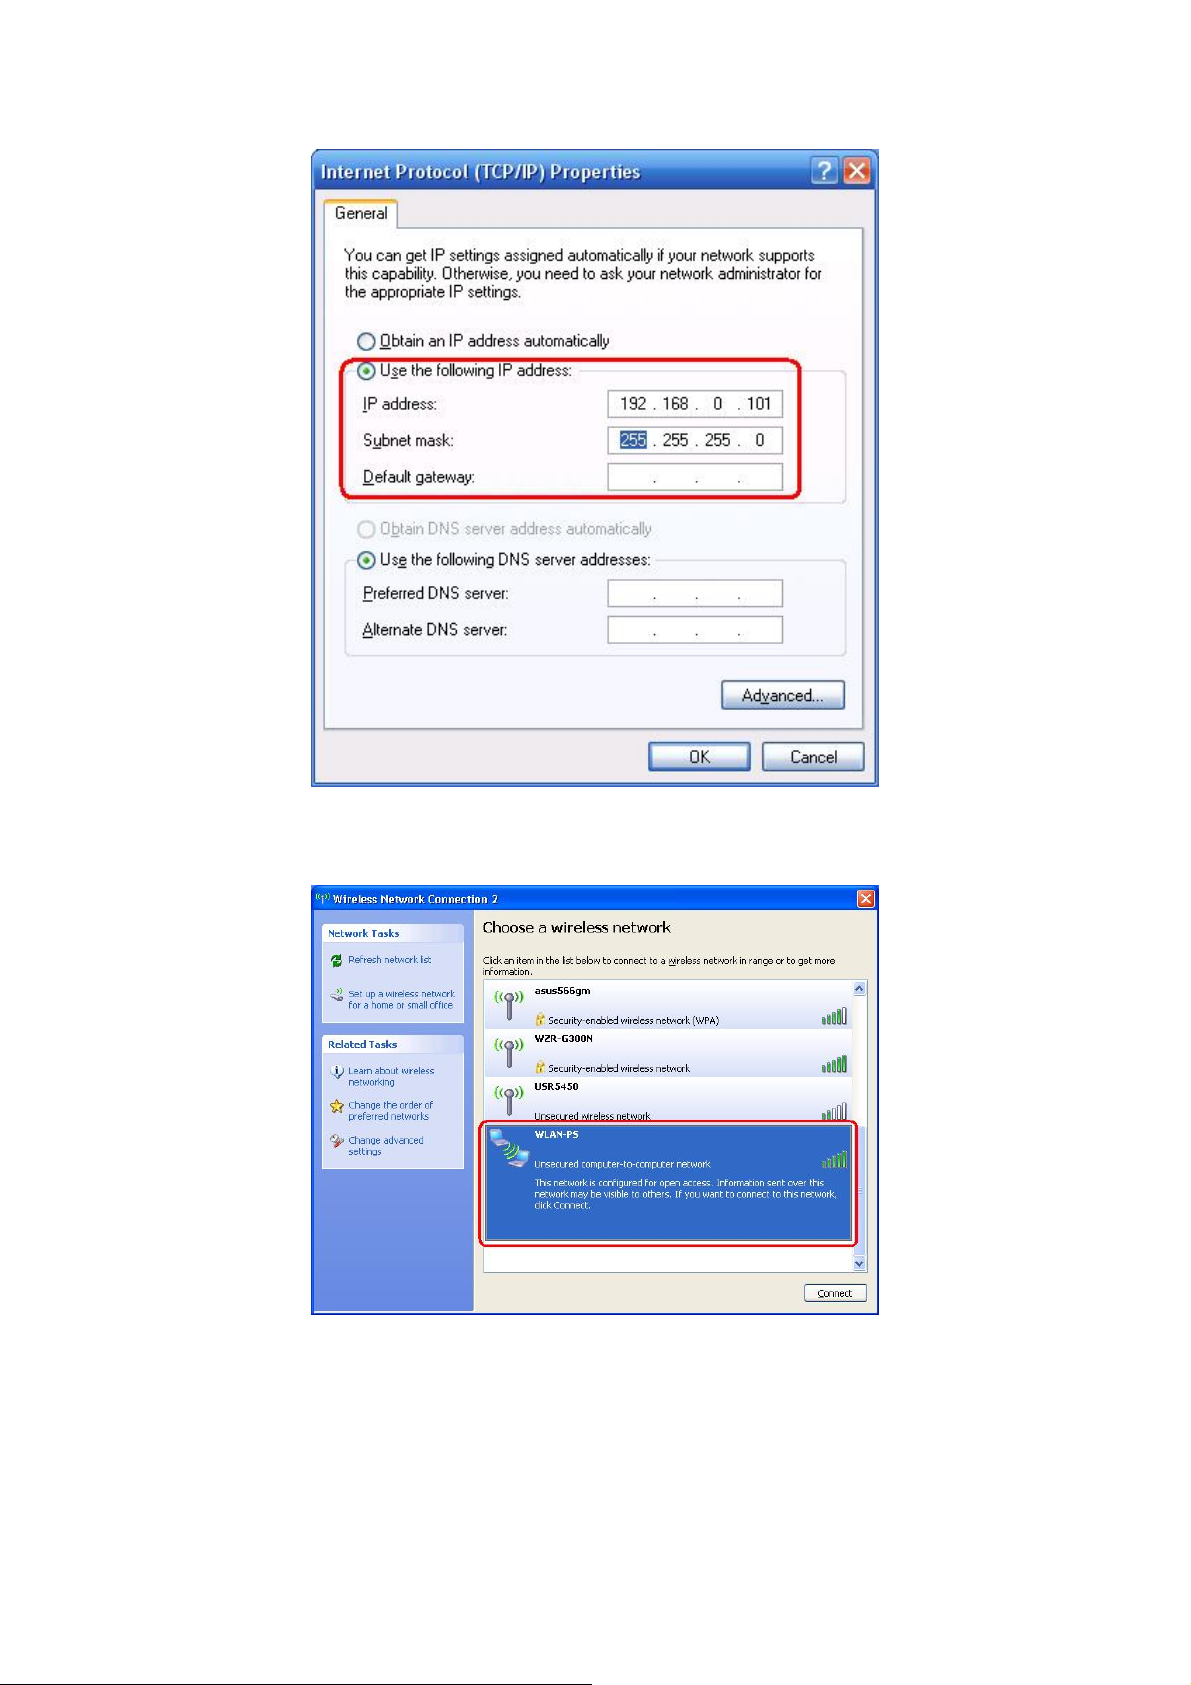
Step 6 Find the SSID (WLAN-PS)of wireless print server by Windows Zero Configuration or vendor utility of
wireless adapter. Then click Connect.
For Windows Vista:
Step 1 On the Windows taskbar, click the Start, then select Control Panel;
6
Page 14
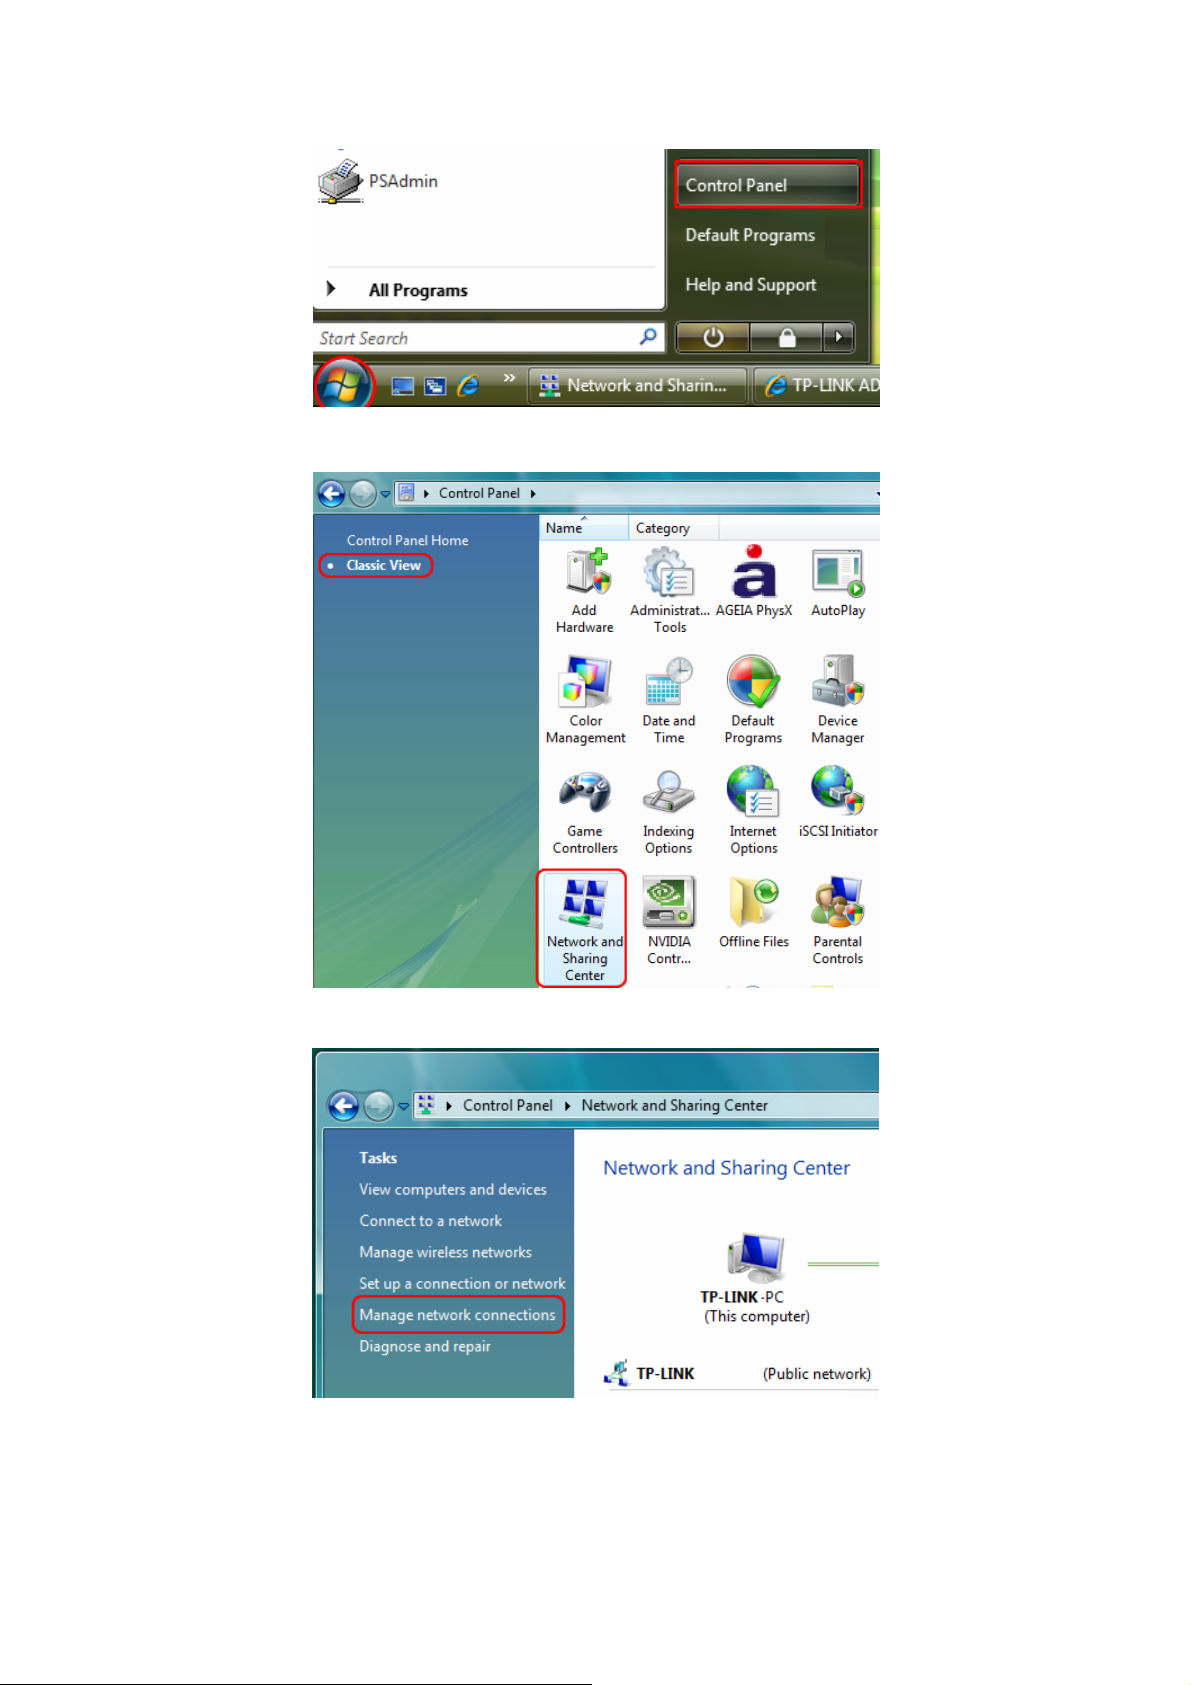
Step 2 Select Classic View on the left side then double-click Networking and Sharing center;
Step 3 Click Manage network connections on the left side;
Step 4 Right click on Wireless Network Connection and select Properties;
7
Page 15
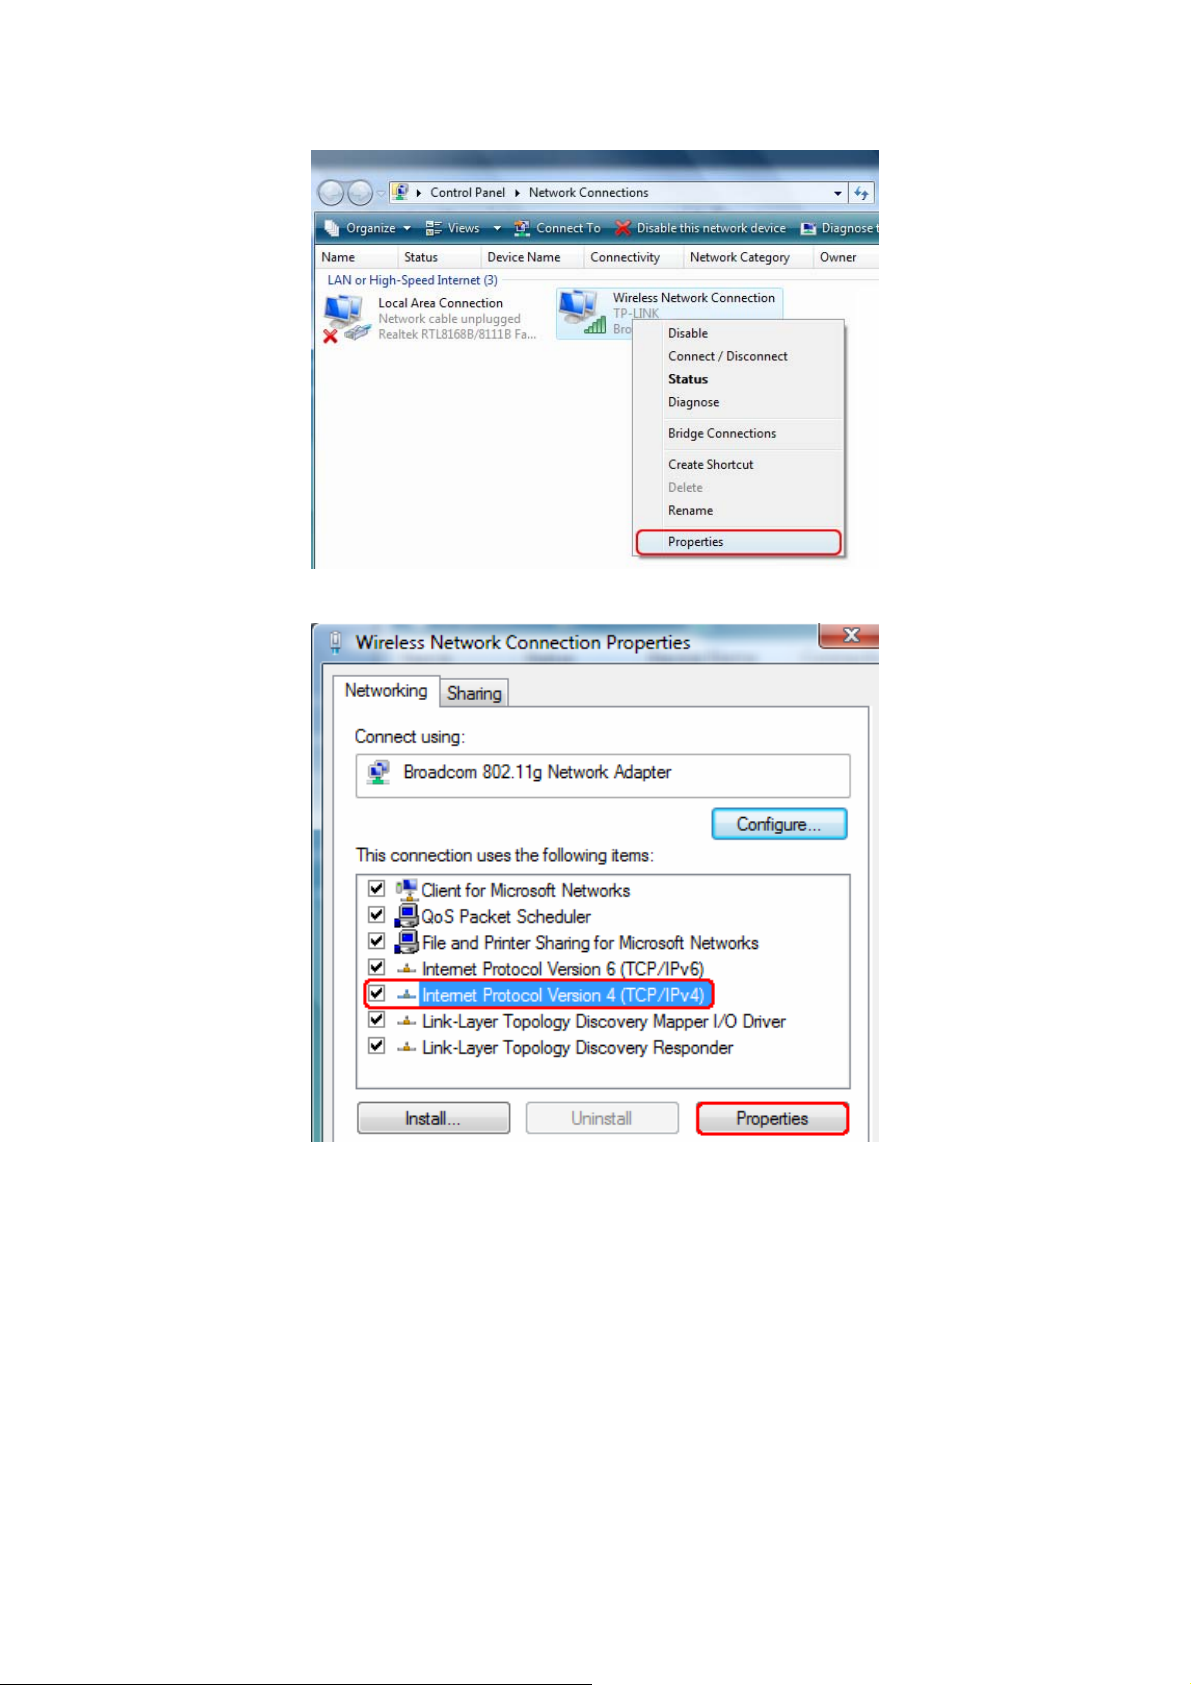
Step 5 Highlight the Internet Protocol Version 4(TCP/IPv4) and select Properties;
Step 6 Select “Use the following IP address” and input the static IP address, e.g.192.168.0.101,Subnet mask:
255.255.255.0, then click OK.
8
Page 16
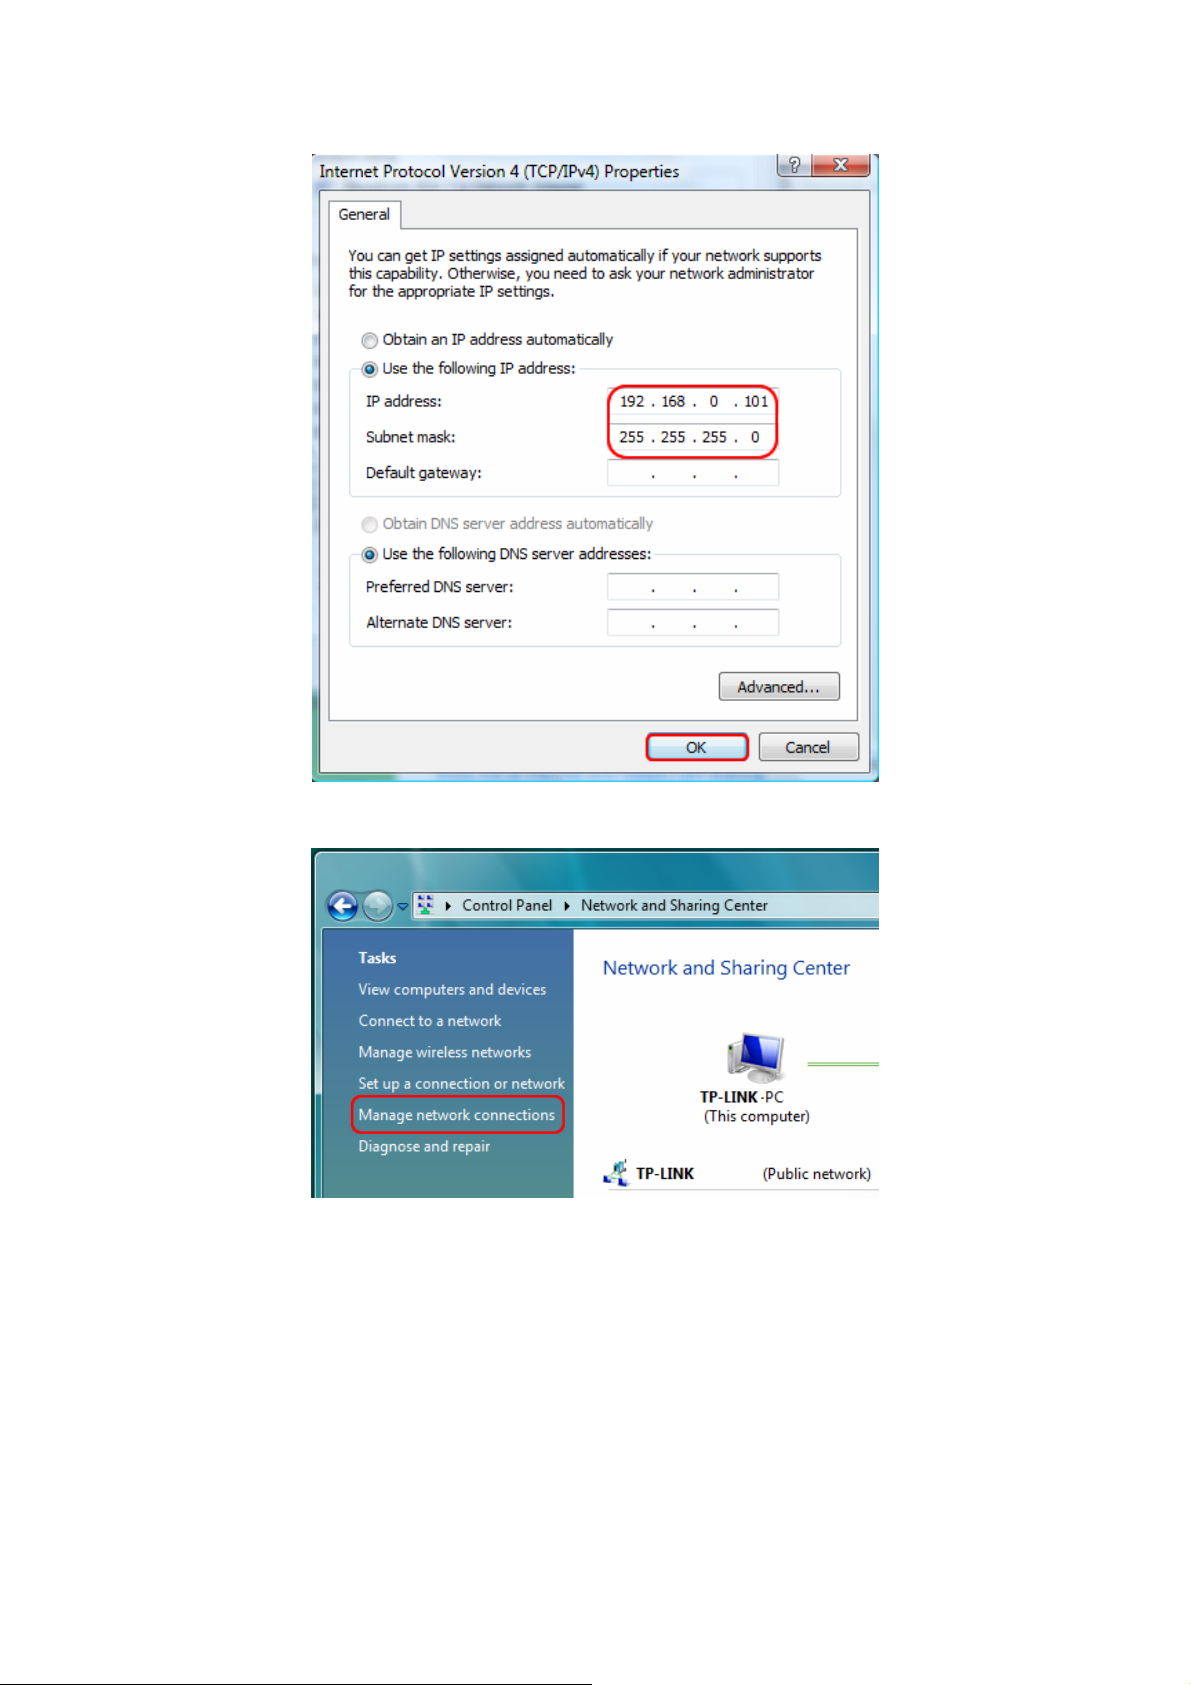
Step 7 Go back to Network and Sharing Center, then click Manage network connections.
Step 8 Right click on Wireless Network Connection and select Connect/ Disconnect;
9
Page 17

Step 9 Click Refresh button to view the wireless network. Select the WLAN-PS, then double click it or click
Connect.
4.2 Installing the PSAdmin and Setup Wizard
1) Insert the setup CD into your CD-drive. The autorun program will be started.
2) Select TL-WPS510U for your print sever.
10
Page 18

3) Choose Setup Wizard to install the print server and configure the connected printer.
4) Click Next, the wizard will automatically discover the print server.
11
Page 19

5) From the Select A Print Server screen, select the print server port that you want to configure and click
Next.
6) On the Change Settings screen, select No or Yes:
12
Page 20

a) Click Yes if you want to change wireless settings or assign a static IP address to the print server, the
default password is 0000
¾ On the Basic Wireless Settings screen, select Communication Type according to your network:
Infrastructure mode
13
Page 21

Ad-Hoc
¾ Enter the proper SSID of your wireless network, e.g. the SSID of your wireless router or access point;
Channel: optional
Data Transmit Rates: select Auto or others
Transmit Mode: select Auto or others
¾ If you have wireless security on your wireless network, please set the correct Authentication type,
then configure it according to your wireless network and click Next.
14
Page 22

¾ On the TCP/IP Settings screen, specify a fixed or dynamic IP address for the print serve r, a fixed IP
address is highly recommended. Click Next.
)Note:
The IP address of print server must be within the same subnet as your network adapter.
e.g. Wireless Router or Access Point (192.168.0.1)
Wireless Printer Server (192.168.0.10) PC\Laptop (192.168.0.101)
b) If you click No on the “Change Settings” page, the printer server will keep using the default IP address
and the default settings:
¾ Username: admin ¾ Encryption: none
¾ Password: 0000 ¾ DHCP client: off
¾ Ad-Hoc mode ¾ IP address: 192.168.0.10
15
Page 23

¾ Channel: 1 ¾ Subnet Mask: 255.255.255.0
¾ SSID: WLAN-PS
7) In the setup wizard, select an already configured printer from the list, click Next and then Finish to
complete the installation.
Or select Add New Printer if the print server is connected to a printer that hasn’t been installed before and
does not appear in the list.
8) Click Add New Printer to launch Windows Add Printer Wizard.
16
Page 24

9) Click Next and select Local Printer, make sure the Automatically detect and install my Plug and Play
printer check box is NOT checked. Then click Next.
10) Make sure the Use the following port radio-button is clicked and select LPT1: (Recommended Printer
Port) from the pull-down list. Then click Next.
11) Select Manufacturer and Printer from the lists of printer’s driver. Then click Next.
17
Page 25

12) If you already have the printer’s driver installed, you will be asked whether to keep it or to replace it. Click
Next. Supply a name for the printer and choose whether you want to make it your default printer. Then click
Next.
13) Then, choose whether you want to share the printer with other network users, print a test page (please
select No.), etc. Select the appropriate radio-button and click Next and Finish.
14) In the setup wizard, finish the installation by highlighting the installed printer in the Select a Printer list and
click Next, Next -> Finish.
15) From Windows system, go to start -> Printers and Faxes and highlight your newly installed printer.
18
Page 26

16) Right-click, select Properties -> Ports and verify that the print server’s port appears.
17) Go to General; click Print Test Page to verify the configuration.
18) Done.
19
Page 27

) Note:
If you wish to install more print servers, start setup wizard from your Windows Start menu: start -> All
Programs -> Network Print Server -> PSWizard and repeat the installation procedure.
4.3 How to create print server port manually?
1) From your Windows Start menu: start -> All Programs -> Accessories -> System Tools -> Control
Panel -> Hardware and Sound -> Printers.
2) Find your installed printer icon, right-click, select Properties -> Ports -> Add Port -> Standard TCP/IP
Port -> New Port -> Next.
3) Input the exact IP address of print server that you configured it. Click Next.
4) Select Custom, and click Settings.
5) Choose LPR, and input the queue name as lp1.
6) Click OK -> Next -> Finish, to complete the wizard.
7) Click Close -> Apply.
8) Now, the print server port has been created.
4.4 How to know the current settings of print server?
1. Plug the AC power adapter into the power connector on the print server.
2. Wait 40 seconds as part of the print server’s Power On Self Test (POST).
3. Press the reset button for 8 seconds, and then release it.
4. Then, the test page includes the current settings of print server will be printed out.
4.5 Using PSAdmin
After the software of setup CD is successfully installed, starts PSAdmin utility from your Windows Start menu:
start -> All Programs -> Network Print Server -> PSAdmin. The screen will then appear as follow picture.
20
Page 28

All print server(s) on the WLAN will be displayed along with their respective device name, MAC Address, print
server name, firmware version, and status. The terms are defined as follows:
¾ Device Name: The name of the print server hardware used for identification purposes.
¾ MAC Address: The Ethernet address of the print server.
¾ Version: The firmware version of the print server.
¾ Status: Connected printer’s status presently.
4.6 Wizard
Wizard is a configuration program that can assist you in setting up the necessary parameters for your print
server device to function. Setup a print server by using Wizard.
TCP/IP Wizard
1) Click Wizard button just like a picture <
>.and select TCP/IP Wizard.
21
Page 29

2) Select “Obtain an IP address from DHCP server”. If there is a DHCP server on your network. This option
allows the print server to obtain IP-related settings automatically from your DHCP server. This setting, by
default, is disabled. If you would like to manually specify an IP address to the device, please skip to the
following step.
3) In the IP Address option, type an IP address for the print server. The IP address must meet the IP
addressing requirements of the network segment.
4) (Optional) In the Subnet Mask option, type the Subnet Mask your LAN or network segment is currently
configured to use.
5) (Optional) In the Gateway field, type the IP address of gateway.
6) When done, click OK button. The program will save the above settings into the print server.
7) Done
4.7 Manual Setup
Manual Setup is a
configuration program designed for more experienced users. Also, all the configurations here
can be configure by the WEB management of print server. You can refer to the Chapter 4.
4.7.1 General:
1)
Select the print server that you wish to configure.
2) Click Properties in the tool bar and the following screen will appear, Properties button just like a picture <
>, as follow picture: (The factory default password is 0000.)
22
Page 30

Then, user can change the print server’s device name and password. The factory default password is 0000.
4.7.2 Wireless:
User can change the prin
t server’s wireless settings and security to match his current wireless network.
23
Page 31

4.7.3 TCP/IP:
User can change the prin
We highly recommend specifying a fixed IP address for the print server
t server’s IP address. Default is 192.168.0.10/255.255.255.0.
4.8 Upgrade
Upgrade allows the user to upgrade the print server device. In order to upgrade the unit please perform the
steps as follows:
1) Click Upgrade button just like a picture <
>, as shown as follow picture
2) Select General Upgrade. Make sure that the upgrade file(mps43.bin) is located in the same directory as
PSAdmin.
24
Page 32

4.9 Reset
1) Click Reset button just like a picture < >.
2) Reset allows the user to reset the print server device in order to establish a new connection or for new
settings to take effect.
4.10 Refresh
1) Click Refresh button just like a picture < >.
2) Refresh searches all attached print server(s).
25
Page 33

Chapter 5. Configuration from Embedded Web Server
5.1 Overview
The Print Server contains an embedded web server that can be accessed through a supported web browser on
a WLAN, for example, IE6, Firefox or above is recommended.
The embedded web server provides access to configuration and management pages for the print server and
the connected peripheral device.
5.2 Using Embedded Web Server
Before you can use the embedded web server, the print server must be configured with a proper IP address.
There are many ways to configure the print server’s IP address. For example, the Windows-based of PSAdmin
utility can easily set an IP address with the print server, please refer to the chapter 3.
Once you have finished the IP address configuration with print server. You should use web browser to manage
the print server.
Preparation
Enter the print server’s IP address in the Address field of your Web browser. Press Enter. Then the print server
page will appear. From here you can configure all print server settings.
Setup Menu
Meanwhile, you have finished the IP address configuration with print server. You should use web browser to
configure the print server. The setup menu of the print server helps administrator to setup the print server.
Preparation
Enter the IP address of the print server as the URL.
Factory default IP address: 192.168.0.10
User Name: admin
Password: 0000
23
Page 34

5.3 Status Menu
Once you have finished the IP address configuration with print server. You should be use web browser to view
and manage the print server.
Preparation
Enter the print server’s IP address in the Address field of your Web browser. Press Enter. Then the print server
page will appear. From here you can configure all print server settings.
Please follow this information in the status menu of the print server:
5.3.1 S ystem Status
1) C
lick Status, it then appears the sub-menu.
2) Click System, it then as shown in the following picture.
24
Page 35

¾ Print Server Name: This option allows you to view device name of the print server. To correct the print
server’s device name.
¾ System Up Time: This option allows you to view uptime of the print server. When you start the print
server, it will compute the print server from start time to power off time.
¾ Firmware Version: This option allows you to view firmware version of the print server. To verify the
print server’s firmware version is newer in this time.
¾ MAC Address: This option allows you to view Node ID of the print server. The Node ID is unique from
any print server.
5.3.2 Wireless Status
1) C
lick Status, it then appears the sub-menu.
2) Click Wireless, it then as shown in the following picture about the current wireless settings.
25
Page 36

5.3.3 Printer Status
1) C
lick Status, it then appears the sub-menu.
2) Click Printer, it then as shown in the following picture.
¾ Manufacturer: This option allows you to view manufacturer of the printer. When the printer connected
with the print server, it will be show in the manufacture box.
¾ Model Number: This option allows you to view model of the printer. When the printer connected with
the print server, it will be show in the model box.
26
Page 37

¾ Printing Language Supported: This option allows you to view command to set the printer. When the
printer connected with the print server, it will be show in the command box.
¾ Current Status: This option allows you to view status of the printer. When the printer connected with
the print server, it will be show in the status box. For Example: Waiting for job. It is means the printer
already to printing.
5.3.4 TCP/IP Status
1) C
lick Status, it then appears the sub-menu.
2) Click TCP/IP, it then as shown in the following picture.
¾ Use DHCP/BOOTP: This option allows you to view DHCP/ BOOTP status. If there is a DHCP/BOOTP
server on your network, this option allows the print server to obtain IP-related settings automatically
from your DHCP server.
¾ IP Address: This option allows you to view IP address from the print server. The IP address must
meet the IP addressing requirements of the network segment. (default: 192.168.0.10)
¾ Subnet Mask: This option allows you to view subnet mask from the print server.
¾ Gateway: This option allows you to view gateway from the print server.
5.4 Setup Menu
Meanwhile, you have finished the IP address configuration with print server. You should use web browser to
configure the print server. The setup menu of the print server helps administrator to setup the print server.
Preparation
27
Page 38

Enter the IP address of the print server as the URL, default: 192.168.0.10. Then the print server’s home page
will appear in content of the web browser.
Please follow this information in the setup menu of the print server:
5.4.1 S ystem Setup
1) C
lick Setup, it then appears the sub-menu.
2) Click System, it then as shown in the following picture.
¾ Print Server Name: This option allows you to input device name of the print server. To correct the
print server’s device name.
¾ Password: This option allows you to change password of the print server. Factory default is 0000.
(default user name is admin, it’s not available to change)
5.4.2 Wireless Setup:
1) C
lick Setup, it then appears the sub-menu.
2) Click Wireless, it then as shown in the following picture.
28
Page 39

Basic Settings:
¾ Network Type: To change the WLAN type to Ad-Hoc(default) or Infrastructure.
¾ SSID: To change the SSID to connect an existing wireless network.(default: WLAN-PS)
¾ Channel: Indicates the channel setting for this print server.
¾ Transmission Rate: Select the basic transfer rates based on the speed of wireless network.
¾ Wireless Mode: Select the WLAN mode based on the existing wireless network
Advanced Settings:
¾ Security Type: To change the wireless security settings based on the existing wireless network. Default
setting is Disable.
The print server provides three kind of security settings: WEP (64/128bit), WPA (TKIP/AES (CCMP)) and WPA2
(TKIP/AES (CCMP)) to fit an existing security setting of wireless network.
WPA-PSK and WPA2-PSK support Infrastructure mode only.
And the following site survey table will provide a list of existing wireless network. You can choose one to join.
5.4.3 TCP/IP Setup:
1) C
lick Setup, it then appears the sub-menu.
2) Click TCP/IP, it then as shown in the following picture.
29
Page 40

¾ DHCP/BOOTP: This option allows you to select DHCP/ BOOTP option. If there is a DHCP/BOOTP server
on your network. This option allows the print server to obtain IP-related settings automatically from your
DHCP server.
¾ IP Address: This option allows you to input IP address from the print server. The IP address must meet the
IP addressing requirements of the network segment.
)Note:
On the TCP/IP Setup screen, specify a fixed IP address is highly recommended.
¾ Subnet Mask: This option allows you to input subnet mask from the print server. The IP address must
meet the IP addressing requirements of the network segment.
¾ Default Router: This option allows you to input gateway from the print server. This IP address of gateway
must meet the router or gateway to go across of the network segment.
5.5 Misc
1) Click Misc, it then appears the sub-menu.
2) Click Factory Default, it can restore the factory default settings to print server. It will erase all previous
settings.
30
Page 41

3) Click Firmware Upgrade, it then as shown in the following picture.
¾ Firmware Upgrade: To upgrade your print server with the up-to-date firmware.
5.6 Restart
Click OK to reboot the print server.
31
Page 42

32
Page 43
Chapter 6. TCP/IP LPR Port Printing Installation
DHCP
The print server supports DHCP feature, allowing the print server to obtain an IP address and related TCP/IP
settings automatically from a DHCP server. While the print server supports DHCP, we strongly recommend you
manually specify a fixed IP address to the print server. By default, the print server’s DHCP function is disabled
and the IP address is 192.168.0.10.
6.1 Windows 2000/XP/2003/Vista Standard TCP/IP
1) Click Start, point to Settings, and select Printer.
2) Run Add Printer, Click Next.
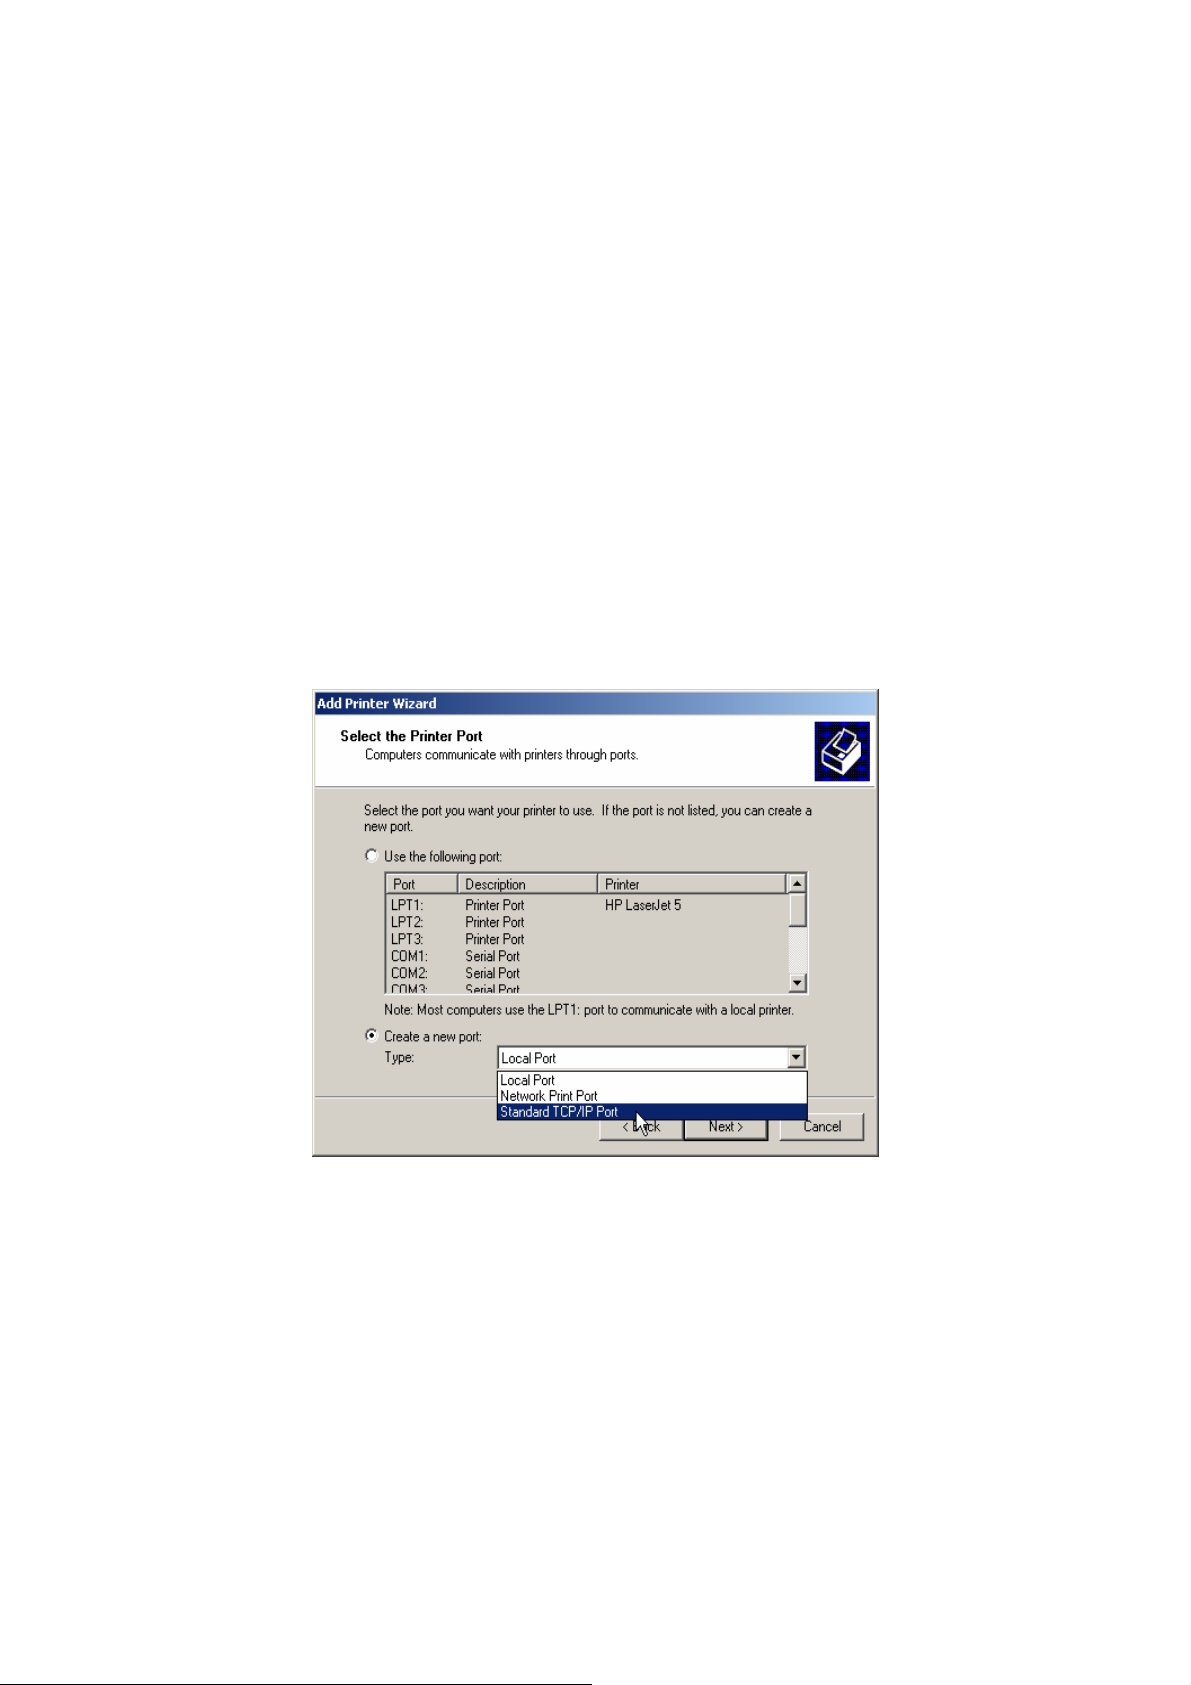
3) The Add Printer Wizard screen will appear, Select Local Printer and click Next.
4) From the type of Create a new port box as shown in the following picture, select the Standard TCP/IP
Port, Click Next and Next.
Port Printing Installation
5) The Add Standard T CP/IP Printer Port Wizard box will then appear as shown the picture as below, and
type in the IP address assigned to the print server in the Printer Name or IP Address box, Click Next.
33
Page 44

6) In the Add Standard TCP/IP Printer Port Wizard box as shown in the following picture, Select Custom,
Click Settings button, and click Next.
7) In the Configure Standard TCP/IP Port Monitor box as shown in the following picture, select LPR form
Protocol, type in a queue name: lp1.
8) Click OK, and Next.
34
Page 45

9) Click Finish.
10) Select the appropriate printer manufacturer and printer type list and click Next.
11) Type in a new Printer name or leave it in default, and click Next button.
12) A message reading, “To confirm that the printer is installed properly, you can print a test page”. Select Yes
(Recommended) and click Finish.
13) Done.
6.2 Mac OS 10.4 and Linux LPR/LPD Installation
For LPD printing applic
ation in Mac OS X 10.4.x
1) From the Printer Setup Utility, click Add.
2) Click IP Printer and select Line Printer Daemon – LPD.
3) Input the IP address of print server and the Queue name: lp1.
4) Choose a proper printer model from the Print Using. Then click Add.
35
Page 46

6.3 Redhat Linux 9/Fedora Core
The Print Server can work under any Linux-based systems, including Slackware, RedHat, etc, without any
problems.
Basically, the Linux's printing system is based on BSD system. Although many commercial Linux systems are
available in the market and their commands will vary slightly, depending upon which version is used, the
functionality of the Linux-based variants is exactly the same.
Following are the outlined procedures (recommended for all users) on Red Hat Linux or later with X-Window
system installed.
1) Make sure that the TCP/IP is well configured on your RedHat system, including network interface card's
driver and IP-related settings say, IP address, subnet mask, and gateway IP).
2) Log in root.
3) Start X-windows by typing startx at the shell mode.
4) Open Printer Configuration.
36
Page 47

5) Click New button.
6) Click Forward button.
7) In the Name field, type a user-defined name, click Forward.
37
Page 48

8) In the Queue Type field, choose Networked UNIX.
9) In the Server field, type the IP address of print server
10) In the Queue field, type a print server’s port name, which connect to the printer. For example: lp1.
11) Click Forward button.
12) In the Printer field, choose Postscript Printer.
13) Choose the model of printer and click Forward.
14) Done.
38
Page 49

Chapter 7. Upgrading Print Server
7.1 Overview
Upgrading print server will allow you to upgrade its firmware inside the print server while the newer software
version of the print server is available from your local dealer. Depending on the different systems users might
use, this chapter is divided into several Sections; please refer to the following lists for your systems.
1. Upgrading the print server from PSAdmin
2. Upgrading the print server from command prompt
3. Upgrading the print server from WEB browser
)Note:
1) Before yo u proceed to up grade the pri nt server, ple ase ensure that the nece ssary binary file is located on
your current working directory.
2) Before upgrading the print server, ensure that it is not printing jobs. You have to wait until the print job is
finished before you can proceed.
3) Be careful not to interrupt the file transfer. If the transfer is interrupted, the print server may have to be
re-initialized by your dealer.
7.2 Upgrading the print server from PSAdmin
1) Ensure binary file is located in the PSAdmin directory.
2) Run PSAdmin from your Windows-based computer.
3) Click the Upgrade icon on tool bar.
7.3 Upgrading the print server from command prompt
1) Ensure binary file is located in your current working directory.
2) At command prompt, and type “tftp –i <print server’s IP address> put mpsXX.bin “.
3) Wait for the transfer successful message.
4) Done.
7.4 Upgrading the print server from Browser
1) Ensure binary file is located in your local drive.
2) Enter the IP address of the print server as the URL. Default is 192.168.0.10
3) Click Misc, and then choose Firmware Upgrade.
4) Click Browse… and select the firmware file.
5) Click Firmware Upgrade button.
6) Done.
39
Page 50

Chapter 8. Troubleshooting
General Troubleshooting Overview
The most common problems, which cause the print server to perform improperly, are covered in this chapter. If
a problem still exists after reading this chapter, please contact your dealer for technical support.
1) LED Light Indicators
The print server is equipped with LED lights to assist in diagnosing problems that are the result of the network
and/or the print server hardware itself.
Power (Red)
When the print server unit is powered on, the Power LED will be turned on. This indicates that the print server
hardware is properly configured.
Wireless (Green)
Indicating the linkage and data transmission via wireless connectivity.
2) Power Related Problems
The print server requires an external AC power adapter in order for it to function. If you have a power problem,
check to see whether the power cord or its connectors are damaged. More importantly, check to see that the AC
power adapter included with the print server matches the AC voltage in your country or area. Using an incorrect
AC adapter will damage your print server.
3) Print Port Related Problems
Printing data failure may be caused by a loose connection of the print server to the USB port of the printer.
Check to see if any of the pins on the USB port connector are damaged. In addition, check the cable connection.
If the pins are damaged, contact your dealer for a replacement connector.
4) TCP/IP Troubleshooting
A. The print server's Node ID you specified in the "arp" command is not correct.
If this is the case, please ensure the Node ID field in the corresponding entry of the print server's IP address in
NT's ARP cache table is correct by typing the following command at NT's DOS prompt. "arp -a"
If the Node ID shown on the screen doesn't match the print server's Node ID, please follow the instructions
below to reset the entry.
1) At NT's DOS prompt, type "arp -d <print server's IP address>" to delete the current entry.
2) Type "arp -s <print server's IP> <print server's Node ID>" to specify a new ARP entry.
B. The print server's IP address is duplicated or is as same as another computer's IP address on the
network.
If this is the case, please consult your network administrator to obtain an unused IP address for your print
server.
40
Page 51

Appendix A: Reset Button
Perform a Factory Default:
1. Disconnect the external power adapter.
2. Hold down the reset button.
3. Reconnect the external power adapter. Wait about 15 seconds.
4. Release the reset button.
5. The print server will restart, the POST time needs 40 seconds.
WARNING:
This will erase all settings of print server to default and should be performed with caution!
After performing a factory default, the default settings will be:
z Username: admin
z Password: 0000
z Wireless Mode: Ad-Hoc (Peer-to-Peer)
z Channel: 1
z SSID: WLAN-PS
z IP Address: 192.168.0.10
z Subnet Mask: 255.255.255.0
41
Page 52

Appendix B: Frequently Asked Questions
1) Question A:
Print jobs are sent to the print queue successfully, but fail to be sent to the printer.
Possible explanations:
1. The Print server Name/Print Queue configuration is incorrect.
2. The Print server name specified and stored in the print server memory doesn’t match the same one.
3. The power adapter connected to the print server is loose or disconnected.
4. The printer is off-line, jammed or out of paper.
Solutions:
1. Check all the information in print port setting.
2. Check all the information of the print server by running PSAdmin.
3. Check to see that if the power adapters are properly connected.
4. Recheck the print server connection by running the PSAdmin.
2) Question B
Print jobs start printing, but print very slowly or print unknown characters.
Possible explanation and solution:
A printer driver is missing or is incompatible with that printer. Using a print driver that is not specific for the
printer can cause printing errors. Install the proper printer driver. If these printer drivers are not available to
you, please contact your printer manufacturer.
3) Question C
The upgrading process indication bar stops and does not seem to proceed again while upgrading the print
server.
Possible Explanation:
There might be a network problem. This causes the upgrading procedure to fail.
Solutions:
1) Check the wireless network connection, especially from the workstation running the PSAdmin to the
print server unit.
2) Upgrade the print server again by PSAdmin or WEB browser.
4) Question D
The setup Wizard can’t find print server.
Possible Explanation:
The Personal Firewall installed in your computer blocks the connection.
Solution:
Please disable the Personal Firewall temporarily or adjust the security level to lower.
42
Page 53

Appendix C: Additional Installation Instructions
Panasonic KX-P6100/6300/6500
If you are using a Panasonic KX-P6100/6300/6500 laser printer with the print server through the Network Print
Port under Windows 95/98, please redirect the printer named “Panasonic KX-P6100 PCL” or “Panasonic
KX-P6300 PCL”, or “Panasonic KX-P6500 PCL” to the print server through the Network Print Port.
DO NOT redirect the printer named “Panasonic KX-P6100 GDI”, “Panasonic KX-P6300 GDI”, or “Panasonic
KX-P6500 GDI” to the print server.
Please note that the print server doesn’t support printing with host-based printers, e.g. CAPT, GDI, and
PPA printers. Furthermore, the print server doesn’t support any non-printing functions of MFP
(Multiple Function Printer).
In case of static electricity or noise of power cable issue causes print server to disconnect, please re-plug the
USB cable or re-start power to connect again.
43
 Loading...