

Page 1

User Guide
Network Video Recorder
1910013008 REV1.2.0
March, 2021
Page 2

Contents
About This Guide .............................................................................................................. 1
Get Started ......................................................................................................................... 2
1. 1 Connect the Hardware ................................................................................................................................. 3
1. 2 Log In to Your NVR ........................................................................................................................................ 3
1. 3 Set Up NVR via Quick Setup Wizard ....................................................................................................... 6
Configure Your Network Camera .............................................................................20
2. 1 Add Cameras to the NVR ..........................................................................................................................21
2. 1. 1 Add Cameras Singly or in Batches ..........................................................................................................21
2. 1. 2 Add a Camera to a Certain Screen .......................................................................................................... 28
2. 1. 3 Add Cameras Manually ................................................................................................................................... 31
2. 1. 4 Modify IP Addresses of Cameras ............................................................................................................. 32
2. 2 Plug and Play Settings ...............................................................................................................................35
2. 3 Configure Image Effects ...........................................................................................................................35
2. 3. 1 Change Picture Mode .....................................................................................................................................36
2. 3. 2 Configure Image Settings ............................................................................................................................. 36
2. 4 Configure OSD Settings ............................................................................................................................37
2. 5 Configure Privacy Mask ............................................................................................................................39
2. 6 Configure Stream Settings ......................................................................................................................40
2. 6. 1 Configure Main Stream and Substream ...............................................................................................40
2. 6. 2 Configure ROI ....................................................................................................................................................... 42
2. 7 Configure Pan&Tilt ......................................................................................................................................42
2. 7. 1 Preset and Call Positions ..............................................................................................................................42
2. 7. 2 Preset and Call Paths in Cruise Scan .....................................................................................................44
2. 7. 3 Preset and Call Patterns in Pattern Scan .............................................................................................44
2. 7. 4 Enable Park ............................................................................................................................................................ 45
2. 7. 5 Preview Preset Settings ................................................................................................................................. 46
2. 8 Manage Your Cameras ..............................................................................................................................48
2. 8. 1 Modify the Name and Network Configurations ................................................................................. 48
2. 8. 2 Change the Password and Reset Email ................................................................................................ 49
2. 8. 3 Upgrade the Firmware.....................................................................................................................................50
2. 8. 4 Configure Scheduled Reboot ..................................................................................................................... 51
2. 8. 5 Remove Cameras from the NVR ............................................................................................................... 52
Page 3

Live View ...........................................................................................................................54
3. 1 Configure the Screen Layout ..................................................................................................................55
3. 1. 1 Change the Screen Layout Quickly ......................................................................................................... 55
3. 1. 2 Rearrange Channels in Settings ................................................................................................................ 56
3. 2 Configure Live View Settings via Toolbar...........................................................................................58
Recording and Storage ................................................................................................60
4. 1 Configure Recording Schedules ............................................................................................................61
4. 1. 1 Configure Recording Schedule for all Channels .............................................................................. 61
4. 1. 2 Customize Recording Schedule ...............................................................................................................61
4. 1. 3 Configure Advanced Recording Settings ............................................................................................ 65
4. 2 Recording Controls .....................................................................................................................................65
4. 2. 1 Configure Storage Disk Group ................................................................................................................... 65
4. 2. 2 Configure Disk Quota ...................................................................................................................................... 66
4. 3 Record Manually ...........................................................................................................................................67
4. 4 Manage Hard Drive ......................................................................................................................................68
4. 4. 1 View and Configure Settings of Hard Drive.........................................................................................69
4. 4. 2 Add External Hard Drive to NVR ................................................................................................................70
4. 4. 3 Bad Sector Detection ...................................................................................................................................... 70
4. 4. 4 S.M.A.R.T Detection .......................................................................................................................................... 71
4. 5 Export Recordings .......................................................................................................................................73
4. 6 Expansion Storage (Only for VIGI NVR1016H) ..................................................................................76
4. 7 Long-term Storage (Only for VIGI NVR1016H) .................................................................................76
4. 8 Backup Recordings .....................................................................................................................................77
Playback ............................................................................................................................79
5. 1 Instant Playback ...........................................................................................................................................80
5. 2 Play Normal Recordings ............................................................................................................................80
5. 3 Play Recordings with Tags .......................................................................................................................83
5. 4 Playback Recordings of Events..............................................................................................................85
5. 5 Playback Operations ..................................................................................................................................86
5. 5. 1 Basic Playback Operations ..........................................................................................................................86
5. 5. 2 Set Smart Playback Rules ............................................................................................................................. 87
5. 5. 3 Edit Recordings...................................................................................................................................................87
5. 5. 4 Export Recordings ............................................................................................................................................90
Events and Alerts ...........................................................................................................92
6. 1 Motion Detection .........................................................................................................................................93
Page 4

6. 2 Video Tampering ..........................................................................................................................................94
6. 3 Area Intrusion ................................................................................................................................................96
6. 4 Line Crossing Detection ...........................................................................................................................98
6. 5 Video Signal Loss ..................................................................................................................................... 101
6. 6 Offline and IP Conflict .............................................................................................................................103
6. 7 Disk Exception ........................................................................................................................................... 104
6. 8 Login Exception .........................................................................................................................................105
Network Management ............................................................................................... 106
7. 1 Configure Network Connection .......................................................................................................... 107
7. 1. 1 Configure Basic Settings. ........................................................................................................................... 107
7. 1. 2 Configure Advanced Settings ................................................................................................................. 109
7. 2 Configure Ports ......................................................................................................................................... 110
7. 3 Configure UPnP ......................................................................................................................................... 111
7. 4 Enable Remote Management via Cloud Services ........................................................................112
NVR Management .......................................................................................................114
8. 1 Upgrade the NVR Firmware ..................................................................................................................115
8. 2 Restart/Log Out/Shut Down the NVR ................................................................................................116
8. 3 Reset the NVR ............................................................................................................................................ 117
8. 4 Configure Reboot Schedule for NVR ................................................................................................117
8. 5 Diagnose the NVR.....................................................................................................................................118
System Management ................................................................................................. 121
9. 1 Configure Basic Settings ....................................................................................................................... 122
9. 2 Modify System Time ................................................................................................................................ 123
9. 3 Configure Interface Output ...................................................................................................................124
9. 4 Manage User Accounts .......................................................................................................................... 125
9. 5 Import and Export Settings ................................................................................................................... 129
9. 6 View System Logs .................................................................................................................................... 131
9. 7 View System Messages ......................................................................................................................... 134
FAQ ...................................................................................................................................139
Page 5

Chapter 1 About This Guide
About This Guide
This User Guide provides information for using and managing NVR. It explains functions of NVR and
shows you how to configure them.
Conventions
When using this guide, notice that:
■ Features available in NVR may vary due to your region, device model, and firmware version. All
images, steps, and descriptions in this guide are only examples and may not reflect your actual
experience.
■ The information in this document is subject to change without notice. Every effort has been
made in the preparation of this document to ensure accuracy of the contents, but all statements,
information, and recommendations in this document do not constitute the warranty of any kind,
express or implied. Users must take full responsibility for their application of any products.
■ This guide uses the specific formats to highlight special messages. The following table lists the
conventions that are used throughout this guide.
Underlined Indicates hyperlinks. You can click to redirect to a website or a specific section.
Bold
> The menu structures to show the path to load the corresponding page.
Caution
Note Indicates information that helps you make better use of your device.
More Information
■ For technical support, the latest version of the User Guide and other information, please visit
https://www.tp-link.com/support.
■ The Quick Installation Guide can be found where you find this guide or inside the package of the
product.
Indicates contents to be emphasized and texts on the web page, including the
menus, tabs, buttons and so on.
Reminds you to be cautious, and Ignoring this type of note might result in device
damage or data loss.
■ To ask questions, find answers, and communicate with TP-Link users or engineers, please visit
https://community.tp-link.com to join TP-Link Community.
1
Page 6

1
Get Started
This chapter guides you on how to set up your NVR for the first time. The quick setup wizard brings you
convenience and flexibility to configure VIGI NVR. This chapter includes the following sections:
• Connect the Hardware
• Log In to Your NVR
• Set Up NVR via Quick Setup Wizard
Page 7

Chapter 1 Get Started
The VIGI network video recorder (NVR) coordinates with camera systems to help you view, store, and
playback videos. With the support of ONVIF, you can easily add cameras of different brands. Also, it
supports detecting events and sending you up-to-date notifications. Moreover, you can manage and
monitor the NVR and cameras remotely via the VIGI app or VIGI Security Manager.
1. 1 Connect the Hardware
To manage multiple cameras, you should prepare a network device, such as a switch or a router. Connect
the NVR and cameras to the network device to ensure they are in the same network. Follow the steps
below to connect the devices.
1. Connect your monitor to the HDMI or VGA port according to the connection port it supports.
2. Connect your monitor to a power source and turn it on.
3. Connect the LAN port of the NVR to a network device with an Ethernet cable.
4. Connect the provided USB Mouse to the USB Interface of the NVR (front panel).
5. Connect the power adapter to the NVR.
6. Connect the cameras to the network device.
VIGI Network Camera
LAN
HDD
POWER
NVR
NVR
8 Channel Network Video Recorder
Network Device
(e.g. Router, Switch)
VIGI Network Camera
Monitor
USB
Monitor
1. 2 Log In to Your NVR
With an user interface displayed on monitor, it is easy to configure and manage the NVR. Follow the
steps below to log in to your NVR for the first time. Take we VIGI NVR1016H as the example.
3
Page 8

Chapter 1 Get Started
1. Set the login password for your NVR and preset a password for the cameras. Enter a password
reset email for your NVR and cameras, which is used to reset the password if you forgot it. Click
Complete.
New Password Set the password of your NVR.
Confirm Password Confirm the password of your NVR.
Password Reset
Email for NVR
Camera’s Password
Password Reset
Email for Camera
Same as the NVR
Set an email address to reset the password of your NVR.
Set a password for cameras added to your NVR. The password will be
applied to the cameras without passwords.
Set an email address to reset the passwords of your cameras.
(Optional) Click the checkbox if you want to apply the password and the
email address of the NVR to your cameras.
4
Page 9
Chapter 1 Get Started
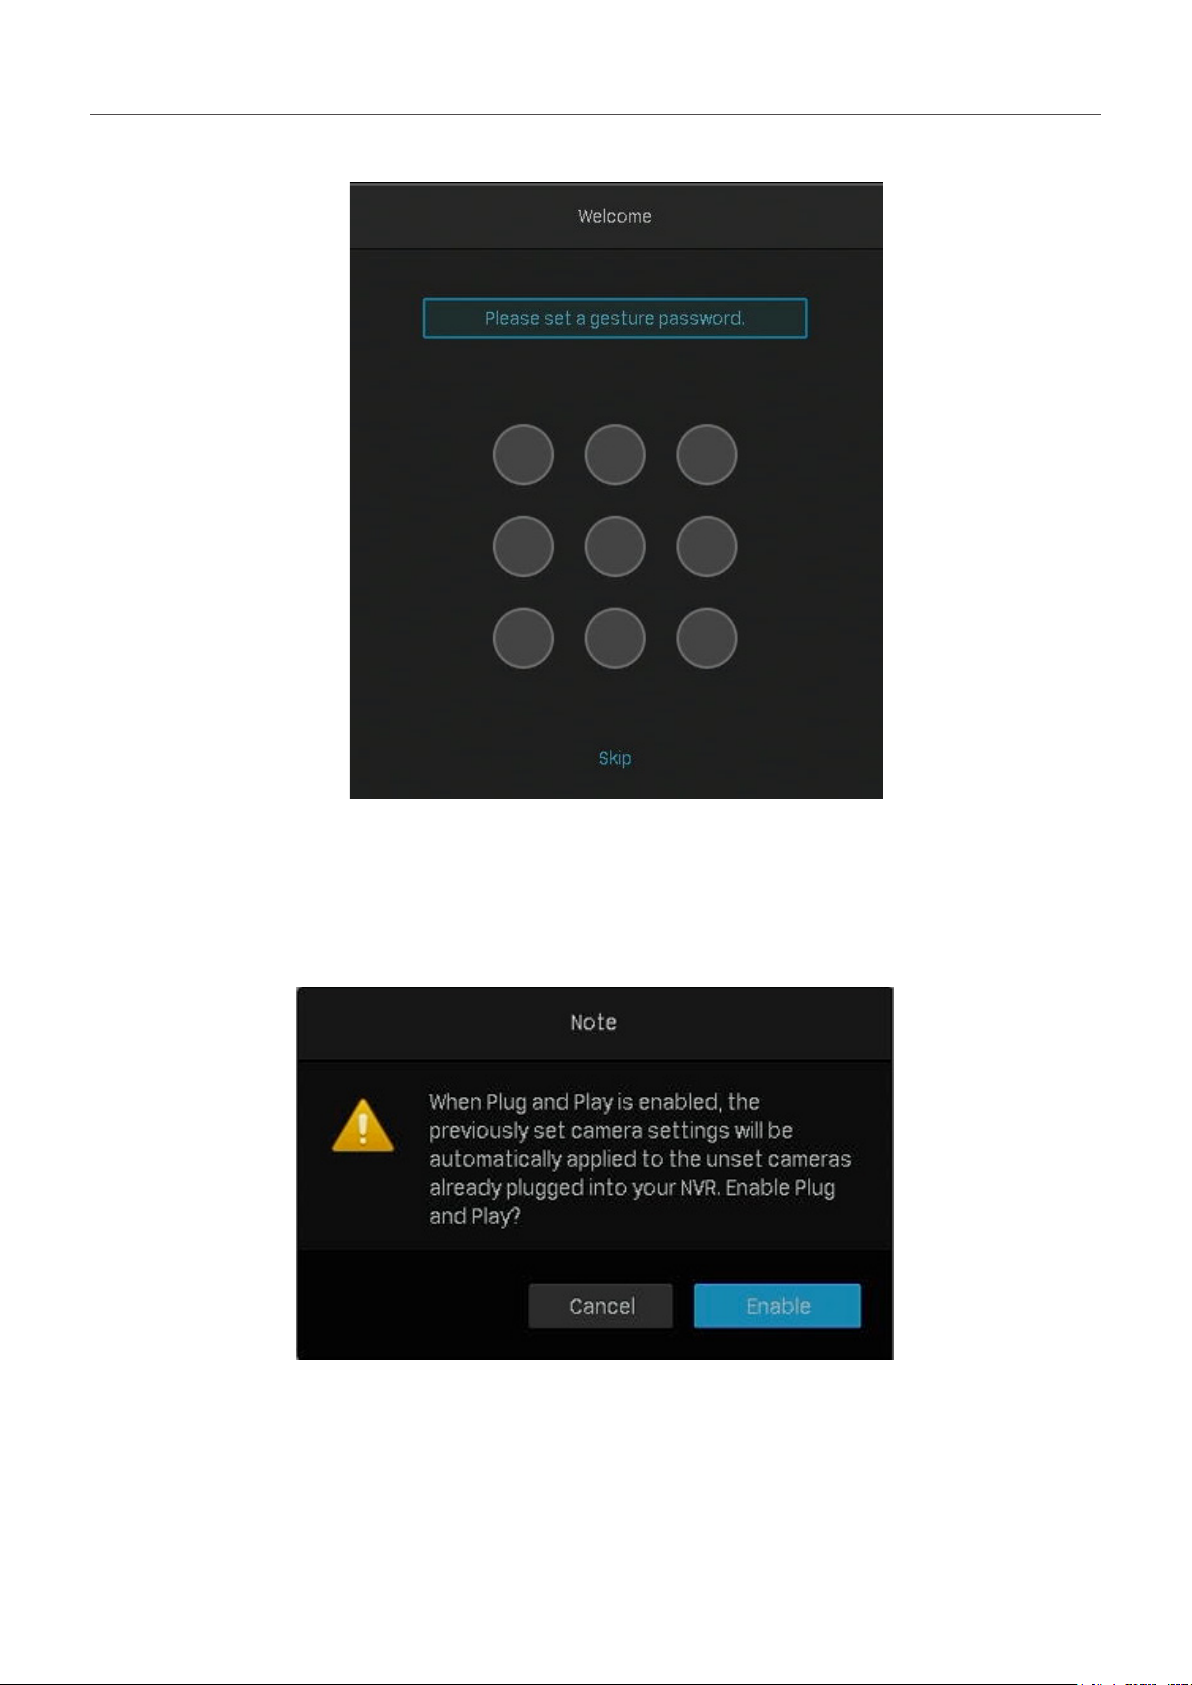
2. Set the gesture password for easy login. If you don’t want a gesture password, click Skip.
4. In the pop-up window, click Enable or Cancel to enable or disable Plug and Play. If you click Enable,
your cameras will be automatically added to the NVR. It is recommended to enable this function to
simplify the processes of quick setup and adding cameras.
Note: If you enable Plug and Play, you cannot enable the long-term storage function in the Quick Setup.
5
Page 10

Chapter 1 Get Started
1. 3 Set Up NVR via Quick Setup Wizard
The Quick Setup Wizard guides you through the process to set up your NVR. If you have enabled Plug
and Play, refer to Quick Setup When Plug and Play is Enabled; if not, refer to Quick Setup When Plug
and Play is Disabled.
■ Quick Setup When Plug and Play is Enabled
1. If your TP-Link security cameras are not in the same subnet as your NVR, the NVR will automatically
modify the IP addresses of your cameras. The following window pops up automatically. Click Add
to add cameras to the NVR.
6
Page 11
Chapter 1 Get Started
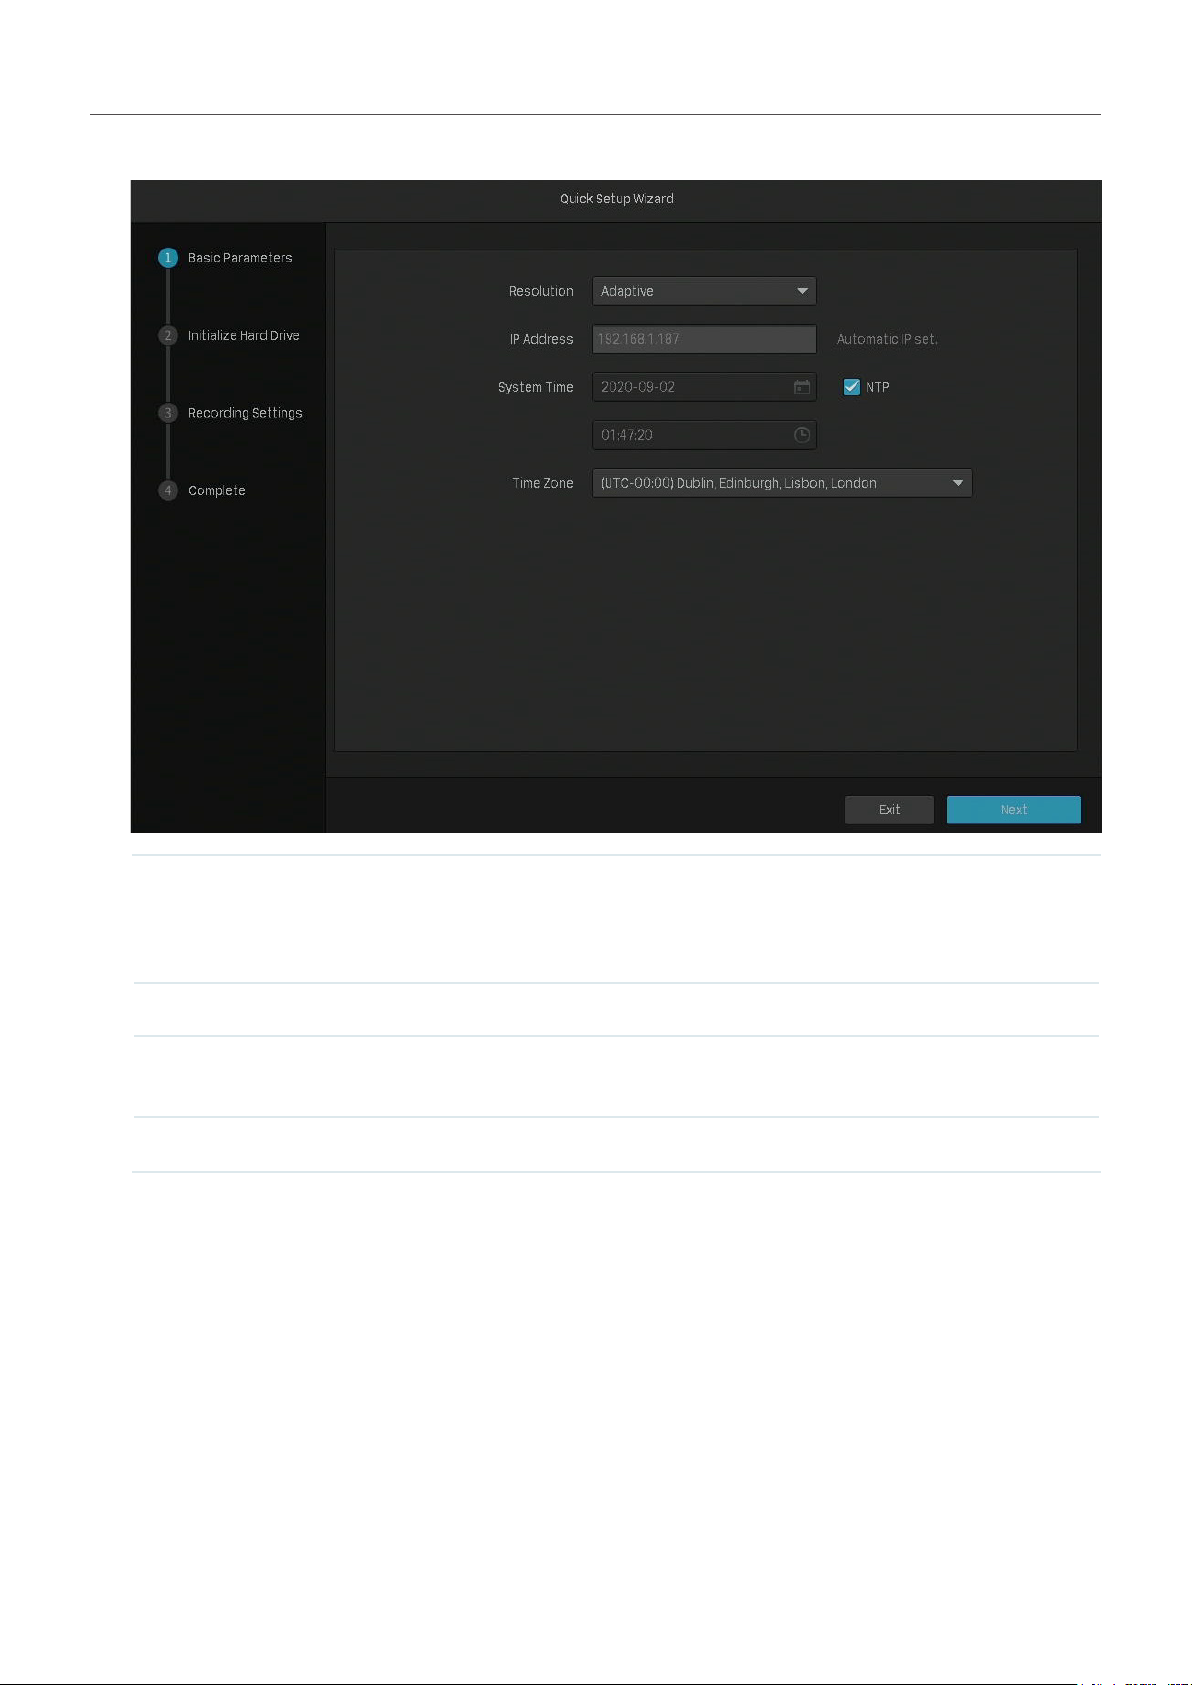
2. Set the basic parameters for the NVR. Click Next.
Select the screen resolution according to your needs.
Resolution
Adaptive: The NVR automatically selects the highest resolution
supported by the screen.
IP Address Displays the IP address that is automatically set.
System Time
Click the check box of NTP to automatically get the system time from
the Internet, or set the system time manually.
Time Zone Select the time zone according to your region.
7
Page 12
Chapter 1 Get Started
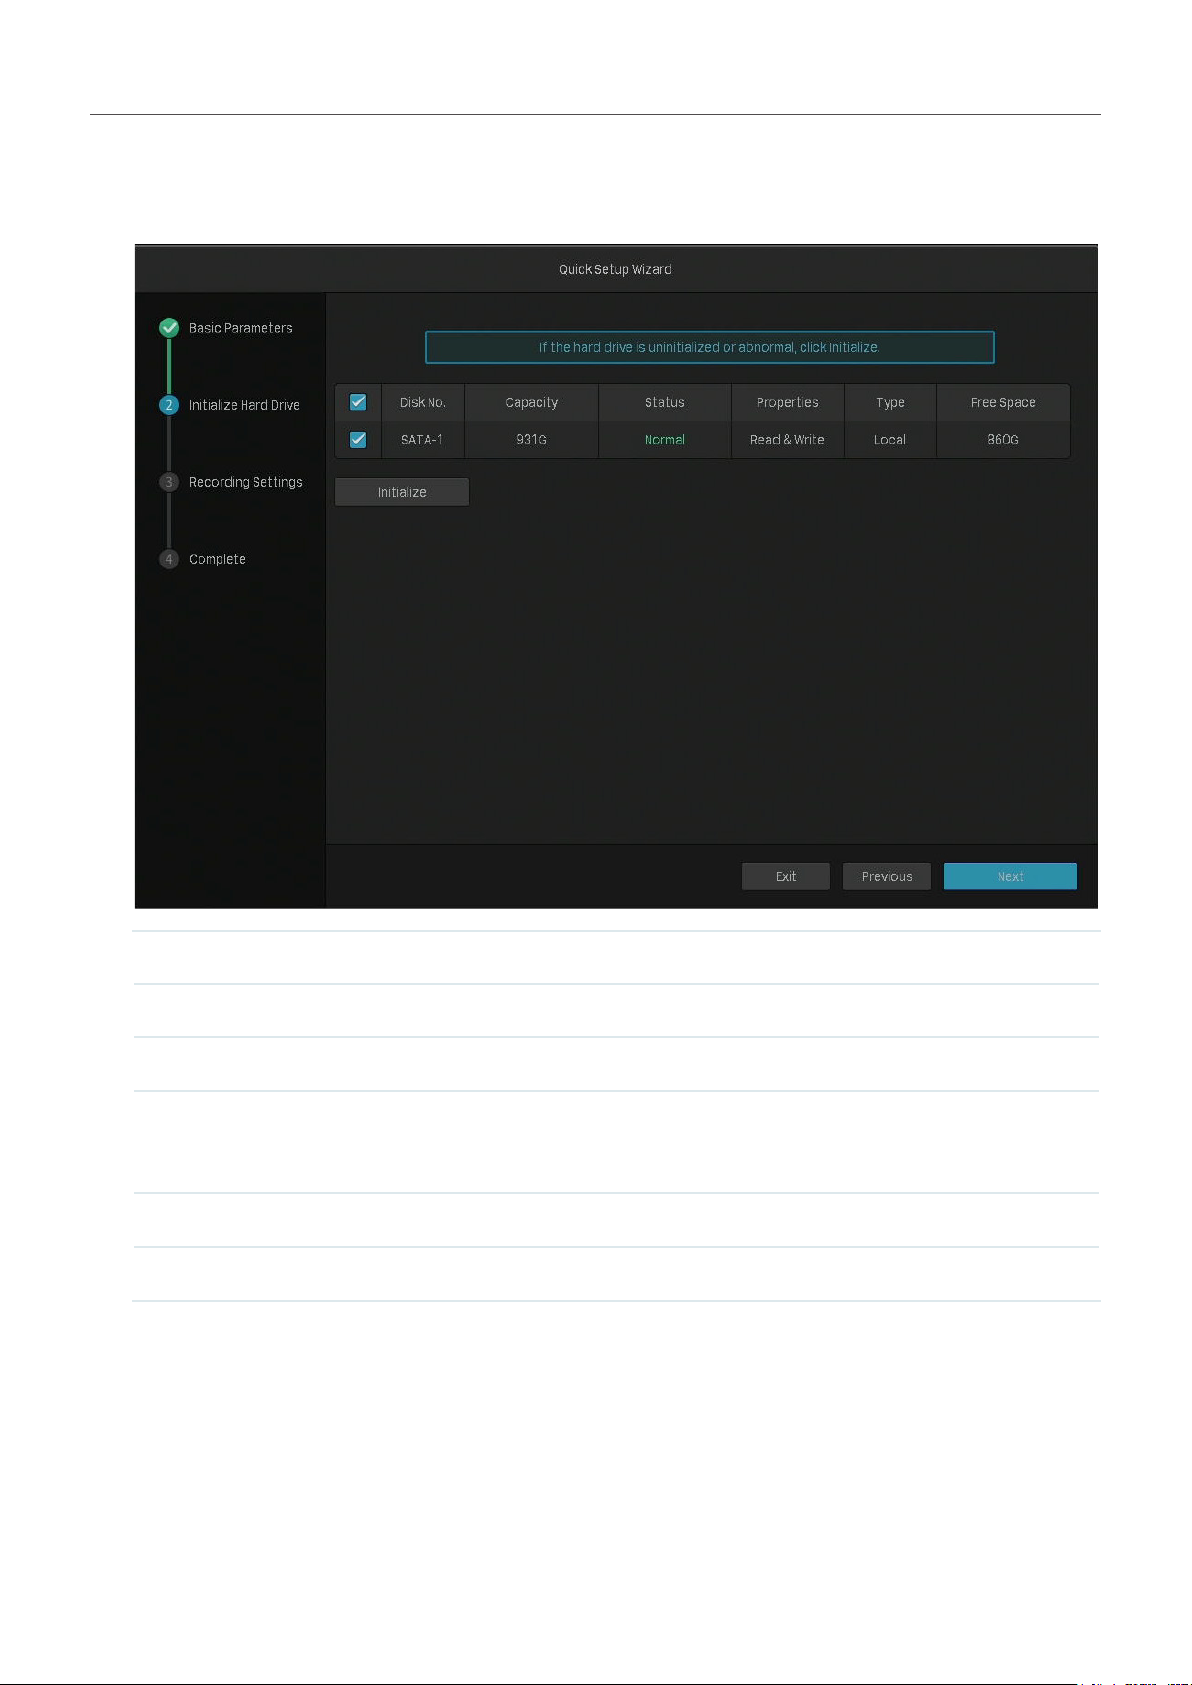
3. (Optional) If your hard drive is abnormal, initialize the hard drive installed in the NVR to ensure the
recording function. Click Next. If you click Initialize to format the hard drive, the files stored in it will
be lost.
Disk No. Displays the number of hard drive.
Capacity Displays the total space of hard drive.
Status Displays the status of hard drive.
Read-write: The data on the hard drive can be read and written.
Properties
Read-only: The data on the hard drive can only be read.
Type Displays the installed type of hard drive.
Free Space Displays the remaining storage capacity of hard drive.
8
Page 13

Chapter 1 Get Started
4. Set the recording schedule according to your needs. By default, the settings are applied to all
cameras managed by the NVR. Click Next.
Turn on 24-Hour Continuous
Recording
Turn on 24-Hour Motion
Detection Recording
Enable Loop Recording
Long-term Storage (Only for
VIGI NVR1016H)
Expected Recording Time
(Only for VIGI NVR1016H)
All of the cameras will be set to record continuously (24/7).
The camera starts to record when a motion is detected.
Click the check box to overwrite the oldest recording files
with the latest one when the hard drive is full.
Click the check box to reduce the size of the video and
maximize recording storage.
Note: If you have enabled Plug and Play, this function cannot
be enabled.
Select the recording time you expect.
9
Page 14

Chapter 1 Get Started
5. (Optional) Scan the QR code on the left to download the VIGI app, then scan the QR code on the
right to add the NVR to the app. You can view live video, manage NVR, and get instant alerts.
6. Click Complete to finish the quick setup. If your cameras have passwords, enter the password to
verify the cameras.
10
Page 15

Chapter 1 Get Started
■ Quick Setup When Plug and Play is Disabled
1. Select the screen resolution according to your need. Click Next. If you select Adaptive, the NVR
automatically selects the highest resolution supported by the screen.
11
Page 16

Chapter 1 Get Started
2. Select Auto to obtain a dynamic IP address or select Manually to set a static IP address for your
NVR. Click Next.
12
Page 17

Chapter 1 Get Started
3. Select NTP to automatically get the system time from the Internet, or select Manually to set the
system time manually. Select the time zone according to your region. Click Next.
13
Page 18

Chapter 1 Get Started
4. Add cameras to your NVR.
Note: Here we take TP-Link Security Cameras as the example. TP-link Security Cameras have no
password in default settings.
• Add Cameras Without Passwords
1 ) Click
to add a single camera. If you want to add cameras in batches, click the check box of
cameras and click Add in Batches.
Smart Coding
Enable Smart Coding to reduce the load on the network and the size
of the file.
Plug and Play Enable Plug and Play to add cameras more conveniently in the future.
Switch to H.265
(Only for VIGI
NVR1008H,
Enable Switch to H.265 to reduce bandwidth and keep high image
quality.
NVR1016H)
14
Page 19

Chapter 1 Get Started
2 ) Set a password for your cameras. You can also click the checkbox to use the preset password
settings for cameras. Click Next.
15
Page 20

Chapter 1 Get Started
• Add Cameras with Passwords
Click
to add a single camera. If you want to add cameras in batches, click the check box of
cameras and click Add in Batches. Then enter the password to verify it. Click Next.
16
Page 21

Chapter 1 Get Started
5. (Optional) If your hard drive is abnormal, initialize the hard drive installed in the NVR to ensure the
recording function. Click Next. If you click Initialize to format the hard drive, the files stored in it will
be lost.
Disk No. Displays the number of hard drive.
Capacity Displays the total space of hard drive.
Status Displays the status of hard drive.
Read-write: The data on the hard drive can be read and written.
Properties
Read-only: The data on the hard drive can only be read.
Type Displays the installed type of hard drive.
Free Space Displays the remaining storage capacity of hard drive.
17
Page 22

Chapter 1 Get Started
6. Set the recording schedule according to your need. By default, the settings are applied to all
cameras managed by the NVR. Click Next.
Turn on 24-Hour Continuous
Recording
Turn on 24-Hour Motion
Detection Recording
Enable Loop Recording
Long-term Storage (Only for
VIGI NVR1016H)
Expected Recording Time
(Only for VIGI NVR1016H)
All of the cameras will be set to record continuously (24/7).
The camera starts to record when a motion is detected.
Click the check box to overwrite the oldest recording files
with the latest one when the hard drive is full.
Click the check box to reduce the size of the video and
maximize recording storage.
Select the recording time you expect.
18
Page 23

Chapter 1 Get Started
7. (Optional) Scan the QR code on the left to download the VIGI app, then scan the QR code on the
right to add the NVR to the app. You can view live video, manage NVR, and get instant alerts.
8. Click Complete to finish the quick setup.
19
Page 24

2
Congure Your Network Camera
This chapter introduces how to add your cameras to NVR and configure them. You can customize
image effects and configure OSD (On Screen Display), Privacy Mask, Stream, and Pan&Tilt. This chapter
contains the following sections:
• Add Cameras to the NVR
• Plug and Play Settings
• Configure Image Effects
• Configure OSD Settings
• Configure Privacy Mask
• Configure Stream Settings
• Configure Pan&Tilt
• Manage Your Cameras
Page 25

Chapter 2 Configure Your Network Camera
2. 1 Add Cameras to the NVR
VIGI NVR can add cameras singly, in batches or to a certain screen. You can also manually add cameras
by entering their IP addresses and passwords. The processes vary depending on whether the camera
has a password and whether Plug and Play is enabled. TP-Link security cameras have no passwords in
default settings.
Choose one of the methods below and follow the steps to add your cameras:
■ Add Cameras Singly or in Batches
■ Add a Camera to a Certain Screen
■ Add Cameras Manually
When adding TP-Link security cameras, the NVR will automatically modify the IP addresses to ensure
every camera has a unique IP address and they are in the same subnet as your NVR. To add cameras
from other brands, it is recommended to refer to their user guides before adding. If the cameras cannot
be automatically found by the NVR, refer to 2. 1. 3 Add Cameras Manually.
2. 1. 1 Add Cameras Singly or in Batches
To add cameras without passwords, refer to Add Cameras without Passwords. To add cameras with
passwords, refer to Add Cameras with Passwords.
Note: If you forget the camera’s password, refer to FAQ to reset the password.
Add Cameras without Passwords
■ When Plug and Play Enabled
After you connect the cameras to the network device, stay in the Live View screen and wait for the NVR
to add the cameras. If detecting that the cameras are not in the same subnet, the NVR will automatically
modify the IP addresses of your cameras . Click Add to add the cameras.
21
Page 26

Chapter 2 Configure Your Network Camera
■ When Plug and Play Disabled
Follow the steps below to add the cameras.
1. Right click on the Live View screen and click Add Camera in the pop-up Main Menu. Alternatively,
right click on the Live View screen and click Settings in the pop-up Main Menu, then go to Camera
> Device Access > Add Device.
22
Page 27

Chapter 2 Configure Your Network Camera
2. Click to add a single camera. If you want to add cameras in batches, click the checkbox of
cameras and click Add in Batches.
23
Page 28

Chapter 2 Configure Your Network Camera
3. Set a password for your cameras. You can also click the checkbox to use the preset password
settings for cameras. Click Ye s. After the cameras are added, you can view the cameras in the
Device Added list.
Add Cameras with Passwords
■ When Plug and Play Enabled
After you connect the cameras to the network device, stay in the Live View screen and wait for the NVR
to add the cameras. The cameras will be automatically added to the NVR. Then enter the passwords in
the Live View screen to verify the cameras.
You can also follow the steps below to verify the passwords.
24
Page 29

Chapter 2 Configure Your Network Camera
1. Right click on the Live View screen and click Add Camera in the pop-up Main Menu. Alternatively,
right click on the Live View screen and click Settings in the pop-up Main Menu, then go to Device
Access > Add Device.
2. Click to add a single camera. If you want to add cameras in batches, click the checkbox of
cameras and click Add in Batches.
25
Page 30

Chapter 2 Configure Your Network Camera
3. Click Edit in the connected device list. Then enter the password in Edit Channel and click Save.
After a successful verification, the connected status will change from Not certified to Connected.
■ When Plug and Play Disabled
When plug and play is disabled, follow the steps below to add cameras.
1. Right click on the Live View screen and click Add Camera in the pop-up Main Menu. Alternatively,
right click on the Live View screen and click Settings in the pop-up Main Menu, then go to Camera
> Device Access > Add Device.
26
Page 31

Chapter 2 Configure Your Network Camera
2. Click to add a single camera. If you want to add cameras in batches, click the checkbox of
cameras and click Add in Batches.
27
Page 32

Chapter 2 Configure Your Network Camera
3. Enter the password manually to verify it. Click Add. After the cameras are added, you can view the
cameras in the Device Added list.
2. 1. 2 Add a Camera to a Certain Screen
You can add a camera to a certain channel in the Live View screen. Follow the steps below to finish the
configuration.
1. Click a screen in the Live View screen and click
on the bottom left corner.
28
Page 33

Chapter 2 Configure Your Network Camera
2. Click .
3. (Optional) If your cameras have set the password, follow the steps below to manually verify the
password.
29
Page 34

Chapter 2 Configure Your Network Camera
• When Plug and Play is enabled, click Edit in the connected device list. Then enter the
password in Edit Channel and click Save. After a successful verification, the connected status
will change from Not certified to Connected.
30
Page 35

Chapter 2 Configure Your Network Camera
• When Plug and Play is disabled, enter the password manually in the pop-up window to verify
it. Click Add.
2. 1. 3 Add Cameras Manually
If the devices cannot be automatically found by the NVR, you can add cameras manually using its
information. Follow the steps below to finish the configuration.
1. Right click on the Live View screen and click Add Camera in the pop-up Main Menu. Alternatively,
right click on the screen and click Settings in the pop-up Main Menu, then go to Camera > Device
Access > Add Device.
2. Click Add Manually.
31
Page 36

Chapter 2 Configure Your Network Camera
3. Enter the information of the camera to add it. For VIGI security camera, enter the IP address and
password. Click Add.
IP Address The IP address of the camera.
Select a protocol that your camera supports. The global protocol that
Control Protocol
Transfer Protocol
Management Port
Username The username of the camera.
Password The password of the camera.
allows surveillance and security devices from different manufacturers
to operate together seamlessly.
TCP(Transfer Control Protocol) that provides reliable, ordered delivery
of a stream of bytes from one device to another device.
The management port to configure, maintain, and support a network
device.
2. 1. 4 Modify IP Addresses of Cameras
To avoid IP conflict and make sure your cameras are in the same subnet, you can modify the IP addresses
manually. Follow the steps below to finish the configuration.
1. Right click on the Live View screen and click Add Camera in the pop-up Main Menu. Alternatively,
right click on the Live View screen and click Settings in the pop-up Main Menu, then go to Camera
> Device Access > Add Device.
32
Page 37

Chapter 2 Configure Your Network Camera
2. Click the checkbox of camera(s) and click Modify IP Address. You can select multiple cameras to
modify their IP addresses in batches.
3. Set the starting IP address you assigned for the camera(s). Click Ye s .
33
Page 38

Chapter 2 Configure Your Network Camera
4. Click Apply to confirm the new IP address(es).
Note: The IP address(es) will be assigned to camera(s) in order.
34
Page 39

Chapter 2 Configure Your Network Camera
2. 2 Plug and Play Settings
Plug and Play function enables NVR to automatically find and add cameras. You can enable or disable
this function according to your needs. To configure and view the settings, right click on the Live View
screen and click Settings in the pop-up Main Menu, then go to Camera > Device Access > Plug and
Play.
■ Add Without Login
When the cameras and your NVR are in the same network, the cameras will be automatically added
without your account logged in.
■ Device Access Alert
If a new camera is found when the channels are full, your NVR will receive a notification.
■ Devices Limited to Access
After the cameras are added to the NVR, they will be automatically added to the list, which means they
cannot be added to the NVR again automatically. If you want to automatically add the cameras for the
second time, remove the cameras from the devices limited access list.
2. 3 Configure Image Effects
To adjust the image effect, you can configure the picture mode and image settings.
35
Page 40

Chapter 2 Configure Your Network Camera
2. 3. 1 Change Picture Mode
1. Right click on the Live View screen and click Picture Mode in the pop-up Main Menu.
2. Select a mode to adjust the image. Click OK.
2. 3. 2 Configure Image Settings
1. Right click on the Live View screen and click Settings in the pop-up Main Menu. Go to Camera >
Display > Image.
2. Select a channel and configure the following parameters.
36
Page 41

Chapter 2 Configure Your Network Camera
Brightness Adjust the brightness of image. The image gets brighter when the value
increases.
Contrast Adjust the contrast of image. The image contrast gets stronger when the
value increases.
Saturation Adjust the saturation of image. The color of image gets richer when the value
increases.
Sharpness Adjust the sharpness of image. The image gets sharper when the value
increases.
Mirror Mode Select a mirror mode. When you select Off, the image displays normally.
Wide Dynamic Wide Dynamic can improve the image effects in backlit scenes.
Auto: The camera adjust the image effects automatically.
Manual: You can adjust the image effects manually. The effects get stronger
when the value increases.
You can also select a channel on the Live View screen to reveal the toolbar and click
parameters.
2. 4 Configure OSD Settings
to edit the basic
You can configure OSD (On Screen Display) to edit the information displayed in Live View and recordings.
Follow the steps below to configure OSD.
1. Right click on the Live View screen and click Settings in the pop-up Main Menu. Go to Camera >
Display > OSD.
37
Page 42

Chapter 2 Configure Your Network Camera
2. Select a channel, click the checkbox to display or hide the information, and select a display effect.
Click Save.
Note: If you change Name in the OSD setting, you also change the camera name.
You can also select a channel on the Live View screen to reveal the toolbar and click
OSD settings.
to configure
38
Page 43

Chapter 2 Configure Your Network Camera
2. 5 Configure Privacy Mask
With Privacy Mask, you can set privacy area in the image. The area cannot be recorded and monitored.
Follow the steps below to configure Privacy Mask.
1. Right click on the Live View screen and click Settings in the pop-up Main Menu. Go to Camera >
Display > Privacy Mask.
2. Select a channel and enable Privacy Mask. Draw the privacy areas on the preview screen (the blue
squares in the picture below). Use the mouse to adjust the size and location of areas. To remove a
39
Page 44

Chapter 2 Configure Your Network Camera
certain privacy area, select it and click Delete. To remove all privacy areas, click Clear. Click Save
to finish the configuration.
2. 6 Configure Stream Settings
In Stream Settings, you can configure video stream levels and ROI (Region of interest) level.
Video stream levels decide the video quality in Live View and recording for each channel, and you can
adjust the video quality of certain area by specifying the ROI level.
2. 6. 1 Configure Main Stream and Substream
The NVR supports two stream levels, main stream and substream. In Live View, the NVR decides which
stream is applied to the channels automatically based on network bandwidth and device performance.
In Recording Controls, you can apply them to the channels to record with different stream settings.
After configuring the streams, refer to 4. 2 Recording Controls to apply them to recordings.
Follow the steps below to configure the stream settings.
1. Right click on the Live View screen and click Settings in the pop-up Main Menu. Go to Camera >
Stream > Videos.
40
Page 45

Chapter 2 Configure Your Network Camera
2. Select a channel and configure the following parameters. Click Save.
Smart Coding Enable Smart Coding to improve compression performance.
Resolution Specify the resolution of the video stream. The screen displays images
more clearly when the resolution increases.
Video Frame Rate Specify the frame rate of videos. The video is more fluent when the rate
increases.
Bite Rate Type Select a type of bit rate.
VBR: The bit rate changes with the image within Maximum Bit Rate.
CBR: The bit rate is Maximum Bit Rate all the time.
Video Quality When VBR selected as the bit rate type, set the video quality as high,
medium, or low.
Maximum Bit Rate When VBR selected as the bit rate type, specify the upper limit of bit
rate.
When CBR selected as the bit rate type, specify the bit rate.
Video Encoding Select the encoding type of the stream. Compared with H.264, H.265 is
improved in reducing the file size and saving the bandwidth.
3. (Optional) If you also want to apply the stream settings to other channels, click Copy to Other
Channels and select the channels. Click Save.
41
Page 46

Chapter 2 Configure Your Network Camera
2. 6. 2 Configure ROI
In ROI, you can configure the interest level of a specified area in each channel. The level 1–6 is ranked
from low to high. The higher the ROI level, the better image quality.
1. Right click on the Live View screen and click Settings in the pop-up Main Menu. Go to Camera >
Stream > ROI.
2. Select a channel and enable ROI. Draw an area on the preview screen (the blue square in the picture
below). Use the mouse to adjust the size and location of areas. Specify the ROI level and click Save.
2. 7 Configure Pan&Tilt
In Pan&Tilt, you can preset the positions, paths and pattern for each channel and call a preset to change
the status of lens quickly and conveniently. Also, you can enable Park to trigger the preset automatically
when there is no operation.
Note: Only the cameras with Pan&Tilt support this feature.
2. 7. 1 Preset and Call Positions
The settings of a position include the direction of lens, the status of zoom and focus, and the rotation
speed. Follow the steps below to preset a position.
1. Right click on the Live View screen and click Settings in the pop-up Main Menu. Go to Pan&Tilt.
42
Page 47

Chapter 2 Configure Your Network Camera
2. Select a channel listed on the left panel, click Preset, and select a Preset number from the dropdown list. Click the buttons to adjust the position and adjust the slide bar to specify the Pan&Tilt
speed. Click Set as Preset to save the Preset settings.
Use the eight directional buttons to adjust the lens direction. Click
the directional button to rotate a certain degree in the corresponding
direction. Long press the button to continuously rotate in the
corresponding direction.
Click to rotate horizontally. Click it again to stop rotating when it is in the
proper position.
Click to zoom out. Long press to continuously zoom out.
Click to zoom in. Long press to continuously zoom in.
Click to adjust the focus and the near objects get clearer.
Click to adjust the focus and the distant objects get clearer.
To call the preset, select a Preset number and click Call. Then, the camera will adjust to the position.
43
Page 48

Chapter 2 Configure Your Network Camera
2. 7. 2 Preset and Call Paths in Cruise Scan
In Cruise Scan, you can configure paths for patrol. A path consists of several preset positions, and your
camera stays in each position for a preset duration.
Note: Before configuring Cruise Scan, you need preset the positions that the path involves.
Follow the steps below to preset a path.
1. Right click on the Live View screen and click Settings in the pop-up Main Menu. Go to Pan&Tilt.
2. Select a channel listed on the left panel, click Cruise Scan, and select a Cruise Path number from
the drop-down list. Click
camera stays. Click Save to save the Cruise Path settings.
Add Cruise Preset to add the position and enter the seconds that the
To call the preset, select a Cruise Path number and click Call. Then, the camera patrols following the
configured path.
2. 7. 3 Preset and Call Patterns in Pattern Scan
In Pattern Scan, you can record the movement to customize the patterns. Follow the steps below to
preset a pattern.
1. Right click on the Live View screen and click Settings in the pop-up Main Menu. Go to Pan&Tilt.
44
Page 49

Chapter 2 Configure Your Network Camera
2. Select a channel listed on the left panel, click Pattern Scan, and select a Pattern Path number from
the drop-down list. Click Start Recording and click the buttons to adjust the position. Click Stop
Recording to save the movements as a pattern.
To call the preset, click Call, and the camera moves following the recorded pattern.
2. 7. 4 Enable Park
When Park enabled, the camera will perform the preset position, path, or pattern automatically if there
is no operations in specified time. Follow the steps below to enable Park.
1. Right click on the Live View screen and click Settings in the pop-up Main Menu. Go to Pan&Tilt.
45
Page 50

Chapter 2 Configure Your Network Camera
2. Select a channel listed on the left panel and click Park. Enable Park, select a mode and a preset,
and enter the park time. Click Save.
Park Mode Select a mode to decide what kind of preset the camera will perform.
Park (Preset) Select a preset from the drop-down list. The presets in the list vary based on
the selected park mode.
Park Time When there is no operations during this time, the camera will perform the
preset.
2. 7. 5 Preview Preset Settings
Follow the steps below to preview all Preset settings and edit the preset name.
1. Right click on the Live View screen and click Settings in the pop-up Main Menu.
46
Page 51

Chapter 2 Configure Your Network Camera
2. Go to Pan&Tilt. Select a channel listed on the left panel and click Preview.
3. Select a preset mode to view the presets. Click the icons in the list to adjust the position, preview
the preset and edit its name.
47
Page 52

Chapter 2 Configure Your Network Camera
Click to enable 3D positioning. Use the mouse to adjust the position of
camera.
Click a point on the screen, and the point will be moved to the center of
the screen.
Hold down the left mouse button and draw a rectangular area from left
to right. Then the camera zooms in focusing on the specified area.
Hold down the left mouse button and draw a rectangular area from right
to left. Then the camera zooms out focusing on the specified area.
Click to enable Center. Click a point on the screen, and the camera
adjusts the position to center on the point.
Click to enable Park. To configure the park mode and time, click Pan &
Tilt Settings at the bottom and click the Park tab.
Click the preset in the list and click the icon to edit the name.
(Only for Preset) Click to move to the preset position.
(Only for Cruise Scan and Pattern Scan) Click to perform the Cruise or
Pattern scan.
(Only for Cruise Scan and Pattern Scan) Click to stop the scan.
2. 8 Manage Your Cameras
For an added camera, you can manage its name, network configurations, account, firmware, and restart
time, or just remove it.
2. 8. 1 Modify the Name and Network Configurations
Note: The cameras should be in the connected status.
1. Right click on the Live View screen and click Settings in the pop-up Main Menu. Go to Camera >
Device Access > Add Device.
48
Page 53

Chapter 2 Configure Your Network Camera
2. Click in the table and modify the name, protocols, and management port. Click Save.
Name Specify the camera name.
Control Protocol
Transport Protocol
Management Port Specify the management port.
Display the protocol used to control the camera.
Displays the protocol used for communication.
2. 8. 2 Change the Password and Reset Email
You can change the device password and reset email to enhance the security.
1. Right click on the Live View screen and click Settings in the pop-up Main Menu. Go to Camera >
Device Management > Password Management.
49
Page 54

Chapter 2 Configure Your Network Camera
2. To change the settings of a single camera, click in the table. To change the password of multiple
cameras in batches, select the cameras and click Change Password. Enter the new settings and
Click Save.
Note:
• The cameras should be in the connected status.
• If you click Use Preset Camera Settings, the camera uses the password and reset email
configured in NVR Quick Setup. To view and modify the preset camera settings in NVR, go to
System > User Management in Settings and click
• If you have added a camera to the NVR but cannot find it in the table, check the connection to
make sure the camera is connected properly. Click Refresh to refresh the data.
of the administrator.
2. 8. 3 Upgrade the Firmware
Two methods are supported to upgrade the firmware, Local Upgrade and Online Upgrade. Follow the
steps below to upgrade the firmware.
1. Get ready to upgrade the firmware.
• (For Local Upgrade) Place the firmware in an external storage device and plug the external
storage device into the NVR.
• (For Online Upgrade) Connect the NVR and cameras to the internet first.
2. Right click on the Live View screen and click Settings in the pop-up Main Menu. Go to Camera >
Device Management > Firmware Upgrade.
50
Page 55

Chapter 2 Configure Your Network Camera
3. Select the cameras and click Local Upgrade or Online Upgrade to upgrade them.
• For Local Upgrade, select the firmware from the external storage device and click Upgrade.
• For Online Upgrade, the device detects the new firmware online and upgrade automatically.
Note:
• The cameras should be in the connected status.
• Make sure to use the correct firmware to upgrade the corresponding camera.
• When upgrading, please do not turn off the power of camera and NVR.
2. 8. 4 Configure Scheduled Reboot
When Reboot Schedule is enable, the camera reboots automatically and regularly at the specified time.
Note: The cameras should be in the connected status.
1. Right click on the Live View screen and click Settings in the pop-up Main Menu. Go to Camera >
Device Management > Reboot Schedule.
51
Page 56

Chapter 2 Configure Your Network Camera
2. Select a channel, enable Reboot Schedule, and specify the reboot time. Click Save.
3. (Optional) If you also want to apply the schedule settings to other channels, click Copy to Other
Channels and select the channels. Click Save.
2. 8. 5 Remove Cameras from the NVR
After removing the camera from the NVR, you cannot configure and manage it via NVR.
1. Right click on the Live View screen and click Settings in the pop-up Main Menu. Go to Camera >
Device Access > Add Device.
52
Page 57

Chapter 2 Configure Your Network Camera
2. Select the cameras to be removed. Click Remove Device.
53
Page 58

3
Live View
In Live View, you can monitor the channels in real time and respond to abnormal conditions with quick
operations, such as viewing instant playback, zooming in the image, and enabling real-time talk. This
chapter contains the following sections:
• Configure the Screen Layout
• Configure Live View Settings via Toolbar
Page 59

Chapter 3 Live View
3. 1 Configure the Screen Layout
The NVR displays the videos of each channel via several screens. You can flexibly configure the screen
layout in both Live View and Settings.
3. 1. 1 Change the Screen Layout Quickly
The NVR supports multiple layout modes (1/4/6/8/9 Screen for NVR1008H/NVR1008, 1/4/6/8/9/16
Screen for NVR1016H), which display multiple screen(s) in one page separately. To change the screen
layout quickly, right click on the Live View screen and click the buttons in Main Menu.
Click the corresponding buttons to change the number of displayed screens.
Click to jump to the previous/next page when the channels is more than the
screens displayed in one page.
Click to enable/disable Switching. For example, 4 channels are displayed in
Live View screen and 8 cameras are added to the NVR. When Switching is
enabled, the NVR switch screens in Live View regularly to display the live
view of 8 channels. To configure Switching Interval, click Settings and go to
System > Basic Settings > Basic Settings.
55
Page 60

Chapter 3 Live View
For the layout mode with multiple screens, you can change the location of a channel by clicking and
dragging it to another location. To view a channel in the full screen, double click it. Double click it again
to go back to multi-screen layout mode.
3. 1. 2 Rearrange Channels in Settings
In Settings, you can rearrange the channels in different layout modes more flexibly. Follow the steps
below to rearrange the layout.
1. Right click on the Live View screen and click Settings in the Main Menu. Go to System > Screen
Layout.
56
Page 61

Chapter 3 Live View
2. Select a layout mode below and the current layout displays. Each square indicates a region on the
screen. Click a square and click the checkbox of a channel to rearrange the channel in Live View.
Click Save. (Here we take VIGI NVR1016H as the example.)
57
Page 62

Chapter 3 Live View
3. 2 Configure Live View Settings via Toolbar
Select a channel in Live View to reveal the toolbar. Click the following icons to configure Live View
settings, such as digital zoom, image settings, OSD, stream, and strategy.
Click to view the playback of this channel. Click 5-min Playback to view
instant playback and History to search and view the recordings in Normal
Playback, Tag Playback, and Event Playback. For detailed configuration,
refer to Playback.
Click to zoom in/out the live image.
Click to adjust the image settings, including brightness, contrast, saturation,
and sharpness.
Click to start/end the recording manually.
Click to configure the information displayed in Live View, including the time
and camera name.
(Microphone needed and only for certain cameras) Click the icon and then
Start Talk to talk. With this function, your can talk to people in the monitor
area in real time.
(Only for certain cameras) Click and use the slide bar to adjust the volume.
58
Page 63

Chapter 3 Live View
(Only for the camera with Pan&Tilt) Click to enter the Preview of Pan&Tilt. You
can adjust the camera location and call the presets. For details, refer to 2. 7.
5 Preview Preset Settings.
Click to select the Live View strategy.
Shortest Delay: Display the latest image with the shortest delay, which may
lower the video fluency.
Fluency: Display each frame to guarantee the fluency. The video may be
delayed.
Balanced: Display the video with a balance between timeliness and fluency.
Displays the stream applied to this channel. You can configure the main
stream and substream on the NVR, and the NVR decides which stream is
applied to the channels automatically based on network bandwidth and
device performance.
To view and configure stream settings, refer to 2. 6 Configure Stream
Settings.
Hover your cursor to view the video information, including its channel, frame
rate, bit rate, resolution, and encoding method.
Click to hide the toolbar.
59
Page 64

4
Recording and Storage
This chapter guides you on how to view and configure recording and storage settings on your NVR. VIGI
NVR allows you to set your own recording schedules and parameters, assign disk quota to connected
cameras, manage and detect the installed hard drive, as well as export and back up recordings. This
chapter includes the following sections:
• Configure Recording Schedules
• Recording Controls
• Record Manually
• Manage Hard Drive
• Export Recordings
• Expansion Storage (Only for VIGI NVR1016H)
• Long-term Storage (Only for VIGI NVR1016H)
• Backup Recordings
Page 65

Chapter 4 Recording and Storage
4. 1 Configure Recording Schedules
Recording schedule section provides convenience and flexibility for the daily monitoring of your NVR.
You can customize the recording schedule for all channels at a time or specify a recording schedule for
certain channels. You can set different schedules for each day. In Advanced Settings page, you can set
the pre-recorded time and delay time for recording.
4. 1. 1 Configure Recording Schedule for all Channels
Right click on the Live View screen and click 24-Hour Recording in the pop-up main menu, all of the
channels will be set to record continuously (24/7).
Right click on the Live View screen and click Motion Detection Recording in the pop-up main menu, all
the channels start to record when motion detection is triggered.
4. 1. 2 Customize Recording Schedule
Recording schedule in Storage enables users to customize the everyday recording plan for each
channel according to their needs.
I want to :
I have set all channels to record continuously (24/7). Now I want two cameras (Channel 1 and 2) to
record based on a schedule of motion detection from 8:00-19:00 and record continuously for the rest
of time in weekdays; on weekends, the cameras will record continuously from 19:00-24:00.
61
Page 66

Chapter 4 Recording and Storage
How can I do that:
1. Right click on the Live View screen and click Settings in the pop-up main menu, then go to Storage
> Recording Schedule > Basic Configuration.
2. Select the channel from the drop-down list.
3. Enable Schedule. By default, it is enabled.
4. Customize the recording schedule with one of the following methods.
■ Method 1: Via Time Bar
1 ) Select
Motion Detection Recording and drag the cursor on time bar to set 8:00 to 19:00 for
motion detection recording from Monday to Friday. The color of these rectangles will change
from blue to green.
2 ) Select
Continuous Recording and drag the cursor to set 8:00 to 19:00 for no recording on
Saturday and Sunday. The color of these rectangles will be erased.
3 ) Click Save in Basic Configuration to save the settings.
62
Page 67

Chapter 4 Recording and Storage
■ Method 2: via Edit Schedule
1 ) Click
Edit Schedule.
2 ) Click Add Schedule, select the recording type and set the start time and end time.
Note:
• Make sure the periods for different recording types are not overlapped.
63
Page 68

Chapter 4 Recording and Storage
• The scheduled time can be accurate to the second.
3 ) Click
Copy Schedule and select the repeating days for this schedule in a week and click
Ye s.
4 ) Click Apply on the Edit Detailed Schedule page.
5 ) Click Save in Basic Configuration to save the settings.
5. Click Cop
y to other Channels and select the channel to apply the settings, then click OK.
6. Click Save in Basic Configuration to save the settings.
64
Page 69

Chapter 4 Recording and Storage
4. 1. 3 Configure Advanced Recording Settings
To configure the pre-recorded and delay time for cameras, go to Storage > Recording Schedule >
Advanced Settings. Click Save after you finish the configuration.
The time is set for cameras to record before the scheduled time or event. For
example, the schedule for continuous recording starts at 10:00. If you set
Pre-recorded Time
Delay
the pre-recorded time as 5 seconds, the camera starts to record at 9:59:55.
Note: It is recommended to remain the default setting of 5 seconds.
The time is set for cameras to record after the scheduled time or event. For
example, if you set the post-record time as 5 seconds, it records till 11:00:05
as motion detection ends at 11:00.
4. 2 Recording Controls
4. 2. 1 Configure Storage Disk Group
In Storage Disk Group, you can manually start and stop recording on certain channels, select the
storage stream for recording, and select the hard drive group.
65
Page 70

Chapter 4 Recording and Storage
To configure these settings, right click on the Live View screen and click Settings in the pop-up main
menu. Then go to Storage > Recording Controls and select Storage Disk Group. Click Save after you
finish the configuration.
Channel Displays the name of camera in this channel.
Recording Switch Start/stop recording on the selected channel.
Select the stream for recording.
Storage Stream
Storage Disk Group Select the disk group for the NVR with multiple hard drives.
Main (Main Stream): The size of recording files will be larger when
selected.
Substream: The size of recording files will be smaller when selected.
4. 2. 2 Configure Disk Quota
In Disk Quota, you can manually start and stop recording on certain channels, select the stream for the
storage of recordings, check the used capacity of hard drive on certain channels, and assign the disk
quota to cameras to store recordings.
66
Page 71

Chapter 4 Recording and Storage
To configure these settings, right click on the Live View screen and click Settings in the pop-up main
menu. Then go to Storage > Recording Controls and select Disk Quota. Click Save after you finish the
configuration.
Channel Displays the name of camera in this channel.
Recording Switch Start/stop recording on the selected channel.
Select the stream for recording.
Storage Stream
Used Capacity Displays the used space of hard drive for this channel.
Recording Quota Assign the disk quota to your cameras for recording storage.
Main (Main Stream): The size of recording files will be larger when
selected.
Substream: The size of recording files will be smaller when selected.
4. 3 Record Manually
You can manually start or stop recording in Live View or Recording Controls.
67
Page 72

Chapter 4 Recording and Storage
Method 1: Via Live View
Click
Method 2: Via Recording Controls
1. Right click on the Live View screen and click Recording Controls in the pop-up main menu.
2. (Optional) Select the recording stream and disk group for storage.
3. Click Recording Switch to start or stop recording.
4. Click Save after you finish the configuration.
on the tool bar at the bottom of the Live View screen to start or stop recording.
4. 4 Manage Hard Drive
In Hard Drive Management section, you can view and customize the settings of hard drive, and choose
different detection methods to check the bad sectors and the status of the installed hard drive.
68
Page 73

Chapter 4 Recording and Storage
4. 4. 1 View and Configure Settings of Hard Drive
In Hard Drive Management, you can view the parameters and configure the properties and disk group
of hard drive. You can also enable the NVR to overwrite the earlier recording files when the hard drive
is full.
To view and configure the settings of hard drive, right click on the Live View screen, click Settings in the
pop-up main menu, then go to Storage > Hard Drive Management > Hard Drive Management. Click
Save after you finish the configuration.
Circular Write of Disk
Disk No. Displays the number of hard drive.
Capacity Displays the total space of hard drive.
Free Space Displays the remaining storage capacity of hard drive.
Status Displays the status of hard drive.
Properties
Enable the NVR to overwrite the eariler recording files when the hard
drive is full.
Select the properties of hard drive.
Read-write: The data can be read and written on the hard drive.
Read-only: The hard drive can only read data.
69
Page 74

Chapter 4 Recording and Storage
Disk Group Select the disk group for the NVR with multiple hard drives.
Click Format to format the hard drive.
Operation
Note: The data stored in the hard drive will be lost after you format it.
4. 4. 2 Add External Hard Drive to NVR
If you want to store more recordings on your NVR, add an external hard drive to expand its storage
space.
Right click on the Live View screen, click Settings in the pop-up main menu, then go to Storage > Hard
Drive Management > Hard Drive Management. Click
to your NVR.
Note: The capacity of the external hard drive should exceed 120G.
and the hard drive will be automatically added
4. 4. 3 Bad Sector Detection
Bad sector detection conducts a check on the entire hard drive or its critical area, and display the
number of bad sectors of the hard drive. Follow the steps below to finish the bad sector detection.
1. Right click on the Live View screen and click Settings in the pop-up main menu.
2. Go to Storage > Hard Drive Management > Bad Sector Detection.
70
Page 75

Chapter 4 Recording and Storage
3. Select the hard drive and click Critical Area Detection or Full Detection at the top.
Different colors of the small blocks represent the good, damaged and shielded sectors on your hard
drive.
4. 4. 4 S.M.A.R.T Detection
S.M.A.R.T detection detects and reports various indicators of drive reliability and presents an overall
assessment of the installed hard drive. Follow the steps below to finish the S.M.A.R.T detection.
1. Right click on the Live View screen and click Settings in the pop-up main menu.
2. Go to Storage > Hard Drive Management > S.M.A.R.T Detection.
3. Select the disk and self-checking type.
Short: A scan of major components of the hard drive .
Extended: A complete surface scan of the drive.
Transmission: A scan of the mechanical parts of the hard drive detecting handling damages.
71
Page 76

Chapter 4 Recording and Storage
4. Click Start Detection on the right.
Temperature Displays the operating temperature of the hard drive.
Use Time (day) Displays the usage time of the hard drive.
Self Assessment
Overall
Displays the current status of the hard drive.
Assessment
Attribute Name Displays the name of attributes concerning the health of hard drive.
Status Displays the status of these attributes.
Flags Displays the code of S.M.A.R.T ID.
Threshold
Value
Displays the threshold value of these attributes. Threshold marks the
value at which the hard drive could fail.
Displays the current value of these attributes. When it gets closer to the
threshold, the hard drive is less likely to be healthy.
Displays the minimum values of these attributes. When Worst values are
Worst
extremely lower than the current value, it indicates the hard drive errors
or extreme working environment of the hard drive.
Raw Value Displays the data used for calculating Value.
72
Page 77

Chapter 4 Recording and Storage
4. 5 Export Recordings
You can export the recordings stored in the hard drive according to your needs. These recordings can
be played on your media devices.
I want to :
Export the continuous recordings on Channel 1 between 12:00 and15:00 from 8/4/2020 to 8/18/2020.
How can I do that :
1. Prepare an external storage device and plug it into the USB slot of the NVR.
2. Right click on the Live View screen and click Settings in the pop-up main menu.
3. Go to Storage > Export File.
4. Select the start time and end time for searching recordings.
73
Page 78

Chapter 4 Recording and Storage
5. Click Advanced Time Filtering and select the time span and repeated days of the week. Then click
Ye s.
6. Click Channel to select Channel 1 for recording export. Then click Ye s.
7. Select Continuous for the recording type and All for the file type.
Locked Files will not be overwritten when loop recording is enabled.
Unlocked Files will be overwritten when loop recording is enabled.
74
Page 79

Chapter 4 Recording and Storage
All Display the locked and unlocked files.
8. Click Search.
9. Select the files you need and click Fast Export.
Note: The format of the audio in exported videos may be incompatible with some playback software.
10. Select the folder or create a new folder and click Start Backup to export the files to your external
storage device.
75
Page 80

Chapter 4 Recording and Storage
4. 6 Expansion Storage (Only for VIGI NVR1016H)
Expansion storage uses key frame storage technology to compresses the earlier videos and release
a large amount of storage space, and thus increases the recording time. After expansion storage is
enabled, select the expansion type based on your needs.
High Expansion Extend the recording time to 3 times the original.
Moderate Expansion Extend the recording time to twice the original.
4. 7 Long-term Storage (Only for VIGI NVR1016H)
Note:
If you have enabled Plug and Play, the long-term storage function cannot be enabled.
Long-term storage can reduce the size of recording files and extend the recording time by automatically
changing the settings for recording and storage. To achieve this function, the VIGI NVR will adopt the
following methods, including changing the smart coding type and bit rate type of camera, enabling
76
Page 81

Chapter 4 Recording and Storage
expansion storage, after evaluating the hard drive capacity and the number of channels. After longterm storage is enabled, select the recording time you expect.
4. 8 Backup Recordings
Backup allows you to copy all the recordings stored in your NVR to the external hard drive. You can view
these recording files when installing the hard drive on another NVR.
Caution:
The data stored in your external hard drive will be lost if you choose to back up the recordings. It is
recommended to back up the data in your external hard drive before you start the backup process.
To back up the recordings, follow the steps below:
1. Right click on the Live View screen and click Settings in the pop-up main menu.
2. Go to Storage > Hard Drive Backup.
77
Page 82

Chapter 4 Recording and Storage
3. Click Backup to start the backup process.
Note:
• You should prepare an external hard disk whose total space is larger than the used space of installed
hard drive in NVR.
• If the free space of your external hard disk is not big enough for backing up recordings stored in
NVR, click Initialize to format your hard drive first. The original data will be erased after initialization.
78
Page 83

5
Playback
This function allows you to play the history recordings and edit them, such as adding tags and exporting
clips. You can easily search the recordings based on the channel, date, tag, and event. This chapter
contains the following sections:
• Instant Playback
• Play Normal Recordings
• Play Recordings with Tags
• Playback Recordings of Events
• Playback Operations
Page 84

Chapter 5 Playback
NVR supports the following four playback modes:
■ Instant Playback
Play the video of a single channel recorded in the last five minutes.
■ Normal Playback
Play the recordings of one day, including the continuous and motion detection recordings.
■ Tag Playback
Play the recordings with tags added.
■ Event Playback
Play the recordings with events detected.
5. 1 Instant Playback
You can replay the video recorded in the last five minutes via Instant Playback. Click a channel on Live
View to reveal the toolbar. Click
and then 5 min Playback to start instant playback.
5. 2 Play Normal Recordings
Normal Recordings are video files from the continuous and motion detection recordings. Follow the
steps below to play normal recordings.
80
Page 85
Chapter 5 Playback
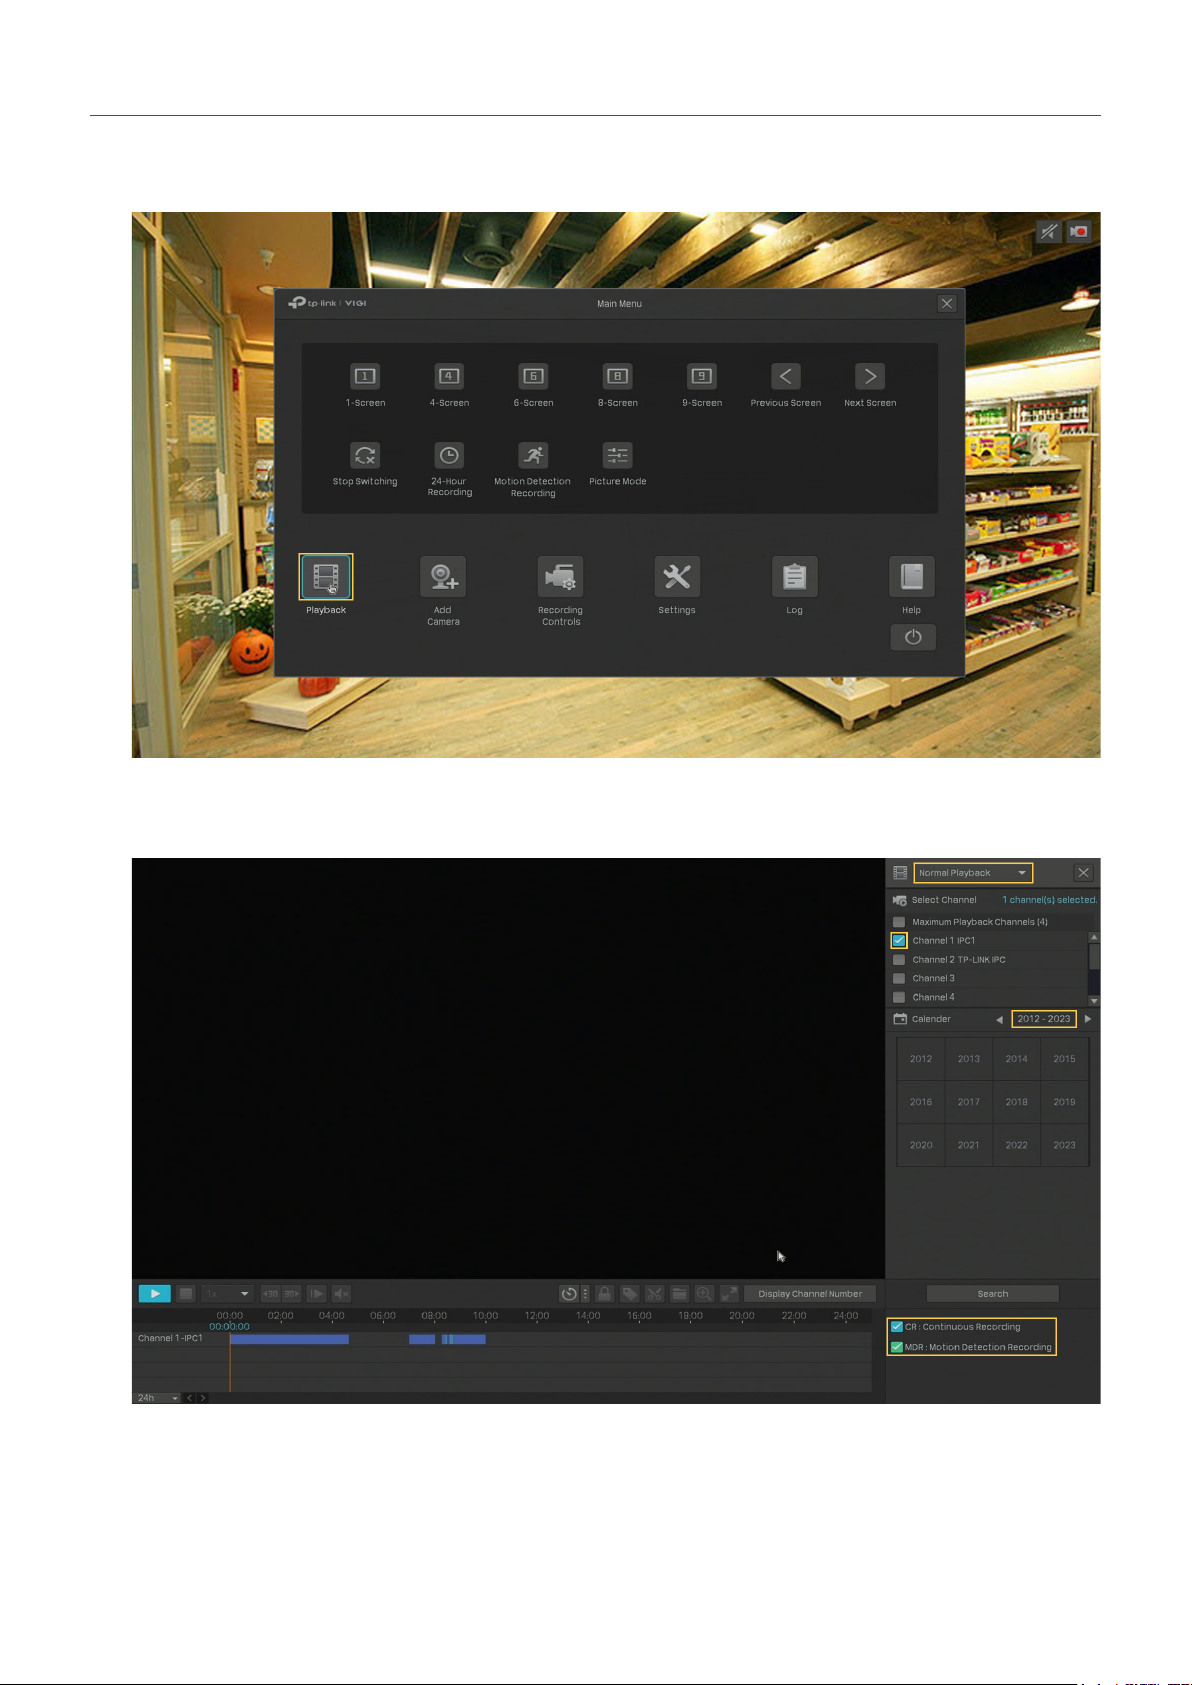
1. Right click on the Live View screen and click Playback in the pop-up Main Menu to open the
Playback module.
2. On the right panel, select Normal Playback, click the checkboxes to select channels, and select a
date in the calendar. You can also click the checkboxes below to filter the recordings. Click Search.
81
Page 86
Chapter 5 Playback
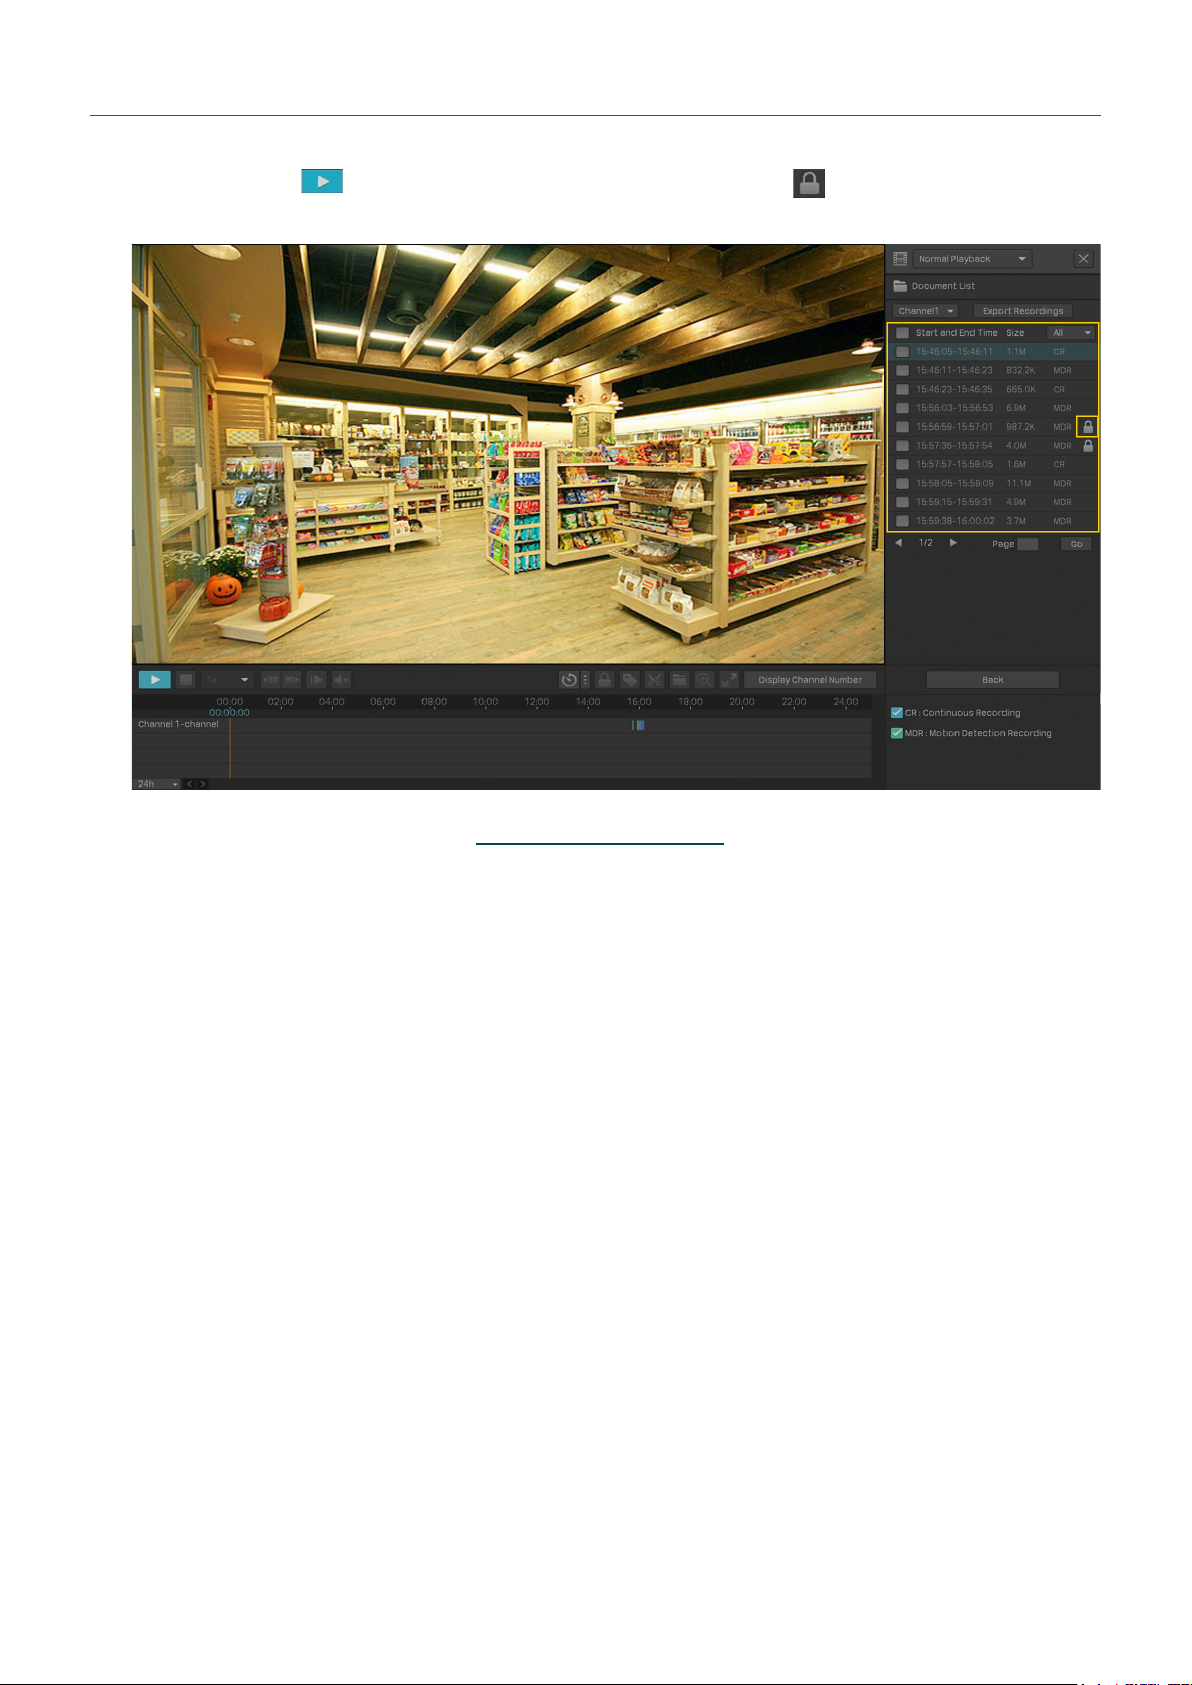
3. The recording files are listed both on the right panel and the time bar below. Double click a recording
in the list or click
to play the recordings. You can also click the to lock the recording. Once
locked, the recording cannot not be overridden when Loop Recording is enabled.
For more playback operations, refer to 5. 5 Playback Operations.
Note: When playing multiple channels, some channels may be unavailable due to limited resources. To
watch the channels, click Back to deselect a few channels on the right panel and try again.
82
Page 87

Chapter 5 Playback
5. 3 Play Recordings with Tags
Tags can be used to mark and search recordings. Follow the steps below to add tags and play recordings
with tags.
■ Step 1: Add Tags to Recording Files
1 ) Right click on the Live View screen and click Playback in the pop-up Main Menu to open the
Playback module. In the Normal Playback mode, specify the channel and date on the right
panel. Click Search.
2 ) Select a time point in the recording listed in the time bar and click in the toolbar. The
following window pops up. Enter the tag manually or select one from history tags. Click Ye s.
83
Page 88

Chapter 5 Playback
■ Step 2: Search Tags
In the same module, select Tag Playback from the drop-down list on the right panel, click the
checkboxes to select channels, and select a time range in the calendar. Click Search.
■ Step 3: Play the Recording File with a tag
The recording files with tags are listed on the right panel. Specify the time range before and after
the tagged time point, then double click a recording in the list to play it.
84
Page 89

Chapter 5 Playback
You can also click in the list and click Edit or Delete to edit the tag or delete it. For more playback
operations, refer to 5. 5 Playback Operations.
5. 4 Playback Recordings of Events
With Events configured, the NVR and cameras can detect and react to events. In Event Playback, you
can search, play, and edit the videos recorded when certain events are detected, including motion, line
crossing and area intrusion.
Note: If you have never configured Events on the NVR, there are no recordings of events. To configure
Events, refer to Events and Alerts.
Follow the steps below to search and play the recordings of certain events.
1. Right click on the Live View screen and click Playback in the pop-up Main Menu to open the
Playback module.
2. On the right panel, select Event Playback and select an event type from the drop-down list. Click
the checkboxes to select channels, and select a time range in the calendar. You can also enable
Person Appeared to search the recordings that people appeared in. Click Search.
85
Page 90

Chapter 5 Playback
3. The recording files of events are listed on the right panel. Double click a recording in the list to play
it.
For more playback operations, refer to 5. 5 Playback Operations.
5. 5 Playback Operations
In the Playback module, you can use the icons and buttons in the toolbar and on the right panel to
adjust the display, edit and back up the recordings.
Note: The operations are not available in Instant Playback.
5. 5. 1 Basic Playback Operations
The following icons are supported when playing recordings:
Select from the drop-down list to change the playing speed.
Jump forward/backward by 30 seconds.
(Available when the recording is paused) Play the recordings by frames.
Click and slide to adjust the volume.
86
Page 91

Chapter 5 Playback
(Available in Normal Playback and Event Playback) Lock/unlock the
recordings. Once locked, the recording cannot not be overridden when
Loop Recording is enabled.
(Available in Normal Playback and Event Playback) Add a tag to the recording.
Zoom in or out via Digital Zoom.
Play the recordings in full screen.
Display/hide the channel number in Playback.
5. 5. 2 Set Smart Playback Rules
In Normal Playback, you can configure Smart Playback rules to adjust the playing speed automatically.
When Smart Playback configured, the NVR can intelligently classify the recordings into two types,
Event Recordings and Non-event Recordings, and adjusts the speed based on the recording types.
Click the
checkbox. Click Yes .
icon and set the playing speed. You can skip Non-event Recordings by clicking the
5. 5. 3 Edit Recordings
Follow the steps below to clip video files.
87
Page 92

Chapter 5 Playback
1. In Playback, specify the playback mode, channels, and time range, then click Search to search
recordings.
2. Click the recordings in the time bar to select a start time. Click at the toolbar to set the beginning
of the clip.
88
Page 93

Chapter 5 Playback
3. Click the recordings again and drag the mouse to adjust the length of the clip. Click to set the
end of the clip.
After editing, you can click to view all clips. To export the clip to an external storage, select the clips
and click Export.
Note:
• To export the clips, an external storage is required.
• For the clips that are not exported, they will not be saved as new recordings when you leave the
Playback module.
89
Page 94

Chapter 5 Playback
5. 5. 4 Export Recordings
In Playback, you can easily search the desired recordings based on channel, time, recording types, tags,
and events, and back up them in batches. Follow the steps below to search and back up recordings.
Note: To back up the recordings, an external storage is required.
1. In Playback, specify the playback mode, channels, and time range, then click Search to search
recordings.
2. The recording files are listed on the right panel. Click the checkbox to select the recordings to be
exported and click Export Recordings.
90
Page 95

Chapter 5 Playback
3. The following window pops up. Specify the path to export the recordings. Click Start Backup and
wait until backup is completed.
91
Page 96

6
Events and Alerts
This chapter guides you on how to configure the event settings and alarm actions when your cameras
detect different types of events. VIGI NVR monitors the user-defined areas and you’ll be automatically
alerted to any suspicious activity in your home and office. This chapter includes the following sections:
• Motion Detection
• Video Tampering
• Area Intrusion
• Line Crossing Detection
• Video Signal Loss
• Offline and IP Conflict
• Disk Exception
• Login Exception
Page 97

Chapter 6 Events and Alerts
6. 1 Motion Detection
Motion detection allows cameras to detect the moving objects in the monitored area and triggers alarm
actions. You can customize the motion detection settings, select the triggered actions and set the
alarm schedule for cameras. Follow the steps below to finish the configuration.
1. Right click on the Live View screen and click Settings in the pop-up main menu, then go to Event >
Smart Event Detection > Motion Detection.
2. Select the channel you want to detect and enable Motion Detection.
3. Draw rectangles for motion detection on the preview screen. The whole region is selected by
default. Then configure the motion detection settings.
Sensitivity
Detection
4. Select the triggered actions according to your needs.
Screen Prompt
Buzzer The buzzer on the NVR will beep when the motion is detected.
Recording Linkage
Adjust the value of sensitivity. A higher value can trigger alarm actions
more easily.
Select the detection type. It can be configured only for the cameras
which support human detection and vehicle detection.
A warning sign
The channels you select for recording linkage will start recording when
the current channel detects the motion.
on Live View screen.
93
Page 98

Chapter 6 Events and Alerts
Pop-up Alarm
Screen
White Light Alarm
Audible Alarm
5. Set the alarm schedule. Click Apply.
The channel in Live View will be in full screen when the motion is
detected.
(Only supports camera models with light alarm) The camera will trigger
light alarm when the motion is detected.
(Only supports camera models with audible alarm) The buzzer on the
camera will alarm when the motion is detected.
6. Click Save to save the settings.
7. (Optional) Click Copy to other channels, select the channels and click Yes if you want to apply the
settings to other channels. Then click Save in Motion Detection to save the settings.
6. 2 Video Tampering
Video tampering triggers alarm actions when an area of camera’s lens is purposely blocked, obstructed
or vandalized. You can customize the video tampering settings, select the triggered actions and set the
alarm schedule for cameras. Follow the steps below to finish the configuration.
94
Page 99

Chapter 6 Events and Alerts
1. Right click on the Live View screen and click Settings in the pop-up main menu, then go to Event >
Smart Event Detection > Video Tampering.
2. Select the channel you want to detect and enable Video Tampering.
3. Set the sensitivity of video tampering. A higher value can trigger the alarm actions more easily.
4. Select the triggered actions according to your needs.
Screen Prompt
A warning sign
in the lower right corner of the monitor screen.
Click it to check the event type and time.
Buzzer The buzzer on the NVR will beep when the video tampering is detected.
Recording Linkage
Pop-up Alarm
Screen
Audible Alarm
The channels you select for recording linkage will start recording when
the current channel detects the video tampering.
The channel in Live View will be in full screen when the video tampering
is detected.
(Only supports camera models with audible alarm) The buzzer on the
camera will alarm when the video tampering is detected.
95
Page 100

Chapter 6 Events and Alerts
5. Set the alarm schedule. Click Apply.
6. Click Save to save the settings.
7. (Optional) Click Copy to other channels, select the channels and click Yes if you want to apply the
settings to other channels. Then click Save in Video Tampering to save the settings.
6. 3 Area Intrusion
Area intrusion triggers alarm actions when the NVR detects an intrusion in the specified areas. You can
customize the area intrusion settings, select the triggered actions and set the alarm schedule. Follow
the steps below to finish the configuration.
96
 Loading...